
Sky Plus - Steam cleaner PALSON - Free user manual and instructions
Find the device manual for free Sky Plus PALSON in PDF.

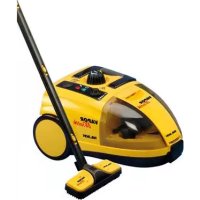
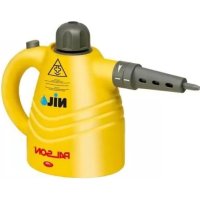
| Product type | Steam cleaner |
| Brand | PALSON |
| Model | Sky Plus |
| Tank capacity | 1.6 liters |
| Runtime | Up to 50 minutes |
| Heating time | A few minutes |
| Steam pressure | Adjustable (continuous) |
| Power supply | Mains (grounded plug) |
| Voltage | 220-240 V |
| Power | Approximately 1500 W |
| Weight | Approximately 4.5 kg |
| Dimensions (L x W x H) | Approximately 35 x 25 x 30 cm |
| Main materials | Heat-resistant plastic, metal |
| Included accessories | Steam gun, hose, extension tubes, floor brush, window nozzle, nylon/metal brushes, adapter, cotton cover, measuring cup, funnel |
| Main functions | High-temperature steam cleaning, disinfection, degreasing, descaling |
| Safety | Child lock, overheat protection, safety cap, automatic shut-off |
| Maintenance | Descaling every 6 months, regular tank rinsing |
| Repairability | Approved after-sales service, original parts |
| Warranty | 2 years (according to legislation) |
| Environment | Recycling at dedicated center |
Frequently Asked Questions - Sky Plus PALSON
User questions about Sky Plus PALSON
0 question about this device. Answer the ones you know or ask your own.
Ask a new question about this device
Download the instructions for your Steam cleaner in PDF format for free! Find your manual Sky Plus - PALSON and take your electronic device back in hand. On this page are published all the documents necessary for the use of your device. Sky Plus by PALSON.
USER MANUAL Sky Plus PALSON
Before opening the tap, press the steamButton to reduce pressure.
Charger of scaling. Before rolling the diameter with a hole, is not too fine 5 minutes.
ATTENTION
natural_image
Black and white photo of a Skylift vacuum cleaner with a long handle, no visible text or symbols on the device body.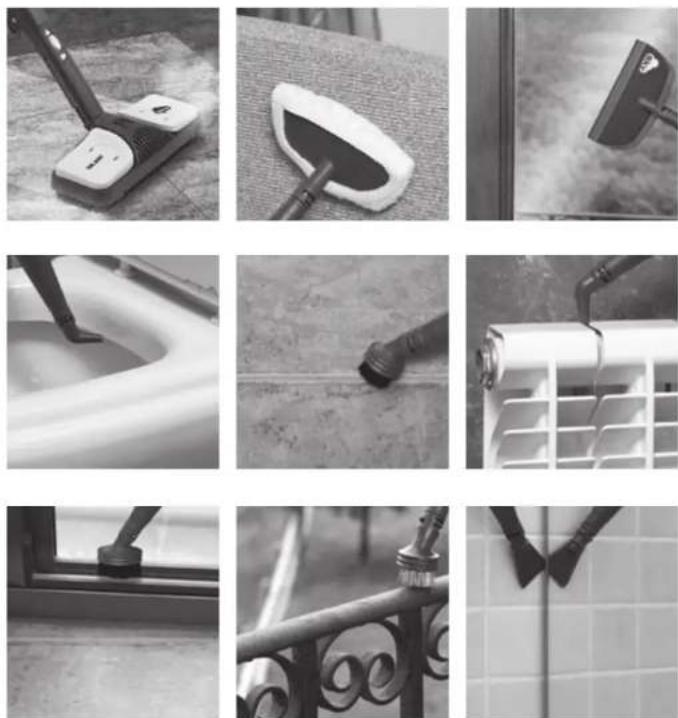

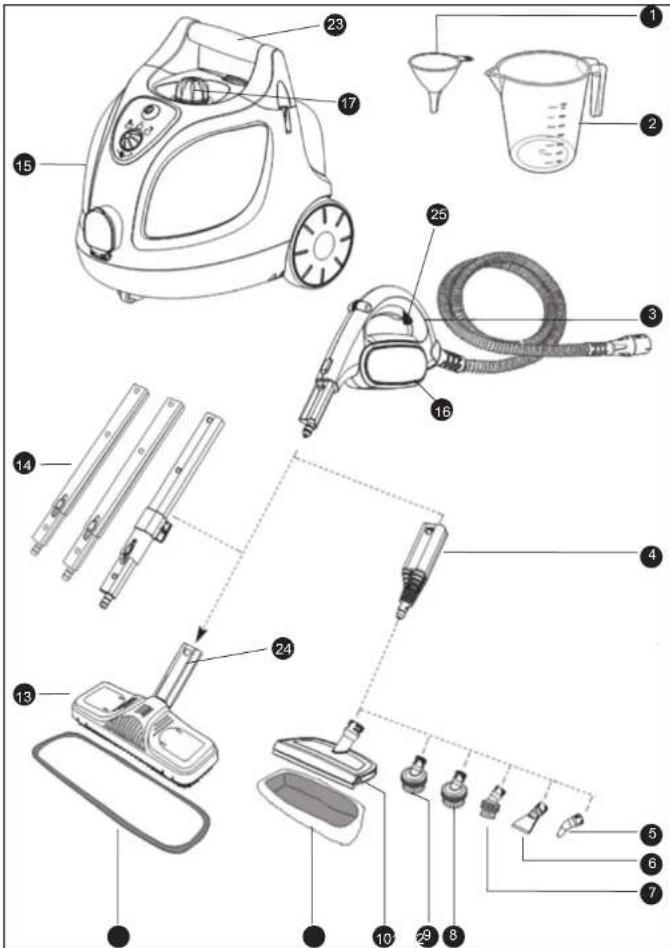
- Embudo
- Jarra de medición
- Pistola de vapor con manquera y depósito de jabón
- Adaptador para accesorios
- Boquilla para rinocones
- Accesono rasqueta
- Cepilo de nylon
- Cepillo metallo
- Copillo doble de nylon
- Accesono para cristales
- Pano de limpieza para accesorio cristales
- Paño de limpieza grande
- Cepillo para suelos
- Tres tubos de extension
- Cuervo limpiador a vapor
- Depósito para jabón
- Tapón de seguridad depósito
- Regulator nivel vapor
- BoMn UO
- Indicador
- Indicadores luminoso "orientando"
- Indicador luminoso "falta de agua"
- Aça de transvoção
- Conector especial capillo suelo
- Bolón bloqueo
- Funnel
- Measuring jug
- Steam gun with hose and
detergent tank - Adaptor for accessories
- Nozzle for corners
- Scraper accessory
- Nylon brush
- Wire brush
- Double motion brush
- Window accessor
- Cloth for window room
- Large cleaning cloth
- Large cleaning cloth
- Floor brush
- Three extension tubes
- Steam cleaner bod
- Tank for detergent
- Tank safety lid
- Steam level controller
- I/O button
- "Ready" luminous indicator
- "Heating" luminous indicator
- "Low water" luminous indicator
- Carrying handle
- Special floor brush connector
-
Lock button
-
Enlonnoir
- Verseuse graduée
- Pistolet à vapeur avec tuyau et
réservir de savon - Adaptateur pour accessoires
- Embout pour les zones difficiles
- Accessoire raclette
- Proces en p/er
- Browse on hyon
- Brasse métalique
- Bourse double en nylon
- Accessoires pour les vives
- Housse de nettoyage et accessoire
- Uve, 2015
- Housse de nettoyage grand
modele - Brosse pour le sol
- Trois tubes extensibles
- Corps du nettoyeur vapeur
- Réservoir à savon
- Bouchon de sécurité du réservoir
- Réquiateur niveau de vapeur
- Bouton I/O
- Témoin lumineux « prêt
- Témpin lumineux « chauffe »
- Témoin lumineux « manque d'eau »
- Poinnée de transport
- Connecteur spécial brosse sol
-
Boulon de blocage
-
Imbuto
-
Caraffa misuratrice
-
Pistola del vapore con manichetta
PALSON ^®
E
natural_image
Line drawings of a car interior showing two views (Fig. 2 and Fig. 3) with arrows indicating motion direction (no text or symbols present)natural_image
Line drawing of a kitchen mixer with a side dish (no text or symbols)Our products are designed to the highest quality, functionality and design standards. We hope you enjoy your new SKY PLUS steam cleaner from PALSON.
INTRODUCTION
Your new steam cleaner is a very versatile aid for several cleaning jobs. Just with the help of steam you can remove the most difficult dirt without any remains on smooth surfaces, such as floor and wall tiles, kitchen utensils, windows, mirrors, and disinfect at the same time. This is the most efficient and ecological way to completely remove remains of stuck food, mould, grease, solid and loose dirt and without chemical solvents.
VERY IMPORTANT SAFETY INSTRUCTIONS
For the power supply
- Check that the voltage shown on the specifications plate coincides with your socket before connecting the steam cleaner to the mains power supply.
- Only connect the appliance to a socket that is correctly earthed.
- You should be able to plug the appliance into the socket. The plug cannot be changed in any way. Do not use adaptors with appliances that have protective earthing. Non-modified plugs reduce the risk of electric shocks.
• We recommend only using the appliance with a socket protected by a residual current circuit breaker. Ask an electrician if necessary.
• Never touch the plug with wet hands. - Always disconnect the appliance from the mains, removing the plug from the socket. Never pull the cord out.
• A broken power cord can only be replaced by one with identical connection values.
• Make sure that there is no danger of tripping over the cord. The cord should not be bent, crushed. - Never use an extension cord.
For groups of special people
- Be extremely careful when using the appliance in the presence of children or the disabled.
- Never leave the steam cleaner unattended, particularly if there are children or disabled people in the same room.
• The cleaner should be kept out of the reach of children.
• This appliance is not a toy. Supervise children so that they do not play with it or the packaging. - Adults or children must not operate this appliance without help or supervision if they are physically, sensorially or mentally incapable of doing so safely. Children should be watched to make sure that they do not play with this product.
- If the power cord is damaged, it must be replaced by the manufacturer, authorised technical service or qualified engineer to prevent dangerous situations.
To use the appliance
- Check the appliance, the cord and accessories now and then to see if they have been damaged. Do not use damaged appliances or accessories.
- Never point the steam cleaner at people, animals or plants (risk of burns). Do not point the steam cleaner at electrical systems or cords.
- Do not use the appliance without supervision. If you leave the work area, always turn the appliance off and unplug it from the mains.
• The cleaner has a thermostat with a heat guard as protection against overheating.
• The accessories heat up during usage. Leave them to cool down before changing them. - Never unscrew the tank's safety lid (17) when you are using the appliance. The tank is subjected to high pressure.
• The appliance cannot be tilted more than 45° during use.
• Never immerse it in water or any other type of liquid. - Keep the appliance away from the rain and damp. Do not use it outdoors.
• Only use the appliance in containers or tanks that are not full of water or other liquids. -
Never use the appliance without water in the tank. The "low water" light (22) will tell us when we have to fill the tank.
• Empty the water tank when the appliance is not being used. -
Never fill the tank up with any liquid other than water. Never add additives (such as perfumes, stain removers or products with surgical spirits) as this could damage the appliance or make it dangerous to use.
• Before adding water, always unplug it and leave it to cool down completely. - Do not overfill the tank. Never go past the maximum filling level (1.6 litres). Use the measuring jar and funnel included in the appliance's box.
- Check that the water tank's plug has been fully screwed in before use.
• Only move the appliance holding the transport handle designed for this purpose (23). - Do not touch any of the appliance's hot areas. It is normal for the cleaner to heat up during operation.
- A small amount of water may come out of the nozzle now and then. This is completely normal, as it is only condensation.
- The strength and the heat of the steam can damage some materials. Always check the suitable for being used with the cleaner testing before on a hidden area.
• If you lend the cleaner to somebody, always give them these operating instructions.
For maintenance and cleaning
• Only use the original accessories included with the cleaner.
• To prevent risks, never do the repairs yourself. Ask the customer service centre and send the appliance to be repaired by the authorised technical service or by qualified technicians who use original spare parts.
- Before cleaning the appliance or carrying out maintenance work, always unplug it and leave the cleaner to clean down.
Disassembling the appliance
Unpack the steam cleaner and all its accessories. Check that everything is there. If possible, keep the box and packaging to protect the appliance during transport or returning it under guarantee. Suitably dispose of the packaging material not required. Immediately contact your distributor if you see any damaged suffered during pressedt when you unpack the appliance. The cleaner cannot be used under any circumstance if it has been damaged in any way.
Warning: make sure that the packaging materials are not picked up by children. They risk being suffocated.
START-UP
Accessory assembly
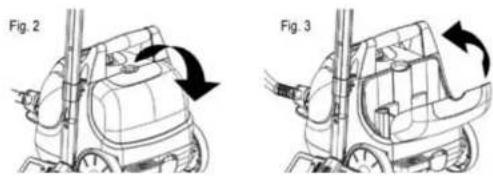
The steam gun with the hose (3) should be connected to the cleaner and you should connect the accessories you want to use before you can use it. The appliance has a compartment for accessories that includes the scraper accessory, three accessories with a brush, nozzle for comers and window accessory. Open the accessory compartment pulling the compartment's cover as shown in (Fig. 2 and 3).
natural_image
Two technical diagrams of a vacuum cleaner showing internal components and motion arrows (no text or symbols)Remove the steam accessory you need and close the cover again.
GB
Steam hose
First connect the steam hose to the steam plug on the front of the cleaner. To do so, open the cover and push the steam hose connector firmly inside the steam plug unit it clicks into position (Fig. 4).
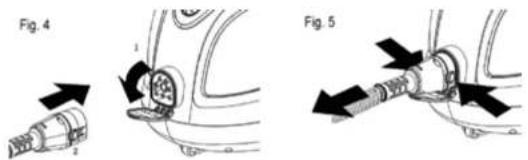
To remove the steam hose, push the two release buttons on the right and left-hand side of the steam connector to remove the steam plug (Fig. 5).
Extension tubes
Assemble the extension tubes if you are going to use the steam cleaner for cleaning floors or hard to reach areas. To do so, push the open end of the tube into the steam gun. Push it into the steam gun until the gun's release button clicks into position (Fig. 6). Put one, two or three extension tubes on if necessary.
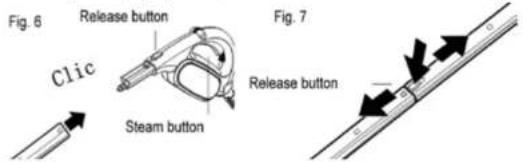
Push the right release button and stretch the tubes to move them away pulling them down to remove the extension tube again (Fig. 7).
Floor brush
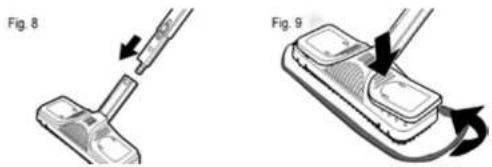
Attach the floor brush to the end of the extension tube. Check that the brush clicks into position (Fig. 8). The floor brush is perfect for cleaning wall and floor linings. It can be used with or without the cleaning cloth. However, we recommend using the cloth to protect linings in the case of sensitive surfaces such as wood. Put the floor brush on the cleaning cloth and fasten the surplus material underneath the staples of the cleaning cloth on the left and on the right. Push the inside sides of the support, open the staples and then fasten the cleaning cloth into place (Fig. 9).
natural_image
Two-step diagram showing a hand holding a clip and a device with a cable, labeled Fig. 8 and Fig. 9 (no text or symbols on the diagrams themselves)To remove the floor brush, push the right release button (Fig. 7) and pull the brush downwards to remove it.
NOTE:
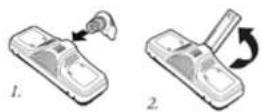
The floor brush comes with a separate connector for packaging reasons.
Assemble the connector as shown in the picture.
Adaptor for accessories
The steam cleaner has very different nozzles for cleaning different surfaces more efficiently and thoroughly. First assemble the accessory adaptor (4) to be able to connect them to the steam hose. The steam adaptor can be directly connected to the steam gun and to the end of one or more extension tubes.
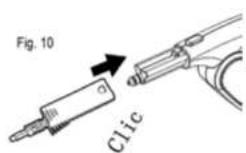
Check that the adaptor is firmly pushed down until it clicks into position (Fig. 10).
Push the right release button and move it away downwards to remove the adaptor again (Fig. 7).
Brush and nozzles
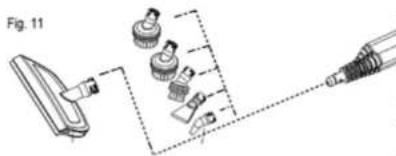
The accessory adaptor (8) can be used only for cleaning or also connected to one of the nozzles with a brush, the jet nozzle and the window accessory.
Push the nozzle onto the accessory adaptor and firmly turn it a quarter way around in the direction of the arrow on the nozzle (Fig. 11).
Follow the same procedure the other way around to remove the nozzle for corners.
Turn the nozzle a quarter of the way round in the opposite way to the arrow and pull it downwards to remove it.
Nozzle for corners
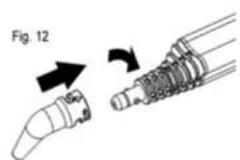
You just have to firmly push the accessory adaptor onto the nozzle for corners to connect it. (Fig. 12).
This nozzle allows thoroughly cleaning hard to reach areas such as corners, joints and toilets easily. The corner nozzle can be removed by pulling it downwards.
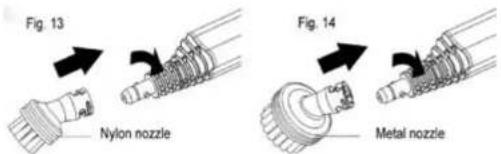
Nozzles with brushes
The two accessory brushes are firmly pushed onto the accessory adaptor in the same way as the jet nozzle. Even the most encrusted dirt can be removed, for example, on blinds, central heating radiators, valves, etc., with the small nylon brush (Fig. 13).

The largest wire brush (Fig. 14) is suitable for resistant stains on less sensitive materials such as stainless steel or stone. Nozzles with brushes are removed just by pulling them downwards.
Window accessory
Push the right angle accessory firmly down onto the nozzle. Put the cotton cover around the accessory to get more thorough cleaning and protect the work surface (Fig. 15).
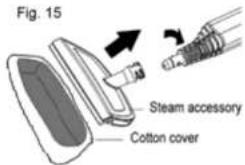
Precaution:
Glass may crack if it is subjected to heat discharge. Preheat the areas with glass before cleaning with steam, spraying steam in a wider arch from a distance of 20 - 25 cm. Slowly reduce the distance to 10 - 15 cm to heat the glass up a little more.
Filling the water tank
This cleaner includes a 1.6 litre water tank.
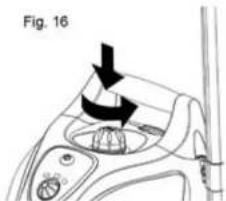
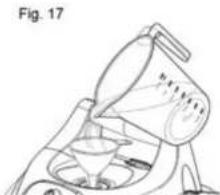
Turn the steam cleaner off and unplug it. The steam cleaner should always be unplugged when you pour water into it. Unscrew the tank lid (Fig. 17) pushing the lid down and turning it anticlockwise at the same time. Use the supplied funnel and measuring jug to add water (Fig. 18).
Only add pure water without additives of any type such as perfumes, detergents, surgical spirit, etc., as these could damage the machine and make using it dangerous. We advise using distilled water to prevent limescale from forming if the water is very hard (over 2.5 mmol/l or 21 dH).
On the contrary, boil the water first to increase the cleaner's working life.
Precaution: do not exceed the maximum amount of 1.6 litres when filling the tank.
Screw the tank lid firmly on turning it clockwise using pressure.
Tip: it will take less time to heat up if you fill it up with hot water.
natural_image
Line drawing of a kitchen mixer with a funnel and side bowl (no text or symbols)HOW THE APPLIANCE WORKS
Plugging it in
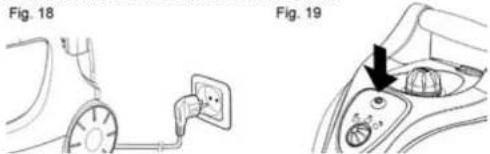
Plug the steam cleaner into a properly installed mains socket (Fig. 18) and turn the machine on pushing the I/O switch (Fig. 19).
The "heating" luminous indicator (orange) indicates that the steam cleaner is heating up. Operating temperature will be reached after a few minutes. The "ready" (green) luminous indicator will then turn on, indicating that the cleaner is ready to use.
Using the steam cleaner
Warning: never point the steam gun at people, animals, plants or electrical systems (for example, a mains plug). The risk of being scalded or electric shocks exists.
Release the locking device (25) (childproof device) pushing the triangular pin on the steam gun down (Fig. 20). Hot steam will come out if you push the steam button.
First hold the steam gun over an old cloth to absorb the pulveriser's initial water. Activate the steam button until steam comes out evenly. You can now start to clean.
Precaution: always test the cleaner in hidden or invisible areas of the surfaces or fabrics to be cleaned to check their tolerance to the hot steam.

- Steam may bleach painted/varnished wood.
- Steam may bleach shiny plastic.
- Acrylic, velvet and linen fabrics are very sensitive to the steam's temperature.
- Do not use the steam cleaner on Dralon fibres without previously testing a hidden area.
The manufacturer cannot be considered liable for any damage to objects, materials, people, animals or plants caused by the appliance's hot steam.
Do not point the steam cleaner's outlet at the same point for too long. Remove dirt moving the steam jet backwards and forwards. Steam flow can be adjusted turning the steam controller and can be adjusted to the level or dirliness. Turn the steam controller clockwise to emit less steam, and anticlockwise to emit more steam (Fig. 21).

Do not knock or till the appliance over 45 ^th during use and check that the cleaner is always placed on a firm base. A full tank is sufficient for 50 minutes of usage. Do not leave the machine unsupervised when it is on and if necessary use the childproof safety lock to protect the steam switch.
NOTE: residual steam continues to be expelled for a few seconds
after turning off the steam function.
GB
Warning: the housing and accessories may get hot during operation. Leave the appliance to cool down before changing the accessories. Never open the tank when the cleaner is on and the tank is pressurised.
Using the detergent tank
There is a dial with two positions "O" and "Max" on the top of the steam gun (Fig. 22). When it is in position "O", steam will come out of the gun and when it is in position "Max" detergent will come out with the steam that we should have put in the gun, filling it up from one of the sides. We recommend using not very fluid detergent or diluted with water to make the expulsion easier.
Fig. 22
How to add water
The tank should be completely filled up if the steam flow starts to drop and the "low water" indicator light (22) turns on.
Turn the steam cleaner off pushing the I/O button. The green operating indicator will turn off. Push the steam gun steam button to release the residual pressure and then lock the gun. Unplug it and leave it to cool down. Beware: the water tank will still be hot even though five minutes have passed. Open the tank lid pushing it down and turning it anticlockwise.
Warning: hot steam may come out when you open it. The risk of burns from the steam that comes out of the lid's screw top and the tank exists.
Top up with water to the maximum level with the measuring jug and funnel and close it again carefully. The steam cleaner can then be plugged in and turned on. The cleaner will be ready to use when the "ready" luminous indicator (20) turns on.
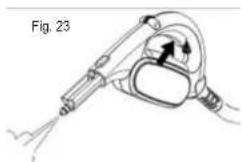
End of operation and storage
Turn the appliance off. Push the steam gun steam button (Fig. 23) to release the residual pressure. Protect the steam gun pushing the lock button. Unplug it and leave it to cool down. Empty the water tank so that no sediments can settle (Fig. 24).
natural_image
Diagram of a medical device with tubing and a central connector, labeled Fig. 23 (no text or symbols on the diagram itself)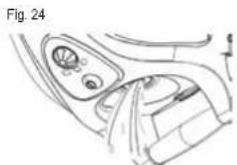
natural_image
Medical illustration of a hand valve mechanism with no visible text or symbolsDo not close the water tank until it is completely dry. The steam cleaner should have totally cooled down before moving it. The appliance should be kept out of the reach of children. The extension tube with the nozzle for floors assembled on it can be put inside the support on the back of the appliance to put it away or for short rests during work.
GENERAL INFORMATION
Cleaning and maintenance
Warning: always check that the steam cleaner is turned off and unplugged before cleaning or servicing it. Clean the appliance passing a slightly damp cloth over the casing. Do not use detergents, abrasive cleaning agents or surgical spirit, as these could damage the casing.
We recommend rinsing the tank after 5 filling operations at the most, if the water hardness is over 1.8 mmol/l (10 ^3 dH). We recommend filling the tank with water and shaking it well before cleaning. This will release any limescale that has settled on the bottom of the steam cleaner. Pour the water away and leave the tank to cool down totally before closing it.
The water tank should be treated with a limescale remover approx. once every 6 months to extend the useful working life of the appliance.
Put one or at the most two of the limescale removal stickers in 1 litre of hot water (50 °C) and fill the tank with water. Leave the solution to work for approximately 30 minutes and pour the water with the dissolved solids away. Repeat this process if necessary and rinse the tank with water.
Troubleshooting
First check if you can solve the problem yourself/consulting this list before sending the cleaner to the Authorised Technical Service.
| Fault Possible cause | Solution | |
| The “heating” indicator light does not turn on. | The appliance is not plugged in or is not turned on.The plug is broken.The power cord is damaged. | Plug it in or turn the appliance on.Check the socket unplugging the cleaner and connecting a different appliance.Ask the customer technical service to check your appliance. |
| No steam is expelled when you push the steam button. | The lock button prevents steam from being released.The water tank is empty. | Push the lock button down.Top up with water to the maximum level (1.6 litres). |
| Only a very small amount of steam is expelled. | The steam controller button is at its lowest point. | Turn the steam controller button anticlockwise until enough steam comes out. |
| The appliance takes a long time to heat up. | The water tank is full of scale. Descale the water tank. | |
PROTECTING THE ENVIRONMENT
Electric products should not be thrown away with domestic rubbish. This appliance should be taken to a local recycling centre for safe treatment.
Thank you for choosing one of our products.
F
natural_image
Line drawings of a two-part robotic vacuum cleaner (Fig. 2 and Fig. 3), showing internal components and motion arrows (no text or symbols)natural_image
Two-step diagram showing a brush applying material to a device, labeled Fig. 8 and Fig. 9 (no text or symbols on the diagrams themselves)natural_image
Medical illustration showing two views of a device with labeled parts (Fig. 23 and Fig. 24), no text or symbols present.natural_image
Line drawings of a two-part robotic vacuum cleaner (Fig. 2 and Fig. 3), showing internal components and motion arrows (no text or symbols)natural_image
Two-step diagram showing a tool interacting with a device, labeled Fig. 8 and Fig. 9 (no text or symbols on the diagrams themselves)natural_image
Line drawing of a kitchen mixer with a side bowl (no text or symbols)natural_image
Diagram of a medical device with an arrow indicating direction, labeled 'Fig. 23' (no text or symbols on the diagram itself)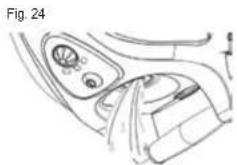
natural_image
Line drawing of a car interior with dashboard and seat (no text or symbols)natural_image
Technical line drawing of a mechanical device with internal components and motion indicators (no text or symbols)natural_image
Technical line drawing of a mechanical device with no visible text or symbolsDisposal of old Electrical & Electronic Equipment (Applicable throughout the European Union and other European countries with separate collection programs)
This symbol, found on your product or on its packaging, indicates that this product should not be treated as household waste when you wish to dispose of it. Instead, it should be handed over to an applicable collection point for the recycling of electrical and electronic equipment. By ensuring this product is disposed of correctly, you will help prevent negative consequences to the environment and human health, which could otherwise be caused by inappropriate disposal of this product. The recycling of materials will help to conserve natural resources. For more detailed information about the recycling of this product, please contact your local city office, household waste disposal service or the retail store where you purchased this product.
Eski elektridi ve elektronik malzemelerle Eklı uygulama (Aruppa B. B. B. B. B. B. B. B. B. B. B. B. B. B. B. B. B. B. B. B. B. B. B. B. B. B. B. B. B. B. B. B. B. B. B. B. B. B. B. B. B. B. B. B. B. B. B. B. B. B. B


- ATTENTION
- E
- INTRODUCTION
- VERY IMPORTANT SAFETY INSTRUCTIONS
- For the power supply
- For groups of special people
- To use the appliance
- For maintenance and cleaning
- Disassembling the appliance
- START-UP
- Accessory assembly
- GB
- Steam hose
- Extension tubes
- Floor brush
- NOTE:
- Adaptor for accessories
- Brush and nozzles
- Nozzle for corners
- Nozzles with brushes
- Window accessory
- Precaution:
- Filling the water tank
- HOW THE APPLIANCE WORKS
- Plugging it in
- Using the steam cleaner
- Using the detergent tank
- How to add water
- End of operation and storage
- GENERAL INFORMATION
- Cleaning and maintenance
- Troubleshooting
- PROTECTING THE ENVIRONMENT
- F
Brand : PALSON
Model : Sky Plus
Category : Steam cleaner