
KA 1801 - Chopper ADE - Free user manual and instructions
Find the device manual for free KA 1801 ADE in PDF.
| Brand | ADE |
| Model | KA 1801 |
| Product type | Electric meat grinder |
| Dimensions (L x W x H) | Approx. 37 x 18 x 32 cm |
| Weight | Approx. 5.3 kg |
| Power supply | 220-240 V ~, 50/60 Hz |
| Rated power | 800 W |
| Maximum power | 2000 W |
| Protection class | I |
| Duty cycle | 5 min max, then 10 min cooling |
| Housing material | Plastic (motor block) and metal (accessories) |
| Package contents | Meat grinder, pusher, support plate, auger housing with hopper, auger, blade block, 3 discs (3, 5, 8 mm), sausage filling tube, kebbe attachments, cookie extrusion plate, locking ring, plate holder ring, manual |
| Functions | Grinding, sausage making, kebbe, cookies |
| Speeds | 2 speeds (1 and 2) + reverse function (Reverse) |
| Safety | Overheat protection, automatic shutdown, locking lever |
| Cleaning | Motor block: damp cloth; accessories: warm soapy water (except parts not dishwasher safe) |
| Spare parts | Replacement blade block available (service@ade-germany.de) |
| Warranty | 2 years (material or manufacturing defects) |
| Country of origin | Germany (Waagen-Schmitt GmbH) |
| Included accessories | Pusher, support plate, auger housing with hopper, auger, blade block, 3 discs, sausage filling tube, kebbe attachments, cookie plate, locking ring and plate holder ring |
Frequently Asked Questions - KA 1801 ADE
User questions about KA 1801 ADE
0 question about this device. Answer the ones you know or ask your own.
Ask a new question about this device
Download the instructions for your Chopper in PDF format for free! Find your manual KA 1801 - ADE and take your electronic device back in hand. On this page are published all the documents necessary for the use of your device. KA 1801 by ADE.
USER MANUAL KA 1801 ADE
natural_image
Black and white photo of a ADE-branded meat processing tool (no visible text or symbols on the device body)Bedienungsanleitung
KA 1801
Operating instructions | Instrucciones de operación | Mode d'emploi Istruzioni per l'uso | Instrukcja obsługi

natural_image
Icon of a person reading a book inside a circular frame (no text or symbols)22089 Hamburg, Germany
natural_image
Line drawing of a manual kitchen tool with a mounted cylindrical component and a side-mounted motor (no text or symbols)Abb. 1
natural_image
Technical line drawing of a mechanical device with a circular inset showing a close-up view of the component (no text or symbols present)Abb. 2
natural_image
Technical line drawing of a mechanical tool with a spring and motor, showing a close-up of the component (no text or symbols present)natural_image
Line drawing of a kitchen tool with a downward arrow indicating rotation or movement (no text or symbols)natural_image
Line drawing of a manual kitchen grater with chopsticks and a bowl of noodles (no text or symbols)Abb. 6
natural_image
Technical line drawings of five different types of kitchen utensils or components (no text or labels)Abb. 7
natural_image
Technical line drawing of a mechanical device with hoses and a central lever (no text or symbols)natural_image
Technical line drawings of a mechanical component showing exploded and assembled views (no text or symbols)Abb. 9
Abb. 10
natural_image
Line drawing of a manual kitchen grater with handle and blade (no text or symbols)Abb. 11
You have chosen to purchase a high-quality product from the ADE brand, which combines intelligent functions with an exceptional design. The wealth of experience of the ADE brand ensures a high technical standard and proven quality for more freshness in your kitchen.
We wish you much pleasure and enjoyment!
Your ADE Team
General information
About this manual

This operating manual describes how to safely use and care for your products. Keep this operating manual in a safe place in case you would like to refer to it later. If you pass this item on to someone else, pass on this manual as well.
Failure to observe the recommendations in this operating manual can lead to injuries or damage to your product.
Explanation of symbols

This symbol, combined with the word DANGER, warns against serious injury.

This symbol, combined with the word WARNING, warns against moderate and mild injuries.

This symbol, combined with the word NOTE, warns against material damage.

This symbol signifies additional information and general advice.
Table of Contents
General information ......22
Intended Use ....24
Safety 24
Scope of Delivery 27
Technical Data 27
Warranty 27
Overview 28
Before first use....30
Basic operation ....30
Making mince ....31
Assembly 31
Processing meat 33
Making sausages 34
Assembly 34
Selecting a sausage casing 35
Preparing sausage mass 35
Filling and twisting sausages 35
Kebbe....36
Assembly 36
Making kebbe ....37
Making shortbread biscuits 37
Assembly 37
Making biscuits 38
After use....38
Cleaning....39
Storage 39
Fault/Remedy 40
Declaration of Conformity.... 40
Disposal....41
This mincer is designed for the following purposes:
- Processing meat
- Making sausage
- Processing dough masses
The device is not suitable for processing frozen or other hard foods such as bones or nuts.
The mincer is designed exclusively for private use indoors and is not suitable for commercial use.
Use the mincer only as described in this operating manual. Any other use is considered improper and may result in damage to property or even personal injury.
The manufacturer or dealer assumes no liability for damage caused by improper or incorrect use.
Safety
- This item can be used by children 8 years of age and above, as well as by persons with reduced physical, sensory, or mental capacities or lacking experience and knowledge, if they are supervised or have been instructed in the safe use of the item and understand the dangers that may arise.
- Keep the device, power cord, and accessories away from children under 8 years of age.
- Cleaning and user maintenance must not be carried out by children, unless they are 8 years of age or older and are being supervised.
- Children must not play with the device.
- Keep wrapping and packaging material away from children. There is a choking hazard! Also pay attention that children do not pull the packaging material over their heads.
- If the power cord of this device is damaged, it must be replaced by the manufacturer or its after-sales or customer service to avoid hazards.
Danger from electricity
- Do not immerse the mincer, power cord or power plug in water or other liquids.
- Place the mincer in such a way that no liquids can spill over the device plug connection.
- Do not operate the device with wet hands.
- Do not operate the device outdoors.
- Connect the device to a correctly installed socket that has a voltage corresponding to that described under "Technical Data".
- Make sure that the mains outlet is readily accessible so that you can quickly unplug the power cord, if necessary.
- Do not use the device:
- if the device itself or its parts are damaged,
- if the power cord or plug is damaged,
- if the device has fallen down.
- Unwind the power cord completely before each use. Make sure that the power cord is not damaged by sharp edges or hot objects.
- Unplug the power cord from the mains outlet:
- if you are not using the mincer,
- after each use,
- before cleaning or putting away the device,
- if, during operation, there appears to be interference,
- during a storm.
- To unplug, always grasp the power plug; do not pull on the cable.
- Do not modify the device or power cord. Have repairs carried out only by a specialist workshop as improperly repaired devices endanger the user.
- Do not use an extension cable.
WARNING against risk of injury
- Always use the pusher and never use your hand or other objects for feeding.
- While working, put up long hair, tie it up backwards or cover it under a cap.
- The cross blade is sharp. Therefore, be careful when inserting, cleaning, and changing.
- Never reach into the filling tube.
BEWARE of material damage
- Operate the mincer for a maximum of 5 minutes at a time (short-time operation). After that, allow the mincer to cool down for approx. 10 minutes.
- Never place the mincer on or near hot surfaces (for example, hot plates, etc.).
- Avoid contact of the power cord with hot parts.
- Never expose the mincer to a high temperature (heating, etc.) or adverse weather conditions (rain, etc.).
- Place the mincer on a robust, smooth, and easy-to-clean worktop. When processing foods, occasional splashes are unavoidable.
- The feed screw, screw body with the filling tube, perforated discs, and fixing ring must not be cleaned in the dishwasher. These parts are not dishwasher safe and their functionality may thus be compromised. After cleaning, all parts (especially the perforated discs) must be thoroughly dried out so as to prevent any rust film.
- The mincer has feet at its bottom. Since surfaces are made from various materials and are treated with diverse care products, the possibility cannot be completely excluded that some of these substances contain ingredients that attack and soften the feet of the device. Place a non-slip pad under the mincer, if necessary.
- Use only original accessories.
Hygiene instructions
Mince is highly delicate. It spoils very quickly and provides an ideal breeding ground for bacteria (for example, Salmonellae if it is stored in an environment that is too warm or for too long).
Observe the following instructions if you are making and/or processing your own mince at home:
- Ensure utmost cleanliness for all activities.
- Use only fresh meat for processing.
- Use only properly chilled meat as it warms up during processing in the mincer.
- Immediately cool the ready-made mince (at up to 4°C) and consume it within 6 hours.
- If you want to store mince, put it into a freezer immediately once it is ready.
- Clean the mincer carefully after use. The mincer or the accessories used must be free of any leftovers.
Scope of Delivery
- Mincer with accessories
- Operating Manual
Technical Data
Model: Mincer KA 1801
Power supply: 220-240 V\~, 50/60 Hz
Power: Nominal: 800 W
Maximum: 2000 W
Protection class: I
Short-time operation: max. 5 minutes, then let it cool down for 10 minutes
Weight: approx. 5.3 kg
Dimensions with a filling tray approx. 37 x 18 x 32 cm
and a cutting set:
Distributor (no service address): Waagen-Schmitt GmbH
Hammer Steindamm 27-29
22089 Hamburg, Germany
Our products are constantly being developed and improved. For this reason, design and technical modifications are possible at any time.
Warranty
The company Waagen-Schmitt GmbH guarantees for 2 years from the purchase date the cost-free rectification of defects on the basis of material or fabrication errors through repair or exchange.
In the event of a warranty claim, please return the product with the proof of purchase (stipulating the reason for claim) to your dealer.
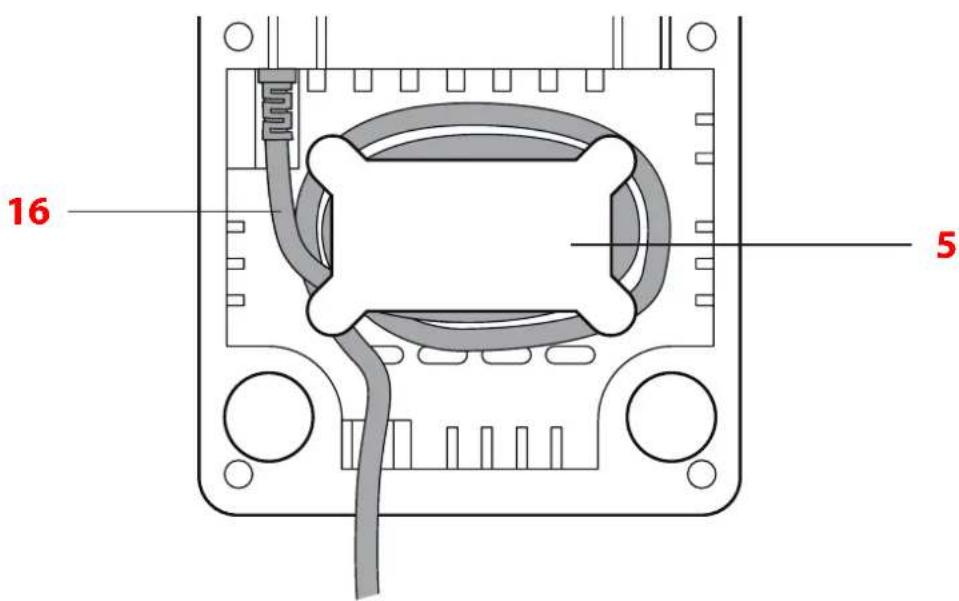
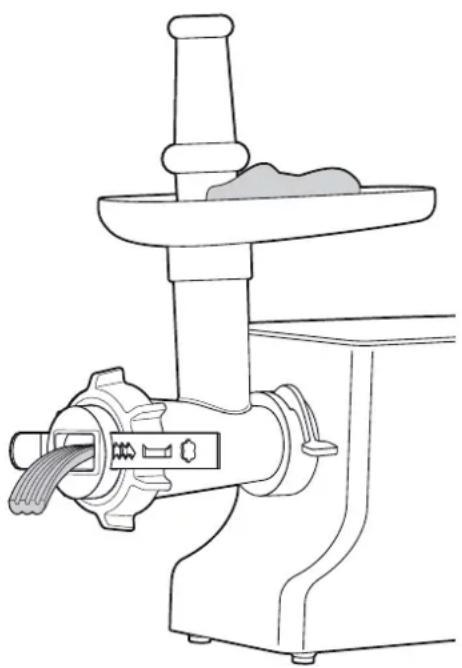
Cable compartment under the motor block
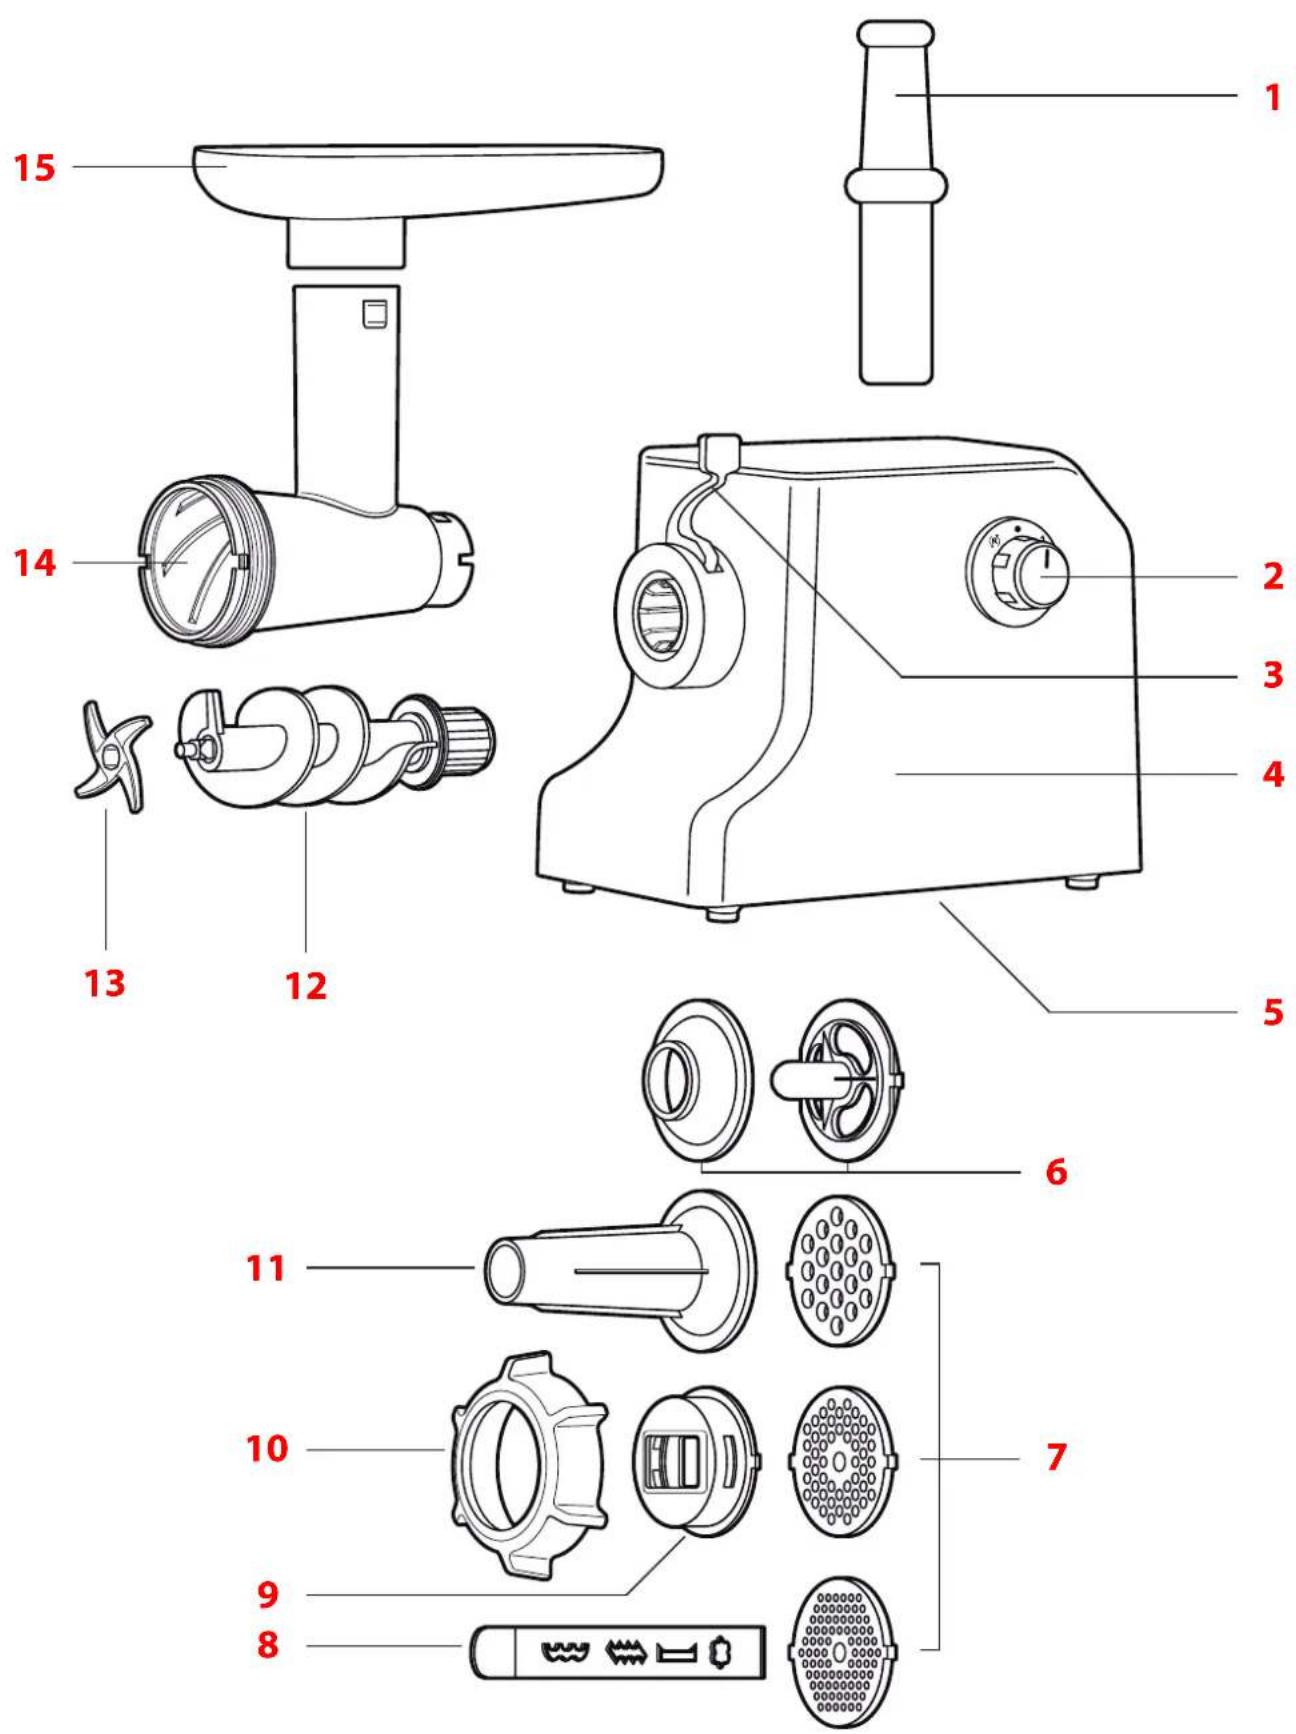
Parts and controls
1 Pusher
2 Mode selector switch: on/off, speed, reverse function
3 Locking lever
4 Motor block
5 Cable compartment for power cord with power plug (at the bottom)
6 Kebbe attachments
7 3 perforated discs: 3, 5, and 8mm
8 Shortbread biscuit attachment for shortbread biscuits
9 Shortbread biscuit set for shortbread biscuit attachment
10 Fixing ring
11 Filling funnel for making sausages
12 Feed screw
13 Cross blade
14 Screw body with filling tube
15 Filling tray
16 Power cord with power plug
CAUTION!
The motor block (4), perforated discs (7), fixing ring (10), feed screw (12), the filling tray (15) and screw body with the filling tube (14) must not be cleaned in the dishwasher. Observe the chapter "Cleaning".
Before first use
- Carefully unpack the mincer and remove all packaging materials.
- Check that the delivery is complete (see chapter "At a glance").
- Check whether the mincer or its individual parts have any damage. If this is the case, do not use the mincer. In this case, contact the dealer where you bought the device.
- Before first use, clean all parts of the mincer as described in the chapter "Cleaning".
Basic operation

NOTE on material damage
- Operate the mincer for a maximum of 5 minutes at a time. After that, allow the mincer to cool down for approx. 10 minutes.
Before you can use the mincer, you must assemble it for the desired purpose. More information can be found in the chapters "Making mince", "Making sausages", "Kebbe", and "Making shortbread biscuits".
This chapter describes the basic operation.
- Place the mincer on a clean and flat surface.
- Unwind the power cord completely and insert the power plug into a mains outlet.
- Put the mode selector switch in position 1 or 2 to turn on the device.
- To turn off, put the mode selector switch back in the switch position ●.
- Unplug the power cord from the mains outlet after use.
- Clean the mincer and the accessories used.

When the cross blade blunts, you will have to replace it. Replacement cross blades can be reordered for a fee. Please email us at our service address: service@ade-germany.de
Reverse function
With this function, the screw turns backwards, making it easier for you to force out meat that has been stuck in the filling tube upwards.
- Put the mode selector switch in position R.
Pay attention to the following:
- This function helps you release jammed meat. Do not use it for other purposes.
- The mode selector switch is spring-loaded when you turn it to R. As soon as you release the switch, the device will switch off.
Overheat protection
This mincer has a built-in overheat protection. If the overheat protection triggers, the device will switch off immediately during use.
In this case:
-
Turn the mode selector switch to ● and unplug the power cord from the mains outlet.
-
Allow the mincer to cool down for at least 60 minutes.
Eventually, you can use the device again as usual.
Making mince
Assembly
natural_image
Line drawing of a manual kitchen tool with a handle and control panel (no text or symbols)Fig. 1
-
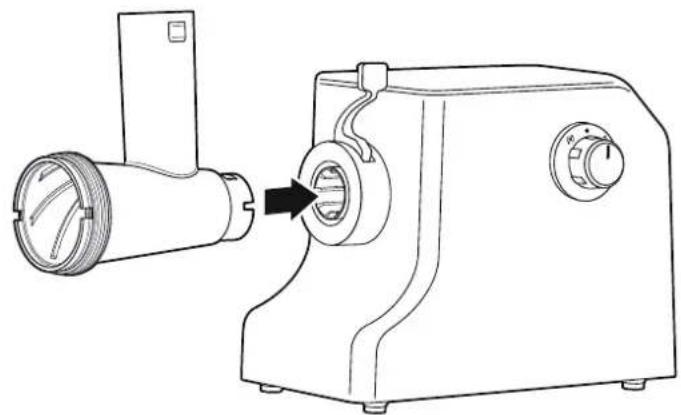
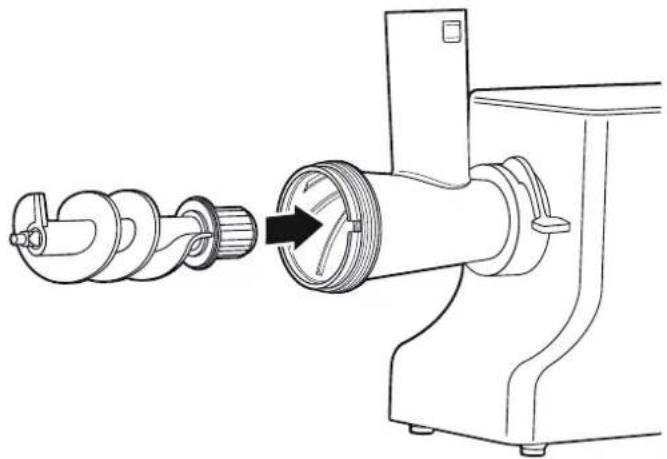
Place the mincer on a clean and flat surface.
-
Insert the screw body with the filling tube on it into the mincer.
natural_image
Technical line drawing of a mechanical device with an inset close-up showing a rotating component (no text or symbols)Fig. 2
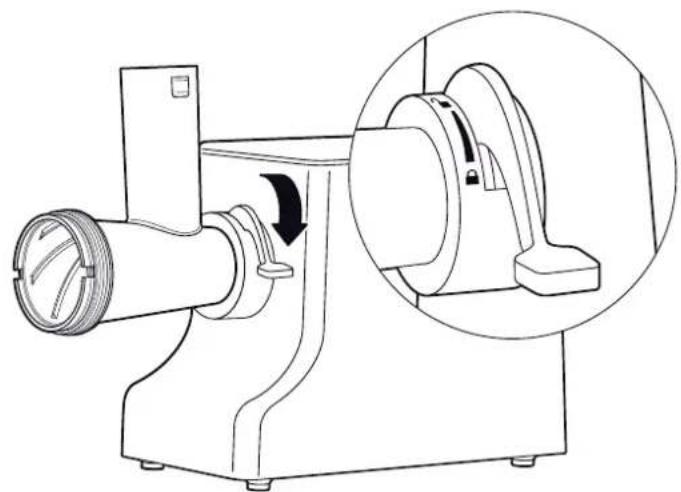
- Move the lever to the side to secure the filling tube. Note the lock symbols. They indicate whether the lever is locked or unlocked.
natural_image
Technical line drawing of a mechanical tool with a spring and motor, showing a close-up of the component (no text or symbols)- Insert the feed screw into the screw body.
Fig. 3

WARNING against injury
- The cross blade is very sharp. Be careful when inserting, cleaning, and changing.
natural_image
Line drawing of a manual kitchen tool with a circular component and a handle, showing the process from left to right (no text or symbols)-
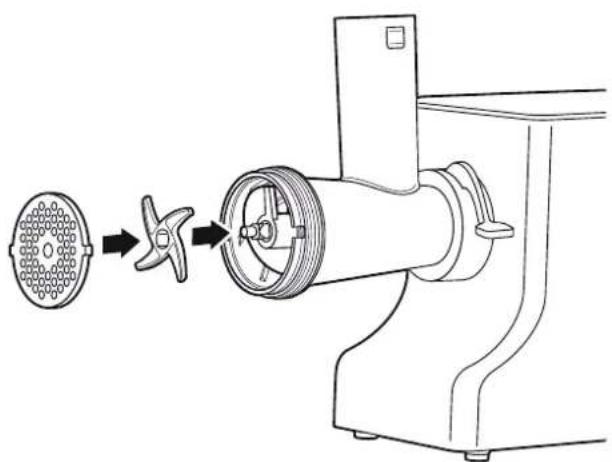
Put the cross blade on the screw so that you can see the blades (see drawing). The blade must fit exactly on the hexagon.
-
Put a perforated disc in front of the blade. The perforated disc must be firmly seated in the two recesses on the screw body.
Fig. 4

When making mince, it is recommended to use the perforated disc with small or medium openings (3 and 5mm).
natural_image
Line drawing of a kitchen tool with a downward arrow indicating force or movement (no text or symbols)Fig. 5
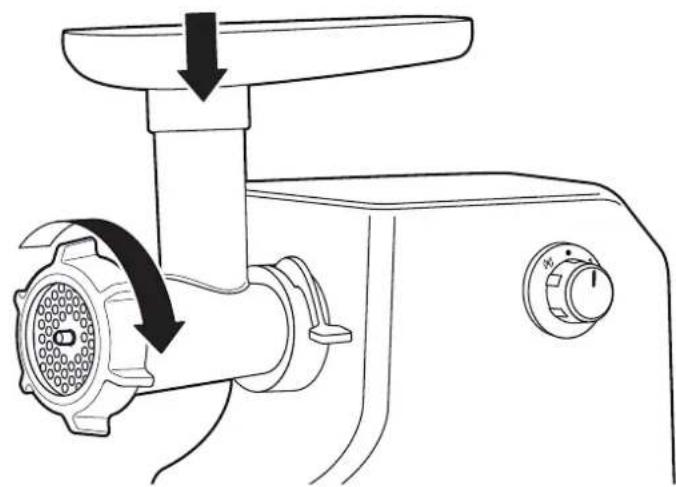
-
Hand-tighten the fixing ring.
-
Mount the filling tray on the filling tube.
The mincer is now fully assembled.
Processing meat

WARNING against injury
- Always use the pusher and never use your hand or other objects for feeding.
- While working, put up long hair, tie it up backwards or cover it under a cap.
- Never reach into the filling tube.

NOTE on material damage
- Never press the pusher in so tightly that the motor audibly slows down. Otherwise, the motor may be overloaded and damaged.
- Remove tendons, hides, and bones from meat. Cut it into cubes approx. 3 cm in size. Do not use frozen meat for processing.
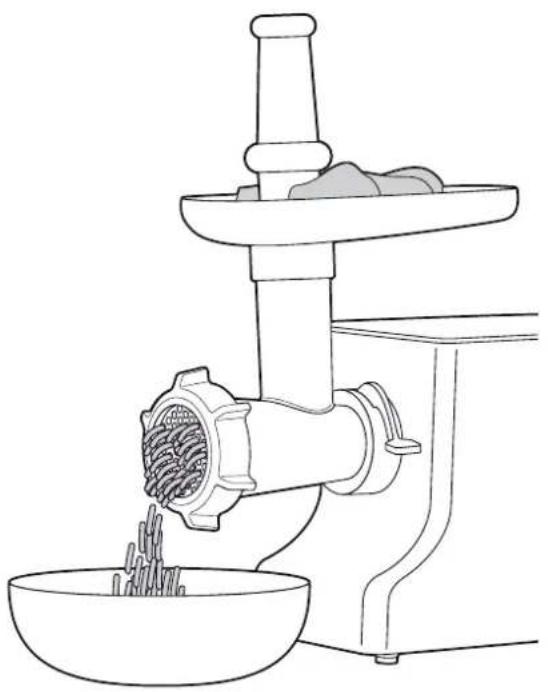
natural_image
Line drawing of a manual kitchen grater with a bowl of noodles and a side post (no text or symbols)Fig. 6
-
Put the pieces of meat into the filling tube and on the tray.
-
Place a plate or bowl for mince under the fixing ring.
-
Turn on the device (level 1 or 2) and push meat with the pusher.
- Do not apply too much force while pushing meat. Otherwise, it can become hot, grey, and greasy.
- If mince is not fine enough, put it through the mincer once again. Put it in the fridge again for 30 minutes, if necessary.
Making sausages
With the filling funnel for sausages, you can make your own sausages by filling a ready-made sausage mass into casings.

It is easier to make sausages when working together.
Assembly
- Proceed as described in the chapter "Making mince" (Step 1 to 3).
natural_image
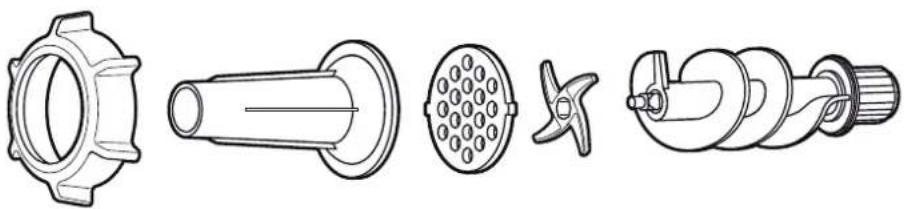
Technical line drawings of five different types of mechanical components (no text or labels)Fig. 7
- Insert the accessory shown above into the screw body in the order described above.
- Hand-tighten the fixing ring.
- Mount the filling tray on the filling tube.
The mincer is now fully assembled.
Selecting a sausage casing
You will need different sausage casings depending on the type of sausage. These are available from a butcher or a specialist shop for butchers.
When making sausages, we recommend that you use a pig's small intestine (the casing should be edible in this case). Assume approx. 1.60 metres for 1 kg of sausage mass. Before processing, put the required amount in lukewarm water for approx. three hours.
Preparing sausage mass
- Mix mince with spices and possibly other ingredients depending on the recipe.
- Knead this mass vigorously for approx. 5 minutes.
- Put the mass in the fridge and let it cool for approx. 30 minutes.
Filling and twisting sausages

WARNING against injury
- Always use the pusher and never use your hand or other objects for feeding.
- While working, put up long hair, tie it up backwards or cover it under a cap.
- Never reach into the filling tube.

NOTE on material damage
- Never press the pusher in so tightly that the motor audibly slows down. Otherwise, the motor may be overloaded and damaged.
natural_image
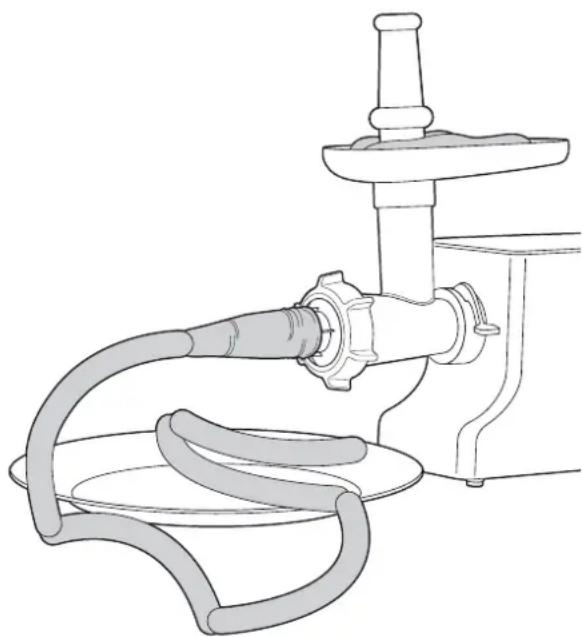
Line drawing of a manual laboring machine with hoses and a handle (no text or symbols)Fig. 8
- Cut an approx. 1 metre long piece from the soaked pig intestine.
- Remove water from the intestine.
- Pull the intestine over the filling funnel for making sausages.
-
Use the filling tray to fill the sausage mass into the filling tube.
-
Turn on the device and push the mass with the pusher.
- Proceed carefully.
- Do not stuff the sausage mass too tightly in the intestine.
- Avoid air bubbles. To remove them, pierce the intestine with a needle, if necessary.
-
After each length of sausage, press the intestine together with your thumb and forefinger to make an empty piece of intestine.
-
Twist the first piece of sausage 2 to 3 times to the right, the second one to the left, the next one to the right again, etc. This is how a sausage string is made.

Remove the rest from the filling tube for further processing. Then, use a long wooden spoon to remove the remaining sausage mass.
Kebbe
Kebbe is the name of a popular dish in Arabic cuisine. It means dumplings or dough tubes made of bulgur that is put through the mincer together with mince and onions. A variety of ideas and recipes (including vegetarian ones) can be found on the Internet.
Assembly
- Proceed as described in the chapter "Making mince" (Step 1 to 3).
natural_image
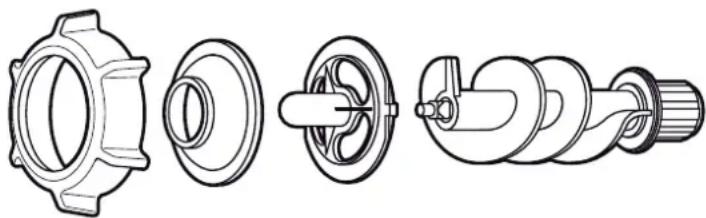
Technical line drawings of a mechanical component showing exploded and assembled views (no text or symbols)Fig. 9
- Insert the accessory shown above into the screw body in the order described above.
- Hand-tighten the fixing ring.
- Mount the filling tray on the filling tube.
The mincer is now fully assembled.
Making kebbe

WARNING against injury
- Always use the pusher and never use your hand or other objects for feeding.
- While working, put up long hair, tie it up backwards or cover it under a cap.
- Never reach into the filling tube.

NOTE on material damage
- Never press the pusher in so tightly that the motor audibly slows down. Otherwise, the motor may be overloaded and damaged.
- Prepare the kebbe paste according to your recipe.
- Use the filling tray to fill the kebbe paste into the filling tube.
- Turn on the device and push the mass with the pusher.
- Cut off the dough tube approx. every 7.5 cm and shape the dough tubes into the dumplings.
- These dumplings are fried, baked over an open fire or cooked depending on the recipe.
Making shortbread biscuits
Assembly
- Proceed as described in the chapter "Making mince" (Step 1 to 3).
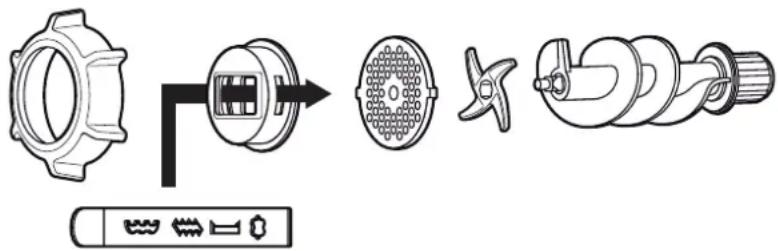
Fig. 10
- Insert the accessory shown above into the screw body in the order described above.
- Hand-tighten the fixing ring.
- Mount the filling tray on the filling tube.
The mincer is now fully assembled.
Making biscuits

WARNING against injury
- Always use the pusher and never use your hand or other objects for feeding.
- While working, put up long hair, tie it up backwards or cover it under a cap.
- Never reach into the filling tube.

NOTE on material damage
- Never press the pusher in so tightly that the motor audibly slows down. Otherwise, the motor may be overloaded and damaged.
natural_image
Line drawing of a manual kitchen grater with handle and blade (no text or symbols)Fig. 11
- Shape the ready-made and properly chilled biscuit dough into a roll of approx. 3 cm in diameter.
- Put this dough mass into the filling tube.
- Use the shortbread biscuit attachment to set the desired biscuit shape.
- Turn on the device and push the mass with the pusher.
- Cut pieces such as bars, S-shapes or curls from the dough strip and place them on a baking tray.
After use
- Turn off the mincer (switch position ●).
- Unplug the power cord from the mains outlet.
- Clean the mincer and the accessories used after each use; see chapter "Cleaning".

Electrical shock HAZARD
- Do not immerse the motor block and the power cord with power plug in water or other liquids.
- Unplug the power cord from the mains outlet before cleaning the device.

WARNING against injury
- The cross blade is very sharp. Be careful when inserting, cleaning, and changing.

NOTE on material damage
- The filling tray, feed screw, screw body with the filling tube, perforated discs, and fixing ring must not be cleaned in the dishwasher. These parts are not dishwasher safe and their functionality may thus be compromised. After cleaning, all parts (especially the perforated discs) must be thoroughly dried out so as to prevent any rust film.
Housing
- Wipe the motor block with a slightly damp cloth, if necessary. Then, wipe it dry thoroughly.
Accessories
- Thoroughly clean the accessories in hot dishwashing water or in the dishwasher (the filling tray, feed screw, screw body with the filling tube, perforated discs, and fixing ring must not be cleaned in the dishwasher).
- Wipe all parts dry thoroughly. After cleaning, all parts (especially the perforated discs) must be thoroughly dried out so as to prevent any rust film.
- Finally, check that all parts are really thoroughly cleaned and free of any stuck leftovers.
Storage
- Clean the device and accessories; see previous chapter.
- Use the cable compartment under the motor block to wind the power cord.
- Keep the device out of reach of children in a dry, frost-free place.
Fault/Remedy
| Fault Possible Cause | |
| No function. · Check if the power cord is plugged. | |
| Meat is poorly processed. · Check that you have mounted the cross blade properly (see Fig. 4). | |
| Meat becomes hot, grey or greasy during cutting. | · The cross blade is blunt and must be replaced with a new one. Replacement cross blades can be reordered for a fee. Please email us at our service address: service@ade-germany.de |
| The motor is blocked. · Use the reverse function to remove jammed meat from the filling tube; see section “Reverse function”. | |
| The device switches off during use. | · The overheat protection has tripped; see section “Overheat protection”. |
Declaration of Conformity
Waagen-Schmitt GmbH hereby declares that the mincer KA 1801 complies with EU directives 2014/30/EU, 2014/35/EU, and 2011/65/EU.
This declaration loses its validity if modifications are made to the product without our approval.
Hamburg, January 2020
Waagen-Schmitt GmbH

Disposing of the packaging

Dispose of the packaging with similar materials. Put cardboard with waste paper, films with recyclable materials.
Disposing of the product
Dispose of the product in accordance with the regulations that apply in your country.
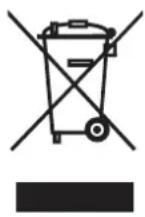
Devices must not be disposed of in normal household waste
At the end of its life, the product must be disposed of in an appropriate way. In this way, valuable materials contained in the device will be recycled and the burden on the environment avoided. Hand in the old device at a collection point for electronic waste or at a recycling depot.
For more information, contact your local waste disposal firm or your local administrative body.
natural_image
Line drawing of a manual kitchen tool with a circular component inserted into a motor (no text or symbols)Fig. 1
natural_image
Technical line drawing of a mechanical device with an inset close-up showing a rotating component (no text or symbols)Fig. 2
natural_image
Technical line drawing of a mechanical tool with a spring and motor, showing a close-up of the component (no text or symbols)natural_image
Line drawing of a kitchen tool with a circular component and a handle, showing a step-by-step assembly (no text or symbols)natural_image
Line drawing of a kitchen tool with a downward arrow indicating rotation or compression (no text or symbols)natural_image
Line drawing of a manual kitchen grater with a bowl of noodles and a side post (no text or symbols)Fig. 6
natural_image
Technical line drawings of five different types of mechanical components (no text or symbols)Fig. 7
natural_image
Line drawing of a manual pump tool with tubing and control knob (no text or symbols)Fig. 8
natural_image
Technical line drawings of mechanical components including gears, housing, and shaft (no text or labels)Fig. 9
Fig. 10
natural_image
Line drawing of a manual kitchen grater with handle and blade (no text or symbols)Protection anti-surchauffe
natural_image
Line drawing of a manual kitchen tool with a handle and control knob (no text or symbols)Fig. 1
natural_image
Technical line drawing of a mechanical device with a circular inset showing a close-up view of the component (no text or symbols present)Fig. 2
natural_image
Technical line drawing of a mechanical tool with a spring and motor, showing a close-up of the component (no text or symbols present)natural_image
Line drawing of a kitchen tool with a circular component and a handle, showing a step-by-step assembly (no text or symbols)natural_image
Line drawing of a kitchen tool with a downward arrow indicating force or movement (no text or symbols)Fig. 5
natural_image
Line drawing of a manual kitchen tool with a bowl of noodles and a side post (no text or symbols)Fig. 6
natural_image
Technical line drawings of five different types of kitchen utensils or components (no text or labels)Fig. 7
natural_image
Technical line drawing of a manual pump or feeding device with hoses and a central handle (no text or symbols)Fig. 8
natural_image
Technical line drawings of mechanical components including a gear, housing, and shaft (no text or symbols)Fig. 9
Fig. 10
natural_image
Line drawing of a manual kitchen grater with handle and blade (no text or symbols)natural_image
Line drawing of a manual kitchen tool with a circular component inserted into a motor (no text or symbols)Fig. 1
natural_image
Technical line drawing of a mechanical device with an inset close-up showing a rotating component (no text or symbols)Fig. 2
natural_image
Technical line drawing of a mechanical tool with a spring and motor, showing a close-up of the component (no text or symbols present)natural_image
Line drawing of a kitchen tool with a circular component and a rotary knob, showing mechanical assembly (no text or symbols)natural_image
Line drawing of a kitchen tool with a downward arrow indicating force or movement (no text or symbols)Fig. 5
natural_image
Line drawing of a manual kitchen grater with chopsticks and a bowl of noodles (no text or symbols)Fig. 6
natural_image
Technical line drawings of five different types of kitchen utensils or components (no text or labels)Fig. 7
natural_image
Technical line drawing of a manual pump tool with tubing and control knob (no text or symbols)natural_image
Technical line drawings of mechanical components including a gear, housing, and shaft (no text or symbols)Fig. 9
Fig. 10
natural_image
Line drawing of a manual kitchen grater with handle and blade (no text or symbols)Fig. 11
natural_image
Line drawing of a manual kitchen tool with a circular component inserted into a motor (no text or symbols)Rys. 1
natural_image
Technical line drawing of a mechanical device with an inset close-up showing a rotating component (no text or symbols)Rys. 2
natural_image
Technical line drawing of a mechanical tool with a spring and motor, showing a close-up of the component (no text or symbols)natural_image
Line drawing of a kitchen knife with a circular component and a handle, showing mechanical assembly (no text or symbols)natural_image
Line drawing of a kitchen tool with a downward arrow indicating force or movement (no text or symbols)Rys. 5
natural_image
Line drawing of a manual kitchen tool with a bowl of noodles and a side post (no text or symbols)Rys. 6
natural_image
Technical line drawings of five different types of kitchen utensils or components (no text or labels)Rys. 7
natural_image
Line drawing of a manual pump tool with hoses and a central handle (no text or symbols)Rys. 8
natural_image
Technical line drawings of mechanical components including a gear, housing, and shaft (no text or labels)Rys. 9
Rys. 10
natural_image
Line drawing of a manual kitchen grater with handle and blade (no text or symbols)Rys. 11

- Bedienungsanleitung
- Abb. 9
- Abb. 10
- General information
- About this manual
- Explanation of symbols
- Table of Contents
- Safety
- Danger from electricity
- WARNING against risk of injury
- BEWARE of material damage
- Hygiene instructions
- Scope of Delivery
- Technical Data
- Warranty
- Cable compartment under the motor block
- Parts and controls
- CAUTION!
- Before first use
- Basic operation
- NOTE on material damage
- Reverse function
- Overheat protection
- Making mince
- Assembly
- WARNING against injury
- Processing meat
- Making sausages
- Selecting a sausage casing
- Preparing sausage mass
- Filling and twisting sausages
- Kebbe
- Making kebbe
- Making shortbread biscuits
- Making biscuits
- After use
- Electrical shock HAZARD
- Housing
- Accessories
- Storage
- Declaration of Conformity
- Disposing of the packaging
- Disposing of the product
- Devices must not be disposed of in normal household waste
- Protection anti-surchauffe
Brand : ADE
Model : KA 1801
Category : Chopper