Phantom Max 125 - Scooter MALAGUTI - Free user manual and instructions
Find the device manual for free Phantom Max 125 MALAGUTI in PDF.

| Product type | Scooter |
| Engine | 4-stroke, 125 cm³, 2 valves, liquid cooling |
| Dimensions (L x W x H) | 1,980 m x 0,760 m x 1,280 m |
| Wheelbase | 1,400 m |
| Dry weight (125cc) | 139 kg |
| Maximum recommended load | 170 kg (rider + passenger + luggage) |
| Fuel tank | 9.5 L (including 3 L reserve) |
| Engine oil | Q8 CLASS 10W-40, capacity 1400 cm³ (oil change 1300 cm³) |
| Transmission oil | Q8 T35 80W, capacity 140 cm³ |
| Coolant fluid | Q8 TOP FLUID |
| Brake fluid | Q8 BRAKE FLUID DOT 4 |
| Battery | 12V 9Ah (maintenance-free for 250 version, maintainable for 125) |
| Spark plug | NGK CR8E, gap 0.6-0.7 mm |
| Front/rear brakes | Disks Ø220 mm, hydraulic |
| Front/rear tires | 130/70-13 57P / 140/60-13 63P, tubeless |
| Tire pressure (front and rear) | 2.3 bar (33.4 psi) |
| Dashboard | Multifunction digital with clock, odometers, temperature, battery level, maintenance and ice indicators |
| Helmet compartment | Under the seat, capacity for two jet helmets |
| Glove compartment | Front right |
| Front lighting | Low beam 12V-65W H3, high beam 12V-55W H3, position lights 12V-3W |
| Rear light | Stop lamp 12V-16W, position lamp 12V-2.3W |
| Periodic maintenance | First service at 1000 km, then every 3000 km (oil change, filter, spark plug, etc.) |
| Compatible accessories | Cover, rear luggage rack (5 kg max), top case, windshield, anti-theft device |
Frequently Asked Questions - Phantom Max 125 MALAGUTI
User questions about Phantom Max 125 MALAGUTI
0 question about this device. Answer the ones you know or ask your own.
Ask a new question about this device
Download the instructions for your Scooter in PDF format for free! Find your manual Phantom Max 125 - MALAGUTI and take your electronic device back in hand. On this page are published all the documents necessary for the use of your device. Phantom Max 125 by MALAGUTI.
USER MANUAL Phantom Max 125 MALAGUTI
Malagami IDEI IN MOTD
INTRODUZIONE
natural_image
Technical line drawing of a mechanical component with labeled point A, no readable text or symbols present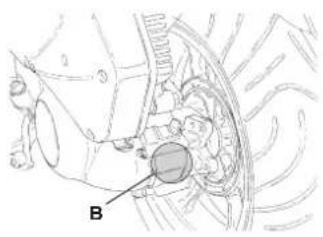
text_image
B
text_image
BFig. 2
125 cc250 cc

text_image
MARCHO DI PASSIVA MALAGLTI S.P.A. CATROCOPADE, VELOCLO (°) 1 2 3 5 8 9 12Fig. 2.1
natural_image
Technical line drawing of a car interior showing a hand holding a steering wheel (no text or symbols)
Malaganti IDES INIC MOTO


1.3 PNEUMATICI
natural_image
Line drawing of a scooter with labeled X and Y axes (no text or symbols on the diagram itself)
text_image
2 mm Fig. 3


Malagmi IDIE IN MOTO
natural_image
Diagram of a car interior showing a hand holding a device, with no visible text or symbolsFig. 9
2.4 GANCIO ANTIFURTO
natural_image
Technical diagram of a vehicle suspension system with labeled component A (no text or symbols beyond label)Fig. 10


Malagati IDE IN MOTO
2.5 VANO PORTATICKET ANTERIORE
text_image
Technical diagram of a car interior with labeled component A and internal componentsFig. 11

text_image
Technical diagram of a soldering iron with labeled components and a circular dial indicator2.11 BLOCCASTERZO
Inserimento
text_image
Diagram showing a hand operating a car wheel with labeled buttons and a directional arrow indicating rotation or change.Fig. 21
Fig. 20

Malagmi IDIE IN MOTO

2.12 CAVALLETTI
2.12.1 CAVALLETTO CENTRALE
natural_image
Line drawing of a pliers applying material to a cloth (no text or symbols)natural_image
Technical line drawing of a car suspension system with labeled component A (no text or symbols beyond label)Fig. 24a

text_image
BFig. 25a
4.3 OLIO MOTORE (Versione 250cc.)
natural_image
Technical line drawing of a mechanical assembly with labeled parts A and B (no text or symbols beyond labels)Fig. 27

natural_image
Technical line drawing of a mechanical assembly with labeled parts (no text or symbols present)Fig. 27a

text_image
1 2 3 Fig. 27b

4.4 OLIO FRENI ANTERIORE POSTERIORE
natural_image
Technical line drawing of a mechanical component with labeled parts (A and Fig. 36), no readable text or symbols beyond labels.

Malagmi IDES IN MOTO
natural_image
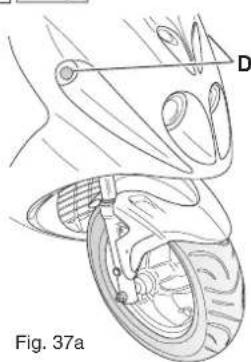
Technical line drawing of a mechanical component with labeled point D and figure number 37a (no text or symbols beyond labels)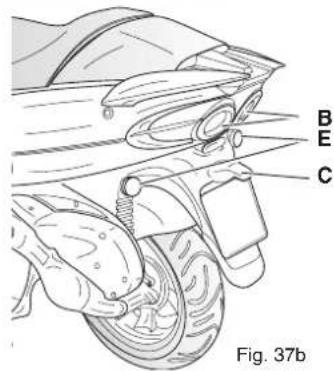
text_image
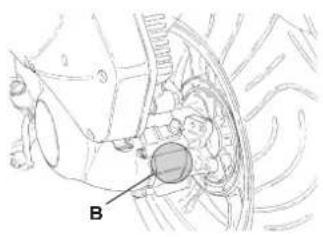
B E C Fig. 37b6.5 FANALINO TARGA
• Lampadina 12V - 5W
text_image
MAX MIN PFig. 39a
text_image
V Fig. 3Fig. 39b
48
text_image
A VAX VEX Fig. 41

Malagmi IDEE IN MOTO
NOTE:
IT
Malaguti consiglia:
RICAMBI ORIGINALI MALAGUTI ED ACCESSORI
MALBO LINE

Malagami IDEE IN MOTD
EINLEITUNG
natural_image
Technical line drawing of a mechanical component with labeled point A (no text or symbols beyond label)Fig. 1

text_image
B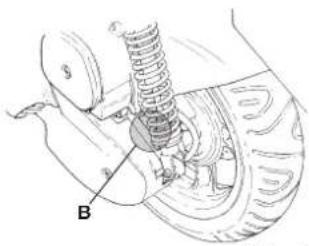
text_image
BFig. 2
125 cc250 cc

text_image
MARCHO DI PASSIVA MALAGUITI S.P.A. CATROCOPADE, VELOCIO (°) 1 2 3 5 8 9 12Fig. 2.1
natural_image
Technical line drawing of a car interior showing steering wheel and dashboard (no text or symbols)Fig. 2.2

Malacan
IDEE IN MOTO


1.3 REIFEN
natural_image
Line drawing of a scooter with labeled X and Y axes (no text or symbols on the diagram itself)

text_image
2 mm Fig. 3

1.4 KRAFTSTOFFTANK
natural_image
Diagram of a car interior showing a hand holding a device, with no visible text or symbolsFig. 9
natural_image
Mechanical assembly diagram showing suspension and spring components (no text or labels)Fig. 10


Malagati IDE IN MOTO
2.5 VORDERES TICKETHALTERFACH
text_image
Technical diagram of a car interior with labeled component A and internal compartmentsFig. 11

natural_image
Hand holding a rotary dial with buttons and a knob, labeled Fig. 21 (no text or symbols on the dial itself)
text_image
Technical diagram of a handheld electrical switch with labeled components and wiringFig. 20

Malagmi IDIE IN MOTO

2.12 STÄNDER
natural_image
Line drawing of a pliers tool with a cloth, labeled Fig. 23 (no text or symbols on the diagram itself)natural_image
Technical line drawing of a car suspension system with labeled component A (no text or symbols beyond label)Fig. 24a

text_image
BFig. 25a

4.3 MOTORÖL (Version 250cc.)
natural_image
Technical line drawing of a mechanical assembly with labeled parts A and B (no text or symbols beyond labels)Fig. 27
D

natural_image
Technical line drawing of a mechanical assembly with labeled parts (no text or symbols present)Fig. 27a

text_image
1 2 3 Fig. 27b37

4.4 ÖL VORDERRADBREMSE
natural_image
Technical line drawing of a mechanical component with labeled parts (A and Fig. 36), no readable text or symbols beyond labels.

Malagmi IDES IN MOTO
natural_image
Medical illustration showing anatomical structures with no visible text or symbols
text_image
B E C Fig. 37bnatural_image
Technical diagram of a boat hull with visible vial and side blades, no text or symbols presentFig. 39b
48

Malagmi IDE IN MOTO
• Malaguti S.p.a. is constantly working to improve both its vehicles and the documentation supplied with them.
Please read carefully this Owner's Manual before using your new vehicle. It is IMPORTANT that both this Manual and the service record booklet are delivered to the new owner of the vehicle in case you decide to sell it.
- MALAGUTI Spa reserves the right to modify its models at any time without notice. Therefore, we advise you to make sure that the vehicle meets your expectations before you purchase it.
- MALAGUTI vehicles are all designed and built according to their standard use. Any other particular use is therefore excluded, if not explicitly agreed upon in writing by MALAGUTI Spa.
• The motorcycle observes the emission limits provided for by the European directive for motorcycles.
- Exclusively refuel your vehicle with UNLEADED PETROL
The exhaust pipe irradiates heat even after the engine has just been turned off.
We therefore recommend you to carefully read the following instructions:
• always allow the engine and the exhaust pipe to cool down before any maintenance operation, in order to avoid burnings.
- Make sure you do not park nor stop your scooter on grass, dead leaves or other easily inflammable materials.
- The passenger should get on and off the scooter from the opposite side of the exhaust pipe, in order to avoid burnings.

ALWAYS RESPECT THE HIGHWAY CODE AND .... RIDE WITH CAUTION
- For Spare Parts and Accessories, always contact Authorised Malaguti vendors and dealers.
SECTIONS OF MANUAL
1) GENERAL INFORMATION
How to become familiar with the scooter. Riding and loading procedures. Refuelling instructions. Tyres.
2) CECTING TO KNOW YOUR VEHICLE
Technical data. Control devices. Instruments on board.
3) OPERATING INSTRUCTIONS
Instructions for use. Checks to be made before the operation. Ignition. Troubleshooting.
4) SCHEDULED MAINTENANCE
Periodical checks on the scooter.
5) UNSCHEDULED MAINTENANCE
Operations to be carried out in qualified Malaguti Authorised Service Centres.
6) ELECTRICAL EQUIPMENT
Electrical equipment on board.
WARNING: for any maintenance or repair operation, as well as for the installation of accessories, always refer to Malaguti Vendors/Dealers.
MANUAL REFERENCE NOTES
- For an effective reference to this Manual, symbols have been used to emphasise warning situations, practical suggestions or mere information. They work as reminders for the user and should be carefully followed.

WARNING!

NO! - Absolutely forbidden interventions.

Mechanical interventions to be exclusively carried out by an Authorised Malaguti Service Centre.

Electrical/Electronic interventions to be carried out by an Authorised Malaguti Service Centre.

Operations to be exclusively carried out while the engine is off.


Malaganti IDEE IN MOTO
USAGE WARNINGS
- The User must be in possession of the technical approval certificate (Log Book), Insurance, road fund certificate and an appropriate Driving licence.
• The identification plate has to be applied to the vehicle.
A helmet must be worn at all ages (helmet approved by ECE/ONU).
• Always comply with the highway code: signs, rights of way, pedestrian crossings, speed limits, overtaking prohibitions, etc
- Any tampering with the engine or other parts in order to increase speed or power is forbidden by law.
Infringements are punished by law by penalties that include confiscation.
- The passenger must wear a type-approved helmet and avoid carrying children or persons who are unable to remain seated in the saddle unassisted.
- Do not carry passengers that have not been previously cautioned and instructed on the behaviour to adopt when riding the vehicle
- Using the vehicle for sporting purposes on circuits or private land voids the warranty and exonerates MALAGUTI Spa from any liability for harm to things or persons as the User has been warned that such use constitutes an improper use of the vehicle.
- Bearing in mind the above we strongly advise that any modifications made to make the vehicle suitable for sporting use be carried out by expert technicians on their own direct responsibility and remind you that after such modifications your vehicle may no longer be authorised to circulate on the public highway.
WARNING!
Work on the vehicle performed by persons who are not part of the MALAGUTI network of agents and dealers may alter the vehicle's safety features and cause the agent from whom you purchased it to refuse to carry out work on it under warranty.
ACCESSORIES
The scooter is fitted for the application of the following accessories:
- BIKE TARPAULIN: protects the scooter during long out-of-service periods.
- REAR LUGGAGE RACK (max. load 5 kg)
• LUGGAGE CASE
• MINI WINDSCREEN
• EXTRALARGE WINDSCREEN
• ELECTRONIC ANTITHEFT DEVICE - Malaguti Spa grants the full compatibility of its vehicle with Malaguti MALBO original accessories. Always refer to Malaguti vendors and dealers.
- MALAGUTI Spa is not liable for any harm or damage suffered by the vehicle or harm suffered by the user due to the fitting of non-original accessories. Equally, MALAGUTI Spa is not liable for any harm or damage suffered by the vehicle or harm suffered by the user due to the improper fitting of accessories, even if the accessories are original. In such cases, liability rests solely with the person who fitted the accessories.
- If you wish to fit electric or electronic accessories, always make sure that they do not interfere with the vehicle's normal operation and in case of doubt contact the MALAGUTI network of agents and dealers for full information.
- If you wish to fit a non-approved part to the vehicle, contact MALAGUTI Spa before doing so to find out if said accessory is compatible with your vehicle.

Malaganti IDEE IN MOTO

| SECT. | SUBJECTS PAGE | |
| 1 General information 5 | ||
| 1.1 Riding Safety (rider + passenger) 5 | ||
| 1.2 Identification data 6 | ||
| 1.3 Tyres 7 | ||
| 1.4 Fuel tank 8 | ||
| 1.5 Coolant tank 8 | ||
| 1.6 Rear-view mirrors 9 | ||
| 2 Getting to know your vehicle 11 | ||
| 2.1 Technical data | 11 | |
| 2.2 Main components | 12 | |
| 2.3 Helmet compartment | 13 | |
| 2.4 Antitheft hook | 13 | |
| 2.5 Front ticket compartment | 14 | |
| 2.6 Dashboard | 15 | |
| 2.7 Digital dashboard 16 | ||
| 2.7.1 Function selection and warning lights | 17 | |
| 2.7.1.1 Warning lights | 18 | |
| 2.8 Handlebar controls - right handlebar | 20 | |
| 2.9 Handlebar controls - left handlebar | 21 | |
| 2.10 Switch with key | 22 | |
| 2.11 Handlebar lock | 22 | |
| 2.12 Stands | 23 | |
| 2.12.1 Centre stand | 23 | |
| 2.12.2 Side stand | 23 | |
| 3 Operating instructions 25 | ||
| 3.1 Running-in | 25 | |
| 3.2 Checks before use | 25 | |
| 3.3 Electric starting | 26 | |
| 3.4 Cold starting | 26 | |
| 3.5 Starting | 26 | |
| 3.6 Braking | 26 | |
| 3.7 Engine stopping | 26 | |
| SECT. | SUBJECTS | PAGE |
| 3.8 Riding suggestions | 27 | |
| 3.9 Standard equipment | 27 | |
| 3.10 Trouble-shooting 27 | ||
| 3.11 Cleaning suggestions | 28 | |
| 3.12 Garaging | 28 | |
| 4 Scheduled maintenance | 29 | |
| 4.1 Maintenance - warnings | 29 | |
| Version 250cc.: MAINTENANCE TABLE: CHECK COUPONS | 30 | |
| Version 125cc.: MAINTENANCE TABLE: CHECK COUPONS | 31 | |
| 4.2 Transmission oil (Version 250cc.) | 32 | |
| Transmission oil (Version 125cc.) | 33 | |
| 4.3 Engine oil (Version 250cc.) | 34 | |
| Engine oil (Version 125cc.) | 36 | |
| 4.4 Front/rear brake oil | 38 | |
| 4.5 Spark plug | 39 | |
| 4.6 Rear shock absorber adjustment | 40 | |
| 4.7 Table of lubricants | 41 | |
| 5 Unscheduled maintenance | 43 | |
| 5.1 Adjustment of idling speed | 43 | |
| 5.2 Throttle clearance adjustment | 43 | |
| 5.3 Brake lever adjustment | 43 | |
| 5.4 Brakes (front/rear) pads and rotor check (checking for wear) | 43 | |
| 5.5 Coolant | 44 | |
| 6 Electrical equipment 45 | ||
| 6.1 Headlight | 45 | |
| 6.2 Beam adjustment | 45 | |
| 6.3 Dashboard | 46 | |
| 6.4 Tail-lamp | 46 | |
| 6.5 Number plate light | 46 | |
| 6.6 Indicator lights | 46 | |
| 6.7 Fuses | 47 | |
| 6.8 Battery | 48 | |
1 GENERAL INFORMATION
1.1 RIDING SAFETY (RIDER + PASSENGER)
- Riders and passengers must lways wear their helmets and suitable garments. The use of loose-fitting garments, unbuttoned jackets and the like should be avoided.
• Always keep your visor (or goggles) and the windscreen clean. - Correctly adjust the rear-view mirrors.
• Always ride being seated, with both your hands on the handlebar and your feet on the footrests. - While riding in a line, keep at a safe distance from other vehicles.
- On dry roads without gravel and sand, use both brakes: the use of only one brake may cause dangerous and uncontrollable skidding.
- On wet roads ride carefully at reduced speed: gently operate the brakes and use the engine braking action.
- Good psychophysical conditions are very important for a safety riding. Drugs, spirits, psychotropic drugs, etc, as well as physical tiredness and sleepiness may cause dangerous situations.
- Changing direction, line, turns in lateral roads and pulling in the vehicle for halts, have always to be indicated through the indicator lights.
- While approaching stops, red lights, level crossings, road bumps, etc. gently slow down at the right time. Safety is important for you but also for the people on the vehicles behind you.
• Always ride with the low beams on, even during the day. - Before starting any journey, always check: the engine oil level as well as the coolant level, the wear and pressure of tyres. Check also the efficiency of the electrical equipment and braking system.
- Use only unleaded petrol and the lubricants recommended by the Constructor. Avoid to mix oils which are not compatible.
- Do not use mobile phones while riding or refuelling.
- Do not let the passenger use the mobile phone during the ride and ask him/her always to cling to the passenger grab rail (fig. 6.1, page 12, n°24).
- While riding with a passenger remember that the type of ride
considerably changes. For this reason it is necessary to adjust both the rear shock absorbers (see sec. 4.6, page 40), and ride more carefully.
- Do not ride keeping sharpened or brittle objects in your pocket.
- Do not carry your helmet by hand nor slipped in your arm while you are riding (the same for the passenger).
- Never divert your attention or let anyone do it while you are riding.
- Do not eat, drink, smoke or turn to talk with your passenger while riding.
- Do not draw or be drawn by other vehicles.
- Do not sit on your scooter while it is resting on its stand.
- Do not start riding while the scooter is resting on its stand.
- Do not use the stand on slopes.
- Do not start the engine in closed or insufficiently ventilated spaces.
- Do not ride on pavements, under arcades, on city parks, etc.
- Wheelles, zigzagging and rolling are extremely dangerous for you and for other people (...pass the word...).
- Do not load any voluminous or heavy objects, unless they have been tightly fixed to the vehicle.
- Do not carry any protruding objects or items that could cover the lights or the indicators.
- Do not carry passengers if they have not previously been informed on the correct behaviour to maintain while riding.
• The rider shall always ride in harmony with the passenger. - Do not exceed the prescribed max weight (see technical data).
- Do not install too many electrical instruments.
- It is absolutely forbidden to make any modifications aimed at improving or altering the scooter performances or changing its original technical features.
- Do not use the scooter in manners other than those for which it has been constructed.


Malagmi IDIE IN MCTO
1.2 IDENTIFICATION DATA
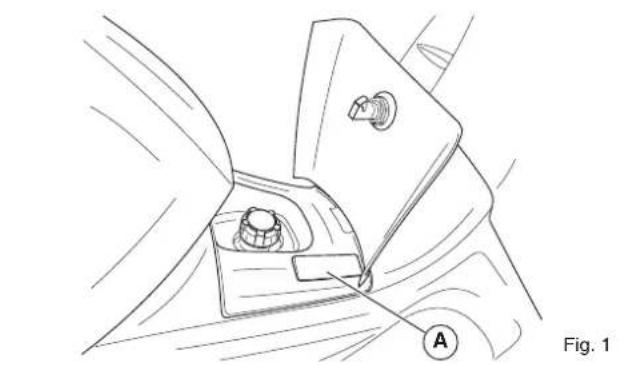
• To access the vehicle identification number, open the centre compartment with the ignition key and remove the cover (A - fig. 1).
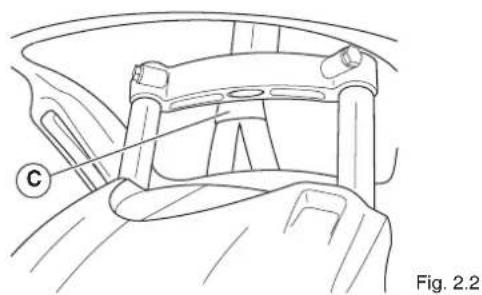
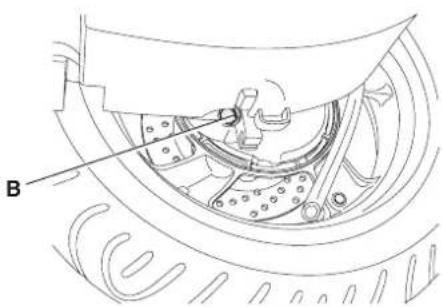
- The vehicle's VIN label is applied to the front of the vehicle, on the right hand side, under the top casing (C - fig. 2.2).
- Engine identification data are visible on the left engine cover (B-Fig. 2).
- Anti-tampering plate (for 125cc models only) (Fig. 2.1) An anti-tampering control plate with all motorbike identification data required by the Directive 97/24/CE Chap. 7 is fit inside the helmet compartment. In case of replacement of the helmet compartment, make sure the plate is refitted.
text_image
B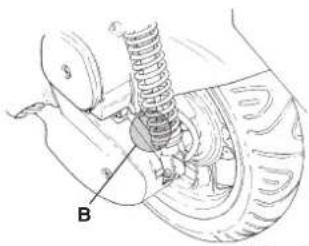
text_image
BFig. 2
125 cc250 cc

Altering the identification data is punished by law.
- When ordering spare parts, always quote the vehicle identification data.
natural_image
Technical line drawing of a mechanical component with labeled point A, no readable text or symbols present
text_image
MARCHO DI PASSIVA MALAGUITI S.P.A. CATROCOPADE, VELOCIO (°) 1 2 3 5 8 9 12Fig. 2.1

natural_image
Technical line drawing of a car interior showing a hand holding a seatbelt, with no visible text or symbols.
Molgaani
IDEE IN MOTO


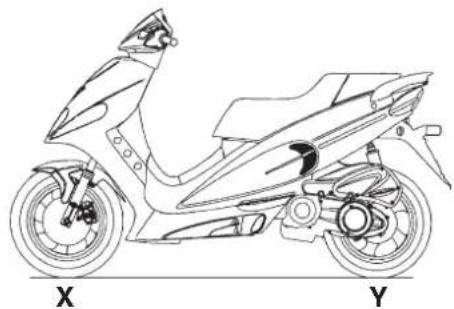
1.3 TYRES
Type: Tubeless
| 125 cc. 250 cc. | |
| X | 130/70-13 57P 130/70-13 57P |
| Y | 130/60-13 63P 140/60-13 63P |
Failure to observe the tyre pressure or load limit instructions can adversely affect riding, operation and control of the vehicle, and the service life of the tyres.

USE ONLY HOMOLOGATED TYRES.
Check the tyre conditions (before every journey): in case of breakage (cracks) or cuts, replace them as soon as possible.
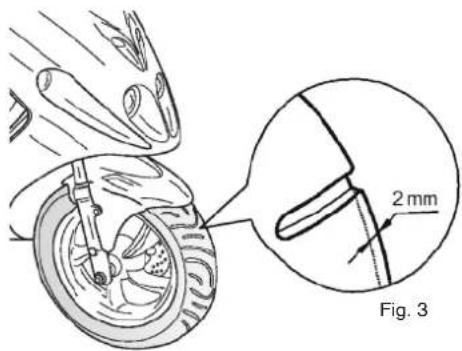
Note: the minimum tread thickness (front and back) is equal to 2 mm (Fig. 3)


The pressure of tyres must be adjusted while the tyre is at ambient temperature.
PRESSURE
| bar (psi) | ### | ||
 | X | 2.3(33,4) | 2,3(33,4) |
 | Y | 2.3(33,4) | 2,3(33,4) |
natural_image
Line drawing of a scooter with labeled X and Y components (no text or symbols on the diagram itself)EN

text_image
2 mm Fig. 3
7


Malagmi IDE IN MOTO
1.4 FUEL TANK
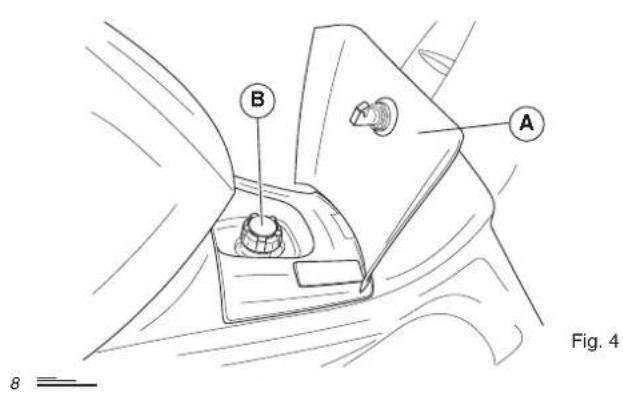
To gain access to the fuel tank, proceed as follows:
- Place the scooter on the centre stand.
- Remove the ignition key from the switch.
- Open the door (A - Fig.4) with the ignition key.
- Unscrew the cap (B - Fig.4) and fill the tank.
- Firmly screw the cap back onto the tank (B - fig. 4).
- After refuelling, check if there are any traces of petrol on the scooter. If so, immediately clean the surface, in order to avoid any damage.
- The quantity of fuel, as well as a low fuel level, is displayed on the dashboard by means of the l.h. instrument (see chap. 2.6).
- Use only UNLEADED PETROL.
| FUEL TANK litres | |
| TOTAL TANK CAPACITY 9.5 | |
| RESERVE 3 | |


Fuel is extremely inflammable. Avoid approaching the tank filler with lighted cigarettes or naked flames (i.e. matches). This also applies to refuelling: fire hazard!
text_image
B A Fig. 41.5 COOLANT TANK
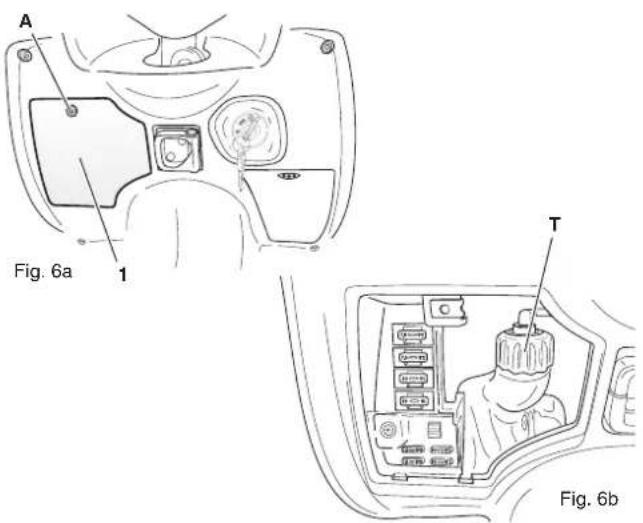
To access the engine coolant tank, lift the cover (1 - Fig. 6a), by loosening the screw (A - fig. 6a). See Section 5.5 (page 44) for information about topping up.

Use the coolant prescribed in this Manual - or one having the same characteristics - for any topping up.
Do not fill up with water, except in emergency situations.
Never unscrew the tank cap (T - Fig. 6b) when the engine is warm so as to avoid burnings.
text_image
A Fig. 6a 1 T Fig. 6b
Malagami
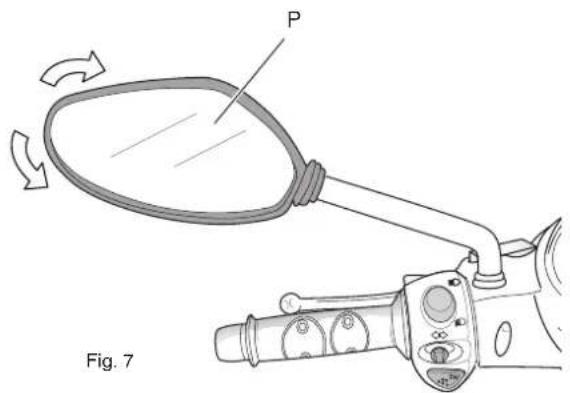
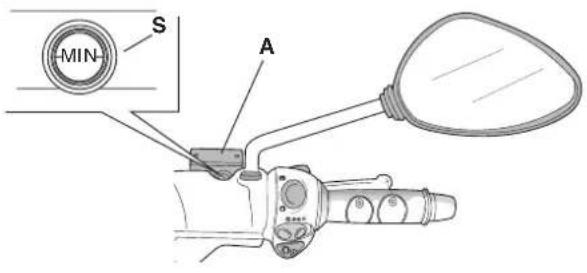
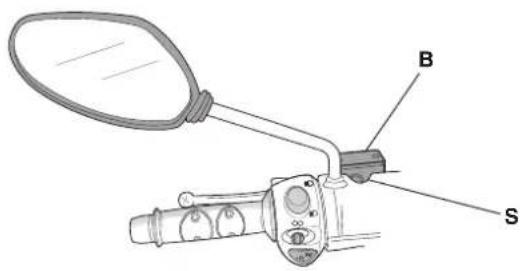
1.6 REAR-VIEW MIRRORS
- The left and right rear-view mirrors must be fitted on the handlebar in their seats and firmly secured in place.

The left hand mirror is fitted by screwing it clockwise.
The right hand mirror is fitted by screwing it anti-clockwise.
Adjust the mirrors seated in driving position. Turn the mirror until you have perfect visibility (P - Fig.7).
The objects that are visible in the mirrors are actually closer than they seem.

Do not adjust the rear-view mirrors while driving. Always wait to stop, at traffic lights for example.
text_image
P Fig. 7

Malagmi IDEE IN MOTO
NOTES:

10

GETTING TO KNOW YOUR VEHICLE
2.1 TECHNICAL DATA
MALAGUTI Spa reserves the right to modify the technical data at any time without notice.

NOTE: the data between brackets refer to the 125 cc version, when different from the 250 cc version.
Size
Wheel base 1.410 m (1.400 m)
Max. length 1.980 m
Max. width 0.760 m
Max. height 1.280 m
Kerb weight 143 kg (139 Kg)
Max. recommended load:
rider, passenger and luggage 170 Kg
Capacity
Engine oil 1000 cc (1400 cc)
Transmission oil 250 cc (140 cc)
Fuel tank with low fuel level 9.51
Engine: 4-stroke, 4-valve (2-valve)
Type PIAGGIO M361M (MINARELLI 3M5)
Cylinders 1
Bore/stroke mm- O 72 x 60 (53,7 x 54,8)
Capacity 244 cm³ (124 cm³)
Compression ratio 11.0 : 0.5 (11.0 : 1.0)
Cooling liquid
Starting system electric starter
Greasing system oil-bath type
Ignition system -- electronic CDI (electronic)
Spark plug
Type --- CHAMPION RG4HC - NGK CR7EB - NGK CR8EB (NGK - CR8E)
Type: automatic speed variator with single-speed V-belt.
Main reduction system: gear type
Clutch: dry, centrifugal and automatic.
Fuel system
Carburettor make/type: WALBRO - KEI HIN - MIKUNI (TEIKEI - 5XL)
Automatic starter.
Fuel: unleaded petrol.
Brakes
Front disk brake o 220 with hydraulic transmission and hydraulic two-piston caliper.
Rear disk brake ∅ 220 with hydraulic transmission and hydraulic caliper
Frame
Steel tube single beam, split at the footrest.
Suspensions
Front: hydraulically controlled fork with two ∅ 33 mm rods. Stroke 90 mm.
Rear: 2 hydraulic shock absorbers with adjustable pre-loading spring.
Stroke 82 mm (88 mm).
Electric equipment 12V
Battery type: 12V 12Ah (12V 9Ah)
Front headlight with low beam, high beam, parking light.
Rear parking light with built-in stop light.
Horn: 12V.
Front and rear direction indicators.
Number plate light.
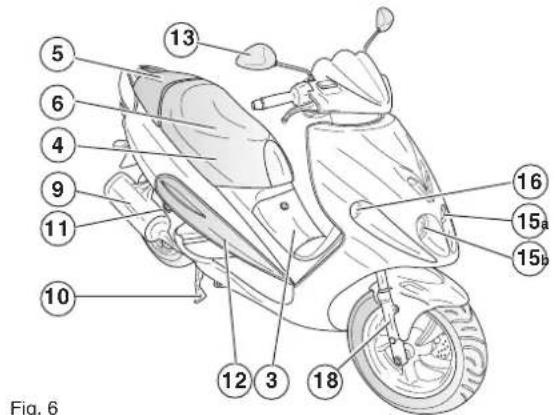
2.2 MAIN COMPONENTS
| N. Description P. | ||
| 1 Digital dashboard 15 | ||
| 2 Key switch 22 | ||
| 3 Fuel tank cap 8 | ||
| 4 Helmet compartment 13 | ||
| 5 Battery 48 | ||
| 6 Seat | - | |
| 7 Tail lamp | 46 | |
| 8 Number-plate bracket | - | |
| 9 Exhaust pipe | - | |
| 10 Centre stand | 23 | |
| 11 Antitheft hook | 13 | |
| 12 Spark plug | 39 | |
| 13 Right rear-view mirror | 9 | |
| 14 Adjustable shock absorbers | 40 | |
| 15a Low beam headlight | 45 | |
| 15b High beam headlight | 45 | |
| 16 Front indicators 46 | ||
| 17 Front disk brake calliper | - | |
| 18 Fork | - | |
| 19 Front ticket compartment | 14 | |
| 20 Air filter | - | |
| 21 Carburettor | - | |
| 22 Left rear-view mirror | 9 | |
| 23 Saddle lock | 13 | |
| 24 Passenger's handle | - | |
| 25 Rear indicators | 46 | |


Malasmi
IDIE IN MOTO
text_image
Fig. 6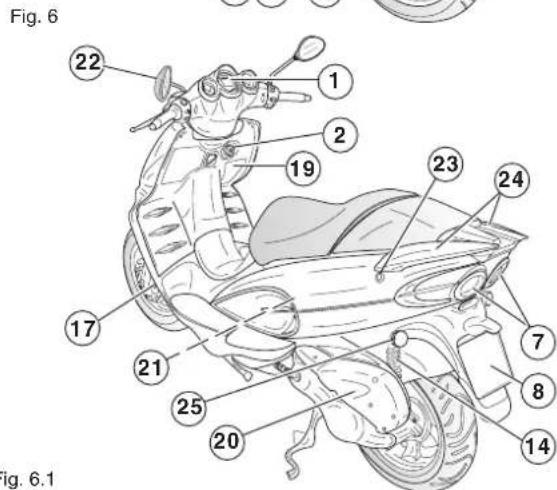
text_image
Fig. 6 22 1 2 19 23 24 17 21 25 20 7 8 14 Fig. 6.1
Malagmi IDIE IN MOTO

2.3 HELMET COMPARTMENT
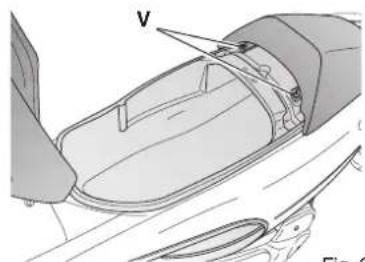
- The helmet compartment is under the saddle. In order to gain access to it, put the vehicle on its centre stand, insert the key into the lock on the left hand side (A - fig. 9) and turn clockwise; this operation will release the saddle lock. The helmet compartment can contain two JET-type helmets, if you place them as shown in fig. 9. Anyway, the compartment may not contain some particular kinds of helmet, or not contain two helmets. Before buying your helmet, we suggest you make sure that the compartment is suitable for it.

The helmet compartment can be used to carry light objects. They shall be stored in such a way as not to compromise the vehicle's stability while riding. Do not store objects which are not temperature resistant (e.g.: lighters, inflammable liquids, perishable goods, etc.). Do not leave documents or valuables inside the helmet compartment.
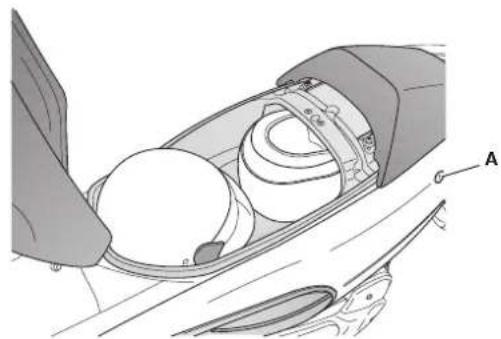
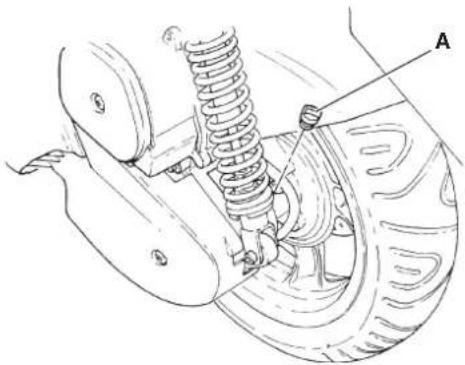
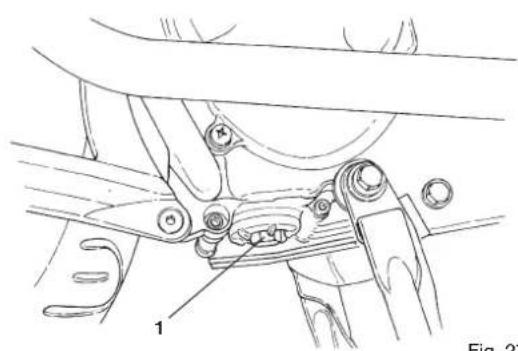
2.4 ANTITHEFT HOOK
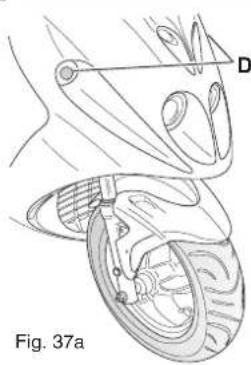
- It is in the right lower part (A – Fig. 10) and is integral with the frame, allowing a firm grasp to any external element (column, post, etc....) by means of an antitheft chain that you can purchase from an Authorised Malagutl Service Centre.

Do not hook the chain to mobile structures and/or parked vehicles.
Always check that the motorbike is steady while it is 'firmly fixed'.
Never lay the antitheft chain - usually fitted into a plastic hose - on the exhaust pipe or on other hot parts.
Never ride if the antitheft chain has not been previously stored inside the helmet compartment - or inside the rear luggage compartment, if provided.

After turning the engine off, be careful not to touch the hot exhaust pipe in order to avoid burns.
EN
natural_image
Diagram of a car interior showing hand positioning and labeled component A (no text or symbols present)Fig. 9

natural_image
Technical diagram of a vehicle suspension system with labeled component A (no text or symbols beyond label)Fig. 10


Malagmi IDE IN MOTO
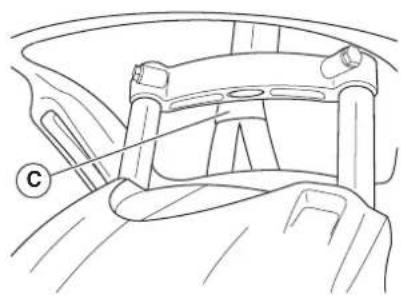
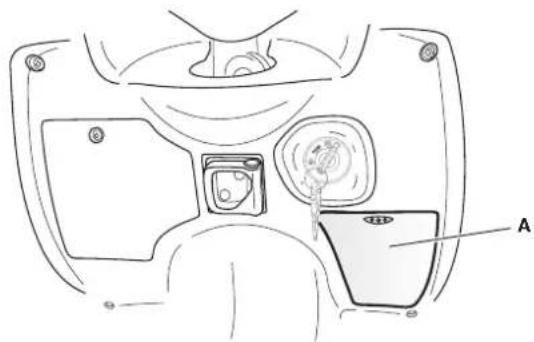
2.5 FRONT TICKET COMPARTMENT
- There is a small compartment on the right hand side of the front casing. To open this compartment, press its cover (A - Fig. 11).
text_image
Technical diagram of a car interior with labeled component A and internal componentsFig. 11

Do not store heavy objects or temperature sensitive items (lighters, matches, inflammable liquids, perishables goods, etc...) inside the compartments. It is advisable not to leave any documents or valuables inside these compartments.
14

Malagmi IDIE IN MOTO

2.6 DASHBOARD
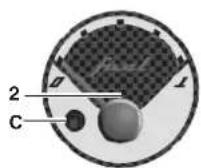
1) Coolant temperature indicator.
The red notch (A) and the red warning light (B) indicate an excessively high temperature of the coolant, due to a fault in the cooling circuit or to a lack of coolant. Immediately stop the vehicle and follow the instructions listed in sec. 5.5.
2) Fuel indicator. Warning light (C) comes on to signal that you are running out of petrol (reserve).
3) Green low beam headlight indicator light.
4) Blue high beam headlight indicator light.
5) Green direction indicator light.
6) Multipurpose digital dashboard. To set the functions, see section 2.7.
7) Not used.

When the vehicle is started, all functions displayed in the three "clocks" will be automatically tested (CHECK). In case this check function is partially or not displayed, contact an Authorised Malaguti Service Centre.
EN
text_image
install km/h 88 T:MC 6:38 4 7 3 5 6

N.B.: if you notice that warning lights B and C keep blinking and the indicator needle is not moving, this means that there is a problem in the electrical circuit; before using the vehicle, check the level of coolant and fuel and have the vehicle checked by an Authorised Malaguti Service Centre.


Malagmi IDEE IN MOTO
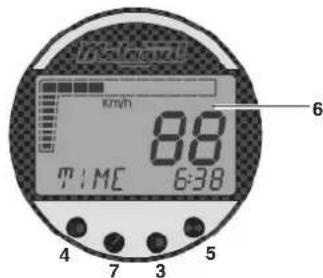
2.7 DIGITAL DASHBOARD
The digital dashboard has more functions than the analog version. These functions are useful for a proper use of the vehicle. To select the functions, simply press the MODE button, which is on the right-hand control (3 - Fig. 16).
The functions provided are divided into: 'main menu' and 'submenu or bar graph', section 2.7.1, and are the following: TIME (clock), TD (partial distance), TOD (total distance), battery charge level, external temperature, oil level or engine oil change servicing, rpm.
The dashboard also features warning lights, section 2.7.1.1, indicating when the engine oil has to be checked or changed. In case of very low temperatures, they warn drivers that roads may be icy. These warning lights automatically appear on the display, and are the following: ICE (probable presence of ice on the road), OIL BAR (engine oil circuit trouble), OIL CHECK/OIL CHANGE (engine oil check or change).
In case of multiple warnings, the warning lights alternate on the display for some seconds, until the problem displayed is solved.
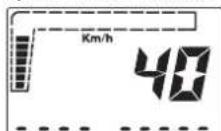
The speed is displayed in km/h or mph by means of a graphic bar together with the respective numeric value.
Setting
Power up the instrument board by connecting the battery to the vehicle's cables.
- Put the key in the ignition switch and turn it to O. The names of stored models appear successively on the display (125 km/h 125 MPH / 200 km/h 200 MPH / 250 km/h 250 MPH).
When the code of your model appears on the display, press the MODE button, to make your selection. If you choose the wrong model, you will be shown improper information (speed, km, etc.). If you choose the wrong model, turn the panel off, wait for about two minutes and repeat the above operations in the correct manner.

These operations must be repeated every time power is disconnected.

The digital dashboard only works if the battery is connected.
If the battery is flat, replace it immediately. When the battery is replaced or the fuse is removed, power is disconnected; any memorised settings will be re set.
Insert the key in the ignition switch and turn it to position; the display will automatically show a check of all functions for 3 seconds. After time the last function used before turning the engine off will be displayed.
This check is performed every time the ignition key is turned to

Replace the flat battery with a new one; if the problem remains, call an Authorised Malaguti Service Centre.

Do not use your vehicle when no function appears on the display or when functions appear partially, since the instrument board is not in the condition to provide sufficient information about your vehicle.

If the battery is running flat, when the vehicle is turned on, the digital instrument board will lose its initial settings (125 KM/H 125 MPH / 200 KM/H 200 MPH / 250 KM/H 250 MPH); reset as described.

Malagmi IDIE IN MOTO

2.7.1 FUNCTION SELECTION AND WARNING LIGHTS
In order to make the display easier to understand, the functions are divided into a 'menu' and a 'submenu or bar graph'. The warning lights (sec. 2.7.1.1) are not selected. They appear automatically whenever necessary. To select functions, press the MODE button until you select the requested one.
SPEED IS ALWAYS DISPLAYED.
N.B. You can get to the menu functions from any submenu.
MAIN MENU
1) TIME FUNCTION:
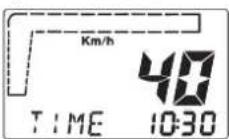
• Shows the time.
To set the desired time, hold down the MODE button. The current time will first have 10 slow increments and then the increment will become rapid. While setting the time, the display will show the segments concerning hour and minutes. This operation shall be carried out
while the vehicle is turned off and the ignition key is in ○ position.
2) TD FUNCTION:
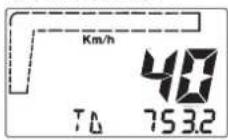
• Shows the partial distance in km and hundreds of metres.
To reset, hold down the MODE with the ignition key in O position. The meter automatically resets when it reaches 999.9 Km, then it restarts counting.
3) TOD FUNCTION:
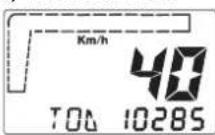
• Shows the total distance covered by the scooter
This value is never reset, even when the scooter is no longer powered. (The total kilometres will be stored for 10 years from the last time the vehicle was used).
4) ENGINE RPM:
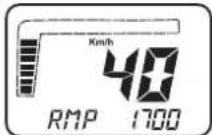
• Shows the engine rpm, with a value combined with a graphic bar.
CAUTION! If the RPM of the motor running idle is lower than 1200, no number will be shown on the display. Have a Authorised Malaguti Service Centre check the vehicle as soon as possible.
• Shows the ambient temperature in °C on the display. The menu functions and speed are not displayed.
6) BAR GRAPH FUNCTION SEARCH:
- Selects the functions from the submenu or bar graph
When this image is displayed, you can select one of the available functions by pressing the MODE button within 3 seconds. If you do not press the button within 3 seconds, the display
will show the first menu function (1) combined with the speed indication.


Malagmi IDEE IN MOTO
BAR GRAPH OR SUBMENU FUNCTIONS
7) BATTERY CHARGE LEVEL (actual speed displayed)
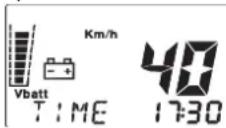
- Shows the battery charge level on the display through the graphic bar on the left. Check the battery charge level, with the engine off and the key turned to

2.7.1.1. WARNING LIGHTS:
ICE WARNING LIGHT (Icy roads)
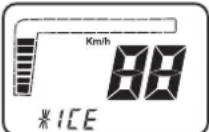
- This function is displayed for 15 seconds when the sensor detects a temperature equal to or lower than 4^ . After this time, the previous function is displayed, while the message ICE remains visible on the lower part of the display until the sensor will detect a temperature equal
to or higher than 6 °C.
8) ENGINE OIL CHECK
text_image
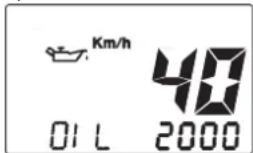
Km/h 48 01 L 2000250 cc (speed always displayed)
- Shows the number of kilometres remaining before you check or change the engine oil. The engine oil has to be changed every 3,000 km. When the Km indicator displays '0000 km', the warning light concerning the oil check (OIL CHK) or the oil change (OIL CHG)
will come on, see sec. 2.7.1.1. Once the operation is carried out, the Authorised Malaguti Service Centre is in charge of turning the warning light off, and making the counter restart from 3000km . Other menu functions are not displayed.

NOTE: the engine oil check must be carried out every 3,000 Km, while the engine oil change must be carried out every 6,000 Km.
125 cc (speed always displayed)
- Shows the number of kilometres remaining before you change the engine oil. When the Km indicator displays \000 km^{2}$ , the warning light concerning the oil change (OIL CHG) will come on, see sec. 2.7.1.1. The Authorised Malaguti Service Centre is in charge of turning the warning light off, and making the counter restart from 3,000 km. Other menu functions are not displayed.

NOTE: the engine oil level must be checked every 1,000 km, while the engine oil change must be carried out every 3,000 km.
ENGINE OIL PRESSURE WARNING LIGHT (250 cc version only):
- When this message is displayed and the engine is turned on, it indicates the presence of a fault inside the engine oil circuit.
If this warning light comes on while driving, immediately turn the engine off, check the
oil level and, if necessary, top up while the engine is cold. If even after this operation the warning light is still on, immediately contact an Authorised Malaguti Service Centre for a check.
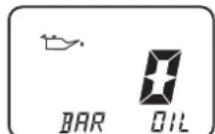
Checking the warning light of the engine oil pressure sensor (automatic).
When turning the starter key inserted in the ignition switch to the ( ) position, without starting the vehicle, the display will show BAR OIL for about 5 seconds, so as to show whether the engine oil pressure sensor is working; the BAR OIL indication must disappear when the vehicle is started. Should the BAR OIL indication not appear on the display, then check the engine oil level before starting the vehicle and have an Authorised Malaguti Service Centre check the vehicle as soon as possible.
NOTE: this function may be displayed for a fraction of a second when the engine is turned on and off with the ENGINE STOP device, but it does not signal any fault inside the engine oil circuit.

Malagmi IDEI IN MOTO

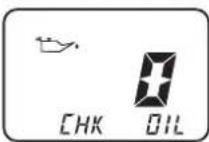
ENGINE OIL CHECK AND CHANGE WARNING LIGHTS:
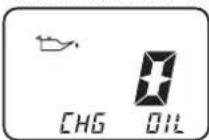
The warning lights act as reminders for the rider, indicating the right time when engine oil should be either checked or changed.
If, turning the ignition key on the starting position, the message OIL CHK is displayed for about 1 minute, it indicates that you should check the engine oil level as soon as possible. If the message OIL CHG is displayed, contact an authorised service centre to have the oil changed. Once the check has been carried out, the Authorised Malaguti Service Centre is in charge of resetting the warning light.
NOTE:
250cc.
ENGINE OIL CHANGE. The warning light indicating the engine oil change is directly connected to that of the oil level check, therefore, if you check it after 3000km (1860 mi), the oil change shall subsequently be carried out after 6000km (3720 mi), as indicated in the maintenance table (section 4.1).
Therefore, it is advisable to change the engine oil every 6000 km (3720 mi), even if the OIL CHG warning light does not come on. After changing the oil, your Authorised Malaguti Service Centre will reset the oil change light.
125cc.
ENGINE OIL CHANGE. The OIL CHG warning light comes on every 3,000 km, after the engine oil change light is reset. As far as the 125 cc version is concerned, the necessity to check the engine oil level check is not signalled by the "OIL CHK" warning light. After the oil change, your Malaguti dealer will reset the oil change light.


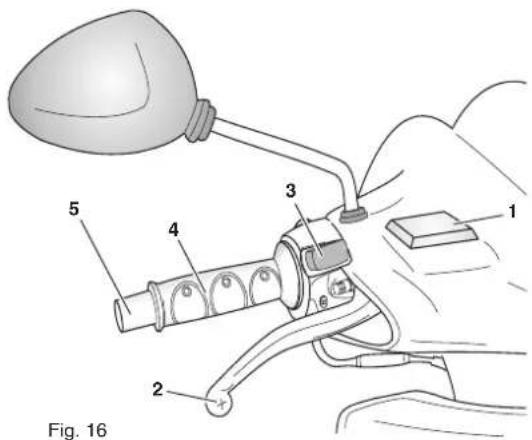
2.8 HANDLEBAR CONTROLS Right handlebar
1) Front brake oil tank
2) Front brake lever
3) MODE button: selects the various functions of the digital dashboard
4) Twist grip throttle control
5) Counterweight
A) Electric starter button
B) Light switch


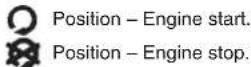
C) Emergency switch, engine stop

Malaguti IDE IN MOTO
text_image
1 2 3 4 5 Fig. 16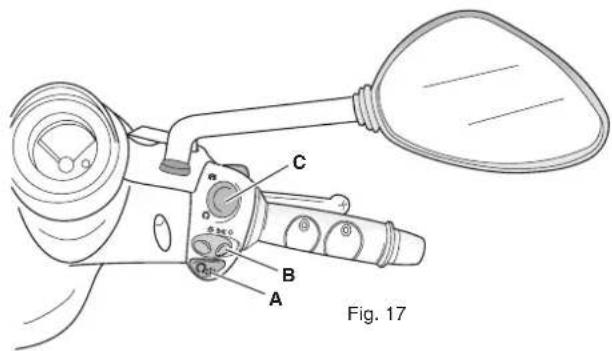
text_image
C B A Fig. 17

Malagmi

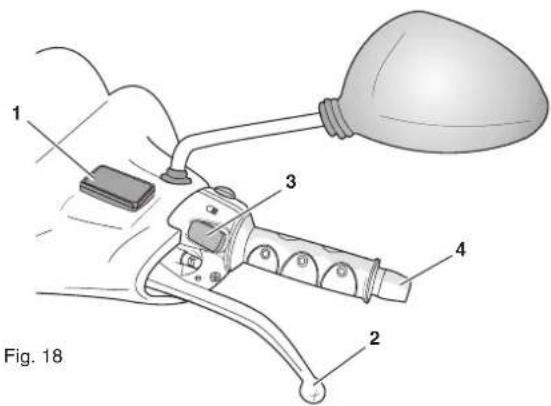
2.9 HANDLEBAR CONTROLS Left handlebar
1) Rear brake oil tank
2) Rear brake lever
3) High beam 'flash' button (passing)
4) Counterweight
5) Tom button
6) Direction indicator switch
7) Light selector:

high beam

low beam
text_image
Fig. 18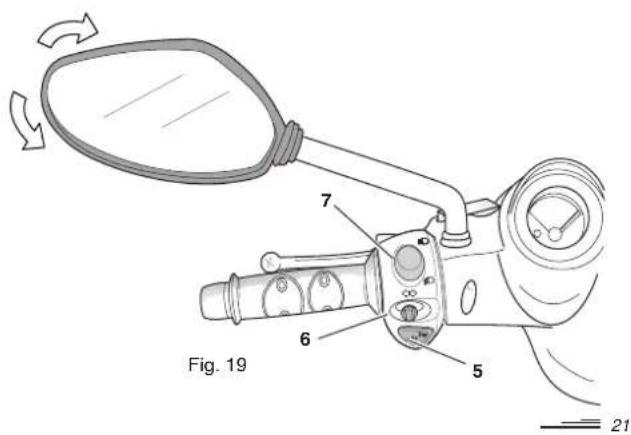
text_image
Fig. 19 7 6 5 21

Malaguti IDE IN MOTO
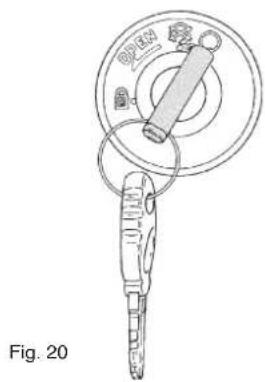
2.10 SWITCH WITH KEY
- This switch (Fig. 20) controls the starting circuit and handlebar lock.


ignition disabled (the key can be removed).
'ready to start' position (the key cannot be removed).
handlebar lock activated (ignition is disabled. The key can be removed).
NOTE: the vehicle is supplied with two keys.
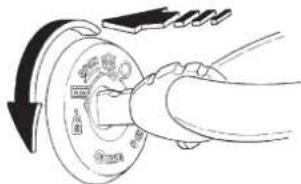
2.11 HANDLEBAR LOCK
Insertion
With the handlebar turned to the left, insert the key completely and then turn it anti-clockwise (Fig. 21).
Disengaging
Turn the key clockwise.

natural_image
Line drawing of a key with a circular head and handle, labeled Fig. 20 (no text or symbols on the main diagram)Fig. 21
text_image
Diagram showing a hand operating a car tire with labeled parts and a circular arrow indicating clockwise motion.
Malagmi IDIE IN MOTO

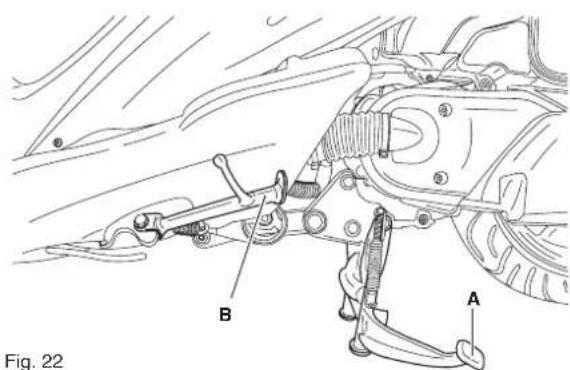
2.12 STANDS
2.12.1 CENTRE STAND
- The centre stand position is not electronically controlled; therefore you can turn the engine on while the vehicle is parked. To place the scooter on the stand, push pin A and raise the vehicle using the grab rail on the rear side of the saddle.
2.12.2 SIDE STAND
- It is on the left side of the vehicle (B - Fig. 22); it is controlled by a microswitch that does not allow the engine to be started if the stand is not properly closed.
Do not remove nor tamper with this safety device.
WARNING: in any case, visually check that the stand is closed and its respective retaining spring is in good working order before starting to ride.

- We advise you to regularly check the retaining system of both stands. This system is composed of tension springs.

• Always make sure that both stands are on firm and level ground. Soft soil, gravel, as well as asphalt which has softened due to heat, etc. may cause the parked motorcycle to fall.
NOTE Do not sit on the scooter while it is resting on one of the two stands.
text_image
Fig. 22 A B


Malagmi IDEE IN MOTO
NOTES:


3 OPERATING INSTRUCTIONS
SUGGESTIONS
The owner is personally responsible for the condition of his vehicle. The scooter's main functions can be rapidly damaged, even if the vehicle garaged (for example, if it is exposed to bad weather). Any damage, leakage or loss of tyre pressure can entail serious consequences. Therefore, it is important to carefully check the vehicle's main components before using it.
WARNING!
AFTER A LONG RIDE AT A HIGH RPM, WHEN YOU STOP THE VEHICLE
DO NOT IMMEDIATELY TURN THE ENGINE OFF UT LET IT RUN IDLE FOR ABOUT 30 SECONDS.
3.1 RUNNING-IN
Good running-in is essential to ensure the long life of the engine components, transmission and all the moving parts and guarantees perfect operation over the years.
During the first 1000 km (625 miles):
- avoid riding flat out and keeping a steady speed for long runs;
- do not use the vehicle over 80% of the top speed.
After the first 1000 km, increase speed progressively up to the top performances.

Note: both during and after running-in, use only UNLEADED PETROL.
3.2 CHECKS BEFORE USE
ELEMENTS CHECKS
Fuel Appropriate quantity.
Transmission and Level within limits specified. engine oil Check the presence of possible leaks.
Tyres Pressure/wear/damages.
Nuts, screws, bolts Correct tightening.
Steering Free movement from one end to the other.
Front/Rear brakes Working properly and not worn; if necessary adjust or replace.
Throttle Operation should be smooth, if necessary lubricate or adjust.
Lights and Indicators Proper working conditions.
Coolant Presence of coolant or possible leaks.

NOTE: checking takes just a few minutes, but your safety and that of other people is extremely important. If you do not have time or prefer to make closer checks, apart from the essential maintenance checks listed in section 4 of this manual, please contact an Authorised Malaguti Service Centre.


Malagmi IOBS IN MOTO
3.3 ELECTRIC STARTING
- Place the scooter on the centre stand (see section 2.12.1).
- Insert the ignition key in the switch and turn it to position
- Make sure that the engine emergency stop switch, on the right hand control, is in position and that the side stand is in rest position.
- Make sure the lights are off.
- Pull one of the two brake levers (preferably the rear one).
- Press the starter button.
- Release the starter button as soon as the engine starts.
- Relese the stand and sit on the saddle.

IMPORTANT! In order to ensure a maximum battery life, we recommend you to turn the engine on with the lights switched off.

3.4 COLD STARTING
- This vehicle's engine features an automatic electrical starter device, which will maintain the engine revved up for the first few minutes of use (only for cold starting).
• To guarantee a long service life of the engine, do not rev up when the engine is cold.

Before using the vehicle after a few days of inactivity, act on the throttle grip; if the engine does not start, wait a few seconds before repeating the operation. Attempts to start the engine should never last long longer than 10 seconds, otherwise the battery could run flat.
3.5 STARTING
- Warm the engine up for a few seconds before setting off.
• Disengage the centre stand. - Get onto the vehicle keeping the rear brake lever pulled and, with both hands on the handlebars, release the brake and then turn the twist grip throttle control gently
- Check that the rear-view mirrors are correctly positioned.
- Look out for oncoming traffic, switch on the indicator light and move off.

Do not accelerate while pulling the brakes.
3.6 BRAKING
- Close the twist grip throttle control and pull the two brake levers gently to balance the power on both levers, so as to avoid dangerous skidding.
3.7 ENGINE STOPPING
- After a long ride, we advise you to let the engine run Idle for a few seconds before turning the key to "

Malagmi IDIE IN MOTO

3.8 RIDING SUGGESTIONS
- Do not keep the engine running too long when the vehicle is parked.
- Do not start nor keep the engine running in closed or insufficiently ventilated areas; exhaust gases are highly toxic.
- Do not start abruptly.
- Do not attempt wheelies or zigzags.
- Do not turn the twist grip throttle control too roughly.
- To avoid damaging the starter, do not press the starter button while the engine is running.
- Make sure the engine is sufficiently warmed before riding. To do so, let the engine run at idle speed.
- On rough roads, uneven, wet and slippery ground, etc., use the brakes gently, if the 'engine brake' action proves to be insufficient to slow down the scooter.
• After long journeys, never park on dry grass.

If you stop on a slope, use the brake to keep the vehicle still and let the engine run idle. Never use the engine to keep the vehicle still as this could overheat the clutch and wear the friction material.
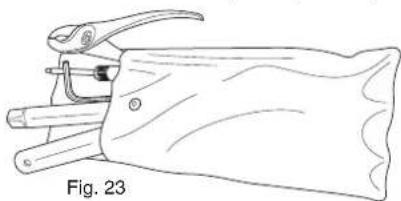
3.9 STANDARD EQUIPMENT
The vehicle is equipped with a tool bag placed in the central glove compartment in which you can find the following tools (fig. 23):
- Spark plug spanner (+ extension) • Screwdriver • Pliers
- Shock absorber wrench • Allen wrench, size 5, "L"-shaped.
natural_image
Line drawing of a pliers tool gripping a textured fabric item (no text or symbols)3.10 TROUBLE-SHOOTING
- If the scooter does not run regularly, it is necessary to carry out the checks and operations listed in their respective sections of this manual.
- If the problem persists, contact an Authorised Malaguti Service Centre, which has the required equipment and experience for any kind of adjustment and repair.
NOTE: we advise you to record any operating troubles you may have encountered on page 50 'Notes', so as to report what exactly happened to the technician of your Authorised Malaguti Service Centre.
FAULTY BRAKE SYSTEM
The scooter does not brake or the brake lever travel is too long.
- For both hydraulic brakes, check the oil level in the brake pump chamber, situated on the handlebar, and if necessary, have them serviced by an Authorised Malaguti Service Centre.
- Have the thickness of the brakes pads checked every 2000 km (1250 mi) by an Authorised Malaguti Service Centre.
THE ENGINE DOES NOT START
1) Brake lever not pulled:
• pull one of the two brake levers.
2) Key switch in the wrong position:
- insert the key and turn it clockwise
3) Make sure that: the engine stop switch on the right side of the handlebar is not activated or that the side stand is not in rest position.
4) Carburettor body, jet or tap clogged:
- contact an Authorised Malaguti Service Centre.

27

5) Flooded engine:
- turn the twist grip throttle control, make repeated attempts to turn the engine on; or remove the spark plug and wipe it dry before turning the engine on.
- If this problem persists, contact anAuthorised Malaguti Service Centre.
6) Clogged or dirty air filter:
- contact an Authorised Malaguti Service Centre.
7) Ignition failure (if the high-voltage cable is powered):
- clean and adjust the spark plug, or replace it
8) Ignition failure (if the high-voltage cable is not powered): - contact an Authorised Malaguti Service Centre for the repair of fly-wheel circuits of ignition magneto or high-voltage coil.
9) The starter motor runs idle:
- the battery is flat or partially run down - contact arAuthorised Malaguti Service Centre .


3.11 CLEANING SUGGESTIONS
To keep each part of your vehicle in perfect working order, we advise you to clean the vehicle properly:
- Before cleaning, protect the exhaust pipe and make sure that the spark plug and the petrol and oil tank caps are properly closed.
- Do not use chemical products, which may spoil the vehicle paintwork, plastic and rubber components, etc.
- An excessive water pressure while cleaning the scooter may damage its mechanical and electrical components, especially those on the front side of the vehicle (handlebar, front panel, dashboard, headlamps, etc.). Avoid high pressure washing, e.g. with cleaning machines.
- For correct cleaning of the windscreen, use a soft, clean cloth or a sponge soaked with neutral detergent.
- While cleaning the vehicle, make sure that the radiator's cooling surface, situated at the back of the front wheel, is not clogged by mud, paper, leaves, etc. In the presence of dirt, clean with a jet of water or air at moderate pressure.
3.12 GARAGING
To keep the vehicle in good conditions during a long out-of-service period, remember to:
- Remove the spark plug and put a spoonful of oil, of the type used for the engine, inside the head. Then refit the spark plug.
- Press the starter button a few times so as to allow the oil poured in to lubricate the parts subject to heat.
• Lubricate the control cables. - Cover all metal surfaces with a coat of oil (but not on rubber or plastic parts).
- Remove the battery and recharge it.
- Store the vehicle in a dry place.
4 SCHEDULED MAINTENANCE
4.1 MAINTENANCE
WARNINGS
It is compulsory to carry out the Scheduled Maintenance operations, at the deadlines indicated in the table at page 30/31 of this Manual, in order not only to ensure both your safety and that of other people but also the good working order of the vehicle.
If these operations are not carried out, vehicle operation may be affected, involving other consequences, including the INVALIDITATION OF THE WARRANTY.
Refer to the “Warranty and Service Booklet” for information about the terms of application of the warranty.
EN
For any operational trouble, we advise you not to wait until the kilometres required for the next servicing are reached, but immediately contact an Authorised Malaguti Service Centre to solve this trouble.
Before starting any interventions on the vehicle, stop the engine, remove the key and wait for the engine, the exhaust and the cooling system to be completely cold so as to avoid burns.
During maintenance operations always wear protective gloves and goggles and make sure the heated parts of the vehicle are cold so as to avoid burns.
250 cc version
THE FIRST CHECK COUPON must be carried out at 1000 km (624 miles), the following ones every 6000 km (3750 miles).
125 cc version
THE FIRST CHECK COUPON must be carried out at 1000 km (624 miles), the following ones every 3000 km (1870 miles).

Version 250 cc. MAINTENANCE TABLE: CHECK COUPONS (☐) = check △= replacement
| CHECKS AND REPLACEMENTOPERATIONS | FIRST1000 km(312624m) | 3000 km(1860 mi)or 8 months | 2 B 46000 km(3720 mi)or 12 months | 9000 km(5580 mi)or 18 months | 12000 km(7440 mi)or 24 months | 15000 km(9300 mi) | 18000 km(11160mi) | 21000 km(13020m) | 24000 km(14880mi) | 27000 km(16740mi) | 30000 km(18600mi) | |
| Spark plug cleaning and/or replacement | ● | △ | ● | ●/△ | ● | |||||||
| Engine oil replacement and oil filter cleaning/replacement (4-stroke engines) | * | ● | ● | △ | ● | △ | ● | △ | ● | △ | ● | △ |
| Intake air filter cleaning and/or replacement | * | ● | ●/△ | △ | ●/△ | △ | ●/△ | |||||
| Transmission air filter cleaning and/or replacement | * | ● | ● | ●/△ | ● | △ | ● | ●/△ | ● | △ | ● | ●/△ |
| Clean: Secondary air filter for 'euro2' versions (external/internal) | * | △ every 2 years or 12000 km (7440 mi) | ||||||||||
| Valve timing (4-stroke engines) | * | ● | ● | ● | ● | ● | ||||||
| Carburettor and idling check and tuning up | * | ● | ● | ● | ● | ● | ● | |||||
| Final transmission oil replacement | * | △ | ● | ● | ●/△ | ● | △ | ● | ||||
| Check the condition and charge level of the battery | ● | ● | ● | ● | ● | ● | ● | ● | ● | ● | ● | |
| V-belt wear check | * | ● | △ | ● | △ | ● | ||||||
| Clutch shoes and discs check | * | ● | ● | ● | ● | ● | ||||||
| Speed variator rollers check | * | ● | ● | ● | ● | ● | ||||||
| Speed variator pulleys | * | ● | ● | ● | ● | ● | ||||||
| Tightness of braking pipes - fuel pipe check | * | ● | ● | ● | ● | ● | ● | |||||
| Pad and disc wear check | * | ● | ● every 2000 km (1250 mi) | |||||||||
| Coolant level check (replace every 2 years) - Manifold sealing check | ● | ● | ● | ● | ● | ● | ● | ● | ● | ● | ● | |
| Brake fluid replacement (every 2 years) | * | △ every 2 years or 12000 km (7440 mi) | ||||||||||
| Wheel bearing check | * | ● | ● | ● | ● | ● | ● | |||||
| Rear swinging arm check | * | ● | ● | ● | ● | ● | ● | |||||
| Steering bearings play and working check (lubrication if needed) | * | ● | ● | ● | ● | ● | ● | |||||
| Front fork and shock absorbers working and sealing check | * | ● | ● | ● | ● | ● | ● | |||||
| Nuts, bolts, screws tightening check | * | ● | ● | ● | ● | ● | ● | |||||
| Main and side stand tightening check - Pin lubrication | * | ● | ● | ● | ● | ● | ● | |||||
| Side stand switch check and lubrication | ● | ● | ● | ● | ● | ● | ● | ● | ● | ● | ● | |
| Tyre pressure and tread wear check | ● | ● | ● | ● | ● | ● | ● | ● | ● | ● | ● | |
| Final check: tyres, air pressure, lighting, warning devices,switch functions, road test | * | ● | ● | ● | ● | ● | ● | |||||
Maintenance interventions must be carried out more frequently if the vehicle is used in rainy or dusty areas or on rough roads.
NOTE: due to their simplicity, checks with no asterisk CAN also be carried out by technicians not authorised by Malaguti, but under their direct responsibility.

Malagmi IDES IN MOTO
Version 125cc. MAINTENANCE TABLE: CHECK COUPONS (☐) = check △ = replacement
| CHECKS AND REPLACEMENTOPERATIONS | 1FIRST1000 km(624 mi) | 24000 km(2460 mi)or 6 months | □7000 km(4340 mi)or 12 months | □10000 km(8200 mi)or 18 months | □13000 km(8360 mi)or 24 months | □16000 km(9920 mi) | □19000 km(11780mi) | □22000 km(13640mi) | □25000 km(15500mi) | R33128000 km(17360mi) | 98.7531000 km(19220mi) | |
| Spark plug cleaning and/or replacement | ● | △ | ● | △ | ● | △ | ● | △ | ● | △ | ||
| Engine oil replacement and oil filter cleaning/replacement (4-stroke engines) | * | △ | △ | △ | △ | △ | △ | △ | △ | △ | △ | △ |
| Intake air filter cleaning and/or replacement | * | ● | ● | △ | ● | △ | ● | △ | ● | △ | ● | ●/△ |
| Transmission air filter cleaning and/or replacement | * | ● | ● | △ | ● | △ | ● | △ | ● | △ | ● | ●/△ |
| Clean: Secondary air filter for 'euro2' versions (external/internal) | * | △ every 2 years or 12000 km (7440 mi) | ||||||||||
| Valve timing (4-stroke engines) | * | ● | ● | ● | ● | ● | ||||||
| Carburettor and idling check and tuning up | * | ● | ● | ● | ● | ● | ● | |||||
| Final transmission oil replacement | * | △ | ● | ● | △ | ● | ● | △ | ● | ● | △ | ● |
| Battery charge, electrolyte fluid level (if needed) and breather pipe check | ● | ● every month | ||||||||||
| V-belt wear check | * | ● | ●/△ | △ | ● | ●/△ | △ | ● | ●/△ | △ | ● | |
| Clutch shoes and discs check | * | ● | ● | ● | ● | ● | ||||||
| Speed variator rollers check | * | ● | ● | ● | ● | ● | ||||||
| Speed variator pulleys | * | ● | ● | ● | ● | ● | ||||||
| Tightness of braking pipes - fuel pipe check | * | ● | ● | ● | ● | ● | ● | |||||
| Brake pads and discs wear check | * | ● | ● every 2000 km (1250 mi) | |||||||||
| Coolant level check (replace every 2 years) - Manifold sealing check | ● | ● | ● | ● | ● | ● | ● | ● | ● | ● | ● | |
| Brake fluid replacement (every 2 years) | * | △ every 2 years or 12000 km (7440 mi) | ||||||||||
| Wheel bearings check | * | ● | ● | ● | ● | ● | ● | |||||
| Rear swinging arm check | * | ● | ● | ● | ● | ● | ● | |||||
| Steering bearings play and working check (lubrication if needed) | * | ● | ● | ● | ● | ● | ● | |||||
| Front fork and shock absorbers working and sealing check | * | ● | ● | ● | ● | ● | ● | |||||
| Nuts, bolts, screws tightening check | * | ● | ● | ● | ● | ● | ● | |||||
| Main and side stand tightening check - Pin lubrication | * | ● | ● | ● | ● | ● | ● | |||||
| Side stand switch check and lubrication | ● | ● | ● | ● | ● | ● | ● | ● | ● | ● | ● | |
| Tyre pressure and tread wear check | ● | ● | ● | ● | ● | ● | ● | ● | ● | ● | ● | |
| Final check: tyres, air pressure, lighting, waming devices,switch functions, road test | * | ● | ● | ● | ● | ● | ● | |||||
Maintenance interventions must be carried out more frequently if the vehicle is used in rainy or dusty areas or on rough roads.
NOTE: due to their simplicity, checks with no asterisk CAN also be carried out by technicians not authorised by Malaguti, but under their direct responsibility.


Malagmi IDEE IN MOTO
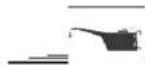
4.2 TRANSMISSION OIL (Version 250cc.)
Check the level every 6,000 km (3720 mi) or 12 months
1) Place the scooter on a level surface on its centre stand.
2) Unscrew the oil rod (A - Fig. 24), clean it and screw it tight.
3) Pull it out again and check that the oil level is between the MIN and MAX notches.
4) If the level is insufficient, top up until you reach almost the MAX notch.
5) Fill the oil sump with Q8 T35 - 80W oil. Oil sump capacity: 250cc.
Renew after the first 1,000 km (624mi) and every 24,000 km (14880mi)

- Carry out the operations described above at points 1-2, then place a collecting tank under the engine cover and unscrew the drain plug (B – Fig. 25) being careful not to damage the gasket.
- Let the oil drain for some minutes into the collecting tank (be careful not to get burnt).
- Refit the drain plug with gasket and fill with 250cc of new oil (Q8 T35 - 80 W), then insert the oil tank filler cap together with the oil rod (A – Fig. 24).
If need be, replace the gasket.
NOTE Regularly check for oil leakages near the drain plug at the rear wheel. If you find some, immediately contact an Authorised Malaguti Service Centre.
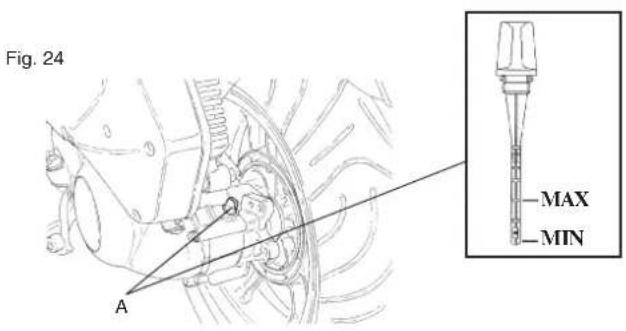
text_image
Fig. 24 A MAX MIN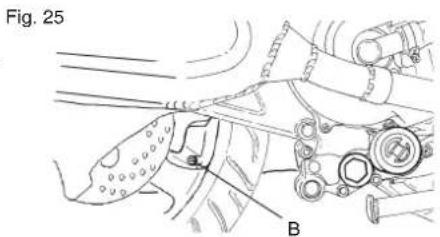
text_image
Fig. 25 BPrevent foreign substances from entering the transmission case while checking or changing the oil. Do not spill it on the tyre or on the wheel.
Never let the vehicle's hub run without correct lubrication or with contaminated or improper lubricants. Moving parts can wear out and cause serious damage.

Malagami LIDELIN MOLD
TRANSMISSION OIL (Version 125cc.)
Check the level
every 3,000 km or 6 months
1) Put the Scooter on the stand.
2) Place a tray under the engine casing.
3) Remove the oil filler cap (A - Fig. 24a) and the oil drain plug (B - Fig. 25a).
4) After draining the oil, refit the drain plug. Tighten it as follows: Torque: 22 Nm / 2.2 kgm.
5) If the oil previously removed is still of good quality, use it to fill the crankcase (140cc.), otherwise replace it.
- Recommended oil: Q8 T35 - 80W
- Capacity: 140 cc.
Replace oil after the first 1,000 km and every 9,000 km
- Carry out the above operations (Points Nos.1, 2, and 3) then let the oil drain into a pan large enough to contain the used oil (take care not to burn yourself).
- Refit the drain plug and fill with 140cc. of new oil (Q8T 35 - 80 W), then close the oil filler cap.

Prevent foreign substances from entering the transmission case while checking or changing the oil. Do not spill it on the tyre or on the wheel.

Never let the vehicle's hub run without correct lubrication or with contaminated or improper lubricants. Moving parts can wear out and cause serious damage.
natural_image
Technical line drawing of a car suspension system with labeled component A (no text or symbols beyond label)Fig. 24a
text_image
BFig. 25a
4.3 ENGINE OIL (Version 250cc.)
Check the oil level every 3,000 km (1860 mi) or 6 months
- Place the scooter on a level surface on its centre stand. Start the engine and wait until it reaches running temperature.
- Turn the engine off and wait for about 5 or 10 minutes, in order to let the oil drain into the oil sump.
- Remove the cap and dipstick (A-Fig.26) from the engine cover and clean it. Refit it and screw firmly down.
- Remove the cap with measuring rod again, and check that the oil level is included between the min. and max. notches, as shown in fig. 26.
- If the level is insufficient, top up with oil
• After topping up, screw the cap back on again.
• Total tank capacity: 1,000 cc. - Recommended type of oil: Q8 CLASS 10W 40 / SBK RACING 15W 50
- Should you check the oil level while the engine is warm, wait for a few minutes in order to allow the engine to cool down.


Malagmi IDES IN MOTO
text_image
Max Min AFig. 26
NOTE
- When checking the oil level, make sure the vehicle is upright. A slight tilting may alter the values.
- Filling to level, i.e. between the MIN. and MAX. level marks, means using around 400 cc of oil.
- Before topping up, check the oil level. Never fill to a level above the MAX. mark.


Malagati LOES IN MOTOR

Change the engine oil and the oil filter cartridge every 6,000 km (3720 mi) or 12 months
- Warm the engine up for a few minutes, since the oil change must be carried out while the engine is warm.
- Turn the engine off. Put an oil collecting pan under the engine cover, in correspondence with the cap (A – fig. 27).
- Remove the filler cap and the dipstick, (A - fig. 26) and then drain the oil.
- Clean the internal mesh by means of compressed air.
- Check the cap's O-Ring conditions. Replace if necessary.
- Remove the cartridge oil filter with relevant O-Ring (B-fig.27) and replace it.
- Before fitting the new cartridge filter, lubricate the relevant O-Ring, and then tighten by hand.
- Reassemble the mesh and the oil filter cap with O-Ring.
- Top up the engine with oil and refit the filler cap with dipstick by tightening it completely.
- Turn the engine on in order to fit the new filter cartridge and the lubrication system. Turn the engine off and, after about 5 minutes, check the oil level and, if necessary, top up until it reaches the MAX notch
NOTE: the oil cartridge filter must be replaced every time oil is replaced, along with its gasket.

Every 3,000 km the message OIL is displayed on the digital dashboard. This warning light indicates that it is time to change the engine oil.
This warning light is displayed on the dashboard until the above-mentioned operation is carried out by an Authorised Malaguti Service Centre.
natural_image
Technical line drawing of a mechanical assembly with labeled parts A and B (no text or symbols beyond labels)Fig. 27

Used oil is toxic for the environment, therefore we suggest you contact an Authorised Malaguti Service Centre for oil disposal according to the rules in force.
EN
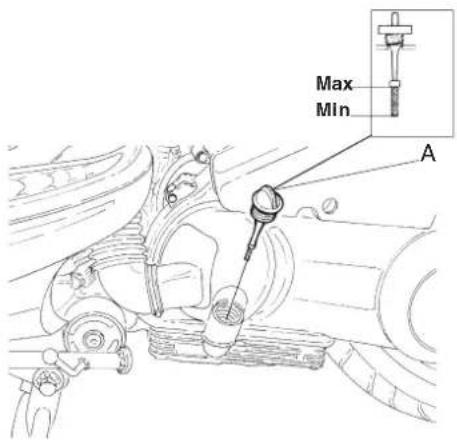
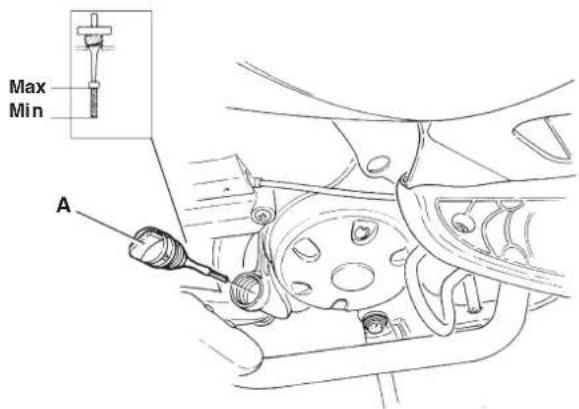
ENGINE OIL (Version 125cc.)
Check the oil level every 1,000 km (930 mi) or 3 months
- Place the Scooter on the central stand and warm up the engine.
- Switch off the engine and wait a few minutes so that the oil level can settle before checking.
- Unscrew and remove the dipstick (A - Fig. 26).
- Clean the dipstick and re-insert it in its seat without tightening it. This allows you to check the oil level.
- The level has to be between the MIN. and MAX. notches on the dipstick (Fig. 26). If the level is low, top-up with oil.
- Re-insert the dipstick and screw it into its seat.
• Max. oil quantity: 1400cc. - Oil quantity for periodical change: max 1300cc.
• Recommended oil: Q8 CLASS 10W-40.


Malagmi IOSS IN MOTO
text_image
Max Min AFig. 26a
Note: when you check the oil level, make sure that the vehicle is upright. A slight lateral tilting may cause an incorrect value to be indicated.


Malagati
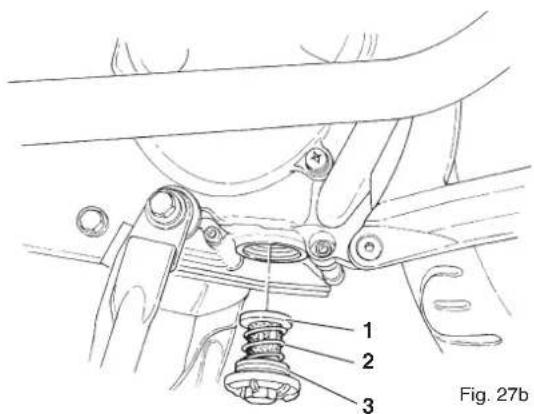
Changing the oil and cleaning the oil filtering net after the first 1,000 Km and every 3,000 Km
• Warm up the engine for some minutes.
- Stop the engine. Place an oil collecting pan under the engine.
- Remove the drain plug and let the oil drain out (1 - Fig. 27a).
- Clean the oil filtering net (1 - Fig. 27b) with a solvent.
- Check the O-ring, (3 - Fig. 27b), and replace it, if worn out.
- Reinstall the O-ring, the compression spring (2 - Fig. 27b), the oil filtering net, and the drain plug.
Note: make sure that the O-ring is positioned correctly.
- Tighten the drain plug applying the following
torque: 32 Nm / 3.2 kgm - Fill the engine with oil and re-insert the dipstick.
- Start the engine and warm it up, then check if there is any leakage. If so, stop the engine, trace the fault, and correct.

Every 3,000 km, the message OIL is displayed on the digital dashboard. This warning light indicates that it is time to change the engine oil.
This warning light is displayed on the dashboard until the above-mentioned operation is carried out by Malaguti Authorised Service Centre.

Used oil is toxic for the environment, therefore we suggest you contact a Malaguti Authorised Service Centre for oil disposal according to the rules in force.

natural_image
Technical line drawing of a mechanical assembly with no visible text or symbolsFig. 27a
text_image
1 2 3 Fig. 27b

Malagmi IOSSIN MOTO
- This (visual) check shall be carried out by means of the sight glasses (S): A – Fig. 28 (front brake) and B – Fig. 29 (rear brake), when the scooter is on a level ground and perfectly upright.
- The level is correct when the oil is 3 mm above the bottom mark of the sight glass.
- Topping up shall be carried out by removing the covers (A-B), after unloosening the two fastening screws. We advise you to use Q8 BRAKE FLUID DOT 4 oil.
text_image
S MIN AFig. 28

Hydraulic oil is corrosive and can cause damages and injuries. Do not mix different types of oil. Check the perfect seal of the gaskets.

Replace every 2 years or 12,000 km (7440 mi)
- If the fluid contains dirt or water, it must be replaced.
- A spongy feeling in the brake lever can indicate the presence of air in the circuit. Have the vehicle checked by an Authorised Malaguti Service Centre.
Note: to ensure long life and efficiency for your scooter, we advise you to have these operations performed by an Authorised Malaguti Service Centre.
text_image
Diagram of a bicycle steering wheel with labeled parts B and S, showing mirror and handle mechanismFig. 29

Malaguti IDES IN MOTO

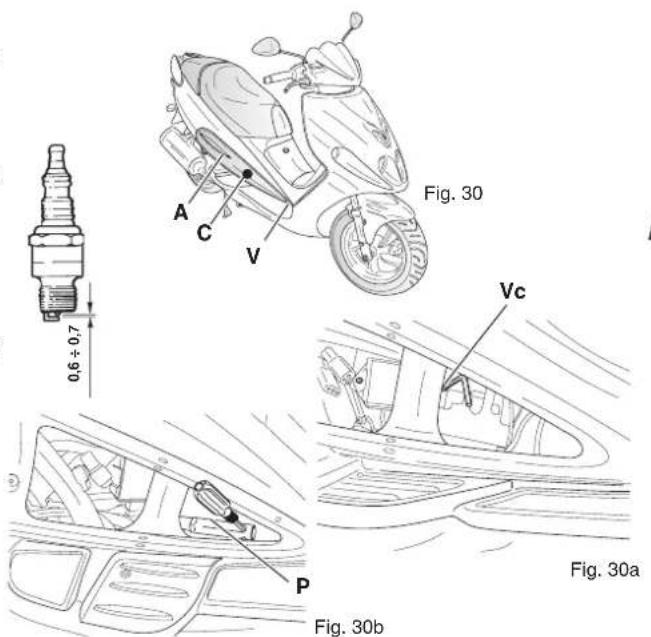
4.5 SPARK PLUG
Recommended types of spark plug:
250cc - CHAMPION RG4HC - NGK CR7EB - NGK CR8EB
Check every 6,000 km. Replace every 12,000 km.
125cc - NGK CR8E
Check every 3,000 km. Replace every 6,000 km.
• Taking good care of the spark plug is essential for perfect engine perfect.
- For maintenance (plug on right hand side C - fig. 30), loosen the screw (V - fig. 30) fastening the insert (A - fig. 30) to the right hand side; release the control unit, by loosening the two setscrews (Vc - fig. 30a), using the special wrench you will find in the tool box, and pull it outwards; gently remove the spark plug cap by performing small turns rightwards and leftwards; you may now remove the spark plug using the wrench and extension supplied (P - fig. 30b). Being careful to avoid burnings if the engine or the exhaust pipe are hot.
- Examine the spark plug conditions while the engine is warm, since the sediments and the colour of the insulator can reveal the heat degree of the spark plug, the carburetion, lubrication and general conditions of the engine. If the insulator is light brown around the central electrode, it indicates a good working order.
Do not diagnose the possible cause, but leave this task to an Authorised Malaguti Service Centre.
- After disassembling the spark plug, suitably clean the electrodes and the insulator by means of a metal brush. Adjust the electrode gap using a filler gauge: the gap should range from 0.6 to 0.7 mm.
- Blow on it so as to prevent possible residues from entering the engine, then reassemble it by hand. Using the special spark plug spanner, moderately tighten it.
- Refit the cap and relevant control unit, taking care not to crush the cables.
Note: spark plugs with a heat degree differing from the recommended one may seriously damage the engine.

Any spark plug showing cracks on the insulator or corroded electrodes must be replaced.
text_image
Fig. 30 A C V 0,6 ÷ 0,7 Vc P Fig. 30a Fig. 30b


Malagmi IOSSIN MOTO
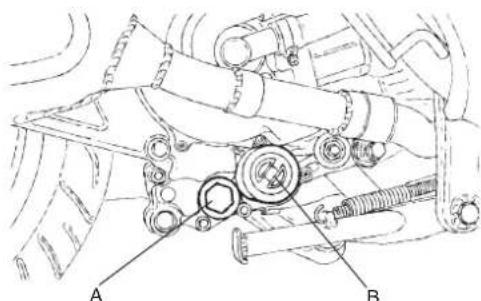
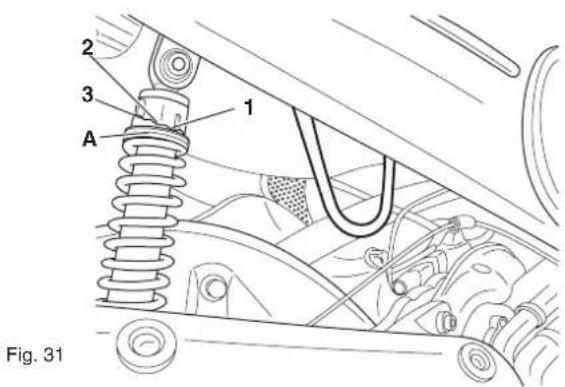
4.6 REAR SHOCK ABSORBER ADJUSTMENT
- The rear shock absorbers can be adjusted on the preloading of the spring, through which it is possible to adapt the scooter's behaviour according to the load, driving conditions and type of road.
- The adjustment is carried out using the special spanner fitted to the ring nut (A – fig. 31). If you turn it clockwise, the spring's force will be increased.
Note: there are three adjustment positions:
1) 'STD' – rider only – minimum load – uneven roads
2) 'Medium' – with passenger; variable load – various road conditions
3) 'Hard' – with passenger – maximum loads


Adjust both shock absorbers according to the same adjustment index. An unbalanced adjustment may compromise the vehicle's stability.
text_image
2 3 1 A Fig. 31
Malagati
4.7 TABLE OF LUBRICANTS
The life of the vehicle also depends on how it is lubricated.
| LUBRICANTS | LUBRICANT TYPE |
| ENGINE OIL (4-STROKE TYPE) Q8 CLASS SAE 10W 40 / SBK RACING 15W 50 | |
| ENGINE TRANSMISSION OIL Q8 T35 - 80W | |
| AIR FILTER LUBRICANT Q8 AIR FILTER OIL | |
| WATER COOLER FLUID Q8 TOP FLUID | |
| BRAKE CIRCUIT FLUID Q8 BRAKE FLUID DOT 4 | |
| FORK ROD OIL Q8 FORK OIL | |
EN
- Viscosity:
The engine oil degree of viscosity has to be considered on the basis of the weather conditions in the area where the scooter will be used.
The following is a guide for the selection of the correct oil degree and viscosity to be used, according to the different weather conditions.
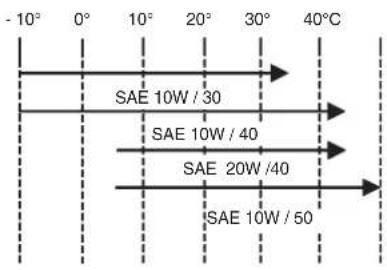
text_image
- 10° 0° 10° 20° 30° 40°C SAE 10W / 30 SAE 10W / 40 SAE 20W / 40 SAE 10W / 50

Malagmi IDEE IN MOTO
NOTES:

5 UNSCHEDULED MAINTENANCE
5.1 ADJUSTMENT OF IDLING SPEED
- Carburettor adjustment must be carried out whenever the engine idling speed is irregular.
- For a proper check start the engine and let it warm up until it reaches its standard operating temperature then let it run idle and check the rpm.
- Open and close the twist grip throttle control to check if the idling speed is steady.
- For further adjustments, please contact an Authorised Malaguti Service Centre.
5.2 THROTTLE CLEARANCE ADJUSTMENT
- Check that the twist grip throttle control idle stroke is 1-3mm (measured on the twist grip throttle control end). Any adjustments must be carried out by an Authorised Malaguti Service Centre.
- Maintenance of brake levers is limited to a check on the brake fluid level (see section 4.4 – page 38).
- A spongy feeling in the brack lever can indicate the presence of air in the hydraulic circuit. If there is air in the circuit, have an Authorised Malaguti Service Centre check and bleed the system.
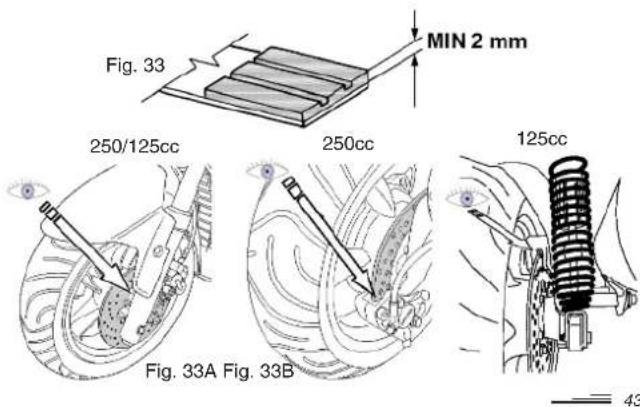
5.4 BRAKE (FRONT/REAR) PADS AND ROTORS CHECK (checking for wear)
· We recommend that you have the front/rear pads and rotors checked by an Authorised Malaguti Service Centre every 2,000 km.
- The minimum thickness of the brake lining shall not be less than 2 mm (Fig. 33). To check thickness of brake pads, see fig. 33A and 33B.
- If the thickness of the pads is close to the lowest permitted limit or if the pads are damaged, have them replaced immediately.
- It is absolutely necessary to replace the rotors and the worn pads as soon as possible. Entrust this operation to an Authorised Malaguti Service Centre.
text_image
Fig. 33 MIN 2 mm 250/125cc 250cc 125cc Fig. 33A Fig. 33B 43

Malagmi IDEE IN MOTO
5.5 COOLANT
- The coolant expansion tank is located on the front side of the vehicle under the left hand cover (section 1.5 page 8).
- Check the coolant level in the tank when the engine is cool, in order to avoid possible burnings. NEVER REMOVE THE TANK CAP WHILE THE ENGINE IS WARM.
- The coolant level is sufficient if it is between the MIN. and MAX. notches marked on the tank.
- If it is lower that the MIN. notch, top up until you reach the MAX. notch.
- We advise you to use Q8 TOP FLUID coolant.
NOTE: the cooling circuit is supplied with an electric fan, actuated by a thermistor, which automatically cools the fluid inside the radiator if temperature rises too much. The electric fan is protected by a 7.5A fuse located in the front glove compartment (see section 6.7) and is only powered when the key is turned to its "ON" position.

Before using the vehicle, check that the cooling surface of the radiator, located behind the front wheel, is not clogged by leaves, paper, mud, etc.
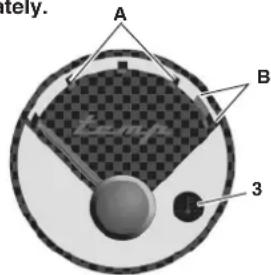
Fluid temperature indicator
Operating temperature is indicated by the special indicator (Fig. 34) which is located in the dashboard. If the indicating pointer is steadily positioned in zone A, temperature is normal.
If the red water temperature warning light (3) comes on (indicator on the red notches, B), stop the vehicle immediately. Allow the engine to cool down and perform the following checks:
- Check that there are no objects clogging the cooling surface of the water cooler located behind the front wheel (eliminate them);
- Check for leakages inside the circuit with subsequent leak of fluid (check oil level, top up);
- Make sure that the fan fuse is in good condition (if not, replace it).
For any trouble inside the cooling circuit we advise you to contact an Authorised Malaguti Service Centre for a thorough check as soon as possible, even if the cause of the trouble has already been removed.

If temperature is not displayed and the red warning light is flashing, the temperature sensor or cables are not in working order. Contact an Authorised Malaguti Service Centre immediately.
text_image
A B 3Fig. 34

ELECTRICAL EQUIPMENT
INTRODUCTION
In most cases, it is no longer possible to replace lamp bulbs without previously disassembling some scooter components. To do this, special know-how and appropriate tools are required. Therefore, we recommend having bulbs replaced by an Authorised Malaguti Service Centre.
6.1 HEADLIGHT
- The front headlight features two lights: the low beam (A - fig. 35) and the high beam (A1 - fig. 35). To select the low or high beam, first turn the right-hand light switch to position - and then press the left-hand light button.
- Low beam headlight (Pos. A – Fig. 35)
Halogen lamp, 12V – 65W HB3
• High beam headlight (Pos. A1 – Fig. 35) Halogen lamp, 12V – 55W H3 - Two parking lights (Pos. B – Fig. 35) Lamp, 12V – 3W
- The parking light is switched on when the right-hand light switch is in the central position DO. The parking light is located in the section of the light, which is not used either for the low beam or high beam.
Note: we advise you to check if the replaced bulb works properly before refitting the headlight unit definitively.
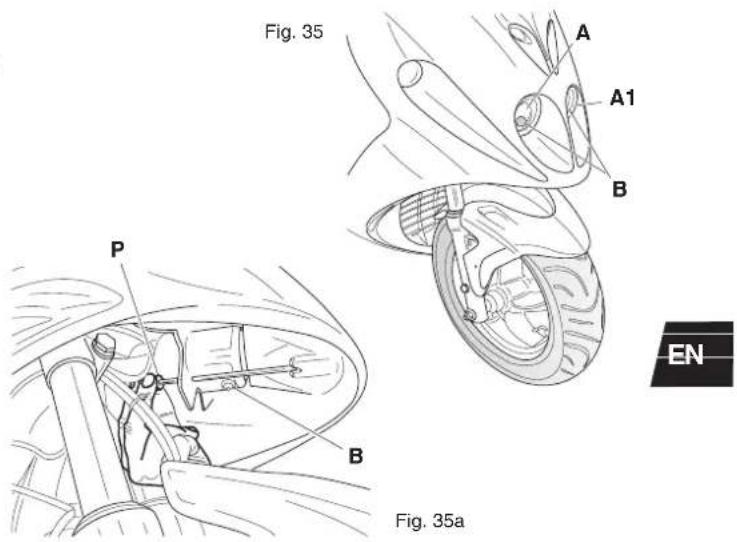
text_image
Fig. 35 A A1 B P B EN Fig. 35a6.2 BEAM ADJUSTMENT

Have the beam of the headlight periodically checked by an Authorised Malaguti Service Centre.
The height of the lights can be adjusted by means of the knob under the lamp (P - fig. 35a); tighten the knob to raise the lamp or loosen it to lower the lamp.


Malagmi IDES IN MOTO
6.3 DASHBOARD

Make sure all instruments are in perfect working order (pos. A - fig. 36). As soon as you notice improper operation, have the instrument checked and replaced by an Authorised Malaguti Service Centre.
6.4 TAIL LAMP (with stop light)
- Lamp, 12V -16W - 2 items (B- Fig. 37): stop
• Lamp, 12V -2.3W - 10 items: parking
Visually check if the tail lamps are in working order. As far as the parking light is concerned, turn the right hand light switch to the ≥00 position; to check the parking light, operate one of the two brake levers. If you notice improper operation, contact an Authorised Malaguti Service Centre.
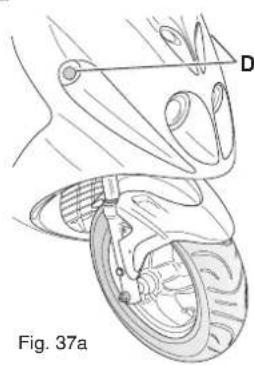
natural_image
Medical illustration showing anatomical structures with labeled point D, no text or symbols present
text_image
B E C Fig. 37bEN
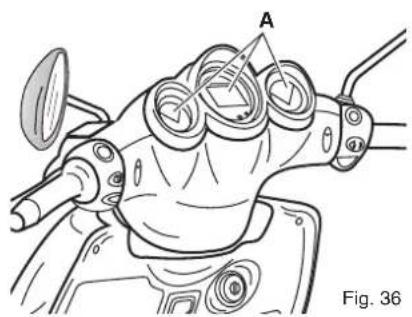
natural_image
Technical line drawing of a mechanical component with labeled parts (A and Fig. 36), no readable text or symbols beyond labels.6.5 NUMBER PLATE LIGHT
- Bulb 12V - 5W
To check if the number plate light (C- Fig. 37) is properly working, move the light switch, which is on the right-hand side control, to ≥00 -and turn the key to starting position.
6.6 INDICATOR LIGHTS
- Right and left front indicators (D – Fig. 37a) Bulb 12V – 10W
- Right and left rear indicators (E – Fig. 37b) Bulb 12V – 10W
To activate the direction indicators, move the switch, which is placed on the right-hand side, in the direction you want to turn.
To turn the indicators off, press the switch.
Trouble with one of the four indicators will be signalled by increased flashing rate of the 'direction indicator' lights on the dashboard.

Malagnti IDES IN MOTO
6.7 FUSES
- The electrical equipment includes four fuses that protect the main components from any possible trouble and are located in the glove compartment (Fig. 38). Next to each fuse you can see the drawing of the protected component.
- To replace a fuse, loosen the screw (A) to open the left hand cover; using the pliers supplied (P-fig 38), extract the blown fuse and replace it with one of the same capacity. Under the pliers (P) there are the spare fuses (F - fig. 38). If you use a spare fuse, we advise you to replace it with a new one having the same capacity.

Do not replace the fuse with one having a higher capacity, as it could seriously damage the electrical equipment and cause fires in the event of a short circuit.
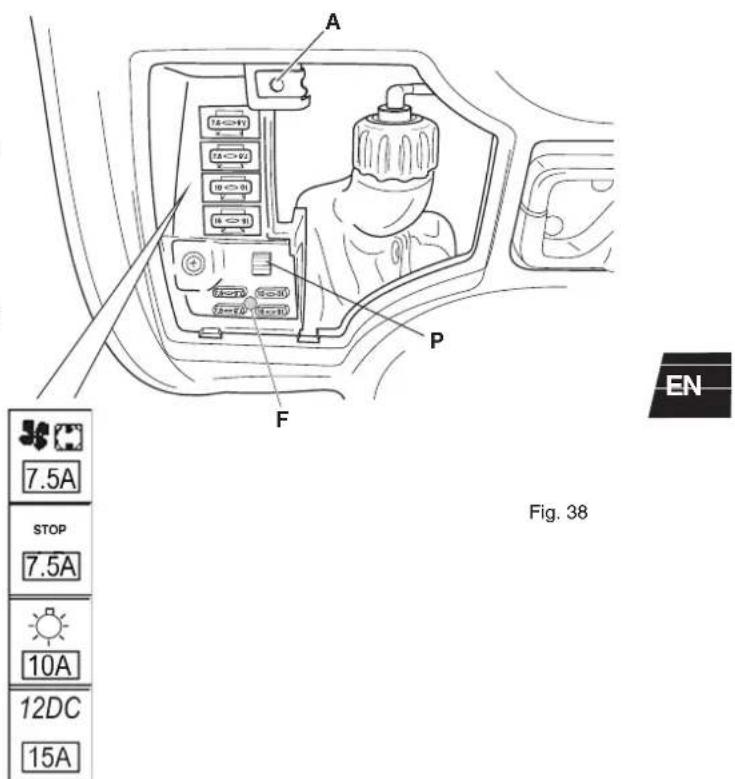
text_image
A F P 7.5A STOP 7.5A 10A 12DC 15A EN Fig. 38

Malagmi IDE IN MOTO
6.8 BATTERY
Version 250: 12V 12Ah maintenance-free
The battery housing is under the passenger's seat.
Installing the battery (operation performed before delivery)
To place the battery in its housing, follow the instructions below:
- First charge the battery.
- Apply the adhesive band supplied with the vehicle as shown in Fig. 39a, removing the two protective films from the ends of the adhesive area, as shown by the arrow in the drawing (P - Fig. 39a).
- Open the seat with the ignition key.
- Using an Allen wrench loosen the two screws (V - fig. 39b) that secure the passenger's seat in place.
- Detach the 15A fuse located under the left hand cover of of the front casing (fig. 38 - page 47).
- Remove the wiring with the BLUE and LIGHT BLUE cables (+) and the two BLACK cables (-) to be connected to the battery.
- Fit the battery, making sure that it perfectly fits in its housing and that the breather pipe (only for the 125 version) comes out of the hole provided.
- Connect the wires to the battery. Positive pole (+) BLUE and LIGHT BLUE cables. Negative pole (-) two BLACK cables (fig. 40).
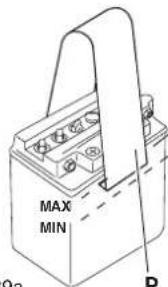
text_image
MAX MIN PFig. 39a
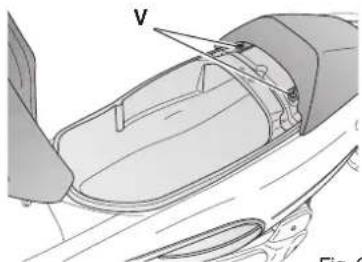
text_image
V Fig. 2Fig. 39b
48
- Refit the passenger's seat and secure it in place with the screws.
- Reconnect the 15A fuse and close the cover.
- Set up the instruments.

Remove the 15A fuse before checking, charging or removing the battery.
Never attempt to disconnect the battery cables while the engine is running. This operation can irreparably damage the vehicle's electronic control unit. The electrolyte contains sulphuric acid: avoid contact with eyes, skin and clothes. In the event of accidental contact, rinse the exposed part with water and seek medical assistance. Explosion hazard!
NOTE Never invert the cable polarity. Danger of short circuits and damage to the electrical equipment. To prevent the electrolyte leaking, never tilt the vehicle too much.
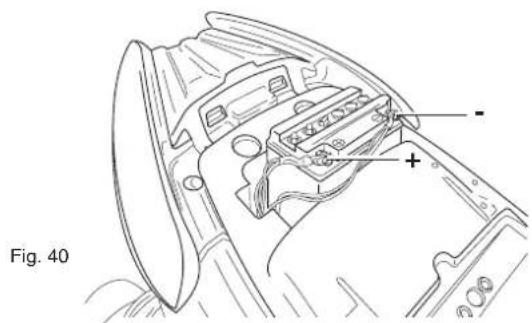
text_image
Fig. 40ATTENTION! WHEN USING MAINTENANCE FREE SEALED BATTERIES, FOLLOW THE INSTALLATION INSTRUCTIONS THE BATTERY IS ENCLOSED WITH.

Malagnti IDES IN MOTO
Version 125: Checking the electrolyte level
monthly
Without removing either the passenger's seat or the battery, you can check the MIN. and MAX. level of battery liquid through the opening (A - fig. 41) in the helment compartment.
Long term storage
In the event of long term storage of the vehicle, the battery must be periodically recharged. Batteries tend to run flat after three years of storage.
- The level of electrolyte must be checked frequently and must also reach maximum level. If not, use only distilled water to top up. If you have to add distilled water too frequently, have the vehicle's electrical equipment checked by an Authorised Malaguti Service Centre: the battery may be working overloaded and this will cause damage in the long run.
Battery recharging
sBatteries must be recharged with current equal to 1/10 of the battery's rated capacity (Version 250cc.: approx. 1,2 A - Version 125cc.: approx. 0,9 A) and for no longer than 8 hours running. It is recommended to have this operation done by an Authorised Malaguti Service Centre.
EN
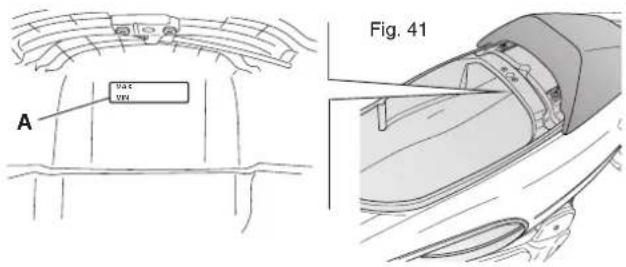
text_image
A Vax VEX Fig. 41

Malagmi IDEE IN MOTO
NOTES:
Malaguti recommends:
EN
MALAGUTI ORIGINAL SPARE PARTS AND MALBO LINE ACCESSORIES

Malagami IDEI IN MOTD
INTRODUCTION
natural_image
Technical line drawing of a mechanical component with labeled point A, no readable text or symbols present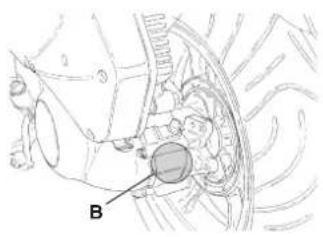
text_image
B
text_image
BFig. 2
125 cc250 cc

text_image
MARCHO DI PASSIVA MALAGUITI S.P.A. CATROCOPADE, VELOCIO (°) 1 2 3 5 8 9 12Fig. 2.1

natural_image
Technical line drawing of a car interior showing a hand holding a seatbelt, with no visible text or symbols.
Malacan
IDEE IN MOTO


1.3 PNEUS
natural_image
Line drawing of a scooter with labeled X and Y axes (no text or symbols on the diagram itself)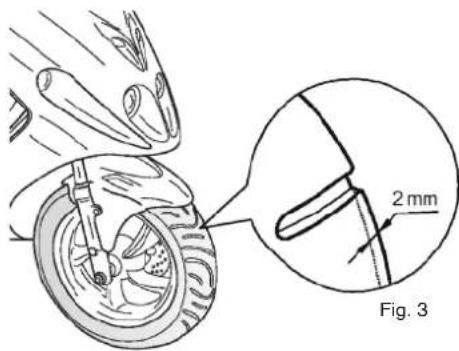
text_image
2 mm Fig. 3

natural_image
Diagram of a car steering wheel with a hand lever and labeled component P, showing rotational motion (no text or symbols beyond label)


Malagmi IDEE IN MOTO
NOTES :

10

CONNAÎTRE SA MOTO
type PIAGGIO M361M (MINARELLI 3M5)
nbre cylindres 1
alésage/course mm 072 x 60 (53,7 x 54,8)
cylindrée cm ^3 244 (124)
natural_image
Diagram of a car interior showing hand positioning and labeled component A (no text or symbols present)Fig. 9
2.4 ANNEAU ANTIVOL
natural_image
Mechanical assembly diagram showing spring and suspension components (no text or labels)Fig. 10

FR


Malagati IDE IN MOTO
2.5 VIDE-POCHES AVANT
text_image
Technical diagram of a car interior with labeled components, showing dashboard and intake manifold layoutFig. 11


text_image
Technical diagram of a soldering iron with labeled components and a circular dial indicatorFig. 20
natural_image
Diagram of a hand operating a rotary switch with a circular dial and buttons, labeled Fig. 21 (no text or symbols on the diagram itself)
Malagmi IDIE IN MOTO

2.12 BÉQUILLES
natural_image
Line drawing of a pliers applying material to a cloth (no text or symbols)text_image
A MAX MINnatural_image
Technical line drawing of a mechanical assembly with labeled component B (no readable text or symbols)
natural_image
Technical line drawing of a car suspension system with labeled component A (no text or symbols beyond label)Fig. 24a
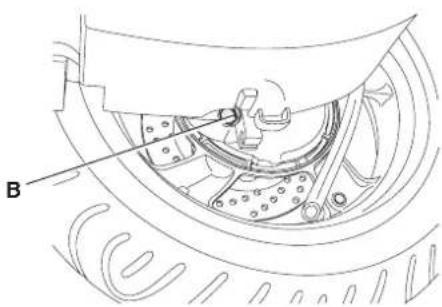
text_image
BFig. 25a
33
FR

text_image
Malaeni IDES IN MOTO4.3 HUILE MOTEUR (Version 250cc.)
natural_image
Technical line drawing of a mechanical assembly with labeled parts A and B (no text or symbols beyond labels)Fig. 27

natural_image
Technical line drawing of a mechanical assembly with labeled parts (no text or symbols present)Fig. 27a

text_image
1 2 3 Fig. 27b


Malaga IDES IN MOTO
4.4 HUILE DES FREINS AVANT ET ARRIÈRE
text_image
Diagram of a bicycle steering wheel with labeled parts B and S, showing mirror and handle mechanismFig. 29

Malagmi IDES IN MOTO

4.5 BOUGIE
natural_image
Technical line drawing of a mechanical component with labeled point D and figure number 37a (no text or symbols beyond labels)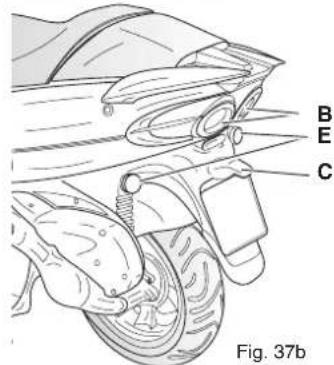
text_image
B E C Fig. 37b6.5 FEU DE PLAQUE
- Ampoule 12V - 5W
natural_image
Technical line drawing of a mechanical component with labeled parts (A and Fig. 36), no readable text or symbols beyond labels.
Malagnti IDES IN MOTO
6.7 FUSIBLES
text_image
MAX MIN PFig. 39a
text_image
V Fig. 1Fig. 39b
48
text_image
A VAX VEX Fig. 41


Malagmi IDEE IN MOTO
NOTES :
natural_image
Anatomical illustration of a human pelvic region with labeled parts (no text or symbols present)Fig. 2
125 cc250 cc

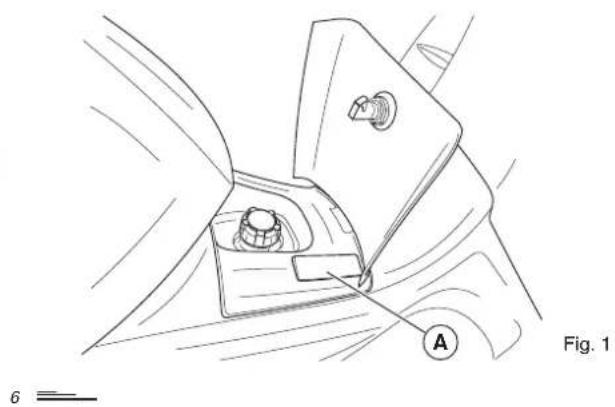
natural_image
Technical line drawing of a mechanical component with labeled section A, showing internal parts and alignment (no text or symbols beyond label)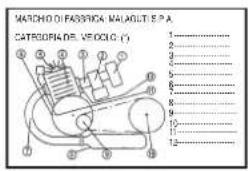
text_image
MARCHO DI PASSIVA MALAGLTI S.P.A. CATROCOPADE, VELOCLO (°) 1 2 3 5 8 9 12Fig. 2.1

natural_image
Technical line drawing of a car interior showing a hand holding a steering wheel (no text or symbols)
Malaganti IDES INIC MOTO


1.3 NEUMÁTICOS
natural_image
Line drawing of a scooter with labeled X and Y components (no text or symbols on the diagram itself)
text_image
2 mm Fig. 3ES

7
1.4 DEPÓSITO DE COMBUSTIBLE
natural_image
Diagram of a car front-mounted mirror with a hand handle and control knob, showing rotational motion (no text or symbols)

Malagmi IDEE IN MOTO
NOTAS:
ES
10
2 CONOCER LA PROPIA MOTO
2.1 DATOS TECNICOS
text_image
Labeled diagram of a scooter body with numbered parts for identification
Malagmi IDES IN MOTO
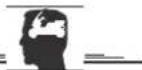
2.3 COMPARTIMENTO DEL CASCO
natural_image
Diagram of a car interior showing hand positioning and labeled component A (no text or symbols beyond label)Fig. 9
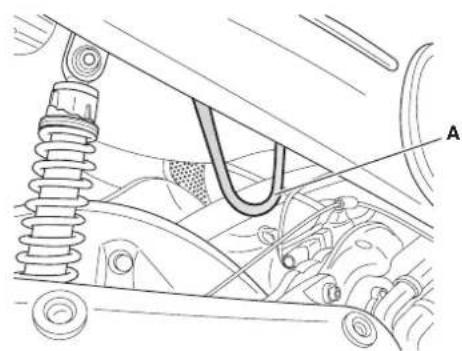
natural_image
Technical diagram of a vehicle suspension system with labeled component A (no text or symbols beyond label)Fig. 10


Malagati IDE IN MOTO
2.5 ALOJAMIENTO PORTATICKET DELANTERO
text_image
Technical diagram of a car interior with labeled component A and internal componentsFig. 11


text_image
Diagram of a hand holding a tool with Chinese characters, likely illustrating a manual or mechanical operation.natural_image
Line drawing of a pliers tool gripping a wrapped object, labeled Fig. 23 (no text or symbols on the diagram itself)3.10 INCONVENIENTES DURANTE EL FUNCIONAMIENTO
text_image
A MAX MINnatural_image
Technical line drawing of a car suspension system with labeled component A (no text or symbols beyond label)Fig. 24a
natural_image
Technical line drawing of a mechanical assembly with labeled parts A and B (no text or symbols beyond labels)Fig. 27

natural_image
Technical line drawing of a mechanical assembly with no visible text or symbolsFig. 27a

text_image
1 2 3 Fig. 27b


Malagmi IOSSIN MOTO
4.4 ACEITE FRENOS DELANTERO Y TRASERO
text_image
Diagram of a bicycle steering wheel with labeled parts B and S, showing mirror and handle mechanismFig. 29

Malaguti IDES IN MOTO
4.5 BUJÍA
Tipos de bujía a utilizar:
250cc - CHAMPION RG4HC - NGK CR7EB - NGK CR8EB
natural_image
Technical line drawing of a mechanical component with labeled parts (A and Fig. 36), no readable text or symbols beyond labels.ES


Malagmi IDES IN MOTO

natural_image
Technical line drawing of a mechanical component with labeled point D and figure number 37a (no text or symbols beyond labels)
text_image
B E C Fig. 37btext_image
A VAX VEX Fig. 41
49


Malagmi IDEE IN MOTO
NOTAS:
Malaguti aconseja: