
LS KD 741 G - Dishwasher KELVINATOR - Free user manual and instructions
Find the device manual for free LS KD 741 G KELVINATOR in PDF.
| Product type | Dishwasher |
| Brand | Kelvinator |
| Model | LS KD 741 G |
| Dimensions (H x W x D) | 85 x 60 x 60 cm (adjustable to 82 cm for built-in installation) |
| Weight | Approximately 50 kg |
| Power supply | 220-240 V, 50 Hz |
| Standard capacity | 12 place settings |
| Wash programs | 4 programs (pre-wash, intensive, eco, delicate) |
| Water softener | Adjustable to 5 positions (0-4) according to water hardness |
| Regenerating salt reservoir | Capacity 1.5 to 1.8 kg |
| Rinse aid | 130 ml reservoir, adjustable dosage from 1 to 6 |
| Upper basket | Adjustable height (2 positions), movable racks |
| Lower basket | With fold-down spikes for pots |
| Half load | Half load wash in upper basket possible |
| Filters | Self-cleaning micro-filter, central reservoir, metal plate |
| Wash arms | Removable for cleaning (upper and lower) |
| Safety | Automatic stop when door is opened |
| Installation | Built-in under worktop (removable worktop possible) |
| Maintenance | Clean filters after each wash, arms periodically |
| General information | User manual available in multiple languages (FR, EN, DE, ES, IT, NL, PT) |
Frequently Asked Questions - LS KD 741 G KELVINATOR
User questions about LS KD 741 G KELVINATOR
0 question about this device. Answer the ones you know or ask your own.
Ask a new question about this device
Download the instructions for your Dishwasher in PDF format for free! Find your manual LS KD 741 G - KELVINATOR and take your electronic device back in hand. On this page are published all the documents necessary for the use of your device. LS KD 741 G by KELVINATOR.
USER MANUAL LS KD 741 G KELVINATOR
| Safety advice | page 24 |
| Setting up, installation | page 25 |
| Opening the door | page 28 |
| Water softener unit | page 29 |
| Adjusting the upper basket | page 31 |
| Loading the dishes | page 32 |
| Half load washing | page 36 |
| Information for test laboratories | page 37 |
| Loading the detergent and rinse aid | page 37 |
| Cleaning the filters | page 39 |
| Some practical hints | page 40 |
| Routine cleaning and maintenance | page 41 |
| Identifying minor faults | page 43 |
23
Safety Instructions
Please read the instructions in this booklet carefully because they contain important information on how to install, use and maintain your dishwasher safely as well as containing useful tips on how to make the most of it. Keep this booklet safe for future reference.
There are certain basic safety rules which are valid for any domestic appliance. They are the following:
- never touch the appliance when your hands or feet are wet or damp
- do not use when your feet are bare
- do not remove the plug from the mains supply socket by pulling the mains cable or the machine itself
- do not leave the appliance exposed to the elements (rain, sun etc)
- do not let children (or others incapable of operating it) use the machine without supervision
- make sure that the plug fitted to the machine is compatible with the power supply socket. If it is not, get a suitably qualified person to fit the correct type, and to make sure that the cables to the mains socket are able to cope with the power rating of the appliance
- ensure that the dishwasher does not crush power cables
- if there is a water softening device installed in the home there is no need to add salt to the water softener fitted in the dishwasher
- the dishwasher is designed for normal kitchen utensils.
Objects that have been contaminated by petrol, paint, traces of steel or iron, corrosive chemicals, acids or alkalis must not be washed in the dishwasher - if you wish to dispose of an old dishwasher be careful to remove the door to eliminate the risk of children becoming trapped inside it
- the dishwasher has been made from materials which can be recycled so that it can be disposed of in an environmentally friendly way
- in general it is not advisable to use adaptors, multiple plugs and/or extension cables
- Water left in the machine or on the dishes at the end of the wash programme should not be swallowed.
- Leaning or sitting on the open door of the dishwasher could cause it to tip over.
- Cutlery is washed best if it is placed in the basket with the handles downwards; however, to avoid any injury from blades or sharp points, it can be placed with the handles upwards.
- Should it be necessary to replace the supply cord, call the Service Department.
- This appliance is be designed for domestic use only.
If the appliance breaks down or stops working properly, switch it off, turn off the water supply and do not tamper with it. Repair work should only be carried out by an approved service agent and only genuine spare parts should be fitted. Any failure to follow the above advice may have serious consequences for the safety of the appliance.
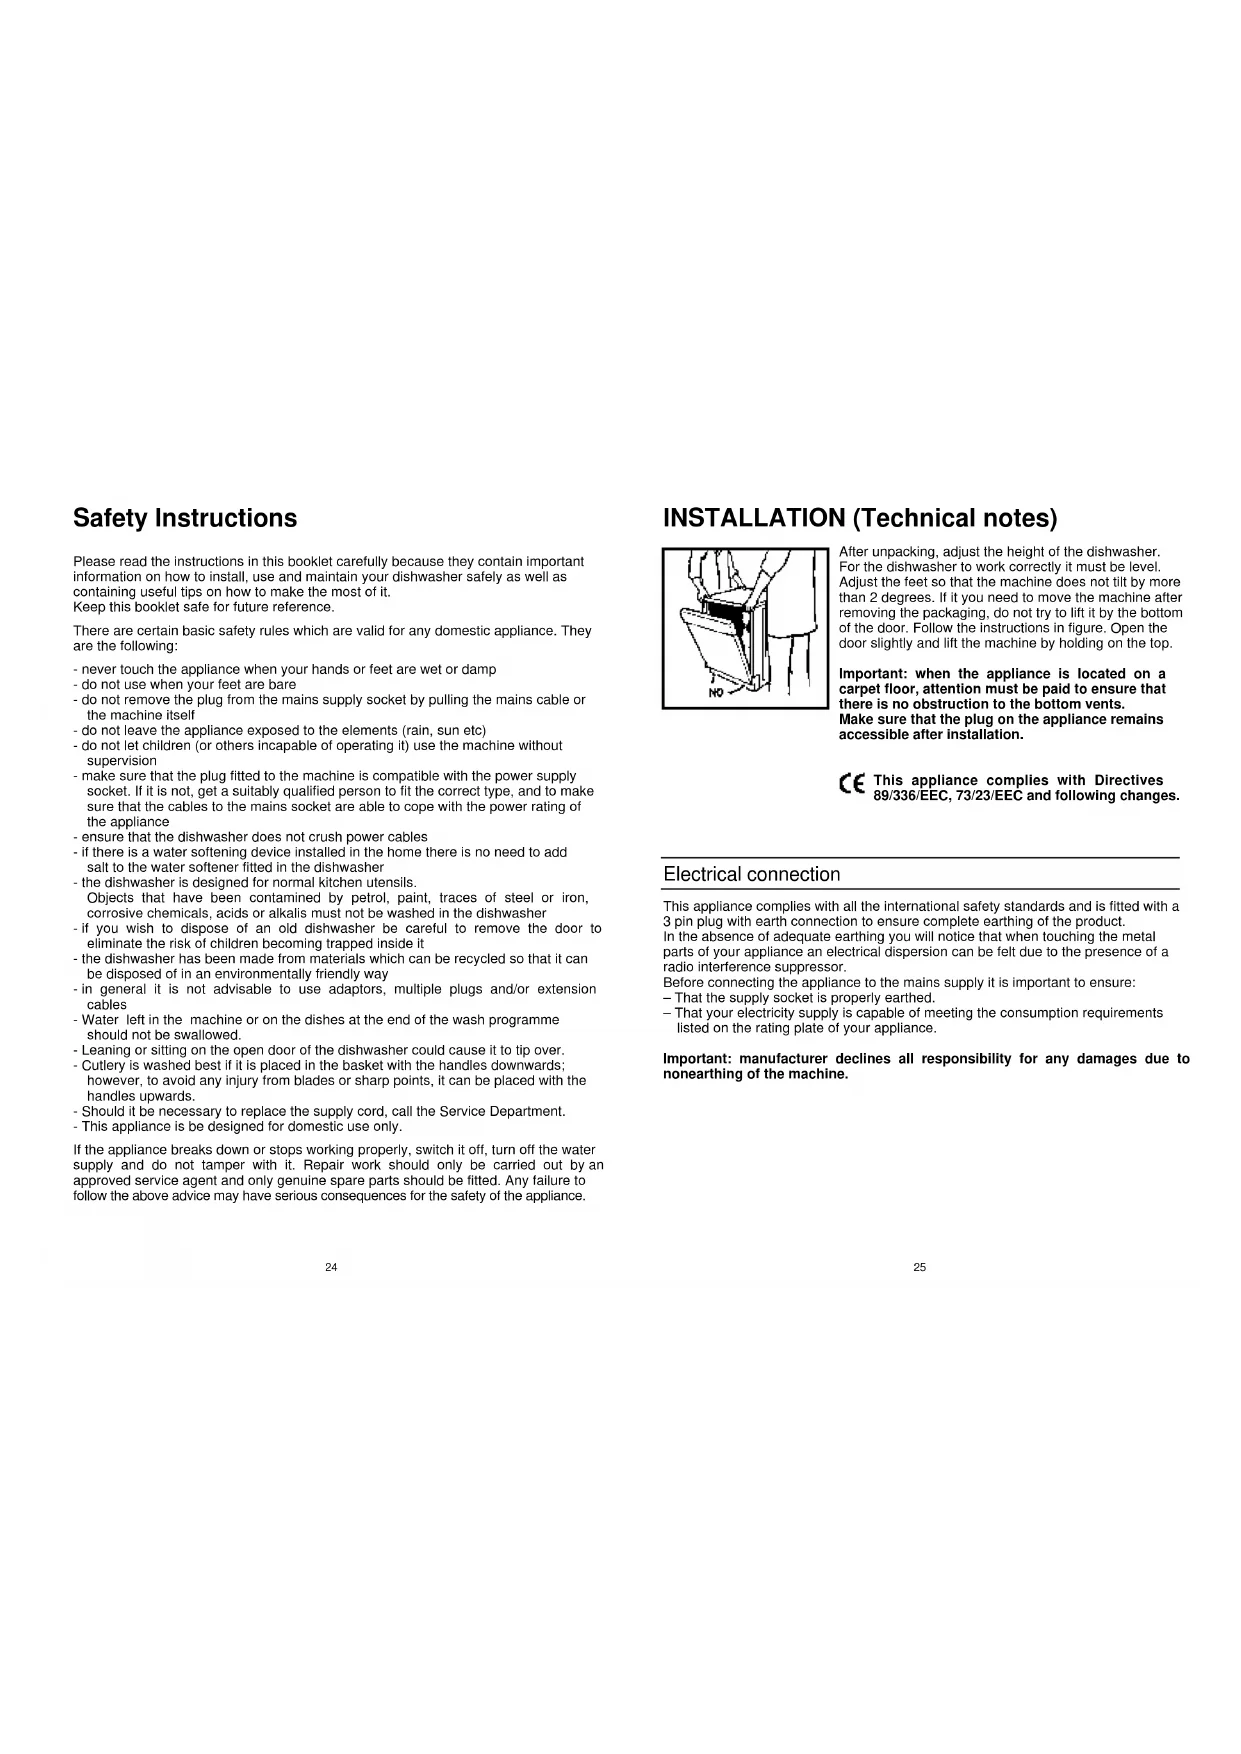
INSTALLATION (Technical notes)

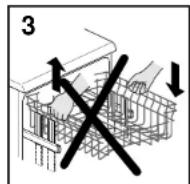
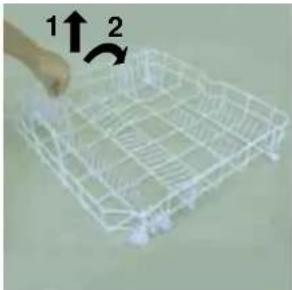
After unpacking, adjust the height of the dishwasher. For the dishwasher to work correctly it must be level. Adjust the feet so that the machine does not tilt by more than 2 degrees. If it you need to move the machine after removing the packaging, do not try to lift it by the bottom of the door. Follow the instructions in figure. Open the door slightly and lift the machine by holding on the top.
Important: when the appliance is located on a carpet floor, attention must be paid to ensure that there is no obstruction to the bottom vents. Make sure that the plug on the appliance remains accessible after installation.
CE This appliance complies with Directives 89/336/EEC, 73/23/EEC and following changes.
Electrical connection
This appliance complies with all the international safety standards and is fitted with a 3 pin plug with earth connection to ensure complete earthing of the product. In the absence of adequate earthing you will notice that when touching the metal parts of your appliance an electrical dispersion can be felt due to the presence of a radio interference suppressor.
Before connecting the appliance to the mains supply it is important to ensure:
- That the supply socket is properly earthed.
- That your electricity supply is capable of meeting the consumption requirements listed on the rating plate of your appliance.
Important: manufacturer declines all responsibility for any damages due to nonearthing of the machine.
For U.K. only
Plug your dishwasher into the power socket.
If the plug we supply does not fit
CUT IT OFF AND DESTROY IT!
You can't use it on other appliances, and the exposed wires could be dangerous if anyone plugged it in.
- Fit a suitable plug, as follows:
| Connect to the terminal in the plug | |
| green and yellow wire m | marked with the letter E, OR marked with the Earth symbol, OR coloured green, OR coloured green and yellow. |
| blue wire marked N | OR coloured black. |
| brown wire marked L | OR coloured red. |

"WARNING"
THIS APPLIANCE MUST BE EARTHED
Fuses and plugs
This appliance should be used only on a
socket with a minimum rating of 13 Amp.
Our ready-fitted plug is already equipped
with a 13 amp fuse which is BS 1362 ASTA approved.
Any replacement should be exactly the same.
If the fuse cover is lost, do not use the plug until it is replaced.
A correct replacement fuse cover (obtainable from your dealer or Electricity Board) must be the same colour as shown or named on the insert on the base of the plug.
Water connection
The inlet and drain hoses can be directed to left or right.
The dishwasher can be connected to either cold or hot water, as long as it is no hotter than 60^ .
Water pressure must be between 0.08 MPa and 0.8 MPa. If the pressure is below the minimum consult our service department for advice.
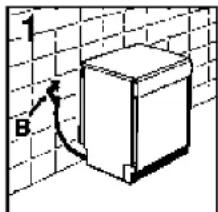
The inlet hose must be connected to a tap so that the water supply can be cut off when the machine is not in use (fig.1 B).
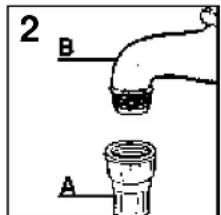
The dishwasher is fitted with 3 / 4'' threaded connector (fig. 2).
Connect inlet hose A to water tap B with a 3/4'' attachment making sure that it has been properly tightened.
If it is necessary to lengthen the inlet pipe, an extension pipe can be fitted.
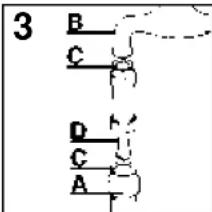
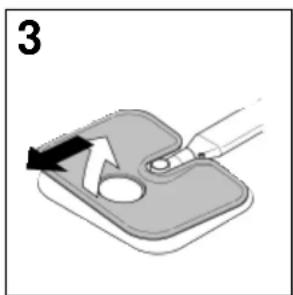
If timescale deposits or sand are present in the water, it is advisable to obtain the appropriate filter, art. 9226085, from the Service Centre (fig. 3).
The filter D must be inserted between the tap B and the inlet hose A, remembering to fit the washer C.
If the dishwasher is connected to new pipes or to pipes which have not been in use for a long time run water through for a few minutes before connecting the inlet hose. In this way no deposits of sand or rust will clog up the water inflow filter.
Connecting the outlet hose
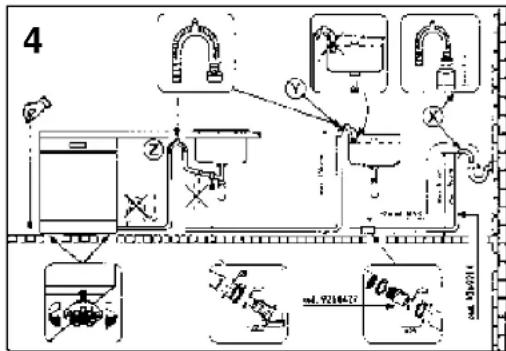
The outlet hose should discharge into a standpipe, making sure that there are no kinks (fig. 4).
The standpipe must be at least 40~cm above floor level and it must have an internal diameter of at least 4cm . It is advisable to fit an anti-odour air trap (fig. 4 x).
If necessary the outlet hose can be extended up to 2,6 m, provided that it is kept at a maximum height of 85 cm above floor level.
The hose can be hooked over the side of the sink (it must not be immersed in water, in order to prevent water from being syphoned back to the machine when this is in operation) (fig. 4 y).
When installing the appliance under a worktop the hose pipe clamp must be attached to the wall in the highest possible position under the worktop (fig. 4 z).
Check that there are no kinks in the inlet and outlet hoses.
Installation in fitted kitchens
Fitting between existing cabinets
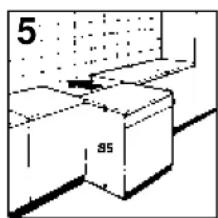
The height of the dishwasher, 85cm , has been designed in order to allow the machine to be fitted between existing cabinets of the same height in modern fitted kitchens. The feet can be adjusted so that correct height is reached.
The laminated top of the machine does not require any particular care since it is heatproof, scratchproof and stainproof (fig. 5).
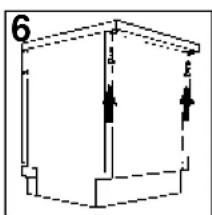
The work top can be easily adjusted to line it with the top of existing cabinets; this is done by moving it by 5 mm each time up to a maximum of 25 mm.
To adjust it, unscrew the two screws at the back and fix the top in the position required (fig. 6).
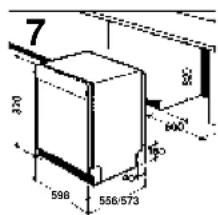
Underneath existing work top (when fitting beneath a work top)
In most modern fitted kitchens there is only one single work top under which cabinets and electrical appliances are fitted.
In this case remove the work top of the dishwasher by unscrewing the screws under the rear edge of the top (fig. 6).
The height will then be reduced to 82~cm , as scheduled by the International Regulations (ISO) and the dishwasher will fit perfectly under the kitchen working top (fig. 7).
Fitting panels (some models only)
The frames around the door, allow decorative panels to be fitted, up to 5 mm thick, and with the following dimensions:
width 591 mm ± 1
height 597 mm ± 1
Opening the door
Put your hand into the recess and push upwards.
If the machine comes open while it is working, an electrical safety device automatically switches everything off.
For the machine to work properly, the door should not be opened while it is in operation.
Closing the door
Place the baskets in the machine.
Make sure that both the spray arms are free to rotate and are not obstructed by cutlery, crocery or pans. Close the door, pressing on it to make sure it is firmly shut.
Water softener unit
Depending on the source of the supply, water contains varying amounts of limestone and minerals which are deposited on the dishes leaving whitish stains and marks. The higher the level of these minerals present in the water, the harder the water is. The dishwasher is fitted with a water softener unit which, through the use of special regenerating salt, supplies softened water for washing the dishes. The softener unit can treat water with a hardness of up to 60^ (French grading) or 33^ (German grading) through five different settings.
The degree of hardness of your water can be obtained from your water supply company.
Regulating the water softener
The table below lists different degrees of water hardness with the corresponding setting for the softener unit.
| Level | Water hardness | Water hardness | Use of regenerating salt | Water softener setting | N° of washes |
| #H (french) | #dH (German) | ||||
| 0 | 0-9 | 0-5 | NO | FREE | |
| 1 | 10-30 | 6-16 | YES | position N.1 | 50 |
| *2 | 31-40 | 17-22 | YES | position N.2 | 40 |
| 3 | 41-50 | 23-27 | YES | position N.3 | 30 |
| 4 | 51-60 | 28-33 | YES | position N.4 | 20 |
- *The water softener unit is set in the factory at level 2, as this is suitable for the majority of users.
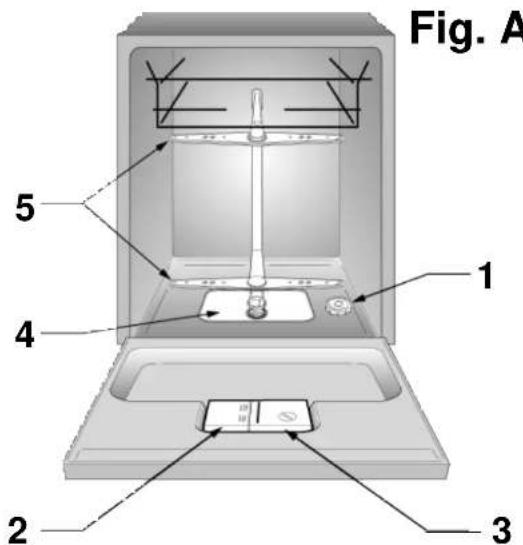
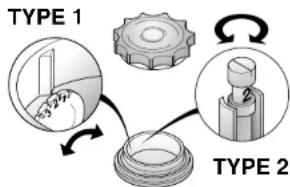
If your water is at level 0, you need not use any regenerating salt, nor need you make any adjustment, as your water is soft. According to the degree of hardness of your water, regulate the softener unit in the following way: - remove the lower rack. Unscrew and remove the cap from the salt dispenser located in the bottom of the tub (Fig. A "1");
- Turn the selector screw to the required position with a screwdriver or a knife.
N.B.: For models fitted with electronic programmer refer to the programme list enclosed.
Loading the salt
The dishwasher is fitted with a softener which clears the water of lime which could cause scale and damage the dishwasher.
On the bottom of the machine there is a container for the salt for regenerating the softener.
The filter medium of the softening plant must be reactivated with dishwasher water softener regenerating salt.
Other types of salt contain small quantities of insoluble particles which over a long period of time may affect and deteriorate the softener performance.
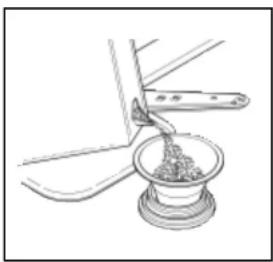
To add salt, unscrew the cap of the container on the bottom and then refill the container.
During this operation a little water will overflow; but keep adding salt until the container is full. When the container is full, clean the thread of salt residue and retighten the tap.
If the dishwasher is not required straightaway, set the Prewash programme so that the salt solution which has overflowed is discharged from the washing tank.
The salt dispenser has a capacity of between 1.5 and 1.8kg and, for efficient use of the appliance, it should be refilled from time to time according to the regulation of the water softener unit.
Important: it is necessary to add water until the container overflows. Only install the dishwasher after completely filling the salt container.
Salt loading indicator
Some models are provided with an indicator light which signals salt consumption. The signal will appear according to one of two systems:
- an indicator light on the control panel which will light up when it is necessary to reload the salt container;
- the salt container cap with a green mobile light which remains visible as long as there is enough salt for regeneration purposes. When the green surface is depressed inside the cap, more salt must be loaded.
Other models are provided with a blind cap. In this case, the salt level must be checked periodically, according to the regulation of the water softener unit.
Important: the appearance of white stains on dishes is generally an important sign that the salt container needs filling.
Adjustment of the upper basket (some models only)
If 27 cm to 31 cm plates are normally used, load them onto the lower basket after the upper basket has been placed in its upper position and proceed as detailed below (According to the models):
Type“A”:
1) Turn the front stops A outwards;
2) Take out the basket and remount it in the upper position;
3) Replace the blocks A in their original position.
Dishes that are bigger than 20~cm in diameter can no longer be loaded onto the upper basket and the mobile supports cannot be used when the basket is in the upper position.
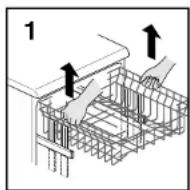
Type "B":
1) Pull out the upper basket;
2) Then grasp the basket from both sides and lift it upwards (fig. 1).
Dishes that are bigger than 20~cm in diameter can no longer be loaded onto the upper basket and the mobile supports cannot be used when the basket is in the upper position.
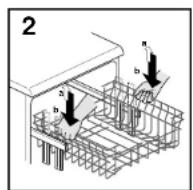
ADJUST BASKET TO THE LOWER POSITION:
1) Grasp the basket from both sides and lift slightly upwards (fig. 2a);
2) Then slowly release into the correct position (fig. 2b)
It is advisable to adjust the basket before loading the dishes.
31
Loading dishes
To load dishes
For good wash performance remove any debris from the dishes (bones, tooth picks, the remains of meat and vegetables) to avoid blocking the filters, water outlet and washing arm nozzles and, as a result, reducing washing efficiency.
Try not to rinse the dishes before loading them into the dishwasher. If saucepans and oven dishes are encrusted with the remains of burnt or roast food, it is advisable to leave them to soak before washing.
Using the upper basket
The upper basket is provided with mobile racks hooked to the sides of the basket which can be regulated in two positions: upright and lowered. In the lowered position the racks may be used for tea and coffee cups, kitchen knives and ladles. Glasses with stems may be safely hung on the ends of the racks.
Glasses, cups, saucers and dessert plates may be loaded under the racks.
Soup plates and ordinary plates may be loaded with the rack in the upright position.
Plates should be loaded vertically with the underside of the plate towards the back of the dishwasher with a space between each plate to allow water to pass freely.
It is advisable to load plates of the same size together in order to utilize maximum basket capacity.
Plates may be loaded in a single row (Fig. 1) or on both rows (Fig. 2).
It is advisable to load large plates (approx. 27 or more cm) slightly tilted towards the rear to facilitate introduction of the basket into the machine.
Salad bowls and plastic bowls may also be loaded on the upper basket. It is advisable to block these in place so that the jets of water do not make them overturn.
The upper basket has been designed to offer maximum flexibility in use and can be loaded with up to 24 plates on two rows, up to 30 glasses on five rows or a mixed load.
Using the lower basket
Saucepans, oven dishes, tureens, salad bowls, lids, serving dishes, dinner plates, soup plates and ladles can be loaded on the lower basket.
Place the cutlery in the plastic cutlery holder with the handles pointing upwards. Place the cutlery holder on the lower basket (fig. 3), making sure that the cutlery does not get in the way of the rotating arms.
1
2
3
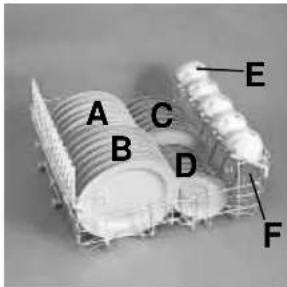
A standard daily load is represented in Figs. 1, 2 and 3.
Upper basket (Fig. 1)
A = soup plates
B = dinner plates
C=dessert plates
D = saucers
E = cups
F = q glasses
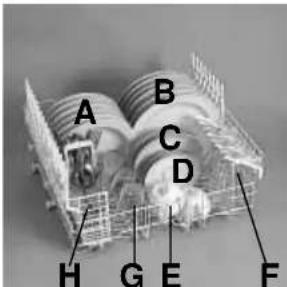
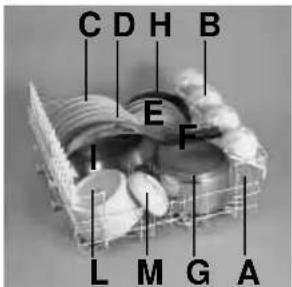
Upper basket (Fig. 2)
A = soup plates
B = dinner plates
C=dessert plates
D = saucers
E = cups
F = glasses with stems
G = glasses
H = single section cutlery basket
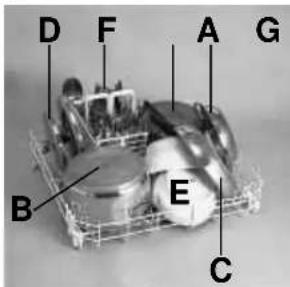
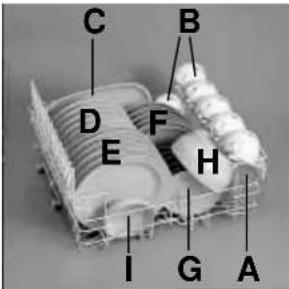
Lower basket (Fig. 3)
A = medium-sized saucepan
B = large saucepan
C = frying pan
D = lids
E = tureens, serving dishes
F = cutlery
G = oven dishes
Please load the dishwasher sensibly to ensure the best wash results.
12 international place load (Ref. I.E.C. 436 - EN 50242).
Correct loading for the upper basket is indicated in Fig. 4 and for the lower basket in Fig. 5. Fig. 6 cutlery basket.
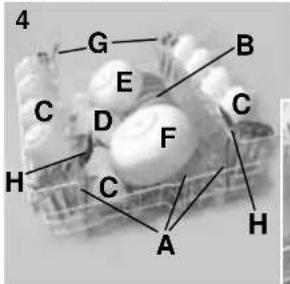
Upper basket (Fig. 4)
A = 5 + 5 + 2 glasses
B=12 saucers
C=4+4+4cups
D = small bowl
E = medium bowl
F=largebowl
G=1+1forks
H = 1 + 1 serving spoons
=3+3+3+3 dessert spoons
L=3+3+3+3teaspoons
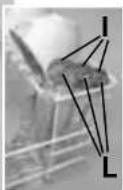
Lower basket (Fig. 5)
M=8+4 soup plates
N = 11 + 1 dinner plates
0 = 12 dessert plates
P = serving dish
Q = cutlery
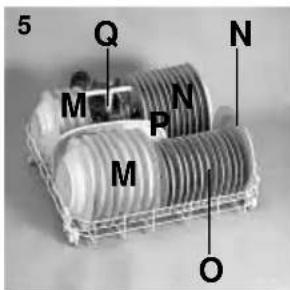
Cutlery basket (fig. 6)
Place the side racks in the lower position and fill with 6 + 6 knives(R): in the spaces left insert cutlery with the handles down.
Take care not to load more than two different types of cutlery in the same compartment.
Cutlery basket without side racks
Insert the remaining cutlery, taking care not to load more than two different types of cutlery in the same compartment.
7
Important (fig. 7)
The lower basket has two rows of racks at the front that can be lowered in a very simple and rapid way to allow easier loading of salad bowls, saucepans and lids. (Some models only)
TO LOWER THE RACKS :
1) Lift the racks slightly upward and let them drop to the correct position;
2) Lifting again is enough them to bring them to a vertical position.
Cutlery basket (fig. 8)
The cutlery basket is made with two detachable parts which will enable various loading options.
The two parts can be detached by sliding the left section away from the right section.
On some models the cutlery basket does not have central dividers.
1
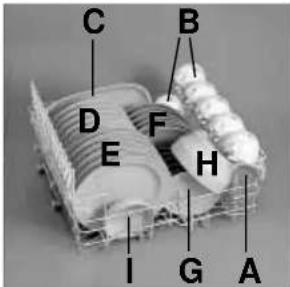
1/2 mixed load (fig. 1)
A = glasses
B=cups
C = soup plates
D = dinner plates
E=dessert plates
F = saucers
G = saucepan
H=lid
I = Irying pan
L = medium bowl
M = small bowl
2
1/2 load standard (fig. 2)
A = 6 glasses
B=5+1cups
C = serving dish
D=6 soup p
E = 6 dinner plates
F = 6 dessert plates
G=6 saucers
H = medium bowl
=smallbow
Place the cutlery in the plastic cutlery holder on the lower basket.
Information for the test laboratories. General programme comparison
(see programmes selection)
Ref. IEC 436 Standards:
1) Upper basket position: low
2) Normal load
3) Shine setting: 3
4) Amount of detergent:
- 5 gr for pre-wash
- 25 gr for wash.
Ref. EN 50242 Standards:
1) Upper basket position: low
2) Normal load
3) Shine setting: 3
4) Amount of detergent:
-30 gr for wash.
Loading the detergent and the rinse aid. Filling the detergent container
It is essential to use a detergent that is specifically designed for dishwashers either in powder, liquid or tablet form.
Unsuitable detergents (like those for washing up by hand) do not contain the proper ingredients for use in a dishwasher and stop the dishwasher from working correctly.
Normal wash
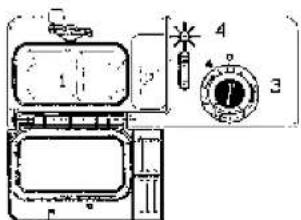
The detergent container is inside the door (fig. A 2). If the lid of the container is closed press the button to open.
At the end of every wash cycle the lid is always open and ready for the next time the dishwasher is used.
The amount of detergent to be used varies according to how dirty the dishes are and on the type of dishes to be washed.
We advise using 20-30 gr of detergent in the wash section of detergent compartment (1).
After pouring the detergent into the container close the lid.
Since not all detergents are the same the instructions on the boxes of detergent can vary. We should just like to remind users that too little detergent does not clean the dishes properly whilst too much detergent will not produce better results and is also a waste. Do not use an excessive amount of detergent and help limit damage to the environment at the same time.
Wash with soaking cycle (some models only) (Prewash)
If setting the intensive wash programme, a second dose of about 20 gr of detergent (1 table-spoon) must be added to the machine in the prewash section of detergent compartment (2).
For normal programme add 5 gr. This dose should be placed directly in the prewash section of detergent compartment (2).
FULL

dark
EMPTY

light
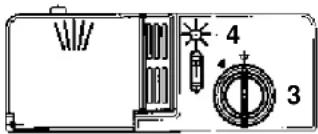
Filling the rinse aid container
The rinse aid container can be found to the right of the detergent container: it has a capacity of about 130 ml (Fig A "3"). Turn the cap (3) anticlockwise and pour enough liquid to last several washes, up to the maximum level shown. Replace the cap.
The rinse aid, which is automatically released during the last rinsing cycle, helps the dishes to dry quickly and prevents spots and stains forming.
It is always advisable to use rinse aid. Check the rinse aid level through the indicator eye which is situated in the centre of the dispenser (4).
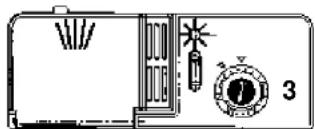
Regulating the rinse aid from 1 to 6
The regulator is placed under the cap (3) and can be turned using a coin. The recommended position is 3.
The limestone content of the water considerably affects the formation of limescale and the drying performance.
It is therefore important to regulate the quantity of rinse aid to achieve good washing results.
If, after the wash, streaks occur on the dishes, decrease the amount by one position. If whitish spots occur, increase the amount by one position.
Cleaning the filters

The filter system (fig.A "4") consists of: a central container that traps the larger particles.
a flat gauze that continuously filters the wash water
a micro filter, located beneath the gauze, that traps the tiniest particles ensuring a perfect rinse.
To achieve excellent results every time, the filters should be checked and cleaned after each wash.
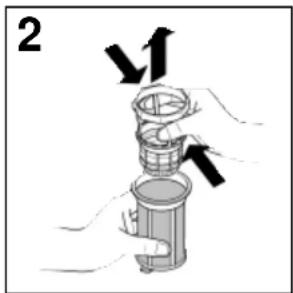
To remove the filter unit, simply turn the handle anticlockwise (fig. 1).
For ease of cleaning, the central container is removable (fig. 2).
Remove the gauze filter (fig.3) and wash the whole unit under a jet of water. If necessary a small brush can be used.
With the Self-cleaning Micro filter, maintenance is reduced and the filter unit need only be checked every two weeks. Nevertheless, after each wash it is advisable to check that the central container and the gauze filter are not clogged.
NB: after cleaning the filters, make sure that they are correctly reassembled and that the gauze filter is properly positioned at the bottom of the dishwasher.
Make sure that the filter is screwed back, clockwise, into the gauze, as poor seating of the filter unit could have an adverse effect on the efficiency of the appliance.
Warning: never use the dishwasher without the filters.
Practical hints
Selecting the programme
This dishwasher offers you a wide range of wash programmes so that you can choose the most suitable according to the type of dishes and how dirty they are. Refer to the PROGRAMME LIST to choose the most suitable programme.
Useful hints
In order to avoid any dripping from the top rack, remove the lower rack first. If the dishes are to be left in the machine for some time, leave the door ajar, to let some air circulate and to improve the drying performance.
How to make SAVINGS
1) If you want the dishwasher to give a complete wash, place the dishes in the dishwasher at the end of each meal and if necessary turn on the COLD PRE-WASH cycle to soften the food remains and remove bigger particles of food from the new load of dishes. When the dishwasher is full start the complete wash cycle programme. 2) If the dishes are not very dirty or if the baskets are not very full select an ECONOMY programme, following the instructions in the program list.
How to get really good wash RESULTS
1) Place the dishes face downwards.
2) Try to place the dishes in such a way that they are not touching one another. If they are loaded properly you will get better results.
3) Before placing the dishes in the dishwasher remove any remaining food (bones, shells, pieces of meat or vegetables, coffee grounds, skin of fruit, cigarette ash etc. that could clog up the outflow and the washing arm jets.
4) After loading the dishes check that the washing arms can rotate freely.
5) Pans and other dishes that have particularly stubborn food particles or remnants of burnt food should be left to soak in water with dishwasher detergent.
6) To wash silver properly:
a) rinse the silver immediately after use, especially if it has been used for mayonnaise eggs, fish etc.
b) do not sprinkle detergent onto it
c) keep it separate from other metals
What to DO If
1) You want to stop the dishwasher to put in more dishes whilst it is in the middle of a wash.
Open the door only after pressing the O/I button so that the dishwasher is in OFF. After closing the door, wait 3 minutes before starting up the machine again.
What not to wash
It should also be remembered that not all dishes are suitable for washing in a dishwasher.
We advise against using the dishwasher to wash items in thermoplastic, cutlery with wooden or plastic handles, saucepans with wooden handles, items in aluminium, crystal, leaded glass unless otherwise stated.
Certain decorations may fade. It is therefore a good idea before loading the whole batch to wash just one of the items first so as to be sure that others like it will not fade. It is also a good idea not to put silver cutlery with non-stainless steel handles into the dishwasher as there could be a chemical reaction between them.
IMPORTANT
When buying new crocckery or cutlery always make sure that they are suitable for washing in a dishwasher.
Cleaning and maintenance
The outside of the cabinet can be cleaned with a non-abrasive cleaning agent suitable for a gloss finish.
The dishwasher does not require special maintenance, because the tank is self-cleaning. Regularly wipe the door gasket with a damp cloth to remove any food remains or rinse aid. It is advisable to remove limestone deposits or dirt periodically, by doing an empty wash; pour a glass of vinegar on the bottom of the tank and select the light wash.
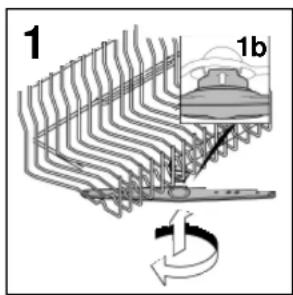
If, in spite of the routine cleaning of the filters, you notice that the dishes or pans are not properly washed or rinsed, check that all the spray heads on the rotor arms (fig. A "5") are clear.
If they are blocked, clean them in the following way:
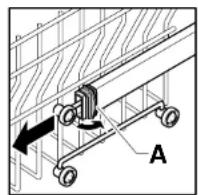
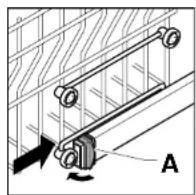
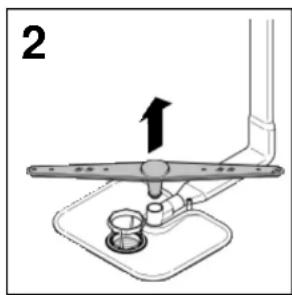
To remove the upper rotor arm, turn it until it lines up with the stop marked by the arrow (fig. 1b). Push it upwards and, keeping it pushed in, unscrew it in a clockwise direction. To reassemble it repeat the same operation, but turn it anticlockwise. The lower rotor arm can be removed simply by pulling it upwards (fig. 2).
- wash the rotor arms under a jet of water to clear any blockage in the spray heads.
- When you have finished, refit the rotor arms in the same position, remembering to re-align the arrow and screw into position.
The water heater element is made of a special stainless steel which after a while may change colour; this does not in any way affect its performance or its working life. Both the door lining and the tank lining are in stainless steel; however, should spots caused by oxidation occur, this is probably due to a high level of iron salts presents in the water. The spots can be removed with a mild abrasive agent; never use chlorine based materials, steel wool, etc.
WHEN CYCLE IS FINISHED
After every wash it is essential to turn off water supply and to switch off the machine by pressing the On/Off button to the off position. If the machine is not going to be used for some time, it is advisable to follow these rules:
- do an empty wash with detergent in order to clean the machine of any deposits.
- pull out the electric plug.
- turn off the water tap
- fill the rinse aid container.
- leave the door ajar.
- Keep the inside of the machine clean.
- If the machine is left in places where the temperature is below 0^ any water left inside the pipes may freeze. Wait until the temperature rises above zero and then wait for about 24 hours before starting up the dishwasher.
Identifying minor faults
Warning!
Before removing any panel: 1. Turn the knob to STOP.
- Pull the electric plug out.
Should the dishwasher fail to operate, before contacting the Service Centre, make the following checks:
FAULT CAUSE REMEDY
| 1 - Machine completely dead | Plug is not connected to wall socket | Connect electric plug |
| O/I button has not been pressed | Press button | |
| Door is open | Close door | |
| No electricity | Check the fuse In the plug and the electricity supply | |
| 2 - Machine does not draw water | See causes for no. 1 | Check |
| Water tap is turned off | Turn water tap on | |
| Programme selector is not at correct position | Turn programme selector to correct position | |
| The inlet hose is bent | Eliminate the bends in the hose | |
| The inlet hose filter is not correctly connected | Clean the filter at the end of the hose | |
| 3 - Machine does not discharge water | Filter is dirty | Clean filter |
| Outlet hose is kinked | Straighten outlet hose | |
| The outlet hose extension is not correctly connected | Follow the instructions for connecting the outlet hose carefully | |
| The outlet connection on the wall is pointing downwards not upwards | Call a qualified technician | |
| 4 - Machine discharges water continuously | Position of outlet hose is too low | Lift outlet hose to at least \( {40}\mathrm{\;{cm}} \) above floor level |
| 5 - Spray arms are not heard to rotate | Excessive amount of detergent | Reduce amount of detergent Use suitable detergent |
| Item prevents arms from rotating | Check | |
| Plate and cup filter very dirty | Clean plate and cup filter | |
| 6 - On electronic appliances without a display: "eco"indi- cator light and indicator light "No.1" with audible signal are heard. | Water inlet tap turned off | Switch off the appliance. Turn on the tap. Re-set the cycle. |
| 7 - On electronic appliances with a display: "E1" appears on the display with audible signal. | Water inlet tap turned off | Switch off the appliance. Turn on the tap. Re-set the cycle. |
FAULT CAUSE REMEDY
| 8 - Load of dishes is only partially washed | See causes for no. 5 | Check |
| Bottom of saucepans have not been washed well | Burnt on food remains must be soaked before putting pans in dishwasher | |
| Edge of saucepans have not been washed well | Reposition saucepans | |
| Spray arms are partially blocked | Remove spray arms by unscrewing ring nuts clockwise and wash under running water | |
| The dishes have not been properly loaded | Do not place the dishes too closely together | |
| The end of the outlet hose is in the water | The end of the outlet hose must not come into contact with the outflow water | |
| The Incorrect amount of detergent has been measured out; the detergent is old and hard | Increase the measure according to how dirty the dishes are and change detergent | |
| The wash programme is not thorough enough | Choose a more vigorous programme | |
| The lower basket dishes have not been washed | Depress half load button | |
| 9 - Presence of white spots on dishes | Water is too hard | Check salt and rinse aid level and regulate amount. Should the fault persist, Contact Service Centre |
| 10 - Noise during wash | The dishes knock against one another | Load dishes better onto the basket |
| The revolving arms knock against the dishes | Load dishes better | |
| 11 - The dishes are not completely dry | Inadequate air flow | Leave the dishwasher door ajar at the end of the wash program to allow the dishes to dry naturally |
N.B.: Should any of the situations occur and should the machine give a bad wash performance, it is necessary to remove the deposits from the dishes by hand since the final drying cycle hardens the deposits which a second wash in the machine would not be able to remove.
If the malfunction continues contact a Service Centre quoting the serial number of the dishwasher. This is found on the plaque on the inside of the dishwasher door at the top or on the guarantee. This information will make it possible to take more effective action more quickly.
The manufacturers do not any responsibility for any printing mistakes in this instruction booklet. They also resole the right to modify their own apopnes as necessary without altering the essential characteristics.
Inhoud
Ref. IEC 436 standard:
Ref. EN 50242 standard:
A = verres
B = tasses
C = assiettes creuses
D = assiéttes plates
E = assiéttes à dessert
F = soucoupees
G=casserole
H = couverage
I = poèle
L = coupe moyenne
M = petite coupe
2
1/2 charge standard (fig. 2)
The manufacturer declines all responsibility in the event of any printing mistakes in this booklet. The manufacturer also reserves the right to make appropriate modifications to its products without changing the essential characteristics.

- Safety Instructions
- INSTALLATION (Technical notes)
- Electrical connection
- For U.K. only
- "WARNING"
- Water connection
- Connecting the outlet hose
- Installation in fitted kitchens
- Fitting between existing cabinets
- Underneath existing work top (when fitting beneath a work top)
- Fitting panels (some models only)
- Opening the door
- Closing the door
- Water softener unit
- Regulating the water softener
- Loading the salt
- Salt loading indicator
- Adjustment of the upper basket (some models only)
- Type“A”:
- Type "B":
- ADJUST BASKET TO THE LOWER POSITION:
- Loading dishes
- To load dishes
- Using the upper basket
- Using the lower basket
- Upper basket (Fig. 1)
- Upper basket (Fig. 2)
- Lower basket (Fig. 3)
- Upper basket (Fig. 4)
- Lower basket (Fig. 5)
- Cutlery basket (fig. 6)
- Cutlery basket without side racks
- Important (fig. 7)
- TO LOWER THE RACKS :
- Cutlery basket (fig. 8)
- 1
- 2
- 1/2 load standard (fig. 2)
- Information for the test laboratories. General programme comparison
- Loading the detergent and the rinse aid. Filling the detergent container
- Normal wash
- Filling the rinse aid container
- Regulating the rinse aid from 1 to 6
- Cleaning the filters
- Practical hints
- Selecting the programme
- Useful hints
- How to make SAVINGS
- How to get really good wash RESULTS
- What to DO If
- What not to wash
- IMPORTANT
- Cleaning and maintenance
- WHEN CYCLE IS FINISHED
- Identifying minor faults
- Ref. IEC 436 standard:
- Ref. EN 50242 standard:
Brand : KELVINATOR
Model : LS KD 741 G
Category : Dishwasher