
ES 850 - Coffee machine GRAEF - Free user manual and instructions
Find the device manual for free ES 850 GRAEF in PDF.
| Product type | Espresso coffee machine with portafilter |
| Brand | Graef |
| Model | ES 850 |
| Power supply | 230 V, 50 Hz |
| Power | Approx. 1350 W |
| Pump pressure | Up to 10 bar |
| Water tank capacity | 1.2 liters (approx.) |
| Main functions | Single/double espresso, milk frother, hot water, temperature and quantity programming |
| Housing material | Stainless steel and plastic |
| Dimensions (W x D x H) | 30 x 25 x 35 cm (approx.) |
| Weight | 7 kg (approx.) |
| Color | Black / Stainless steel |
| Safety | Automatic shut-off after 30 min, overheating protection, portafilter lock |
| Maintenance | Scheduled descaling, brewer cleaning, steam wand cleaning |
| Programming | Coffee temperature, 1 cup/2 cup quantity, steam quality, descaling reminder |
| Warranty | 2 years manufacturer |
| Included accessories | Single/double portafilter, tamper, descaling tablets (not included) |
| Coffee type | Ground espresso coffee |
Frequently Asked Questions - ES 850 GRAEF
User questions about ES 850 GRAEF
0 question about this device. Answer the ones you know or ask your own.
Ask a new question about this device
Download the instructions for your Coffee machine in PDF format for free! Find your manual ES 850 - GRAEF and take your electronic device back in hand. On this page are published all the documents necessary for the use of your device. ES 850 by GRAEF.
USER MANUAL ES 850 GRAEF
Operating Instructions
ES
General safety instructions 29
Product description. 31
Preface. 32
Information on these operating instructions. 32
Warning messages 32
Danger caused by electric current 33
Intended use 33
Limitation of liability. 33
Unpacking 33
Requirements on the installation location 34
Electrical connection 34
34
Pressure gauge 35
Control panel programming 36
Prior to first use 36
Initial operation 36
Venting 36
Preparation 37
Espresso preparation 37
SingleEspresso 37
DoubleEspresso 38
Automatic switching off 38
Making milk froth 38
Hot water withdrawal 39
^+ Dscaling. 40
Explanation of the descending function 40
Dscaling the brewing head. 41
Cleaning the brew assembly. 42
External cleaning. 42
Programming 43
Coffeetemperature. 43
Quantity 1 cup. 44
Quantity 2 cup. 45
Steam quality (pump frequency) 45
D escaling reminder 46
Factory setting 47
Disposal of the packaging. 47
Disposal of the unit 47
Two-year warranty 48
GENERAL SAFETY INSTRUCTIONS
This device conforms to the relevant safety regulations. However, incorrect handling may lead to injury and damage.
For safe handling of this unit, please observe the following safety instructions:
- Before using this device for the first time, check it for visible outer damages on the housing, connection cable and plug. Do not operate a damaged unit.
- If the connection cable is damaged, it must may only be replaced by the manufacturer, the manufacturer's customer service or a similarly qualified person, in order to avoid potential dangers.
- Repairs may be carried out only by an expert or by Graef after-sales service. Incorrect repairs may cause considerable hazards for the user. In addition, any claim under guarantee is forfeited.
- Defective parts must be replaced by original spare parts only. It is only with these parts that the safety requirements are met.
- This equipment can be used under supervision by children over 8 years of age, as well as by persons with reduced physical, sensory or mental abilities, or lack of experience and knowledge, if they have been instructed in the safe use of the equipment and understand the hazards involved. Cleaning and user maintenance must not be carried out by children, unless they are 8 years of age or older and are supervised.
- The unit and its connection cable have to be keep out of reach of children who are younger than 8 years.
- Children should be supervised in order to make sure that they do not play with this unit.
- The unit is not intended to be used with an external timer or a separate remove control.
- Always disconnect the connection cable by using plug; do not pull the connecting cable.
- Be careful not to let the power cord hang freely, this could cause the fall of the appliance.
- Packaging materials must not be used for playing. There is a danger of suffocation.
- The appliance must not be immersed in any liquid.
This appliance is intended for domestic and similar use, such as:
Staff kitchens in shops and office
In agricultural estates
- From customers in hotels, motels and other residential areas
In bed and breakfast boarding houses
CAUTION
The appliance can cause dangers if is not used as intended.
- Use the unit exclusively as intended.
-
Observe the procedures described in these operating instructions.
-
Claims of any kind caused by damage by unintended use shall be excluded.
- The risk shall be borne sole by the operator.
The surface are liable to get hot during and after use.
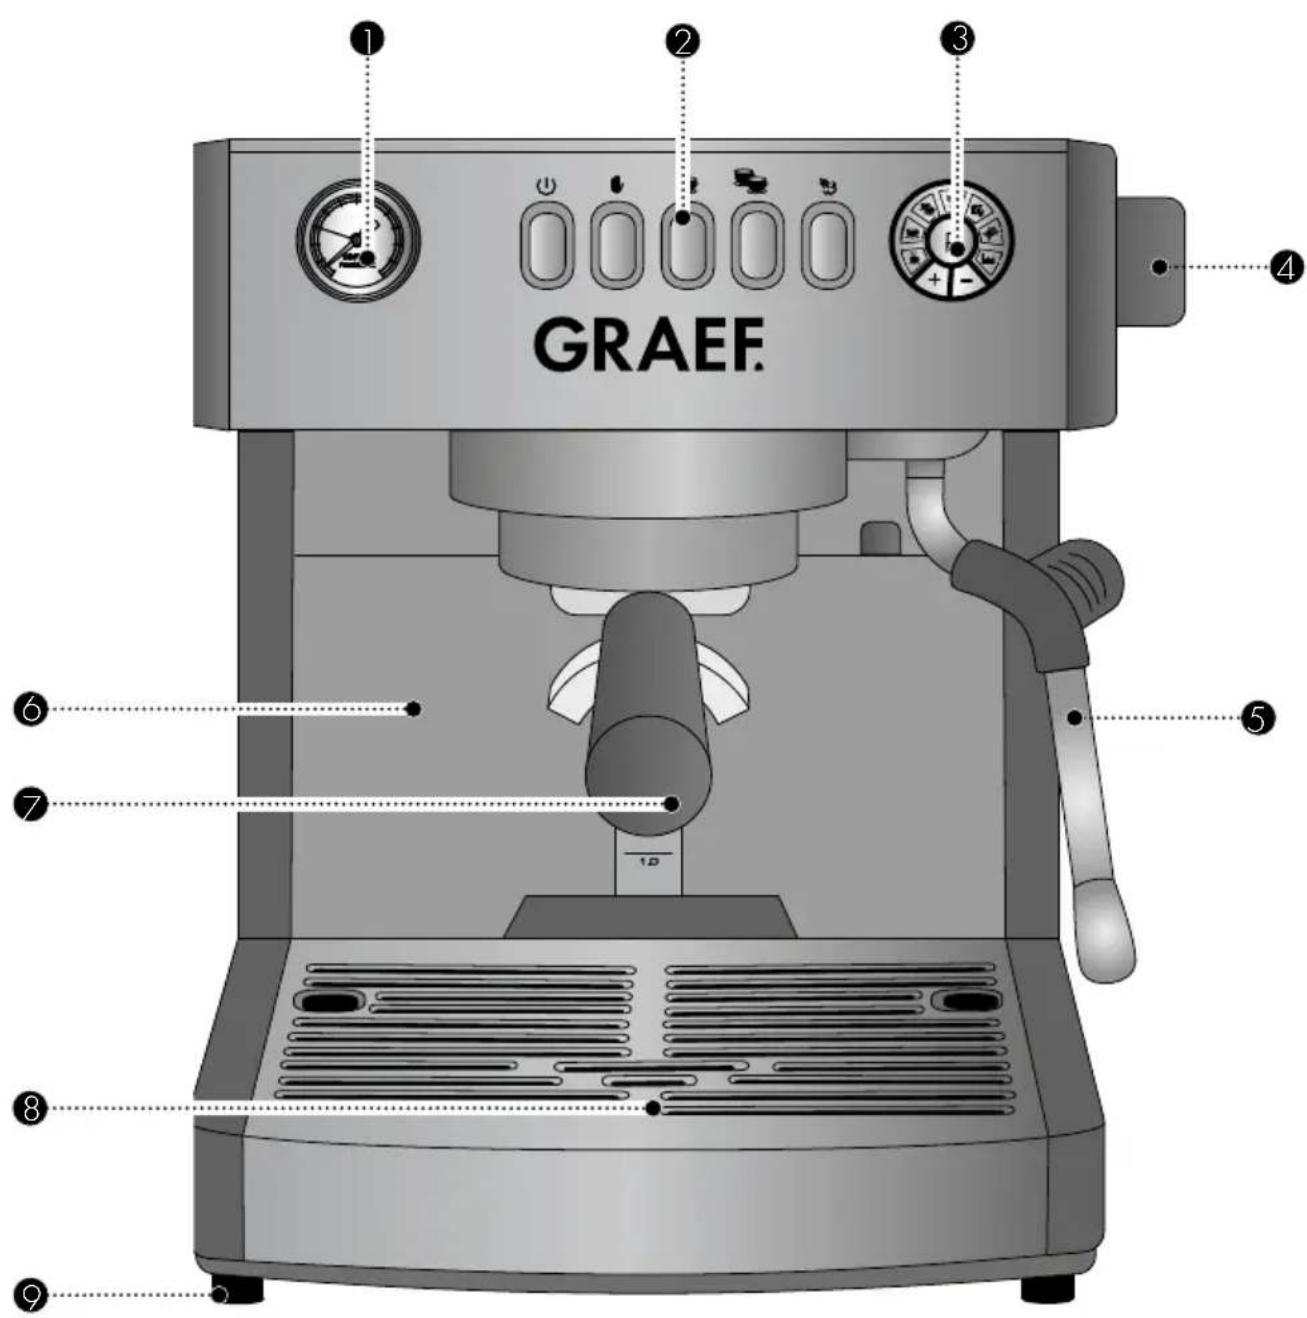
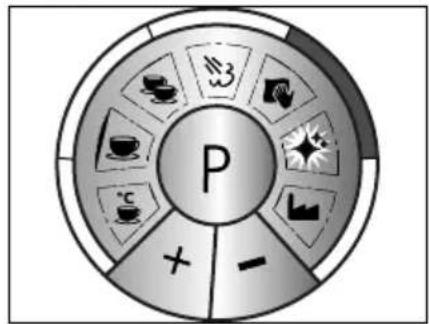
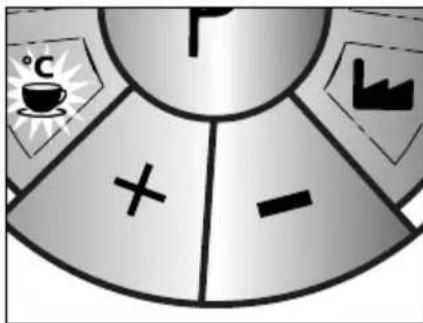
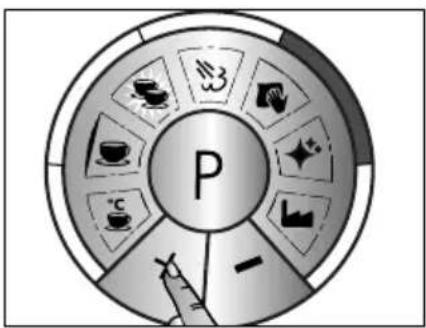
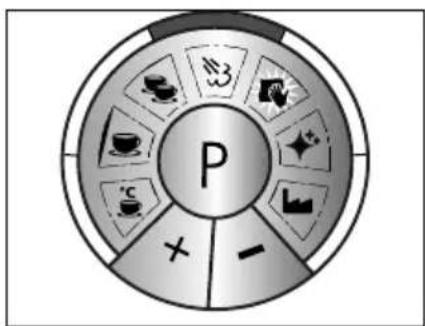
Pressure gauge
Control panel
3 Programming
4 Control knob
Steam / Hot water lance
Water tank
Group handle
8 Drip tray
Feet
PREFACE
Dear Customer,
With this espresso machine you have made a very good choice. You have purchased a recognised quality product. We would like to thank you for buying this machine and wish you a lot of fun with your new Graef espresso machine.
INFORMATION ON THESE OPERATING INSTRUCTIONS
This operating manual of the espresso machine (hereinafter referred to as the appliance) gives you important information on the commissioning, safety, the intended use and maintenance of the appliance.
The operating instructions shall have to be available at the unit at all times. The instructions have to be read and applied by every person which deals with
- initial operation,
- operation,
troubleshooting and/or - cleaning
of the unit.
Keep these operating instructions and pass them on to the next owner along with the unit.
These operating instructions cannot take into consideration every conceivable use. For further information or in case of problems which are not dealt with or not dealt with sufficiently in these instructions, please get in touch with Graef customer service or your specialist dealers.
WARNING MESSAGES
In these operating instructions, the following warning messages and signal words are use:

WARNING
This refers to a potentially dangerous situation. Failure to observe this warning may result in serious injury or even death.
CAUTION
This refers to a potentially dangerous situation. In case of non-observation of this warning message, material damage may occur.
IMPORTANT!
This refers to application tips and other especially important information!
WARNING
Mortal danger is caused by contact with energised cables or components!
Please observe the following safety instructions in order to prevent an exposure to electric current:
- Do not use the unit if the mains cable or plug are damaged.
- In this case, you should let the Graef Customer Service install new connection cable before using the appliance again. This may be done also by an authorised specialist.
- Do not open the housing under any circumstances. If live connections are touched or the electrical and mechanical construction are modified, there is the danger of electric shock.
- Never touch live parts. This can cause an electric shock and may cause even death.
INTENDED USE
This unit is not intended for commercial use. Kindly use the filter carrier of the espresso machine only in confined areas and operate the sieve carrier of the espresso machine only with cold tap water. The use of the appliance strictly for making coffee, foaming milk and heating water avoids potential hazards. Any other type of use or application is not allowed.
LIMITATION OF LIABILITY
All technical information, data and notes on the installation, the operation and the care contained in these operating instructions correspond to the last status before printing, and are rendered under consideration of our previous experience and to the best of knowledge.
No claims may be derived from the particulars, illustrations and descriptions in these instructions.
The manufacturer shall not assume any liability for damage caused by:
non-observation of the instructions
- unintended use
Incorrect repairs
Technical modifications
- use of unapproved spare parts
Translations shall be carried out to the best of knowledge. We shall not assume any liability for translation mistakes. The original German text only shall be binding.
UNPACKING
When unpacking the unit, proceed as follows:
- Remove the unit from the box.
- Remove the packaging parts.
- Remove any stickers on the unit (do not remove the type plate).
REQUIREMENTS ON THE INSTALLATION LOCATION
For safe and fault free operation of the unit, the following requirements of the installation location have to be met:
- The unit has to be placed on a solid, flat, horizontal, and non-slipping surface with a sufficient weight-carrying capacity.
- Make sure that the unit cannot topple over.
- Choose the location in such a way that children cannot reach the hot surface of the unit on the supply lines.
- Do not place the appliance on hot surfaces, such as hotplates, or near them.
- Never use the appliance outdoors, and always keep it in a dry place.
- The unit is not designed for installation in a wall or a built-in cupboard.
- Do not set up the unit in a hot, wet or moist environment.
- The socket has to be easily accessible so that the power cable can be removed easily in case of emergency.
ELECTRICAL CONNECTION
For safe and fault-free operation of the unit, the following requirements have to be met during the electrical connection:
- Before connecting the unit, compare the connecting data (voltage and frequency) on the type plate with those of your energy network. These details must correspond so that no damage occurs to the unit. In case of doubt ask your trained electrician.
- The socket has to be protected at least by a 10 amps circuit breaker.
- Make sure that the power cable is not damaged and is not laid across hot surfaces or sharp edges.
- The connecting cable must not be stretched tightly.
- The electric safety of the unit is ensured only when it is connected to a socket with protective conductor installed correctly. Operation on a socket without protective conductor is forbidden. If in doubt, let the house installation checked by a trained electrician. The manufacturer shall not assume responsibility for damage which has been caused by absent or interrupted protective conductor.
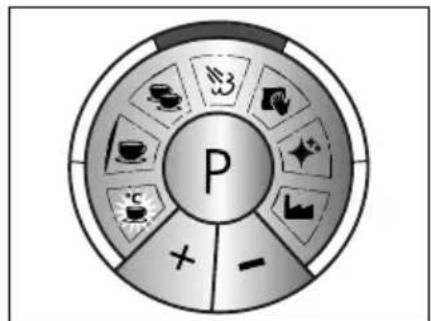
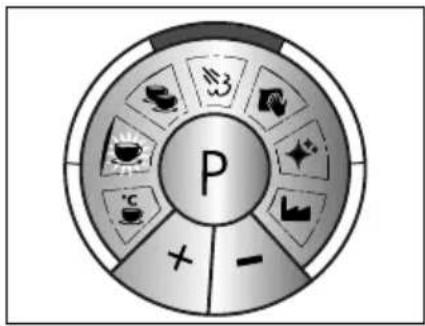
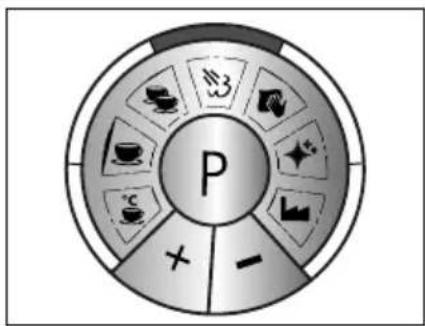
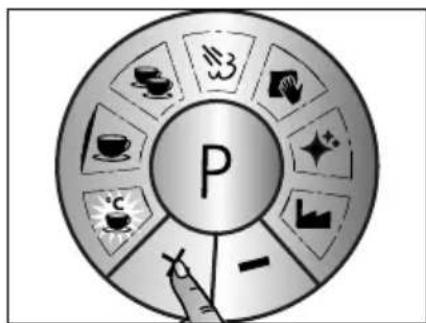
DESCALING REMINDER
The factory setting for the descending function recall is set to 25 L. After the consumption of descal setting, a red ring light up. Only after a complete decalcification the light goes off.
The number of liters can be changed according to the use and hardness of your water.
12 L = (In hard water areas with more than 5^ )
25 L = (In mild water areas with 7,3° dH up to 14° dH)
50L = (n soft water areas with up to max. 7,3^)
You can ask for your exact water hardness at the local waterworks.
PRESSURE GAUGE
Under-extraction:
In case of under-extraction you will get a very thin, flat and underdeveloped coffee. In this case, too little components have been dissolved out. The coffee is very light, the cream very thin, not available or the cream is very light with large bubbles.
- Brewing pressure up to 9 bar
- Grinding degree too coarse (falls rather quickly out of the outlet, with only a few lumps or small balls to be seen. The coffee grounds feel rather coarse-gained when rubbing them between your fingers)
Dosage is too low - Coffee grounds distributed too unevenly in the group handle
- Contact pressure too little
Pressure uneven
Water temperature too low - Coffee beans not fresh
- Coffee grounds not fresh (possibly pre-ground too long)
Optimal Range
In case of optimal extraction, the espresso flows evenly, slowly and creamily "like honey" out of the outlet into the cup. The cream is dense and dark brown to golden brown.
- Brewing pressure between 9 and 10 bar
- Contact pressure approx. 15kg
- Coffee grounds evenly distributed in the group handle
- Optimal grinding level, not too fine, not too coarse
- Optimal water temperature, not too cold, not too hot
Beans are fresh - Coffee grounds freshly ground
Over-extraction:
In case of over-extraction, too many bitter substances are dissolved out of the coffee. The coffee is very dark or the cream is dark brown to reddish and has an unpleasant and bitter or even burnt taste. The outline on the cream is very uneven, with lighter spots being found between darker areas.
- Brewing pressure over 10 bar
Grinding level too fine (falls rather slowly out of the outlet, partly larger chunks or lumps).
Dosage too high - Contact pressure too strong
Water temperature too high - Prior to preparation, coffee grounds clamped too long in the brewing unit
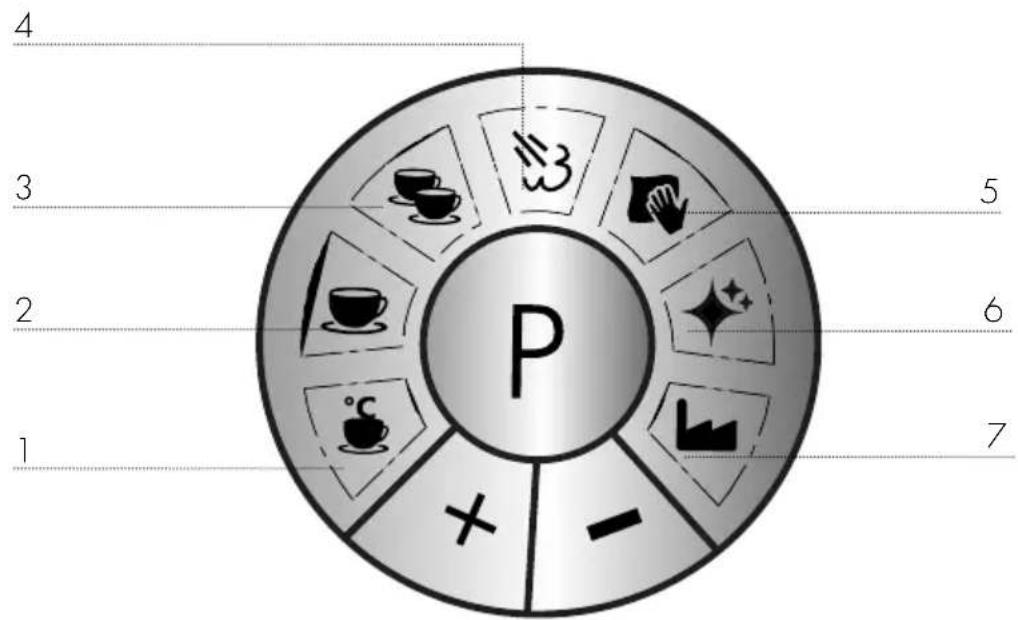
- Espresso temperature
- Adjustment of the water hardness grade
- Espresso volume for 1 cup
- Descaling
- Espresso volume for 2 cups
- Factory setting
- Steam moisture content
You will find an explanation of the individual programs on page 44.
PRIOR TO FIRST USE
Prior to first use, clean the group handle (not the unit) and the water tank under running water so that potential production residues are removed.
INITIAL OPERATION
CAUTION
Observe the following safety instructions to prevent hazards and material damage:
During use, the surfaces become hot!
- While water is runing through the machine, never remove the group handle filled with coffee grounds, because it is under pressure.
- Before preparing espresso, check to see that the group handle is tightened firmly.
- Do not misuse the espresso machine other than it's intended use in order to avoid potential injury.
- After switching on, the appliance steams. This is not a fault on the device.
VENTING
Note: The device must be vented before initial start-up or after prolonged non-use.
- Insert the plug into the socket.
-
Fill the water tank with fresh water.
-
Switch the unit on ( )
- Units heats up.
- The unit is ready for operation when all buttons are lighted up.
- Put one cup or one glass under the hot-water / steam wand.
- Rotate the knob on.
- Let the air escape until a constant water jet runs through.
- Rotate the knob off.
PREPARATION
Note: After switching the unit back on again, carry out an empty withdrawal (without coffee grounds) as described below in order to bring the system to temperature.
- Fill fresh water into the water tank. 2.5 litres at the maximum.
- Insert the desired filter insert.
- Put in the group handle without coffee grounds (from left to right).
CAUTION
Always use the handles to move the lances. Do not touch the lances on the pipe after use, they become hot.
Switch the unit on
The unit is heating up.
- The unit is ready for operation when all buttons are lighted up.
Put a cup below the outlet.
- Press the button.
- Let the cup run half full, to bring the system to desired temperature.
- Then press the button to end the procedure.
ESPRESSO PREPARATION
IMPORTANT!
- Make sure that there is always enough water in the tank. If too little water or no water enters the tank, the small red lamp next to the water level indicator flashes.
- Make sure the water tank is always used correctly.

SINGLE ESPRESSO
Note: See under preparation in order to warm up the group handle, system and cup. After that, start preparing espresso. Insert the filter insert for 1 cup.
- Dry the group handle after preparation.
- Grind the coffee into the group handle (until the group handle is full).
-
Firmly press on the coffee grounds using the enclosed tamper.
-
The distance between the upper edge and the coffee grounds should be approx. 3mm
- Wipe the excess coffee from the edge and tighten the group handle.
Put a cup below the outlet. - Press the button.
After finishing the process, remove the group handle. - Tap the coffee grinder in a grounds container (not included).

DOUBLE ESPRESSO
Note: See under preparation in order to warm up the group handle, system and cup. After that, start preparing espresso. Insert the filter insert for 2 cups.
- Dry the group handle after preparation.
- Grind the coffee into the group handle (until the group handle is full).
- Firmly press on the coffee grounds using the enclosed tamper.
- The distance between the upper edge and the coffee grounds should be approx. 3mm
- Wipe the excess coffee from the edge and tighten the group handle.
Put a cup below the outlet.
Press the cup.
After finishing the process, remove the group handle.
Tap the coffee grinder in a grounds container (not included).
AUTOMATIC SWITCHING OFF
To save energy, the device turns off after approximately 30 minutes when not in use. (Regulation of the EU commission).
MAKING MILK FROTH
If the unit is switched off, switch it back on again
- Units heats up.
- Pour cold milk into the milk jug.
- Hold the hot-water / steam wand toward the drain cover.
- Press the 3 button. It is flashing, with the system heating up.
- If the 3 button illuminates, the system is ready for operation.
- Rotate the dial and allow the condensation water to escape.
After the condensation water has leaked out, turn the knob again. - Swivel the steam distributor outward.
- Turn on the control knob and hold the milk jug at a slight angle.
- Once the milk level is increasing, lower the milk jug.
After finishing the process, turn off the control knob again. - Wipe the steam plant with a damp cloth after a sufficient allowed time for cooling. This can be very hot, right after use.
- Press the 3 button again.
WARNING
- To froth milk, only use the attached milk jug or a larger vessel. Do not use a cup. Excessive foaming milk may lead to burns.
- Never direct the steam plant to yourself or others. There is a risk of burning.
Please note:
If the milk is heated up to more than 70^ , the foam will simply collapse and the drink will later taste too sweet or even of burned milk.
Tips for making milk froth
The phases "steep" and "roll"
- First the "steep phase": in order to fold in the air, put the steam distributor very closely below the milk surface.
- You will have achieved the right position if you can hear kind of a "sip noise".
- This might suspend for a short time, because the surface of the milk is moving.
Now it is for the "roll phase". - As soon as the volume of the milk increases, slide the steam distributor into the milk.
- When the pot becomes hot, turn off the control knob.
- After making the milk froth, hit the pot briefly onto the table top in order to remove the last coarse air bubbles.
- Swivelling is also helpful to distribute the froth evenly.
- Immediately after finishing the process, clean the steam distributor using a damp cloth. However, allow the tube to cool down for a little, as this becomes hot.
- Clean the steam distributor also using a short jet of steam so that the milk remnants are blown out of the steam distributor.
To practise it, you can use the following method:
- Pour cold water into the milk jug.
- Add a drop of detergent.
- Froth it up as described above.
If you froth it correctly, the mixture will look like real milk froth. - Please do not drink this mixture!
HOT WATER WITHDRAWAL
If the unit is switched off, switch it back on again
The unit is heating up.
The unit is ready for operation.
- Put one cup under the hot-water distributor.
- Turn on the control knob.
Water is flowing into the cup.
After finishing the process, turn off the control knob again.

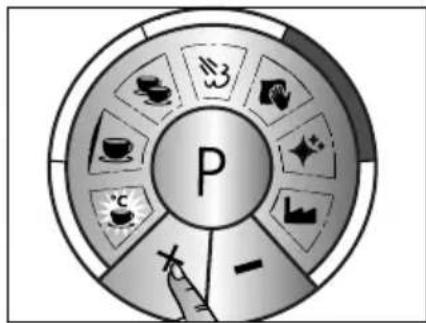
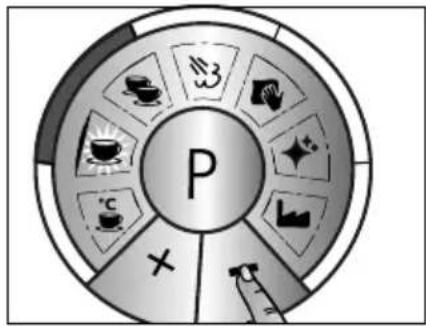
DESCALING
Regularly perform a decalcification, when the a red ring lights up. Use only Graef descending tablets which are especially matched to our appliances. You can get these in our Online shop, via haushalt.graef.de/shop under the Item no. 145618 or from your specialist dealer.
IMPORTANT!
We accept no liability for missing or insufficient decalcification. In this case, the warranty will become null and void.
IMPORTANT!
The water filter cartridge should be replaced after every decalcification process. Replacement filter cartridges are available in our Online shop via haushalt.graef.de/shop under Item no. 146242.
EXPLANATION OF THE DESCALING FUNCTION
- Descaling brewing unit.
- Descaling hot water lance.
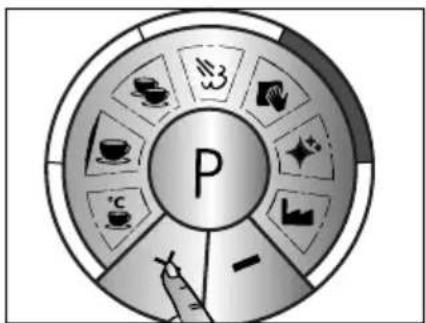
DESCALING HOT-WATER / STEAM LANCE
- Remove the water tank and fill 1.7 liters of fresh water.
- Add two decalcifying tablets to the water tank.
This takes about 5 minutes to dissolve in the water. - Place a large container under the steam distributor.
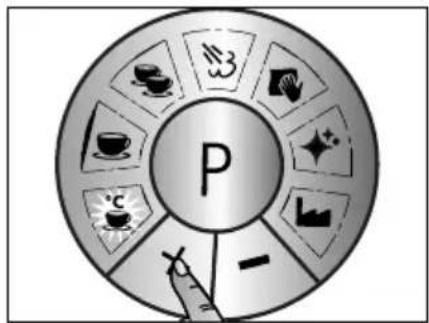
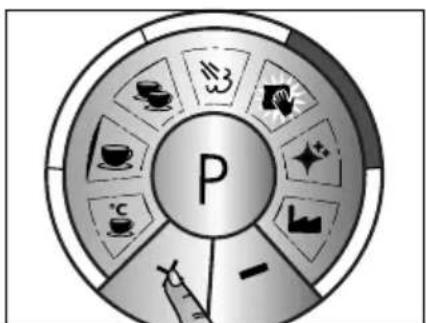
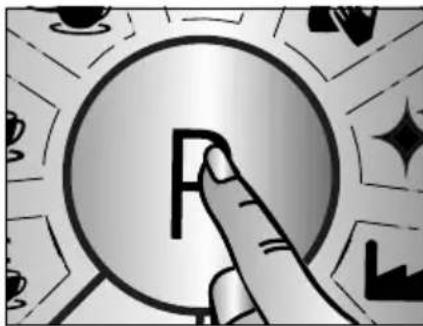
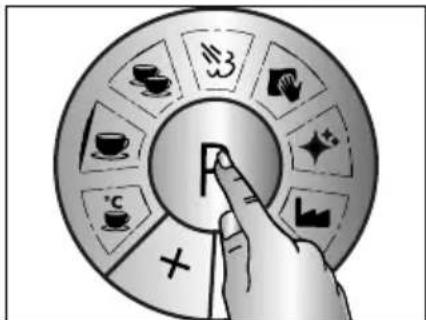
- Press the P button.
- Press the + button until
- Acknowledge with P button.
- Press the + button.
The right edge is lit, acknowledge with P button.
2 beeps confirm the descending process. - Turn on the control knob.
The decalcification process can take a few minutes.
The edge remains red until the process is finished. -
Turn off the control knob again. Units heats up.
-
Pour the descending mixture out of the vessel and place this vessel under the steam distributor.
- Fill in fresh water. (If there is still water in the tank, pour it away).
- Turn on the control knob.
- Turn the dial again after approx. 40 seconds.
IMPORTANT!
- In order to stop the decalcification process or to refill the water, press the P button. To resume, press the P button again.
- To cancel the descending process, press the P key for approx. 3 sec.
Keep standing at the unit during the descending process.
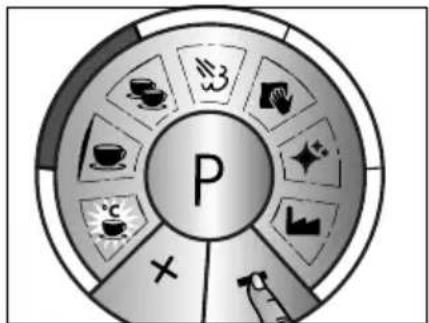
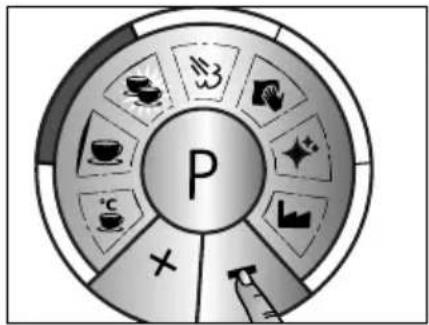
DESCALING THE BREWING HEAD
Take out the group handle, water tank and collection tray.
- Put the machine on its back side.
- Using a 2.5 ~mm Allen key, unscrew the screw under the brewing head.
- Remove the 2 filters and the sealing ring.
- Clean the filters and the sealing ring under running water.
- Dry them up well and put them in a safe place together with the screw and the washer.
- Take a small brush and clear the section in the brewing unit, and remove all old coffee remnants.
- Put the unit into an upright positon again.
- Re-insert the drip tray.
- Remove the tank and fill in 700ml of fresh water into the tank.
- Put one Graef descending tablet into the tank.
- This takes about 5 minutes to dissolve in the water.
- Place a large container (for example a measuring cup) under the brewing head.
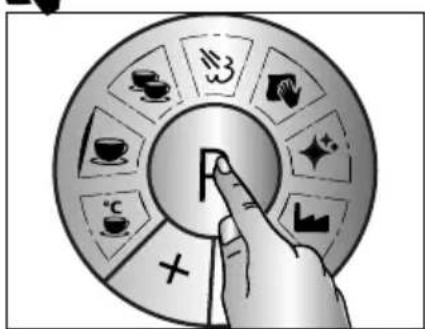
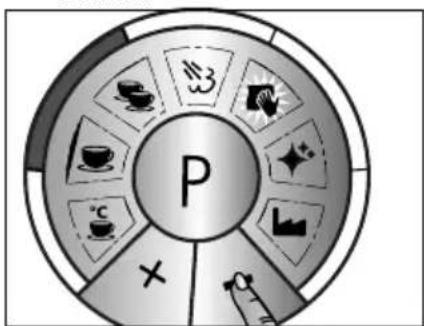
- Press the P button.
- Press the + button until
- Acknowledge two times with P button.
The left edge is lit.
2 beeps confirm the descending process.
The decalcification process can take a few minutes.
- The edge remains red until the process is finished.
- Decalcification is finished, the appliance heats up.
- Pour the mixture away and place the cup under the brewing head.
- Fill in fresh water. (If there is still water in the tank, pour it away).
- When the appliance has heated up, acknowledge with button.
- Allow water to run for about 40 seconds. Then press the button again.
- Allow the appliance to cool down.
- Now replace the sealing ring and strainer in the reverse order and tighten the strainer again.
IMPORTANT!
- In order to stop the decalcification process or to refill the water, press the P button. To resume, press the P button again.
- To cancel the descending process, press the P key for approx. 3 sec.
CLEANING THE BREW ASSEMBLY
We recommend to carry out backwashing once a week.
Only Use Graef cleaning tablets which are especially matched to our appliances. These can be found in our Online shop via haushalt.graef.de/shop under the Item no. 145614 or obtained from your specialist dealer.
- Fill in 2.5 liter of fresh water.
- Insert the filter insert for 2 cups.
- Insert the blind filter.
- Put a Graef cleaning tablet into the group handle.
- Clamp in the group handle.
- Make sure that the drip tray is inserted.
- Press the button.
After 10 seconds, press the button again.
Repeat this process 4 times. - Remove the blind filter.
- Clamp in the group handle.
- Press the button.
After 10 seconds, press the button again.
Repeat this process 4 times. - Now you can proceed as usual with preparing espresso.
Note: Empty the unit at the end of the drip tray and insert it back again.
EXTERNAL CLEANING
CAUTION
Watch the following safety instructions before starting to clean the unit:
- Switch the unit off before cleaning and pull the power cord from the electric socket.
- Let the unit cool down before cleaning.
- Do not use any aggressive or abrasive detergents and no solvents.
- Do not scratch off stubborn soiling with hard objects.
-
Do not put the unit into the dishwasher and do not hold under running water either.
-
Use a soft and moist cloth to clean the outer surfaces of the unit. Use a mild detergent in
case of heavy soiling.
Pull out the drip tray.
- Remove the drip tray.
Empty the drip tray.
Clean both under running water.
- Then reinsert the drip tray together with the grille.
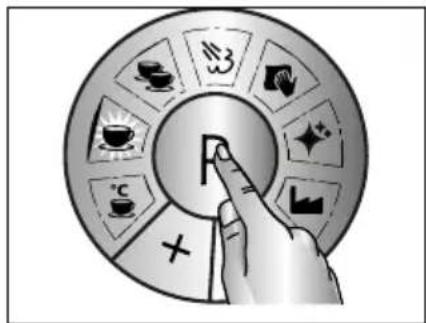
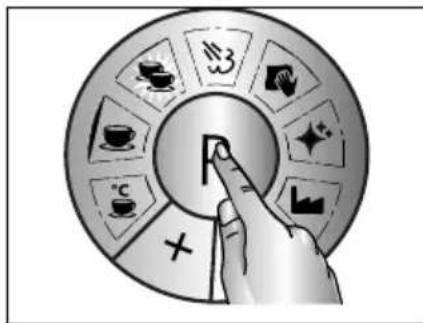
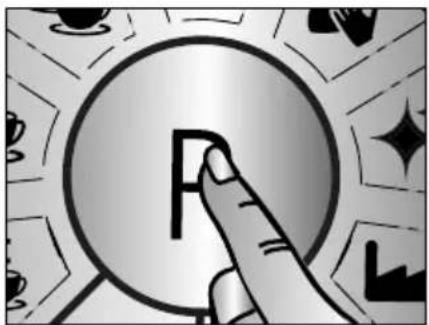
PROGRAMMING
It is possible for you to carry out various programming.
- Switch the unit on.

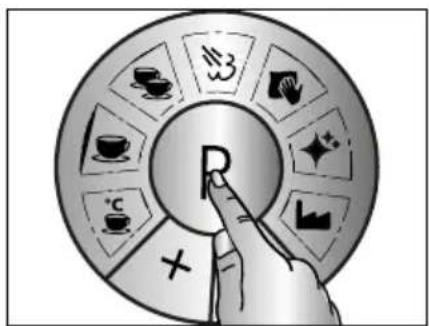
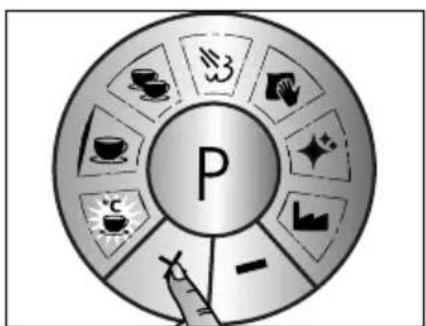
COFFEE TEMPERATURE
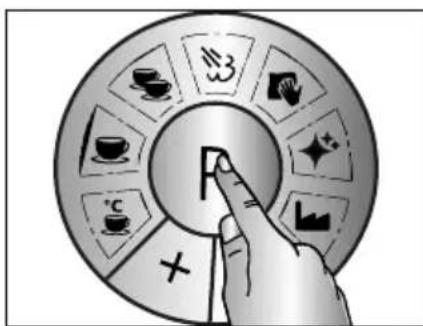
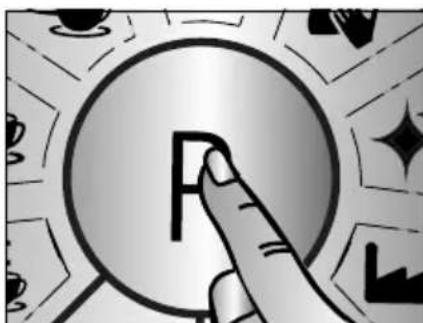
- Press the P button.
- Acknowledge directly with P button.
Factory setting
To change the temperature, press ^ + ^ or 一 ^
- "+" increases the temperature in 3^ steps.
- "-" decreases the temperature in 2^ steps.
- Confirm the desired temperature with P.

QUANTITY 1 CUP

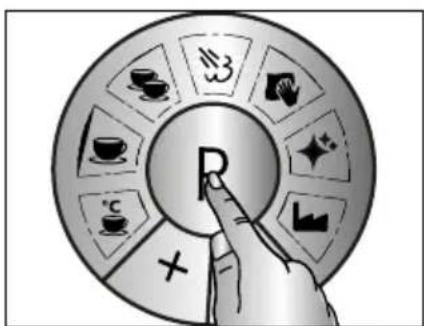
- Press the P button.

- Press the + button. - Acknowledge with P button.
Factory setting

- ^ + ^ increases the amount in 5 ml steps.
- "-" decreases the amount in 5 ml steps.

- Confirm the quantity with P button.

QUANTITY 2 CUP
Press the P button.
- Press the + button. - Acknowledge with P button.
Factory setting
-
"+" increases the amount in 5 ml steps.
-
"-" decreases the amount in 10ml steps.
- Confirm the quantity with P button.

- Press the + button. - Acknowledge with P button.
Factory setting
- " ^+ " increases the pump frequency - steam becomes more dried

- " ^+ " decreases the pump frequency - steam becomes more humid

- Confirm the desired frequency with P button.

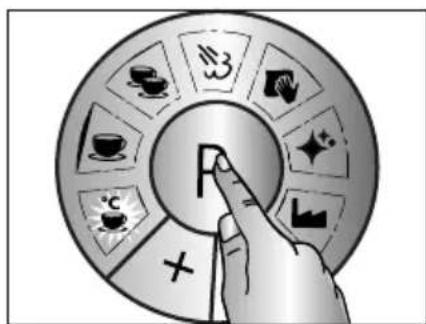
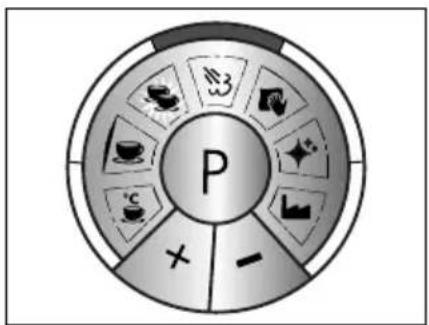
DESCALING REMINDER
- Press the P button.
- Press the + button. - Acknowledge with P button.
owledge with P button.
Factory setting 25 liter
- "+" increases the flow rate to 50 liters
- "-" decreases the flow rate to 12 liters
- Confirm the quantity with P button.

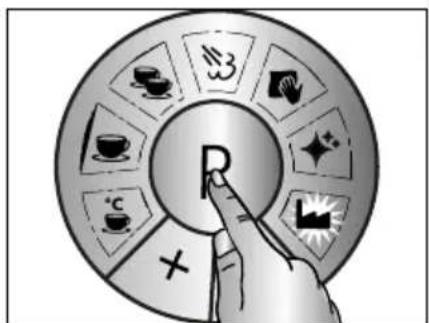
FACTORY SETTING
- Press the P button.
- Press the + button. - Acknowledge with P button.
AFTER-SALES SERVICE
If your Graef device is damaged, please contact your dealer or the Graef Customer Service at 02932- 9703677 or write an e-mail to service@graef.de

DISPOSAL OF THE PACKAGING
The packaging protects the unit against transport damage. The packaging materials are selected according to the environmental compatibility and disposal-related aspects and can therefore be recycled.
The return of packaging into the material cycle saves raw material and reduces the waste volume. Dispos of the packaging material no longer needed at collection points for the "Green Dot" recycling system (in Germany).
IMPORTANT!
If possible, keep the original packaging during the guarantee period of the device in order to be able to properly pack and transport the device in the guarantee case.

DISPOSAL OF THE UNIT
At the end of its service life, this product cannot be disposed of in normal domestic waste. The symbol on the product and in the operating instructions point out to this fact. The materials are recyclable according to your marking. With the reuse, recycling or other forms of recycling of
old equipment, you make an important contribution to the protection of our environment. Please ask your municipal administration for the disposal point.
TWO-YEAR WARRANTY
For this product, we assume 24 months manufacturer warranty for defects, which are due to production or material defects. Your legal warranty claim in conformity with Section 437 et seq. of the German Civil Code (BGB) shall remain unaffected by this regulation. The warranty does not cover damage caused by improper handling or use as well as defects which only slightly influence the function or the value of the appliance. We do not assume any liability for damage caused by lack of or insufficient descaling and maintenance. In this case, the warranty will also become null and void. Use only the original Graef decalcification and cleaning tablets. Transport damages, as far as we are not responsible for it, are excluded from the warranty claims. A warranty claim is excluded for damage caused by a repair which has not been carried out by us or one of our agents. In case of justified complaints, we shall repair the defective product or replace it by a product without defects at our discretion.
TABLE DES MATIÈRES
Chere cliente, cher client,
12 L = (hard water boven 15^ )
25 L = (middelhard water 7,3°dH tot 14°dH)
50L = (zacht water tot 7,3^)
MANUELE ESPRESSO BEREIDING
NASPOELEN NA ONTKALKING
CAFFE ESPRESSO DOPPIO
TILBEREDNING AF ESPRESSO
VIGTIGT!
Vaeopmaerksompa,at der er tilstraekelig med vand i tanken.
Vaeopmaerksompa,atvandtankenaltiderplaceretkorrekt.

ENKELT ESPRESSO
Bemerk: For at opvarme filterbeholderen, systemet og koppen, se forberedning. Derefter begynder du med espresso tilberedningen. Placer filterindsatsen til 1 kop i filterbeholderen.
MANUEL TILBEREDNING AF ESPRESSO
AFKALKNING AF DAMPDYSE

- GENERAL SAFETY INSTRUCTIONS
- CAUTION
- PREFACE
- INFORMATION ON THESE OPERATING INSTRUCTIONS
- WARNING MESSAGES
- WARNING
- IMPORTANT!
- INTENDED USE
- LIMITATION OF LIABILITY
- UNPACKING
- REQUIREMENTS ON THE INSTALLATION LOCATION
- ELECTRICAL CONNECTION
- DESCALING REMINDER
- PRESSURE GAUGE
- Under-extraction:
- Optimal Range
- Over-extraction:
- PRIOR TO FIRST USE
- INITIAL OPERATION
- VENTING
- PREPARATION
- Switch the unit on U
- ESPRESSO PREPARATION
- SINGLE ESPRESSO
- DOUBLE ESPRESSO
- AUTOMATIC SWITCHING OFF
- MAKING MILK FROTH
- Please note:
- Tips for making milk froth
- The phases "steep" and "roll"
- To practise it, you can use the following method:
- HOT WATER WITHDRAWAL
- DESCALING
- EXPLANATION OF THE DESCALING FUNCTION
- DESCALING HOT-WATER / STEAM LANCE
- DESCALING THE BREWING HEAD
- CLEANING THE BREW ASSEMBLY
- EXTERNAL CLEANING
- PROGRAMMING
- COFFEE TEMPERATURE
- QUANTITY 1 CUP
- QUANTITY 2 CUP
- FACTORY SETTING
- AFTER-SALES SERVICE
- DISPOSAL OF THE PACKAGING
- DISPOSAL OF THE UNIT
- TWO-YEAR WARRANTY
- TABLE DES MATIÈRES
- MANUELE ESPRESSO BEREIDING
- NASPOELEN NA ONTKALKING
- CAFFE ESPRESSO DOPPIO
- TILBEREDNING AF ESPRESSO
- VIGTIGT!
- ENKELT ESPRESSO
- MANUEL TILBEREDNING AF ESPRESSO
- AFKALKNING AF DAMPDYSE
Brand : GRAEF
Model : ES 850
Category : Coffee machine