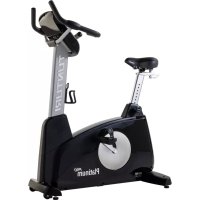
Platinum Upright - Exercise bike TUNTURI - Free user manual and instructions
Find the device manual for free Platinum Upright TUNTURI in PDF.

User questions about Platinum Upright TUNTURI
0 question about this device. Answer the ones you know or ask your own.
Ask a new question about this device
Download the instructions for your Exercise bike in PDF format for free! Find your manual Platinum Upright - TUNTURI and take your electronic device back in hand. On this page are published all the documents necessary for the use of your device. Platinum Upright by TUNTURI.
USER MANUAL Platinum Upright TUNTURI
TUNTURI® From the Heart
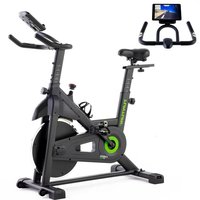
Upright Bike
www.tunturi.com
Contents
Installation
| Important safety instructions | 2 |
| Assembly | 3 |
| Console | |
| Console operation |
Fitness -
| Fitness | test |
| Heart | rate |
| Exercising |
Maintenance -
| Maintenance | |
| Troubleshooting | |
| Technical | data |
Product information -
| Exploded | view |
| Parts | list |
Welcome to the world of Tunturi exercising!
Your choice shows that you really want to invest in your well being and condition; it also shows you really value high quality, safe and motivating product as your training partner. Whatever your goal in training, we are certain this is the training equipment to get you there. You'll find information about using your exercise equipment and what makes for efficient training at Tunturi's website at www.tunturi.com
Important Safety Instructions
Read this guide through carefully before assembling, using or servicing your fitness equipment. Please keep the guide somewhere safe; it will provide you now and in the future with the information you need to use and maintain your equipment. Always follow these instructions with care.
Note about your health
Before you start any training, consult a physician to check your state of health.
If you experience nausea, dizziness or other abnormal symptoms while exercising, stop your workout at once and consult a physician.
- To avoid muscular pain and strain, begin each workout by warming up and end it by cooling down (slow pedaling at low resistance). Don't forget to stretch at the end of the workout.
Note about the exercise environment
The equipment is not to be used outdoors.
- Place the equipment on a firm, level surface. Place the equipment on a protective base to avoid any damages to the floor beneath the equipment.
Make sure that the exercising environment has adequate ventilation. To avoid catching cold, do not exercise in a draughty place.
- In training, the equipment tolerates an environment measuring +10^ to +35^ . The equipment can be stored in temperatures ranging between -15^ and +40^ .
Air humidity in the training or storage environment must never exceed 90% .
Note about the equipment
If children are allowed to use the equipment, they should be supervised and taught to use the equipment properly, keeping in mind the child's physical and mental development and their personality.
- Before you start using the equipment, make sure that it functions correctly in every way. Do not use faulty equipment.
- Press the keys with the tip of the finger; your nails may damage the key membrane.
- Never lean on the interface.
- Never remove the side covers. Do not step on the frame casing.
- Only one person may use the equipment at a time.
- Hold the handlebar for support when getting on or off the equipment.
Wear appropriate clothing and shoes when exercising.
- Project the meter from sunlight and always dry the surface of the meter if there are any drops of sweat on it.
Further information on warranty terms can be found in the warranty booklet included with the product.
- Please note that the warranty does not cover damage due to shipping or negligence of adjustment or maintenance instructions described in this manual.
The equipment must not be used by persons weighing over 150 kg.
- Do not attempt any servicing or adjustments other than those described in this guide. Everything else must be left to someone familiar with the maintenance of electromechanical equipment and authorized under the laws of the country in question to carry out maintenance and repair work.
- Never drop or insert any object into any openings.
Do not use outdoors.
- Do not use excessive pressure on console control keys. They are precision set to properly function with little finger pressure. Pushing harder is not going to make the unit go faster or slower. If you feel the buttons are not functioning properly with normal pressure, contact your dealer.
SAVE THIS INSTRUCTION MANUAL
Assembly instructions
Step 1: Rear support tube assembly
- Install the Rear support tube (5) onto the Main Frame (1) with four 3/8'' × 2'' Hex Head Bolts (50) and four 3/8'' × 25mm Flat Washers (71).
1.

71.3/8"X25mmx2T Flat Washer - 4PCS
- 3/8"X2" Hex Head bolt - 4PCS

- 12/14m/m_Wrench
Step 2: Front Upright Tube Assembly
- Unravel the Computer Cable (29) and snake it through the Upright tube Cover (38) and the Upright tube (2) until the cable connector comes out the top opening of the upright tube. Slide the plastic cover (38) onto the upright tube, ensuring the correct orientation of the cover.
- Install the Upright tube (2) onto the Main Frame (1) with seven 5 / 16^ × 5 / 8^ Hex Head bolts (51), six 5 / 16^ × 18mm Flat Washers (72) on the side screws and one 5 / 16^ × 19mm Curved Washer (99) on the front screw.
2.


72.5/16'X18mmX1.5T Flat Washer - 6PCS

- 5/16'X5/8' Hex Head Bolt - 7PCS

99.5/16'X19mmX1.5T Curved Washer - 1PCS

- 12/ln/n_Wrench
Step 3: Handlebar
- Run the two hand pulse wires (26) into the hole in the handle bar mounting plate and out through the hole in the console plate. Install the Handle Bar (3) onto the Upright tube (2) with two 5/16'' × 5/8'' Hex Head bolts (51), two 5/16'' × 18mm Flat Washers (72) and two 5/16'' Split Washers (103) being careful not to pinch the hand pulse wires.
3.
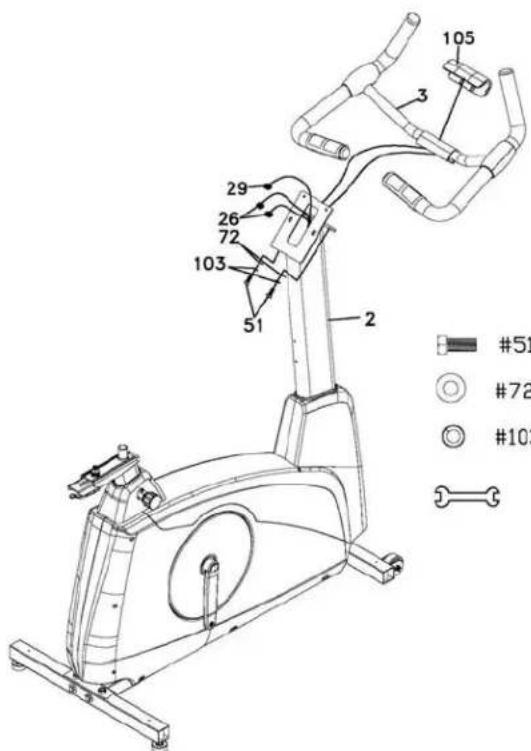
- 5/16'X5/8' Hex Head Bolt - 2PCS
72.5/16'X18mmX1.5T Flat Washer - 2PCS
103.5/16'X1.5T Split Washer - 2PCS
- 12/14m/m_Wrench
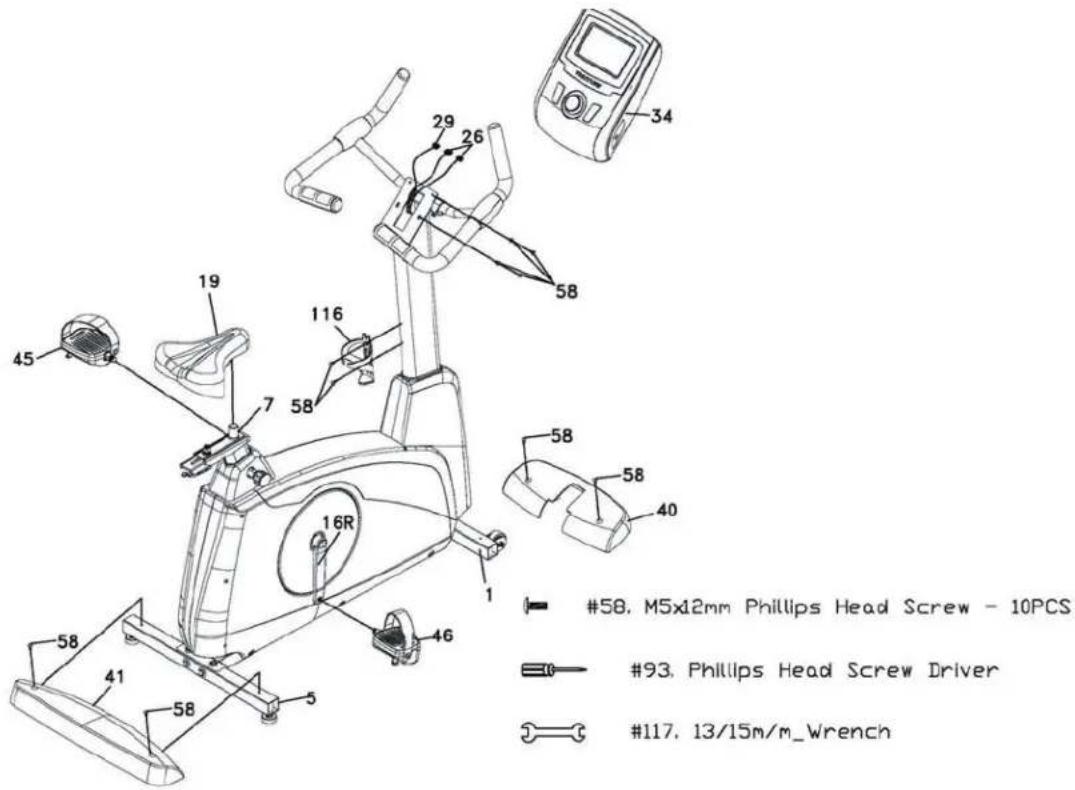
Step 4: Console, Seat, Pedals And Main Housing Covers Assembly
- Insert the Computer Cable (29) and two Hand pulse cables (26) into the connectors in the back of the Console (34). Install the Console (34) onto the Upright tube with four M5x12mm Phillips Head Screws (58).
- Install the Front Foot Cover (40) and the Rear Foot Cover (41) onto the Main Frame (1) with four M5x12mm Phillips Head Screws (58).
- Install the Pedals (45 L, 46R) onto the Crank arms (16L, 16R). Remember that the left pedal has a reverse thread and will be screwed into the crank in the opposite rotation from normal threads. There is an "L" stamped into the end of the threaded post of the
left pedal and an "R" in the right. Make sure to tighten the pedals as much as you possibly can. It may be necessary to re-tighten the pedals if you feel a thumping during pedaling the bike. A noise or feeling such as a thumping or clicking is usually caused by the pedals being too loose.
- Install the Seat slide tube (7) onto the track on top of the seat tube with the seat post facing forward. Install the seat (19) onto the seat post.
- Install the Bottle Holder (116) onto the Upright tube with two M5x12mm Phillips Head Screws (58).
4.
Console
The commercial bikes have a built-in generator for power and do not need to be plugged into an AC outlet. To power up the console simply start to pedal, the console will turn on automatically. To save the lift of the generator, please keep pedaling at low speed during console operation.
After 2 min of no use (pedaling input or button input), the console will turn off automatically.
Keys
- QUICK / START
This is the quickest way to start a workout. Use QUICK/START button to begin a selected training or to resume your workout during Pause. - BACK / STOP Use BACK/STOP button to navigate back towards Program Menu. During training, you can pause or stop your training session by pressing BACK/STOP button.
- JOGWHEEL The JOGWHEEL functions in two ways: A) By rotating the JOGWHEEL clockwise, you can scroll the menus downwards or to the right, and increase values or resistance. By rotating the JOGWHEEL counterclockwise, you can scroll the menus upwards or to the left, and decrease values or resistance.
B) By pressing the JOGWHEEL, you accept the selection you made.
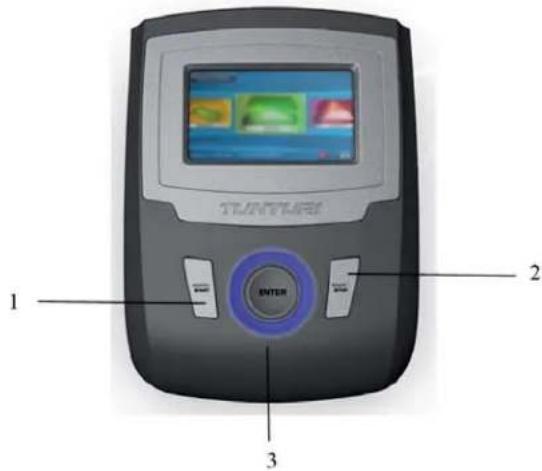
Message Bar
During the workout and menu selection, there are helpful hints and explanations in the message bar on the bottom of the display.
Operating the console
Personal data
After the console powers up for a few seconds, it will display personal data. You can adjust your own personal data or press QUICK/START button to begin Program Menu.
To update personal data, select the value to change with the JOGWHEEL, press ENTER and adjust the value. Press ENTER again to confirm the updated value.
Create Personal Data
- Select a language by rotating the JOGWHEEL and confirm your selection by pressing the JOGWHEEL. You will automatically be taken to the next setting.
- Select the units you wish to use: Metric—km/kg/cm, or the corresponding Imperial—ml/lbs/inch. Make your selection by rotating the JOGWHEEL, and confirm by pressing the JOGWHEEL.
- Set your gender by rotating the JOGWHEEL. Confirm your selection.
- Set your age, Confirm your selection.
- Set your height. Confirm your selection.
- Set your weight. Confirm your selection.
- Set your maximum heart rate using the formula 220 - age. If you know your exact maximum heart rate, you can adjust the estimated maximum heart rate given by the meter.
After you have updated all Personal Data, select SAVE & CONTINUE, and press ENTER to proceed. If needed, you can access the Personal Data again from the Program Menu.
Program menu
In the Program Menu, you can select one of the following training sessions via the JOGWHEEL.
Manual
Basic program, with which you can set your effort level manually with the JOGWHEEL during the workout.
After selecting the Manual program, you can set target TIME, DISTANCE, or HR by rotating the JOGGWHEEL and confiming the value (by pressing the JOGGWHEEL).
After your settings are done, press START button to begin training.
During the training you can pause the training with the BACK/STOP button, or press twice to stop the training
Hill
The Hill program simulates going up and down a hill. The resistance in the pedals will steadily increase and then decrease during the program.

After selecting the Hill program, you can set target TIME, DISTANCE, or HR by rotating the JOGGHEEL and confining the value (by pressing the JOGG WHEEL).
After your settings are done, press START button to begin training.
This program will start with a warming up skip by
pressing START button.
- During the training you can pause the training with the BACK/STOP button, or press twice to stop the training.
This program ends with a cooling down, you can skip by pressing STOP button.
Fatburn
The Fat Burn program is designed to maximize the burning of fat. The absolute best way to burn fat is to keep your heart rate at around 60% to 70% of its maximum potential. This program does not use heart rate but simulates a lower, steady exertion workout.

After selecting the Fatburn program, you can set target TIME, DISTANCE, or HR by rotating the JOGGWHEEL and confirming the value (by pressing the JOGGWHEEL).
- After your settings are done, press START button to begin training.
This program will start with a warming up skip by pressing START button.
- During the training you can pause the training with the BACK/STOP button, or press twice to stop the training.
- This program ends with a cooling down, you can skip by pressing STOP button.
Interval
The Interval program takes you through high levels of intensity followed by periods of low intensity. This program increases your endurance by depleting your oxygen level followed by periods of recovery to replenish oxygen. Your cardio vascular system gets programmed to use oxygen more efficiently this way.
After selecting the Interval program, you can set target TIME, DISTANCE, or HR by rotating the JOGGHEEL and confirming the value (by pressing the JOGGHEEL).
After your settings are done, press START button to begin training.
This program will start with a warming up skip by pressing START button.
During the training you can pause the training with the BACK/STOP button, or press twice to stop the training.
This program ends with a cooling down, you can skip by pressing STOP button.
Cardio
The Cardio program is designed to increase your Cardio vascular function. This is an exercise for your heart and lungs. It will build up your heart muscle and increase blood flow and lung capacity. This is achieved by incorporating a higher level of exertion with slight fluctuations in work.

After selecting the Cardio program, you can set target TIME, DISTANCE, or HR by rotating the JOGG WHEEL and confiming the value (by pressing the JOGGWHEEL).
- After your settings are done, press START button to begin training.
- This program will start with a warming up skip by pressing START button.
- During the training you can pause the training with the BACK/STOP button, or press twice to stop the training.
This program ends with a cooling down, you can skip by pressing STOP button.
5K
This is a preset for 5 km distance track.
- Press START button to begin training.
- This program will start with a warming up skip by pressing START button.
During the training you can pause the training with the BACK/STOP button, or press twice to stop the training.
This program ends with a cooling down, you can skip by pressing STOP button.
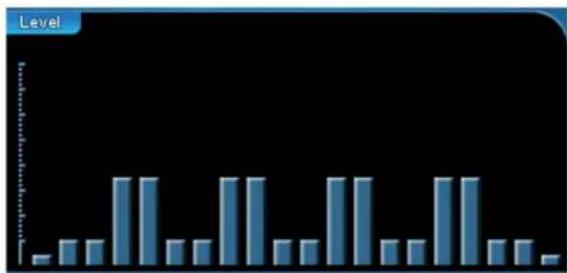
User
The User program is designed to create your own workout.
After selecting the User program, you can set target TIME, DISTANCE, or HR by rotating the JOGGHEEL and confiming the value (by pressing the JOGGHEEL).
After your settings are done, you can personalize the level profile for the training, by selecting the steps and increasing or decreasing the steps.
- Then press START button to begin training.
- This program will start with a warming up skip by pressing START button.
- During the training you can pause the training with the BACK/STOP button, or press twice to stop the training.
- This program ends with a cooling down, you can skip by pressing STOP button.
Target HR 1 & 2
The Target HR (Heart Rate) programs allow you to preset your pulse level.
After selecting a Target HR program, you can set target TIME, or HR by rotating the JOGWHEEL and confirming the value (by pressing the JOGWHEEL).
- After your settings are done, press START button to begin training.
- During the training you can pause the training with the BACK/STOP button, or press twice to stop the training.
Fitness test
The fitness test is based on the YMCA protocol and is a sub-maximal test that uses predetermined, fitxed work levels that are based on your heart rate readings as the test progresses. The test begins at a low level of effort, which increases steadily. A multi-step test is a safe and reliable, submaximal means of measuring a person's physical fitness level. The test continues until the test subject has achieved his or her individual target heart rate (85% of maximum heart rate).
The test requires the use of a heart rate belt or handpulse grips: the console monitors changes in the heart rate throughout the test, using the data to calculate an estimate of the tested person's maximum oxygen uptake capacity.
The maximum oxygen uptake capacity is the best measure of a person's physical fitness level. After the test, the meter gives versatile information on your fitness level: a description and a numerical value (ml / kg / min) . The test will take between 6 to 15 minutes to complete, depending on your level of fitness.
Before the test:
Make sure you are in good health; check with your physician before performing any exercise if you are over the age of 35 or persons with pre-existing health conditions.
- Adjust the seat to the proper position so that when your leg is extended during pedaling there is a slight bend at the knee of about 5 degrees.
Make sure you have warmed up and stretched before taking the test.
- Do not take in caffeine before the test.
- Hold the hand grips gently, do not tense up.
Press START button to begin training.
During the test:
The console must be receiving a steady heart rate for the test to begin. You may use the hand pulse sensors or wear a heart rate chest strap transmitter.
- You must maintain a steady 50 RPM pedal speed. If your pedal speed drops below 48 RPM or goes above 52 RPM the console will emit a steady beeping sound until you are within this range.
1. The message window will always display your pedal speed on the right side to help you maintain 50RPM.
2. The data shown during the test is:
a. Work in Watts [1 wait is equal to 6.1 kg·m/min.]
b. HR is your actual heart rate; THR is the target heart rate to reach to end the test.
c. Time is the total elapsed time of the test.
| Age Sex Level | 18-25 26-35 | 36-45 | 46-55 | 56-65 | 65+ | |||
| Male | Excellent | >60 | >56 | >51 | >45 | >41 | >37 | |
| Very good | 52-60 | 49-56 | 43-51 | 39-45 | 36-41 | |||
| Good | 47-51 | 43-48 | 39-42 | 35-38 | 32-35 | |||
| Average | 42-46 | 40-42 | 35-38 | 32-35 | 30-31 | |||
| Low | 37-41 | 35-39 | 31-34 | 29-31 | 26-29 | |||
| Very low | 30-36 | 30-34 | 26-30 | 25-28 | 22-25 | |||
| Poor | <30 | <30 | <26 | <25 | <22 | <20 | ||
| Female | Excellent | 56 | 52 | 45 | 40 | 37 | ||
| Very good | 47-56 | 45-52 | 38-45 | 34-40 | 32-37 | |||
| Good | 42-46 | 39-44 | 34-37 | 31-33 | 28-31 | |||
| Average | 38-41 | 35-38 | 31-33 | 28-30 | 25-27 | |||
| Low | 33-37 | 31-34 | 27-30 | 25-27 | 22-24 | |||
| Very low | 28-32 | 26-30 | 22-26 | 20-24 | 18-21 | |||
| Poor | <28 | <26 | <22 | <20 | <18 | <17 | ||
Upright Bike
After the test:
Cool down for about one to three minutes.
The display will show your training result. Its meaning is stated in the table below.
Take note of your score because the console will automatically continue after a few minutes.
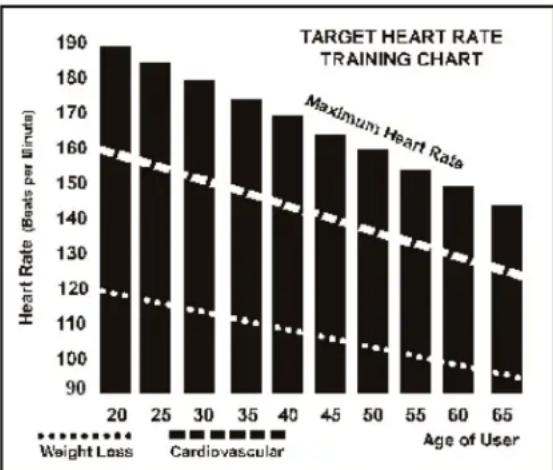
Heart Rate Training
A word about Heart Rate:
The old motto, "no pain, no gain", is a myth that has been overpowered by the benefits of exercising comfortably. A great deal of this success has been promoted by the use of heart rate monitors. With the proper use of a heart rate monitor, many people find that their usual choice of exercise intensity was either too high or too low and exercise is much more enjoyable by maintaining their heart rate in the desired benefit range.
To determine the benefit range in which you wish to train, you must first determine your Maximum Heart Rate. This can be accomplished by using the following formula: 220 minus your age. This will give you the Maximum heart rate (MHR) for someone of your age. To determine the effective heart rate range for specific goals you simply calculate a percentage your MHR. Your Heart rate training zone is 50% to 90% of your maximum heart rate. 60% of your MHR is the zone that burns fat while 70% is for strengthening the cardio vascular system. This 60% to 70% is the zone to stay in for maximum benefit.
For someone who is 40 years old their target heart rate zone is calculated:
220-40=180 (maximum heart rate)
180 × .6 = 108 beats per minute ( 60% of maximum)
180 X .7 = 126 beats per minute (70% of maximum)
So for a 40 year old the training zone would be 108 to 126 beats per minute.
How to wear your wireless chest strap transmitter:
- Attach the transmitter to the elastic strap using the locking parts.
- Adjust the strap as tightly as possible as long as the strap is not too tight to remain comfortable.
- Position the transmitter with the logo centered in the middle of your body facing away from your chest (some people must position the transmitter slightly left of center). Attach the final end of the elastic strap by inserting the round end and, using the locking parts, secure the transmitter and strap around your chest.
- Position the transmitter immediately below the pectoral muscles.
- Sweat is the best conductor to measure very minute heart beat electrical signals. However, plain water can also be used to pre-wet the electrodes (2 black square areas on the reverse side of the belt and either side of transmitter). It's also recommended that you wear the transmitter strap a few minutes before your work out. Some users, because of body chemistry, have a more difficult cult time in achieving a strong, steady signal at the beginning. After "warming up", this problem lessens. As noted, wearing clothing over the transmitter/strap doesn't affect performance.
- Your workout must be within range - distance between transmitter/receiver - to achieve a strong steady signal. The length of range may vary some what but generally stay close enough to the console to maintain good, strong, reliable readings. Wea ring the transmitter immediately against bare skin assures you of proper operation. If you wish, you may wear the transmitter over a shirt. To do so, moisten the areas of the shirt that the electrodes will rest upon.
NOTE!
The transmitter is automatically activated when it detects activity from the user's heart. Additionally, it automatically deactivates when it does not receive any activity. Although the transmitter is water resistant, moisture can have the effect of creating false signals, so you should take precautions to completely dry the transmitter after use to prolong battery life (estimated transmitter battery life is 2500 hours). If your chest strap has a replaceable battery the replacement battery is Panasonic CR2032.
Caution! Do not use this bike for Target Heart Rate unless a steady, solid Actual Heart Rate value is being displayed. High, wild, random numbers being displayed indicate a problem.
- Areas to look at for interference, which may cause erratic heart rate:
- Microwave ovens, TVs, small appliances, etc. Fluorescent lights.
- Some household security systems.
- Perimeter fence for a pet.
- Some people have problems with the transmitter picking up a signal from their skin. If you have problems trying wearing the transmitter upside down. Normally the transmitter will be oriented so the logo is right side up.
- The antenna that picks up your heart rate is very sensitive. If there is an outside noise source, turning the whole machine 90 degrees may detune the interference.
- If you continue to experience problems contact your dealer.
Exercising
Working out with this device is excellent aerobic exercise, the principle being that the exercise should be suitably light, but of long duration. Aerobic exercise is based on improving the body's maximum oxygen uptake, which in turn improves endurance and fitness. The ability of the body to burn fat as a fuel is directly dependent on its oxygen uptake capacity. Aerobic exercise should be above all pleasant. You should work up a light sweat but you should not get out of breath during the workout.
You should exercise at least three times a week, 30 minutes at a time, to reach a basic fitness level Maintaining this level requires a few exercise sessions each week. Once the basic condition has been reached, it is easily improved, simply by increasing the number of exercise sessions. You should start slowly at a low pedalling speed and low resistance, because for an overweight person strenuous exercise may subject the heart and circulatory system to excessive strain. As fitness improves, resistance and pedalling speed can be increased gradually.
Maintenance
The equipment requires very little maintenance. Check, however, from time-to-time that all screws and nuts are tight.
After exercising, clean the equipment with a soft, absorbent cloth. Do not use solvents.
- Never remove the equipment's protective casing.
The electromagnetic brake forms a magnetic fi eld that may damage the mechanism of a watch, or the magnetic identifi cation strip on a credit or cash card, should they come into immediate contact with the magnets. Never attempt to detach or remove the electromagnetic brake! The electromagnetic brake is based on electromagnetic resistance; resistance level is electronically measured and shown as watt reading on the display. Due to the measurement system, your Tunturi ergometer need not be recalibrated when assembled, serviced and used according to this Owner's Manual.
Troubleshooting
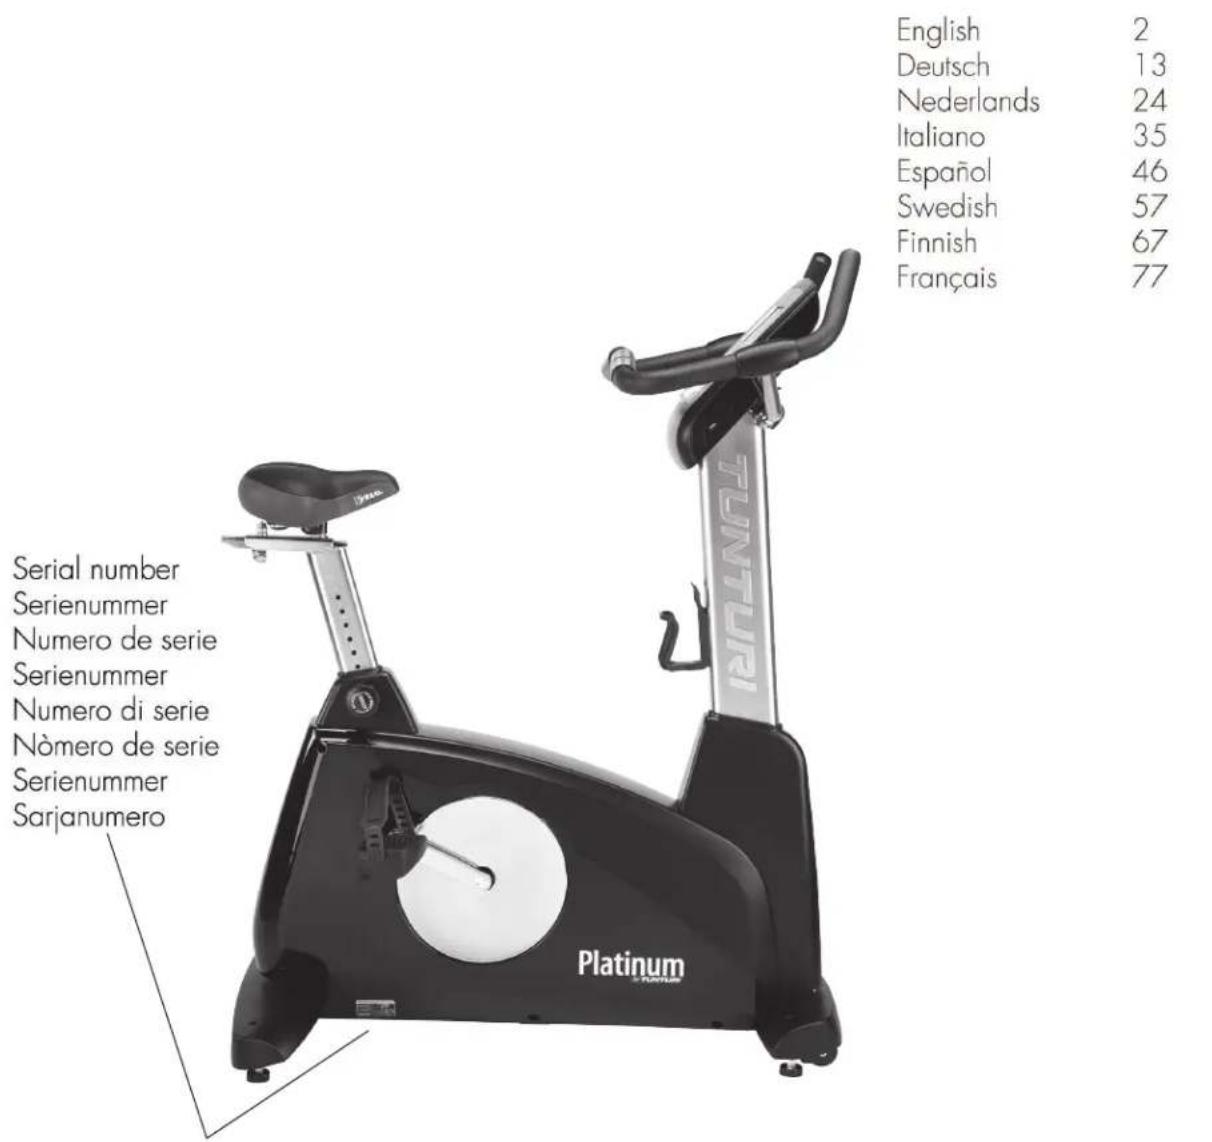
Despite continuous quality control, defects and malfunctions caused by individual components may occur in the equipment. In most cases it's unnecessary to take the whole device in for repair, as it's usually sufficient to replace the defective part. If the equipment does not function properly during use, contact your Tunturi dealer immediately. Always give the model and serial number of your equipment. Please state also the nature of the problem, conditions of use and purchase date.
If you require spare parts, always give the model, serial number of your equipment and the spare part number for the part you need. The spare part list is at the back of this manual. Use only spare parts mentioned in the spare part list.
Moving and storage
Please follow these instructions when carrying and moving the cycle about, because lifting it incorrectly may strain your back or risk other accidents: Stand behind the equipment. Grip the seat with one hand and the handlebar with the other, and set your foot on the rear support. Tilt the equipment so that it rests on its transport wheels. Wheel the equipment to move it, on these transport wheels. Lower the equipment while holding on to the handlebar and remain behind the equipment all the time.
NOTE!
Transport the equipment with caution over uneven surfaces, for example over a step. The equipment should never be transported upstairs using the wheels over the steps, instead it must be carried. We recommend that you use a protective base when transporting the equipment.
To prevent the equipment malfunctioning, store in a dry place with as little temperature
Technical specifications
Length 108 cm
Width 55cm
Height 136 cm
Weight 53 kg
This product meets the requirements of the EU's EMC Directives on electromagnetic compatibility (89/336/EEC) and electrical equipment designed for use within certain voltage limits (73/23/EEC). This product therefore carries the CE label.
This product meets EN precision and safety standards (Class SA, EN-957, parts 1 and 5).
Due to our continuous policy of product development, Tunturi reserves the right to change specific cations without notice.

NOTE!
The instructions must be followed carefully in the assembly, use and maintenance of your equipment. The warranty does not cover damage due to negligence of the assembly, adjustment and maintenance instructions described herein. Changes or modifications not expressly approved by Tunturi Oy Ltd will void the user's authority to operate the equipment!
WE WISH YOU MANY ENJOYABLE TRAININGS WITH YOUR NEW TUNTURI TRAINING PARTNER!
Inhaltsverzeichnis
Installation
71.3/8"X25mmx2T Flat Washer - 4PCS
50.3/8"X2"HexHead bolt-4PCS

- 12/14m/m_Wrench
Transport undagerung
71.3/8"X25mmx2T Flat Washer - 4PCS
- 3 / 8^ 2^ Hex Head bolt - 4PCS

- 12/14m/m_Wrench
Stap 2: Montage Van De Verticale Buis Voor
72.5/16'X18mmX1.5T Flat Washer - 6PCS
E
- 5/16'X5/8' Hex Head Bolt - 7PCS
99.5/16'X19mmX1.5T Curved Washer - 1PCS
- 12/ln/n_Wrench
FitnessTrainingMetTunturi
- 3/8"X2" Hex Head bolt - 4PCS

- 12/14m/m_Wrench
71. 3/8"X25mmx2T Flat Washer - 4PCS
- 3/8"X2" Hex Head bolt - 4PCS

- 12/14m/m_Wrench
72.5/16'X18mmX1.5T Flat Washer - 6PCS
E
- 5/16'X5/8' Hex Head Bolt - 7PCS
99.5/16'X19mmX1.5T Curved Washer - 1PCS
- 12/ln/n_Wrench
71.3/8"X25mmx2T Flat Washer - 4PCS
50.3/8"X2"HexHead bolt-4PCS

- 12/14m/m_Wrench
Steg 2: Montering Av Stang For Staende Cykel
71. 3/8"X25mm×2T Flat Washer - 4PCS
50.3/8"X2"HexHead bolt-4PCS

- 12/14m/m_Wrench
CONSERVEZ CES INSTRUCTIONS!
- 3/8"X2" Hex Head bolt - 4PCS

- 12/14m/m_Wrench
| # Part description Q'ty |
| 1 Main Frame 1 |
| 2 Upright tube 1 |
| 3 Handle Bar 1 |
| 5 Rear support tube 1 |
| 6 Seat Slider 1 |
| 7 Sliding Seat Mount 1 |
| 9 Belt tightener Assembly 1 |
| 11 Crank Axle 1 |
| 13 Main Cover Bracket 1 |
| 14 Drive Belt 1 |
| 15 Ø330_Drive Pulley 1 |
| 16L Crank [L] 1 |
| 16R Crank [R] 1 |
| 17 6004_Bearing 2 |
| 18 6203_Bearing 2 |
| 19 Seal 1 |
| 20 Induction Brake 1 |
| 21 Generator/Brake Controller 1 |
| 22 Magnet 1 |
| 23 300m/m_Sensor W/Cable 1 |
| 24 1 x 5T x 250m/m_Handgrip Foam 2 |
| 25 1" x 5T x 200m/m_Handgrip Foam 2 |
| 26 800m/m_Handpulse W/Cable Assembly 2 |
| 27 Battery 1 |
| 29 2000m/m_Computer Cable 1 |
| 30 200m/m_Wire Brake Coil Harness 1 |
| 31 Generator Wire Harness 1 |
| 34 Console 1 |
| 35 Ø35 x 10m/m_Rubber Foot 4 |
| 36 Main Cover[L] 1 |
| 37 Main Cover[R] 1 |
| 38 Upright tube Cover 1 |
| 39 Seat Post Cover 1 |
| 40 Front Support tube Cover 1 |
| 41 Rear Support tuber Cover 1 |
| 42 Hardgrip Side Cap[Top] 2 |
| 43 Hardgrip Side Cap (Bottom) 2 |
| 45 Pedal[L] 1 |
| 46 Pedal[R] 1 |
| 47 Transport Wheel 2 |
| 49 Ø25.4 x 2.0T_Button Head Plug 4 |
| 50 3/8" x 2" _Hex Head Bolt 4 |
| 51 5/16" x 5/8" _Hex Head Bolt 9 |
| 52 5 x 19m/m_Tapping Screw 2 |
| 53 5/16" x 1-3/4" _Button Head Socket Bolt 2 |
| 54 1/4" x 3/4" _Hex Head Bolt 8 |
| 55 M8 x 170m/m_J Boll 1 |
| 56 M6 x 15m/m_Phillips Head Screw 3 |
| 58 M5 x 12m/m_Phillips Head Screw 23 |
| 59 3/8" x 2m/m_FLat Head Socket Bolt 4 |
| 62 Ø3 x 20m/m_Tapping Screw 4 |
| 65 Ø3 x 10m/m_Tapping Screw 4 |
| 66 Ø17_C Ring 1 |
| 67 Ø20_C Ring 2 |
| 69 1/4" x 13mm x 1T_FLat Washer 7 |
| 70 3/8" x 19mm x 1.5T_FLat Washer 4 |
| 58 84.5 x 76cm_Steel Cable 1 |
| 61 Seat 1 |
| 63 Mesh Seat Back 2 |
| 64 Ø1 x 5T x 600m/m_Handgrip Foam 4 |
| 65 3/8" x 2-1/4" _Hex Head Bolt 4 |
| 66 1/4" x 3/4" _Hex Head Bolt 8 |
| 67 3/8" x 4" _Hex Head Bolt 2 |
| 68 5/16" x 5/8" _Hex Head Bolt 8 |
| 69 5/16" x 2-1/2" _Hex Head Bolt 1 |
| 70 5/16" x 1-1/4" _Hex Head Bolt 1 |
| # | Part description Q'ty |
| 71 | 3/8" × 25mm × 2T_Flat Washer 4 |
| 72 | 5/16" × 18mm × 1.5T_Flat Washer 9 |
| 73 | Ø17 × 23.5mm × 1T_Flat Washer 1 |
| 75 | M5_Blind Nut 6 |
| 76 | Ø1/4" Split Washer 7 |
| 77 | M8 × 7T_Nyloc Nut 1 |
| 79 | 1/4" × 8T_Nyloc Nut 4 |
| 80 | 5/16" × 6T_Nyloc Nut 4 |
| 82 | 3/8" × 7T_Nut 8 |
| 83 | M10 × 1.25m/m_Nut 2 |
| 85 | Round Disk 2 |
| 86 | Quick Release lever 1 |
| 93 | Phillips Head Screw Driver 1 |
| 94 | Sticky Banding Stripe 2 |
| 96 | M22 × 1.0 Ø23_Crank Arm End Cap 2 |
| 99 | 5/16" × 19 × 1.5T_Curved Washer 1 |
| 100 | 12.14m/m_Wrench 1 |
| 102 | 5/16 × 16 × 1.0T_Flat Washer 2 |
| 103 | 5/16" × 1.5T_Split Washer 2 |
| 105 | Handle Bar Cover 1 |
| 106 | Seat Adjustment Knob 1 |
| 107 | Slider Sleeve 1 |
| 114 | Slide Spacer 1 |
| 116 | Bottle Holder 1 |
| 117 | 13.15m/m_Wrench 1 |
| 118 | 5/16" × 2/4'Hex Head Bolt 2 |
| 120 | Connecting Cap 1 |
| 121 | 5/16" × 20 × 3.0T_Flat Washer 3 |
| 122 | Sleeve 1 |
| 123 | 450m/m_Battery Connecting Wire 1 |
Benelux
Accell Fitness Benelux
Koningsbeltweg 51
1329 AE ALMERE
The Netherlands
Tel: +31 36 5460050
Fax: +31 36 5460055
Scandinavia
Accell Fitness Scandinavia
Varusmestarintie 26
20361 TURKU
Finland
Tel: +358 10 2733 200
Fax: +358 2513 313
Germany
Accell Fitness North America Inc.
130 Hayward Ave, Suite 2
N2C 2E4
Kitchener, ON Canada
Tel. 1-888-388-6887
Fax: 1-519-576-2521
www.accellfi.tness.com
www.tunturi.com