eVOLUTION Boost 300 - Water filter Ecowater - Free user manual and instructions
Find the device manual for free eVOLUTION Boost 300 Ecowater in PDF.

User questions about eVOLUTION Boost 300 Ecowater
0 question about this device. Answer the ones you know or ask your own.
Ask a new question about this device
Download the instructions for your Water filter in PDF format for free! Find your manual eVOLUTION Boost 300 - Ecowater and take your electronic device back in hand. On this page are published all the documents necessary for the use of your device. eVOLUTION Boost 300 by Ecowater.
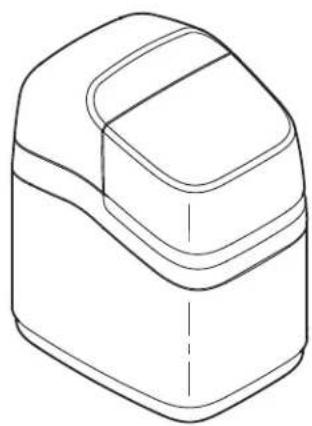
USER MANUAL eVOLUTION Boost 300 Ecowater
Your Water. Perfected.
natural_image
Line drawing of a mechanical component with layered sections and a central dashed line (no text or symbols)
natural_image
Line drawing of a laboratory instrument with control panel and side screen (no text or symbols)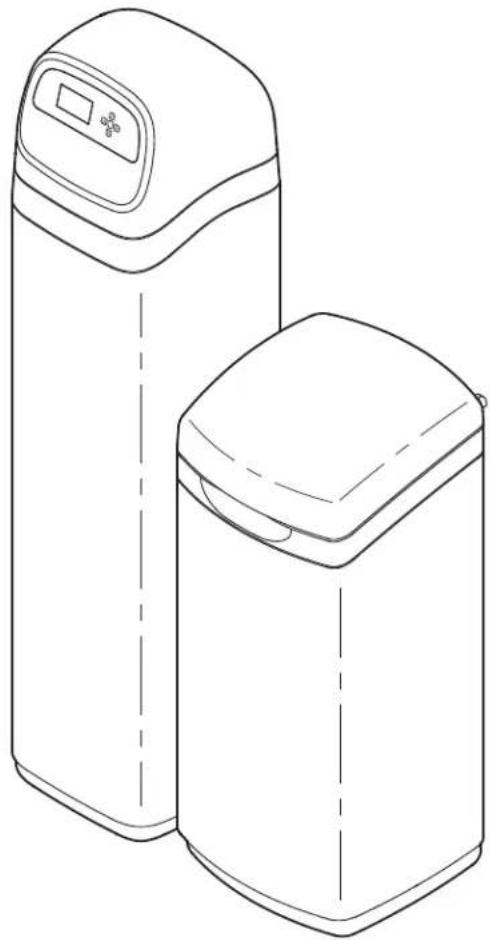
natural_image
Line drawing of two cylindrical industrial water treatment units with control panel (no text or symbols)English eVOLUTION Series Water Conditioner / Refiner 2
Installation Requirements .... 2
Safety Guides 2
Installation Illustrations .... 3
Conditioner/Refiner Programming .... 4-8
Adding Salt 9
Sanitizing 9
Troubleshooting 9
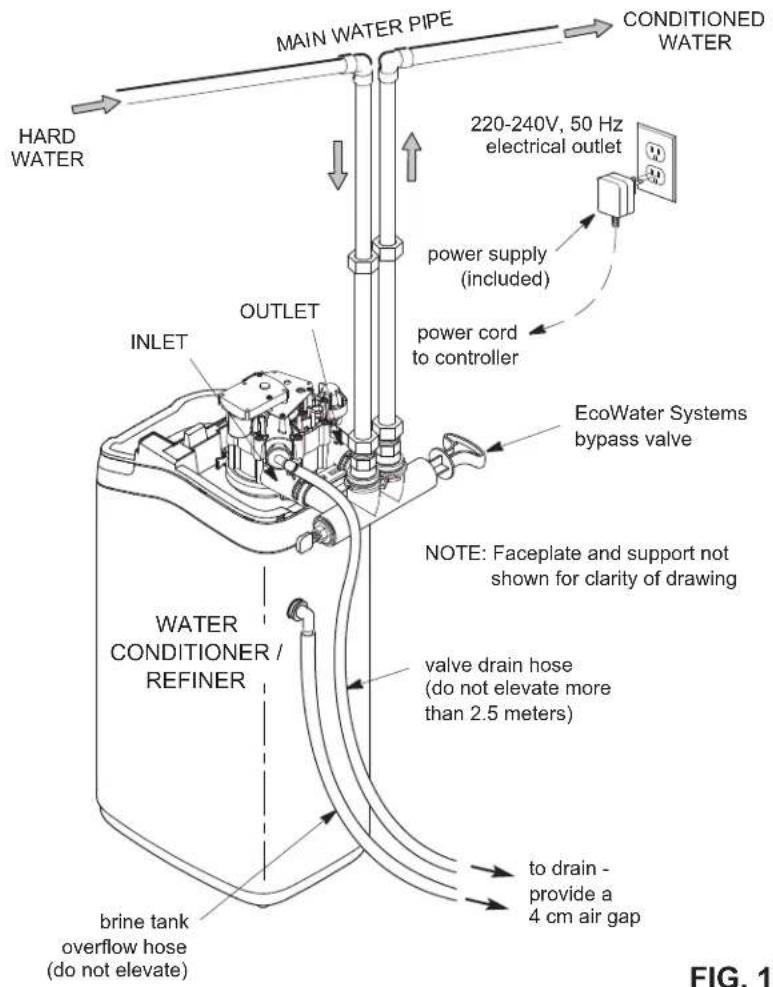
INSTALLATION REQUIREMENTS
● Installation should only be performed by a trained professional.
● Make sure that the main water supply is shut off before starting installation.
● Always install either an EcoWater Systems bypass valve or a 3-valve bypass system. Bypass valves allow you to turn off water to the conditioner/refiner for repairs if needed, but still have water in house pipes.
- A drain is needed for recharge discharge water. A floor drain is preferred, close to the EcoWater Systems conditioner/refiner. A laundry tub, standpipe, etc., are other options.
● A 220-240V, 50 Hz, grounded, continuously "live" electrical outlet is needed, in a dry location within 2 meters of the EcoWater Systems conditioner/refiner.
● After completing installation of the system, perform a pressure test to detect any leaks.
● After completing pressure test, perform a manual recharge.
SAFETY GUIDES
- Before beginning installation, read the manual and obtain tools and materials needed.
● The installation must conform to local plumbing and electrical codes. - Use only lead-free solder and flux for all sweat solder connections.
-
Handle the conditioner/refiner with care. Do not turn upside down, drop, or set on sharp protrusions.
-
Do not locate the conditioner/refiner:
- where freezing temperatures may occur.
- in direct sunlight.
- where it may be exposed to wet weather.
- Do not attempt to treat water over 49^ .
- The conditioner/refiner requires a minimum water flow of 11 liters per minute at the inlet.
● Maximum allowable inlet water pressure is 8.6 bar. If daytime pressure is over 5.5 bar, nighttime pressure may exceed the maximum. Use a pressure reducing valve if necessary.
- This system works on 28 volt DC electrical power. Be sure to use the included power supply and plug it into a nominal 220-240V, 50 Hz household outlet that is in a dry location only, grounded and properly protected by an over current device such as a circuit breaker or fuse.
- This system is not intended to be used for treating water that is microbiologically unsafe or of unknown quality without adequate disinfection before or after the system.

European Directive 2002/96/EC requires all electrical and electronic equipment to be disposed of according to Waste Electrical and Electronic Equipment (WEEE) requirements. This directive or similar laws are in place nationally and can vary from region to region. Please refer to your state and local laws for proper disposal of the equipment.
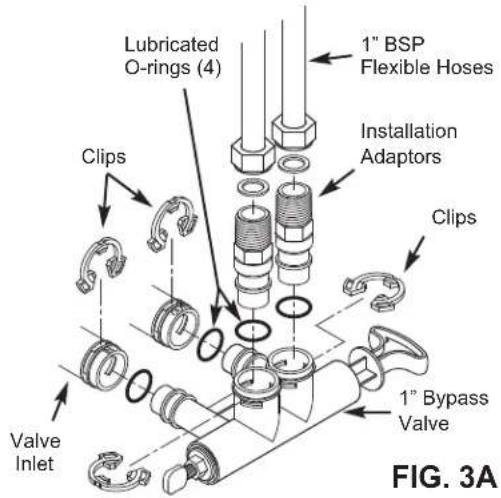
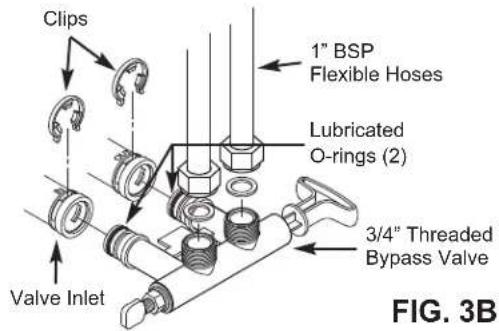
TYPICAL INSTALLATION
1" BYPASS VALVE
3/4" THREADED BYPASS VALVE
3/4" CLIP STYLE BYPASS VALVE
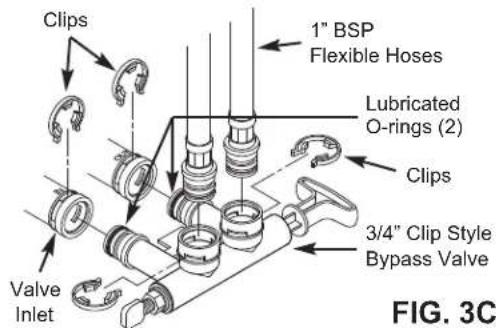
BYPASS OPTIONS
EcoWater Systems
Bypass Valve
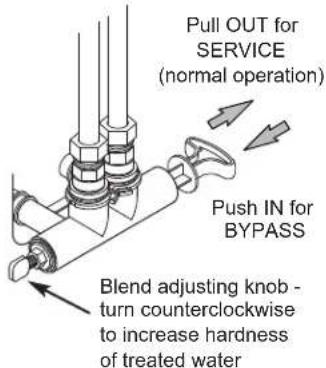
FIG. 2A
3-Valve Bypass
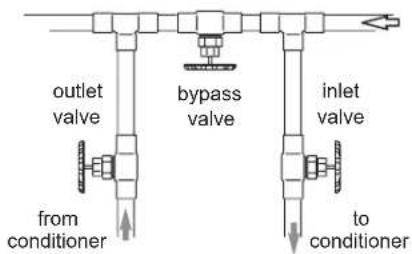
- for SERVICE:
- open input and output valves
- close bypass valve
- for BYPASS:
- close input and output valves
- open bypass valve
FIG. 2B
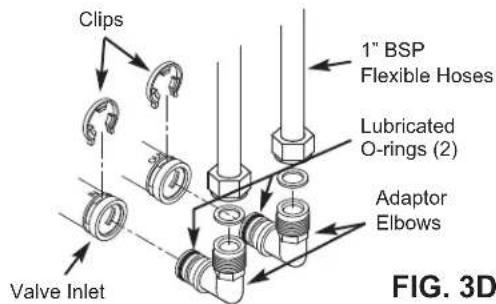
3/4" ADAPTOR ELBOWS

flowchart
graph TD
    A["Display"] --> B["Left Button"]
    B --> C["UP Button"]
    C --> D["RIGHT Button"]
    D --> E["DOWN Button"]
    E --> F["SELECT Button"]
    F --> G["Select Button"]
SETUP PROCEDURE
When the unit is plugged in for the first time, you will be prompted to enter basic operating information.
- LANGUAGE Press the DOWN (▼) or UP (▲) buttons to go to the desired language, then press SELECT (○) twice.
NOTE: You can also skip Wireless Setup and do it after completing Setup Procedure Steps 6-11. From Main menu, go down to Advanced settings and select Wireless setup.
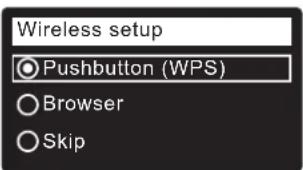
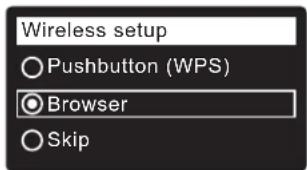
- WIRELESS SETUP Choose how you will connect the softener to your home's wireless network:
Browser: You can connect using the browser on your laptop, tablet or phone. Skip to Step 4. OR
Pushbutton: If your wireless router has a WPS (Wi-Fi Protected Setup) or Push to Connect button, you can proceed to Step 3.
3. PUSHBUTTON (WPS) OPTION
a. Use SELECT (O) to choose Pushbutton (WPS). The softener display will show "Push wireless router button".
b. Press WPS or Push to Connect button on your router and wait to see if display changes to "Connected". If not, cancel and use the browser option.
c. Write down the key code. You need it to register your system on the Eco Water web site. Proceed to Step 5.
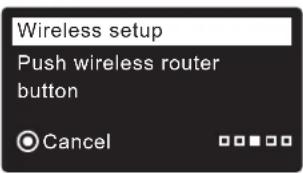

NOTE: If the "Connected" message shows "----" (dashes) instead of a key code, your router may not be connected to the internet. Verify that the router's internet connection works with your laptop or other device.
4. BROWSER OPTION
a. Press the DOWN (▼) button to scroll to Browser.
b. Press SELECT (O) twice. The softener display will show "See connection instructions".
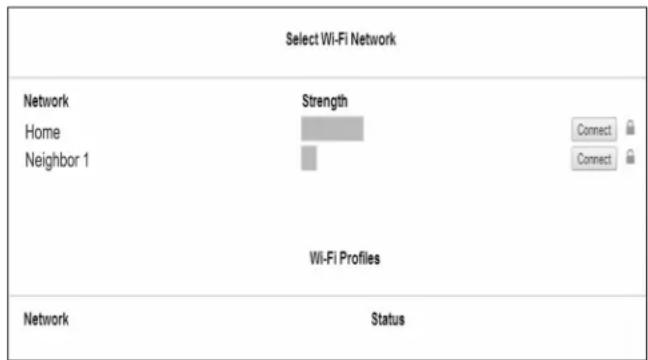
c. On your laptop, tablet or phone, activate the view of wireless networks in range. For example, on a laptop, click on the wireless icon along the lower right edge of the screen. On a phone, go into "Settings" and look for "Wi-Fi".
d. You should see a network named "H2O-" followed by 12 characters. Select this network to connect your device with it.
e. Once your device is connected to the H2O network, go to your internet browser and type in this URL: then click Go or press
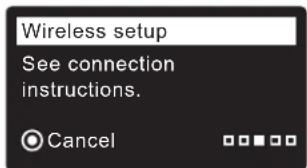
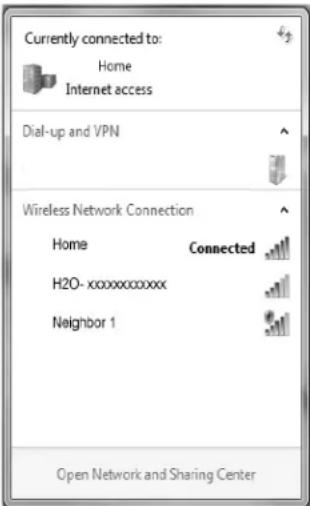
192.168.0.1

f. After a screen like the one shown above appears, select your in-home wireless network and enter the correct password.
continued
g. The softener display should change to "Connected" and give you a key code.
h. Write down the key code. You need it to register your system on the Eco Water web site.
Wireless setup
Connected!
Key:
abc123
Continue
NOTE: If the "Connected" message shows "----" (dashes) instead of a key code, your router may not be connected to the internet. Verify that the router's internet connection works with your laptop or other device.
i. On your laptop, tablet or phone, go back to the view of networks in range, and make sure that your device is connected back to your local network.
5. FINISH SETTING UP THE SOFTENER Once you have connected Wi-Fi and written down your key code, press SELECT (O) to continue setup.
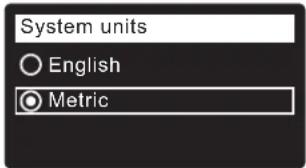
6. SYSTEM UNITS Press SELECT (O) for metric or use the UP (▲) button to go to English units and press SELECT (O).
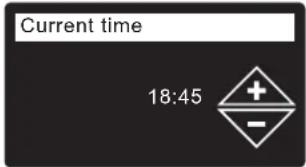
7. CURRENT TIME Press the DOWN (▼) or UP (▲) buttons to set the current time. Hold button to go faster.
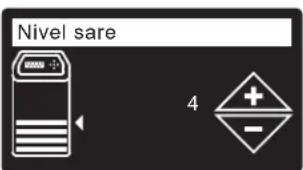
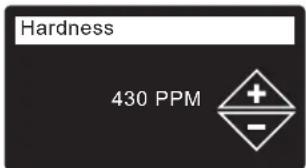
8. HARDNESS Press the UP (▲) or DOWN (▼) buttons to set the value of your water's hardness.
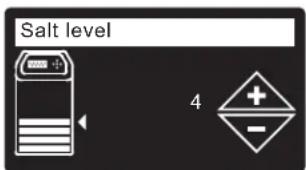
9. SALT LEVEL (only on 2-Tank units without a salt level sensor) Press the UP (▲) or DOWN (▼) buttons to set the salt level to match the lowest number visible on the brinewell above the salt.
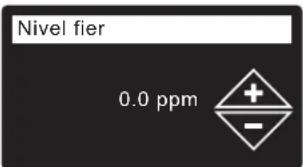
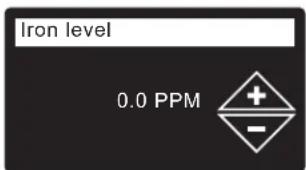
10. IRON LEVEL Press the UP (▲) or DOWN (▼) buttons to set the value for iron in your water.
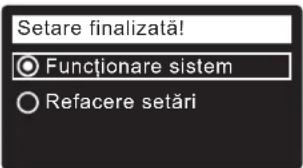
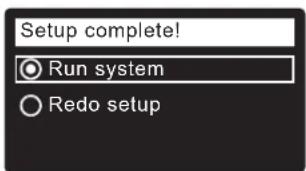
11. When "Setup complete!" appears, press SELECT (O) and the unit begins normal operation.
-
In your internet browser, type in this URL: http://wifi.ecowater.com
-
If you are a dealer, and have an account, log in to your account. If you are a customer, you will need to create a new account.
- Follow the screens on the website. You will need to enter the key code that you wrote down earlier. If you wait too long before registering, the code may change. This is a security feature. Look up the new key code, as described in the following note.
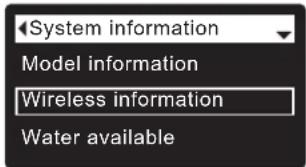
NOTE: You can look up the current key code on your softener's controller by going down to the System information menu and selecting Wireless information.

VISITING YOUR CUSTOMER ACCOUNT
Any time after your customer account has been created and system registered, you can visit your account to see your softener "dashboard", change settings, etc. Direct your browser to http://wifi.ecowater.com and log in using the e-mail and password that were specified when setting up the account.
HOW TO SHARE A SYSTEM BETWEEN A DEALER AND CUSTOMER
NOTE: A system can only be shared from a customer's account, not a dealer's.
Systems can be “shared” between a dealer and customer. If a system is shared, the dealer has full access to the displays and settings for that system on the EcoWater Wi-Fi web site. If a system is not shared, the dealer only has access to the “Manage Dealer Alerts” screen for that system.
Once a customer account has been created by a dealer, a customer can grant access to the dealer who sold that system.
With permission, a dealer could also grant it for the customer. To do so, a dealer must log in as a customer rather than as a dealer, using the customer's e-mail and password entered when the account was created.
- Go to http://wifi.ecowater.com and log in (customer's e-mail and password, not dealer's).
- Click on the "Support" tab along the top of the customer Home page.
- On the Support screen, click the "Allow" button. It should change to read "Deny".
- The system is now shared.
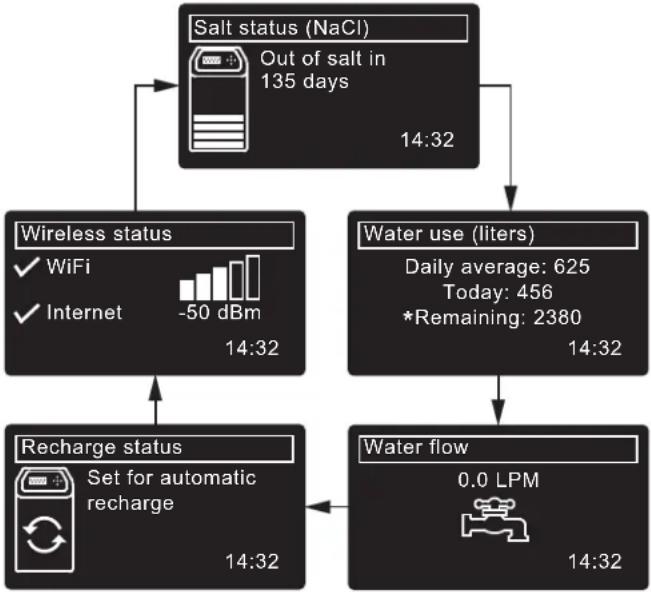
NORMAL OPERATION / STATUS SCREENS
During normal operation, the unit displays status screens in an automatic sequence.
In the “Wireless status” screen, the check marks indicate the following:
√ WiFi - The softener is connected to a Wi-Fi router.
√ Internet - The softener is connected to a Wi-Fi router which is connected to the internet.
flowchart
graph TD
    A["Salt status (NaCl)\nOut of salt in 135 days"] --> B["Wireless status\n✓ WiFi\n✓ Internet\n-50 dBm 14:32"]
    A --> C["Water use (liters)\nDaily average: 625\nToday: 456\n*Remaining: 2380 14:32"]
    B --> D["Recharge status\nSet for automatic recharge 14:32"]
    C --> E["Water flow\n0.0 LPM 14:32"]
    D --> E
*Water remaining before the next recharge.
OTHER MESSAGES, ALERTS & REMINDERS
The status screens described above will not be displayed when one of the following items is displayed:
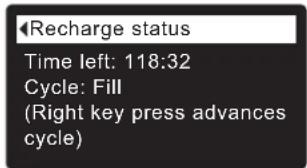
● Recharge status (Displayed during recharges, showing valve position and time remaining)
- Add salt or Out of salt indicates salt needs to be added (Page 9).
- Current time setting screen instead of status screens indicates time needs to be set (Page 8).
● Service reminder (Contact your dealer)
● Error detected (Contact your dealer)
FLASHING DISPLAY
The display will flash on and off when one or more of the following conditions occurs:
● Salt needs to be added
● Time needs to be set (Time has been lost)
● Service is overdue (Service reminder)
- Error condition
The flashing will stop after any key is pressed.
However, it will start again at Midnight if the underlying condition (e.g. low salt level) has not been addressed.
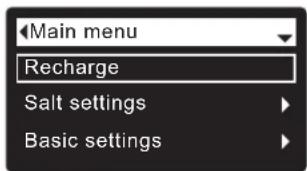
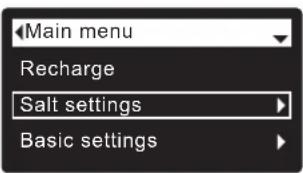
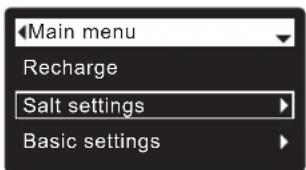
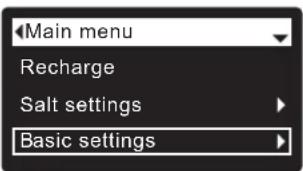
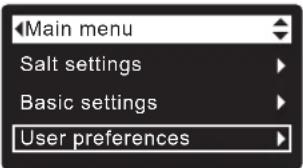
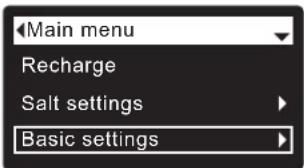
MAIN MENU
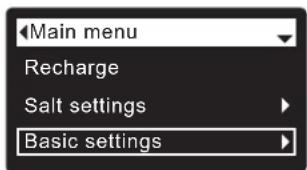
During normal operation, press SELECT (O) to display the Main menu. This leads to the following:
● Recharge (See Page 7)
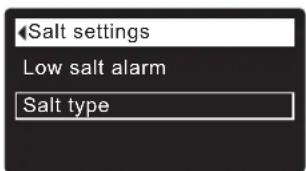
- Salt settings ^1
● Salt level ^① (See Page 7)
● Low salt alarm
● Salt type (See Page 7)
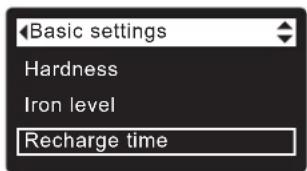
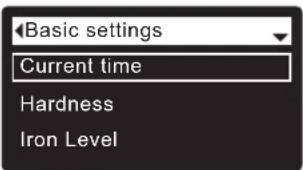
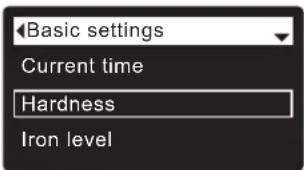
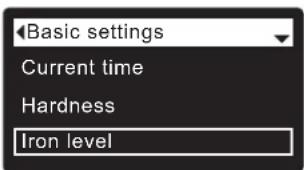
- Basic settings
● Current time (See Page 8)
● Hardness (See Page 8)
● Iron level (See Page 8)
● Recharge time (See Page 7)
- Rolling screens
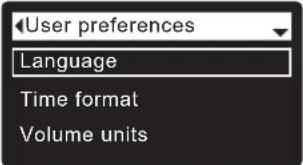
- User preferences
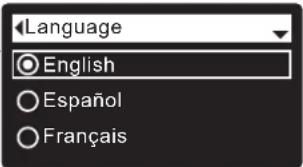
● Language (See Page 8)
- Time format
• Volume units
- Hardness units
- Weight units
● System information
● Model information
● Wireless information
● Water available
● Daily avg. water used
● Water used today
● Total water used
● Current water flow
● Days powered up
- Last recharge
- Total recharges
● Advanced settings
- Cycle times
- Backwash time ^2
- Extra backwash time ^3
● 2nd backwash (On/Off)
●2nd backwash time - Fast rinse time
- Extra fast rinse time ^3
- Special features
● Efficiency mode
● Max. days between recharges
● Auxiliary control
● Chemical feed volume ^④
- Chemical feed timer ^4
- 97% feature
● Service reminder
- Troubleshooting
- Diagnostics
- Setup changes
- SLS calibration ^5
● Wireless setup (See Pages 4-5)
① Only on two-tank models without a salt level sensor.
②Only on refiners.
③ Only on conditioners.
④ Only displayed if Auxiliary control is set to Chemical feed.
⑤ Only on cabinet models with a salt level sensor.
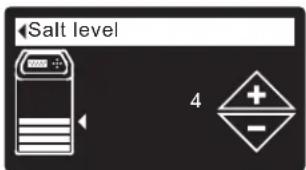
MANUALLY SETTING SALT LEVEL (Two-Tank Model 600 Power only)
This feature is active only on units without a salt level sensor connected to the electronic controller. Cabinet models (no separate brine tank) have an internal sensor that automatically measures the level of salt in the tank. The salt level is displayed on the salt status rolling screen and is used by the electronic control to calculate the number of days before empty.
On two-tank Model 600 Power, you must manually enter the salt level number each time you add salt:
- Press SELECT (O) to go to the Main menu.
- Go to Salt settings screen.
- Go to Salt level screen.
- Add and level salt, then observe the numbered scale on the brinewell. Press UP (▲) or DOWN (▼) to match the lowest number visible above the salt.
- Press SELECT (O), then press LEFT (◀) several times to return to the status screens.
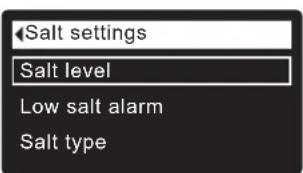
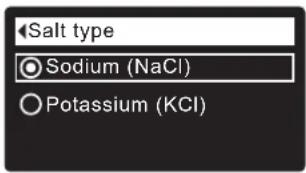
SETTING SALT TYPE
Default is NaCl (Sodium Chloride). Selecting KCl (Potassium Chloride) increases fill and brine/slow rinse times. To change it:
- Press SELECT (O) to go to the Main menu.
- Go to Salt settings screen.
- Go to Salt type screen.
- Press DOWN (▼) or UP (▲) to scroll to the other salt type.
- Press SELECT (O), then press LEFT (◀) several times to return to the status screens.
MANUALLY RECHARGING
This may be done to assure an adequate supply of conditioned water at times of unusually high water use. For example, if you have guests, you could deplete conditioned water capacity before the next automatic
recharge. A manual recharge will restore 100% conditioned water capacity after complete. After long periods of no water use (vacations, etc.) it is recommended to start a recharge.

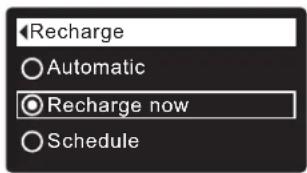
- Press SELECT (O) to go to the Main menu.
- Go to Recharge screen.
- Go to Recharge Now and press SELECT (O) to begin an immediate recharge. Recharge status screen appears until recharge is complete, or press LEFT
(◀) twice to return to status screens.
Other recharge options:
● Automatic cancels a manually scheduled recharge (if it has not already begun) and lets the electronic control determine when to recharge next.
- Schedule sets a recharge to begin at the preset recharge start time (see below)
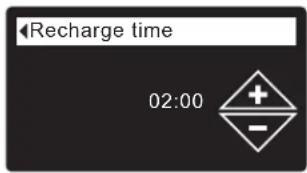
SETTING RECHARGE START TIME
Default is 02:00 (2:00 a.m.). To change it:
- Press SELECT (O) to go to the Main menu.
- Go to Basic settings screen.
- Go to Recharge time screen.
- Press DOWN (▼) or UP (▲) to set the recharge start time. Hold button to go faster.
- Press SELECT (O), then press LEFT (◀) several times to return to the status screens.
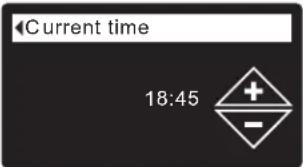
SETTING THE CURRENT TIME
Normally done during setup. To change it:
- Press SELECT (O) to go to the Main menu.
- Go to Basic settings screen.
- Go to Current time screen.
- Press DOWN (▼) or UP (▲) to set the current time. Hold button to go faster.
- Press SELECT (O), then press LEFT (◀) several times to return to the status screens.
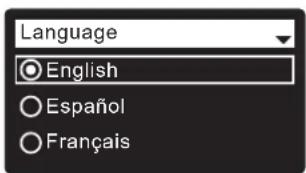
SETTING THE LANGUAGE
Normally done during setup. To change it:
- Press SELECT (O) to go to the Main menu.
- Go to User preferences screen.
- Go to Language screen.
- Press DOWN (▼) or UP (▲) to scroll to the desired language. The choices are: English, Spanish, French, Italian, German, Dutch, Polish, Russian, Hungarian, Turkish, Lithuanian, Greek, Romanian, Czech, Slovak, Bulgarian, Serbian or Croatian.
- Press SELECT (○) twice, then press LEFT (◀) several times to return to the status screens.
TO RESET TO YOUR NATIVE LANGUAGE IF ANOTHER LANGUAGE IS DISPLAYED:
From the status screens, press SELECT (O). Press the DOWN (▼) button three times, then press SELECT (O) twice. Press DOWN (▼) or UP (▲) to scroll to your native language (see list below), then press SELECT (O) twice. Press LEFT (◀) twice to exit all menus.
Languages are listed in this order: English, Spanish, French, Italian, German, Dutch, Polish, Russian, Hungarian, Turkish, Lithuanian, Greek, Romanian, Czech, Slovak, Bulgarian, Serbian, Croatian.
SETTING HARDNESS
Normally done during setup. To change it:
- Press SELECT (O) to go to the Main menu.
- Go to Basic settings screen.
- Go to Hardness screen.
- Press DOWN (▼) or UP (▲) to set your water's hardness.
Conversions: 1 grain = 1°dH 10 ppm = 1°f
- Press SELECT (O), then press LEFT (◀) several times to return to the status screens.


NOTE: Do not increase the hardness setting to compensate for iron in your water. The electronic control compensates automatically after you set the iron level (see below).
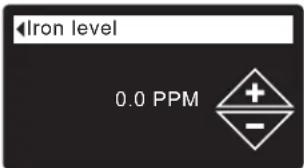
SETTING IRON LEVEL
Normally done during setup. To change it:
- Press SELECT (O) to go to the Main menu.
- Go to Basic settings screen.
- Go to Iron level screen.
- Press DOWN (▼) or UP (▲) to set the value for iron in your water.
- Press SELECT (O), then press LEFT (◀) several times to return to the status screens.
ADDING SALT
If the conditioner/refiner uses all the salt before more is added, hard water will result. Cabinet models have automatic salt level sensing. On two-tank Model 600 Power, lift the brine tank lid and check the salt level frequently. Your Wi-Fi account can also be used to monitor salt. Be sure that the brinewell cover is on when adding salt.
TWO-TANK MODEL 600 POWER: After adding and leveling salt, always set the salt level number on the electronic controller, as described on Page 7.
NOTE: In humid areas it is best to keep the salt level less than half full and add salt more often.
RECOMMENDED SALT: Cube, pellet, coarse solar, etc., water conditioner salt with less than 1% insoluble impurities. This type of salt is high purity evaporated crystals, sometimes formed into briquets.
POTASSIUM CHLORIDE (KCI): If you choose KCl salt:
- Set "Salt type" on the electronic control to "KCI", as shown on Page 7.
- Place only one bag of potassium chloride (KCl) into your conditioner/refiner at a time.
SALT NOT RECOMMENDED: Rock salt high in impurities, block, granulated, table, ice melting, or ice cream making salts, etc., are not recommended.
BREAKING A SALT BRIDGE
Sometimes a hard crust or salt “bridge” forms in the brine tank. This is usually caused by high humidity or the wrong kind of salt. When this happens, an empty space forms between the water and the salt. Then salt will not dissolve in the water, the resin bed will not be recharged, and hard water will result.
A bridge may be underneath loose salt. Use a broom handle or like tool to check, as shown in Figure 4. Carefully push it straight down into the salt. If a hard object is felt, it is most likely a salt bridge. Carefully push into the bridge in several places to break it. Do not try to break the salt bridge by pounding on the salt tank.
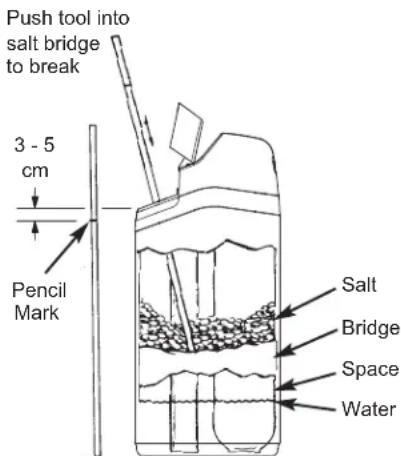
FIG. 4
SANITIZING INSTRUCTIONS
Care is taken at the factory to keep your EcoWater Systems conditioner/refiner sanitary. However, during shipping, storage, installing and operating, bacteria could get into the unit. For this reason, sanitizing is suggested* when installing:
- Remove the brinewell cover and pour about 40 ml (2 to 3 tablespoons) of common household bleach into the conditioner/refiner brinewell. Clorox and other brand names of bleach are readily available. Replace the brinewell cover.
- Initiate a "Recharge now" (See Page 7). This recharge draws the bleach into and through the conditioner/refiner.
*Recommended by the Water Quality Association. On some water supplies, the EcoWater Systems unit may need periodic disinfecting.
NOTE: We recommend that you have the conditioner/refiner serviced annually.
TROUBLESHOOTING GUIDE
| PROBLEM CAUSE CORRECTION | ||
| No soft water | No salt in the storage tank. Add salt and then initiate a “Recharge now”. | |
| Salt is “bridged.” Break salt bridge (See above) and then initiate a “Recharge now”. | ||
| Power supply unplugged, power cable leads disconnected from electronic control board, fuse blown, circuit breaker off. | Check for power loss due to any of these and correct. When power is restored, set the time if the display shows “Current Time” screen (See Page 8). | |
| Bypass valve(s) in bypass position. Place bypass valve(s) in service position (See Page 3). | ||
| Valve drain hose plugged or restricted. Drain hose must not have kinks, sharp bends, or be raised too high. | ||
| Water hard sometimes | Bypassed hard water being used during recharge, due to current time or recharge time settings being incorrect. | Check the current time displayed. If not correct, refer to “Set Current Time” on Page 8. Check the recharge time, as described on Page 7. |
| Hardness number setting is too low. Referring to “Setting Hardness” on Page 8, check the current hardness setting and increase if needed. Have hardness of water supply tested, if necessary. | ||
| Hot water being used when conditioner/refiner is recharging. | Avoid using hot water during recharges, because water heater refills with hard water. | |
| Error code displayed | Fault in wiring, position switch, valve, motor or electronic control board. | Contact your dealer for service. |
Modelos
eVOLUTION Compact 100, eVOLUTION Compact 200, eVOLUTION Boost 300, eVOLUTION Boost 400, eVOLUTION Power 500, eVOLUTION Power 600,
eVOLUTION Refiner Boost, eVOLUTION Refiner Power
CONTENIDO
Página


FIG. 2B
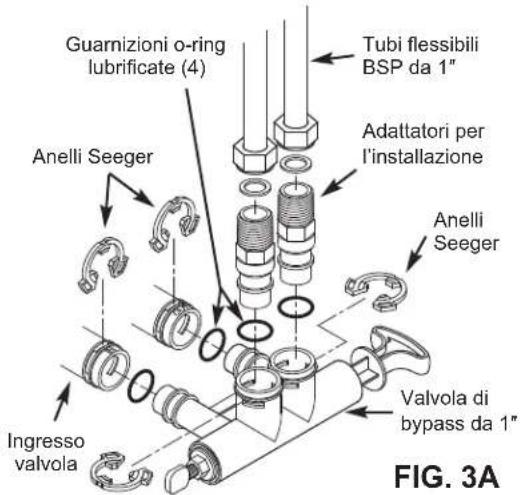
VALVOLA DI BYPASS DA 1"
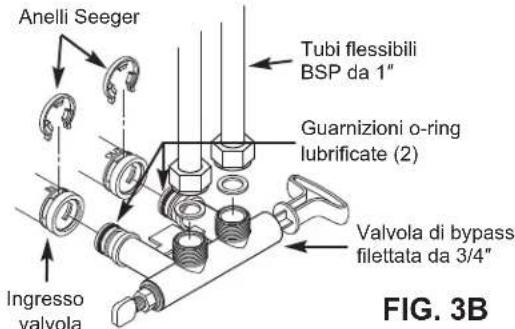
VALVOLA DI BYPASS FILETTATA DA 3/4"
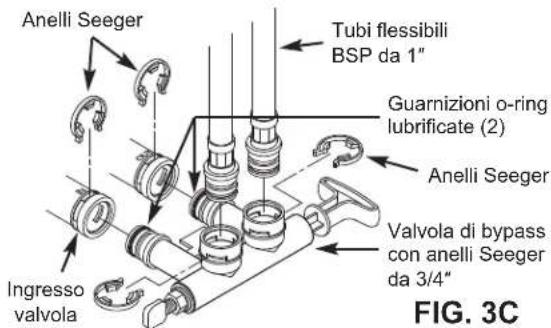
VALVOLA DI BYPASS CON ANELLI SEEGER DA 3/4"

ACCEDERE AL PROPRIO ACCOUNT CLIENTE
3/4" BYPASSVENTIL MIT KLEMMEN
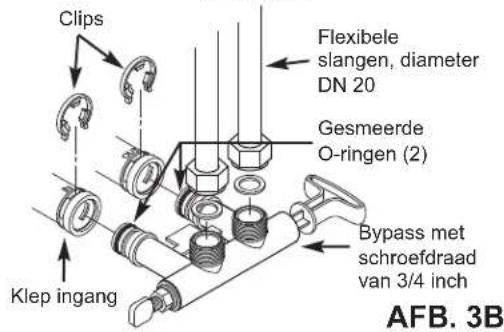
BYPASS MET SCHROEFDRAAD VAN
3/4 INCH
192.168.0.1, klikt u op Start of drukt u op Enter.

UW KLANTACCOUNT OPENEN
ANDERE BERICHTEN, WAARSCHUWINGEN EN HERINNERINGEN
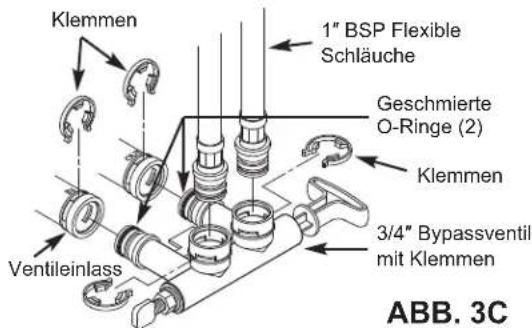
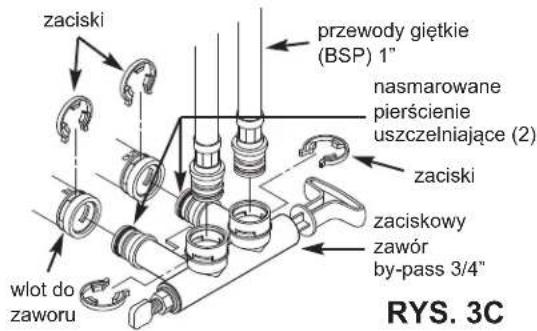
KLIPSOWY ZAWÓR BY-PASS 3/4"
ZMIANA JEZYKA NA INNY:

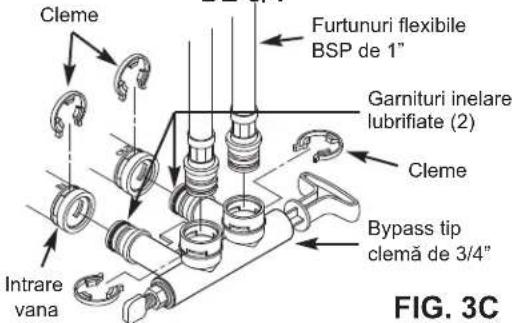
INSTALARE CU BYPASS TIP CLEMĂ
DE 3/4"
INSTALARE CU COTURI ADAPTOARE

flowchart
graph TD
    A["Afişaj"] --> B["Block"]
    C["Buton STÂNGA"] --> D["Button"]
    E["Buton SUS"] --> F["Button"]
    G["Buton DREAPTA"] --> H["Button"]
    I["Buton SELECTARE"] --> J["Button"]
    K["Buton JOS"] --> L["Button"]
PROCEDURA DE SETARE