BPM ARM 6331 - Blood pressure monitor TOPCOM - Free user manual and instructions
Find the device manual for free BPM ARM 6331 TOPCOM in PDF.
User questions about BPM ARM 6331 TOPCOM
0 question about this device. Answer the ones you know or ask your own.
Ask a new question about this device
Download the instructions for your Blood pressure monitor in PDF format for free! Find your manual BPM ARM 6331 - TOPCOM and take your electronic device back in hand. On this page are published all the documents necessary for the use of your device. BPM ARM 6331 by TOPCOM.
USER MANUAL BPM ARM 6331 TOPCOM
UK The features described in this manual are published with reservation to modifications.
9F No.186, Jian Yi Road, Chung Ho City, Taipei, Taiwan
Represented in Europe by:
EMERGO EUROPE
Molenstraat 15, 2513 BH, The Hague, The Netherlands
TEL : +31-70-3458570 FAX : +31-70-3467299
This Blood Pressure Monitor complies with the EC Directives and bears the CE Mark "CE 0197".
This blood pressure monitor als complies with mainly the following standards, (including but not limited)
Safety standards
EN 60601-1 - Medical electrical equipment part 1: General requirements for safety
EN 60601-1-2 - Medical electrical equipment part 1-2: Collateral standard:
Electromagnetic compatibility-Requirements and tests
Performance standards:
EN 1060-1 Non-invasive sphygmomanometers - General requirements
EN 1060-3 Non-invasive sphygmomanometers - Supplementary requirements for electromechanical blood pressure measuring systems.
EN 1060-4 Non-invasive sphygmomanometers - Test procedures to determine the overall system accuracy of automated non-invasive sphygmomanometers.
The declaration of conformity can be found on:
http://www.topcom.net/support/cedeclarations.php
1 Introduction
Congratulations with your purchase of the Topcom BPM Arm 6331. This fully automatic, arm mounted blood pressure monitor is both easy to use and ideally suited for daily measurements. The large display includes systolic, diastolic and pulse, all clearly shown at the completion of each reading.
In addition, you can store up to 30 measurements per Memory Zone, ideal for users who want to monitor and track their blood pressure on a regular basis. The BPM Arm 6331 is compact and portable, making it ideal for home use and travel.


Please read this manual carefully before use. For specific information on your own blood pressure, contact your physician. Put the user guide away in a safe place for future reference.
2 Safety instructions
- This product is for household use only. It is not intended as a substitute for consultation with your doctor.
- For users diagnosed with common arrhythmia (atrial or ventricular premature beats or atrial fibrillation), diabetes, poor circulation of blood, kidney problems, or for users suffered from stroke, or for unconscious users, the device might not be suitable for use. Consult your doctor in case of any doubt.
- The unit should not be operated by children so to avoid hazardous situations.
- The unit contains high-precision assemblies. Therefore, avoid extreme temperatures, humidity, and direct sunlight. Avoid dropping or strongly shocking the main unit, and protect it from dust.
- Leaky batteries can damage the unit. Remove the batteries when the unit is not used for a long time.
- Do not press the START key when the cuff is not placed around the arm.
- Do not disassemble the main unit or cuff.
- If the unit is stored in a cold place, allow it to acclimate at room temperature before use.
- Clean the blood pressure monitor body and the cuff carefully with a slightly damp, soft cloth. Do not press. Do not bend the pre-formed cuff inside out. Do not wash the cuff or use chemical cleaner on it. Never use thinner, alcohol or petrol (gasoline) as cleaner.
To avoid inaccurate results caused by electromagnetic interference between electrical and electronic equipments, do not use the device near a cell phone or microwave oven.
3 H e l p f u l t i p s
Here are a few helpful tips to help you obtain more accurate readings:
- Do not measure your blood pressure immediately after consuming a large meal. To obtain more accurate readings, please wait one hour before measuring.
- Do not smoke or drink alcohol before measuring your blood pressure.
- You should not be physically tired or exhausted while taking a measurement.
- It is important that you relax during measurement. Try to take 15-minutes rest before a reading.
- Do not take measurements if you are under stress or under tension.
• Take your blood pressure at normal body temperature. If you are feeling cold or hot, wait a while before taking a measurement. - If the monitor is stored at very low temperature (near freezing), have it placed at a warm location for at least one hour before using it.
- Wait about 5 minutes before taking the next pressure measurement.
4 Disposal of the device
natural_image
Simple line drawing of a trash bin with two crossed lines and a solid rectangle below (no text or symbols)At the end of the product lifecycle, you should not throw this product into the normal household garbage but bring the product to a collection point for the recycling of electrical and electronic equipments. The symbol on the product, user guide and/or box indicate this.
Some of the product materials can be re-used if you bring them to a recycling point. By re-using some parts or raw materials from used products you make an important contribution to the protection of the environment. Please contact your local authorities in case you need more information on the collection points in your area.
5 Blood pressure
5.1 What is Blood Pressure?
Blood pressure is the pressure exerted on the artery tube while blood flows through the arteries. The pressure measured when the heart contracts and sends blood out of the heart is systolic (highest). The pressure measured when
the heart dilates with blood flowing back into the heart is called diastolic (lowest) blood pressure.
5.2 Why Measure Your Blood Pressure?
Among the various health problems afflicting modern people, problems associated with high blood pressure are by far the most common. High blood pressure's dangerously strong correlation with cardiovascular diseases
and high morbidity has made measuring blood pressures a necessity of identifying those at risk.
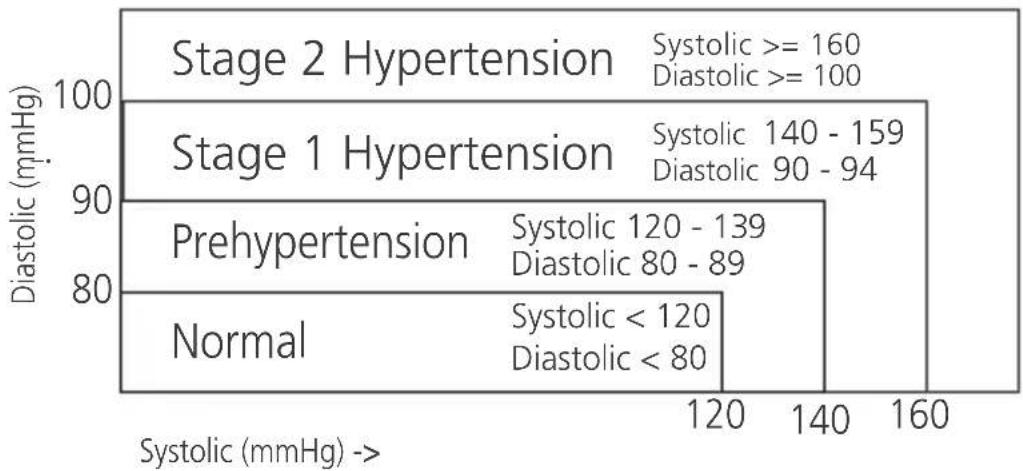
5.3 Blood Pressure Standard
The World Health Organization (WHO) and National High Blood Pressure Education Program has developed a Blood pressure standard, according to which areas of low and high-risk blood pressure are identified. This standard however, is a general guideline as individual's blood pressure varies among different people and different groups, etc.
bar
| Category | Diastolic (mmHg) | | :--- | :--- | | Stage 2 Hypertension | Systolic >= 160, Diastolic >= 100 | | Stage 1 Hypertension | Systolic 140 - 159, Diastolic 90 - 94 | | Prehypertension | Systolic 120 - 139, Diastolic 80 - 89 | | Normal | Systolic < 120, Diastolic < 80 |It is important that you consult with your physician regularly. Your physician will tell you your normal blood pressure range as well as the point at which you will be considered at risk.
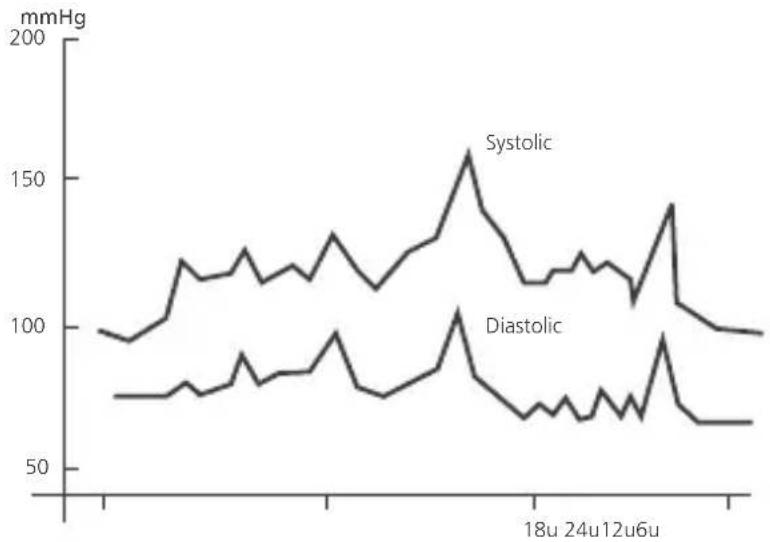
5.4 Blood Pressure Fluctuation
Blood pressure fluctuates all the time!
You should not be worried if you encountered two or three measurements at high levels. Blood pressure changes over the month and even throughout the day depending on circumstances (state of mind, temperature, ...)
Ex. Fluctuation within the day for a Male, 35 years old.
line
| Time | Systolic (mmHg) | Diastolic (mmHg) | |------|------------------|------------------| | 18u | ~100 | ~75 | | 24u | ~160 | ~100 | | 12u | ~140 | ~90 |6 Battery installation
natural_image
Simple line drawing of a rectangular device with buttons and a blank screen (no text or symbols)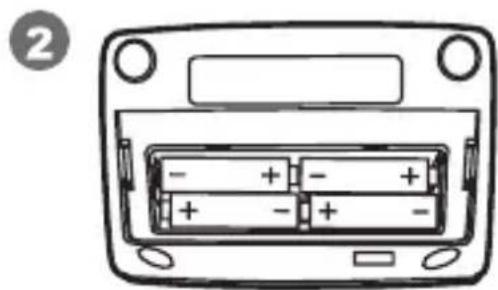
natural_image
Diagram of a device rear panel with four battery cells and labeled terminals (no text or symbols beyond basic labels)- Open the battery compartment by pulling the cover away on the bottom of the unit. - Insert 4 AA non - rechargeable batteries. Follow the polarity as indicated in the battery compartment.

When the Battery Low Indicator is displayed, the batteries needs to be replaced.
Do not shortcircuit & dispose of in fire. Remove the battery if this device is not going to be used for a long period.
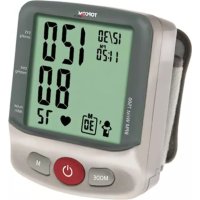
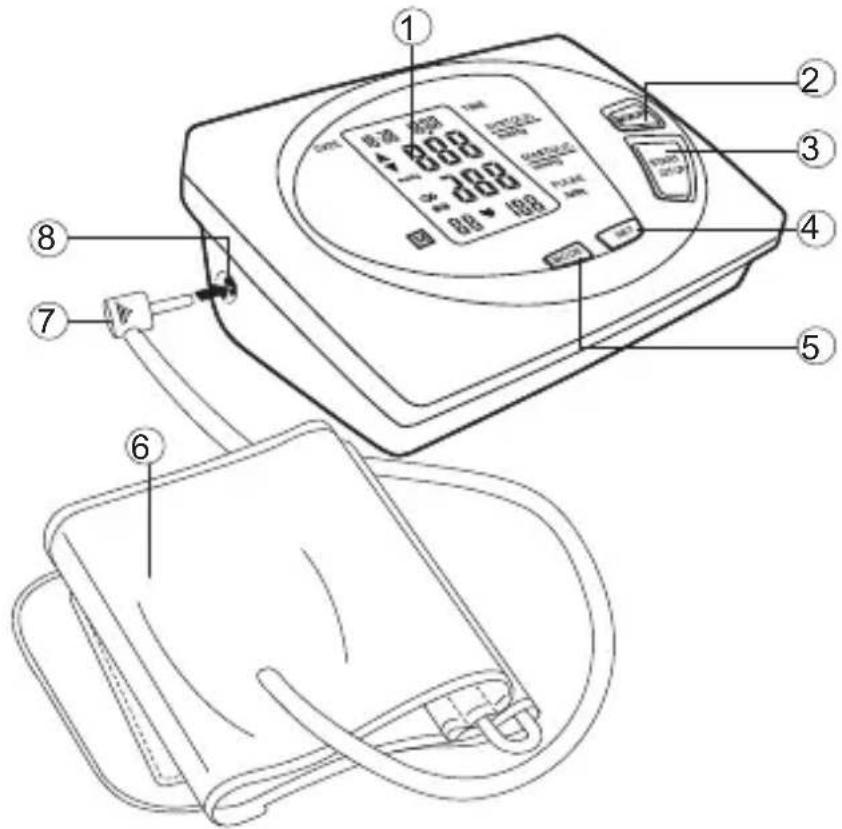
7 Buttons
text_image
Diagram of a blood pressure monitor with labeled parts including digital display and blood pressure monitor- LCD display
- MEMORY button
- START / STOP button
- SET button
-
MODE button
-
Arm cuff
- Air Jack
- Air Plug
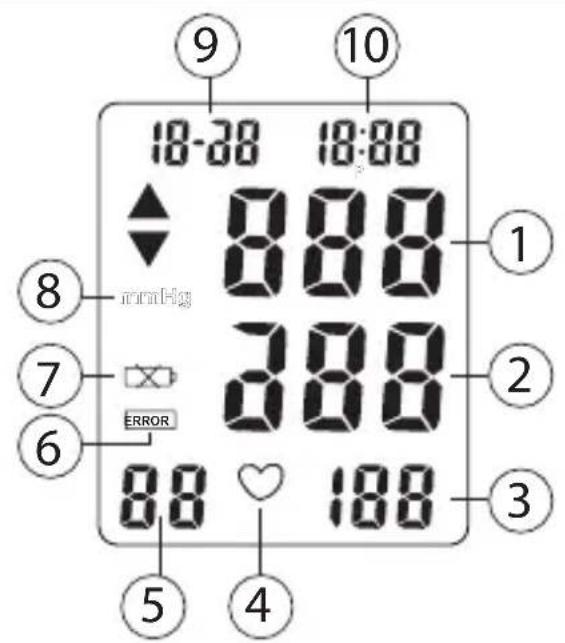
8 Display
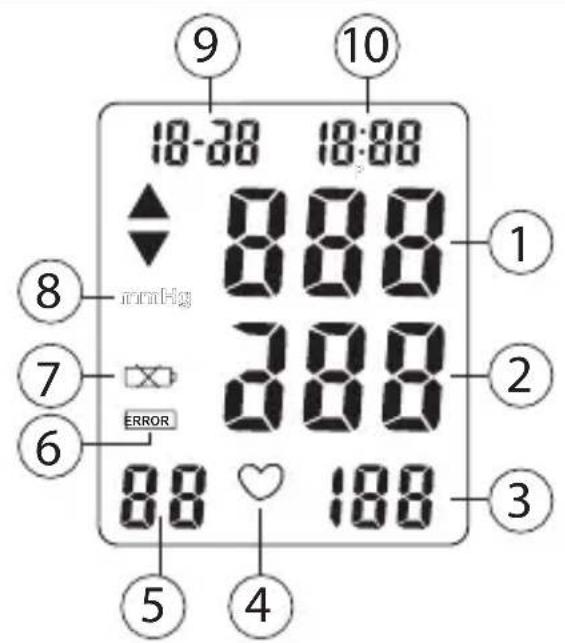
text_image
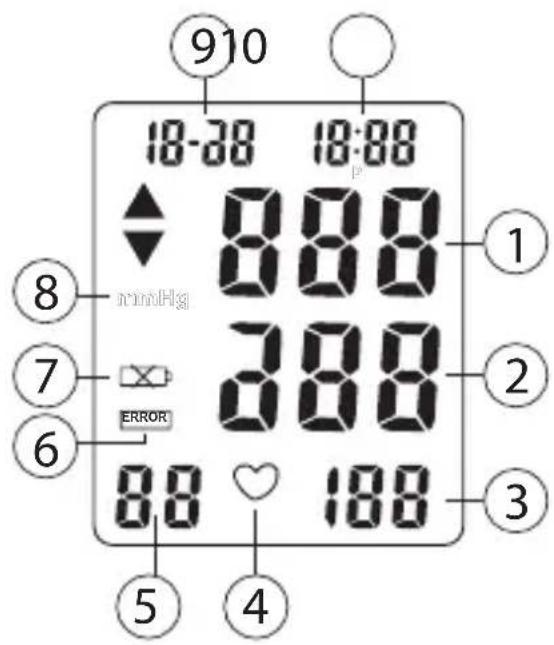
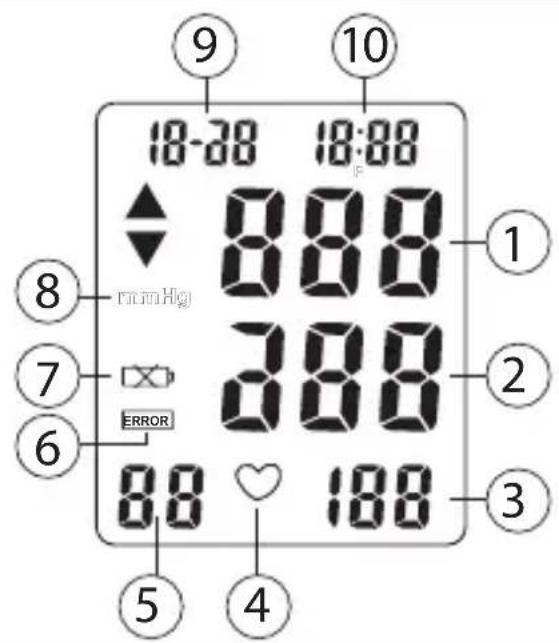
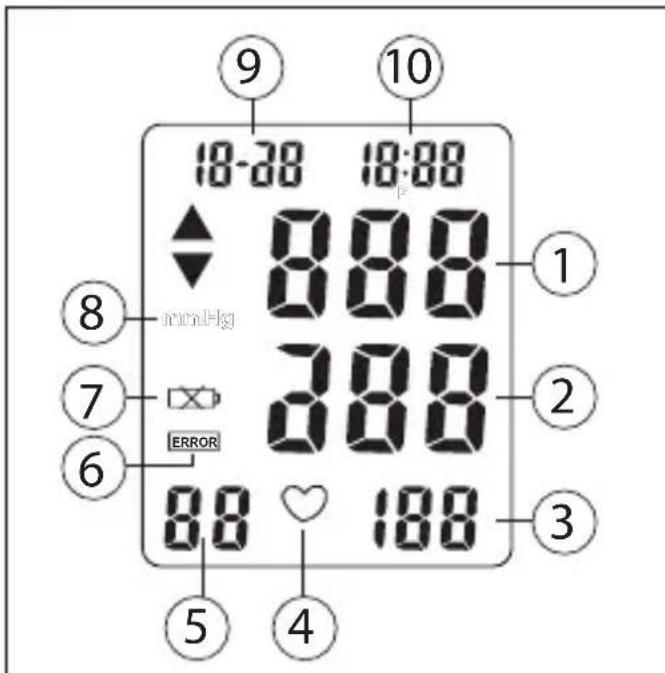
18-28 18:88 10 9 8 888 mmHg 7 388 ERROR 6 88 188 ① ② ③ ④ ⑤- Systolic pressure
- Diastolic pressure
- Pulse rate
- Pulse symbol
- Memory number
- Error indication
- Battery Low indicator
- Blood pressure unit
- Date
- Time
9 Applying the cuff
natural_image
Illustration showing a hand performing a physical therapy or massage technique on a wrist, with no text or symbols present.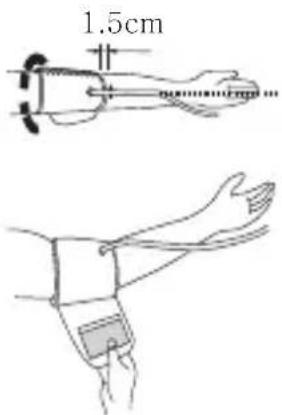
text_image
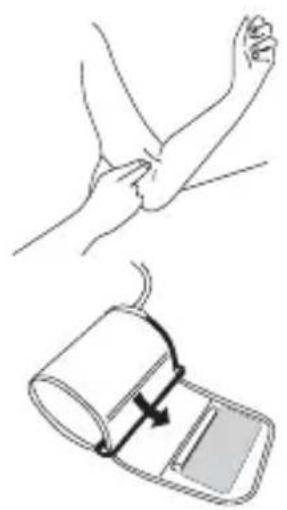
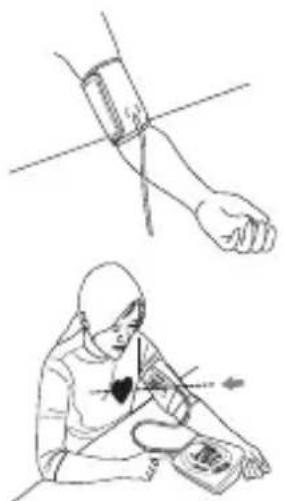
1.5cm- Remove all watches, jewelry, etc. prior to attaching the Arm cuff.
- Press your brachial artery by two fingers approximately 2,5 cm above the elbow on the inside of your left arm to determine where your strongest pulse is.
- Slide the end of arm cuff furthest from the tube through the metal ring to a loop. The smooth cloth should be on the inside of the cuff. The Velcro will be on the outside of the cuff.
- Put the left arm through the cuff loop. The bottom of the cuff should be approx. 1,5 cm above the elbow. The cuff should lie over the brachialartery on the inside of the arm.
- Pull the cuff so that the top and bottom edges are tightened around your arm.
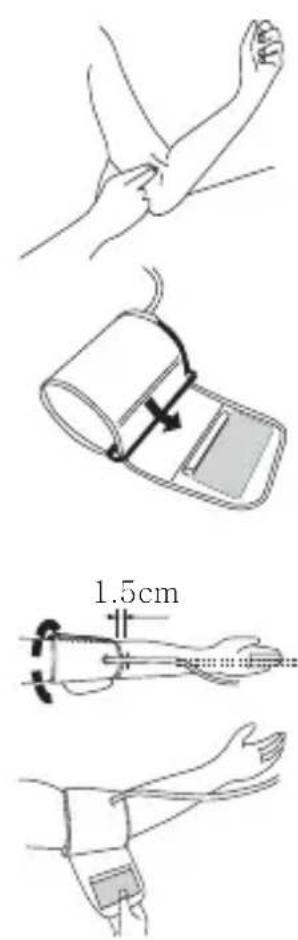
natural_image
Illustration showing a hand holding an arm and a person receiving a blood pressure monitor (no text or symbols present)-
When the cuff is positioned properly, press the Velcro firmly against the pile side of the cuff. The metal ring will not touch your skin.
-
Relax your entire body, especially the area between your elbow and fingers. Place your elbow on a table so that the cuff is at the same level as your heart. Avoid leaning back while the measurement is being taken.
10 Measurement
10.1 Important
- This monitor automatically switches off 1 minute after the last key operation.
- To interrupt the measurement, simply press any key. The cuff will deflate immediately after a key is pressed.
- During the measurement, do not talk or move your arm or hand muscles.
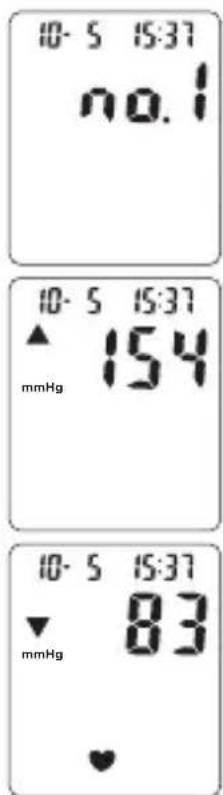
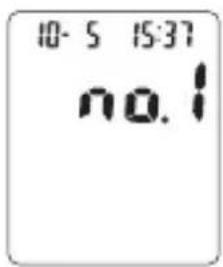
- After each measurement, the result will be automatically stored. The BPM ARM 6331 has 3 memory zones with each 30 location. Select the desired Memory Zone before measurement (see §11)
10.2 Procedure
text_image
10-5 15:37 no.1 10-5 15:37 ▲ 154 mmHg 10-5 15:37 ▼ 83 mmHg- Press the SET button repeatedly to select the desired memory zone.
- Press the START/STOP button to start measurement. The cuff will inflate to the level that is right for you.
- When the right level is reached, the cuff will deflate.
text_image
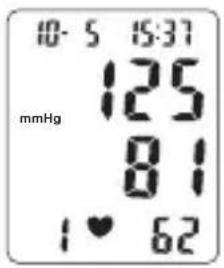
10-5 15:37 mmHg 125 81 1♥ 62ERROR
- When the measurement is completed, systolic, diastolic and pulse will be shown simultaneously on the LCD screen.
When a mistake was detected during measurement the Error mark appears on the display
11 Memory
text_image
10-5 15:37 no.1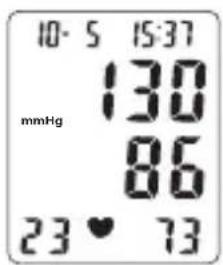
text_image
10·5 15:37 mmHg 130 86 23 · 73The BPM 6331 has 3 Memory zones. Each can store up to 30 measurements including the date and time The result will be stored automatically in the selected Memory Zone after the measurement.
Select the desired Memory Zone before measurement, by pressing the SET button repeatedly.
To recall measurement results:
- Press the SET button repeatedly to select the desired memory zone.
- Press the MEMORY button to see the average of all measurement results [A].
- Press the MEMORY button again to see the last measurement result.
- Press the MEMORY button repeatedly for prior values stored.
- To stop reading the data, press the START/STOP button to switch back to normal time.
To erase all data from one memory zone:
- Press the SET button repeatedly to select the desired memory zone.
- Press the MEMORY button to see the last measurement result.
- Press the MODE and SET button simultaneously to erase all data from the selected memory zone.

When the batteries are installed, the data in the memories will not be lost even when the Blood Pressure Monitor is switched off.
12 Time adjustment
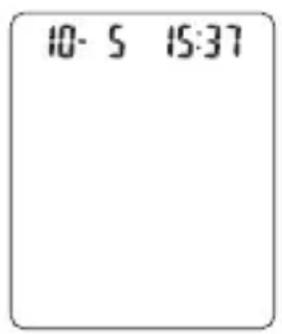
text_image
10-5 15:37To adjust the date and time:
- Press the SET button to activate the display. The memory zone will be displayed.
- Press the MODE button, the month will blink on the display.
- Press the SET button successively to change the month.
- Press the MODE button to confirm the month. The day will blink on the display.
- Change the day, hours and minutes as described above, using the SET button to change and the MODE button to confirm every setting.
• After setting the minutes, the device is ready to use.
13 Technical specifications
| Model | BPM Arm 6331 |
| Power source | 6V DC: 4 x AA - Alkaline batteries |
| Measurement zone | Pressure: 0~300 mmHg |
| Pulse: 40~199 beats/minute | |
| Accuracy | Pressure: ±3 mmHg |
| Pulse: within ±5% of reading | |
| Pressure sensor | Semi-conductor |
| Inflation | Automatic - Pump driven |
| Deflation | Automatic Pressure release valve |
| Memory capacity | 3 Memory zones for each 30 memories |
| Auto-shut-off | 1 minute after last key operation |
| Operation environment | +10°C~+40°C |
| ≤85% RH max. | |
| Storage environment | -20°C~+70°C |
| ≤85% RH max. | |
| Weight | 265g (with batteries) |
| Cuff Arm circumference | 23~33 cm / 9~13 in |
| Limited patient | Over 18 years old |
| Classification | Internally powered equipmentClassification of type BFIP X 0Not suitable for use in presence of flammable anaesthetic mixture with air or with oxygen or nitrous oxideContinuous operation with short-time loading |
*Specifications are subject to change without notice.
The CE symbol indicates that the unit complies with the essential requirements of the directive 93/42/EEC.
14 Topcom Warranty
14.1 Warranty period
The Topcom units have a 24 - month warranty period. The warranty period starts on the day the new unit is purchased. The warranty on batteries is limited to 6 months after purchase. Consumables or defects causing a negligible effect on operation or value of the equipment are not covered.
The warranty has to be proven by presentation of the original purchase receipt, on which the date of purchase and the unit-model are indicated.
14.2 Warranty handling
A faulty unit needs to be returned to a Topcom service centre including a valid purchase note. If the unit develops a fault during the warranty period, Topcom or its officially appointed service centre will repair any defects caused by material or manufacturing faults free of charge.
Topcom will at its discretion fulfill its warranty obligations by either repairing or exchanging the faulty units or parts of the faulty units. In case of replacement, colour and model can be different from the original purchased unit.
The initial purchase date shall determine the start of the warranty period. The warranty period is not extended if the unit is exchanged or repaired by Topcom or its appointed service centres.
14.3 Warranty exclusions
Damage or defects caused by incorrect treatment or operation and damage resulting from use of non-original parts or accessories not recommended by Topcom are not covered by the warranty.
The warranty does not cover damage caused by outside factors, such as lightning, water and fire, nor any damage caused during transportation.
No warranty can be claimed if the serial number on the units has been changed, removed or rendered illegible.
Any warranty claims will be invalid if the unit has been repaired, altered or modified by the buyer or by unqualified, non-officially appointed Topcom service centres.
To ensure precise measurement reading, recalibration of the device is recommended after 2 years from the date of purchase. Shipping plus handling cost and recalibration service fee shall be charged accordingly. (www.topcom.net)
1 Inleiding
natural_image
Simple line drawing of a trash bin with two crossed lines and a horizontal bar below (no text or symbols)bar
| Category | Diastolic (mmHg) | | :--- | :--- | | Stage 2 Hypertension | Systolic >= 160, Diastolic >= 100 | | Stage 1 Hypertension | Systolic 140 - 159, Diastolic 90 - 94 | | Prehypertension | Systolic 120 - 139, Diastolic 80 - 89 | | Normal | Systolic < 120, Diastolic < 80 |natural_image
Simple line drawing of a rectangular device with buttons and a blank screen (no text or symbols)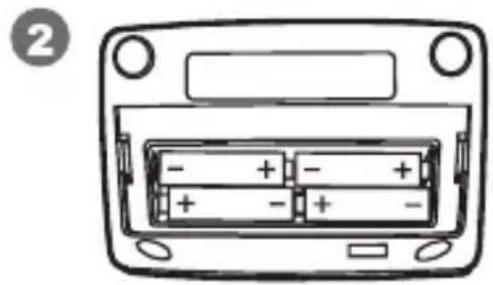
natural_image
Diagram of a device rear panel with four battery cells and mounting holes (no text or symbols)text_image
Diagram of a blood pressure monitor with labeled parts including digital display and blood pressure monitor- LCD-display
- MEMORY-toets
- START / STOP-toets
-
INSTEL-toets
-
MODE-toets
- Armband
- Luchtaansluiting
- Luchtstekker
8 Display
text_image
910 18-38 18:88 ↓ 888 mmHg 7 388 ERROR 6 88 188 ① ② ③ ④ ⑤natural_image
Illustration showing a hand performing a wrist compressing an arm and then adjusting the pressure device (no text or symbols present)
text_image
1.5cmnatural_image
Illustration showing two different physical interventions: one with a wrist strap and another with a hand holding an IV catheter (no text or symbols present)text_image
10-5 15:37 no.1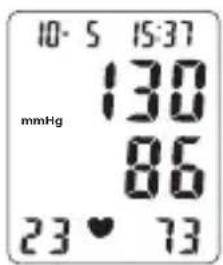
text_image
10-5 15:37 mmHg 130 86 23 • 73natural_image
Simple line drawing of a trash bin with two crossed lines and a horizontal bar below (no text or symbols)bar
| Hypertension Stage | Diastolic (mmHg) | | :--- | :--- | | Stage 2 Hypertension | Systolic >= 160, Diastolic >= 100 | | Stage 1 Hypertension | Systolic 140 - 159, Diastolic 90 - 94 | | Prehypertension | Systolic 120 - 139, Diastolic 80 - 89 | | Normal | Systolic < 120, Diastolic < 80 |natural_image
Simple line drawing of a rectangular device with buttons and a blank screen (no text or symbols)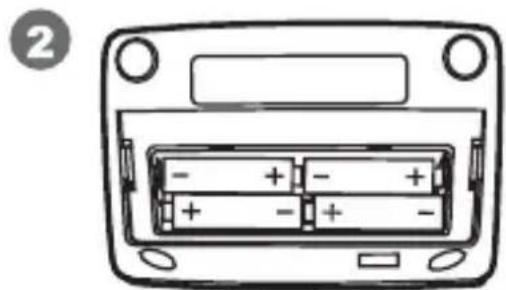
natural_image
Front view of a device rear panel with four battery cells (no text or symbols visible)text_image
Diagram of a blood pressure monitor with labeled parts including digital display and pressure monitor, showing internal components and connections.- Écran LCD
- Touche MEMORY
- Touche START / STOP
-
Touche SET
-
Touche MODE
- Manchette
- Air Jack
- Air Plug
8 Display
text_image
9 18-28 18:88 10 8 888 mmHg 7 388 ERROR 6 88 188 5 4natural_image
Illustration showing a hand performing a wrist compressure technique and a corresponding medical device with motion arrows (no text or symbols)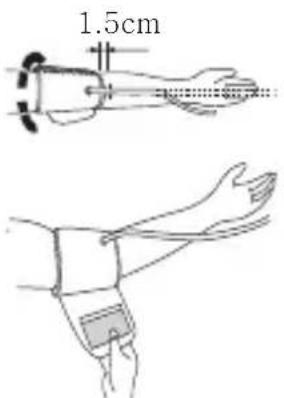
text_image
1.5cmnatural_image
Illustration showing two different physical or medical procedures: one with a wrist and hand, the other with a person holding an IV catheter (no text or symbols present)text_image
10-5 15:37 no.1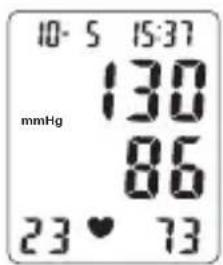
text_image
10-5 15:37 mmHg 130 86 23 • 73bar
| Hypertension | Diastolic (mmHg) | | :--- | :--- | | Stage 2 Hypertension | Systolic >= 160, Diastolic >= 100 | | Stage 1 Hypertension | Systolic 140 - 159, Diastolic 90 - 94 | | Prehypertension | Systolic 120 - 139, Diastolic 80 - 89 | | Normal | Systolic < 120, Diastolic < 80 |natural_image
Simple line drawing of a rectangular device with buttons and a blank screen (no text or symbols)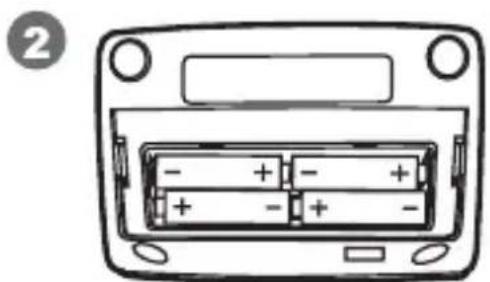
natural_image
Diagram of a device rear panel with four internal battery modules (no text or symbols)text_image
Diagram of a blood pressure monitor with labeled parts including digital display and blood pressure monitornatural_image
Illustration showing a hand performing a physical therapy or massage technique on a wrist, with no text or symbols present.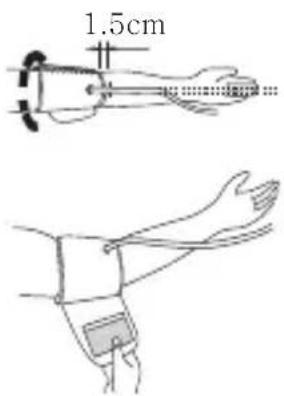
text_image
1.5cmnatural_image
Illustration showing a hand performing a wrist compressure technique and a person kneeling with a heart symbol (no text or symbols present)text_image
10-5 15:37 no.1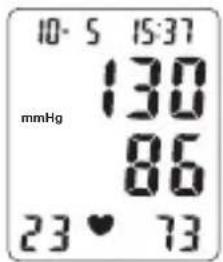
text_image
10-5 15:37 mmHg 130 86 23 • 73natural_image
Simple line drawing of a trash bin with two crossed lines above and below, no text or symbols present.bar
| Hypertension Stage | Diastolic (mmHg) | | :--- | :--- | | Stage 2 Hypertension | Systolic >= 160, Diastolic >= 100 | | Stage 1 Hypertension | Systolic 140 - 159, Diastolic 90 - 94 | | Prehypertension | Systolic 120 - 139, Diastolic 80 - 89 | | Normal | Systolic < 120, Diastolic < 80 |natural_image
Simple line drawing of a rectangular device with buttons and a blank screen (no text or symbols)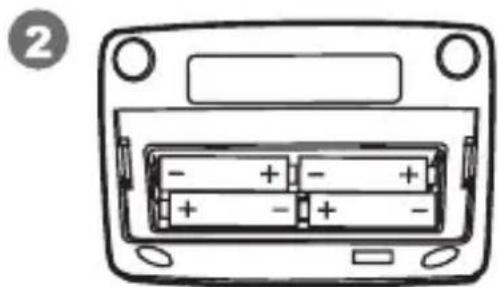
natural_image
Diagram of a device rear panel with four internal battery modules (no text or labels)text_image
Diagram of a blood pressure monitor with labeled parts including digital display and blood pressure monitor- LCD-display
- MINNESknapp
- START/STOPP-knapp
-
SET-knapp
-
MODE-knapp
- Manschett
- Luftuttag
- Luftanslutning
8 Teckenfönster
text_image
18-28 18:88 9 10 8 888 mmHg 7 388 ERROR 6 88 188 5 4text_image
Medical illustration showing hand placement and measurement of a wrist with a magnified view of the wrist.natural_image
Illustration showing a hand performing a wristwatch and a person using a device (no text or symbols present)text_image
10-5 15:37 no.1
text_image
10-5 15:37 ▲ 154 mmHg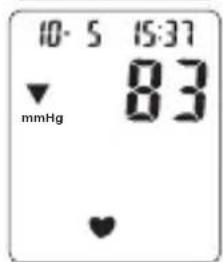
text_image
10·5 15:37 mmHg 83text_image
10-5 15:37 no.1
text_image
10-5 15:37 mmHg 130 86 23 • 73natural_image
Simple line drawing of a trash bin with two crossed lines and a solid bar below (no text or symbols)bar
| Category | Diastolic (mmHg) | | :--- | :--- | | Stage 2 Hypertension | Systolic >= 160, Diastolic >= 100 | | Stage 1 Hypertension | Systolic 140 - 159, Diastolic 90 - 94 | | Prehypertension | Systolic 120 - 139, Diastolic 80 - 89 | | Normal | Systolic < 120, Diastolic < 80 |natural_image
Simple line drawing of a device front panel with buttons and a blank screen (no text or symbols)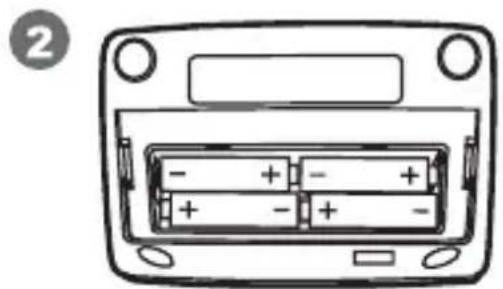
natural_image
Diagram of a device rear panel with battery and indicator lights (no text or symbols)text_image
Diagram of a blood pressure monitor with labeled parts including digital display and blood pressure monitor- LCD-display
- MEMORY-knap
- START / STOP-knap
- SET-knap
-
MODE-knap
-
Manchet
- Luftstik
- Luftstik
8 Display
text_image
18-28 18:88 9 10 ↑ 888 mmHg 7 388 ERROR 6 88 188 ① ② ③ ④ ⑤- Systolisk tryk
- Diastolisk tryk
- Pulshastighed
- Pulssymbol
- Hukommelsesnummer
- Fejlangivelse
- Indikator for lavt batteri
- Blodtryksenhed
- Dato
- Tid
natural_image
Illustration showing a hand performing a physical therapy or pulse diagnosis technique (no text or symbols present)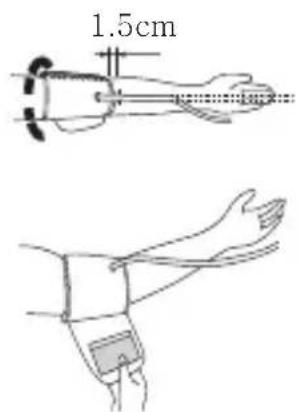
text_image
1.5cmnatural_image
Illustration showing a hand performing a blood pressure measurement with an arm and a close-up of the patient's chest (no text or symbols)text_image
10-5 15:37 no.1
text_image
10-5 15:37 mmHg 130 86 23 ♥ 73natural_image
Simple line drawing of a trash bin with two crossed lines and a horizontal bar below (no text or symbols)Når produktet skal avhendes, må du ikke kaste det i det vanlige husholdningsavfallet, men ta produktet til et innsamlingspunkt for resirkulering. Symbolet på produktet, brukerveiledningen og/eller boksen indikerer dette.
bar
| Category | Diastolic (mmHg) | |---|---| | Stage 2 Hypertension | Systolic >= 160, Diastolic >= 100 | | Stage 1 Hypertension | Systolic 140 - 159, Diastolic 90 - 94 | | Prehypertension | Systolic 120 - 139, Diastolic 80 - 89 | | Normal | Systolic < 120, Diastolic < 80 |natural_image
Simple line drawing of a rectangular device with buttons and a blank screen (no text or symbols)
natural_image
Diagram of a device rear panel with four battery cells and mounting holes (no text or labels)text_image
Diagram of a blood pressure monitor with labeled parts including digital display and blood pressure monitor- LCD-display
- MINNE-tast
- START / STOP tast
-
SET-tast
-
MODE-knapp
- Mansjett
- Luftkontakt
- Luftplugg
8 Display

text_image
9 10 18-28 18:88 8 mmHg 888 1 7 ERROR 3 6 88 188 5 4 1. Systolisk trykk 2. Diastolisk trykk 3. Pulsfrekvens 4. Pulssymbol 5. Lagret i minne 6. Feilindikator 7. Indikator for lavt batteri 8. Blodtrykksenhet 9. Dato 10. Klokke9 Bruke mansjetten
text_image
1.5cmnatural_image
Illustration showing a hand performing a wristwatch and a person using an ECG device (no text or symbols present)text_image
10-5 15:37 no.1
text_image
10-5 15:37 ▲ 154 mmHg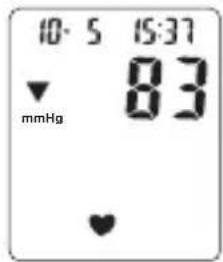
text_image
10:5 15:37 mmHg 83text_image
10-5 15:37 no.1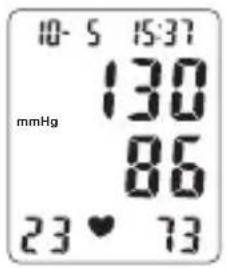
text_image
10-5 15:37 mmHg 130 86 23 ♥ 73natural_image
Simple line drawing of a trash bin with two crossed lines above and below, no text or symbols present.bar
| Category | Diastolic (mmHg) | | :--- | :--- | | Stage 2 Hypertension | Systolic >= 160, Diastolic >= 100 | | Stage 1 Hypertension | Systolic 140 - 159, Diastolic 90 - 94 | | Prehypertension | Systolic 120 - 139, Diastolic 80 - 89 | | Normal | Systolic < 120, Diastolic < 80 |natural_image
Simple line drawing of a device front panel with buttons and a blank screen (no text or symbols)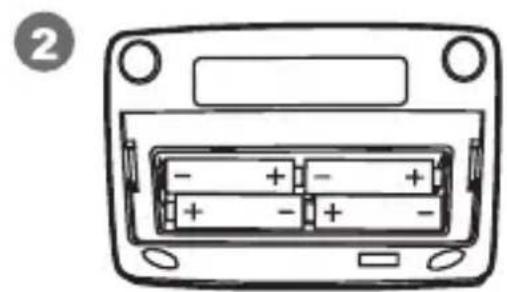
natural_image
Diagram of a device rear panel with four battery cells and labeled pins (no text or symbols beyond basic labels)text_image
Diagram of a blood pressure monitor with labeled parts including digital display and blood pressure monitornatural_image
Illustration showing a hand performing a blood pressure measurement with an IV catheter (no text or symbols present)text_image
10-5 15:37 no.1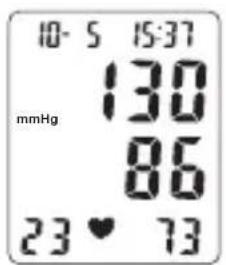
text_image
10-5 15:37 mmHg 130 86 23 • 73| ConductedRFIEC61000-4-6 | 3 V rms150kHz to 80 MHz | 3 V rms | Portable and mobile RF communications equipment should be used no closer to any part of the device, including cables, than the recommended separation distance calculated from the equation applicable to the frequency of the transmitter. | |
| RadiatedRFIEC61000-4-3 | 3 V/m80 MHz to 2.5 GHz | 3 V/m | Recommended separation distance d = 1,2 d = 1,2 80MHz to 800MHz d = 1,2 800MHz to 2.5 GHzwhere P is the maximum output power rating of the transmitter in watts (W) according to the transmitter manufacturer and d is the recommended separation distance in metres (m).Field strengths from fixed RF transmitters, as determined by an electromagnetic sitesurvey, should be less than the compliance level in each frequency range. Interference may occur in the vicinity of equipment marked with the following symbol: | |
| NOTE 1 At 80 MHz and 800 MHz, the higher frequency range applies.NOTE 2 These guidelines may not apply in all situations. Electromagnetic propagation is affected by absorption and reflection from structures, objects and people. | ||||
| Field strengths from fixed transmitters, such as base stations for radio (cellular/cordless) telephones and land mobile radios, amateur radio, AM and FM radio broadcast and TV broadcast cannot be predicted theoretically with accuracy. To assess the electromagnetic environment due to fixed RF transmitters, an electromagnetic site survey should be considered. If the measured field strength in the location in which the device is used exceeds the applicable RF compliance level above, the device should be observed to verify normal operation. If abnormal performance is observed, additional measures may be necessary, such as reorienting or relocating the device. Over the frequency range 150 kHz to 80 MHz, field strengths should be less than 3 V/m. | ||||
| Recommended separation distances between portable and mobile RF communication equipment and the device | ||||
| The device is intended for use in an electromagnetic environment in which radiated RF disturbances are controlled. The customer or the user of the device can help prevent electromagnetic interference by maintaining a minimum distance between portable and mobile RF communications equipment (transmitters) and the device as recommended below, according to the maximum output power of the communications equipment. | ||||
| Rated maximum output power of transmitter W | Separation distance according to frequency of transmitter m | |||
| 150 kHz to 60 MHz d = 1,2 | 80 MHz to 600 MHz d = 1,2 | 800 MHz to 2.5 GHz d = 2,3 | ||
| 0,01 | 0,12 | 0,12 | 0,23 | |
| 0,1 | 0,38 | 0,38 | 0,73 | |
| 1 | 1,2 | 1,2 | 2,6 | |
| 10 | 3,8 | 3,8 | 7,3 | |
| 100 | 12 | 12 | 23 | |
| For transmitters rated at a maximum output power not listed above, the recommended separation distance d in metres (m) can be estimated using the equation applicable to the frequency of the transmitter, where P is the maximum output power rating of the transmitter in watts (W) according to the transmitter manufacturer.NOTE 1 At 80 MHz and 800 MHz, the separation distance for the higher frequency range applies.NOTE 2 These guidelines may not apply in all situations. Electromagnetic propagation is affected by absorption and reflection from structures, objects and people. | ||||
| Guidanceandmanufacturer's declaration-electromagneticemissions | ||
| The device is intended for use in the electromagnetic environment specified below. The customer or the user of the device shouldassurethatisusedinsuchanenvironment. | ||
| EmissionstestCompliance | Electromagneticenvironment-guidance | |
| RFemissionsCISPR11 | Group1Thedeviceuses | RFenergyonlyforitsinternalfunction.Therefore,itsRFemissionsareverylowandarenotlikelytocauseanyinterferenceinnearbyelectronicequipment. |
| RFemissionsCISPR11 | ClassBThedeviceiss | suitableforuseinallestablishments,includingdomestic establishmentsandthosedirectlyconnected tothepubliclow-voltagepowersupplynetwork thatsuppliesbuildingsusedfordomestic purposes. |
| HarmonicemissionsIEC61000-3-2 | Notapplicable | |
| Voltagefluctuations/flickeremissionsIEC61000-3-3 | Notapplicable | |
| Guidanceandmanufacturer's declaration-electromagneticimmunity | |||
| The device is intended for use in the electromagnetic environment specified below. The customer or the user of the device should assure that it is used in such an environment. | |||
| ImmunitytestIEC60601 | testlevel | Compliancelevel | Electromagneticenvironment – guidance |
| Electrostatic discharge(ESD)IEC61000-4-2 | ±6kVcontact±8 k V air | ±6 kV contact±8 k V air | Floorsshouldbewood,concreteor ceramictile.Iffloorsarecovered with synthetic material,therelative humidityshouldbeatleast30%. |
| Powerfrequency (50/60Hz) magneticfieldIEC61000-4-8 | 3 A/m 3 A/m | Powerfrequencymagneticfields shouldbeatlevelscharacteristicof atypicallocationinatypical commercialorhospitalenvironment. | |
| Guidanceandmanufacturer's declaration-electromagnetic immunity | |||
| The device is intended for use in the electromagnetic environment specified below. The customer or the user of the device should assure that it is used in such an environment. | |||
| ImmunitytestIEC60601testlevelCompliance | level | Electromagnetic environment – guidance | |
| ConductedRFIEC61000-4-6 | 3 V r ms150kHz to 80MHz | 3 V r ms | Portable and mobile RF communications equipment should be used in a close to any part of the device, including cables, than the recommended separation distance calculated from the equation applicable to the frequency of the transmitter. |
| RadiatedRFIEC61000-4-3 | 3 V/m80MHz to 2,5GHz | 3 V/m | Recommended separation distance d = 1,2 d = 1,2 80MHz to 800MHz d = 1,2 800MHz to 2,5GHzwhere P isth maximum output power rating of the transmitter in watts (W) according to the transmitter manufacturer and if the recommended separation distance in metres (m). |
TOPCOM®
BPM ARM 6331
visit our website
www.topcom.net