— Cooker — Mode d'emploi PDF")
PIM 640 A (BK) - Cooker INDESIT - Free user manual and instructions
Find the device manual for free PIM 640 A (BK) INDESIT in PDF.
User questions about PIM 640 A (BK) INDESIT
0 question about this device. Answer the ones you know or ask your own.
Ask a new question about this device
Download the instructions for your Cooker in PDF format for free! Find your manual PIM 640 A (BK) - INDESIT and take your electronic device back in hand. On this page are published all the documents necessary for the use of your device. PIM 640 A (BK) by INDESIT.
USER MANUAL PIM 640 A (BK) INDESIT
Operating Instructions HOB
Contents
Operating Instructions,1
Warnings,3
Assistance,9
Description of the appliance,11
Installation,23
Start-up and use,27
Precautions and tips,27
Maintenance and care,28
Troubleshooting,28
PT
Portuges
PykoBoDCTBO no 3KcNpyaun,2
PpeDynpexKeHn7,7
CepBnchoe 6cbnyKbHaHne,10
Oncanhe n3denn1,14
YCTaHOBka,72
BkIIOUeHHe N 3KcNJIyatauia,77
PpeoctopoxkHOCTn peKOMeHdaun,78
Texnueckoe obcnykmbaHne uyxo,78
HencnpaBHOCTn MeToDbI x yctpaHeHHa,79
IT
Avvertenze
WARNING: The appliance and its accessible parts become hot during use. Care should be taken to avoid touching heating elements. Children less than 8 years of age shall be kept away unless continuously supervised. This appliance can be used by children aged from 8 years and above and persons with reduced physical, sensory or mental capabilities or lack of experience and knowledge if they have been given supervision or instruction concerning use of the appliance in a safe way and understand the hazards involved. Children shall not play with the appliance. Cleaning and user maintenance shall not be made by children without supervision.
WARNING: Unattended cooking on a hob with fat or oil can be dangerous and may result in fire. NEVER try to extinguish a fire with water, but switch off the appliance and then cover flame e.g. with a lid or a fire blanket.
WARNING: Danger of fire: do not store items on the cooking surfaces.
Never use steam cleaners or pressure cleaners on the appliance.
Remove any liquid from the lid before opening it. Do not close the glass cover (if present) when the gas burners or electric hotplates are still hot.
The appliance is not intended to be operated by means of an external timer or separate remote control system.
CAUTION: the use of inappropriate hob guards can cause accidents.

Avertissements
jaii jaiie 8 jai jaiy jaiy jaiy jaiy jaiy jaiy jaiy jaiy jaiy
- appliance model (Mod.)
- serial number (S/N)
This information is found on the data plate located on the appliance and/or on the packaging.
FR
Assistance
Indiquez-lui :
IpepeTEmkO6paTnTbCByUeHTpTexHnueckoro
06cnykubahn:
- MoDJIb n3dJIyra (MoI.)
Homep tex. nacnopTa (cepHHbN Ng)
3Tn daHHbIe Bbl HAnTe Ha nacnpTHon Ta6nueKe, paCNOJIOKeHHoH Ha N3dJIIN.
AR
#
:J
(Mod.) jj
(S/N)
jglg 100000000000000000000000000000000000000000000
.0001 1
IT
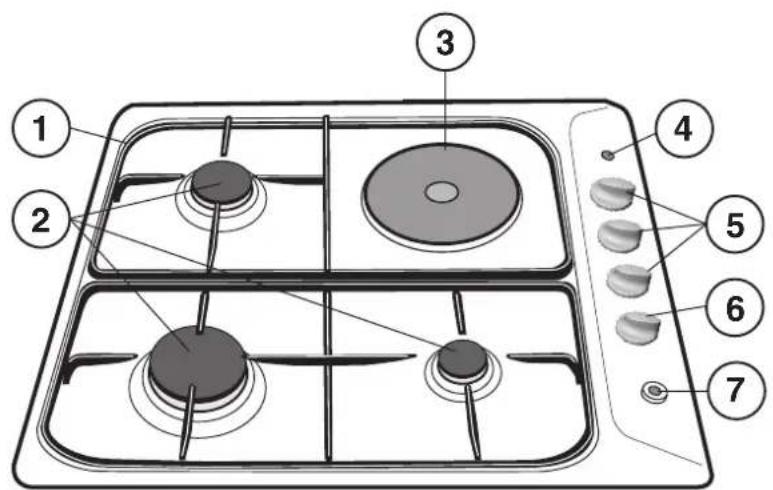
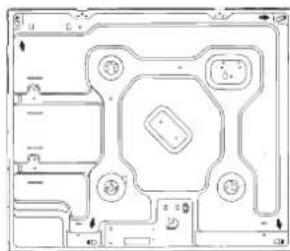
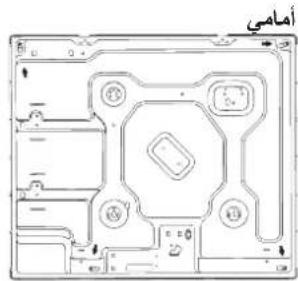
Description of the appliance
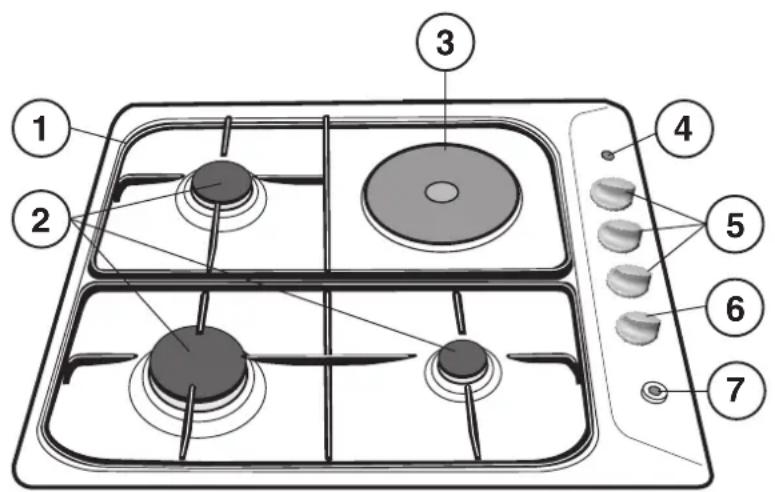
Overall view
1 Support Grid for COOKWARE
2 GAS BURNERS
3 ELECTRIC HOTPLATE
4 Electric HOTPLATE INDICATOR LIGHT
5 Control Knobs for GAS BURNERS
6 Control Knobs for ELECTRIC HOTPLATES
7 GAS BURNERS button
8 Ignition for GAS BURNERS
9 SAFETY DEVICES
- ELECTRIC HOTPLATES may have different diameters and operate at different power levels. These power levels may be "normal" or "rapid" (the latter may be distinguished from the others by a red spot in the middle of the hotplate).
- The ELECTRIC HOTPLATE INDICATOR LIGHT switches on whenever the selector knob is moved from the 'off' position.
- GAS BURNERS differ in size and power. Use the diameter of the cookware to choose the most appropriate burner to cook with.
Control Knobs for GAS BURNERS and ELECTRIC PLATES* adjust the power or the size of the flame. - GAS BURNER IGNITION* enables a specific burner to be lit automatically.
- SAFETY DEVICE* stops the gas flow if the flame is accidentally extinguished.
- Only available on certain models.
FR
aillil jie jia jia jia jia
Jaa Jj j j j j
IT
Installazione
! Before operating your new appliance please read this instruction booklet carefully. It contains important information for safe use, installation and care of the appliance.
Please keep these operating instructions for future reference. Pass them on to possible new owners of the appliance.
Positioning
! Keep packaging material out of the reach of children. It can become a choking or suffocation hazard (see Precautions and tips).
! The appliance must be installed by a qualified professional according to the instructions provided. Incorrect installation may cause harm to people and animals or may damage property.
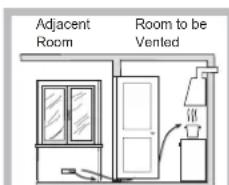
This unit may be installed and used only in permanently ventilated rooms in accordance with current national regulations. The following requirements must be observed:
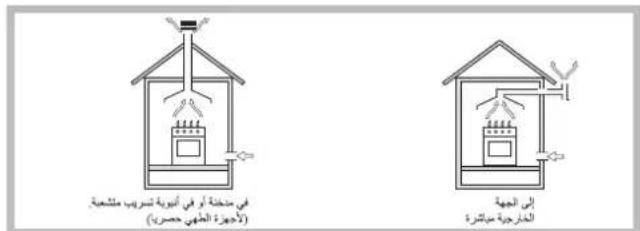
- The room must be equipped with an air extraction system that expels any combustion fumes. This may consist of a hood or an electric fan that automatically starts each time the appliance is switched on.
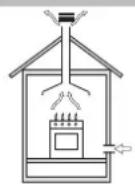
In a chimney stack or branched flue. (exclusively for cooking appliances)

Directly to the Outside
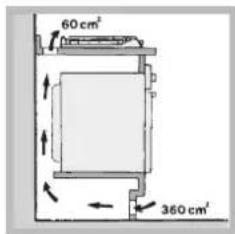
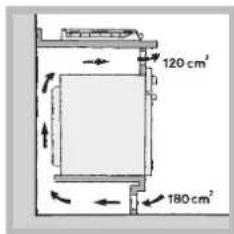
- The room must also allow proper air circulation, as air is needed for combustion to occur normally. The flow of air must not be less than 2m^3 /h per kW of installed power.
Examples of ventilation holes for combustant air.
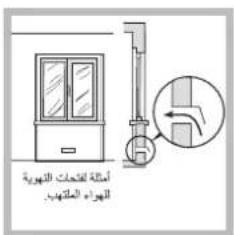
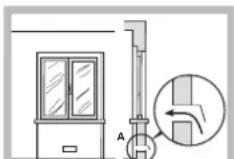
The air circulation system may take air directly from the outside by means of a pipe with an inner cross section of at least 100~cm^2 the opening must not be vulnerable to any type of blockages.
Enlarging the ventilation slot between window and floor
The system can also provide the air needed for combustion indirectly, i.e. from adjacent rooms fitted with air circulation tubes as described above. However, these rooms must not be communal rooms, bedrooms or rooms that may present a fire hazard.
- Liquid petroleum gas sinks to the floor as it is heavier than air. Therefore, rooms containing LPG cylinders must also be equipped with vents to allow gas to escape in
the event of a leak. As a result LPG cylinders, whether partially or completely full, must not be installed or stored in rooms or storage areas that are below ground level (cellars, etc.). It is advisable to keep only the cylinder being used in the room, positioned so that it is not subject to heat produced by external sources (ovens, fireplaces, stoves, etc.) which could raise the temperature of the cylinder above 50^ .
Fitting the appliance
The following precautions must be taken when installing the hob:
- Kitchen cabinets adjacent to the appliance and taller than the top of the hob must be at least 600mm from the edge of the hob.
- Hoods must be installed according to their relative installation instruction manuals and at a minimum distance of 650mm from the hob (see figure).
- Place the wall cabinets adjacent to the hood at a minimum height of 420mm from the hob (see figure).
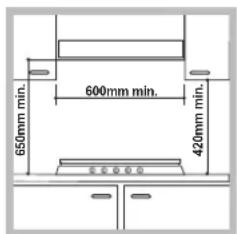
If the hob is installed beneath a wall cabinet, the latter must be situated at a minimum of 700mm above the hob.
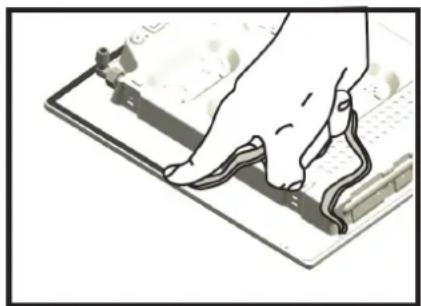
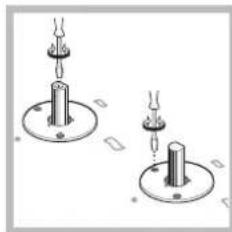
Before the installation remove the grids and burners from the hob and turn it upside down, making sure you don't damage the thermocouples and spark plugs. Apply the seals that come with the appliance along the outer edges of the hob to prevent any passage of air, humidity and water (see Figure). For proper application make sure the surfaces to be sealed are clean, dry and free of any grease/oil.
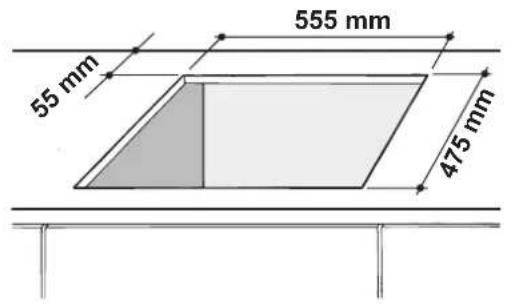
- The installation cavity should have the dimensions indicated in the figure.
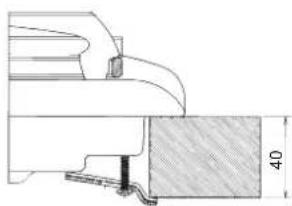
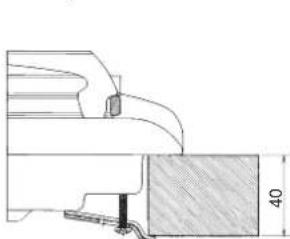
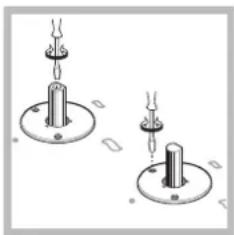
Fastening hooks are provided, allowing you to fasten the hob to tops that are between 20 and 40mm thick. To ensure the hob is securely fastened to the top, we recommend you use all the hooks provided.
Hook fastening diagram
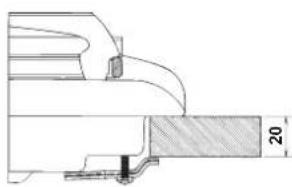
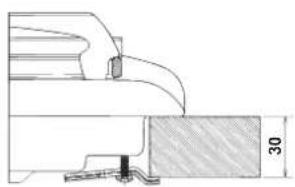
Hooking position Hooking position for top H=20mm for top H=30mm
Front
Hooking position Back for top H=40mm
! Use the hooks contained in the "accessory pack".
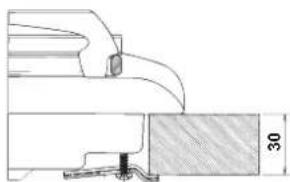
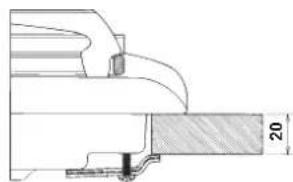
- Where the hob is not installed over a built-in oven, a wooden panel must be installed as insulation. This must be placed at a minimum distance of 20mm from the lower part of the hob.
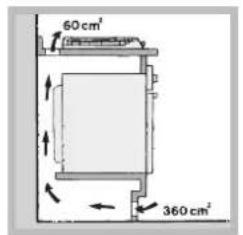
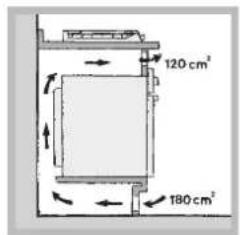
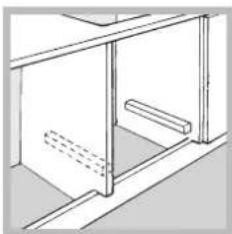
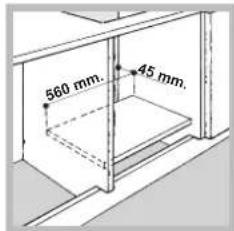
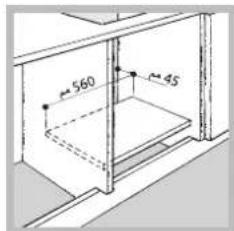
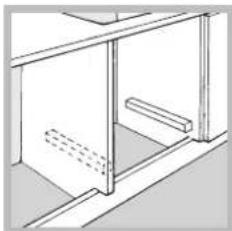
Ventilation
To ensure adequate ventilation, the back panel of the cabinet must be removed. It is advisable to install the oven so that it rests on two strips of wood, or on a completely flat surface with an opening of at least 45 × 560 ~mm (see diagrams).
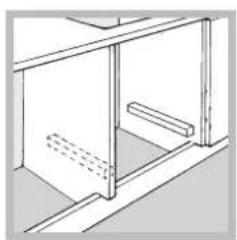
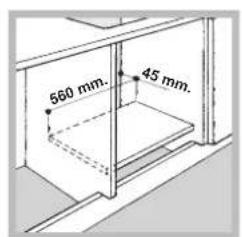
Where a hob is installed above an oven without a forced ventilation cooling system, adequate ventilation must be provided inside the cabinet by means of air holes through which air can pass (see figure).
! The PI 640 AST/PIM 640 AST hob can only be installed above built-in ovens with a cooling ventilation system.
Electrical connection
Hobs equipped with a three-pole power supply cable are designed to operate with alternating current at the voltage and frequency indicated on the data plate (this is located on the lower part of the appliance). The earth wire in the cable has a green and yellow cover. If the appliance is to be installed above a built-in electric oven, the electrical connection of the hob and the oven must be carried out separately, both for electrical safety purposes and to make extracting the oven easier.
Connecting the supply cable to the mains
Install a standardised plug corresponding to the load indicated on the data plate.
The appliance must be directly connected to the mains using an omnipolar circuit-breaker with a minimum contact opening of 3mm installed between the appliance and the mains. The circuit-breaker must be suitable for the charge indicated and must comply with current electrical regulations (the earthing wire must not be interrupted by the circuit-breaker). The supply cable must not come into contact with surfaces with temperatures higher than 50^ .
! The installer must ensure that the correct electrical connection has been made and that it is compliant with safety regulations.
Before connecting to the power supply, make sure that:
- The appliance is earthed and the plug is compliant with the law.
- The socket can withstand the maximum power of the appliance, which is indicated on the data plate.
The voltage is in the range between the values indicated on the data plate. - The socket is compatible with the plug of the appliance. If the socket is incompatible with the plug, ask an authorised technician to replace it. Do not use extension cords or multiple sockets.
! Once the appliance has been installed, the power supply cable and the electrical socket must be easily accessible.
! The cable must not be bent or compressed.
The cable must be checked regularly and replaced by authorised technicians only (see Assistance).
! The manufacturer declines any liability should these safety measures not be observed.
Gas connection
The appliance should be connected to the main gas supply or to a gas cylinder in compliance with current national regulations. Before carrying out the connection, make sure the cooker is compatible with the gas supply you wish to use. If this is not the case, follow the instructions indicated in the paragraph "Adapting to different types of gas." When using liquid gas from a cylinder, install a pressure regulator which complies with current national regulations.
! Check that the pressure of the gas supply is consistent with the values indicated in Table 1 ("Burner and nozzle specifications"). This will ensure the safe operation and longevity of your appliance while maintaining efficient energy consumption.
Connection with a rigid pipe (copper or steel)
! Connection to the gas system must be carried out in such a way as not to place any strain of any kind on the appliance. There is an adjustable L-shaped pipe fitting on the appliance supply ramp and this is fitted with a seal in order to prevent leaks. The seal must always be replaced after rotating the pipe fitting (seal provided with appliance). The gas supply pipe fitting is a threaded 1/2 gas cylindrical male attachment.
Connecting a flexible jointless stainless steel pipe to a threaded attachment
The gas supply pipe fitting is a threaded 1/2 gas cylindrical male attachment.
These pipes must be installed so that they are never longer than 2000mm when fully extended. Once connection has been carried out, make sure that the flexible metal pipe does not touch any moving parts and is not compressed.
! Only use pipes and seals that comply with current national regulations.
Checking the tightness of the connection
! When the installation process is complete, check the pipe fittings for leaks using a soapy solution. Never use a flame
Adapting to different types of gas
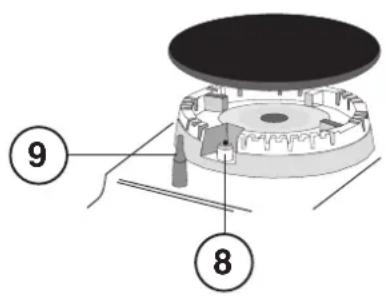
To adapt the hob to a different type of gas other than default type (indicated on the rating plate at the base of the hob or on the packaging), the burner nozzles should be replaced as follows:
-
Remove the hob grids and slide the burners off their seats.
-
Unscrew the nozzles using a 7 mm socket spanner, and replace them with nozzles for the new type of gas (see table 1 "Burner and nozzle characteristics").
-
Reassemble the parts following the above procedure in the reverse order.
-
Once this procedure is finished, replace the old rating sticker with one indicating the new type of gas used. Sticker are available from any of our Service Centres.
Adjusting the burners' primary air
Does not require adjusting.
-
Setting the burners to minimum
-
Turn the tap to the low flame position;
-
Remove the knob and adjust the adjustment screw, which is positioned in or next to the tap pin, until the flame is small but steady.
-
Having adjusted the flame to the required low setting, while the burner is alight, quickly change the position of the knob from minimum to maximum and vice versa several times, checking that the flame does not go out.
-
Some appliances have a safety device (thermocouple) fitted. If the device fails to work when the burners are set to the low flame setting, increase this low flame setting using the adjusting screw.
-
Once the adjustment has been made, replace the seals on the by-passes using sealing wax or a similar substance.
If the appliance is connected to liquid gas, the regulation screw must be fastened as tightly as possible.
! Once this procedure is finished, replace the old rating sticker with one indicating the new type of gas used. Stickers are available from any of our Service Centres.
! Should the gas pressure used be different (or vary slightly) from the recommended pressure, a suitable pressure regulator must be fitted to the inlet pipe (in order to comply with current national regulations).
| DATA PLATE | |
| Electrical connections | see data plate |
| CE | This appliance conforms to the following European Economic Community directives: - 2006/95/EEC dated 12/12/06 (Low Voltage) and subsequent amendments - 2004/108/EEC dated 15/12/04 (Electromagnetic Compatibility) and subsequent amendments - 93/68/EEC dated 22/07/93 and subsequent amendments. - 2009/142/EEC dated 30/11/09 (Gas) and subsequent amendments. - 2012/19/EC and subsequent amendments. |
GB
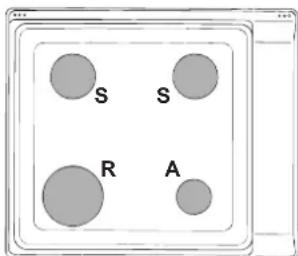
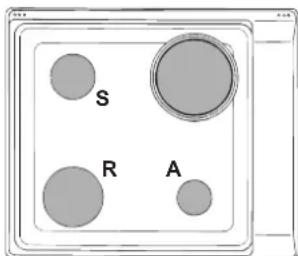
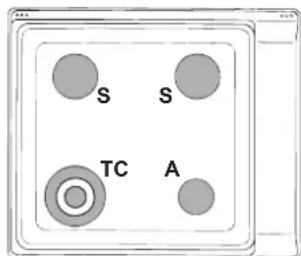
Burner and nozzle specifications
Table 1
| Burner | Diameter (mm) | Thermal Power kW (p.c.s.*) | By-pass 1/100 (mm) | Nozzle 1/100 (mm) ** | Flow* g/h | Nozzle 1/100 (mm) | Flow* l/h | |||
| Nom. Red. | (1) | |||||||||
| Fast (R) | 94 | 3.00 | 0.70 | 39 | 41 | 87 | 218 | 214 | 128 | 286 |
| Semi Fast (S) | 69 | 1.90 | 0.40 | 28 | 30 | 70 | 138 | 136 | 104 | 181 |
| Auxiliary (A) | 46 | 1.00 | 0.40 | 28 | 30 | 52 | 73 | 71 | 76 | 95 |
| Triple Crown (TC) | 130 | 3.25 | 1.50 | 61 | 57 | 91 | 236 | 232 | 133 | 309 |
| Supply pressures | Nominal (mbar) | 28-30 | 37 | 20 | ||||||
| Minimum (mbar) | 20 | 25 | 17 | |||||||
| Maximum (mbar) | 35 | 45 | 25 | |||||||
- At 15^ C and 1013,25 mbar - dry gas
Propane P.C.S. = 50.37 MJ/Kg
* Butane P.C.S. = 49.47 MJ/Kg
Natural P.C.S. = 37.78 MJ/m
(1) Only for appliances with the security device.
PI 640
PI 640 A
PI 640 IB
PI 640 AS
PI 640 A R
PI 640 S
PI 640 AS R
PIM 640AS
PIM 640 S
PIM 640AS EX
PIM 640 A
PI 631
PI 631 IB
PI 631 A
PI 631 AS
PIM 631 AS
PI 640 AST
PIM 640 AST
! The PI 640 AST/PIM 640 AST hob can only be installed above built-in ovens with a cooling ventilation system.
Start-up and use
! The position of the corresponding gas burner or electric hotplate* is shown on every knob.
Gas burners
Each burner can be adjusted to one of the following settings using the corresponding control knob:
- Off


To light one of the burners, hold a lit match or lighter near the burner and, at the same time, press down and turn the corresponding knob anti-clockwise to the maximum setting. Since the burner is fitted with a safety device, the knob should be pressed for approximately 2-3 seconds to allow the automatic device keeping the flame alight to heat up. When using models with an ignition button, light the desired burner by first pressing the gas burners button (identifiable by the symbol), then pressing down the corresponding knob as far as possible and turning it anticlockwise towards the maximum setting.
If a flame is accidentally extinguished, turn off the control knob and wait for at least 1 minute before trying to relight it.
To switch off the burner, turn the knob in a clockwise direction until it stops (when reaches the "●" position).
Electric hotplates*
The corresponding knob may be turned clockwise or anticlockwise and set to six different positions:
| Setting | Normal o Fast Plate |
| 0 Off | |
| 1 | Low |
| 2-5 Medium | |
| 6 High |
When the selector knob is in any position other than the off position, the 'on' light comes on.
Practical advice on using the burners
To ensure the burners operate efficiently:
- Use appropriate cookware for each burner (see table) so that the flames do not extend beyond the bottom of the cookware.
Always use cookware with a flat base and a cover. -
Only available on certain models.
-
When the contents of the pan reach boiling point, turn the knob to minimum.
| Burner | Ø Cookware Diameter (cm) |
| Fast (R) | 24 - 26 |
| Semi Fast (S) | 16 - 22 |
| Auxiliary (A) | 10 - 14 |
| Triple Crown (TC) | 24 - 26 |
Practical advice on using the electric hotplates*
To avoid heat loss and damage to the hotplates, use pans with a flat base, whose diameter is no less than that of the hotplate itself.
| Setting | Setting |
| 0 | Off |
| 1 | Cooking vegetables, fish |
| 2 | Cooking potatoes (using steam) soups, chickpeas, beans. |
| 3 | Continuing the cooking of large quantities of food, minestrone. |
| 4 | For roasting (average) |
| 5 | For roasting (above average) |
| 6 | For browning and reaching a boil in a short time |
Before using the hotplates for the first time, you should heat them at maximum temperature for approximately 4 minutes, without placing any pans on them. During this initial stage, their protective coating hardens and reaches its maximum resistance.
Precautions and tips
This appliance has been designed and manufactured in compliance with international safety standards. The following warnings are provided for safety reasons and must be read carefully.
General safety
This is a class 3 built-in appliance.
Gas appliances require regular air exchange to maintain efficient operation. When installing the hob, follow the instructions provided in the paragraph on "Positioning" the appliance.
- These instructions are only valid for the countries whose symbols appear in the manual and on the serial number plate.
- The appliance was designed for domestic use inside the home and is not intended for commercial or industrial use.
- The appliance must not be installed outdoors, even in covered areas. It is extremely dangerous to leave the appliance exposed to rain and storms.
- Do not touch the appliance with bare feet or with wet or damp hands and feet.
- The appliance must be used by adults only for the preparation of food, in accordance with the instructions outlined in this booklet. Any other use of the appliance (e.g. for heating the room) constitutes improper use and is dangerous. The manufacturer may not be held liable for any damage resulting from improper, incorrect and unreasonable use of the appliance.
- Ensure that the power supply cables of other electrical appliances do not come into contact with the hot parts of the oven.
- The openings used for ventilation and dispersion of heat must never be covered.
Always make sure the knobs are in the " " /"o" position when the appliance is not in use. - When unplugging the appliance always pull the plug from the mains socket, do not pull on the cable.
- Never carry out any cleaning or maintenance work without having detached the plug from the mains.
- In case of malfunction, under no circumstances should you attempt to repair the appliance yourself. Repairs carried out by inexperienced persons may cause injury or further malfunctioning of the appliance. Contact a Service Centre (see Assistance).
- Always make sure that pan handles are turned towards the centre of the hob in order to avoid accidental burns.
- Do not close the glass cover (if present) when the gas burners or electric hotplates are still hot.
- Do not leave the electric hotplate switched on without a pan placed on it.
- Do not use unstable or deformed pans.
- The appliance should not be operated by people (including children) with reduced physical, sensory or mental capacities, by inexperienced individuals or by anyone who is not familiar with the product. These individuals should, at the very least, be supervised by someone who assumes responsibility for their safety or receive preliminary instructions relating to the operation of the appliance.
- Do not let children play with the appliance.
- The appliance is not intended to be operated by means of an external timer or separate remote-control system.
Disposal
- When disposing of packaging material: observe local legislation so that the packaging may be reused.
- The European Directive 2012/19/EC on Waste Electrical and Electronic Equipment (WEEE), requires that old household electrical appliances must not be disposed of in the normal unsorted municipal waste stream. Old appliances must be collected separately in order to optimise the recovery and recycling of the materials they contain and reduce the impact on human health and the environment. The crossed out "wheeled bin" symbol on the product reminds you of your obligation, that when you dispose of the appliance it must be separately collected.
Consumers should contact their local authority or retailer for information concerning the correct disposal of their old appliance.
Maintenance and care
Switching the appliance off
Disconnect your appliance from the electricity supply before carrying out any work on it.
Cleaning the appliance
! Do not use abrasive or corrosive detergents such as stain removers, anti-rust products, powder detergents or sponges with abrasive surfaces: these may scratch the surface beyond repair.
! Never use steam cleaners or pressure cleaners on the appliance.
- It is usually enough to wash the hob with a damp sponge and dry it with absorbent kitchen roll.
- The removable parts of the burners should be washed frequently with warm water and soap and any burnt-on substances removed.
- For hobs which ligth automatically, the terminal part of the electronic instant lighting devices should be cleaned frequently and the gas outlet holes should be checked for blockages.
- The electric hotplates should be cleaned with a damp cloth and lubricated with a little oil while still warm.
- Stainless steel can be marked by hard water that has been left on the surface for a long time, or by aggressive detergents containing phosphorus. After cleaning, rinse and dry any remaining drops of water.
Gas tap maintenance
Over time, the taps may become jammed or difficult to turn. If this happens, the tap must be replaced.
! This procedure must be performed by a qualified technician authorised by the manufacturer.
Troubleshooting
It may happen that the appliance does not function properly or at all. Before calling the service centre for assistance, check if anything can be done. First, check to see that there are no interruptions in the gas and electrical supplies, and, in particular, that the gas valves for the mains are open.
The burner does not light or the flame is not even around the burner.
Check whether:
- The gas holes on the burner are clogged.
- All the movable parts that make up the burner are mounted correctly.
- There are draughts near the appliance.
The flame dies in models with a safety device.
GB
Check to make sure that:
- You pressed the knob all the way in.
- You keep the knob pressed in long enough to activate the safety device.
- The gas holes are not blocked in the area corresponding to the safety device.
The burner does not remain lit when set to minimum.
Check to make sure that:
- The gas holes are not blocked.
- There are no draughts near the appliance.
- The minimum setting has been adjusted properly.
The cookware is unstable.
Check to make sure that:
- The bottom of the cookware is perfectly flat.
- The cookware is positioned correctly at the centre of the burner.
- The pan support grids have been positioned correctly.
Installation
MoHTaK KpIoka DnA onOpHBx MoHTaK KpIoka DnA onOpHBx 6pyCKOB H=20mm 6pyCKOB H=30mm
CnepeDu
MOHTAX KPOKA DnONOPbIX C3aDn 6pyckOB H=40mm
!NcnoB3ynte KpOKn 13 KOMnEKeTA《BCNOmOraTeNbHbIe npHaJnEJIeXHOCTN》
- Ecnn BapouhnaHb He yctaHaBnBaetc Cbepyx BCTPOeHHoro DyXOBOro LiKaΦa, Heo6xoDMMo BCTaBnTb DepeBraHHyo NaHeJIb B KaeeCTBe N3OJaCm. 3Ta naHeIb DOJIXHA 6bITb yCTaHOBJeHa Ha pacCToHn He Mehee 20 MM OT HIXKHe Yactn BapouHn NaHeIN.
Bentnla
IINOeueHnHaIeXaueBHeHTIaHn Heo6xmo CHrTb 3aHIO NaHEn HnN KxOHHO 3JeMeHTa. PeKOMeHNyETcYCTaHOBt bDyXOBn uKaΦ Ha Dba depeBraHHbIX 6pycka nHn Ha cIINoWHe OCHOBaHne C OTBepCTmE dNaMeTpom He Mehee 45 x 560 MM (cm cepTeKn).
Ecnn BapouhnaHb yctHaBnBaetcBepxv BCTpoEHORO dyXOBoro 1ka, He ochaueHHoro npHynteHbON OxNaINTeHbON BeHTNlauen, Dna Hndnxauen BeHTNlaun BHytpn KxyOHHO 3neMeHTa Heo6xOIMO npOdenatb BeHTNlaUHHbIe OTBepCTn dIy CpKpyLauu BO3dyxa (cm cepTeKn).
!BapouhnaHnIbI640AST/PIM640ASTMOKET6bITb yctaHOJIeHaToJIbKOHaB BCTpaINBaEMbIMN DXYOBblIMN KkaΦamnCOxNaINTeHbHOBEHTNJRAUne.
3NeKtpnueeckoe noDKJIOUeHne
BapouhIe naHEnI, OchaueHHbIe TpexnonpHbIM ceTeBbIM Ka6enm, paCHTaHbI Ha cyHKUHOHPoBaHne C nepemEHbIM TOKOM C HApPaxHeHm N uactOTOn 3NeKTPoNtAHnya3aHHbIM Ha nacopTHO Ta6nUKe (paCnoJIOxehHO CHn3y BapouHON naHEnI). PpOBOD 3a3EmHeHn cTeBOrKa6eI IMeET XeNTo-3eHbIN UBeT. B Cnyuae yCTaHOBKn BapouHON naHEnI CBepxdyXoBOrO uKaΦa, BCTpoEHHO B KxOHbIN 3JeMENT, 3NeKTPnueCKoe NOcOeHNHeHne BapouHON naHEnI IN DxyOBoro uKaΦa DOJIHXO BblONHrTBcR pa3dEhHO no npuHAm 6e30nachocTH, a TAK Jee dJa JeKOrO cbema DxyOBoro uKaΦa.
IopcoeHHeHcTeBOro uHypa H3dennK cetn 3JeKtponHTAHN
YcTaHOBnTe Ha CTeBOH Ka6eBb HopMaIN3OBaHHyU WTeNCEJIbHyIO BUNKy, paCHNTAHHyIO HA Harpy3Ky, yKa3aHHyIO HA NaCnOpTHeo Tabnue. B Cnyae npMoro NpOKnOuCeHnK CETn 3JeKTPoNtAHn MExdy N3DeIeNm I CetbIO Heo6xOIMO YcTAHOBnTB MHOrONIOHChBn BBIKIOUaTeNb C MINHMaNbHbIM pacCTOraHnEM MeKdy KOHTaTAMN 3 MM, paCHTaHHbIM H aDaHHyIO Harpz3Ky I COOTBeCTByIOuHN DeNCTByIOuIM HOPMaTINBaM (BbIKIOUaTeNb He DoJXeH pa3MbikTa IIPOBOD 3a3EmNeHn). CTeBOu Ka6eBb DOJXeH 6bITb PaCNOJOKeH TaKIM O6pa3OM, YTO6bl H N B ODHOn ToUke erO TeMnePepatypa He npeBbIwana TempepatypnomeuHnboJee Yem Ha 50^
RU
!3JektpomOHTeHecETOTBeTCTBeHHOCtB3a npabnIbHOe NOKIIouHeNe N3JeNna K 3JekTpueckOn CETn 3a co6nOHeHne npabn 6e3oNaCHOCTn.
PpeI NOKJIIOHHeHnEM N3dJIINa K cETn 3JIeKTPoNTaHnI npOBepbTe CneDyIOUee:
- po3eTkaДолЖна 6bIb coeДиHea C 3a3eMJIeHnEm I COOTBETCTBOBaT b HOpMaTINBaM;
- ceteBa p03eTka dOJIxHa 6bITb paccuTaHa Ha MaKcImMaIbHyIO NOTpe6IaemyIO MOUHocTb N3dJIy, yKa3aHHyIO B Ta6IInCeTexHuecknx XapaKTepnCTNK;
- HanpЯжehne uqactota Toka CETn DOJXhbl COOTBeTCTBOBaTb 3NeKtpuYeCKM DaHHbIM N3dEIny;
- ceteBaJ po3eTKa dOJIKHa 6bITb COBMeCTnMa co WTeNCEJBHON BUNKOn n3JeINr. B npOTNBOM cnyae 3aMeHInTe po3eTKy INN BUNKy; He nCNoIb3yInTe yDNIHHTeIN INN TPOHNIKN.
I N3dJIeNn DOnJXHO 6bITb yCTaHOBJeHO TAKIM O6pa3OM, YTO6bl 3JIeKTPnueckn npoBOd n ceTeBa r po3eTKa 6bln NERKO DOCTyINHbl.
13neKtpnuecknn npoBOD n3deJnna He doJIkeH 6bITb corHyT nnCkAT.
! Perynnpno npOBepnnte coCToHne ka6eJna 3NeKTPonHTAHn n B cnUyae Heo6xOaMocTn nOpuynte ero 3aMeHy ToIbKO yNoHOMOeHHbIM TexHnKaM (CM. TexHnueckoe o6cnykBaHne).
!Pon3BODnteH He Hecet OTBetCTBeHHOCTN 3a nocneCTBnH Heco6JIOJeHnI nepeuNCHeHbIX Bblwe Tpe6oBaHN.
IopcoeHHeHneKra3oNpOBOy
HaHHeu 3dEJIe MoKet 6bIb yctaHO H NcNoB3OBAbCra ToIbKO B NOMEUeHNrX C NOCToHHON BeHTnIaIeN B COOTBeTCTBm C NOJIOKeHnA M DeNCTByIOuNX HopMaTHOB, ToIbKO nocJe npOBepKn COOTBeTCTBna H3dJIeN TaIy Ra3a, K KOtOpMy OH NODcoEINHReTcR. B Cnyuae HeCOOTBeTCTBnBaIIOJHnTB opeaun, ONNCaHHbE B naparpaPe «HaCTponKa Ha pa3JNUHbIe TnIb rata). B Cnyuae NcNoB3OBAHn CxJXKeHnO ra3a I3 BaIInoHa NcNoB3OBAbTepeYJTopbl DaBHeHn, COOTBeTCTByIOuNe HopMaTHBaMn IN XN NOCJeDyUOzIM NONpABkAm.
!InnaHadeXHoroФyHKUHOHnpOBaHn,paCIOHaJIbHOrO nCNoJIb3OBAHn 3HeprnN 60Jee JInTeJIbHOrO cPoka cnJxkbI 3JeKtpuYeCKoRIO n3dEJIINr npOBepbTe,YTO6bl DaBHeHne NODaun Ra3a COOTBETCTBOBaNO 3HaueHnM, yKa3aHHbIM B Ta6JIuCe 1 "XapakTepnCTIKn Ra3OBbIX ropEnOK nΦopCyHOK".
IopcoeHHeHne npn nmoOn TbePOn Tpy6Kn (MeHON nn CTaJIbHON)
!IoJcoeHHeHneKra3OpBoHy He doJIxHO Oka3bIBaTb KaKnx-Ⅱ60Harpy3OKHa n3deJInE.
Ha natapy6ke noaun r3a B n3dennn mMeetc
BpaauoeeecKoneHO"LCyNIOHTeHbON npOKnAko.
Pn Heo6xoIIMOCtN NOBepHyTB KOJeHO 06ra3aTeJbHO
3ameHte yNIOHTeJIbHyO npOKnaKy (npNlaraioUcTcR
K n3deJIIO). PaTpy6ok noDaun ra3a B n3deJIne IMeet
UnnnHprueckyo HApYkHyO pe3b6y 1/2 ra3.
IopcoeHHeHne npn nOmoOn r6KoN Tpy6Kn N3 HepXaBeOuSe nCTaJIc CO cNIOUHbIMN CTeHKAMN C pe3b6OBbIMN CoeHNHeHnMn.
Natpy6ok nodaun ra3a B n3deneHmeet uHHnpueckyohapxHypo3b6y 1/2 ra3.
NoDCoeDHeHne TAKnx ⅢaHROB DOJNHO pON3BOIDtbc TaKIM O6pa3OM, YTO6bI INx DInHa npMakCmAJbHOM pactXKeHN He npeBbIaJa 2000 MM. No 3abePWeHN NOcEOdHeHn IPOBepbTe, YTO6bI MetaJIINueckn IIN6Kn WNaHr He KacaIcnaOBNXbIX YacTeu INIe 6bl cKaT.
IcnoJb30BaTb NCKHouHTeJIbHo Tpy6Kn, COOTBeTCTByIOUne HopMaTnBv, n yNloTHnteJIbHbIe npoklaAdKn, COOTBeTCTByIOUne DeNCTByIOUm IocyapCTBeHHbIM HopMaTnBam.
PpOBepka ynNoTHeHn
!No3aBepueHn noCoeHHeHn npOBepbTe npOCHb yNtHeHn BCex nATpy6KOB npn NOMoU MblbHorpactbopa,HO HkOrda He NJaMeHem.
IoproTOBka K pa3nHbIM Tnam Ra3a
InepeocheHn Bapouhon naHn Ira3a, OTJUauOeMycr OToRa3a,Ha KOTOpBn BapouhnaHb paCHTaHa n3HaayalbHo (yKa3aHn Ha 3TuKeTke Ha BepxHen Yactn Bapouhon naHEn Hn Ha yNaKOBKe), HeoXoDIMO 3aMeHnTb cOpcyKn KOHOpOK CnEnyuOnm O6pa30m:
- CHMNTe C BapouHOn nAHeJIOn ONoPbIe peWetKn N BblbTe KOHΦOpKn I3 CBOx rHe3d.
- OTBnHTnte fopcyHKn npn NOMOUI NOJON OTBepTKN 7 MM n 3ameHNTe INx Ha fopcyHKn, paCHNTAHbIe HHOBBIN TIN rA3a (CMOTPnTe TabJIuCy 1 «XapakTepnCTNK KOHfOpOK n fopcyHOK»).
-
BOCCTaHOBNTb DeTaJIH Ha CBON MecTa, BbINONHЯ ONepaunB O6paTHOM NOPdKe.
4.ПоЗавершениОперашиЗаменTe CTapyIO 3TNKETky TAPINPOBAHЯHA HOByIO, COOTBETCTBYIOUJO HOBOMy TINY NcNoJIb3yEMOrO ra3a. 3TNKETKY MOxHO 3aKa3aTb B HauNX LcHTpax TexHnueckoro O6cIpyKuBaHЯ. -
Peryunu nepBnHoro Bo3dyxa KoHΦopok KoHΦopKn He HxKaIaOTcB KaKoN-Jn6o peryua nepBnHoro Bo3dyxa.
- PerylaцmaMHImaMbHOro PnAmEH
- Nobeprnte pykortky-pernytOp B noLoxehne MNHmAbhoro nameHn;
- cHmnte pyKoRTky nOBepHnTe peryIaIOHHbIN BnHT,paCNoJoxKeHHb IN BHyTpN nnPraOM CO cTepkHem KpaHa, BnIoTbDo NoJIyuEHHcTa6uNbHOroMaNOro nnameHn.
- Поберпг, чтобл пи рзкововоре руковский
нложеня мakсимально памени Ha минималбhoe,
Конфоркн He ratni.
4.Bn3dJIINx,OCHaUeHHbIX 3aunTHbIM yCTPONCBOM (TePMonapOn),Bcnyae HeuCnpaBHOCTN 3TOro yCTPONCTBa npu MNHMaJbHOM pIaMeHN KOHΦopOK yBeJIyCbTe paXoD ra3a MHNMaJbHOrO pIaMeHN pI npi NOMOUs peYrJaUNOHHO BnHTA. - Nt3aBepWeHn peryIaCm BocCTaHOBnTe cypryuHbIe nn noo6HbIe nIOM6bHa o6BoDHom ra3OpPoBOe.
!Bcnyae nCnoJb3ObaHn CxKHeHHoro ra3a peryIaIOHHbIN BHT DoJKeH 6bIb 3aBnHcHDo ynpa.
!No3aBepueHnO npaun 3aMeHnTe cTapyo 3TuKETky TaupoBaHHa HOByO, COOTBeTCTByIOUyHO HOBOMY TUNy IcNOJb3yEmoro r3a. 3TuKETKy MOxHO 3aKa3aTb B HaNX UeHTpax TexHnueckoro O6cnykubAHn.
!Ecnn daBneHne nCnoNb3yeMoro rata otTnuaeTcra OT npedycmOTpeHHoro daBleHnna (nIn Bapbnpyet), Heo6xOIMO yctaHOBntb Ha nItaUoIe m ra3OpOBoDe COOTBeTCTByIOuIN peryJrTop daBHeHn (corNaCHO Hopmatny By PeryJrTopbln kAHAnu3nPoBaHHbx ra3OB)).

AIO 77
3ABOДСКАТБЛИЧА
| Злекторитунио | см. 3аВОДСКУЮ Табличу |
| CE | Данhoe Изделице COOTВЕТСТВЕТСLEДУЮШМ ДИРЕТИВАМЕВОЕСКORO СообшесТВА:2006/95/CEE ot 12/12/06 (Низкоеварпяжени) с поLEMDEДУЮШМИЗМЕHENЯМ - 2004/108/CEE ot15/12/04 (ЗлектормагинтуаяCOВМecтUMOCТь) с поLEMDEДУЮШМИЗМЕHENЯМ - 93/68/CEE ot22/07/93 c поLEMDEДУЮШМИЗМЕHENЯМ. - 2009/142/CEE ot30/11/09 (ГaЗ) c поLEMDEДУЮШМИЗМЕHENЯМ; - 2012/19CEE cпосLEMDEДУЮШМИЗМЕHENЯМ |
XapaKTePncTnKoHΦopOK nΦopcyHOK
HencnpaBHOCTN MeToDbI INX
yctpaheHn
Ecnn BaW xoIOniNbHnK He pa60aet. NpeXe qem o6paTntbcra B CHTp CepBnchoro 06cnykBaHna, npOBepbTe, MoXHO JIn yCTpaHnTB HeNCnPpABHOCTb, nCNOJIb3yPeKOMeHdaUu, npNBedeHHbE B CneDyIOUe m nepeuehe.
Ecnn HencnpaBHOCTb He MoXeT 6bITb yCTpaHeHa, Bbl3OBITEexHnka n3 yNtHNOHOMOeHHORo CepBnca: EINHBIn HaunOHahbHbIn Homep: 199.199.199 (MaKcmaJIbHaJ CTOnMOCTb 3BOHKOB cDOMaUHero TeJefoHa 0,1426 Ebpo).
KoHΦopka He 3aXnraeTcR, INI INaM rOpIT HepaBHomePHO.
ΦopcyHKU 2a3o8ou KOHΦopku 3acopuNucb.
Bce cbeMHbIyactn KOHOpKn DoXhbl 6bItb yCTaHOBJIeHbI npabNJbHO.
CKBO3HKn pIaOM C rA3OBn BapOuHOn nAneJIbIO.
B moJenX BapOuHON naHeN, OCHaUeHHbIX 3aUHTbIM ycTPONCTBOM, KOHOpKa 3aRopaetc n cpa3y rachET.
RU
PykoMa KaHΦopku Haxama He do ynpa.
PykoTka 6bIa Haxata B TeueHne BpemEn, HeoctatoCHoro DnB BKJIOeHn 3aunTHoro yCTponCTba.
3acopenbIΦopcyHKnra3OBONKoHΦopKn,pacnoJoxeHHbIE HnpoTINB 3aunTHOrO yCTponCTBa.
KoHcpopka rachET B NOJIOXeHHM MAJORO PJIaMeHN.
3acopenbl ombepcmu nodaqu 2a3e KOHOppe.
CKBO3HRAI pIOM C rA3OBON BAPOHN paHEnbIO.
- HenpaBnBHO OtperyuNipoBaHO MmHMaJIbHoe nIaM.
Hecta6nIbHbIe KacTpOJIa
HnKacmpJnu doJnxHo 6bim ubealbo nnockum.
Kactpionla DOnkha 6bItb yctaHOBneHa no ceHTpy ra3OBONnN 3NeKtpnuecko KOHopKn.
- OnopHbIe peWeTkn Ha BapOuHON naHeJIy yCTaHOBnEhbl HEnpaBnJIbHo.
- 1.1 & 或 1.2 1.2 & 或 1.3 .
Ls a jaoaagallgaiy alljauallaj
j
aai jia 02jai ai jai ai aai
必须使 a_n > 0
JalSly JdIJIg
jla jia jiai i jai li aai s 1aai gao zaiai
jL j 0000 gll aibial gds jllg
1
.
J 1
K 11 all
AilSc jia jiu jie li
1
Lalaia aabuaa gaaal eli! sla
J 1
J 1
a a a a a a a a a a a a a a a a a a a a a a
aie 1g aill
jie jie
Ae J 1
jieey
aaii i 1
j 1
Aala 1
g 100000000000000000000000000000000000000000000000
J 1
aal aai aai j aai aai paaai y aai all aai
zblll 1gla p12! clall ll gao yblall glalll gai j say
sblll .r gao gali lgln aiaa aiaa aiaa
jiai 4 1
1 1
iannll no alti pi i jno aalall oia jil
g jsl
e 1 1 1 1 1 1 1 1 1 1 1 1 1 1 1 1 1 1 1 1 1 1 1 1 1 1 1 1 1 1 1 1 1 1 1 1 1 1 1 1 1
e 10000000000000000000000000000000000000000000
J 1 1 1 1 1 1 1 1 1 1 1 1 1 1 1 1 1 1 1 1 1 1 1 1 1 1 1 1 1 1 1 1 1 1 1 1 1 1 1 1 1 1 1 1
2 1 1 1 1 1 1 1 1 1 1 1 1 1 1 1 1 1 1 1 1 1 1 1
Lai laia 1 jal aagill aal all aalaae gao jalil y laie "0"一 " saa gao gilaal n laia sla
aasssssssssssssssssssssssssssssssssssssssssssssssssssssssssssssssssssssssssssssssssssss
y 1
J 1 J 1 1 1 1 1 1 1 1 1 1 1 1 1 1 1 1
(ooeloll)
g j 1
aaii j 1 aai i aai ai aai i aai i aai i aai i aai i aai i aai i aai i aai i aai i aai i aai i aai i aai i aai i aai i aai i aai i aai i aai i aai i aai i aai i aai i aai i aai i aai i aai i aai i aai i aai i aai i aai i aai i
3 jj j j j 12
J 11 J 11 J 11 J 11 J 11 J 11 J 11 J 11 J 11 J 11 J 11 J 11 J 11 J 11 J 11 J 11 J 11 J 11 J 11 J 11 J 11 J 11 J 11 J 11 J 11 J 11
p 1
1
jiall j
:al llll 1i i 1i 1i 1i 1i 1i 1i

g 2-3 g 2-3 g 2-3 g 2-3 g 2-3 g 2-3 g 2-3 g 2-3 g 2-3 g 2-3 g 2-3 g 2-3 g 2-3 g 2-3 g 2-3 g 2-3 g 2-3 g 2-3 g 2-3 g 2-3 g 2-3
aalil jla jna jia cai aalall g Jaaal p jial no paaal
laill jc (yla ciao g) jiall ciao binae plaii l 1
()gdlllgliealallabiaa 1
(2015年全国春季)
(ooell) jai jia jia jia jia jia jia jia jia jia jia jia jia jia jia jia jia jia jia jia jia jia jia jia jia jia jia jia jia jia
a a a a a a a a a a a a a a a a a a a a a
jiei 1
aalll gllg jlll aaiy bgljll jll llae yll jll jll jll 1000000000000000000000000000000000000000000000000000000000000000000000000000000000
1 Jgall glll jlll gao ylaia jlll jaaa 2 no aai!
aaiyraaia glll jiaiaia iiai (aagll, grral lalal)
ailll lal alglol glblall gdl
(1)
AR
Ciiibbbl bbb
30=
120=E
40=EaijXiei jx
Culal qas" 80g gall
15
2.4g 1
()
aai 1 aai y i gai y iaiy iaiy jia jaii jaii jaii jaii jaii jaii jaii jaii jaii jaii jaii jaii jaii jaii jaii jaii jaii jaii jaii jaii jaii jaii jaii jaii jaii jaii jaii jaii jaii jaii jaii jaii jaii jaii
a 1 aalai aagll aagll aas 1 Ls .
J a J aell aee s y aae bgsy jia y jia g
.2
j 100 1