USER MANUAL IOVEN INOX TEKA
Before using your oven for the first time, please carefully read the installation and maintenance instructions that come with it.
Depending on the model, the accessories included in your oven may vary from those shown in the pictures.
FRANÇAIS

PROGRAMAR LA FUNCION TEKA HYDROCLEAN

NOTA
PROGRAMAÇAO DA FUNCAO TEKA HYDROCLEAN

NOTA
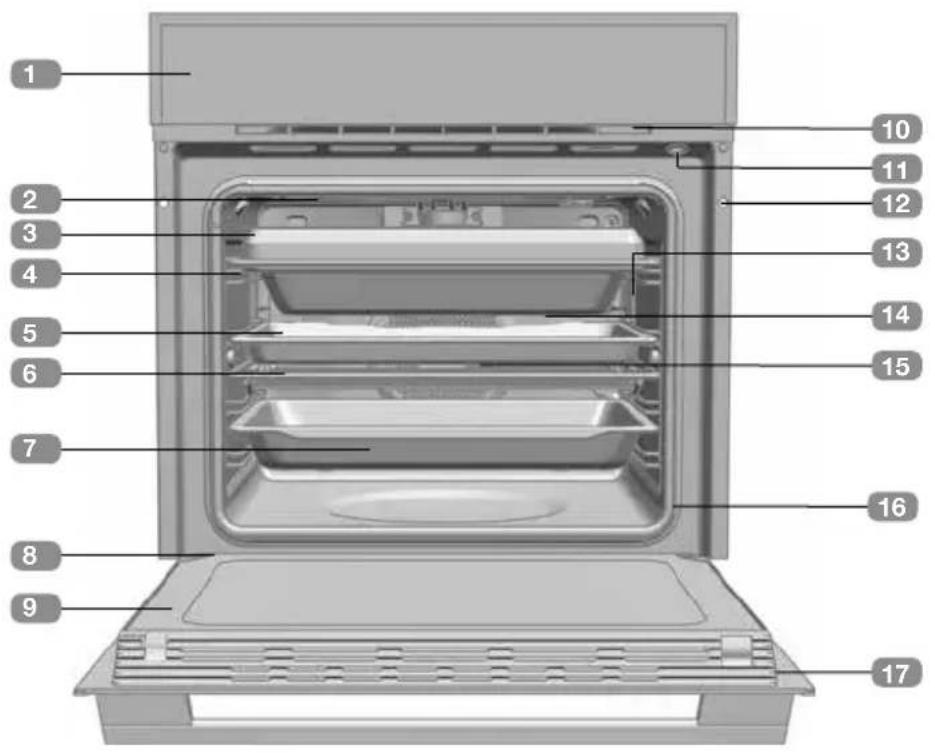
Description of the oven
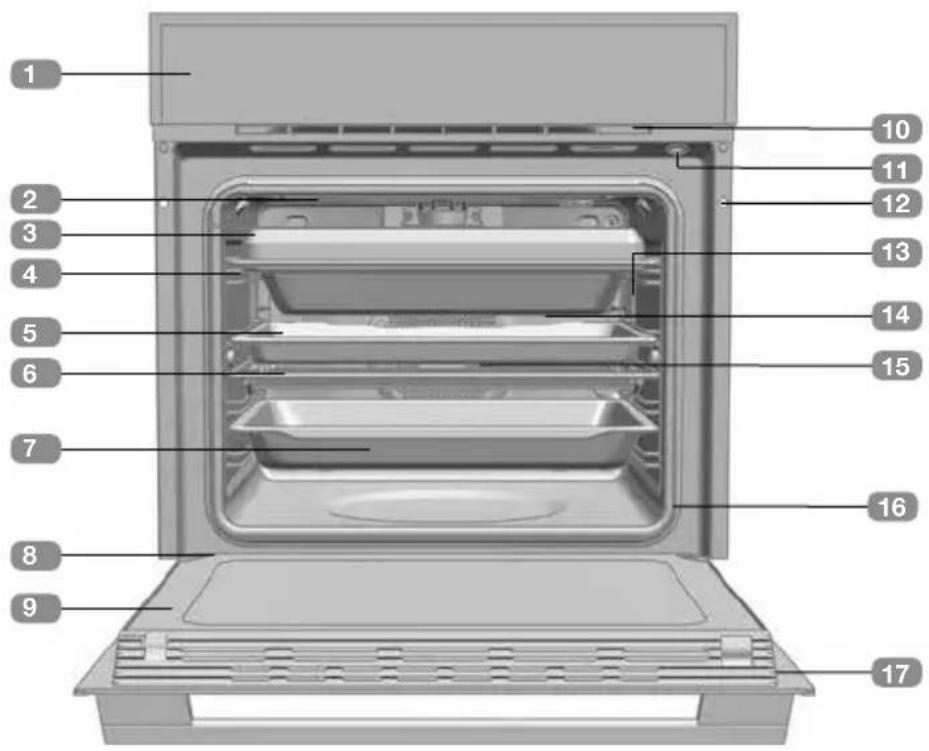
1 Control front panel
2 Grill resistor
3 Multicook
4 Tray support
5 Baking tray
6 Grill
7 Deep tray
8 Hinge
9 Inner glass
10 Cooling air outlet
11 Door switch
12 Attachment to fitting
13 LED lighting
14 Rear panel
15 Fan
16 Oven door seal
17 Door
Control front panel
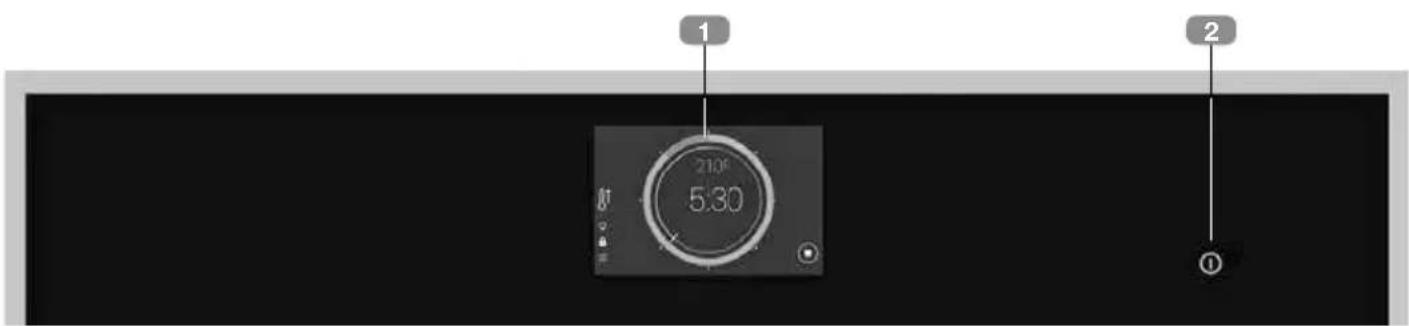
TFT screen.
2 ON/OFF Button
- Short press: End of current cooking cycle - Return to standby screen.
- Press >3 s Overall switching off of oven.
Switching on and initial configuration
After switching on the oven at the mains for the first time, or after long periods of disconnection, you should complete the initial configuration of your oven.
This configuration involves the following steps:
Language.
- Date and time.
- Units (Weight and Temperature)
In each case, to confirm the setting press ACKPT.
If you do not wish to complete the configuration now, press CANCEL.
You can configure these values at any moment by going to the EXTRAS MENU-> SETTINGS from the main menu.
When you have completed or skipped the initial configuration, you will go to the oven main menu.

WARNING
The sensitivity of the touch area of the TFT screen continuously adjusts to the environmental conditions. When the oven is connected to the power supply, make sure that the glass surface of the control front panel is clean and unobstructed.
Main menu
You will automatically be taken to this screen on completion of the initial configuration, or by touching the screen or the ON/OFF button when the oven is in standby mode.
The following elements can be found in the main menu:
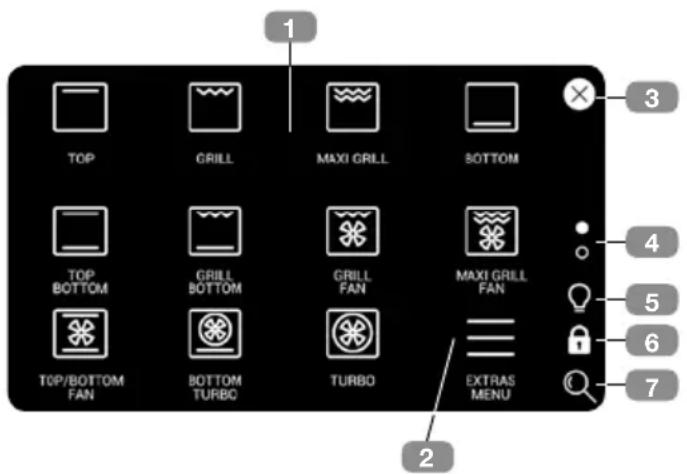
Each of the available functions is represented by a symbol (1). Press the different symbols to go to the cooking screen.
- Press the EXTRAS MENU (2) symbol to go to a menu with automatic recipes and various additional functions of the oven.
- Press the symbol × (3) to return to standby, or press the ON/OFF button. When the oven is in cooking mode, the symbol is displayed. This allows you to return to the current cooking cycle from the main menu.
- The dots (4) indicate at which part of the menu you are. Press the dots, or slide your finger vertically up or down the screen to view the other available functions.
- The symbol (5) switches the cavity lighting on or off.
The symbol (6) activates the child lock.
- The symbol (7) allows you to change the size of the symbols displayed.
Oven functions
The following oven functions are accessed via the main cooking menu:

For a description of how to use each of the functions, please see the cooking guide provided with the oven.

TOP/BOTTM

GRILL AND LOWER

TOP 8

GRILL

MAXIGRILL

BOTTOM

GRILL AND FAN

MAXIGRILL AND FAN

BOTTOM AND TURBO

TURBO

TOP/BOTTM AND FAN

ECO

HYDROCLEAN

PROVE

DEFROST

KEEP WARM

SLOWCOOK

Functions which include automatic fast preheating.

Functions compatible with cooking with meat thermometer.
Direct cooking functions
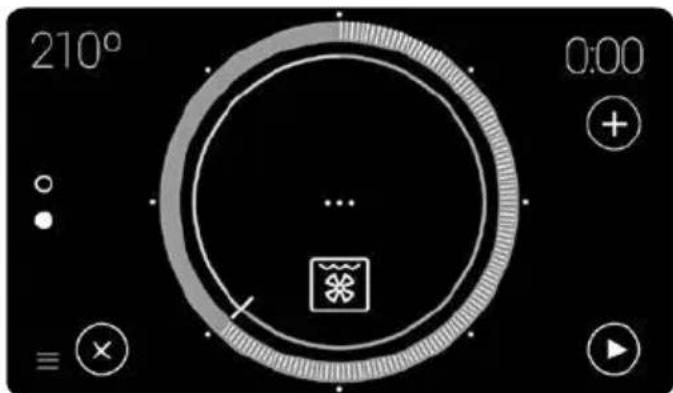
Press on one of the symbols described to go to the cooking configuration screen.
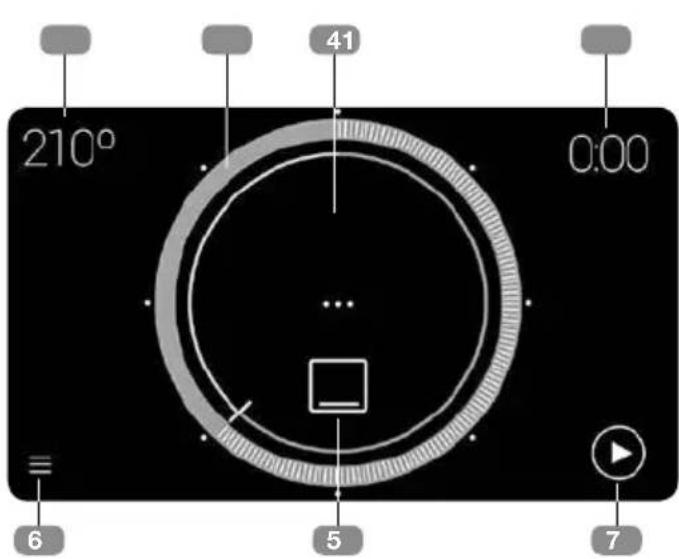
- Recommended cooking temperature. Press to go to the cooking temperature selection screen.
- Programmed cooking time. Press to go to the timer screen.
- Represents the selected temperature. Press on a dot or drag to select a temperature.
- Temperature viewer in real time. (Only visible at start of cooking cycle).
- Function selected. Press to select a new function.
- Access to extras menu.
- Start of cooking cycle. Once the cooking cycle has started, the display on the screen is as follows:
Once the cooking cycle has started, the display on the screen is as follows:
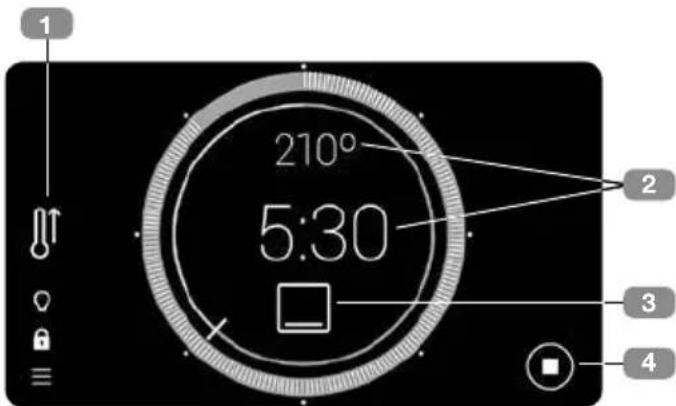
- Indicates that automatic fast preheating is ON.
- Press on either of the two dots shown to change the cooking values.
- Press on the symbol for the current function to select a new function.
This takes you to the main menu, where you can select a new cooking function.
If you do not wish to change the current function, just press on the symbol in the upper right corner, to return to the cooking screen without making any changes.
- End of cooking cycle.

To programme or modify a programme, please see the section "Planning: programming cooking time".
Automatic fast preheating
The functions marked with the symbol include automatic fast preheating by default. To disable this default setting go to the edit menu: EXTRAS MENU SETTINGS ENERGY EFFICIENCY
When starting a cooking cycle, if this option is ON and the function is compatible with the fast preheating function, the associated symbol is
displayed on the right. If at any moment you wish to cancel the fast preheating function, press on the symbol and follow the steps on the screen.
When the temperature setting is reached, a buzzer sounds and the fast preheating symbol disappears.
Programming cooking times
Press on the upper right corner of the temperature selection screen to go to the timer screen:

- This shows the selected cooking time. Press on a dot or drag to select a time.

The white dots around the circumference allow the cooking time to be quickly selected in 15-minute intervals.
To programme a cooking time of more than 2 h, complete one full circle and continue dragging until a longer time is displayed.
- Direct access to additional options:
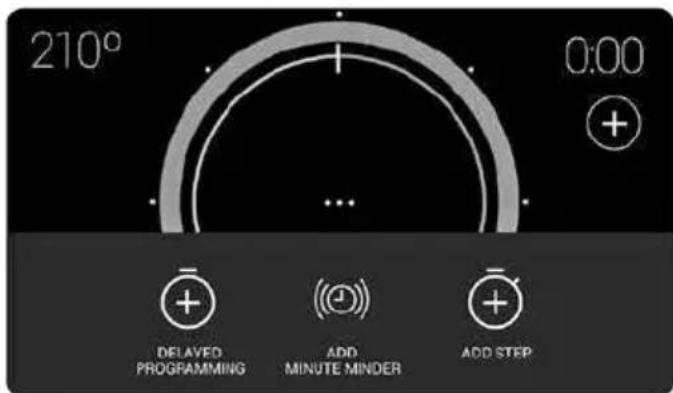
One you have entered this menu, you have the following timer options for programming a cooking cycle:
- Add minute minder
- Add step
- Delayed programming
MINUTE MINDER DURING COOKING CYCLE
This creates an alarm which buzzes at the end of the programmed time. The cooking cycle does NOT stop when the programmed alarm time ends.
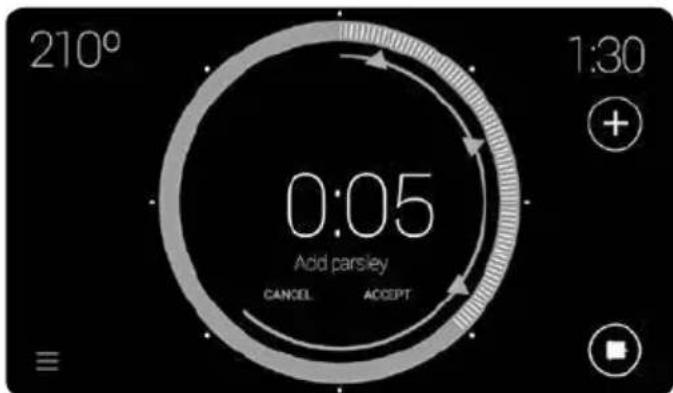
Up to three alarms can be programmed at the same time, displayed on screen by a blue triangle. This allows you to:
- Programme an alarm after programming a cooking time. Go to the time options menu and press on Add minute minder on the screen.
Programme an alarm without previously programming a cooking time.
In both cases, the procedure for programming the alarm is the same. Press on the blue triangle, continue pressing while dragging it to the required time.
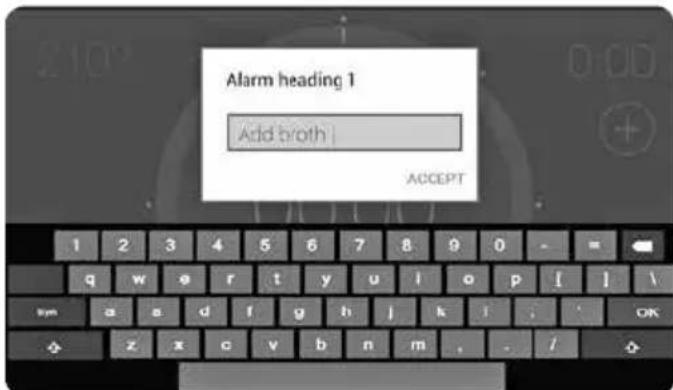
When an alarm time is selected, a dialog box with the on-screen keyboard is automatically displayed to allow you to enter a name. The default names are ALARM 1, ALARM 2 and ALARM 3.
COOKING IN STEPS
Select this option to programme a cooking cycle with up to three independent steps in the same cycle, by pressing the symbol from the cooking screen, ONLY after selecting the length of the cycle.
Press + "ADD STEP".
This takes you to the main menu. Now select the new step function.

Not all the cooking functions can be used with the cooking in steps function. Therefore, when you go to the main menu to add a new cooking step, some functions cannot be selected.
After selecting the new cooking step, you go to the cooking configuration screen.
At this point, you can:
- Add a third step if you have selected a cooking time for the second step, using the symbol ①
- Use the selector button to view the steps already programmed.
- Use the symbol , to delete the current step, except the first step.
During the cooking cycle, the selector button indicates the current cooking step.
COOKING WITH DELAYED PROGRAMMING
This allows the oven to be programmed so that the cooking cycle automatically stops at a certain time.
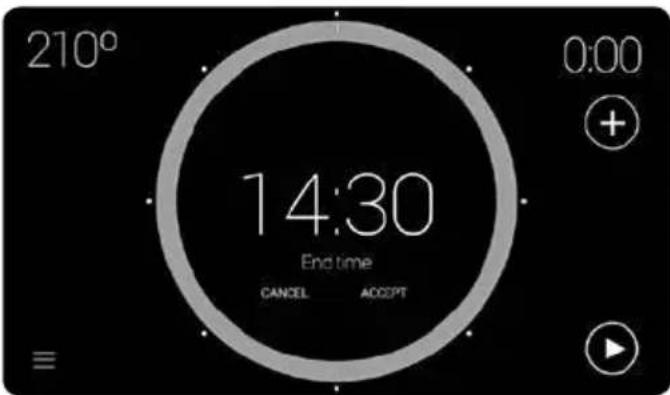
To go to this programming option, press the symbol from the cooking screen and press "DELAYED PROGRAMMING".

For the oven to remain in standby mode and end at the required time, before programming the end time it is necessary to programme the required cooking time.
Otherwise, only the end time is programmed and the oven will function as if only a cooking time had been programmed.
After entering an end time, "END TIME" and the time you have selected are displayed on the screen:
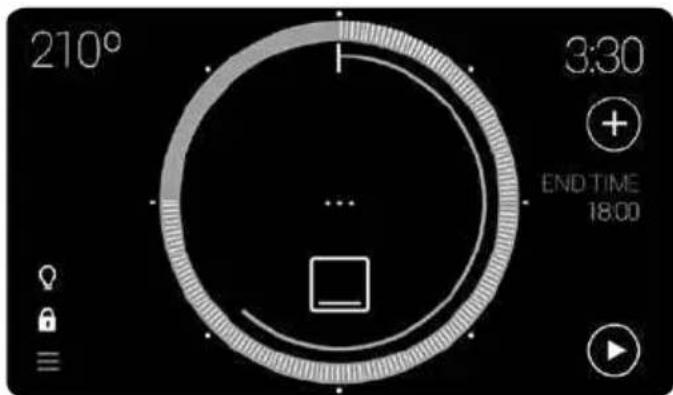
Once the cooking cycle has started, the oven remains on standby to start the cooking cycle.
Go to the Extras Menu using the symbol either from the main menu or from the cooking screen:
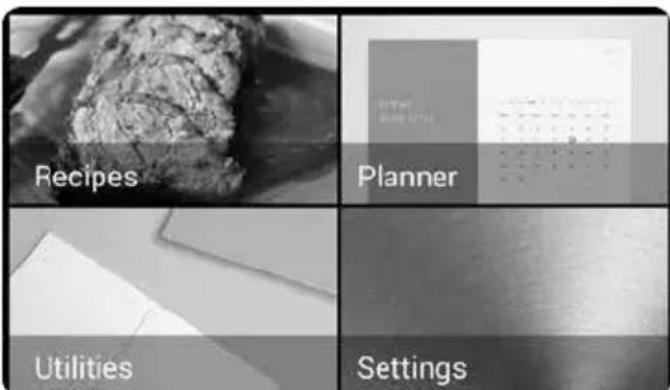
The following sub-menus are available in this menu:
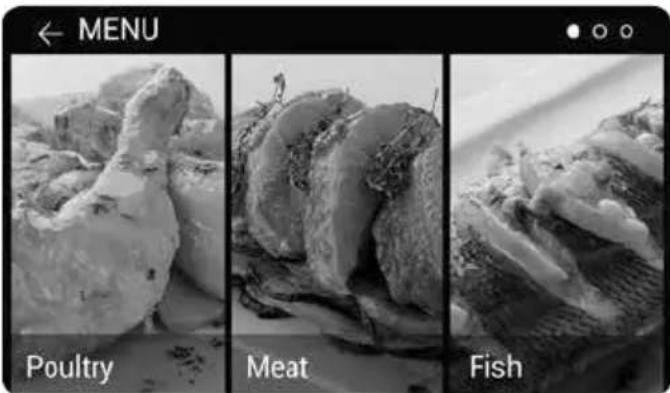
RECIPES
This sub-menu contains a recipe book with 50 programmes which allow you to programme the oven to automatically cook food to perfection just by entering a few simple parameters.
First select a family of food, and then a specific recipe. Slide your finger horizontally across the
screen to scroll through the possible options and press on the recipe required:
Now, you may select the weight, temperature and cooking finish, by dragging on each of the pointers
After entering the recipe parameters, the cooking cycle summary is displayed:
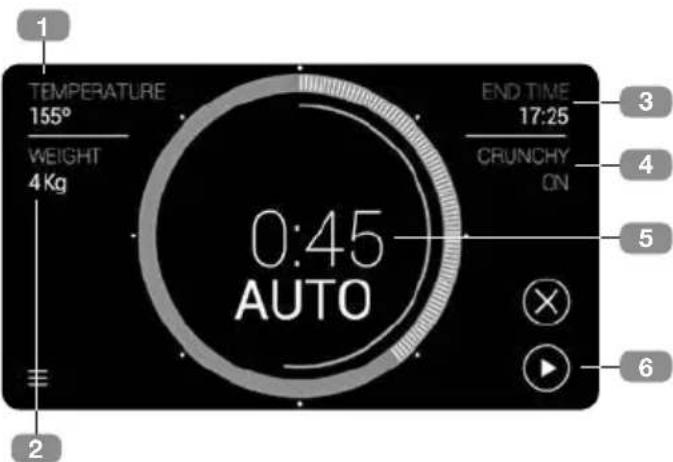
- Selected cooking temperature.
- Selected weight.
- Estimated end time based on parameters entered.
- Selected cooking finish.
- Cooking time automatically calculated from the parameters entered by the user.
- Start of cooking cycle.
The values entered in the previous step can be modified by touching the parameters 1, 2, and 4. The changes can be made during the cooking cycle.
Press on the END TIME (3) information area to defer the cooking start time.
Some of the recipes have special conditions. Notification about these conditions will be given before starting the cooking cycle:
- Preheating temperature:
Some of the recipes require preheating of the oven while empty. When the ideal cooking temperature is reached, a buzzer alarm is heard and a pop-up window on the screen reminds you to insert the food in the oven.
- Food requires turning over:
Some recipes (meat) require that the food is turned over at a certain point in the cooking cycle. The oven will notify the user by means of a buzzer alarm and a pop-up window on the screen.
PLANNER
In this sub-menu you can include alarms not linked to the cooking cycle, entering the date and time for each one.
When you go to the planner, a list of the established calendar entries is displayed. For each of these entries there is a sliding button, in blue if the alarm is ON and in grey if it is OFF:
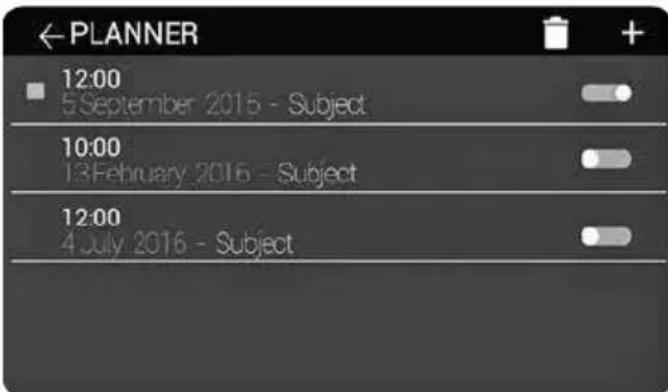
To add a new entry, press on the symbol + . The screen for entering the date and time of the reminder is displayed. The buttons Cancel (to cancel the entry), Next (to enter a name for the entry) and Finish (to confirm the entry with
the date/time selected) are displayed on this screen.
Once the details have been entered, activate the alarm using the button
To delete an entry:
Press on the symbol
- Select the entries you wish to delete.
- Press the symbol again. A pop-up window is displayed asking you to confirm the deletion:
When the date selected by the user of an entry in the planner arrives, a buzzer alarm sounds and a pop-up window appears on the screen displaying the entry.
UTILITIES
This sub-menu contains the MEMO utility, where you can add reminders.
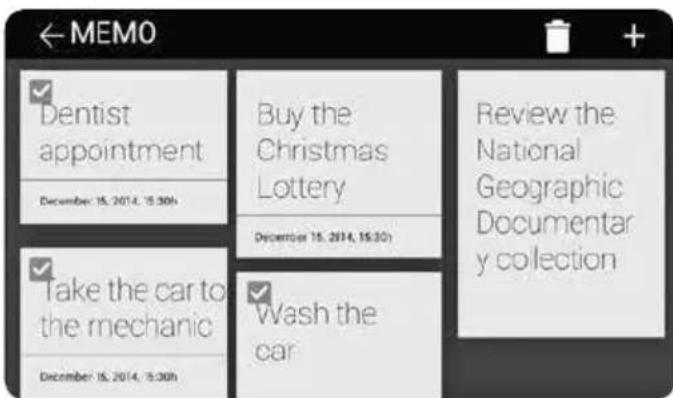
To add a new Memo entry, press +
Unlike the planner, a date for a reminder alarm can be entered optionally.
To delete one or more Memo entries, just press, select the entries to be deleted and press again.
SETTINGS
The settings menu contains all the configurable options of the oven.
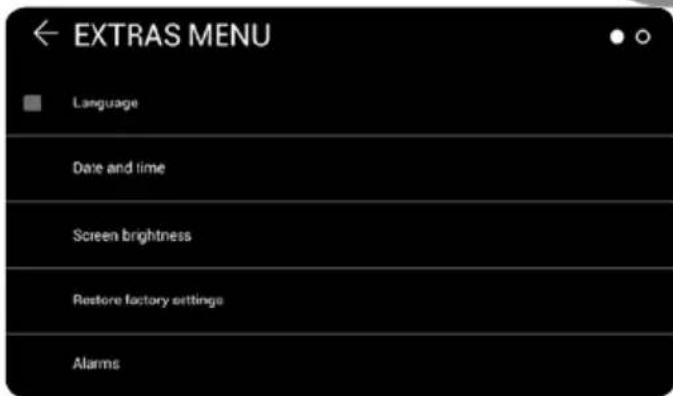
The available options are:
- Language
- Date / time
- Screen brightness
- Restore factory settings
- Alarms
- Security
- Weight / Temperature.
- Energetic efficiency
- Sort functions
Press and drag to go to the options which are not visible on the screen.
The dots in the upper right corner indicate which part of the list the user is currently in.
The Language, Date and Time, Weight and Temperature functions are explained in the section "Switching on and initial configuration" on page 4, and therefore only the following are explained below:
a) Screen brightness: In this screen menu it is possible to adjust the oven screen brightness. To modify, press and drag over the pointer .
b) Alarms: In this menu, it is possible to change both the length of the alarms and to switch on/off the pulse sound on the screen. To modify, press and drag over the pointer
c) Factory Settings: Use this option to delete all the oven settings, the oven is restarted and all the default settings are restored. When the over restarts, the initial parameter configuration is offered.
Press CONTINUE to display a confirmation pop-up window. If this is confirmed, the system will delete all the values saved and return to the initial settings.
d) Security: The security menu includes the options for limiting the maximum operating time and the maximum temperature. It also includes the automatic child lock function, when the oven is not in use.
e) Energetic efficiency: The energetic efficiency menu permits the activation/deactivation of the default ECO mode and fast preheating functions:
The ECO mode, activated by default, optimizes the use of the oven when it is not in use.
If this option is disabled, the oven can be activated from standby just by touching the screen, but the energy consumption is higher.
The preheating function, activated by default, is an option which allows the desired temperature to be reached more quickly.
f) Sort functions: This option allows you to customise the display of the main menu functions, permitting complete configuration.
The adjustment method is displayed/explained in a dialog box. To start the sorting, press "START".
Security functions
CHILD LOCK (CONTROL PANEL LOCK)
This function can be applied at any moment from the cooking screen.
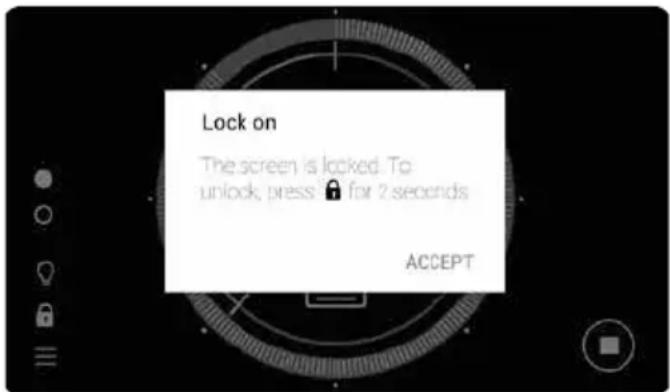
It is activated by pressing for 2 or more seconds, and the following message about the button lock status is displayed. In this status, the symbol is displayed in red.
Both the screen and the ON/OFF button are locked. If either of these are touched, a pop-up window appears advising of the situation.
To disable the child lock, just press the symbol again for 2 or more seconds until a buzzing sound is heard.
TEKA Hydroclean function
This function permits grease and other dirt attached to the oven walls to be cleaned more easily.
To make cleaning easier, it prevents the buildup of dirt. Clean the oven frequently.
PROGRAMMING THE TEKA HYDROLEAN® FUNCTION

NOTE
Do not pour water inside the oven while it is still hot. This could damage the enamel.
Always run the cleaning cycle when the oven is cool. If the oven is too hot, the oven and the enamel may be damaged.
First remove the trays and all the accessories from inside the oven, including the tray supports or telescopic arms. To do so, follow the instructions given in the Installation and Maintenance Manual provided with the oven.
When the oven has cooled, spread a dishcloth over the base of the oven.
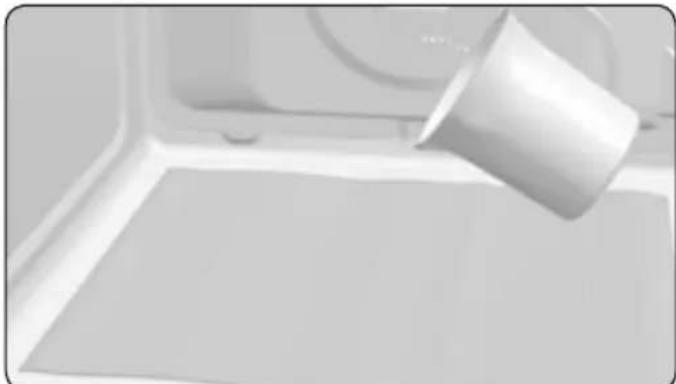
Slowly pour 200ml of water into the lower part of the oven cavity.

NOTE
For the best results, add a teaspoon of mild washing-up liquid to the water before pouring this onto the dishcloth.
Switch on the oven, and go to the main menu-hydroclean function:
When this function is pressed, a message appears containing an operating warning:
"The Hydroclean® function will clean your oven automatically. For best results, do not interrupt. An alarm will sound when cleaning is complete. Wipe dry".
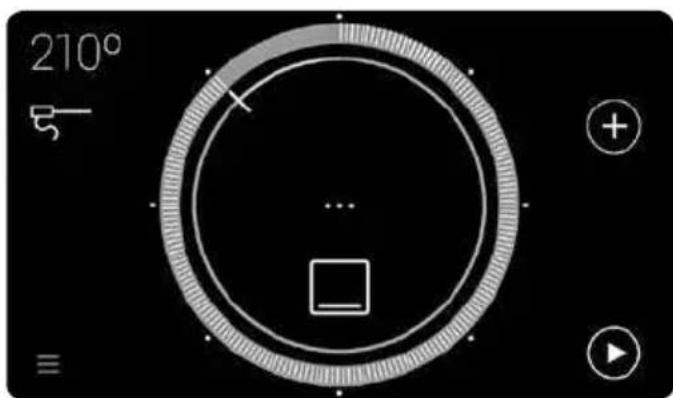
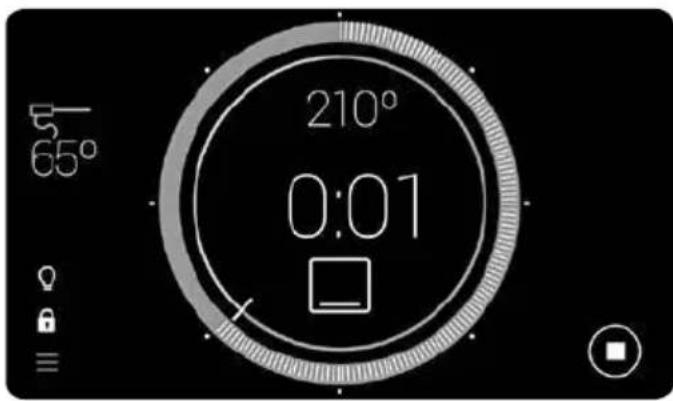
Press accept to go to the Hydroclean summary screen. Neither the temperature nor the cooking time can be modified with this function.

IMPORTANT
The length of this function cannot be modified. To terminate the cycle before the end time, switch the oven off with the ON/OFF button.
You can select an end time for the Hydroclean cleaning function. As explained in the section "Planning: programming cooking time", with the exception that only the end time can be entered.
Regardless of whether an end time has been selected, when the cleaning process starts a confirmation beep is heard (2 long and 2 short beeps).
The time remaining until the end of the cleaning process is displayed in the centre of the circle:

IMPORTANT
Do not open the oven door until the Hydroclean® function has finished.
The cooling phase is necessary for the correct operation of the function.
- When the end time is reached, a buzzer alarm is heard until any point on the screen is pressed or until the ON/OFF button is pressed.
- The oven displays the time screen.
The Hydroclean® function is run at low temperature. However, the cooling times may vary with the ambient temperature.

WARNING
Before touching the interior surfaces of the oven, make sure that oven has cooled.
If after running the Hydroclean® function, a more thorough cleaning is required, use neutral detergents and non-abrasive cloths.
Cooking with meat thermometer
The meat thermometer measures the interior temperature of the roasting meat. When the thermometer detects a previously selected temperature, the oven will automatically switch off.
Cooking with the meat thermometer guarantees optimum results regardless of the type of meat or fish being cooked.
HOW TO INSERT THE MEAT THERMOMETER
- Only use the original meat thermometer.
- Insert the thermometer before starting the cooking cycle.
- Insert the thermometer through one side of the meat to be roasted. So that the tip is in the centre of the piece of meat.
- Insert the thermometer completely up to the handle.
- The tip of the thermometer must not touch the bone or fatty areas. Nor should it be in a hollow areas as may occur in the case of poultry.
USE OF THE MEAT THERMOMETER
- Place the piece of meat with the meat thermometer inserted into it inside the oven.
- Insert the thermometer connector in the socket provided on the upper left side of the oven.
- Select a function which is compatible with the use of the meat thermometer (Consult compatible functions in the section "Oven functions", on page 4).
- When you go to the cooking configuration screen, the meat thermometer symbol 品 ^ - is displayed in the upper left of the screen:
- Touch this symbol to see the recommended temperature to complete the cooking cycle. Touch the circle to modify this temperature.
- Press accept to confirm the thermometer temperature setting. On returning to the cooking summary screen, the thermometer symbol is red, indicating that the temperature configuration has been accepted.
- During the cooking process, the thermometer symbol and the temperature that it is currently measuring are displayed on the screen.
- When the interior of the meat reaches the selected temperature, a buzzer alarm is heard indicating that the cooking cycle is complete.
EDIT MEAT THERMOMETER TEMPERATURE
Once the cooking with meat thermometer cycle has started, if you wish to change the temperature setting, just press the symbol again to return to the temperature setting menu.
Follow the instructions described above to enter a new temperature.
Description du four
TEKA Hydroclean-function

