
KC930EUW - Air purifier SHARP - Free user manual and instructions
Find the device manual for free KC930EUW SHARP in PDF.



| Product type | Air purifier with humidification |
| Brand | Sharp |
| Model | KC930EUW |
| Power supply | 220-240 V, 50/60 Hz |
| Power consumption (max/medium/low) | 27 W / 13 W / 4.5 W |
| Airflow rate (max/medium/low) | 180 m³/h / 126 m³/h / 60 m³/h |
| Humidification rate (max/medium/low) | 350 ml/h / 250 ml/h / 140 ml/h |
| Recommended area (purification) | ~21 m² |
| Recommended area (Plasmacluster high-density ions) | ~17 m² |
| Water tank capacity | 2.1 L |
| Sensors | Odor sensor, dust sensor |
| Main filter | HEPA filter (class H10) / Deodorizing filter (activated carbon) |
| Humidification filter | Rayon and polyester filter |
| Dimensions (W x D x H) | 375 x 205 x 535 mm |
| Weight | 6.1 kg |
| Power cord length | 2.0 m |
| Standby power consumption | ~0.9 W |
| Purification technology | Plasmacluster Ion (positive and negative ions) |
| Operating modes | Automatic, Low, Medium, Max |
| Recommended maintenance | Regular cleaning of sensors, rear panel, tank, tray and humidification filter |
| Filter lifespan | Dust/deodorizing filter: ~2 years; Humidification filter: ~1 year |
| Available spare parts | Dust/deodorizing filter: FZ-Y30SFE; Humidification filter: FZ-Y30MFE |
| Safety | Automatic shutoff in case of anomaly, moisture protection, use on stable surface |
Frequently Asked Questions - KC930EUW SHARP
User questions about KC930EUW SHARP
0 question about this device. Answer the ones you know or ask your own.
Ask a new question about this device
Download the instructions for your Air purifier in PDF format for free! Find your manual KC930EUW - SHARP and take your electronic device back in hand. On this page are published all the documents necessary for the use of your device. KC930EUW by SHARP.
USER MANUAL KC930EUW SHARP
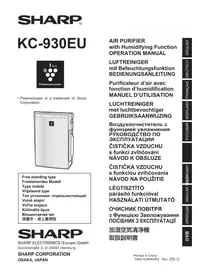
- Plasmacluster is a trademark of Sharp Corporation.
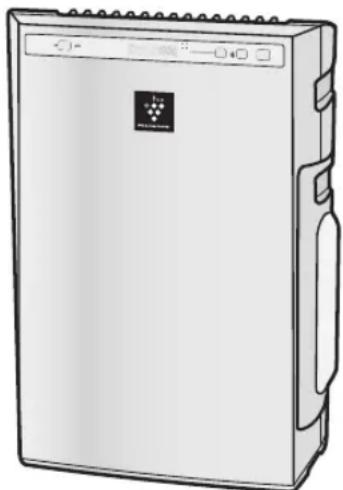
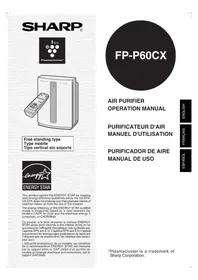
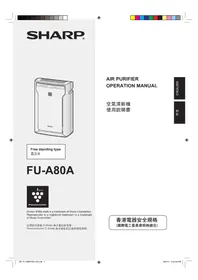
Free standing type
with Humidifying Function
OPERATION MANUAL
AIR PURIFIER
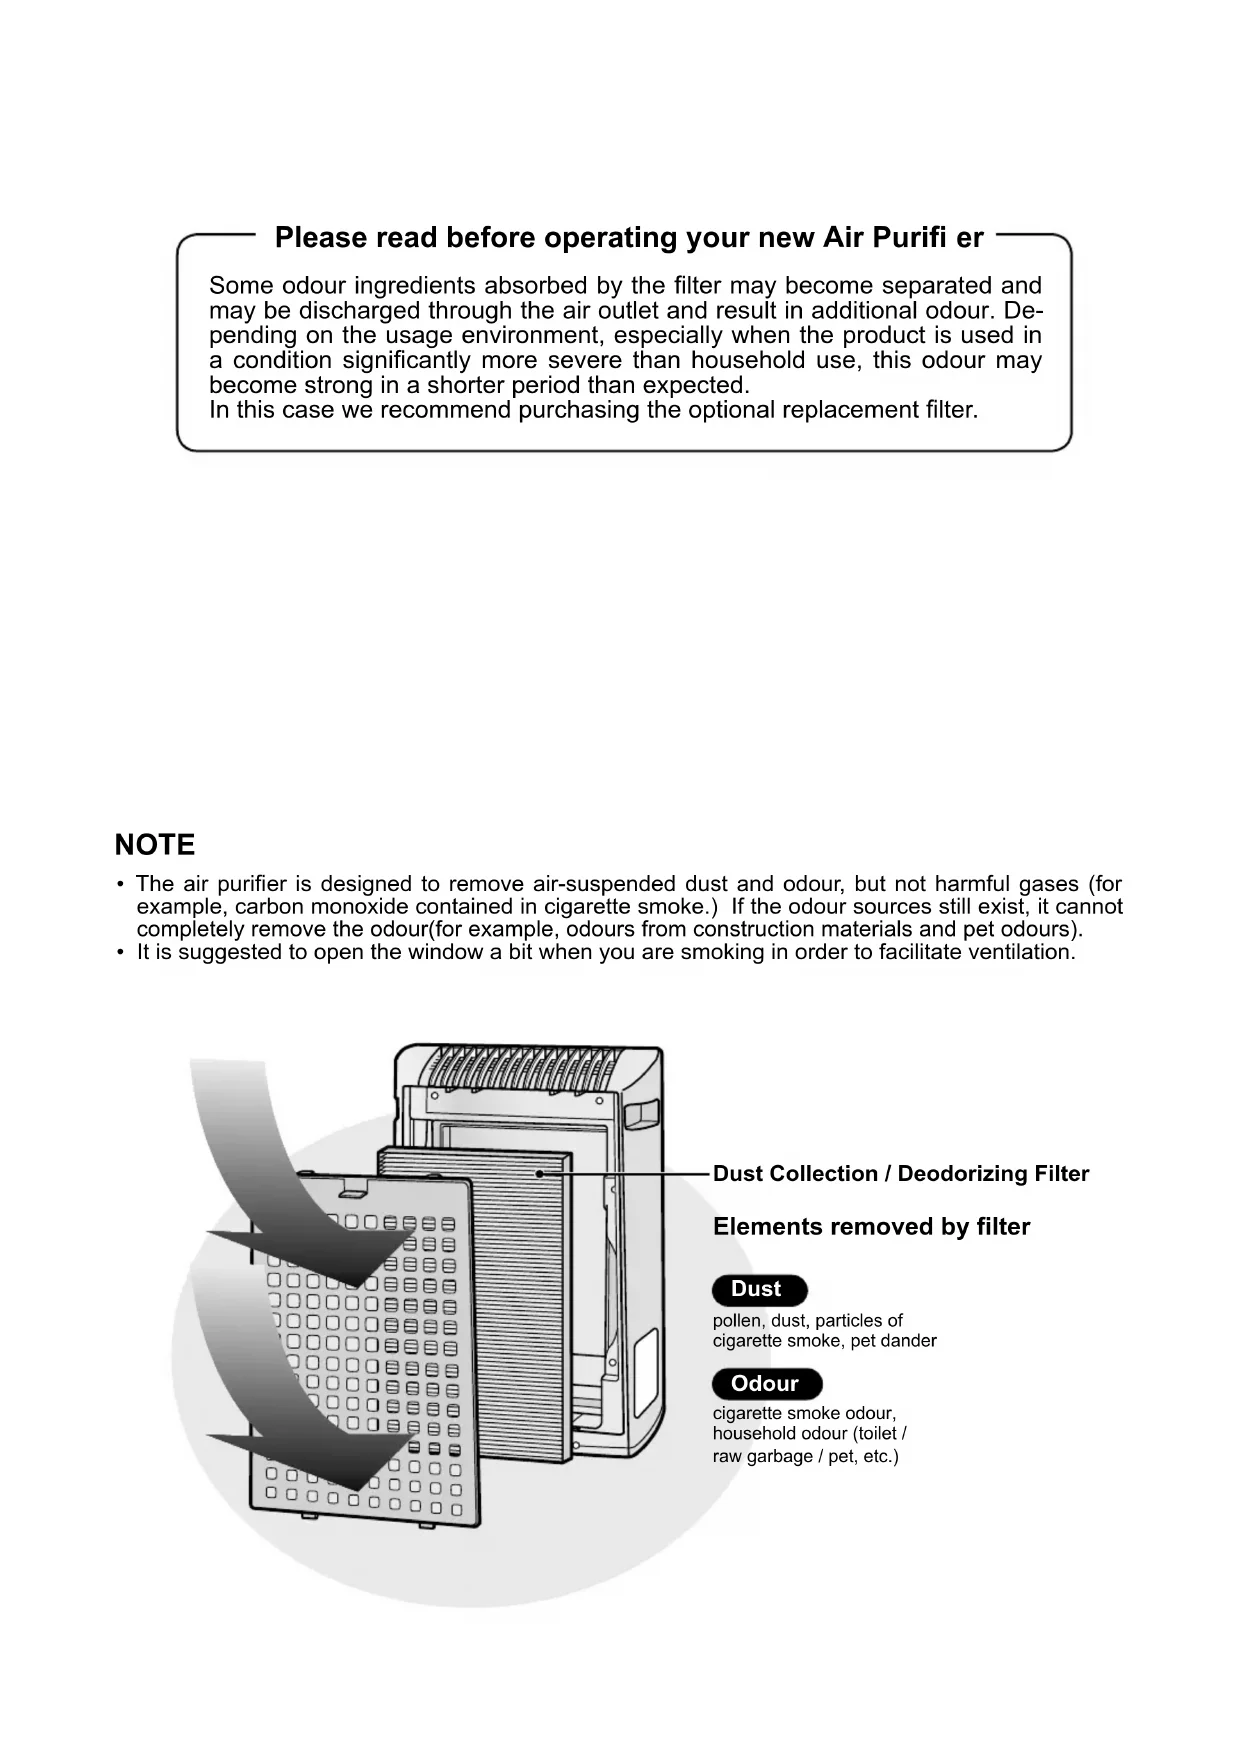
Please read before operating your new Air Purifier
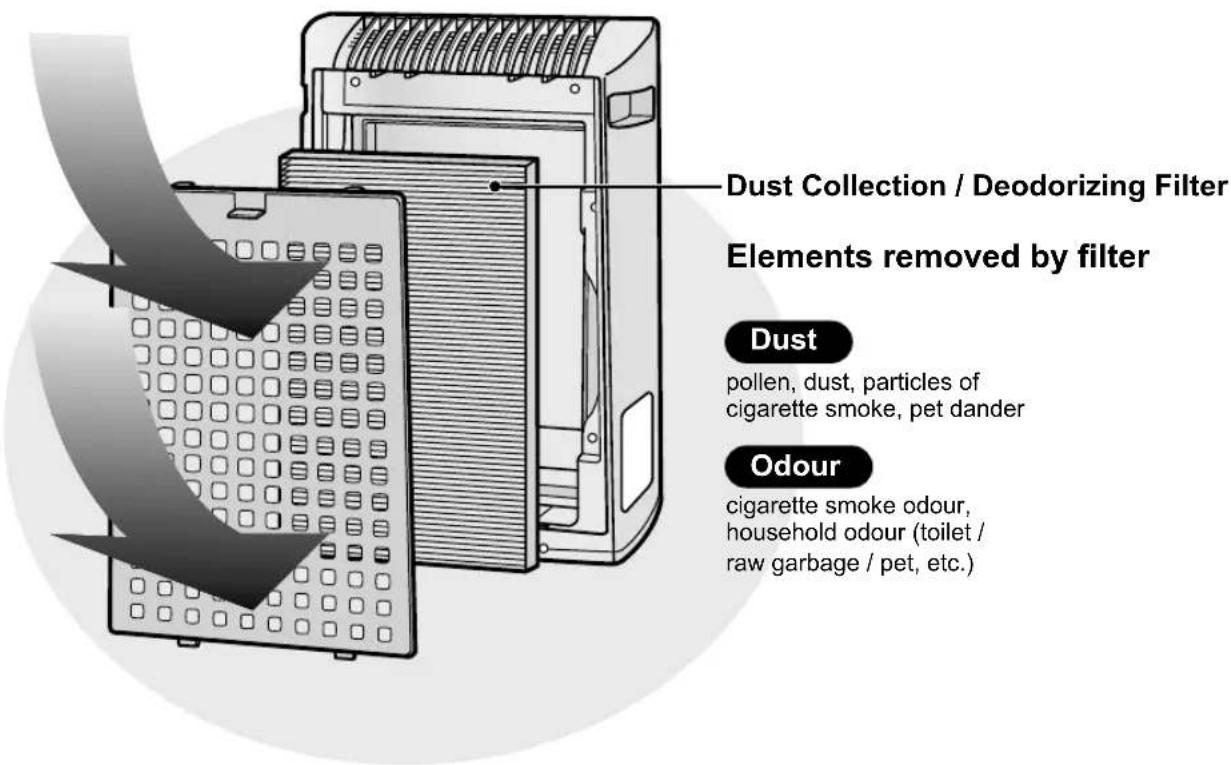
Some odour ingredients absorbed by the filter may become separated and may be discharged through the air outlet and result in additional odour. Depending on the usage environment, especially when the product is used in a condition significantly more severe than household use, this odour may become strong in a shorter period than expected.
In this case we recommend purchasing the optional replacement filter.
NOTE
- The air purifier is designed to remove air-suspended dust and odour, but not harmful gases (for example, carbon monoxide contained in cigarette smoke.) If the odour sources still exist, it cannot completely remove the odour (for example, odours from construction materials and pet odours).
- It is suggested to open the window a bit when you are smoking in order to facilitate ventilation.
FEATURES
"Plasmacluster" technology
Plasmacluster technology uses plasma discharge to produce and release the same positive and negative ions as those found in nature ("Plasmacluster ions").
This is a unique air cleaning technology of the SHARP CORPORATION for breaking down and inactivating such potential allergens as the faecal matter or corpses of aerial mites*1, viruses *2 and mold and bacteria *3 suspended in the air, and has been substantiated by third-party organizations both in Japan and overseas.
When there is a high density of Plasmacluster ions in the air, the smell of cigarette smoke trapped in curtains or sofas is removed in about 80 minutes*4, and when clothing is hung in a place exposed to the direct air expelled from the unit generating Plasmacluster ions, the smell of sweat is reduced to a virtually imperceptible level in one night (about 6 hours).
*1 Graduate School of Advanced Sciences of Matter, Hiroshima University, Japan
Measurement of action on the potential allergens of aerial mites in (13 m²)
*2 Retroscreen Virology, Ltd., London, UK
Measurement of ratio of viruses eliminated from the air in a 1 m³ box
*3 Ishikawa Health Service Association, Japan
Measurement of aerial mold and bacteria with an air sampler (13 m²)
*4 Japan Spinners Inspecting Foundation, Japan
Evaluation of deodorizing effect on odor-imbued fragments of cloth
CONTENTS
IMPORTANT SAFETY INSTRUCTIONS.....E-2
-WARNING E-2 - CAUTIONS CONCERNING OPERATION ..E-3 - INSTALLATION GUIDELINES E-3 - FILTER GUIDELINES E-3
PART NAMES. E-4
MAIN UNIT DISPLAY E-4 ILLUSTRATIVE DIAGRAM E-4 - INCLUDED E-5 - BACK E-5
PREPARATION. E-6
- FILTER INSTALLATION E-6
- REFILLING THE WATER TANK E-7
OPERATION E-8
Thank you for purchasing the SHARP Air Purifier. Please read this manual carefully for the correct usage information. Before using this product, be sure to read the section: "Important Safety Instructions."
After reading this manual, retain it in a convenient location for future reference.
IMPORTANT SAFETY INSTRUCTIONS
When using electrical appliances, basic safety precautions should be followed, including the following:
WARNING - To reduce the risk of electrical shock, fire or injury to persons:
- Read all instructions before using the unit.
- Use only a 220-240 volt outlet.
- Do not use the unit if the power cord or plug is damaged or the connection to the wall outlet is loosened. Periodically remove dust from the power plug.
- Do not insert fingers or foreign objects into the intake or air outlet.
- When removing the power plug, always hold the plug and never pull the cord.
Electrical shock and/or fire from short circuit may occur as a result.
- Do not remove the plug when your hands are wet.
- Do not use this unit near gas appliances or fireplaces.
- Remove the power plug from the wall outlet before cleaning the unit and when not using the unit.
Electrical shock from bad insulation and/or fire from short circuit may occur as a result.
- When refilling the Water Tank, cleaning the unit, or when the unit is not in use, be sure to unplug the unit. Electrical shock and/or fire from a short circuit may result.
- If the power cord is damaged, it must be replaced by the manufacturer, its service agent, Sharp Authorised Service Centre or similarly qualified person in order to avoid a hazard.
- Do not operate when using aerosol insecticides or in rooms where there is oily residue, incense, sparks from lit cigarettes, chemical fumes in the air or in very high humidity conditions, such as a bathroom.
- Be cautious when cleaning the unit. Corrosive cleansers may damage the exterior.
- Only Sharp Authorised Service Centre should service this air purifier. Contact the nearest Service Centre for any problems, adjustments, or repairs.
- When carrying the unit, remove the Water Tank and Humidifying Tray first and hold the unit by handles on both sides.
- Do not drink the water in the Humidifying Tray or Water Tank.
- Change the water in the Water Tank daily with fresh tap water and regularly clean the Water Tank and Humidifying Tray. (See E-11 and E-12). When unit is not in use, dispose of the water in the Water Tank and Humidifying Tray. Leaving water in the Water Tank and/or Humidifying Tray may result in mold, bacteria, and bad odours. In rare cases, this bacteria may cause harmful physical effects.
- This appliance is not intended for use by persons (including children) with reduced physical, sensory or mental capabilities, or lack of experience and knowledge, unless they have been given supervision or instruction concerning use of the appliance by a person responsible for their safety.
Children should be supervised to ensure they do not play with the appliance.
NOTE - Radio or TV Interference
If this air purifier should cause interference to radio or television reception, try to correct the interference by one or more of the following measures:
- Reorient or relocate the receiving antenna.
- Increase the separation between the unit and radio/TV receiver.
- Connect the equipment into an outlet on a circuit different from that to which the receiver is connected.
- Consult the dealer or an experienced radio/TV technician for help.
CAUTIONS CONCERNING OPERATION
- Do not block the intake and/or air outlet.
- Do not use the unit near or on hot objects, such as stoves or heaters or where it may come into contact with steam.
- Always operate the unit in an upright position.
- Always hold the handle on both sides of the unit when moving it.
Holding the back panel when carrying may cause it to detach, thus dropping the unit and resulting in bodily injury.
- Do not operate the unit without the filters, Water Tank, and Humidifying Tray properly installed.
- Do not wash and reuse the filter.
Not only does it not improve filter performance, it may cause electrical shock or malfunction.
- Clean the exterior with a soft cloth only.
Do not use volatile fluids and/or detergents.
The unit surface may be damaged or cracked.
In addition, the sensors may malfunction as a result.
INSTALLATION GUIDELINES
- During the operation of the product, place the unit at least 2 m away from equipment that uses electrical waves, such as televisions, radios, or wave clocks.
- Avoid use in locations where furniture, fabrics, or other items may come into contact with and restrict the air intake and/or air outlet.
- Avoid use in locations where the unit is exposed to condensation or rapid temperature changes. (Use under appropriate conditions between 0 and 35°C in the room.)
(If it is unavoidable, allow the unit to stand for 1 hour before switching on.)
- Place on a stable surface with sufficient air circulation. When placing the unit on a heavily carpeted area, it may cause the unit to vibrate slightly.
- Avoid use in locations where grease or oily smoke is generated (such as in a kitchen, etc.).
The unit surface may crack or the sensor may malfunction as a result.
- Place the unit about 30 cm to 60 cm (1 to 2 ft) away from the wall to ensure proper airflow.
The wall directly behind the air outlet may become dirty over time. When using the unit for an extended period in the same location, periodically clean the wall and protect it with a vinyl sheet, etc., to prevent it from becoming dirty.
FILTER GUIDELINES
- Follow the instructions in this manual for correct care and maintenance of the filters.
Use only filters designed for this product.
PART NAMES
MAIN UNIT DISPLAY
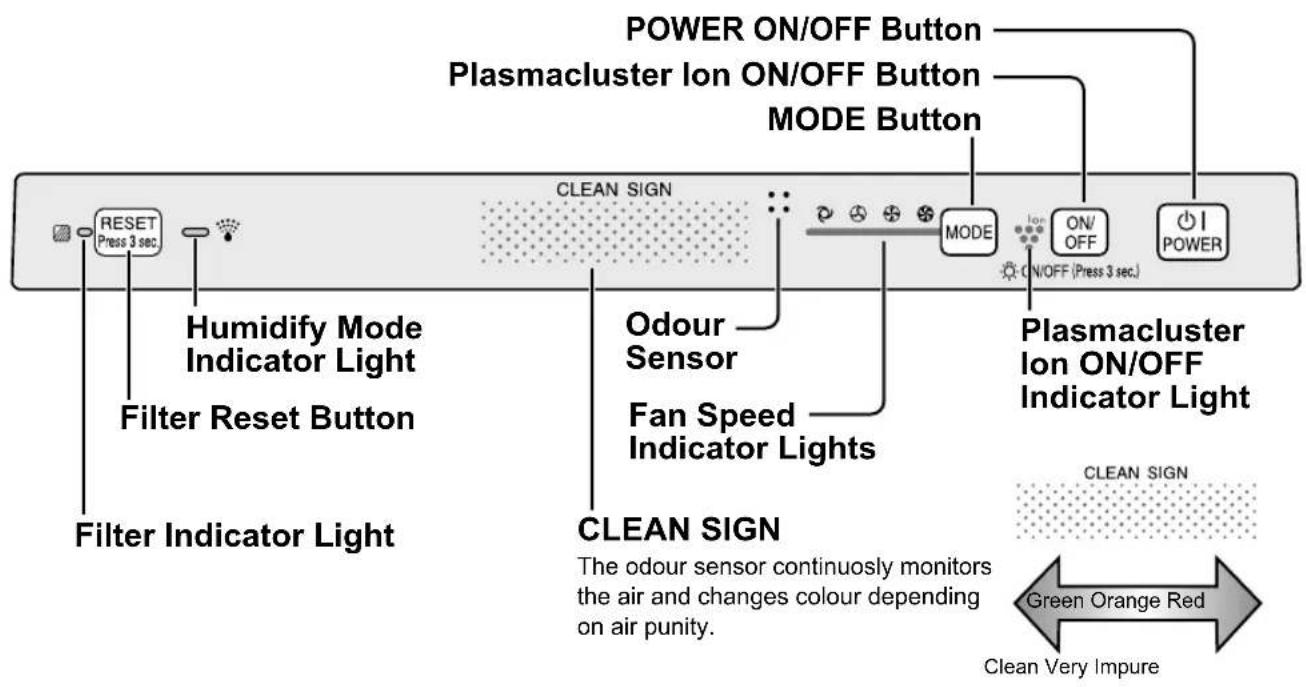
E-4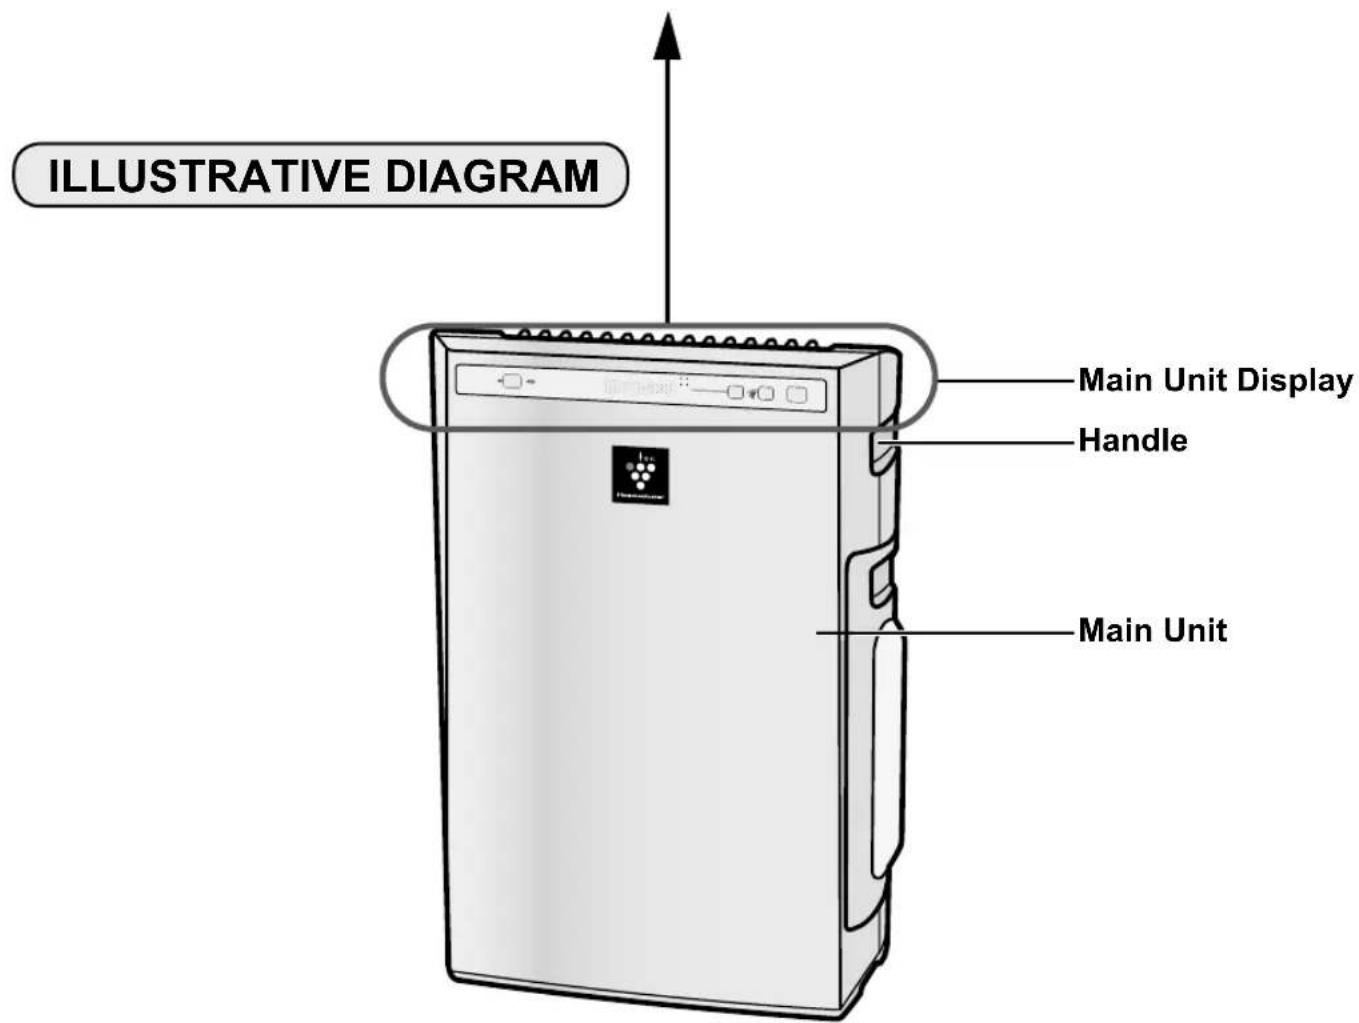
INCLUDED
Operation manual
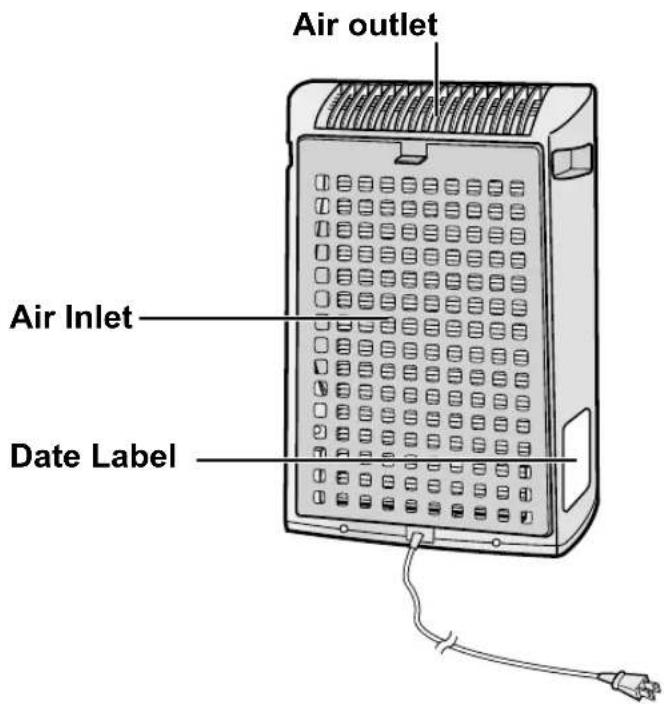
BACK
(Shape of plug depends on country.)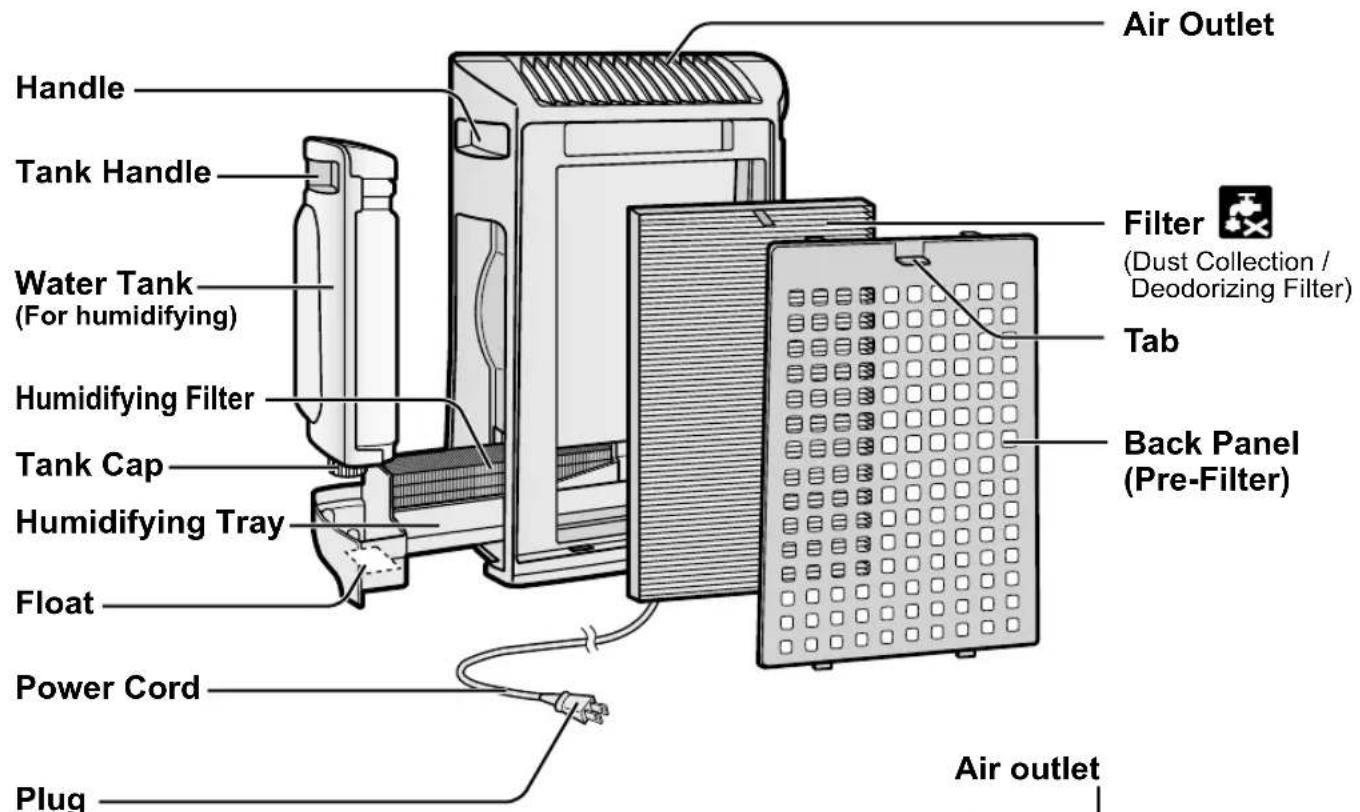
FILTER INSTALLATION
To maintain the quality of the filter, it is installed in the main unit and packed in plastic bag. Be sure to remove the filter from the plastic bag before using the unit.

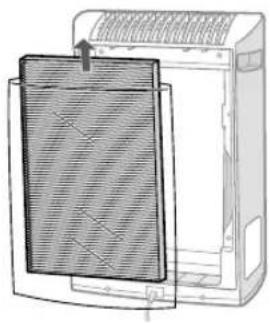
Remove the filter
1 Remove the Back Panel. Pull the tab at the top of the Back Panel.
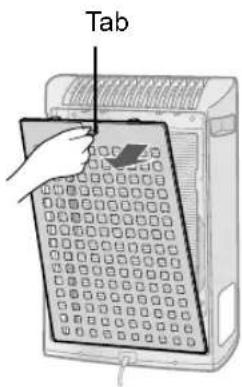
2 Remove the Filter from the plastic bag.

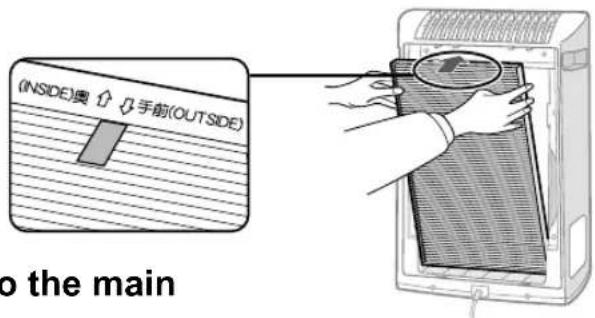
Install the filter
1 Place the Filter within the main unit. Do not install the filter backwards or the unit will not operate properly.
2 Replace the Back Panel to the main unit.
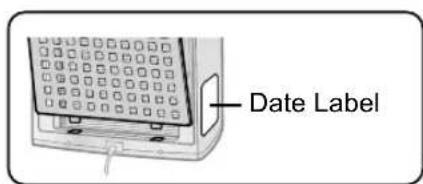
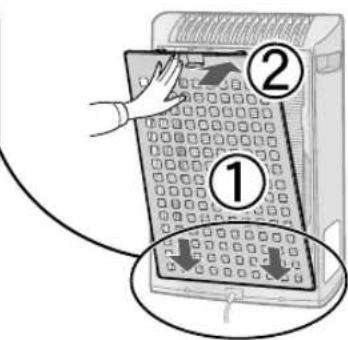
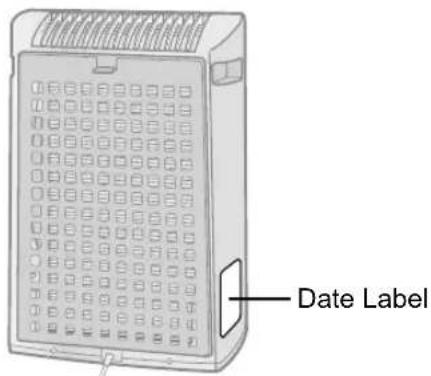
3 Fill in the usage start date on the Date Label.
Use the date as a guide for the filter replacement schedule.
REFILLING THE WATER TANK
The unit can be used in the Clean Air Mode without putting water in the Water Tank. When using in the Humidify Mode, the Water Tank should be filled with water.
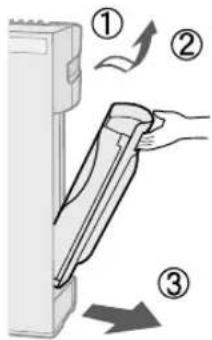
1 Remove the Water Tank by unlatching the top. 2 Remove the Water Tank Cap and carefully fill the Water Tank with tap water.
Change the water in the Water Tank every day with fresh tap water.
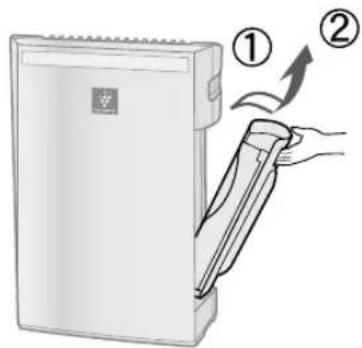
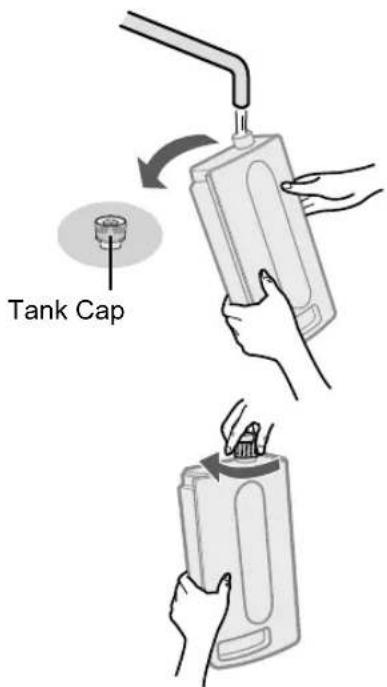
After filling, securely tighten the Tank Cap.
- Check to see that there is no water leaking.
- Be sure to wipe off any excess water on the outside of the Water Tank.
- When carrying the Water Tank, hold it with both hands so that the Water Tank opening is facing up.
4 Replace the Water Tank in the unit.
The top latch will "click" in place when the Water Tank is properly installed.
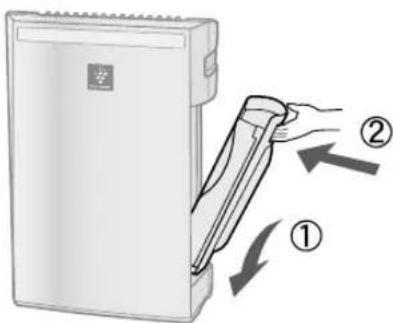
CAUTION
- Do not expose the unit to water. Short circuit and/or electrical shock may occur as a result.
- Do not use hot water (40°C), chemical agents, aromatic substances, dirty water, or other damaging substances, deformation and/or malfunction may occur.
- Use only fresh tap water. Use of other water sources may promote the growth of mold, fungus and/or bacteria.
MAIN UNIT OPERATION
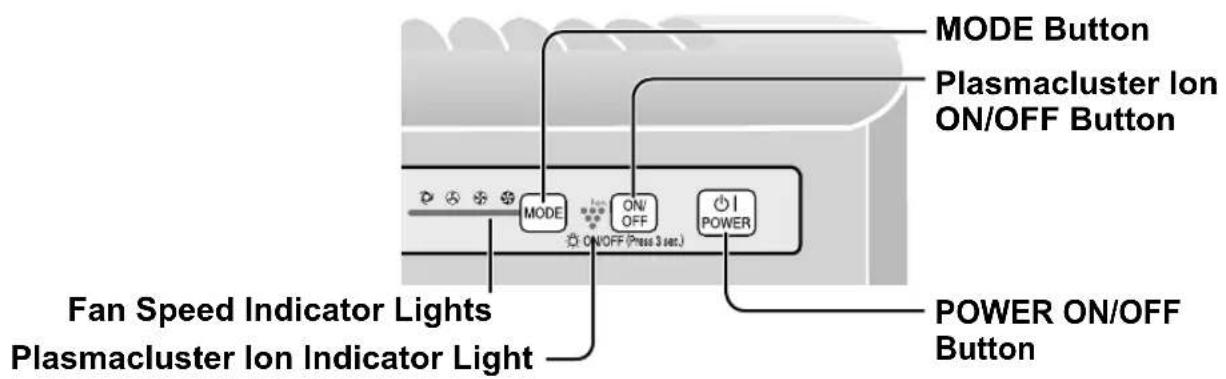
Please select either Humidify mode or Clean air mode operation when using.
Humidify mode: Fill Water Tank. (See E-7)
Clean Air mode: Drain Water Tank and Humidifying Tray.
Power ON/OFF Button
- Press to start operation (short beep) and stop operation (long beep).
- Plasmacluster Indicator Light and Fan Speed Indicator Light turn on/off.
- Unless the power cord has been unplugged, the operation starts in the previous mode it was operated in.
MODE Button
- Press the MODE Button to select the desired fan speed. Indicator Lights will show the fan speed currently selected.
- The operation mode can be switched as below.
AUTO operation

The fan speed is automatically switched (between HIGH and LOW) depending on the amount of impurities in the air. The sensors detect impurities for efficient air purification.
LOW operation

The unit will operate quietly using minimal air intake.
MAX operation

The unit will operate at a fan speed of MAX.
MEDIUM operation

The unit will operate at a fan speed of MEDIUM.

Plasmacluster Ion ON/OFF Button
Press the Plasmacluster Ion ON/OFF Button to turn Plasmacluster Ion Mode ON and OFF.
When Plasmacluster Ion is ON, the Plasmacluster Ion Indicator Light will turn on. (blue)
CARE AND MAINTENANCE
To maintain optimum performance of this air purifier, please clean the unit including the sensor and filters periodically.
When cleaning the unit, be sure to first unplug the power cord, and never handle the plug with wet hands. Electrical shock and/or bodily injury may occur as a result.
FILTER INDICATOR LIGHT
Care Cycle
After 720 hours of use (30 days × 24 hours = 720)
The Filter Indicator Light will illuminate as a reminder to perform maintenance of the Back Panel, Sensors, and Humidifying Filter. The Indicator Light will turn on after approximately 720 hours of use.
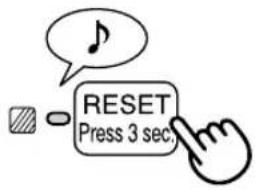
After performing maintenance, reset the Filter Indicator.
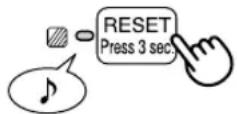
1 Plug the unit in, turn power ON. Press the RESET button for 3 seconds.
- The Filter Indicator Light will go off.
- Even if the Filter Indicator Light is already off, the RESET button should be pressed to reset the maintenance timer.
BACK PANEL and SENSORS
Care Cycle
Whenever dust accumulates on the unit or every 2 months
Gently remove dust from the sensor opening and the back panel, using a vacuum cleaner attachment or similar tool.
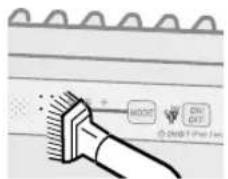
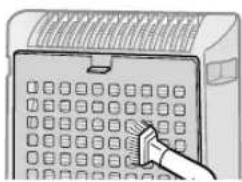
1 In case of heavy dirt, soak the back panel in water with a small amount of kitchen detergent.
(Approx. 10min.)
(Avoid scrubbing the back panel hard when washing.)
2 Rinse the back panel repeatedly with clean water to remove the solution residue.
3 Drip dry filter to remove excess water.
Back Panel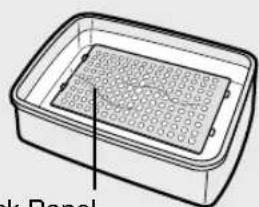
CARE AND MAINTENANCE
WATER TANK
Care Cycle: Every day when humidifying
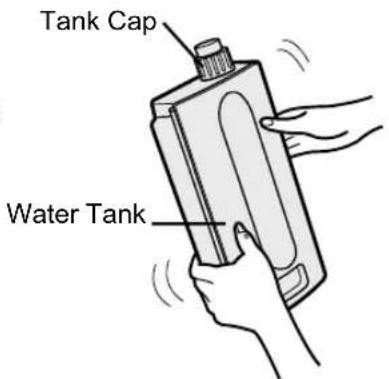
Rinse the inside of the tank by leaving a small amount of lukewarm water inside, closing the tank cap firmly, and shaking the tank. Mild household detergents may be used to clean the inside of the tank, but detergent should be diluted and the tank should be thoroughly rinsed to remove all detergent residue. (Note: The Water Tank is not dishwasher safe.)
UNIT
Care Cycle: Whenever dust accumulates on the unit or every 2 months
To prevent dirt or stains on the unit, clean regularly. If stains are allowed to remain, they may become difficult to remove.
Wipe with a dry, soft cloth.
For stubborn stains or dirt, use a soft cloth dampened with warm water.
Do not use volatile fluids.
Benzene, paint thinner, polishing powder may damage the surface.
Do not use detergents.
Detergent ingredients may damage the unit.
HUMIDIFYING TRAY
Care Cycle: 1 month
Frequency of maintenance cycle will depend on the hardness of the water. Avoid spilling water when removing or cleaning the tray.
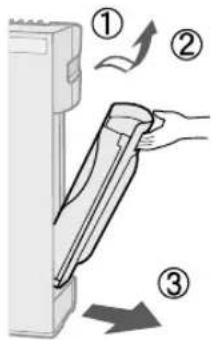
1 Remove the Water Tank and Humidifying Tray.
Unlatch the Water Tank first, then remove the tray. Use both hands when pulling out the Humidifying Tray to avoid spilling water.
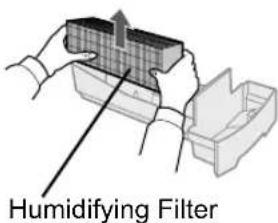
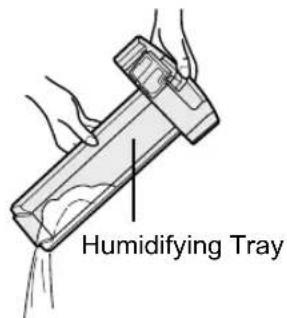
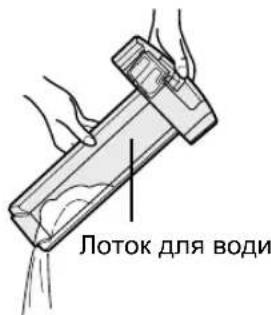
2 Remove the Humidifying Filter from the Humidifying Tray. Drain accumulated water by tilting the Humidifying Tray slowly.
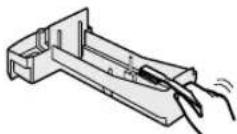
3 Rinse the inside of the Humidifying Tray with lukewarm water to remove impurities.
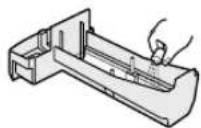
- Do not remove the Styrofoam float. Clean difficult-to-reach parts with a cotton-tipped swab or toothbrush.
When Water Deposits are Difficult to Remove
1 Fill Humidifying Tray halfway with lukewarm water, add a small amount of mild kitchen detergent, and leave to soak for about 30 minutes.
Dilute detergent according to instructions on the container. Clean difficult-to-reach parts with a cotton swab or toothbrush.
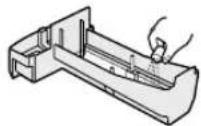
2 Rinse the Humidifying Tray with lukewarm water.
- Rinse until all detergent residue is removed.
- Inadequate rinsing may cause the detergent odour or changes in the shape/colour of the main unit.
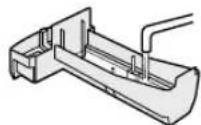
CAUTION
- Use only mild kitchen detergents to clean the Humidifying Tray. Use of non-designated chemicals or detergents can cause deformation, tarnishing, cracking (water leakage).
If the Styrofoam float comes off, replace by inserting the tabs of the Float into the holes in the Humidifying Tray as shown in the diagram.
Insert the tab of the float into the hole.
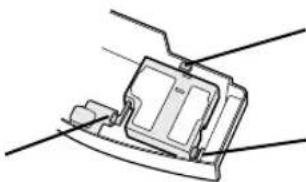
① Insert the float below this tab. ③ Insert the tab on the other side of the float into the hole.
CARE AND MAINTENANCE
When cleaning the unit, be sure to first unplug the power cord, and never handle the plug with wet hands. Electrical shock and/or bodily injury may occur as a result.
HUMIDIFYING FILTER
Care Cycle: Once a month or when the Filter Indicator Light is on.
Frequency of maintenance cycle will depend on the hardness or the impurities of the water that you use; the harder the water the more often descaling will be necessary.
Pay attention not to spill water when cleaning the filter.
1. Remove the Water Tank and Humidifying Tray. (See E-11)
2. Remove the Humidifying Filter from the Humidifying Tray.
Avoid spilling water from the Humidifying Tray.
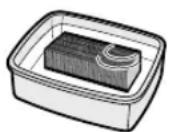
3. Preparing the descaling solution.
Citric acid, available at some drugstores, or 100% bottled lemon juice are used for descaling. Choose either one to use, and prepare the descaling solution.
Dissolve 3 teaspoons of citric acid and 2 1/2 cups of lukewarm water in a suitable container, and stir well.
100% bottled lemon juice can be used for descaling. Use only 100% bottled lemon juice with no pulp (strain juice if necessary). Combine 1/4 cup lemon juice and 3 cups of lukewarm water in a container large enough to hold the Humidifying Filter and stir well.
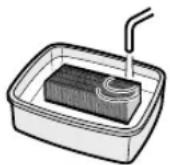
4. Pre-soak the Humidifying Filter in the solution for 30 minutes before cleaning.
When using lemon juice, it is recommended to pre-soak longer than citric acid.
5 Rinse the Humidifying Filter repeatedly with lukewarm water to remove all the solution residue.
Inadequate rinsing may cause odour and affect the performance and/or appearance of the unit.
- Do not scrub the Humidifying Filter, rinse gently under lukewarm water only.
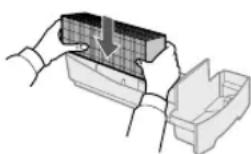
6 Attach the Humidifying Filter to the Humidifying Tray, and replace the Humidifying Tray in the unit.
The Humidifying Filter does not need to be oriented in any particular position (forward/backward, up/down).
- When not using the unit for long periods of time, dry the Humidifying Filter completely before replacing.
7 Plug in the unit, turn power ON, and press the Filter Reset Button on the display for more than 3 seconds to reset.
You may notice reddish-brown or white deposits forming on the surface of the Humidifying Filter. These impurities (calcium, etc.) are due to the impurities contained in tap water; this is not a defect. Replace the Humidifying Filter when it is covered completely in white deposits.
FILTER REPLACEMENT GUIDELINES
Filter life varies depending on the room environment, usage, and location of the unit.
If dust or odour persist, replace the filter.
(Refer to "Please read before operating your new Air Purifier")
Guide for filter replacement timing
- The following filter life and replacement period is based on the condition of smoking 5 cigarettes per day and the dust collection/deodorization power is reduced by half compared with that of a new filter.
We recommend replacing the filter more frequently if the product is used in conditions significantly more severe than normal household use.
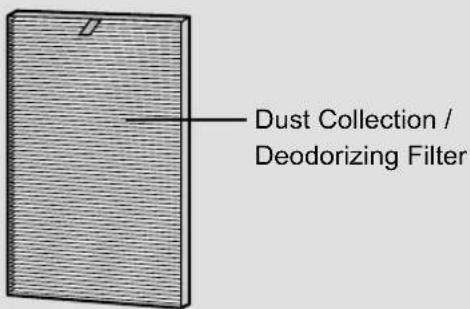
- Dust Collection / Deodorizing Filter .......About 2 years after opening
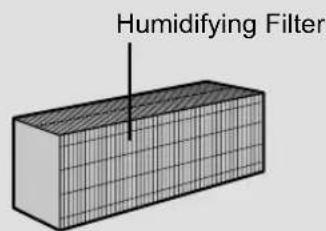
- Humidifying Filter About 1 year after opening
REPLACING THE FILTER
1. See pages E-6 and E-11,12 for directions on how to install the filter when replacing. 2. Fill in the usage start date of the filter on the Date Label.
Replacement Filters
Model: FZ-Y30SFE
- Dust Collection / Deodorizing Filter: 1 unit
Model: FZ-Y30MFE
Humidifying filter: 1 unit
Please consult your dealer for purchase of replacement filter.
Disposal of Filter
Please dispose of the replaced filter according to local disposal laws and regulations.
Dust Collection / Deodorizing Filter materials:
- Filter: Polypropylene - Frame: Polyester - Deodorizer: Activated charcoal Humidifying Filter materials: Rayon, Polyester
TROUBLESHOOTING
Before calling for service, please review the Troubleshooting chart below, since the problem may not be a unit malfunction.
| SYMPTOM | REMEDY (not a malfunction) | |
| Odours and smoke are not removed. | • Clean or replace the filters if they appear to be heavily soiled. (See E-13) | |
| The Clean Sign illuminates green even when the air is impure. | • The air could be impure at the time the unit was plugged in. Unplug the unit, wait one minute, and plug the unit in again. | |
| The Clean Sign illuminates orange or red even when the air is clean. | • Sensor operation is affected if the odour sensor openings are dirty or clogged. Gently clean the dust sensors. (See E-9) | |
| A clicking or ticking sound is heard from the unit. | • Clicking or ticking sounds may be audible when the unit is generating Plasumacluster ions. | |
| The discharged air has an odour. | • Check to see if the filter are heavily soiled. • Clean or replace the filter. • Plasmacluster Air Purifiers emit small traces of ozone which may produce an odour. | |
| The unit does not operate when cigarette smoke is in the air. | • Is the unit installed in a location that is difficult for the sensor to detect cigarette smoke? • Are the dust sensor openings blocked or clogged? (In this case, clean the openings.) (See E-9) | |
| Filter Indicator Light is illuminated. | • After replacing filters, connect the power cord to an outlet and press the Filter Reset Button. (See E-9) | |
| The Clean Sign are turned off. | • Check to see if the Lights OFF Mode selected. If so, then press the Lights Control Button to activate the indicator lights. (See E-8) | |
| The Humidify Mode Indicator Light does not illuminate when the tank is not empty. | • Check Styrofoam float for impurities. Clean the Humidifying Tray. Ensure unit is located on a level surface. | |
| Water level in the tank does not decrease or decreases slowly. | • Check to see if the Humidifying Tray and Water Tank are correctly installed. Check the Humidifying Filter. • Clean or replace the filter when it is heavily so (See E-11, E-12, E-13) | |
| The Clean Sign lights change colour frequently. | • The Clean Sign lights automatically change colours as impurities are detected by the dust sensor and odour sensor. | |
| Flashing of the Fan Speed Indicator Light' ' | • Abnormal fan motor | • Turn power OFF to cancel the error display, wait one minute, and then turn power ON. |
| Model | KC-930EU | |||
| Power supply | 220-240V 50/60Hz | |||
| Fan Speed operation | Fan Speed Adjustment | MAX | MED | LOW |
| Rated Power | 27W | 13W | 4.5W | |
| Fan Speed | 180m³/hour | 126m³/hour | 60m³/hour | |
| Humidifi cation | 350ml/hour | 250ml/hour | 140ml/hour | |
| Recommended Room Size | ~21m² *1 | |||
| High density Plasmacluster ion recommended room size | ~17m² *2 | |||
| Water tank capacity | 2.1L | |||
| Sensor | odour sensor | |||
| Filter type | Dust Collection (HEPA Filter *3)/ Deodorizing Filter | |||
| Cord Length | 2.0m | |||
| Dimensions | 375mm(W)x205mm(D)x535mm(H) | |||
| Weight | 6.1kg | |||
1 Size of a room which is appropriate for operating the unit at maximum fan speed. - It indicates the space where a certain amount of dust particles can be removed in 30 minutes (JEM1467). 2 Size of a room in which approximately 7000 ions can be measured per cubic centimeter in the center of the room (at a height of approximately 1.2 meters from the floor) when the product is placed next to a wall and run at the MAX operation position.
Standby Power
In order to operate the electrical circuits while the power plug is inserted in the wall outlet, this product consumes about 0.9W of standby power.
For energy saving, unplug the power cord when the unit is not in use.
*3 The class of the HEPA filter by EN 1822 is H10.
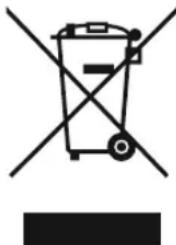
Attention: Your product is marked with this symbol. It means that used electrical and electronic products should not be mixed with general household waste. There is a separate collection system for these products.
A. Information on Disposal for Users (private households)
1. In the European Union
Attention: If you want to dispose of this equipment, please do not use the ordinary dust bin!
Used electrical and electronic equipment must be treated separately and in accordance with legislation that requires proper treatment, recovery and recycling of used electrical and electronic equipment.
Following the implementation by member states, private households within the EU states may return their used electrical and electronic equipment to designated collection facilities free of charge. In some countries your local retailer may also take back your old product free of charge if you purchase a similar new one.
*) Please contact your local authority for further details.
If your used electrical or electronic equipment has batteries or accumulators, please dispose of these separately beforehand according to local requirements.
By disposing of this product correctly you will help ensure that the waste undergoes the necessary treatment, recovery and recycling and thus prevent potential negative effects on the environment and human health which could otherwise arise due to inappropriate waste handling.
2. In other Countries outside the EU
If you wish to discard this product, please contact your local authorities and ask for the correct method of disposal.
For Switzerland: Used electrical or electronic equipment can be returned free of charge to the dealer, even if you don't purchase a new product. Further collection facilities are listed on the homepage of www.swico.ch or www.sens.ch.
B. Information on Disposal for Business Users.
1. In the European Union
If the product is used for business purposes and you want to discard it:
Please contact your SHARP dealer who will inform you about the take-back of the product. You might be charged for the costs arising from take-back and recycling. Small products (and small amounts) might be taken back by your local collection facilities.
For Spain: Please contact the established collection system or your local authority for take-back of your used products.
2. In other Countries outside the EU
If you wish to discard of this product, please contact your local authorities and ask for the correct method of disposal.
Please dispose of the replaced filter according to the local disposal laws and regulations.
- INSTALLATION OF FILTER CZ-6
- FILLING THE WATER TANK CZ-7
OPERATION CZ-8
OPERATION OF THE MAIN UNIT CZ-8
CARE AND MAINTENANCE CZ-9
- FILTER INDICATOR LAMP .......CZ-9 REAR PANEL AND SENSORS .CZ-9 WATER TANK CZ-10 UNIT CZ-10 HUMIDIFYING TRAY CZ-11 HUMIDIFYING FILTER CZ-12
- INSTRUCTIONS FOR FILTER REPLACEMENT CZ-13
TROUBLESHOOTING CZ-14
TECHNICAL DATA CZ-15
Thank you for purchasing an air purifier from SHARP. Please read this manual carefully for information on correct usage. Before using this product, please read the section: "Important Safety Instructions".
IMPORTANT SAFETY INSTRUCTIONS
CLEAN SIGN (AIR QUALITY INDICATOR)
TROUBLESHOOTING
Before calling for service, please refer to the troubleshooting table below, as the problem may not be a malfunction of the device.
Plasmacluster Technology
Plasmacluster technology uses plasma discharge to generate and emit the same positive and negative ions that exist in nature (Plasmacluster ions). It is a unique air purification technology developed by SHARP, designed to reduce and deactivate potential allergens such as pollen and dust mites*1, viruses*2 and mold and bacteria*3 that are present in the air, and has been verified by third-party organizations both in Japan and abroad.
The Plasmacluster ions emitted into the air, according to research, will be removed approximately 80 minutes*4 after the fan stops, and when clothes are hung in a room that is in the airflow, the odor is actively reduced to zero within one hour (approximately 6 hours).
*1 Based on research by the University of Hiroshima, Japan, on the control of potential allergens in the air (13 m²). *2 Retroscreen Virology, Ltd., London, UK. Measurement of the amount of viruses released into the air in a volume of 1 m³. *3 Association for Health, Japan. Measurement of mold and bacteria in the air in a ventilated room (13 m²). *4 Japan Spinners Inspecting Foundation, Japan. Deodorizing effect on the smell of clothing fibers.
CONTENTS
IMPORTANT SAFETY INSTRUCTIONS UA-2
WARNINGS REGARDING OPERATION... UA-3 INSTALLATION INSTRUCTIONS... UA-3 - MAINTENANCE INSTRUCTIONS FILTERS...........................................................UA-3
PART NAMES UA-4
- MAIN BODY AND FILTER UA-4
- OPERATION PANEL UA-4 AIR OUTLET. UA-5 BACK SIDE UA-5
PREPARATION... UA-6
·INSTALLING THE FILTERS. UA-6 - FILLING THE WATER TANK.....UA-7
OPERATION.. UA-8
OPERATING THE MAIN UNIT UA-8
MAINTENANCE...UA-9
- FILTER INDICATOR .........UA-9 REAR PANEL AND SENSORS UA-9
- WATER TANK.. UA-10 MAIN UNIT. UA-10 AIR INLET.. UA-11
- 3BOLOKYUOCHIΦIbTP. UA-12
- IHCTPYKJII NO 3AMIHI ΦINbTPY......UA-13
BINRAHEHHA HECNPABHOCTEUA-14
CNEUΦIKAUJI UA-15
Thank you for purchasing the SHARP Air Purifier. Please carefully read the Operating Instructions for correct use and information. Before using this appliance, please read the "Important Safety Instructions" thoroughly.
After reading the Operating Instructions, keep them in a convenient place for future reference.
IMPORTANT SAFETY INSTRUCTIONS
When using electrical appliances, basic precautions should always be followed, including the following:
WARNING: To reduce the risk of electrical shock, fire, or personal injury:
- Read all instructions before using the appliance. Use only 220-240 volt outlets. Do not use the appliance if the power cord or plug is damaged, or if it does not fit properly into the wall outlet.
- Periodically remove the plug from the outlet. Do not insert fingers or foreign objects into the air inlet or air outlet. -When unplugging, always grip the plug, never pull on the cord. Electric shock and/or fire may occur due to short circuit. Do not handle the plug with wet hands. Do not use the appliance near gas appliances or fireplaces.
- Unplug the appliance from the outlet before cleaning and when not in use.
Electric shock due to improper insulation and/or fire from short circuit may result.
-When filling the water tank, cleaning, or when the appliance is not in use, unplug it from the outlet. This may prevent electric shock and/or fire due to short circuit. - If the power cord is damaged, it must be replaced by the manufacturer, its service agent, an authorized Sharp service center, or a qualified person to avoid hazards. Do not use the appliance near flammable gases or in rooms with oil residue, oily dust, sparks from ignition sources, chemical vapors in the air, or in places where the appliance may get wet, such as bathrooms. - Ensure the surface is stable when using the appliance. Strong corrosive detergents may damage the casing. - Have the air purifier serviced only by an authorized Sharp service center. In case of problems, need for adjustment, or repair, contact the nearest service center. -When transporting the appliance, empty the water tank and the water tray, and hold the appliance by the handles on both sides. - Do not spill water on the water tank or tray. Change the water in the tank daily, filling with fresh water from the tap, and regularly clean the tank and tray. (See pages UA-11 and UA-12). If the appliance is not used for a long time, empty the water from the tank and tray. If water is left in the tray/tank, it may cause mold, bacteria, and unpleasant odors.
The device may become hot as a result of prolonged use.
This device can be used by persons (including children) with reduced physical, sensory or mental capabilities, or by persons lacking experience or knowledge, provided they are supervised or have been given instructions on how to use the device safely and understand the risks involved.
Children must be supervised to ensure they do not play with the device.
NOTE - Radio or TV interference
If this device causes interference to radio or television reception, try to correct it using one or more of the following methods:
- Reorient or relocate the receiving antenna.
- Increase the distance between the device and the radio/TV receiver. Connect the device to a different outlet than the one used by the receiver. Consult the dealer or an experienced radio/TV technician for help.
WARNINGS REGARDING USE
Do not block the air intake or exhaust vents. Do not use the device near water or in humid environments, such as near a bathtub, washbasin, or in places where the device may come into contact with steam. Always use the device in a vertical position. Keep your hands dry when moving the device.
Hold the device by the handle. During movement, parts may become loose and fall, causing injury.
Do not use the device without properly installed filters, water tank, and water tray. Do not wash or reuse filters.
This will not only reduce filter performance but may also cause electric shock or damage to the device.
- Clean the housing only with a soft cloth.
Do not use strong detergents or abrasive cleaners.
The surface of the device may be scratched or cracked.
Okpim zboRo, kpe3yNbTaT, daTChkMoKyTb 6ytN noIkoJKeHi.
INSTALLATION INSTRUCTIONS
- During operation of the device, place it on a flat, stable surface, at least 2 m away from objects that emit electromagnetic waves, such as televisions, radios, or electric motors. - Avoid places where furniture, fabric, or other objects could block the air intake or exhaust vents. - Avoid using the device where it could be exposed to condensation or sudden temperature changes. (Use in normal conditions at temperatures from 0 to 35°C in the room.)
(If this cannot be avoided, please keep the device turned on for at least 1 hour.)
Place on a flat surface in rooms with sufficient air circulation.
When installing the device on carpet, the device may vibrate slightly.
- Avoid places where there are oil fumes (such as kitchens, etc.).
Press the Mode button to select the desired fan speed. The indicator shows the current fan speed. The drying mode can be activated as shown below.
AUTO operation

The fan speed automatically adjusts (from high to low and in reverse) depending on the humidity level in the air. The sensor detects the level of pollution to ensure effective air purification.
LOW operation

The device will operate in a quiet mode with minimal air intake.
HIGH operation

The device will operate at maximum fan speed.
MEDIUM operation

Pull the plug out of the socket with the plug body.
Plasmacluster Ion button
Press the Plasmacluster Ion button to turn on or off the ion generation mode. When the Plasmacluster Ion mode is turned on, the Plasmacluster Ion indicator lights up (blue).
CARE AND MAINTENANCE
To ensure optimal performance of this air purifier, please clean the unit, including the sensors and filters, periodically.
When cleaning the unit, first make sure to unplug the power cord and never hold the plug with wet hands. This may cause electric shock or personal injury.
FILTER INDICATOR
Maintenance period
Maintenance period
When dust accumulates on the unit or every 2 months
Remove the dust from the sensor and the intake vent using a vacuum cleaner or similar device.
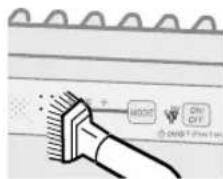
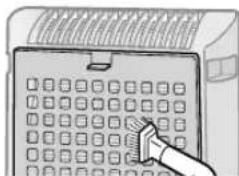
1 If heavy dirt appears, soak the intake vent in water with a mild detergent and rinse the container.
(Approximately 10 minutes)
(Try not to squeeze the intake vent too hard while rinsing.)
2 Rinse the intake vent several times with clean water to remove the detergent residue.
3 NocTaBTe fIJIbTp, 0o6 cTeKJN 3aJIuShKn BOJN.
3aHnnaHeIb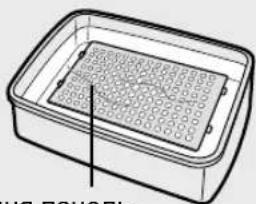
EMHICTbДЯBODN
NepioD 06cnyroByBaHHa KoxeH DeHb, kAIO npauOe y peKmI 3BOJIOKeHHa
PpomnTe EMHicb ycepeuHi, 3aNnWBuN TaM HeBENky KJIb-kiCTb Teploi BODN, 3akpnTe EMHictb KpuKoTO Ta CtpychITb II. IJRA MTTTc EMHOCTI y cepeuHI MoXHa BnKOpNCToBYBaTu JERKi 3ac06n, 1O uHCTa, XOa IX Tpe6a PO36abJrTa BOIOU, a EMHICTb DObpe BmNBaTu DNra BnJaJeHHra 3aNnWKIB MNKQHX 3ac06ib.
(3ayBaXTe, 0eMHiCTb He MoXHa MHTn y NocyDOMnHi MaunHi.)
Kpnska Emnocti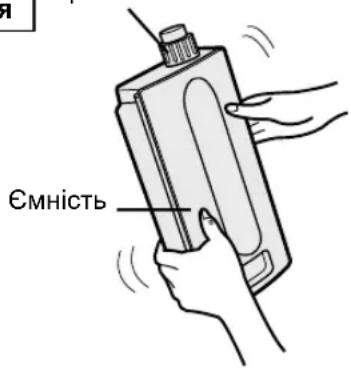
БЛOK
IepioD 06cnyroBaHnNo mipi hakonnuBaHH na npnaadi a6o koxhi 2 Micaui
Ira toro, 66 ha npnnai He hakonnyBaBc nA a60 He yTBopOBaJncb nJaMn, uCTiB npnlaeperypno Bn He Bn daNte nnm CBOeacHo, ix Byde Baxko no36yTncy noaJIbwoMy.
BntnpaTe cyxO M'koT KKaHnHO.
Ia He3MnBHOi rpa3i Ta nPbM BnKOpNCObyTe M'ky TkaHHy, 3MooyHy y TeNII BODI.
He BnKOpncToByTe cnIbHoIoui piAnHH
BeH3nH, po3uHHNK, noJipyOHy nopoWOk MoKyb NOoKOdHTN NOBepxHIO.
He BnKOpncToBvIe 3acO6n, Ioo YnCTaTb
Components of the device that may come into contact with food.
Water flow
Maintenance period: 1 month
The maintenance interval depends on the hardness of the water. Do not allow water to spill during removal or cleaning of the flow.
1. Remove the container and water flow.
First remove the container, then remove the flow. While removing the flow, hold it with both hands to avoid spilling water.
If the water tank is difficult to remove
1. Fill the water tank halfway with warm water, add a mild detergent for washing dishes, and let it sit for 30 minutes.
Dilute the detergent as indicated in the instructions on the package. Clean hard-to-reach areas with a soft cloth or a soft brush.
2. Remove the water flow filter from the flow. Remove any accumulated debris completely.
Water flow filter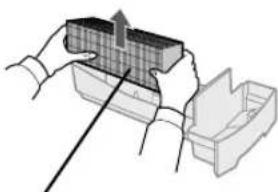
Rinse the flow with warm water to remove any blockages.
- Do not use abrasive cleaners. - Clean hard-to-reach areas with a soft cloth or a soft brush.
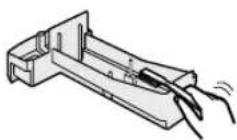
2. Rinse the water flow with warm water.
- Rinse until all detergent residues are removed. Improper rinsing may cause an unpleasant odor from the detergent or changes in the shape/color of the main component.
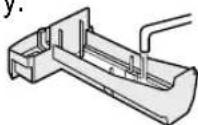
Use only the cleaning agents specified for cleaning the water tank. Use of unlisted chemical or cleaning agents may cause deformation, cracks, or damage (leakage).
Remove the filter cover, place it on a flat surface, insert the filter outlet into the water tank opening, as shown in the figure.
② Insert the filter outlet.
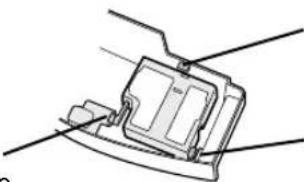
Insert the filter cover with this outlet. Insert the outlet on the other side of the filter cover.
CARE AND MAINTENANCE
During cleaning of the device, first make sure it is unplugged from the power supply, and never touch it with wet hands. This may cause electric shock and/or personal injury.
REPLACEMENT FILTER
Maintenance period
Once a month or when the filter indicator lights up.
The maintenance interval (cleaning) will depend on the hardness of the water you use; the harder the water, the more often you need to clean it.
Be careful not to spill water during filter cleaning.
1 Remove the water tank and the water tank lid. (See Fig. 11) 2 Remove the replacement filter from the water tank lid.
Avoid spilling water from the water tank lid.
Rinse with clean water.
(Bynd nacka, npoHTaTe neped BnKOpncTaHHm BaIoro HOBOrO OCHNka NOBITp)
Ihctpykuii 0do ctpokib 3amHn pfnbTpipB
- PoinaIbSha DiE3DaTHiCtB fInbTpTu Ta nepioD 3amHn 3achOBaHa Ha yMOBi naiHHra 5 uRapok Y DeHb Ta yIOBNIoBaHHn Nnny/De3OOpuyOHa NotyXHicTb 3MeHWeHa Ha noIOBHy y nopIBHHHi 3 pOboToIO HOBOrO fInbTpY.
Mn pekomehnyeMo 3amHrTn fInbTp qactiue, kUo npuJaB BnKOpNCTOByeTbcra B yMOBaX Ha6araTo JopctokiUnx, Hix y DomauHbomy BnKOpNCaHHI.
36ip Nny/ De3oOpuyuoyn FInbTp... Pnp6n3HO 2 pOK nicra BiDkpnTTA 3B0noxyuoyn FInbTp ... Pnp6n3HO 1 pIK nicra BiDkpnTTA
3AMIHA ΦΙΙbTPy
BnBJIeHHHeCnPABHOCTeI
Ipeed TmJ K TeJeOHyBaTn Do cepBicHOro ceHTpy, 6yNb Iacka, po3rIaNbTe HxKHe TexHoIoriy KapTy BINABJIENHHA HECPAPABHOCTEi, TOMy 0 npo6Iema MoKe BHNKHyTn He 3 npNBOy HeCnpabHOcti npuJaDy.
| ПОНБЛЕМА | УСУHEНь (п Loansы не с пошкоadingу prinладу) | |
| Залaxи та дим He вдаля-юльс. | · Почир差别 abo 3amihitb φilbtpri, якшо BOHи 3daoktbsc сильно 3a-6рudнeni. (Дивись UA-13) | |
| Идзлakator Вka3iBnka Oчи-цehня CBiTntbcsЯ Зеленm CBiTlOM, Habi'b коли nobi-туглару збрунда. | · Повитая могло 6byt n 3abpudhene ne iiz chac BMKanHЯ prinlady u po3etky. ВимKKiHb prinlaad 3 po3eTKn, nouchekayte xBviliHny yBIMKHiTb myTo 3HOy. Ha p6obTu daTchikiv BvIINBaC 3abpudHeHЯ abo 3acmichenry OTbopiv DaTchikiv.Оberexho prouchctiB to TBopni daTchikiv. (Дивись UA-9) | |
| Идзлakator Вka3iBnka Oчи-цehня CBiTntbcsЯ Раманчевим Та черBOHm CBiTlOM Habi'b priu Chstomy nobiTPi. | · Σокачи abo klazaochi 3Byk mOjUtsy chytnca koni prinlada rehepye Plasumacluster ionu. (Дивись UA-9) | |
| Зprindу лунaitь zuokaqui abo klazaochi 3Byk. | · Дунготу duTchikiv BvIINBaC 3abpudHeHЯ abo 3acmichenry OTbopiv DaTchikiv. Оberexho prouchctiB to TBopni daTchikiv. (Дивись UA-9) | |
| Повитray, сio вхodntb ma€ 3anax. | · Поревирету, сio He 3abpudHicnsc φilbtrpi. (Дивись UA-9) | |
| Принад He npaцoc, коли у nobiTPi princSyTNi си rapET-NiДIM. | ·Чи He bCTahOBLeNo prinlady u takOMу Miczi, De daTchiky Baxko 3na-TiNcSIRAPLcster moxTyb BvdiJIaTIy He3NaChy KInb-KicTb o3OHy, якшо ВиPo6IaTIy 3anax. (Дивись UA-9) | |
| Світінься indзлakator prôfimbу. | · Пися замин φilbtrpv, BCTABTe shHyp JxMVeHnY y po3etky ta ha- TCHiTb KONKу ckiDAnHЯ φilbtrpv. (Дивись UA-9) | |
| Вразднik Oчишени в- мКнени. | · Поревирету, сio образни реким BMKhenHЯ indzHKaTopa.Якшо тak, hab- ТCHiTb KONKу kepyBaHnY indzHKaTOpamn, убakTbByBatn iIndzKaTOpn. (Дивись UA-8) | |
| Идзлakator Pechimy 3В�о- Жeнney He CBiTntbCS кOLи сmHicTb He nopoxня. | · Поревирети пинлactOBи пинлавец Na 3abpudHeHЯ.Почир差别 Лотok ду Bodi. Пореконайтесь, сio ррлad 3haxOДITbCS Ha pIBNi nobepxHi. (Дивись UA-11, UA-12, UA-13) | |
| Ровь ВODи в CMHocti He 3menShyctb, abo 3menShy- сь ср NobiHNo. | · Поревирети пинлвicitь BCTANOBleHЯ loTky dlya Bodi Ta CMHocTi dlya Bodi. Поревиретe 3BoloxyUoynФiIbtrp. (Дивись UA-11, UA-12, UA-13) | |
| Світло Indзлakotу Вka3iBnhi- ka Oчишени чаTO 3mHIOe КoIP. | · Идзлakotу Вka3iBnika Oчишени ABTomatUHNo 3mHIOOTb Kolip по Mipi 3haxOДжeHnY 3abpudHeHЯ daTchikamn ПИPy Ta 3anaxy. | |
| Могань Indзлakotу Швid- ковitsi BeHTnilaTopy' | · Нecрравистсе eelentro- ДВИГИнha BeHTnilaTopy | · ВIMkhHitb КИВLEння, сio6 BiMchin покаЗnomiLOK, почakiTE xBviliHny, notim yBIMkhHitb КИВLEння 3HObY. |
| Модаль | KC-930EU | |||
| Джерештоховедя Вениларову | Доступные Plasmacluster io- новская Plasmacluster io- новская Plasmacluster io- новская Plasmacluster io- новская Plasmacluster io- новская Plasmacluster io- новская Plasmacluster io- новская Plasmacluster io- новская Plasmacluster io- новская Plasmacluster io- новская Plasmacluster io- новская Plasmacluster io- новскаяPlasmacluster io- новскаяPlasmacluster io- новскаяPlasmacluster io- новскаяPlasmacluster io- новскаяPlasmacluster io- новскаяPlasmacluster io- новскаяPlasmacluster io- новскаяPlasmacluster io- новскаяPlasmacluster io- новскаяPlasmacluster io- новскаяPlasmacluster io- новскаяPlASMA | MAKC | CEPEДH | HN3ыKA |
| Встановке на поожиб枝ь | 27ВТ | 13ВТ | 4,5ВТ | |
| Швдікість Вениларову | 180 M³/юдп | 126 M³/юдп | 60 M³/юдпн | |
| Зволоженя | 350 мл/юдп | 250 мл/юдп | 140 мл/юдпн | |
| Рекоменданоаний Розмір Кімнати | ~21 M²*1 | |||
| Виска ушільникі Plasmacluster io- нів рекоменданоаний розмір Кімнати | ~17 M²*2 | |||
| ОБ\'ем Emності дія ВODи | 2,1 П | |||
| Датуник | Датуник залуху | |||
| Тип Фільтур | Уловник Вени这样一个Пиіу (Фільтур HEPA*3) / Дeзоручий Фільтур | |||
| Довжинашируеlementтравимпевочья | 2,0 M | |||
| Розмірі | 375 ММ(Д)x205 ММ(Г)x535 ММ(B) | |||
| Bara | 6,1 кг | |||
1 Po3mip kimhaTn, 70 npn3HaueHn dny po6oTu npuJaHy Ha MaKcMaIbHi NwBnKOCTi BeHTnJIaTOpy. BIn Bu3Haueac npocTip, De Bu3HaueHa KInbKicTb qactok nny moke 6ytN 3HnSeHa 3a 30 XBnIH (JEM1467). 2 Po3Mip kimHaTn, De np6Hn3Ho 7000 iOHiB moKyTb 6yTu BmIPaHi y Ky6iHnx caHTmEpax y ceHtpi kimHaTn (Ha Bucoti np6Hn3Ho 1,2 MeTpN BiD niDnOri) KOJI npNJad BCTaHOBHeHn 6IJI r CTIHn Ta npauoE Ha NOBHy NOTyXHICTb.
CnoXnBaHH Eheprii B pexkiokyBaHH
Ira 3a6e3neueHH poBTo n eEKeTpnuHx KOn npn BCTabHei y po3eTKy BuIzui, daHn npnad cnoKnBaep npn6n3Ho 0,9 BT eHeprii B pexkmi ouikyBaHH. Ira ekOHOMII eNEKTpoeHeprii BnIMt b Whyp kNbeneHH 3 po3eTKn, kUIO npncptri He BnKOpNCTOByEcra.
*3 KnapiNbtpa HEPA no EN1822 e H10.
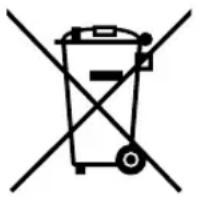

Ybara:Bau npdykt ma cmboL. CmBbO 03haac, zo BVKOpncTahe eJeKtpOnHe a6o eJeKtpnHe oHaHaH H He cnD BkNdaTn pao3om3 HopMaIbHIMM DOMaHIMBIxOJaAMC. CcneiaJbHa CnCTema 360py xnx npdyktib.
A. InΦopMaúiДЯ KOpNCTyBaYiB (npNBaTHI DomaùHl roCnOapCTBa) npoc yCyBaHnB BiXoDiB
1. Y depkabax Ebponeckoro Co03y
Warning: This product contains chemicals known to the State of California to cause cancer and birth defects or other reproductive harm. Do not dispose of in normal trash containers!
Dispose of electronic waste separately, in accordance with local regulations for waste disposal, recycling, and reuse of used electrical and electronic equipment.
In countries of the European Union, private households in the EU may return used electrical and electronic equipment free of charge* to designated collection points. In some countries*, you may also return the old product free of charge to points of sale, provided you purchase a similar new product.
*) For more detailed information on this topic, please contact your local waste management authority.
If the used electrical or electronic equipment contains batteries or accumulators, dispose of them separately, in accordance with local regulations.
Proper disposal of the product helps to ensure that waste is recycled, reused, or otherwise recovered, and prevents potential negative consequences for the environment and human health. Incorrect disposal of waste may result in penalties.

- PLEASE READ BEFORE OPERATING YOUR NEW AIR PURIFIER
- NOTE
- FEATURES
- PLASMACLUSTER" TECHNOLOGY
- CONTENTS
- IMPORTANT SAFETY INSTRUCTIONS.....E
- PART NAMES. E
- PREPARATION. E
- OPERATION E
- IMPORTANT SAFETY INSTRUCTIONS
- NOTE - RADIO OR TV INTERFERENCE
- CAUTIONS CONCERNING OPERATION
- INSTALLATION GUIDELINES
- FILTER GUIDELINES
- PART NAMES
- MAIN UNIT DISPLAY
- INCLUDED
- BACK
- FILTER INSTALLATION
- REMOVE THE FILTER
- INSTALL THE FILTER
- REFILLING THE WATER TANK
- CAUTION
- MAIN UNIT OPERATION
- POWER ON/OFF BUTTON
- MODE BUTTON
- AUTO OPERATION
- LOW OPERATION
- MAX OPERATION
- MEDIUM OPERATION
- PLASMACLUSTER ION ON/OFF BUTTON
- CARE AND MAINTENANCE
- FILTER INDICATOR LIGHT
- CARE CYCLE
- BACK PANEL AND SENSORS
- WATER TANK
- CARE CYCLE: EVERY DAY WHEN HUMIDIFYING
- UNIT
- CARE CYCLE: WHENEVER DUST ACCUMULATES ON THE UNIT OR EVERY 2 MONTHS
- HUMIDIFYING TRAY
- CARE CYCLE: 1 MONTH
- REMOVE THE WATER TANK AND HUMIDIFYING TRAY
- REMOVE THE HUMIDIFYING FILTER FROM THE HUMIDIFYING TRAY. DRAIN ACCUMULATED WATER BY TILTING THE HUMIDIFYING TRAY SLOWLY
- RINSE THE INSIDE OF THE HUMIDIFYING TRAY WITH LUKEWARM WATER TO REMOVE IMPURITIES
- WHEN WATER DEPOSITS ARE DIFFICULT TO REMOVE
- FILL HUMIDIFYING TRAY HALFWAY WITH LUKEWARM WATER, ADD A SMALL AMOUNT OF MILD KITCHEN DETERGENT, AND LEAVE TO SOAK FOR ABOUT 30 MINUTES
- RINSE THE HUMIDIFYING TRAY WITH LUKEWARM WATER
- HUMIDIFYING FILTER
- FILTER REPLACEMENT GUIDELINES
- GUIDE FOR FILTER REPLACEMENT TIMING
- REPLACING THE FILTER
- REPLACEMENT FILTERS
- DISPOSAL OF FILTER
- TROUBLESHOOTING
- STANDBY POWER
- INFORMATION ON DISPOSAL FOR USERS (PRIVATE HOUSEHOLDS)
- IN THE EUROPEAN UNION
- IN OTHER COUNTRIES OUTSIDE THE EU
- INFORMATION ON DISPOSAL FOR BUSINESS USERS
- OPERATION CZ
- CARE AND MAINTENANCE CZ
- TROUBLESHOOTING CZ
- TECHNICAL DATA CZ
- PLASMACLUSTER TECHNOLOGY
- IMPORTANT SAFETY INSTRUCTIONS UA
- PART NAMES UA
- PREPARATION... UA
- OPERATION.. UA
- MAINTENANCE...UA
- BINRAHEHHA HECNPABHOCTEUA
- CNEUΦIKAUJI UA
- WARNINGS REGARDING USE
- INSTALLATION INSTRUCTIONS
- HIGH OPERATION
- PLASMACLUSTER ION BUTTON
- FILTER INDICATOR
- MAINTENANCE PERIOD
- EMHICTBДЯBODN
- БЛOK
- WATER FLOW
- REMOVE THE CONTAINER AND WATER FLOW
- REMOVE THE WATER FLOW FILTER FROM THE FLOW. REMOVE ANY ACCUMULATED DEBRIS COMPLETELY
- RINSE THE FLOW WITH WARM WATER TO REMOVE ANY BLOCKAGES
- RINSE THE WATER FLOW WITH WARM WATER
- REPLACEMENT FILTER
- ONCE A MONTH OR WHEN THE FILTER INDICATOR LIGHTS UP
- IHCTPYKUII 0DO CTPOKIB 3AMHN PFNBTPIPB
- AMIHA ΦΙΙBTPY
- BNBJIEHHHECNPABHOCTEI
- INΦOPMAÚIДЯ KOPNCTYBAYIB (NPNBATHI DOMAÙHL ROCNOAPCTBA) NPOC YCYBAHNB BIXODIB
- Y DEPKABAX EBPONECKORO CO03Y
Brand : SHARP
Model : KC930EUW
Category : Air purifier