
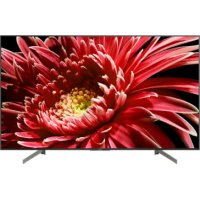
Bravia KD75XG8599 - Television SONY - Free user manual and instructions
Find the device manual for free Bravia KD75XG8599 SONY in PDF.



User questions about Bravia KD75XG8599 SONY
0 question about this device. Answer the ones you know or ask your own.
Ask a new question about this device
Download the instructions for your Television in PDF format for free! Find your manual Bravia KD75XG8599 - SONY and take your electronic device back in hand. On this page are published all the documents necessary for the use of your device. Bravia KD75XG8599 by SONY.
USER MANUAL Bravia KD75XG8599 SONY
- In the actual model names, the "□□" indicates numbers and/or characters specific to each model.
To Customers: For product protection and safety reasons, Sony strongly recommends that installation of your TV be performed by Sony dealers or licensed contractors. Do not attempt to install it yourself.
To Sony Dealers and Contractors: Provide full attention to safety during the installation, periodic maintenance, and examination of this product.
Sufficient expertise is required for installing this product, especially to determine the strength of the wall for withstanding the TV's weight. Be sure to entrust the attachment of this product to the wall to Sony dealers or licensed contractors and pay adequate attention to safety during the installation. Sony is not liable for any damage or injury caused by mishandling or improper installation.
For safety and proper installation, follow the Wall-mount Bracket Operation Instructions, TV Setup Guide, and the directions in this manual.
On Safety
Thank you for purchasing this product.
To Customers
Sufficient expertise is required for installing this product. Be sure to subcontract the installation to Sony dealers or licensed contractors and pay special attention to safety during the installation. Sony is not liable for any damages or injury caused by mishandling or improper installation, or installing any other than the specified product. Your Statutory Rights (if any) are not affected.
To Sony dealers
Sufficient expertise is required for installing this product. Be sure to read this instruction manual thoroughly to do the installation work safely. Sony is not liable for any damages or injury caused by mishandling or improper installation. Please give this manual to the customer after installation.
This instruction manual shows the correct handling of the product and important precautions necessary to prevent accidents. Be sure to read this manual thoroughly and use the product correctly. Keep this manual available for future reference.
Products by Sony are designed with safety in mind. If the products are used incorrectly, however, it may result in a serious injury through fire, electric shock, the product toppling over, or the product dropping. Be sure to observe the precautions for safety to prevent such accidents.
CAUTION
Specified products
This Wall-Mount Bracket is designed for use with the products specified TVs. For TVs, refer to their Reference Guide to verify that the Wall-Mount Bracket can be used.
To Customers
WARNING
If the following precautions are not observed, serious injury or death through fire, electric shock, or the product dropping can result.
Be sure to subcontract the installation to licensed contractors and keep small children away during the installation.
If the Wall-Mount Bracket or the TV is not installed correctly, the following accidents may occur. Be sure licensed contractors carry out installation.
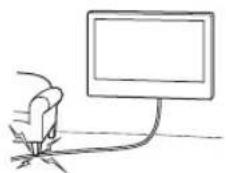
The TV may fall and cause a serious injury such as a bruise or a fracture. - If the wall on which the Wall-Mount Bracket is installed is unstable, uneven, or not perpendicular to the floor, the unit may fall and cause injury or property damage. The wall should be capable of supporting a weight of at least four times the TV weight. (Refer to your TV's Reference Guide for its weight.) - If the installation of the Wall-Mount Bracket on the wall is not sufficiently sturdy, the unit may fall and cause injury or property damage.
Be sure to subcontract moving or dismounting of the TV to licensed contractors.
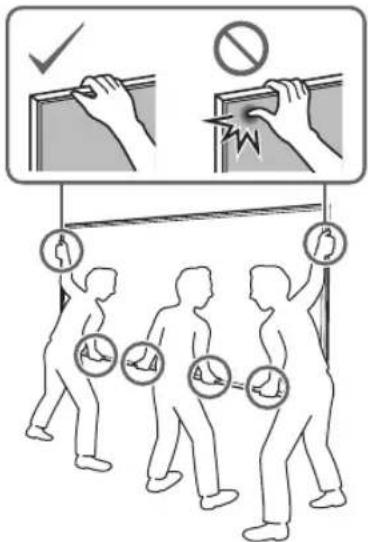
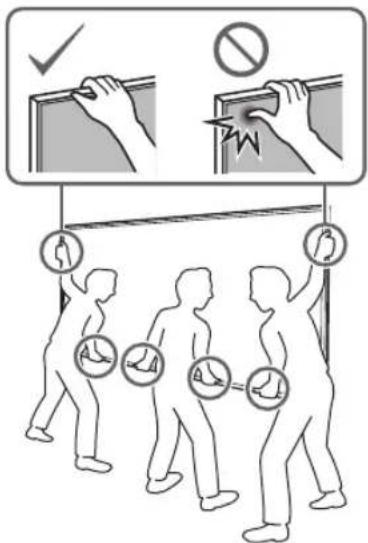
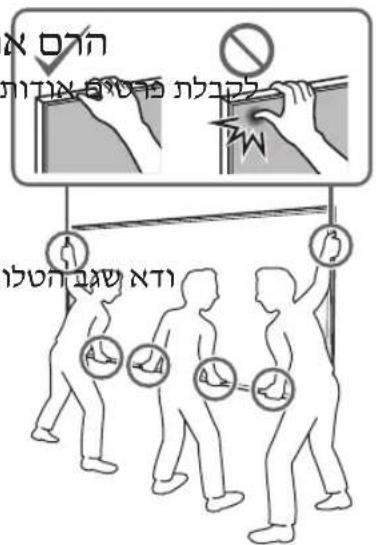
If persons other than licensed contractors transport or dismount the TV, it may fall and cause injury or property damage. Be sure that two or more persons (three or more persons for 75 inches and above TV set) carry or dismount the TV.
Do not remove screws, etc., after mounting the TV.
If you do so, the TV may fall and cause injury or property damage.
Do not make alterations to the parts of the Wall-Mount Bracket.
If you do so, the Wall-Mount Bracket may fall and cause injury or property damage.
Do not mount any equipment other than the specified product.
This Wall-Mount Bracket is designed for use with the specified product only. If you mount equipment other than specified, it may fall or break, and cause injury or property damage.
Do not apply any load other than the TV on the Wall-Mount Bracket. Do not shake the TV left/right, up/down.
If you do so, the TV may fall and cause injury or property damage.
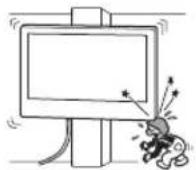
Do not lean on or hang from the TV.
Do not lean on or hang from the TV as it may fall on you and cause serious injury.
CAUTION
If the following precautions are not observed, injury or property damage may occur.
Do not handle the product with excessive force during cleaning or maintenance.
Do not apply excessive force on the topside of the TV. If you do so, the TV may fall and cause injury or property damage.
Precautions
- If you use the TV installed on the Wall-Mount Bracket for a long time, the wall behind or above the TV may become discolored or the wallpaper may come unstuck, depending on the material of the wall.
- If the Wall-Mount Bracket is removed after installing it on the wall, the screw holes are left.
- Do not use the Wall-Mount Bracket in a place where it is subjected to mechanical vibrations.
Installing the Wall-Mount Bracket
To Sony Dealers
WARNING
The following instructions are for Sony dealers only. Be sure to read the safety precautions described above and pay special attention to safety during the installation, maintenance, and checking of this product.
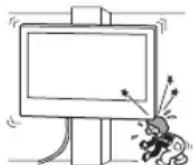
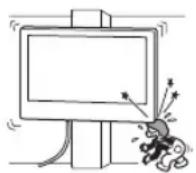
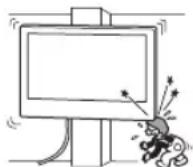
Do not install the Wall-Mount Bracket on wall surfaces where the corners or the sides of the TV protrude away from the wall surface.
Do not install the Wall-Mount Bracket on wall surfaces such as a pillar, where the corners or the sides of the TV protrude away from the wall surface. If a person or object happens to hit the protruded corner or side of the TV, it may cause injury or property damage.
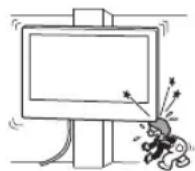
Do not install the TV over or under an air conditioner.
If the TV is exposed to water leaks or air current from an air conditioner for a long time, it may cause a fire, an electric shock, or a malfunction of the TV.
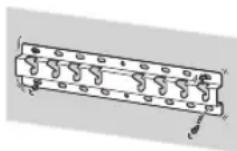
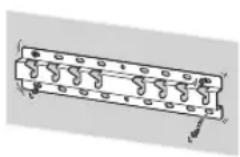
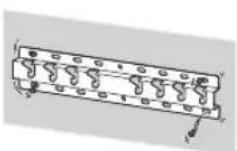
Be sure to install the Wall-Mount Bracket securely to the wall following the instructions in this instruction manual.
If any of the screws are loose or fall out, the Wall-Mount Bracket may fall and cause injury or property damage. Be sure to use the appropriate screws for the material of the wall and install the unit securely using four or more screws of 8 mm diameter (or equivalent).
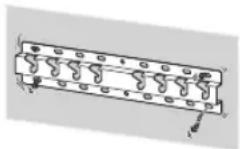
Be sure to use the supplied screws and attachment parts properly following the instructions given in this instruction manual. If you use substitute items, the TV may fall and cause bodily injury to someone or damage to the TV.
Be sure to assemble the bracket properly following the instructed procedure explained in this instruction manual.
If any of the screws are loose or fall out, the TV may fall and cause bodily injury to someone or damage to the TV.
Be sure to tighten the screws securely in the designated position.
If you fail to do so, the TV may fall and cause bodily injury to someone or damage to the TV.
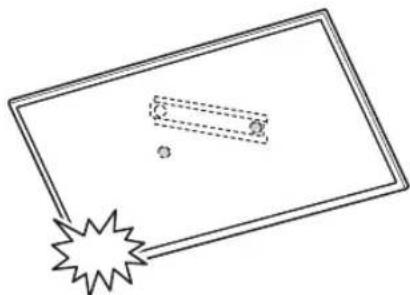
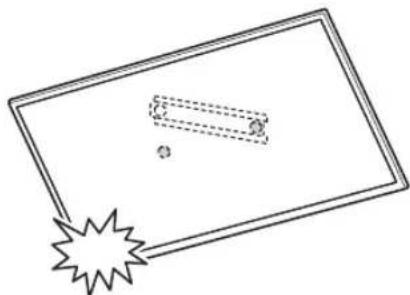
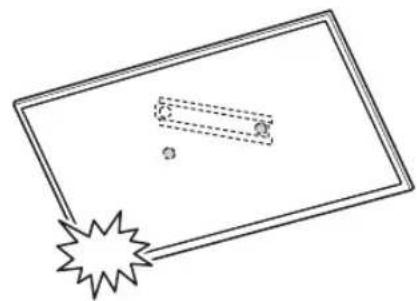
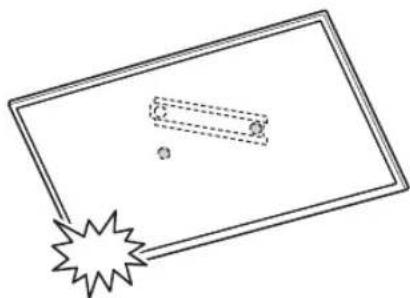
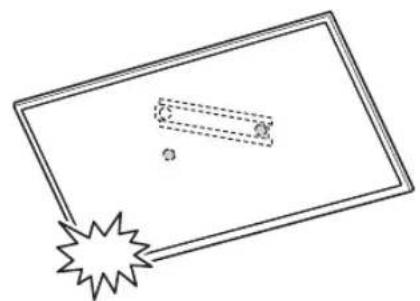
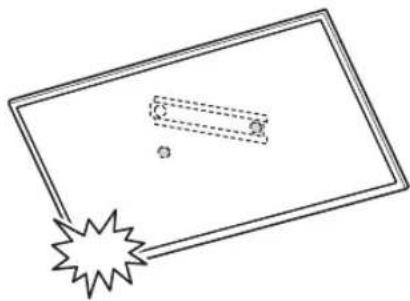
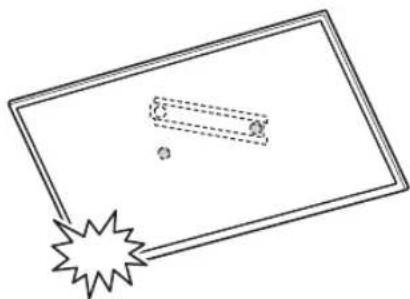
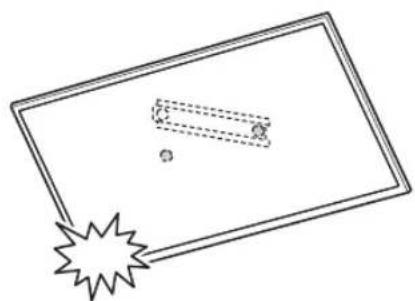
Be careful not to subject the TV to shock during installation.
If the TV is exposed to shock, it may fall or break apart. This may cause injury.
Be sure to install the TV on a wall that is both perpendicular and flat.
If you fail to do so, the TV may fall and cause injury.
After proper installation of the TV, secure the cables properly.
If people or objects get tangled with cables, this may result in injury or damage to the TV.
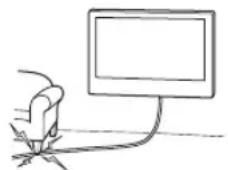
Do not allow the mains lead or the connecting cable to be pinched.
If the mains lead or the connecting cable is pinched between the unit and the wall or is bent or twisted by force, the internal conductors may become exposed and cause a short circuit or an electrical break. This may cause a fire or an electric shock.
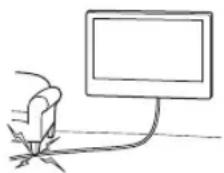
The screws needed to secure the Wall-Mount Bracket to the wall are not supplied.
Use the appropriate screws for the wall material and structure when mounting the Wall-Mount Bracket.
Table of Contents
Preparing for installation. 5
Checking the parts. 5
Deciding on the installation location 6
Installing the Base on the wall 8
Preparing for the installation of the TV. 9
KD-85/75XG85□□, KD-75XG87□□
KD-65/55XG87□□, KD-65/55XG85□□.11
Installing the TV on the wall 13
KD-85/75XG85□□, KD-75XG87□□.13
KD-65/55XG87□□, KD-65/55XG85□□.15
Confirming the completion of the
installation 18
Other information. 18
Specifications. 18
Installing the TV onto the wall
Installation procedure differs, depending on your TV.
Use the Wall-Mount Bracket SU-WL450 to install the TV to the wall.
Note
- Be sure to store the removed screws in a safe place, keeping them away from children.
Preparing for installation
- Have the TV's Reference Guide and Setup Guide at hand before installation.
- Be sure to have a Phillips screwdriver that fits the screws prior to the assembly.
- Confirm the installing position of your TV.
- Prepare four or more screws of 8 mm diameter and one screw of 5 mm or equivalent (not supplied). Select screws suitable for the material of the wall.
Checking the parts
Supplied with SU-WL450
- Verify that all the parts are included.
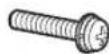
| A Base (20) (1) B Pulley (2) | |
| ◎ PSW 6x20 (4)◎ PSW 4x20 with Bush (2) | |
| E Spacer (20) (2) E Belt (1) | |
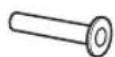
| G Bush (20) (M4) (2) G PSW 4x20 (2) | |
| I Base Adaptor (2) I PSW 4x10 (8) | |
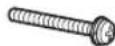
| K Spacer (60) (2) L PSW 6x50 (2) | |
| M Bush (M4) (2) N PSW 4x50 (2) |
Deciding on the installation location
1 Decide on the installation location.
Make sure that the wall has enough space for the TV and is capable of supporting a weight of at least four times that of the TV.
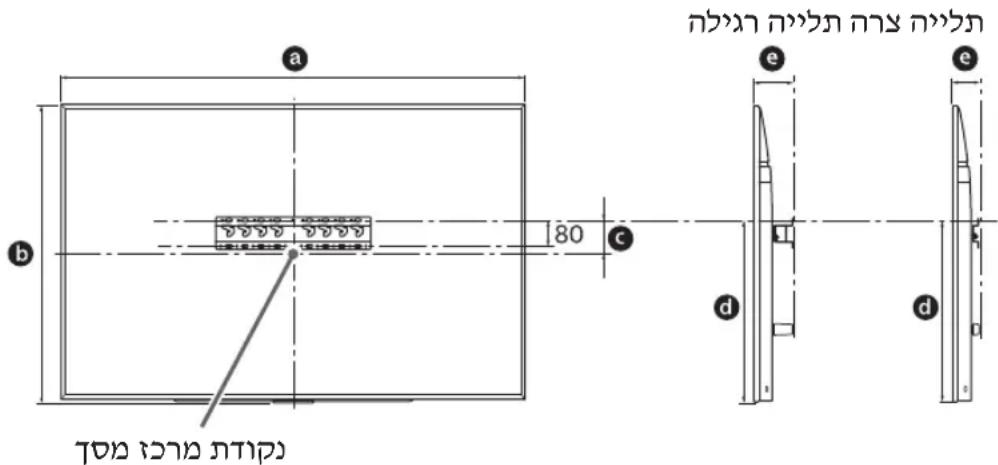
Refer to the following table on installing the TV to the wall. Refer to your TV's Reference Guide for the TV's weight.
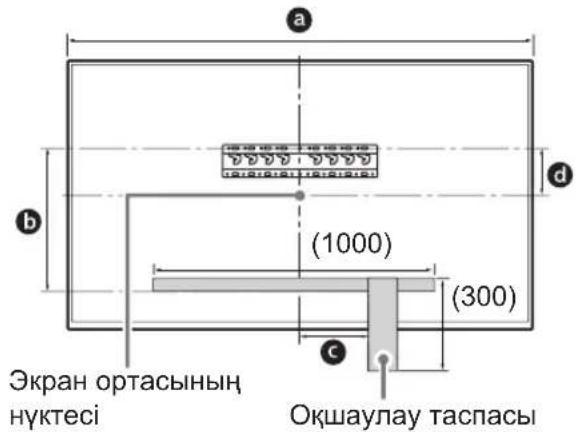
Standard mounting Slim mounting Screen centre point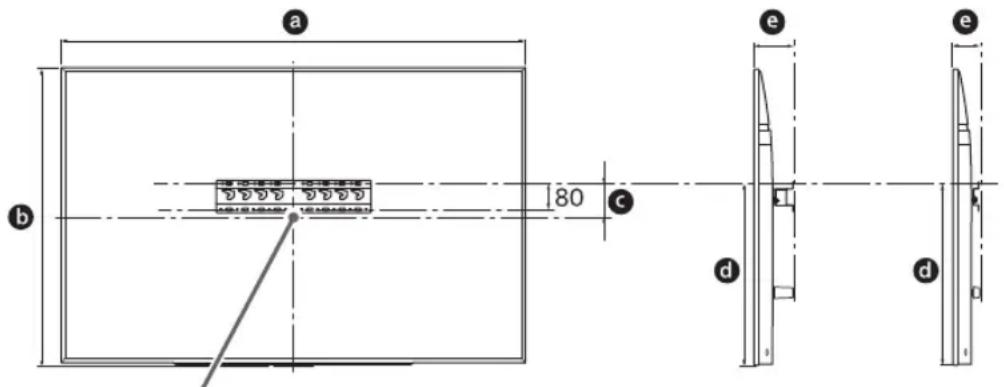
Unit: mm
| Model Name | Display dimensions | Screen centre dimension | Length for mounting | |||
| a | b | c | d | e | ||
| Standard mounting | Slim mounting | |||||
| KD-85XG85□□ | 1,909 | 1,097 | 251 | 803 | 142 | 100 |
| KD-75XG87□□ KD-75XG85□□ | 1,673 | 963 | 107 | 595 | 116 | 75 |
| KD-65XG87□□ KD-65XG85□□ | 1,450 | 836 | 99 | 523 | 115 | 73 |
| KD-55XG87□□ KD-55XG85□□ | 1,231 | 713 | 106 | 468 | 115 | 73 |
Note
- Figures in the table may differ slightly depending on the installation.
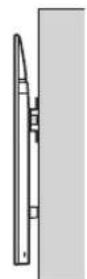
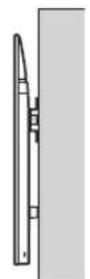
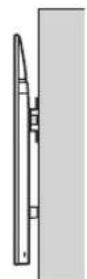
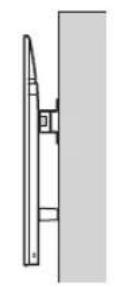
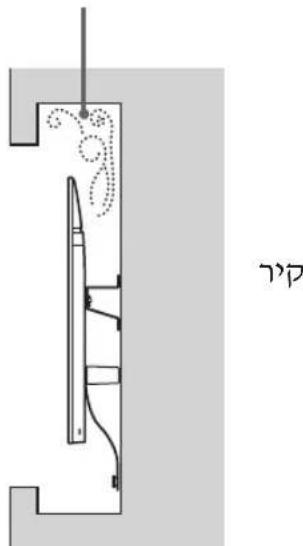
- When your TV is installed on the wall, the upper side of the TV slightly leans forward.
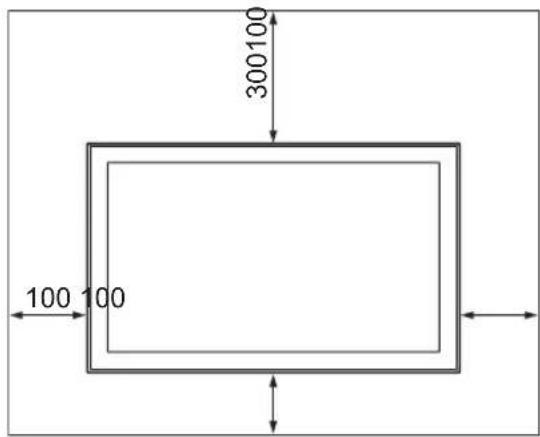
Allow for suitable clearance between the TV and the ceiling and protruding parts of the wall as shown below.
Unit: mm
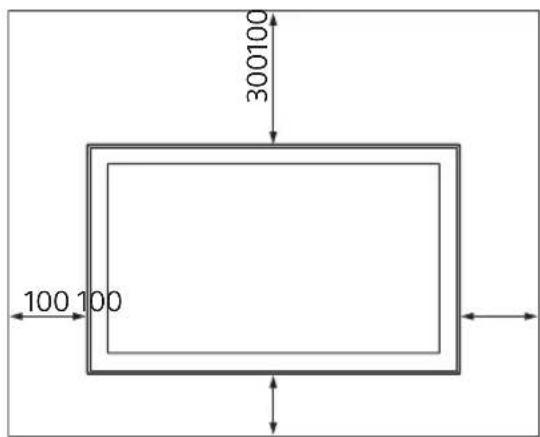
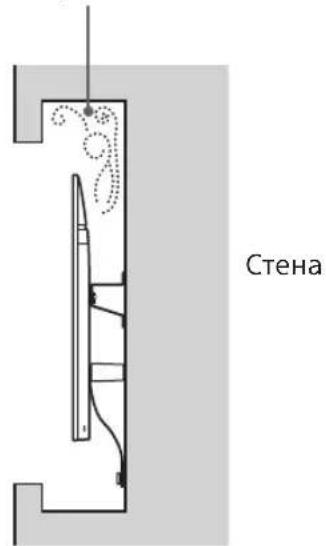
To ensure proper ventilation and prevent the collection of dirt or dust:
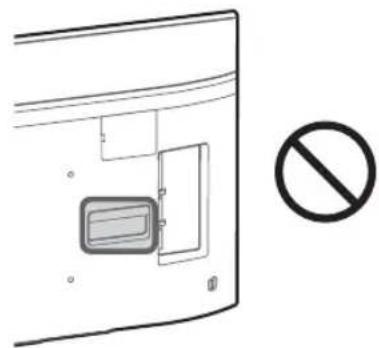
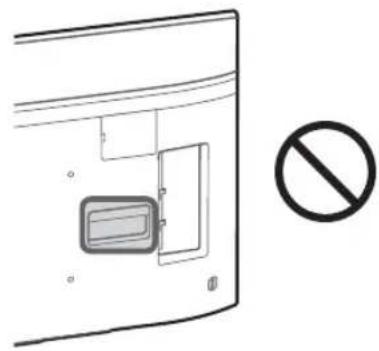
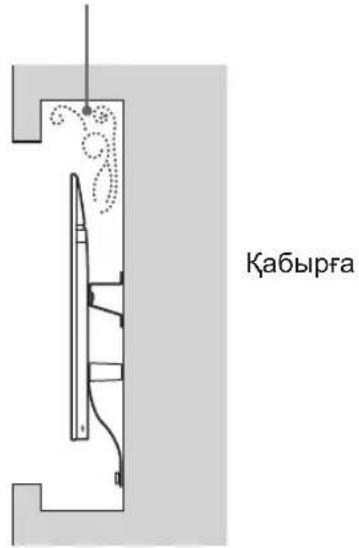
Do not lay the TV set flat, install upside down, backwards, or sideways. Do not place the TV set on a shelf, rug, bed, or in a closet. Do not cover the TV set with a cloth, such as curtains, or items such as newspapers, etc. Do not install the TV set as shown below.
Air circulation is blocked.
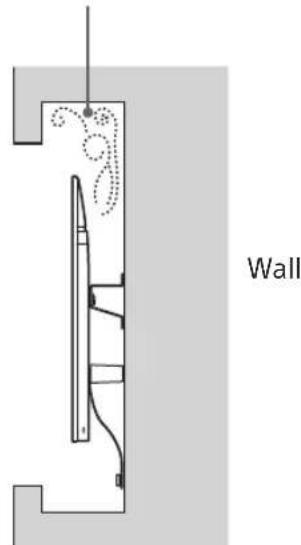
Note
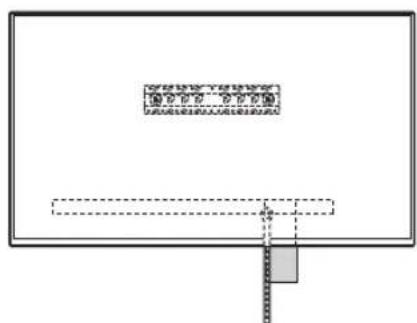
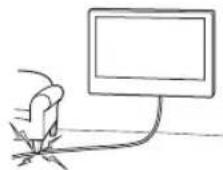
- If you intend to route the cables in the wall, make a hole in the wall to insert the cables before beginning the installation.
To prevent pinching the cables, prepare a hole in the wall somewhere outside the perimeter of the Base (20) A, Base Adaptor 1, and Spacer (20) E, Spacer (60) K.
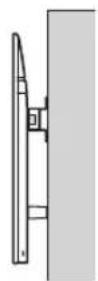
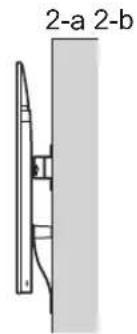
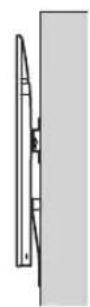
2 Select Wall mounting style. It is selectable as shown below.
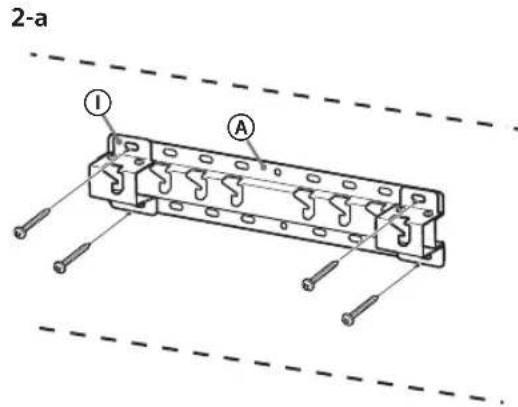
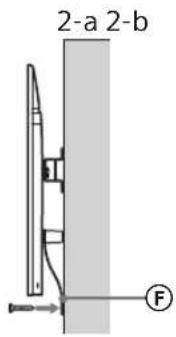
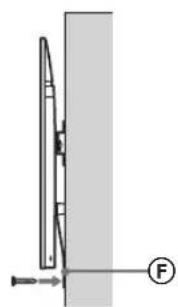
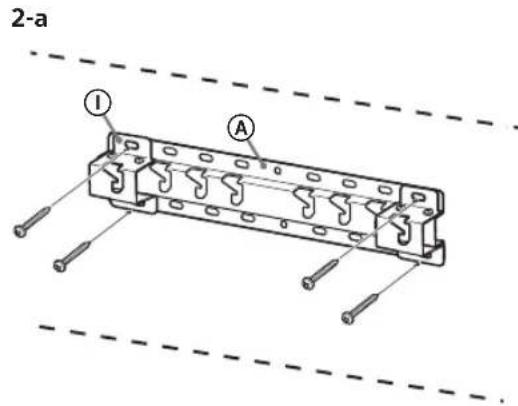
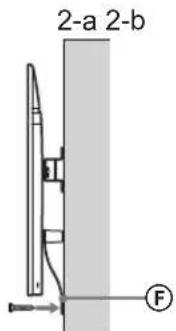
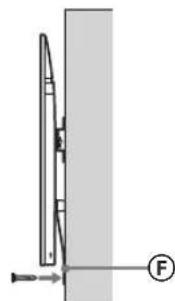
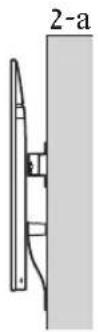
2-a Standard mount
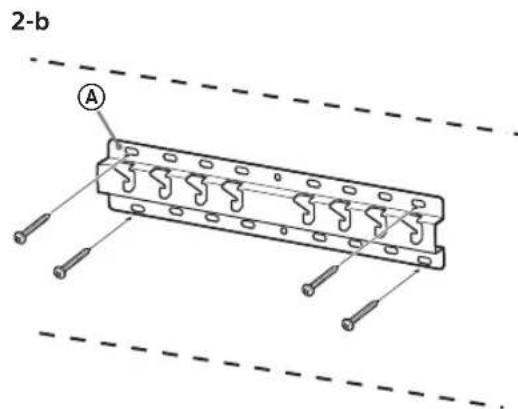
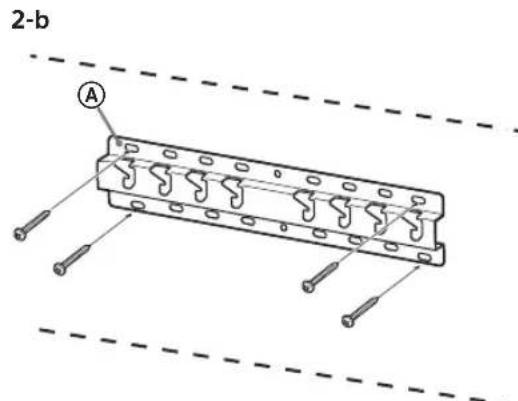
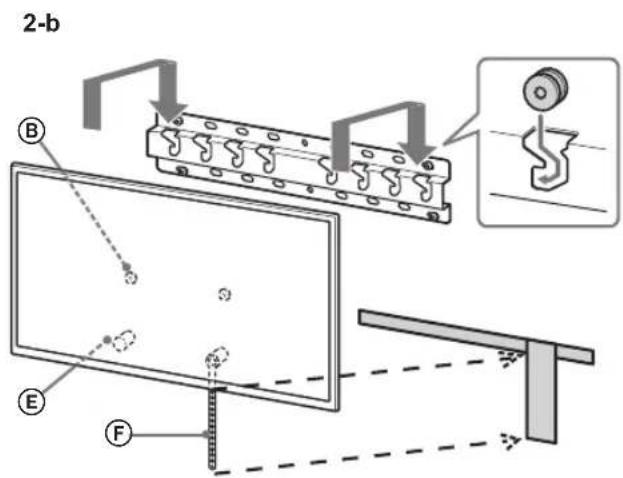
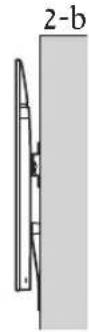
2-b Slim mount
Refer to the table of step 1.
WARNING
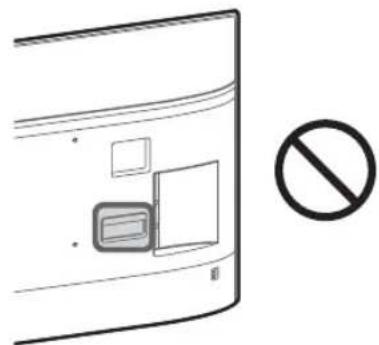
- When 2-b is selected, rear terminal access is limited.
2-a 2-b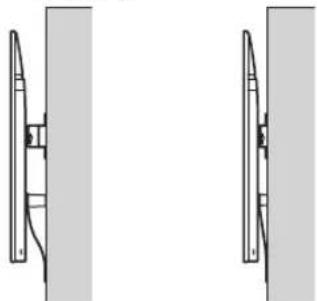
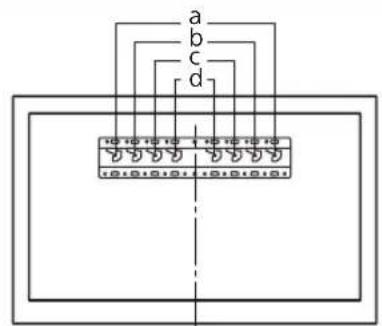
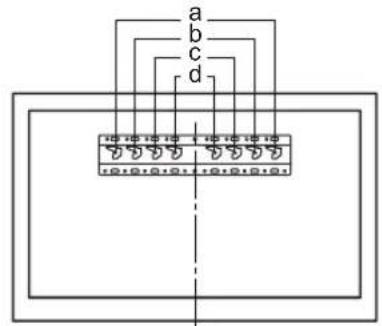
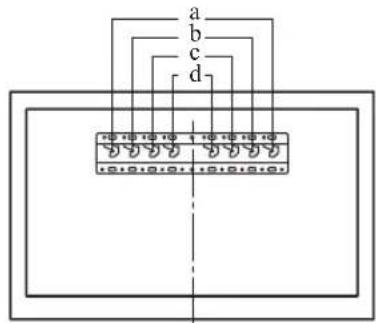
3 Refer to the below table about the Base Adaptor fitting location. In case of selecting 2-b, then skip this step.
| Model Name Hook location | |
| KD-85XG85□□ | |
| KD-75XG87□□ | a |
| KD-75XG85□□ | |
| KD-65XG87□□ | |
| KD-65XG85□□ | b |
| KD-55XG87□□ | |
| KD-55XG85□□ | |
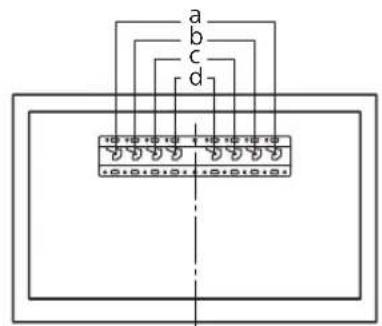
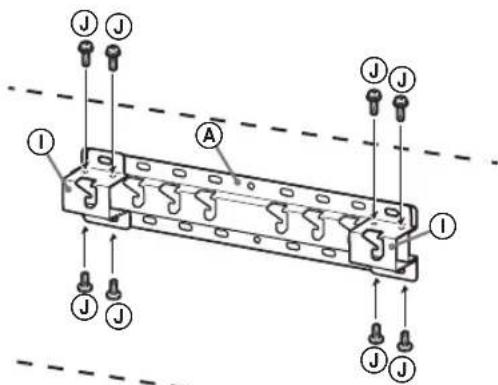
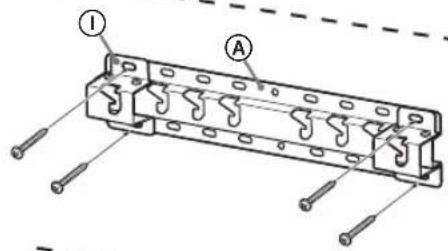
Fit Base Adaptor ① by using Screw (PSW 4x10) ② to Base (20) ④ when selecting 2-a.
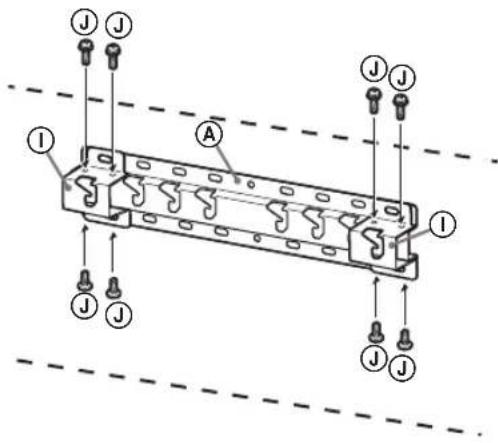
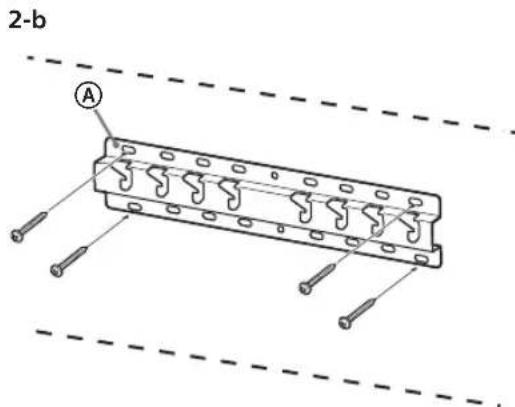
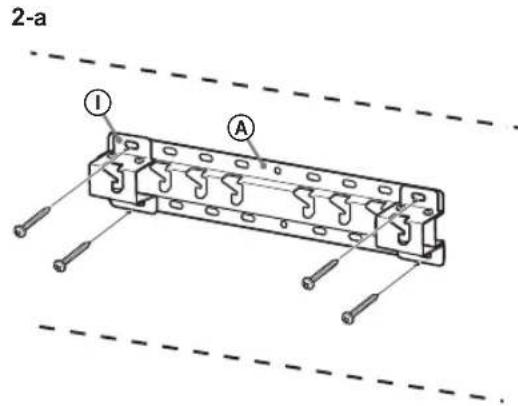
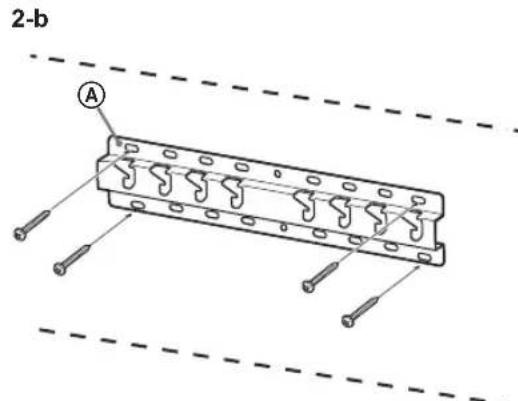
4 Decide the positions of the screws for installing the Base (20) A.
Refer to the specifications on page 18. When selecting 2-a, please use the hole positions of Base Adaptor ①.
WARNING
The wall that the TV will be mounted on should be able to support a weight of at least four times that of the TV (Refer to your TV's Reference Guide for its weight.). - Determine the strength of the wall the TV will be mounted on. Reinforce the wall sufficiently, if necessary.
Installing the Base on the wall
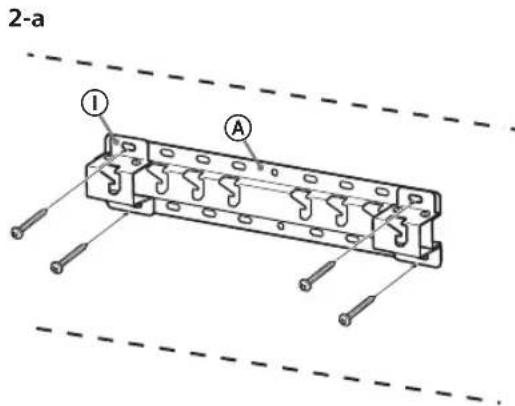
- Use four or more screws of 8mm diameter or equivalent (not supplied).
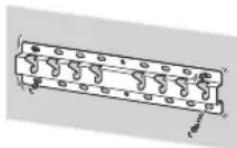
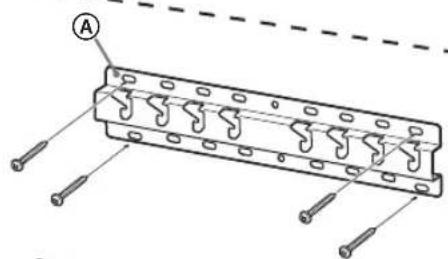
- Fit four screws to the holes of Base Adaptor ① with Base (20) A (2-a only). Install the Base (20) A on the wall horizontally.
Preparing for the installation of the TV
Refer to the Setup Guide for stand installation.
KD-85/75XG85□□, KD-75XG87□□
1 Mark the installation location on the wall.
- Use masking tape, etc. (not supplied) to mark the location of the TV near the Base or Base Adaptor. Refer to the following table.
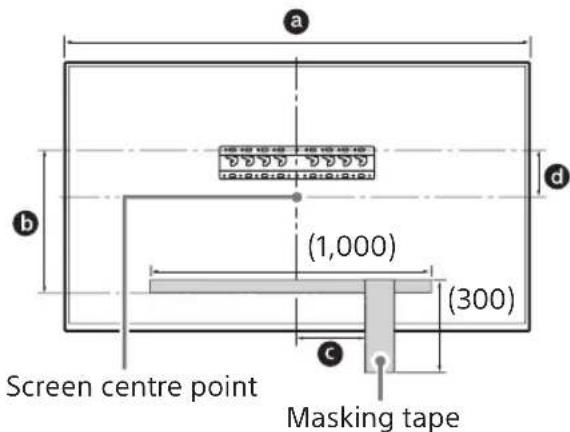
| Model Name | Length for marking | Screen centre dimension | ||
| a | b | c | d | |
| KD-85XG85□□ | 1,909 | 683 | 200 | 251 |
| KD-75XG87□□ KD-75XG85□□ | 1,673 | 468 | 200 | 107 |
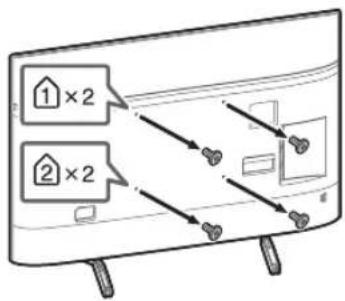
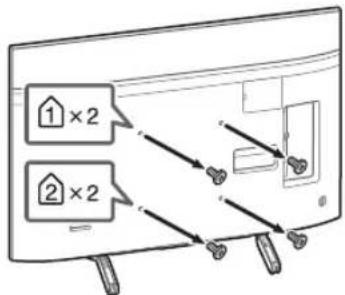
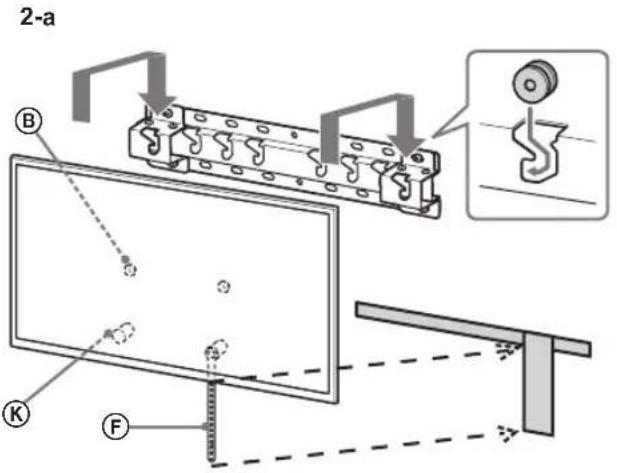
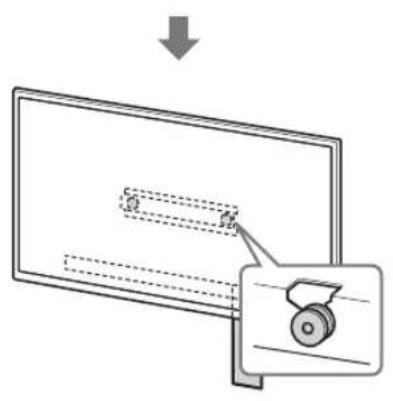
2 Remove the screws from the rear of the TV.
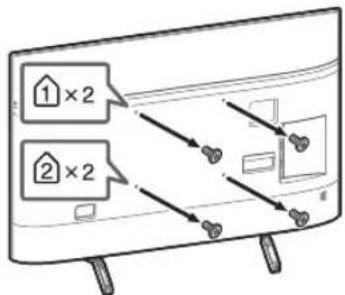
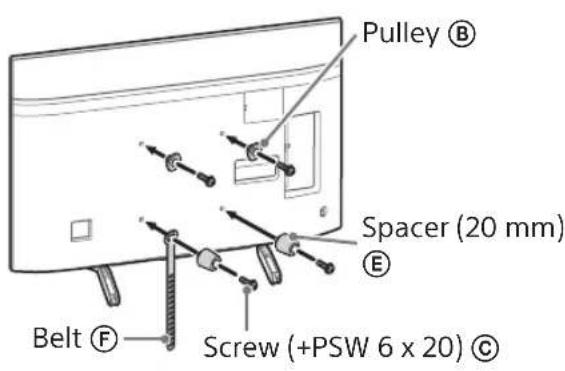
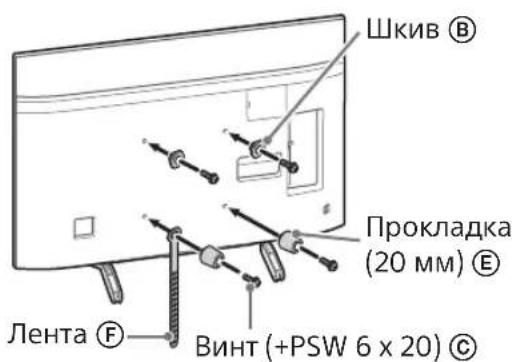
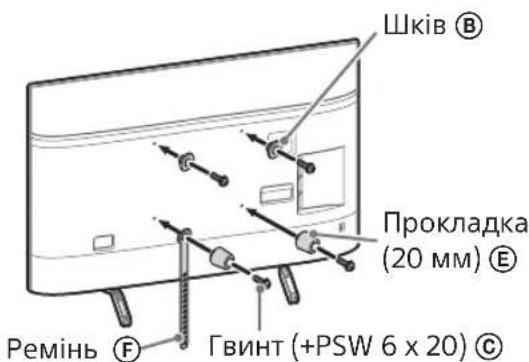
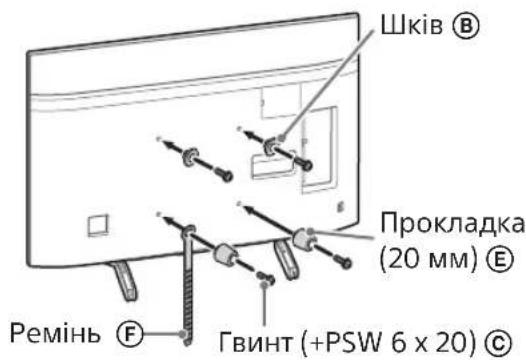
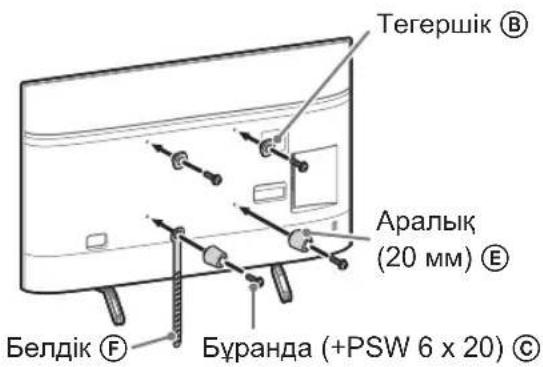
3 Attach the Attachment parts for Wall-Mount Bracket. Check the Attachment parts by referring to "Supplied with SU-WL450" in "Checking the parts" on page 5.
Note
- Firmly secure the attachment parts using screws.
- When using an electric screwdriver, set the torque setting to approximately 1.5 N·m {15 kgf·cm}.
- Be sure to store the used or unused parts in a safe place for future use. Retain this manual for future reference.
Standard mounting (2-a) Slim mounting (2-b)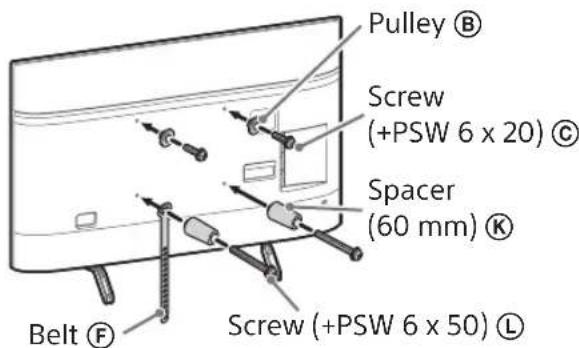
Note
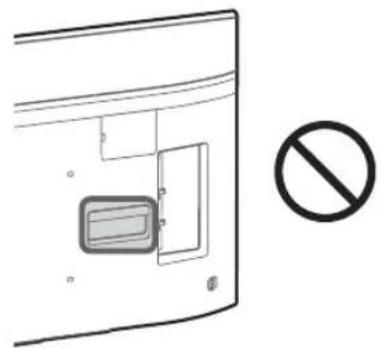
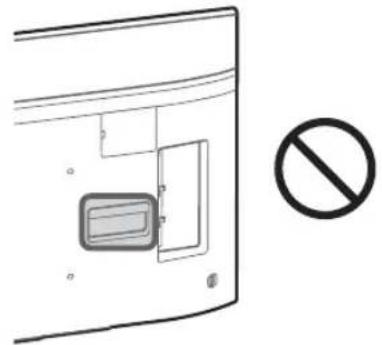
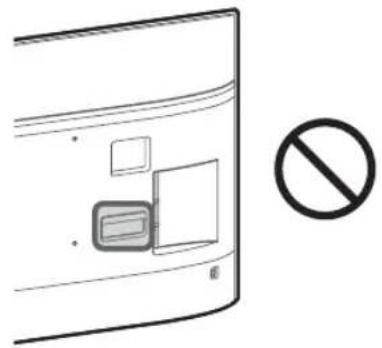
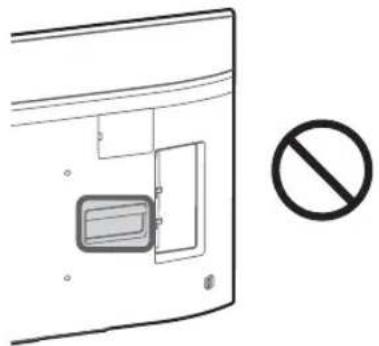
- You cannot use some of the terminals on the rear of the TV when using this mounting style.
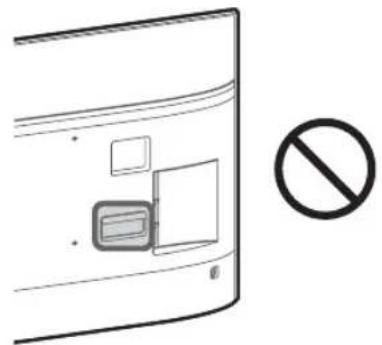
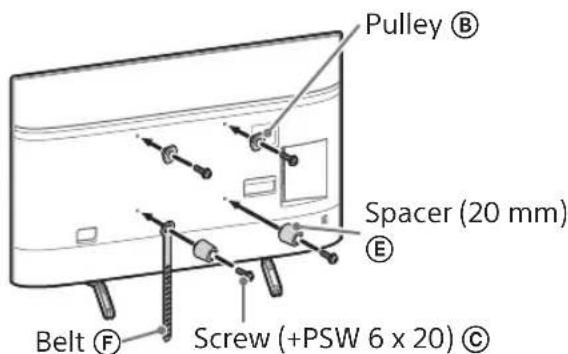
4 Connect the necessary cable(s) to the TV.
Make sure to connect the cables before installing the TV on the wall. You will be unable to connect the cables when the TV is installed. Refer to the Reference Guide supplied with your TV.
Note
- Subcontract the cable routing in the wall to a licensed contractor.
- Bundle the connecting cables to prevent stepping on them before wall mounting.
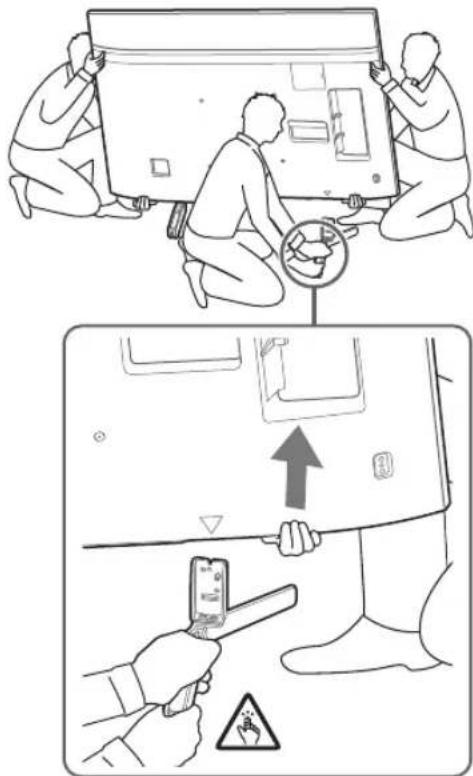
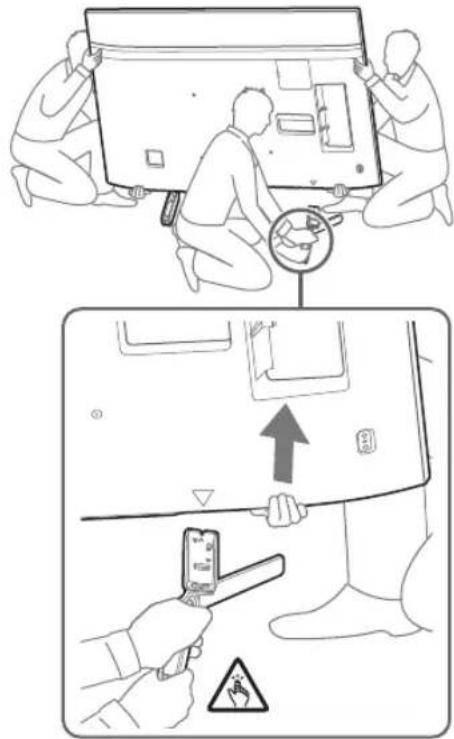
5 Detach the Table-Top Stand from the TV.
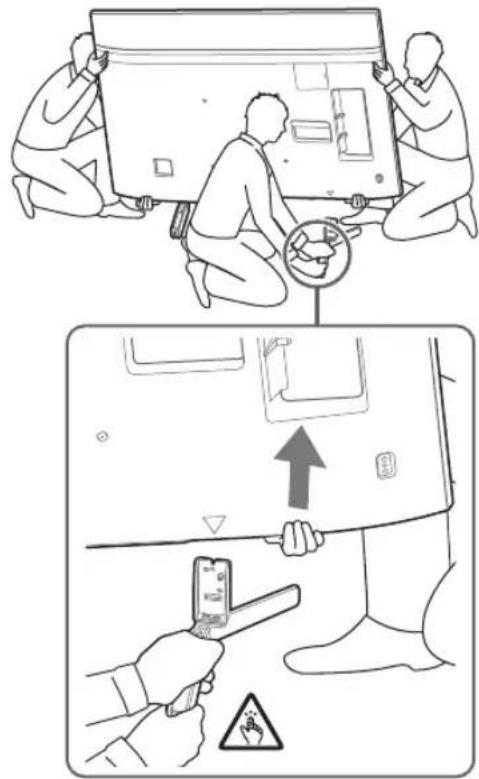
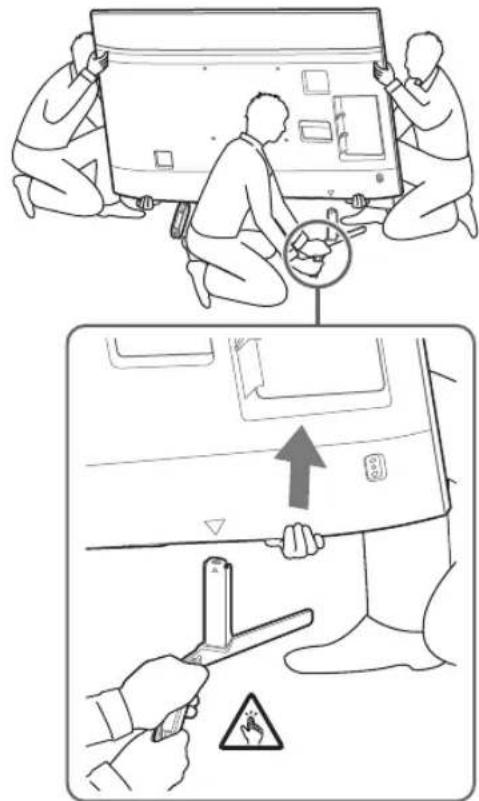
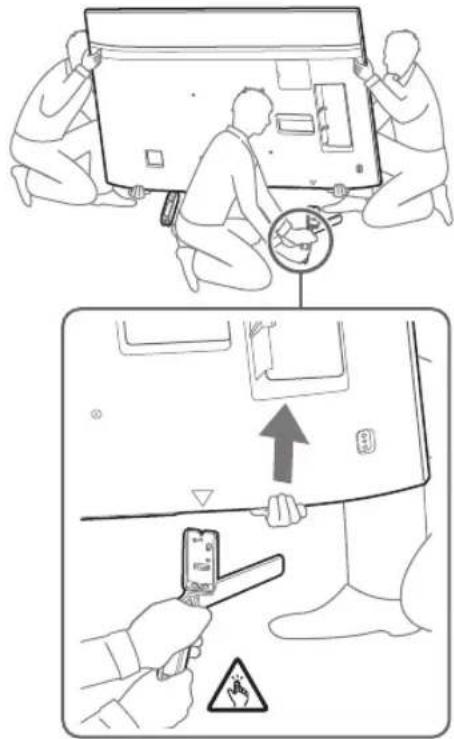
- Remove one side of the Table-Top Stand at a time. Firmly hold the Table-Top Stand securely with both hands while the other people lift up the TV.
KD-85XG85□□
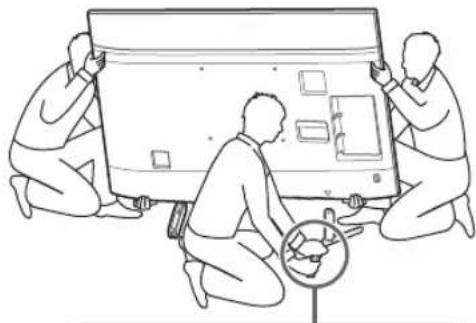
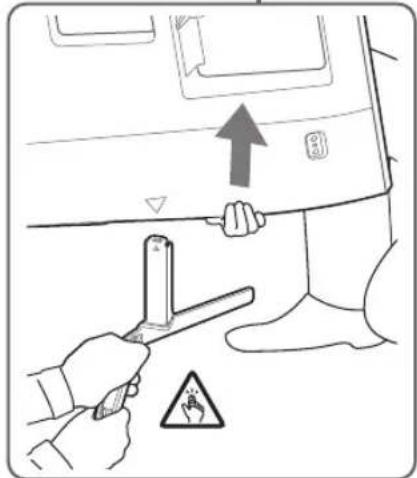
KD-75XG87□□, KD-75XG85□□
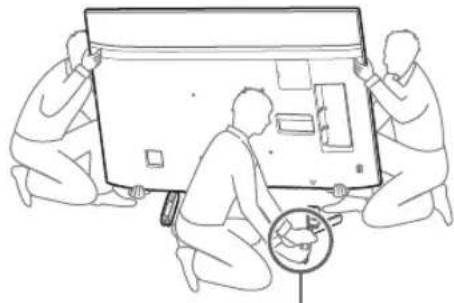
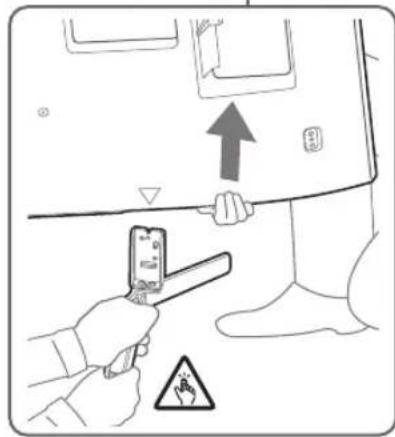
- Repeat the previous step and remove the other side of the Table-Top Stand.
Note
- Three or more people are required to detach the Table-Top Stand.
- Be careful not to use excessive force while detaching the Table-Top Stand from the TV as it may cause the TV set to fall resulting in personal injury or physical damage to the TV. Take care when handling the Table-Top Stand to prevent damage to the TV.
- Be careful when lifting the TV as the Table-Top Stand is detached, the Table-Top Stand may topple over and cause personal injury. Take care when removing the Table-Top Stand from the TV to prevent it from falling over and damaging the surface that the TV is sitting on.
KD-65/55XG87□□
KD-65/55XG85□
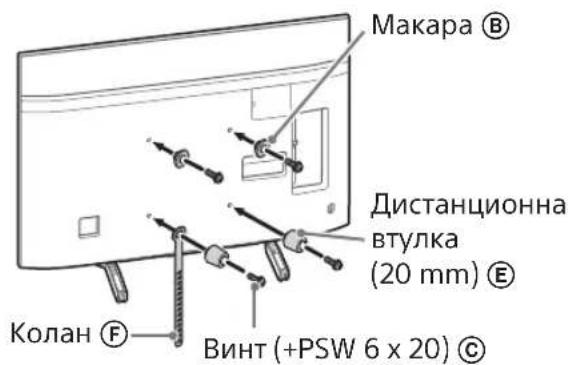
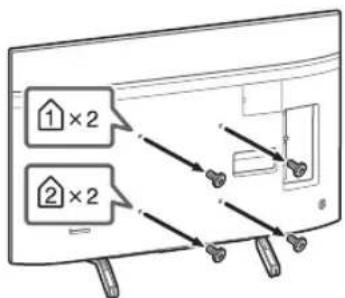
1 Remove the screws from the rear of the TV.
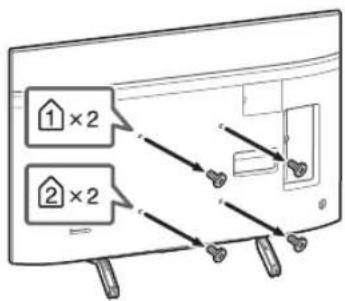
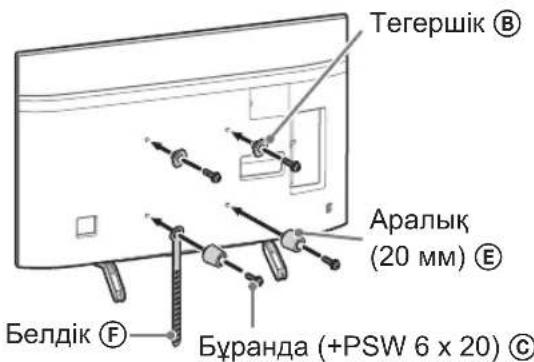
2 Attach the Attachment parts for Wall-Mount Bracket. Check the Attachment parts by referring to "Supplied with SU-WL450" in "Checking the parts" on page 5.
Note
- Firmly secure the Attachment parts using screws.
- When using an electric screwdriver, set the torque setting to approximately 1.5 N·m {15 kgf·cm}.
- Be sure to store the used or unused parts in a safe place for future use. Retain this manual for future reference.
Standard mounting (2-a)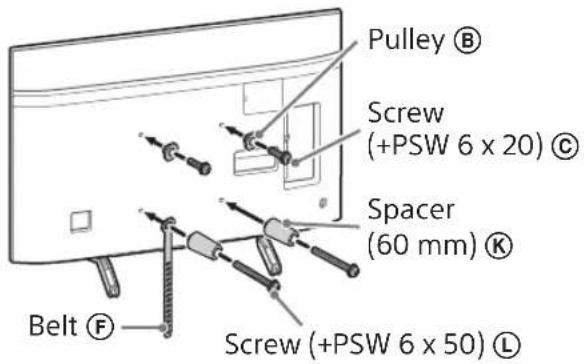
Slim mounting (2-b)
Note
- You cannot use some of the terminals on the rear of the TV when using this mounting style.
3 Connect the necessary cable(s) to the TV.
Make sure to connect the cables before installing the TV on the wall. You will be unable to connect the cables when the TV is installed.
Refer to the Reference Guide supplied with your TV.
Note
- Subcontract the cable routing in the wall to a licensed contractor.
- Bundle the connecting cables to prevent stepping on them before wall mounting.
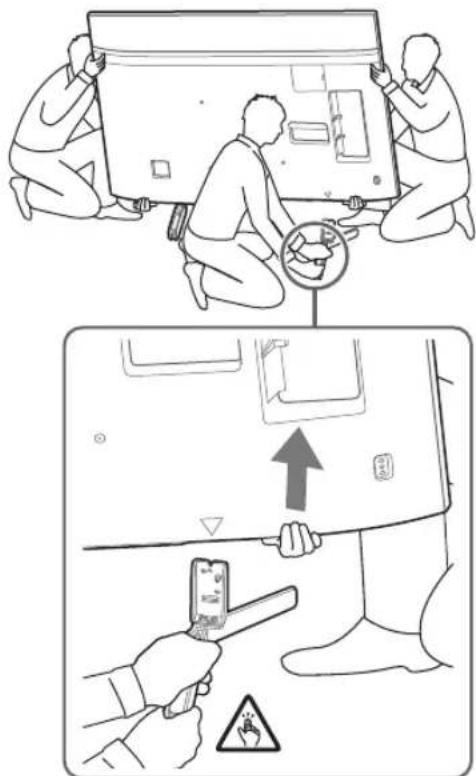
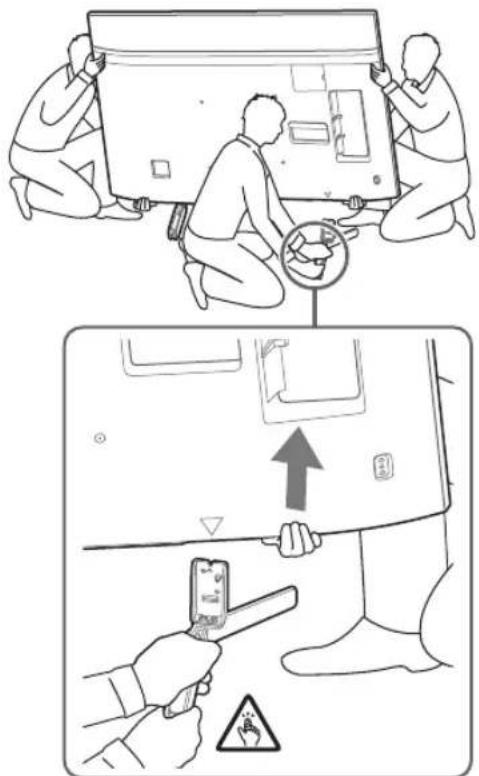
4 Detach the Table-Top Stand from the TV.
- Remove one side of the Table-Top Stand at a time. Firmly hold the Table-Top Stand securely with both hands while the other people lift up the TV.
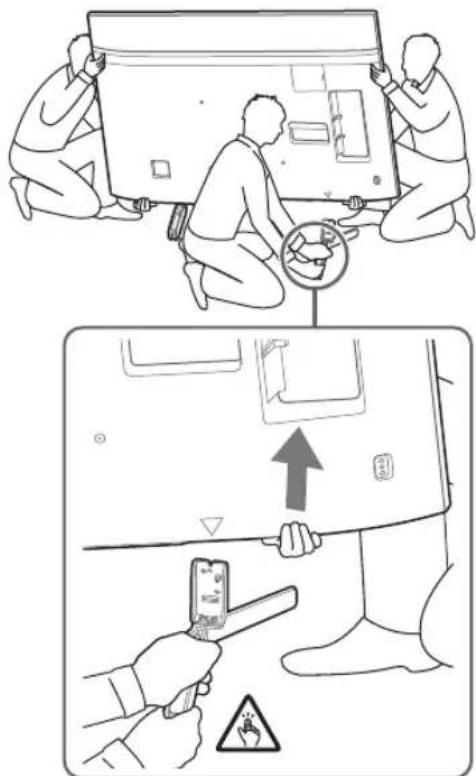
- Repeat the previous step and remove the other side of the Table-Top Stand.
Note
- Three or more people are required to detach the Table-Top Stand.
- Be careful not to use excessive force while detaching the Table-Top Stand from the TV as it may cause the TV set to fall resulting in personal injury or physical damage to the TV. Take care when handling the Table-Top Stand to prevent damage to the TV.
- Be careful when lifting the TV as the Table-Top Stand is detached, the Table-Top Stand may topple over and cause personal injury. Take care when removing the Table-Top Stand from the TV to prevent it from falling over and damaging the surface that the TV is sitting on.
Installing the TV on the wall
KD-85/75XG85□□, KD-75XG87□□
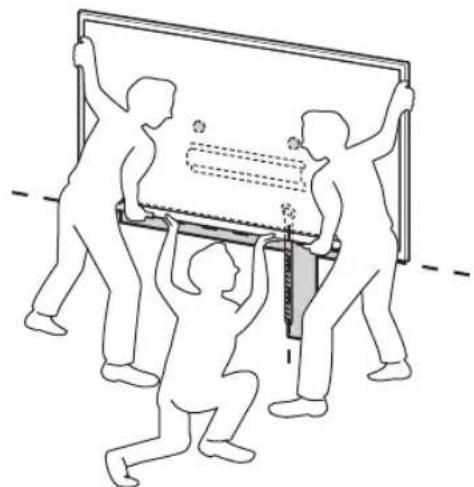
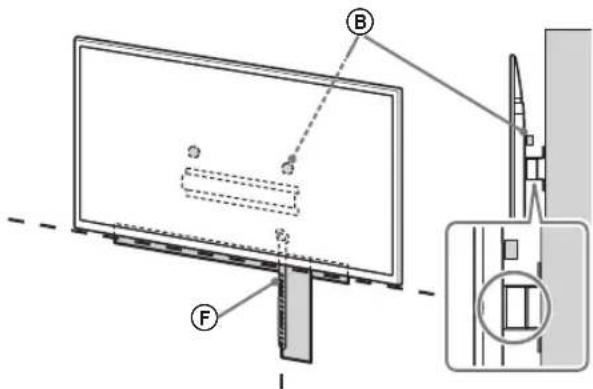
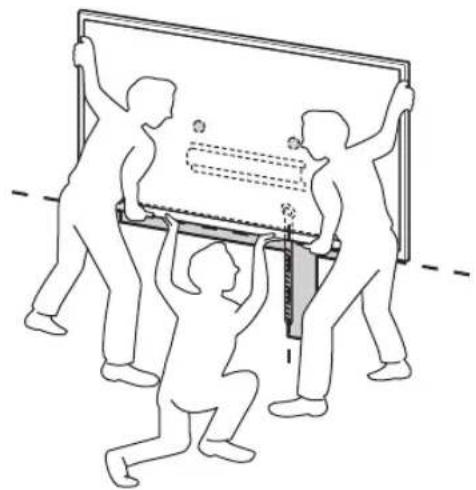
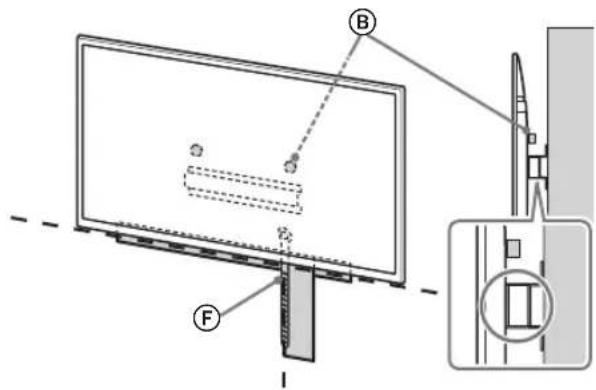
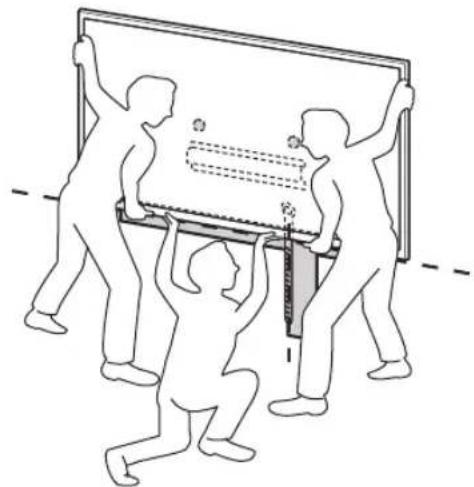
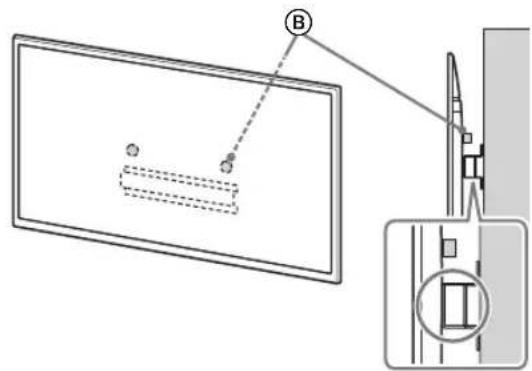
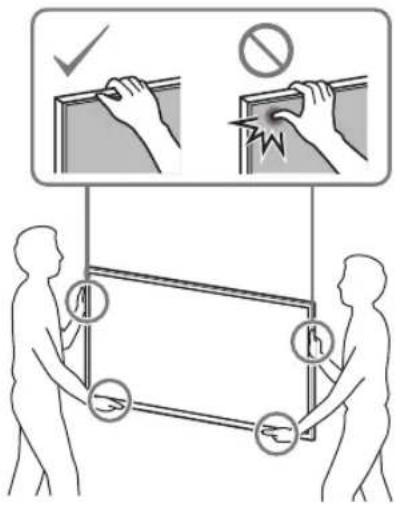
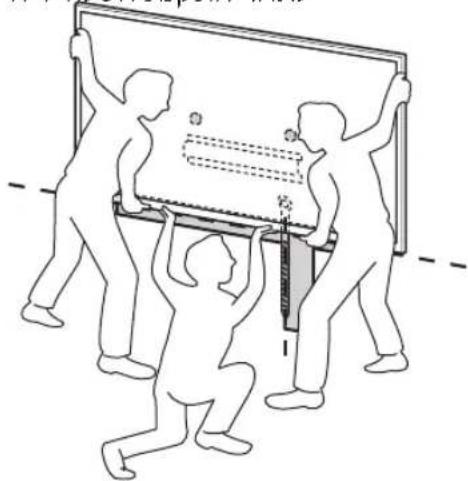
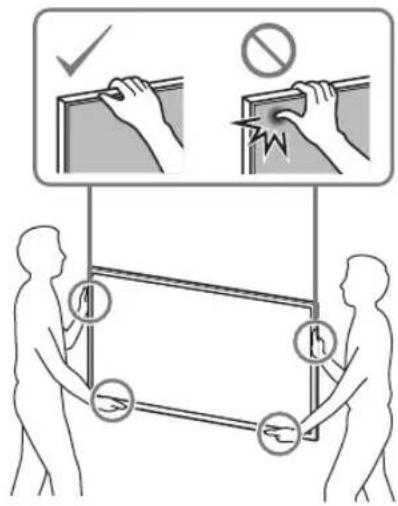
1 Lift the TV.
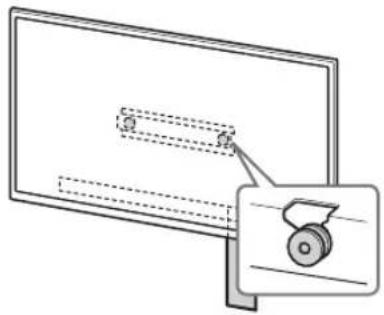
- For the location of the Pulleys (B) to hang on the Base or Base Adaptor, refer to the table of step 3 in "Deciding on the installation location" on page 7.
- Make sure that the rear of the TV touches the Base or Base Adaptor when holding the TV.
Note
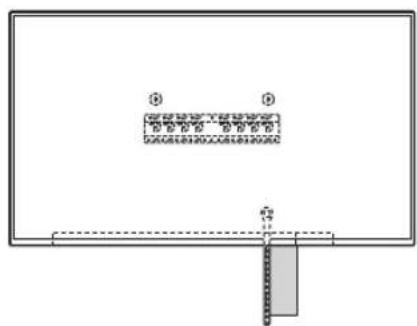
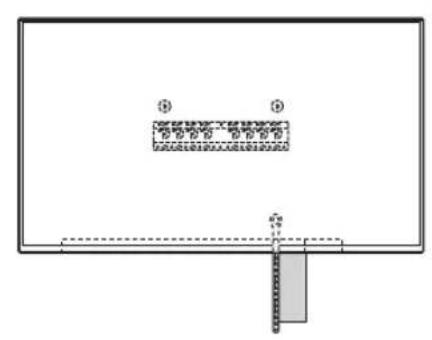
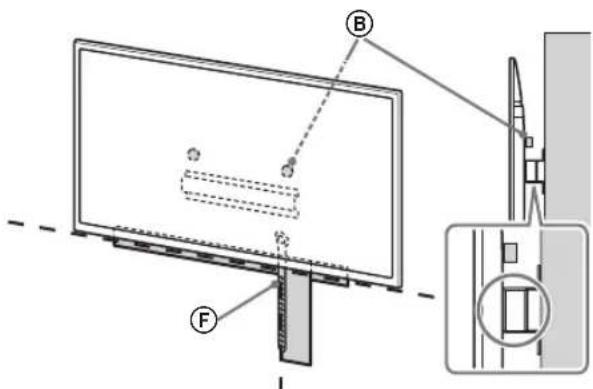
- Hold the TV securely with both hands and make sure the Belt (F) and the bottom of the TV align with the masking tape.
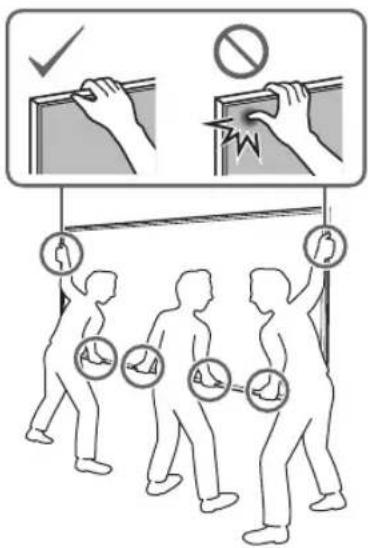
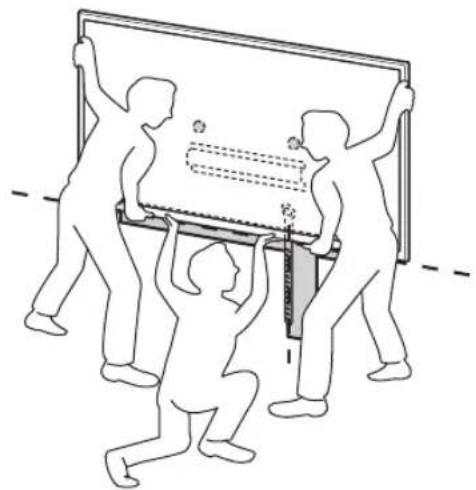
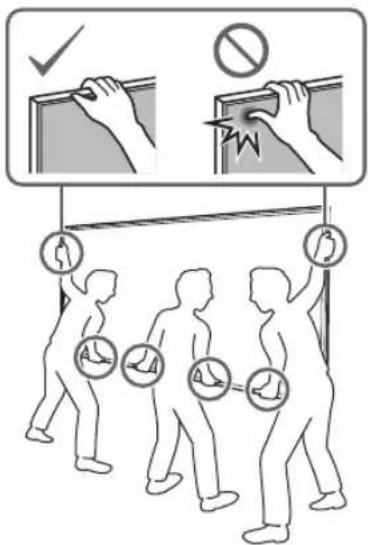
- Carry the TV with three people and the person who is in front of the TV leads the others to adjust the position.
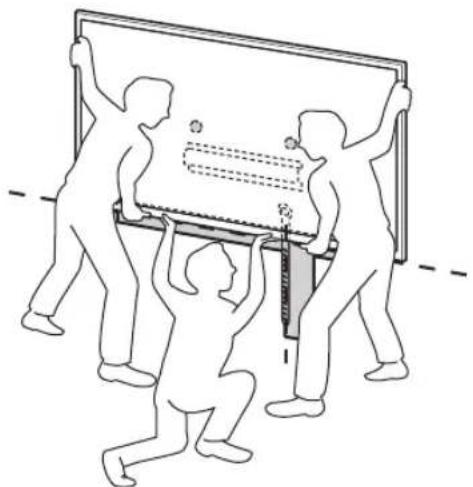
Take great care when installing the TV to the wall especially for the person who is supporting the TV from below, the television set may fall, causing serious bodily injury or even death.
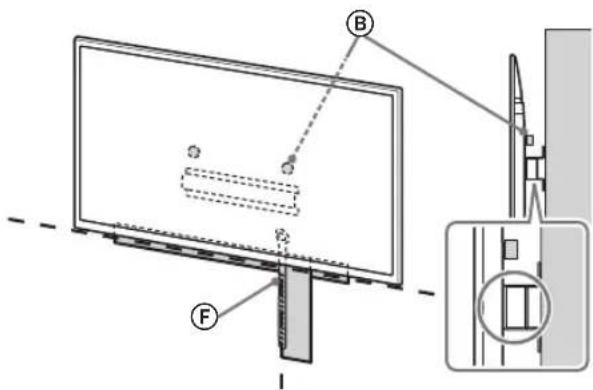
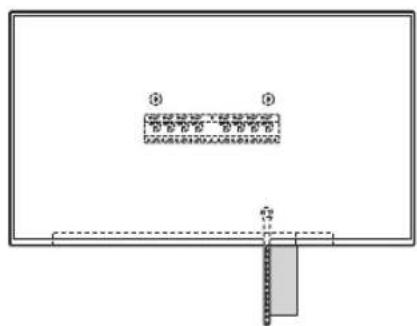
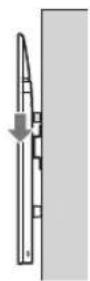
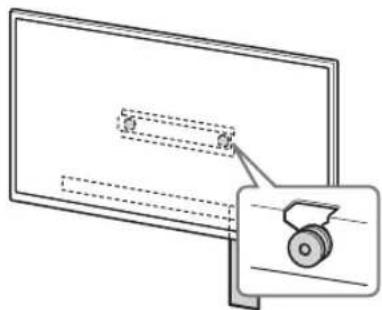
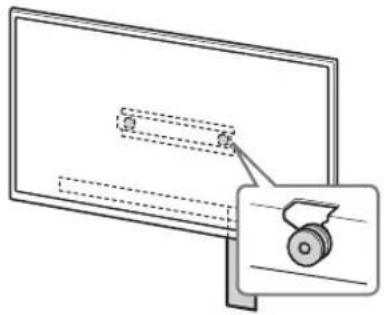
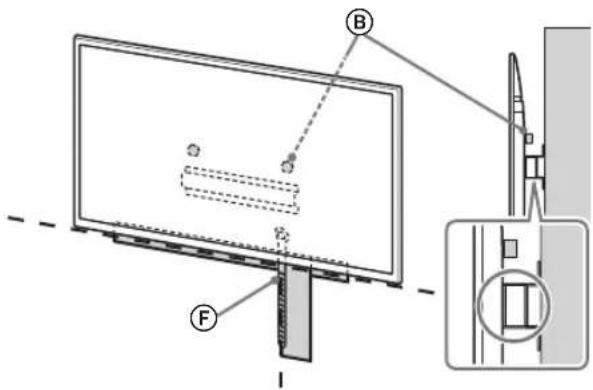
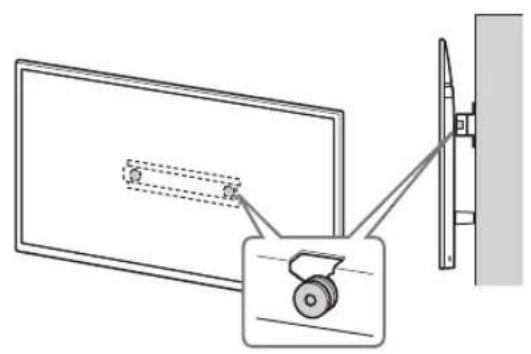
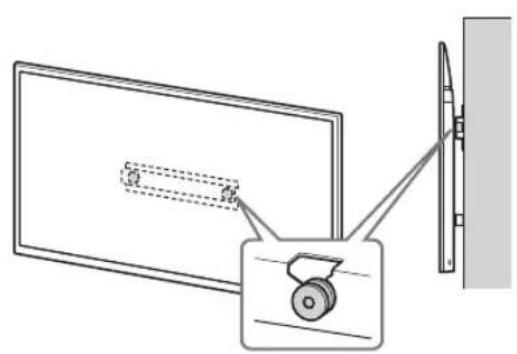
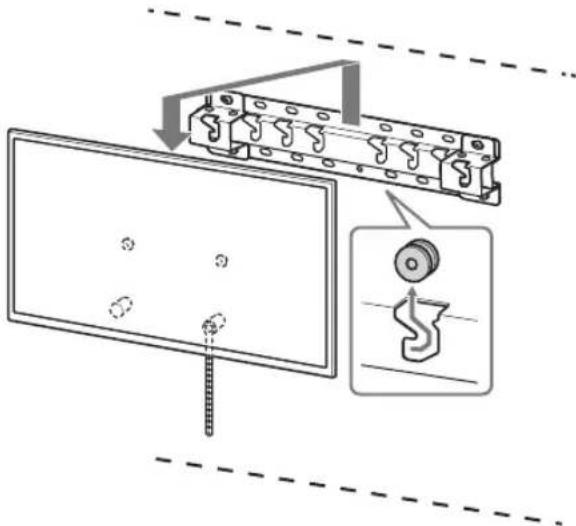
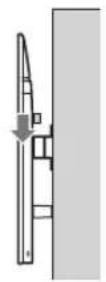
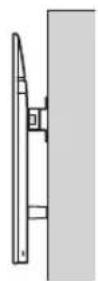
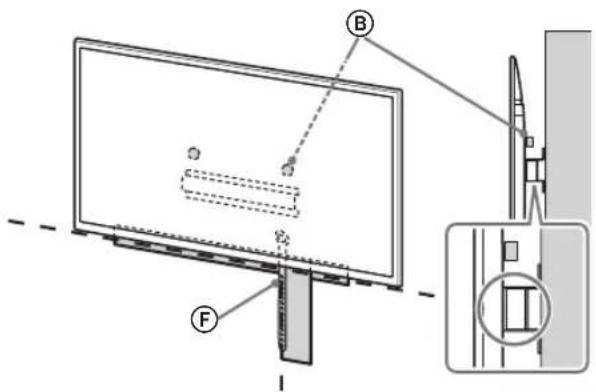
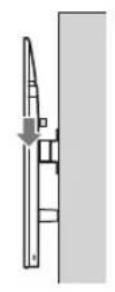
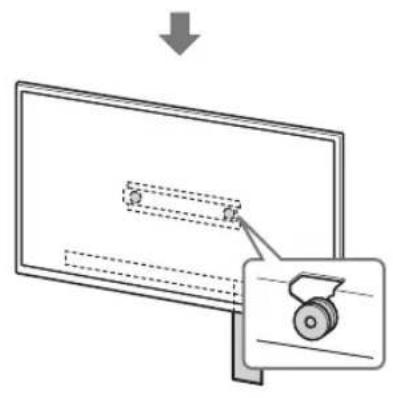
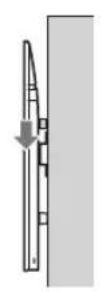
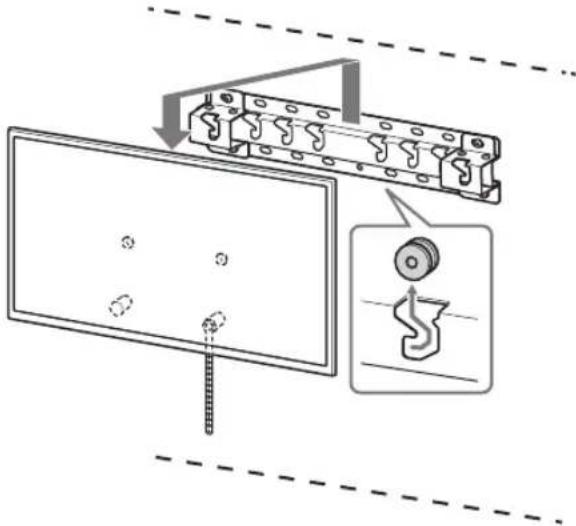
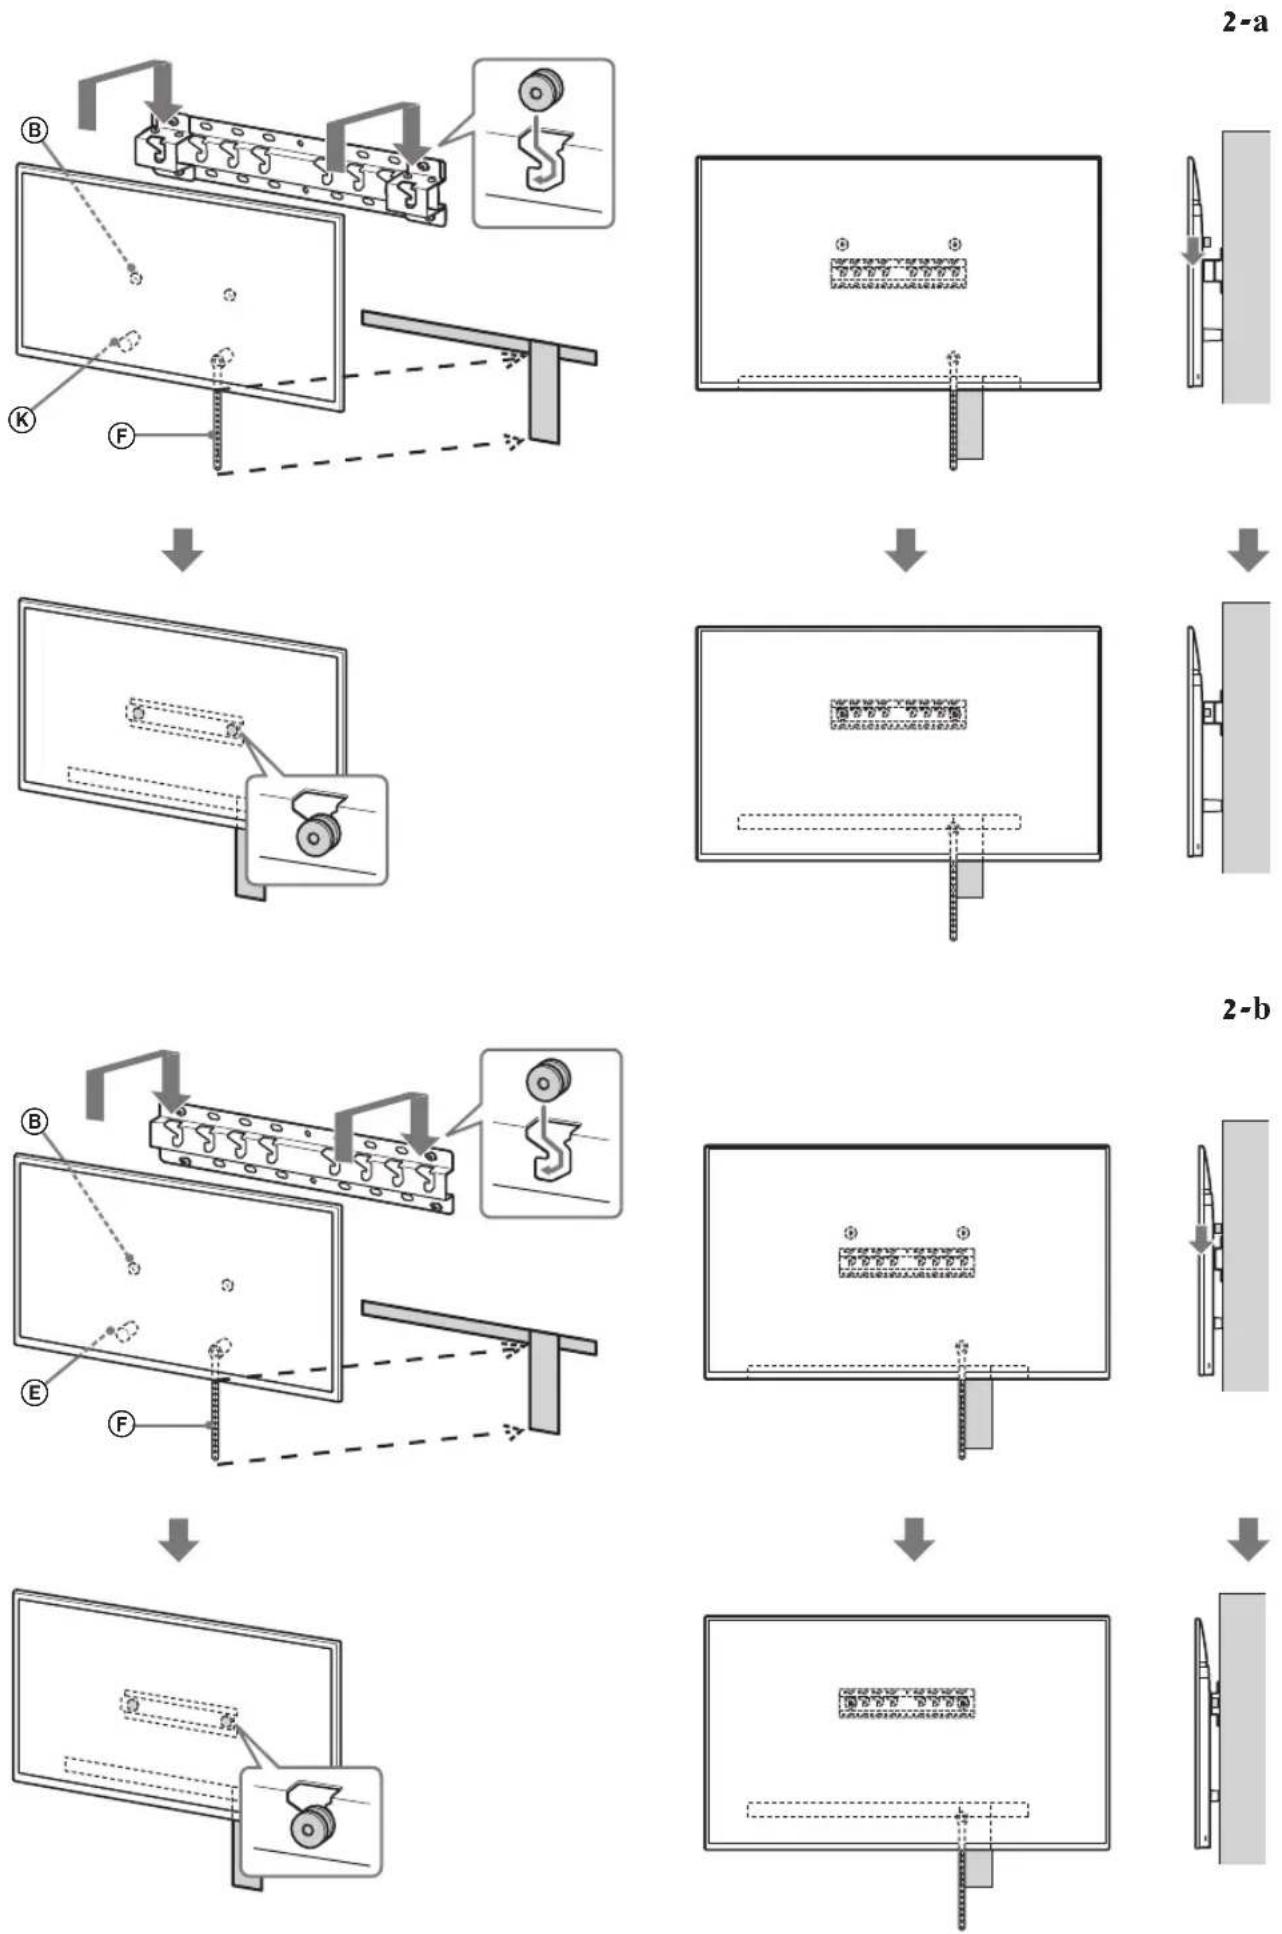
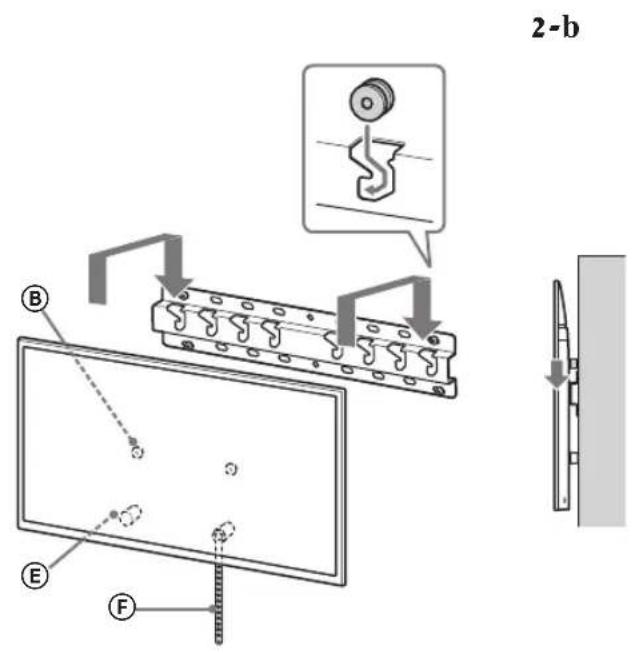
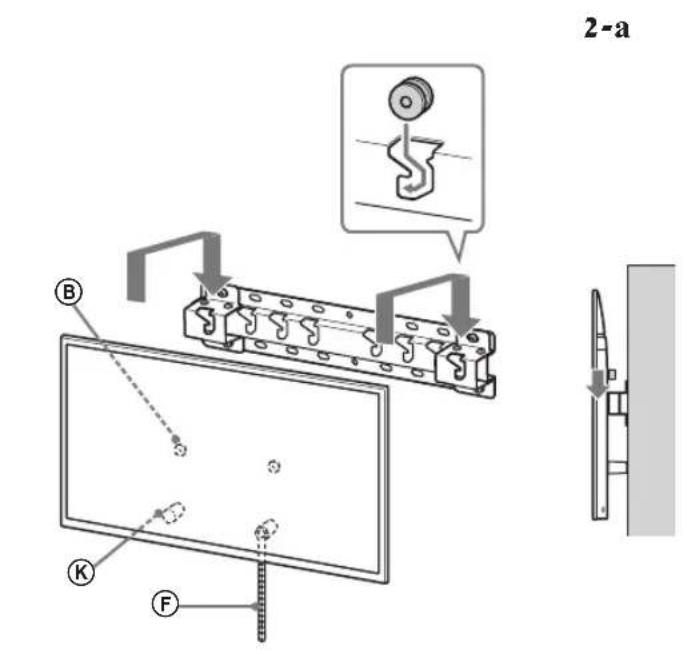
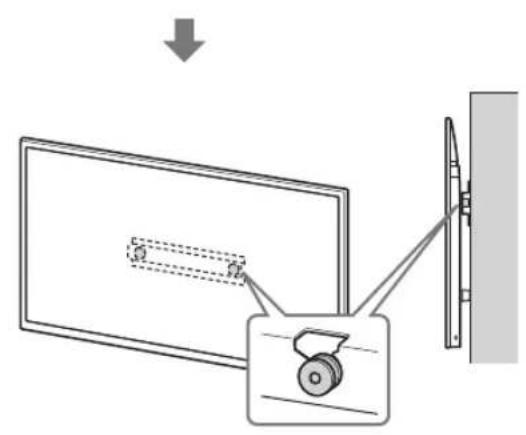
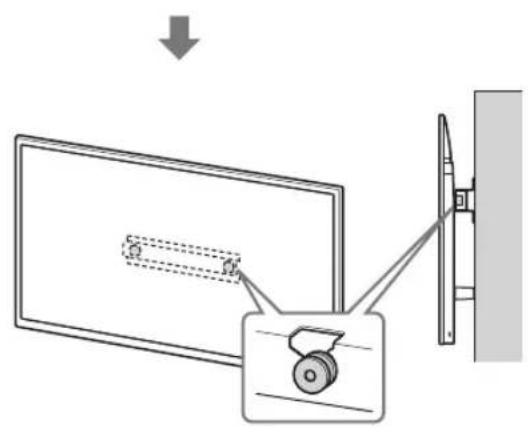
2 Install the TV onto the Base or Base Adaptor.
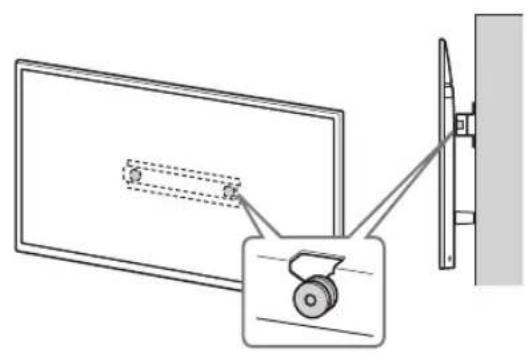
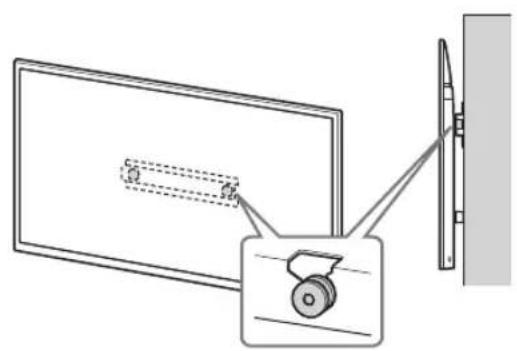
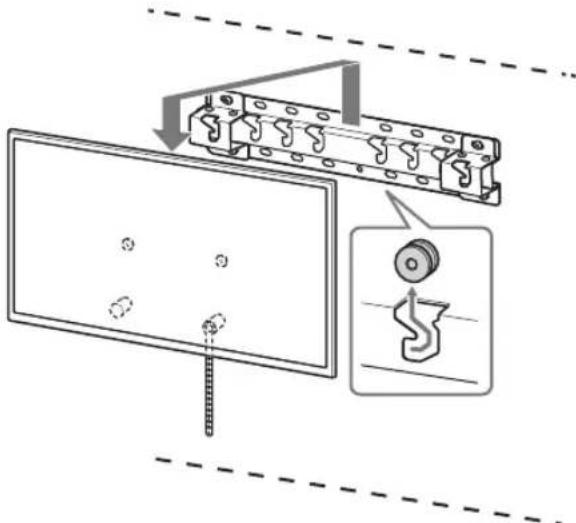
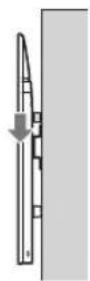
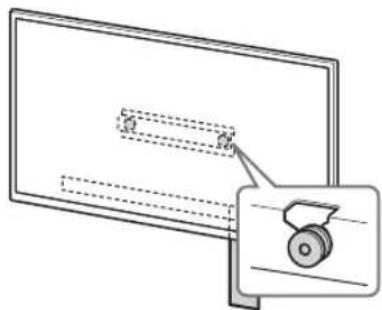
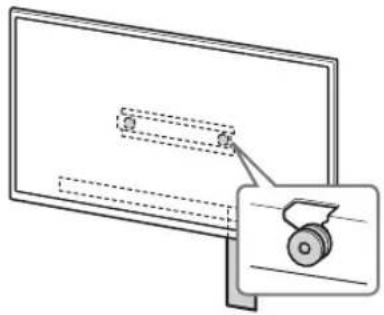
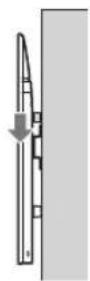
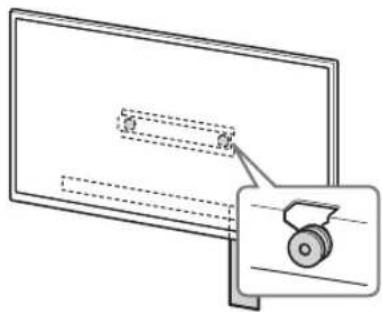
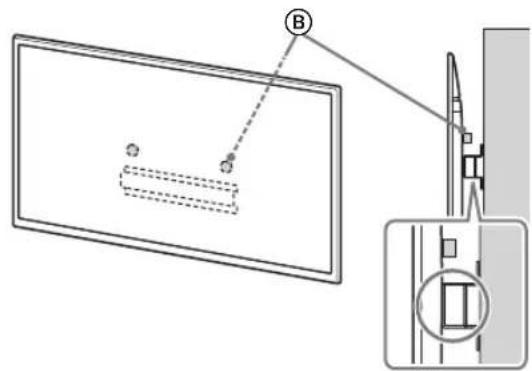
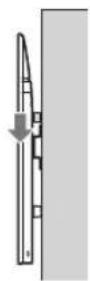
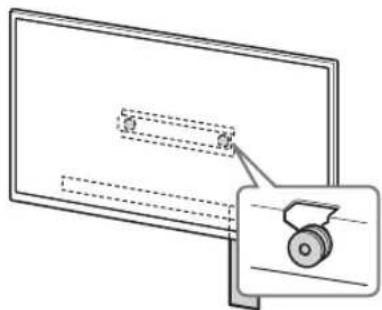
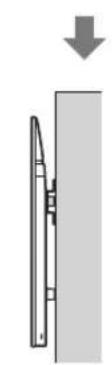
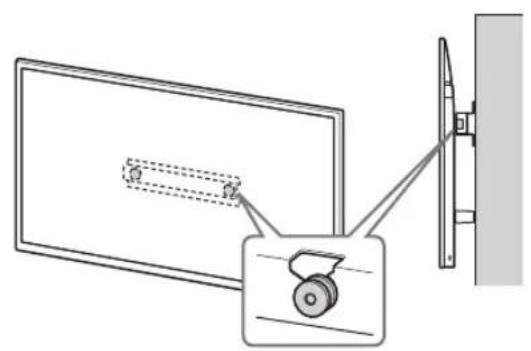
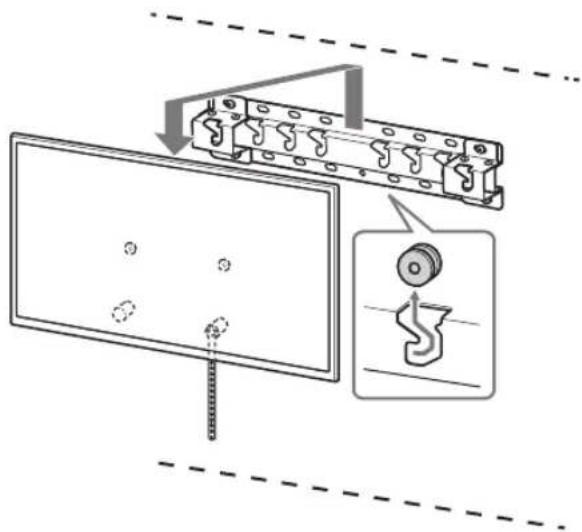
Gently slide down the TV and hang the Pulleys (B) attached to the rear of the TV to the Base or Base Adaptor, making sure to confirm the shape of the holes. After installing the TV on the wall, confirm the Pulleys (B) are firmly latched into the Base or Base Adaptor. - Release both hands slowly to ensure that the TV does not fall.
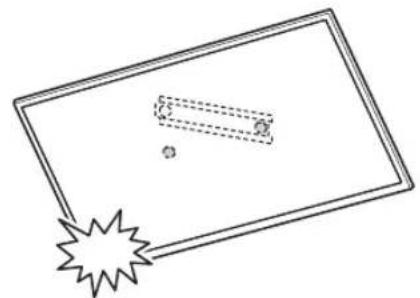
- After installing the TV on the wall, remove the masking tape, etc. from the wall.
2-a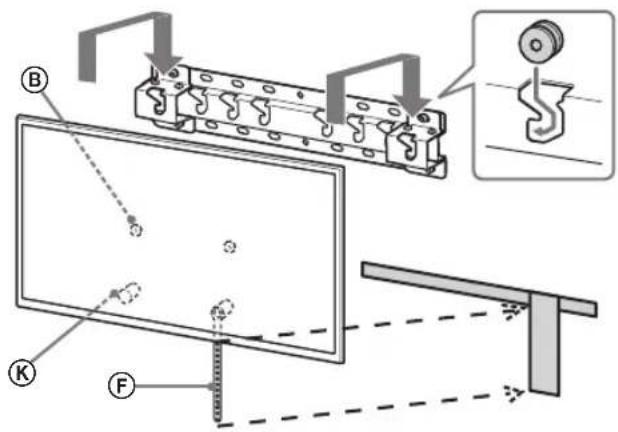

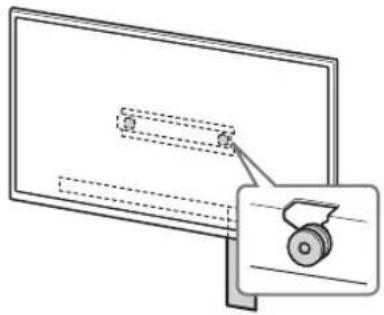
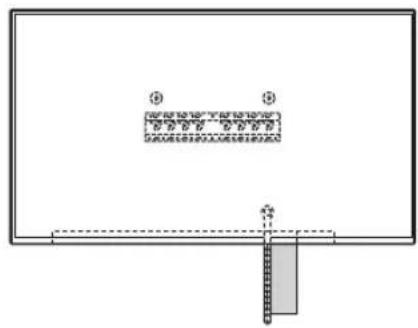

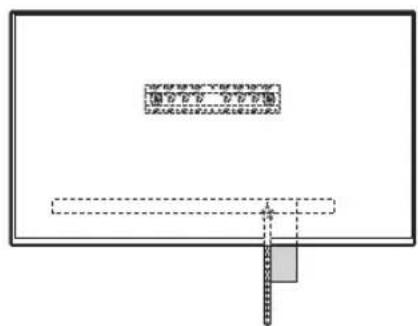

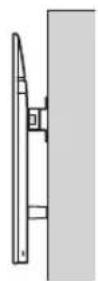
2-b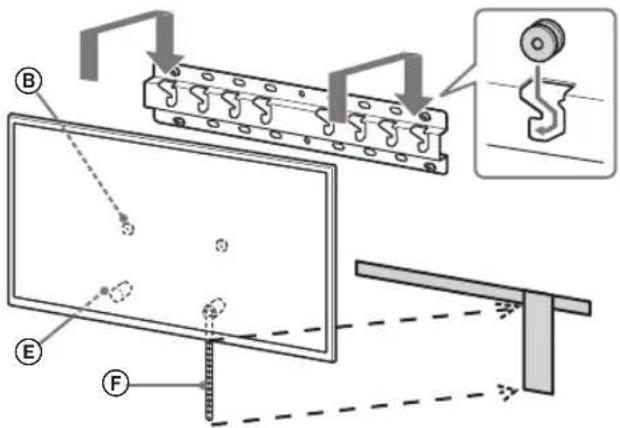



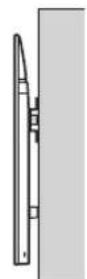
WARNING
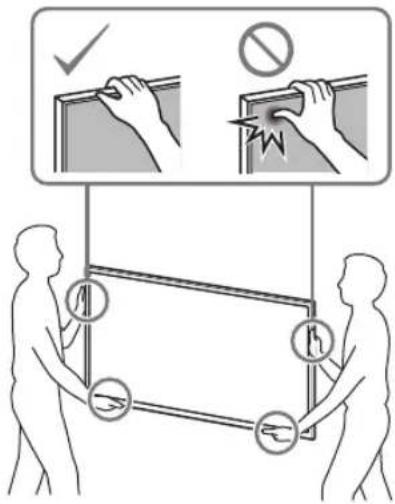
- Be sure that two or more persons (three or more persons for 75 inches and above TV set) hold the TV when carrying it.
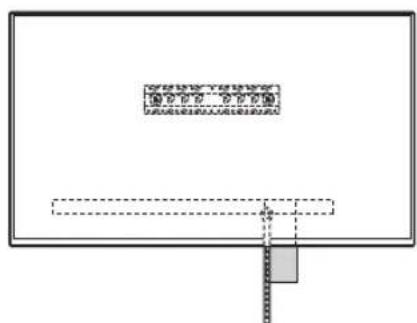
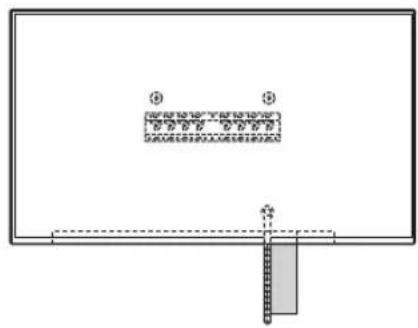
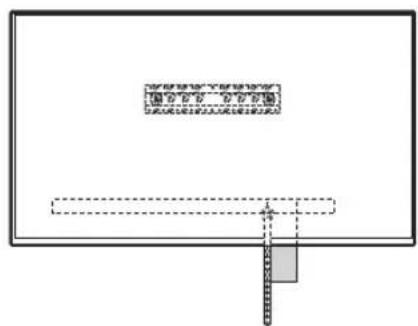
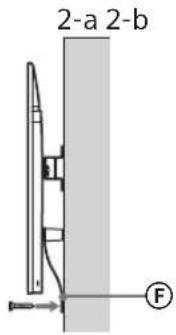
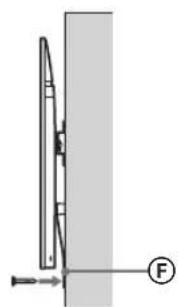
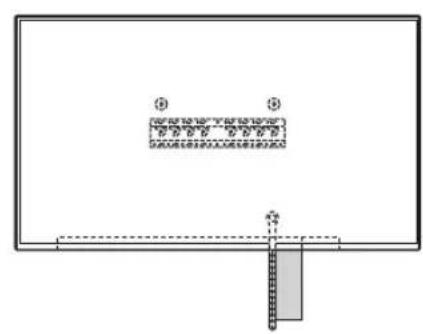
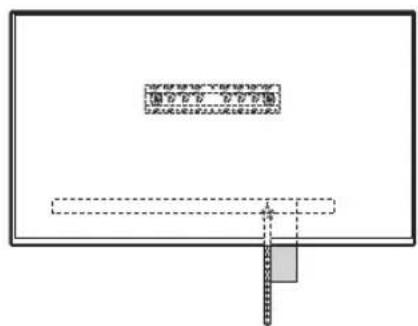
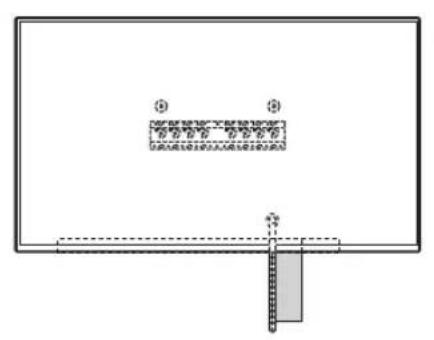
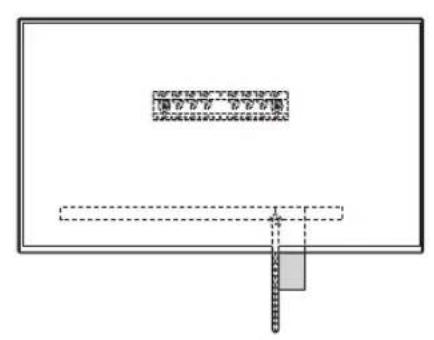
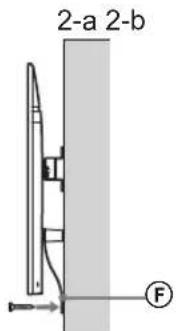
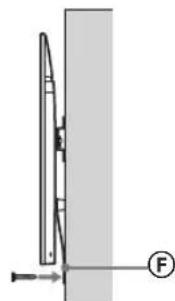
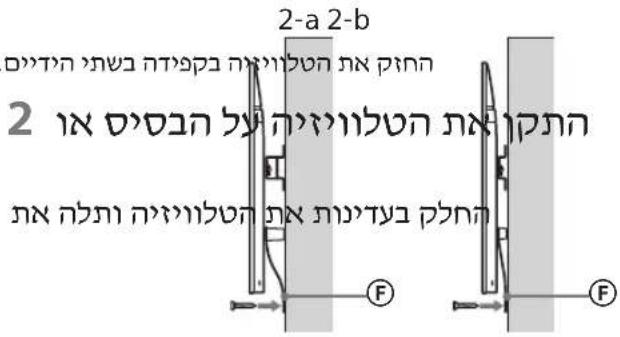
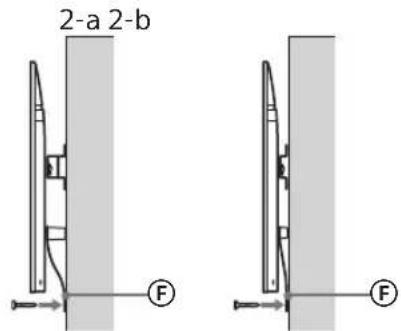
3 Preventing the bottom of the TV from shifting.
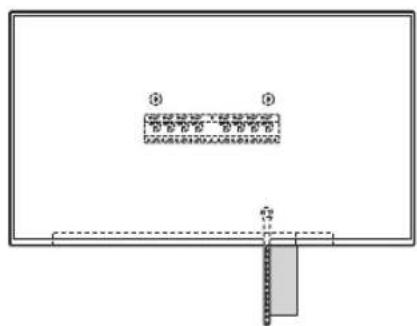
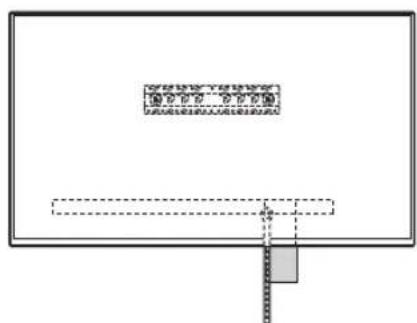
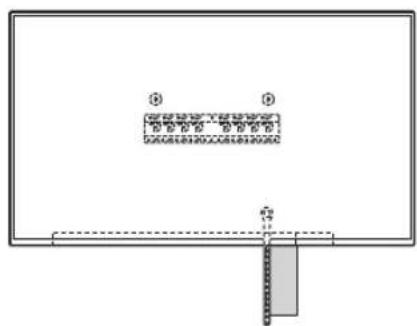
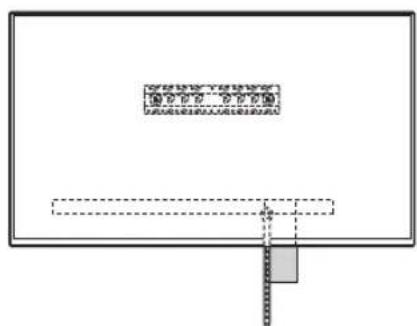
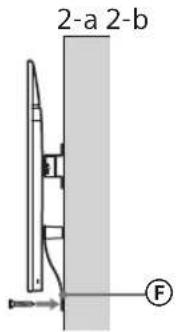
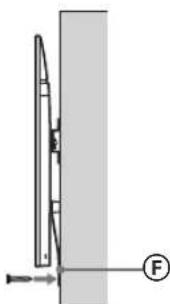
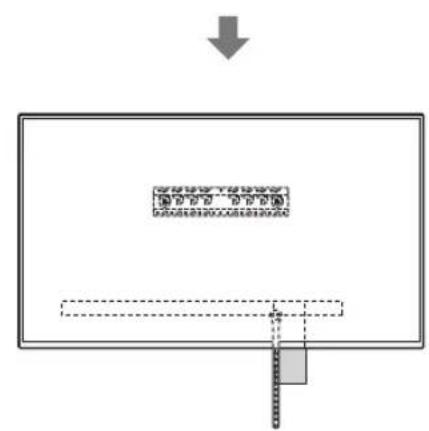
Take up the slack of Belt F and attach it to the wall tightly.
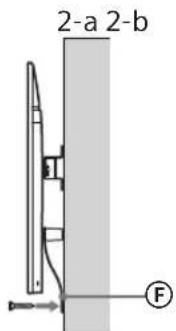
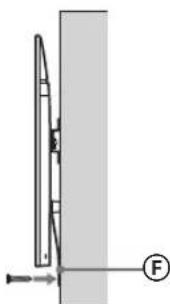
- Use a 5 mm diameter screw or equivalent (not supplied).
Note
Try to pull the bottom of the TV towards yourself slightly, to make sure that it does not move forward. If there is any movement, it is not fixed correctly, and the Belt should be secured firmly again.
KD-65/55XG87□□
KD-65/55XG85□
1 Lift the TV.
- For the location of the Pulleys to hang on the Base or Base Adaptor, refer to the table of step 3 in "Deciding on the installation location" on page 7. Make sure that the rear of the TV touches the Base or Base Adaptor when holding the TV.
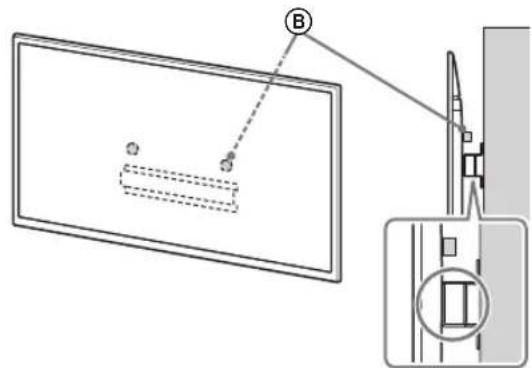
Note
- Hold the TV securely with both hands.
2 Install the TV onto the Base or Base Adaptor.
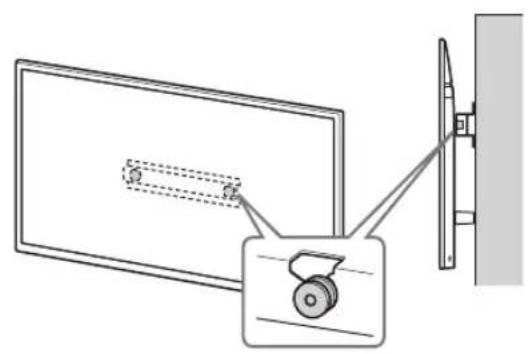
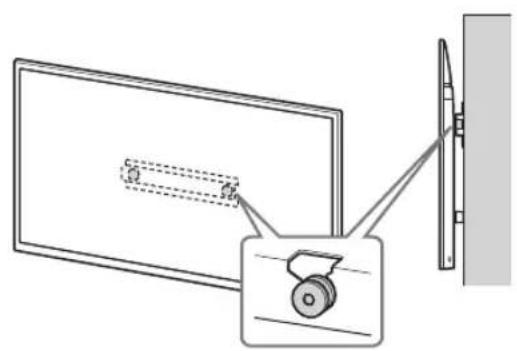
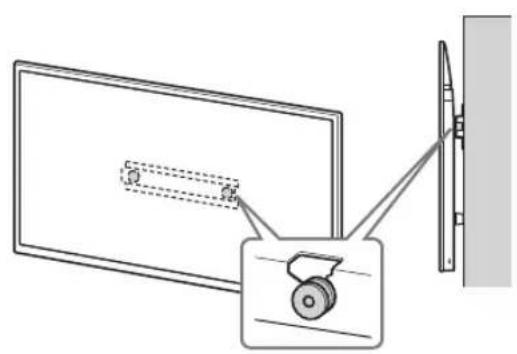
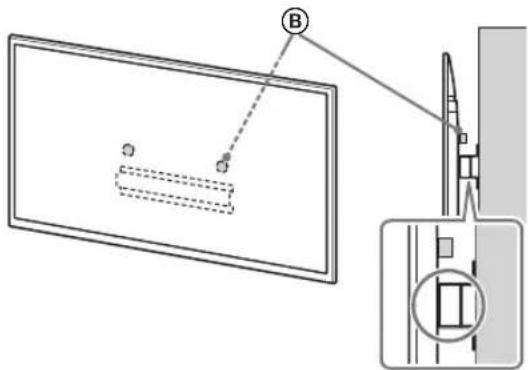
Gently slide down the TV and hang the Pulleys ⑧ attached to the rear of the TV to the Base or Base Adaptor, making sure to confirm the shape of the holes. After installing the TV on the wall, confirm the Pulleys ⑧ are firmly latched into the Base or Base Adaptor. - Release both hands slowly to ensure that the TV does not fall.
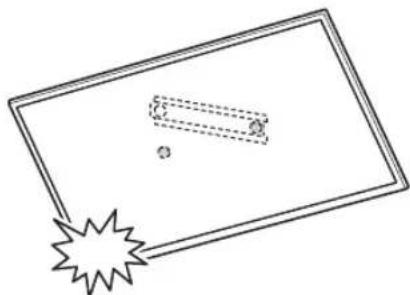
2-a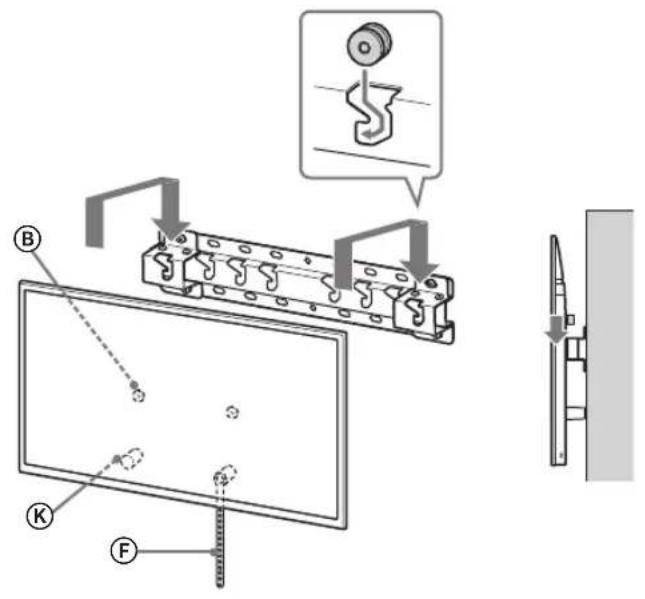
2-b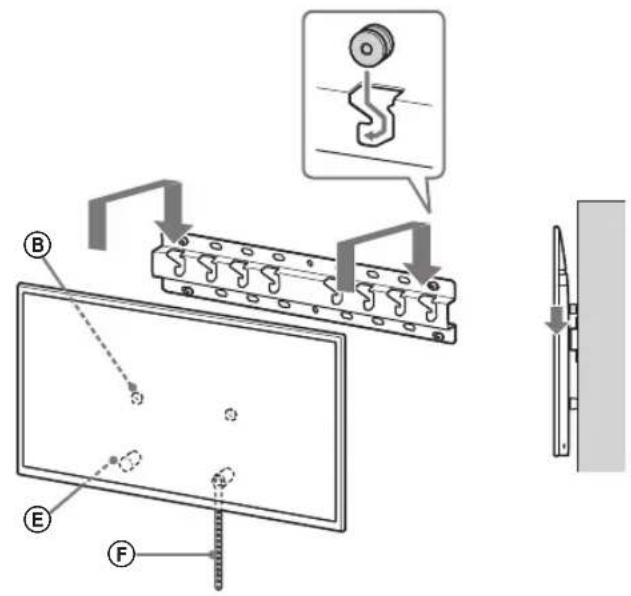
↓
↓
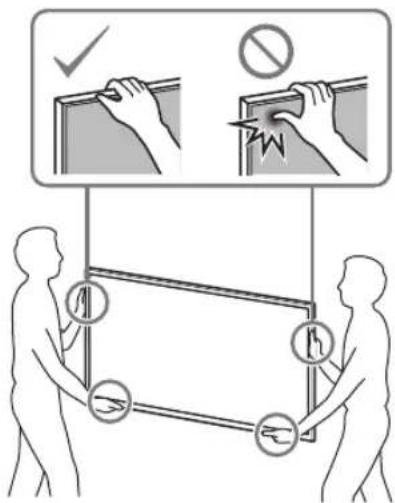
WARNING
- Be sure that two or more persons (three or more persons for 75 inches and above TV set) hold the TV when carrying it.
3 Preventing the bottom of the TV from shifting.
Take up the slack of Belt F and attach it to the wall tightly.
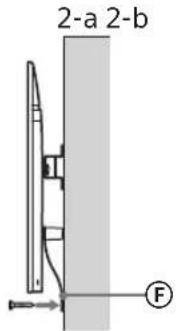
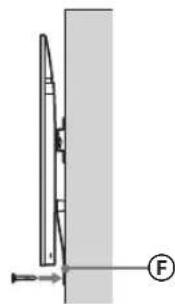
- Use a 5 mm diameter screw or equivalent (not supplied).
Note
Try to pull the bottom of the TV towards yourself slightly, to make sure that it does not move forward. If there is any movement, it is not fixed correctly, and the Belt should be secured firmly again.
Confirming the completion of the installation
Check the following points.
- The Pulleys (B) are firmly hung onto the Base or Base Adaptor.
- The cord and the cable are not twisted or pinched.
- The Belt (F) is tight with no slack.
WARNING
- Improper placement of the mains lead, etc. may cause fire or electric shock through a short circuit. Be sure to confirm the completion of the installation for safety.
Other information
When removing the TV, reverse the previous installation procedure.
WARNING
- Be sure that two or more persons (three or more persons for 75 inches and above TV set) hold the TV when removing it.
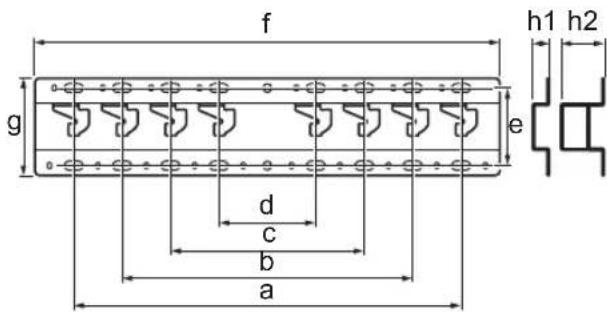
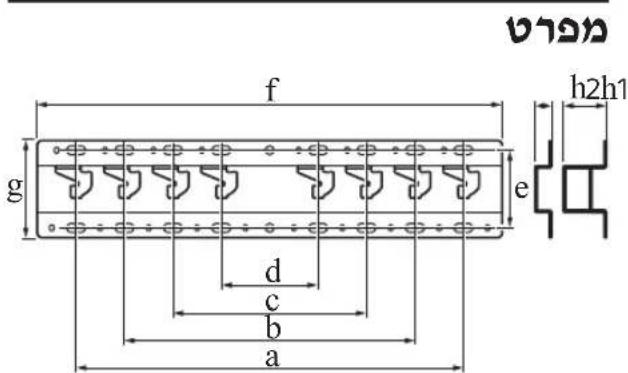
Specifications
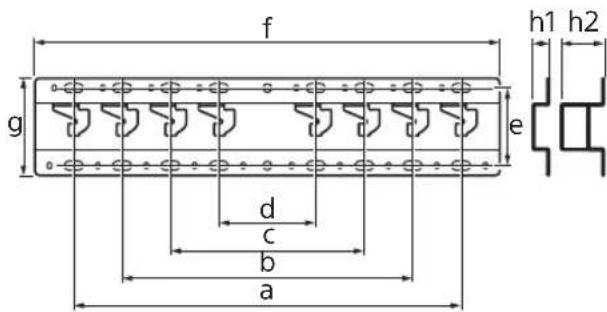
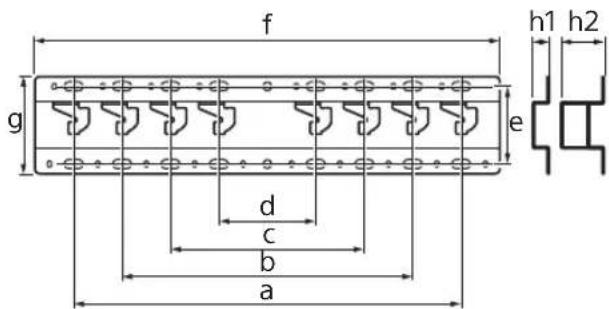
Dimensions: (Approx.) [mm]
a:400
b : 300
c:200
d:100
e:80
f:480
g: 100
h1: 20 (case 2-b)
h2: 60 (case 2-a)
Weight (base only): (Approx.) [kg]
0.8
Design and specifications are subject to change without notice.
Dimensions: (Approx.) [mm]
a: 400
b: 300
c: 200
d: 100
e: 80
f: 480
g: 100
h1: 20 (case 2-b)
h2: 60 (case 2-a)
Dimensions: (approx.) [mm]
a: 400
b: 300
c: 200
d: 100
e: 80
f: 480
g: 100
h1: 20 (case 2-b)
h2: 60 (case 2-a)
Weight (base only): (approx.) [kg]
0.8
Clearance hole for installation. 5
Inspection of parts 5
Find a location 6
Preparation for installation
1 Find the TV's location.
PpOeToIaOia yia tooTheTnO
- Na éxete ková Šaç tov Ośnyó avaφopac
- kal tov Ośnyó evkatáσtaonc tnc
- tnaεραonc πpiv ano tvv evkatáσtaon.
- Pniv ano tny tonotheon pfovtiote vα exete eva kaotαβiδi Phillips nou va taipiaεi otic βidec.
- Eπαληθεύστε τη θέση τοῦθέτησις της τηλεόρασκ. Etoiaote teoepic n nepioootepc bi8e c diapetpu 8 mm kai iia bi8a diapeptou 5mmniooovauan (ev npexovtai). EnlaTe bioc nou eiva kaataaennec yia to uliko kataaekunc tou toixou.
'EAeyxoc twv Eapntmuatwv
TuniktootheonAnEπtn tootheon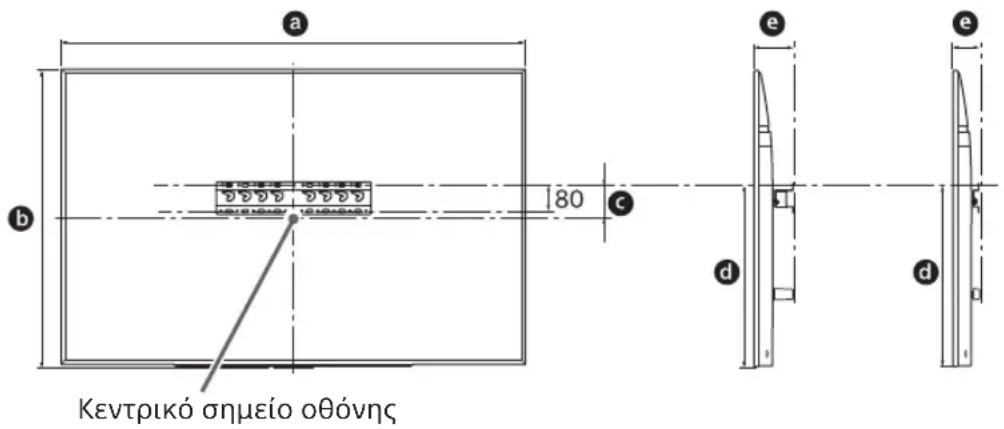
Movαδα: mm
Rozmery: (pribl.) [mm]
a:400
b : 300
c:200
d:100
e:80
f:480
q:100
h1:20 (case 2-b)
h2:60 (case 2-a)
Do not insert screws or other mounting elements into the TV.
If you do, the TV may fall and cause injury or damage to property.
Do not skip the wall-mount bracket parts for wall mounting.
If you do, the wall-mount bracket may fall and cause injury or damage to property.
Do not mount other equipment other than the specified product.
This wall-mount bracket is designed for use only with the specified product. If you mount equipment other than the specified one, it may fall or collapse and cause injury or damage to property.
Do not place the wall-mount bracket on any other product than this TV. Do not place the TV on the floor or on a slanted surface.
If you do, the TV may fall and cause injury or damage to property.
Place the unit on the television.
Do not attempt to lift or move the television, as it may fall and cause serious injury.
WARNING
If the safety precautions are not followed, damage or injury may occur.
Do not treat the product with excessive force during installation or removal.
Do not apply excessive force to the front part of the television. If you do, the television may fall and cause injury or damage to property.
Safety Precautions
If you use the television for a long time, the wall mount bracket may become hot. The wall behind it may also become discolored depending on the wall material. - If the wall mount bracket is removed from the wall after installation, screw holes will remain. Do not use the wall mount bracket in a location where it may be subjected to mechanical vibration.
Wall Mount Bracket Installation
For Sony dealers
WARNING
These instructions are intended only for Sony dealers. Read the safety precautions described above and pay special attention to safety during installation, maintenance, and inspection of the product.
Do not install the wall mount bracket on a wall surface where the bolts or the sides of the television protrude from the wall surface.
Do not install the wall mount bracket on a wall surface, such as a column, where the bolts or the sides of the television protrude from the wall surface. If an object or person falls or hits the side of the television, it may cause injury or damage to property.
Do not mount the television above or under an air conditioner.
If the television is placed in a location subject to continuous vibration from climate, it may cause electric shock or malfunction of the television.
Mount the wall mount bracket securely to the wall by following the instructions in this manual.
If any of the screws are loose or missing, the wall mount bracket may fall and cause damage or injury. Use appropriate screws for the wall material and mount the bracket securely using four or more screws with a diameter of 8 mm (or equivalent).
Use the correct screws and mounting parts as instructed in this manual. If you use replacement parts, the television may fall and cause personal injury or damage.
Make sure you install the bracket correctly by following the procedure described in this manual.
If any of the screws are loose or missing, the television may fall and cause personal injury or damage.
Tighten the screws securely in the indicated position.
If you do not do this, the television may fall and cause personal injury or damage.
Be careful not to hit the television during installation.
If the television is subjected to impact, it may fall and cause injury. This may lead to damage.
Mount the television on a wall that is perpendicular and flat.
If you do not do this, the television may fall and cause damage.
After correctly mounting the television, route the cables properly.
If people or objects get caught in the cables, it may cause damage or injury to the television.
Do not allow the power cord or connecting cable to be pinched.
If the cables are connected or the cables are connected between the structures, the TV may be damaged. If the cables are connected or the cables are connected with force, the internal wires may be damaged and the connection may cause an electric shock. This may cause a fire or electric shock.
The screws required for fixing the wall-mount bracket to the wall are not included in the package.
Use appropriate screws for the wall material and structure when mounting the wall-mount bracket.
Contents
Preparation for installation. 5
Checking the parts. 5
Determining the mounting location 6
Mounting the base on the wall 8
Preparation for mounting the TV...9
KD-85/75XG85□□, KD-75XG87□□
KD-65/55XG87□□, KD-65/55XG85□□.11
Mounting the TV on the wall.13
KD-85/75XG85□□, KD-75XG87□□.13
KD-65/55XG87□□, KD-65/55XG85□□.15
Checking the connection
MOHTaxa 18
Dpyra uHΦopMaun 18
Cneunphiauu.. 18
Mounting on a wall-mounted TV
Procedure for mounting different TV models.
Use the SU-WL450 wall-mount bracket to mount the TV on the wall.
Caution
Do not allow the supplied screws to be stored in a safe place, keeping them away from children.
Mounting procedure
The installation procedure for the TV must be completed before mounting. - Before starting, prepare a Phillips screwdriver that matches the screws. - Choose the mounting position for the TV. - Tighten the four M8 screws and one M5 screw or equivalent (not included). Select screws suitable for the wall material.
Selecting the mounting position
Supplied with SU-WL450
Check that all parts are present.
| A Oснова (20) (1) B Мakара (2) | |
| ◎ PSW 6x20 (4)◎ PSW 4x20 c Втулka (2) | |
| E Дистанционна Втулka (20) (2) | F Колан (1) |
| ◎Втулka (20) (M4) (2) | H PSW 4x20 (2) |
| ◎Aдантетер на Оснobата (2) | ◎J PSW 4x10 (8) |
| ◎Дистанционна Втулka (60) (2) | ◎L PSW 6x50 (2) |
| ◎Втулka (M4) (2)◎PSW 4x50 (2) | |
Determining the mounting location
1 Select the mounting location.
Be careful to leave enough space behind the TV for the stand to be able to support the weight, but do not place it too close to the wall. See the special instructions for mounting the TV on the wall. See the TV's user manual regarding its weight.
Standard mount Tension mount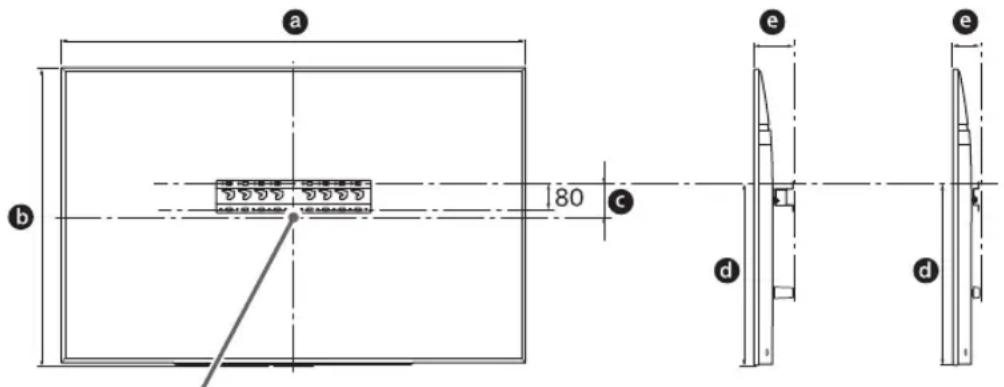
Unit: mm
| Иme на морел | Размери на ekранa | Размер на цentьра на ekранa | Дылжина на моHTах | |||
| a | b | c | d | e | ||
| Стоцартын MOHTах | Teсен MOHTах | |||||
| KD-85XG85□□ | 1909 | 1 097 | 251 | 803 | 142 | 100 |
| KD-75XG87□□ KD-75XG85□□ | 1673 | 963 | 107 | 595 | 116 | |
| KD-65XG87□ KD-65XG85□□ | 1450 | 836 | 99 | 523 | 115 | 73 |
| KD-55XG87□ KD-55XG85□□ | 1231 | 713 | 106 | 468 | 115 | 73 |
Caution
- The values in the table may vary slightly depending on the mounting method. When your TV is mounted on the wall, its top part may tilt forward slightly.
Leave an appropriate distance between the TV, the wall, and the protruding parts of the wall, as shown below.
Unit: mm
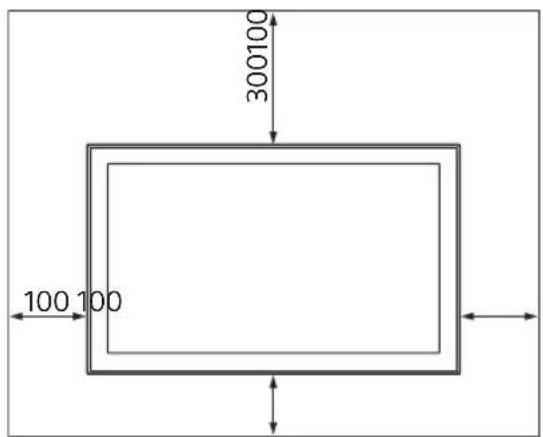
To ensure proper ventilation and prevent dust accumulation, maintain the following clearances:
Do not place the TV on a flat surface on its side, do not mount it upside down, or on its side. Do not place the TV on top of radiators, heaters, or stoves. Do not cover the TV with cloth, such as a curtain, or with objects like vests, etc. Do not mount the TV as shown below.
Air circulation is blocked.
Caution
If you intend to route the cables through the wall, make an opening in the wall to pass the cables before starting the installation. To prevent the cables from being pinched, make the opening in the wall outside the perimeter of the base (20) A, then the base (1) and the mounting bracket (20) E, and the mounting bracket (60) K.
2 Select the wall mount. The distance from the back of the TV to the wall can be selected as shown below.
2-a Standard mount 2-b Tension mount
See the table from link 1.
If you have selected 2-b, proceed to step 3.
2-a 2-b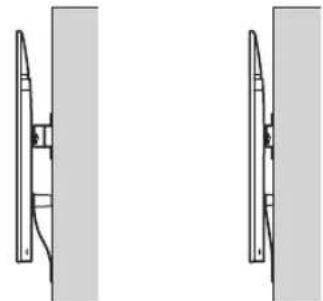
See the table below for the position of the adapter for the base. If you have selected 2-b, skip this step.
| Име на мodyел Мecтоноожени На Кукatinga | |
| KD-85XG85□□ | |
| KD-75XG87□□ | a |
| KD-75XG85□□ | |
| KD-65XG87□□ | |
| KD-65XG85□□ | b |
| KD-55XG87□□ | |
| KD-55XG85□□ | |
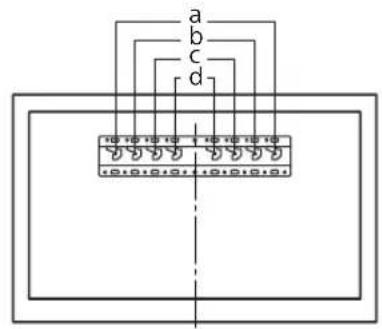
Mount the adapter to the base ① using the screw (PSW 4x10) to the base (20) A, if you have selected 2-a.
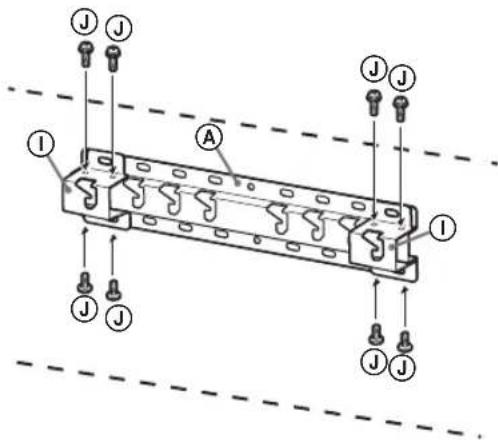
Determine the positions of the screws for mounting the base (20) A.
See the specifications on page 18.
When you select 2-a, use the special holes for the adapter on the base ①.
The wall on which the TV will be mounted must be able to support at least four times the weight of the TV (see the TV's reference manual regarding its weight).
- Determine the strength of the wall on which the TV will be mounted. If necessary, reinforce the wall sufficiently.
Mounting the base on the wall
- Use four or more screws with a diameter of 8 mm or equivalent (not supplied). Secure the four screws in the holes of the adapter on the base ① with the base (20) A (only 2-a).
- Mount the base (20) A horizontally on the wall.
Preparation for mounting the TV
Installation and setup guide.
KD-85/75XG85□□, KD-75XG87□□
1 Select the mounting location on the wall.
- Use the supplied screws (not included in the kit) to select the location of the TV, close to the base of the stand. See the following table.
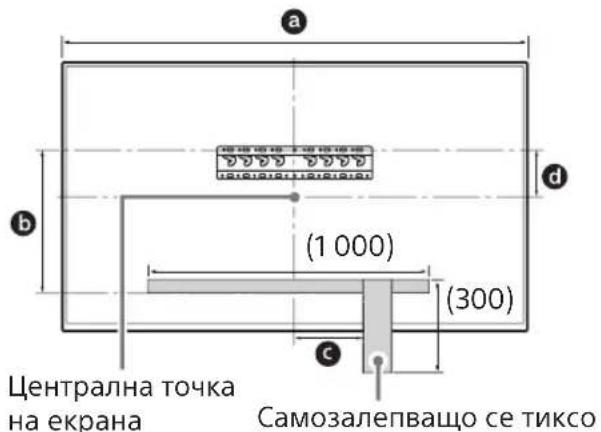
| Мернейнци: mm | ||
| Име на м odeл | Дыжина 3a otбелязвае | Размер на центьра на ekранa |
| a b c d | ||
| KD-85XG85□□ | 1909 683 200 251 | |
| KD-75XG87□□ | 1673 468 200 107 | |
| KD-75XG85□□ | ||
2 Remove the screws from the rear of the TV.
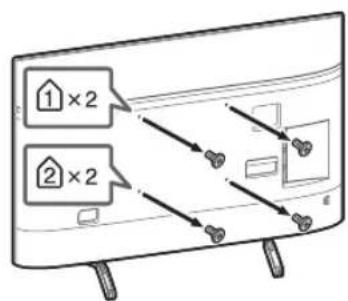
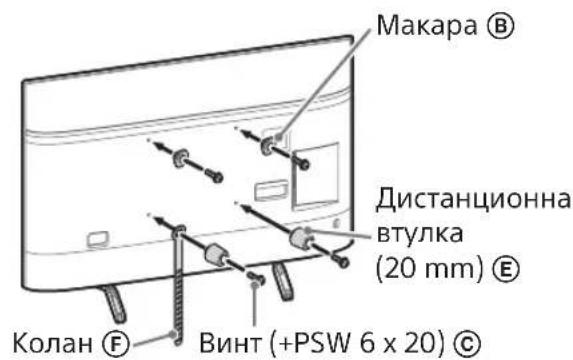
3 Attach the wall-mount brackets. Check the attachment by comparing with "Supplied with SU-WL450" in "Checking the parts" on page 5.
Note
Attach the brackets with the screws. When using an electric screwdriver, set the torque to approximately 1.5 N·m {15 kgf·cm}. Store the unused parts in a safe place for future use. Keep this manual for future reference.
Standard mounting (2-a)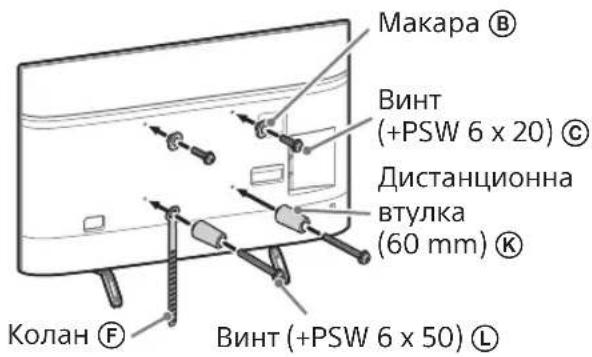
Thin mounting (2-b)
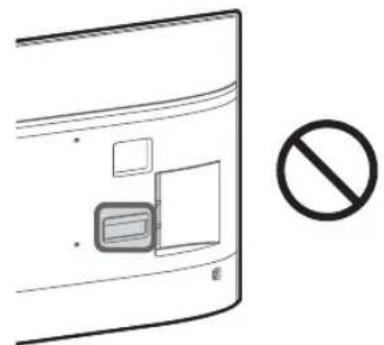
Note
When using this mounting style, you can use the terminals on the back of the TV.
4 Connect the necessary cables to the TV.
Make sure you have connected the cables before mounting the TV on the wall. You can connect them after the TV is mounted. See the manual supplied with your TV.
Note
Drill the cable holes in the wall and install the anchors. - Pull the cables out of the pre-installed wall to avoid stepping on them.
5 Remove the TV stand.
- Remove the other side of the stand. Carefully lift the stand and hold it steady with both hands until the screws are fully tightened to the TV.
KD-85XG85□□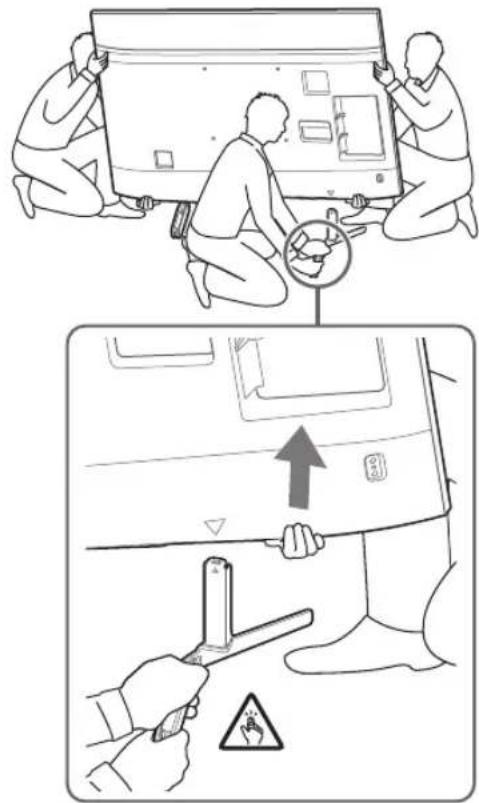
KD-75XG87□□,KD-75XG85□□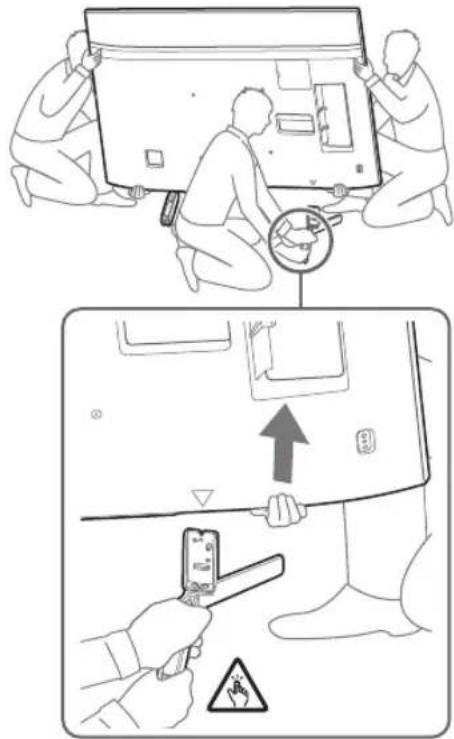
- Repeat the same procedure to remove the other side of the stand.
Caution
When removing the TV stand, be careful not to apply excessive force, as the TV may fall and cause personal injury or damage to the TV itself. - Be careful when working with the TV stand to avoid damage to the TV. Be careful when lifting the TV, as the stand is not secured and may slip and cause injury. Be careful when moving the TV stand to prevent it from falling and damaging the surface on which the TV stands.
KD-65/55XG87□□,
KD-65/55XG85□
1 Remove the screws from the rear of the TV.
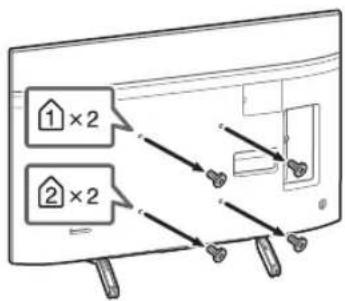
2 Attach the wall mount brackets to the TV. Check the brackets by comparing them with "Supplied with SU-WL450" in "Checking the parts" on page 5.
Caution
Secure the brackets with the screws. When using an electric screwdriver, set the torque to approximately 1.5 N·m {15 kgf·cm}. - Store the screws and parts safely for future use. Keep the manual for future reference.
Standard mounting (2-a)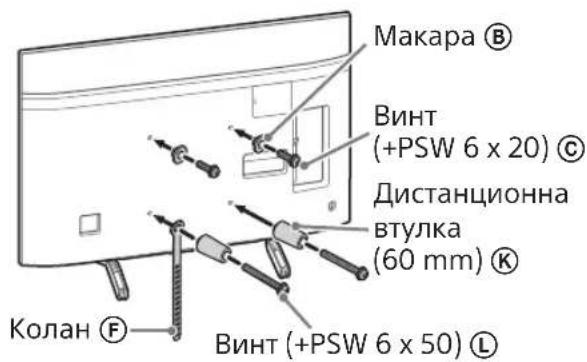
TV installation (2-b)
Note
When using the installation stand, you can use the terminals on the back of the TV.
Connect the necessary cables to the TV.
Make sure you have connected the cables before mounting the TV on the wall. You can connect them after the TV is mounted. See the manual supplied with your TV.
Note
Pull the cables through the wall or use cable guides. - Do not connect the cables before mounting to the wall, so that you do not step on them.
4 Attach the table-top stand to the TV.
- Remove one side of the table-top stand. Insert the stand into the TV until it clicks into place, while holding the TV.
Repeat the procedure to attach the other side of the table-top stand.
Note
The installation of the table-top stand should be carried out by two or more people. Be careful not to apply excessive force when attaching the table-top stand to the TV, as the TV may fall and cause personal injury or damage to the TV itself. - Be careful when working with the table-top stand to avoid damage to the TV. Be careful when lifting the TV, as the table-top stand is not secured and may come off and cause injury. Be careful when moving the table-top stand away from the TV to prevent damage to the surface on which the TV stands.
Mounting the TV on the wall
KD-85/75XG85□□,KD-75XG87□□
1 Lift the TV.
3. Mount the bracket ⑧ to the base of the stand for the base, insert the tab into the slot with "Determining the mounting location" on page 7. - Make sure that the side of the TV marked with the base of the stand for the base is facing up when you lift the TV.
Caution
- Hold the TV with both hands. Make sure that the holes on the side of the TV are aligned with the self-tapping screws. The tilt of the TV, which is in front of the TV, should be adjusted to stop, to adjust the tilt.
Be careful when mounting the TV to the wall, especially for the person who holds it from the front, because the TV may fall and cause serious injury or death.
2. Mount the TV onto the base of the stand for the base.
Carefully lift the TV and insert the brackets ⑧, attaching them to the side of the TV, to the base of the stand for the base, checking the shape of the opening. After mounting the TV, check that the brackets ⑧ are securely attached to the base of the stand for the base. Also tighten the two screws to ensure that the TV does not fall.
After mounting the TV to the wall, remove the self-tapping screws from the wall.
2-a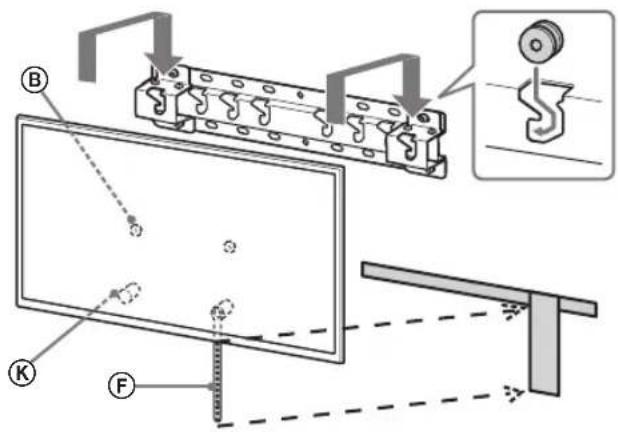
↓
↓
↓
2-b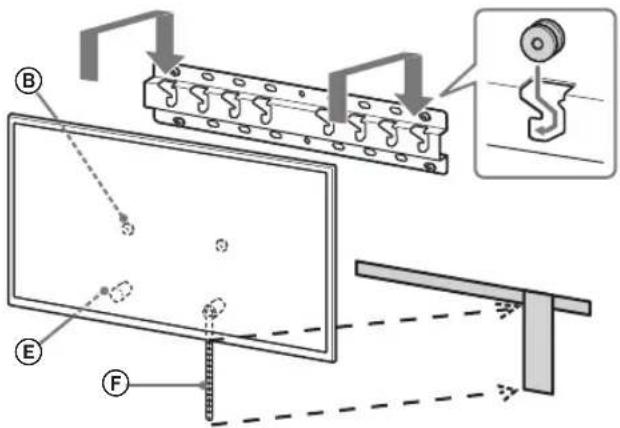
↓
↓
↓
- Make sure the TV is held by two people (or by more people for TV sets with screen sizes from 75 inches) when carrying it.
2 Mount the TV onto the base stand.
Carefully place the TV on a flat surface and insert the brackets B, securing them to the back of the TV, onto the base stand. Check the format of the opening. After placing the TV, check that brackets B are properly secured to the base stand. - Important: Pull and push the TV to ensure it is stable.
2-a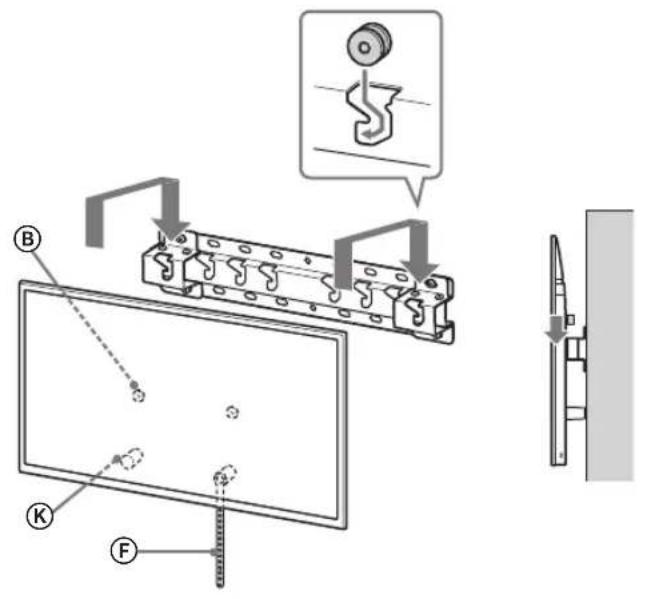
2-b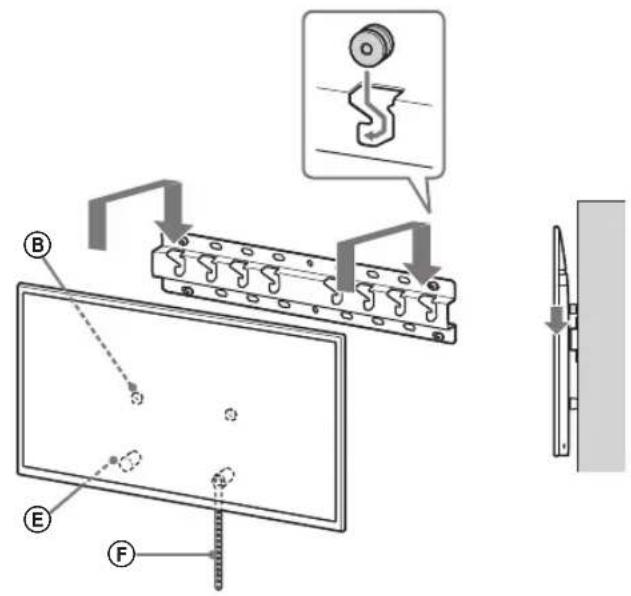
↓
↓
- Make sure the TV is held by two people (or by more people for TV sets with screen sizes from 75 inches) when carrying it.
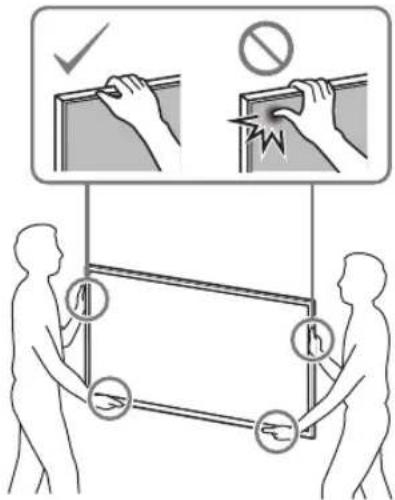
3 Adjustment
Adjusting the height of the TV.
- Select the detached part of the stand and attach it to the wall.
- Use a screw with a diameter of 5 mm or equivalent (not included in the kit).
Care
Place the TV on the base and make sure it is not tilted. If it tilts, it is not attached correctly and the TV should be reattached securely.
Checking the
Supported models:
KD-85XG85□□*/75XG87□□*/75XG85□□*/65XG87□□*/ 65XG85□□*/55XG87□□*/55XG85□□*
* In actual model names, the "□□" denotes digits or symbols specific to each model.
To customers
To ensure the safety of the product and for safety reasons, Sony Corporation strongly recommends that you have the TV installed only by Sony dealers or licensed contractors. Do not attempt to install it yourself.
To Sony dealers and contractors
Pay special attention to safety during installation, periodic maintenance, and inspection of this product.
Proper installation of this product requires sufficient experience, especially in determining whether the wall can support the weight of the TV. Be sure to have this product installed on the wall by Sony dealers or licensed contractors, and strictly follow the safety instructions when performing installation work. Sony Corporation is not responsible for any damage or injury caused by improper handling or incorrect installation of this product.
Do not allow children to play near the TV. Keep small parts out of the reach of children to prevent them from accidentally swallowing them.
For moving or removing the TV, be sure to contact licensed contractors.
If transportation or removal of the TV is performed by unlicensed contractors, it may cause injury or damage to property. Make sure that the TV is carried or removed by two or more people (three or more people for TVs with a 75-inch screen or larger).
After installing the TV, do not remove the screws, etc.
Otherwise, the TV may fall and cause injury or damage to property.
Install the wall-mount bracket securely to the wall.
Otherwise, the wall-mount bracket may fall and cause personal injury or property damage.
Do not install any other equipment on the bracket other than that specified.
This wall-mount bracket is intended for use only with the specified products. If you install equipment not intended for this mount, it may fall and cause personal injury or property damage.
To avoid overloading the wall-mount bracket, do not place anything on it other than the TV. Do not move the TV left/right or up/down.
Otherwise, the TV may fall and cause personal injury or property damage.
Do not lean on the TV or hold onto it.
Do not lean on the TV or hold onto it, as it may fall and cause serious injury.
WARNING
Follow these precautions. There is a risk of injury or property damage.
Care must be taken to avoid excessive force.
Do not overload the top of the TV. Otherwise, the TV may fall and cause personal injury or property damage.
Precautions
If the TV mounted on the wall-mount bracket is used in a confined space, depending on the wall material, the wall behind or below may become stained. After removing the wall-mount bracket, holes will remain in the wall. Do not use the wall-mount bracket in places with mechanical vibrations.
Do not install the wall-mount bracket on walls where the TV edges will protrude beyond the wall edges.
Install the wall mount on wall surfaces (e.g., on columns) where the edges of the TV will protrude beyond the edge of the wall surface. Hooking onto the protruding edges of the TV may cause injury or property damage.
Do not install the TV with the stand.
If the TV is exposed to condensation or airflow from an air conditioner for a long period of time, it may cause a fire, electric shock, or malfunction of the TV.
Be sure to securely attach the wall mount to the wall, following the instructions in this manual.
If any of the screws are loose or missing, the wall mount may fall and cause injury or property damage. When performing installation, be sure to use screws that match the wall material, securely install the device, using no less than four 8 mm screws (or equivalent).
Be sure to use the screws and parts included in the kit for mounting and strictly follow the instructions in this installation manual. If other mounting materials are used, the TV may fall and be damaged or cause injury.
Be sure to perform the assembly of the bracket, exactly following the instructions in this installation manual.
If any of the screws are loose or missing, the TV may fall and be damaged or cause injury.
Securely tighten the screws into the designated mounting holes.
Otherwise, the TV may fall and be damaged or cause injury.
Make sure that the TV is not subjected to impacts during installation.
Impacts may cause the TV to fall and be damaged. This may result in injury.
Install the TV on a wall only if it is flat and perpendicular to the floor.
Otherwise, the TV may fall and cause injury.
After installing the TV, ensure that cables are arranged safely.
Cables and objects that may obstruct the path can become a cause of serious injury or damage to the TV.
Do not allow the power cord or connecting cables to become tangled.
If the power cord or connecting cables are caught between the device and the wall, or are bent or pinched, the insulation of the internal wires may be damaged, which can cause a short circuit or break. This can lead to a fire or electric shock.
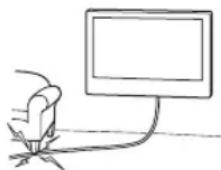
Screws for mounting the bracket to the wall are not included in the delivery set.
When mounting the bracket for wall installation, use screws that match the material and structure of the wall.
The product should be stored in its cardboard packaging in a dark, dry, clean, and well-ventilated room, away from direct sunlight. Storage temperature: from -20°C to +60°C. Storage humidity: <80%.
Contents
Preparation for installation. 6
Checking the delivery set 6
Determining the installation method 7
Wall-mounted installation 9
Preparation for TV installation...10
KD-85/75XG85□□,KD-75XG87□□ 10
KD-65/55XG87□□,KD-65/55XG85□□.12
TV wall installation.14
KD-85/75XG85□□, KD-75XG87□□ 14
KD-65/55XG87□□, KD-65/55XG85□□ 16
Checking the installation 19
Proforma 19
Technical characteristics 19
Use the bracket for wall mounting SU-WL450 or for mounting the TV on the wall.
Application
Store the supplied screws in a safe place out of the reach of children.
- Determine the strength of the wall on which the TV will be installed. If necessary, reinforce the wall.
Installing the base on the wall
- Use four or more screws with a diameter of 8 mm or equivalent (not included in the delivery). Insert four screws into the holes of the base's center (①), attach it to the base (20) A (only 2-a).
- Install the base (20) A horizontally on the wall.
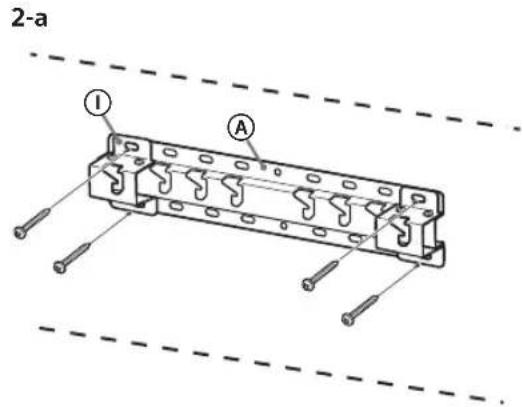
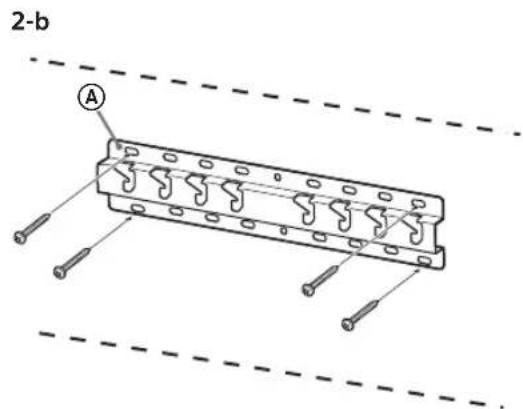
1 Mark the installation location on the wall.
- Use adhesive tape (not included) to mark the location of the TV next to the base or base adapter. See the following table.
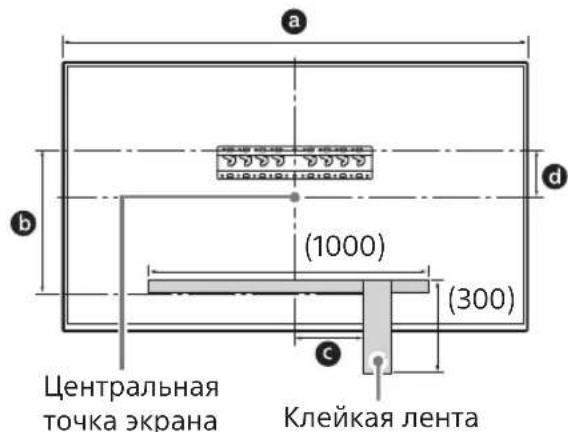
Unit of measurement: mm
- Remove the tabletop stand. Hold the tabletop stand firmly with both hands while other people lift the TV.
KD-85XG85□□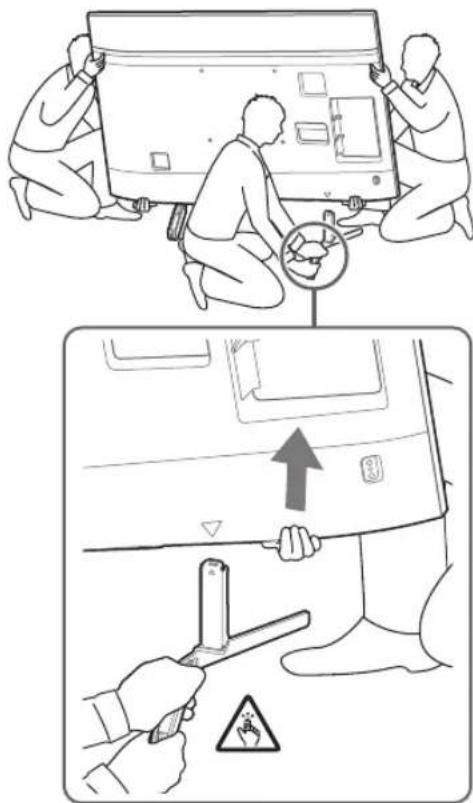
KD-75XG87□□, KD-75XG85□□
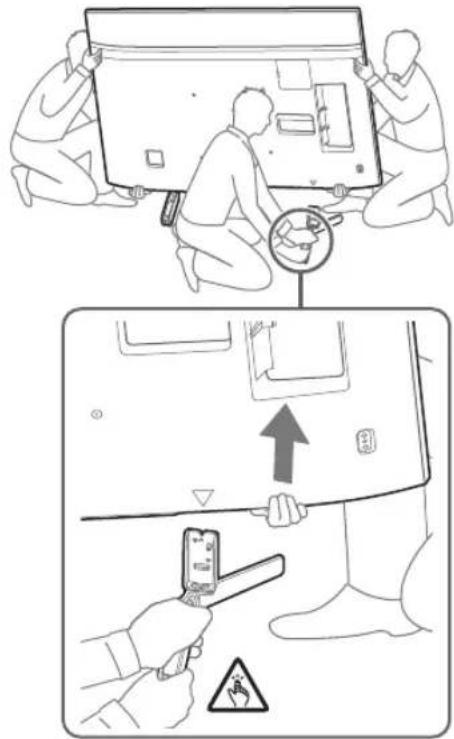
- Repeat the instruction and remove the other side of the tabletop stand.
Note
- Disconnecting the tabletop stand requires at least two people. - Be careful not to use excessive force when disconnecting the tabletop stand from the TV, as this may cause the TV to fall and result in injury or damage to the TV. - Be careful when handling the tabletop stand to prevent damage to the TV. - Be careful when lifting the TV, as the tabletop stand may detach and fall, which could cause injury. - Be careful when disconnecting the tabletop stand from the TV to avoid tipping over the device and damaging the surface on which the TV is placed.
KD-65/55XG87□□
KD-65/55XG85□
1. Remove the screws from the rear panel of the TV.
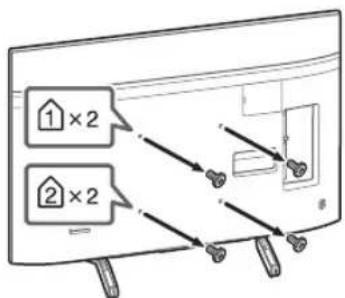
2. Attach the mounting brackets to the tabletop stand. Perform the check of the mounting brackets according to the section "SU-WL450" in the "Checking the accessories" section on page 6.
Note
- Tighten the mounting brackets securely with screws. - When using an electric screwdriver, set the tightening torque to approximately 1.5 N·m {15 kgf·cm}. Keep the used and unused parts in a safe place for future use. Retain this instruction manual for future reference.
Standard mounting (2-a)
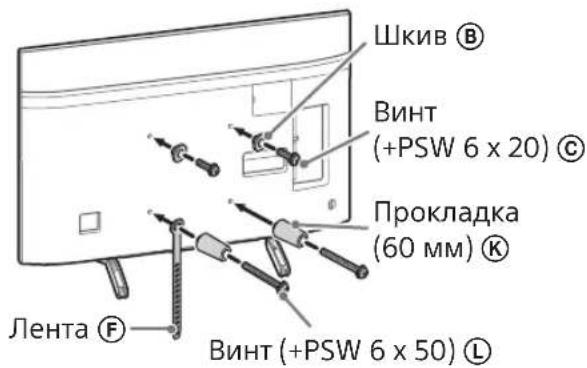
Compact installation (2-b)
Note
In such an installation, some connectors on the rear panel of the TV may be inaccessible.
Connect the necessary cables to the TV.
Before installing the TV on the wall, be sure to connect the cables.
After installing the TV, cable connection will become impossible.
See the instruction manual supplied with the TV.
Note
For cable routing, use the wall of the specified order. When mounting the device on the wall, connect the connector cables so that they are not accidentally stepped on.
Disconnect the table-top stand from the TV.
- Remove the side of the table-top stand alternately. Firmly hold the table-top stand with both hands while others lift the TV.
- Repeat the specified action and remove the other side of the table-top stand.
Note
To disconnect the table-top stand, three or more people are required. Be careful not to use excessive force when disconnecting the table-top stand from the TV, as this may cause the TV to fall and result in injury to someone or damage to the TV. Be careful when handling the table-top stand to prevent damage to the TV. Be careful when lifting the TV, as the table-top stand may detach and fall, which could cause injury. Be careful when disconnecting the table-top stand from the TV to avoid dropping the device and damaging the surface on which the TV is placed.
Wall mounting the TV
KD-85/75XG85□□, KD-75XG87□□
1. Lift the TV.
The location of the hooks on the wall for mounting the base or the base adapter is shown in Table 3 in the section "Determining the location for installation" on page 8. - Make sure that the TV's rear panel is in contact with the base or the base adapter when holding the TV.
Application
- Hold the TV with both hands and make sure that the tape and the bottom part of the TV are aligned with the center of the wall.
- The TV must be carried by three people. The person in front of the TV should guide the others to place the TV in the proper position.
- When installing the TV on the wall, be careful, especially the person holding the TV from below, as it may fall and cause serious injury or even death.
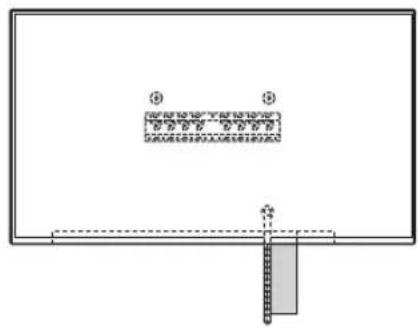
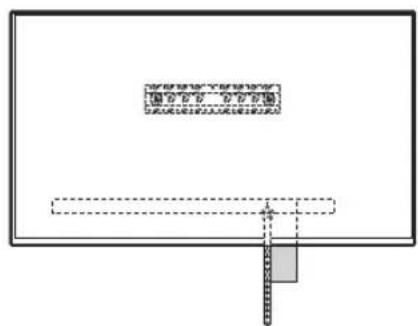
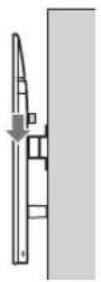
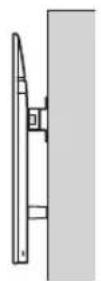
2 Install the TV on the base or the base adapter.
- Carefully lower the TV and hang the hooks (B) installed on the rear panel of the monitor onto the base or the base adapter, following the shape of the holes.
- After installing the TV on the wall, make sure that the hooks are securely fastened to the base or the base adapter.
- Slowly remove both hands and make sure that the TV is securely installed.
- After installing the TV on the wall, remove the tape and any other materials from the wall.
2-a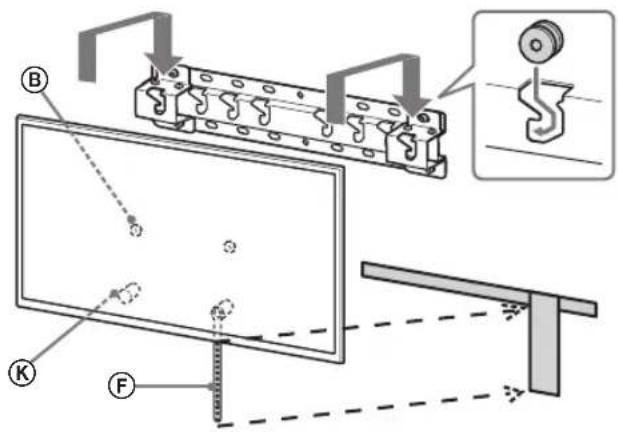
↓
↓
↓
2-b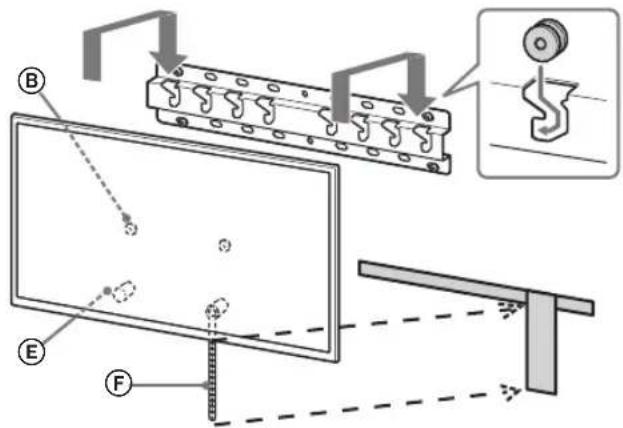
RU
↓
↓
↓
PNEyIpyEKdEHNE
- Ensure that the TV is held by two or more people (three or more people for TVs with a 75-inch screen or larger) when carrying it.
To prevent the TV from tipping over.
- Remove the belt and securely attach it to the wall.
- Use a screw with a diameter of 5 mm or its equivalent (not supplied).
Note
Gently tilt the bottom of the TV toward you to make sure it does not tip forward. If there is a slight tilt, the TV is not securely fastened, and the belt should be secured more firmly.
KD-65/55XG87□□,KD-65/55XG85□□
Lift the TV.
The location of the screws for attaching the base or base adapter is shown in the table in step 3 in the section "Determining the installation location" on page 8. - Make sure that the rear panel of the TV is in contact with the base or base adapter when holding the TV.
Note
- Do not use force.
2 Install the TV on the base of the floor stand.
- Carefully lower the TV and hook the brackets (8, installed on the back and front of the monitor) onto the base of the floor stand, following the shape of the holes.
- After installing the TV on the wall, make sure that the brackets ⑧ are securely fixed in the base of the floor stand. Slowly remove your hands and make sure the TV is securely installed.
2-a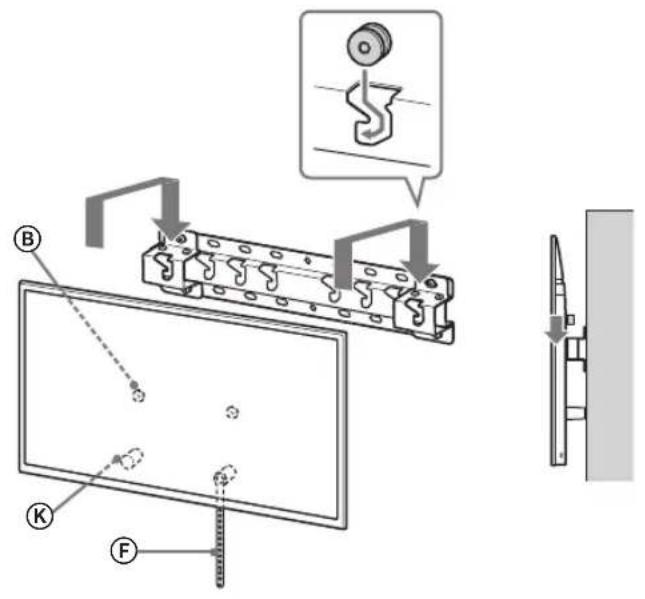
2-b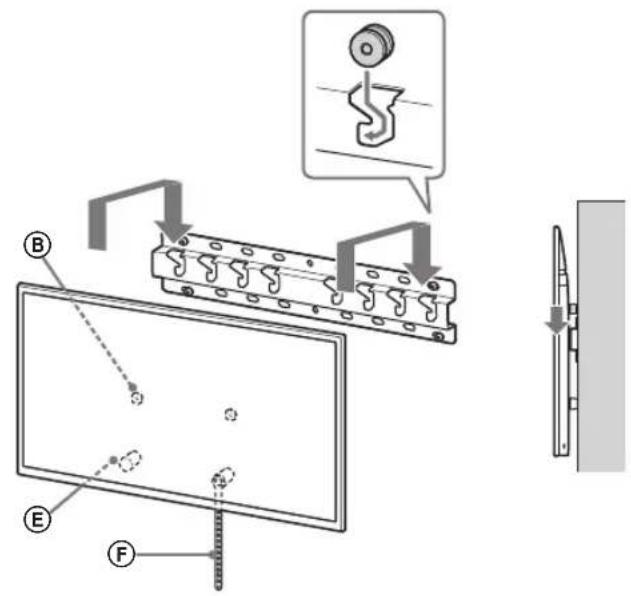
↓
↓
RU
WARNING
- Make sure that the TV is held by two or more people (three or more people for TVs with a screen size of 75 inches or more) when moving it.
3 Preventing the lower part of the TV from shifting.
- Remove the strap F and securely attach it to the wall.
- Use a screw with a diameter of 5 mm or equivalent (not supplied).
Note
Place the TV on a stable surface to ensure it does not move forward. If there is a slight incline, the TV may not be secured properly, and the F strap should be secured more firmly.
- The straps ⑧ are securely attached to the base or the base adapter.
- The cords and cables are not twisted or tangled.
- The F strap is securely attached without slack.
WARNING
- Incorrect placement of cables, straps, etc., can lead to fire or electric shock due to a short circuit. To ensure safety, make sure all installation steps are completed.
Initial Information
To remove the TV, perform the procedure described above in reverse order.
CAUTION
Make sure that the monitor is held by two or more people (three or more people for TVs with a diagonal of 75 inches or more) when removing it.
Technical Specifications
Dimensions: (approx.) [mm]
Do not unscrew the screws, as the TV mounting may be affected.
If you do, the TV could fall and cause serious injury or damage.
Do not remove parts of the bracket for partial mounting.
If this is done, the bracket for wall mounting may fall and cause serious injury or damage.
Do not install any other devices other than the specified product.
The bracket for wall mounting is intended for use only with the specified product. If other devices are installed, they may fall and cause serious injury or damage.
Do not use the bracket for wall mounting for purposes other than mounting the TV. Do not tilt the TV up/down or left/right.
If this is done, the TV may fall and cause serious injury or damage.
Do not lean on the TV or hang on it.
Do not lean on the TV or hang on it, as it may fall on you and cause serious injury.
WARNING
If the following safety precautions are not observed, this may cause serious injury or damage.
When cleaning or servicing the product, do not apply excessive force to it.
Do not apply excessive force to the top of the TV. If this is done, the TV may fall and cause serious injury or damage.
Safety Precautions
If the TV, installed with the bracket for wall mounting, will be used for a long time, depending on the material of the wall covering, the wall surface behind the TV or the wall may discolor or the wallpaper may peel off.
When installing the bracket for wall mounting, if it is not installed securely to the wall, holes for screws may remain in the wall. Do not use the bracket for wall mounting in places where mechanical vibration occurs.
Installing the bracket for wall mounting
Sony wall mount bracket
WARNING
Read these instructions carefully before using this Sony product. Please read the safety precautions described below and pay special attention to safety during installation, maintenance, and inspection of this product.
Do not install the bracket for wall mounting on a wall where the sides of the TV protrude beyond the wall surface.
Do not install the bracket for wall mounting on surfaces such as columns, because the left and right edges of the product may protrude beyond the wall surface. If a protruding object hits the side of the TV that extends beyond the wall, it may cause injury or damage.
Do not install the TV on a stand with a monitor.
If the TV is exposed to water, moisture, or steam from a monitor for a long time, it may cause damage, electric shock, or malfunction of the TV.
Install the bracket for wall mounting securely to the wall according to the instructions in this manual.
If the screws are loose or fall out, the bracket for wall mounting may fall and cause injury or damage. The screws must match the material of the wall. To ensure secure installation, use anchor bolts with screws of 8 mm diameter (or equivalent).
Use the screws supplied with the product and tighten them securely according to the instructions in this manual. Using other screws may cause the TV to fall and be damaged or cause injury to people.
Assemble the bracket securely, following the procedure described in this manual.
If the screws are loose or fall out, the TV may fall and cause injury or damage.
Tighten the screws securely in the specified position.
If not tightened, the TV may fall and cause injury or damage.
After mounting the bracket for wall mounting, use screws appropriate for the structure and material of the wall.
Storage: cardboard boxes, in a dark, dry, clean place with good ventilation, separately from acids and alkalis. Storage temperature: from -20°C to +60°C. Storage humidity: <80%.
Contents
Preparation for installation 5
Checking the parts. 5
Identifying the installation location. 6
Installing the TV on the wall 8
Preparing for TV installation......9 KD-85/75XG85□□, KD-75XG87□□ KD-65/55XG87□□, KD-65/55XG85□□ 11
Installing the TV on the wall. 13 KD-85/75XG85□□, KD-75XG87□□ 13 KD-65/55XG87□□, KD-65/55XG85□□ 15
Checking after installation is complete 18 Additional information 18
Technical specifications 18
Installing the TV on the wall
The installation procedure depends on the TV model.
To install the TV on the wall, use the wall-mount bracket SU-WL450.
Note
Keep the remote control away from the TV.
Preparation for
installation
- Before installation, please read the TV manual and installation guide carefully. Before assembling, make sure you have the appropriate screwdriver for the screws.
- Check the installation position of the TV. The wall must be flat and able to support at least four times the weight of the TV. Use screws with a diameter of 8 mm and one screw with a diameter of 5 mm or equivalent (not included in the package). Choose screws according to the material of the wall.
Checking the parts
Supplied with SU-WL450
- Check that all parts are included in the package.
| AБаза(20)(1)ВШК | В(2) |
| CГВИNTPSW6x20(4) | DГВИNTPSW4x20i3Втулков(2) |
| EПрокадka(20)(2) | FРемиь(1) |
| GВтулka(20)(M4)(2) | HГВИNTPSW4x20(2) |
| IПерекдддддддддддддддддддддддддддддддддддддддддддддддддддддддддддддддддддддддддддддддддддддддддддддддддддд徳баши(2) | JГВИNTPSW4x10(8) |
| KПрокадka(60)(2) | LГВИNTPSW6x50(2) |
| MВтулka(M4)(2) | NГВИNTPSW4x50(2) |
Determining the installation location
1. Determine the installation location.
Make sure the wall has sufficient dimensions and can support the weight, at least four times the weight of the TV.
The required screws for installing the TV on the wall can be found in the table below. The weight of the TV can be found in the TV manual.
Standard mounting
Center of the screen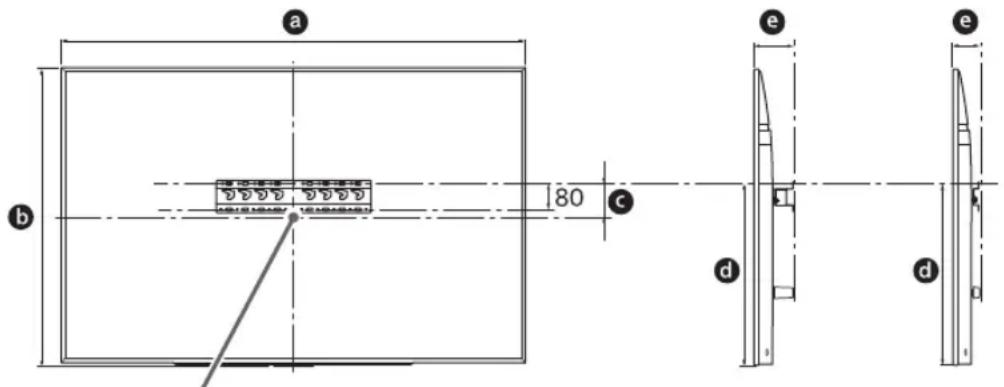
Single measurement: mm
From the installation location, refer to the table below. If option 2-b is selected, skip this step.
| Назва мodyдлі Розташуванna ragкiv | |
| KD-85XG85☐☐ | a |
| KD-75XG87☐☐ | |
| KD-75XG85☐☐ | |
| KD-65XG87☐☐ | b |
| KD-65XG85☐☐ | |
| KD-55XG87☐☐ | |
| KD-55XG85☐☐ | |
Choose a wall strong enough to support the TV. If necessary, change the wall or reinforce it.
Installation on a wall
Use straight screws with a diameter of 8 mm or equivalent (not included in the delivery set). Screw the screws into the holes on the back of the base ① with the base (20) A (step 2). Place the base (20) A horizontally on the wall.
If using this type of mounting, you cannot use the separate wall mounts for the TV.
Connect the TV to the required cable.
Connect the cable before installing the TV on the wall. After installing the TV, it will be impossible to connect the cable.
Note. Connect to the TV.
Note
The cable in the wall must be laid in a licensed conduit. Route the cables without stepping on them or mounting them on the wall.
5 Remove the stand from the TV.
Remove one side of the stand at a time. Hold the stand firmly with both hands while another person removes the TV.
KD-85XG85□□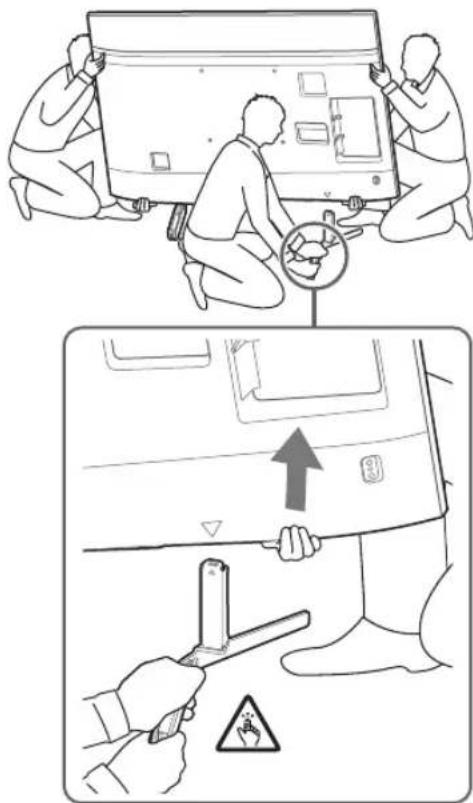
KD-75XG87□□, KD-75XG85□□
- Repeat the previous step and remove the other side of the stand.
Note
Removing the wall-mount bracket from the TV. Be careful when using the wall-mount bracket. If you remove the wall-mount bracket from the TV, it may fall and cause injury or damage to the TV. - Do not lift the TV by the wall-mount bracket, as it may damage the TV. - Lift the TV carefully, as the wall-mount bracket may tip over and cause injury. - Be careful when removing the wall-mount bracket from the TV. If the bracket falls, it may damage the surface on which the TV is placed.
KD-65/55XG87□□
KD-65/55XG85□
1 Remove the screws from the rear of the TV.
2 Attach the wall-mount bracket to the rear of the TV. Check the supplied wall-mount brackets using the list "Supplied SU-WL450" in the "Checking the parts" section on page 5.
Hook
Then secure the wall-mount brackets with the screws. - For the tightening torque, set the moment to approximately 1.5 N·m {15 kgf·cm}. - Be sure to store the used or unused components in a safe place for future use. Keep this manual for future reference.
Standard mounting (2-a)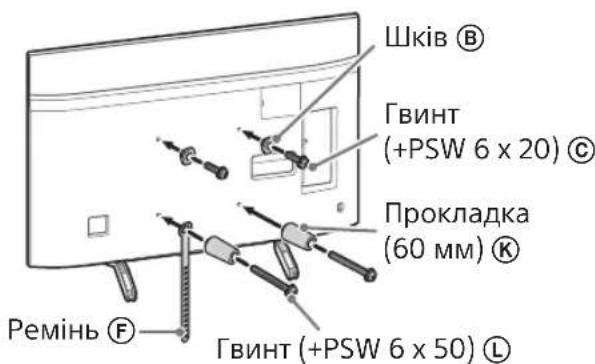
Thin mounting (2-b)
Hook
When using this type of mounting, do not use the holes on the rear of the TV separately.
Connect the necessary cables to the TV.
Check the cable connections before mounting the TV on the wall. After mounting the TV, it will be impossible to connect the cables. Note: Connect the cables to the TV.
Hook
The cable is routed through the wall. - Route the cable without stepping on it, before mounting it on the wall.
4. Remove the stand from the TV.
Hold the stand with both hands while another person lifts the TV.
- Repeat the previous step and remove the other side of the stand.
Note
- Two people are required to remove the stand from the TV. Be careful when applying force to detach the stand from the TV, as it may cause the TV to fall and result in injury or damage to the TV. Carefully handle the stand to avoid damaging the TV. Lift the TV carefully, as the stand may tip over and cause injury.
- Be careful when removing the stand from the TV. If the stand falls, it may damage the surface on which the TV is placed.
Installing the TV on a wall
KD-85/75XG85□□, KD-75XG87□□
1. Lift the TV.
- Remove the screws ⑧ that secure the TV to the base or the base stand, see the table in step 3 in the section "Identifying the installation location" on page 7. While holding the TV, make sure the back of the TV is not touching the base or the base stand.
Note
Hold the TV with both hands. The bottom edge of the TV should be aligned with the arrow mark. - Hold the TV firmly. The part that protrudes from the back of the TV should be used as a guide to determine the position of the TV.
Be careful when installing the TV on a wall. Be careful to support the TV from below. The TV may fall and cause serious injury or even death.
2. Install the TV on the base or the base stand.
- Carefully lower the TV and align the screws ⑧ with the holes on the back of the TV, on the base or the base stand (they should match the size of the holes).
- After installing the TV on the wall, make sure it is securely fixed in the base or in the wall bracket.
- When moving the TV, hold it by the handles to prevent it from falling.
- Installing the TV on the wall reduces the risk of injury (or similar material) from the wall.
2-a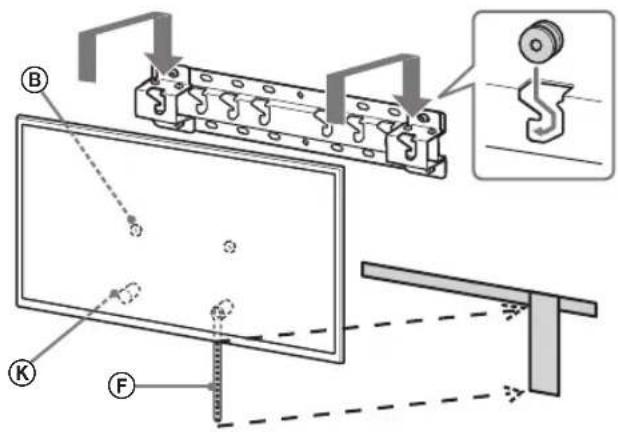



2-b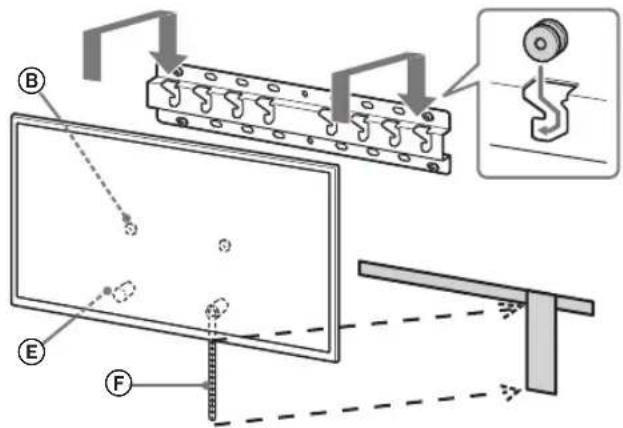



WARNING
Wall mounting (2-b)
Mark.
Wall mounting (2-b)
Mark.
Weight (base only): (approx.) [kg]
0.8
h1:20 (2-b variants)
When installing the TV on the wall, be careful not to damage the wall.
The TV is heavy. If the wall is not strong enough, the TV may fall and cause injury.
Before connecting the cable, make sure that the original connectors are installed correctly. The cable material must be suitable for the operating conditions. Before connecting the cable, check the connectors and the cable for damage. Connecting the cable to the connectors must be done in accordance with the original design.
Connecting the cable to the connector
Do not use force when connecting.
If the connectors are not connected properly, they may become loose or fall out. This can cause damage.
The connectors must be connected perpendicular to the cable and the connector.
If the connection is not correct, the connectors may become loose or fall out.
After connecting the connectors correctly, connect the cables correctly.
If the connectors or other parts are damaged, they must be replaced immediately.
The power cable or the cable must be kept away from the cable.
If the power cable or the cable is damaged or cut between the cable and the connector, the two ends must be closed and short-circuited or the electrical connection must be made. This may cause a fire or electric shock.
Do not use damaged connectors for connecting the cable.
When connecting the cable to the connector, do not damage the cable material or the connector.
Lubricant
Installation
__SUPPIMER__
Table of contents 9 KD-85/75XG85□□,KD-75XG87□□.9 KD-65/55XG87□□,KD-65/55XG85□□.11
Cable connection table of contents 13 KD-85/75XG85□□,KD-75XG87□□ 13 KD-65/55XG87□□,KD-65/55XG85□□ 15
Safety instructions 18
Specifications 18
Cable connection
The procedure for installing the TV is described below. To mount the TV on the wall, use the SU-WL450 wall-mount bracket.
Instructions
- Remove the screws from the back of the TV.
Installation
Before installation, remove the TV from the packaging and the installation screws. Make sure you have the Phillips screwdriver ready. Determine the mounting position of the TV. Use screws with a diameter of 8 mm or larger, and a length of 5 mm or more (not provided). Select the screws according to the wall material.
Parts check
Supplied with SU-WL450
Check that all parts are present.
| A Heri3 (20) (1) B Terepiik (2) | |
| ◎ PSW 6x20 (4) D TbIFbIH PSW 4x20 (2) | |
| E ApaIbIK (20) (2) E | Belenik (1) |
| ◎ TbIFbIH (20) (M4) (2) | H PSW 4x20 (2) |
| ① Heri3ri aIaIantep (2) | J PSW 4x10 (8) |
| K ApaIbIK (60) (2) L | PSW 6x50 (2) |
| M TbIFbIH (M4) (2) N | PSW 4x50 (2) |
Ophtalmic solutions
1. Ophtalmic solutions.
Before using the device, check that the solution is present and that the T-tube is not damaged.
For instructions on how to place the device, see the section on placing the device. For information on the device's safety, see the section on device safety.
Standard placement
Center of the screen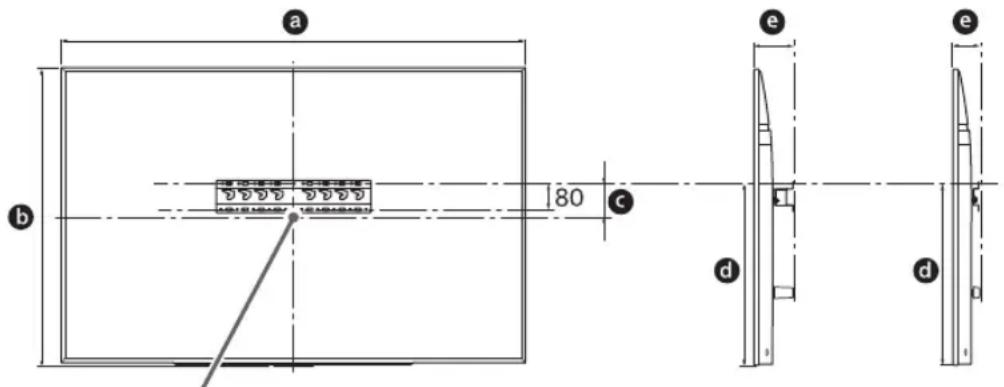
Note:
| Ynliri hemipi | Зкразецемерi | Зкразецьим �шемi | Орнату узbingьгы | ||
| a | b | c | d | ||
| Столарты opнату | Жасын opнату | ||||
| KD-85XG85□□ | 1909 | 251 | 803 | 142 | 100 |
| KD-75XG87□□ | 1673 | 963 | 107 | 595 | 116 75 |
| KD-75XG85□□ | |||||
| KD-65XG87□□ | 1450 | 836 | 99 | 523 | 115 73 |
| KD-65XG85□□ | |||||
| KD-55XG87□□ | 1231 | 713 | 106 | 468 | 115 73 |
| KD-55XG85□□ | |||||
Instructions
It is possible to adjust the placement settings manually. The T-tube can be placed in the upper or lower position.
Place the device in the open position between the device and the tube and the safety clips.
Note:
To avoid damage to the device and to ensure proper operation:
- Do not place the T-tube in the upper position, but rather in the lower position, or place it with a slight tilt.
- Do not place the T-tube on a bed, table, floor, or cabinet. Do not cover the T-tube with curtains or newspapers, etc. Place the T-tube as shown in the figure.
This is a sample text.
Cable cores must be checked for damage before installation.
To connect the cable, use the base (20) A, base adapter ① and bracket (20) E, bracket (60) K to the perimeter of the cable entry.
2. Select the installation method. The rear part of the device must be visible for the cable entry opening.
2-a Standard installation 2-b Alternative installation
Refer to step 1.
ATTENTION
2-b When selecting, the rear terminal must be connected.
3. Refer to the instructions for the base adapter mounting location. When selecting 2-b, perform this step and continue.
| Yürgi Hämipi İnmek Öpnbı | |
| KD-85XG85☐☐ | |
| KD-75XG87☐☐ | a |
| KD-75XG85☐☐ | |
| KD-65XG87☐☐ | |
| KD-65XG85☐☐ | b |
| KD-55XG87☐☐ | |
| KD-55XG85☐☐ | |
Adapter ① base (PSW 4x10) ② with screws for 2-a installation to the (20) A base.
4. For the (20) @ installation, determine the screw positions.
Refer to the diagrams on page 18. When selecting 2-a, the adapter base mounting location is determined.
ATTENTION
The cable entry must be sealed with a suitable sealant to prevent moisture ingress (refer to the sealing instructions for cable entries).
Determine the cable entry position. If necessary, enlarge the cable entry.
Cable fixing
- Diameters 8 mm are not included. Use the supplied screws to attach the cable fixing brackets. ① Attach the cable fixing brackets (20) to the rear of the TV (Fig. 2-a). Fix the cables (20) with the cable fixing brackets.
TV installation
Before installation, turn off the TV.
KD-85/75XG85□□,KD-75XG87□□
1 Remove the cable fixing bracket.
To determine the TV installation position on the wall or the wall adapter, use the supplied paper pattern, i.e., (supplied). Then attach it.
Unit: mm
| Yntri hemipi | Белriney Узblдыflы | Зкpen opТасblнIH Елшемi | ||
| a | b | c | d | |
| KD-85XG85□□ | 1909 | 683 | 200 | 251 |
| KD-75XG87□□ | 1673 | 468 | 200 | 107 |
| KD-75XG85□□ | ||||
2 Remove the screws on the rear of the TV.
3 To install the cable fixing brackets, use the supplied screws. Refer to the "SU-WL450 (supplied with the bracket)" section in the 5-6 page "Bracket attachment" for installation of the bracket.
Note
- Attach the bracket with the screws. - When installing the TV, keep a distance of at least 15 cm from the wall. - If the TV is not installed properly, it may fall. Follow the instructions carefully. Keep this note for future reference.
Standard installation (Fig. 2-a)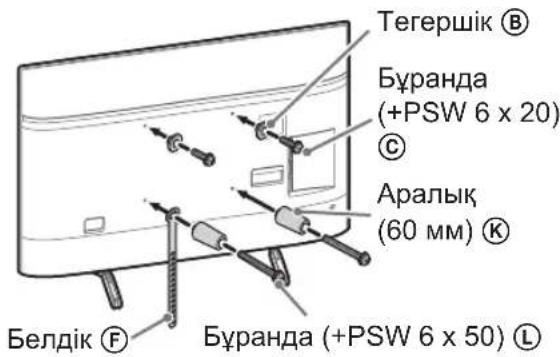
Wall installation (Fig. 2-b)
Note
Remove the protective film from the antenna terminals before connecting the cables.
4 Connect the cables to the cable terminals.
Do not connect the cables until the terminals are properly aligned. After aligning the terminals, it may not be possible to connect the cables. See the instructions for connecting the cables with the terminals.
Note
Do not insert the cables into the terminals forcibly. During installation, do not bend or twist the cables excessively.
5 Remove the stands from the TV.
- Remove the stand base from the stand neck. Then, attach the stand neck to the TV as shown.
KD-85XG85□□
KD-75XG87□□, KD-75XG85□□
Remove the stand base and the stand neck from the TV.
Note
- To remove the stand neck, first remove the screws. When removing the stand neck, be careful not to drop the TV or cause injury. Do not remove the stand neck unless necessary. If you need to remove the stand neck, follow the instructions carefully. Do not use excessive force when removing the stand neck.
1 Remove the screws from the back of the TV.
2 To install the wall mount bracket, use the screws provided. See the instructions for the wall mount bracket in the manual.
Note
Check the integrity of the brake system. If the brake pads are worn, replace them. If the brake pads are not worn, check the brake fluid level. If the brake fluid level is low, add brake fluid.
Standard position (2-a)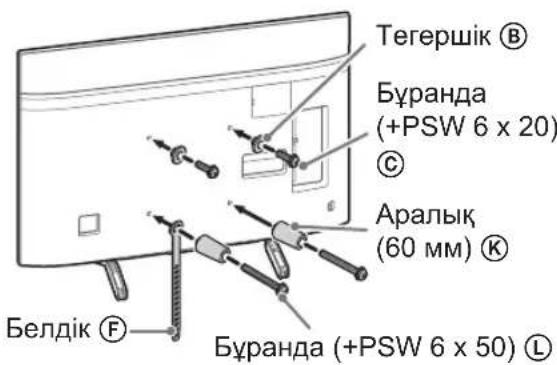
Correct position (2-b)
Instruction
- When using this position, do not touch the contacts on the back of the device.
Connect the cable(s) to the device.
Place the device in the bracket and secure the cables. After placing the device, the cables should not be pulled. See the instruction label on the device.
Instruction
Insert the cables into the bracket. If the bracket has a cover, close it. Do not pinch the cables.
4. Lift the device from the top.
- Remove the top cover by lifting it up. Do not remove the cover if the device is hot.
Remove the bottom cover and then remove the top cover.
Instruction
To remove the top cover, you may need a screwdriver. When removing the top cover, be careful not to damage the device. Do not use excessive force. If the device is stuck, gently pry it open. If the device is not working properly, contact customer support.
Place the device in the bracket
KD-85/75XG85□□, KD-75XG87□□
1. Connect the TV.
If you connect the TV to the antenna or cable, you can watch the 7-6 channels "On-air TV" without a separate 3-step setup. After connecting the TV, you can watch TV without any additional setup.
Note
When connecting the TV to the antenna or cable, you may need to adjust the antenna or cable connection. If the TV is not receiving a signal, you may need to adjust the antenna or cable connection.
If you connect the TV to a cable box or satellite receiver, you can watch TV without a separate antenna or cable connection. You can also watch TV using a cable box or satellite receiver.
2. Connect the TV to the antenna or cable.
Connect the TV to the antenna or cable, and then adjust the antenna or cable connection. If you are using a cable box or satellite receiver, connect it to the TV. To watch TV, you need to connect the TV to the antenna or cable.
After connecting the TV to the antenna, you can watch TV without a separate antenna or cable connection.
Note
If you are using a cable box or satellite receiver, you may need to connect it to the TV. If you are using a cable box or satellite receiver, you may need to connect it to the TV.
3. Do not block the TV's ventilation holes.
- Place the TV on a stable surface.
- Diameter 5mm or less, use a screwdriver (not provided).
Note
To install the TV on the wall, you must first check the strength of the wall. If it is not strong enough, consult a specialist and use a mounting kit.
KD-65/55XG87□□, KD-65/55XG85□□
1 Remove the TV.
For the screws (M6 or M8) used for installation, refer to step 3 of “Identifying the mounting holes” on page 7. When installing the TV, do not tighten the screws too much into the base or adapter.
Caution
Install the TV with two people.
2 Place the TV on the base or adapter.
After removing the TV from the wall, place it on the base or adapter, and then secure it with the screws. After placing the TV on the base or adapter, make sure it is securely attached. To avoid damaging the TV, use two people.
2-a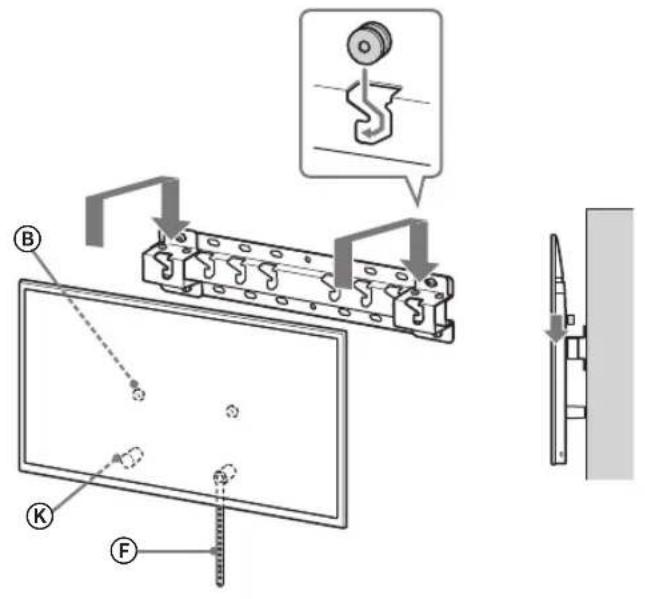
2-b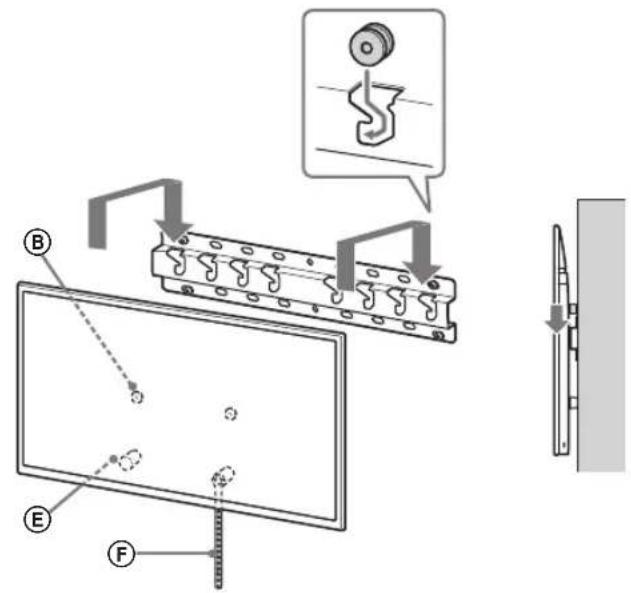
↓
↓
NOTE
Do not install the TV with one or more people (for 75-inch or larger TVs, use three or more people).
3 Do not remove the TV from the wall.
- Beiikti F anbIn, OHbl Ka6bIpara MbiKTan 6ekitiH3.
- Diameters of 5 mm bolts are not subject to replacement (permanent).
Start
Before starting work, check the temperature of the device against the ambient temperature. If it is cold, wait until it reaches the ambient temperature before starting.
Operating procedure
Check the connections.
Ensure that the terminals are securely attached. - The wire and cable are not damaged or broken. - The large (F) bolt is tightened.
WARNING
Do not use the device if the protective conductor is damaged or if the power cord is damaged. Do not place the device on soft surfaces.
Other equipment
Before starting the device, follow the operating procedure described above.
WARNING
Before starting the device, ensure that the voltage and frequency (75 Hz and 60 Hz) are correct for the device, and that the power cord is properly connected.
Technical specifications
Sony
0
N 5 100
- nyn nn nn nn nn, npnnn 5 . . . . . . . . . . . . . . . . . . . . . . . . . . . . . . . . . . . . . . . . . . . . . . . . . . . . . . . . . . . . . . . . . . . . .
- 6 · 8 9 KD-65/55XG87□11 KD-65/55XG85□
- KD-85/75XG85□□,KD-75XG87□□ KD-65/55XG87□ . KD-65/55XG85□
#
SU-WL450 1
(1)(20) (A)(2) 防火手B
18 18. 0792

PSW 4x20 (2)

(4)PSW6x20

(2) (20) nnnn

(2) PSW 4x20 H

(2) (M4) (20) ⑥

(2) OVAON
E(1) nyn
F
nnuuun nnnn nn nnnn nnnn Su-WL450 npnnnwnn nn
.075v07vnnopnnn
,


(2) (60) nnnn
①⑧) PSW 4x10 J

(2) (M4)
M(2) PSW 4x50 N
yNnNnNnNnNnNnNnNnNnNnNnNnNnNnNnNnNnNnNnNnNnNnNnNnNnNnNnNnNnNnNnNnNnNnNnNnNnNnNnNnNnNnNnNnNnNnNnNnNnNnN
y:n
| e | d | c | b | a | b+1 b+1 | |
| n/a | n/a | |||||
| n/a | n/a | |||||
| 1,9091,097KD-803X4860□ | ||||||
| 1,6739631072511675KD-75XG85□□ | ||||||
| 1,450836952311573KD-65XG87□KD-65XG85□□ | ||||||
| 1,23171310646811573KD-55XG87□KD-55XG85□□ |
. .
2-a
npt nvn 2-b
12y
77
nnn nn nyn,2-b nna
nnn
| a | KD-85XG85□□KD-75XG87□□KD-75XG85□□ |
| b | KD-65XG87□□KD-65XG85□□KD-55XG87□□KD-55XG85□□ |
2 Pn7P 7
n:n ∴ n = 72 时. - by in Tn, -NNnNn -, ∴ m : x = 1 或 3x + 4y + 1 = 0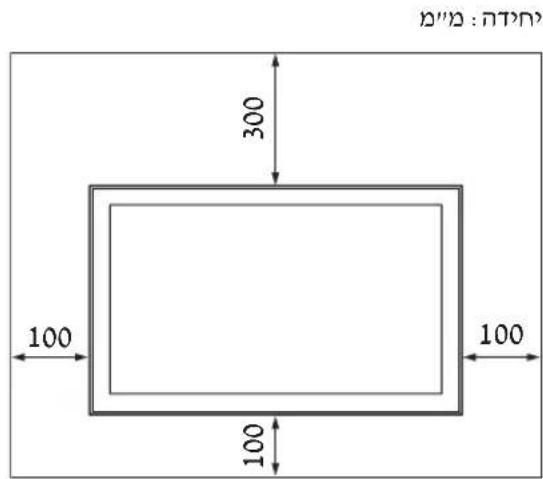
.
7n7n,
nnpnn nn nnnn 0000000000000000
yipn nn, ybnny noyn
(20) nnnn ① v nn, (20) v nn
2-a
2-b
· 87
(pan)
#
- 72x mnnn
nON. nN NNNNnNnNnNnNnNnNnNn
[1] (7y):
400: a
300: b
200: c
100: d
80: e
480: f
100: g
(2-b nnp) 20: h1
(2-a nnp) 60: h2
[1] (7y): (7y)
0.8
y
.
.07070
Therefore, the area of triangle OBC equals the area of triangle COD plus the area of triangle BOC.
.
.
77
·
77
Therefore, PB is perpendicular to BA.
77
ybn75
nannnny
- ON SAFETY
- TO CUSTOMERS
- TO SONY DEALERS
- CAUTION
- SPECIFIED PRODUCTS
- WARNING
- BE SURE TO SUBCONTRACT THE INSTALLATION TO LICENSED CONTRACTORS AND KEEP SMALL CHILDREN AWAY DURING THE INSTALLATION
- BE SURE TO SUBCONTRACT MOVING OR DISMOUNTING OF THE TV TO LICENSED CONTRACTORS
- DO NOT REMOVE SCREWS, ETC., AFTER MOUNTING THE TV
- DO NOT MAKE ALTERATIONS TO THE PARTS OF THE WALL-MOUNT BRACKET
- DO NOT MOUNT ANY EQUIPMENT OTHER THAN THE SPECIFIED PRODUCT
- DO NOT LEAN ON OR HANG FROM THE TV
- DO NOT HANDLE THE PRODUCT WITH EXCESSIVE FORCE DURING CLEANING OR MAINTENANCE
- PRECAUTIONS
- INSTALLING THE WALL-MOUNT BRACKET
- DO NOT INSTALL THE TV OVER OR UNDER AN AIR CONDITIONER
- BE SURE TO INSTALL THE WALL-MOUNT BRACKET SECURELY TO THE WALL FOLLOWING THE INSTRUCTIONS IN THIS INSTRUCTION MANUAL
- BE SURE TO ASSEMBLE THE BRACKET PROPERLY FOLLOWING THE INSTRUCTED PROCEDURE EXPLAINED IN THIS INSTRUCTION MANUAL
- BE SURE TO TIGHTEN THE SCREWS SECURELY IN THE DESIGNATED POSITION
- BE CAREFUL NOT TO SUBJECT THE TV TO SHOCK DURING INSTALLATION
- BE SURE TO INSTALL THE TV ON A WALL THAT IS BOTH PERPENDICULAR AND FLAT
- AFTER PROPER INSTALLATION OF THE TV, SECURE THE CABLES PROPERLY
- DO NOT ALLOW THE MAINS LEAD OR THE CONNECTING CABLE TO BE PINCHED
- THE SCREWS NEEDED TO SECURE THE WALL-MOUNT BRACKET TO THE WALL ARE NOT SUPPLIED
- TABLE OF CONTENTS
- INSTALLING THE TV ONTO THE WALL
- NOTE
- PREPARING FOR INSTALLATION
- CHECKING THE PARTS
- SUPPLIED WITH SU-WL
- DECIDING ON THE INSTALLATION LOCATION
- DECIDE ON THE INSTALLATION LOCATION
- INSTALLING THE BASE ON THE WALL
- PREPARING FOR THE INSTALLATION OF THE TV
- KD-85/75XG85□□, KD-75XG
- MARK THE INSTALLATION LOCATION ON THE WALL
- REMOVE THE SCREWS FROM THE REAR OF THE TV
- CONNECT THE NECESSARY CABLE(S) TO THE TV
- DETACH THE TABLE-TOP STAND FROM THE TV
- KD-85XG
- KD-75XG87□□, KD-75XG
- SLIM MOUNTING (2-B)
- INSTALLING THE TV ON THE WALL
- LIFT THE TV
- INSTALL THE TV ONTO THE BASE OR BASE ADAPTOR
- PREVENTING THE BOTTOM OF THE TV FROM SHIFTING
- CONFIRMING THE COMPLETION OF THE INSTALLATION
- OTHER INFORMATION
- SPECIFICATIONS
- DIMENSIONS: (APPROX.) [MM]
- WEIGHT (BASE ONLY): (APPROX.) [KG]
- PREPARATION FOR INSTALLATION
- FIND THE TV'S LOCATION
- PPOETOIAOIA YIA TOOTHETNO
- EAEYXOC TWV EAPNTMUATWV
- ROZMERY: (PRIBL.) [MM]
- DO NOT INSERT SCREWS OR OTHER MOUNTING ELEMENTS INTO THE TV
- DO NOT SKIP THE WALL-MOUNT BRACKET PARTS FOR WALL MOUNTING
- DO NOT MOUNT OTHER EQUIPMENT OTHER THAN THE SPECIFIED PRODUCT
- DO NOT PLACE THE WALL-MOUNT BRACKET ON ANY OTHER PRODUCT THAN THIS TV. DO NOT PLACE THE TV ON THE FLOOR OR ON A SLANTED SURFACE
- PLACE THE UNIT ON THE TELEVISION
- DO NOT TREAT THE PRODUCT WITH EXCESSIVE FORCE DURING INSTALLATION OR REMOVAL
- SAFETY PRECAUTIONS
- WALL MOUNT BRACKET INSTALLATION
- DO NOT INSTALL THE WALL MOUNT BRACKET ON A WALL SURFACE WHERE THE BOLTS OR THE SIDES OF THE TELEVISION PROTRUDE FROM THE WALL SURFACE
- DO NOT MOUNT THE TELEVISION ABOVE OR UNDER AN AIR CONDITIONER
- MOUNT THE WALL MOUNT BRACKET SECURELY TO THE WALL BY FOLLOWING THE INSTRUCTIONS IN THIS MANUAL
- MAKE SURE YOU INSTALL THE BRACKET CORRECTLY BY FOLLOWING THE PROCEDURE DESCRIBED IN THIS MANUAL
- TIGHTEN THE SCREWS SECURELY IN THE INDICATED POSITION
- BE CAREFUL NOT TO HIT THE TELEVISION DURING INSTALLATION
- MOUNT THE TELEVISION ON A WALL THAT IS PERPENDICULAR AND FLAT
- AFTER CORRECTLY MOUNTING THE TELEVISION, ROUTE THE CABLES PROPERLY
- DO NOT ALLOW THE POWER CORD OR CONNECTING CABLE TO BE PINCHED
- THE SCREWS REQUIRED FOR FIXING THE WALL-MOUNT BRACKET TO THE WALL ARE NOT INCLUDED IN THE PACKAGE
- CONTENTS
- MOUNTING ON A WALL-MOUNTED TV
- MOUNTING PROCEDURE
- SELECTING THE MOUNTING POSITION
- DETERMINING THE MOUNTING LOCATION
- SELECT THE MOUNTING LOCATION
- DETERMINE THE POSITIONS OF THE SCREWS FOR MOUNTING THE BASE (20) A
- MOUNTING THE BASE ON THE WALL
- PREPARATION FOR MOUNTING THE TV
- SELECT THE MOUNTING LOCATION ON THE WALL
- THIN MOUNTING (2-B)
- CONNECT THE NECESSARY CABLES TO THE TV
- REMOVE THE TV STAND
- KD-65/55XG
- TV INSTALLATION (2-B)
- ATTACH THE TABLE-TOP STAND TO THE TV
- MOUNTING THE TV ON THE WALL
- KD-85/75XG85□□,KD-75XG
- MOUNT THE TV ONTO THE BASE OF THE STAND FOR THE BASE
- MOUNT THE TV ONTO THE BASE STAND
- ADJUSTMENT
- CARE
- CHECKING THE
- SUPPORTED MODELS
- TO SONY DEALERS AND CONTRACTORS
- FOR MOVING OR REMOVING THE TV, BE SURE TO CONTACT LICENSED CONTRACTORS
- AFTER INSTALLING THE TV, DO NOT REMOVE THE SCREWS, ETC
- INSTALL THE WALL-MOUNT BRACKET SECURELY TO THE WALL
- DO NOT INSTALL ANY OTHER EQUIPMENT ON THE BRACKET OTHER THAN THAT SPECIFIED
- TO AVOID OVERLOADING THE WALL-MOUNT BRACKET, DO NOT PLACE ANYTHING ON IT OTHER THAN THE TV. DO NOT MOVE THE TV LEFT/RIGHT OR UP/DOWN
- DO NOT LEAN ON THE TV OR HOLD ONTO IT
- APPLICATION
- STANDARD MOUNTING (2-A)
- COMPACT INSTALLATION (2-B)
- DISCONNECT THE TABLE-TOP STAND FROM THE TV
- WALL MOUNTING THE TV
- INSTALL THE TV ON THE BASE OR THE BASE ADAPTER
- PNEYIPYEKDEHNE
- TO PREVENT THE TV FROM TIPPING OVER
- KD-65/55XG87□□,KD-65/55XG
- INSTALL THE TV ON THE BASE OF THE FLOOR STAND
- PREVENTING THE LOWER PART OF THE TV FROM SHIFTING
- INITIAL INFORMATION
- TECHNICAL SPECIFICATIONS
- DO NOT UNSCREW THE SCREWS, AS THE TV MOUNTING MAY BE AFFECTED
- DO NOT REMOVE PARTS OF THE BRACKET FOR PARTIAL MOUNTING
- DO NOT INSTALL ANY OTHER DEVICES OTHER THAN THE SPECIFIED PRODUCT
- DO NOT USE THE BRACKET FOR WALL MOUNTING FOR PURPOSES OTHER THAN MOUNTING THE TV. DO NOT TILT THE TV UP/DOWN OR LEFT/RIGHT
- DO NOT LEAN ON THE TV OR HANG ON IT
- WHEN CLEANING OR SERVICING THE PRODUCT, DO NOT APPLY EXCESSIVE FORCE TO IT
- INSTALLING THE BRACKET FOR WALL MOUNTING
- SONY WALL MOUNT BRACKET
- DO NOT INSTALL THE BRACKET FOR WALL MOUNTING ON A WALL WHERE THE SIDES OF THE TV PROTRUDE BEYOND THE WALL SURFACE
- DO NOT INSTALL THE TV ON A STAND WITH A MONITOR
- INSTALL THE BRACKET FOR WALL MOUNTING SECURELY TO THE WALL ACCORDING TO THE INSTRUCTIONS IN THIS MANUAL
- ASSEMBLE THE BRACKET SECURELY, FOLLOWING THE PROCEDURE DESCRIBED IN THIS MANUAL
- TIGHTEN THE SCREWS SECURELY IN THE SPECIFIED POSITION
- PREPARATION FOR
- INSTALLATION
- DETERMINING THE INSTALLATION LOCATION
- DETERMINE THE INSTALLATION LOCATION
- INSTALLATION ON A WALL
- CONNECT THE TV TO THE REQUIRED CABLE
- REMOVE THE STAND FROM THE TV
- HOOK
- INSTALLING THE TV ON A WALL
- INSTALL THE TV ON THE BASE OR THE BASE STAND
- WALL MOUNTING (2-B)
- MARK
- WHEN INSTALLING THE TV ON THE WALL, BE CAREFUL NOT TO DAMAGE THE WALL
- CONNECTING THE CABLE TO THE CONNECTOR
- DO NOT USE FORCE WHEN CONNECTING
- THE CONNECTORS MUST BE CONNECTED PERPENDICULAR TO THE CABLE AND THE CONNECTOR
- AFTER CONNECTING THE CONNECTORS CORRECTLY, CONNECT THE CABLES CORRECTLY
- THE POWER CABLE OR THE CABLE MUST BE KEPT AWAY FROM THE CABLE
- DO NOT USE DAMAGED CONNECTORS FOR CONNECTING THE CABLE
- LUBRICANT
- CABLE CONNECTION
- INSTRUCTIONS
- PARTS CHECK
- OPHTALMIC SOLUTIONS
- ATTENTION
- CABLE FIXING
- TV INSTALLATION
- REMOVE THE CABLE FIXING BRACKET
- REMOVE THE SCREWS ON THE REAR OF THE TV
- WALL INSTALLATION (FIG. 2-B)
- CONNECT THE CABLES TO THE CABLE TERMINALS
- REMOVE THE STANDS FROM THE TV
- CORRECT POSITION (2-B)
- INSTRUCTION
- CONNECT THE CABLE(S) TO THE DEVICE
- LIFT THE DEVICE FROM THE TOP
- PLACE THE DEVICE IN THE BRACKET
- CONNECT THE TV
- CONNECT THE TV TO THE ANTENNA OR CABLE
- DO NOT BLOCK THE TV'S VENTILATION HOLES
- KD-65/55XG87□□, KD-65/55XG
- REMOVE THE TV
- PLACE THE TV ON THE BASE OR ADAPTER
- DO NOT REMOVE THE TV FROM THE WALL
- START
- OPERATING PROCEDURE
- OTHER EQUIPMENT
- SONY
Brand : SONY
Model : Bravia KD75XG8599
Category : Television