
Bravia KD55XG8577 - Television SONY - Free user manual and instructions
Find the device manual for free Bravia KD55XG8577 SONY in PDF.
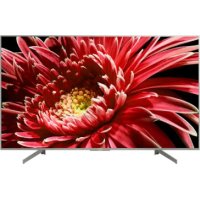


| Product Type | 4K HDR LED TV |
| Brand | Sony |
| Model | Bravia KD55XG8577 |
| Screen Size | 55 inches (139 cm) |
| Resolution | 3840 x 2160 pixels (4K Ultra HD) |
| Dimensions Without Stand (W x H x D) | 1231 x 713 x 106 mm |
| Weight Without Stand | Approximately 16.5 kg |
| Power Supply | 220-240 V AC, 50/60 Hz |
| Typical Power Consumption | 150 W |
| Processor | 4K HDR Processor X1 |
| Operating System | Android TV |
| HDR Compatibility | HDR10, HLG, Dolby Vision |
| HDMI Connectivity | 4 HDMI inputs (1 with ARC) |
| USB Connectivity | 2 USB ports |
| Wireless Connectivity | Built-in Wi-Fi, Bluetooth |
| Mounting Method | Tabletop stand or wall mount (compatible with SU-WL450) |
| Safety | Professional installation recommended for wall mounting |
| Maintenance | Wipe with a soft, dry cloth; do not use chemicals |
| Repairability | Repairability index not provided |
Frequently Asked Questions - Bravia KD55XG8577 SONY
User questions about Bravia KD55XG8577 SONY
0 question about this device. Answer the ones you know or ask your own.
Ask a new question about this device
Download the instructions for your Television in PDF format for free! Find your manual Bravia KD55XG8577 - SONY and take your electronic device back in hand. On this page are published all the documents necessary for the use of your device. Bravia KD55XG8577 by SONY.
USER MANUAL Bravia KD55XG8577 SONY
- In the actual model names, the "□□" indicates numbers and/or characters specific to each model.
To Customers: For product protection and safety reasons, Sony strongly recommends that installation of your TV be performed by Sony dealers or licensed contractors. Do not attempt to install it yourself.
To Sony Dealers and Contractors: Provide full attention to safety during the installation, periodic maintenance, and examination of this product.
Sufficient expertise is required for installing this product, especially to determine the strength of the wall for withstanding the TV's weight. Be sure to entrust the attachment of this product to the wall to Sony dealers or licensed contractors and pay adequate attention to safety during the installation. Sony is not liable for any damage or injury caused by mishandling or improper installation.
For safety and proper installation, follow the Wall-mount Bracket Operation Instructions, TV Setup Guide, and the directions in this manual.
On Safety
Thank you for purchasing this product.
To Customers
Sufficient expertise is required for installing this product. Be sure to subcontract the installation to Sony dealers or licensed contractors and pay special attention to safety during the installation. Sony is not liable for any damages or injury caused by mishandling or improper installation, or installing any other than the specified product. Your Statutory Rights (if any) are not affected.
To Sony dealers
Sufficient expertise is required for installing this product. Be sure to read this instruction manual thoroughly to do the installation work safely. Sony is not liable for any damages or injury caused by mishandling or improper installation. Please give this manual to the customer after installation.
This instruction manual shows the correct handling of the product and important precautions necessary to prevent accidents. Be sure to read this manual thoroughly and use the product correctly. Keep this manual available for future reference.
Products by Sony are designed with safety in mind. If the products are used incorrectly, however, it may result in a serious injury through fire, electric shock, the product toppling over, or the product dropping. Be sure to observe the precautions for safety to prevent such accidents.
CAUTION
Specified products
This Wall-Mount Bracket is designed for use with the products specified TVs. For TVs, refer to their Reference Guide to verify that the Wall-Mount Bracket can be used.
To Customers
WARNING
If the following precautions are not observed, serious injury or death through fire, electric shock, or the product dropping can result.
Be sure to subcontract the installation to licensed contractors and keep small children away during the installation.
If the Wall-Mount Bracket or the TV is not installed correctly, the following accidents may occur. Be sure licensed contractors carry out installation.
The TV may fall and cause a serious injury such as a bruise or a fracture. - If the wall on which the Wall-Mount Bracket is installed is unstable, uneven, or not perpendicular to the floor, the unit may fall and cause injury or property damage. The wall should be capable of supporting a weight of at least four times the TV weight. (Refer to your TV's Reference Guide for its weight.) - If the installation of the Wall-Mount Bracket on the wall is not sufficiently sturdy, the unit may fall and cause injury or property damage.
Be sure to subcontract moving or dismounting of the TV to licensed contractors.
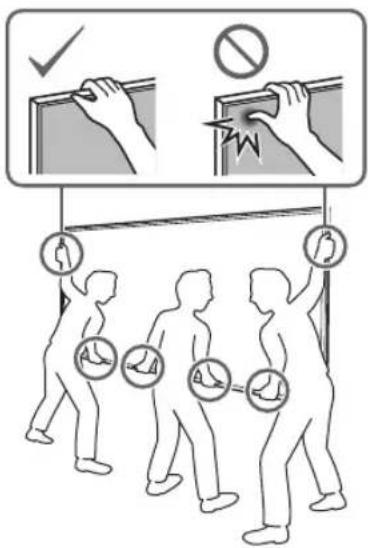
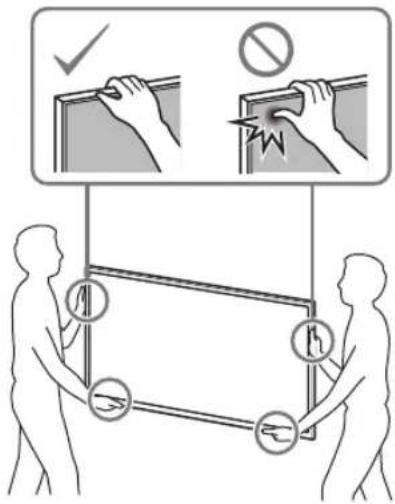
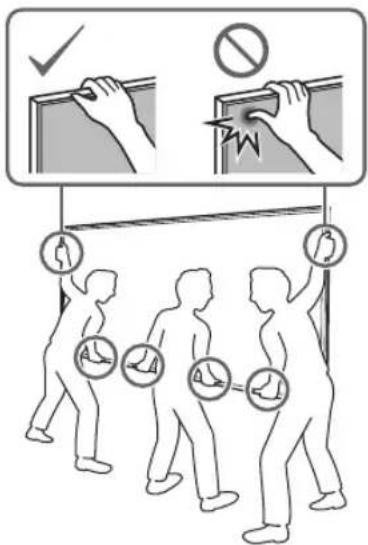
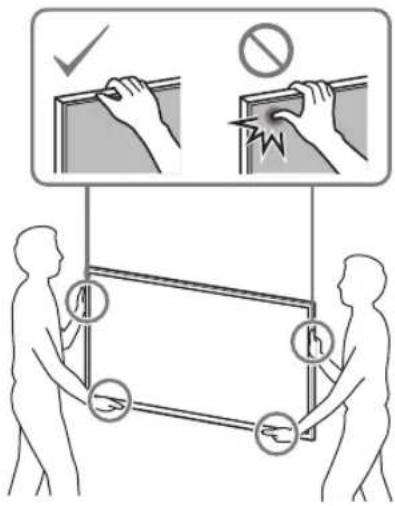
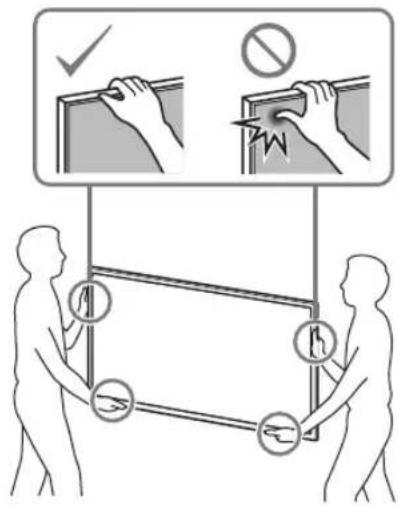
If persons other than licensed contractors transport or dismount the TV, it may fall and cause injury or property damage. Be sure that two or more persons (three or more persons for 75 inches and above TV set) carry or dismount the TV.
Do not remove screws, etc., after mounting the TV.
If you do so, the TV may fall and cause injury or property damage.
Do not make alterations to the parts of the Wall-Mount Bracket.
If you do so, the Wall-Mount Bracket may fall and cause injury or property damage.
Do not mount any equipment other than the specified product.
This Wall-Mount Bracket is designed for use with the specified product only. If you mount equipment other than specified, it may fall or break, and cause injury or property damage.
Do not apply any load other than the TV on the Wall-Mount Bracket. Do not shake the TV left/right, up/down.
If you do so, the TV may fall and cause injury or property damage.
Do not lean on or hang from the TV.
Do not lean on or hang from the TV as it may fall on you and cause serious injury.
CAUTION
If the following precautions are not observed, injury or property damage may occur.
Do not handle the product with excessive force during cleaning or maintenance.
Do not apply excessive force on the topside of the TV. If you do so, the TV may fall and cause injury or property damage.
Precautions
- If you use the TV installed on the Wall-Mount Bracket for a long time, the wall behind or above the TV may become discolored or the wallpaper may come unstuck, depending on the material of the wall.
- If the Wall-Mount Bracket is removed after installing it on the wall, the screw holes are left.
- Do not use the Wall-Mount Bracket in a place where it is subjected to mechanical vibrations.
Installing the Wall-Mount Bracket
To Sony Dealers
WARNING
The following instructions are for Sony dealers only. Be sure to read the safety precautions described above and pay special attention to safety during the installation, maintenance, and checking of this product.
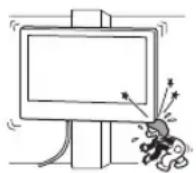
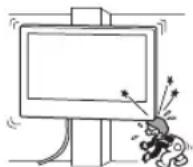
Do not install the Wall-Mount Bracket on wall surfaces where the corners or the sides of the TV protrude away from the wall surface.
Do not install the Wall-Mount Bracket on wall surfaces such as a pillar, where the corners or the sides of the TV protrude away from the wall surface. If a person or object happens to hit the protruded corner or side of the TV, it may cause injury or property damage.
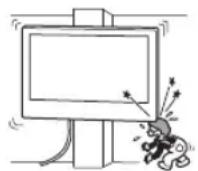
Do not install the TV over or under an air conditioner.
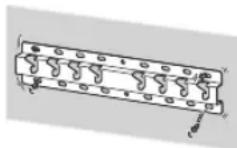
If the TV is exposed to water leaks or air current from an air conditioner for a long time, it may cause a fire, an electric shock, or a malfunction of the TV.
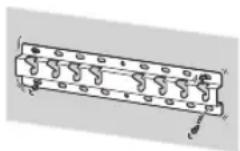
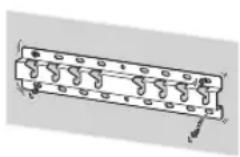
Be sure to install the Wall-Mount Bracket securely to the wall following the instructions in this instruction manual.
If any of the screws are loose or fall out, the Wall-Mount Bracket may fall and cause injury or property damage. Be sure to use the appropriate screws for the material of the wall and install the unit securely using four or more screws of 8 mm diameter (or equivalent).
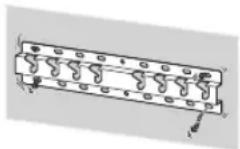
Be sure to use the supplied screws and attachment parts properly following the instructions given in this instruction manual. If you use substitute items, the TV may fall and cause bodily injury to someone or damage to the TV.
Be sure to assemble the bracket properly following the instructed procedure explained in this instruction manual.
If any of the screws are loose or fall out, the TV may fall and cause bodily injury to someone or damage to the TV.
Be sure to tighten the screws securely in the designated position.
If you fail to do so, the TV may fall and cause bodily injury to someone or damage to the TV.
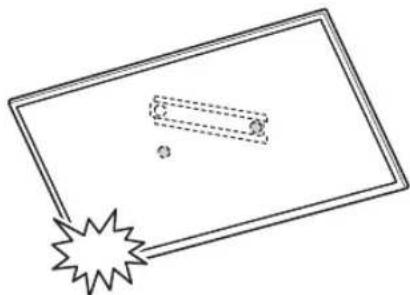
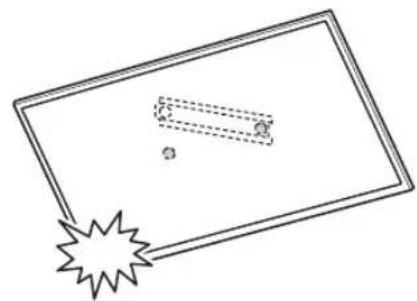
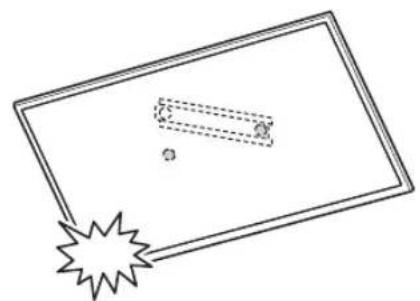
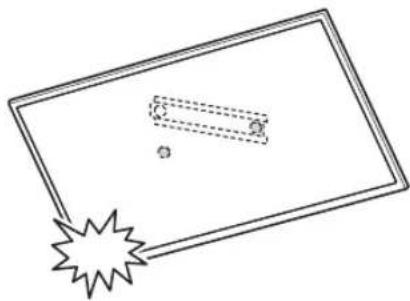
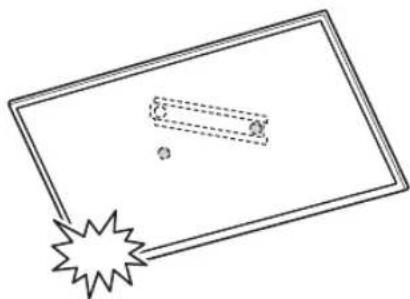
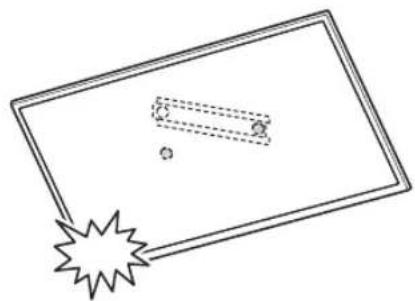
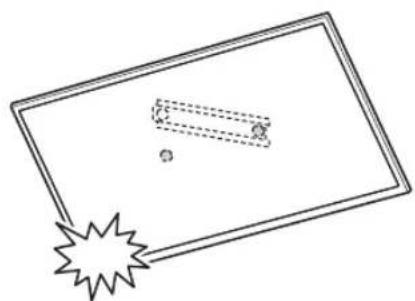
Be careful not to subject the TV to shock during installation.
If the TV is exposed to shock, it may fall or break apart. This may cause injury.
Be sure to install the TV on a wall that is both perpendicular and flat.
If you fail to do so, the TV may fall and cause injury.
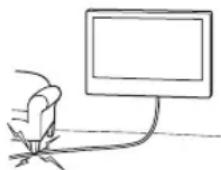
After proper installation of the TV, secure the cables properly.
If people or objects get tangled with cables, this may result in injury or damage to the TV.
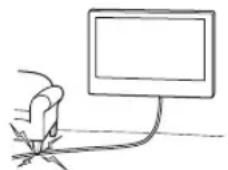
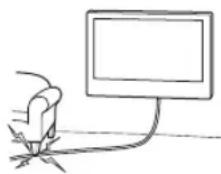
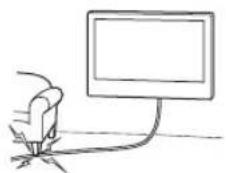
Do not allow the mains lead or the connecting cable to be pinched.
If the mains lead or the connecting cable is pinched between the unit and the wall or is bent or twisted by force, the internal conductors may become exposed and cause a short circuit or an electrical break. This may cause a fire or an electric shock.
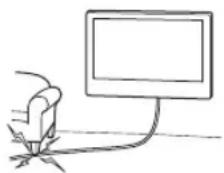
The screws needed to secure the Wall-Mount Bracket to the wall are not supplied.
Use the appropriate screws for the wall material and structure when mounting the Wall-Mount Bracket.
Table of Contents
Preparing for installation. 5
Checking the parts. 5
Deciding on the installation location 6
Installing the Base on the wall 8
Preparing for the installation of the TV. 9
KD-85/75XG85□□, KD-75XG87□□
KD-65/55XG87□□, KD-65/55XG85□□.11
Installing the TV on the wall 13
KD-85/75XG85□□, KD-75XG87□□.13
KD-65/55XG87□□, KD-65/55XG85□□.15
Confirming the completion of the
installation 18
Other information. 18
Specifications 18
Installing the TV onto the wall
Installation procedure differs, depending on your TV.
Use the Wall-Mount Bracket SU-WL450 to install the TV to the wall.
Note
- Be sure to store the removed screws in a safe place, keeping them away from children.
Preparing for installation
- Have the TV's Reference Guide and Setup Guide at hand before installation.
- Be sure to have a Phillips screwdriver that fits the screws prior to the assembly.
- Confirm the installing position of your TV.
- Prepare four or more screws of 8 mm diameter and one screw of 5 mm or equivalent (not supplied). Select screws suitable for the material of the wall.
Checking the parts
Supplied with SU-WL450
- Verify that all the parts are included.
| A Base (20) (1) B Pulley (2) | |
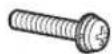
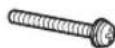
| ◎ PSW 6x20 (4)◎ PSW 4x20 with Bush (2) | |
| ◎ Spacer (20) (2)◎ Belt (1) | |
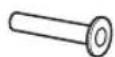
| ◎ Bush (20) (M4) (2)◎ PSW 4x20 (2) | |
| ① Base Adaptor (2)① | PSW 4x10 (8) |
| ◎ Spacer (60) (2)◎ PSW 6x50 (2) | |
| ◎ Bush (M4) (2)◎ PSW 4x50 (2) | |
Deciding on the installation location
1 Decide on the installation location.
Make sure that the wall has enough space for the TV and is capable of supporting a weight of at least four times that of the TV.
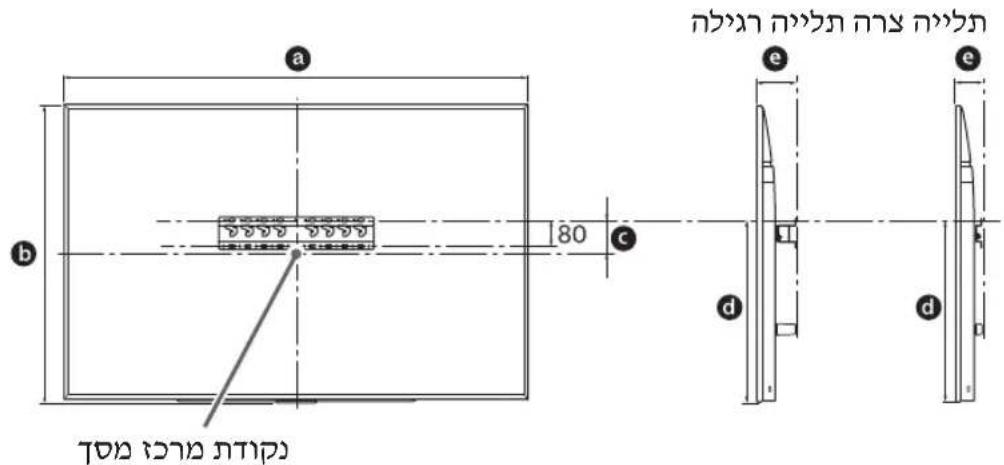
Refer to the following table on installing the TV to the wall. Refer to your TV's Reference Guide for the TV's weight.
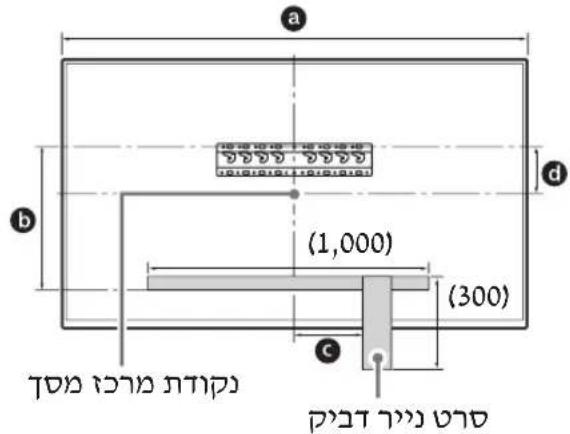
Standard mounting Slim mounting Screen centre point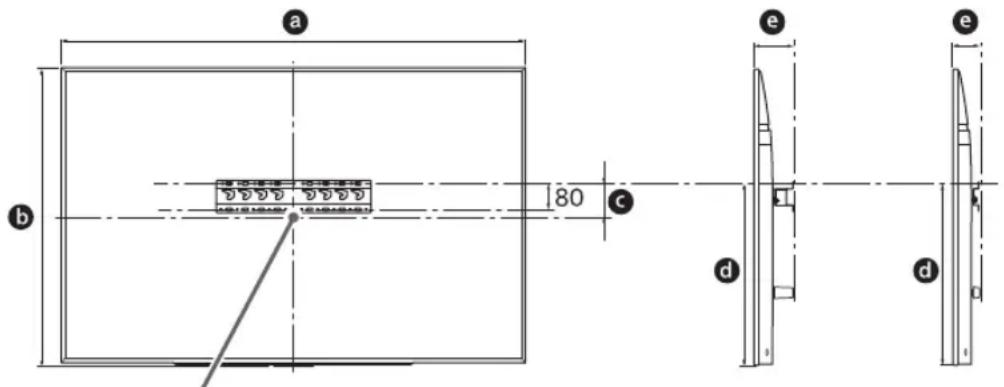
Unit: mm
| Model Name | Display dimensions | Screen centre dimension | Length for mounting | |||
| a | b | c | d | e | ||
| Standard mounting | Slim mounting | |||||
| KD-85XG85□□ | 1,909 | 1,097 | 251 | 803 | 142 | 100 |
| KD-75XG87□□ KD-75XG85□□ | 1,673 | 963 | 107 | 595 | 116 | 75 |
| KD-65XG87□□ KD-65XG85□□ | 1,450 | 836 | 99 | 523 | 115 | 73 |
| KD-55XG87□□ KD-55XG85□□ | 1,231 | 713 | 106 | 468 | 115 | 73 |
Note
- Figures in the table may differ slightly depending on the installation.
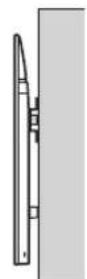
- When your TV is installed on the wall, the upper side of the TV slightly leans forward.
Allow for suitable clearance between the TV and the ceiling and protruding parts of the wall as shown below.
Unit: mm
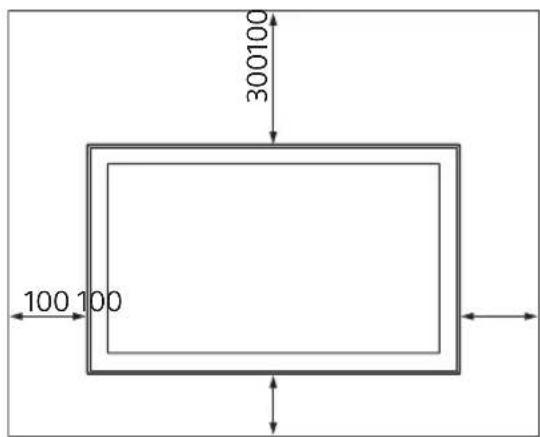
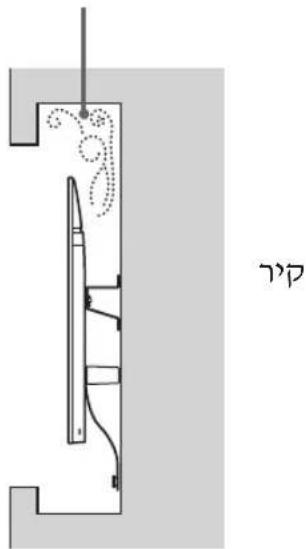
To ensure proper ventilation and prevent the collection of dirt or dust:
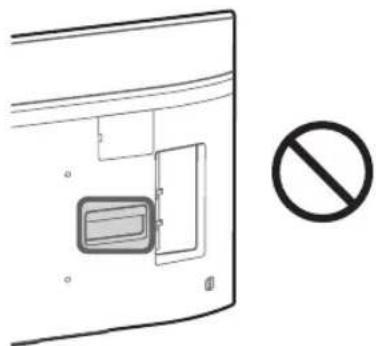
Do not lay the TV set flat, install upside down, backwards, or sideways. Do not place the TV set on a shelf, rug, bed, or in a closet. Do not cover the TV set with a cloth, such as curtains, or items such as newspapers, etc. Do not install the TV set as shown below.
Air circulation is blocked.
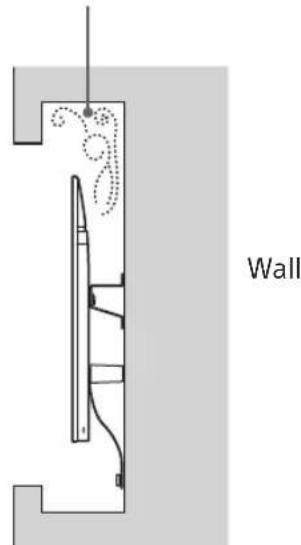
Note
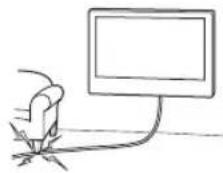
- If you intend to route the cables in the wall, make a hole in the wall to insert the cables before beginning the installation.
To prevent pinching the cables, prepare a hole in the wall somewhere outside the perimeter of the Base (20) A, Base Adaptor 1, and Spacer (20) E, Spacer (60) K.
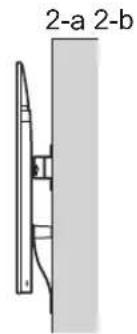
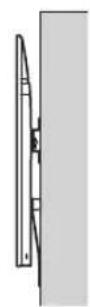
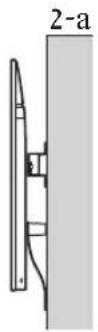
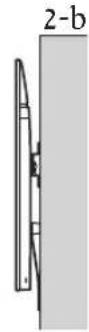
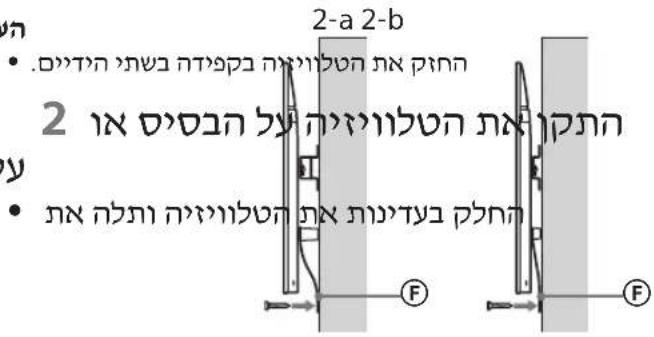
2 Select Wall mounting style. It is selectable as shown below.
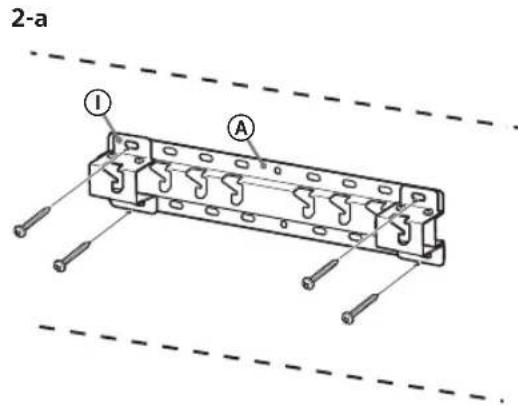
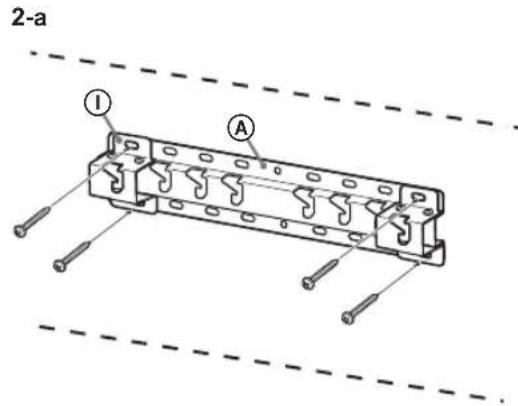
2-a Standard mount
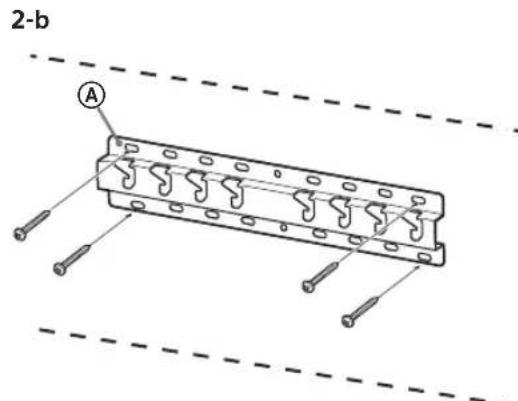
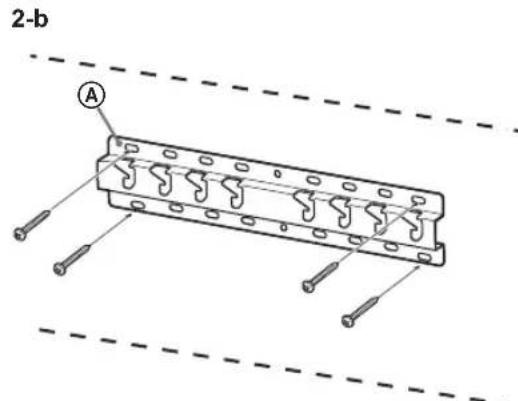
2-b Slim mount
Refer to the table of step 1.
WARNING
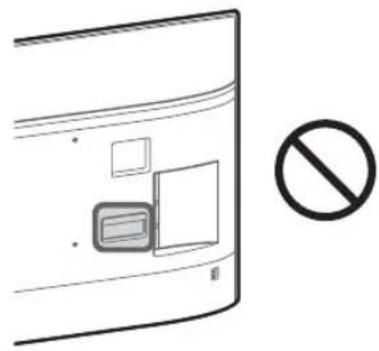
- When 2-b is selected, rear terminal access is limited.
2-a 2-b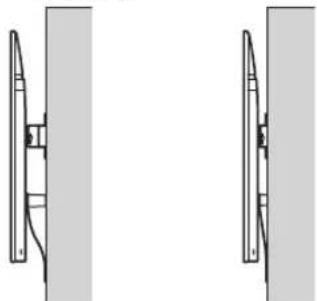
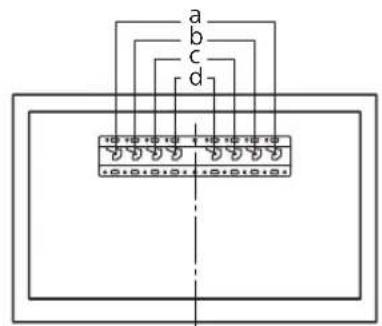
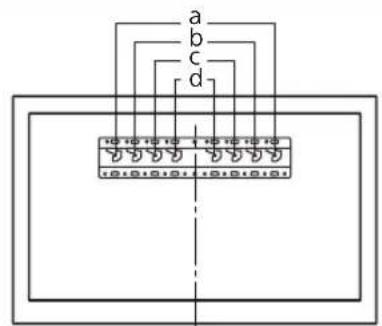
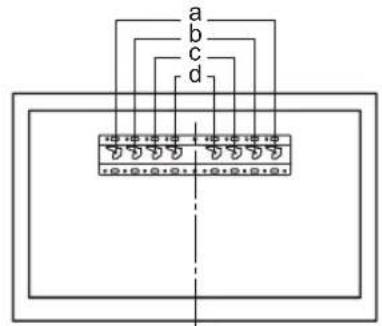
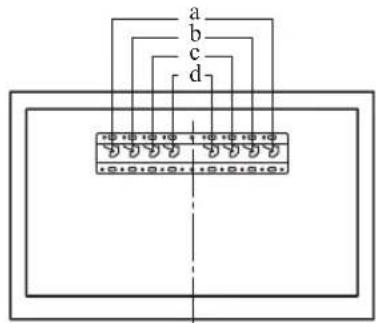
3 Refer to the below table about the Base Adaptor fitting location. In case of selecting 2-b, then skip this step.
| Model Name Hook location | |
| KD-85XG85□□ | |
| KD-75XG87□□ | a |
| KD-75XG85□□ | |
| KD-65XG87□□ | |
| KD-65XG85□□ | b |
| KD-55XG87□□ | |
| KD-55XG85□□ | |
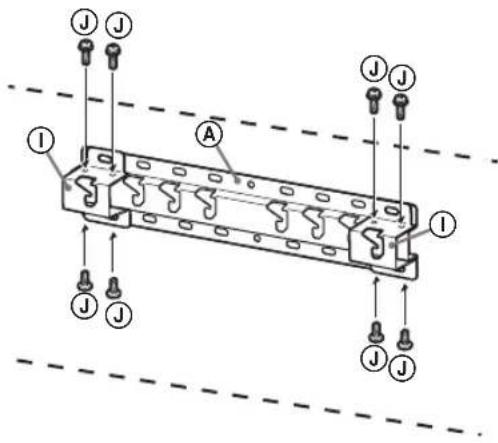
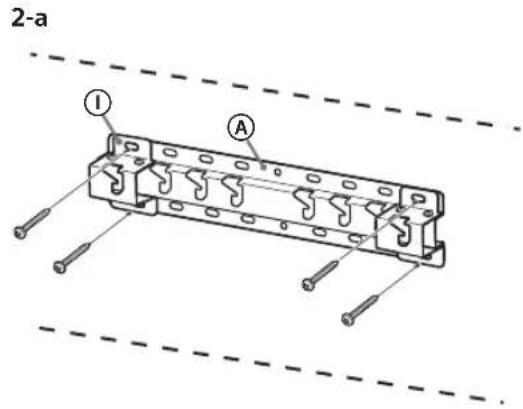
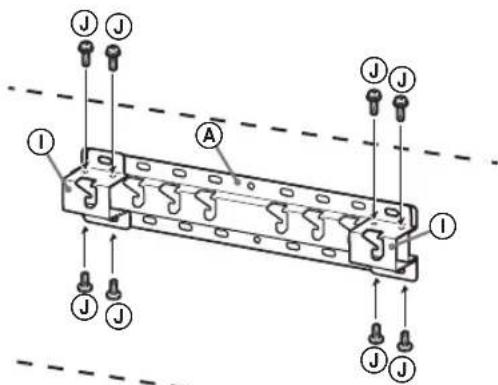
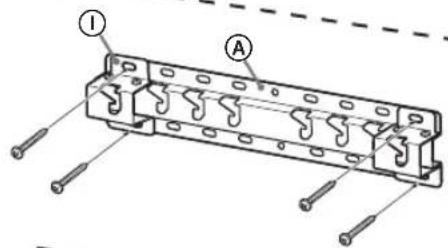
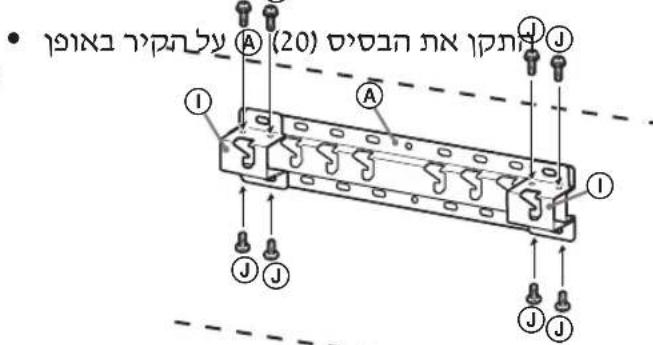
Fit Base Adaptor ① by using Screw (PSW 4x10) ② to Base (20) ④ when selecting 2-a.
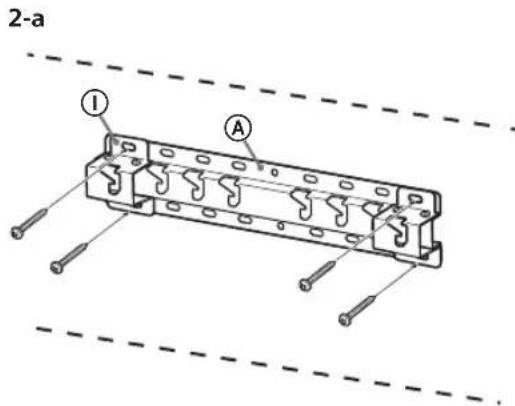
4 Decide the positions of the screws for installing the Base (20) A.
Refer to the specifications on page 18. When selecting 2-a, please use the hole positions of Base Adaptor ①.
WARNING
The wall that the TV will be mounted on should be able to support a weight of at least four times that of the TV (Refer to your TV's Reference Guide for its weight.). - Determine the strength of the wall the TV will be mounted on. Reinforce the wall sufficiently, if necessary.
Installing the Base on the wall
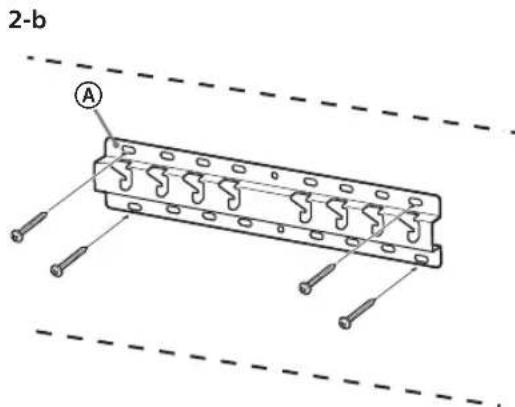
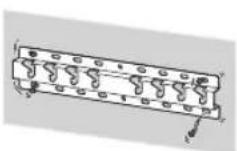
- Use four or more screws of 8 mm diameter or equivalent (not supplied).
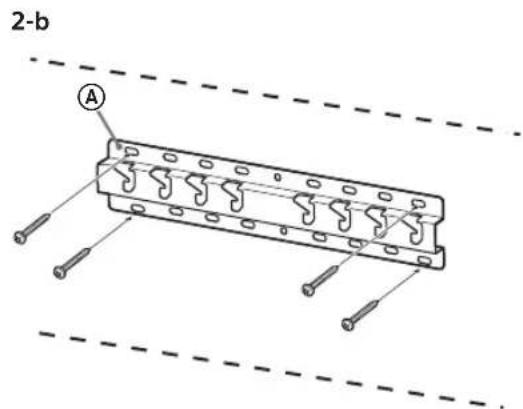
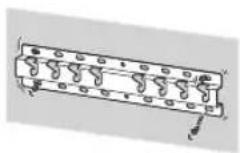
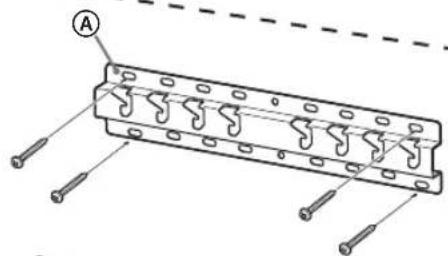
- Fit four screws to the holes of Base Adaptor ① with Base (20) A (2-a only). Install the Base (20) A on the wall horizontally.
Preparing for the installation of the TV
Refer to the Setup Guide for stand installation.
KD-85/75XG85□□, KD-75XG87□□
1 Mark the installation location on the wall.
- Use masking tape, etc. (not supplied) to mark the location of the TV near the Base or Base Adaptor. Refer to the following table.
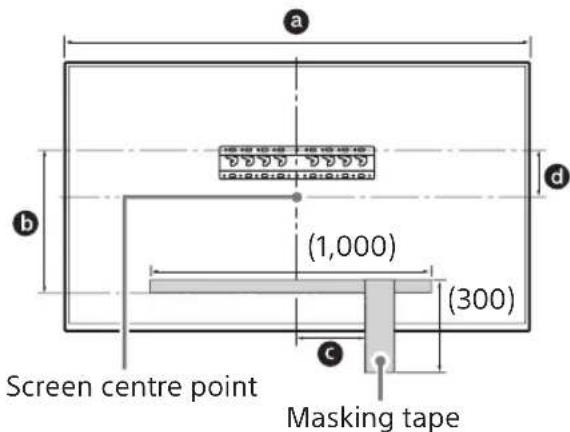
| Model Name | Length for marking | Screen centre dimension | ||
| a | b | c | d | |
| KD-85XG85□□ | 1,909 | 683 | 200 | 251 |
| KD-75XG87□□ KD-75XG85□□ | 1,673 | 468 | 200 | 107 |
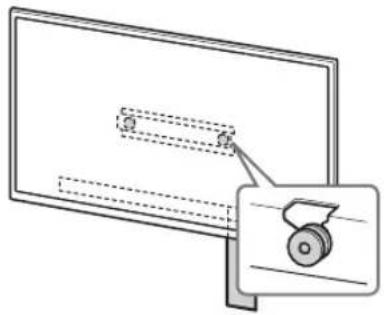
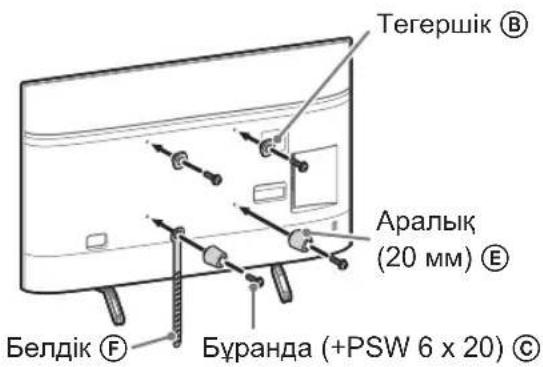
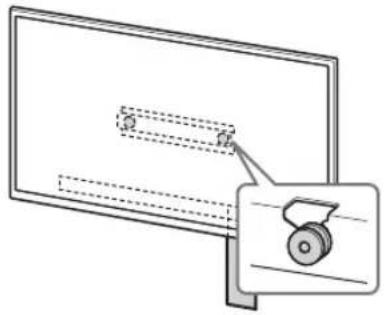
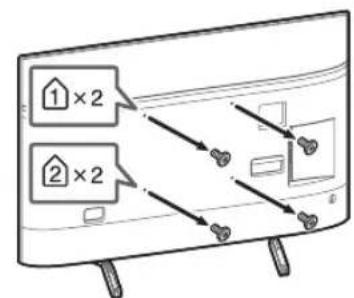
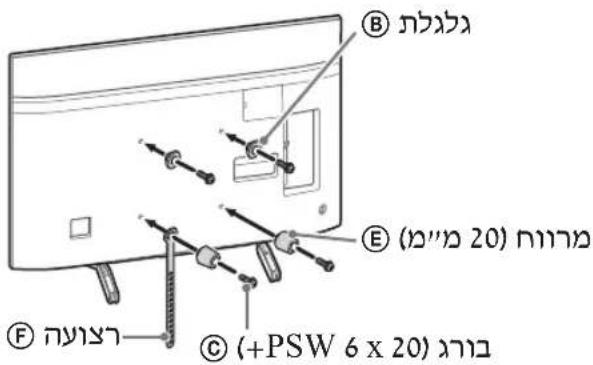
2 Remove the screws from the rear of the TV.
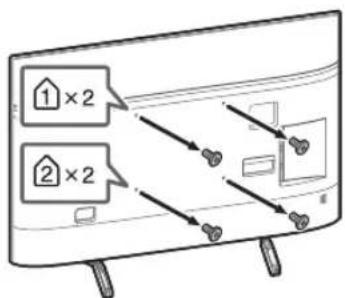
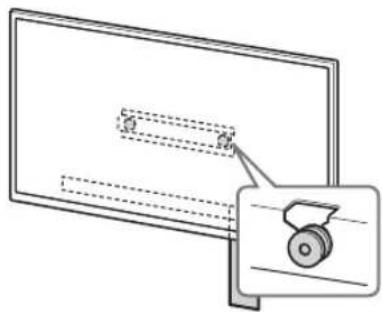
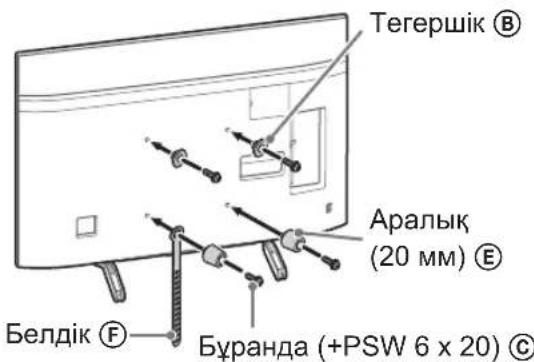
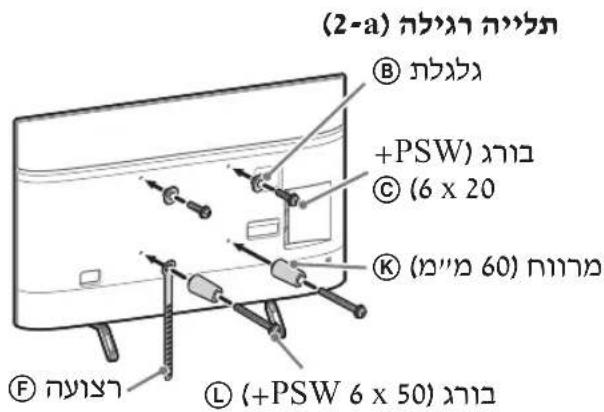
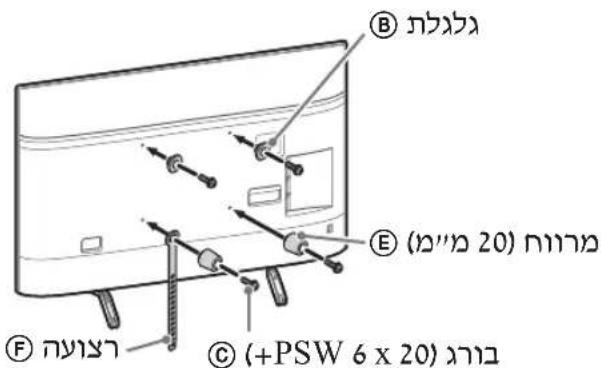
3 Attach the Attachment parts for Wall-Mount Bracket. Check the Attachment parts by referring to "Supplied with SU-WL450" in "Checking the parts" on page 5.
Note
- Firmly secure the attachment parts using screws.
- When using an electric screwdriver, set the torque setting to approximately 1.5N· m {15 kgf·cm}.
- Be sure to store the used or unused parts in a safe place for future use. Retain this manual for future reference.
Standard mounting (2-a) Slim mounting (2-b)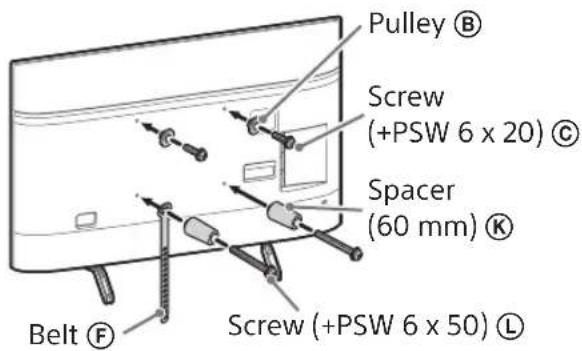
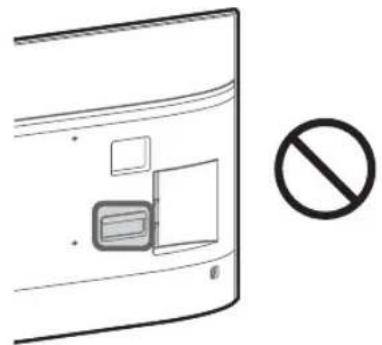
Note
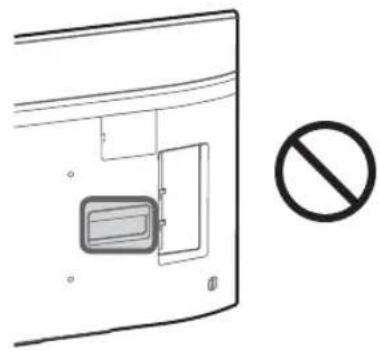
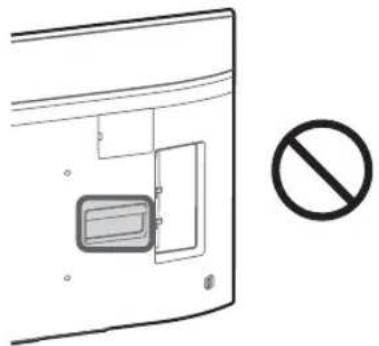
- You cannot use some of the terminals on the rear of the TV when using this mounting style.
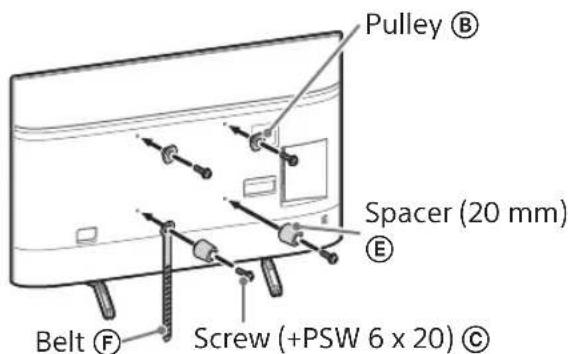
4 Connect the necessary cable(s) to the TV.
Make sure to connect the cables before installing the TV on the wall. You will be unable to connect the cables when the TV is installed. Refer to the Reference Guide supplied with your TV.
Note
- Subcontract the cable routing in the wall to a licensed contractor.
- Bundle the connecting cables to prevent stepping on them before wall mounting.
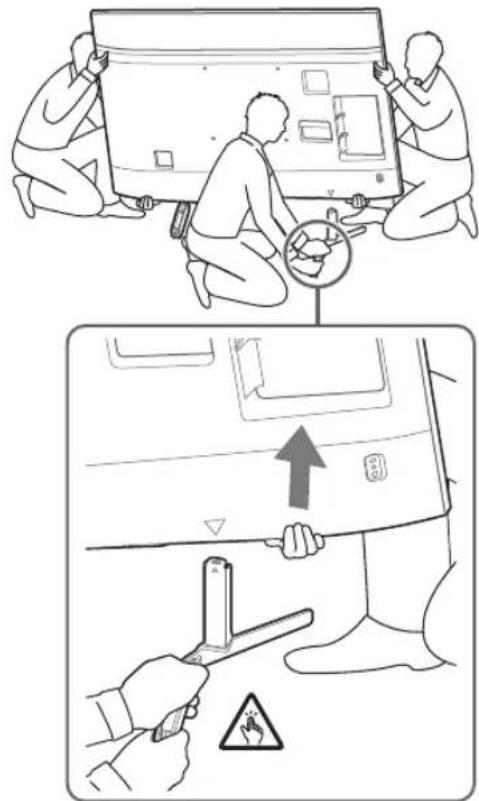
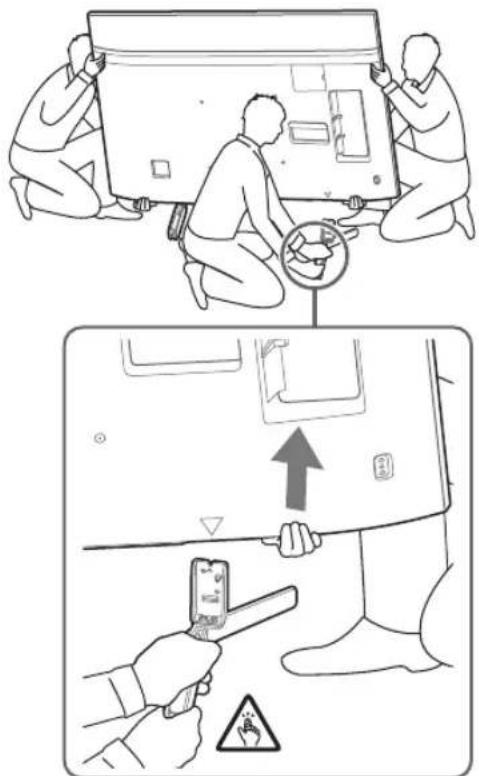
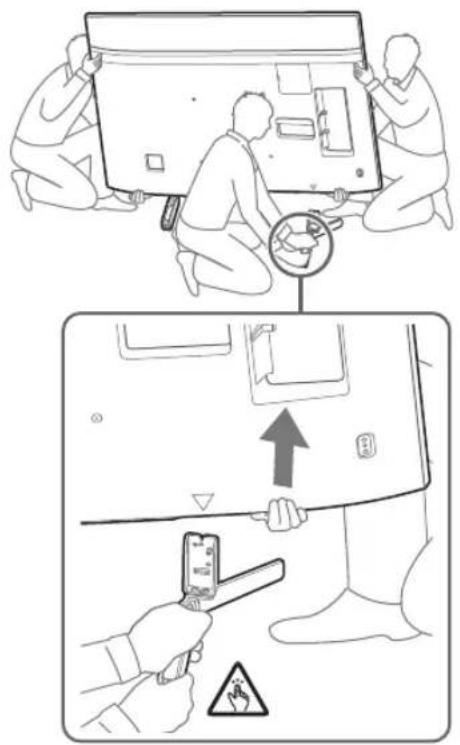
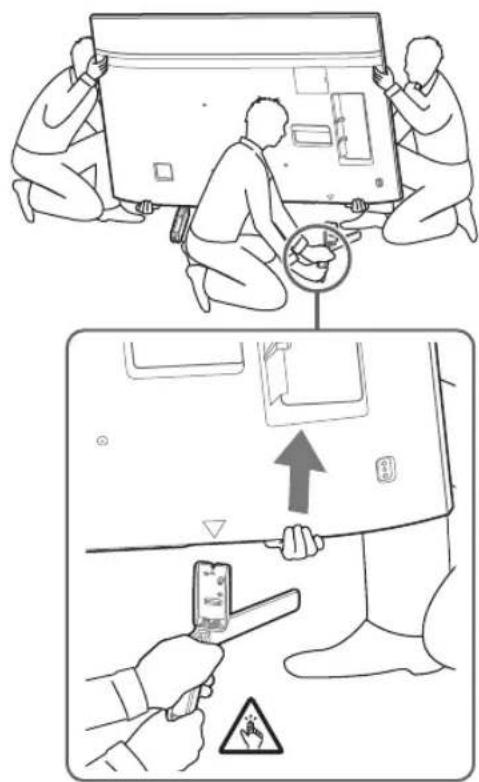
5 Detach the Table-Top Stand from the TV.
- Remove one side of the Table-Top Stand at a time. Firmly hold the Table-Top Stand securely with both hands while the other people lift up the TV.
KD-85XG85□□
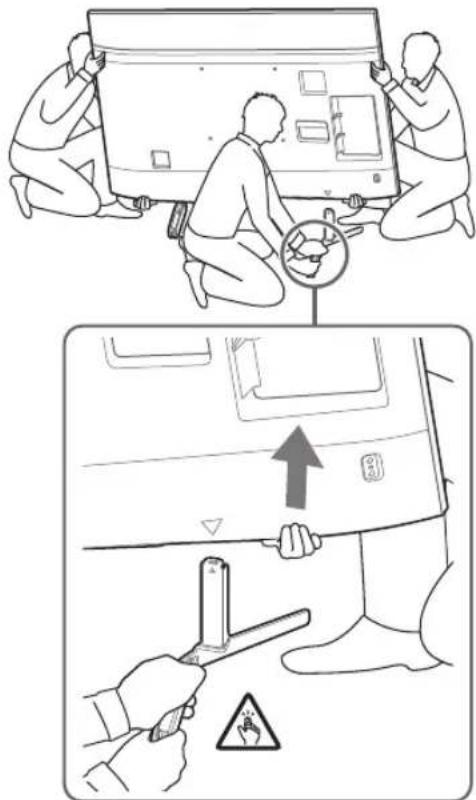
KD-75XG87□□, KD-75XG85□□
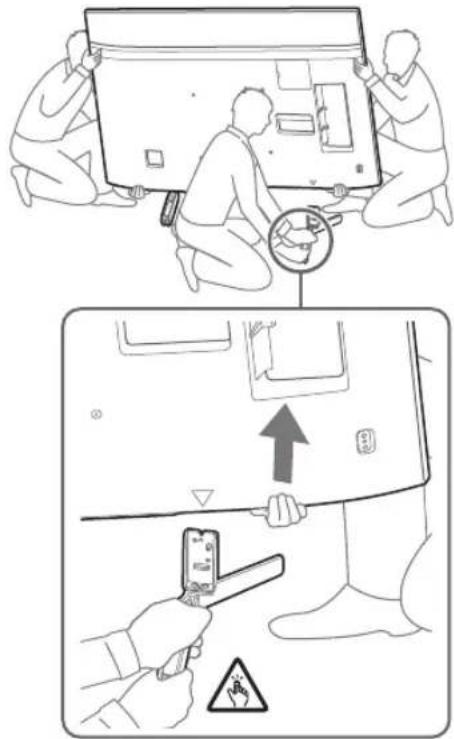
- Repeat the previous step and remove the other side of the Table-Top Stand.
Note
- Three or more people are required to detach the Table-Top Stand.
- Be careful not to use excessive force while detaching the Table-Top Stand from the TV as it may cause the TV set to fall resulting in personal injury or physical damage to the TV. Take care when handling the Table-Top Stand to prevent damage to the TV.
- Be careful when lifting the TV as the Table-Top Stand is detached, the Table-Top Stand may topple over and cause personal injury. Take care when removing the Table-Top Stand from the TV to prevent it from falling over and damaging the surface that the TV is sitting on.
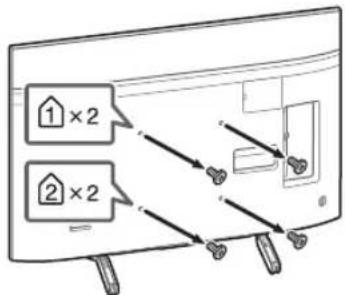
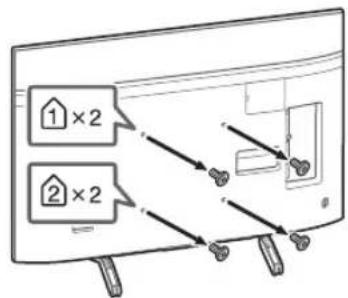
1 Remove the screws from the rear of the TV.
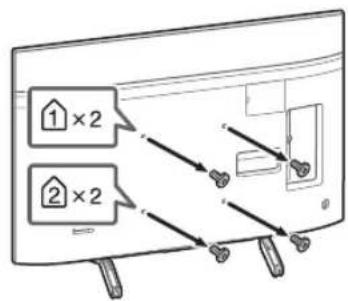
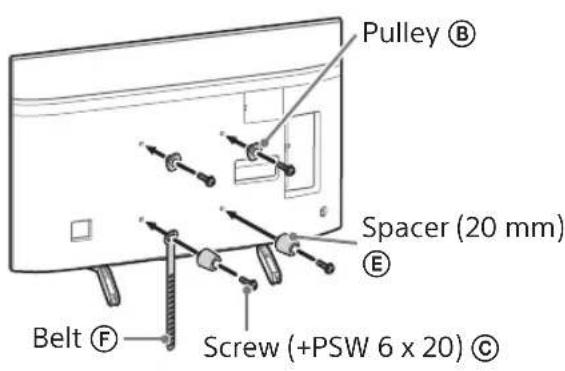
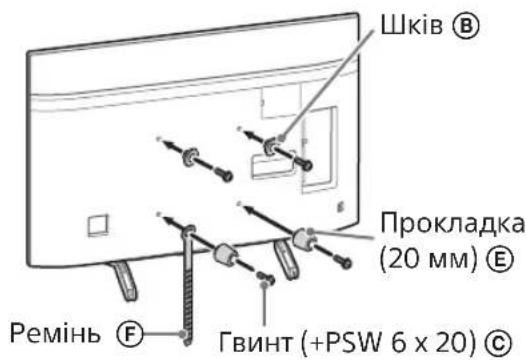
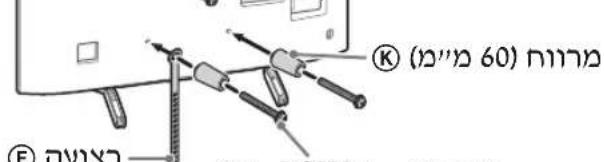
2 Attach the Attachment parts for Wall-Mount Bracket. Check the Attachment parts by referring to "Supplied with SU-WL450" in "Checking the parts" on page 5.
Note
- Firmly secure the Attachment parts using screws.
- When using an electric screwdriver, set the torque setting to approximately 1.5 N·m {15 kgf·cm}.
- Be sure to store the used or unused parts in a safe place for future use. Retain this manual for future reference.
Standard mounting (2-a)
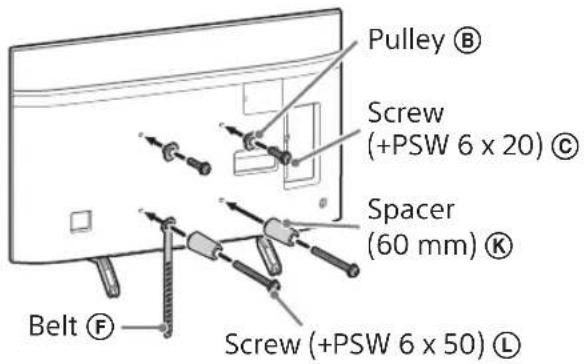
Slim mounting (2-b)
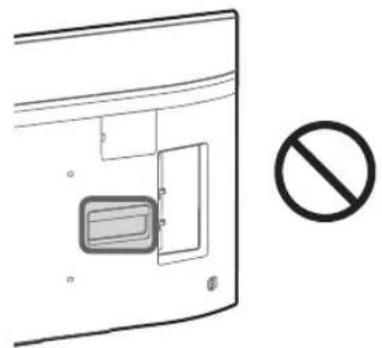
Note
- You cannot use some of the terminals on the rear of the TV when using this mounting style.
3 Connect the necessary cable(s) to the TV.
Make sure to connect the cables before installing the TV on the wall. You will be unable to connect the cables when the TV is installed.
Refer to the Reference Guide supplied with your TV.
Note
- Subcontract the cable routing in the wall to a licensed contractor.
- Bundle the connecting cables to prevent stepping on them before wall mounting.
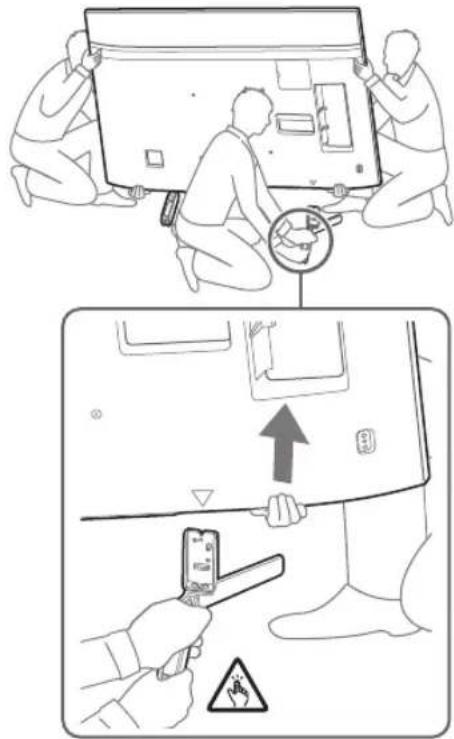
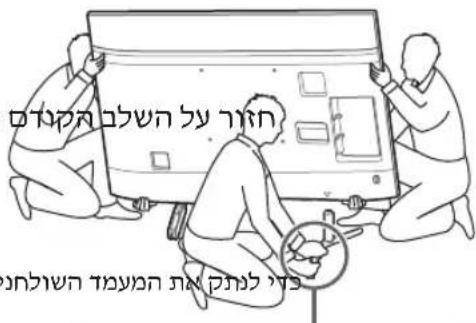
4 Detach the Table-Top Stand from the TV.
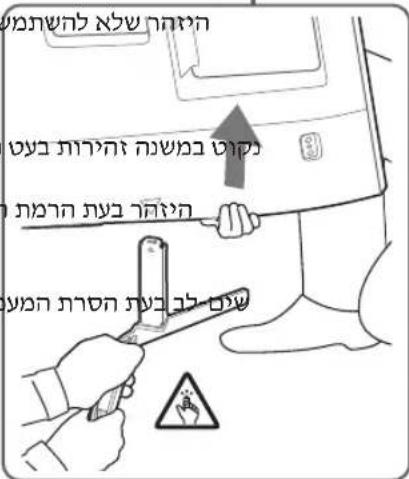
- Remove one side of the Table-Top Stand at a time. Firmly hold the Table-Top Stand securely with both hands while the other people lift up the TV.
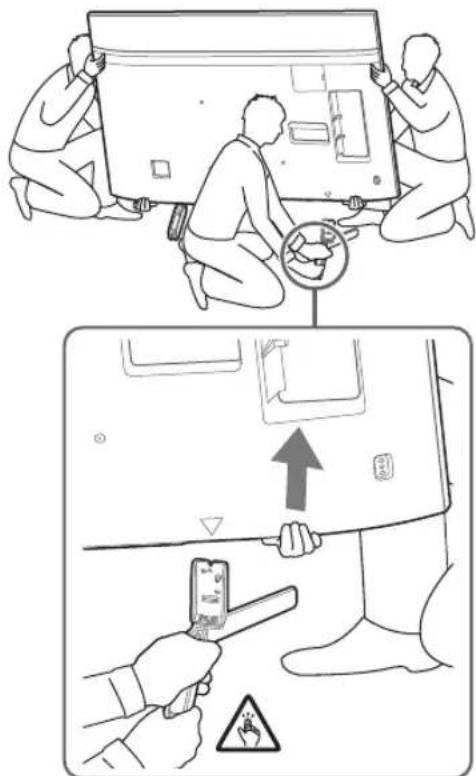
- Repeat the previous step and remove the other side of the Table-Top Stand.
Note
- Three or more people are required to detach the Table-Top Stand.
- Be careful not to use excessive force while detaching the Table-Top Stand from the TV as it may cause the TV set to fall resulting in personal injury or physical damage to the TV. Take care when handling the Table-Top Stand to prevent damage to the TV.
- Be careful when lifting the TV as the Table-Top Stand is detached, the Table-Top Stand may topple over and cause personal injury. Take care when removing the Table-Top Stand from the TV to prevent it from falling over and damaging the surface that the TV is sitting on.
Installing the TV on the wall
KD-85/75XG85□□, KD-75XG87□□
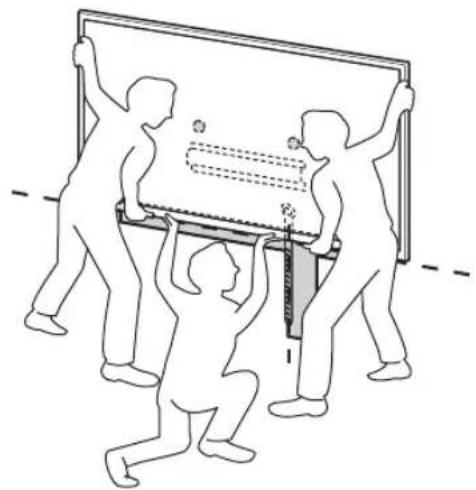
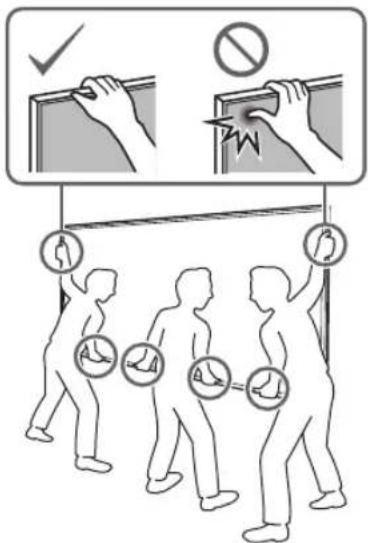
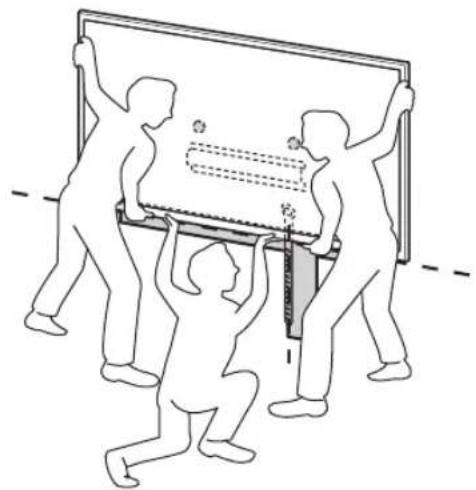
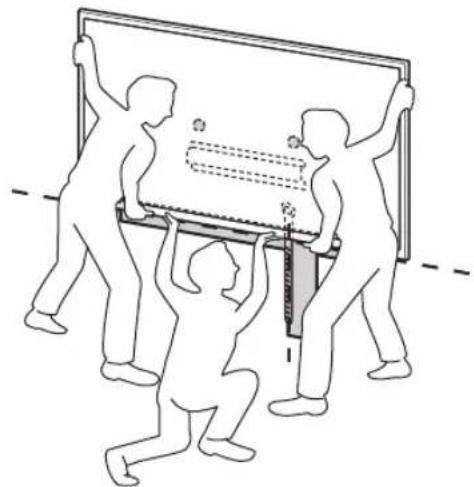
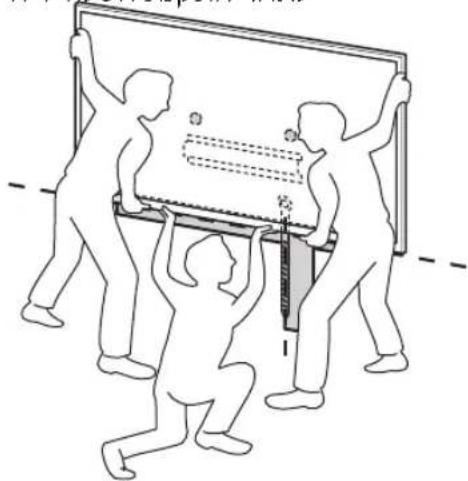
1 Lift the TV.
- For the location of the Pulleys (B) to hang on the Base or Base Adaptor, refer to the table in step 3 of "Deciding on the installation location" on page 7. Make sure that the rear of the TV touches the Base or Base Adaptor when holding the TV.
Note
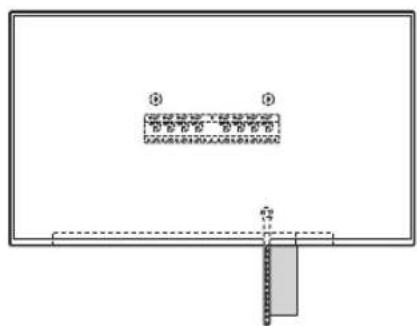
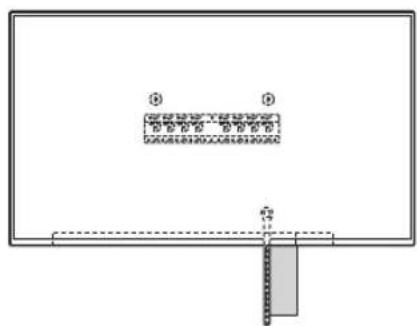
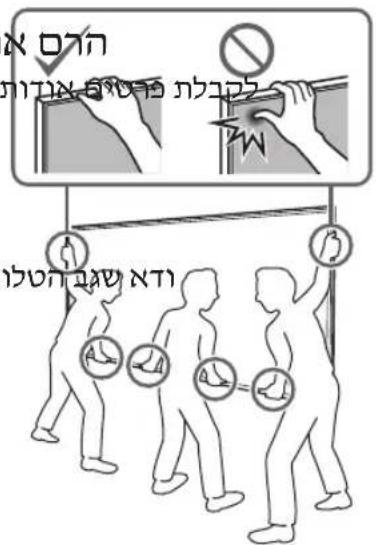
- Hold the TV securely with both hands and make sure the Belt (F) and the bottom of the TV align with the masking tape.
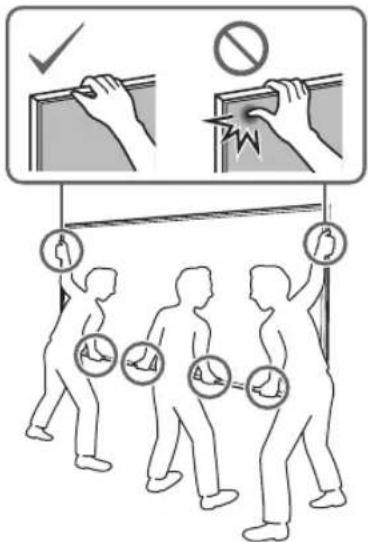
- Carry the TV with three people, and the person who is in front of the TV leads the others to adjust the position.
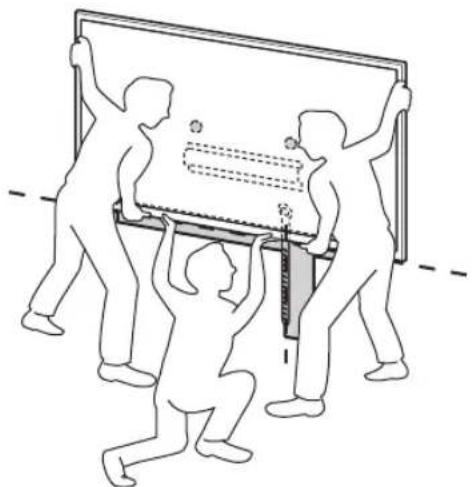
Take great care when installing the TV to the wall, especially for the person who is supporting the TV from below. The television set may fall, causing serious bodily injury or even death.
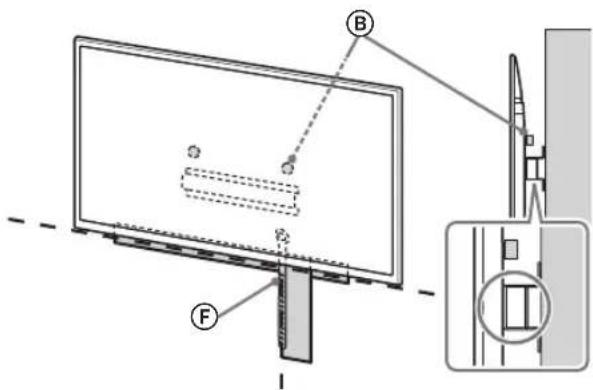
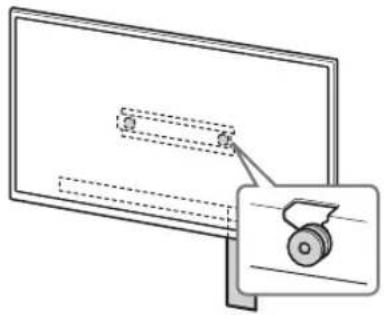
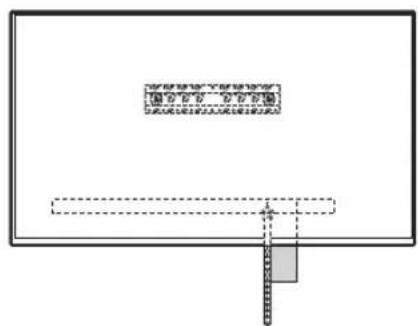
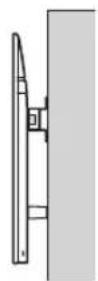
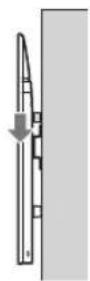
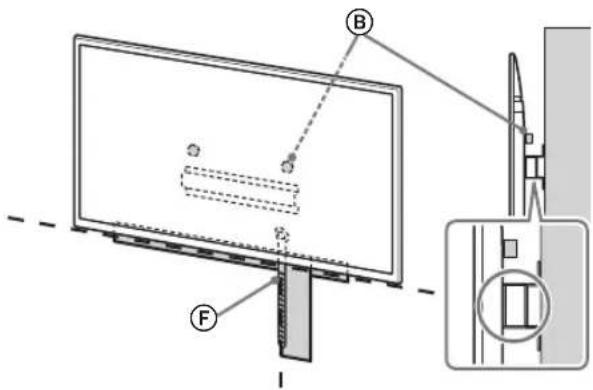
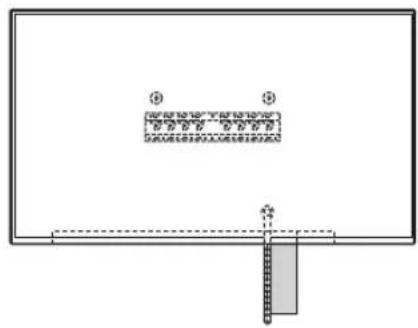
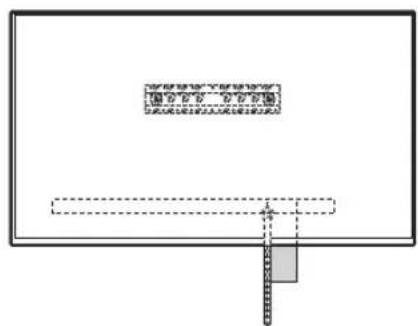
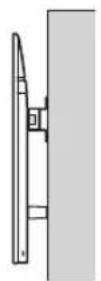
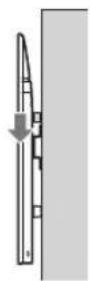
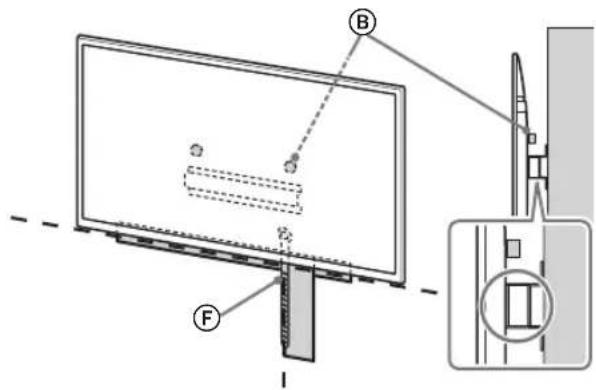
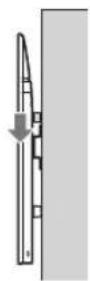
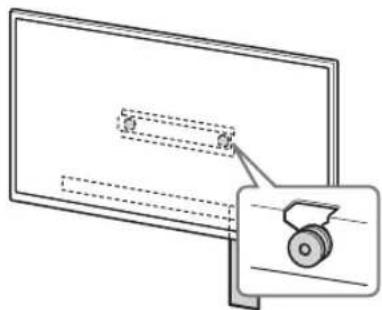
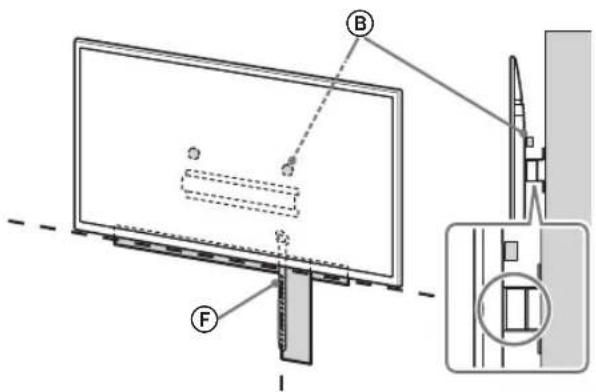
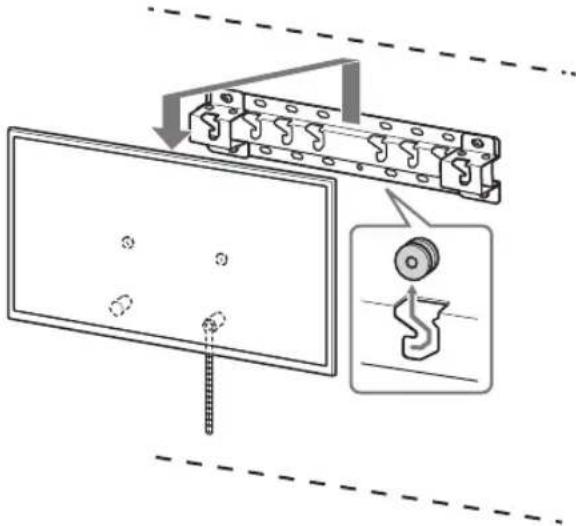
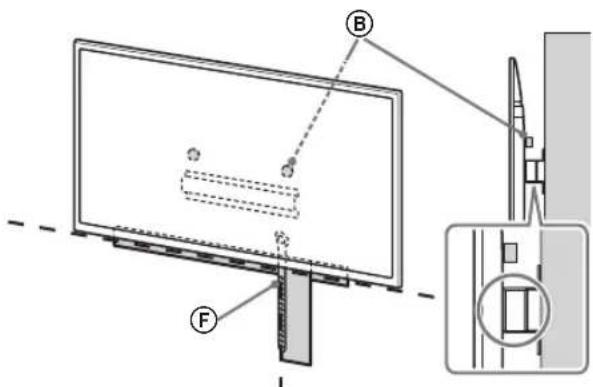
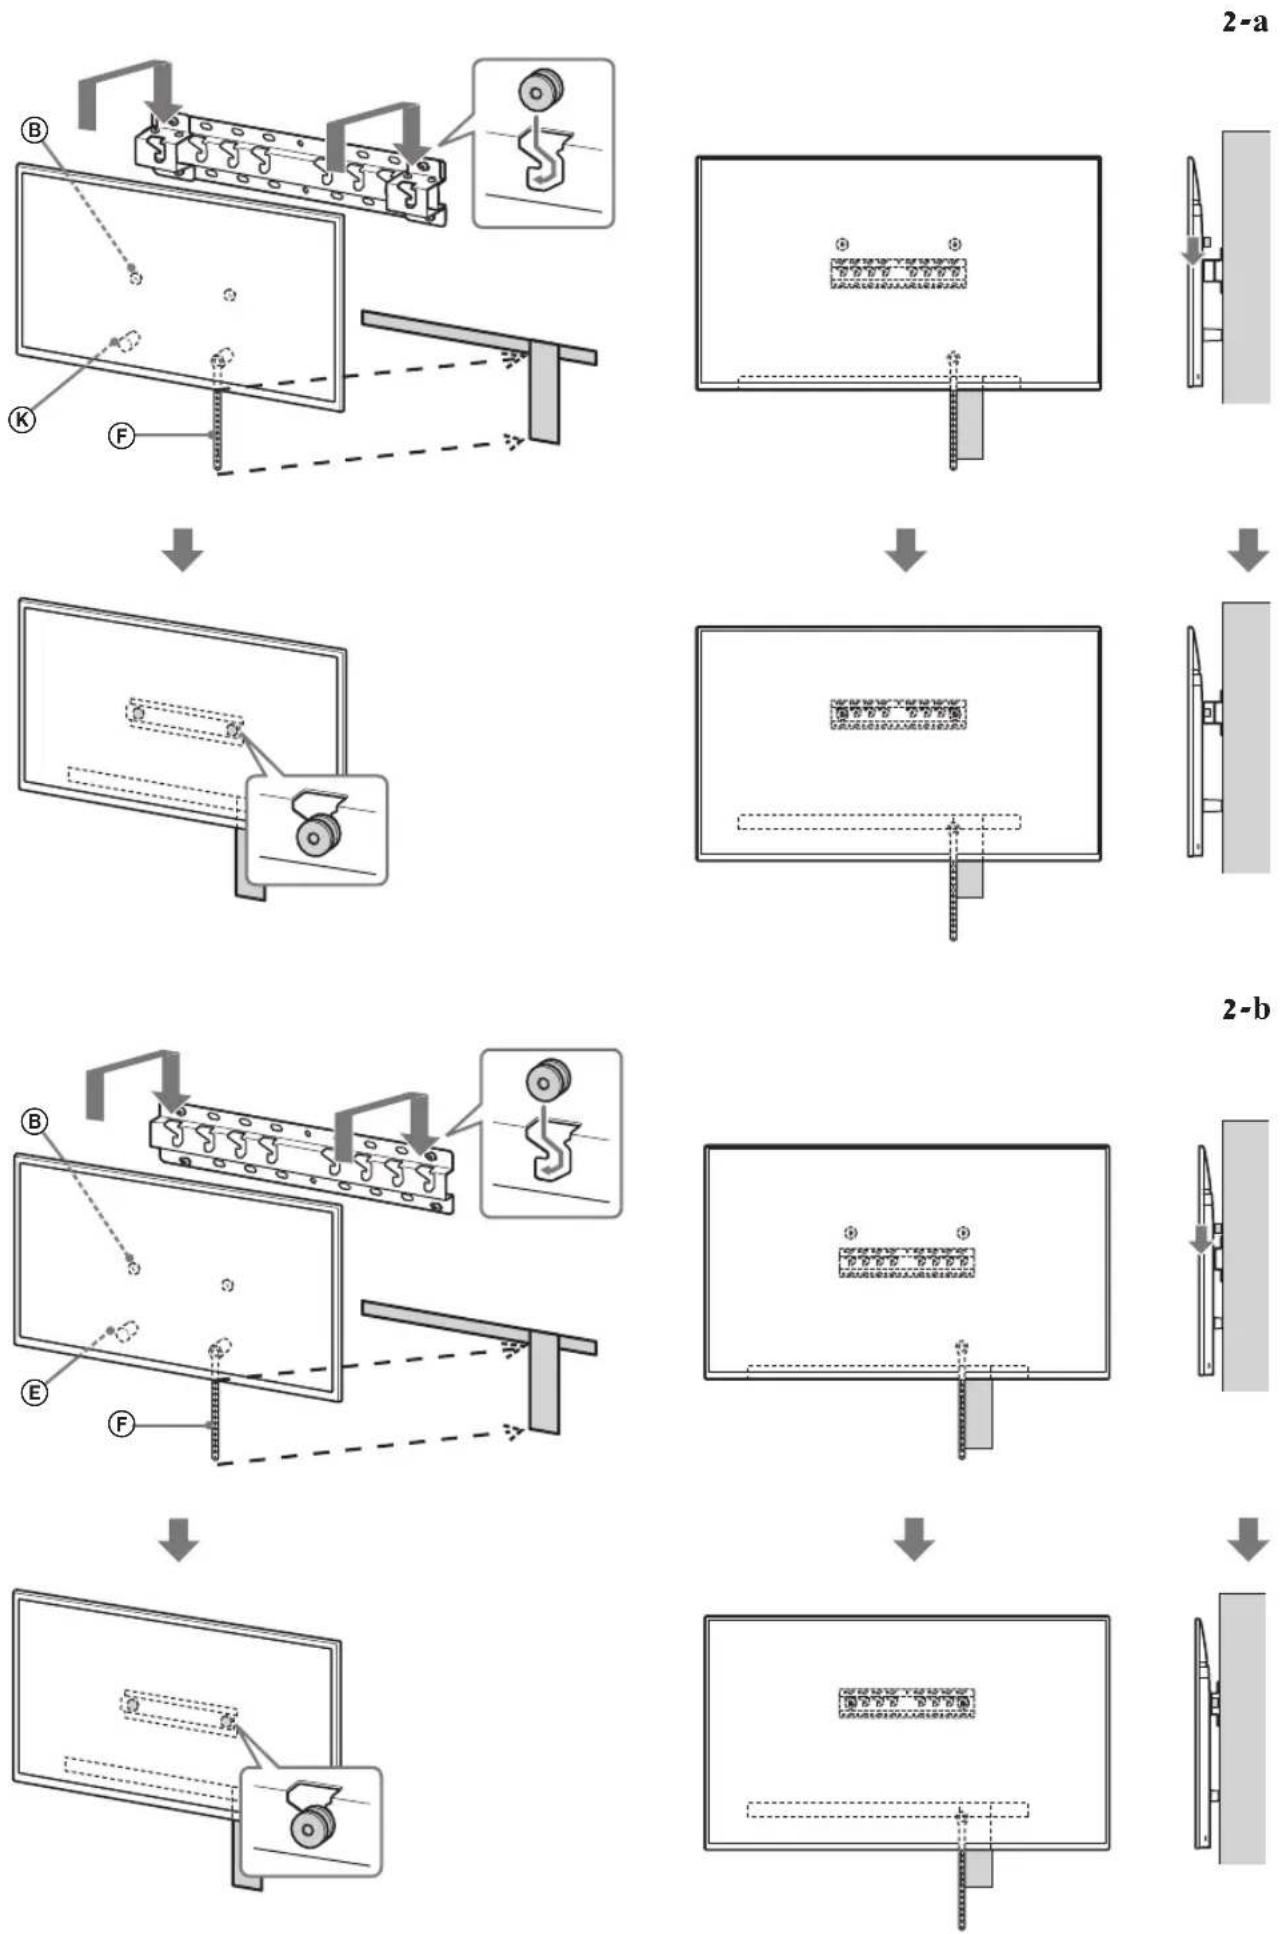
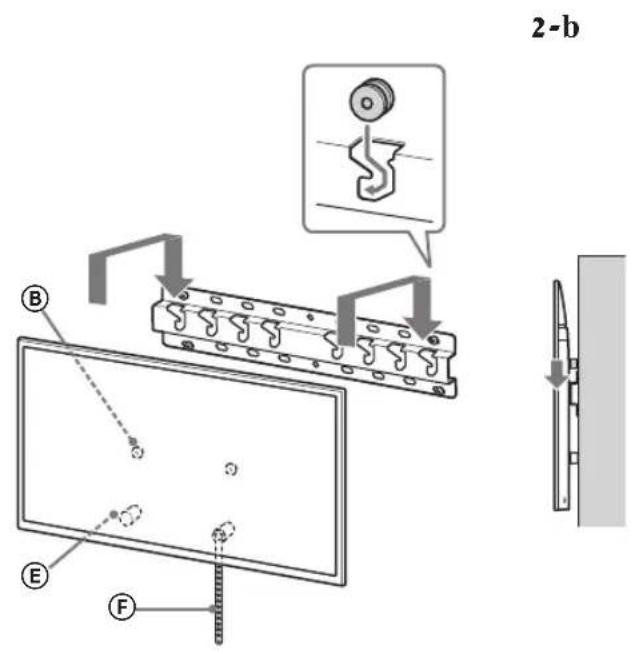
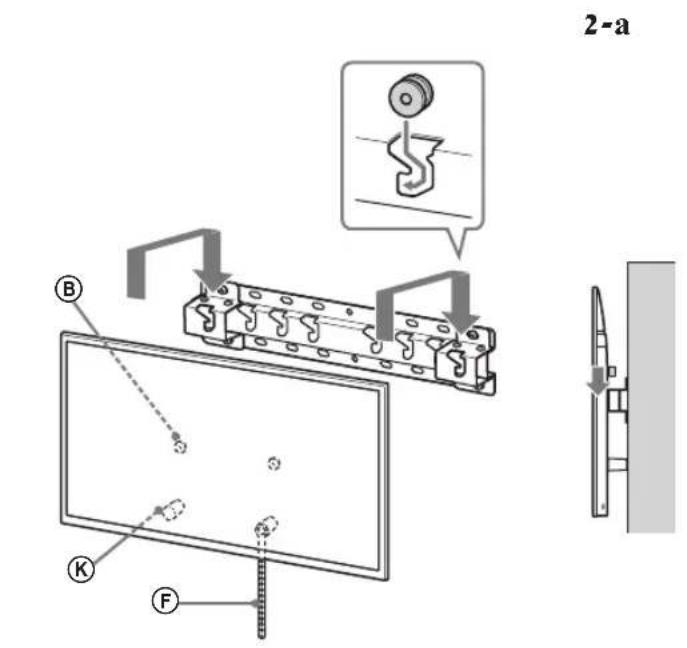
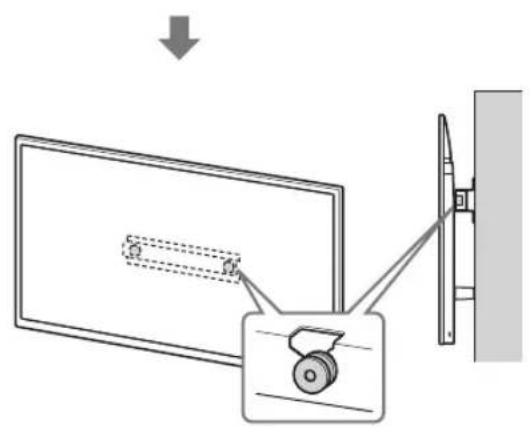
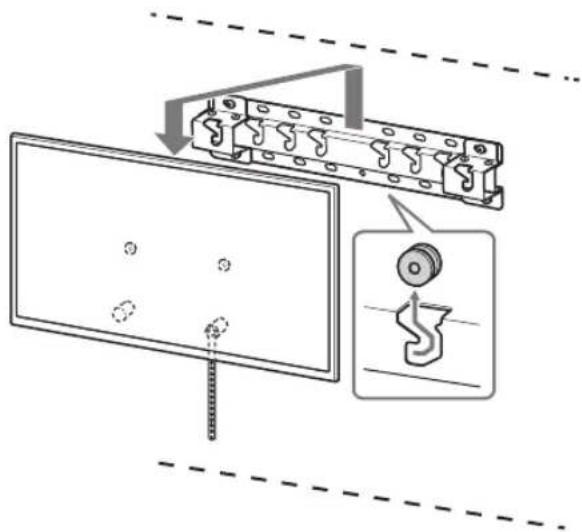
2 Install the TV onto the Base or Base Adaptor.
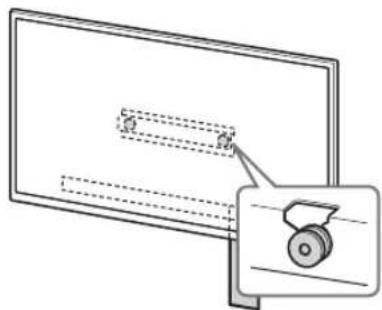
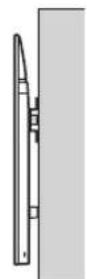
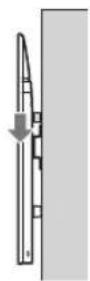
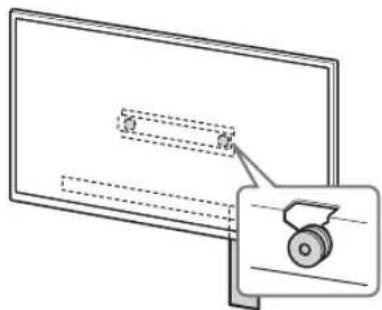
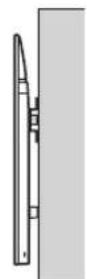
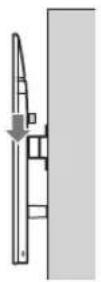
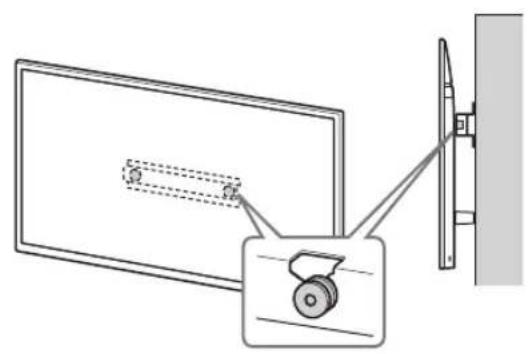
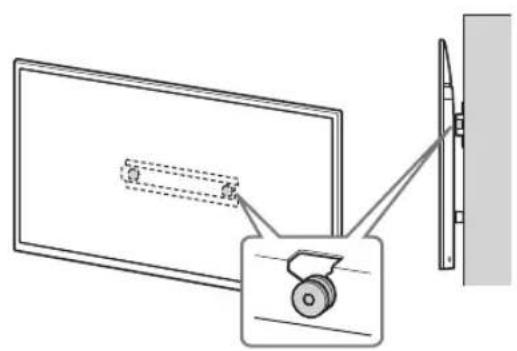
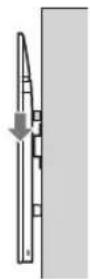
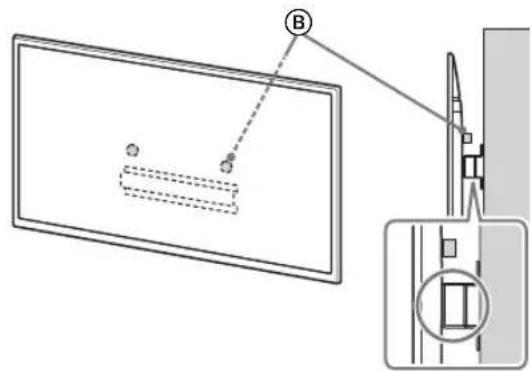
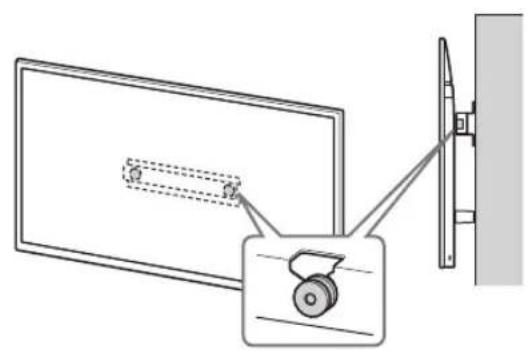
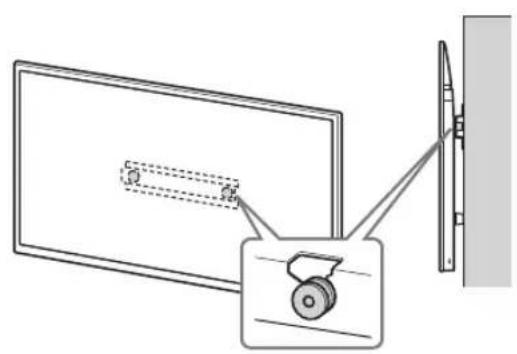
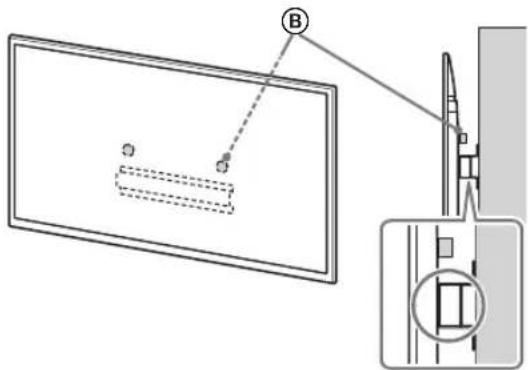
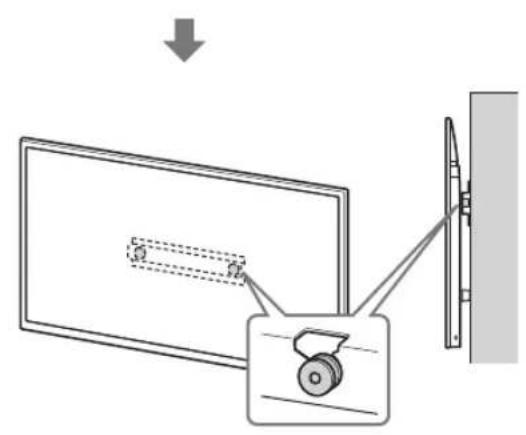
- Gently slide down the TV and hang the Pulleys (B) attached to the rear of the TV to the Base or Base Adaptor, making sure to confirm the shape of the holes. After installing the TV on the wall, confirm the Pulleys (B) are firmly latched into the Base or Base Adaptor.
- Release both hands slowly to ensure that the TV does not fall.
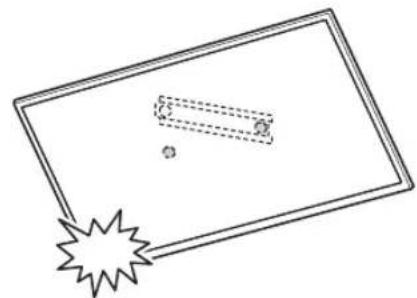
- After installing the TV on the wall, remove the masking tape, etc. from the wall.
2-a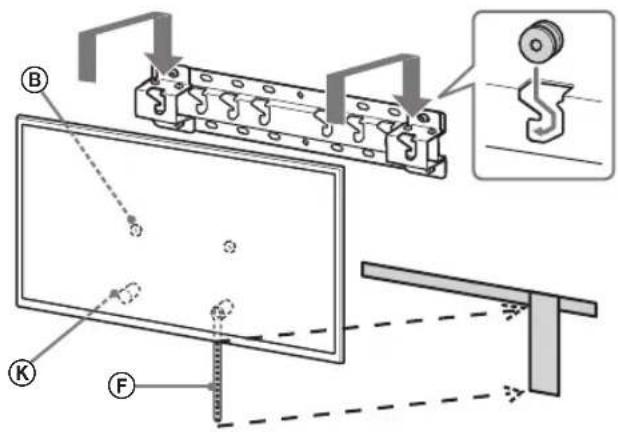
↓
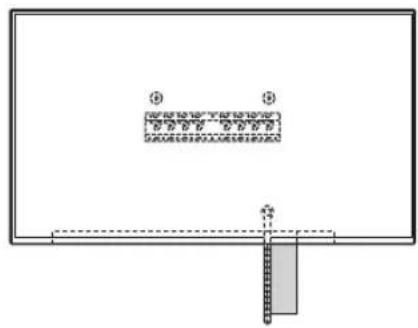
↓
↓
2-b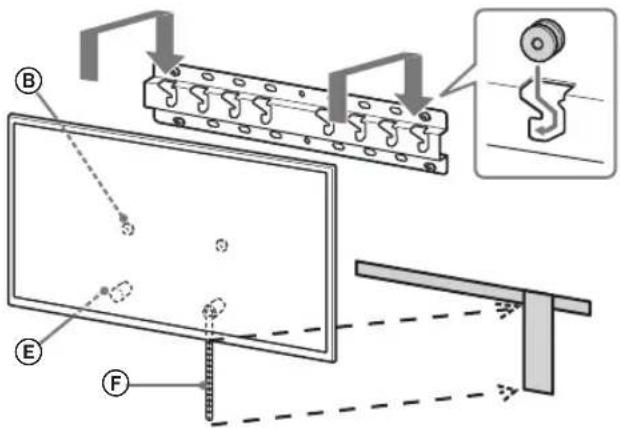
↓
↓
↓
WARNING
- Be sure that two or more persons (three or more persons for 75 inches and above TV set) hold the TV when carrying it.
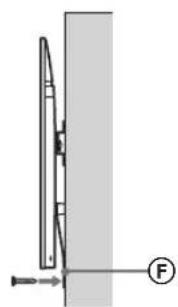
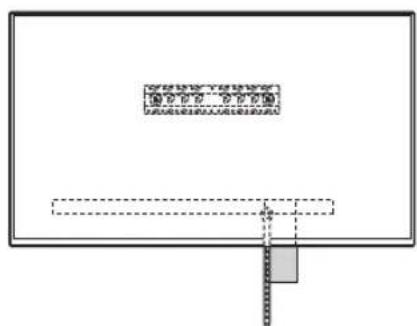
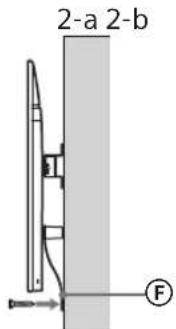
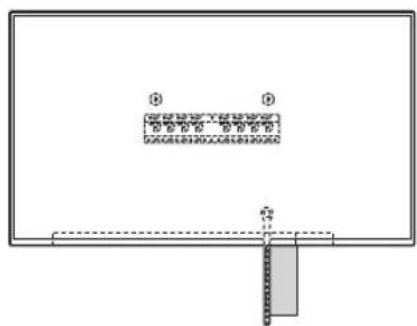
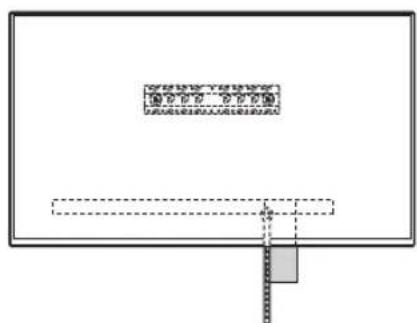
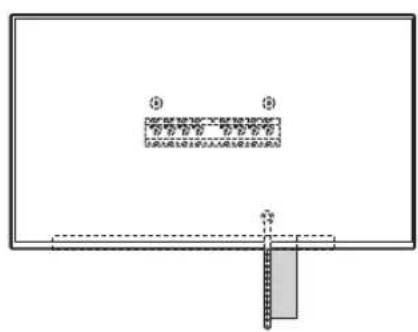
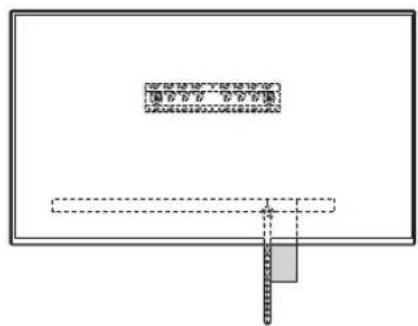
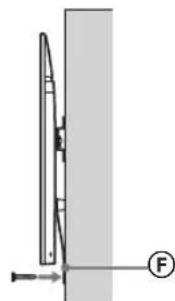
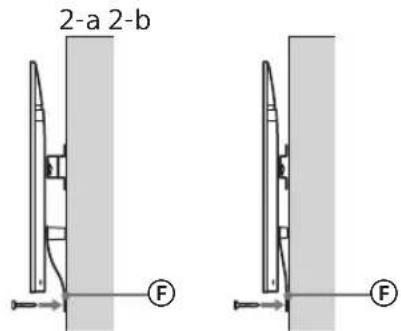
3 Preventing the bottom of the TV from shifting.
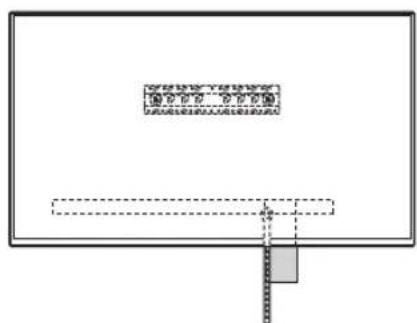
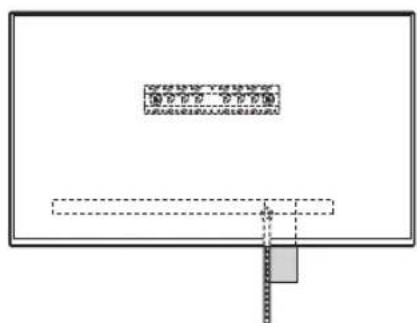
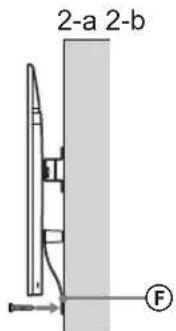
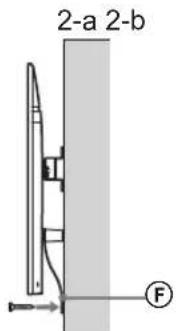
Take up the slack of Belt F and attach it to the wall tightly.
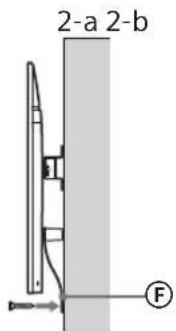
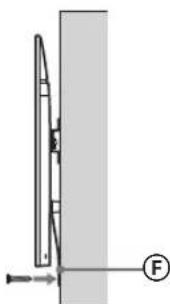
- Use a 5 mm diameter screw or equivalent (not supplied).
Note
Try to pull the bottom of the TV towards yourself slightly, to make sure that it does not move forward. If there is any movement, it is not fixed correctly, and the Belt should be secured firmly again.
KD-65/55XG87□□
KD-65/55XG85□
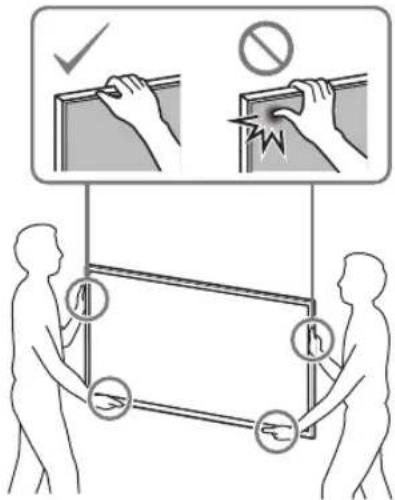
1 Lift the TV.
- For the location of the Pulleys to the hang on the Base or Base Adaptor, refer to the table of step 3 in "Deciding on the installation location" on page 7.
- Make sure that the rear of the TV touches the Base or Base Adaptor when holding the TV.
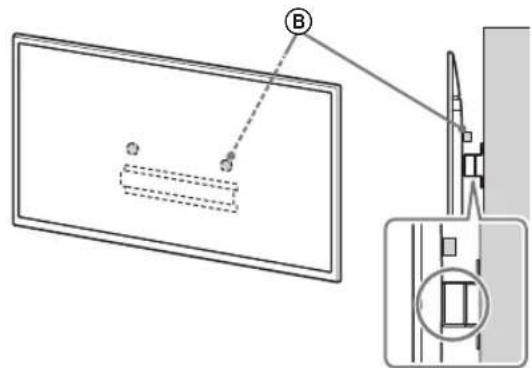
Note
- Hold the TV securely with both hands.
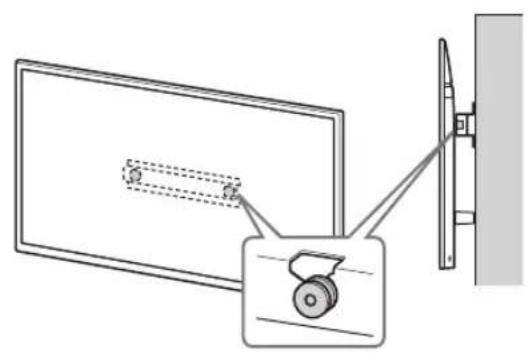
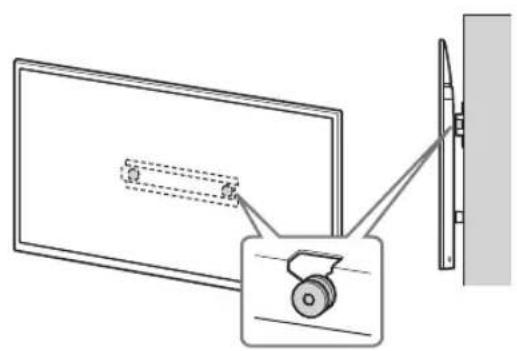
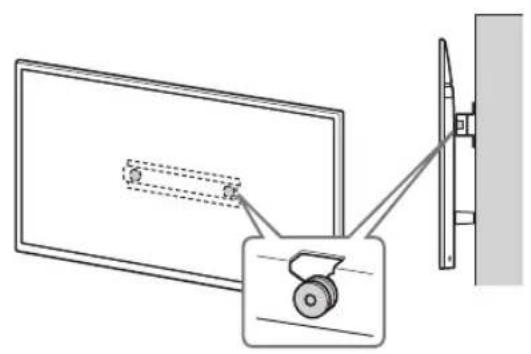
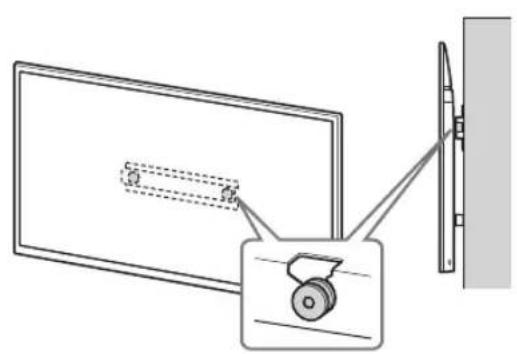
2 Install the TV onto the Base or Base Adaptor.
Gently slide down the TV and hang the Pulleys ⑧ attached to the rear of the TV to the Base or Base Adaptor, making sure to confirm the shape of the holes. After installing the TV on the wall, confirm the Pulleys B are firmly latched into the Base or Base Adaptor. - Release both hands slowly to ensure that the TV does not fall.
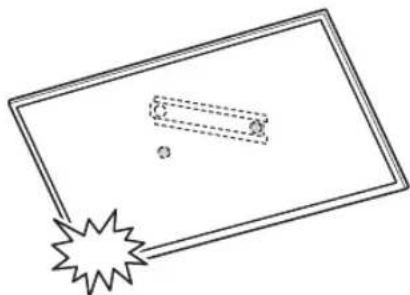
2-a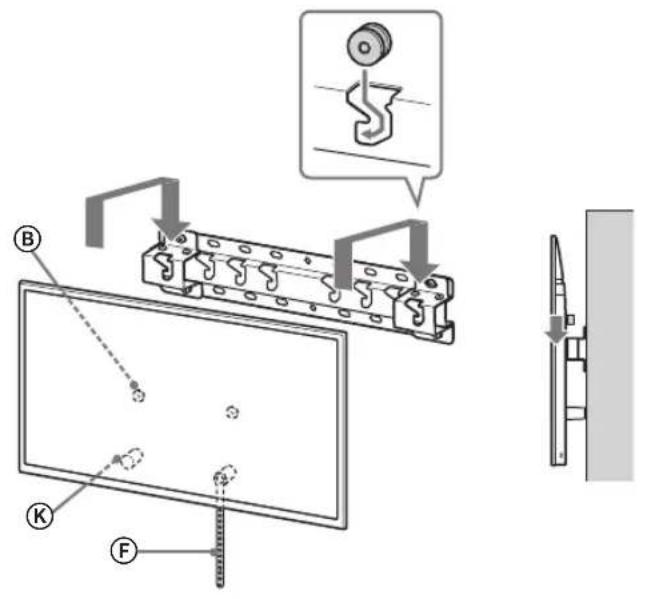
2-b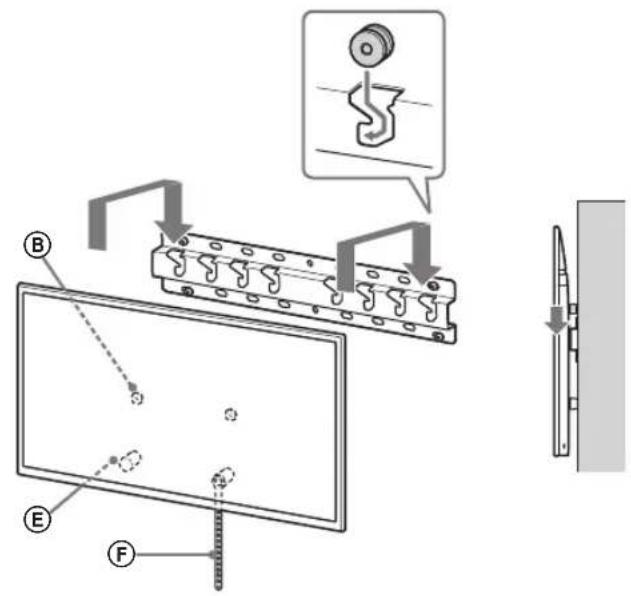
↓
↓
WARNING
- Be sure that two or more persons (three or more persons for 75 inches and above TV set) hold the TV when carrying it.
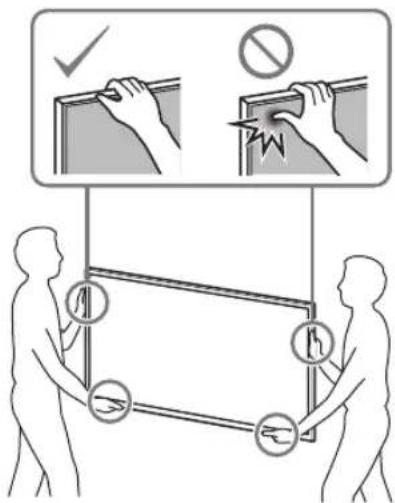
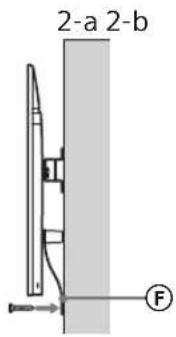
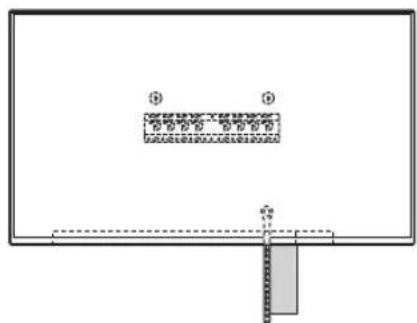
3 Preventing the bottom of the TV from shifting.
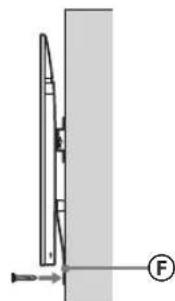
Take up the slack of Belt F and attach it to the wall tightly.
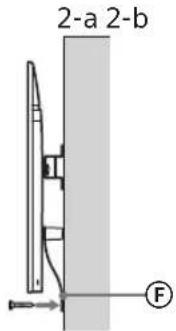
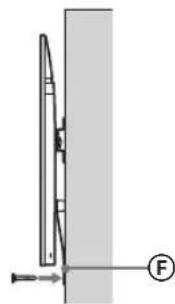
- Use a 5mm diameter screw or equivalent (not supplied).
Note
Try to pull the bottom of the TV towards yourself slightly, to make sure that it does not move forward. If there is any movement, it is not fixed correctly, and the Belt should be secured firmly again.
Confirming the completion of the installation
Check the following points.
- The Pulleys (B) are firmly hung onto the Base or Base Adaptor.
- The cord and the cable are not twisted or pinched.
- The Belt (F) is tight with no slack.
WARNING
- Improper placement of the mains lead, etc. may cause fire or electric shock through a short circuit. Be sure to confirm the completion of the installation for safety.
Other information
When removing the TV, reverse the previous installation procedure.
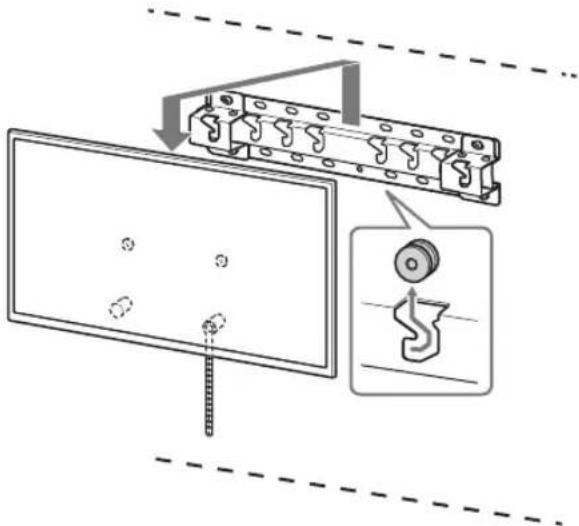
WARNING
- Be sure that two or more persons (three or more persons for 75 inches and above TV set) hold the TV when removing it.
Specifications
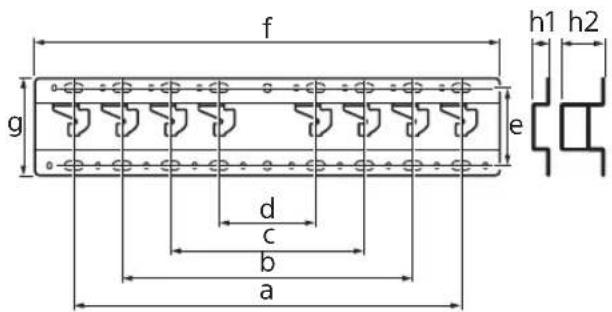
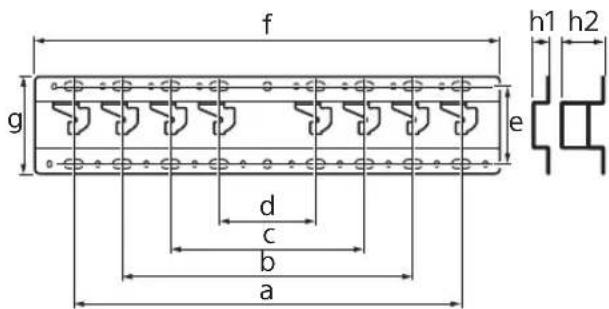
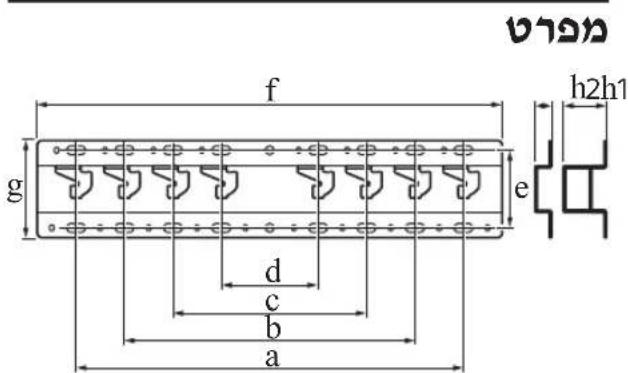
Dimensions: (Approx.) [mm]
a:400
b: 300
c: 200
d: 100
e: 80
f: 480
g: 100
h1: 20 (case 2-b)
h2: 60 (case 2-a)
Weight (base only): (Approx.) [kg]
0.8
Design and specifications are subject to change without notice.
Dimensions: (Approx.) [mm]
a: 400
b: 300
c: 200
d: 100
e: 80
f: 480
q: 100
h1: 20 (case 2-b)
h2: 60 (case 2-a)
Dimensions: (approx.) [mm]
a: 400
b: 300
c: 200
d: 100
e: 80
f: 480
g: 100
h1: 20 (case 2-b)
h2:60 (case 2-a)
Weight (base only): (approx.) [kg]
0.8
Preparation for installation. 5
Checking the parts 5
Finding a location 6
Preparation for installation
1 Find the TV's location.
Dimensions: (approx.) [mm]
a:400
b:300
c:200
d:100
e:80
f:480
q: 100
h1:20 (case 2-b)
h2:60 (case 2-a)
Do not insert screws or other items during TV installation.
If you do, the TV may fall and cause injury or property damage.
Do not skip the wall mount bracket parts.
If you do, the wall mount bracket may fall and cause injury or property damage.
Do not mount other equipment other than the specified product.
This wall mount bracket is designed for use only with the specified product. If you mount equipment different from the specified one, it may fall and cause injury or property damage.
Do not place the wall mount bracket on any other product except the TV. Do not place the TV on a sloping or unstable surface.
If you do, the TV may fall and cause injury or property damage.
Do not lean on or sit on the TV.
Do not lean on or sit on the TV, as it may fall and cause serious injury.
WARNING
If the specified screws are not used, injury or property damage may occur.
The product warranty is void if the product is used for commercial purposes.
Do not place the product on top of the TV. If it falls, the TV may be damaged or cause injury or property damage.
Precautions
- If you use the TV for a long time, mounted on a wall mount, the wall behind it may become discolored or the wallpaper may peel, depending on the wall material.
- If the wall mount is removed from the wall after installation, the screw holes will remain. Do not use the wall mount for any other purpose, as it may cause mechanical vibrations.
Wall Mount Installation
For Sony dealers
WARNING
These instructions are for Sony dealers only. Read the safety precautions described above and pay special attention to safety during installation, maintenance, and inspection of the product.
Do not install the wall mount on wall surfaces where the sides of the TV protrude from the wall surface.
Do not install the wall mount on wall surfaces, such as pillars, where the sides of the TV protrude from the wall surface. If a person or object hits the side of the TV, it may cause damage or injury.
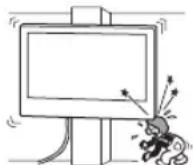
Do not install the TV above or below an air conditioner.
If the TV is exposed to continuous airflow from an air conditioner, it may cause electric shock, fire, or malfunction of the TV.
Install the wall mount securely to the wall by following the instructions in this manual.
If any of the screws become loose or fall out, the wall mount may fall and cause damage or injury. Use screws suitable for the wall material and install the structure securely using four or more screws with a diameter of 8 mm (or equivalent).
Use the correct screws and mounting parts as described in this instruction manual. If you use replacement parts, the TV may fall and cause personal injury or damage.
Make sure you use the console correctly by following the procedure described in this instruction manual.
If any of the screws become loose or damaged, the TV may fall and cause personal injury or damage.
Tighten the screws firmly in the indicated position.
If you do not do this, the TV may fall and cause personal injury or damage.
Be careful not to drop the TV during installation.
If the TV is subjected to impact, it may fall and break. This can lead to injury.
Mount the TV on the wall, perpendicular and flat.
If you do not do this, the TV may fall and cause injury.
After proper installation of the TV, ensure the cables are correctly routed.
If people or objects get caught on the cables, this can cause injury or damage to the TV.
Do not allow the power cord or connecting cable to be pinched.
If the power cord or connecting cable is pinched between the TV stand and the wall, or if they are pulled or bent with force, the internal wires may be damaged and cause a short circuit or electric shock. This can cause fire or electric shock.
The screws required for securing the console for wall mounting to the wall are not included in the package.
Use appropriate screws for the wall material and structure when mounting the console for wall mounting.
Preparation for mounting. 5
Checking the parts. 5
Determining the mounting position. 6
Mounting on the wall. 8
Preparation for mounting the TV...9
KD-85/75XG85□□, KD-75XG87□□
KD-65/55XG87□□, KD-65/55XG85□□.11
Mounting the TV on the wall. 13
KD-85/75XG85□□, KD-75XG87□□.13
KD-65/55XG87□□, KD-65/55XG85□□.15
Checking the connection of the
mounting 18
Other information 18
Specifications.. 18
Wall-Mounting the TV
The mounting procedure differs depending on the TV.
Use the SU-WL450 wall-mount bracket to mount the TV on the wall.
Note
Do not lose the supplied screws; keep them in a safe place by removing them from the packaging.
Preparing for Mounting
The setup guide and operating instructions for the TV should be at hand before starting the mounting. - Before mounting, prepare a Phillips screwdriver that matches the screws. - Choose the mounting position for the TV. - Prepare four M8 screws and one M5 screw or equivalent (not included). Select screws suitable for the wall material.
Checking the Parts
Supplied with SU-WL450
- Check that all parts are present.
| A Oснова (20) (1) B Мakара (2) | |
| ◎ PSW 6x20 (4)◎ PSW 4x20 c Втулka (2) | |
| E Дистанционна Втулka (20) (2) | F Колан (1) |
| ◎Втулka (20) (M4) (2) | H PSW 4x20 (2) |
| ◎Aдантетер на Основатa (2) | ◎J PSW 4x10 (8) |
| ◎Дистанционна Втулka (60) (2) | ◎L PSW 6x50 (2) |
| ◎Втулka (M4) (2)◎PSW 4x50 (2) | |
Determining the Mounting Position
1 Select the mounting position.
Ensure that the wall has sufficient space for the TV and is capable of supporting its weight, including the TV's weight. Refer to the instructions regarding wall-mounting the TV. Refer to the TV's operating instructions for its weight.
Standard Mounting / High Mounting / Center Mounting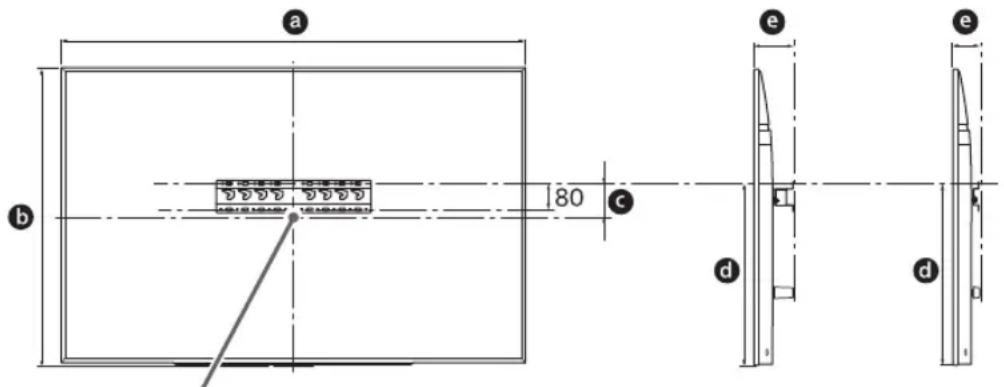
Unit: mm
2. Mount the TV to the base stand.
Carefully lift the TV and hook the brackets (B) onto the wall plate, securing them to the wall side of the TV, to the base stand, checking the hole format. After mounting the TV, check that the brackets (B) are securely fastened to the base stand. Also pull both cords to ensure the TV does not fall.
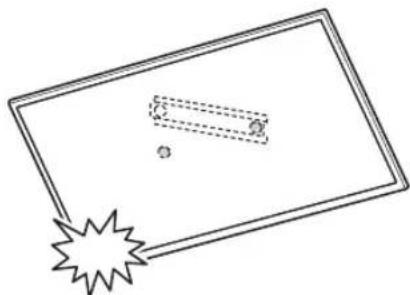
After mounting the TV to the wall, remove the self-adhesive pads from the wall.
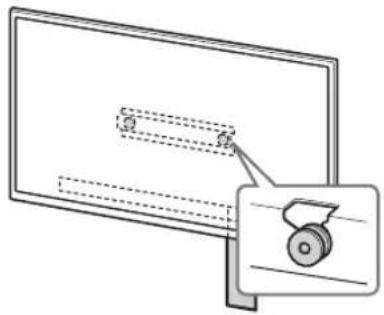
2-a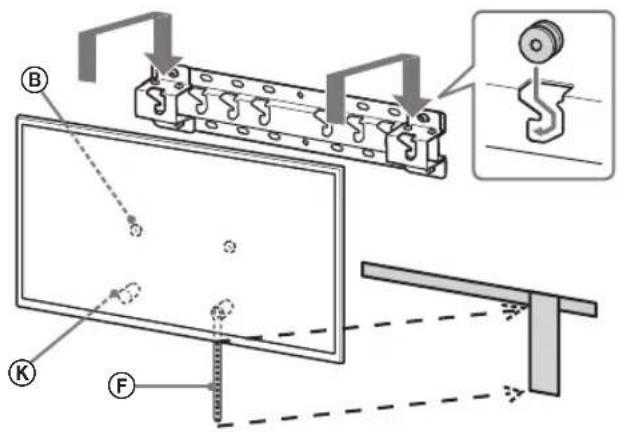

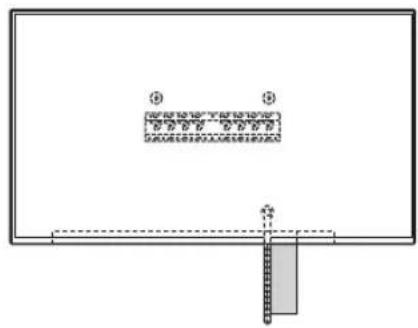

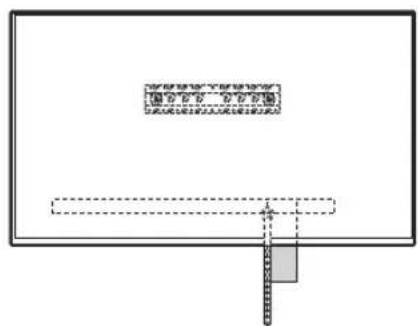

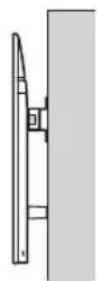
2-b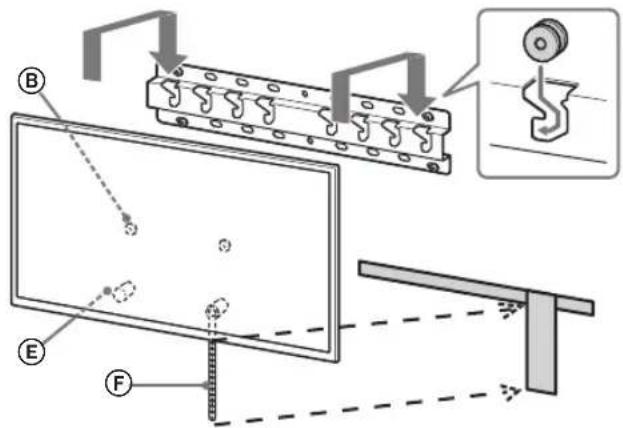
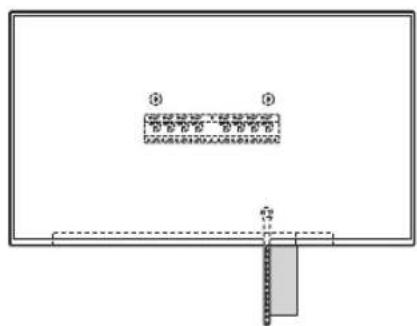



CAUTION
- Ensure that the floor or surface (or the floor or surface for a complete TV with a size of 75 inches) can support the TV when you carry it.
2. Mount the TV to the base stand.
Carefully lift the TV and hook the brackets (B), secured to the wall side of the TV, to the base stand, checking the hole format. After mounting the TV, check that the brackets (B) are securely fastened to the base stand. - Also pull both cords to ensure the TV does not fall.
2-a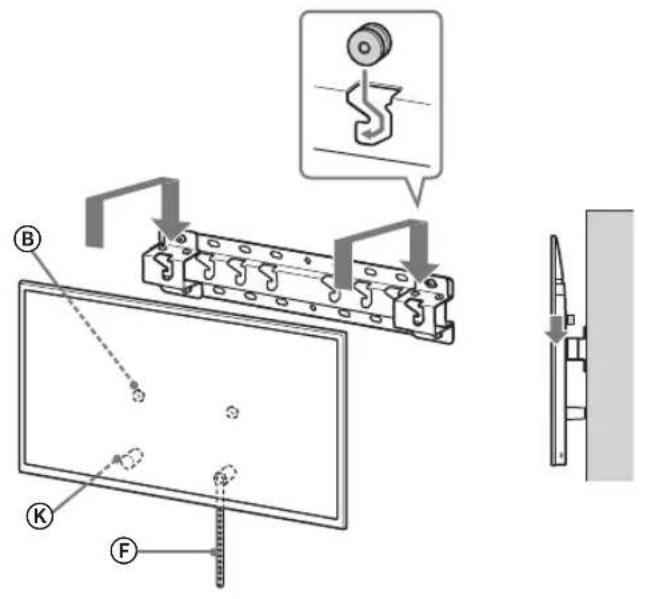
2-b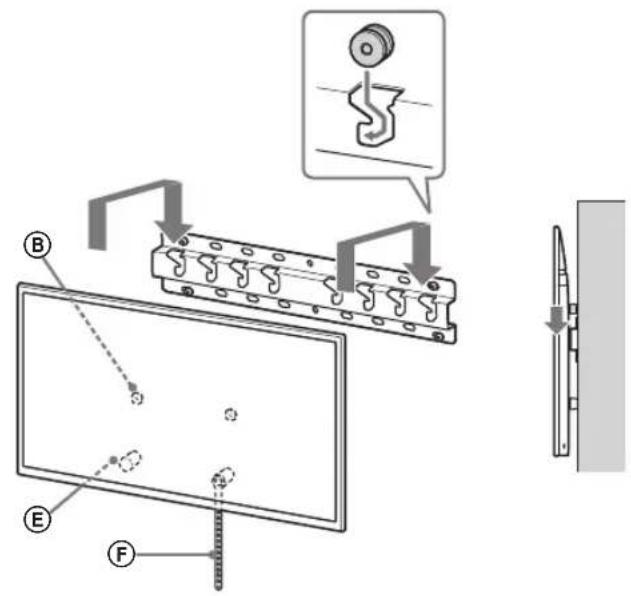
↓
↓
CAUTION
- Ensure that the floor or surface (or the floor or surface for a complete TV with a size of 75 inches) can support the TV when you carry it.
3 PpeoTbpaTaBaHe
IpeMeCTBaHeTo HaДоЛHaTa ЧаСТ Ha TeJIeВиЗOпа.
- N3dbpnaIte pa3xla6eHaTa qact Ha KOJahF IЯ 3aKaYeTe PJIbTHO KbM CTeHaTa.
- ⅠЗПОЛЗВаИТЕ BИNT C ДИАМЕТБР 5mm
- ИЛЕКВИВАLEНTEH (He e BKЛЮЧЕНВ
- KOMПЛЕКТа).
3a6eJexKka
-OnntaTe IeKo Da n3dbpnte KbM c6e cn dOJHaTa Ha TeBn3opa, 3a Da CE yBepuTE, He He Ce npemecTba Happei. Ako ce DnKn, ToH e 3akpenen npabunHO N KOanH F TprBa OTHOBo Da ce 3akpen 3dpabo.
Поберка на
Pondepknaemble moeI:
KD-85XG85□□*/75XG87□□*/75XG85□□*/65XG87□□*/ 65XG85□□*/55XG87□□*/55XG85□□*
*BΦaKTnuecknx Ha3BaHnIx MoJeN " " o6o3Haayet uΦpbI N/IIIN CUMBOJIbI, xapaKTePbIe IJIa KOHKpeTHoN MoJeN.
K cbeHIO nokynteJe
Дя obecneuehenia coxpaHnoCTn n3deJnIy nI3 COO6paXeHn 6e3OnaCHocTn KOMnaHnry Sony NaCToTeJbHO peKOMeHdyET npINBJIeKaTb IJy UCTaHOBKn TeJIeBN3Opa TOLbKO dIJnePob NII INIeH3NPOBaHHbIX NOprdAnKOB Sony. He nbTaIaTEcb BbINOJNHbY cA MoCToTeJbHO.
K cBeHeHnIO dIJIePoB n IOJaIuNkoB Sony
Please pay special attention to safety during installation, periodic maintenance, and inspection of this product.
For proper installation of this product, sufficient experience is required, especially in determining whether the wall can support the weight of the TV. Be sure to have this product installed on the wall by dealers or licensed contractors, and strictly follow the safety techniques when performing installation work. Sony is not responsible for any damage or injury caused by improper handling or incorrect installation of this product.
For safe and proper installation, refer to the instructions for use of the wall-mount bracket, the TV installation guide, and the instructions in this manual.
Safety
Thank you for purchasing this product.
For customers
Installing this product requires sufficient experience. Be sure to consult a dealer or licensed contractor of SONY, and also take the necessary precautions during installation. Sony is not responsible for any damage or injury caused by improper handling or installation, or installation not intended for this product. This does not affect your statutory rights (if any).
For Sony dealers
Installing this product requires sufficient experience. For safe installation of the device, be sure to carefully read this manual. Sony is not responsible for any damage or injury caused by improper handling or improper installation. After installation, hand this manual over to the customer.
This installation manual provides important precautions and information to ensure proper handling of the product, which are necessary to prevent accidents. Be sure to carefully read this manual and use the product as intended. Keep this manual for future reference.
Sony products are designed with safety in mind. However, incorrect use of the product may result in serious injury due to electric shock, fire, tipping over, or falling of the product. To avoid such accidents, be sure to follow the appropriate precautions.
The date of manufacture is indicated on the product, packaging, or label with a barcode in the following format: YYYY/MM, where YYYY is the year and MM is the month of manufacture.
Manufacturer: Sony Visual Products Inc., 2-10-1 Osaki Shinagawa-ku Tokyo, 141-8610 Japan Made in China
The organization authorized to accept claims from consumers on the territory of Kazakhstan: Sony Electronics Representative Office in Kazakhstan, 050010, Republic of Kazakhstan, Almaty, Dostyk Ave., 117/7
Importer in the Customs Union countries: JSC "Sony Electronics", Russia, 123103, Moscow, Karamyshevsky proezd, 6
BHIMAHNE
Yka3aHHbIe n3dJIInr
DaHHb KpOHTeH nHa HacteHHoro KpenJIeHNn PpeNaN3HaueH dNn OTDeIbHbIX MoJeNe TepEBN3OpB. Cm. CpAbOuHoe pyKOBoDCTBO K TeEbn3Opam dNn npOBepKn BO3MOxHOCTn IcNoJb3ObaHN KpOHTeHnA dNn HaTeHHoY cTaHOBKn.
Для nokуразелей
PNEUINPEKDEHNE
HecobJIOeHne npBBeHbIX HNKe Mep npeoCTopOxHOCTn MOKeT CTaTb npuHNO CmEPtn NNN NOyueHnE cep3HbIX TpaBM BCJeDCTBNE nopaeHnE 3NeKTPnuCeKN MTOKOM, BO3rOpAHn, ONPOKNbBaHnN NNI NaDeHn N3DeJIIN.
063aTeIbHo 06paTntecb K JIuceHn3PoBaHHOMy IOpRAnky,a TaKKe He DOnyckaIte TORO,HTo6bl DeTN HaxOdnCb B6JIn3m MeCTa YCTaHOBKn N3dEIny.
HenpaBnBnaYcTaHObKa KPOHtTeHa nIa HacteHHOy cTaNOBKn IIN TeJIeBN3Opa MOKeT cTb npuNNoN nepeuNCHeHHbIX HnKe HeCuaCTbX CNYaeB. DnA BbIOJIneHnY cTaNOBKn O83aTeNbHO 06pATNTecb K NlueEHNpOBaHHbIM NoDpAqNKam.
TeIeBIMoK MoXeTynactbN CtaTb npuHNOI npUeyENn cepBe3hIx TpaBM, HanpImep YUnOBoNnnpeNoNOMOB. - ECNI CTeHa, Ha KOToPoB BbIOnHReTc8 yCTaHOBKa KPOHHTeHa,Ja HAcTeHHoH yCTaHOBKn, HeCYTOuHBA, HEOBHa NlN He BePTKkAHLBa, N3dJIne MoKtE YnAcTb NIOUYHTb NOpeXdHeHn NlN CTaTB npUHN TpaBM NlN NOBpeXdHeHn IMyUeCTBa. CTeHa DOJXHa BbIpeKbNAbT Bec, No KpAHeH Mepe, B YeTbIpe paa TpeBbIaHoum Bec TeNeBu3Opa. (YTO6bl y3HaTb Bec TeteBN3Opa, CM. CnpabOuHoe pykoBOcDBo.) - EcnnycTaHOBKa KpOHTeHa dIa HAcTeHHoY cTAtHOBKn BbIOJHReTcHa HeoOCTaTOHOpNoPCHOn CTHe, N3DeJIne MoKeT yNaCTb N NOyNTb NOBpeXdHnur INIcTAb NpNCHINOH TpaBm INI NOBpeKdHnur MMyUcCTBa.
Mepbl npedeoctopoXHOCTN B OTHOWeHn DeTei
He no3B0JaTe TeTbMaB36npaTbcHaTeJIeBUN3Op. XpaHnTe MeKnKe DetaIIN BHe DocraeMoCTn DeTe, TcObI OHn He MOrJI CnyaHNO pRrNtntb nx.
Для поемецени nln demoHTaxa TeJeBn3opa 6braTeJbHo 6paTntecb KЛицeh3ИрOBaHHbIM NOdprAnKam.
Ecn TpaHcnpTnOBKa NnN DEmoHTax TeBn3Opa BbIOJIHReTc HnuehnoBaHbIMN NOpRdUKNaMn, OH MoKet Ynactb N CTb NpUHNO TpAMm Nn NobpeXeHnN MyuCtBa. Y6eINTeCb, YTO nepHeoc Nnn DEmoHTax TeBn3Opa OcyuCTBnaTc DByMaN NnBoee NuaaM (Tpn Nn Boee yenOBek nIteBn3Opa c dnaorHaIoB 75 duMOB n 60bnse).
Iocne MoTaxa TeLeBn3opa He BbIHMa'Te BNHTbl N T. D.
B npOTHNOM CNYaE TeneBn3Op MoKET yNaTb N CTaTb PNpHNOH TpaBM NIN NOBpeJdEHN MmUeCTBa
Install the wall-mount bracket securely to the wall.
Otherwise, the wall-mount bracket may fall and cause injury or property damage.
Do not install any equipment other than the specified one on the bracket.
This wall-mount bracket is intended for use only with the specified products. If you mount equipment not intended for this installation on the wall-mount bracket, it may fall or be damaged, and may cause injury or property damage.
To avoid overloading the wall-mount bracket, do not place anything other than the TV on it. Do not push the TV left/right or up/down.
Otherwise, the TV may fall and cause injury or property damage.
Do not lean on the TV or hold onto it.
Do not lean on the TV or hold onto it, as it may fall and cause serious injury.
WARNING
Follow these precautions. There is a risk of injury or property damage.
Care must be taken to avoid excessive force.
Do not overload the top of the TV. Otherwise, the TV may fall and cause injury or property damage.
Precautions
If the TV mounted on the wall-mount bracket is used in a confined space for a long time, depending on the wall material, the wall behind or around it may discolor or the wallpaper may peel. After removing the wall-mount bracket, holes will remain in the wall. Do not use the wall-mount bracket in places with mechanical vibrations.
Do not install the wall-mount bracket on walls where the edges of the TV will protrude beyond the edges of the wall.
Do not install the bracket for wall mounting on surfaces of walls (for example, on columns) where the edges of the TV will protrude beyond the edges of the wall surface. By catching on the protruding edges of the TV, you can get injured or damage property.
Do not install the TV under an air conditioner or above it.
If during a prolonged period of time the TV is exposed to the direct airflow of an air conditioner, this can become a cause of fire, electric shock, or malfunction of the TV.
Be sure to securely attach the wall mount bracket to the wall, following the instructions provided in this manual.
If any of the screws are loose or missing, the wall mount bracket may fall and cause injury or damage to property. When performing the installation, be sure to use screws that match the material of the wall, and securely install the device, using no less than four 8 mm screws (or equivalent).
Be sure to use the screws and parts included in the kit for fastening, and strictly follow the instructions provided in this installation manual. If other fastening materials were used during installation, the TV may fall and get damaged or cause injury.
Be sure to perform the assembly of the bracket, exactly following the instructions provided in this installation manual.
If any of the screws are loose or missing, the TV may fall and get damaged or cause injury.
Securely tighten the screws in the designated fastening holes.
Otherwise, the TV may fall and get damaged or cause injury.
Make sure that during installation the TV is not subjected to impacts.
Impacts can cause the TV to fall and be damaged. This can lead to injury.
Install the TV on the wall only if it is flat and positioned at a right angle to the floor.
Otherwise, the TV may fall and cause injury.
After properly installing the TV, ensure the safe routing of cables.
Cables and objects that may obstruct the path can become a cause of serious injury or damage to the TV.
Do not allow cables or connecting cables to become tangled.
If the cables or connecting cables are routed between the device and the wall, or are bent or crossed, the insulation of the internal wires may be damaged, which can lead to a short circuit or break. This can cause a fire and lead to electric shock.
The brackets for wall mounting are not included in the delivery set.
When mounting the bracket for wall mounting, use screws that match the material and structure of the wall.
The product should be stored in its cardboard packaging in a dark, dry, clean, and well-ventilated room, away from direct sunlight. Storage temperature: from -20°C to +60°C. Storage humidity: <80%.
Contents
Preparation for installation. 6
Checking the delivery set 6
Determining the installation method 7
Wall mounting 9
Preparation for TV installation...10
KD-85/75XG85□□, KD-75XG87□□ 10
KD-65/55XG87□□, KD-65/55XG85□□.12
Mounting the TV on the wall.14
KD-85/75XG85□□, KD-75XG87□□ 14
KD-65/55XG87□□, KD-65/55XG85□□ 16
Checking the installation 19
Information 19
Technical specifications 19
4 Determine the location of the mounting screws for the base (20) A.
See the specifications on page 19. When selecting item 2, use the position of the base adapter hole ①.
WARNING
The wall on which the TV is to be mounted must be able to support a weight at least four times the weight of the TV (to find out the weight of the TV, see the reference guide.)
- Determine the strength of the wall on which the TV will be mounted. If necessary, reinforce the wall.
Mounting the base on the wall
- Use four or more screws with a diameter of 8 mm or equivalent (not supplied). Insert four screws into the holes of the base adapter ①, and attach it to the base (20) A (only 2-a).
- Install the base (20) A horizontally on the wall.
1 Mark the installation location on the wall.
- Use masking tape (not supplied) to mark the position of the TV next to the base and base adapter. See the following table.
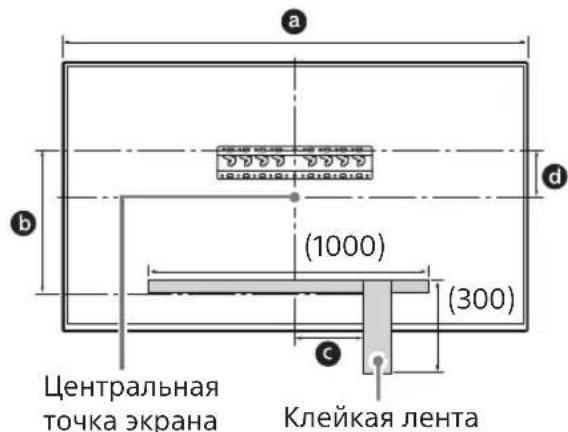
Measurements
Connect the necessary cables to the TV.
Before mounting the TV on the wall, be sure to connect the cables. After mounting the TV, connecting the cables will be impossible.
See the Reference Guide supplied with the TV.
Note
- For cable routing, follow the wall-mount pattern. - Before mounting the device on the wall, connect the connecting cables so that they are not stepped on.
4 Detach the table-top stand from the TV.
- Remove one side of the table-top stand. Firmly hold the table-top stand with both hands while others lift the TV.
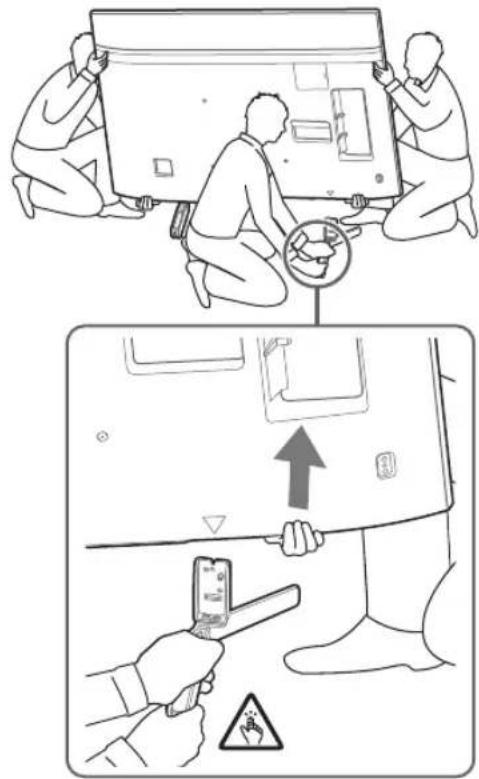
Repeat the above action and remove the other side of the table-top stand.
Note
- Detaching the table-top stand requires at least 3 people. - Be careful not to use excessive force when detaching the table-top stand from the TV, as this may cause the TV to fall and result in injury or damage to the TV. - Be careful when handling the table-top stand to prevent damage to the TV. - Be careful when lifting the TV, as the table-top stand may detach and fall, which could cause injury. - Be careful when detaching the table-top stand from the TV to avoid pinching the device and damaging the surface on which the TV is placed.
Mounting the TV on the wall
KD-85/75XG85□□,KD-75XG87□□
1 Lift the TV.
The location of the holes on the mounting base or adapter base is shown in Step 3 of the "Determining the mounting location" section on page 8. - Make sure the TV's rear panel is in contact with the base or adapter base when holding the TV.
PpmeaHne
- YdepknBaIte TeNeBn3Op oBeIMn pykAmn y6eIntecb, yTO IeHTa F HIXKHa qAcTb TeBn3Opa BbIPOBHeHb IO KneKoJ NeHTe. -Перенoc TeNeBn3opaДолжeh OcyuEcTBЯTbCra TpeMJIIOdbM:ЧeLOBek, KOTOpbI HaxOДNTc rpeDiN TeNeBn3opa,Должeh HAnpaBnTb OCTaIbHbIX IIOdeI DnY YCTaHOBKn TeNeBn3opa B HaIneKaUee NOLOKeHne.
-Пи установке телевизopa Ha CTeHy Heo6xOДИМО co6IIOaTb OCTopokHOCTb, Oco6eHNO YeIOnBeky, KOTOpBn NOdepkXINBaETelEVN3Op CnH3y, TAK KaK OH MOKeT yNaCTb N CTaTb PnUHON cepbe3HbIX TpaBM nIu daxke CmepTN.
2 YctaHOBnte TeJIeBu3Op Ha OCHOBaHne IIn aIaNTep OCHOBaHn.
- Octopoxho onyctnte TeJeBn3Op n HaBeCbTe uKnBbl (B, yCTaHOBJIeHHbIe Ha 3aHHe NaHeJIMoHITopa,Ha OCHOBaHne IIN aJaTep OCHOBaHnA, co6IIOda fOpMy OTBepCTn.
- Iocne yCTaHOBKn TeJIeBn3Opa Ha CTeHy y6eIInTEcB B TOM, YTO UKNBbl B HAnExKHO 3aΦNkCnpOBaHbI B OCHOBaHN Nnn aadantpe OCHOBaHna. MeJHeHNo y6epnte oBe pyKn u y6eIInTeCb, YTO TeJIeBn3Op HAnEKeHNO UCTaHOBneH.
- Nocne yctaHOBKn TeIeBn3Opa Ha CTeHy ydaJIte KNeIkyJeHTy n. D. CO CTeHbl.
2-a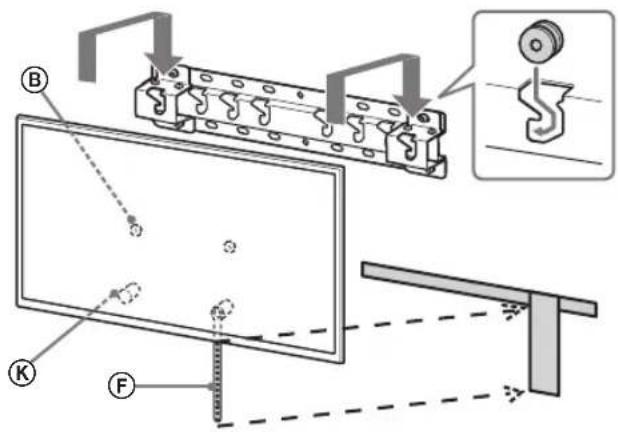
↓
↓
↓
2-b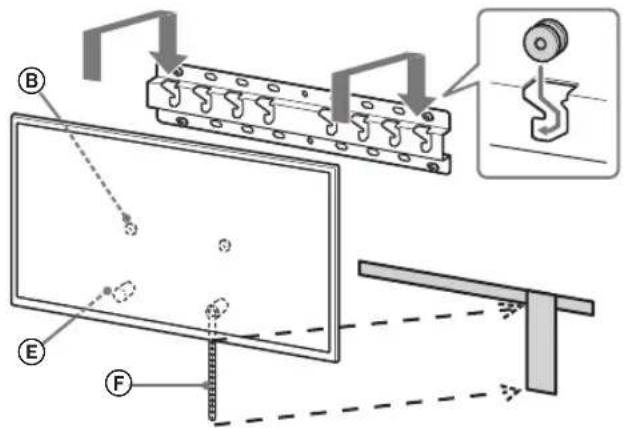
RU
↓
↓
- Two or more people are required to carry the TV (for TVs with a screen size of 75 inches or more) when moving it.
To prevent the TV from tipping over.
- Remove the stand and securely attach it to the wall.
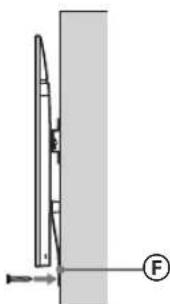
- Use a screw with a diameter of 5 mm or its equivalent (not supplied).
Note
Gently tilt the bottom of the TV toward you to ensure it does not move forward. If there is a slight tilt, the TV is not securely fastened; the strap F should be secured more firmly.
KD-65/55XG87□□, KD-65/55XG85□□
1. Lift the TV.
The location of the holes on the mounting base or the base adapter is shown in Table 3 in the section "Determining the installation location" on page 8. - Ensure that the rear panel of the TV is in contact with the base or base adapter when holding the TV.
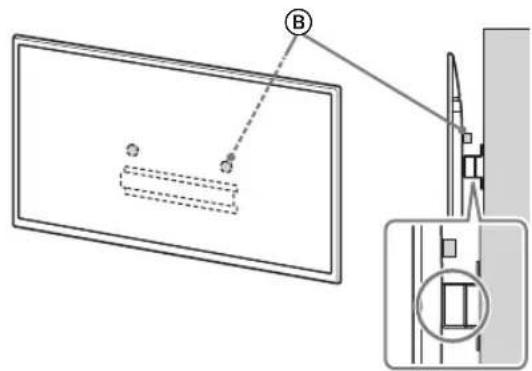
Note
- Hold the TV with both hands.
2. Place the TV on the base or base adapter.
- Carefully lower the TV and align the holes (8) on the rear of the monitor with the base or base adapter, following the shape of the holes.
- When installing the TV on the wall, make sure that the hooks ⑧ are securely fastened to the base or base adapter. Slowly release both hands and make sure the TV is securely installed.
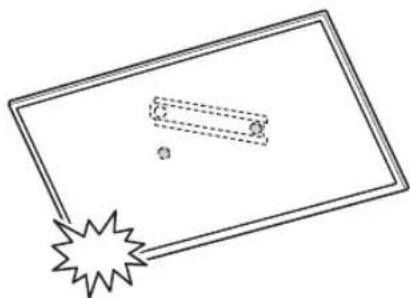
2-a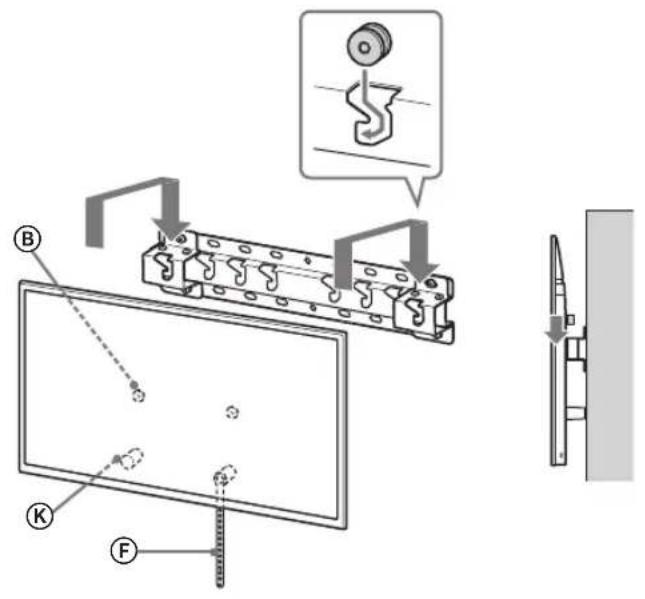
2-b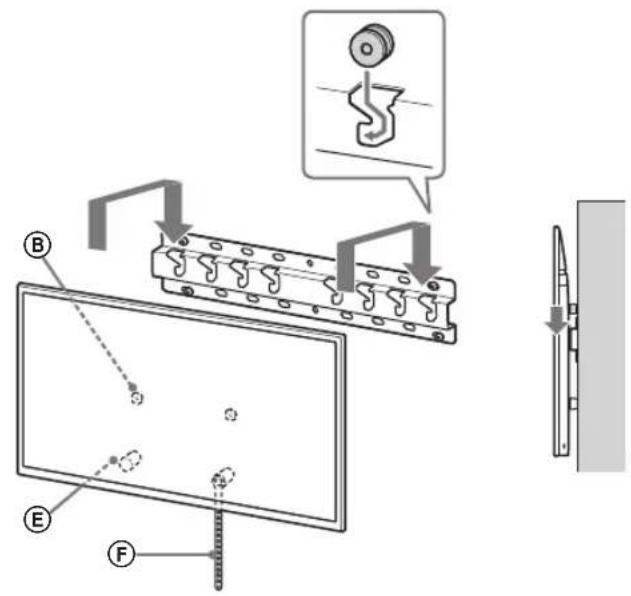
↓
↓
RU
PRECAUTION
- Make sure that the TV is held by two or more people (three or more people for TVs with a screen size of 75 inches or larger) when moving it.
3 Prevent the lower part of the TV from shifting.
- Remove the strap F and securely attach it to the wall.
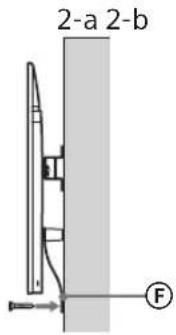
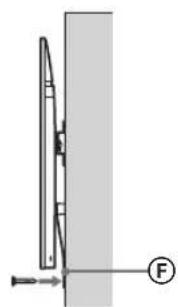
- Use a screw with a diameter of 5 mm or its equivalent (not supplied).
Note
Gently pull the lower part of the TV toward you to check that it does not move. If there is any slight movement, the TV is not secured properly, and strap F should be secured more firmly.
- Hooks ⑧ are securely hung on the base or base adapter.
- The cord and cable are not crossed or tangled.
- Do not use this device without proper grounding.
WARNING
- Incorrect cable routing or other issues may lead to fire or electric shock due to short circuit. To ensure safety, make sure all installation steps are completed.
Initial Information
To remove the TV, perform the procedure described above in reverse order.
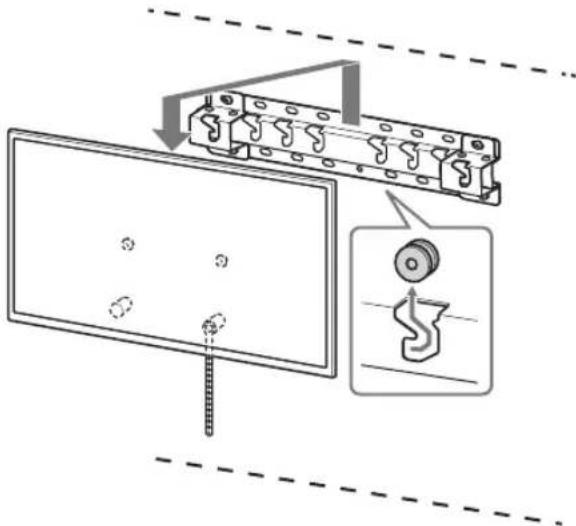
Precautions
Make sure the monitor is held by at least two people (or more for TVs with a 75-inch diagonal or larger) when removing it.
Technical Specifications
Dimensions: (approx.) [mm]
Do not unscrew the screws used for TV mounting.
If you do, the TV may fall and cause serious injury or damage.
Do not remove the bracket parts for wall mounting.
If you do, the wall mount bracket may fall and cause serious injury or damage.
Do not install any other devices not specified for this product.
The wall mount bracket is designed for use only with the specified product. Installing other devices may cause the bracket to fall and cause serious injury or damage.
Fasten the brackets to the wall for secure mounting and to prevent the TV from falling. Do not place the TV on unstable surfaces.
If this happens, the TV may fall and cause serious injury or death.
Do not place the TV on unstable surfaces.
Do not place the TV on unstable surfaces, as it may fall and cause serious injury.
WARNINGS
Failure to follow the safety precautions below may result in serious injury or death.
When cleaning or servicing the product, do not apply excessive force.
Do not apply excessive force to the top of the TV. If this happens, the TV may fall and cause serious injury or death.
Safety Precautions
If the TV is installed on a wall using the wall-mount bracket, depending on the material of the wall, the wall surface behind the TV may weaken or the screws may come out of the wall.
For wall-mount bracket installation, after the bracket is installed on the wall, the holes for the screws remain in the wall. Do not use the bracket for wall mounting in places where there is a risk of mechanical vibration.
Installing the Wall-Mount Bracket
Sony Wall-Mount Bracket
WARNING
The instructions below are intended for Sony wall-mount brackets. Please read the safety precautions above carefully and pay special attention to safety during installation, servicing, and inspection of this product.
Install the brackets for partial wall mounting in the place where the edges of the TV sides protrude beyond the wall surface.
Do not install the brackets for partial mounting on surfaces such as columns, because in these places the edges of the product sides protrude beyond the wall surface. If the product falls due to the sharp angle of the TV sides protruding beyond the wall, it may cause injury or damage to the product.
Do not install the TV on a wall with a condenser.
If the TV is exposed to water, leaks, or condensation for a long time, it may cause damage, electric shock, or malfunction of the TV.
Install the brackets for partial wall mounting according to the instructions in this manual.
If the screws are loose or fall out, the bracket for partial mounting may fall and cause injury or damage. The screws must match the material of the wall. To ensure proper installation, use the provided screws with a diameter of 8 mm (or equivalent).
Use the screws provided in the mounting kit according to the instructions in this manual. Using other screws may cause the TV to fall and be damaged or cause injury.
Assemble the brackets properly, following the procedure described in this manual.
If the screws are loose or fall out, the TV may fall and cause injury or damage.
Tighten the screws securely in the specified position.
If not, the TV may fall and cause injury or damage.
During installation, be careful not to drop the TV.
If the TV falls, it may break or be damaged. This may cause injury.
Install the TV on a perpendicular wall with a flat surface.
If this is not done, the TV may fall and cause serious injury.
Fix the TV securely using the mounting hardware.
If the wall or objects are hidden behind the cables, this can lead to damage to the TV or injury.
Make sure that the power cord or connecting cable is not pinched.
If the power cord or connecting cable is pinched between the product and the stand or wall, or if it is bent or twisted with the attached plug, the internal conductors may be exposed, causing a short circuit or electric shock. This can lead to fire or electric shock.
When using screws for mounting the bracket on the wall, do not use the screws included in the package.
When mounting the bracket, use screws appropriate for the wall structure and material.
Store the product in a cool, dry, well-ventilated place away from direct sunlight, and keep it away from acids and alkalis. Storage temperature: -20°C to +60°C. Storage humidity: <80%
Contents
Preparation for installation 5
Checking the parts. 5
Identifying the installation location. 6
Installing the TV on the wall 8
Preparation for installing the TV......9 KD-85/75XG85□□, KD-75XG87□□ KD-65/55XG87□□, KD-65/55XG85□□ 11
Installing the TV on the wall. 13 KD-85/75XG85□□, KD-75XG87□□ 13 KD-65/55XG87□□, KD-65/55XG85□□ 15
Checking after installation 18 Additional information 18
Technical characteristics 18
Wall mount installation
The installation procedure depends on the TV model.
To install the TV on the wall, use the bracket and the wall mounting kit SU-WL450.
Accessories
Keep the screws out of the reach of children.
Preparation for
installation
- Before installation, carefully read the manual and the TV setup guide. Before assembling, make sure you have the appropriate screwdriver for the screws.
- Check the installation position of the TV. Prepare four screws with a diameter of 8 mm and one screw with a diameter of 5 mm or equivalent (not included in the package). Choose the screws according to the material of the wall.
Checking the parts
Supplied with SU-WL450
- Check that all parts are included in the package.
| AБаза(20)(1)ВШК | В(2) |
| CГВИNTPSW6x20(4) | DГВИNTPSW4x20i3Втулков(2) |
| EПрокадka(20)(2) | FРемиь(1) |
| GВтулka(20)(M4)(2) | HГВИNTPSW4x20(2) |
| IПерекдддддддддддддддддддддддддддддддддддддддддддддддддддддддддддддддддддддддддддддддддддддддддддддддддддд徳баши(2) | JГВИNTPSW4x10(8) |
| KПрокадka(60)(2) | LГВИNTPSW6x50(2) |
| MВтулka(M4)(2) | NГВИNTPSW4x50(2) |
Determining the installation location
1 Determine the installation location.
Check that the wall is strong enough to support the weight. The designation B. The bracket weighs more than the TV.
If you need to install the TV on a wall, you can find the necessary information in the table below. The TV weight can be found in the TV's user manual.
Standard mounting screws
Center of the screen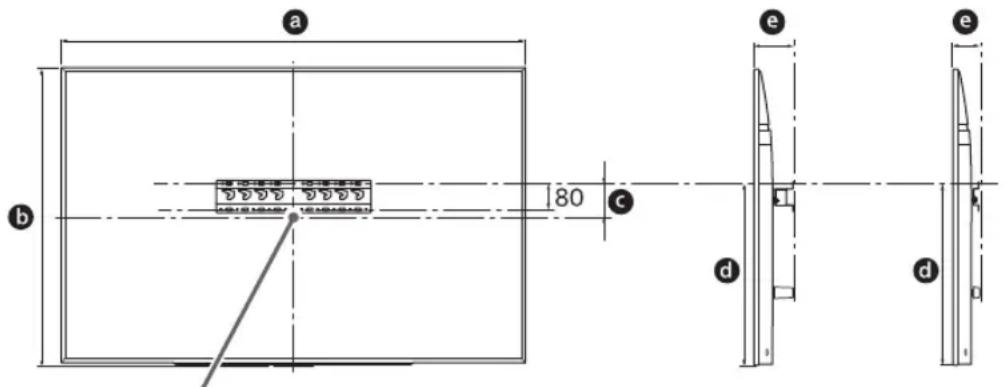
Dimensions in mm
From the installation location, the base plate dimensions are given in the table below. If option 2-b is selected, skip this step.
| Назва модени Розташуванни raков | |
| KD-85XG85□□ | a |
| KD-75XG87□□ | |
| KD-75XG85□□ | |
| KD-65XG87□□ | b |
| KD-65XG85□□ | |
| KD-55XG87□□ | |
| KD-55XG85□□ | |
Determine the wall type on which the TV is installed. If necessary, change the wall or use a different mounting method.
Installation on a wall
Use straight screws with a diameter of 8 mm or equivalent (not included in the delivery). Screw the screws into the holes on the back of the base ① with the base (20) A (step 2-a). Place the base (20) A horizontally on the wall.
Mounting point (2-b)
Bracket
If this type of mounting is used, do not use the separate holes on the back of the TV.
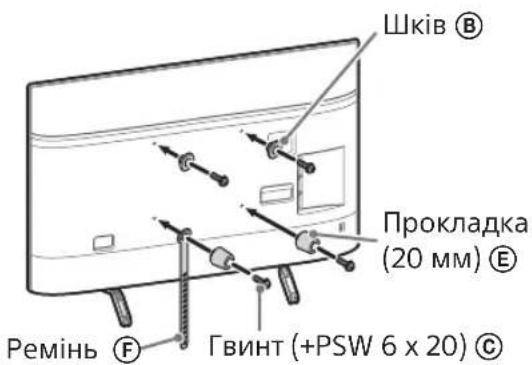
Connect the TV cable.
Check the cable connections before moving the TV to the wall. After installing the TV, it will be impossible to connect the cables.
Power. Connect to the TV.
The cable must be laid by a licensed electrician. - Lay the cables, do not step on them, before mounting them on the wall.
5 Remove the stand from the TV.
Remove one side of the stand at a time. Hold the stand firmly with both hands, while another person lifts the TV.
KD-85XG85□□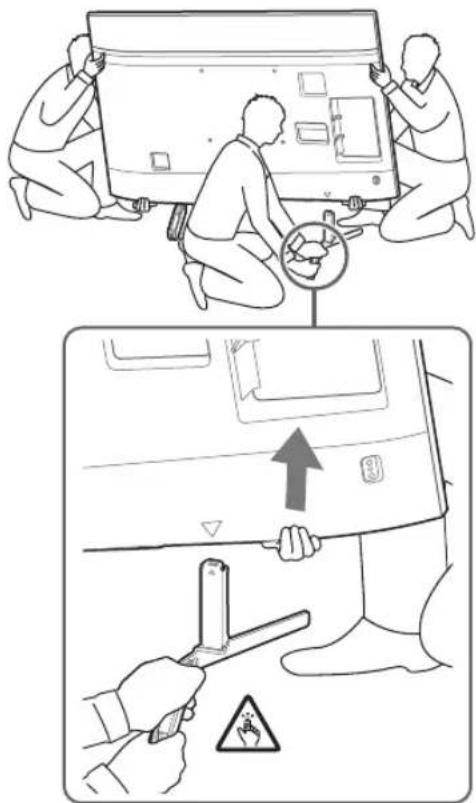
KD-75XG87□□,KD-75XG85□□
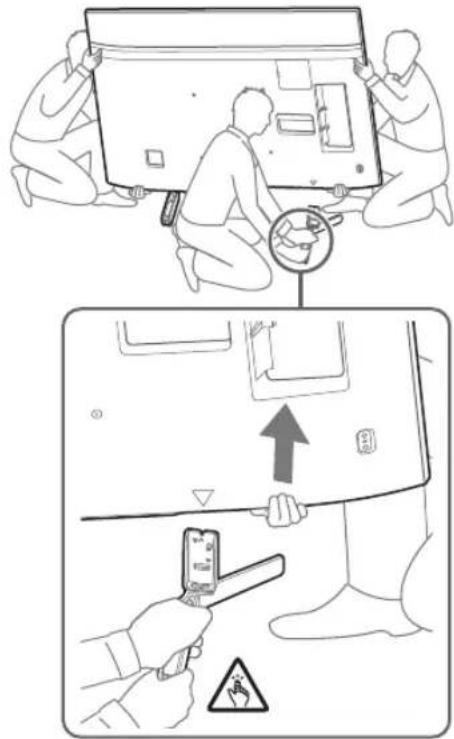
- Repeat the crosswise steps and remove the other side of the stand.
- To remove the stand from the TV, three people are needed. Be careful when using force, removing the stand from the TV may cause the TV to fall and result in injury or damage to the TV. - Carefully lift the stand, do not damage the TV. - Lift the TV carefully, as the stand may tip over and cause injury. - Be very careful when removing the stand from the TV. If the stand falls, it may damage the surface on which the TV is placed.
KD-65/55XG87□□
KD-65/55XG85□
1 Remove the screws from the rear panel of the TV.
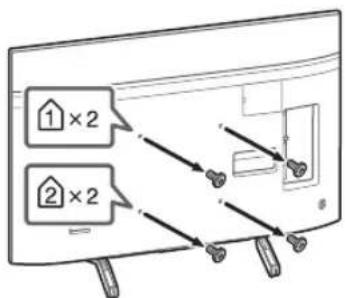
2 Attach the wall-mount brackets to the wall-mount adapter. Check the available brackets using the list "SU-WL450" in the "Checking the parts" section on page 5.
Then attach the wall-mount brackets with the screws. - For the tightening torque, set the moment to approximately 1.5 N·m {15 kgf·cm}. - Be sure to keep the used and unused components in a safe place for future use. Keep this manual for future use.
Wall mount (2-a)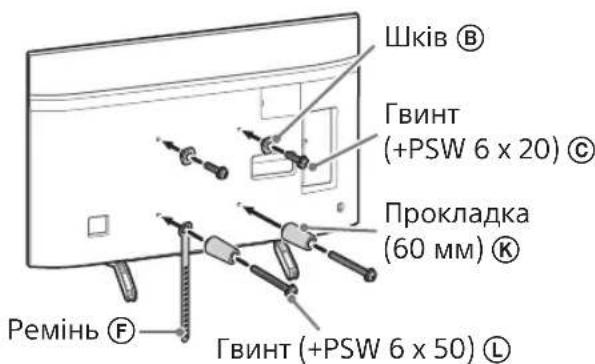
Wall mount (2-b)
Note
When using this type of mount, you cannot use the separate stands for the TV feet.
Connect the cables to the TV before mounting.
Check the cable connections before mounting the TV on the wall. After mounting, it will be impossible to connect the cables. Note: Connect to the TV.
Note
The cables in the wall must be laid with licensed conduits. Route the cables without stepping on them before mounting on the wall.
4 Remove the stand from the TV.
Remove one side of the stand at a time. Hold the stand firmly with both hands while another person lifts the TV.
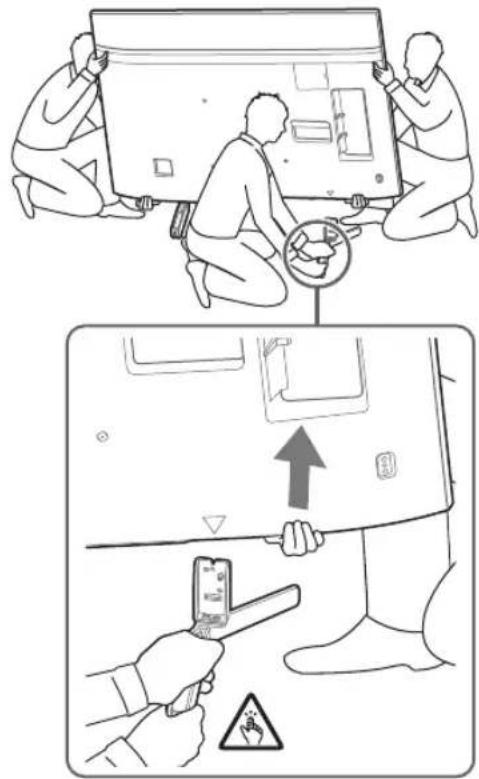
- Repeat the previous step and remove the other side of the stand.
Note
- Three people are needed to remove the stand from the TV. Be careful when applying force while removing the stand, as it may cause the TV to fall and result in injury or damage. Handle the stand carefully to avoid damaging the TV. Lift the TV carefully, as the stand may tip over and cause injury.
- Be careful when removing the stand from the TV. If the stand falls, it may damage the surface on which the TV is placed.
Mounting the TV on the wall
KD-85/75XG85□□, KD-75XG87□□
1. Read the safety regulations.
- Place the TV on the base or wall-mount bracket. For the base or wall-mount bracket, see Table 1 in the section “Identifying the installation location” on page 7. Hold the TV, make sure the back of the TV is touching the base or wall-mount bracket.
Caution
Hold the TV with both hands. The bottom of the TV must be aligned with the magnetic strip. - Hold the TV firmly. The part protruding from the back of the TV must be supported by your hands. Check the placement of the TV.
- Be careful when installing the TV on a stand. The stand must be supported by the person holding the TV from below. The TV may fall and cause serious injury or even death.
2. Install the TV on the base or wall-mount bracket.
- Carefully lower the TV and align the hooks ⑧ on the back of the TV with the base or wall-mount bracket (they must match the holes).
- After installing the TV on the stand, make sure the hooks are securely locked in the base or wall-mount bracket.
- Gently release the TV with both hands to make sure it does not fall.
- After installing the TV on the stand, remove the magnetic strip (or similar material) from the stand.
2-a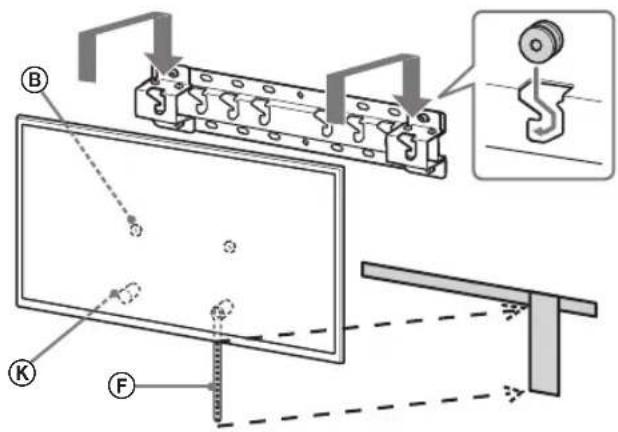

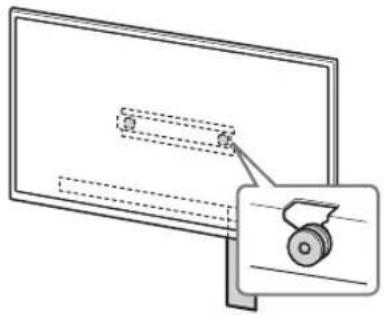


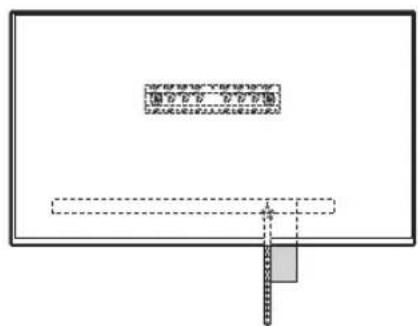

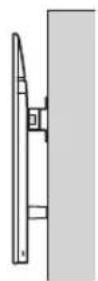
2-b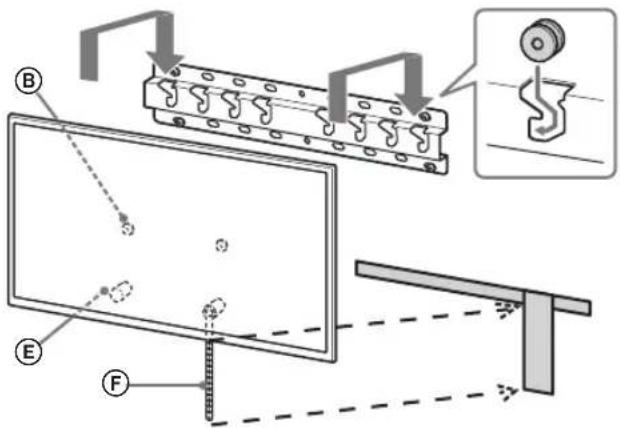



WARNING
Wall mounting (2-b)
Markus.
Installation of the base (2-b)
Markus.
Mass (base only): (approx.) [kg]
0.8
Do not install the device in a place where it may be exposed to rain or moisture.
Ensure proper ventilation. If the wall is concrete, it may be necessary to use anchors or plugs.
Mounting accessories
If the mounting brackets are not installed for a long time, the balance of the material may be lost and the device may fall or tip over. After installing the mounting brackets, check for any damage. Install the mounting brackets in a place where they will not be affected by mechanical stress.
Installing the mounting brackets
Do not install the device on an unstable surface.
If the device is placed on an unstable surface for a long time, it may fall, tip over, or be damaged by vibration or impact.
Mounting bracket installation
Use the device only as intended.
If the wall is not strong enough, use the mounting brackets, anchors, or plugs to secure the device. Ensure that the material can support the weight and use appropriate screws or bolts for installation.
Before starting work, it is necessary to disconnect the device from the power supply. If the elements are disconnected, the housing, cables, and moving parts may be damaged or the device may be blocked.
It is possible to disconnect the device from the power supply only after the procedures described in the instructions have been completed.
Disconnect the device.
If the wires are damaged or broken, the housing, cables, and moving parts may be damaged or the device may be blocked.
The wires must be securely fastened in the indicated places.
If this is not the case, the housing, cables, and moving parts may be damaged or the device may be blocked.
During installation, do not pinch the cables.
If the cables are pinched, they may be damaged or broken. This may cause damage.
The cables must be installed perpendicular to the housing and the frame.
If this is not the case, the cables may be damaged or cause damage.
After installing the cables correctly, secure them properly.
If people or other objects come into contact with the cables, they may be damaged or the device may be blocked.
The mains cable or extension cable must be kept short.
If the mains cable or extension cable is pinched between the frame and the housing, or if it is damaged or cut, it may cause a short circuit or electric shock. This may lead to fire or electric shock.
The wires required for fastening to the frame are not provided.
Use the supplied bracket to attach the bracket to the material.
Table of contents
Original 5
Original installation 6
Bracket installation 8
Installing the TV on the bracket 9 KD-85/75XG85□□, KD-75XG87□□.9 KD-65/55XG87□□, KD-65/55XG85□□.11
Installing the TV bracket 13 KD-85/75XG85□□, KD-75XG87□□ 13 KD-65/55XG87□□, KD-65/55XG85□□ 15
Checking after installation 18 Basic equipment 18
Technical specifications 18
Installing the TV on the bracket
The procedure for installing the TV on the wall bracket is described below. To install the TV on the bracket, use the supplied SU-WL450 bracket.
Caution
- Be careful not to pinch your fingers between the TV and the wall.
Installation preparation
Before installation, remove the TV from the stand and remove the stand. Be careful not to scratch the floor. Remove the screws from the back of the TV. Use a screwdriver with a Phillips head. Use screws with a diameter of 8 mm or larger, and a length of 5 mm or more (not supplied). Select screws that fit the material.
SU-WL450 User Manual
Check that all parts are present.
| A Heri3 (20) (1) B Terepiik (2) | |
| ◎ PSW 6x20 (4) D TbIFbIH PSW 4x20 (2) | |
| E ApaIbIK (20) (2) E | Belenik (1) |
| ◎ TbIFbIH (20) (M4) (2) | H PSW 4x20 (2) |
| ① Heri3ri aIaIantep (2) | J PSW 4x10 (8) |
| K ApaIbIK (60) (2) L | PSW 6x50 (2) |
| M TbIFbIH (M4) (2) N | PSW 4x50 (2) |
Identifying the installation location
1 Identify the installation location.
Check that there is enough space for the bracket and refer to the instructions for the TV's weight.
To install the bracket, refer to the installation instructions. Refer to the TV's manual for identifying the TV's mounting holes.
Standard installation Installation center point of the screen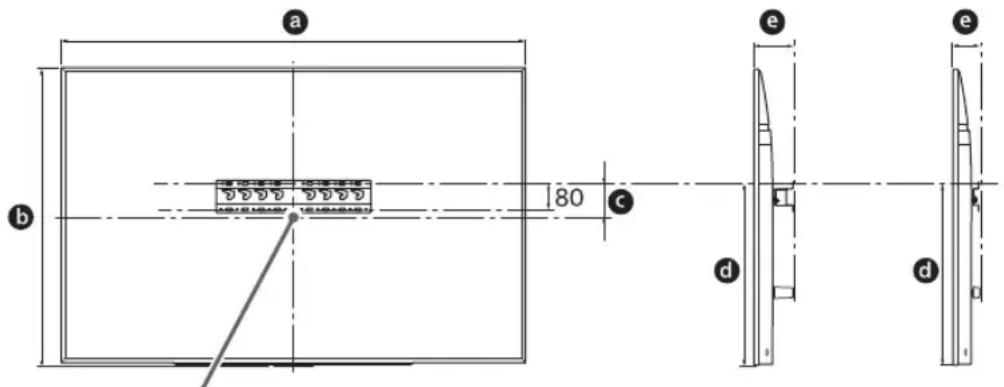
Note: MM
| Ynliri hemipi | Зкразецемерi | Зкразецьим �шемi | Орнату узbingьflu | ||
| a | b | c | d | ||
| Стоандарты орнату | Жа KBИ орнату | ||||
| KD-85XG85□□ | 1909 | 251 | 803 | 142 | 100 |
| KD-75XG87□□ | 1673 | 963 | 107 | 595 | 116 75 |
| KD-75XG85□□ | |||||
| KD-65XG87□□ | 1450 | 836 | 99 | 523 | 115 73 |
| KD-65XG85□□ | |||||
| KD-55XG87□□ | 1231 | 713 | 106 | 468 | 115 73 |
| KD-55XG85□□ | |||||
Note
The installation may be adjusted slightly before tightening. When installing the TV, adjust it slightly before tightening.
Leave an open space between the TV and the wall and the bracket's protruding parts.
Note: MM
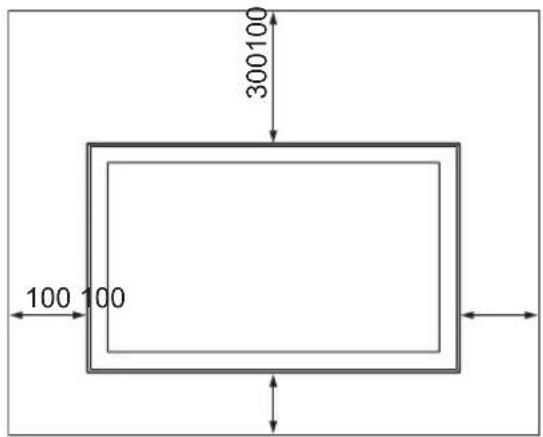
To tilt and swivel and to clean the TV:
- Pull the TV forward, tilt it up or down, or rotate it left or right. Do not place the TV on a table, shelf, desk, or cabinet. Do not cover the TV with curtains or newspapers, etc. Install the TV as shown in the instructions.
Aya aHaHaNbIMbI 6JOKTaJFaH.
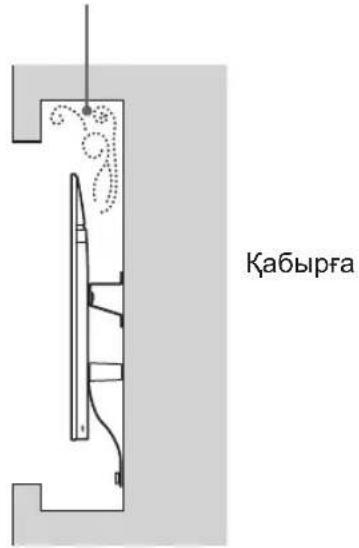
Hyckay
Ka6eBnepi Ka6bipra iWine caNtH 6oNcaHb3, opHaTnac 6ybpH Ka6eB caNbHaTbH Ka6bipraHb Tecin anybHb3 KepeK.
KaBeIbIep KbcIbIbn KaMnac yIiH Heri3 (20) A, Heri3ri aIaIaTep ① MeH apaIbIK (20) E, apaIbIK (60) K nepuMeTpIHeH Tbc KaBipFaHaH CaHbIay DaIbIHDaHbI3.
2 Ka6bipfara opnaty ctniH TaHaHbI. TeJeiNapdbIH apTKbl XaftMeH Ka6bipfa apakaBikTBIfbIH TEmHeKepcetTInreHdien TaHdayFa 6oNaDbipTeTneJI.
2-a CtaHndapTTbOpHaTy 2-b KaKbIH opHaTy
1-kaam keCTeIHe KapaHbI3.
ECKEPTY
-2-b TaHdaIraH Ke3e, ApTkbl TepMHaIra KaTbHac WeKteyni 60anaB1.
3 Heri3ri aanTepdi 6eKity opHbI TypaJIbI TeMeHderi KeCTeDeH KapaHbI3.2-b TaHaJFaH XaFdaNda, OcbI KaaAMdbI eTKi3in Xi6epiHi3.
| Yürgi Hämipi İnmek Öpnbı | |
| KD-85XG85☐☐ | |
| KD-75XG87☐☐ | a |
| KD-75XG85☐☐ | |
| KD-65XG87☐☐ | |
| KD-65XG85☐☐ | b |
| KD-55XG87☐☐ | |
| KD-55XG85☐☐ | |
AanTop ① Heri3iH (PSW 4x10) ② BypaHdaIapbImeH 2-a TaHdaIraH Ke3de (20) A Heri3iHe 6ekity.
4 Heri3di (20) @ opnaty ywiH 6ypaHaJapdbIH opHbIH aHbIKTaHbI3.
18-6eTteri cnaTtAmanapdbkapaHb3.
2-a TaHdaanFaH Ke3Je, ①AaantOp Heri3iHiT Tecik OphbIH naJaIaHbIHbI3.
ECKEPTY
The TV can be mounted on the wall. For details, see the instructions supplied with the Wall-Mount Bracket (sold separately).
Be sure to fasten the TV to the wall mount securely. If necessary, reinforce the wall mount.
Installing the Wall-Mount Bracket
- If the wall is not strong enough to support the TV, reinforce it before installation (consult a contractor). Attach the wall-mount brackets (20) to the back of the TV (only for 2-a). Attach the brackets (20) to the TV as shown.
Preparing for wall-mount installation
Check the installation location before installation.
KD-85/75XG85□□, KD-75XG87□□
1 Mark the installation position on the wall.
To determine the position of the TV on the wall or wall-mount brackets, use the supplied paper template (sold separately). Cut it out and check.
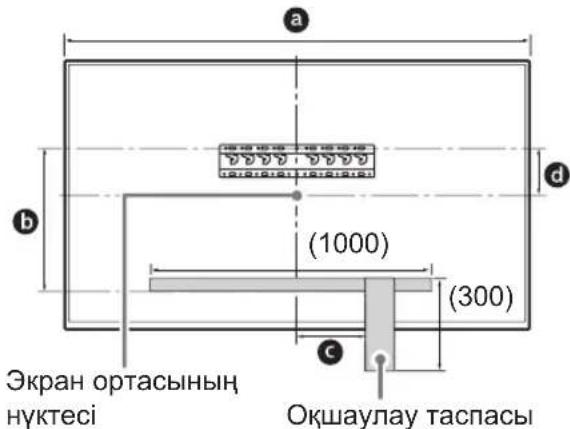
Unit: mm
| Ynlri hemipi | Белriney узbihдь范围内 | Зкран ортысbihн саншемi | ||
| a | b | c | d | |
| KD-85XG85□□ | 1909 | 683 | 200 | 251 |
| KD-75XG87□□ | 1673 | 468 | 200 | 107 |
| KD-75XG85□□ | ||||
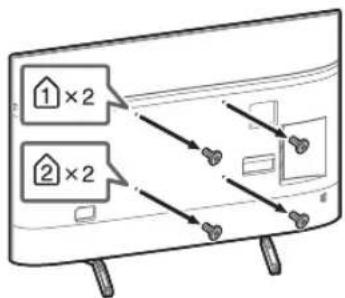
2 Remove the screws on the back of the TV.
3 To install the wall-mount bracket, use the supplied screws. Refer to the "Wall-Mount Bracket (SU-WL450)" section in the "Installation Information" for the mounting procedure.
Installation
- Secure the mounting screws using the holes. When using an electric screwdriver, set the torque to approximately 15 kgf·cm. - If the screws are not tightened enough, the TV may fall. Keep this manual for future reference.
Standard installation (2-a)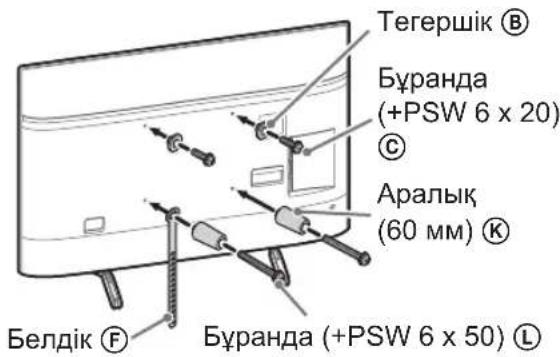
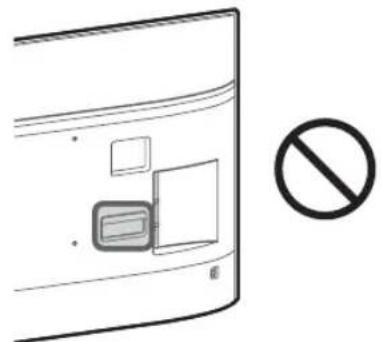
Install the unit (2-b)
Instruction
Before installing the unit, make sure that the wall surface is strong enough to support the weight of the unit. If the wall is not strong enough, the unit may fall and cause injury or damage.
4 Connect the cables (cables) to the terminals.
Before installing the unit, check that the cables are not damaged. After installing the unit, it may be difficult to check the cables. See the instructions provided with the unit.
Instruction
Connect the cables to the unit. During installation, to avoid damage, do not bend the cables excessively.
5 Do not install the unit above the TД.
- Install the unit on a flat, stable surface. If the unit is installed on an unstable surface, it may fall and cause injury or damage.
KD-85XG85□□
KD-75XG87□□, KD-75XG85□□
Install the unit on a flat, stable surface.
Instruction
- To install the unit, you will need a screwdriver and other tools.
- Before installing the unit, make sure that the wall surface is strong enough to support the weight of the unit. If the wall is not strong enough, the unit may fall and cause injury or damage. Also, make sure that the wall surface is free of any obstructions, such as pipes or electrical wiring, that could be damaged during installation. If you are unsure about the strength of the wall, consult a qualified professional.
1 Install the device on a flat surface.
2 To install into a cabinet, use the mounting brackets. See section 5-6 "Mounting brackets" in the "SU-WL450 Installation Guide" for installation instructions.
Note
- Secure the mounting brackets firmly with screws. Do not overtighten them. If the brackets are not installed correctly, the device may fall and cause injury. Keep this note for future reference.
Standard installation (2-a)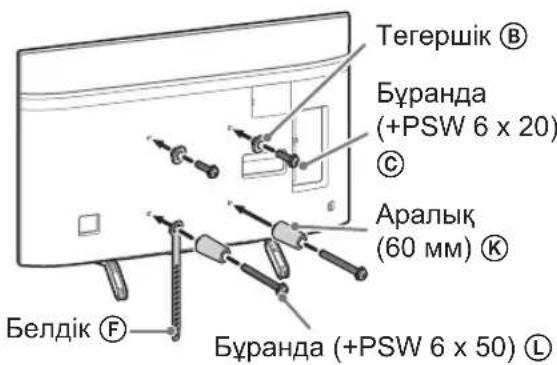
Oblique installation (2-b)
Note
- When installing, do not touch the rear terminals or connectors with your hands.
3 Connect the cables to the device.
Connect the cables to the device as shown in the figure. Do not pull the cables when connecting them. See the connection guide for details.
Note
Connect the cables to the device with the cable clamps. When installing, do not pinch or damage the cables.
4 Place the device on the stand.
- Align the stand's mounting hole with the device's mounting hole and place it. Do not place the device on the stand before connecting the cables.
Secure the device to the stand with the screws provided.
HycKay
YCTEN TYfblpBH WEEW YWIN YUH OAn H KEn aam KaKeT 6oana. YcTeI TYbIPbIH TeNeiDapdAn WeUkeH Ke3De WAMaHaH KEN KYU CanMayFa TbIPbcBbH3, ce6e6i 6yTeneiDapdbH KyJaan, DeHe XapaKaTaHa HeMece TeEniDapdbH fN3nKaTbIK 3aKbMbHa eKeJyIMMkiH. Teeneiapabih3akbIMdanybIH6oNdbipmay yuH yCTen TyfbiphA6auian kondaHbIbI3. TeNepnapbblKeTepreHneabai6oJIbHb3,eHTkeHi yTeTIyfbIpaXkbpTaJIbIN,XapaMcbI3bIKKa yIbpaybiMmKiH. - TeNeiIapAn YcTeN TyfblpH any Ke3IHne KyNaTbIn anydAn XeHe TeNeIaIapOpHaTbINFaH 6eTke 3aKbIM KENTipyEn CaTbIK WapanapBn KOfA aNbIbI3.
Ka6bipfara TeIeIiIapIbI opHaTy
KD-85/75XG85□□,KD-75XG87□□
1 TepeiapdbI KeTeepiH3.
Heri3deri Hemece Heri aanTepihderi imekteri TerepukkTe 8 opbH 7-6Tteri «OpHaTbIaTbH opbIHbI aHbIKay» iwiHderi 3-Kaam keCTecHeK kapaHbI3. TeeneiapdbI yctaraH Ke3e TeJeiap apTbI Hei3re HemeCHe Hi3 aanTepiHe TneTIiHe Ke3 XeTKi3iHi3.
HycKay
TeNepiapbki konmeh 6epik yctan,6en6ey F xane Tepeiap actbi OKwaynay TacnacbImeH TypanaHaHbHa Ke3 XeTKi3iHi3. TeIeINapbl yu aam BoNbIn TacbImaHaB3KeHe TeNeINap anDbHafbl aam BackanapbHaOpbH peTey BoNbIHwHcykay bepy KepeK.
TeeneiapblKa6bIprafae6eKITyKe3Hneabai 60nblb3 (acipece, Teeneiapbl acTBHaH yCTaTbH aam), c6e6ti Teeneiap KINHArly Kynan, aybp DeHe JapaKaTaBHn Hemece Tinti EImre eKenyi MymkiH.
2 TepeiapIbI Herizre Hemece Heriz aanTepiHe opHaTbIHbI3.
TeeneiIapabiaakbpihTemeHcbipfblIN, TeeneiIap apTbHa TipKeIreH terepwikTepdi 已 heri3re Hemece Heri3 aanTepine inin, cahbnaynap niwiin paCTaHbI3. TД-ды ka6bipfara opHaTKaHHaKeiH TereepwikTeP ⑧ Herizre Hemece Herizri adanTepre 6ekem iinHreHdiirn TeKcepH3. TeIeIaIapDbIH KJlAmaHTbIHbHa Ke3 XeTki3y ywiH eKi KOJIbIHbI3dbI 6aay 6ocatbI3.
Tepeiapbl Ka6bipfara opHaTKaHHaH KeiH, Ka6bipraHaN Okuaynay TacnacbiH, T.6. WewiH3.
2-a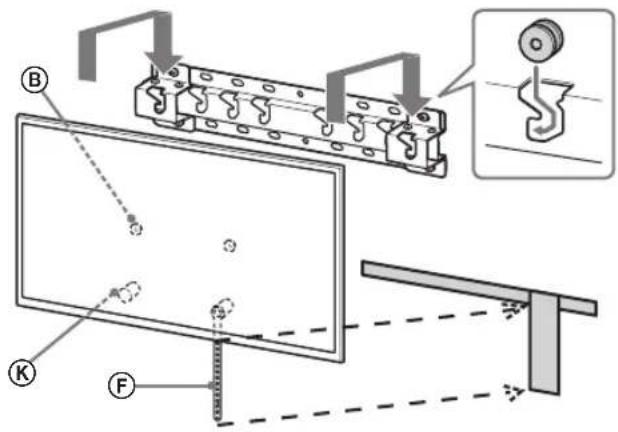
↓
↓
If the TV does not turn on, check the power cord connection.
The TV may not turn on if the power cord is not connected properly. Check the power cord connection.
3. Press the power button on the TV.
- Press the button and check if the TV turns on.
- If the diameter is 5 mm or more, replace the fuse.
Start
Before turning on the TV, check the power cord connection. If it is loose, reconnect it and try again.
KD-65/55XG87□□
KD-65/55XG85□
1. Turn on the TV.
Install the device on a horizontal or vertical surface using the 3M adhesive tape provided. Before final installation, ensure the surface is clean and dry.
Note
Install the device with both hands.
2. Attach the device to a horizontal or vertical surface.
Remove the protective film from the adhesive tape, then press the device firmly onto the horizontal or vertical surface. After positioning, ensure the tape is securely attached. To avoid damage, do not bend the device.
2-a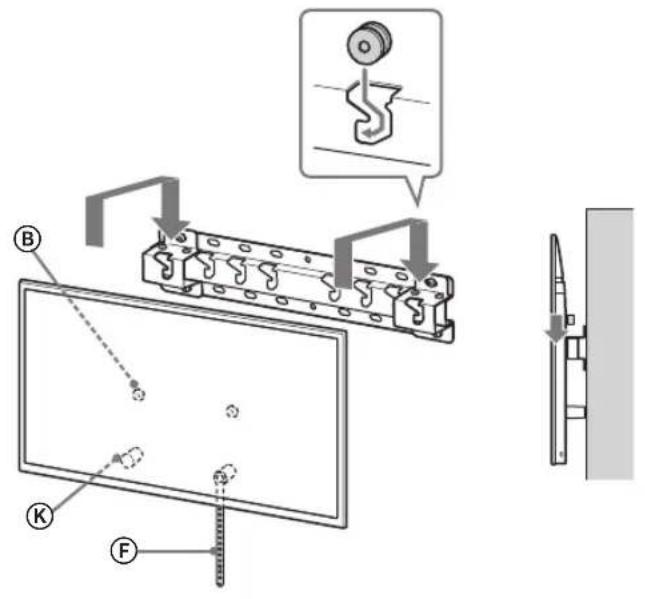
2-b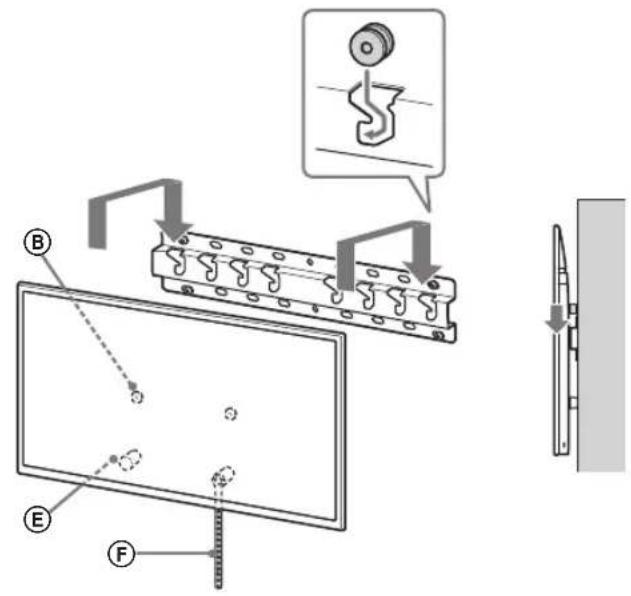
↓
↓
CAUTION
Do not install the device on surfaces that are uneven or have significant curvature (for devices larger than 75 mm, use three or more mounting points).
3. Do not allow the device's adhesive to come into contact with skin.
- Press the device firmly against the surface.
- For diameters of 5 mm or less, use a suitable adhesive (provided).
Note
This manual contains safety instructions that must be followed to ensure safe operation. If you have any questions, please contact the manufacturer.
Original instructions
Keep for future reference.
Ensure that the device is properly grounded. - Do not use if the plug or cable is damaged. - The device (F) must be grounded.
WARNING
If the device is used in a manner not specified by the manufacturer, the protection provided by the device may be impaired. Do not use the device in hazardous areas.
Accessories
The installation procedure must be performed in the order described.
WARNING
If the device is used in a manner not specified by the manufacturer, the protection provided by the device may be impaired. Do not use the device in hazardous areas.
Technical specifications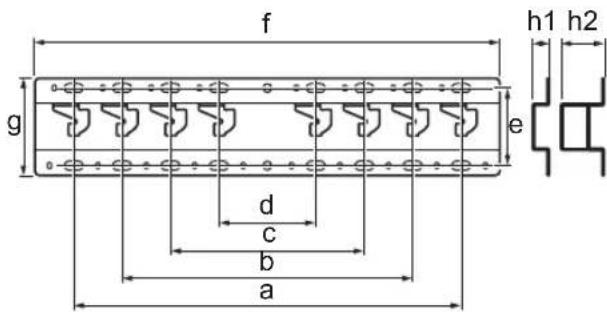
Sony
Sony
- 6 · 8 9 KD-65/55XG87□11 KD-65/55XG85□
- KD-85/75XG85□□,KD-75XG87□□ KD-65/55XG87□ . KD-65/55XG85□
#
SU-WL450 1
(1)(20) (A)(2) 防火手B
18 18. 0792

PSW 4x20 (2)

(4) PSW 6x20 (5)
(2) (20) nniE1) ny
F
nnuuun nnnn nn nnnn nnnn Su-WL450 npnnn wwnn npnn by
(2)PSW4x20 H

(2) (M4) (20) ⑨

.075v07vnnopnnn
,

(2) D D D N D ①

8)PSW 4× 10
(2) (60) nnnn K
2)PSW6x50 L

(2) (M4) ∩ ∩ M
2)PSW4x50⑨
nppnn npny noyn
| e | d | e | b | a | □□□ | |
| n/a/n | n/a/n | |||||
| n/a/n | n/a/n | |||||
| 1,9091,097KD-75XG87□□ | ||||||
| 1,6739631075511675KD-75XG85□□ | ||||||
| 1,4508369952311573KD-65XG87□□ | ||||||
| KD-65XG85□□ | ||||||
| 1,23171310646811573KD-55XG85□□ |
2-a
npt nvn 2-b
12y
77
nnn nn nyn,2-b nna
nnn
| a | KD-85XG85□□KD-75XG87□□KD-75XG85□□ |
| b | KD-65XG87□□KD-65XG85□□KD-55XG87□□KD-55XG85□□ |
2 1
n:n ∴ 7n + 5 = 10 - by in Tn, -NNnNn -, ∴ m : x = 1 或 3x + 4y + 1 = 0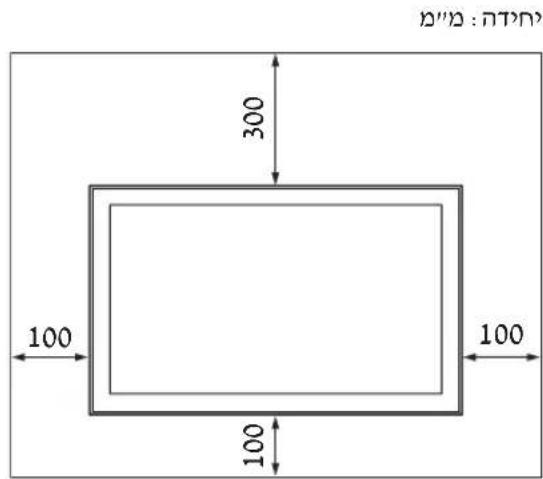
.
KD-85/75XG85□□, KD-75XG87□□
#
NNDNININDININININ
077777777
ynnn nn yp,ynn nnnn y
15 1.5-2 1000000000000000000000000000000
- 17222222
- n
1007(p9)
(2-b) n
y:y
2217
·

d
C
b
a
1,9096K320025G85□□
KD-75XG87□□
68200XRGD-75XG85□□
2nnn
.
Therefore, n^2 + 1 ≡ 0
#
.
D. ①②③
5 100
.
·
KD-85XG85□□
- 1
#
.
.
-
-
·
·
1nnn
.
2n
nn nn nn pnn
□y77n" 9y077y7-5y
"SU-WL450 0x70 y 0p00n
.5 1
77
NNDNIN
07777777
7
KD-85/75XG85□□, KD-75XG87□□
·
1.
- ⑧ ( \uparrow \downarrow \downarrow \downarrow \downarrow \downarrow \downarrow \downarrow \downarrow \downarrow \downarrow \downarrow \downarrow \downarrow \downarrow \downarrow \downarrow \downarrow \downarrow \downarrow \downarrow \downarrow \downarrow \downarrow \downarrow \downarrow \uparrow \uparrow \uparrow \uparrow \uparrow \uparrow \uparrow \uparrow \uparrow \uparrow \uparrow \uparrow \uparrow \uparrow \uparrow \uparrow \uparrow \uparrow \uparrow \uparrow \uparrow \uparrow \uparrow \uparrow \uparrow \downarrow \downarrow \downarrow \downarrow \downarrow \downarrow \downarrow \downarrow \downarrow \downarrow \downarrow \downarrow \downarrow \downarrow \downarrow \downarrow \downarrow \downarrow \downarrow \downarrow \downarrow \downarrow \downarrow \downarrow
[1] (7y):
400:a
300:b
200:c
100:d
80:e
480:f
100:g
(2-b nnp) 20:h1
(2-a nnp) 60 : h2
[1] (7y): (v)
0.8
y
nppnn nnuyn
.
Therefore, the area of triangle OBC equals the area of triangle COD plus the area of triangle BOC.
Therefore, PB is perpendicular to BA.
- ON SAFETY
- TO CUSTOMERS
- TO SONY DEALERS
- CAUTION
- SPECIFIED PRODUCTS
- WARNING
- BE SURE TO SUBCONTRACT THE INSTALLATION TO LICENSED CONTRACTORS AND KEEP SMALL CHILDREN AWAY DURING THE INSTALLATION
- BE SURE TO SUBCONTRACT MOVING OR DISMOUNTING OF THE TV TO LICENSED CONTRACTORS
- DO NOT REMOVE SCREWS, ETC., AFTER MOUNTING THE TV
- DO NOT MAKE ALTERATIONS TO THE PARTS OF THE WALL-MOUNT BRACKET
- DO NOT MOUNT ANY EQUIPMENT OTHER THAN THE SPECIFIED PRODUCT
- DO NOT LEAN ON OR HANG FROM THE TV
- DO NOT HANDLE THE PRODUCT WITH EXCESSIVE FORCE DURING CLEANING OR MAINTENANCE
- PRECAUTIONS
- INSTALLING THE WALL-MOUNT BRACKET
- DO NOT INSTALL THE TV OVER OR UNDER AN AIR CONDITIONER
- BE SURE TO INSTALL THE WALL-MOUNT BRACKET SECURELY TO THE WALL FOLLOWING THE INSTRUCTIONS IN THIS INSTRUCTION MANUAL
- BE SURE TO ASSEMBLE THE BRACKET PROPERLY FOLLOWING THE INSTRUCTED PROCEDURE EXPLAINED IN THIS INSTRUCTION MANUAL
- BE SURE TO TIGHTEN THE SCREWS SECURELY IN THE DESIGNATED POSITION
- BE CAREFUL NOT TO SUBJECT THE TV TO SHOCK DURING INSTALLATION
- BE SURE TO INSTALL THE TV ON A WALL THAT IS BOTH PERPENDICULAR AND FLAT
- AFTER PROPER INSTALLATION OF THE TV, SECURE THE CABLES PROPERLY
- DO NOT ALLOW THE MAINS LEAD OR THE CONNECTING CABLE TO BE PINCHED
- THE SCREWS NEEDED TO SECURE THE WALL-MOUNT BRACKET TO THE WALL ARE NOT SUPPLIED
- TABLE OF CONTENTS
- INSTALLING THE TV ONTO THE WALL
- NOTE
- PREPARING FOR INSTALLATION
- CHECKING THE PARTS
- SUPPLIED WITH SU-WL
- DECIDING ON THE INSTALLATION LOCATION
- DECIDE ON THE INSTALLATION LOCATION
- INSTALLING THE BASE ON THE WALL
- PREPARING FOR THE INSTALLATION OF THE TV
- KD-85/75XG85□□, KD-75XG
- MARK THE INSTALLATION LOCATION ON THE WALL
- REMOVE THE SCREWS FROM THE REAR OF THE TV
- CONNECT THE NECESSARY CABLE(S) TO THE TV
- DETACH THE TABLE-TOP STAND FROM THE TV
- KD-85XG
- KD-75XG87□□, KD-75XG
- SLIM MOUNTING (2-B)
- INSTALLING THE TV ON THE WALL
- LIFT THE TV
- INSTALL THE TV ONTO THE BASE OR BASE ADAPTOR
- PREVENTING THE BOTTOM OF THE TV FROM SHIFTING
- CONFIRMING THE COMPLETION OF THE INSTALLATION
- OTHER INFORMATION
- SPECIFICATIONS
- DIMENSIONS: (APPROX.) [MM]
- WEIGHT (BASE ONLY): (APPROX.) [KG]
- PREPARATION FOR INSTALLATION
- FIND THE TV'S LOCATION
- DO NOT INSERT SCREWS OR OTHER ITEMS DURING TV INSTALLATION
- DO NOT SKIP THE WALL MOUNT BRACKET PARTS
- DO NOT MOUNT OTHER EQUIPMENT OTHER THAN THE SPECIFIED PRODUCT
- DO NOT PLACE THE WALL MOUNT BRACKET ON ANY OTHER PRODUCT EXCEPT THE TV. DO NOT PLACE THE TV ON A SLOPING OR UNSTABLE SURFACE
- DO NOT LEAN ON OR SIT ON THE TV
- THE PRODUCT WARRANTY IS VOID IF THE PRODUCT IS USED FOR COMMERCIAL PURPOSES
- WALL MOUNT INSTALLATION
- DO NOT INSTALL THE WALL MOUNT ON WALL SURFACES WHERE THE SIDES OF THE TV PROTRUDE FROM THE WALL SURFACE
- DO NOT INSTALL THE TV ABOVE OR BELOW AN AIR CONDITIONER
- INSTALL THE WALL MOUNT SECURELY TO THE WALL BY FOLLOWING THE INSTRUCTIONS IN THIS MANUAL
- MAKE SURE YOU USE THE CONSOLE CORRECTLY BY FOLLOWING THE PROCEDURE DESCRIBED IN THIS INSTRUCTION MANUAL
- TIGHTEN THE SCREWS FIRMLY IN THE INDICATED POSITION
- BE CAREFUL NOT TO DROP THE TV DURING INSTALLATION
- MOUNT THE TV ON THE WALL, PERPENDICULAR AND FLAT
- AFTER PROPER INSTALLATION OF THE TV, ENSURE THE CABLES ARE CORRECTLY ROUTED
- DO NOT ALLOW THE POWER CORD OR CONNECTING CABLE TO BE PINCHED
- THE SCREWS REQUIRED FOR SECURING THE CONSOLE FOR WALL MOUNTING TO THE WALL ARE NOT INCLUDED IN THE PACKAGE
- WALL-MOUNTING THE TV
- PREPARING FOR MOUNTING
- DETERMINING THE MOUNTING POSITION
- SELECT THE MOUNTING POSITION
- MOUNT THE TV TO THE BASE STAND
- PPEOTBPATABAHE
- A6EJEXKKA
- ПОБЕРКА НА
- PONDEPKNAEMBLE MOEI
- K CBEHIO NOKYNTEJE
- K CBEHEHNIO DIJIEPOB N IOJAIUNKOB SONY
- SAFETY
- FOR CUSTOMERS
- FOR SONY DEALERS
- BHIMAHNE
- YKA3AHHBIE N3DJIINR
- ДЛЯ NOKУРАЗЕЛЕЙ
- PNEUINPEKDEHNE
- ATEIBHO 06PATNTECB K JIUCEHN3POBAHHOMY IOPRANKY,A TAKKE HE DONYCKAITE TORO,HTO6BL DETN HAXODNCB B6JIN3M MECTA YCTAHOBKN N3DEINY
- MEPBL NPEDEOCTOPOXHOCTN B OTHOWEHN DETEI
- ДЛЯ ПОЕМЕЦЕНИ NLN DEMOHTAXA TEJEBN3OPA 6BRATEJBHO 6PATNTECB KЛИЦEH3ИРOBAHHBIM NODPRANKAM
- IOCNE MOTAXA TELEBN3OPA HE BBIHMA'TE BNHTBL N T. D
- INSTALL THE WALL-MOUNT BRACKET SECURELY TO THE WALL
- DO NOT INSTALL ANY EQUIPMENT OTHER THAN THE SPECIFIED ONE ON THE BRACKET
- TO AVOID OVERLOADING THE WALL-MOUNT BRACKET, DO NOT PLACE ANYTHING OTHER THAN THE TV ON IT. DO NOT PUSH THE TV LEFT/RIGHT OR UP/DOWN
- DO NOT LEAN ON THE TV OR HOLD ONTO IT
- CONTENTS
- MOUNTING THE BASE ON THE WALL
- CONNECT THE NECESSARY CABLES TO THE TV
- MOUNTING THE TV ON THE WALL
- KD-85/75XG85□□,KD-75XG
- PPMEAHNE
- YCTAHOBNTE TEJIEBU3OP HA OCHOBAHNE IIN AIANTEP OCHOBAHN
- TO PREVENT THE TV FROM TIPPING OVER
- KD-65/55XG87□□, KD-65/55XG
- PLACE THE TV ON THE BASE OR BASE ADAPTER
- PRECAUTION
- PREVENT THE LOWER PART OF THE TV FROM SHIFTING
- INITIAL INFORMATION
- TECHNICAL SPECIFICATIONS
- DO NOT UNSCREW THE SCREWS USED FOR TV MOUNTING
- DO NOT REMOVE THE BRACKET PARTS FOR WALL MOUNTING
- DO NOT INSTALL ANY OTHER DEVICES NOT SPECIFIED FOR THIS PRODUCT
- FASTEN THE BRACKETS TO THE WALL FOR SECURE MOUNTING AND TO PREVENT THE TV FROM FALLING. DO NOT PLACE THE TV ON UNSTABLE SURFACES
- DO NOT PLACE THE TV ON UNSTABLE SURFACES
- WARNINGS
- WHEN CLEANING OR SERVICING THE PRODUCT, DO NOT APPLY EXCESSIVE FORCE
- SAFETY PRECAUTIONS
- SONY WALL-MOUNT BRACKET
- INSTALL THE BRACKETS FOR PARTIAL WALL MOUNTING IN THE PLACE WHERE THE EDGES OF THE TV SIDES PROTRUDE BEYOND THE WALL SURFACE
- DO NOT INSTALL THE TV ON A WALL WITH A CONDENSER
- INSTALL THE BRACKETS FOR PARTIAL WALL MOUNTING ACCORDING TO THE INSTRUCTIONS IN THIS MANUAL
- ASSEMBLE THE BRACKETS PROPERLY, FOLLOWING THE PROCEDURE DESCRIBED IN THIS MANUAL
- TIGHTEN THE SCREWS SECURELY IN THE SPECIFIED POSITION
- DURING INSTALLATION, BE CAREFUL NOT TO DROP THE TV
- INSTALL THE TV ON A PERPENDICULAR WALL WITH A FLAT SURFACE
- FIX THE TV SECURELY USING THE MOUNTING HARDWARE
- MAKE SURE THAT THE POWER CORD OR CONNECTING CABLE IS NOT PINCHED
- WHEN USING SCREWS FOR MOUNTING THE BRACKET ON THE WALL, DO NOT USE THE SCREWS INCLUDED IN THE PACKAGE
- ACCESSORIES
- PREPARATION FOR
- INSTALLATION
- DETERMINING THE INSTALLATION LOCATION
- DETERMINE THE INSTALLATION LOCATION
- INSTALLATION ON A WALL
- MOUNTING POINT (2-B)
- BRACKET
- CONNECT THE TV CABLE
- REMOVE THE STAND FROM THE TV
- WALL MOUNT (2-B)
- CONNECT THE CABLES TO THE TV BEFORE MOUNTING
- READ THE SAFETY REGULATIONS
- INSTALL THE TV ON THE BASE OR WALL-MOUNT BRACKET
- WALL MOUNTING (2-B)
- MARKUS
- INSTALLATION OF THE BASE (2-B)
- MASS (BASE ONLY): (APPROX.) [KG]
- DO NOT INSTALL THE DEVICE IN A PLACE WHERE IT MAY BE EXPOSED TO RAIN OR MOISTURE
- MOUNTING ACCESSORIES
- INSTALLING THE MOUNTING BRACKETS
- DO NOT INSTALL THE DEVICE ON AN UNSTABLE SURFACE
- MOUNTING BRACKET INSTALLATION
- USE THE DEVICE ONLY AS INTENDED
- IT IS POSSIBLE TO DISCONNECT THE DEVICE FROM THE POWER SUPPLY ONLY AFTER THE PROCEDURES DESCRIBED IN THE INSTRUCTIONS HAVE BEEN COMPLETED
- DISCONNECT THE DEVICE
- THE WIRES MUST BE SECURELY FASTENED IN THE INDICATED PLACES
- DURING INSTALLATION, DO NOT PINCH THE CABLES
- THE CABLES MUST BE INSTALLED PERPENDICULAR TO THE HOUSING AND THE FRAME
- AFTER INSTALLING THE CABLES CORRECTLY, SECURE THEM PROPERLY
- THE MAINS CABLE OR EXTENSION CABLE MUST BE KEPT SHORT
- THE WIRES REQUIRED FOR FASTENING TO THE FRAME ARE NOT PROVIDED
- INSTALLING THE TV ON THE BRACKET
- INSTALLATION PREPARATION
- SU-WL450 USER MANUAL
- IDENTIFYING THE INSTALLATION LOCATION
- IDENTIFY THE INSTALLATION LOCATION
- HYCKAY
- ECKEPTY
- PREPARING FOR WALL-MOUNT INSTALLATION
- MARK THE INSTALLATION POSITION ON THE WALL
- REMOVE THE SCREWS ON THE BACK OF THE TV
- INSTALL THE UNIT (2-B)
- INSTRUCTION
- CONNECT THE CABLES (CABLES) TO THE TERMINALS
- DO NOT INSTALL THE UNIT ABOVE THE TД
- OBLIQUE INSTALLATION (2-B)
- CONNECT THE CABLES TO THE DEVICE
- PLACE THE DEVICE ON THE STAND
- KA6BIPFARA TEIEIIIAPIBI OPHATY
- TEPEIAPDBI KETEEPIH
- TEPEIAPIBI HERIZRE HEMECE HERIZ AANTEPIHE OPHATBIHBI
- IF THE TV DOES NOT TURN ON, CHECK THE POWER CORD CONNECTION
- PRESS THE POWER BUTTON ON THE TV
- START
- TURN ON THE TV
- ATTACH THE DEVICE TO A HORIZONTAL OR VERTICAL SURFACE
- DO NOT ALLOW THE DEVICE'S ADHESIVE TO COME INTO CONTACT WITH SKIN
- ORIGINAL INSTRUCTIONS
- SONY
- NPPNN NPNY NOYN
- (2-B) N
- THEREFORE, N^2 + 1 ≡
- NPPNN NNUYN
Brand : SONY
Model : Bravia KD55XG8577
Category : Television