
BT 4 - Exercise bike Christopeit - Free user manual and instructions
Find the device manual for free BT 4 Christopeit in PDF.
User questions about BT 4 Christopeit
0 question about this device. Answer the ones you know or ask your own.
Ask a new question about this device
Download the instructions for your Exercise bike in PDF format for free! Find your manual BT 4 - Christopeit and take your electronic device back in hand. On this page are published all the documents necessary for the use of your device. BT 4 by Christopeit.
USER MANUAL BT 4 Christopeit
Assembly and exercise instructions for Order No.1725
HctpyKuHa No MoHTaKy N 3KcnIyataun No 3aka3a 1725
RU O63op coeepkaHnA CTP. 52
CZ Obsah Strana 64

Programm 17 HRC (55%)
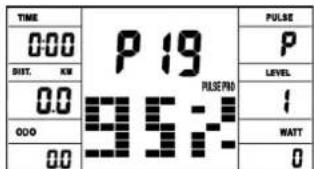
Programm 19 HRC (95%) Programm 20 HRC Programm 21 Body Fat
Programm Manual:
Programme 1 - 10: Fitness
- Summary of Parts Page 3 - 4
- Important Recommendations and Safety Information Page 17
- Parts List Page 18 - 19
- Assembly Instructions With Exploded Diagrams Page 20 - 22
- Mount, Use & Dismount
Watt table
Page 23
- Computer instructions
Page 24 - 25
- Cleaning, Storage, Checks, Troubleshooting
Page 26
- Training Instructions, Warm up exercises (Warm Up)
Page 27
Dear customer,
We congratulate you on your purchase of this home training sports unit and hope that we will have a great deal of pleasure with it. Please take heed of the enclosed notes and instructions and follow them closely concerning assembly and use. Please do not hesitate to contact us at any time if you should have any questions.
Important Recommendations and Safety Instructions
Our products are all tested and therefore represent the highest current safety standards. However, this fact does not make it unnecessary to observe the following principles strictly.
- Assembly the machine exactly as described in the installation instructions and use only the enclosed, specific parts of the machine. Before assembling, verify the completeness of the delivery against the delivery notice and the completeness of the carton against the assembly steps in the installation and operating instructions.
- Check the firm seating off all screws, nuts and other connections before using the machine for the first time and at regular intervals to ensure that the trainer is in a safe condition. In particular, the adjustment of saddle and handlebar need smooth function and good condition.
- Set up the machine in a dry, level place and protect it from moisture and water. Uneven parts of the floor must be compensated by suitable measures and by the provided adjustable parts of the machine if such are installed. Ensure that no contact occurs with moisture or water.
- Place a suitable base (e.g. rubber mat, wooden board etc.) beneath the machine if the area of the machine must be specially protected against indentations, dirt etc.
- Before beginning training, remove all objects within a radius of 2 metres from the machine.
- Do not use aggressive cleaning agents to clean the machine and employ only the supplied tools or suitable tools of your own to assemble the machine and for any necessary repairs. Remove drops of sweat from the machine immediately after finishing training.
- WARNING! Systems of the heart frequency supervision can be inexact. Excessive training can lead to serious health damage or to the death. Consult a doctor before beginning a planned training programme. He can define the maximum exertion (pulse, Watts, duration of training etc.) to which you may expose yourself and can give you precise information on the correct posture during training, the targets of your training and your diet. Never train after eating large meals.
- Only train on the machine when it is in correct working order. Use original spare parts only for any necessary repairs. WARNING! Replace the worm parts immediately and keep this equipment out of use until repaired.
- When setting the adjustable parts, observe the correct position and the marked, maximum setting positions and ensure that the newly adjusted position is correctly secured.
- Unless otherwise described in the instructions, the machine must only be used for training by one person at a time. The exercise time should not overtake 60 min./daily.
-
Wear training clothes and shoes which are suitable for fitness training with the machine. Your clothes must be such that they cannot catch during training due to their shape (e.g. length). Your training shoes should be appropriate for the trainer, must support your feet firmly and must have non-slip soles.
-
WARNING! If you notice a feeling of dizziness, sickness, chest pain or other abnormal symptoms, stop training and consult a doctor.
- Never forget that sports machines are not toys. They must therefore only be used according to their purpose and by suitably informed and instructed persons.
- People such as children, invalids and handicapped persons should only use the machine in the presence of another person who can give aid and advice. Take suitable measures to ensure that children never use the machine without supervision.
- Ensure that the person conducting training and other people never move or hold any parts of their body into the vicinity of moving parts.
- At the end of its life span this product is not allowed to dispose over the normal household waste, but it must be given to an assembly point for the recycling of electric and electronic components. You may find the symbol on the product, on the instructions or on the packing.
The materials are reusable in accordance with their marking. With the re-use, the material utilization or the protection of our environment. Please ask the local administration for the responsible disposal place. - To protect the environment, do not dispose of the packaging materials, used batteries or parts of the machine as household waste. Put these in the appropriate collection bins or bring them to a suitable collection point.
- For speed dependent operation mode, the braking resistance level can be adjustable manually and the variations of power will depend on the pedaling speed. For speed independent operation mode, the user can set the wanted power consumption level in Watt, constant power level will be kept by various braking resistance levels, that will be determined automatically by system. That is independent on the pedaling speed.
- The machine is equipped with 24-step resistance adjustment. This makes it possible to reduce or increase the braking resistance and thereby the training exertion. Pressing the button " - " for the resistance setting towards stage 1 reduces the braking resistance and thereby the training exertion. Pressing the button " + " for the resistance setting towards stage 24 increases the braking resistance and thereby the training exertion.
- The maximum permissible load (=body weight) is specified as 120 kg. This machine has been tested and certified in compliance with EN ISO 20957-1:2013 und EN ISO 20957-5:2016 ^aH / A^a .This item's computer corresponds to the basic demands of the EMV Directive of 2014/30 EU.
- The assembly and operating instructions is part of the product. If selling or passing to another person the documentation must be provided with the product.
Parts List - Spare Parts List BT 4 Order No. 1725
Technical data: Issue: 10.03.2021
Ergometer of class H/A with high accuracy
- Magnetic brake system with approx. 7 KG flywheel
- Motor- and Computer-controlled resistance, with 24 manually adjustable load steps
10 installed programs
4 heart rate programs - 5 individual programs
- 1 manually program
1 speed independent program, power control in steps of 10 Watt (30 - 350 Watt)
1 Body Fat program - Handlebar and saddle incline adjustable
- Saddle horizontally- and vertically-adjustable
- Wheels for easier transportation
- Power plug (Adapter)
- LCD computer, showing at same time: Speed, time, distance, approx. calories, Pedal revolutions per minute, Watt and heart rate and ODO. Holder for smartphone / tablet.
- Input of limits for time, distance and approx. calories, watt and heart rate, Announcement of higher limits
Fitness test (Recovery)
Max. body weight 120 KG
Items weight: 26,5kg
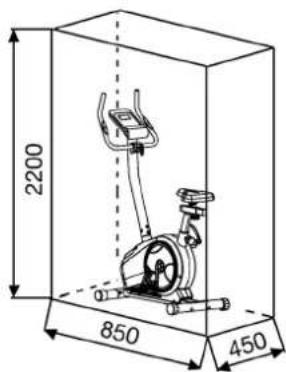
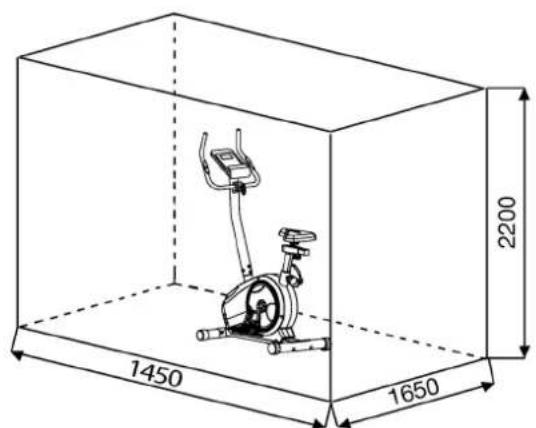
Space requirement approx. L 85, W 48, H 145 cm
Exercise space approx: min. 2,5m^2
Please contact us if any components are defective or missing, or if you need any spare parts or replacements in future:
This product is created only for private Home sports activity and not allowed to us in a commercial or professional area. Home Sport use class H/A
| 0 | 5 | 10 | 15 | 20 | 25 | 30 | 35 | 40 | 50 | 60 | 70 | 80 | 90 | 100 mm |
| Illustration No. | Designation mm | Dimensions | Quantity illustration No. | Attached to | ET number | |
| 1 | Main frame | 1 | 33-1725-01-SW | |||
| 2 | Front stabilizer | 1 | 1 | 33-1725-02-SW | ||
| 3 | Rear stabilizer | 1 | 1 | 33-1725-03-SW | ||
| 4 | Eccentric cap | 2 | 3 | 36-9906310-BT | ||
| 5 | Carriage bolt | M8x75 | 4 | 2+3 | 39-10019-CR | |
| 6 | Arc washer | 8//25 | 8 | 5+17 | 39-9966-CR | |
| 7 | Cap nut | M8 | 4 | 5 | 39-9900-CR | |
| 8L | Crank left | 9/16" | 1 | 9L+59 | 33-1107-12-SI | |
| 8R | Crank right | 9/16" | 1 | 9R+59 | 33-1107-13-SI | |
| 9L | Pedal left | 9/16" | 1 | 8L | 36-1107-14-BT | |
| 9R | Pedal right | 9/16" | 1 | 8R | 36-1107-15-BT | |
| 10L | Front end cap left | 1 | 2 | 36-9925459-BT | ||
| 10R | Front end cap right | 1 | 2 | 36-9925460-BT | ||
| 11 | Motor cable | 1 | 13+53 | 36-9212-04-BT | ||
| 12 | Adapter | 9V=DC/1A | 1 | 81 | 36-1420-17-BT | |
| 13 | Connection cable | 1 | 11+26 | 36-9212-06-BT | ||
| 14 | Inner hex bolt | M8x16 | 4 | 17 | 39-9888 | |
| 15 | Saddle bushing | 1 | 1 | 36-1725-05-BT | ||
| 16 | Handgrip-nut | 1 | 30 | 36-9211-19-BT | ||
| 17 | Handlebar post | 1 | 1 | 33-1725-04-SW | ||
| 18 | Saddle | 1 | 18a | 36-9107-06-BT | ||
| 18a | Saddle bracket | 1 | 18+19 | 36-9814-12-BT | ||
| 19 | Horizontal saddle post | 1 | 28 | 33-1725-06-SW | ||
| 20 | Pulse unit with cable | 2 | 25 | 36-9211-08-BT | ||
| 21 | Foam grip | 2 | 25 | 36-9211-22-BT | ||
| 22 | Round end cap | 2 | 25 | 36-9211-21-BT | ||
| 23 | Screw | M4x12 | 4 | 17+26 | 39-10188 | |
| 24 | Spring washer | for M8 | 8 | 5+14 | 39-9864-VC | |
| 25 | Handlebar | 1 | 17 | 33-1725-05-SW | ||
| 26 | Computer | 1 | 17 | 36-1725-03-BT | ||
| 27 | Square end cap | 2 | 19 | 36-9211-23-BT | ||
| 28 | Saddle post | 1 | 1+19 | 33-1725-07-SW | ||
| 29 | Quick release | 1 | 1+28 | 36-9211-18-BT | ||
| 30 | Fixed bracket | 1 | 19 | 33-9211-08-SI | ||
| 31 | Washer | 10//20 | 2 | 16+78 | 39-9989-CR | |
| Illustration No. mm illustration No. | Designation | Dimensions | Quantity | Attached to | ET number | |
| 32 Washer 4/10 4 23 39-10510 | ||||||
| 33 Handlebar screw 1 17 36-9211-16-BT | ||||||
| 34 Handlebar cover 1 25 36-9211-09-BT | ||||||
| 35 Spacer 1 33 36-9613209-BT | ||||||
| 36 Washer 8/16 1 33 39-10520 | ||||||
| 37 DC connection cable 1 11+12 36-1721-07-BT | ||||||
| 38 Nylon nut M8 3 18 39-9918-CR | ||||||
| 39 Washer 8/16 3 18 39-10018-CR | ||||||
| 40 Screw 4.2x18 17 42+53+80 36-9825339-BT | ||||||
| 41 Crank cap 2 8 36-9840-15-BT | ||||||
| 42L Chain cover left 1 1+12 1 1+42R 36-1725-11-BT | ||||||
| 42R Chain cover right 1 1+12 1 1+42L 36-1725-12-BT | ||||||
| 43 C-clip C17 2 59 36-9504-20-BT | ||||||
| 44 Sensor 1 1+11 36-1721-13-BT | ||||||
| 45 Axle nut M10x1.25 2 59 39-9820-SW | ||||||
| 46 Bearing 6203Z 2 1+59 39-9947 | ||||||
| 47 Belt 1 59 36-1725-06-BT 1 48+76 36-9217-30-BT | ||||||
| 48 Bolt wheel 1 59 36-1725-06-BT | ||||||
| 49 Axle nut M10x1 2 57 36-1721-12-BT | ||||||
| 50 Bolt M6x50 2 57 39-10000 | ||||||
| 51 U-piece 2 50 36-9713-56-BT | ||||||
| 52 Nut M6 2 50 39-9861-VZ | ||||||
| 53 Motor 1 1+11 36-1721-09-BT | ||||||
| 54 Nut small M10x1-4 2 57 39-9820 | ||||||
| 55 Bearing 6003 2 56 39-9999 | ||||||
| 56 Flywheel 1 57 33-1725-08-SW | ||||||
| 57 Flywheel axle 1 56 33-9211-13-SI | ||||||
| 58 Crank cover 2 42 36-1725-04-BT | ||||||
| 59 Pedal axle 1 48 33-1725-10-SI | ||||||
| 60 Bolt M6x15 6 48+59+64 39-10120-VC | ||||||
| 61 Spring washer for M6 6 60 39-9868 | ||||||
| 62 Washer 6/14 2 60 39-9863 | ||||||
| 63 Safety clip C12 2 64 36-9111-39-BT | ||||||
| 64 Magnetic bracket axle 1 65 36-9211-26-BT | ||||||
| 65 Magnetic bracket 1 64 33-1725-11-SI | ||||||
| 66 Spring for magnetic bracket 1 1+65 36-9808-37-BT | ||||||
| 67 Bolt M5x60 1 65 39-10406 | ||||||
| 68 Nut M5 2 67 39-10012 | ||||||
| 69 Nylon nut M10 2 72+78 39-9981-VC | ||||||
| 70 Washer 4/8 4 40 39-10510 | ||||||
| 71 Idler wheel 1 72 36-9211-28-BT | ||||||
| 72 Idler wheel bracket 1 1 33-1725-09-SI | ||||||
| 73 Spring for idle wheel bracket 1 72 36-9808-39-BT | ||||||
| 74 Nylon nut M6 4 60 39-9861-VZ | ||||||
| 75 Bearing 6000 1 57 39-9998 | ||||||
| 76 Small belt wheel 1 56 36-9211-38-BT | ||||||
| 77 Bushing 1 57 36-1211-15-BT | ||||||
| 78 Screw M10x20 1 1+72 39-9974-CR | ||||||
| 79 Freewheel bearing 1 56 36-9814-26-BT | ||||||
| 80 Magnet 1 48 36-9613222-BT | ||||||
| 81 Tension cable 1 53+65 36-1721-10-BT | ||||||
| 82 Tool set 1 36-9211-34-BT | ||||||
| 83 Assembly and exercise instructions 1 36-1725-10-BT | ||||||
| 84 Assembly and exercise instructions 1 36-1725-10-BT | ||||||
| 85 Assembly and exercise instructions 1 36-1725-10-BT | ||||||
| 86 Assembly and exercise instructions 1 36-1725-10-BT | ||||||
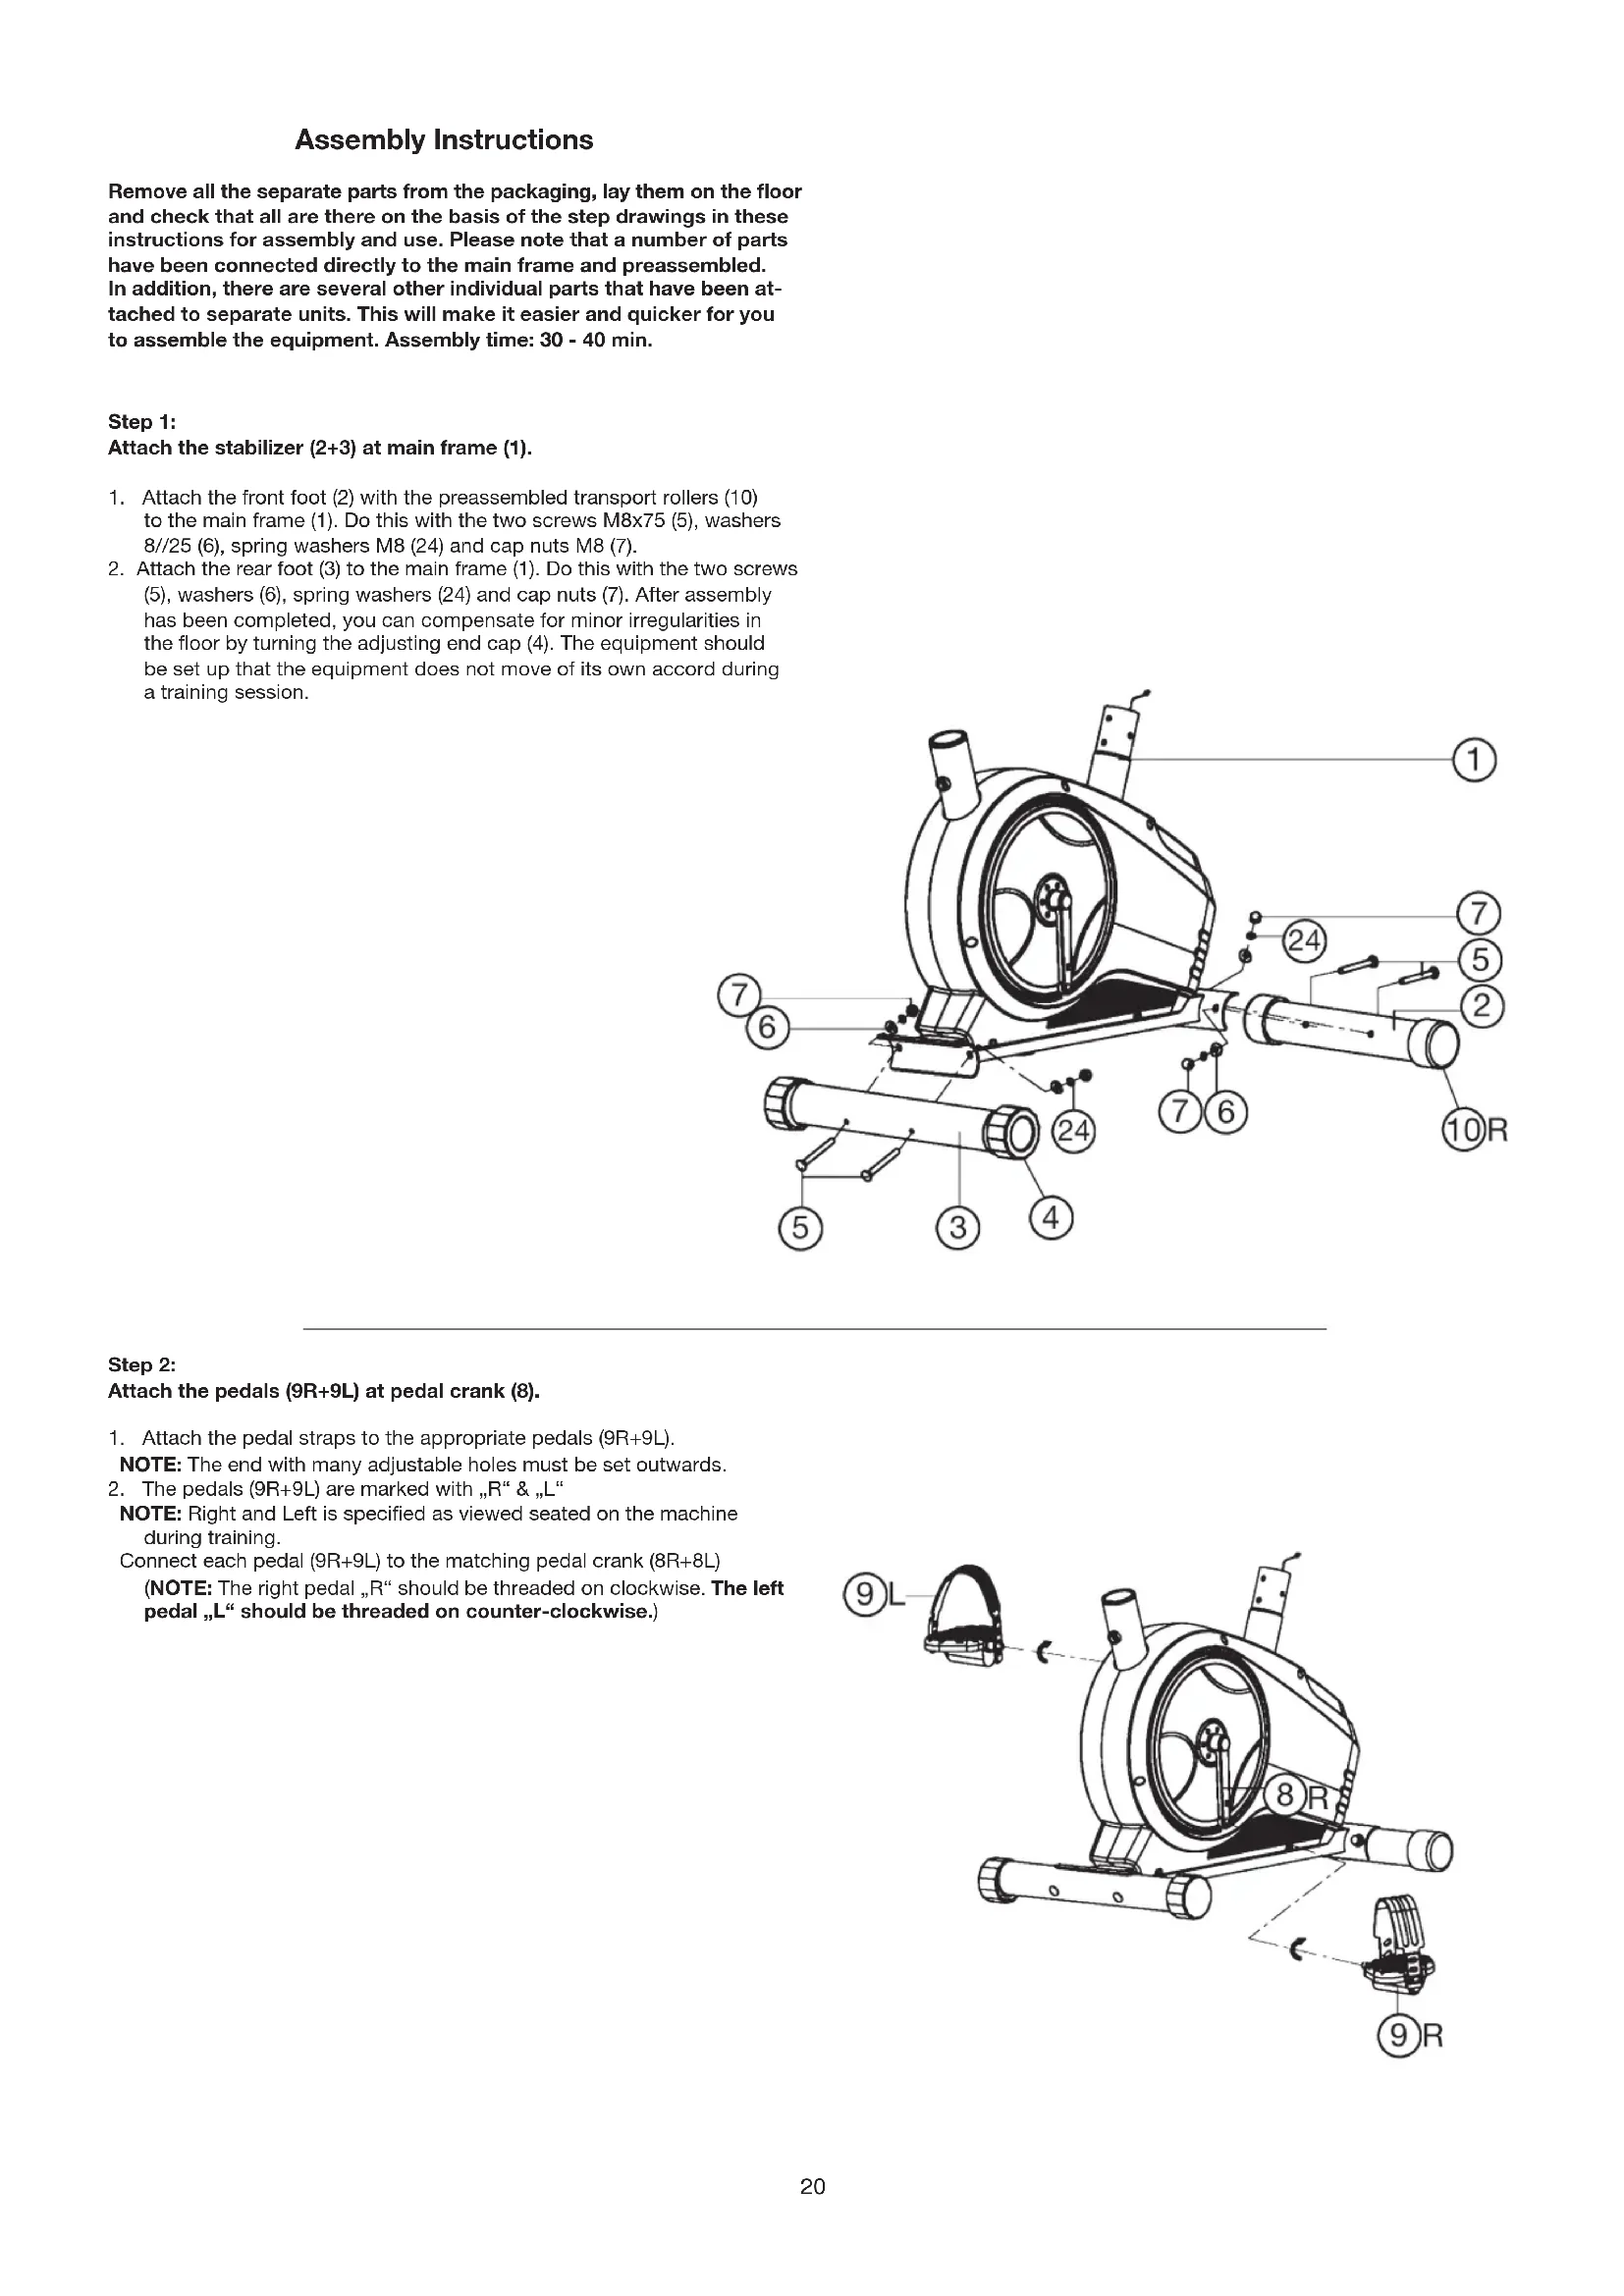
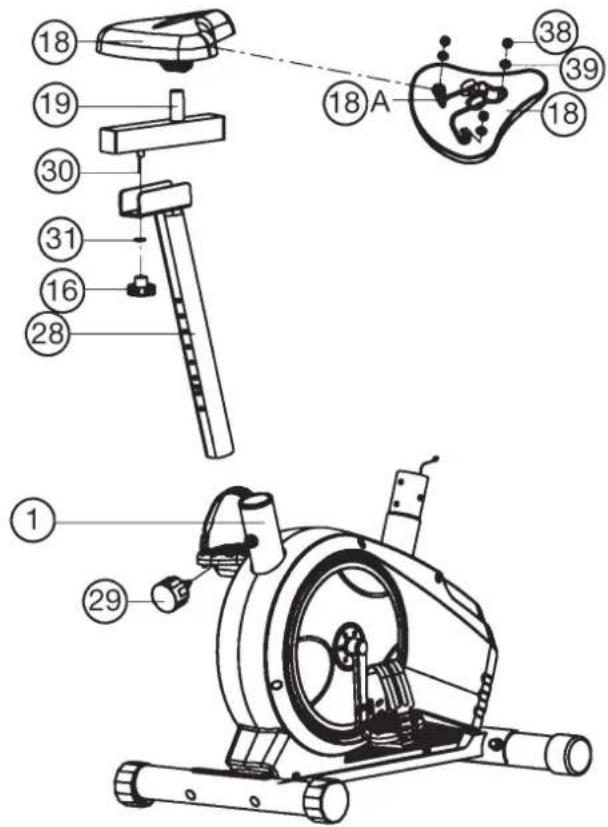
Assembly Instructions
Remove all the separate parts from the packaging, lay them on the floor and check that all are there on the basis of the step drawings in these instructions for assembly and use. Please note that a number of parts have been connected directly to the main frame and preassembled. In addition, there are several other individual parts that have been attached to separate units. This will make it easier and quicker for you to assemble the equipment. Assembly time: 30 - 40 min.
Step 1:
Attach the stabilizer (2 + 3) at main frame (1).
- Attach the front foot (2) with the preassembled transport rollers (10) to the main frame (1). Do this with the two screws M8x75 (5), washers 8//25 (6), spring washers M8 (24) and cap nuts M8 (7).
- Attach the rear foot (3) to the main frame (1). Do this with the two screws (5), washers (6), spring washers (24) and cap nuts (7). After assembly has been completed, you can compensate for minor irregularities in the floor by turning the adjusting end cap (4). The equipment should be set up that the equipment does not move of its own accord during a training session.
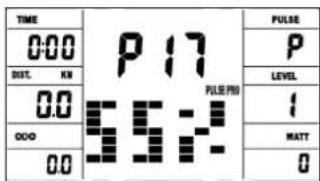
Step 2:
Attach the pedals (9R + 9L) at pedal crank (8).
- Attach the pedal straps to the appropriate pedals (9R+9L).
NOTE: The end with many adjustable holes must be set outwards. - The pedals (9R+9L) are marked with _R" & _L"
NOTE: Right and Left is specified as viewed seated on the machine during training.
Connect each pedal (9R + 9L) to the matching pedal crank (8R + 8L) (NOTE: The right pedal, R should be threaded on clockwise. The left pedal, L should be threaded on counter-clockwise.)
Step 3: Attach the seat (18) and seat post (28).
- Insert the seat post (28) to seat post mounting tube of mainframe (1) and secure in position with the seat post quick release (29).
- Place the saddle (18) with the seat surface downwards. Place the saddle bracket (18a) on the upwards pointing bottom of the saddle (18). The threaded pieces on the bottom of the saddle must project through the corresponding holes in the saddle bracket (18a). Place washers (39) on the threaded pieces, screw on nuts (38) and tighten firmly.
- Put the clamp of saddle bracket (18a) to the seat slide (19) and tighten the seat firmly into your desired position.
- After place the seat slide (19) with seat (18) onto the seat post (28) fix it with washer 10//20 (31) and hand grip nut (16). You can move the seat slide to adjust your desired position.
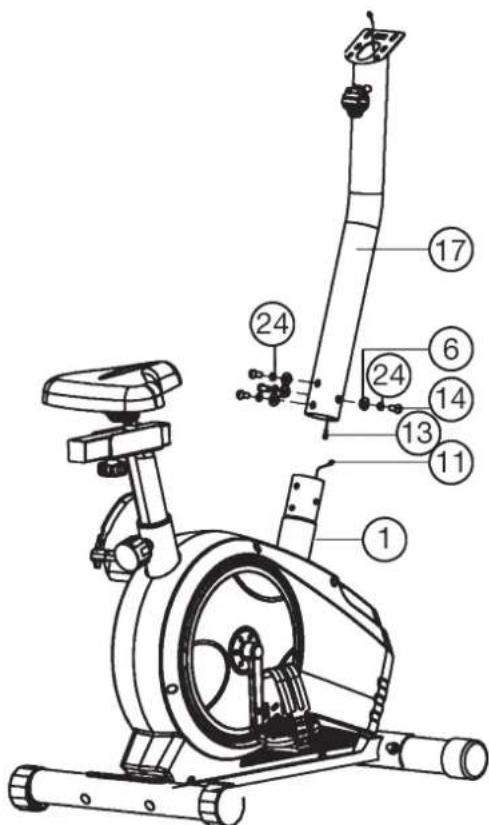
Step 4: Attach the handlebar post (17) at mainframe (1).
- Remove the pre-assembled Allen head bolt (14), washers (6), and spring washers (24) from main frame (1).
- Attach the front post (17) to the front post mounting tube of main frame (1) and connect the plug of motor cable (11) to the socket of the connection cable (13).
- Insert the front post (17) to mainframe (1) and secure, using Allen head bolts (14), spring washers (24) and washers (6).
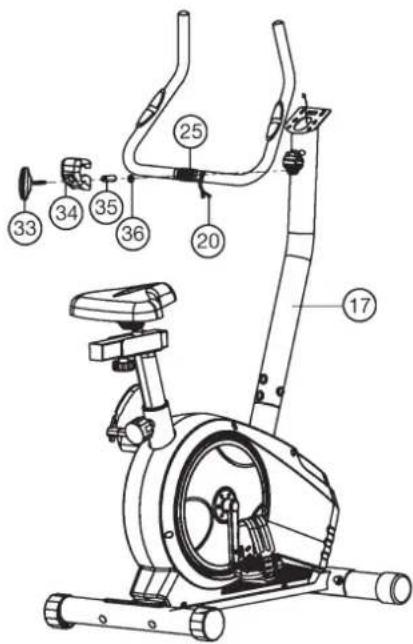
Step 5: Attach the handlebar (25) at handlebar support (17).
- Guide the preassembled handlebar unit (25) through the upper part of the handlebar post (17) and push the pulse cable (20) through the holes at handlebar support into top position and close the bracket of handlebar holder.
- Attach the handlebar cover (34) at the handlebar (25).
- Screw the handlebar (25) into desired position at the handlebar post (17) with spacer (35), washer (36) and handlebar screw (33).
Step 6: Attach the computer (26) at handlebar support (17).
- Push the plugs of the connecting cable (13) and pulse cables (20) projecting from the handlebar support (17) into the associated socket of the computer (26).
- Place the computer (26) on top of the handlebar support (17) and tight firmly by using screw (23) and washers (32). The screws (23) you find at backside of computer.
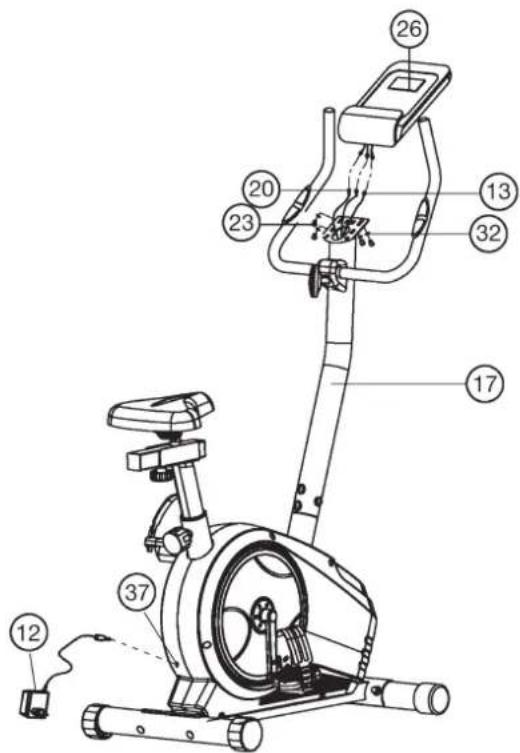
Step 7: Attach the AC adapter (12).
- Please insert the plug of adapter (12) to the DC socket (37) at end of chain guard.
- Please insert the plug of adapter (12) to the jack of wall power (230V~50Hz).
Step 8: Checks
- Check the correct installation and function of all screwed and plug connections. Installation is thereby complete.
- When everything is in order, familiarise yourself with the machine at a low resistance setting and make your individual adjustments.
Note: Please keep the tool set and the instructions in a safe place as these may be required for repairs or spare parts orders becoming necessary later.
Mount, Use & Dismount
Transportation of Equipment:
There are two rollers equipped on the front foot. For moving, you can lift up the rear foot and drive it to where you would like to locate or store it.
Adjustment - Seat Position
For an effective workout, the seat must be adjusted properly. While your are pedaling, your Knees should be slightly bent when the pedals are in the farthest position. In order to adjust the seat, unscrew the knob few turns and draw it out slightly. Adjust the seat to the right height, then release the knob and tighten it all the way.
Important:
Make sure to put the knob back into place in the seat post and tighten it completely. Never exceed the maximum height of the seat. Always get off the bicycle before making any adjustment.
Mount, Use & Dismount
Mount:
a. After the seat is adjusted to properly position, insert your foot into retaining strap of pedal step on the pedal and hold the handlebar tightly.
b. Try to put whole body weight on your foot and simultaneously cross over the trainer and land your another foot on the other side.
c. Now you are in the position to start your training.
Use:
a. Keep you hands on the handlebar, and both feet are insert into retaining straps of both pedal properly.
b. Pedal your exercise bike by your both feet alternately.
c. Then you can increase the pedaling speed gradually and adjust braking resistance levels to increase the exercise intention.
Dismount:
a. Slow down the pedaling speed until it comes to rest.
b. Keep the left hand grabbing the left handlebar tightly, put your feet cross over the equipment and land on the floor, then land the other one.
This training equipment is a stationary exercise machine used to simulate without causing excessive pressure to the joints, hence decreasing the risk of impact injuries.
Exercise bike offer a non-impact cardiovascular workout that can vary from light to high intensity based on the resistance preference set by the user.
It will strengthen your muscles of legs and increase cardio capacity and maintain fitness of your body also.
RPM and Power in Watt of Level 1- Level 24 for BT 4 Art.-No. 1725
| Level/RPM 20304050607080↓ | ||||||
| 19172838526882 | ||||||
| 210193145617996 | ||||||
| 3112135527091110 | ||||||
| 41224405979103125 | ||||||
| 51326456688115139 | ||||||
| 61429497297127153 | ||||||
| 715315378106139167 | ||||||
| 816345885115151182 | ||||||
| 918376393124164198 | ||||||
| 10193968100133176214 | ||||||
| 11204272106142188229 | ||||||
| 12224577113151201243 | ||||||
| 13234882120160214258 | ||||||
| 14245187127169226274 | ||||||
| 15255391134178238287 | ||||||
| 16265595140187250300 | ||||||
| 17275899146196262310 | ||||||
| 182860103152205274322 | ||||||
| 192962108159214287336 | ||||||
| 203063112166224298350 | ||||||
| 213166117173234310364 | ||||||
| 223370122180244319378 | ||||||
| 233573128186254331392 | ||||||
| 243676131192264338402 |
Remarks:
-
The power consumptions (Watt) are adjusted by measuring the driving speed (min-1) of axle and the braking torque (Nm).
-
Your equipment was tested to fulfill the requirements of its accuracy classification before shipment, If you have doubts about the accuracy, please contact with your local retailer or send it to accredited test laboratory to ensure or calibrate it.
(Pleases note that a deviation tolerance as noted on page 15, is permissible.)
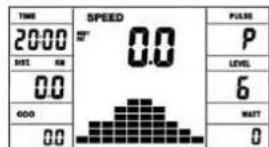
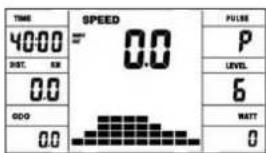
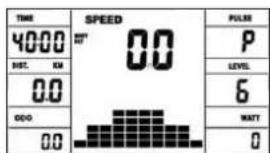
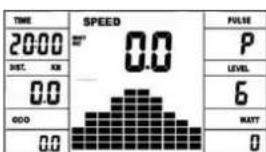
Computer Instructions
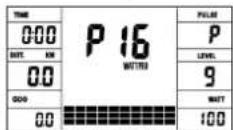
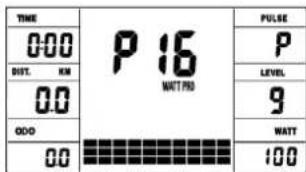
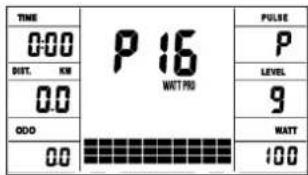
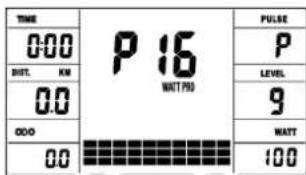
The computer on your ERGOMETER is very easy to use. By displaying all functions at the same time, there is no need to switch back and between the individual functions and you are always fully informed about your training process at a glance. This device is a speed-independent device. In order to achieve the performance you want, the computer regulates the resistance independently of the cadence in the watt program (P16).
Turn on:
1) Insert the connection plug into the adapter connection socket on the device. An acoustic signal sounds - all LCD display segments appear for 2 seconds and are set to 00.
or
2) The power plug is already in the socket / device has automatically switched off.
By pressing any key - or with at least one turn of the pedal - the computer switches itself on.
Turn off:
As soon as the device is not used for more than approx. 4 minutes, the computer switches off automatically. After finishing the training, pull out the mains plug.
KEYS
A total of 5 buttons: START / STOP, FUNCTION (F), UP (+), AB (-), and fitness test (TEST).
"START/STOP"
Training start or interruption in the selected program. The computer only starts counting when the _START / _STOP" button has been pressed before. If the _START / _STOP" button is pressed for more than 3 seconds, all values are reset to 00:00 in the starting position.
F^ : You can switch from one input field to the next with the input and confirmation key (F). The selected function flashes. Enter the values with the + / - key and confirm them by pressing the F^ key again. At the same time, the flashing display jumps to the next input field. During training, the functions UPM and calories, as well as speed and distance can be displayed permanently or alternately by pressing the F key.
n + " And - Use the + / - buttons to change the values - only flashing values Information can be changed in value.
Test: With this button you can determine your fitness grade.
DISPLAY
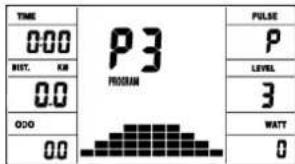
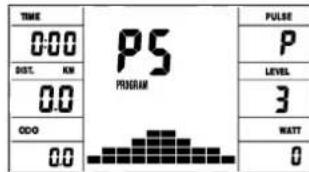
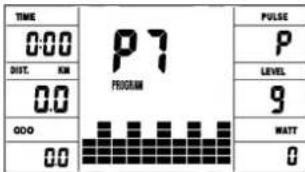
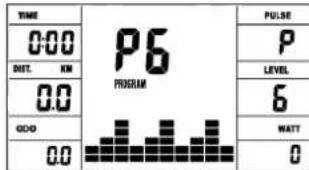
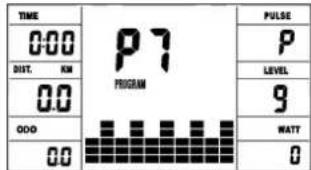
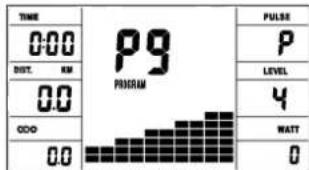
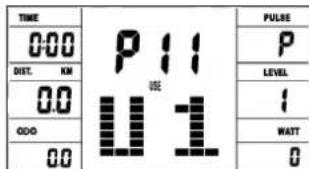
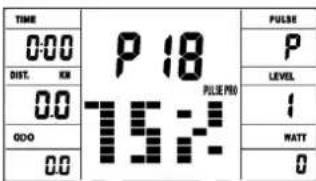
Program:
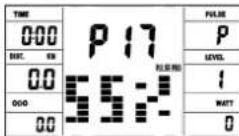
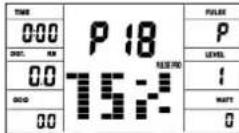
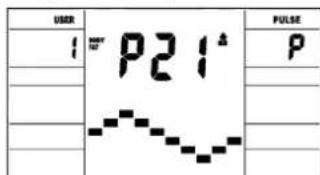
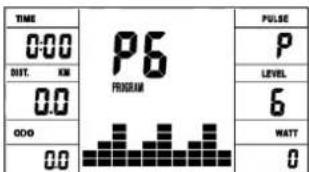
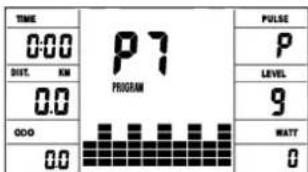
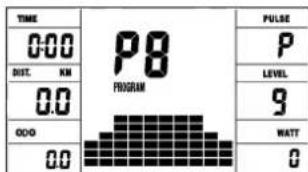
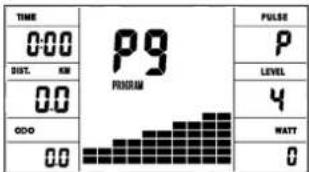
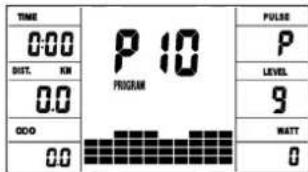
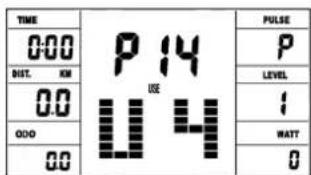
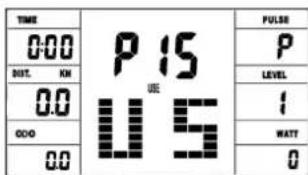
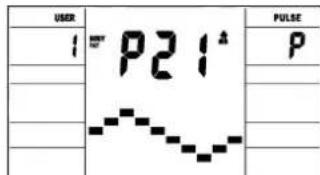
Display of set program 1-21. (Manual, Progr. 1 - 10 = fitness program; Progr. 11-15 = individual user program; Program 16 = watt program; Progr. 17-20 = pulse program; Progr. 21 = body fat program)
Resistance level:
Display of the resistance from level 1 - 24. The higher the number, the higher the resistance. The bar graph hat 12 bars available. Each bar shows two
values (e.g. 3 bars are level 5 or 6) You can see the exact value on the LEVEL display. The resistance can be changed in every program (except WATT program P16) by pressing the + and - keys.
TIME/WATT:
For setting / displaying the time in minutes and seconds up to a maximum of 99:00 minutes.
Preselection in minute steps / counting up + down in second steps. In the programs 1 - 20 min, default time is set to 5 minutes. Setting range 5-99 min. The computer precisely measures the performance achieved during training. The performance displayed in watts. Setting range 30-350 watt. In program 16 consider the display of the target value. Display of time and watt alternating automatically. Or permanent by pressing the F key.
RPM / SPEED (km/h):
Display of pedal revolutions per minute and speed in km / h in automatic change. Or permanent by pressing the F key.
DIST (distance KM) / CAL (calories kcal):
Display and default for distance and restrictions. The distance can be from 1 - 999 km. Using the average values, the computer calculates the calories that are displayed in KCal. To convert the binding unit of measurement for energy „Joule" in the general target specification use this formulas: 1Joule = 0.239 cal, or 1cal = 4.186J.
The loss calories consumption can be set from 10 - 990 kcal. The up / down counting takes place in 0.1 steps. Display of distance and approx. calories alternating automatically. Or permanent by pressing the F key.
KM Total (ODO):
The distance in km of all training units is displayed. It is not possible to specify. The OD O display can be reset to zero at any time. To do this, press the F-key and the Start / Stop-key at once for 2 seconds.
The currently measured pulse is displayed here. If an upper heart rate limit is set, the display flashes when the set value is reached.
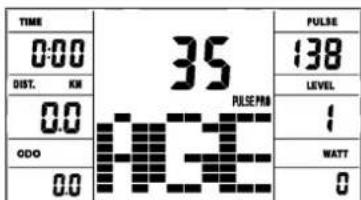
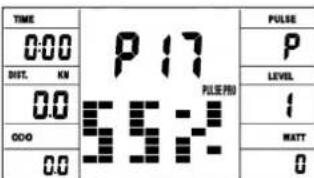
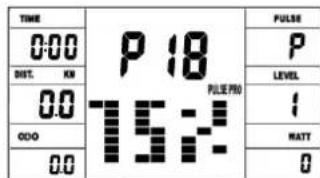
PULSE LIMIT / AGE: Available in programs 17-20.
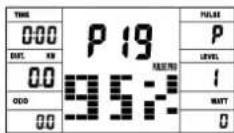
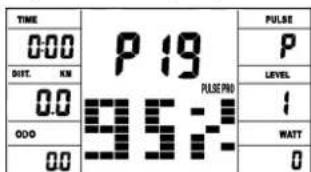
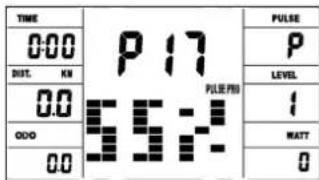
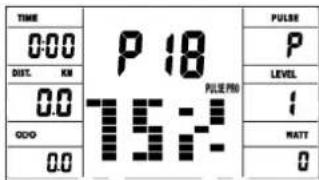
Program 17 - 19 are training programs with calculated max heart rate of 55% / 75% or 95% . As soon as you enter your age, the computer will calculate your max. pulse value that you should never exceed (formula: (220 - age) x 0.80). When this value is reached, the pulse display starts to flash and you should then immediately reduce the speed or the load level.
Age setting range: 10-100.
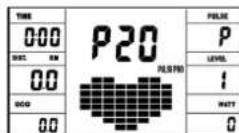
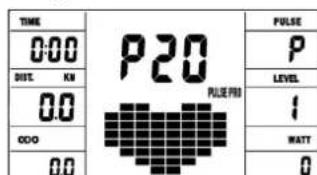
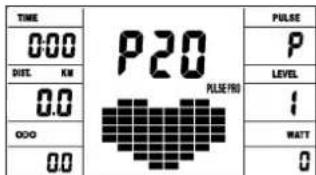
In program 20: Display of the individual target heart rate you have specified. Pulse setting range: 60-240
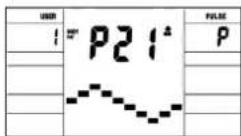
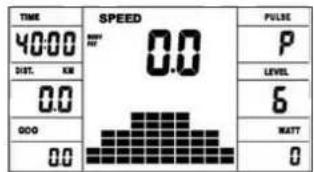
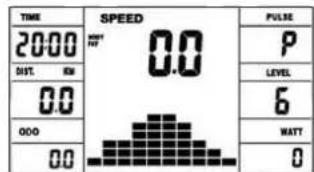
RESISTANCE PROFILE:
The desired training duration can be preset in the TIME area. The system divides this preset time into 10 sub-intervals. Each bar on the time axis (horizontal) = 1/10 of the specified time, e.g.: training time = 5 min = each bar is 30 seconds, training time = 10 min = each bar = 1 min. Each of the 10 bars corresponds to such a time interval. The current time bar is indicated by FLASHING. If no time is specified, each time bar means 3 minutes of training, ie after 3 minutes the flashing display jumps from bar 1 to bar 2, etc. up to a total of 30 minutes. If the program is stopped in the meantime with the start / stop button, the Time to continue counting from there after pressing the Start / Stop button again.

PEDAL RESISTANCE:
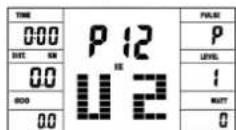
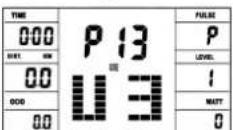
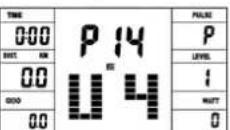
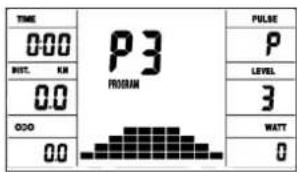
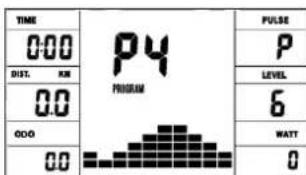
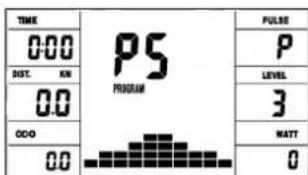
You can use the + / - button to adjust the pedal resistance at any time-in all programs, except in the watt program P16. You can see the change in the height of the bar and in the LEVEL display - the higher the bar, the higher the resistance and contrariwise. Each bar segment stands for 3 levels (e.g. 3 segments stand for levels 7,8 + 9 or 7 segments stand for levels 19,20 +21) . The selected value is shown on the LEVEL display.
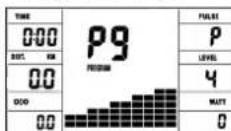
The change affects the current and subsequent time position. The height of the bars indicates the load, not a terrain profile. Program sequences are shown graphically on the display. The individual programs run as shown in the bar diagram in the display field, e.g. program 5 = mountain / program 2 = valley etc. (where the bar height = resistance, the time is distributed over the bar width)
- After setting the program, it is essential to press the "START / STOP" button if you want to start training. In principle, all determined and displayed values are not suitable for medical evaluations.
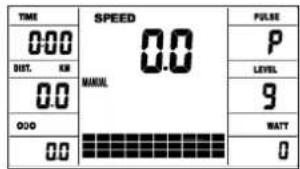
Manual Program
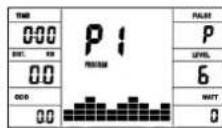
Program 1 Rolling
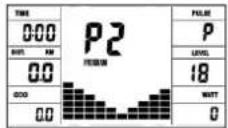
Program 2 Valley
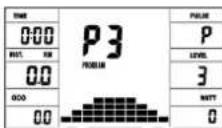
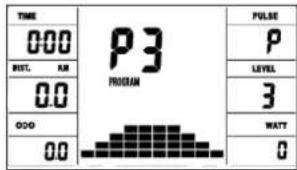
Program 3 Fatburn
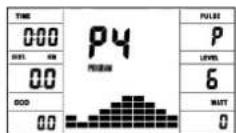
Program 4 Ramp
Program 5 Mountain
Program 6 Interval
Program 7 Cardio
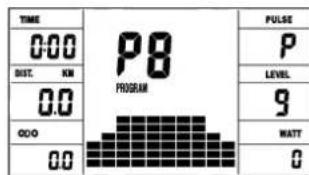
Program 8 Endurance
Program 9 Slope
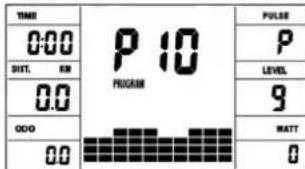
Program 10 Rally
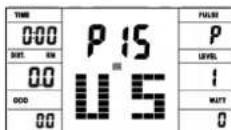
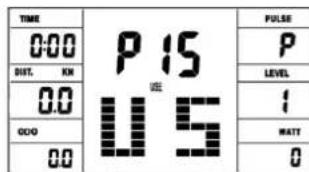
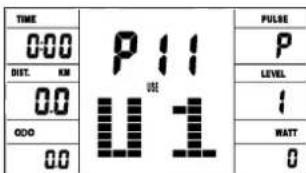
User Program 11 (U1)


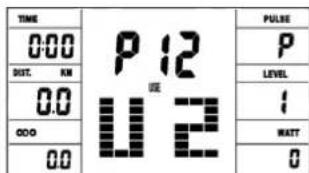
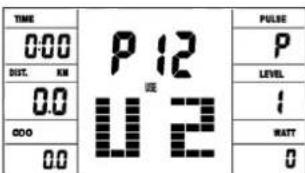
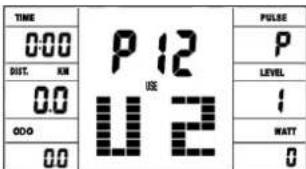
User Program 12 (U2)
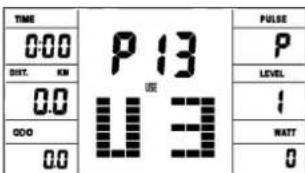
User Program 13 (U3)
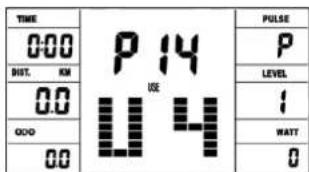
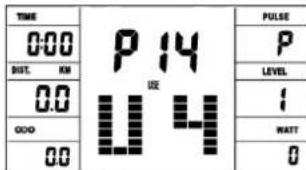
User Program 14 (U4)
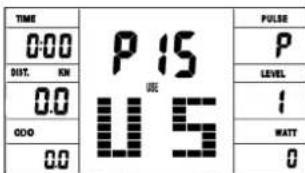
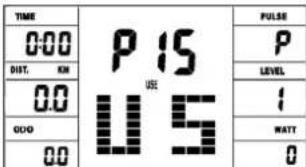
User Program 15 (U5)
Watt Program 16
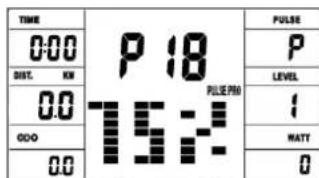
Program 17 HRC (55%)
Program 18 HRC (75%) Program 19 HRC (95%)
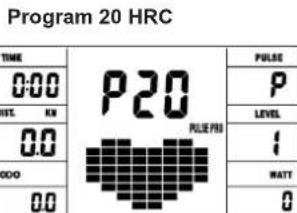
Program 20 HRC
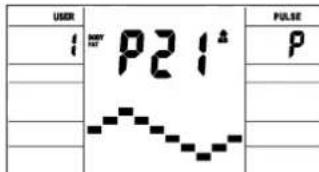
Program 21 Body Fat
Manual program:
this program corresponds to the functions of a normal exercise bike. The time, the speed, the rpm, the distance, the wattage, the Kcal and the current pulse are shown permanently in the display. The pedal resistance can be set manually using the + and - keys. All values are to be operated manually - there is none automatic regulation. Setting of the training parameters time / distance / calories / upper pulse limit by pressing the F key.
Programs 1 - 10: Fitness
Various training programs are given here. If one of these programs is selected, the program runs automatically and includes various intervals. The division is made in difficulty levels and in time intervals. However, you can intervene in the program at any time to change the pedaling resistance or the duration. In addition, there is a corresponding bar display in the display field. Setting of the training parameters time / distance / calories / upper pulse limit by pressing the F key.
Program 11-15: individual training programs
Here you can enter and train your various resistance profiles (U1-U5). Setting of the training parameters time / distance / calories / upper pulse limit by pressing the F key.
Program 16: Watt program
Here you can enter your individual watt specification. The pedaling resistance is automatically adjusted within a certain tolerance range by the computer, regardless of the pedaling frequency, so that you are always in the specified zone. Setting of the training parameters time / distance / calories / upper pulse limit by pressing the F key.
Program 17 - 19:
Here the computer automatically calculates your maximum heart rate after entering your age and, depending on the program, the corresponding training target heart rate will be adjusted to 55% / 75% or 95% . This target value is displayed. The pedaling resistance is automatically adjusted by the computer in order to stay at this target frequency.
Program 20:Target training heart rate THF
Here you can specify your optimal training pulse rate THF. The pedal resistance is within a certain tolerance range automatically readjusted by the computer so that you are always in the specified pulse zone.
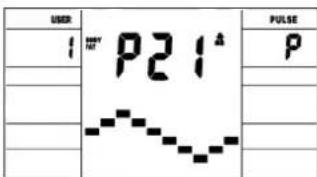
Program 21: Body Fat Program
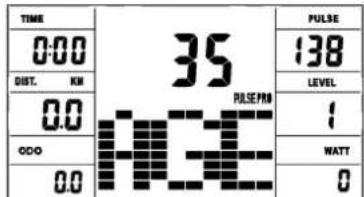
Here you can get a body fat analysis and get exercise suggestion. Use the F key to access the different data (user no.) = 1-8, height = 120-250 cm, gender = male / female, age = 10-99 years, weight = 20 -200kg) one after the other and set them to your data using the +/- buttons. Then press the Start/Stop key and grab the hand pulse sensors to measure your body fat.
After about 10 seconds, the deisplay show body your fat in%, BMI and BMR as well as a suggested exercise program. Press start/stop key to exit body fat test and press again to start exercising this program.
Body fat table
| Gender/Age Underweight/Healthy Slightly Overweight Overweight Obese | ||||
| Male/≤30 < 14% | 14%-20% | 20.1%~25% | 25.1%~35% >35% | |
| Male/>30 < 17% | 17%-23% | 23.1%~28% | 28.1%~38% >38% | |
| Female/≤30 < 17% | 17%-24% | 24.1%~30% | 30.1%~40% >40% | |
| Female/>30 < 20% | 20%-27% | 27.1%~33% | 33.1%~43% >43% | |
Remark:
-
During body fat test, it will display Err2 if hand pulse sensors get no input.
-
According to test result, 10 seconds have no operation or operation arbitrarily key, will get into system recommendation to toughen program.

ERROR MESSAGES:
Each time the computer is restarted, it will run a quick test for functionality. If something is not in order, it indicates possible errors:
E1 This symbol and a warning tone appear if the wiring is incorrectly connected or there is a fault in the resistance setting. Check all cable connections, especially at the connectors. After eliminating the error, press and hold the "Start / Stop" button for 3 seconds to reset the system.
FITNESS NOTE / RECOVERY PULSE FUNCTION
Your ergometer offers the option of evaluating your individual fitness in the form of a "fitness grade". The measuring principle is based on the fact that in healthy, well-trained people, the pulse rate drops faster within a certain period of time after training than in healthy, less well-trained people. To determine the fitness level, the difference between the pulse rate at the end of the training (start pulse) and the pulse rate one minute after the end of the training (end pulse) is used. Do not start this function until you have trained for some time. Before starting the recovery pulse function, you must have your current pulse rate displayed by placing your hands on the hand pulse sensors.
-
Press the "Test" button and then place both hands on the sensors to measure your heart rate.
-
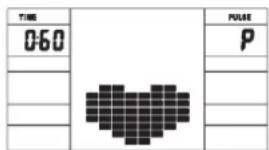
The computer goes into STOP mode, a large heart symbol is shown in the middle of the display and the automatic recovery pulse measurement is initiated.
- The time in the display starts counting down at 0:60
- The start pulse at the beginning of the measurement is shown in the display. It is the average of the four highest heart rate values in the last 20 sec. before pressing the fitness button.
- The currently measured pulse value is displayed in the „Pulse" field.
- After one minute has elapsed, the time is reduced to 0:00 and an acoustic signal sounds. The end pulse at the time 0:00 is displayed in the „Pulse" field. You can now take your hands off the heart rate sensors. After a few seconds, your fitness grade from F 1.0 - F 6.0 (school grade system) appears in the middle of the display.
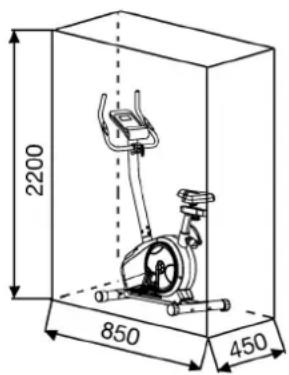
Training area in mm (for home trainer and user)

Free area in mm (Training area and security area (rotating 60cm))
Cleaning, Checks and Storage of the Ergometer bike:
1. Cleaning
Use only a less wet cloth for cleaning. Caution: Never use benzene, thinner or other aggressive cleaning agents for surface cleaning as this damage caused.
The device is only for private home use and for use suitable indoors. Keep the unit clean and moisture from the device.
2. Storage
Plug out the power supply unit while intending the unit for more than 4 weeks not to use. Push the saddle slide toward the handlebar and the seat support tube as deeply as possible into the frame. Choose a dry storage in-house and put some spray oil to the pedal bearings left and right, to the thread of the handlebar bolt, and on the thread of the quick release for saddle support.
Cover the bike to protect it from being discolor by any sunlight and dirty through dust.
3. Checks
We recommend every 50 hours to review the screw connections for tightness, which were prepared in the assembly. Every 100 operating hours, you should put some spray oil at the pedal bearings left and right, to the thread of the handlebar bolt and to the thread of quick release for saddle support.
Troubleshooting
If you cannot solve the problem with the following information, please contact the authorized service center.
| Problem Possible | Cause Solution | |
| Computer has no value at Dis-play if you press any key. | No power adapter is well plugged or wall power is without power. | Check that the power adapter is properly plugged in, possibly with another electric device check if the wall power is fine. |
| Computer is not counting data and do not switch on after start cycling. | Sensor impulse missing base on not well plugged connection | Check the plug connections at computer and inside of handle-bar support. |
| Computer is not counting data and do not switch on after start cycling. | Sensor impulse missing base on not correct position of sensor. | Take off the cover and check the distance between magnet and Sensor. The magnet at turning belt wheel should have only less than < 5mm distance against the sensor position. |
| No pulse value Pulse cable is not plugged in. | Check the separately pulse cable is well connected with computer. | |
| No pulse value Pulse sensors not well connected | Screw out the screw for pulse measurement and check if plugs are well connected and no damage at pulse cable. |
Training instructions
You must consider the following factors in determining the amount of training effort required in order to attain tangible physical and health benefits:
1. Intensity:
The level of physical exertion in training must exceed the level of normal exertion without reaching the point of breathlessness and / or exhaustion.
A suitable guideline for effective training can be taken from the pulse rate. During training this should rise to the region of between 70% to 85% of the maximum pulse rate (see the table and formular for determination and calculation of this).
During the first weeks, the pulse rate should remain at the lower end of this region, at around 70% of the maximum pulse rate. In the course of the following weeks and months, the pulse rate should be slowly raised to the upper limit of 85% of the maximum pulse rate. The better the physical condition of the person doing the exercise, the more the level of training should be increased to remain in the region of between 70% to 85% of the maximum pulse rate. This should be done by lengthening the time for the training and / or increasing the level of difficulty.
If the pulse rate is not shown on the computer display or if for safety reasons you wish to check your pulse rate, which could have been displayed wrongly due to error in use, etc., you can do the following:
a. Pulse rate measurement in the conventional way (feeling the pulse at the wrist, for example, and counting the number of beats in one minute).
b. Pulse rate measurement with a suitable specialised device (available from dealers specialising in health-related equipment).
2. Frequency
Most experts recommend a combination of health-conscious nutrition, which must be determined on the basis of your training goal, and physical training three times a week. A normal adult must train twice a week to maintain his current level of condition. At least three training sessions a week are required to improve one's condition and reduce one's weight. Of course the ideal frequency of training is five sessions a week.
3. Planning the training
Each training session should consist of three phases: the warm-up phase, the training phase, and the cool-down phase. The body temperature and oxygen intake should be raised slowly in the warm-up phase. This can be done with gymnastic exercises lasting five to ten minutes.
Then the actual training (training phase) should begin. The training exertion should be relatively low for the first few minutes and then raised over a period of 15 to 30 minutes such that the pulse rate reaches the region of between 70% to 85% of the maximum pulse rate.
In order to support the circulation after the training phase and to prevent aching or strained muscles later, it is necessary to follow the training phase with a cool-down phase. This should be consist of stretching exercises and / or light gymnastic exercises for a period of five to ten minutes.
You find further information on the subject warm-up exercises, stretch exercises or general gymnastics exercises in our download area under www.christopeit-sport.com
4. Motivation
The key to a successful program is regular training. You should set a fixed time and place for each day of training and prepare yourself mentally for the training. Only train when you are in the mood for it and always have your goal in view. With continuous training you will be able to see how you are progressing day by day and are approaching your personal training goal bit by bit.
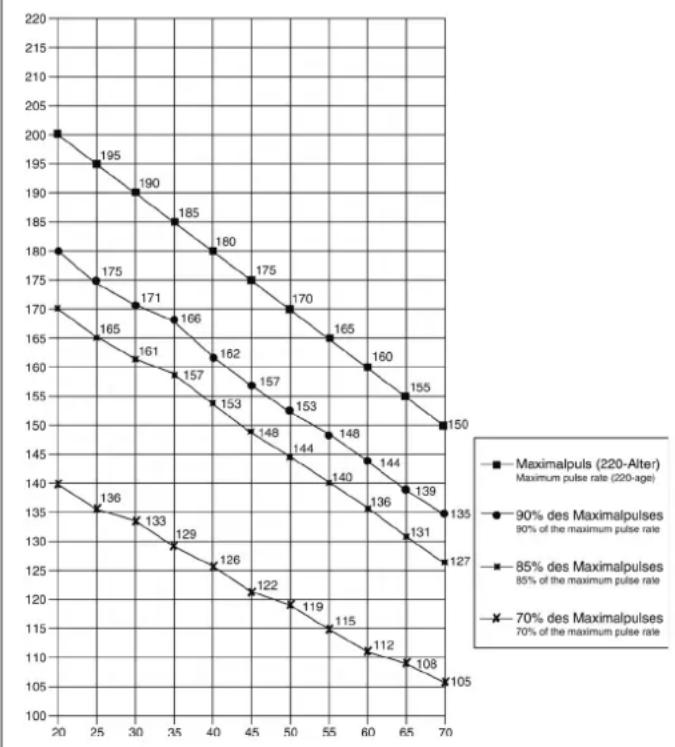
Calculation formula: Maximum pulse rate = 220· age (220 minus your age)
90% of the maximum pulse rate = (220 - age) x 0.9
85% of the maximum pulse rate = (220 - age) x 0.85
70% of the maximum pulse rate = (220 - age) x 0.7
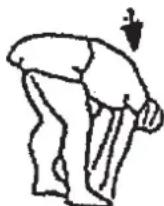
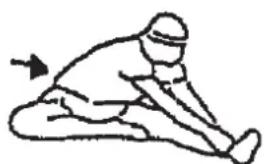
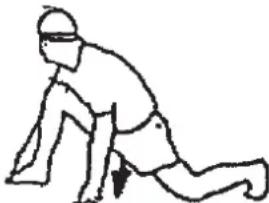
Warm up exercises (Warm Up)
Start your warm up by walking on the spot for at least 3 minutes and then perform the following gymnastic exercises to the body for the training phase to prepare accordingly. The exercises do not overdo it and only as far run until a slight drag felt. This position will hold a while.

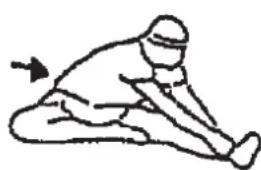

Reach with your left hand behind your head to the right shoulder and pull with the right hand slightly to the left elbow. After 20sec. switch arm.
Bend forward as far forward as possible and let your legs almost stretched. Show it with your fingers in the direction of toe. 2 x 20sec.
Sit down with one leg stretched out on the floor and bend forward and try to reach the foot with your hands. 2 x 20sec.
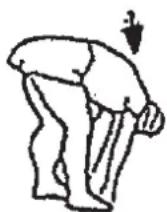
Kneel in a wide lunge forward and support yourself with your hands on the floor. Press the pelvis down. Change after 20 sec leg.
Chere cliente, cher client,
DUREE (Time) / WATT:
Tours/min (RPM) /SPEED (Vitesse):
Program 3 Fatburn Program 4 Ramp Program 5 Mountain

Program 6 Interval Program 7 Cardio Program 8 Endurance

Program 9 Slope Program 10 Rally

User Setting Program 13 (U3)
User Setting Program 11 (U1)

User Setting Program 12 (U2)

User Setting Program 14 (U4)
User Setting Program 15 (U5)
Program 18 HRC (75%)
Program 16 Watt Control
Program 19 HRC (95%)
Program 20 HRC
Program 21 Body Fat
PROGRAMME 1:Manuel
Warming-up oefingen (Warm Up)
Geachte klant
Program 3 Fatburn Program 4 Ramp Program 5 Mountain
Program 6 Interval Program 7 Cardio Program 8 Endurance


Program 9 Slope Program 10 Rally
User Setting Program 13 (U3)
User Setting Program 11 (U1)
User Setting Program 14 (U4)

User Setting Program 15 (U5)
Program 17 HRC (55%)


Program 18 HRC (75%)
Program 19 HRC (95%)

Program 21 Body Fatt
Programma manual: handmatig
Programma's 1-10: fitness
3. Planning van de training
Warming-up oefingen (Warm Up)
- RykoOCTBO NO NcNoJIb3OBAHnIO KOMNbIOTepa PykoOCTBO NO TpeHnpOBkAM
Ybaxaemble nokynatelenbhuinokynatei!
Iozdpabnem Bac c nokynk TpeHnpoBOnHO Chapra dIy DomaHnx 3aHrtn Cnoptom Hxenaem Bam cambix npnTbX BneatneHn.
CneyTe, noxaynCTa, yka3aHnM m HnHcTpkynM haJeO pyKOBOcTBA nMOHTaKy nKcNnyatau.
Ecnn y Bac Bo3HNKHyT KaKe- H6yBb BOpocbl, To Bbl MoKeTe B JIO6oe Bpemr 6e3 CteCHeHn O6paTaBcR K Ham.
CyBaXeHEmBauKpunctonaiTUnpotΓm6X
Uar 6: MoHTaX KOMNbIOTepa (26) Ha onopHyIO Tpy6y pyna (17)
- BCTaBbTe WTEkep KOMNbHOpTePHoro Ka6eYI (13) n Ka6eNn3MepeHnnybca (20) BbIXoJaun CBepy n3 onOpHoT py6bl pyn (26), BCOOTBeTCTByUcEe rHe3do, HaxOJaeeecn Ha o6paTHoN CTOpOHeKOMNbHOpTePa (26).
- BCTaBbTe KOMNbIOTep (26) CBepxHa onOpHyIO Tpy6y pyJr (17)c NOMOuB6oNTOB (23) nIOnknaHnA (32).
Uar 7: IopKIOUeHne 6Joka NITAHNA (12).
- BCTaBbTe uTKepe 6noka nHTAHn (12) B COOTBeTCTByOuuee rHe3do (37) Ha 3aJIHem KOHue oBIMBKN
2.BCTaBbTe 6JIOK nHTaHnA (12) B wTEnCeNbHyIO po3eTKy (230V / - 50Hz)

Uar 8: KOnTpObl
- NpOBeBpTe BCE coeHHeHnHa npaBnBHoCTb c6OpKn n npoBeDnTe npOBeKpyfHKcNoHaNbHoCTn.Pnp 3OM MoHTax CnTaeTcR 3AKOHHeHbIM.
2.EcnnBce BnpAke, npoBeInTe np6HyTo TpeHnPOBky npn MaIeHbKoN Harpy3Ke, INHINBnDyaJIbHO HAcTpoNe TpeHaKepe.
3aMeuHHe:
IoxaJyncTa, coxpaHnTe Ha6Op HNCTpyMeHTOB nJa NocneDyoUx BO3MOXhBIX pEmOHTOB INHCTpyKcHIO NO MOHTaxy dRy BO3MOXhBIX 3aKa3OB 3anaChbix Yacte.

IoiB3OBaHne TpeHaXepom
TIME (BPEMR) / WATT (BATT):
YcTaHOBka/HnDnKauH BpeMeHN B mHyTax n CeKyHdx Do MaKcMaJIbHOr 3HaueHn99:00 MmN. BBoD npOn3BODtCBA NOMHyTHo, CHT no HapactaUeH n y6bBaUOe npOn3BODtCBA CSeYHdx. B npOrpamMax 1-20 MNHMaIbHOe 3aDaBaEMoe COCTABnREt 5 MmH. YcTaHaBnBaEtCn OT 5 do 99 Mm. KombIoTeP ToH No3MepReT pOn3BeHeHHy BO XoDe TpeHnpOBKn pa6Oy. HnDnKaun npOn3BODtCBA BATTx. B npOrpAmme 16 npOn3BODtCn HnDnKaun ceneBoro 3HaueHn. YcTaHaBnBaETCn OT 30 do 350 BAATT. ABToMaTInCeCKoe n3MeHeHne OTOp6paxHeHn TIME (BpeM) n WATT (BaTT). INn NOCTOAnHHO, HxKab KnaBnuy F.
RPM (OB/MnH) / SPEED/km/h (CKOPOCTb/kM/μac):
HdkaunobopoTOBneDaneB MHyTu nCKOPOCTu B KM/uc. ABtomatueeckoe u3meHeHne OTo6paXeHN RPM (OB/MnH) n SPEED/km/h (CKOPOCTb/kM/uc). INn NOCToRHHo, Hxakab KnaBnuy F.
KCAL/KNJIOJXOYJIb/DIST(PACCTORHHE):
UcTaHOBka HnHnKauqra pacCToHn. YcTaHaBaNbAeTcR O 0 Do 999 KM. Cuet no HapactaIouei n y6bIbAouei warom No 0,1 KM. PpOn3BOuNTcR HnHnKaun DnCTaHmnc BCEX TpeHNPoBOK B KM. YcTaHaBnBaAEcR O 1 Do 999 KM. C NOMOsbO cpeDnHex BEnHnx KOMMbOTep pAcHTbIAeT KaOpn, KOtOpbie BByOBaTcRA h DaCnJIeB E KInIOkAnopnRx. JnnepeCeta eDInHn3Heprnn Dxooyen B KaOpnn npImeHnTe FopMny: 1 Dxoylb = 0,239 KaOpnn nn 1 KaOpnn = 4,186 Dx. YcTaHaBnBaTeCt O 10 Do 990 KIno KaOpnn. NIn NoctoHHo, Haxab KnaBnuy F.
Bcero KM (ODO)
Ha nncnnee oTo6paKaetaCyaMMapHoe pacCToHne B KM. Yka3aTb 3Ha-ueHHN HeBO3MOxHO. NcIeN ODO MOxHO 6hynTB JIO6OE Bpemr. IINrTOO ONDOBpeMeHHo HAXMTe KONKy F INKONKy CtapT / CtonB TeueHne 2 cekyHd.
HEART RATE / INHINKAUINIYJbCA/TNI TELA:
Hndkaunrtekyuero 3naeHHnnybca.Ecn 3aanBepxHn npednnyibca,dncnneMnraet,KordaDOCTNRHYTO 3aahHOe 3naeHHne.
TARGET H.R. (BEPXHEE OPGAHUHHE NylbCA) / ALTER (BO3PACT):Функцд дocTyHa toIbko B nporpaMMax 17-20. B nporpaMme 17-19: trpeHIpOboUHЯ nporpaMma c 55% / 75% nnn 95% BaWe MHF (MaKcIMaJIbHOJ qactOTOn cepdYeHbIX cokpaUeHn). Pocne BBoDA BaWero BO3pacta (10-100) paCHtlbAeTcBAwe MHF (MaKcIMaJIbHAJ qactota cepdeHbIX cokpaUeHn), KOTOPAR PACCHITlbAeTcBA COOTBETCTBEHOM npoceTHOM COOTHOseHm. Pe3yIbTAT, BaW MH F and AkyalbHi nyIbC, BblBOdTcR Ha dncnne. Pocne BBOda Bo3pacta KomNbIotep paCHtlbAeBertexHN DoynCTmMbД nra BaWero Bo3pacta NOka3aTeIe NyIbCa (fOpmya: (220 - Bo3pact) x 0,80 ), KOtOpBn Hn B Koem cnyae HeDOLKeH npEByIaTcB. Pn DocTnxHeHn STOn BeINuYNHbI NaHnae MRAtb INdIKaTOP nyIbCa. Bam Heo6xOdImo HeMeJeHn OMeHbWnt COKoPcTb Nn CHN3NTb ypoBeH harpysKn. B nporpaMme 20: nIndkaIua BBeDEHrO RAMn ceNeBoro noKa3atEn nylba.CyTaHaBnBaETcTcO 60 do 240.
WIDERSTANSPROFIL/IIPOΦHJIb HARY3KN:
IpoDOnJXnTeJIbHOCT TpeHINPOBKN MOxHO BbICTaBNTc NOMOuBIO KJIaBNU ZEIT/BPEM. 3TO BpEMN DEiNTcKOMbIoTEpOM Ha 10 INHTepBaIIOB. KaKdA baKaHa OCN BpeMeHN (no ropn3oHTaII) = 1/10 3aDaHNO BpeMeHN, HApnpMEr TpeHINPOBOUHoe BpEMN = 5 MmH. = KaKdA baIka paBAHa 30 cek., TpeHINPOBOUHoe BpEMN = 10 MmH. = KaKdA baIka = 1 MmH. KaKdA n3 10 BaONK COOTBeTcTByeT TakOMY BpeMeHOMy INHTepBaIy. TeKyuN mOtezOK BpeMeHN o63NaueTcN INDkaCuaN MErAHmE KOLOHKn. EcIn BpEMn He 3aadaTcR, To KaKdA KOLOHKn paBAHa 3 MmH. TpeHINPOBKn, yO tO3Haayet: NO pOwSECTBn 3 MmH. INDkaCuaN MIRaHmE NepexOHT C KOLOHKn 1 Ha KOLOHKY 2 n T.D. Do MAkCMMaNbHORo 3HaueHN 30 MmN. PnP octAhOBKe npOrpaMMb KJIaBNuWe ,S" OCTaHaBnMbAEtCn OTChET BpeMeHN n Pn IOBTOPHM HKAATNI KJIaBNU ,S" BpeMn IpoDoJNkaeOTCHNTbIBaEBcRa DaJIbWe.

BbIe 6bnKa = BbIe Harpy3ka H3kA 6bnKa = H3kA 8nHarpy3ka KaXdb ciemTe 6bnK coepxNt 3-e BeINuHbI
Kakdajn 106aJokcoOTBeTcTByeT 1/10-3aI3aHOrO TpeHPOBOHO BVPemH
LEVEL/HARPY3KA:
Pn nomoOn Knabu + / - Bo3MOxHO yCTaHOBHeHne ONTmAbHoH Harpy3Kn BO BcEx nporpaMMax. INMeHHe BnHO NO BbICote 6anok n No HnDnKaun LEVE/LCTENEHb HAPY3KN- Yem Bblwe KOHOKN, TEm Bblwe Harpy3ka Haobopot. K KaKdOMy CERMeHTy KOHOKN OTHOCTCA DBe BeINHHb (Hapnpimep, 3 cerMeHT COOTBetCTBYET CTEnEH 7,8n9, nnCerMeHT 7 COOTBetCTByET CTEnEH 19,20n21).Bb6paHna BeINHHa BnHaBa OKoUke LEVE/CTENEHb HAPY3KN. INMeHHe HBNET Ha DeNCTByOuOyIO NocLeDuOuNE NO3uIN BpEmHN. Bicota KOHOOK
yka3bIbaeT BELINHHy Harpy3Kn, Ho He npOoBn DOporn. IpoxoxJdeHne nporpaMMbl noka3bIbaOTc H daCnnee rpaOnueckn. KaKdAn nporpaMMA npoteKaet no yka3aHHoN cxeme Ha dcNCEE, HanpImep nporpaMMA 5 = ropa / Hm3Ha = 2 n T.d. (Pn1 30m BbICota cerMeHTa = Harpy3Ka, BpeMa pacnpedennetcno Bcei Wkane).
Nocne NaCTPOKN nporpAMMbI o83aTeNBHO neped Hauanom TpeHnpoBKn HaxKaTb KnaBnWy ,Start/Stop". HN OdHo n3 onpeJeHHbIX N OTo6paKaembIX 3HaueHHe neoXoDnT dnn MediunHCKHX NCnoB3OBAHN.
Manual Program Program 1 Rolling Program 2 Valley
Program 3 Fatburn Program 4 Ramp Program 5 Mountain

Program 6 Interval Program 7 Cardio Program 8 Endurance
Program 9 Slope Program 10 Rally
User Setting Program 13 (U3)
User Setting Program 11 (U1)


User Setting Program 14 (U4)
User Setting Program 15 (U5)
Program 18 HRC (75%)
Program 16 Watt Control
Program 19 HRC (95%)
Program 20 HRC
Program 21 Body Fat
Pporpamma Manuell/PyHnA:
3Ta nporpamma COOTBETCTBYe FyHKUH M HopMaIbHO RBOENOTpehaxepa. NOKa3aTeHN BPEMH, CKOPoTn/06/MMH, DICTAHuN, BATT/KINODKOynn N TeKyuOro NOKa3aTeNl PnybCa HENpepbBHO NOKa3bIBaIOrCB INHdkaTOphBIX OKoWKax. C NOMOuBIO KJIaBNI ,+ " N ,- " MOXHO BpyHyO 3aDaBaTB Harpy3k. Bce NapametpbI 3aJaIOrCBpyHyO - Het HNKaKoABOMATHECKO perynipOBKn. Ecn Heo6xOIMO, yctahOBKa NOKa3aTeNl TpeHnpOBKn Zeit/Entfernung/Kaliorien/Puls (BPEMR / DNTCAHTAU / KALOPUN / PYNlbC).
Pporpamma1-10/ΦnTHec:
3decb 3aadaHb pa3nHbIte TpeHnpOBuHbI nporpaMMbI. PnBbIope Ooh HN, nporpaMMA npOTEkaeT abOMaTHueCKN NO BCEM COepXauIMC B Hei pa3nHbIM INTEpBaIam. Pa3deneHne npOxCoNT no CTynEHMa Harpy3Kn I Bpemehbbm INTEpBaIam. OJaHO KaB MoKTe B IIO6oe Bpema NImeHTb Harpy3ky NIN BpEMr. TaKke pOn3BOITcN HINKaUaNpORpaMbI B rpaHneCKom 036paKeHH (Dnarpama) Ha DCnPlee. Ecn Neo6xoIMMo, yctahOBka noka3ateNe TpeHnpOBkZ Zeit/Entfernung/Kalorien/Puls (BPEM/INCTAHLr/KAJIOPUN/PIJbc).
PporpmaMa 11-15:HdBnDyalbHbIe TpeHnpOBOuHbIe nporpaMMbl
B 3Tnx nporpammax BO3MOXeH BBOD pa3nHybIX NHybIX npoФиел cTeNeHei Harpy3Kn (U1-U5) dI rTreHInpOBKn. EcHr Heo6xOdMo, ycTaHOBka noka3aTeJIe TpeHInpOBKn Zeit/Entfernung/Kalorien/Puls (BPEM / IINTAHU/ KAIOPIN / IVNbC).
Iporpamma 16:Batt-nporpamma
3dec Bbl MoXeTe 3aDaTb Bawy INHmBnDyaJbHyU HarpY3ky B BaTTax KOMNtOETC yueTOM ONpeJeHbIX DOYNyCKOB IN He3aBNCIMO OT YAcTObI BpaSeHn PeJaneY uePeknBaet 3Ty Harpy3ky B 3aJaHHom Bamn PpeJene. (30-350 BA).Ecn Heo6xOIMO, ycTaHOBka NOKa3aTeNe TpeHIpOBKn Zeit/Entfernung/Kalorien/ Puls (BPEM / DInCTAHLr / KAIONPNI / PJIbC).
Iporpamma 17-19:LeJeBoe 3NaueHne nylbca THF
Nocne BbOda Baawero Bo3pacta (10-100) KomnbIOTep pacHTbBaET BaW MaKcMaJIbHO DOyCTMnBn IyNbC n B 3aBICMNOCt OT npORpaMMbl 3aDaET Bam TpeHIpOBoHyh IeNeBOn NOKa3aTeB - 55% / 75% nn 95% oT MaKcMaJIbHO DOyCTMnOACToTB lyNbca. 3OT HOMATNBHbN NOKa3aTeB BBBOIMTC Ha DCINnee. KomnbIOTep perynpyet Harpy3ky Ta, TTo6bl TpeHIpOBoHyh IyNbC OCTaBANC B 06laCTn Bb6paHHoro pexHima.
Pporpma 20: LeneBoe 3aHne nylbca THF
3decb Bbl MoXeTe 3aDaTb ONTMnAbHbI NOKa3aTeNb YacToBb 6HeHHA cepua (THF) IN KOMNbIOTeP C yETOM ONpeDeJIeHHbIX DOnyCKOB yDepxNBaeT 3Ty Harpy3ky B 3aDaHHom Bamn npedeJe. (60-240 nyIba)
Pporpamma 21: Pporpamma no cKnraHIO Xnpa
3Decb Bm MoXeTe npOBecn aHaHn3 Knpa n noJyHTb HnDnBnDaIbHOe npENoXeHne No TpeHnOpBkAm.
IcnoIb3yIte KnaBnUy F IJRA BbIbopa nepcoHaJIbHbIX DaHHbIX (Homep nOJIb3OBaTeIra (user) = 1-8, poCT (height) = 120-250 cm, non = MyJKCkOJ / JKeHckN, Bo3pact (age) = 10-99 net, Bec (weight) = 20-200 kr) uYctAHOBITe IN C NOMOuBIO KNABIM +/-.
3aTeM hAnMnTe KhONkY 已 Start/Stop)N BO3bMnTeCb 3a DaTnKn nyIbCa dnnn3mpeHnnaXnpa.PnIpMePHoYeep310cekyHnHaKpAneOTOpa3nTCa CDepKxHnE Xnpa B%BMBRnPpeDnOxKeHnepOrpAmMbTIpeHnPOBKn. DnTOrTO6bblBmTNnPporpAmMbAnHn3Xnpa,HAnMnTe KhONkY 已 Start/Stop)Onn pa3NTO6b3anctntb nporpAMMy TpeHnPOBKn, HAnMnTe CHOBA KhONkY 已 Start/Stop
Ta6nua xupa
| Пол / Ворост МатематICALS | Б尊ький Вес | Здоговский Небун� Избунчим Вес | Избунчим Вес | Ожиренье |
| Мужшина / ≤ 30 < | 14% 14%~20% | 20.1%~25% | 5.1%~35% > 35% | |
| Мужшина / > 30 < | 17% 17%~23% | 23.1%~28% | 28.1%~38% > 38% | |
| Женина / ≤ 30 < | 17% 17%~24% | 24.1%~30% | 0.1%~40% > 40% | |
| Женина / > 30 < | 20% 20%~27% | 27.1%~33% | 33.1%~43% > 43% |
PpmeaHne:
- Coo6eHHe 6 oW6ke Err2 noaBnaTeC, ecn daTynk nynbca He kacaoTc cpa3y BO Bpemr aHaHn3a.
- IporpamMhIbe npEINOKeHnO OCHOBaHb TOnbKO Ha ONpeDeeHHbIX daHHbIX O XINPOBbX OTNOKeHnX nCnyKaT dna CEneBOI TpeHnpOBKn.
CINCOK BO3MOXHbIX HENCPABHOCTE:
Tocne KaJdoHO HOBO CTApaTka KOMNbIOTep npoBOHNT 6bICTpbI TcET HaФнкионьHOCtB.ПиObHApYKeHHeCOOTBeTcBn IMEOTcTprCINHAn HeCNpABoHCTM:
E1 3TOT cHnH, conpOBOXdaIOUIMCR 3ByKOM, NORBnRErCH, ecJN eCTb HEnCnPaBHcTN B Ka6eIbHbIX CoeINHeHHx. PpOBePte BCE Ka6eJIbHbIX COeINHeHHN u Oco6HnO WTeKepbI. Iocne ycTpAHeHH N HeCNpABHoCTN HaxMmTE KnaBnY "Start/Stop" n depXnTE 6oone 3 cekynd dnn TORO, YTO6b CNTcEMy yCTaHOBtB B HONb.
TEST-FITNESS NOTE (tecT-ΦNTHEC-OLEHKA)
PacnTBaBtak Ha3bBAeMyo fHTHeC-0eHky, Bau TpeHaxep npOn3BOuNT OueHKy COCTOHHBaAe CnOpTUBHOf oOpMbI. PnpHcHp pacTe aOCHOBaH ha Tom, 1TO y 3DopOBoro TpeHPOBaHHORo YenOBeka cactota nylbc aHa onpeJeneHOM OTPe3Ke BPEMeHN CHHXaeTc8 b6IcTpee, cem y 3DopOBoro HETpeHPOBaHHORo. DnI ONpeJelenH NOKa3aTeNl FTHHeC-OeHKN KOMNbIOEpaCnTBaEt pa3HNUy MEXdy XACTOTOn Nylbc B KOHcTEpHPOBKn (HaayJIbHi Nylbc) uactOTOn Nylbc Apeez Ody MNHyTu Nocne OKOHuaHr TpeHPOBKn (KoneHbN Nylbc). Nolb3yITecb 3ToI pYHKmE Nocne TORo, KAK BY HeKOTOpoe BPEM TpeHPOBaHncb. Ipeed HAanom BoCTaHOBtEnbHOh Nay3bl Bbl DOJXHb N3MePntb TeKUyn Nylbc. DnI 3TORo Bbl DOJXHb NINOxNtBu pyKn Ha ceHCOPbI.
1. IN3MEPEHNE NYJbCA:
B npabom n nebom npuyhe haxoJrTc DaTnKn N3mepeHnnybca CneDnte 3a Tem, YTO6bl o6e pykN NO Bpem TpeHnpOBKn PNO THO nexKaIHa daTnKac. KaK TOnbKO N3mepeHne NynbCa HauHTcR, HauHTet MIRATb3NaOK "cepdu" pDoM C NOkAsTeJeNpybCa. (NokaAsTeNb NynbCaNBnEeTCa OPHeHTPOBOuHbIM NOKa3aTeJeM, KOTpbm MoKET OTNIuHaTbcrOT DeIeCTBtBeNBoHOro NynbCa N3-3a Bo3dEnCTBn DBXKeHnra, TpeHnORA tN.T.D. Y HeKToPbIX NIODe BO3MOxKhBu OIN6Kn Prn N3mepeHn. Ecny BAc Bo3HnKaHO TpyHocTn C N3mepeHnem NybCa, Mbl peKOMeHNyeNCnoB3ObaHne HarpyHOrO KapDnOdaTnuKa.)
0b6yehnBMM (NyaYCTPOINCTBAHNONb3OBATEEN)
BecnnaTbHn NOBepxHOCTb BMM (PiouaDb OByeHne H30hI 630NaChOcTN (BpaauoUmeC86cm))
Ynctka, TexHueckoe 6cbnyxmbaHne XpaHeHne TpeHaXepa
1. Ynctka
ДячNTКИСПОЛБ3уTeЧИСТЮВлжHуO canpeTky.ВнIMаHne:нИKOrda He ИСПОЛБ3уTe ДЯчNTКи 6eH3n,pa36aBHTeJIbIpyrHe arpeCCHBHyIe ChTЯше cpeIcTBA,KOTOpbie MOrYT NOBpeINtB NOBepxHocTb.TpeHaJePpeHa3HaueH ToJIbKOДЯDOMaH Hero NcPONBJ3OBaHnB NOMeUeHn.IpeDoxpahNte TpeHaJeK eP O CBipoCTN IblI.
2. XpaHeHne TpeHaXepe
Pn He nCNoB3OBAHm TpeHaxKepa 6oJbwe 4 HeJeB, Heo6xoJIMO OTKIOHTb erO OT cETn. YCTaHOBtte caJa3Kn CeJNa KaK MOxHO 6bnke KpyIO uONOpHyTO py6y ceJNa ONyCTnte KaK MOxHO HIXe. IocTaBBte TpeHaxep B cyXoe NOMEueHne u pacbIJInte HemHoro Macna Ha NODUnNHKn NeJaIe CNpaBa i CNEBa, a TaKxe Ha pe3b6y BInHTa pyJN 6bICTpOeIcTByUcEro 3aTBopa. HakpoTe TpeHaxKe, yTo6bl 3aUHTb erO OT COJHeuHbIX Jyuei N PbIJN N 3TINM PpeOBpATNTb IN3MeHeHne OKpackn
3. TexHmueckoe 06cnyxuBaHne
Mbl peKomeHnyem nocne kaKdbix 50 yacob noIb3ObaHn npoBepaTb 60NTOBbIe coeINHeHn n nocle kaKdbix 100 yacob noIb3ObaHn cMa3bIBaTb nOdUnNHKn neJaJe CNeBa n Cnpaba, pe3b6y BnHTa pyn I 6bICTpOdeiCTByIOUezo 3aTBopa Macnom n3 pacbnInTeJ
IcnpaBHeHne HenoJaOk:
Ecn npo6nema He MoKeT 6bIbpeHc NOMOuH HNKeCTOnuX yka3aHm, noKaanycta, o6paNTecb B ceHTp, rDe Bbl Kynnn TpeHaxep.
Makc. yactota nylbca = 220 - Bo3pact
(220-BaWBo3pact)
90% OT MaKc. YacToTbI nyJbCa = (220 - Bo3pact) x 0.9
85% OT MaKc. YacToTbI NyIbCa = (220 - Bo3pact) x 0.85
70% OT MaKc. YacToTb NyIbCa = (220 - Bo3pact) x 0.7
UnpaXHeHnIpa3MHKnpepeTpeHnpOBKo
HaHTe pa3MHky C xOdb6bHa MeCTe B TeueHne 3 MHyT. Iocne 3TOB bInONHTE cIeMyUcne ynpaxHeHH, KOtOpBte NOMOT Bam ONImaJIbHO NOrTOBnTBcR K TpeHnpOBKe. Bo BpEM BAINONHeHH ynpaxHeHH Bbl He dOnxHbI NCbITbIBaTb 60nb. BInONHraTe ynpaxHeHH Do nORBHeHH TaHyUeero YBCTBa B MbIuie.

BCTaHbTe poBHO n3aBeDInTe OdHy pyKy 3a rONoBy. BToPyIO pyKy pNOJoxKnTe CBepx, Bo3BMnTEcb 3a JLOkOt N NotAHnTe Do OuyueHHaPcTaJKeHHa TpNiueCa. OctaHbTecB b 3tOM NoJoxKeHHn Ha 20 CeKYHa, NOBTopNe DpyRoi pykoI.
HaKIoHNTecb BnepeJ He Cn6BaI HOR NOnBtAaTecb DoCTaTb NaBcAmPyk Do nona. BInoNHeY npaxKeHHe 2 pa3a no 20 CekyHd.
CádbTe Ha non N BbITAHTE OdHy Hory. HAcNHOHTecb Bnepei nnonpo6yIte doCTaTb CTynHIO. BbINOHNrTe ynpaKHeHne 2 pa3a no 20 cekyHd.
B noJoxeHn IwpoKOro BbInaD aOBnpTeCb pyKaMn B NOI NOTAHHTe MblUcbl Hor. Chepe3 20 cekyHn NOMeHnTe Hory.
Pocne pa3MHKNIOTpncnteHoramnpykami,HTO6bI paccna6ntbMbIu. He npekpaauTe TpeHnpOBky Bhe3aHNO.Chaana yMeHBWte TEMTpeHnpOBKn, YTO6bl nybc onyctnncd o obuHoro nokaatae (Cool down).Mby peKOMeHdyem B KOHc TepeHnpOBKn CHObA BbINONHTb KOMNJIeKC ynpaxHeHn dJa pa3MHKNI.
Obsah
Program 3 Fatburn Program 4 Ramp Program 5 Mountain
Program 6 Interval Program 7 Cardio Program 8 Endurance

Program 9 Slope Program 10 Rally

User Setting Program 13 (U3)
User Setting Program 11 (U1)
User Setting Program 12 (U2)

User Setting Program 14 (U4)
User Setting Program 15 (U5)
Program 18 HRC (75%)
Program 16 Watt Control
Program 17 HRC (55%)

Program 19 HRC (95%)

Program 20 HRC

Program 21 Body Fat
Program Manuál:
Program 16: Program wattu
Zde muzete zadat individualln hodnotu wattu. V ramci urcitie tolerance provadif regulaci odporu pfi slapani automaticky poctac, a to nezavise na frevenci slapani tak, abyste se vzdny nachazeli v predepsanem pasmu. Nastaveni tréninkovch parametru cas/vzdalenost/kalorie/hornl hranice pulzu pomoci klavesy F.
Programy 17 - 19:
(220 minus your age)
90% maximalho pulsu = (220 - věk) x 0.9
85% maximalpulsu = (220 - vek) x 0.85

© by Top-Sports Gilles GmbH
D-42551 Velbert (Germany)
Service:
Tel.: +49 (0)2051/6067-0
Fax: +49 (0)2051/6067-44
