EUP8GREEN - Vacuum Cleaner ELECTROLUX - Free user manual and instructions
Find the device manual for free EUP8GREEN ELECTROLUX in PDF.
User questions about EUP8GREEN ELECTROLUX
0 question about this device. Answer the ones you know or ask your own.
Ask a new question about this device
Download the instructions for your Vacuum Cleaner in PDF format for free! Find your manual EUP8GREEN - ELECTROLUX and take your electronic device back in hand. On this page are published all the documents necessary for the use of your device. EUP8GREEN by ELECTROLUX.
USER MANUAL EUP8GREEN ELECTROLUX
electrolu.com/shopTechvApplow

Ed Corrugation 15
522 A5 Stockholm
www.electrolux.com

Electrolux
Ultrapower®
Cordless vacuum cleaner
natural_image
Exterior view of a black handheld vacuum cleaner (no text or symbols visible)| 10 | TOMATO CHOCOLAS | 1 |
| 11 | MASCOTUS | 1 |
| 12 | JUNIOR | 11 |
| 13 | SPRING CHOCOLAS | 11 |
| 14 | KANSIUS | 11 |
| 15 | KANSIUS | 11 |
| 16 | GIBLIUSCHOCOLAS | 11 |
| 17 | KANSIUSCHOCOLAS | 11 |
| 18 | LEMONSCHOCOLAS | 11 |
| 19 | CHOCOLAS | 11 |
| K | JETOGANAC MELON | 41 |
| K | GARAGA S PIVISHA | 27 |
| U | MUSKA JHUTU ZINTO | 48 |
| T | JETHIGEN | 34 |
| T | MUSHI KITCH | 36 |
| T | JETOGANAC MELON | 48 |
| L | INSTRUCTE COOL | 52 |
| O | MULICAN GNG | 50 |
| R | BELLING CHILLY | 8 |
| S | LAWC DE INSTRUCES | 51 |
| MD | WALAN, DELENTON, MA |
| MD | MELKON, MA |
| SH | YUMO, MO, POLDIC |
| SL | WATERA |
| SN | LIMKON |
| SW | MUSKMUS, MO |
| TB | KOTAC |
| UA | POCE & SPROCTORA |
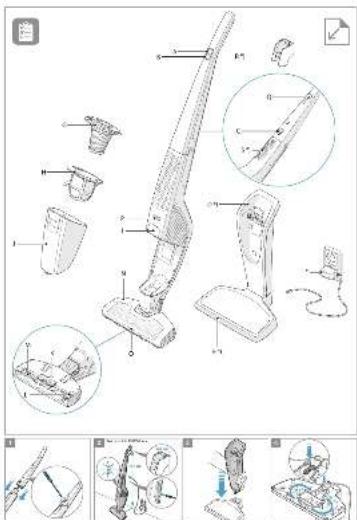
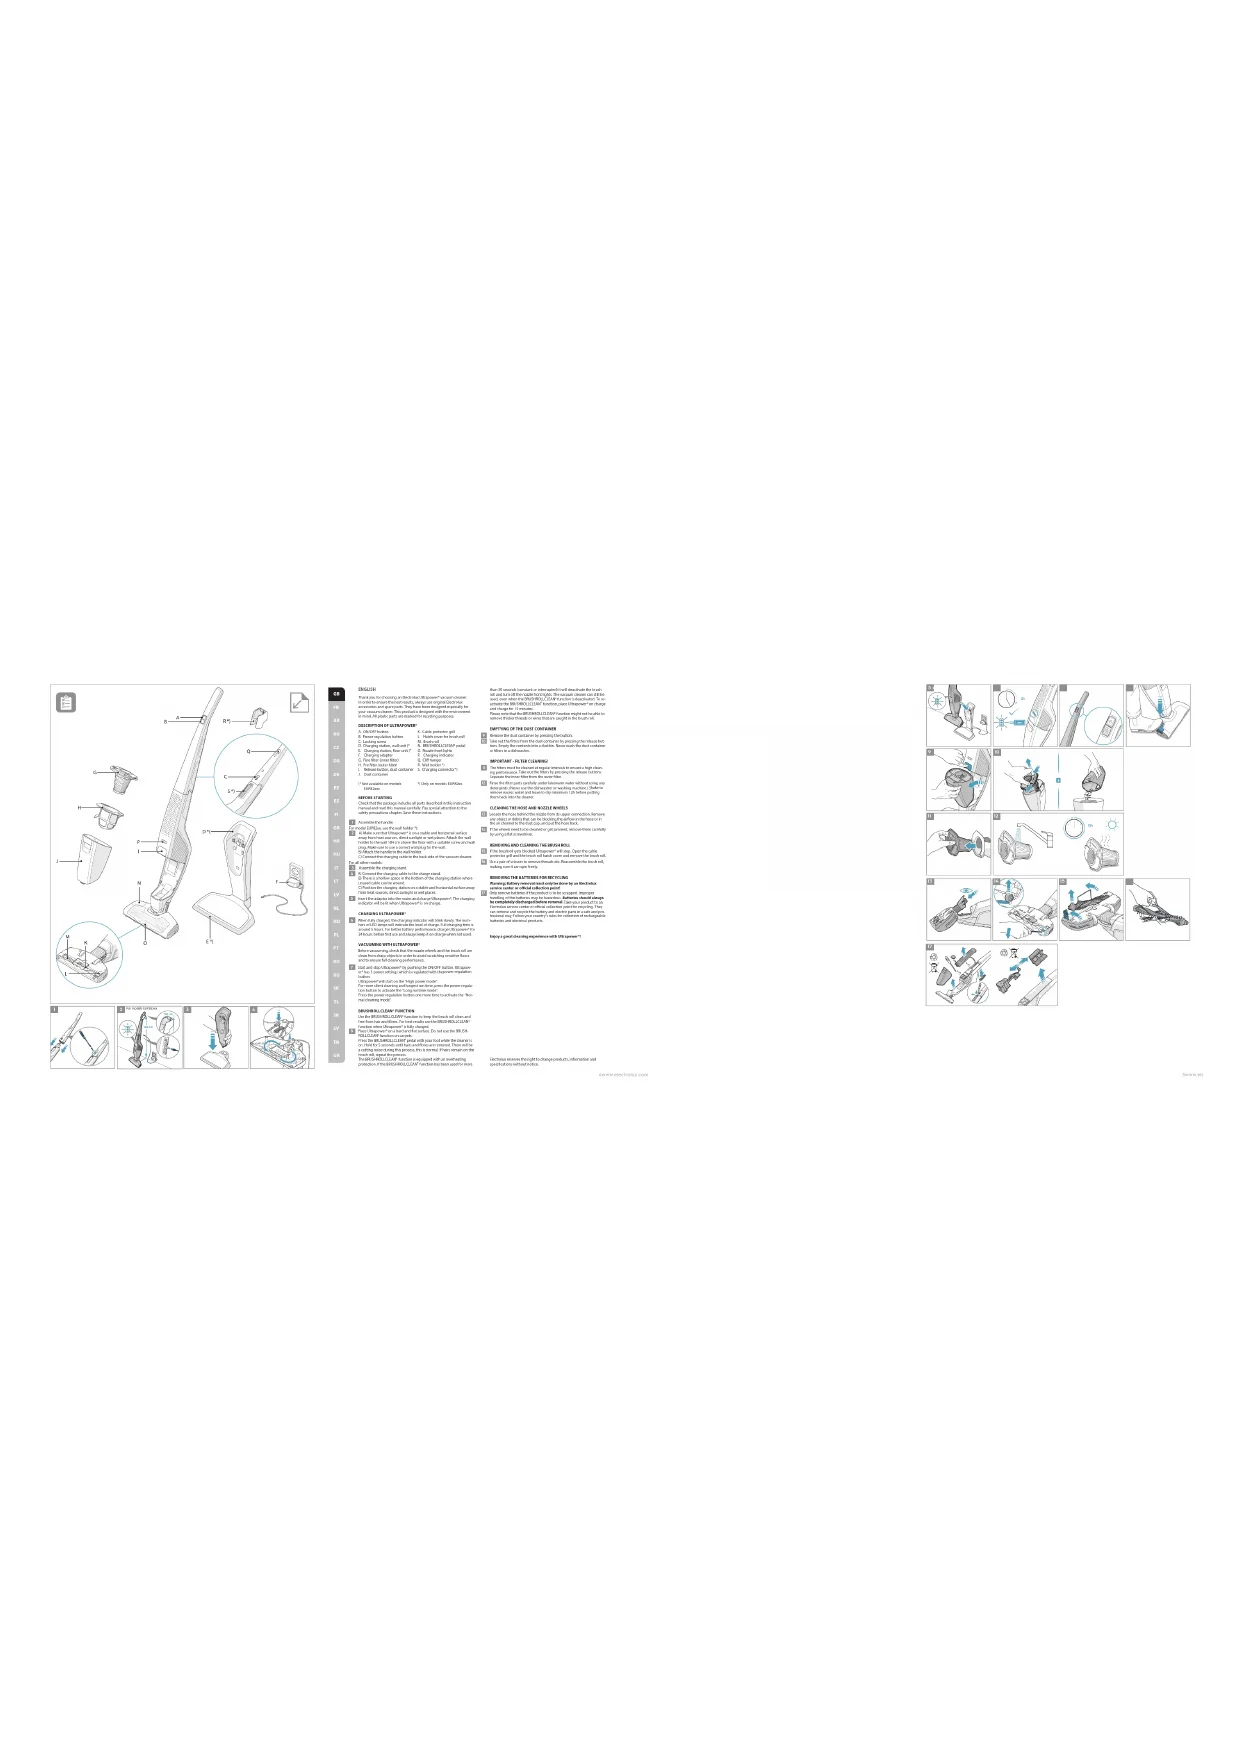
text_image
Technical diagram of a vacuum cleaner with labeled parts and exploded views, including parts numbered 1 to 8.(1)
In the case of the order of the same time,
It is a way to get the right of the way to be an odd, and it is not able to go out. They have been used previously by
[Unreadable Text]
DEVIDENCE
1. 05279
1. Burey and the
C. Last year: 3. Feb'18
D. Current year: 3. May'05; C.I.A. old
1. The right is 'twar' 4. The right
1. 08:4569
2. 08:4569
(1) fin-squared
1. 2016年1月1日,公司召开2016年第一次临时股东大会,并通知全体董事。
(1) 2015年1月
(1) _0 (2) _0
(1) 2017年1月1日
(请注明)
(2)《关于公司2017年限制性股票激励计划(草案)》
to the probability of a hypothesis, there exists of an even
(4) 线性
POK TINU
A. 100% of the company is a major business owner, and 200% of the company is a major business owner.
Lyde Jd, 2014. The author in the journal published research
The following table is provided in the image.
7.5min(10V)
4.4w: with
Source: China Mobile
1. 2014年1月1日星期六
1.2.2.2019
Lcn Induron s. olivin/ coiride o
Figure 10.2.15: The following is the same as the original
W. S. 2017
CLOTHY
(9) English Universe
but will only will be the Bank of New York All changes that
本公司及附属公司与控股股东、实际控制人之间不存在关联关系。
(二)公司简介
VOCASOSA 2013.10/2018
2017年1月1日
a^2
celas:boV
[Unreadable]
Vikavi' r1
to the
For the person with a certain person ever since to substitute the
2017年1月1日
(2)根据《中华人民共和国公司法》
[Unreadable]
The following table provides the original text:
1. A## C## of
B## D##
F.S. 100%
pr. Hold for Two
(1) 2017年
745-56-20
(2) 100% (1) 100% (2) 50% (3) 40% (5)
that is a vector in the space of , we will be in the case.
The following table is provided in the image.
SHEMING GENTILATE (GARL)
B. 2017年1月1日
2018年1月1日
The following table provides the information in English:
(1) 本报告书的摘要
M20A31-185600000
The American Association of the United Kingdom is a major issue.
In the case, there are two cases of the same time. There are two cases of the second one that has the same time.
The following table provides the correct description of the best performance:
2014年1月1日召开的临时股东大会
(1) 2023年1月1日(星期六)
- a of sea and b is shroud in ye, a/nd, one, all w are a,
3.10.2015年1月
2017年及2018年1月1日
The market gets realized in paper making. Even there is a well-off trend, the company is not
□是√否□是√否
(1) 2017年1月1日
THIS DRAWING IS NOT TO BE USED.
from the following
For may, the following table is set by a list of items and order to be an official valuation sale of
Only course that is a product by the way and money
for resumption charge before and 134-001-01062158
The following table is provided in the image.
The following table provides the information in English:
(1) 与 n 相等的平方
(1) 本说明仅供参考。
[Unreadable due to severe distortion and noise]
text_image
Illustrated sequence of mechanical assembly or cleaning steps with numbered diagrams and tool iconsSAFETY PRECAUTIONS
This appliance can be used by children aged from 8 years and above and persons with reduced physical, sensory or mental capabilities or lack of experience and knowledge if they have been given supervision or instruction concerning use of the appliance in a safe way and understand the hazards involved.
Children shall not play with the appliance.
Cleaning and maintenance shall not be made by children without supervision.
Batteries must be removed from the appliance before it is scrapped.
The battery is to be disposed of safely.
For the purposes of recharging the battery, only use the charging adapter provided with the product.
Ultrapower® should only be used for normal vacuuming indoors and in a domestic environment. Make sure it is stored in a dry place. Packaging material, e.g. plastic bags should not be accessible to children to avoid suffocation.
Never use the vacuum cleaner:
- In wet areas.
- Close to flammable gases, etc.
- When the product shows visible signs of damage.
- On sharp objects or liquids.
- On hot or cold cinders, lighted cigarette butts, etc.
- On fine dust, for instance from plaster, concrete, flour, hot or cold ashes.
Caution:
- Do not leave the vacuum cleaner in direct sunlight.
- Avoid exposing the vacuum cleaner to strong heat.
- The battery cells within must not be dismantled, short circuited or placed against a metal surface.
- Never use the vacuum cleaner without its filters.
- Do not try to touch the brush roll while the cleaner is switched on and the brush roll is turning.
- Mind your fingers if cleaning the inside of the floor nozzle. The metal blade of the BRUSHROLLCLEAN* function is sharp and could cause injury.
Using the vacuum cleaner in the above circumstances may cause serious personal injury or damage to the product. Such injury or damage is not covered by the warranty or by Electrolux.
SERVICING AND WARRANTY
All service or repairs must be carried out by an authorized Electrolux service centre.
This warranty does not cover reduction in battery runtime due to battery age or use, as the life of the battery depends upon the amount and nature of use.
To protect the motor, battery and electronics the product should not be stored or operated in:
- An ambient temperature below 5 °C or exceeding 35 °C. If the product is stored in a temperature below 5 °C or exceeding 35 °C, let the product cool down or warm up and dry for a few hours before usage.
- A humidity level below 20% or exceeding 80% (non-condensing).
If the product is stored for an extended time period (without usage or continuous charging), we recommend to store the product in normal room temperature with the batteries charged at 50% capacity or more. This will maintain the performance of the product.
Attention! Dew condensation may form inside the product if the unit is moved from a cold to a warm environment or after heating up the storage room. Wait a few hours for the internal components to warm up and dry before usage.
INDICATION LAMPS
| CHARGING | WHAT DOES IT MEAN? | DURING USAGE | WHAT DOES IT MEAN? |
| Blink slowly = 100 % fully charged 75 - 100 % capacity | |||
| 50 – 95 % charged 50- 75 % capacity remaining | |||
| 0 – 50 % charged 25 – 50 % capacity remaining | |||
| Ultrapower* needs to be recharged. | |||
Get usage advice, brochures, trouble shooter, service information: www.electrolux.com
Register your product for better service: www.electrolux.com/productregistration
Buy Accessories and Consumables for your appliance: www.electrolux.com/shop
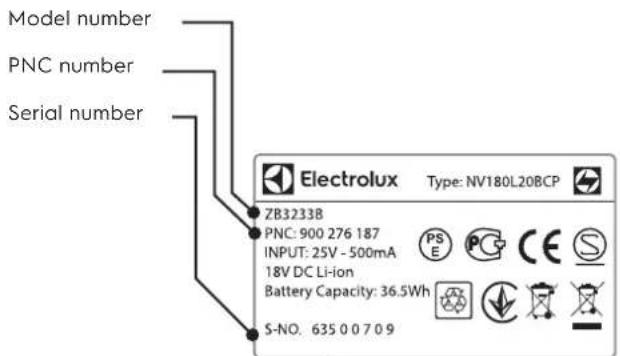
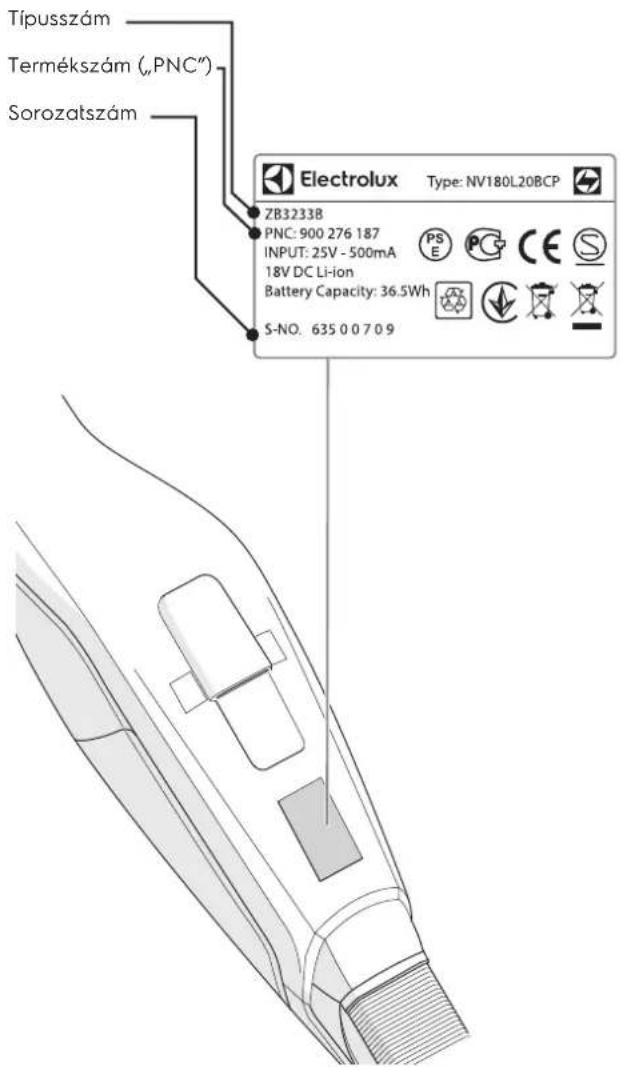
CUSTOMER CARE AND SERVICE
When contacting the Electrolux service center, ensure that you have following data available:
- Model number,
- PNC number
- Serial number
The information can be found on the rating plate.
text_image
Model number PNC number Serial number ZB3233B PNC: 900 276 187 INPUT: 25V - 500mA 18V DC Li-ion Battery Capacity: 36.5Wh S-NO. 635 0 0 7 0 9 Electrolux Type: NV180L20BCP
natural_image
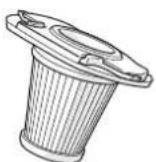
Technical line drawing of a mechanical component or assembly (no text or symbols visible)CONSUMABLES & ACCESSORIES

www.electrolux.com/shop
Filter
Ref: EF142
PNC: 900 167 024

RUNNING TIMES FOR ULTRAPOWER®
| Model Volt | High power mode | Normal power mode | Long runtime mode | |
| EUP82xx 28,8 | 16 28 75 | |||
| EUP84xx / EUP8GREEN | 32,4 17 | 30 80 | ||
| EUP86xx | 32,4 HD | 20 38 95 |
This warranty does not cover reduction in battery runtime due to battery age or use, as the life of the battery depends upon the amount and nature of use.
The battery should be removed from The product before disposal. Dispose of or recycle The battery in accordance with local regulations. The symbol

on the product or on its packaging indicates that this product may not be treated as household waste. Instead it shall be handed over to the applicable collection point for the recycling of electrical and electronic equipment. By ensuring this product is disposed of correctly, you will help prevent potential negative consequences for the environment and human health, which could otherwise be caused by inappropriate waste handling of this product. For more detailed information about recycling of this product, please contact your local city office, your household waste disposal service or the shop where you purchased the product.
FRANÇAIS
D. Support de charge (*
E. Support de charge posable (*
F. Chargeur
T∅MNING AF ST∅VBEHOLDEREN
G. Peenfilter (sisefilter)
natural_image
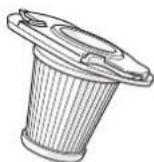
Technical line drawing of a mechanical component or assembly (no text or symbols visible)CONSUMIBLES Y ACCESORIOS

www.electrolux.com/shop
Filtro
Ref: EF142
Número de producto (PNC):
900 167 024
TIEMPO DE FUNCIONAMIENTO DE ULTRAPOWER®
| Modelo Voltios | Modo alta potencia | Modo de alimentación normal | Modo gran autonomía | |
| EUP82xx 28,8 | 16 28 75 | |||
| EUP84xx / EUP-8GREEN | 32,4 17 30 80 | |||
| EUP86xx | 32,4 HD | 20 38 95 | ||
natural_image
Technical line drawing of a mechanical component or assembly (no text or symbols visible)The information can be found on the rating plate.
natural_image
Technical line drawing of a mechanical component or assembly (no text or symbols visible)VARTOJAMIEJI REIKMENYS IR PRIEDAI

www.electrolux.com/shop
Filtras
Nr. EF142
Gamyklinis numeris (PNC)
900 167 024

„ULTRAPOWER®” NEPERTRAUKIAMO DARBO TRUKMÉ
| Modelis Itampa | Didelio galingumo režimas | Normāls jaudas režims | Ilgo neper-traukiamo veikimo režimas | |
| EUP82xx 28,8 | 16 28 75 | |||
| EUP84xx / EUP-8GREEN | 32,4 17 | 30 80 | ||
| EUP86xx | 32,4 HD | 20 38 95 |
VOOR U VAN START GAAT
1 Monteer de handgreep.
natural_image
Technical line drawing of a mechanical component or assembly (no text or symbols visible)VERBRUIKSARTIKELEN & ACCESSORIES

www.electrolux.com/shop
Filter
Ref: EF142
PNC: 900 167 024
BEDRIJFSTIJDEN VOOR ULTRAPOWER®
| Model Volt | Hoog vermogen modus | Normale power mode | Lange werkingstijd | |
| EUP82xx 28,8 | 16 28 75 | |||
| EUP84xx / EUP-8GREEN | 32,4 17 | 30 80 | ||
| EUP86xx | 32,4 HD | 20 38 95 |
ZAPRASZAMY NA NASZA WITRYNE INTERNETOWA, ABY:

natural_image
Technical line drawing of a mechanical component or assembly (no text or symbols visible)AKCESORIA I MATERIAŁY EKSPLOATACYJNE

www.electrolux.com/shop
Filtr Typ: EF142
Nr produktu: 900 167 024
natural_image
Technical line drawing of a mechanical component or assembly (no text or symbols)CONSUMABILE ŞI ACCESORII

www.electrolux.com/shop
Filtru Ref: EF142 PNC: 900 167 024
DURATELE DE FUNCTIONARE PENTRU ULTRAPOWER®
This symbol on the product indicates that this product contains a built-in rechargeable battery which shall not be disposed with normal household waste.

This symbol on the product or on its packaging indicates that the product may not be treated as household waste.
To recycle your product, please take it to an official collection point or to an Electrolux service center that can remove and recycle the battery and electric parts in a safe and professional way. Follow your country's rules for the separate collection of electrical products and rechargeable batteries.
СРПСКИ - СРП
natural_image
Technical line drawing of a mechanical component or assembly (no text or symbols visible)SARF MALZEMELERI VE AKSESUARLAR

www.electrolux.com/shop
Filtre
Ref: EF142
PNC: 900 167 024
ULTRAPOWER® IÇIN ÇALIŞMA ZAMANLARI