
PRP2400 011 - Iron HOOVER - Free user manual and instructions
Find the device manual for free PRP2400 011 HOOVER in PDF.
| Brand | Hoover |
| Model | PRP2400 011 |
| Product type | Steam generator |
| Power | 2400 W |
| Power supply | 220-240 V ~ 50/60 Hz |
| Temperature setting | Slider with multiple positions |
| Steam function | Steam trigger, continuous steam |
| Vertical ironing | Yes, for curtains and hanging garments |
| Dry ironing | Yes |
| Anti-scale protection | Integrated filter cassette, replaceable |
| Cord storage | Integrated holder |
| Steam hose storage | Dedicated space on the base |
| Water tank capacity | Approximately 1.5 L (estimated) |
| Weight | Approximately 4 kg (estimated) |
| Included accessories | U79 filter cassette |
| Spare parts available | Filter cassette (ref. 35601716) |
| Maintenance | Clean the soleplate with a non-metallic damp sponge; empty the tank after use |
| Safety | Do not immerse; do not direct steam towards people or animals; hot surface |
| Warranty | According to the conditions in force in the country of purchase |
Frequently Asked Questions - PRP2400 011 HOOVER
User questions about PRP2400 011 HOOVER
0 question about this device. Answer the ones you know or ask your own.
Ask a new question about this device
Download the instructions for your Iron in PDF format for free! Find your manual PRP2400 011 - HOOVER and take your electronic device back in hand. On this page are published all the documents necessary for the use of your device. PRP2400 011 by HOOVER.
USER MANUAL PRP2400 011 HOOVER
MANUAL DE INSTRUÇÉS (PT) P 46
MANUAL DE INSTRUCCIONES (ES) .P55
BRUGERVEJLEDNING (DK) .P 64
INSTRUKTIONSMANUAL (SE) .P73
KÄYTTÖOHJE (FI) P 82
OAHIEXPHSEΩG(R) P91
PYKOBOCTBO NOLb3OBATER (RU) .P 100
INSTRUKCJA OBSLUGI (PL) P 109
NAVOD KOBSLUZE (CZ) P 118
NAVODILA ZA UPORABO (SI) P 127
KULLANIM KILAVUZU(TR) .P 136
Parts Description
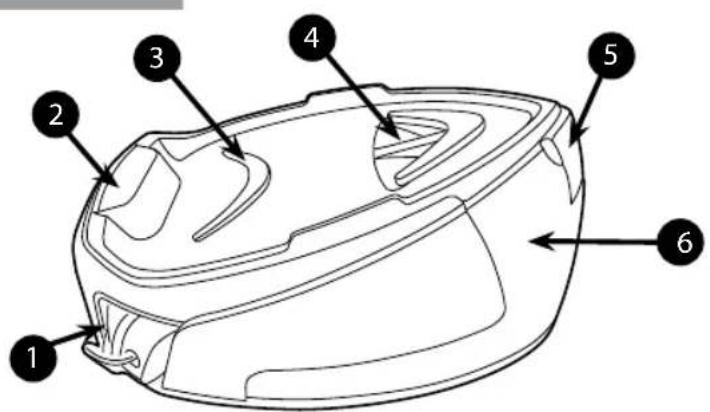
Fig. 1: Base and Tank Description
| 1 Cord Storage |
| 2 Iron Tray |
| 3 Silicon Pad |
| 4 Resin Cover |
| 5 Water Tank Cover |
| 6 Water Tank |

Fig. 2:Domestic Iron Description
| 7 Steam Trigger |
| 8 Temperature Dial |
| 9 Steam Hose Storage |
| 10 Iron heating Light |
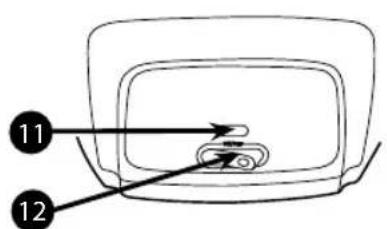
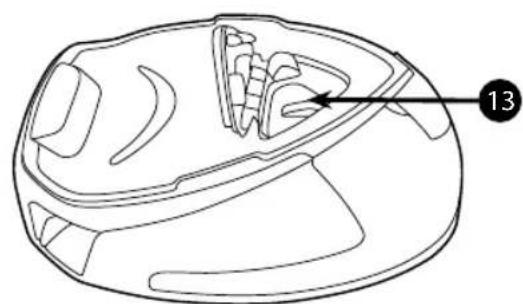
Fig. 3: Domestic Iron Control Panel Fig. 4: Filter Cassette
| 11 Power On Light |
| 12 ON/OFF Switch |
| 13 Filter Cassette |
Introduction
Dear customer,
First of all, we would like to congratulate you for purchasing this Hoover ironing system and to thank you for the confidence you have in Hoover brand.
This appliance has been manufactured with great care, respecting all of our quality criteria and has been tested several times. We hope its use will fulfil your expectations. We are strongly convinced that it will make your ironing much faster and better.
Before using your new Hoover appliance, please read carefully this user's manual. If you need further information or if you encounter any trouble which are not noticed in this manual, please contact the after-sales service or your standard dealer.
Important Safety Instructions
Read this user manual carefully before you first use and save it for future reference.
This appliance can be used by children aged from 8 years and above and persons with reduced physical, sensory or mental capabilities or lack of experience and knowledge if they have been given supervision or instruction concerning use of the appliance in a safe way and understand the hazards involved. Children shall not play with the appliance. Cleaning and user maintenance shall not be made by children without supervision.
-
This product has been designed for domestic use only. In case of any commercial use, inappropriate use or failure to comply with the instructions, the manufacturer is not responsible and the guarantee will not apply.
-
Before connecting your appliance, check if the main voltage is the same as the voltage indicated on your appliance and that the power outlet is connected to the earth.
-
Ensure before each use that the electric cord or any
Important Safety Instructions
other important part is not damaged.
- Keep the iron and its cord out of reach of children less than 8 years of age when it is energized or cooling down.
- Never direct the steam towards persons or animals. Never direct the steam jet towards any other electrical or/and electronic appliances.
- The iron is not to be used if it has been dropped, if there are visible signs of damage or if it is leaking.
- If the appliance shows evidence of breakdown, malfunction, leakages. Please make sure it is checked by an authorized Service Centre to avoid any danger.
- Always make sure the appliance is switched off, unplugged and cooled down before doing any maintenance work.
- The iron must not be left unattended while it is connected to the supply mains and before it has cooled down.
- Do not unplug the appliance by pulling on the cord or on the appliance.
- Never immerse the iron, the stand, the cable or the plugs in water. Never hold them under the water tap.
- The soleplate of the iron can become extremely hot and may cause burns if touched. Never touch the electric cords with the soleplate.
- If the supply cord is damaged, it must be replaced by the manufacturer, service agent or similarly qualified persons in order to avoid a hazard.
- When placing the iron on its stand, ensure that the
Important Safety Instructions
surface on which the stand is placed is stable.
- The plug must be removed from the socket-outlet before the water reservoir is filled with water.
- The surfaces with are liable to get hot during use.
- To have a electronic copy of the instruction manual contact the after sales service in guarantee card.
- The iron must be used and rested on a stable surface.
Chapter 1: Preparation for Use
Due to the powerful output of steam, Hoover recommends the use of an active ironing board with blowing and vacuuming function which allows escape of any excess steam.
Place the ironing system on a stable and level surface, for example on the hard part of an ironing board or on a heat-resistant surface.
Chapter 1.1: What Kind of Water May be Used?
The Hoover ironing system has been designed to be used with tap water only.
There is no need to use distilled or pure distilled water.
Nevertheless, in case you live in a hard water area, you can mix 50% of distilled water with 50% of tap water.
Do not use any other kind of water or do not add any contents to water tank as it can damage your appliance.
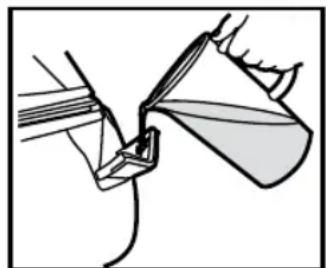
Chapter 1.2 : Filling the Water Tank
Switch off the appliance and unplug it.
Open the water tank cover (5) to gain access to the water tank.
Fill it with tap water with the help of a bottle.
Do not exceed the max mark.
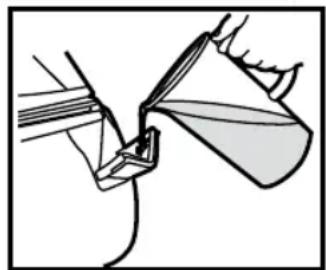
Fig. 5: Water Tank Filling
WARNING: Do not add vinegar, hot water, perfume, or any other kind of chemical agents or any other contents in the water tank. It could damage the steam generator and shorten its life use.
Chapter 1.3 - Switching on the Appliance
Connect the appliance with the mains cord to the earthed socket. Press on the main switch (12), the power light (11) will illuminate red color, turn the temperature dial (8) to your desired setting, the iron heating light (10) will illuminate informing you that the appliance is heating up, this will turn off when the soleplate reaches the selected temperature.
After approximately 1 minute, the iron heating light (10) will go off, then you can start ironing.
N.B.
The first time the appliance is used, some fumes, dust and a smell should appear.
It's quite normal and will quickly disappear.
This is due to a treatment applied to the soleplate that improves the steam performance.
Before use, please use the iron as described in Chapter 2.4 Vertical Steam Ironing.
Chapter 2: Using Your Steam Generator
Chapter 2.1: Regulating the Soleplate Temperature
Select the temperature of the soleplate by turning the dial (8) on the iron to the desired position.
Wait a few moments until the iron heating light (10) is off.
It will indicate to you that the soleplate has reached the requested temperature.
While ironing, the iron heating light (10) may turn on and off, the temperature adjusts without interrupting your ironing.
in
Help
To know the best suitable temperature for each textile, check the laundry care label of the article to be ironed. Please note that during use, the temperature light goes on from time to time. It signifies that the iron is heating up to the set temperature.
If a fabric is made with various kinds of fibers always select the soleplate temperature adequacy with the most delicate one.
If you select a lower temperature while ironing, wait until the iron has cooled down to the set temperature before you continue ironing.
If the temperature is too low, some drops of water could escape from the soleplate. Please raise up the temperature above the 2 dots ( ) to avoid this issue.
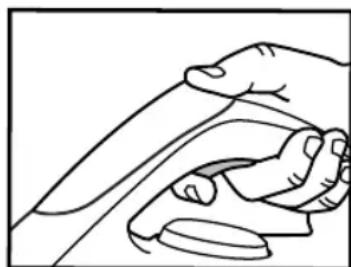
Chapter 2.2 - Ironing
Dry Ironing
Select the temperature of the soleplate following the indications of chapter
3.1. Start your ironing without pressing the steam trigger (7), when the soleplate reaches the appropriate temperature.
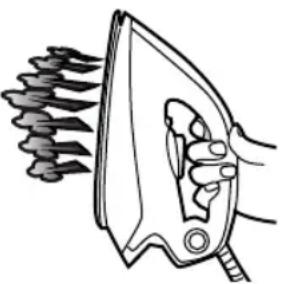
Steam Ironing
Select the temperature of the soleplate following the indications of chapter
3.1. The steam will be ready to be used after 1 minute and the dedicated
lamp will turn off. Starting from that time you can begin your ironing and press the steam trigger (7) for having steam.
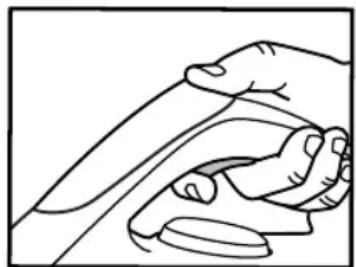
Fig. 6: Pressing Steam Trigger Graphic
N.B.
During the use, you should hear some noise coming from your steam generator. It's totally normal. It signifies that a pump injects water into iron soleplate.
Chapter 2.3 - How to Choose the Correct Soleplate Temperature and Steam?
To obtain the best results, it is really important to set the correct temperature of the soleplate and the steam flow you are using. If correctly used, it will simplify your ironing and provide outstanding results, making ironing easier and faster.
| Textile Soleplate T°C | |
| Jeans • | |
| Cotton • | |
| Linen • | |
| Starched Clothes • | |
| Velvet/Alcantara • | |
| Wool • | |
| Silk • | |
| Cashmere • | |
| Rayon • | |
| Polyester • | |
| Nylon • | |
| Acrylic • | |
| Lycra • | |
| Polyamid | • |
Help
When steam ironing clothes on which shiny patches may occur, we recommend you to set the soleplate temperature to a lower temperature or iron the garment on the reverse.
Start with the fabrics that needed to be ironed at a lower temperature () and finish with those that needed to be ironed at the higher temperature ( / Max) .
Chapter 2.4 - Vertical Steam Ironing
Set the soleplate temperature (8) to the max temperature.
Hang curtains and clothes (jackets, suits, coats). Hold the iron in vertical position at a short distance of the fabric to avoid burning it. Press the steam trigger (7) to steam iron moving it from top to bottom.
WARNING: Do not direct the steam jet towards people or animals.
Chapter 2.5 - Refilling the Water Tank During Usage
You can fill the water tank at any time during use.
Open the water tank cover (5) and refill the water tank with the help of a bottle of water without exceeding the max mark level.
Please refer to chapter 1.2 for more detailed instructions.
Chapter 3: Maintenance and Cleaning
All the maintenance and cleaning operations have to be done when the unplugged appliance has cooled down for at least 2 hours, to prevent any risk of burns.
Chapter 3.1 - Cleaning the Appliance
Do not use any detergent or descending products for cleaning the soleplate. Regularly clean it with a damp, non-metallic pad.
Empty the water tank after each use before storing it. To empty the water tank, press the trigger to release steam until no steam come out.
To clean the plastic parts of the stand, please use soft clothes.
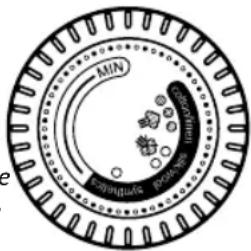
Chapter 3.2 - Filter Cassette Replacement
The appliance contains a filter cassette (12) to reduce scale deposits, this considerably prolongs the operational life of your iron.
The filter cassette is a single part under the tray and can be replaced.
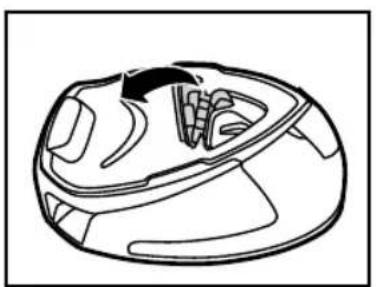
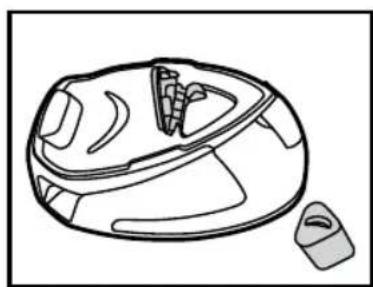
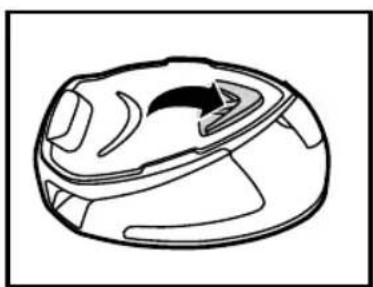
Fig. 7: Filter Cassette Replacement
Chapter 3.3 - Storage
Switch off the appliance and unplug it.
Empty the water tank. to empty the water tank, press the trigger to release steam until no steam come out.
Put the iron on the heat-resistant iron silicon pad (4). Wait at least 30 minutes allowing the soleplate and the generator to cool down.
Store the power cord in cord storage (1), and store the steam hose in the steam hose storage (9).

Fig. 8: Cord Storage
Then you can take away your appliance in order to store it safely and easily.
Troubleshooting
These are common problems you may encounter when using your appliance. If you are unable to solve any issue please contact your local Hoover Service Office.
| Problem Cause | Solution | |
| The appliance does not become hot | There is a connection problem. | Check the mains cord, the plug and the wall socket |
| The appliance is not switched on. | Press on the on/off switch | |
| The soleplate temperature is too low. | Set a higher temperature of the soleplate | |
| The appliance does not produce steam | The appliance is not switched on | Press on the on/off switch |
| The tank may be empty | Refill the water tank | |
| You are not pressing the steam trigger | Press the steam trigger | |
| The soleplates becomes dirty or brown | There should be chemical or additives in the water used for ironing | Never use any chemical or additives in the water. Contact your after sales service if the linen is still dirty |
| The linen is still dirty | Clean the soleplate with a non-metallic sponge | |
| Water stripes appear on the textile | Your ironing board cover is saturated in water | Change the cover or use a mesh ironing board |
Important Information
Hoover spares and Consumables
Always replace parts with genuine Hoover spares. These are available from your local Hoover dealer or direct from Hoover. When ordering spare parts, always check your model number.
Consumable
Filter Cassette U79-35601716
Hoover Service
Should you require service at any time, please contact your local Hoover Service Office. Please see all the contact details below.
Safety
Hoo ver believes that independent approval is the best way of demonstrating safety in design and manufacture.
All Hoover iron systems have been manufactured in compliance of all safety regulations and approved by the most qualified independent approval certification bodies.
ISO 9001
Hoover's factories have been independently assessed for quality. Our products are made using a quality system which meets the requirements of ISO 9001.
The Environment
The symbol on this appliance indicates that this appliance may not be treated as household waste.
Instead it must be handed over to the applicable collection point for the recycling of electrical
and electronic equipment. Disposal must be carried out in accordance with local environment
regulations for waste disposal. For more detailed information about treatment, recovery and
recycling of this appliance, please contact your local city office, your household and waste disposal
service or the shop where you purchased the appliance.


This appliance complies with the European Directives 2014/35/EU, 2014/30/EU and 2011/65/EU.
CANDY HOOVER GROUP Srl Via Privata Eden Fumagalli, 20861 Brugherio (MB) Italy
Your Guarantee
The guarantee conditions for this appliance are as defined by our representative in the country in which it is sold. Details regarding these conditions can be obtained from the dealer from whom the appliance was purchased. The bill of sale or receipt must be produced when making any claim under the terms of this guarantee.
Subject to change without notice.
Description
Avtaakka kαaawoua Hoover
'Otav npaaotei n avaykn xpnoiopoite anokkietuka yvnoia avtalakktika Hoover. Ta avtalakktika Hoover diatievtai ano tov tonko avtuposwo Hoover n aneuvteiaac ano tn Hoover. Otav npayyelve t avtaalakktka eleyxete tov kwdsikotou movteau
AvaWosuα
He 3aIINBaIte BbIe OTeMTeKn max.
BHUMAHNE! He do6aBnTe yKcyc, ropnyo Body, Odekoloh nll npytne xmmueckne Beuectba nll npcaikn B pe3epByap Ira B0dbI. OHmMOrT nobpeDntb rehepatornapa n cokpaNTb cpoK cnjxkbBaawero ythora.
Pnc.5:3aINbKa BOnblBpe3epByap
Pa3delen 1.3 - BkIoueHne npn6opa
Поdkлочи teceBoi shHyp np6bopa K 3a3eMneHno po3eTke. HaxMnTe Ha rIabHbI BblKlOuAtelb (12), INdNKaTOp nITaHnra (11) noDCBETnTcra KpaChbIM. NObepHnTe nepeKlOuAtelb TempepaTypbI (8) Na hyxHyIO HAcTpOyKy, INdNKaTOp HarpeBa yToRa (10) 3arOpNTcra, yKa3bIBaHa To, YTO np6op HarpeBaetcA, a 3aTeM NoracHT, KaK TolbKO noDoWbHa6epet HyxHyIO TempepaTypy.
PnmupeHo uee3 1 mHny uHndkaTOp HarpeBa yIora (10) noracHeT, nocle yero MOxHO HaunHaTb rAaNTb.
Приимechanicals.
Pn nepbOM nCnoB3ObaHnn np6opa moKeT o6pa3OBbIbA TbCn Dblm, NblN Heo6bIhN 3anaX.
3To HopMaJIbHO IN BCKope npeKpaTNTcA.
3To o6bAChraTc cneuaJIbHoi 06pa6OTko NIOoWbbl, NOBbIaHOUe 3ΦΦeKTHBHOCTb OTnpuBaHn.
Ipeed nCnoB3OBAHnEM, BbINOJIHHe DeIcTBnA, ONuCAHHbE B pa3dene 2.4 "OTnapuBaHne B BepTuKaJIbHOM IonoJKeHN".
Pa3dien 2:Исpoьзоване rehepaTopa npa
Pazden 2.1: PeruInpoBka Tempepatypb i nooWbbl
Bb6epnte tempeatpy nooobbl, nobephyb peyIaTOp (8) B HxKHOe noIOKeHne.
Iodoknte HeckoIbKO MmHyT Do Tex nop, noka HndkaTop HarpeBa (10) He noracHeT.
3To 03Naayet, yTo noDooBa Harpelacb Do HyxHoro ypoBna.
B npoucee rnaaKn nHdkKaTOp HarpBa (10) MoKeT nepnoDnueckn BkIIOuHaTbcN BbIKNoOHaTbc. 3To O3Haaye, TOp CTeneHb HarpBa nooOBBi NoCToRHHopeyIINpyTeC63 Heo6xoJIMocTn PpepbBaTb npoucec.
Pone3HbI COBET
Haubonee noxdoar memepamypa dna kdozo muna mkanu yka3b6aemc Ha 6upke c daHbIMU no yxody 3a KOHKpemHbIM u3denuem. Obpumme bHumahue, ymo enpocece uonnb30abHua nepuoduecku Bknoyaemc undukamop memnpamypbl. 3mo
3Naum, ymo ymio2 Haapeaemc do 3adahno memnepamypbl.
Ipu 2naJke KOM6uHupoBaHbIX u3deLuu 6ceZda b6upaume memnepamypy, npuememyo dna hauboene deukamHO mkaHu.
Ipeeknuyuucb 8 npoucese 2aakku Ha 6oee Huzkyo memepampy, nodozdu mehokopoe bpeym, noka ym02 ocmbyem do 8no8y cmaHOBneHHO2 3haueHua.
Ipu cnuuokom Huzkou memnepamype Ha nodowue ymua Mozym opa3oabcbKaannu bOdbi. Ymo6bI He donycmumb 3mo2o, noBbcme memnpampy do 2 moeK ( )
Pa3dcl 2.2 -TlaXka
Cyxara ngaika
Bb6epnte Tempeatpy nooowbbl corlacho npabnlaam, npnbdeHHbIM Bpa3dene 3.1. Korda nooowba hapept hyxkyu Tempeatpy, HauHnte rnaKky, He haxmarnyckateNB napa (7).
NapOBaIraJka
Bb6epnte Temnepatpy noDOWbI corlaCHO npaBnAm, npBBeDEHHbIM B pa3dene 3.1. Nap 6ydtrotOB K nCNOJIb3OBAHnO uepe 1 MNHyT, N COOTBEcTBYIOua JAMNooKa IORaCHET. HauHnA C 3TORO MOMeHTa, MOXHO HaHnHaTb rJaIDITb C napOM, HauKmAs nycKaTeJb (7).
PpIMeuaHne.
Bo BpemnncnoB0aHnn 6ydt cnblweH yM, KOTopb n3daeT rehepaTop npapa. 3To a6coIIOTHo HopMaIbHO n O3HaayeT, YTO HAcOC BnpbickNBAeT BOy B noDOWBy yTOrA.
Pnc.6:HaXaTne KHONKn
nyckaTeIa napa
Pa3delen 2.3 - KaK BbIbpaTb npaBnIbHyIO TeMpepatyp noDooWBbl napa?
IJI NOJUyHHe IyUWeIpe3yIbTaTAtOueHb BaXHO yCTaHOBHTb npaBnIbHyIO TemnepaTyPOdoWbI INHTeHCNBHOCTb NToKa napa. PpN npaBnIbHbIX HAcTpOiKax rAkk6yDeT IpocToI N OΦΦeKTHBHO BcENKoJIeNHbIM pe3yIbTaTOM.
He nCnoB3yIte KaKne-ln6 OoNCTnte nn nIcpeCTBa Iny ydaJIeHn HaKnII npn OOnCTke NDoWBbl.
Perylaepno npotnpaTe ee BnaKHO HeMeTaIInuecko ry6ko.
CnBaIte BDOy n3 pe3epByapa nocne kaxdoRo NcNoIb3OBAHn nepeTem KAK NOCTaBtB yTOr Ha xpaHeHne.
IyraBbOdbi n3 peepByapa HxMnte nyckaTeIb npa N ydepKnBaIte ero Do Tex nop, noka He 3aOKHHTcB Oda.
Tpe6oBaHn8 6e3oNaChOCTN
IIO MHeHIO Hoover, He3aBcImma OeHka - 3TO LyuShn CnOC6 nOITBepDnTb HAdEeKHOCTb KOHCTpyKuN IN KaueCTBO n3rOToBLeHn np6opa.
Bce cnctembl rnaKn Hoover n3rotobHe b c6oIIOeHHeM Bcex Bo3MOHHbIX Tpe6ObaHn 6e3OnaCHO t N Odo6peHb HAn6Olee KBaIINuPObAHbIMn He3aBNCmbIMn CePTNkauNOHHbIMn OpraHAM.
ISO 9001
3aObdi KOMnAHn Hoovr npoJH He3aBcMHy OueKhy Ha npedMe c6blJeHn Tpe6oBaHn K KaeeCTBy BbInyckaemOn npdykun. Haa npodykun n3rotabnBaetc r npimeHeHm CnCTembl KaeeCTBa, ydoBnTbopraooe Tpe6oBaHnM cTaHdapTa ISO 9001.
Okpykaioa cpea:
CnMBOJHa daHHOM np6ope yka3bIaet Ha To, YTO erO HeJIb3a YTNIN3npoBaT BMeCTe C 6blTObIMN OTXODAMN. ERO Heo6xOJIMO cdaBaT B COOTBeCTBHyUcN IyHK T npHeMa dJa DaJIbHeiWeI nepepa6OTKn 3LeKTPuuecknx N 3LeKTPoHbIX qacte. YTNIN3aunr DOJHXn PNOBOIDTCBcR B COOTBeCTBNN C MeCTHbIMN PPnPOOOxPAnHTeNbHbIMN PpABUNAMN PO YTNIN3aunr OTXODOB. 3a 60lee noOp6HOH INΦOpMauneN NO oBaPSeHIO C daHNbIM pIn6opom,ero YTNIN3aunn I nepepa6OTKe o6paITecb B MeCTHbIE OpraHb I BlaCTN, B Cnyk6y YTNIN3aunn OTXODOB HnN MaRa3HN, rDe BBI npno6peHn DaHHbI np6Op.

EaHbI np6op oTbeuaet Tpe6oBaHnM Ebponecknx DnpeKtnB 2014/35/EU, 2014/30/Eu n 2011/65/EU.
CANDY HOOVER GROUP Srl Via Privata Eden Fumagalli, 20861 Brugherio (MB) Italy
Bawa rapaHTna
YcNoBnI rapaHTnI dJaDaHOrO 6bITOBoro 3JeKTPnueCKoR Opi6opa onpeJelHO Tc HaIMM PpeCTabNTeJIbCTBOM B Toi cTpaHe, B KOTopoN 3OT 3JeKTPpnp6op 6bl KynIeN. BoIee nOpRo6HyIO HHΦOpMaIuO 6 bTHX YcNoBnIX Bbl MoKeTe NOLyUHTb OT HaIwero DInIepa. Prn PpeJbRAJIeHN nPeTeH3N I NO YcNoBnAM DaHHbIX rapaHTnIHbIX 6Ba3aTeJIbCTB HeO6xOdIMO PpeJbABNTb YeK IIN KBITaHcIIO Ha npOdaHHbI TOBap.
N3MeHeHn MOryT 6bItb BHeceHbI 6e3 npedBaPteJbHO rYbeOMJIeHn.
Opisczeci


- Parts Description
- Introduction
- Important Safety Instructions
- Chapter 1: Preparation for Use
- Chapter 1.1: What Kind of Water May be Used?
- Chapter 1.2 : Filling the Water Tank
- Chapter 1.3 - Switching on the Appliance
- N.B.
- Chapter 2: Using Your Steam Generator
- Chapter 2.1: Regulating the Soleplate Temperature
- Help
- Chapter 2.2 - Ironing
- Dry Ironing
- Steam Ironing
- Chapter 2.3 - How to Choose the Correct Soleplate Temperature and Steam?
- Chapter 2.4 - Vertical Steam Ironing
- Chapter 2.5 - Refilling the Water Tank During Usage
- Chapter 3: Maintenance and Cleaning
- Chapter 3.1 - Cleaning the Appliance
- Chapter 3.2 - Filter Cassette Replacement
- Chapter 3.3 - Storage
- Troubleshooting
- Important Information
- Hoover spares and Consumables
- Hoover Service
- Safety
- ISO 9001
- The Environment
- Your Guarantee
- Description
- Avtaakka kαaawoua Hoover
- Pa3delen 1.3 - BkIoueHne npn6opa
- Приимechanicals.
- Pa3dien 2:Исpoьзоване rehepaTopa npa
- Pazden 2.1: PeruInpoBka Tempepatypb i nooWbbl
- Pone3HbI COBET
- Pa3dcl 2.2 -TlaXka
- Cyxara ngaika
- NapOBaIraJka
- PpIMeuaHne.
- Pa3delen 2.3 - KaK BbIbpaTb npaBnIbHyIO TeMpepatyp noDooWBbl napa?
- Tpe6oBaHn8 6e3oNaChOCTN
- Okpykaioa cpea:
- Bawa rapaHTna
- Opisczeci
Brand : HOOVER
Model : PRP2400 011
Category : Iron