USER MANUAL 12617 Coati
natural_image
3D rendering of a white rectangular electronic device with a circular button and indicator lights (no readable text or symbols)
Art.: 12617
(E) MANUAL DE INSTRUCCIONES
(P) MANUAL DE INSTRUÇÕES
(F) MODE D'EMPLOI
(I) MANUALE D'INSTRUZIONI
(GB) OPERATING INSTRUCTIONS
(PL) INSTRUKCJA OBSLUGI

text_image
CE

natural_image
Empty white square with four thin black lines at corners (no text or symbols)
MANUAL DE INSTRUCCIONES ..... 5
MANUAL DE INSTRUÇÕES ...... 21
MODE D'EMPLOI.... 36
MANUALE D'INSTRUZIONI...... 53
OPERATING INSTRUCTIONS...... 69
INSTRUKCJA OBSLUGI...... 83
Espanol
Portugues
Français
Italiano
English
Polski

natural_image
Empty white square with four thin black lines at corners (no text or symbols)
E) CRONOTERMOSTATO DIGITAL
ÍNDICE
P) CRONOTERMOSTATO DIGITAL
ÍNDICE
This programmable thermostat has been designed to be used with fixed oil, gas or electric heating systems, and may be used in place of most indoor home thermostats.
2. INSTALLATION

WARNING
The thermostat should be installed only in dry, indoor areas, in fixed heating systems, and on non-conductive surfaces.
To avoid electrical shock, always disconnect the heating system from the main electrical power from the

master switch in the house. Please read carefully the following instructions before installing the thermostat.
Where to Install the thermostat
The ideal location for your thermostat is a spot approximately 1'5 meters from the floor, in a well ventilated area, and far from:
- Indoor draughts
- Heat sources
- Heat from the sun or household appliances
- Built-in pipes or chimneys
It is advisable to install your thermostat in a frequently used room, such as the living room or dining room.
Mounting the thermostat on the wall
Remember to disconnect the main electrical power from the central switch before taking out the old thermostat and installing the new one.
- Before placing the batteries, make a hole in the wall, making sure that the thermostat cable terminals are properly aligned.
- Next, place one of the plastic anchors provided with the thermostat into the hole. Make sure the anchor is flush with the wall.
-
Fit one of the screws provided into the anchor.
-
On the back of the thermostat, there is a hole on the right side. With the back of the thermostat facing the wall, line up the hole on the thermostat with the screw on the wall, moving the thermostat toward the left until it fits into the guide.
-
Open the front cover of thermostat. In the battery compartment there is a second hole for mounting the thermostat. Mark on the wall the location for the second screw, making sure that it is in line with the first screw, and remove the thermostat.
-
Make a hole where you put your mark, and place another plastic anchor, again ensuring that the plug is flush with the wall.
-
Mount the thermostat on the wall and connect the cables to the terminals as shown in the following diagram. If you have any questions or concerns, call our customer service number.
-
The terminals are found on the back of the thermostat. Only two cables are needed to connect the thermostat to the heater, these cables are shown in the heater electrical diagram or in the electrical diagram of the thermostat which is replacing.
Note: When there is not previous installation, bear in mind that most heaters have their own thermostat. Remove the connecting bridge between the heater and its own thermostat, and connect the heater to the cables leading directly to the new thermostat.
English
For greater safety, however, consult the manual for your particular heating system beforehand.
- Again line up the new thermostat with the hole for the first screw. Open the front cover, and fit the screw into the plug located behind the battery compartment.
- Once the thermostat is mounted and connected, proceed to reconnect the main electrical power from the household main switch.
Placing the Batteries
The thermostat operates with two 1'5 V AA batteries, preferably alcaline. To switch on the thermostat place the batteries into the battery compartment.
When inserting the batteries for the first time, the screen should show two different informations alternatively: in the first screen it shows the time, date and room temperature (for example 22^ C), as shown in the drawing below:
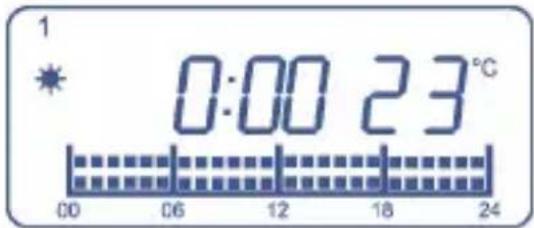
text_image
1
0:00 23°C
00 06 12 18 24
In the second screen it shows the consignment temperature, as shown in the drawing below:
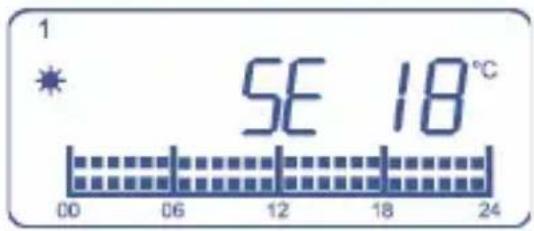
text_image
1
* SE 18°C
00 06 12 18 24
If case the screen shows a different information, press the RESET key using a sharp object, such as a paper clip.
After inserting the batteries, close the thermostat front cover.
When the battery level is below the minimum to ensure the correct working of the thermostat, the screen will show the symbol. When this happens, replace the batteries for new ones, preferably alcaline.
3. TIME AND DATE SETTING
- Press the √ key once, the day indicator starts blinking. With / keys set the day of the week.
- Press the √key again, the hour indicator starts
blinking. With / keys set the hour.
- Press the key again, the minutes indicator starts blinking. With / keys set the minutes.
- Press the key again to exit, or after 15 seconds it will exit automatically.
4. CRONOTHERMOSTAT ADJUSTMENTS
The thermostat has several control functions which can be adjusted by the user:
Temperature Differential Adjustment
The temperature differential refers to the minimum temperature difference between room and consignment temperature which causes a working change.
The temperature differential can be set between 0'2°C and 1°C. To set the temperature differential:
- Press the DIF CL key until you see on the screen dIFF0.2 °C.
- With / keys set the temperature differential.
- To set the new differential value and return to the normal operating mode, press SET key.
Temperature Gauge Adjustment
In some special cases the thermostat can be installed in a place where it cannot measure the room tempera-
ture you wish to control. For example, you may wish to control the temperature in the dining room and the thermostat is located in another room, so we have to take into account that there might be a temperature difference between both rooms. To compensate this temperature difference between the two rooms, the temperature gauge can be modified between -5^ and +5^ , depending on the temperature difference existing between the two rooms.
- Press and hold the DIF CL key until you see on the screen CL 0°.
- With / keys set the temperature gauge.
- To set the new differential value and return to the normal operating mode, press SET key.
This value will be used to add or subtract it from the real room temperature measurement shown in the screen, using this temperature as the control temperature.
5.CONTROL TEMPERATURE SETTING
This thermostat works according to two different control temperatures: economic temperature, symbolized as a moon drawing in the screen, and comfort temperature which is symbolized as a sun drawing.
Normally, "comfort" temperature is the one we want to have when we are at home and "economic" tempera-
ture when we are out. Obviously, “economic” temperature should be lower than “comfort” temperature.
For example, if the user does not change the pre-set control temperatures, will have a “comfort” temperature of 21^ C and an “economic” temperature of 18^ C. During the periods in which it is selected the “comfort” temperature, the system will keep the room temperature around 20^ C depending on the selected temperature differential.
When the user selects the “economic” temperature, the system will be activated only if the room temperature falls below 18^ C minus the differential. When the temperature comes again over 18^ C plus the differential, the system will stop.
In order to change both “economic” and “comfort” temperatures:
English
-
Press key, the sun indicator starts blinking.
-
With / keys set the "comfort" temperature.
-
Press key again, the moon indicator starts blinking.
-
With / keys set the "economic" temperature.
-
Finally press the SET key to confirm and exit. If
you don't press any key, it will exit automatically after 15 seconds also saving the new temperature values.
The factory pre-set values are the following:
-comfort temperature: 21°C
-economic temperature: 18°C
-control temperature for or HEAT mode: 7°C.
The unit will exit from this function automatically if any key is not pressed in 10 seconds.
6. PROGRAM SETTING
Once you have set the control temperatures, time and date, you can set the working program. To do so, select the day or group of days in which you want the program to be activated, the number of program you want and if the program is not a pre-set one, set the temperatures we want for each period.
SELECTION OF THE DAY/GROUP OF DAYS AND PROGRAM NUMBER
- Press key, the day or group of days (1-7) indicator starts blinking.
-
With / keys, select the day or group of days we want to program. You can choose between following three options:
-
A different program for each day of the week (1, 2, 3, 4, 5, 6, 7).
- One program for days 1-5 and another program for days 6 and 7 (1-5, 6-7).
- The same program for all the days of the week (1-7)
- Press | key to confirm the day or group od days, the program indicator starts blinking.
- With / keys, select the program (P1-PA) you want to set for the selected day or group of days.
- Press SET key, the day or group of days indicator start blinking again and you can repeat the above steps to select another day or group of days to set another program.
- Pressing SET key a second time, you will exit this function saving the changes.
7. CUSTOMIZE YOUR OWN PROGRAM
The thermostat can store 10 different programs, the first two programs (P1 and P2) are fixed.
P1 is comfort temperature for the whole day, and P2 is economic temperature for the whole day. The other 8 programs are totally programmable by the user, who can decide for each one of the 24 hours in a day to have the economic temperature, comfort temperature or OFF mode.
In order to customize your own program make the following.
-
Press and hold SET key and at the same time press key, the program indicator starts blinking.
-
With / keys select the program you want to modify.
-
Press key and the first time segment, corresponding to the period between 00:00-01:00, starts blinking.
-
With / keys you can go forward or backwards to the next time segment without changing the status of original time segment.
-
When you want to change from comfort to economic temperature or vice versa in one time segment, press key. The temperature for that segment will change from comfort to economic or vice versa and the next time segment will start blinking.
-
When one time segment is blinking and you press the key, this time segment will be empty (indicating mode for this segment) and next time segment will start blinking.
-
When you have finished programming your own program, press SET key and the edited program indicator will blink again. In this moment you can change to another program using / keys in order to program it following above steps.
-
Press again SET key to exit and save the changes after you have finished the new program.
8. ANTI-FREEZE FUNCTION
This function is only available when the chronothermostat is installed in a heating system and allows the establishment of a very low temperature, at which the system would activate in order to avoid the formation of ice in the pipes.
-
Press the key. The display will show the symbol and the symbol
-
By pressing any button the anti-freeze function will deactivate and the normal operation programme will return.
9. MANUAL OPERATION
With this thermostat you can manually set a temperature level and independently of the program established for that period. This function can be activated permanently or for a certain period of time. When it is activated permanently the fixed temperature will remain until you press SET key, and when it is activated for a certain period of time the the fixed temperature will remain until next program instruction. In that moment the manual function is automatically cancelled.
In order to fix the manual operation for a certain
period of time:
- Press / keys until the desired temperature is shown in the screen. When pressing / keys the indicator will be blinking and the screen will be showing the temperature you want to fix.
- After a few seconds without pressing any key, the selected temperature will be fixed and it will be shown in the screen alternatively with the room temperature. The new temperature level selected will remain until next program instruction.
- If you want to cancel the manual mode before next program instruction, press SET key.
In order to fix the manual operation permanently:
- Press and hold Key until HOLD indication is shown in the screen.
- With / keys select the desired temperature.
- To fix the new temperature level press SET key The screen will show alternatively the main screen and the new consignment temperature selected together with HOLD indication.
Remember: this function will remain activated until you press SET key.
ON/OFF switch.
In the front side of the thermostat there is a manual
switch with which you can stop the heater system. If you select 0 position, the heating system will not start even if the room temperature is lower than the consignment tempered specified in the current program. If you select 1 position, the heating system will work according to the stabilised program.
10. TECHNICAL FEATURES
Power Source: 2 x 1'5V AA batteries
Preferably Alcaline
Contact capacity: 230V AC 6(2)A MAX
Temperature Range: 5°C to 35°C
Control range: 7°C to 30°C
Differential : 0,2° to 1° C
Temperature accuracy: +/- 1C AT 20 C
Clock accuracy: +/- 90 SEC./MONTH
PL) CHRONOTERMOSTAT CYFROWY
SPIS TRESCI
- USTAWIANIE CZASU 83
- USTAWIANIE BIEŻĄCEGO PROGRAMU .....84
- USTAWIANIE PROGRAMU 86
- USTAWIANIE TEMPERATURY 87
- TRYB TYMCZASOWEGO POMINIĘCIA PROGRAMU.... 87
- FUNKCJA PRZECIW ZAMARZANIU 88
- FUNKCJA SWING 88
- FUNKJA HOLD.... 88
- PRZEŁACZNIK ON/OFF 88
10.FUNKCJA ELECTRONICZNEJ KALIBRACJI .. 89
1. USTAWIANIE CZASU
natural_image
Empty white square with four corner markers (no text or symbols)
Temper Portugal S.A.