
12600 - Thermostat Coati - Free user manual and instructions
Find the device manual for free 12600 Coati in PDF.
| Brand | Coati |
| Model | 12600 |
| Product type | Chrono-thermostat |
| Use | Fixed electric, gas or oil heating systems |
| Power supply | 2 AA 1.5 V batteries (preferably alkaline) |
| Control temperature range | From 7 °C to 38 °C |
| Adjustable differential | From 0.2 °C to 3 °C |
| Number of programs | 4 for weekdays and 4 for weekends |
| Manual switch | Yes, on/off (position 0 or 1) |
| Display | Room temperature, time, date, programs |
| Calendar setting | Programmable day and time |
| Compensatory calibration | From -5 °C to +5 °C |
| Installation | Indoor, dry places, on non-conductive surfaces |
| Wall mounting | Approximately 1.5 m from the ground |
| Recommended location | Living room or dining room (usually occupied room) |
| Boiler compatibility | Connects to the two free terminals of the existing thermostat |
| Load type | 5 A for resistive load |
| Maintenance and cleaning | Clean with a dry cloth, do not use abrasive products |
| Safety | Disconnect the system before installation; do not connect L directly to the thermostat |
Frequently Asked Questions - 12600 Coati
User questions about 12600 Coati
0 question about this device. Answer the ones you know or ask your own.
Ask a new question about this device
Download the instructions for your Thermostat in PDF format for free! Find your manual 12600 - Coati and take your electronic device back in hand. On this page are published all the documents necessary for the use of your device. 12600 by Coati.
USER MANUAL 12600 Coati
2° manual 12600.qxd 30/11/00 17:46 Pagsi

Art.: 12600
(E) MANUAL DE INSTRUCCIONES
(GB) OPERATING INSTRUCTIONS
(P) MANUAL DE INSTRUCOES
(I) MANUALE D'INSTRUZIONI
(F) MODED'EMPLOI
2* manual 12600.qxd 30/11/00 17:46 Pagsina 2
(E) CRONOTERMOSTATO ELECTRONICO DIGITAL INDICE DE CONTENIDOS
- INTRODUCCION
- INSTALLACION
3.PROGRAMACION DE LA HORAY DIA ACTUALES - AJUSTES DEL CRONOTERMOSTATO
5.AJUSTE DE LOS PROGRAMAS - FUNCIONAMIENTO MANUAL
- CHARACTERISTICSTECNICAS
3
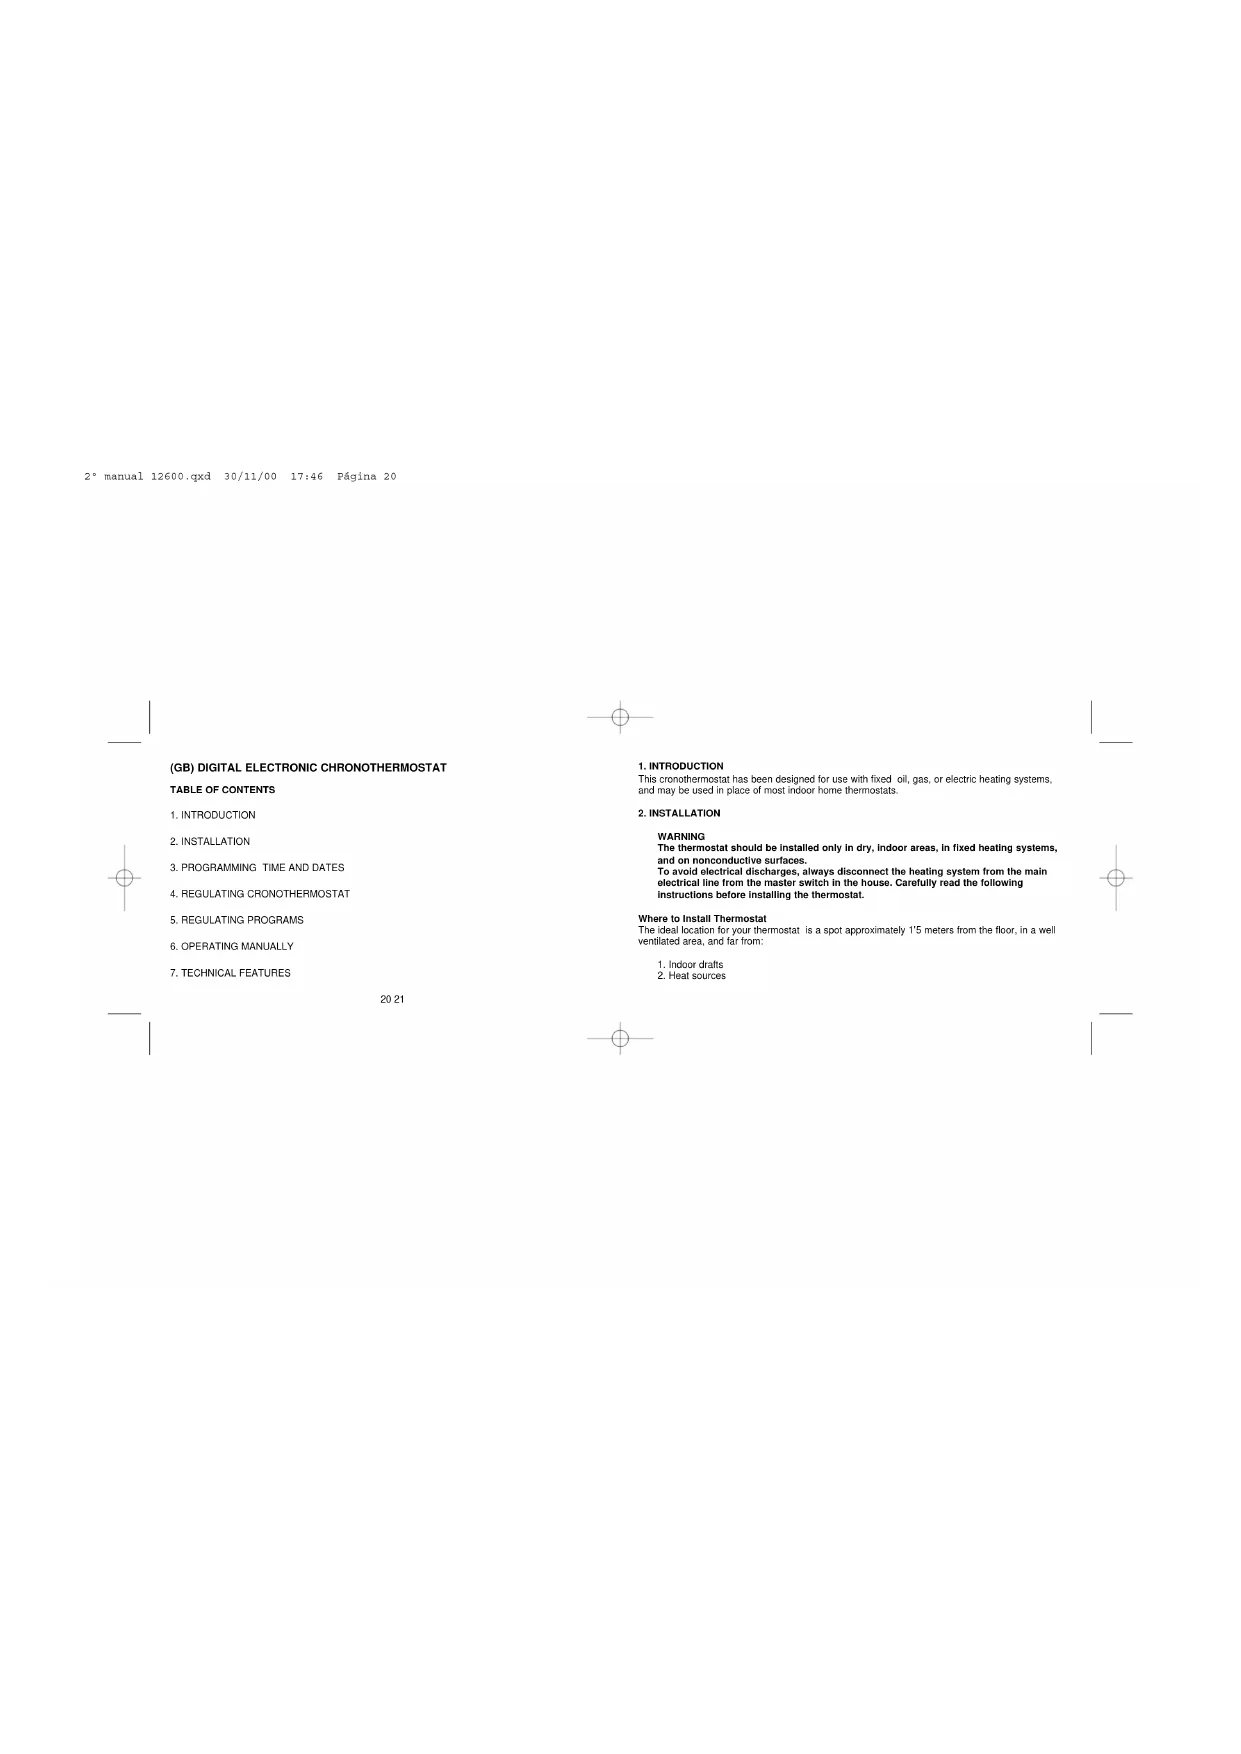
(GB) DIGITAL ELECTRONIC CHRONOTHERMOSTAT
TABLE OF CONTENTS
- INTRODUCTION
- INSTALLATION
3.PROGRAMMING TIME AND DATES - REGULATING CRONOTHERMOSTAT
- REGULATING PROGRAMS
- OPERATING MANUALLY
- TECHNICAL FEATURES
2021
- INTRODUCTION
This cronothermostat has been designed for use with fixed oil, gas, or electric heating systems, and may be used in place of most indoor home thermostats.
2. INSTALLATION
WARNING
The thermostat should be installed only in dry, indoor areas, in fixed heating systems, and on nonconductive surfaces.
To avoid electrical discharges, always disconnect the heating system from the main electrical line from the master switch in the house. Carefully read the following instructions before installing the thermostat.
Where to Install Thermostat
The ideal location for your thermostat is a spot approximately 1'5 meters from the floor, in a well ventilated area, and far from:
- Indoor crafts
- Heat sources
2° manual 12600.qxd 30/11/00 17:46 Pájina 22
- Heat from the sun or household appliances
It is advisable to install your thermostat in a frequently used room, such as the living room or dining room.
Mounting the cronothermostat on the wall
Remember to disconnect the electrical main from the central switch before taking out the old thermostat and installing the new one.
- Before placing the batteries, make a hole in the wall, making sure that the thermostat cable terminals are properly aligned.
- Next, place one of the plastic plugs provided with the thermostat into the hole. Make sure
that the plug is flush with the wall. 3. Fit one of the screws provided into the plug. -
On the back of the thermostat, there is a hole on the right side. With the back of the thermostat facing the wall, line up the hole on the thermostat with the screw on the wall, moving the thermostat toward the left until it fits into the guide.
-
Open the front cover of thermostat. In the battery compartment there is a second hole for mounting the thermostat. Mark on the wall the location for the second screw, making sure that it is in line with the first screw, and remove the thermostat.
- Make a hole where you put your mark, and place another plastic plug, again ensuring that the plug is flush with the wall.
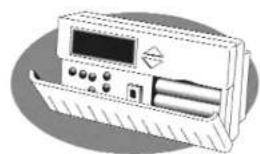
- Mount the thermostat on the wall and connect the cables to the terminals as shown in the following diagram. If you have any questions or concerns, call our customer service number.
- The terminals are found on the back of the thermostat. Only two cables are needed to connect the thermostat to the heater. Connect the cables as follows:
Connect cables L and N to the furnace as shown in the diagram. Connect two additional cables between the furnace and the new thermostat, as indicated in the diagram on your furnace. Never connect the L and N cables directly to the croneothermostat.
CRONOTHERMOSTAT
HEATING SYSTEM

L N
Note: Bear in mind that most furnaces have their own thermostat. Remove the connecting bridge between the furnace and the old thermostat, and connect the furnace to the cables leading directly to the chronothermostat. For greater safety, however, consult the manual for your particular heating system beforehand.
-
Again line up the new thermostat with the hole for the first screw. Open the front cover, and fit the screw into the plug located behind the battery compartment.
-
Once the thermostat is mounted and connected, proceed to reconnect the main electrical line from the household main switch.
Inserting Batteries
The cronothermostat operates with 1'S V AA batteries, preferably alkaline. The batteries must be inserted in the battery compartment of the thermostat.
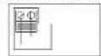
When inserting the batteries for the first time, the screen should show the proper time, date, and room temperature, as shown in the drawing below.
If the information displayed on the screen is not correct, press the "erase" key, using a pointed object, such as a paper clip.
After inserting the batteries, close the front cover of the thermostat.
3.PROGRAMMING TIME AND DAY
To program the time, follow the steps below:
-
Hold down the "HOUR" key until the two dots on the clock stop blinking.
-
Press the 'HOUR' key to set the correct hour.
-
Once the hour is correctly set, press the MIN key to the correct time.
-
To set the days of the week, press the "DAY" key to read the correct day. Days are
designated as follows:
SUN= Sunday TUE=Tuesday THU= Thursday SAT= Saturday
MON=MondayWED=WednesdayFRI=Friday
- Lastly, press the 'ENTER' key to return to the standard operating mode. The two dots on the
clock will again start blinking
4. REGULATING THERMOSTAT
The thermostat can be regulated in various ways.
Regulating Temperature Differential
The temperature differential refers to the difference between actual room temperature and thermostat's programmed temperature. The temperature differential can be set between 0^2^ and 3^ . To set the temperature differential:
- Press the "ENTER" key for at least two seconds until you see on the screen "1.2° C SWING".
-
Use the triangular key to change the differential.
-
To set the differential and return to the standard operating mode, again press the 'ENTER' key.
Adjusting Temperature Gauge
Occasionally the chronothermostat can not be installed in the same room whose temperature you wish to control. For example, you may wish to control the temperature in the dining room, and the thermostat is located in another room. To compensate for the difference in temperature between
the two rooms, the thermostat gauge needs to be modified between -5^ and +5^ , depending on the temperature difference existing between the two rooms.
- Press the "REG/MAN" key twice and hold down until you see on your screen CL O.
-
Use the triangular buttons to set the correct temperature.
-
To program the temperature and return to the standard operating mode, press ENTER.
Maintaining Constant Temperature
In cases where you are absent from the home for extended periods, the thermostat can set and maintain your home at a constant temperature. This temperature is usually very low. To set the temperature:
- Press the "REG/MAN" key once. The word HOLD will appear blinking on the screen.
- Using the triangular buttons, select desired temperature.
- To program temperature, now press ENTER". The word HOLD (not blinking) will again
To return to standard operating mode, press ENTER.
5. ADJUSTING PROGRAMS
Program Blocks
The thermostat has two program blocks (weekdays and weekends), with four programs in each block. The programs are preset as follows:
WEEKDAY
BLOCK
WEEKEND
| Starting Time Temperature Starting Time Temperature | |||||
| Program1 | 6:30 am. | 20 °C | Program 1 | 8:00 am. | 20 °C |
| Program 2 | 8:00 am. | 14 °C | Program 2 | 10:00 am. | 14 °C |
| Program 3 | 4:30 pm. | 20 °C | Program 3 | 7:00 pm. | 20 °C |
| Programa 4 | 11:00 pm. | 15 °C | Program 4 | 11:30 pm. | 15 °C |
This table indicates the time and temperature for each program. The programs turn the heat on and off at the specified times in order to maintain the indicated temperatures. Program times and temperatures may be reprogrammed according to your individual needs and preferences. Normally programs 1 and 3 turn the heater on, and are set at a comfortable room temperature. Prorams 2 and 4 usually turn off the heat, and are set for a fairly low room temperature. These can be reversed, however, with programs 2 and 4 maintaining a higher temperature, and 1 and 3 maintaining a lower temperature.
Example:
Suppose we get up each morning at 7:30 am. We can set Program 1 to begin at 7:00 in order to start the program at 9:00 (with a time shift of 2 hours).
to treat the house to 22^ provided we are in the house).
Suppose we leave the house at 9:30 am. We can set Program 2 to begin at that time, in order to maintain the house at 15^ C. (given that we are not going to be there.)
We are at around 7:30 pm. We can set Program 3 to begin at 7:00 in order to raise
the indoor temperature to a comfortable 22^ - 23^ C. At 11:00 pm we can set Program 4 to lower the room temperature again to 14°C
Therefore, the general programming schedule for weekdays would be:
Program 1: from 7:00 a 9:29 am, 22°C
Program 2: from 9:30 am to 6:59 pm, 15^ C
Program 3: from 6:00 pm to 10:59 pm, 23^
Program 4: from 11:00 pm to 6:59 am, 14°C
To set program times and temperature, proceed as follows:
Weekday Programming
- Press the "DAILY" key. On your screen will appear the connecting time for Program 1.
- The connecting time can be changed by pressing the "HOUR" and "MIN" keys until the screen reads the desired time. Remember that the minutes can only be set at minimum intervals of 10 minutes.
- Once you have selected the correct connecting time, press "ENTER".
- The screen will display a "1" and a preset temperature. To change the desired temperature, use the triangular keys.
- Having selected the correct temperature, press 'ENTER'.
-
The screen will now display program 2. Repeat steps 2 through 5 for each of the remaining programs.
-
When finished, press the REGIMAN" key to return to the standard operating mode.
Weekend Programming
For weekend programming, begin by pressing the "SAT/SUN" key, and then follow the same steps used for weekday programming:
- Press the "SAT/SUN" key. On your screen will appear the connecting time for Program 1.
- The connecting time can be changed by pressing the 'HOUR' and 'MIN' keys until the
screen reads the desired time. Remember that the minutes can only be set at minimum
intervals of 10 minutes.
3. Once you have selected the correct connecting time, press 'ENTER'.
4. The screen will display a "1" and a preset temperature. To change the desired temperature,
use the triangular keys.
5. Having selected the correct temperature, press "ENTER".
6. The screen will now display program 2. Repeat steps 2 through 5 for each of the remaining
programs
7. When finished, press the "REG/MAN" key to return to the standard operating mode.
Operating
The word HEAT will always appear on the screen. When it is blinking it means the furnace is on.
When the word HEAT is not blinking, it means the furnace is turned off.
6. Manually Operated
The thermostat can be regulated manually, independently of the program that is on at the time. To
adjust the temperature manually:
2° manual 12600.qxd 30/11/00 17:46 Párgina 32
Press the triangular keys until the screen displays the desired temperature. The words TARGET TEMP will appear blinking on the screen. After approximately 20 seconds, without pressing any key, the words TARGET TEMP will stop blinking, and the actual room temperature will reappear on the screen. The thermostat will establish and maintain the newly selected temperature until the next program begins.
If you wish to cancel the manual function before the next program begins, press the "FREG/MAN" key.
In the front of the thermostat there is a manual switch for turning off the heater. By setting the switch in the position designated "0", the heater will not turn on, even if the room temperature is below the temperature programmed for that time. Setting the switch to position "1" will turn your heating system back on in accordance with the preset programs.
7. TECHNICAL FEATURES
Power Source 2 1'5V AA batteries (preferably alkaline)
Voltage and Cycles: VAC:250V~Hz:50
Maximum Amperage: 5A
Temperature Range:
0,2^ to 3^
Four weekday programs and four weekend programs.
Switch to turn off thermostat.
(D) ELEKTRONISCHER DIGITALER CHRONOTHERMOSTAT
INHALTSANGABE
MON = Montag WED = Mittwoch FRI = FREITAG

