SV 80 - Other kitchen appliances STEBA - Free user manual and instructions
Find the device manual for free SV 80 STEBA in PDF.
| Product Type | Sous-vide cooker |
| Brand and Model | Steba SV 80 |
| Power Supply | 230 V ~ 50 Hz, 120 W |
| Temperature Range | 0.5 °C to 90 °C in 0.5 °C increments |
| Timer | 1 to 99 hours (adjustable in hours and minutes) |
| Protection Rating | IPX7 (waterproof) |
| Dimensions (approx.) | 300 x 80 x 80 mm |
| Weight (approx.) | 1.2 kg |
| Housing Material | Stainless steel |
| Water Capacity | Up to the 'Max' mark (minimum pot height 18 cm) |
| Main Functions | Sous-vide cooking, sterilization, defrosting |
| Maintenance and Cleaning | Descaling with vinegar after 20 uses or 100 hours |
| Safety | Overheating protection, water level sensor, automatic shut-off, IPX7 |
| Spare Parts and Repairability | Repairs exclusively by an authorized after-sales service; original spare parts |
| General Information | Domestic use; do not use with an external timer or remote control |
Frequently Asked Questions - SV 80 STEBA
User questions about SV 80 STEBA
0 question about this device. Answer the ones you know or ask your own.
Ask a new question about this device
Download the instructions for your Other kitchen appliances in PDF format for free! Find your manual SV 80 - STEBA and take your electronic device back in hand. On this page are published all the documents necessary for the use of your device. SV 80 by STEBA.
USER MANUAL SV 80 STEBA
Instructions for use 13
Mode d'emploi 22
Sous-Vide is a way of slow-cooking vacuum-packed food at low temperatures over a long period. The current consumption with cold water, which is heated to 63^ is 120 watts/hour! The vacuum packing, the long cooking time and the transfer of heat from the water to the food from all directions retains its vitamins, natural flavour and succulence!

Only vacuum-sealed food can be warmed in this device. Pay attention to a thick weld.
Generally
This appliance is for private and indoor use only and must not be used commercially. Please read the instruction manual carefully and keep it at a safe place. When the appliance is given to another person the instruction manual should be passed to that person, too. Only use the appliance as described in the instruction manual and pay attention to the safety information. No liability for damages or accidents will be accepted, which are caused by not paying attention to the instruction manual. Remove all packaging and sticker. Wash up all parts carefully (see cleaning).
Safety information
- Connect and operate the appliance in accordance with the specifications shown on the rating label.
- Do not use if the plug cord is damaged. Verify before every use.
- Do not plug with wet hands.
- Connect the power plug to a properly installed and easily accessible socket only.
- To unplug the power plug, always pull the plug – not the cable.
Plug off the appliance after each use or in case of failure. - Do not pull at the cord. Don't pull it over edges and don't bend it too much.
- Keep the cord away from hot parts.
The appliance can be used by children aged 8 and above and persons with limited physical, sensory or mental capabilities or lack of experience/knowledge, provided that are supervised or have been provided with instruction in the safe use of the appliance and have understood the resulting dangers. Children must not use the packaging as a toy. Cleaning and user maintenance must not be carried out by children unless they are 8 years or older and are supervised.
- Children under the age of 8 must be kept away from the appliance and the connecting cable.
- Children should be supervised to ensure that they do not play with the appliance or packaging material (e.g. Plastic Bags).
- The appliance must not be operated using a timer or a separate remote system!
- Do not leave the appliance outdoors or in a damp area.
- Never use the device after a malfunction, e.g. if it felt down or has been damaged in any other manner.
- The device is waterproof according to IPX 7, if it fell into water, be sure to unplug the power cord firstly.
- The manufacturer is not liable for damage which is occurring due to the usage of the appliance in a different way as described or a mistake in the handling has been made.
- To prevent injury, repairs such as replacing a damaged cord, should only be carried out by a customer service. Only original spare parts have to be used.
The device gets hot, only transport after it cooled down. - Only use the device as described in this manual.
-
This appliance is intended to be used in household and similar applications such as:
o staff kitchen areas in shops, offices and others working environments
o by clients in hotels, motels and other residential type environments
o bed and breakfast type environments. -
Before initial use: clean all parts carefully and leave to dry.

Attention! Device gets hot. Danger of burns! Do not place the appliance on a sensitive surface (e.g. painted furniture) and keep a distance of at least 70cm able materials.
- If an extension cable is used, it has to have a cross-section of 1.5mm^2 . A cable drum must always be unwound.
- If a GS-tested 16 A multi-pin extension is used, it may not be charged with more than 3680 watts due to fire hazard.
- Make sure that children do not tease the cable or that a trip hazard occurs.
- The device must always be disconnected from the power supply if it is not supervised and before assembling, disassembling or cleaning.
Cleaning
Attention! Pull the plug before cleaning and allow the device to cool down.
-
Never immerse the unit into water.
-
The device can be cleaned with warm water with normal commercial washing up liquid.
- Hygiene: in any case you need to clean the device if vacuum bags became leaky during the cooking and food floats directly into the water.
- To clean coarse residues, you can remove the circulation cover no. G and the stainless-steel housing no. F with a rotary move. Then, reinstall the parts again!
To clean the Sous-Vide Cooker proceed as described:
- Cleaning supplies:
o 1 pot with at least 18~cm height and a diameter of max. 25 cm
o 1 litre of vinegar in food-grade
Due to minerals in our tap water, some scale may occur on the heating elements and the housing of the device after heating the water. This scale negatively influences the heating efficiency and appearance of the device. Thus, the device needs to be cleaned after ever 20th use or after 100 hours in operation.
- Insert the device into the pot. Fill with water up to the "Min" marking. Add the vinegar (attention: rinse quickly and thoroughly with water when chemical burn is caused by vinegar. If the eye is still red, painful, tears and is sensitive to light, medical advice is required.)
- Turn on the device and set the temperature at 80^ and the timer to 3 hours.
- Check the result. If the scale has not been removed completely, repeat the 2nd step. If all scale is removed, rise with clear water. Leave the device to dry before storing.
Workplace
Important:
Never place this device on or next to hot surfaces (e.g. hot stoves). Only use it on a even, stable and a heat resisting surface. It is important that no inflammable items are near to the device. Do not place the device on the edge of the table so that it cannot be touched by children or fall down when touched.
Vacuum packing
Only use bags that are suitable for vacuum packing. There is no guarantee of proper closure if normal bags are used. Ensure that there are no spices in the vicinity of the weld seam, otherwise hermetic sealing will not be possible.
Vacuum sealers
To get on overview of our vacuum sealers and vacuum film bags and rolls, please visit www.steba.com.
You can obtain those products in a specialist shop or at Steba Elektrogeräte GmbH.
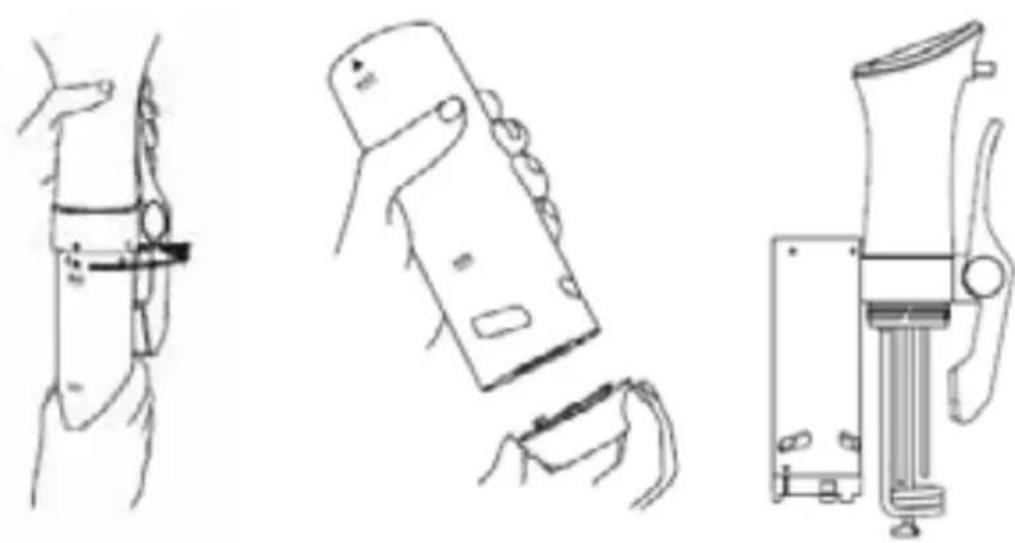
A) Setting buttons + and -
B) Power control light
C) ON/OFF
D) Clamp
E) Water level indication
F) Stainless-steel housing
G) Circulation cover

Getting started
The appliance is suitable for heating water only, everything else blocks the pump.
- Safely install the device into a pot. The pot must be as high that the device hangs into the water up till the marking "max" and a distance of at least 1cm to the ground is kept in order not to block the water circulation.
- Please fill the pot with lukewarm water before use. Pay attention that the water, together with the food, reaches the marking "max".
Plug in the device.
- If the water level is "min", EE1 appears on the display and the device beeps three times.
Setting the temperature and time
- Switch on the device. The symbol ON/OFF, the power control light and the temperature indication light up in blue. The device is in stand-by mode.
The operation of the touch screen works better with grease-free fingers. - Pres the ON/OFF button once, the temperature indication lights in ^ C . Note: if the ON/OFF button is pressed for more than 3 seconds, you can choose between ^ C and ^ F .
- Use the + / - buttons to set the desired temperature in steps of 0,5^ up to 90^
- Press the setting button once. The timer indication is blinking. Use the +/- buttons to set the desired hours in steps of 1 hour up to 99 hours. By pressing the setting button again, the minutes can be set in steps of 1 minute up to 59 minutes.
- The program will be started by pressing the ON/OFF button, all LED's of the display are shining in blue.
- After reaching the selected temperature, the device beeps twice, the blue LED flashes and the timer starts to count down.
After the time has elapsed, the device beeps 3 times and the display shows "END". The power control light shines in red.
Plug off the device. - If you want to change the temperature or time during the cooking process, press the ON/OFF button for 3 seconds. Then, temperature and time can be changed as described above. Then, restart the device.
Water quantity
Do not put too much water in the device - leave sufficient room for the food. If necessary, top up water until Max. The unit can be switched on only when the water level reaches the max marking. The food must always be covered with water. The temperature sensor needs a couple of minutes until he adjusted to the set temperature if pre-heated water is filled in. If there is no water in the pot, the device will not turn on and beeps EE1. Turn off the appliance, add water and start again.

The water level sensor switches off the appliance when the water level drops rapidly

If you plug the device out, or if you have a power outage, the unit remembers the last set values.
Seasoning
The food can be seasoned or have herbs added to it before vacuum packing. Please take care when seasoning, since the food keeps its natural flavour during Sous-Vide cooking.
The cooking time depends on the thickness of the food
- Increase time by at least 20% for deep-frozen food.
- All time information is approximate and should be adjusted according to taste.
- The time should be doubled for tough meat.
The cooking time depends on the thickness of the food
- Increase time by at least 20% for deep-frozen food.
All time information is approximate and should be adjusted according to taste.
The time should be doubled for tough meat.
Meat: Temperature 68^ C - 62^ C
| Thickness Time |
| 10 mm 30 Minutes |
| 20 mm 45 Minutes |
| 30 mm 95 Minutes |
| 40 mm 120 Minutes |
| 50 mm 180 Minutes |
| 60 mm 250 Minutes |
Fish: Temperature 55^ C - 58^ C
| Thickness Time |
| 10 mm 10 Minutes |
| 20 mm 20 Minutes |
| 30 mm 30 Minutes |
| 40 mm 40 Minutes |
| 50 mm 50 Minutes |
| 60 mm 60 Minutes |
Poultry: Temperature 63^ - 65^
| Thickness Time |
| 10 mm 20 Minutes |
| 20 mm 40 Minutes |
| 30 mm 75 Minutes |
| 40 mm 90 Minutes |
Vegetables: Temperature 80^ - 85^
| Type Time | |
| Asparagus 35 Minutes | Potatoes* 70 Minutes |
| Root vegetables* 10 Minutes | 10 Minutes |
*diced

Do not let the temperatures fall lower than indicated in the table!
Please note that the times shown in the operating instructions and the recipe booklet are recommended minimum times that the food should stay in the device, when the appliance has already been filled with hot (tap) water. Filling the appliance with cold water will increase the times by approximately 30 minutes. Always, fill the sous-vide cooker, including the food, with water up to the marking "max". Thus, it can be ensured that the set temperatures can be kept within the sous-vide cooking field of 65^ with a precision of +/- 0,5^ . The food that is being cooked can be put
into the water bath immediately after filling, and can remain in the water for well beyond the specified minimum times without the required core temperature rising above the temperature setting due to the sous-vide method.
Steba tip
If you insert several vacuum bags with different cooking times and qualities of meat, you should mark them previously. At 62^ you can leave the meat in the pot and remove any if necessary, without any change of the consistency of the meat.
Further processing
Preservation: Cool meat in ice water immediately after cooking.
It can then be stored in the fridge for several days (fridge temperature of 7^ = 5 days, fridge temperature of 5^ = 10 days) without loss of quality or frozen in the freezer compartment.
To thaw, place the vacuum-packed food in the device at approx. 55^ and thaw it out in the bag. Then remove from bag, eat immediately or briefly sear.
Eating immediately: Of course, the meat can also be eaten immediately after Sous-Vide cooking, or seared on each side for no more than 1 minute in an extremely hot frying pan with a little sunflower oil. The shorter the frying time, the juicier the meat. The meat can also be brushed with oil and scorched with a butane gas burner. Allow meat to relax for approx. 2 minute before cutting.
Backwards cooking: If the raw meat is briefly fried, seasoned and vacuum packed, it is ready for eating after SousVide cooking.
You can also prepare a seasoned red wine / balsamic vinegar stock, add it to the meat, vacuum pack and cook using SousVide.
Troubleshooting
Dear Client,
Thank you for buying this high-quality STEBA product. The following table will help you with problems that may occur when using your device. For many problems there is a simple solution, because not everything that appears like a malfunction must be serious. Please check the following list before contacting our customer service.
| Problem Reason Solution | ||
| No light after plug-in of the device | • No power • To many devices at one power cord | • Check is plug is plugged in correctly • Check the fuse |
| Device is humming · Motor | cooling · Circulation · Loosen housing | · Tighten the stainless steel housing |
| Sounds of water | · Water swirl caused by the circulation · Too less water | · Refill water |
| Thermometer shows other temperature than the device | · Commercially available thermometers are inaccurate compared to electronics. |
Correct Disposal of this product
This marking indicates that this product should not be disposed with other household wastes throughout the EU. To prevent possible harm to the environment or human health from uncontrolled waste disposal, recycle it responsibly to promote the sustainable reuse of material resources. To return
your used device, please use the return and collection systems or contact the retailer where the product was purchased. They can take this product for environmental safe recycling.
Packaging disposal: Do not throw away the package materials. Please put it in the recycling bin.

Gift box: Paper, should be put to the old paper collection point. Plastic packaging material and foils should be collected in the special collection containers.
Service and Repair:
If the appliance must be repaired, please get in touch with your trader or with the manufacturer: