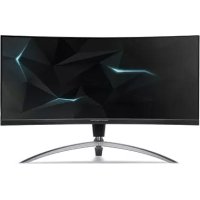
USER MANUAL Predator X35 ACER
Acer LCD Monitor Quick Start Guide (QSG)
Important safety instructions
Please read the following instructions carefully.
- To clean the LCD monitor screen: Be sure that your monitor is electrically rated to operate with the AC power available in your location.
- Turn off the LCD monitor and unplug the power cord.
- Spray a non-solvent cleaning solution onto a rag and clean the screen gently. NEVER SPRAY OR POUR ANY LIQUID DIRECTLY ONTO THE SCREEN OR CASE.
- PLEASE DO NOT USE ANY AMMONIA OR ALCOHOL-BASED CLEANERS ON THE LCD DISPLAY SCREEN OR CASE.
- Acer will not be liable for damage resulting from use of any ammonia or alcohol-based cleaners.
- Do not place the LCD monitor near a window. Exposing the monitor to rain, moisture or sunlight can severely damage it.
- Do not apply pressure to the LCD screen. Excessive pressure may cause permanent damage to the display.
- Do not remove the cover or attempt to service this unit yourself. An authorized technician should perform servicing of any nature.
- Store the LCD monitor in a room with a temperature of -20° to 60° C (-4° to 140° F). Storing the LCD monitor outside this range may result in permanent damage.
- Immediately unplug your monitor and call an authorized technician if any of the following circumstances occur:
Monitor-to-PC signal cable is frayed or damaged. - Liquid spills onto the LCD monitor or the monitor is exposed to rain. The LCD monitor or case is damaged.
Attaching the monitor to the base
- Remove the monitor base from the packaging and place it on a stable and level workspace.
- Remove the monitor from the packaging.
- Attach the monitor stand arm to the base.
- Ensure that the base is locked onto the monitor stand arm. (for selected models)
- Secure the base to the monitor stand arm by turning the screw using the integrated tab or a suitable coin. (for selected models)
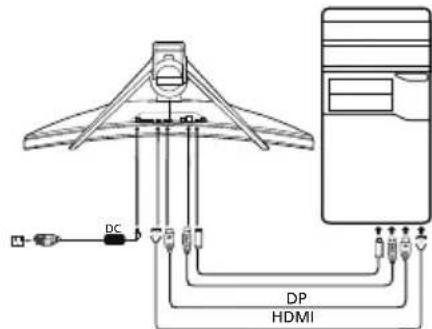
Connecting Your Monitor to a Computer
- Turn off your monitor and unplug your computer's power cord.
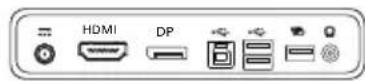
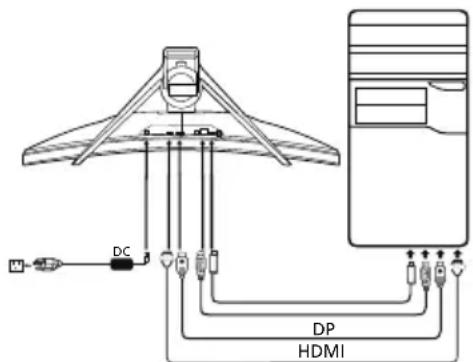
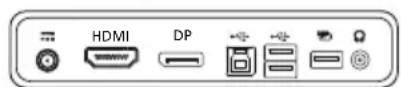
- 2-1 Connect HDMI Cable
a. Make sure both the monitor and computer are powered-OFF.
b. Connect the HDMI cable to the computer.
When using HDMI, you can press any button, excluding the Power button, to trigger the I/O port source.
2-2 Connect DP Cable (Default input)
a. Make sure both the monitor and computer are powered-OFF. b. Connect the DP cable to the computer.
- Insert the monitor power cable into the power port at the back of the monitor.
- Plug the power cords of your computer and your monitor into a nearby electrical outlet.
- Select Power-off USB charge ON/OFF to enable/disable Power-off USB charge function.
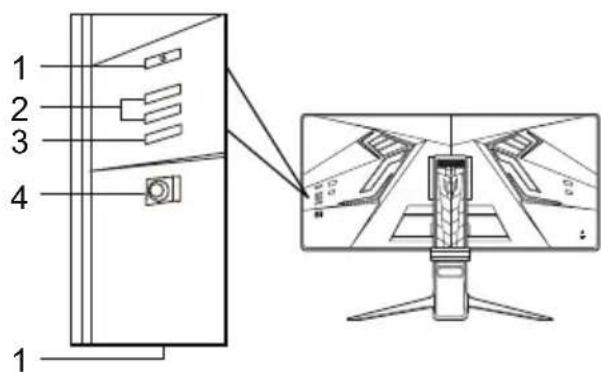
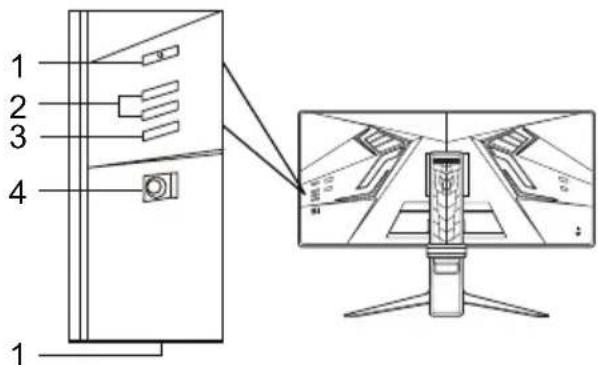
External Controls
| No. Item Description |
| 1 | Power button/indicator | Turns the monitor on/off. Blue indicates power on. Amber indicates standby/power saving mode. |
| 2 | Hotkey 1, 2 buttons | Press to activate user defined hotkey function. |
| 3 | Input button Press to toggle input sources. |
| 4 | Navi/OK button | Press to activate the OSD menu, then use it as a directional key to highlight the desired function. Press it again to enter a selection. |
Adjusting the OSD settings

NOTE: The following content is for general reference only. Actual product specifications may vary.
The OSD (on-screen display) can be used to adjust the settings of your LCD monitor. Press the MENU key to open the OSD. You can use the OSD to adjust the picture quality, OSD position and general settings. For advanced settings, please refer to the following pages:
Main page
The default function for buttons 1 and 2 are Mode and Brightness. You can use the Hot Key Assignment function to set these buttons to your preferred functions.
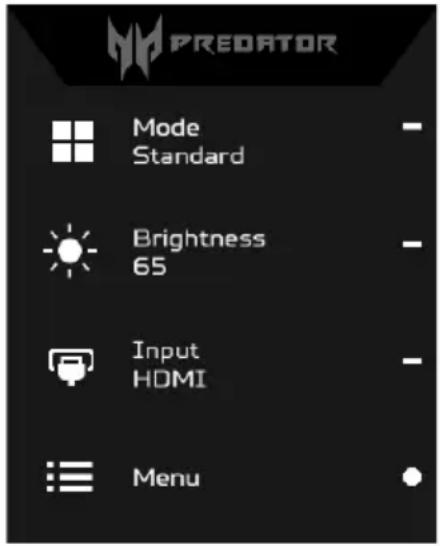
- Mode
- Brightness
- Input
- Menu
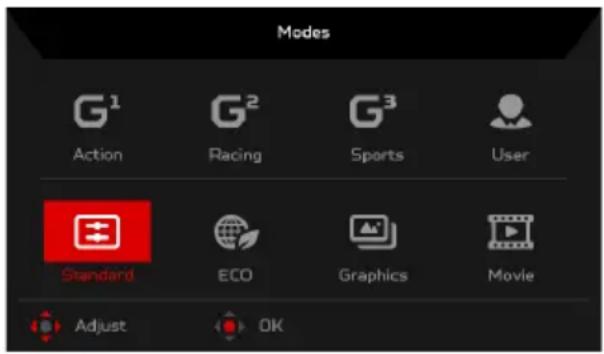
Turning Modes on or off
From any function page, press to open the Modes control and select which user-defined profile to use (please see the OSD section for more information).
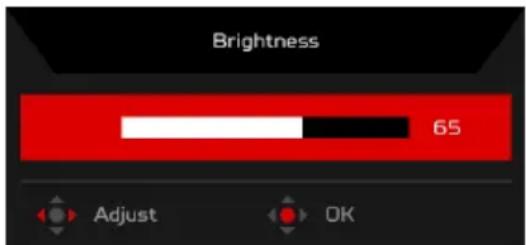
Adjusting the Brightness
Open the Brightness control and select the brightness setting using the Navi/OK button. When you are done, press the Navi/OK button to go back one level.
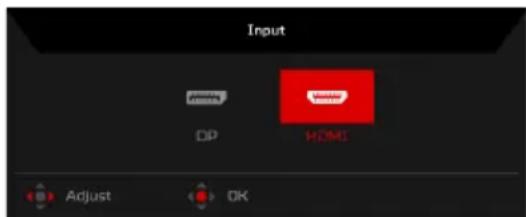
Open the Input control and select the desired input. When you are done, press the Navi/OK button to go back one level.
The Function page
Open the Function page to select a menu function, and adjust the settings which you want using the Navi/OK button. When you are done, press the Navi/OK button or Togo back one level.
Picture
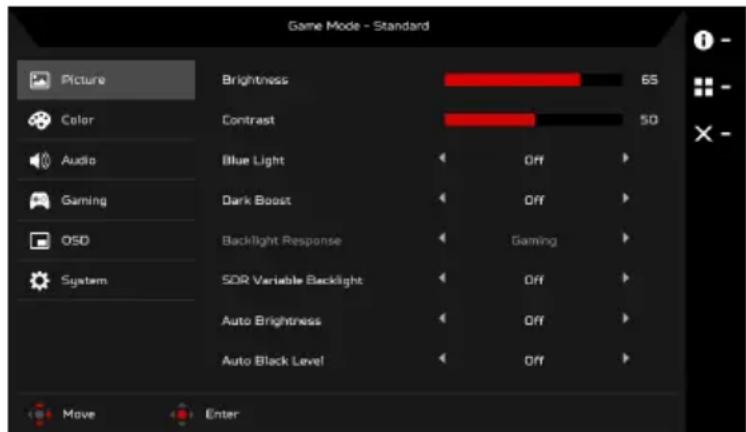
- Press the MENU key to open the OSD.
- Using the Navi/OK button, select Picture from the OSD. Then navigate to the setting you wish to adjust.
- Use the Navi/OK button to adjust the sliding scales.
- Brightness: Adjust the brightness from 0 to 100.

NOTE: Adjusts the balance between light and dark shades.
- Contrast: Adjust the contrast from 0 to 100.

NOTE: Sets the degree of difference between light and dark areas.
- Blue Light: Filters out blue light to protect your eyes by adjusting how much blue light is shown -- 80%, 70%, 60%, or 50%.

NOTE: Higher values allow more blue light through. For the best protection select a lower value.
- Dark boost: This boosts the amplitude of the dark color levels of the display- blacks will be less black. The higher the level, the higher the boost.
- Backlight Response: Basic response time of variable backlight.
- SDR Variable Backlight: Turn SDR Variable Backlight On or Off.
- Auto Brightness: Turn Auto Brightness On or Off. When turned On, the brightness is adjusted automatically.
- Auto Black Level: Turn Auto Black Level On or Off. When turned On, the black level is adjusted automatically.
Color
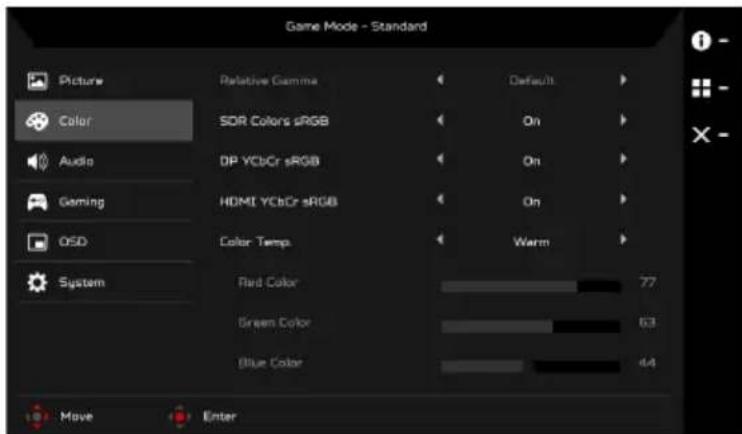
- Press the MENU key to open the OSD.
- Using the Navi/OK button, select Color from the OSD. Then navigate to the setting you wish to adjust.
- Use the Navi/OK button to select the setting.
- Relative Gamma mode allows you to adjust the luminance tone. The default value is 2.2 (standard value for Windows).
- SDR Colors sRGB: Turn SDR Colors sRGB On or Off.
- DP YCbCr sRGB: Turn DP YCbCr sRGB On or Off.
- HDMI YCbCr sRGB: Turn HDMI YCbCr sRGB On or Off.
- Color Temperature: Default is warm. You can choose Cool, Warm, Normal, Bluelight or User.
Audio
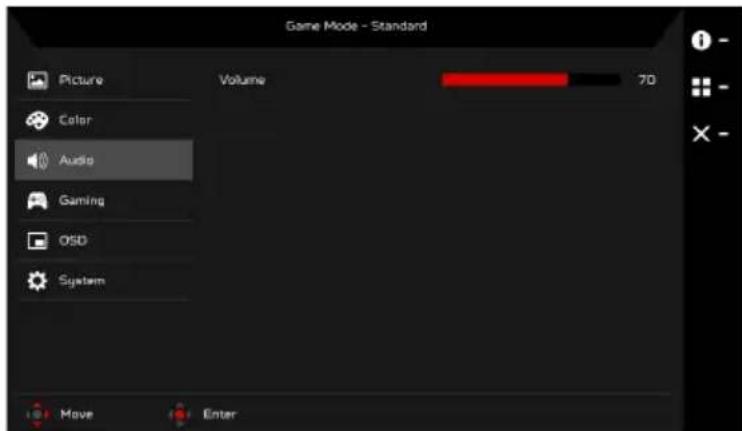
- Press the MENU key to open the OSD.
- Using the Navi/OK button, select Audio from the OSD. Then navigate to the setting you wish to adjust.
- Use the Navi/OK button to adjust any sliding scales.
- Volume: Adjust the volume.
Gaming
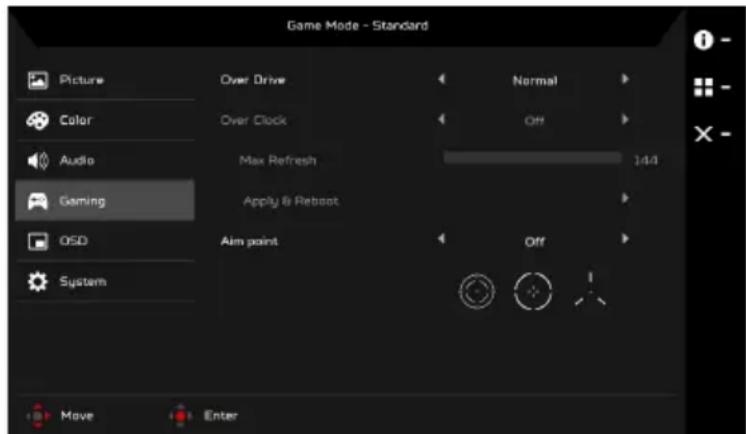
- Press the MENU key to open the OSD.
- Using the Navi/OK button, select Gaming from the OSD. Then navigate to the setting you wish to adjust.
- Use the Navi/OK button to adjust any sliding scales.
- Over Drive: Select Off, Normal, or Extreme.
- Over Clock (selective models): The monitor can be over-clocked to a higher refresh rate than advertised by the panel specification.
*This function allows you to reset the maximum refresh rate in the NVIDIA Control Panel after rebooting. If nothing is displayed, disconnect the DisplayPort cable and use the monitor's on-screen display to select a default refresh rate.
IMPORTANT: Overclocking may result in flicker or other adverse effects that may derive from the total configuration of the system connected to the display, and possibly, in addition, the display's panel specifications. It may be possible to resolve or reduce such effects by setting a lower refresh rate.
- Aim point: Show an Aim point on the screen for shooting games.
OSD
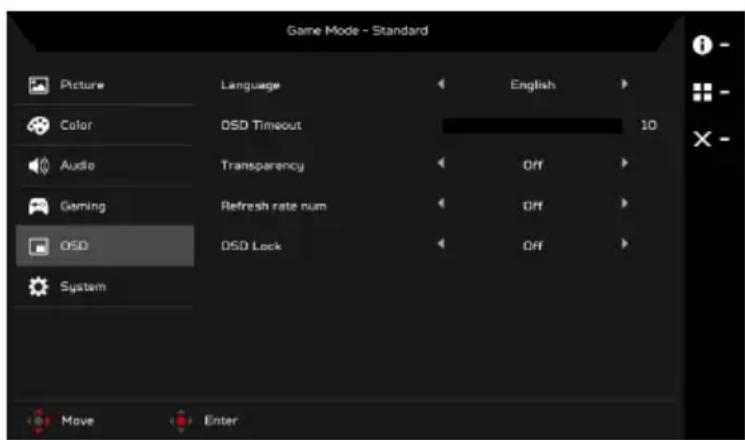
- Press the MENU key to open the OSD.
- Using the Navi/OK button, select OSD from the OSD. Then navigate to the setting you wish to adjust.
- Use the Navi/OK button to adjust any sliding scales.
- Language: Set the OSD menu language.
- OSD timeout: Adjust the delay before turning off the OSD menu.
- Transparency: Select the transparency when using gaming mode. The transparency can be 0% (OFF), 20%, 40%, 60%, or 80%.
- Refresh rate num: Display the panel's current refresh rate on the screen.
- OSD Lock: OSD Lock function is used to prevent OSD button from being pressed accidentally. To remove the OSD Lock message, press and hold the Navi/OK button continuously for 3 seconds until the message disappears. If the OSD Lock message remains, please check whether the Navi/OK button is stuck.
System
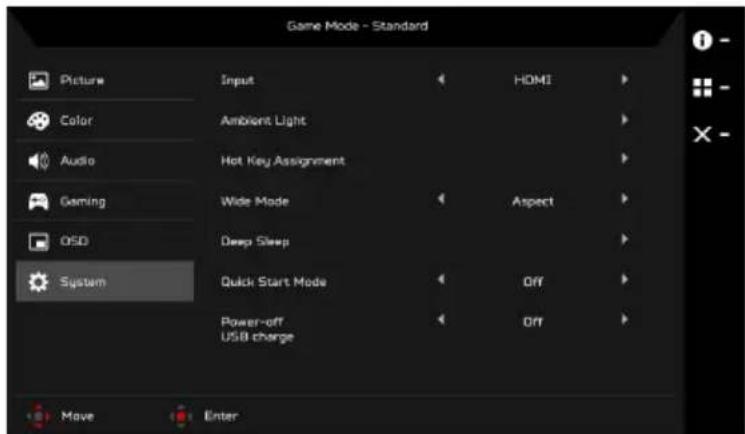
- Press the MENU key to open the OSD.
- Using the Navi/OK button, select System from the OSD. Then navigate to the setting you wish to adjust.
- Use the Navi/OK button to select the setting.
- Input: Select the source from an available input source.
- Ambient light: Adjust the lighting effects, color, and style.
- Hot Key Assignment: Select the function of Hot Key 1 or Hot Key 2.
- Wide Mode: You can select which screen aspect you are using. The options are Aspect and 1:1.
- Deep Sleep: When Deep Sleep function is On, the monitor shuts down its core functions and goes into energy saving mode if the monitor is idle for a certain period of time, or if the user turns off the monitor DC power.

NOTE: Pressing any button (except the Power button) on the monitor may also wake up the monitor after it goes into deep sleep.
- Quick Start Mode: Enable monitor rapidly.
- Power-off USB charge: Turn On or Off.
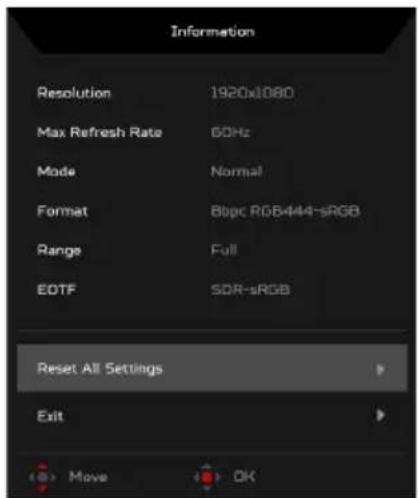
- From any function page, press the key to open the OSD.
- Reset All Settings: Reset all settings to the factory defaults.
Standard timing table
HDMI
| Mode Resolution Remark | |
| 1 VGA 6 | 40 x 480 60 Hz | | | |
| 2 SVGA | 800 x 600 60 Hz | | | |
| 3 XGA 1 | 024 x 768 60 Hz | | | |
| 4 Wide QHD 3440 x 1440 60 Hz | | |
| 5 Wide QHD 3440 x 1440 100 Hz | | |
DP
| Mode Resolution Remark | |
| 1 VGA 6 | 40 x 480 60 Hz | | | |
| 2 SVGA | 800 x 600 60 Hz | | | |
| 3 XGA 1 | 024 x 768 60 Hz | | | |
| 4 Wide QHD 3440 x 1440 | 60 Hz | | | |
| 5 Wide QHD 3440 x 1440 | 100 Hz | | | |
| 6 Wide QHD 3440 x 1440 | 120 Hz | | | |
| 7 Wide QHD 3440 x 1440 | 144 Hz | | | |
| 8 Wide QHD 3440 x 1440 | 180 Hz | | | |
| 9 Wide QHD 3440 x 1440 | 200 Hz | | | |
G-SYNC Experience
For the following resolution:
3440 x 1440@60 Hz (DP only)
3440 x 1440@100 Hz (DP only)
3440 x 1440@120 Hz (DP only)
3440 x 1440@144 Hz (DP only)
3440 x 1440@180 Hz (DP only)
For the following resolution with Over Clock function (DP only):
3440 x 1440@200 Hz
G-SYNC HDR features (only for DisplayPort input) require an NVIDIA GeForce GTX1050 GPU or higher, such as GTX1070, GTX1080, and GTX1080Ti.
For more information, please visit the NVIDIA® Website: http://www.nvidia.com/

NOTE: This monitor does not support 4K HDR content on game consoles and DVD players.

NOTE: NVIDIA Graphic card is recommended for the best G-SYNC HDR performance.
Regulations and safety notices
FCC notice
This device has been tested and found to comply with the limits for a Class B digital device pursuant to Part 15 of the FCC rules. These limits are designed to provide reasonable protection against harmful interference in a residential installation. This device generates, uses, and can radiate radio frequency energy and, if not installed and used in accordance with the instructions, may cause harmful interference to radio communications.
However, there is no guarantee that interference will not occur in a particular installation. If this device does cause harmful interference to radio or television reception, which can be determined by turning the device off and on, the user is encouraged to try to correct the interference by one or more of the following measures:
Reorient or relocate the receiving antenna. - Increase the separation between the device and receiver. - Connect the device into an outlet on a circuit different from that to which the receiver is connected. - Consult the dealer or an experienced radio/television technician for help.
Hereby, Acer Inc., declares that this LCD monitor is in compliance with the essential requirements and other relevant provisions of EMC Directive 2014/30/EU, Low Voltage Directive 2014/35/EU, and RoHS Directive 2011/65/EU and Directive 2009/125/EC with regard to establishing a framework for the setting of ecodesign requirements for energy-related product.
Notice:
In order to prevent damage to the monitor, do not lift the monitor by its base.
Notice: Shielded cables
All connections to other computing devices must be made using shielded cables to maintain compliance with EMC regulations.
Notice:
Acer monitor is purported for video and visual display of information obtained from electronic devices.
Notice: Peripheral devices
Only peripherals (input/output devices, terminals, printers, etc.) certified to comply with the Class B limits may be attached to this equipment. Operation with non-certified peripherals is likely to result in interference to radio and TV reception.
Caution
Changes or modifications not expressly approved by the manufacturer could void the user authority, which is granted by the Federal Communications Commission, to operate this product.
Operation conditions
This device complies with Part 15 of the FCC Rules. Operation is subject to the following two conditions: (1) this device may not cause harmful interference, and (2) this device must accept any interference received, including interference that may cause undesired operation.
Notice: Canadian users
This Class B digital apparatus complies with Canadian ICES-003.
Disposal of Waste Equipment by Users in Private Household in the European Union
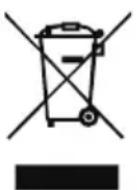
This symbol on the product or on its packaging indicates that this product must not be disposed of with your other household waste. Instead, it is your responsibility to dispose of your waste equipment by handing it over to a designated collection point for the recycling of waste electrical and electronic equipment. The separate collection and recycling of your waste equipment at the time of disposal will help to conserve natural resources and ensure that it is recycled in a manner that protects human health and the environment. For more information about where you can drop off your waste equipment for recycling, please contact your local city office, your household waste disposal service or the shop where you purchased the product.
SPECIFICATION
| LCD Panel | Driving System TFT Color LCD |
| Size 35"W (88.9 cm) | |
| Pixel Pitch 0.24 mm (H) x 0.24 mm (V) | |
| Brightness | Native: 600 cd/m2; HDR mode: 1000 cd/m2 (peak) |
| Contrast 2500:1 | |
| Viewable Angle 178° (H) 178° (V) (CR=10) | |
| Response Time 2 ms (GTG) | |
| Panel Type VA | |
| H-Frequency | HDMI: 30-150 KHzDP: 88-282 KHz |
| V-Frequency | HDMI: 24-100 HzDP: 24-180 Hz |
| Display Colors 16.7 Million | |
| Dot Clock | HDMI 2.0: 543.5 MHzDP 1.4: 1017 MHzDP 1.4: 1056 MHz (DP-over clock function = ON) |
| Maximum Resolution | HDMI: 3440 x 1440 @ 100 HzDP: 3440 x 1440 @ 180 HzDP: 3440 x 1440 @ 200 Hz (Overclocking mode for G-Sync only) |
| Plug & Play VESA DDCCI/DDC2B | |
| Energy Efficiency Class D | |
| *Annual Energy Consumption 145 (kWh) (for HDMI-input Model) |
| Power Consumption (at 200 nits) | On Mode 64.1 W (Typical) | |
| Sleep Mode 0.50 W (Typical) | |
| Off Mode 0.50 W (Typical) | |
| Input Connector | HDMIDPD |
| Input Video Signal | HDMISignalDP |
| Speakers 4 W x 2 | |
| USB | USB 3.0 x 3 |
| Maximum Screen Size | Horizontal: 819.408 mmVertical: 345.888 mm |
| Power Source | 20V --- 14A |
| Environmental Considerations | Operating Temp: 0° to 40°CStorage Temp: -20° to 60°COperating Humidity: 20% to 80% |
| Dimensions | 833 (W) x 450.5 ~ 580.5 (H) x 309 (D) mm |
| Weight (N. W.) | 13.39 kg (net) |
| Mechanism Specifications | Tilt: -5° to +25° (Only at the highest point can 25 degrees of recline be offered for the angle of elevation)Swivel: -30° to +30°Height adjustment: 0 mm to 130 mmPivot: NoDetachable foot stand: Yes |
| External Controls | Switch/Buttons | Power ButtonInputHotkey 15 Navi KeyHotkey 2 |
| Functions | BrightnessAim pointLanguageQSD TimeoutTransparencyRefresh rate numOSD LockInputAuto BrightnessInputAmbient LightHot Key AssignmentWide ModeDeep SleepQuick Start ModePower-off USB chargeDisplay InformationReset All SettingsExit |
| All specifications are subject to change without notice. |
Find manuals and other documents for your Acer product on the official Acer support website.
*Annual energy consumption is calculated using the typical power consumption 4 hours per day, 365 days per year.
Panduan Praktis Monitor LCD Acer (QSG)
YCTaHOBka MOHHTopa Ha OCHOBaHne
1.ИЗВЛЕКИТЕ OCHOВАНЕ NOДСТАКИ MOHNTOPA ИУNASKOBКИ И размecTHTе erо Ha pOBHOr I yCToHnBOЯрбочи NOBEPXHOCTN. 2. 13BNEKNTMOHHTOPnynakOBKN. 3. YCTAHOBNTE CTOKy MOHITOPa Ha OCHOBaHne.
- Y6eIHTecb, YTO OCHOBaHHe 3aΦNKcnpoBaHo Ha CToIke MOHITopa (He dIy BCEx MoJenIeN). 3aKpeHnTe OCHOBaHHe Ha cToIke MOHTopa, NOBepHyB BnHT C NOMOuB CNeUaJIbHO INCTpyMeHTa HIN NOxOJaEe MoHeTbI (He nra BCEX moJeIe).
NoKIOUeHne MOHTopa K KOMNbIOTepy
- Unplug the monitor and disconnect the computer power supply.
- 2-1 Connect the HDMI cable
a. Make sure the monitor and computer power are off. b. Connect the HDMI cable to the monitor.
For the input/output port during HDMI use
Press any button except the power button.
2-2 Connect the DP cable (default input)
a. Make sure the monitor and computer power are off. b. Connect the DP cable to the computer.
- Connect the monitor power cable to the power port on the back panel of the device.
- Plug the computer and monitor power cords into an electrical outlet.
- Select "Charge via USB when power is off" On/Off to enable or disable the USB charging function when the power is off.
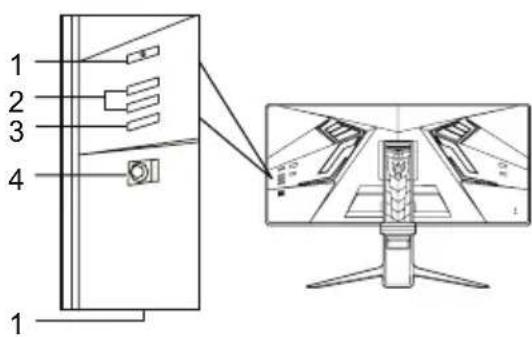
External controls
Operating conditions
This device complies with Part 15 of the FCC Rules. Operation is subject to the following two conditions: (1) This device may not cause harmful interference, and (2) this device must accept any interference received, including interference that may cause undesired operation.
Important safety instructions
Please read these instructions carefully.
- Do not place the LCD monitor in direct sunlight. Remember that the monitor is designed for use with alternating current power in your home.
- Disconnect the LCD monitor and remove the power cable from the outlet.
- Spray a mild cleaning solution without thinner onto a cloth and wipe the screen carefully. DO NOT SPRAY LIQUID DIRECTLY ONTO THE SCREEN OR THE CABINET. DO NOT USE CLEANING SOLUTIONS CONTAINING AMMONIA OR ALCOHOL-BASED SOLUTIONS TO CLEAN THE LCD SCREEN OR THE CABINET.
- The manufacturer is not responsible for damage caused by the use of cleaning solutions containing ammonia or alcohol-based solutions.
- Do not place the LCD monitor near open windows. Exposure of the monitor to rain, moisture, or direct sunlight may seriously damage it.
- Do not apply pressure to the LCD screen. Excessive pressure may cause permanent damage to the display.
- Do not remove the cover and do not attempt to repair this device yourself. Authorized technicians must perform all servicing.
- Store the LCD monitor in a temperature range of -20° to 60°C (-4° to 140°F). Storing the LCD monitor outside this range may cause permanent damage.
- Immediately unplug your monitor and contact an authorized technician if any of the following conditions occur: The signal cable from the monitor to the computer is frayed or damaged. Liquid has been spilled on the LCD monitor, or the monitor has been exposed to rain. The LCD monitor or the cabinet has been damaged.
Attaching the monitor to the base
- Remove the monitor base from the packaging and place it on a flat, stable surface.
- Remove the monitor from the packaging.
- Attach the stand arm of the monitor to the base.
- Make sure the base is securely attached to the stand arm of the monitor. (For selected models) Secure the base to the stand arm of the monitor by tightening the screw with the provided screwdriver or a suitable tool. (For selected models)
Connecting the monitor to the computer
- Turn off the monitor and unplug the computer's power cable from the outlet.
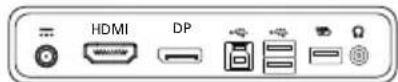
- 2-1 Connecting the HDMI cable
a. Make sure both the monitor and the computer are turned off.
b. Connect the HDMI cable to the computer.
Using the HDMI port, you can press the source button.
Press the power button to activate the I/O port.
For the source.
2-2 Connecting the DP cable (optional)
a. Make sure both the monitor and the computer are turned off. b. Connect the DP cable to the computer.
- Connect the monitor's power cable to the power port on the back of the monitor.
- Plug the power cables of the computer and monitor into a nearby electrical outlet.
- Select the On/Off function for USB charging when the power is off, to activate/deactivate this function.

Power button control
| Homep | Elefembre | Описсiones |
| 1 | Бутон за
Зхсанов/
Индikатор | Изк nullува/Вьлочьma MOHITOPа. Сильото
показа, че мониторьт Ev Вьлочч.
ОразжевOTо озанчава ржим Ha
�отовНСТ/песене Ha eнергия. |
| 2 | Бурз Клавши 1, 2
Бутона | Нат生态系统а за akтувираце на Фуншту!
с настюени OTNotpeбитейя Бурз
Клавши. |
| 3Бутон за вхOD | Нат生态系统а за прувк nullуваце на
Източницие на вхOD. |
| 4 | Бутон Navi
(Hавигration)/OK | Нат生态系统а за akтувираце на OSD
МechIoTO, сад TOВа Г ИзПОЛЗВайт КATO
Бутон за habиrimаре, за ду маркирate
Желаната Фуншцma.Нат生态系统е Г OTHOBО
За вьveждане на Избор. |
Safety instructions and warnings
To prevent damage to the monitor, do not lift it by the base.
Note: Shielded cables.
All connections to other devices must be made using shielded cables to comply with electromagnetic compatibility (EMC) requirements.
Note: Peripheral devices.
Only peripheral devices (input/output devices, terminals, printers, etc.) that comply with the Class B limits may be connected to this equipment. Operating with non-compliant peripheral devices may cause interference to radio and television reception.
Attention
Changes or modifications not expressly approved by the manufacturer could void the user's authority to operate this equipment.
Operating conditions
This device complies with Part 15 of the FCC Rules. Operation is subject to the following two conditions: (1) This device may not cause harmful interference, and (2) This device must accept any interference received, including interference that may cause undesired operation.
Note: Canadian users
This digital device of Class B complies with Canadian ICES-003.
Important safety instructions
CE
Acer Inc., 2014/30/EU, Low Voltage Directive 2014/35/EU and RoHS Directive 2011/65/EU and Directive 2009/125/EC
Class B digital device, Canadian ICES-003
y
∴ S ΔOBC = S ΔCOD + S ΔBOC - S ΔBOC
CES-003 《
3OBHIiHi eIemeHTn kepyBaHHa
3 MeToH 3aNo6iraHH NoIkoJKeHH MoHiTop, He NiDImaTe MOHiTop 3a NOro NiCTaBky.
We,
Acer Incorporated
8F, 88, Sec. 1, Xintai 5th Rd., Xizhi, New Taipei City 221, Taiwan
And,
Acer Italy s.r.l.
Via Lepetit, 40, 20020 Lainate (MI) Italy
Tel: +39-02-939-921, Fax: +39-02 9399-2913
www.acer.it
Product:
LCD Monitor
Trade Name:
ACER
Model Number:
X35
SKU Number:
X35
(Characters: 0-9, a-z, A-Z, or blank)
We, Acer Incorporated, hereby declare under our sole responsibility that the product described above is in conformity with the relevant Union harmonization legislations as below Directive and following harmonized standards and/or other relevant standards have been applied:
EMC Directive: 2014/30/EU
EN55032:2012/AC:2013 Class B
EN55024:2010
EN55032:2015/AC:2016 Class B
EN61000-3-3:2013
EN61000-3-2:2014 Class D
LVD Directive: 2014/35/EU
EN60950-1:2006/A11:2009/A1:2010/A12:2011/A2:2013
RoHS Directive: 2011/65/EU
EN50581:2012
ErP Directive: 2009/125/EC
Regulation (EC) No. 1275/2008; EN 50564:2011
Year to begin affixing CE marking: 2019.
RU Jan / Sr. Manager
Acer Incorporated (Taipei, Taiwan)
May 22, 2019
Date
8F, 88, Sec. 1, Xintai 5th Rd., Xizhi, New Taipei City 221, Taiwan
Y,
Acer Italy s.r.l.
Via Lepetit, 40, 20020 Lainate (MI) Italy
Tel: +39-02-939-921, fax: +39-02 9399-2913
www.acer.it
Product:
LCD Monitor
Trade Name:
ACER
Model Number:
X35
Acer Incorporated (Taipei, Taiwan)
May 22, 2019
Date
8F, 88, Sec. 1, Xintai 5th Rd., Xizhi, New Taipei City 221, Taiwan
Und
Acer Italy s.r.l.
Via Lepetit, 40, 20020 Lainate (MI) Italy
Tel: +39-02-939-921, Fax: +39-02 9399-2913
www.acer.it
Product:
LCD monitor
Trade name:
ACER
Model number:
X35
Article number:
X35
RU Jan / Managing Director Acer Incorporated (Taipei, Taiwan)
May 22, 2019
Date
8F, 88, Sec. 1, Xintai 5th Rd., Xizhi, New Taipei City 221, Taiwan
Et.
Acer Italy s.r.l.
Via Lepetit, 40, 20020 Lainate (MI) Italy
Tel: +39-02-939-921, Fax: +39-02 9399-2913
www.acer.it
Product:
LCD Monitor
Trade Name:
ACER
Model Number:
X35
SKU Number:
X35 XXXXX;
(X''X'') = 0~9 a~z, A~Z, or blank)
RU Jan / Sr. Manager Acer Incorporated (Taipei, Taiwan)
May 22, 2019
Date
8F, 88, Sec. 1, Xintai 5th Rd., Xizhi, New Taipei City 221, Taiwan
E,
Acer Italy s.r.l.
Via Lepetit, 40, 20020 Lainate (MI) Italy
Tel: +39-02-939-921, Fax: +39-02 9399-2913
www.acer.it
RU Jan / Senior Manager
Acer Incorporated (Taipei, Taiwan)
May 22, 2019
Data
8F, 88, Sec. 1, Xintai 5th Rd., Xizhi, New Taipei City 221, Taiwan
En,
Acer Italy s.r.l.
Via Lepetit, 40, 20020 Lainate (MI) Italy
Tel: +39-02-939-921, fax: +39-02 9399-2913
www.acer.it
Product:
LCD monitor
Trade name:
ACER
Model number:
X35
SKU number:
X35
XXXXX
(" x " = 0 9, a z, A Z, ofleeg)
RU Jan / Sr. Manager Acer Incorporated (Taipei, Taiwan)
May 22, 2019
Date
We,
Acer Incorporated
8F, 88, Sec. 1, Xintai 5th Rd., Xizhi, New Taipei City 221, Taiwan
and
Acer Italy s.r.l.
Via Lepetit, 40, 20020 Lainate (MI) Italy
Tel: +39-02-939-921, Fax: +39-02 9399-2913
www.acer.it
Product:
LCD Monitor
Regulatory Compliance






R43002 RoHS




barcode
MC.TG411.003
P/N: 4J.45P01.071 (xx)