Technistar S6 - Satellite receiver TECHNISAT - Free user manual and instructions
Find the device manual for free Technistar S6 TECHNISAT in PDF.

| Product type | Digital satellite receiver |
| Brand | TechniSat |
| Model | Technistar S6 |
| Power supply | External power supply, 12 V DC, 2 A |
| Power consumption | Not specified, but 12V/2A adapter indicates a maximum power of 24 W |
| Connectivity | LNB input (F), HDMI, Analog AV output (via adapter), Optical S/PDIF, USB (software update, storage), Ethernet RJ45 |
| Decoding | Integrated smart card reader (CONAX) + CI/CI+ interface |
| Main functions | Digital satellite reception, DVR recording via USB, Timeshift, teletext, subtitles, electronic program guide (EPG), parental control, simplified ISI mode |
| Supported video formats | MPEG-2, MPEG-4 (via HDMI), resolution depends on broadcaster |
| Supported audio formats | Dolby Digital, MPEG, stereo, mono |
| DiSEqC | Yes (compatible with DiSEqC 1.2 for motorization) |
| Network | Ethernet 10/100, Wi-Fi via optional USB adapter, optional Bluetooth |
| USB Storage | External storage (USB key, hard drive) for recording and multimedia playback (MPEG, MP3, JPG) |
| Remote control | Infrared, 1.5 V microcell batteries (2 AAA batteries supplied) |
| Software update | Via USB or via satellite (OTA) |
| Security | Parental control via PIN code, program locking, overvoltage protection (via power supply) |
| Maintenance and Cleaning | Disconnect before cleaning, use a dry cloth, do not open the device, do not expose to humidity |
| Included Accessories | 1 receiver, 1 remote control, 2 batteries, 1 power supply, 1 HDMI cable, 1 quick start guide |
| Warranty | 24 months legal warranty from date of purchase |
| Standards | CE, directive 2014/53/EU, Dolby Laboratories under license |
| Dimensions (approx.) | Not specified, standard receiver for home installation |
| Weight | Not specified |
Frequently Asked Questions - Technistar S6 TECHNISAT
User questions about Technistar S6 TECHNISAT
0 question about this device. Answer the ones you know or ask your own.
Ask a new question about this device
Download the instructions for your Satellite receiver in PDF format for free! Find your manual Technistar S6 - TECHNISAT and take your electronic device back in hand. On this page are published all the documents necessary for the use of your device. Technistar S6 by TECHNISAT.
USER MANUAL Technistar S6 TECHNISAT
Thank you for choosing TechniSat's TECHNISTAR S6 Digital Satellite Receiver.
The quick start manual supplied is intended to help you to familiarise yourself with the extensive functions of your new digital receiver and make best use of it.
It will help you to use your digital receiver as intended and safely.
It is for anyone who assembles, connects, operates, cleans or disposes of the receiver.
Keep the quick start manual in a safe place for future reference.

The range of functions in your receiver is constantly being expanded by means of software updates. This means that additional steps in the operation may be added that are not yet described in this instruction manual, or that the operation of existing functions may change.
As such, you should occasionally visit the TechniSat homepage, to download the latest version of the quick start manual or instruction manual.
We hope you enjoy your
TechniSat TECHNISTAR!
Your
TechniSat Team
1 Illustrations
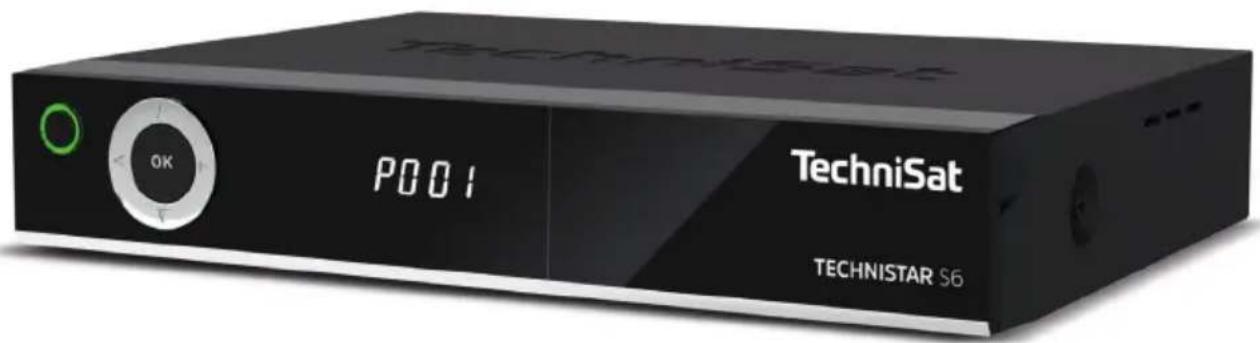
Front
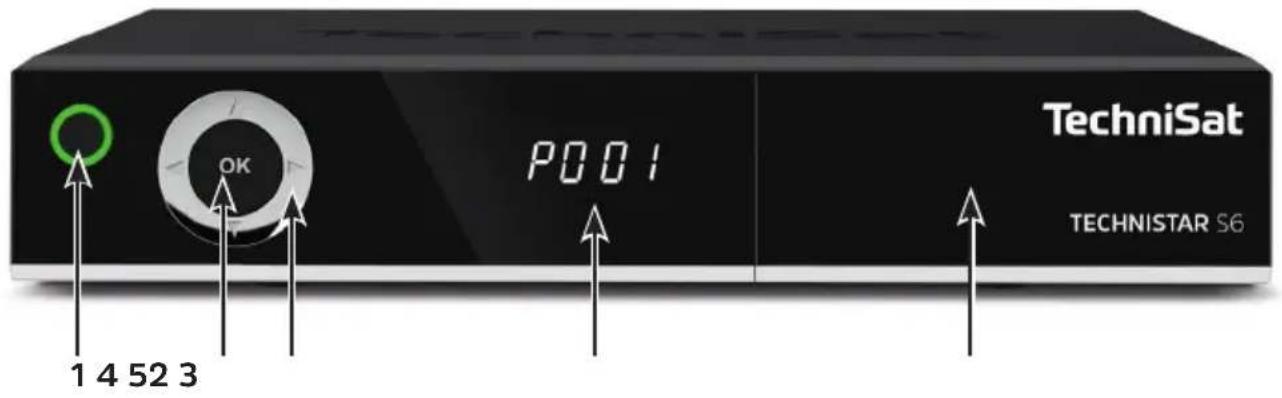

1 On/Standby
2 OK button (selection, retrieving the channel list)
3 Up/down and right/left arrow buttons (channel +/-, volume +/-, menu navigation)
4 Display
5 Front flap (CI/CI+ module slot and smart card reader)
Rear
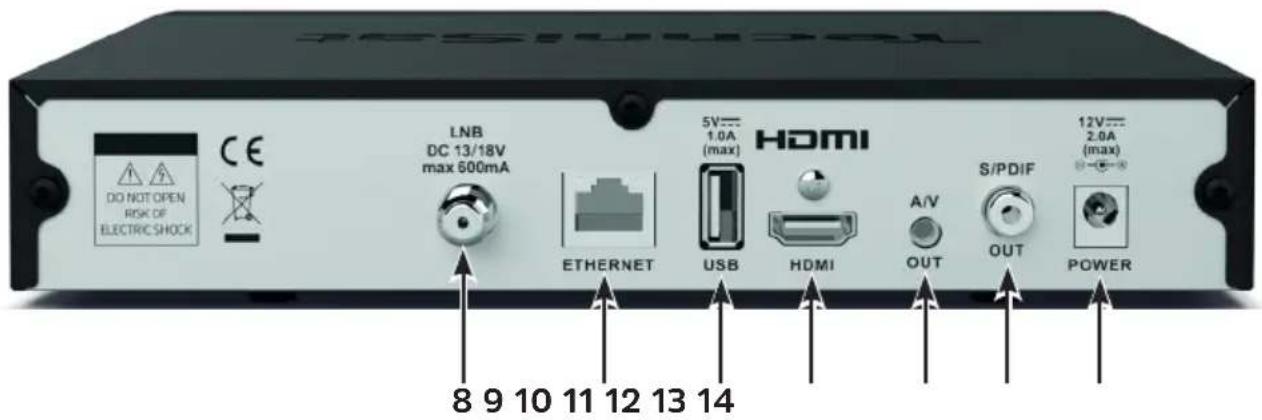
8 LNB port (DC 13/18V, max. 600mA)
9 Ethernet connection
10 USB port
11 HDMI output
12 A/V output (Video/Audio analogue)*
13 S/PDIF output (Audio Digital)
14 Power supply unit connection (DC 12V, 2A)
*For TechniSat- specific adapter set, article number 0000/3649
Front flap open (grip on side and open downwards):
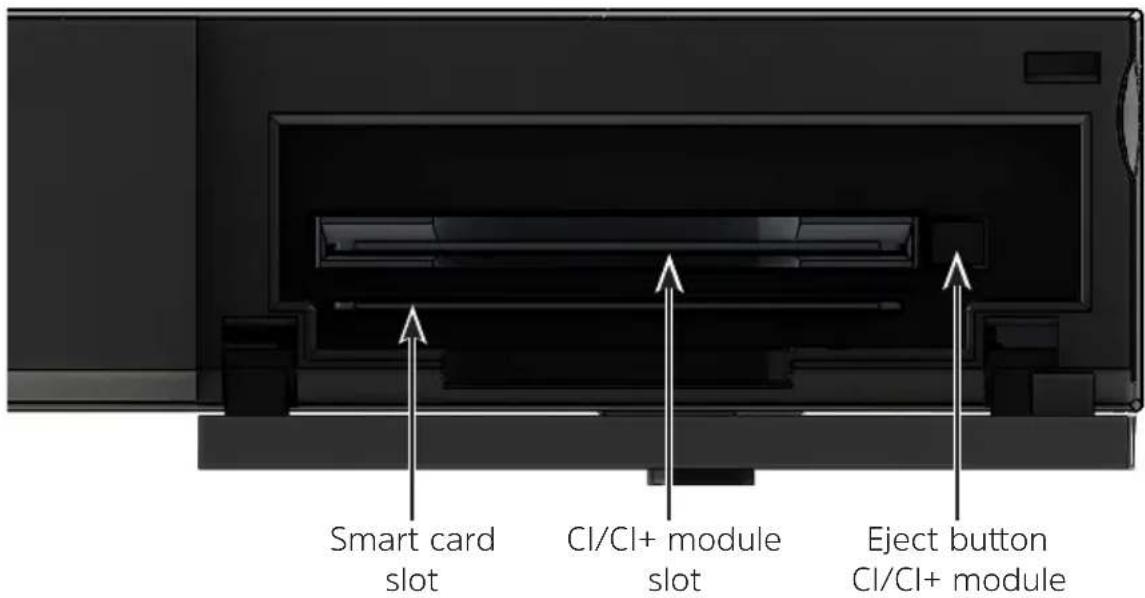
i Insert the smart card with the gold contacts forwards and facing downwards into the smart card slot.
To eject an inserted CI/CI+ module, press the eject button and remove the module.
2 Please read this first
Before connecting and using the device, first check that everything has been supplied and familiarise yourself with the safety advice.
The scope of delivery for the TECHNISTAR S6 includes:
1 Digital receiver,
1 Quick start manual,
1 Remote control, batteries (2 pcs. 1.5V microcells)
1 Plug-in power supply unit.
1 HDMI cable
2.1 Intended use
The digital satellite receiver is used to receive digital satellite channels in the private sector. It is intended exclusively for this purpose. Observe all the information in this quick start manual, in particular the safety instructions. Any other use is considered improper and can lead to property damage or personal injury. No liability is accepted for damage resulting from improper use.
2.2 Safety instructions
For your own protection you should read the safety notes carefully before using the device. The manufacturer accepts no liability for damage caused by inappropriate handling, or by non-compliance with the safety precautions.
Function-related discharge current may occur with electrical equipment.
This is acceptable and poses no risk, even if it is experienced as a slight tingling. To prevent such discharge currents, mains operated devices (receivers, TVs etc.) must always be installed or connected with the power switched off, i.e. all devices must be disconnected from the mains.
- The device must only be operated in an appropriate climate.


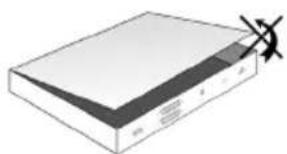
- To ensure adequate ventilation, place the device on a flat, horizontal surface and do not place any objects on top of it. There are ventilation slots here to allow heat to be dissipated from the interior of the unit.
- Do not place any burning objects, such as lit candles, on top of the receiver.

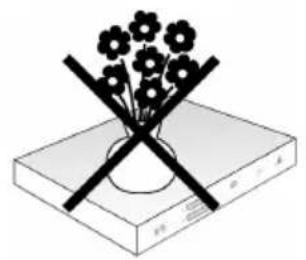
- Do not expose the device to water droplets or water spray, and do not place any objects filled with liquid, such as vases, on top of it. If water gets into the unit, immediately disconnect the mains plug and inform the service department.
- Do not operate sources of heat near the device that can additionally heat it up.


-
Do not obstruct the ventilation slots with any objects.
-
Never open the device! You risk receiving an electric shock. Any necessary repairs to the receiver should only be carried out by qualified service personnel.
In the following circumstances, you should disconnect the device from the mains power and consult an expert:
the power cable or mains plug is damaged
the device has been exposed to moisture or liquid has got into it
there are significant malfunctions
there is severe external damage.
2.3 Operating breaks
During a storm or lengthy periods of non-use (e.g. holiday), the device should be disconnected from the mains and the antenna cable removed.
Before you disconnect the receiver from the mains, you should first switch it to standby mode and wait until the red LED light is displayed.
2.4 Important notes on operation
Operation of the digital receiver is simplified through the use of a so-called "On Screen Display" (OSD).
This also means that the number of buttons on the remote control unit is reduced.
All functions are displayed on screen, and can be controlled by means of a few control buttons.
EN
Functions that are logically related are combined into a "MENU". The selected function will be highlighted. The red, yellow, blue and green function buttons are indicated by coloured bars at the bottom of the screen. These coloured bars represent different functions in the various menus, which can be implemented by pressing the appropriately coloured buttons (multi-function buttons) on the remote control.
The function buttons are only active when a brief description is displayed in the appropriate field.
The button identifications and terms that appear in the OSD menu are shown in bold type in this operating manual.
Help: where available, press the blue function button in the menus to display the help text; press again to close the help window.
2.5 Important information on data security
Before handing your receiver to your supplier for maintenance purposes, we recommend that you remove all USB storage media.
The recovery of data is not part of the maintenance and repair work. TechniSat assumes no warranty for the loss or damage of data during the repair.
2.6 Remote control/Changing the battery
Open the cover on the battery compartment at the rear of the remote control by pressing gently on the point indicated and pressing in the direction of the arrow.
Insert the supplied batteries, ensuring that the poles are the right way round (indicator visible in battery compartment).
Close the battery compartment again.
2.7 Disposal advice
The packaging material used for your device consists entirely of recyclable materials. Please sort these appropriately, and dispose of them in line with your local waste disposal regulations.

At the end of its useful life, this product may not be disposed of in your regular domestic refuse. It must be taken to a recycling collection point for electrical and electronic equipment.

This is indicated by the symbol on the product, the instruction manual or the packaging.
The materials are recyclable according to their identification.
By ensuring that valuable raw materials are re-used you can make an important contribution towards protecting our environment.
Please ask local authorities for the location of the relevant disposal point.
Please ensure that flat batteries removed from the remote control and electronic waste are not disposed of in your regular household refuse, but are correctly disposed of either in special bins for problem waste, or at collection points in the retail trade.

2.8 Optional accessories
Optional IsiZapper remote control
IsiZapper (Item No. 0000/3773) is an optional remote control which is specially designed for the operation of the ISI mode (see Section 13).

TechniSat A/V adapter set
To connect analogue audio/video playback devices, please use the TechniSat specific adapter set (Item No. 0000/3649).
TechniSat WLAN dongle
TELTRONIC ISIO USB WLAN adapter (Item No. 0002/3633)
TELTRONIC ISIO TC USB-WLAN adapter (Item No. 0004/3633)
USB Bluetooth adapter
(Item No. 0000/3635)
3 Connecting the DVB receiver
3.1 Mains connection
The digital receiver should only be connected to the mains power supply once you have finished making all the connections to the various other components.
This will prevent damage to the digital receiver or other components.
Once you have made all the connections in accordance with the following sections, use the power supply unit supplied to connect the receiver to a 230 V/50-60 Hz mains power outlet.
3.2 Sat system
Connect LNB input (8) on the digital receiver to your external unit using a suitable coaxial cable.
Also observe the section on Antenna setting in the instruction manual.

It is not possible to receive analogue TV!
3.3 Connecting to a TV
Connect the receiver (HDMI output 11) and the TV (HDMI input) using an HDMI cable (included in the scope of supply). If your television set is appropriately equipped, it will switch to the HDMI input automatically when the digital receiver is switched on. Optionally, you can also connect the receiver to the TV set via analogue. To do so, see Section 3.7.
3.4 Hi-Fi / surround amplifier
To achieve the best possible sound quality, you can connect your digital receiver to a Hi-Fi surround amplifier:
3.4.1 Digital
If your amplifier has an appropriate electrical input, connect the SPDIF (13) socket to the electrical input on your amplifier.

Depending on the signal provided by each individual broadcaster, sampling rates of 32, 44.1 and 48kHz are available. In addition, where broadcast, the Dolby Digital signal is also available on this output.
3.4.2 Analogue
To do this, connect the optionally available TechniSat specific adapter set to the AV OUT (12) socket on the receiver and the audio input on your Hi-Fi / surround amplifier. (e.g. CD or AUX; attention - the phono input is not suitable!)
3.5 USB port
The USB port (10) is used for updating the operating software and transferring data.
Moreover, using the movie/DVR, music or picture playback (for more information see the instruction manual) etc., you can access MPEG, MP3 or JPG files on the USB storage medium. You can also insert an external WLAN dongle, e.g. the TELTRONIC ISIO TC USB WLAN adapter (Item No. 0004/3633), into the USB port for this purpose. To do so, see the WLAN settings section in the instruction manual.
Using a Bluetooth dongle (Item No. 0000/3635) it is possible, for example, to connect the Bluetooth audio receiver to the receiver.
When connecting a USB storage medium, you should also note the section 10 (Storage volume selection).
3.6 Network port (RJ45)
Using the network port (9) you can connect the device to your existing network. By doing so, you can, for example, use the Internet radio functionality or control the device via the TechniSat CONNECT app.
To do so, also observe the Network settings section in your instruction manual.
3.7 Analogue Audio/Video connection
You can also operate the receiver on a TV or an external recording device with analogue audio/video input. To do so, use the optionally available TechniSat specific adapter set and connect it to the AV OUT (12).
4 Basic operation
Dear Customer,

The following section starts by covering basic operation as well as the recurrent steps for operating the device. This should make it easier to read the quick start manual, since it avoids repeated description of identical steps at each individual stage.
If a function or setting for the device needs to differ from the basic operation, the difference in operation is described in detail at the relevant point in the operating manual.
The so-called "On Screen Display" (OSD) is used in your device. This simplifies the operation of your device since the buttons on the remote control can perform different functions. This makes it possible to reduce the number of buttons. On this On Screen Display (OSD) the selected functions or settings can be highlighted.
Furthermore, on the lower edge of the screen there is a line where individual buttons on the remote control are represented with their current functions. In this instruction manual the terms shown in the OSD as well as the buttons to be pressed are distinguished from the rest of the text by the print format used.

Warning - indicates an important note which you absolutely should observe in order to avoid problems with the device, loss of data or unwanted operation.

Tip - This identifies information relating to the described function, as well as to another related function that may have to be taken into account, with reference to the corresponding section in the manual.
4.1 Switching the device on and off
When the device is on standby, you can switch it on by pressing the On/ Standby button on the remote control.
When operating normally you can switch the device to standby mode by pressing the On/Standby button.

To switch the device on/off, also take note of further instructions in the instruction manual.
4.2 Retrieval of the main menu and menu navigation
The following example will illustrate how you can reach the main menu and retrieve a sub-menu. The objective of the example is to retrieve the Picture settings menu.
After pressing the Menu button the main menu appears on the screen.
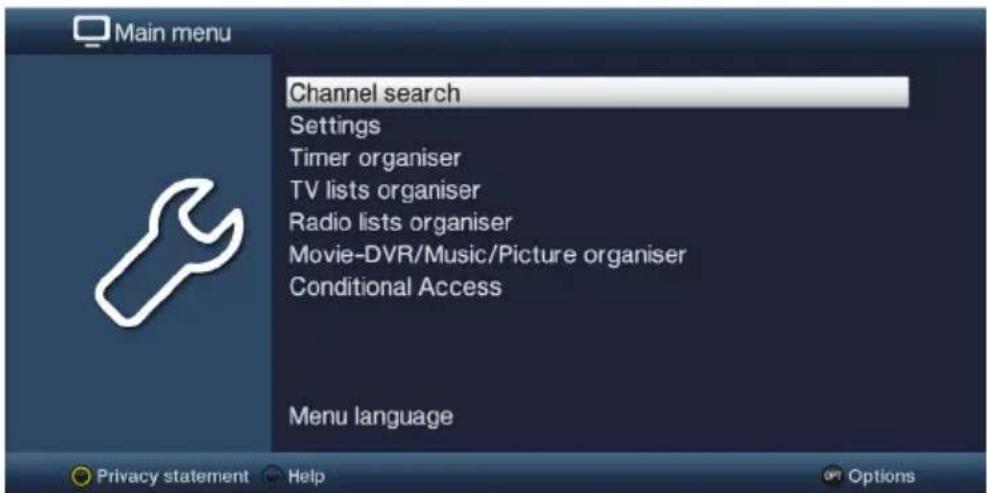
Select the Settings menu item by moving the highlight over this item using the up/down arrow buttons.
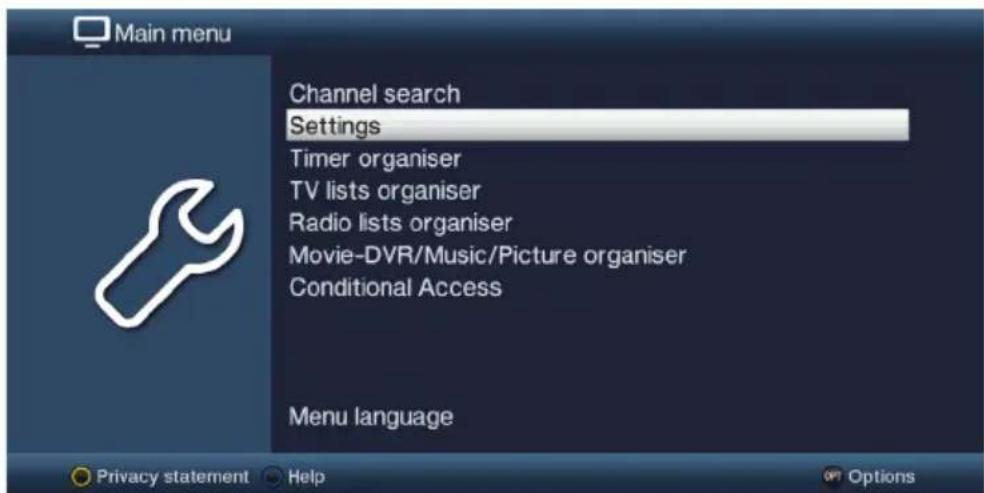
Press the OK button to open the Settings menu.
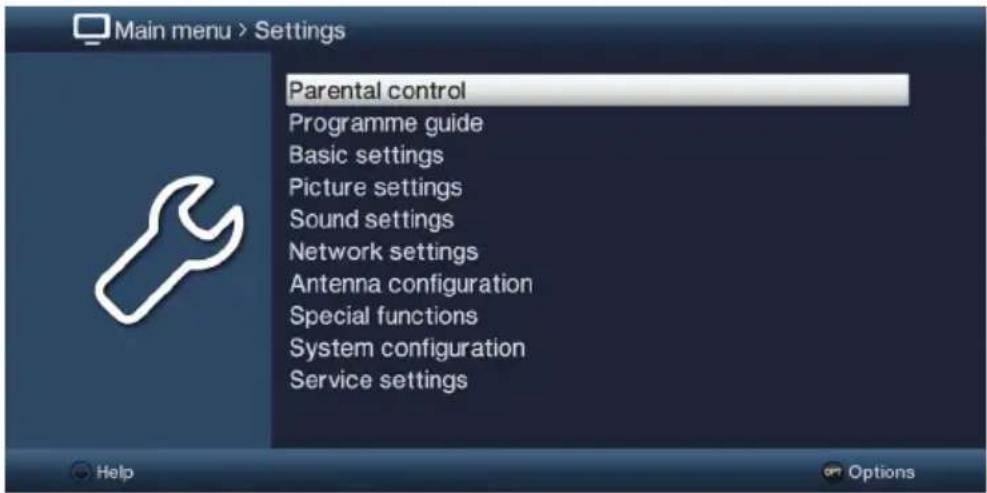

Use the up/down arrows buttons to highlight the Picture settings item.
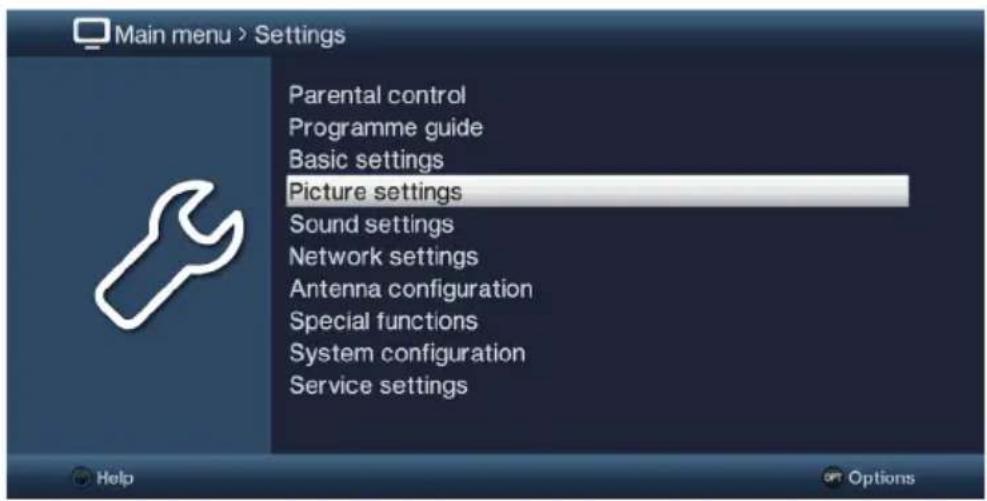
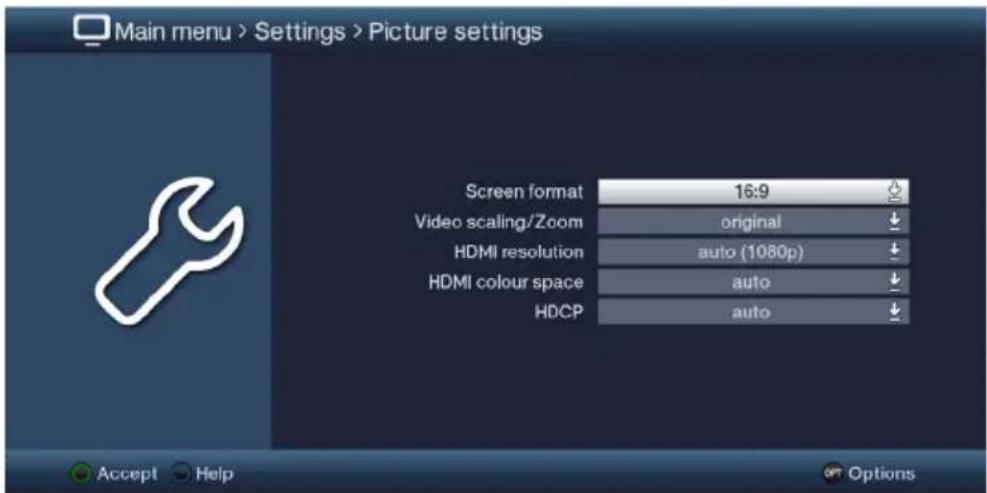
Then press the OK button to confirm and open the Picture settings menu.

You can also highlight the individual menu items in the same way as you highlight an item on a submenu to open them and alter the respective settings.

The menu items in some menus have to be highlighted by moving sideways. This is done by pressing the right/left arrow buttons.

By pressing the up/down arrow buttons it is possible to move the highlight from line to line and to move upwards and downwards page by page using the page up/down buttons.

You will see the so-called menu path in the uppermost line of the menu. This shows you the menu you are currently in and the path you took to reach this menu. In the example shown, this is Main menu > Settings > Picture settings. The menu path is also shown throughout the user manual and shows you how you can reach the respective menu with the settings described.

If the blue function button with Help is displayed on the bottom line on the screen, a Help page can be displayed by pressing this button, and hidden again by pressing it again.
4.3 Accepting settings / Exiting menus
In some menus and functions the changes made must be accepted manually in order to save them permanently.
It you do not do so, on exiting the menu or function the values that were valid before the change will be automatically set again.

If an Accept field or the green function button with Accept is displayed in the bottom line of the screen, you can see that the changes made must be saved manually to be accepted.
By highlighting Accept using the right/left arrow buttons and confirming with the OK button or by pressing on green function button (Accept), the changes are saved and you return to the next menu level up.
Alternatively:
Press the Return button. You are now asked whether the changes made should be accepted.

Use the right/left arrow buttons to highlight Yes or No and confirm using the OK button. Depending on your selection, the changes will now be saved or rejected and you return to the next menu level up.
Alternatively:
Press the Menu button to directly leave the menu. In this case settings that need to be saved manually will be reset.

If the green function button with Accept is not displayed on the bottom line of the screen, the changes are saved automatically on exiting the menu.
4.4 Changing a setting
You can create settings using the arrow selection method, the selection list, by entering numbers and by using the virtual keyboard. The device specifies the method that can be used to change a highlighted setting. This is evident from the following displayed symbols:
- Arrow selection method (Section 4.4.1) Arrows are shown on the left or right edge of the displayed.
Selection list (Section 4.4.2) Symbol is shown on the right edge of the highlight. - Entering numbers (Section 4.4.3)
- Virtual keyboard (Section 4.4.4)
Symbol is shown on the right edge of the highlight.
4.4.1 Arrow selection
If is shown on the left and on the right next to the set value, you can alter this using the left/right arrow buttons.
4.4.2 Selection list
If this is shown on the right next to the set value, the value is altered via the selection list. As an example below, the OSD font size is changed from "normal" to "small".


Move the highlight onto the corresponding item and press the OK, button to open the selection list:

Highlight the desired setting using the up/down arrow buttons.


By pressing the up/down arrow buttons it is possible to move the highlight from line to line and to move upwards and downwards page by page using the page up/down buttons.
Confirm by pressing the OK button. The selection list closes again and the selected setting is shown in the menu.

4.4.3 Entering numbers
Use the number buttons to enter the new setting you want if a question mark or a numeric value 1 displayed.
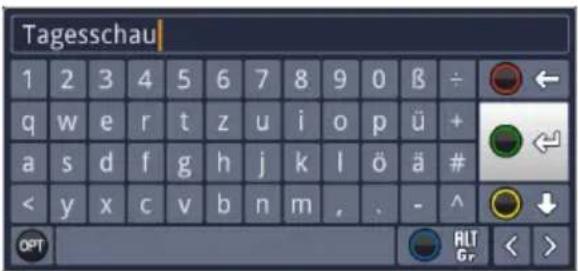
4.4.4 Virtual keyboard
If is shown on the right next to the set value, the value is altered using the virtual keyboard. You have three different input options when using this data entry method. You can switch the keyboard layout between the so-called QWERTY keyboard and the alphabetic keyboard; an SMS keyboard can also be used at any time. The functionality of the QWERTY keyboard is identical to that of the alphabetic keyboard. They only differ in the arrangement of the various letters, numbers, characters and symbols.
Press the OK button to open the virtual keyboard. The keyboard now appears in alphabetic form.
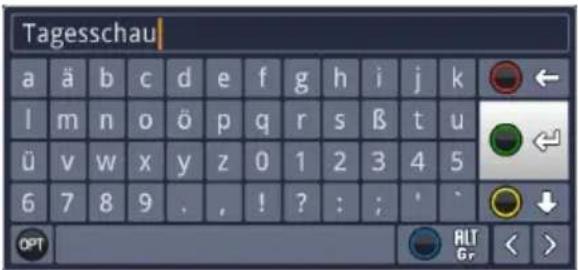
You can switch to the QWERTY keyboard and back to the alphabetic keyboard by pressing the Option OPT button.
You can now enter the desired term as follows:
Arrow buttons: Moves the highlight on the keys of the virtual keyboard.
OK: The highlighted character is added to the end of the term, or the highlighted function is executed.
/ Yellow function button: The keyboard switches between upper case/ lower case.

/ Red function button: Pressing/holding down deletes the character in front of the blue highlight/the whole entry.

/ Green function button: The entered term is accepted.

/ Blue function button: The keyboard switches to the alternative characters.

/Arrows: Moves the blue highlight within the term.
The SMS keyboard is operated using the numeric keypad on both the alphabetical and the QWERTY keyboard and can be used at any time.
The coloured buttons thus incorporate the functions described above.
Press one of the numeric pad keys 0 - 9 and select the various letters, numbers, characters and symbols. After first pressing a numeric keypad key, the first letter of the corresponding row is highlighted.
Every time the same numeric pad key is pressed, the highlight moves one field to the right. Press until you reach the character you want. This will be added to the entered term after a short delay.
The various numeric pad keys are assigned the following displayed letters, numbers, characters and symbols.
0:

1:

2:

3:

4:

5:

6:

7:

8:

9:


Once you have reached the field you want with the highlight, you can then begin selecting the next character immediately since, in this case, the character is added directly to the term. If you wish to continue directly selecting a character from the same numeric pad, you can add the previously highlighted character to the term by pressing the right arrow key.
4.5 Option selection
In some menus and operating modes (e.g. TV mode, music/image playback, etc.), you have the option of retrieving additional functions and options using the option selection.
Press the Option button (OPT) to open the option selection function in the lower right-hand corner of the screen. In this example the Option selection menu for the channel list is shown.
EN
Every additional press of the Option button moves the highlight down one line.

Some options are selected directly in this window. Other options for a number of subordinate selection options are located in the option groups. Highlight one of these options groups and press the OK button or the left-hand arrow button (if there is an arrow next to the item) and another window will open automatically on the left next to it.
You can use the up/down arrow buttons within the options group to highlight one of the options listed there.

By pressing the up/down arrow buttons it is possible to move the highlight from line to line and to move upwards and downwards page by page using the page up/down buttons.
The highlighted option is selected by pressing the OK button; you exit the option selection area.
If you do not want to select an option or wish to leave the option selection area without making any changes, simply press the Option button until it is hidden.
5 Initial installation
After you have read the safety instructions and connected the device 3 as described in Section4, you can switch it on.
On initial start-up of the device, the AutoInstall installation wizard starts automatically. The installation wizard allows you to perform the most important settings for your digital receiver in the simplest way possible.
Each step of the installation explains which settings can be performed.
In the installation wizard start window, you can cancel the initial installation by pressing the red function button. The receiver then begins to run default pre-programming.

In the subsequent installation steps you can press the OK button to accept the setting you have selected and move on to the next installation step.

By pressing the Back button you can go back to the previous installation step. This enables you to correct any incorrect entries at any time. The initial installation shown here simply serves as an example.
The exact process for the initial installation will depend on the settings you select. Therefore please follow all the instructions displayed on the screen.

Most of the settings in Autoinstall can also be changed at a later date via the menu.
Operating language
When the installation wizard starts, you will first of all see a window for selecting the operating language.
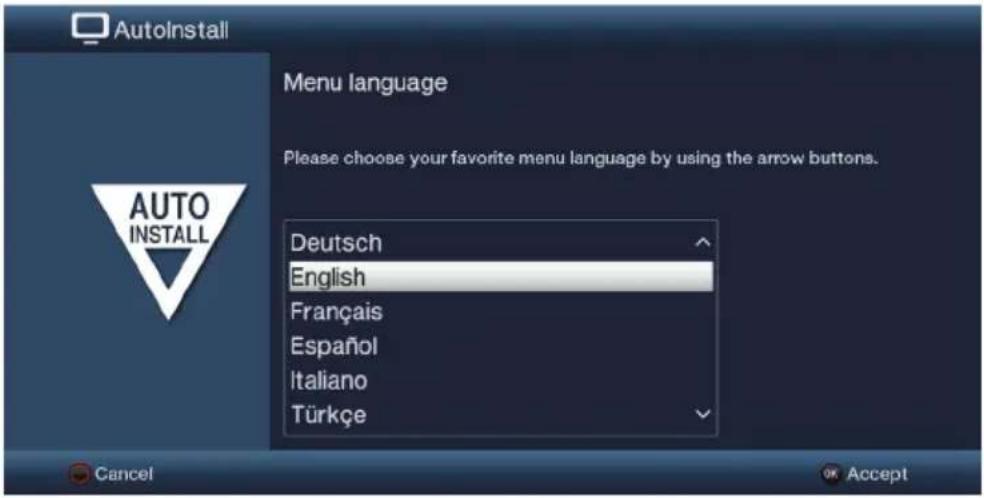
Use the arrow buttons to highlight the desired operating language.

The preferred audio language will be set automatically according to this selection. These settings can also be modified at a later date via the menu.
Press the OK button to confirm the setting and access the next stage of the installation wizard.
Country selection
Use the arrow buttons to select the country in which the device will be operated.
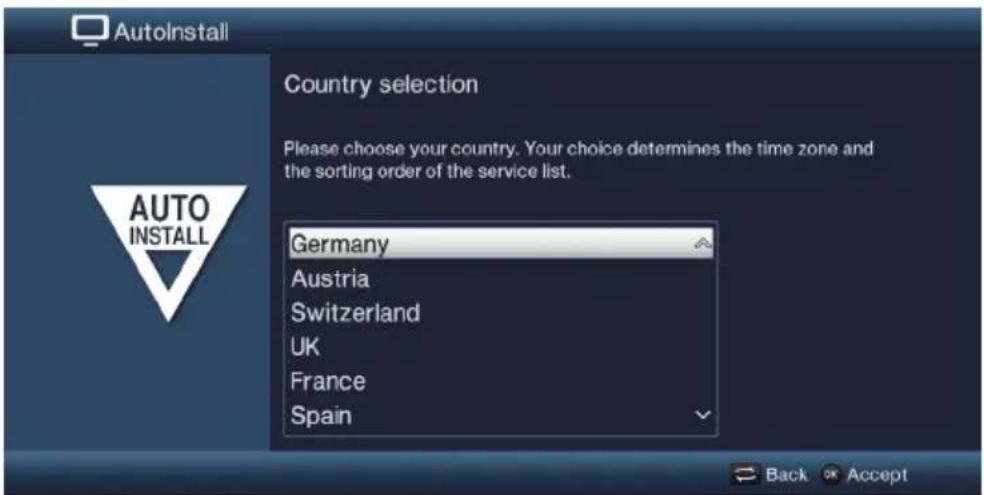

Automatic setting of the local time as well as changing to summer/winter time will be based on your selection. Channels will also be automatically sorted in the installation wizard according to this setting as well as after a channel search.
Press the OK button to confirm the selection.

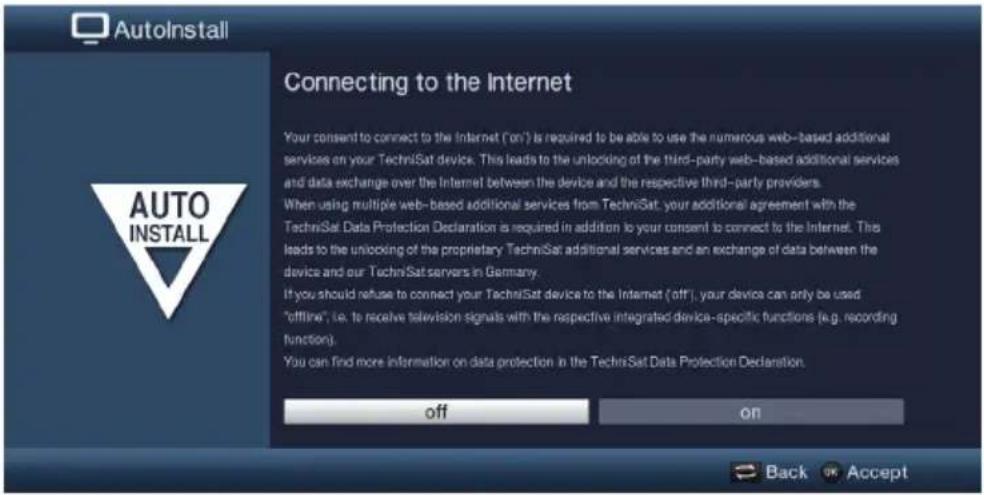
In order to use the Internet-based functions on your device there must be an active connection to the Internet. Select on, to allow connection to the Internet. In order to take full advantage of the TechniSat additional services corresponding to your receiver, you must also agree to the data protection stipulations in the window which then appears.
If you do not wish to use Internet functionality, select Internet > no. If you want to use Internet services, the device will recommend allowing connection to the Internet and accepting the Data Protection Declaration.
The connection to the Internet and the Data Protection Declaration can be subsequently changed at any time from the main menu.
The functions described in this quick start manual and the user manual assume that the Internet connection is enabled and the Data Protection Declaration has been accepted.
Not all the services which are listed in the Data Protection Declaration are necessarily supported by the device.
Picture format
Use the right/left arrow buttons to set the picture format for the connected TV.
The picture format on the TV will be automatically adjusted according to your selection.
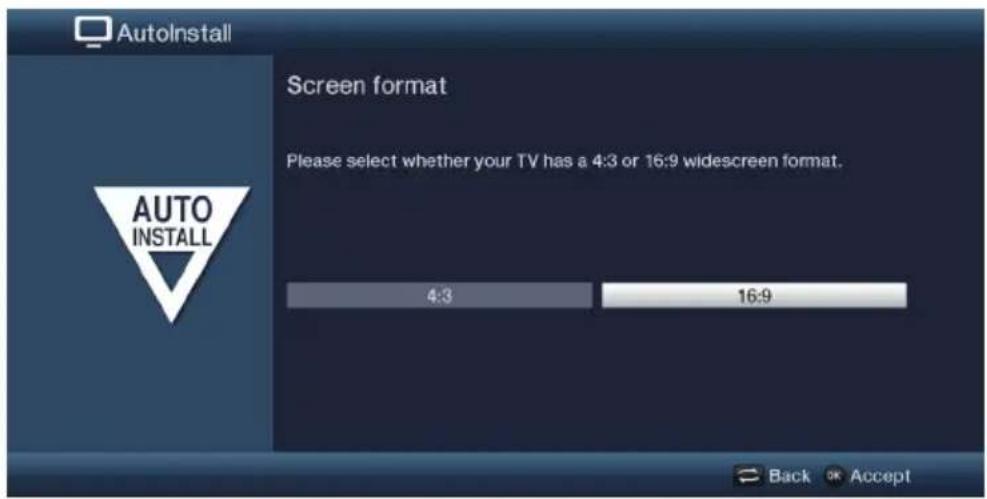
Press the OK button to open the selection list.
Antenna configuration
In this step of the installation you can adapt your digital receiver setup to the configuration of your antenna.
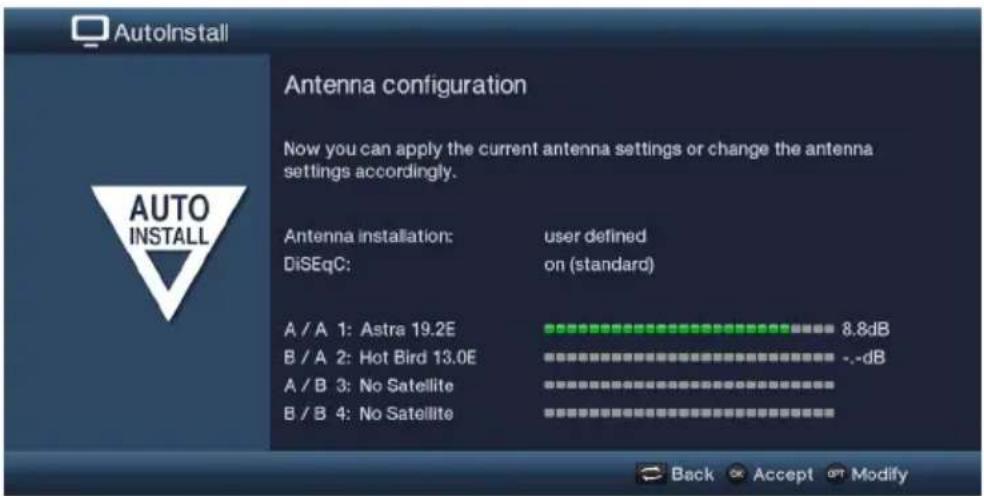
If you wish to accept the standard antenna setting, press the OK button.
If the configuration of your reception equipment does not conform to the default setting, press the Option button.
Now create the antenna settings according to your reception equipment, then press the Back button to return to the antenna configuration overview. For more information, please consult the instruction manual.
Then confirm with the OK button to accept the settings.
Network configuration
In this step the TV automatically checks the network configuration.
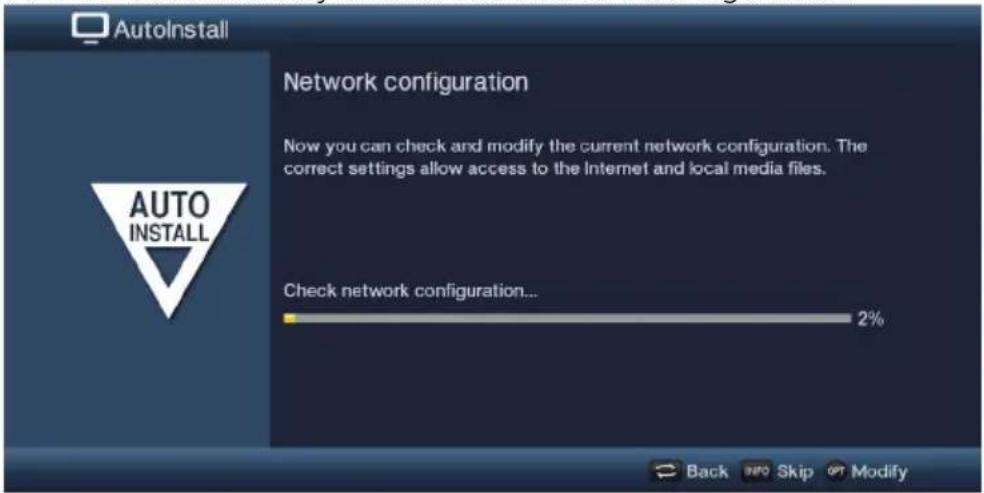
If you do not want to run the network configuration check, press the Info button.
If you wish to check or change the network settings, press the Option button:
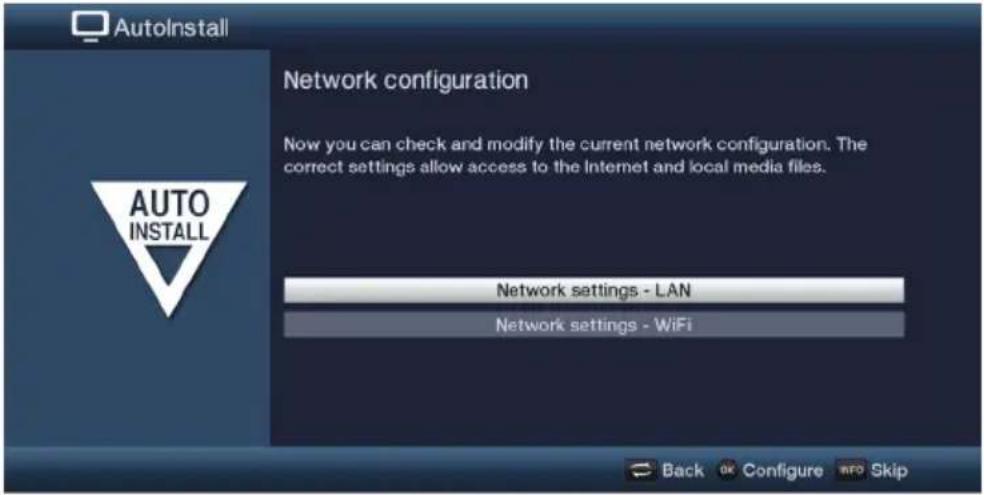
Use the up/down arrow buttons to select whether you want to configure a LAN or WLAN network and press the OK button.
Now carry out the network settings. Consult the instruction manual for more detailed information on the setting options.
Then press the Info button to accept the settings. The network configuration check restarts.
Software update
The digital receiver will now check whether a new version of the software is available for the device.
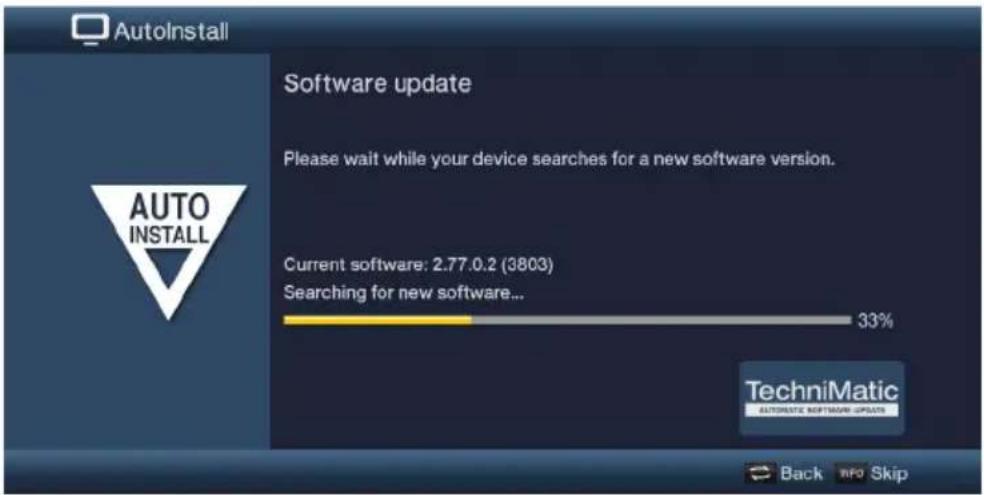
If you do not want to wait for a search for new software, you can skip this step by pressing the Info button.

If the search for a new software version has been skipped, your device will now perform another test according to the time set in the menu, provided you have the function enabled and the device is on standby at this precise moment.
If there is no new device software available, you can press the OK button to go to the next step in the installation wizard.
Channel scan
You have various options for searching for new channels or updating the channel list. You can use the ISIPRO channel list function to download a new channel list for your receiver from the satellite or run a channel scan.
To download an up-to-date channel list, use the up/down arrow buttons to highlight the ISIPRO channel list update line.
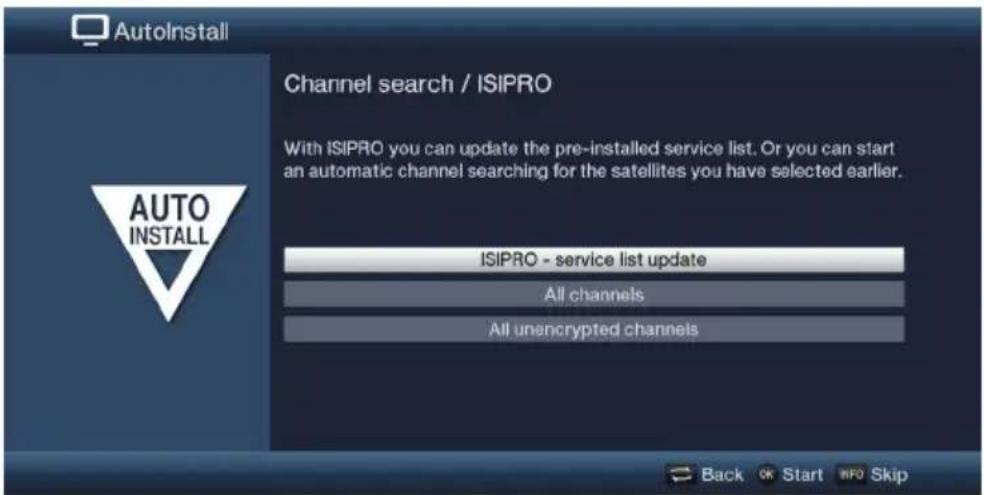
To download the available current channel list, use the up/down arrow buttons to highlight the ISIPRO channel list update line and start the process by pressing the OK button.

The current channel list will now be downloaded via satellite. Please pay attention to subsequent screen displays.
If you wish to perform a channel scan instead of a channel list update via satellite, use the up/down arrow buttons to highlight the All channels or All unencrypted channels field and then start the channel scan by pressing the OK button.

During this scan, all selected satellites in the antenna configuration are automatically scanned for channels. This procedure may take several minutes. Please note all messages displayed on the screen.

If you skip the channel scan/channel list update, the default channel list will be loaded.
Regional channels
Some broadcasters transmit channels with varying regional content. On this page you can define your preferences for these regional channels. The selected regional channel is automatically set by switching to the relevant channel provider.

Use the arrow buttons to highlight the channel provider you would like to specify for your preferred regional channel.
Press the OK button to open a window with the regional channels available for this broadcaster.
Use the up/down arrow buttons to select your preferred regional channel.
Press the OK button to close the window again.To accept the selected regional channels, use the arrow buttons to highlight the Accept field.
Press the OK button to move on to the next step of the installation.
Loading SFI data
Your digital receiver features an electronic programme information service (Electronic Programme Guide). You must first get the receiver to download the SFI data from the satellite to enable electronic programme guide data to be displayed.
For this reason, the receiver will automatically start downloading the SFI data after the channel list update or after the channel scan is completed. This process can take up to 30 minutes.
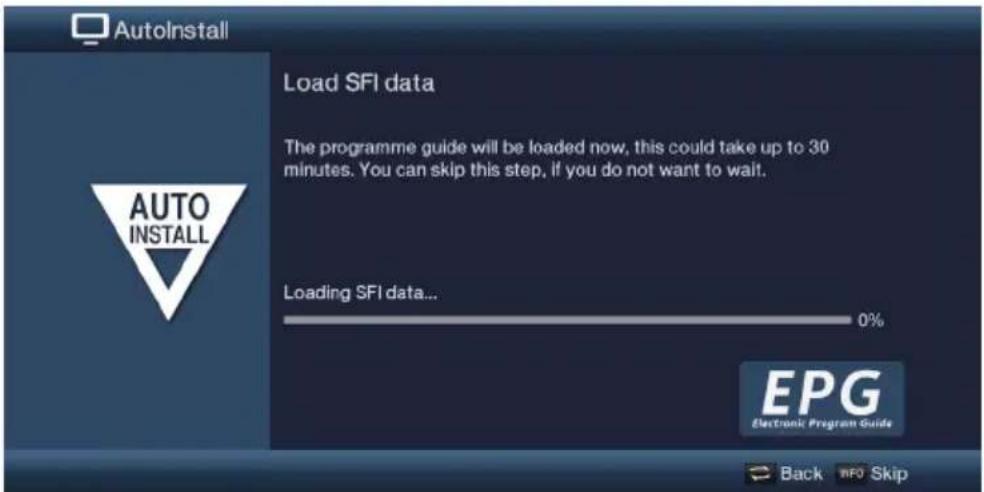
If you do not want to wait for the SFI data to be downloaded, you can skip this process by pressing the Info button. The SFI data will then be automatically updated the following night, or you can update it manually at any time.
If the SFI update has been skipped, your device automatically loads the SFI data, provided that the automatic SFI update is enabled and, moreover, that the device is on standby at this precise moment. You can also start the update manually at any time. For more detailed information please consult the instruction manual.
Exiting the installation wizard
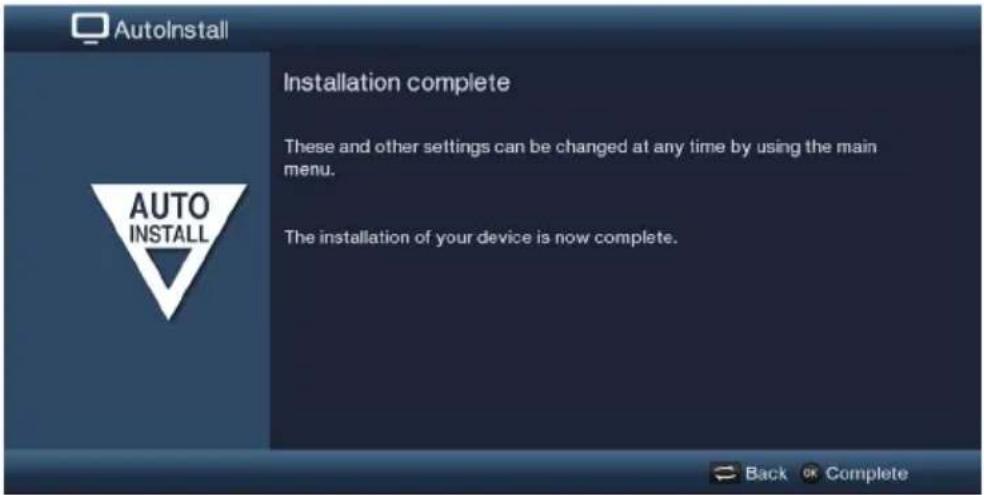
Confirm the final message from the installation assistant by pressing the OK button.
6 Operation
6.1 Switching on
Switch the digital receiver on by pressing the On/Standby button either on the device or on the remote control.
6.2 Off
Press the On/Standby button either on the device or on the remote control to switch the device off again.
The device is now in ready mode (standby). This means that the time is displayed on the device display panel (if activated). If the time is not shown, the device has not yet read it. To do this, switch the device on and set it to receive e.g. ZDF for approx. 30 seconds to automatically read the time.
6.3 Selecting a channel
6.3.1 Using the channel up/down buttons
Use the up/down arrow buttons on the receiver to select a channel, or use the Channel +/- buttons on the remote control to scroll up or down the channel settings.
6.3.2 Using the number buttons
Use the number buttons to enter the number of the desired channel. Example:
1 for channel slot 1
1, then 4 for channel slot 14
2, then 3, then 4 for channel slot 234
1, then 5, then 6 then 7 for channel slot 1567

When entering channel numbers with multiple digits, you have approx. three seconds after pressing a button to complete the entry.
If you wish to enter a number consisting of only one, two or three digits, you can speed up the entry procedure by keeping the button pressed for longer on the last digit or by pressing the OK button.
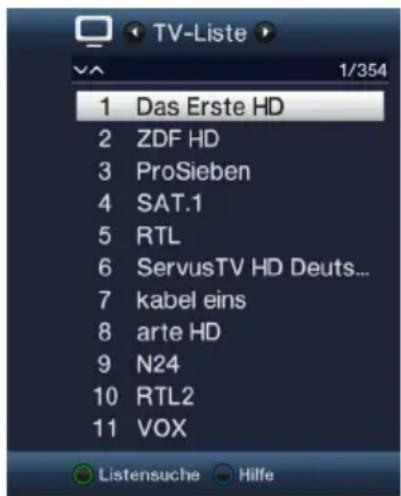
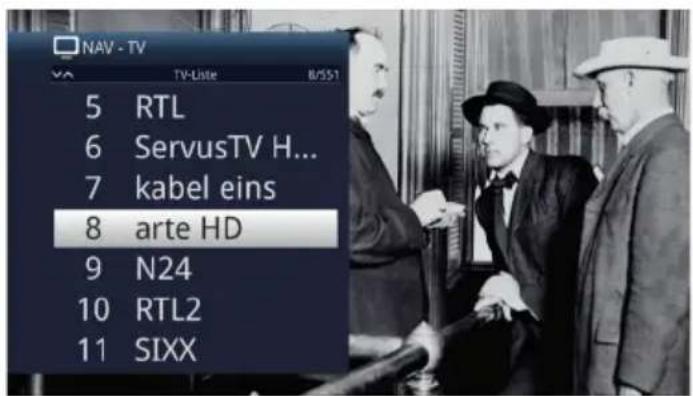
6.3.3 Using the navigator (channel list)
Press the OK button.
The channel list navigator now appears. In TV mode, only TV channels are shown, and in radio mode only radio channels are shown. The channel currently selected is highlighted.
You can view additional information about the current programme by pressing the INFO button.
6.3.4 Selecting the channel
You can now highlight the desired channel using the up/down arrow buttons, the page up/down buttons and the number buttons.
Press the OK button to select the highlighted channel.
6.3.5 Selecting the list
To make it easier for you to find channels, your device provides several channel lists. You can select one of your favourites lists (TV list - TV list 16) and sort or filter the channels according to the various criteria.
Press the OK button. The active channel list is now displayed.
You can now open the desired channel list by using the Option selection (OPT button).

EN
Alternatively:
Use the right/left arrow buttons to select the list to be displayed from the open channel list. The current list is shown at the top of the OSD.

You can configure your own TV lists in Menu > Administer TV lists. For more detailed information please consult the instruction manual.
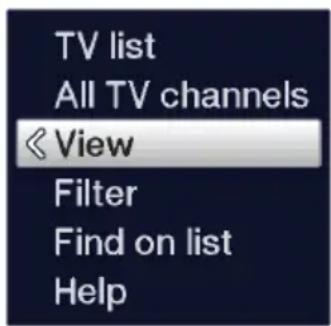
6.3.5.1 View
The View option enables you to change the display order of the channels in the active channel list. The available options are Sort by channel number (sorting by channel slot number) or Sort by name (alphabetical sorting).
Highlight the View option and press the OK button or the left arrow button to open the option.
Highlight the desired sorting order and press the OK button.

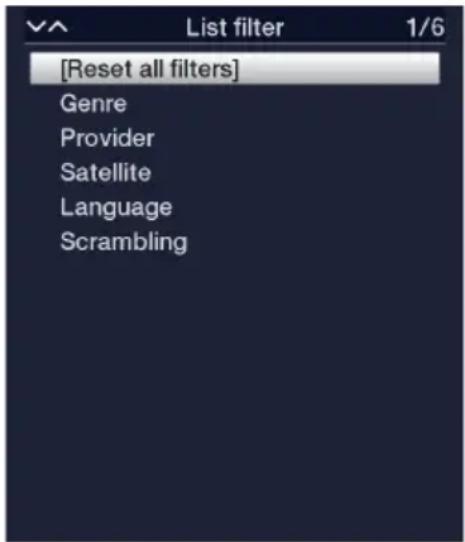
6.3.5.2 Filter
By setting one or more filters, you can limit the display to certain channels that fulfil the desired criteria.
Highlight the Filter option and press the OK button.
Now select the desired filter option from the list that appears and confirm the selection using the OK button.

The channel list now only shows the channels that fit the desired criteria. In order to filter the list further, follow the above steps again and set more filters this way.
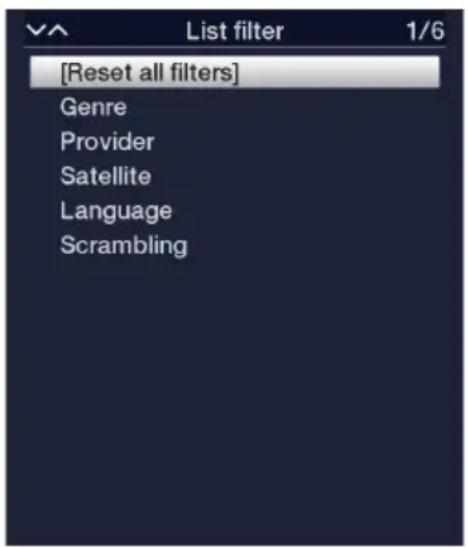
To remove all filters
Open the Option menu using the OPT button.
Select the Filter option and press the OK button.
Now select [Reset all filters] and press the OK button.
The full channels list is now displayed again.
6.3.6 Retrieving blocked channels
If a channel is selected that is blocked by the parental control function, the message Device PIN will be displayed on the screen.
Device PIN
????
Use the number buttons to enter the device PIN.
The selected channel can now be viewed.
or
Switch to a channel that is not blocked.

If global parental control is enabled, the device PIN code will be requested again when the blocked channel is switched on. To make things easier for you, you only need enter the PIN code once during each operating phase.

To do so, it is essential that you also observe the instructions and settings regarding the global user-dependent parental controls (TechniFamily) in your instruction manual.
6.3.7 Back to the last channel set
Press the Back button on the remote control to return to the last channel selected.
Press the button again to return to the channel you were previously watching.
6.3.8 Switching between TV/Radio
Use the TV/Radio button to switch between TV and radio mode.

The device switches to the last radio channel listened to.

Also observe the setting for the OSD radio/music in your instruction manual.
6.3.9 Selecting a regional channel
During the initial installation, you selected your preferred regional channels for some channels. If you now set one of these channels, a note appears in the info box stating that additional regional channels are available for selection.
Using the Option selection you can select between the various regional channels in the Region item.

The selected regional programme is now stored as a preferred regional programme from this programme provider.
6.4 Info box
An info box is displayed on the screen for the time set in Menu > Settings > Special functions > OSD > Display time every time you change channels. It can also be retrieved manually by pressing the Info button on the remote control.

This info box displays the location and name of the selected channel, the title of the current channel and the currently active channel list.

The progress bars are coloured yellow according to the amount of transmission time already expired for the current programme. If the beginning of the progress bar is coloured red, the transmission started too early, and if the end of the progress bar is coloured red the current programme has overrun.
Additional channel properties are also displayed:
For example:

for Teletext

for 4:3 programmes

for encrypted channels

for Dolby Digital broadcasts

for subtitles
Also the current time is shown in the upper right-hand corner of the displayed.
6.5 Receiving encrypted channels
Your device is equipped with an integrated CONAX Light decryption system (smart card reader) as well as a common interface for incorporating a CI/CI+ - module. This enables you to receive and view encrypted channels. To this end, you must either insert a corresponding smart card into the integrated card reader or a CI/CI+ module with a valid smart card in the slots provided.
Insert the smart card into the card slot in the integrated card reader. (gold-coloured chip facing down, and in the direction of insertion)
or
Insert a CI / CI+ module into the slot.
Insert the smart card into the CI / CI+ module card slot. Ensure that the gold-coloured chip on the smart card is facing upwards, in the direction in which the card is inserted.
If you now select an encrypted channel, the digital receiver will automatically check the card reader, and the CI/CI + slot and will display the channel in decoded form, provided a valid smart card or an appropriate CI/CI+ module with a valid smart card for this channel is inserted.
6.6 Volume control
You have the option of adjusting the volume on your digital receiver. This facilitates operation of the receiver, as it means you can access all the major functions on a single remote control, and will only rarely have to resort to using the remote control for the TV.
Adjust the volume up or down on your receiver using the Volume + rocker and the Volume - rocker.

During volume adjustment, the currently set volume is displayed at the upper edge of the screen.


When you switch on the digital receiver, sound will be reproduced at the volume level last set.

Volume control and the mute button also control the digital audio outputs (not for the bit stream setting) and switch these to mute.
6.7 Mute function
By pressing the Mute on/off button the sound is switched on or off by pressing this button.

Throughout the time that the volume is switched to mute, the symbol appears at the upper right of the screen.
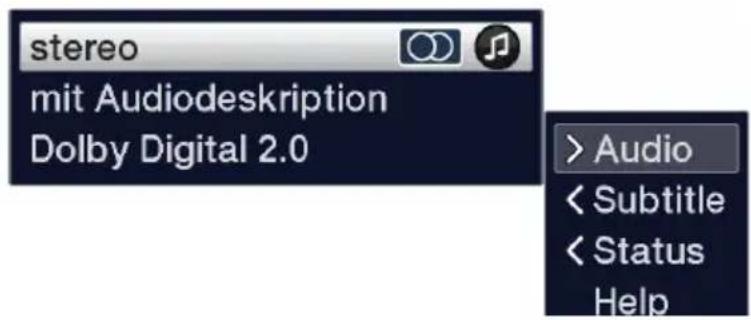
6.8 Selection of another language / sound option
For some channels you have the option of selecting a different sound option (Dolby Digital, Stereo or Audio Channel 1 or Audio Channel 2) or another language.

If a channel has various sound options or languages, this is displayed by the Sound indicator along with the currently selected sound option or language on the lower edge of the extended channel information.

If a set programme is also being broadcast in Dolby Digital Sound, the symbol also appears in the info box.
Using the Option selection feature you can select the language/sound option you want via the Sound option.

Alternatively, you can also press the SOUND button (audio channel) on the remote control to immediately access the sound selection.
EN
6.9 Freeze frame
By pressing the Freeze frame button the current TV picture will be displayed as a freeze frame image.
Press this button again to return to normal operation.

The sound will continue to be reproduced normally during freeze frame.
6.10 Teletext
Your device can display Teletext information on channels that broadcast Teletext data. This is displayed by the symbol in the info box.
Teletext is switched on by pressing the TXT (Teletext) button on the remote control.
6.11 Subtitles
When switching on a programme which is broadcast with subtitles, the subtitles symbol appears in the info box.
Using the Option selection feature allows you to select the subtitles you wish to display in the Subtitles item.

The unit can display both teletext subtitles and DVB subtitles. The display for the two subtitle types may be different.

Please note that subtitles can only be displayed if the programme provider actually broadcasts the corresponding data. If the programme provider only sends subtitle recognition but no data, subtitles cannot be displayed.

If you would like your device to provide subtitled programmes automatically, set your device to automatic subtitles playback. For more information please consult the instruction manual.
EN
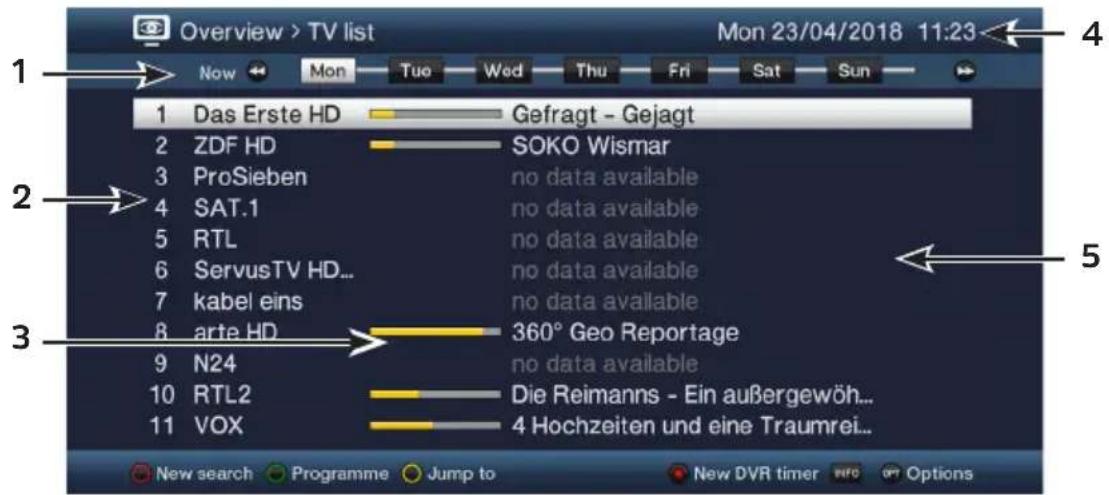
1: Viewing time > provides the time of the programmes being shown.
Time line > a graphical display of the viewing time in the form of progress bars.
2: Channel name with the corresponding channel slot within the active channel list.
3: Progress bars or the start/stop time of the programme being shown.
4: The current date and time.
5: Programmes on the channel being shown.
You can move forward and back through the viewing time by using the right/left arrow buttons.

The progress bar will also be moved backwards or forwards along the time bar according to the display time.
Using the yellow function button you can switch to the view of the programmes currently or next being broadcast as well as the set prime time schedule.

You can specify your preferred prime time schedules in Menu > Settings > SFI.
By pressing the up/down arrow buttons it is possible to move the highlight from line to line and to move upwards and downwards page by page by using the page up/down buttons.
If further information is available on the highlighted programme, you can retrieve and exit this by pressing the Info button.
Press the OK button to switch directly to the highlighted channel.
8 Timer recordings
Your device has the timer functions (timer type) listed below:
1. DVR timer
This function is used to switch your digital receiver on and off for the selected broadcast to record the selected programme onto the recording medium while you are out. If the device has been switched on by the DVR timer, this will be indicated on the display.
Some menu items are blocked and can therefore not be retrieved or modified. Please take into account that under certain circumstances not all programmes can be recorded.
2. Video recorder timer
EN
This function is used to switch your digital receiver on and off for the selected broadcast so it can be recorded onto a connected video recorder in your absence.

Please note that, to record programmes, an external video recorder must also be programmed accordingly. To do so, follow the instructions in the recorder instruction manual.
3. Channel switching timer
If your device is in normal operating mode, it will switch to the programmed channel slot at the set time.

In contrast to using the video recorder timer option, the device remains fully functional and will not be switched off at the end of the programme.
4. Alarm timer
If your device is in standby mode, it is switched on to the programmed channel slot when the set time is reached.

In contrast to using the video recorder timer option, the device remains fully functional and will not be switched off.
5. Series timer
To make it easier to find programmes, you can search for programme data highlighted in the SFI using any terms.
The series timer function is used to automatically generate ongoing DVR timer settings for the programmes you find. Timer generation is also continued after the SFI data has been updated. This means that there is no need for repeated manual programming of timers, e.g. to record episodes in a TV series.

In order to ensure that DVR timers are only automatically generated for the programmes you want, you must apply the settings with as much detail as possible. Otherwise the number of generated timers can become very high.

With automatic DVR timer generation, there could be overlaps with other timers with the possible result that not all timers are executed.

With series timer generation, the settings for the timer lead-in and lead-out times and Perfect Recording will be taken into consideration. For more detailed information please consult the instruction manual.
Caution!!!
Ensure that the receiver has read the correct time. This will be displayed in the info box during normal operation. If this is not the case, leave your device switched to a major channel such as ZDF for approx. 30 seconds, to read the time.
9 Function selection
You can open the Navigation menu (NAV menu) to select the desired function by pressing the NAV button (Navigator/function selection).
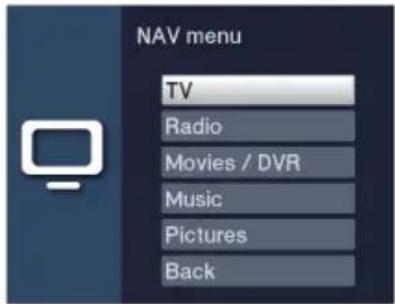
Use the up/down arrow buttons to highlight the function you want to access.
TV: TV mode: broadcasting of the TV channels.
Radio: Radio mode: broadcasting of the radio channels/Internet radio.
Movies/DVR: Movies/DVR Navigator: retrieval of the video files stored on a device connected to the USB port.
Music: Music navigator: retrieval of the music tracks stored on a device connected to the USB port.
Pictures: Picture navigator: retrieval of pictures stored on a device connected to the USB port.
Confirm with OK to select the highlighted function.
10 Storage volume selection
If a storage volume is inserted while using the TV or radio mode, a selection appears with possible operating options:
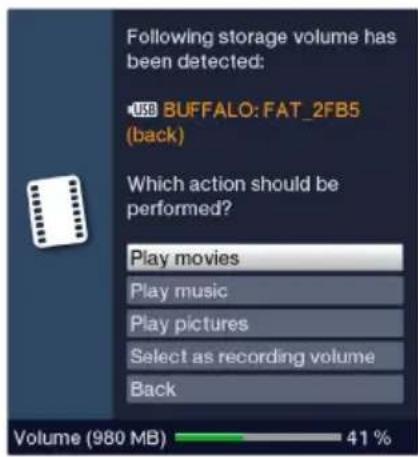
EN
Select Play movies to switch to play movies for this storage volume.
Select Play Music to switch to play music for this storage volume.
Select Play pictures to switch to play pictures for this storage volume.
Select Select as recording volume if this new storage volume is to be used as the recording volume.

Ensure that this selection overwrites the setting in Menu > Administer movies DVR/MUSIC/Pictures > Recording media settings or can be changed again at any time.
With Back you can exit the selection and return to the last view without changing settings.
11 DVR mode
With the DVR function (DVR= Digital Video Recorder) you no longer require an external recording device to record a programme (e.g. video or DVD recorder), since you can use this function to record to a connected USB memory.
The recording capacity thus depends on the volume of data in the broadcast material and the size of the attached storage volume (USB memory).

When recording, the Teletext data and subtitles (where broadcast) are also recorded as well as the actual audio and video data. You can access these during subsequent playback.
11.1 DVR recording

Before starting a DVR recording, please specify which storage medium should be used as a recording medium in Menu > Administer movies DVR/MUSIC/ Pictures > Recording media settings
The following recording modes are available for DVR recording:
1. Instant recording
Select this type of recording to immediately record the programme currently being broadcast at the push of a button.
2. Timer-controlled recording
This function is used to switch your digital receiver on and off for the selected broadcast to record to the recording medium while you are out. The timer can be either manually or automatically programmed via the SFI function.
3. Timeshift recording
Timeshift recording enables timeshifted TV viewing. You can start to play back a programme while it is still recording (= timeshifting).

Note that the DVR recording functions are only ever available for the currently set channel. Simultaneous recording/timeshift of one channel and playback of another channel (twin mode) is not possible.

The recording of programmes can be blocked by the channel provider. In this case, you receive messages on the screen that the programme cannot be recorded due to licence rights.
11.1.1 Instant recording
11.1.1.1 Starting the recording manually
Option 1
Switch to the channel on which the programme you want to record is being broadcast.
Press the Record button to record the current programme.

The programme will continue to be played on the screen while the recording is running. You will be notified when the recording starts by means of a note in the Infobox.
Press the Pause / Play button to play back the current programme from a particular point.

A freeze frame image appears on the screen while recording continues in the background.
To continue playing back the programme from this point, press the Play / Pause button again.
i You are now watching the programme with a time delay to the live broadcast (Timeshift), while the programme continues to be recorded in the background.
Option 2
If you need to interrupt the viewing a programme, e.g. due to a telephone call etc., press the Pause/Play button to stop the programme playback and, at the same time, start recording the programme being broadcast.
A freeze frame image appears on the screen while recording continues in the background.
To continue playing back the programme from this point, press the Play / Pause button again.
You are now watching the programme with a time delay to the live broadcast (Timeshift), while the programme continues to be recorded in the background.
11.1.1.2 Manually end recording
Pressing the Stop button generates a query as to whether the recording should be saved or discarded.
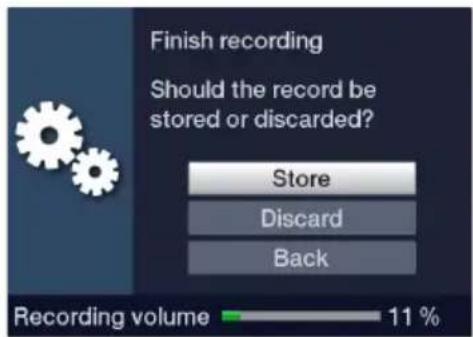
Select Store to save the recording, Discard to discard the recording or Back to continue with the recording.
11.1.1.3 Automatically end recording
Option 1
After pressing the On/Standby button a query appears as to what should happen to the ongoing recording.
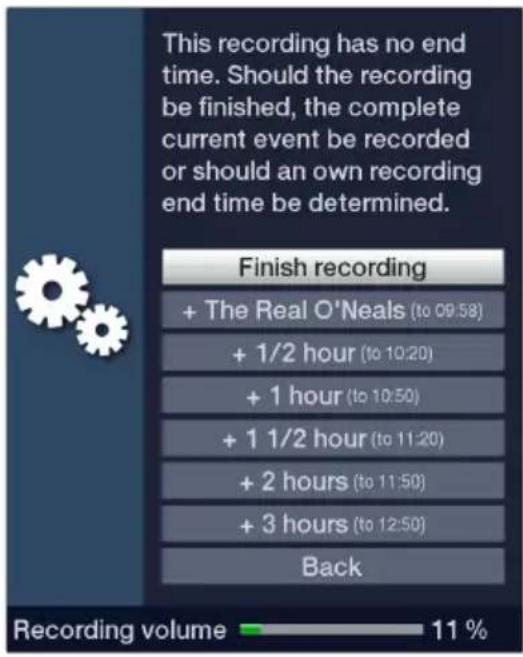
Select the line with the desired action.

If you select Finish recording, a query appears as to what should be done with the recording.

If you selected the programme title or one of the specified times, the receiver will now record the current programme in full or until the selected time and then switch to standby. The screen will switch off immediately according to the selection.
Option 2
Pressing the Record button causes a window to open containing all available functions.
You can, for example, select +1 hour, whereby the receiver will continue to record the channel for this period and then automatically stop recording.
11.1.2 Timer recordings
By using the DVR timer, you can automatically record programmes on an inserted recording volume while you are out. Your receiver also has a channel-switching timer. In terms of their programming, these timer types differ only in name. You can program the timers manually as described in this chapter, or use the SFI function.

Ensure that the receiver has read the correct time. During operation this is displayed in the info box If this is not the case, switch the receiver to a major channel such as ZDF for approx. 30 seconds, to acquire the time.
11.1.3 Timeshift function
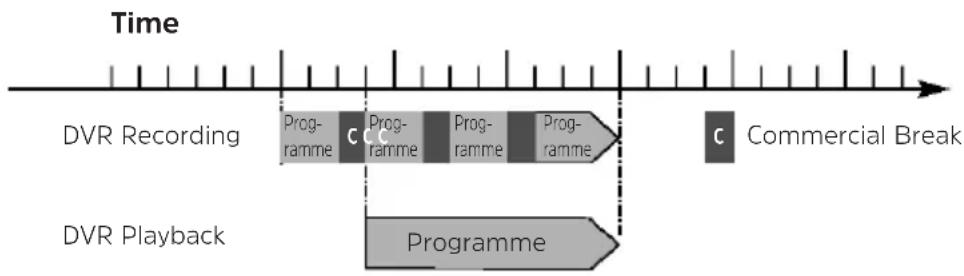
The Timeshift function allows you to record and play back at the same time. This enables "timeshifted" viewing. Hence you can start watching the beginning of a recording and skip through any sections already recorded (e.g. advertising slots). The live broadcast of the programme continues to be recorded at the same time. (see the following examples)
Example: skipping advertising slots
Do you want to see a programme without annoying commercial breaks?
With the DVR you can simply skip recorded ad breaks.
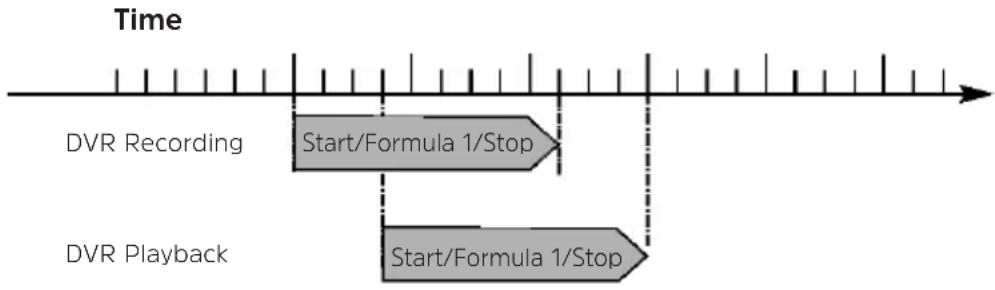
Example: timeshifted playback
You have missed the start of the Formula 1 race.
No problem! The DVR shows you the race with a time delay, whilst it also continues to record it.
11.1.4 Starting the timeshift function
Press the Play / Pause button. The programme playback is paused and recording of the ongoing programme starts simultaneously. The recording continues in the background, and a freeze frame image is displayed on the screen with a message in the upper right area of the screen and in the info box.
To continue playing back the programme from this point, press the Play / Pause button again.

You are now watching the programme with a time delay to the live broadcast (Timeshift), while the programme continues to be recorded in the background.
To get to a specific point of the ongoing recording, you can use the Play, Pause, Rewind / Fast Forward or Jog Shuttle functions.
Pressing the Info button brings up the info box with a progress bar indicating the length of the recording/playback.
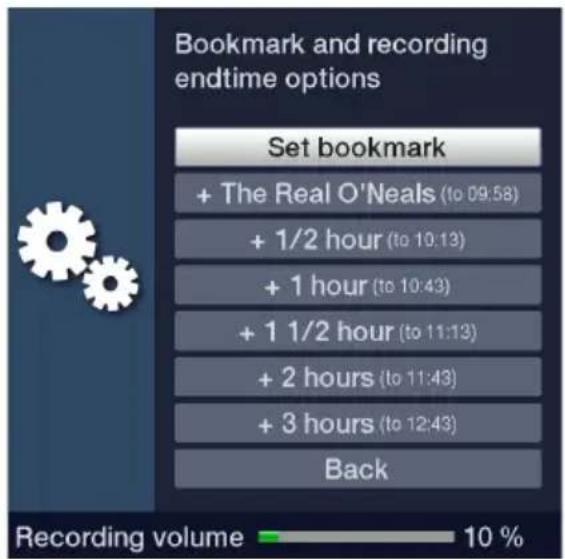
11.1.5 Setting tags while recording
By pressing the Record button during an ongoing recording, a window opens with the available functions.
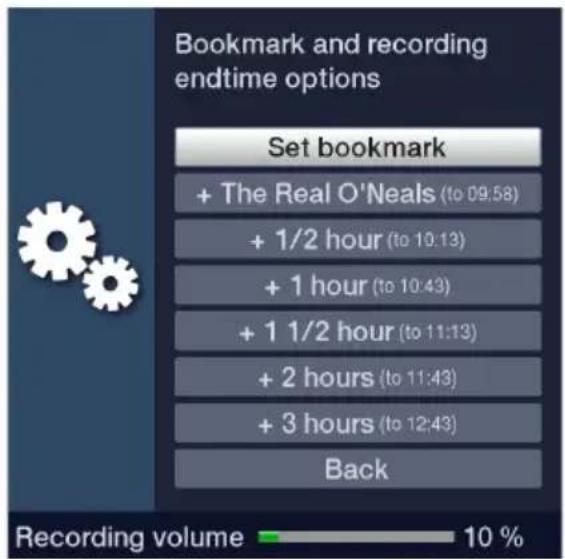
By selecting the Set bookmarks a tag is set at the current position.
i Tags can also be set or edited manually or automatically during playback and in the Modify DVR recordings menu, where this is enabled in automatic programme tagging.
11.2 DVR playback
The DVR Navigator can be called up in the following ways. Depending on whether you are in TV or radio mode, a list appears with all the TV or radio recordings present on an attached USB storage medium.
When doing this pay careful attention to the information and settings for global and user-dependent parental control in your instruction manual.

The broadcast information can be displayed and hidden by pressing the Info button repeatedly.
You can start to play back a recording by highlighting it and confirming with OK.
11.2.1 When in TV mode
In TV mode press the Stop/DVR button to switch directly to the DVR Navigator.
or
Open the programme lists navigator by pressing the OK button and switch to the DVR Navigator by pressing the Stop/DVR button.
or
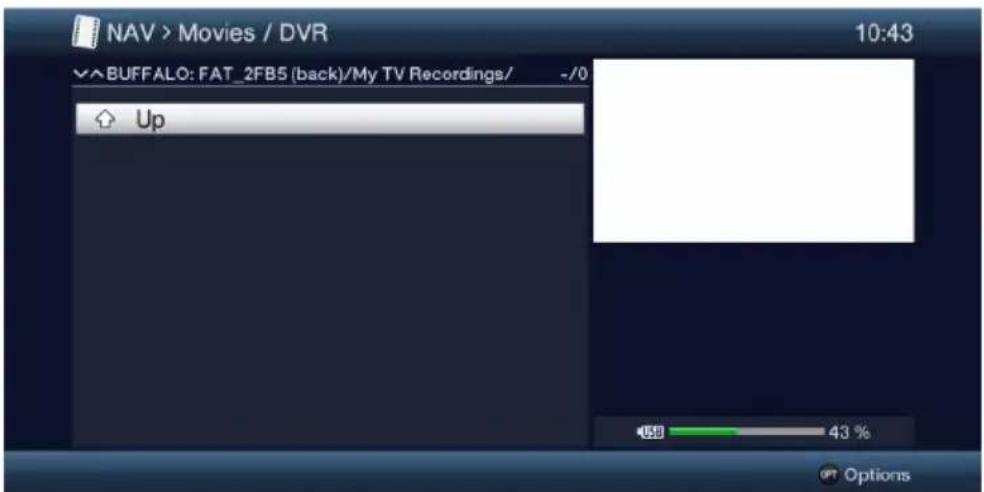
In the function selection select the Movies / DVR item.
Now retrieve the My Recordings folder on your connected recording medium.
11.2.2 From playback of a running / existing DVR recording
Press the OK button to open the DVR Navigator.
or
In the function selection select the Movies / DVR item.
Now retrieve the My Recordings folder on your connected recording medium.
11.2.3 Pausing / Freeze frame
To pause playback of a recording (freeze frame), press the Pause/Play button during playback.
Press the Pause / Play button again to resume playback from the same location.
11.2.4 Fast foward and rewind
To get to a specific place in a recording, your DVR has Fast Forward and Rewind functions.
Press the Fast forward or Rewind button during playback. A message appears saying "Fast forward" or "Rewind". The recording is played back at 4x the speed in the selected direction.
If you press the Fast Forward or Rewind button again, the speed will increase to 16x. A message appears saying "Fast forward " or "Rewind ".
If you press the Fast Forward or rewind button again, the search speed will increase to 64x. A message appears saying "Fast forward " or "Rewind
By pressing the Fast Forward or Rewind button again you can skip forwards and backwards in 10-minute steps.
When you get to the place you want in the recording, you can return to normal playing mode by pressing the Play / Pause button.
11.2.5 Setting tags
Skip to a location in the recording as described above where you want to add a tag.
Pressing the Record button sets a tag at the selected location.
EN
i Tags can also be set or edited manually or automatically during recording and in the DVR recordings menu, where this is enabled in automatic programme tagging.
11.2.6 Jump to tags
During playback you have the option of navigating directly to locations in the recording where you have set tags.
Using the Tag menu item in the Option selection, select the tag to skip to the location you want in the recording.
11.2.7 Stopping playback
Press the Stop button to stop playback. Playback is ended and the receiver reverts to normal mode. In doing so the receiver "takes note" of the place in the recording where playback ended. If you start playing this recording again, it will automatically resume at the point where you previously left off.
12 Encryption system
Under this menu item you can go to the submenus of the inserted smartcard and the Cl - / Cl + module.
Retrieve the Main Menu > Encryption System.
Select the inserted CI-/CI+ module, or the smart card, to access its submenu and to perform settings.

Please take into account that the submenus and setting options shown are provided by the module or the smart card and could therefore differ.
CAM-MHEG Autostart
If a CAM-MHEG application is available for an application, this can be started automatically.
Set the CAM-MHEG Autostart item to on or switch the function off.
PIN input
Here you can store a PIN for the respective Cl slot/smart card. This PIN is required to support DVR recordings with parental control restrictions.
This setting is only available if this function is supported by your CI/CI+ module/smart card.
Manually initialising the Cl / Cl+ module
You can manually initialise the inserted CI/CI+ module/smart card by pressing the green function button CI Reset.
13 ISI mode
The numerous functions and added value make watching television with TechniSat a wonderful and complex experience, with a wide range of possibilities. ISI mode cuts down the large number of options and is therefore ideal for children or older people who do not feel comfortable with the host of configuration options when operating the device. If the mode is activated, it is no longer possible to accidentally make changes with the remote control. At the same time, ISI mode displays simplified channel information in large text on the screen for people with visual impairment and, if desired, offers a clearly legible digital time display.
Activate ISI mode in Main menu > Settings > Special functions > OSD > ISI mode.
When ISI mode is active, the following functions are deactivated:
- Automatic updates
- Movies / DVR / music / pictures
- SFI / Timer
- UPnP renderer
Access to various menus is also blocked, however it is still possible to access the menu to deactivate the ISI mode.
ISI mode can also be used with the IsiZapper remote control which is optimised for ISI mode. Also see Section 2.8 (optional IsiZapper remote control).
13.1 Switching the device on/off (ISI mode)
When the device is on standby, you can switch it on by pressing the On/ Standby button on the remote control or on the device.
When operating normally you can switch the device to standby mode by pressing the On/Standby button.
13.2 Channel selection (ISI mode)
13.2.1 Using the channel up/down buttons
Use the up/down arrow buttons on the receiver to select a channel, or use the Channel +/- buttons on the remote control to scroll up or down the channel settings.
13.2.2 Using the number buttons
Use the number buttons to enter the number of the desired channel. Example:
1 for channel slot 1
1, then 4 for channel slot 14
2, then 3, then 4 for channel slot 234
1, then 5, then 6 then 7 for channel slot 1567
When entering channel numbers with multiple digits, you have approx. three seconds after pressing a button to complete the entry.
If you wish to enter a number consisting of only one, two or three digits, you can speed up the entry procedure by keeping the button pressed for longer on the last digit or by pressing the OK button.
13.2.3 Using the navigator (channel list)
Press the OK button.
The channel list navigator now appears. In TV mode, only TV channels are shown and in radio mode only radio channels are shown. The channel currently selected is highlighted.
You can now highlight the desired channel using the up/down arrow buttons, the page up/down buttons and the number buttons.
Press the OK button to select the highlighted channel.
13.3 Switching between TV/Radio
Using the 0 button, retrieve the NAV menu.
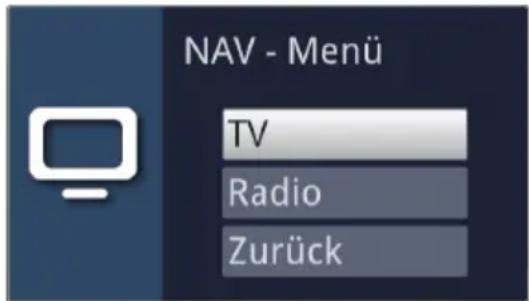
Now you can use the up/down arrow buttons to highlight the desired operating mode TV or Radio or Back to exit the menu again.
Pressing the OK button confirms the selection and switches to the selected operating mode.
The unit switches to the last radio channel set.
13.4 Volume control (ISI mode)
You have the option of adjusting the volume on your digital receiver. This facilitates operation of the receiver, as it means you can access all the major functions on a single remote control, and will only rarely have to resort to using the remote control for the TV.
To adjust the volume of your TV, press the Volume + rocker to increase the volume, and the Volume - rocker to decrease it.
During volume adjustment, the currently set volume is displayed at the upper edge of the screen.

When you switch on the digital receiver, sound will be reproduced at the volume level last set.
Volume control and the mute button also control the digital audio outputs (not for the bit stream setting) and switch these to mute.
13.4.1 Mute function
By pressing the MUTE button the sound is switched off or, if pressed again, switched back on.

Throughout the time that the volume is switched to mute, the appears at the upper right of the screen.

13.5 Teletext (ISI mode)
Your device can display Teletext information on channels that broadcast Teletext data.
13.5.1 Switching on Teletext
Switch the Teletext on by pressing the TEXT button.
13.5.2 Page selection
Use the number buttons 0 to 9 to enter the 3-digit page number of the Teletext page you want.

Your entry will be displayed in the upper left-hand corner of the screen.

As the Teletext pages cannot all be transmitted by the broadcaster at the same time, it may take a few seconds before the page is displayed. This is the case when the requested page cannot be instantly read into the memory, e.g. when using the Teletext search immediately after the channel is changed.
13.5.3 Teletext subpages
If Teletext subpages exist for a selected Teletext page, the subpages already loaded are indicated on the left, alongside the Teletext display. As soon as a new subpage is available, this is automatically displayed.
Use the OK button to show a specific subpage. The column on the left side of the screen is enabled. Subpages that have already been acquired are displayed.
Use the up/down arrow buttons to select the desired subpage.
You can exit the display of specific subpages by pressing OK.
13.5.4 Mixed mode
Pressing the Teletext button again enables mixed viewing mode. This means that the Teletext is superimposed on the TV picture.
13.5.5 Exiting Teletext
Pressing the Teletext button takes you back to normal mode.
14 Software update via USB interface
You have the option of updating the receiver's software via the USB interface.

To be able to run the software update via the USB interface, you first need to download the current software version from the Technisat Homepage (www.technisat.de).

The update can be performed using a standard USB flash stick which has been formatted in the FAT32 format.
Now copy the software file onto the USB flash stick.
If you only want to run a single update, copy the singleupdate file or, for multiple updates, the autoupdate file to the USB stick.

Please bear in mind that the singleupdate or autoupdate files may not have a file extension. Please also note that, to do this, the folder settings on your PC must be set to hide file extensions.

Do not store multiple software files on the USB stick. Furthermore, the "autoupdate" and "singleupdate" files must not be present at the same time.
Now switch the receiver to standby and insert the USB stick into the receiver's USB port. Now switch the receiver on.

The update process is now displayed in the following steps.
-
The message Loading software from data medium will now appear
-
Then a progress bar appears showing the progress of the software loading operation.
When the update is complete, the TV picture appears again. You can now switch the receiver to standby and remove the USB stick.

The update should not be interrupted at any point by removing the USB stick or by switching off the power supply, as this can cause the receiver to malfunction.
15 Troubleshooting
| Fault Possible cause Solution | ||
| Remote control does not work | Incorrect remote control code set | Set the correct remote control code |
| Batteries are spent Replace Batteries are spent Replace | batteries | |
| Various channels are not shown in the channel list | Incorrect channel list selected | Select another channel list |
| Sound OK, no TV picture Radio mode selected and radio background image is switched off | Check setting | |
| Incomplete or distorted picture | Incorrect picture format set | Check picture format |
| Incorrect picture display / zoom selected | Check picture display / zoom in the menu | |
| Check zoom setting | ||
| No image, no sound, display does not illuminate | No mains voltage Check mains power outlet and plug | Ins power outlet and plug |
| No picture via HDMI Incorrect HDMI sound format selected | Check HDMI sound format settings | |
| No sound or incorrect sound can be heard | Dolby Digital is active or incorrect audio language is selected | Check setting in the menu |
| Check Dolby Digital / language selection | ||
| No reception for channels which were OK before | Dish incorrectly positioned or faulty | Check dish |
| Channel is being transmitted on another transponder | Perform a search/scan | |
| Channel is no longer being transmitted | None | |
| The picture sometimes has square blocks At times the device switches to freeze frame image, no sound. At times the screen is black with the message "no signal". | Heavy rain or snow Remove | snow from dish |
| Dish incorrectly aligned Re-align dish | ||
| Dish is too small at the reception location | Use larger dish | |
| There is an obstacle between the dish and the satellite (e.g. a tree) | Mount the dish in an unobstructed position | |
| No image, no sound, display illuminates | Short-circuit in the LNB connection | Switch off device, rectify short-circuit Switch device on again |
| Defective or missing cable connection | Check all cable settings | |
| Faulty LNB Replace LNB | ||
| Incorrect outdoor unit set on the receiver | Modify setting | |
| The antenna cannot be rotated | Motor not suitable for DiSEqC 1.2 | Use suitable motor |
| Texts, e.g. in the info box or SFI plus detailed info, are difficult to read at a distance | Character size is set to "small" | Adjust character size |
| Device has no connection to the network | Incorrect network settings | Check network settings |
| Network cable not connected correctly | Check network connection | |
| Network connection not allowed | Allow network connection in Special functions > Allow network. | |
| DVR recording no longer possible | Selected storage medium is full | Delete existing recording(s) |
| Insert and set another storage medium. | ||
| DVR recordings cannot be deleted | File system on the storage medium is corrupt | Check storage medium |
| DVR recordings are not displayed | Selected storage medium is not inserted. | Insert set storage medium |
| Correct the storage medium setting | ||
| The device cannot be operated, or switched on or off | Faulty data stream -> Device blocked | Press and hold the On/ Standby button on the remote control for approx. 5 seconds. |
| Remove the mains plug for approx. 5 seconds, then switch the device back on | ||
| Perform flash reset: Caution! In doing so, all personal settings are deleted and the device starts with factory settings > Remove mains plug from the device > Press standby and the up arrow button on the device at the same time and do not release. > When the standby and up arrow button are pressed reconnect the mains plug > Keep the buttons pressed for approx. 5 secs. and then release both buttons. The display shows the message “FLA5.” | ||
| USB device is not detected | USB device is formatted in the incorrect file system | Format USB device in the FAT32 file system |
| Devices switches itself off after a specific time | Auto standby function is switched on | Check auto standby setting and if required switch off. |
16 Legal notices
Your TV bears the CE symbol and complies with all requisite EU standards.
Changes and printing errors reserved. Version 06/18.
Duplication and reproduction only with the publisher's approval.
TechniSat and TECHNISTAR S6 are registered trademarks of
D-54550 Daun/Eifel, Germany
www.technisat.de
This product is quality-tested and provided with the legal warranty period of 24 months as from the date of purchase.
Please keep your receipt as proof of purchase.
In the event of warranty claims please contact the product dealer.
TechniSat herewith declares that the radio system model TECHNISTAR S6 corresponds to Directive 2014/53/EU.
The complete text of the EU declaration of conformity is available at the following website:
The terms HDMI, HDMI High-Definition Multimedia Interface, and the HDMI Logo are trademarks or registered trademarks of HDMI Licensing Administrator, Inc.
Manufactured under license of Dolby Laboratories. Dolby, Dolby Audio and the double-D symbol are trademarks of Dolby Laboratories.
CE
Chere cliente, cher client,
3.2 Installation satellite
The terms HDMI, HDMI High-Definition Multimedia Interface, and the HDMI Logo are trademarks or registered trademarks of HDMI Licensing Administrator, Inc.
2. Videorecorder-timer
The terms HDMI, HDMI High-Definition Multimedia Interface, and the HDMI Logo are trademarks or registered trademarks of HDMI Licensing Administrator, Inc.
Manufactured under license from Dolby Laboratories. Dolby, Dolby Audio and the double-D symbol are trademarks of Dolby Laboratories.
CE
Námod k použití
TECHNISTAR S6
CZ
Predmluva
13.5 Videotext - teletext
D-54550 Daun/Eifel, Germany
www.technisat.de
The terms HDMI, HDMI High-Definition Multimedia Interface, and the HDMI Logo are trademarks or registered trademarks of HDMI Licensing Administrator, Inc.
Manufactured under license of Dolby Laboratories. Dolby, Dolby Audio and the double-D symbol are trademarks of Dolby Laboratories.
CE