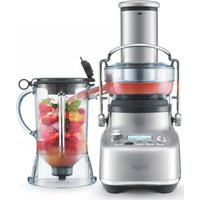
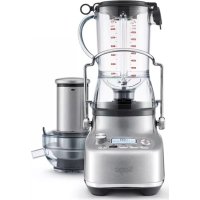
The Nutri Juicer SJE410 - Juicer SAGE - Free user manual and instructions
Find the device manual for free The Nutri Juicer SJE410 SAGE in PDF.
| Product type | Centrifugal juicer |
| Brand | Sage |
| Model | The Nutri Juicer SJE410 |
| Dimensions (approx.) | Height: 40 cm, Width: 30 cm, Depth: 25 cm (approx.) |
| Weight (approx.) | Approximately 5 kg |
| Power supply | 220-240 V, 50/60 Hz |
| Motor power | Robust motor, power not specified |
| Speeds | 2 speeds (low and high) |
| Feed chute | Extra-large, 84 mm diameter |
| Juice jug capacity | 1 liter with lid |
| Pulp container capacity | Large capacity, dishwasher safe |
| Filter basket material | Titanium reinforced micro-mesh stainless steel |
| Main functions | Centrifugal juice extraction, pusher included |
| Maintenance and cleaning | Removable parts dishwasher safe (top rack), cleaning brush included |
| Safety | Safety locking arm, automatic shut-off in case of overload, overheat protection |
| Warranty | 2 years parts, 5 years motor |
| Included accessories | Pusher, juice jug with lid, pulp container, cleaning brush |
Frequently Asked Questions - The Nutri Juicer SJE410 SAGE
User questions about The Nutri Juicer SJE410 SAGE
0 question about this device. Answer the ones you know or ask your own.
Ask a new question about this device
Download the instructions for your Juicer in PDF format for free! Find your manual The Nutri Juicer SJE410 - SAGE and take your electronic device back in hand. On this page are published all the documents necessary for the use of your device. The Nutri Juicer SJE410 by SAGE.
USER MANUAL The Nutri Juicer SJE410 SAGE
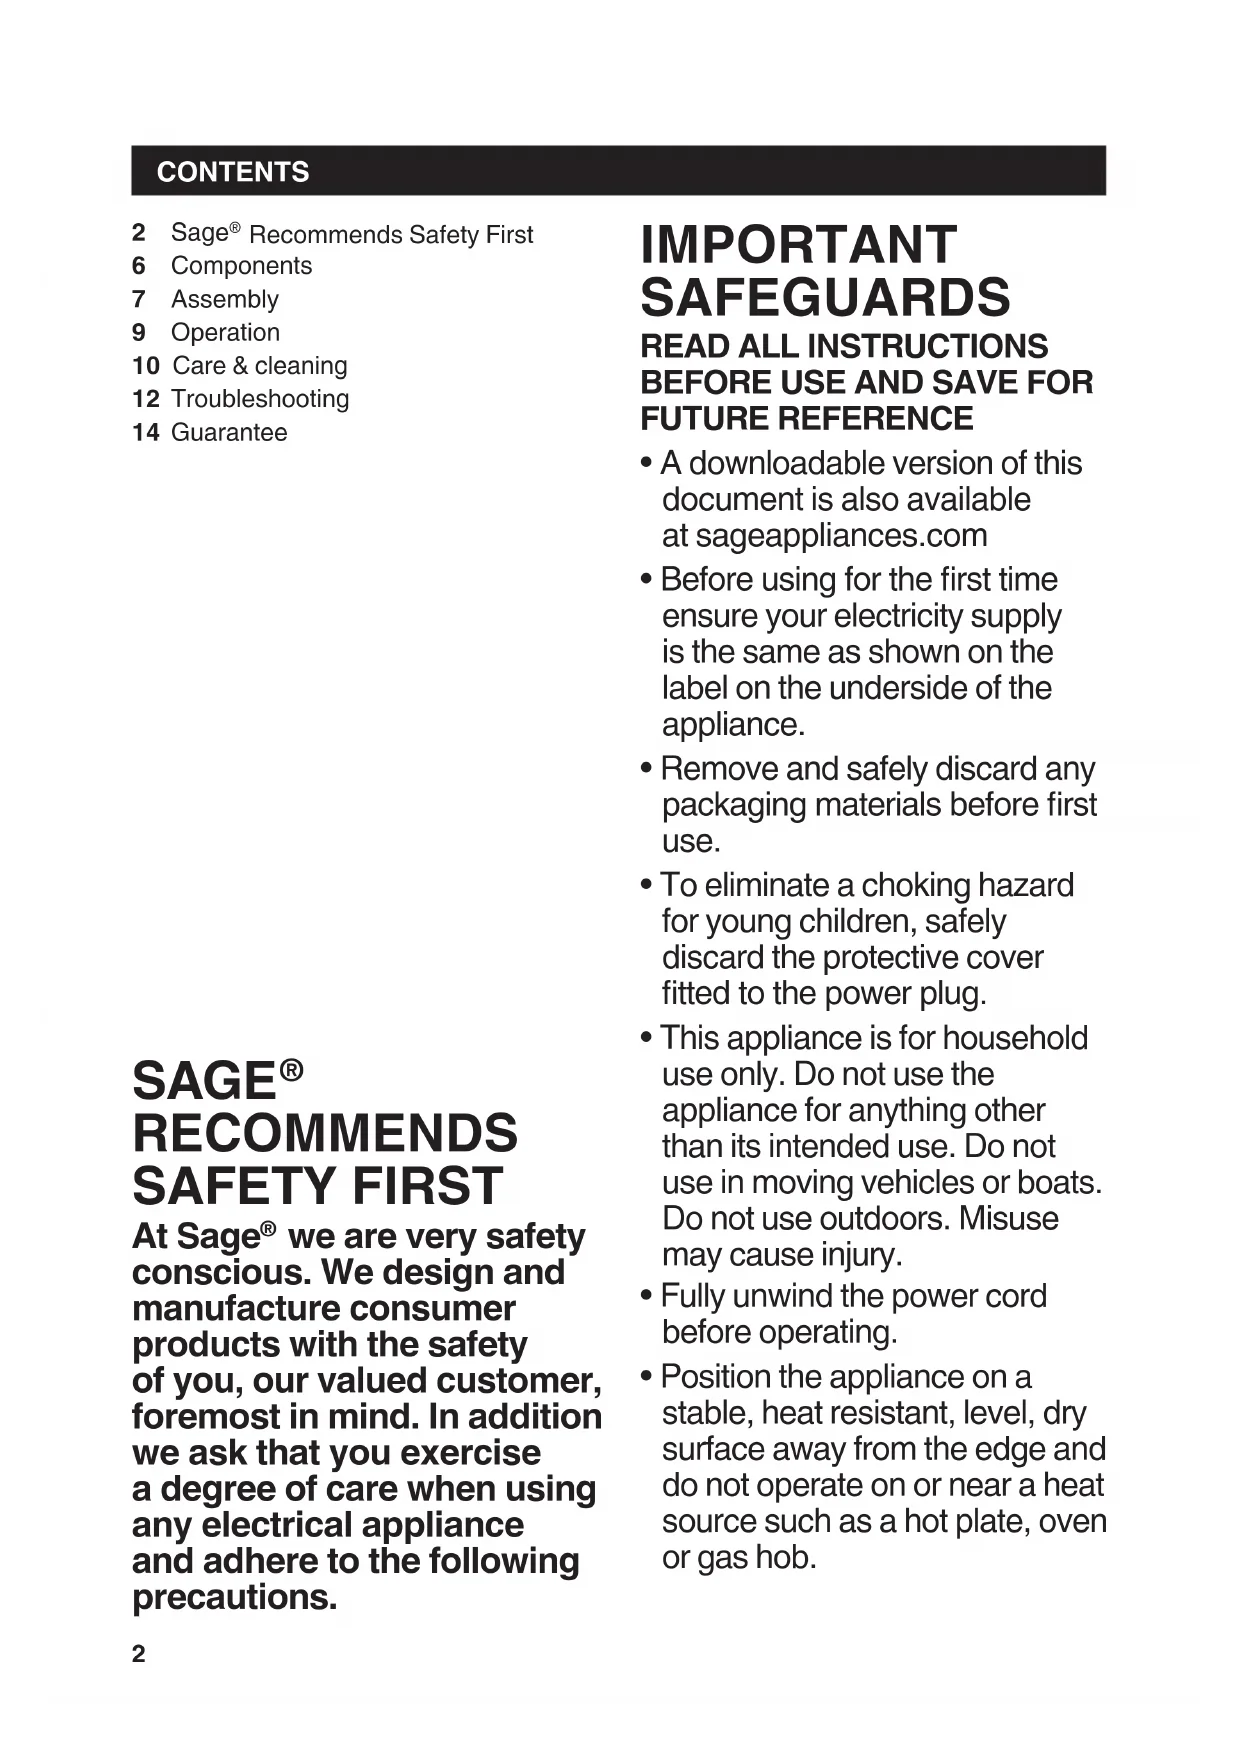
2 Sage® Recommends Safety First
6 Components
7 Assembly
9 Operation
10 Care & cleaning
12 Troubleshooting
14 Guarantee
SAGE®
RECOMMENDS SAFETY FIRST
At Sage® we are very safety conscious. We design and manufacture consumer products with the safety of you, our valued customer, foremost in mind. In addition we ask that you exercise a degree of care when using any electrical appliance and adhere to the following precautions.
IMPORTANT SAFEGUARDS
READ ALL INSTRUCTIONS BEFORE USE AND SAVE FOR FUTURE REFERENCE
- A downloadable version of this document is also available at sageappliances.com
- Before using for the first time ensure your electricity supply is the same as shown on the label on the underside of the appliance.
- Remove and safely discard any packaging materials before first use.
- To eliminate a choking hazard for young children, safely discard the protective cover fitted to the power plug.
- This appliance is for household use only. Do not use the appliance for anything other than its intended use. Do not use in moving vehicles or boats. Do not use outdoors. Misuse may cause injury.
- Fully unwind the power cord before operating.
- Position the appliance on a stable, heat resistant, level, dry surface away from the edge and do not operate on or near a heat source such as a hot plate, oven or gas hob.
WE RECOMMEND SAFETY FIRST
- Vibration during operation may cause the appliance to move.
- Do not let the power cord hang over the edge of a bench or table, touch hot surfaces or become knotted.
- Always ensure the appliance is turned OFF, unplugged at the power outlet and has been allowed to cool before cleaning, attempting to move or storing.
- Do not use the appliance if the power cord, plug, or appliance becomes damaged in any way. If damaged or maintenance other than cleaning is required, please contact Sage Customer Service or go to sageappliances.com
- Any maintenance other than cleaning should be performed by an authorised Sage® service centre.
- The installation of a residual current safety switch is recommended to provide additional safety when using all electrical appliances. Safety switches with a rated operating current not more than 30mA are recommended. Consult an electrician for professional advice.
-
Always ensure the appliance is properly assembled before use. The appliance will not operate unless properly assembled.
-
Do not use the appliance on a sink drain board.
- Keep hands, fingers, hair, clothing as well as spatulas and other utensils away from moving or rotating parts during operation.
- Do not use the appliance for anything other than food and/or beverage preparation.
- In order to avoid the possible hazard of the appliance starting by itself due to inadvertent resetting of the overload protection, do not attach an external switching device (such as a timer) or connect the appliance to a circuit that can regularly switch the appliance on and off.
- Carefully read all instructions before operation and save for future reference.
- This appliance can be used by children aged from 8 years and above and persons with reduced physical, sensory or mental capabilities or lack of experience and knowledge if they have been given supervision or instruction concerning use of the appliance in a safe way and understand the hazards involved.
Children shall not play with the appliance.
WE RECOMMEND SAFETY FIRST
- Cleaning and user maintenance shall not be made by children without supervision.
- Switch off the appliance and disconnect from the power outlet before changing accessories or approaching parts that move or in use.
- Do not use the appliance if the rotating sieve or the protective cover is damaged or has visible cracks.
- Always turn the appliance to the OFF position, switch off at the power outlet and unplug at the power outlet when the appliance is not in use.
- Always disconnect the appliance from the power outlet when it is left unattended and before assembling, disassembling or cleaning.
- The maximum operating time is 15 minutes. The maximum load is 5kg beetroot at a time.
- This appliance shall not be used by children. Keep appliance and its cord out of reach of children.
- Do not leave the appliance unattended when in use.
-
Do not push food into the feed chute with your fingers or other utensils. Always use the food pusher provided. Do not place hand or fingers into the food chute when it is attached to the appliance.
-
Do not juice stone fruit unless seeds and/or stones have been removed.
- Do not operate the juice extractor without the pulp and juice container in place.
- An example of the heaviest loading anticipated for use with this juices is 5kg of beetroot, juiced continuously over a period of 2 minutes.
- Make sure the stainless steel filter basket has stopped rotating and the motor has completely stopped before releasing the safety locking arm and/or attempting to move the appliance, when the juicer is not in use, and before disassembling, cleaning and storing.
- Any significant spillage onto the surface under or around the appliance, or onto the appliance itself, should be cleaned and dried before continuing to use the appliance.
- Be careful when handling the stainless steel filter basket as the small cutting blades at the base of the filter basket are very sharp. Mishandling may cause injury.
- Remove rind from all citrus fruit before juicing.
WE RECOMMEND SAFETY FIRST
- Do not use the appliance if the rotating sieve (filter basket) or lid is damaged.
- Always make sure juicer cover is clamped securely in place before motor is turned on. Do not unfasten interlock arm while juicer is in operation.

The symbol shown indicates that this appliance should not be disposed of in normal
household waste. It should be taken to a local authority waste collection centre designated for this purpose or to a dealer providing this service. For more information, please contact your local council office.

To protect against electric shock, do not immerse the
power plug, cord or appliance in water or any liquid.
SAVE THESE INSTRUCTIONS
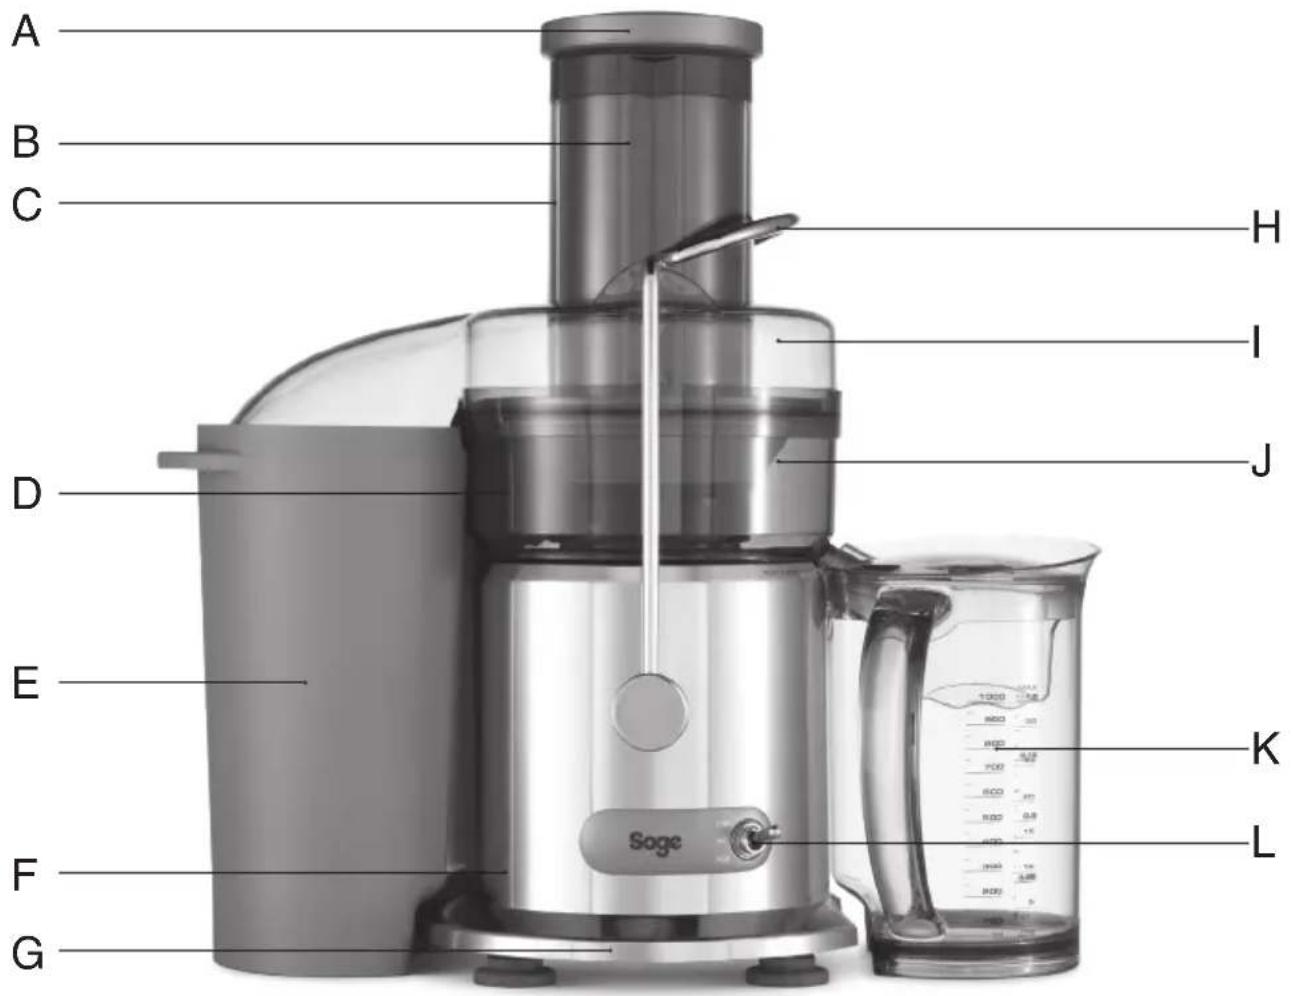
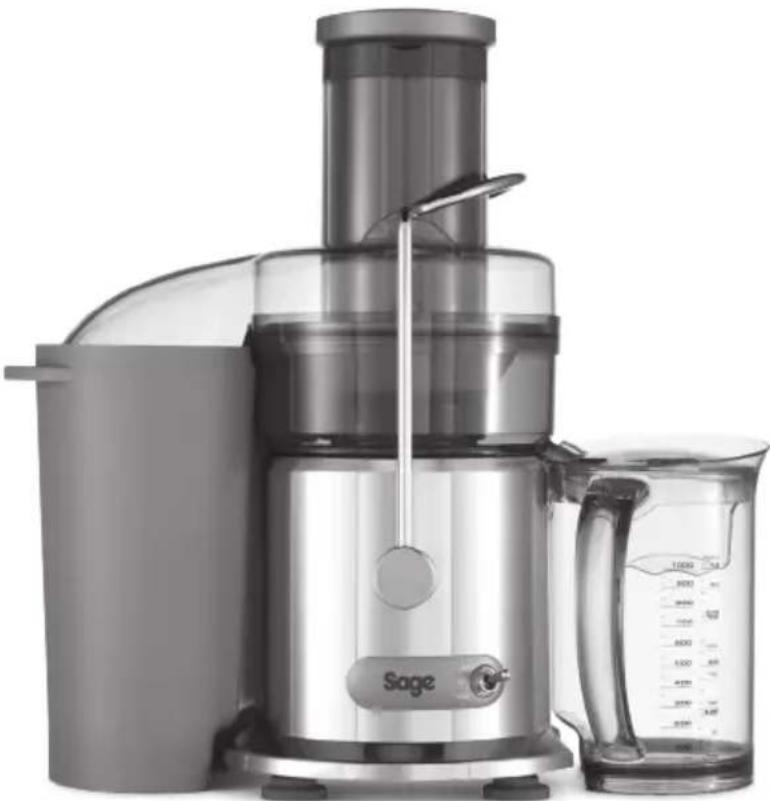
A. Food pusher
B. Unique Direct Central Feed System
C. Extra wide 84mm feed chute
D. Stainless steel titanium reinforced micro mesh filter basket
E. Large capacity pulp container (dishwasher safe).
F. Heavy duty motor
G. Cord storage
H. Interlocking safety arm
I. Juicer cover (not dishwasher safe).
J. Filter bowl surround (dishwasher safe).
K.1 litre juice jug and lid (dishwasher safe).
L. 2 speed electronic control ON / OFF switch
ASSEMBLY
BEFORE FIRST USE
Before using your juicer for the first time, remove and safely discard any packaging materials and promotional stickers and labels.
Ensure the appliance is switched off at the power outlet and the power cord is unplugged.
Wash the filter bowl surround, filter basket, juicer cover, food pusher, pulp container and juice jug and lid in warm, soapy water with a soft cloth. Rinse and dry thoroughly. The motor base can be wiped with a damp cloth. Dry thoroughly.
- Place motor base on a flat, dry surface such as a bench top. Ensure that the motor base is switched OFF at the control panel, then switch the appliance off at the power outlet and unplug the power cord.

- Place filter bowl surround on top of the motor base.
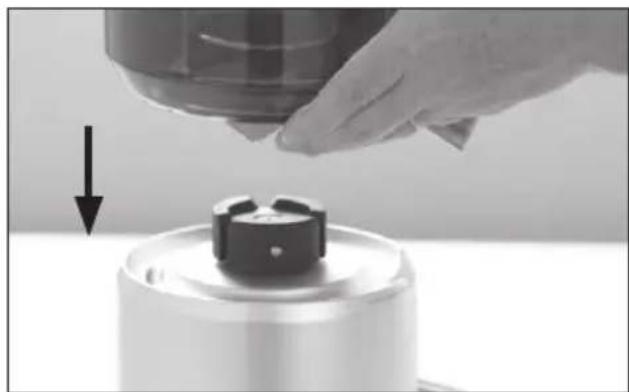
- Align the arrows at the base of the stainless steel filter basket with the arrows on the motor drive coupling and push down until it clicks into place. Ensure the stainless steel filter basket is fitted securely inside the filter bowl surround and onto the motor base.

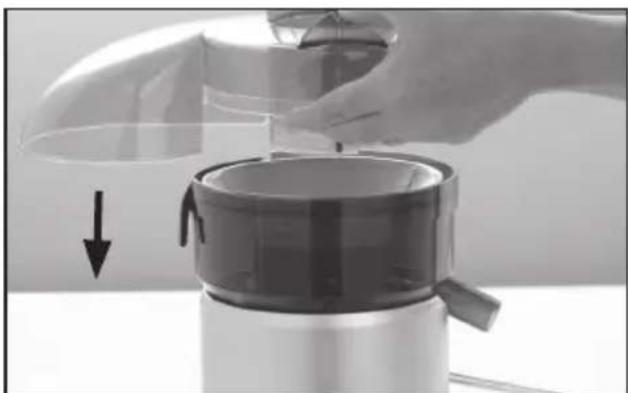
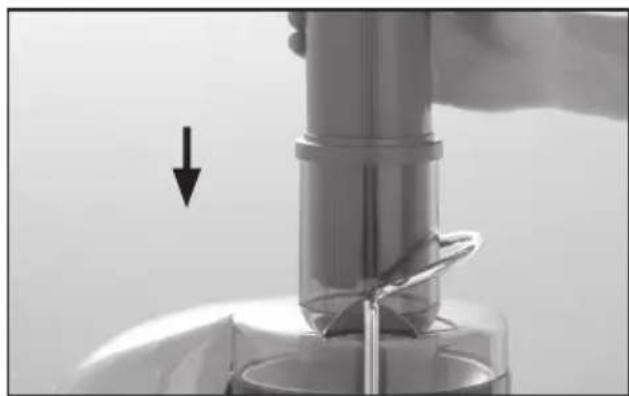
- Place the juicer cover over the filter bowl surround, positioning the feed chute over the stainless steel filter basket and lower into position.
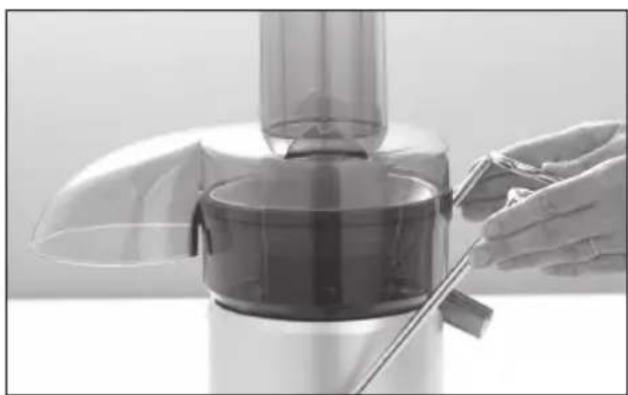
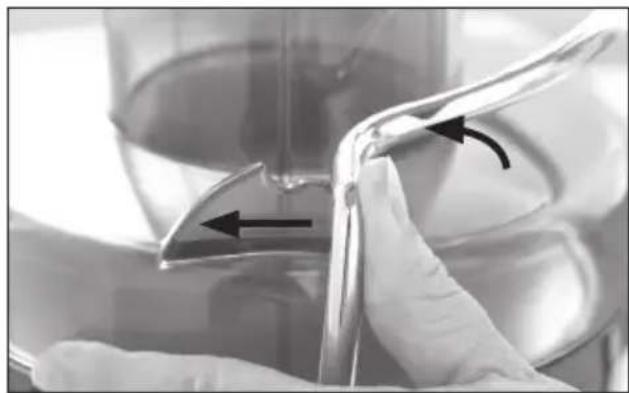
- Raise the safety locking arm up and locate into the two grooves on either side of the juice cover.
ASSEMBLY
The safety locking arm should now be in a vertical position and locked into place on top of the juice cover.
- Slide the food pusher down the food chute by aligning the groove in the food pusher, with the small protrusion on the inside of the top of the feed tube.
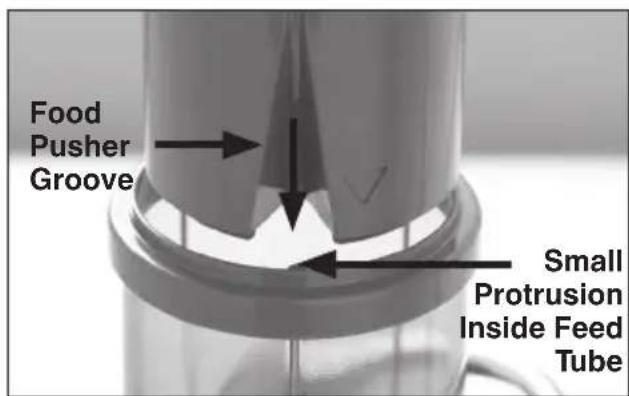
Continue to slide the food pusher down on the feed chute.
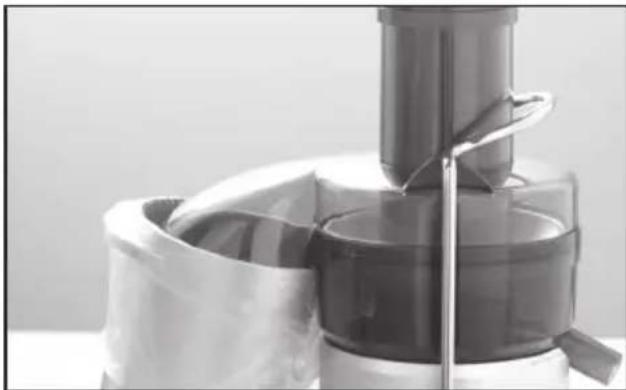
- Place the pulp container into position by tilting the motor base slightly to the right. Insert the pulp container under the juicer cover on the left hand side ensuring it is supported by the juicer cover and motor base.
NOTE
To minimise cleaning, line the pulp container with a plastic freezer bag to collect the pulp. Pulp can be used in other dishes, or as a compost for the garden or discarded.
- Place the juicer jug under the juice spout on the right hand side of the juicer. The juice jug lid can be used to avoid any splatter.
OPERATION
- Wash your selection of fruit and vegetables to be juiced.
- Ensure the juicer is correctly assembled. Refer to Assembling your Sagejuicer. Ensure the juicer jug is placed under the juice spout and pulp container is in position before commencing juicing.
- Plug the power cord into a 220-240V power outlet. Turn the power ON at the power outlet. Adjust the speed to the desired setting. Push the two speed switch either up for low speed or down for high speed depending on the type of fruit or vegetable being juiced. Use the speed selector as a guide for juicing different fruits and vegetables.
| SPEED SELECTOR TABLE | |
| Apples High | |
| Apricots (stone removed) Low | |
| Beetroot (trimmed) High | |
| Blueberries Low | |
| Broccoli Low | |
| Brussels sprouts (trimmed) High | |
| Cabbage Low | |
| Carrots High | |
| Cauliflower Low | |
| Celery High | |
| Cucumber (peeled) Low | |
| Cucumber, soft skinned | High |
| Fennel | High |
| Grapes (seedless) | Low |
| Kiwi Fruit (peeled) | Low |
| Mangoes (peeled, stone removed) | Low |
| Melons (peeled) | Low |
| Nectarines (stone removed) | Low |
| Oranges (peeled) | High or Low |
| Peaches (stone removed) | Low |
| SPEED SELECTOR TABLE | |
| Pears (stalks removed) | High for hard or Low for soft |
| Pineapple (peeled) | High |
| Plums (stone removed) | Low |
| Raspberries | Low |
| Tomatoes | Low |
| Watermelon (peeled) | Low |
- With the motor running, place food into the feed chute and use the food pusher to gently guide food down. To extract the maximum amount of juice, always push the food pusher down slowly.
| NOTE |
| The motor must be running prior to loading the feed chute. |
WARNING
Never use fingers to push food down the feed chute or to clear the feed chute. Always use the food pusher provided.

WARNING
The stainless steel filter basket contains small sharp blades to cut and process fruit and vegetables. Avoid touching the blades when handling the filter basket.
CARE & CLEANING
Ensure the juicer is turned off by switching the ON/OFF button on the control panel to OFF. Then switch the appliance off at the power outlet and unplug the power cord.
Ensure the juicer is correctly disassembled. Refer to Disassembling your new appliance.
FOR EASIER CLEANING:
- Clean as you go and avoid dried on juice or pulp residue.
- Immediately after each use, rinse removable parts in hot water to remove wet pulp. Allow parts to air dry.
NOTE
To minimise cleaning, line the pulp container with a plastic freezer bag to collect the pulp. Pulp can then be used for other dishes, or as compost for the garden or discarded.

CLEANING THE MOTOR BASE
- Wipe the motor base with a soft, damp cloth then dry thoroughly.
- Wipe any excess food particles from the power cord.
NOTE
Do not use abrasive scouring pads or cleaners when cleaning the parts or motor base as they may scratch the surface.
CLEANING THE FILTER BOWL SURROUND, JUICER COVER, FOOD PUSHER, PULP CONTAINER
Wash all parts in warm soapy water with a soft cloth. Rinse and dry thoroughly.
NOTE
The filter bowl surround, juicing jug and lid, food pusher and pulp container, are dishwasher safe (top shelf only). The juice cover is not dishwasher safe.
CLEANING THE FILTER BASKET
- For consistent juicing results always ensure that the stainless steel filter basket is thoroughly cleaned using the supplied cleaning brush. It is important to do this immediately after use.
- Soak the stainless steel filter basket in hot soapy water for approximately 10 minutes immediately after juicing is completed. If pulp is left to dry on the filter it may clog the fine pores of the filter mesh thereby lessening the effectiveness of the juicer.
- Using the cleaning brush, hold the filter basket under running water and brush from the inside of the basket to the outer rim. Avoid touching the small sharp blades in the centre of the filter basket. Repeat this process on the outside of the basket. After cleaning the filter basket, hold it up towards a light to ensure the fine mesh holes are not blocked. If the holes are blocked, soak the filter basket in hot water with 10% lemon juice to loosen the blocked holes. Repeat the cleaning process using the cleaning brush. Alternatively, wash the filter basket in the dishwasher.
CARE & CLEANING

Do not soak the stainless steel filter basket in bleach or other abrasive cleansers.
Always treat the filter basket with care as it can be easily damaged.
NOTE
The stainless steel filter basket is dishwasher safe (top shelf only).
- Rinse the juice jug and lid with froth attachment under running water.
- Wash both parts in warm soapy water with a soft cloth. Rinse and dry thoroughly.
NOTE
The juice jug and lid are dishwasher safe (top shelf only).
REMOVING STUBBORN OR STRONG FOOD STAINS AND ODOURS
Discolouration of the plastic may occur with strongly coloured fruit and vegetables. To help prevent this, wash parts immediately after use. If discolouration does occur, the plastic parts can be soaked in water with 10% lemon juice or they can be cleaned with a non abrasive cleaner.
The juicer is constructed with a heavy duty motor. So heavy duty, we have given the motor a 5-year guarantee against faulty materials or manufacture. This warranty is an extension of the 12-month replacement guarantee and covers the motor only. The warranty does not cover damage caused by accident, misuse, or being used in a manner not stated in the instruction book.
WARNING
Do not immerse the motor base in water or any other liquid. The centre of the filter basket and feed chute contains small sharp blades to process fruit and vegetables during the juicing function.
Do not touch blades when handling the filter basket or feed chute.
TROUBLESHOOTING
| POSSIBLE PROBLEM | EASY SOLUTION |
| Machine will not work when switched ON | ·The safety locking arm may not be correctly engaged in the vertical operating position with the locking arm located into the two grooves on either side of the juicer cover. |
| Motor appears to stall when juicing | ·Wet pulp can build up under the juicer cover if the juicing action is too vigorous. Try slower juicing action by pushing the food pusher down more slowly. Follow Disassembling and Cleaning instructions and clean the filter bowl surround, the stainless steel filter basket and the juicer cover. ·The juicer will automatically stop operating if the motor is stalled for more than 10 seconds. Either too much food is being processed at one time or the pieces are not small enough. Try trimming the food or cutting into smaller pieces of even size and processing a smaller amount per batch. To continue juicing, reset the juicer by pressing the ON / OFF switch on the control panel back to OFF then turn the appliance back on by pressing ON / OFF switch to ON. ·Hard fruit and vegetables will put excess strain onto the motor if a low speed is selected. Please refer to the juicing guide to determine the correct speed for the fruit and vegetables selected for juicing. Please ensure the motor is running prior to loading the chute. |
| Excess pulp building up in the stainless steel filter basket | ·Stop the juicing process and follow Disassembling instructions. Remove the juicer cover, scrape off pulp, reassemble and begin juicing again. Try alternating (soft and hard) vegetables and fruit varieties. |
TROUBLESHOOTING
| POSSIBLE PROBLEM | EASY SOLUTION |
| Pulp too wet and reduced extracted juice | Try a slower juicing action. Remove the stainless steel filter basket and thoroughly clean mesh walls with a cleaning brush. Rinse the filter basket under hot water. If the fine mesh holes are blocked, soak the basket in a solution of hot water with 10% lemon juice to unlock the holes or wash in the dishwasher. This will remove excess fibre build up (from fruit and vegetables) which could be inhibiting the flow. |
| Juice leaks between the rim of the Juicer and the juicer cover | Try a slower juicing speed and push the food pusher down the feed chute more slowly. Ensure all parts are securely pieced together, with the interlocking arm in place. |
| Juice sprays out from spout | The juice is being extracted too fast: try a slower juicing speed and push the food pusher down the feed chute more slowly. |
| Overheating with excessive loads. | The juicer is fitted with a safety device which safeguards against overheating with excessive loads. If overheating occurs, the juicer will automatically activate the overload protection device and the unit will switch itself off. When the overload protection is activated, unplug the Juicer from the power outlet for at least 15 minutes to allow the unit to cool. Then plug the juicer into the power outlet and use as normal. It is important to ensure the juicer is turned on and the motor is running prior to loading the chute. Do not put excessive loads in the feed chute and ensure the filter basket is totally clear of any food build up, on the blades and mesh, as this can result in unnecessary resistance against the motor resulting in overheating. |
GUARANTEE
2 YEAR LIMITED GUARANTEE AND 5 YEAR LIMITED MOTOR GUARANTEE
Sage Appliances guarantees this product for domestic use in specified territories for 2 years for all parts of the product and 5 years for the product's motor from the date of purchase against defects caused by faulty workmanship and materials. During this guarantee period Sage Appliances will repair, replace, or refund any defective product (at the sole discretion of Sage Appliances).
All legal warranty rights under applicable national legislation will be respected and will not be impaired by our guarantee. For full terms and conditions on the guarantee, as well as instructions on how to make a claim, please visit www.sageappliances.com.
the Nutri Juicer
SJE410
DE HANDBUCH
sage
INHALT
GWARANCJA I 5-LETNIA
OGRANICZONA GWARANCJA
NA SILNIK
BRG Appliances Limited
Unit 3.2, Power Road Studios,
114 Power Road, London, W4 5PY
Freephone (UK Landline): 0808 178 1650
Mobile Calls (National Rate): 0333 0142 970
DEU
www.sageappliances.com
Registered in England & Wales No.8223512 Registered in Germany No.HRB 81309 AG Dusseldorf) Registered in France No.879449 866 RCS
EN Due to continued product improvement, the products illustrated or photographed in this document may vary slightly from the actual product. DE Aufgrund unserer kontinuierlichen Produktverbesserungen kann die her gezeigte Abbildung gingefugig vom tatsächlichen Produkt abweichen. FR En raison de leur amelioration continue, les produits representes ou photographiés dans le present document peuvent différer légerement du produit réel. NL Vanwege voortdurende productverbeteringen, küssen de algebeidele produits in dit document sight afwijken van het eigenerijke product. IT A causa del continuo miglricularamento del prodotti, il prodotto descritto o illustrato in isto documento puo variare leggermente rispetto al prodotto reale. ES Perfeccionamos nosestros produits continuamente, por lo que el articulo podria diferir ligeramente de la ilustracion o la fotografia en este documento. PT Devidao a melhoria continua dos produits, os produits ilustrados ou fotografados;nesto documento podem variar ligereamente do produco real. e wzgldu na stale prersepawadzane ulepszenia, produkty prerstedastwna ou ilustracjach lub zdjeciach w tym dokumencia moga roznic sie od uzwyanego pro DA Pp grund af Iabende produktuvikling kan de Ilustrerede ell fotograferede producerk i dette Dokument variere en smule fra det faktiske produkt. a grund av kontinuierlig produktforbätting kan produkterma son visas i ilustrationema och fotografia i detta document skilja sig nagot fran den faktiska produ FI Jatkuvan tuotekehittyn seurauskensau kuvituksen tuotteet oivat vallamatta ole tysin samanaisia kuin varsinainen tuote. NO Pa grunn av kontinuierlig produktuvikling kan produktene som er vist ervafografert i dette dokumentet, variere noe fra det faktiske produktet.
Copyright BRG Appliances 2023