the Big Squeeze BJS700 - Juicer SAGE - Free user manual and instructions
Find the device manual for free the Big Squeeze BJS700 SAGE in PDF.


User questions about the Big Squeeze BJS700 SAGE
0 question about this device. Answer the ones you know or ask your own.
Ask a new question about this device
Download the instructions for your Juicer in PDF format for free! Find your manual the Big Squeeze BJS700 - SAGE and take your electronic device back in hand. On this page are published all the documents necessary for the use of your device. the Big Squeeze BJS700 by SAGE.
USER MANUAL the Big Squeeze BJS700 SAGE
natural_image
Modern kitchen brush rester with clear glass and metallic casing (no visible text or symbols)EN QUICK GUIDE
DE KURZANLEITUNG
FR GUIDE RAPIDE
NL SNELSTARTGIDS
IT GUIDA RAPIDA
ES GUÍA RÁPIDA
PT MANUAL RÁPIDO
Sage®

Contents
2 Important Safeguards
5 Components
6 Assembly
9 Operation
10 Care & Cleaning
12 Troubleshooting
15 Guarantee
SAGE® RECOMMENDS SAFETY FIRST
At Sage® we are very safety conscious. We design and manufacture consumer products with the safety of you, our valued customer, foremost in mind. In addition we ask that you exercise a degree of care when using any electrical appliance and adhere to the following precautions.
IMPORTANT SAFEGUARDS
READ ALL INSTRUCTIONS BEFORE USE AND SAVE FOR FUTURE REFERENCE
- A downloadable version of this document is also available at sageappliances.com
- Before using for the first time ensure your electricity supply is the same as shown on the label on the underside of the appliance.
- Remove and safely discard any packaging materials before first use.
• To eliminate a choking hazard for young children, safely discard the protective cover fitted to the power plug. - This appliance is for household use only. Do not use the appliance for anything other than its intended use. Do not use in moving vehicles or boats. Do not use outdoors. Misuse may cause injury.
- Fully unwind the power cord before operating.
- Position the appliance on a stable, heat resistant, level, dry surface away from the edge and do not operate on or near a heat source such as a hot plate, oven or gas hob.
- Vibration during operation may cause the appliance to move.
- Do not let the power cord hang over the edge of a bench or table, touch hot surfaces or become knotted.
• Always ensure the appliance is turned OFF, unplugged at the power outlet and has been allowed to cool before cleaning, attempting to move or storing.
• Always turn the appliance to the OFF position, switch off at the power outlet and unplug at the power outlet when the appliance is not in use.
- Do not use the appliance if the power cord, plug, or appliance becomes damaged in any way. If damaged or maintenance other than cleaning is required, please contact Sage Customer Service or go to sageappliances.com
- Any maintenance other than cleaning should be performed by an authorised Sage® service centre.
• Children should not play with the appliance.
- Cleaning of the appliance should not be carried out by children unless they are 8 years or older and supervised.
- The appliance and its cord should be kept out of reach of children aged 8 years and younger.
- The installation of a residual current safety switch is recommended to provide additional safety when using all electrical appliances. Safety switches with a rated operating current not more than 30mA are recommended. Consult an electrician for professional advice.
• Always ensure the appliance is properly assembled before use.
The appliance will not operate unless properly assembled.
- Do not use the appliance on a sink drain board.
- Keep hands, fingers, hair, clothing as well as spatulas and other utensils away from moving or rotating parts during operation.
- Do not use the appliance for anything other than food and/or beverage preparation.
- In order to avoid the possible hazard of the appliance starting by itself due to inadvertent resetting of the overload protection, do not attach an external switching device (such as a timer) or connect the appliance to a circuit that can regularly switch the appliance on and off.
- Carefully read all instructions before operation and save for future reference.
- The appliance can be used by persons with reduced physical or mental capabilities or a lack of experience and knowledge, only if they have been given supervision or instruction concerning use of the appliance in a safe way and understand the hazards involved.
- This appliance shall not be used by children.
-
Do not leave the appliance unattended when in use.
-
Do not push food into the feed chute with your fingers or other utensils. Always use the food pusher provided. Do not place hand or fingers into the food chute when it is attached to the appliance.
- Do not juice stone fruit unless seeds and/or stones have been removed.
- Do not operate the juice extractor without the pulp and juice container in place.
- Do not use the juice extractor if the juicing screw is damaged.
- Do not operate the machine longer than 20 seconds before inserting ingredients.
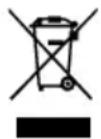
The symbol shown indicates that this appliance should not be disposed of in normal household waste.
It should be taken to a local authority waste collection centre designated for this purpose or to a dealer providing this service. For more information, please contact your local council office.

To protect against electric shock, do not immerse the er plug, cord or appliance ter or any liquid.
SAVE THESE INSTRUCTIONS

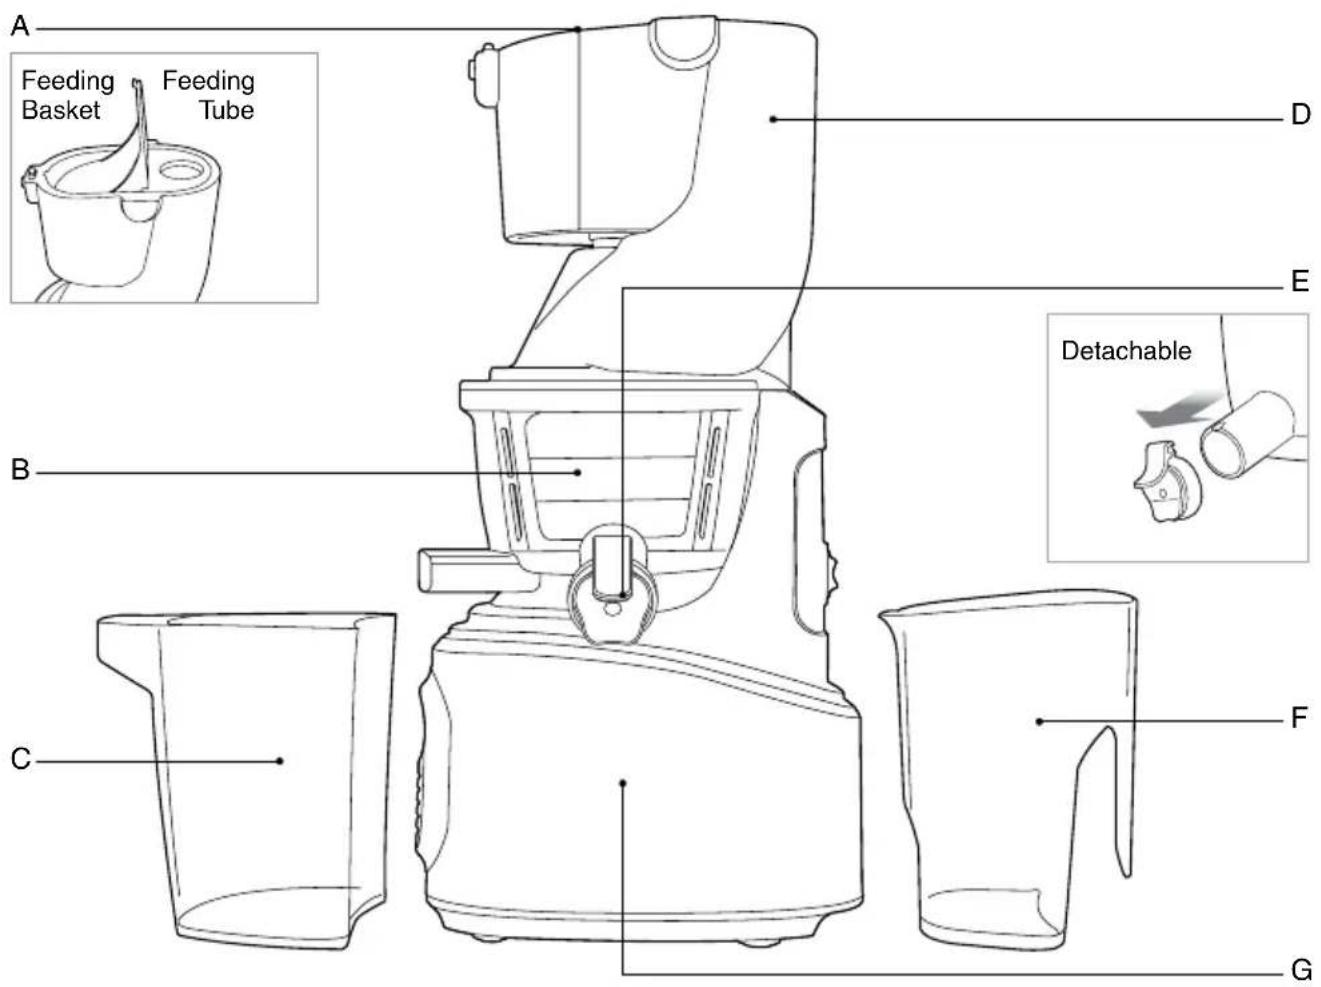
Components
text_image
A Feeding Basket Feeding Tube B C D E Detachable F GHIJKL
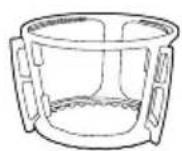
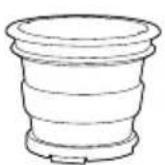
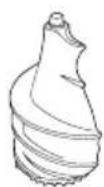
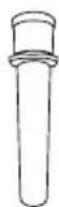
A. Feeding Tube & Basket For different sizes of produce.
B. Juicing Bowl
C. Pulp Cup
D. Drum Lid
E. Detachable Smart Cap
F. Juice Jug
G. Motor Body
H. Rotation Wiper
I. Strainer
J. Juicing Screw
K. Pusher
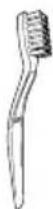
L. Cleaning Brush

Rating Information
220-240V\~50/60Hz 240W

Assembly
BEFORE FIRST USE
Before using your Juicer for the first time, remove any packaging material and promotional labels. Ensure the power is in the OFF position, the juicer is switched off at the power outlet and the power cord is unplugged.
Wash bowl and juicing tools in warm soapy water with a soft cloth. Rinse and dry thoroughly.
When first using your appliance, you may notice an odour coming from the motor. This is normal and will dissipate with use.
TOP SET ASSEMBLY
Align the dots ● on each part and assemble in the order shown. Once assembled, turn the drum lid clockwise to close.
TOP-SET AND BODY ASSEMBLY
Place the drum lid on the juicing bowl. Align the red dot ● on the drum lid with the ALIGN mark on the body and turn to the LOCK position.

natural_image
Line drawings of various kitchen appliances including a mixer, fan, and blender (no text or labels)ASSEMBLY
- Firmly insert the compression silicone into the slot below the pulp spout. The Juicer may leak if not assembled properly.
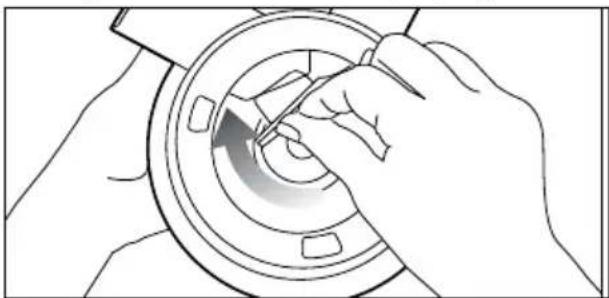
natural_image
Line drawing of hands using a tool to adjust or install a circular component (no text or symbols visible)- Assemble the strainer into the rotation wiper then place this assembly in to the juicing bowl ensuring the red dot on the strainer is aligned with the red dot on the juicing bowl.
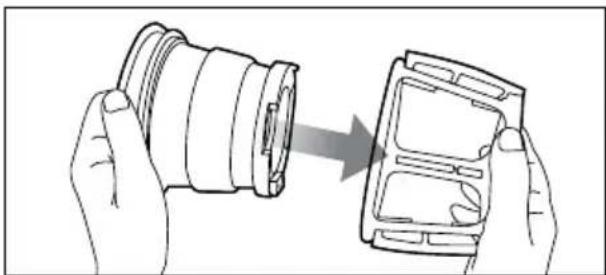
natural_image
Illustration of hands holding a camera lens and a plastic case, showing the process (no text or symbols)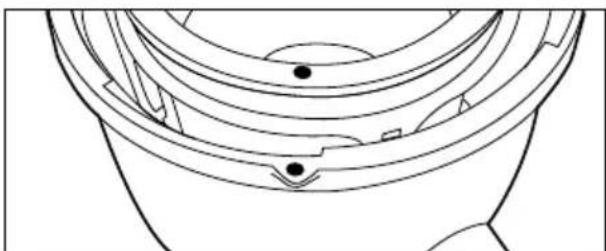
natural_image
Technical line drawing of a mechanical component with no visible text or symbols- Place the juicing screw into the strainer. Turn and press down on it until it clicks into place.
natural_image
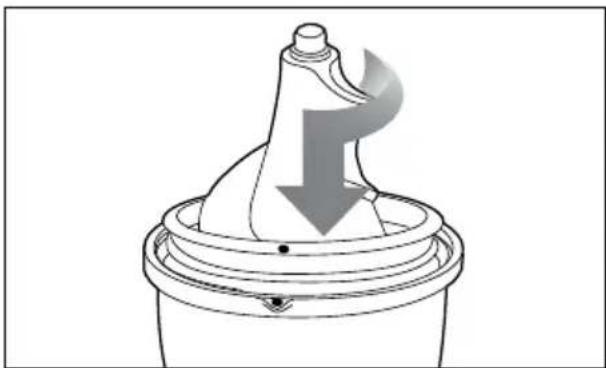
Diagram of a mechanical component with a downward arrow indicating force or direction (no text or symbols)The juicing screw needs to be locked in place in order to close the drum lid.
- Place the drum lid on to the juicing bowl aligning the dot ● on the drum lid with the red dot ● on the juicing bowl.
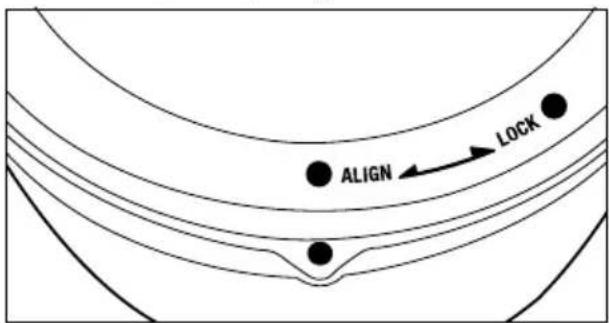
text_image
ALIGN LOCK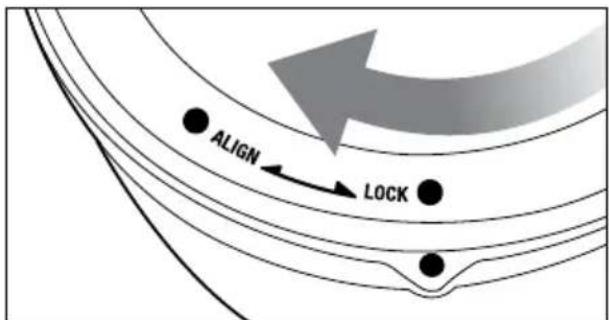
text_image
ALIGN LOCK
TIP
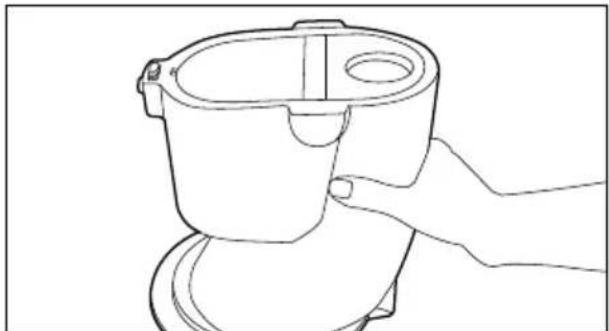
For easy assembly hold the drum lid by grabbing the feeding tube and turn clockwise as shown in the illustration.
natural_image
Line drawing of a hand holding a small mechanical component (no text or symbols)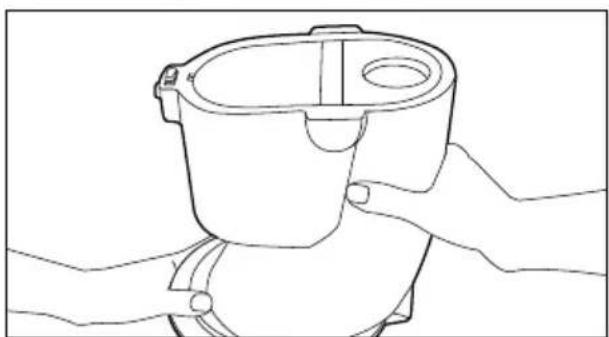
natural_image
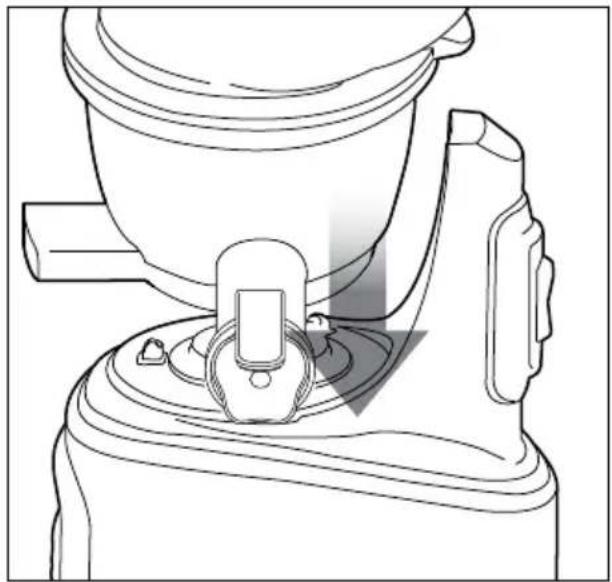
Line drawing of two hands holding a mechanical component (no text or symbols)- Align the red dot ● on the drum lid with the ALIGN mark on the body and turn to the CLOSE position.
natural_image
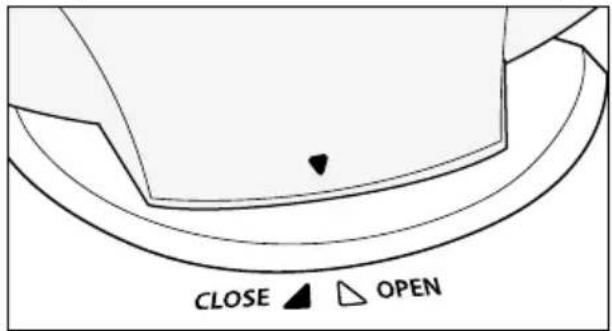
Technical line drawing of a mechanical device with a central component and a gray arrow indicating direction (no text or symbols)- Align arrows on drum lid and motor body.
text_image
CLOSE ▲ △ OPEN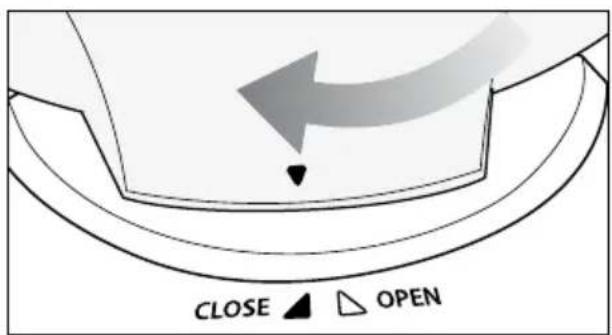
text_image
CLOSE ▲ △ OPEN
NOTE
The juicer will not operate if the down arrow ▼ on the drum lid is not completely aligned with the CLOSE mark on the body.
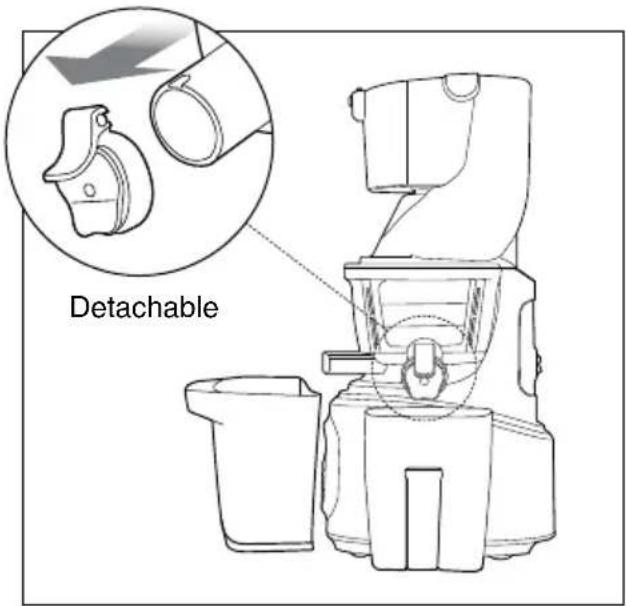
- Place the pulp cup under the pulp spout and place the juice cup under the juice spout as shown in the illustration.
text_image
Detachable
Operation
USING YOUR JUICER
-
After preparing the ingredients, plug the power cord into a wall outlet. Do not touch the power cord with wet hands. It may cause electrical shock, short-circuit, or fire.
-
Press the FORWARD button to operate.
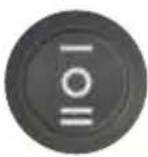
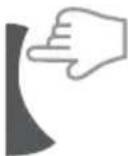
Forward: Pulls down and slowly masticates the ingredients.
Reverse: Pushes the ingredients back up to dislodge them. The REVERSE button only works while holding down the switch.
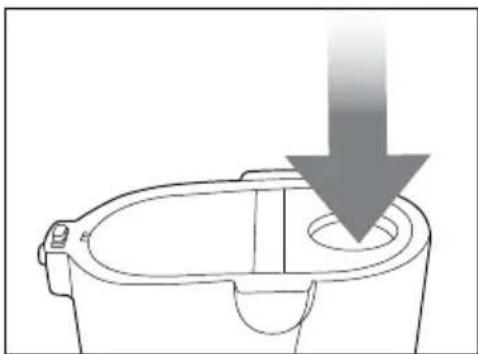
- Insert the prepared ingredients into the feeding tube, one piece at a time. If large quantity of ingredients are put into the feeding tube, it can cause the juicer to stop Remove hard seeds or pits in fruits. When juicing frozen fruits, completely thaw before juicing.
HARD VEGETABLES & HIGH FIBRE FOODS (E.G. CARROTS, BEETROOT, & SPINACH)
Insert into the feeding tube.
natural_image
Line drawing of a mechanical component with a downward arrow indicating force or direction (no text or symbols)Tough and fibrous ingredients: Cut to 2cm wide and 5cm long.
Fibrous leafy vegetables: (celery, kale, collard greens, etc.): Cut the stems into 5cm long and bundle up the leafy part as you insert them into the juicer.
SOFT FRUITS & VEGETABLES (E.G. APPLES, ORANGES & TOMATOES)
Insert into the feeding basket.
natural_image
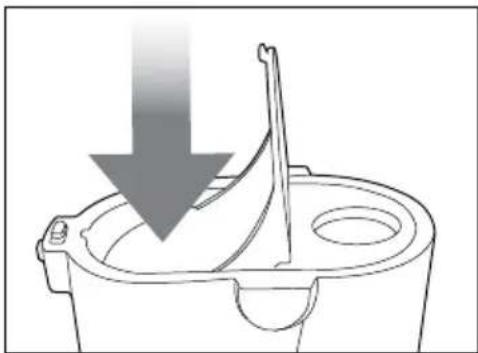
Technical line drawing of a mechanical component with a downward arrow indicating force or direction (no text or symbols)Soft ingredients: Cut ingredients into 1–4 pieces. Insert the prepared ingredients into the feeding basket and push down the ingredient with the basket lid to extract.

Care & Cleaning
Extract all the remaining pulp in the juicing bowl before stopping the juicer.
For easier clean up, operate the juicer for an additional 30 seconds after the juice is extracted. Then fill the juicing bowl with water and run the juicer before opening the drum lid.
When the drum lid is stuck, press the REVERSE - OFF - FORWARD button in this order, switching back and forth 2 to 3 times to dislodge. Then place both hands on the drum lid and firmly press down while simultaneously turning the drum lid to open.
CLEANING THE JUICER
- Switch OFF and unplug the power cord from the wall outlet.
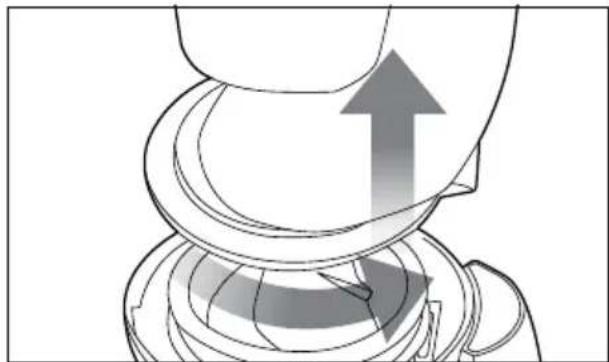
- Turn the drum lid counter clockwise to open.
natural_image
Mechanical assembly diagram showing a rotating component with an upward arrow indicating motion (no text or symbols)
WARNING
When moving the appliance, do not lift by grabbing the feeding tube. Always lift the appliance by grabbing the body or handle.
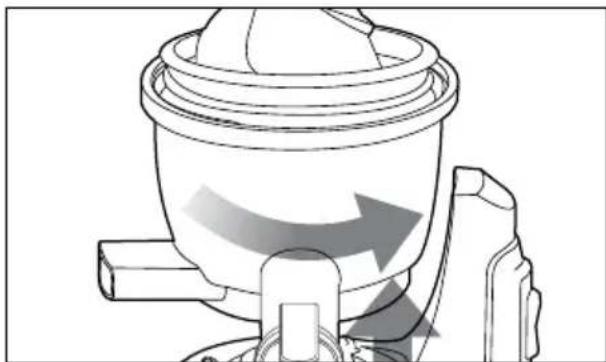
3. Turn the top-set counter clockwise and lift off the body.
natural_image
Technical line drawing of a mechanical component with directional arrows indicating motion (no text or symbols)- Remove the juicing screw, strainer and rotation wiper unit from the juicing bowl. Clean with provided brush.

NOTE
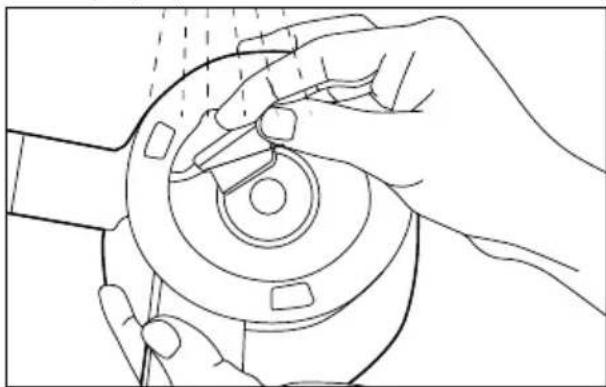
Immediately clean the juicer after each use. If remaining residue in the juicer dries up, it can make disassembling and clean-up difficult. The excess build up can cause poor performance in future uses. For easier disassembly, place the top-set in the sink and run the water through from the top of the top-set.
We do not recommend to wash any parts of the juicer in the dishwasher. Washing parts in the dishwasher can cause damage to them due to prolonged exposure to harsh detergents, hot water and pressure.
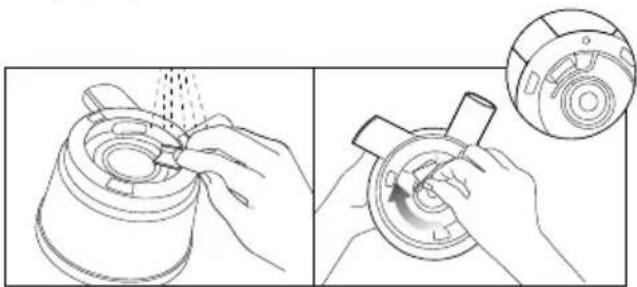
- Place the juicing bowl under running water and unplug the compression silicone to clean the pulp spout.
natural_image
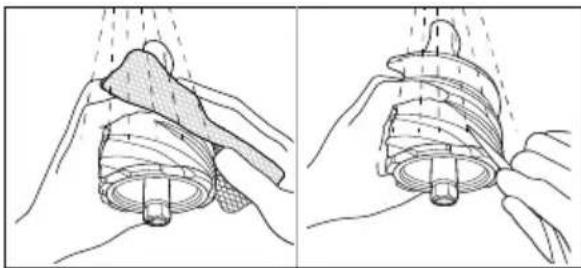
Line drawing of hands assembling a mechanical component (no text or symbols)- Under running water, clean the outside of the juicing screw with a dish scrub. Use the tip of the cleaning brush to push out any residue in the crevices on the bottom of the juicing screw.
natural_image
Illustration of a hand holding a mechanical component with spray, shown from two different angles (no text or symbols present)Thoroughly clean the juicing screw ensuring that the juicing screw is clean without any residue.
Thoroughly dry the bottom of the juicing screw. After juicing ingredients with seeds, make sure to thoroughly clean the bottom crevice of the juicing screw. (If this area isn't properly cleaned, it can cause the part to be damaged).
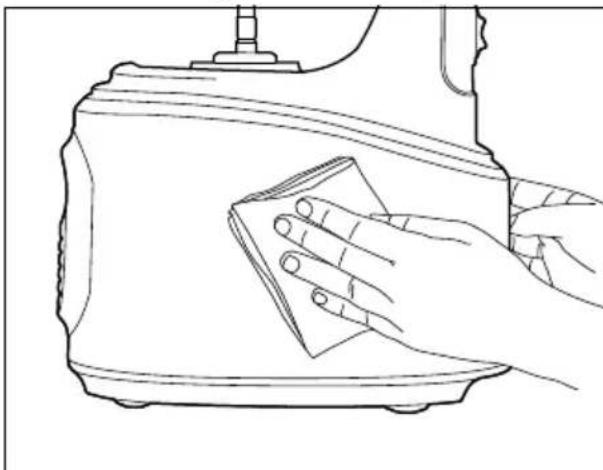
- Clean the body with a soft damp towel and dry.
natural_image
Line drawing of a hand cleaning a small object on a surface, no text or symbols presentIf the towel is dripping wet, make sure to squeeze out the excess liquid before using it on the juicer.
CLEANING SILICONE PARTS
Clean the rotation wiper under running water.
Thoroughly dry after cleaning. Before assembling the top-set, ensure that the compression silicone and silicone ring are firmly inserted.
If the compression silicone and silicone ring are not firmly inserted, juice may leak from the bottom of the juicing bowl.
COMPRESSION SILICONE
Unplug to clean.
After cleaning, firmly insert into the slot below the pulp spout.
natural_image
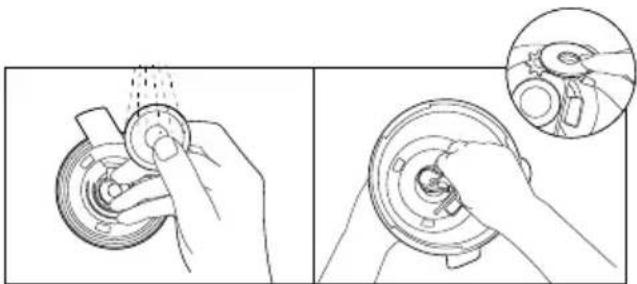
Illustration of hands using a tool to adjust or clean a mechanical component, showing a close-up view (no text or symbols present)SILICONE RING
Remove the silicone ring from the juicing bowl to clean.
After cleaning, push in the silicone ring with the smaller surface facing down.
natural_image
Illustration showing two steps of a hand holding a circular component, with an inset close-up of the interior (no text or symbols)SMART CAP
Remove from the juice spout to clean. After cleaning, attach the smart cap to the smart cap silicone on the juice spout.

natural_image
Three-step diagram showing a pipe fitting process: adding a valve, adjusting a valve, and inserting a plug into a terminal outlet (no text or symbols present)PROBLEM EASY SOLUTION
| There is no power to the juicer | Check if the power cord is properly plugged in.Check if the drum lid and the juicing bowl are properly assembled.Check if the top-set and the body are properly assembled.NOTE: Juicer will not operate if parts are not assembled properly. |
| Low juice yield | Different ingredients hold different amounts of fluid that will yield different amounts of juice.If the ingredients are not fresh, they may contain reduced amount of fluid, which will yield less juice. Soak ingredients in cold water for about 30 minutes prior to juicing for the best result.Check if the compression silicone is firmly inserted.If the ingredient itself has low water content, it may help to soak it in water before juicing.If juicing ingredients with small seeds, after a few servings, it may reduce the juice yield. For best result, disassemble and wash the top set in between juicing.If there is seed residue on the bottom of the strainer, this can affect juicer performance and the overall juice yield. |
| There is too much pulp in the juice | To reduce the fine pulp, clean the top-set frequently and extract the pulp.Use a mesh strainer and put the juice through it to collect the unwanted pulp.If the strainer and the screw are damaged and affecting the juicer's performance, it is recommended the parts be replaced.The lifetime of each part may vary depending on length and method of use and ingredients extracted. |
| The drum lid will not close | Make sure the juicing screw is pushed all the way in to the strainer in order for the drum lid to close properly.If the juicing screw is not properly in position, the drum lid may not close. |
PROBLEM EASY SOLUTION
| Odd noise from the juicer | Check if the parts are assembled correctly. Try reassembling the parts and listen for the odd noise.Do not start the juicer unless there are ingredients and/or liquid in it.Operating the juicer without ingredients can cause damage to the screw.If the juicer is operated without ingredients or liquid, the noise level can increase and also can lead to damage.The friction noise from the juicing screw and the strainer will disappear when ingredients are inserted into the juicer.If the noise occurs when ingredients are inserted into the juicer, check the size of the ingredients. Do not insert anything over 3cm in thickness.Depending on the type of ingredients, the dimensions can be smaller.The noise can occur if the juicer is operated on an uneven or slanted surface. Place the juicer on a horizontally flat surface when operating. |
| The extracted pulp is very moist | During the very beginning of extraction, the pulp can be more moist.Depending on the ingredient's condition, the extracted pulp can be affected; especially when the ingredient is not fresh, the juice can be extracted with the pulp. |
| During operation, the juicing bowl shakes | The juicing screw and the strainer are set up to crush and squeeze the ingredients. It is normal for the juicing screw and the strainer to vibrate.If the ingredient contains strong fibre, the vibration from the top-set may be stronger. |
| During juicing, the juicer stopped | Check the power cord and make sure it is plugged in correctly.Check that all the parts are correctly assembled.If too many ingredients are inserted at one time, this can cause the juicer to stop.When the juicer stops because there are too many ingredients inserted in it, press the REVERSE - OFF - FORWARD button in this order, switching back and forth 2 to 3 times. The reverse setting will push the ingredients up and the forward setting will pull the ingredients down.After using more than 30 minutes, if the juicer stops due to the overload protection, let the juicer cool for 30 minutes to 1 hour before juicing again.If there are hard seeds within the ingredients, remove them before juicing. Hard seeds can damage the juicer. |
| Layers of separation in the juice | Depending on the density of the ingredients, the extracted juice may show layers of different juices. It is different from separation due to oxidation caused by juicing with a high-speed juicer. |
PROBLEM EASY SOLUTION
| The drum lid is stuck | After juicing, let the juicer operate for another 30 seconds to extract the remaining pulp.If there is too much pulp in the top-set, this can cause the drum lid to not open. In this situation, press the REVERSE - OFF - FORWARD button in the order, switching back and forth 2 to 3 times. Then place both hands on the drum lid and firmly press down while simultaneously turning the drum lid to open.Pour water down the feeding tube to rinse out the insides and then try opening the drum lid. |
| Juice dripping down the body | If the compression silicone on the bottom of the juicing bowl is not plugged in correctly, the juice may seep out on to the juicer body.Before assembling the parts, check and make sure the compression silicone is plugged in correctly. |
| Is it possible to juice ingredients with tough fibre? | Ingredients like celery or ginger contain long fibres that may wrap around the juicing screw and affect the juicer's performance. When juicing fibrous ingredients, do not collect more than 500ml of juice. After collecting this quantity or less, clean the top-set completely before juicing again. |
| Discolouration of the plastic parts | After juicing, if the juicer is not cleaned right away, the remaining pulp inside the top-set can dry up which can make disassembling and cleaning hard. This can also affect the juicer's performance and colour.Ingredients that are rich in carotenoids such as carrots and spinach may dye plastic parts. When the parts are dyed with carotenoids, rub vegetable oil in to the dyed areas and use mild detergent to clean.Vegetable oil should only be used during clean-up for parts that are discoloured. Do not use vegetable oil on the juicing screw or the strainer. If vegetable oil or oil from animal fat gets on the juicing screw or the strainer, this can affect the juicer's performance and may result in damaged parts.The silicone pieces on the top-set can be detached to be thoroughly cleaned. |
| Using for purposes other than juicing | This juicer is designed to juice ingredients like fruits and vegetables.Do not use the juicer for extracting vegetable oil.Do not juice ingredients with high contents of vegetable/ animal oil.If vegetable/animal oil gets on the juicing screw or the strainer, this can affect the performance of the juicer and could result in damaged parts. |

Guarantee
2 YEAR LIMITED GUARANTEE AND 5 YEAR LIMITED MOTOR GUARANTEE
Sage Appliances guarantees this product for domestic use in specified territories for 2 years for all parts of the product and 5 years for the product's motor from the date of purchase against defects caused by faulty workmanship and materials. During this guarantee period Sage Appliances will repair, replace, or refund any defective product (at the sole discretion of Sage Appliances).
All legal warranty rights under applicable national legislation will be respected and will not be impaired by our guarantee. For full terms and conditions on the guarantee, as well as instructions on how to make a claim, please visit www.sageappliances.com.

Inhalte
natural_image
Line drawings of various kitchen appliances including a blender, fan, and blender (no text or labels)MONTAGE
natural_image
Line drawing of hands using a tool to adjust or install a circular component (no text or symbols visible)natural_image
Diagram showing two hands holding a camera lens and a plastic housing, with an arrow indicating transformation (no text or symbols present)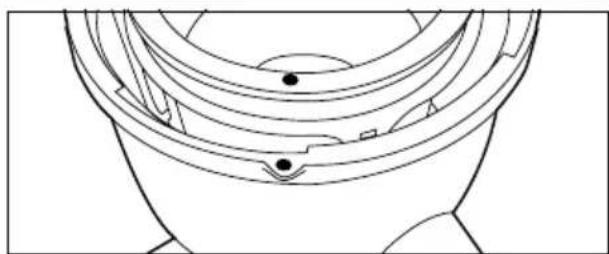
natural_image
Technical line drawing of a mechanical component with no visible text or symbolsnatural_image
Diagram of a mechanical component with a downward arrow indicating force or direction (no text or symbols present)natural_image
Line drawing of a mechanical component with a hand adjusting its part (no text or symbols)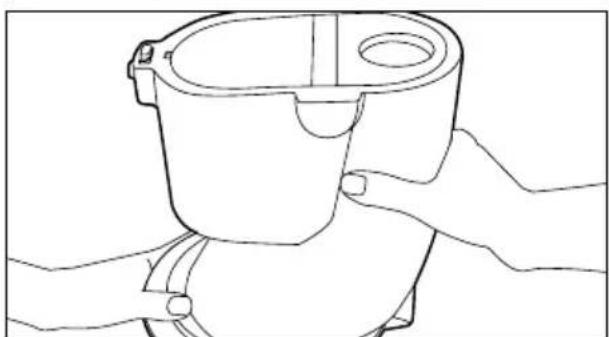
natural_image
Line drawing of a mechanical component with hands holding it (no text or symbols)natural_image
Line drawing of a kitchen mixer with handle and control knob (no text or symbols)text_image
CLOSE ▲ △ OPEN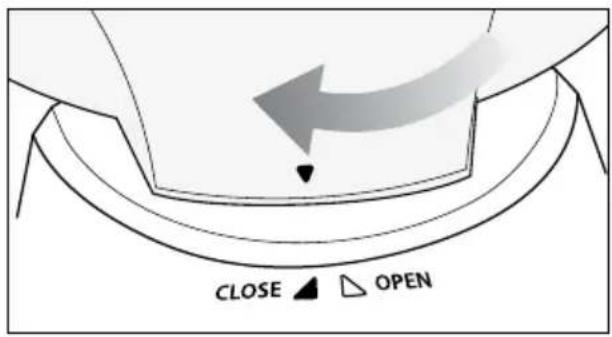
text_image
CLOSE ▲ OPEN
HINWEIS
natural_image
Technical line drawing of a mechanical component with a downward arrow indicating force or direction (no text or symbols)natural_image
Technical line drawing of a mechanical component with a downward arrow indicating force or direction (no text or symbols)natural_image
Diagram of a mechanical or fluidic component with an upward arrow indicating motion or force (no text or symbols present)
WARNUNG
natural_image
Technical line drawing of a mechanical component with directional arrows indicating motion (no text or symbols)natural_image
Line drawing of hands operating a mechanical component with no visible text or symbolsnatural_image
Illustration of two hands performing a manual tool on a mechanical component, showing spray and contact details (no text or symbols)natural_image
Line drawing of a hand cleaning a small object on a surface (no text or symbols)natural_image
Technical line drawing showing two-step assembly: one of a container with liquid being poured, the other of a mechanical component being inserted (no text or symbols)SILIKONRING
natural_image
Illustration showing two steps of a hand turning a circular component, with an inset close-up highlighting the process (no text or symbols present)SMART CAP
natural_image
Three-step diagram showing a pipe fitting process: adding a valve to a cylindrical component, adjusting a valve tip, and inserting a plug into a hose (no text or symbols present)natural_image
Modern kitchen brushset with clear glass and metallic casing (no visible text or symbols)FR GUIDE RAPIDE
Sage®

Table des matières
natural_image
Line drawings of various kitchen appliances including a blender, fan, and blender (no text or labels)ASSEMBLAGE
natural_image
Line drawing of hands using a tool to adjust or install a circular component (no text or symbols visible)natural_image
Illustration of hands holding a camera lens and a device casing, showing the process of adding or removing (no text or symbols present)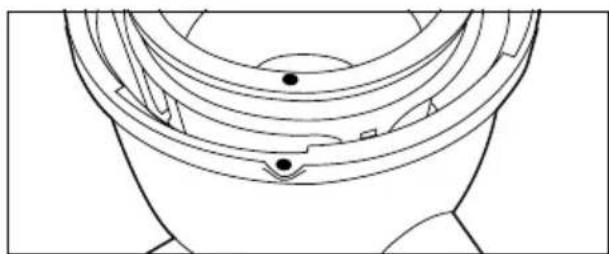
natural_image
Technical line drawing of a mechanical component with no visible text or symbolsnatural_image
Diagram of a mechanical component with a downward arrow indicating force or direction (no text or symbols present)natural_image
Line drawing of a mechanical component with a handle and mounting hole (no text or symbols)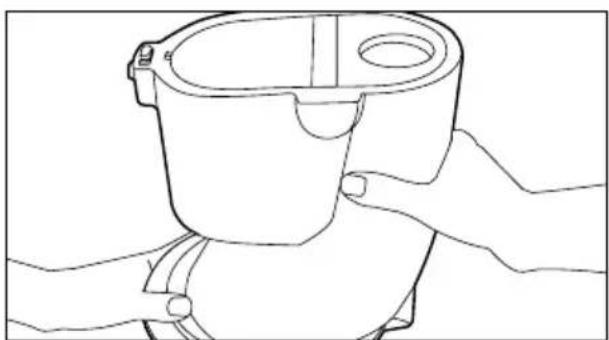
natural_image
Line drawing of a mechanical component being handled by two hands (no text or symbols)natural_image
Technical line drawing of a kitchen mixer with handle and control panel (no text or symbols)text_image
CLOSE ▲ △ OPEN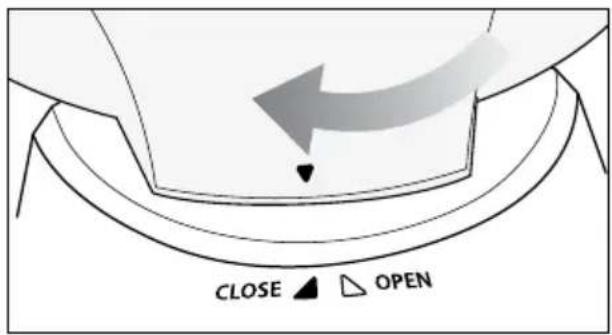
text_image
CLOSE ▲ △ OPEN
REMARQUE
natural_image
Technical line drawing of a mechanical component with a downward arrow indicating force or direction (no text or symbols)natural_image
Technical line drawing of a mechanical component with a downward arrow indicating force or direction (no text or symbols)natural_image
Mechanical diagram showing a rotating component with an upward arrow indicating motion (no text or symbols)
AVERTISSEMENT
natural_image
Technical line drawing of a mechanical component with directional arrows indicating motion (no text or symbols)natural_image
Line drawing of hands operating a mechanical component with no visible text or symbolsnatural_image
Medical illustration showing two stages of a procedure involving a device with liquid, no text or symbols presentnatural_image
Line drawing of a hand cleaning a small object with a sponge (no text or symbols)text_image
Technical diagram showing a hand using a spray gun to clean a rubber can, with an inset close-up of the component.JOINT EN SILICONE
natural_image
Technical illustration showing two steps of a mechanical assembly: one with a hand holding a circular component, the other with a close-up view of a mechanical component (no text or symbols present)BOUCHON INTELLIGENT
natural_image
Modern kitchen brush rester with clear glass and metallic casing (no visible text or symbols)NL
SNELSTARTGIDS
Sage®

Inhoud
natural_image
Line drawings of various kitchen appliances including a blender, fan, and blender (no text or labels)MONTAGE
natural_image
Line drawing of hands using a tool to adjust or install a circular component (no text or symbols visible)natural_image
Illustration of hands holding a camera lens and a plastic case, showing the process (no text or symbols)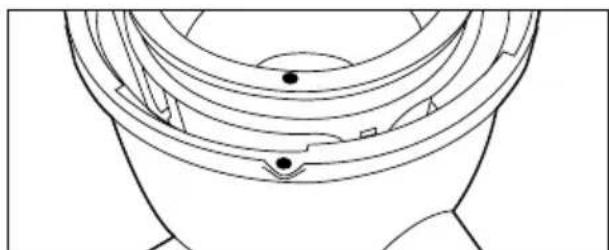
natural_image
Technical line drawing of a mechanical component with no visible text or symbolsnatural_image
Diagram of a mechanical component with a downward arrow indicating force or direction (no text or symbols present)natural_image
Line drawing of a mechanical component with a handle and mounting hole (no text or symbols)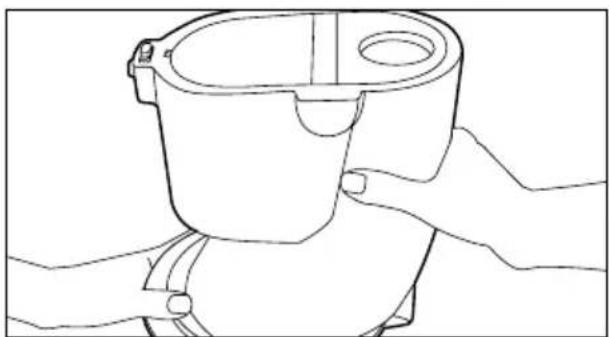
natural_image
Line drawing of a mechanical component with hands holding it (no text or symbols)natural_image
Technical line drawing of a kitchen mixer with handle and control knob (no text or symbols)text_image
CLOSE ▲ △ OPEN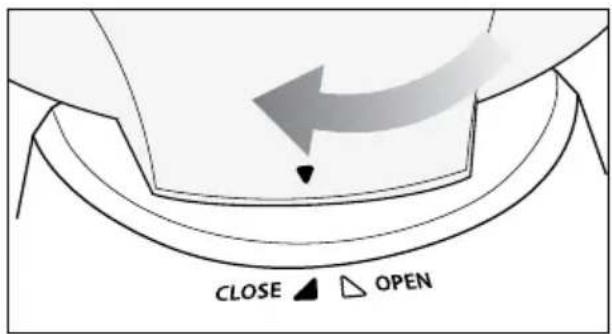
text_image
CLOSE ▲ OPEN
OPMERKING
natural_image
Two icons: a circular button with horizontal lines and a hand pointing at it (no text or symbols)natural_image
Technical line drawing of a mechanical component with a downward arrow indicating force or direction (no text or symbols)natural_image
Technical line drawing of a mechanical component with a downward arrow indicating force or direction (no text or symbols)natural_image
Diagram of a mechanical or fluidic component with an upward arrow indicating motion or force (no text or symbols present)
WAARSCHUWING
natural_image
Technical line drawing of a mechanical component with directional arrows indicating motion (no text or symbols)natural_image
Line drawing of hands operating a mechanical component with no visible text or symbolsnatural_image
Illustration of two hands performing a manual valve or pump tool, showing internal components and fluid flow (no text or symbols)natural_image
Line drawing of a hand cleaning a container with a sponge (no text or symbols)natural_image
Line drawing showing two steps of a hand holding a container with liquid, and a close-up of the lid being inserted (no text or symbols present)SILICONEN RING
natural_image
Illustration showing a hand holding a mechanical component with a magnified inset of the close-up (no text or symbols)SLIMME DOP
natural_image
Three-step diagram showing a mechanical assembly process: adding a component, adjusting a bolt, and connecting a pipe fitting (no text or symbols present)PROBLEEM EENVOUDIGE OPLOSSING
natural_image
Modern kitchen brushset with clear glass and metallic casing (no visible text or symbols)IT
GUIDA RAPIDA
Sage®

Sommario
natural_image
Line drawings of various kitchen appliances including a blender, fan, and blender (no text or labels)MONTAGGIO
natural_image
Line drawing of hands using a tool to adjust or install a circular component (no text or symbols visible)natural_image
Illustration of hands holding a camera lens and a plastic housing, showing the process from left to right (no text or symbols)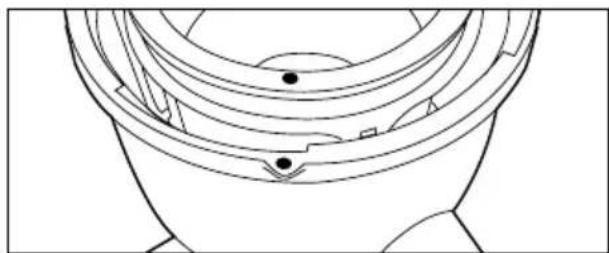
natural_image
Technical line drawing of a mechanical component with no visible text or symbolsnatural_image
Diagram of a mechanical component with a downward arrow indicating force or direction (no text or symbols present)natural_image
Line drawing of a hand holding a mechanical component (no text or symbols)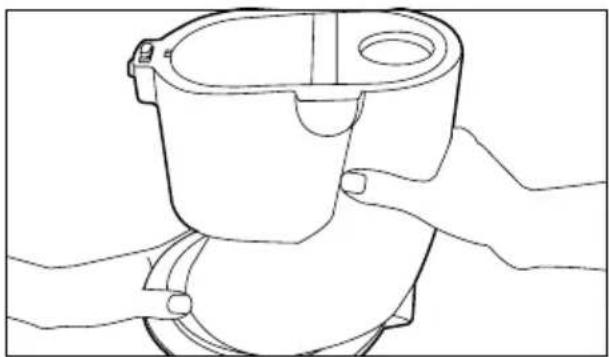
natural_image
Line drawing of a mechanical component with hands holding parts (no text or symbols)natural_image
Technical line drawing of a mechanical device with no visible text or symbolstext_image
CLOSE ▲ △ OPEN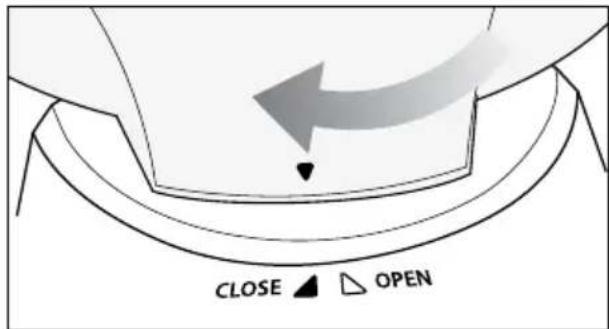
text_image
CLOSE ▲ △ OPEN
NOTA
natural_image
Technical line drawing of a mechanical component with a downward arrow indicating force or direction (no text or symbols)natural_image
Technical line drawing of a mechanical component with a downward arrow indicating force or direction (no text or symbols)natural_image
Mechanical diagram showing a rotating component with an upward arrow indicating motion (no text or symbols)
ATTENZIONE
natural_image
Technical line drawing of a mechanical component with directional arrows indicating motion (no text or symbols)natural_image
Line drawing of hands operating a mechanical component with no visible text or symbolsnatural_image
Illustration of a hand holding a mechanical component with raindrops, shown from two different angles (no text or symbols present)natural_image
Line drawing of a hand cleaning a small object from a kitchen appliance (no text or symbols)natural_image
Technical illustration showing two mechanical assembly steps: one with hand cleaning a circular component, the other with hand turning a gear (no text or symbols)SMART CAP
natural_image
Three-step diagram showing a pipe fitting process: adding pressure, adjusting a valve, and inserting a plug into a hose (no text or symbols present)PROBLEMA SOLUZIONE SEMPLICE
natural_image
Exterior view of a modern stainless steel milkshake maker with clear glass and white interior (no text or symbols visible)
GUÍA RÁPIDA
Sage®

Índice
natural_image
Line drawings of various kitchen appliances including a blender, fan, and blender (no text or labels)ENSAMBLAJE
natural_image
Line drawing of hands using a tool to adjust or install a circular component (no text or symbols visible)natural_image
Illustration of hands holding a camera lens and a device casing, showing the process of transformation (no text or symbols present)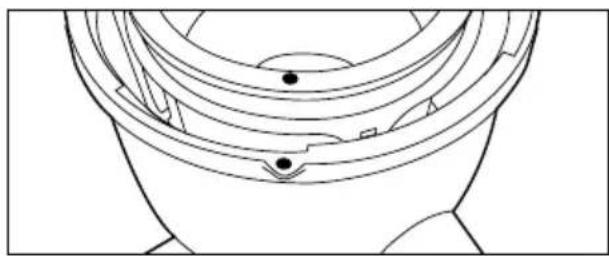
natural_image
Technical line drawing of a mechanical component with no visible text or symbolsnatural_image
Diagram of a mechanical component with a downward arrow indicating force or direction (no text or symbols present)natural_image
Line drawing of a mechanical component with a hand holding it (no text or symbols)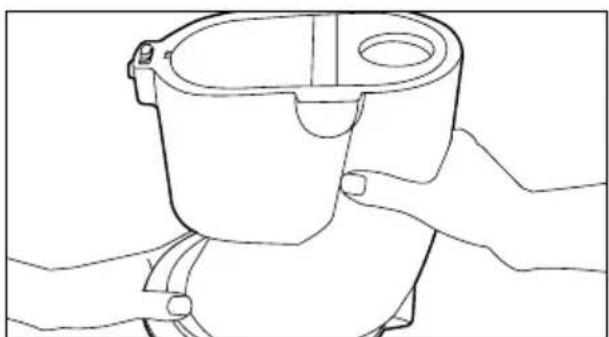
natural_image
Line drawing of a mechanical component with hands holding it (no text or symbols)natural_image
Line drawing of a kitchen mixer with handle and control knob (no text or symbols)text_image
CLOSE ▲ △ OPEN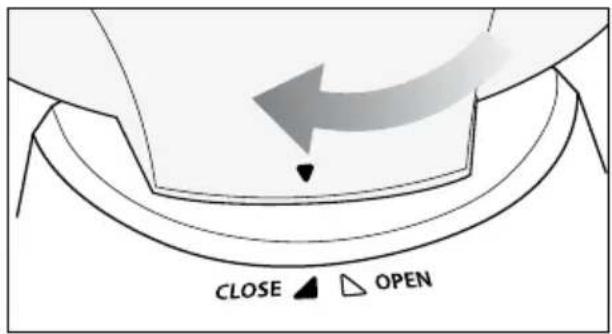
text_image
CLOSE ▲ △ OPEN
NOTA
natural_image
Two icons: a circular button with minus sign and a hand pointing at a curved interface element (no text or symbols)natural_image
Diagram of a mechanical component with a downward arrow indicating force or direction (no text or symbols)natural_image
Technical line drawing of a mechanical component with a downward arrow indicating force or direction (no text or symbols)natural_image
Mechanical diagram showing a rotating component with an upward arrow indicating motion (no text or symbols)
ADVERTENCIA
natural_image
Technical line drawing of a mechanical component with directional arrows indicating motion (no text or symbols)natural_image
Line drawing of hands operating a mechanical component with no visible text or symbolsnatural_image
Illustration of two hands performing a manual tool on a mechanical component, showing spray and cleaning steps (no text or symbols)natural_image
Line drawing of a hand cleaning a small object with a cloth (no text or symbols)natural_image
Illustration showing a hand holding a mechanical component with a magnified inset of the close-up (no text or symbols)natural_image
Line drawing showing two steps of a hand holding a container with liquid, and a close-up of the lid being inserted (no text or symbols present)TAPÓN INTELIGENTE
natural_image
Three-step diagram showing a mechanical assembly process: adding a cylindrical component, adjusting a valve, and connecting a pipe fitting (no text or symbols present)natural_image
Modern kitchen brushset with clear glass and metallic casing (no visible text or symbols)
MANUAL RÁPIDO
Sage®

Índice
natural_image
Line drawings of various kitchen appliances including a blender, fan, and blender (no text or labels)MONTAGEM
natural_image
Line drawing of hands using a tool to adjust or install a circular component (no text or symbols visible)natural_image
Illustration of hands holding a camera lens and a plastic case, showing the process (no text or symbols)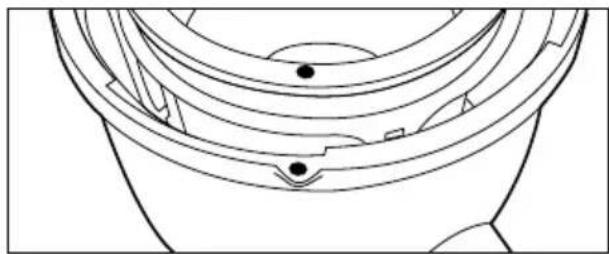
natural_image
Technical line drawing of a mechanical component with no visible text or symbolsnatural_image
Diagram of a mechanical component with a downward arrow indicating force or direction (no text or symbols)natural_image
Line drawing of a hand holding a mechanical component (no text or symbols)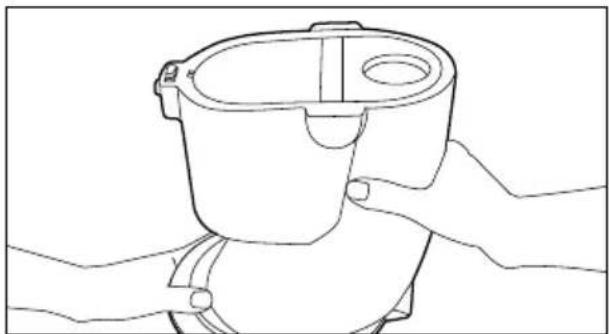
natural_image
Line drawing of a hand holding a small cylindrical object, possibly a container or housing (no text or symbols)natural_image
Line drawing of a toilet with a valve and handle, showing internal components (no text or symbols)text_image
CLOSE ▲ △ OPEN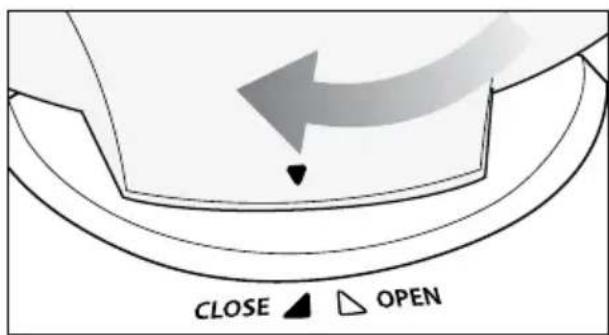
text_image
CLOSE ▲ △ OPEN
NOTA
natural_image
Line drawing of a mechanical component with a downward arrow indicating force or direction (no text or symbols)natural_image
Diagram of a mechanical component with a downward arrow indicating force or direction (no text or symbols present)natural_image
Diagram of a mechanical or fluidic component with an upward arrow indicating motion or force (no text or symbols present)
AVISO
natural_image
Technical line drawing of a mechanical component with directional arrows indicating motion (no text or symbols)natural_image
Line drawing of hands operating a mechanical component with no visible text or symbolsnatural_image
Illustration of two hands performing a manual tool on a mechanical component, showing step-by-step assembly (no text or symbols present)natural_image
Line drawing of a hand cleaning a kitchen appliance with a cloth (no text or symbols)natural_image
Two-step diagram showing a hand holding a container with liquid, before and after cleaning the lid (no text or symbols)ANEL DE SILICONE
natural_image
Technical illustration showing two steps of a mechanical component being handled, with an inset close-up highlighting the internal structure (no text or symbols present)TAMPA INTELIGENTE
natural_image
Three-step diagram showing mechanical assembly steps: pinning, cleaning, and fitting (no text or symbols)www.sageappliances.com
Registered in Germany No. HRB 81309 (AG Düsseldorf).
Registered in England & Wales No. 8223512.
- Due to continued product improvement, the products illustrated or photographed in this document may vary slightly from the actual product.
•Aufgrund kontinuierlicher Produktverbesserungen kann das auf dieser Verpackung dargestellte Produkt leicht vom tatsächlichen Produkt abweichen. - En raison de son amélioration continue, le produit représenté sur cet emballage peut différer légèrement du produit réel.
- Vanwege de voortdurende verbetering van de producten kunnen de producten die in dit document
worden geïllustreerd of gefotografeerd enigszins afwijken van het daadwerkelijke product. - A causa del continuo miglioramento dei prodotti, il prodotto illustrato su questa confezione può variare leggermente rispetto al prodotto reale.
- Perfeccionamos nuestros productos continuamente, por lo que el artículo podría diferir ligeramente de la ilustración o imagen en este documento.
- Devido à melhoria contínua dos produtos, os produtos ilustrados ou fotografados neste documento podem variar ligeiramente do produto real.
Copyright BRG Appliances 2019.