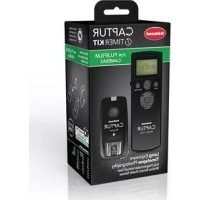
Captur Module Pro - Remote control Hähnel - Free user manual and instructions
Find the device manual for free Captur Module Pro Hähnel in PDF.
| Product Type | Wireless remote control for DSLR cameras |
| Brand | Hähnel |
| Model | Captur Module Pro |
| Compatibility | Compatible with the Captur system (sold separately) and cable connection (sold separately) |
| Main Functions | Manual shutter release, interval burst mode, sensor triggering (sound, infrared, light, laser, auxiliary), time-lapse, long exposure, key lock |
| Display | LCD screen with battery indicator, delay, exposure time, intervals, number of shots, sensitivity |
| Built-in Sensors | Microphone, infrared sensor, light/laser sensor |
| Connectivity | Wireless via DCM (channel setting), auxiliary input for external sensor, trigger cable |
| Power | Battery (type not specified, battery indicator present) |
| Maintenance | Keep away from water and moisture; remove batteries if not used for extended periods |
| Safety | Do not modify the product; do not use near flammable gas; keep out of reach of children; do not expose to extreme temperatures |
| General Information | Manufactured by Hähnel. For more information: www.hahnel.ie |
Frequently Asked Questions - Captur Module Pro Hähnel
User questions about Captur Module Pro Hähnel
0 question about this device. Answer the ones you know or ask your own.
Ask a new question about this device
Download the instructions for your Remote control in PDF format for free! Find your manual Captur Module Pro - Hähnel and take your electronic device back in hand. On this page are published all the documents necessary for the use of your device. Captur Module Pro by Hähnel.
USER MANUAL Captur Module Pro Hähnel
English 8
German 12
French 16
Polish 20
Dutch 24
Spanish 28
Czech 32
Portuguese 36
Swedish 40
Finnish 44
Italian 48
Hebrew 51
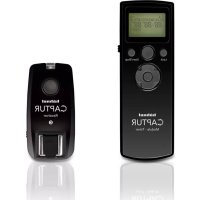
Wireless: Requires Captur (sold separately)
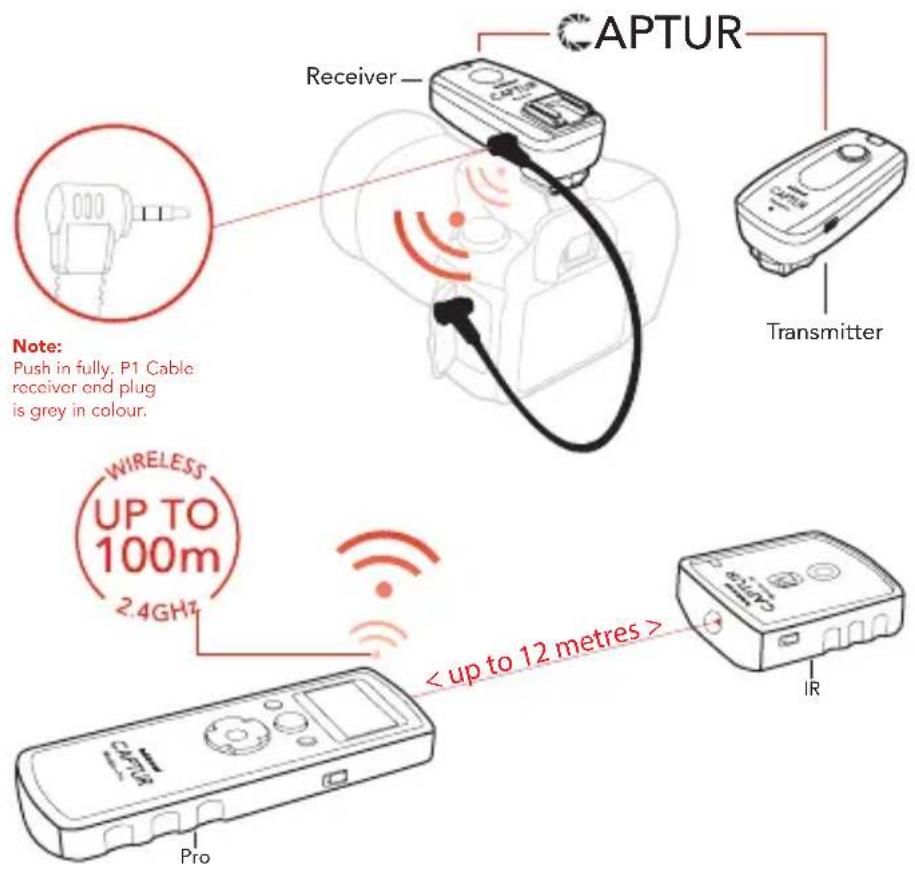
Wired: Requires Camera Cable (sold separately)

Example:
| 3 | DELAY | = 0:00'00" | Delay 1 hour |
| 4 | LONG | = 00:00'00" | No long |
| 5 | INTVL1 | = 00:00'10" | 10 sec interval 1 |
| 6 | N1 | = [003] | 3 shots interval 1 |
| 7 | INTVL2 | = 00:01'00" | 1 min interval 2 |
| 6 | N2 | = [003] | Repeat 3 x interval 1 |
Manual Remote Control
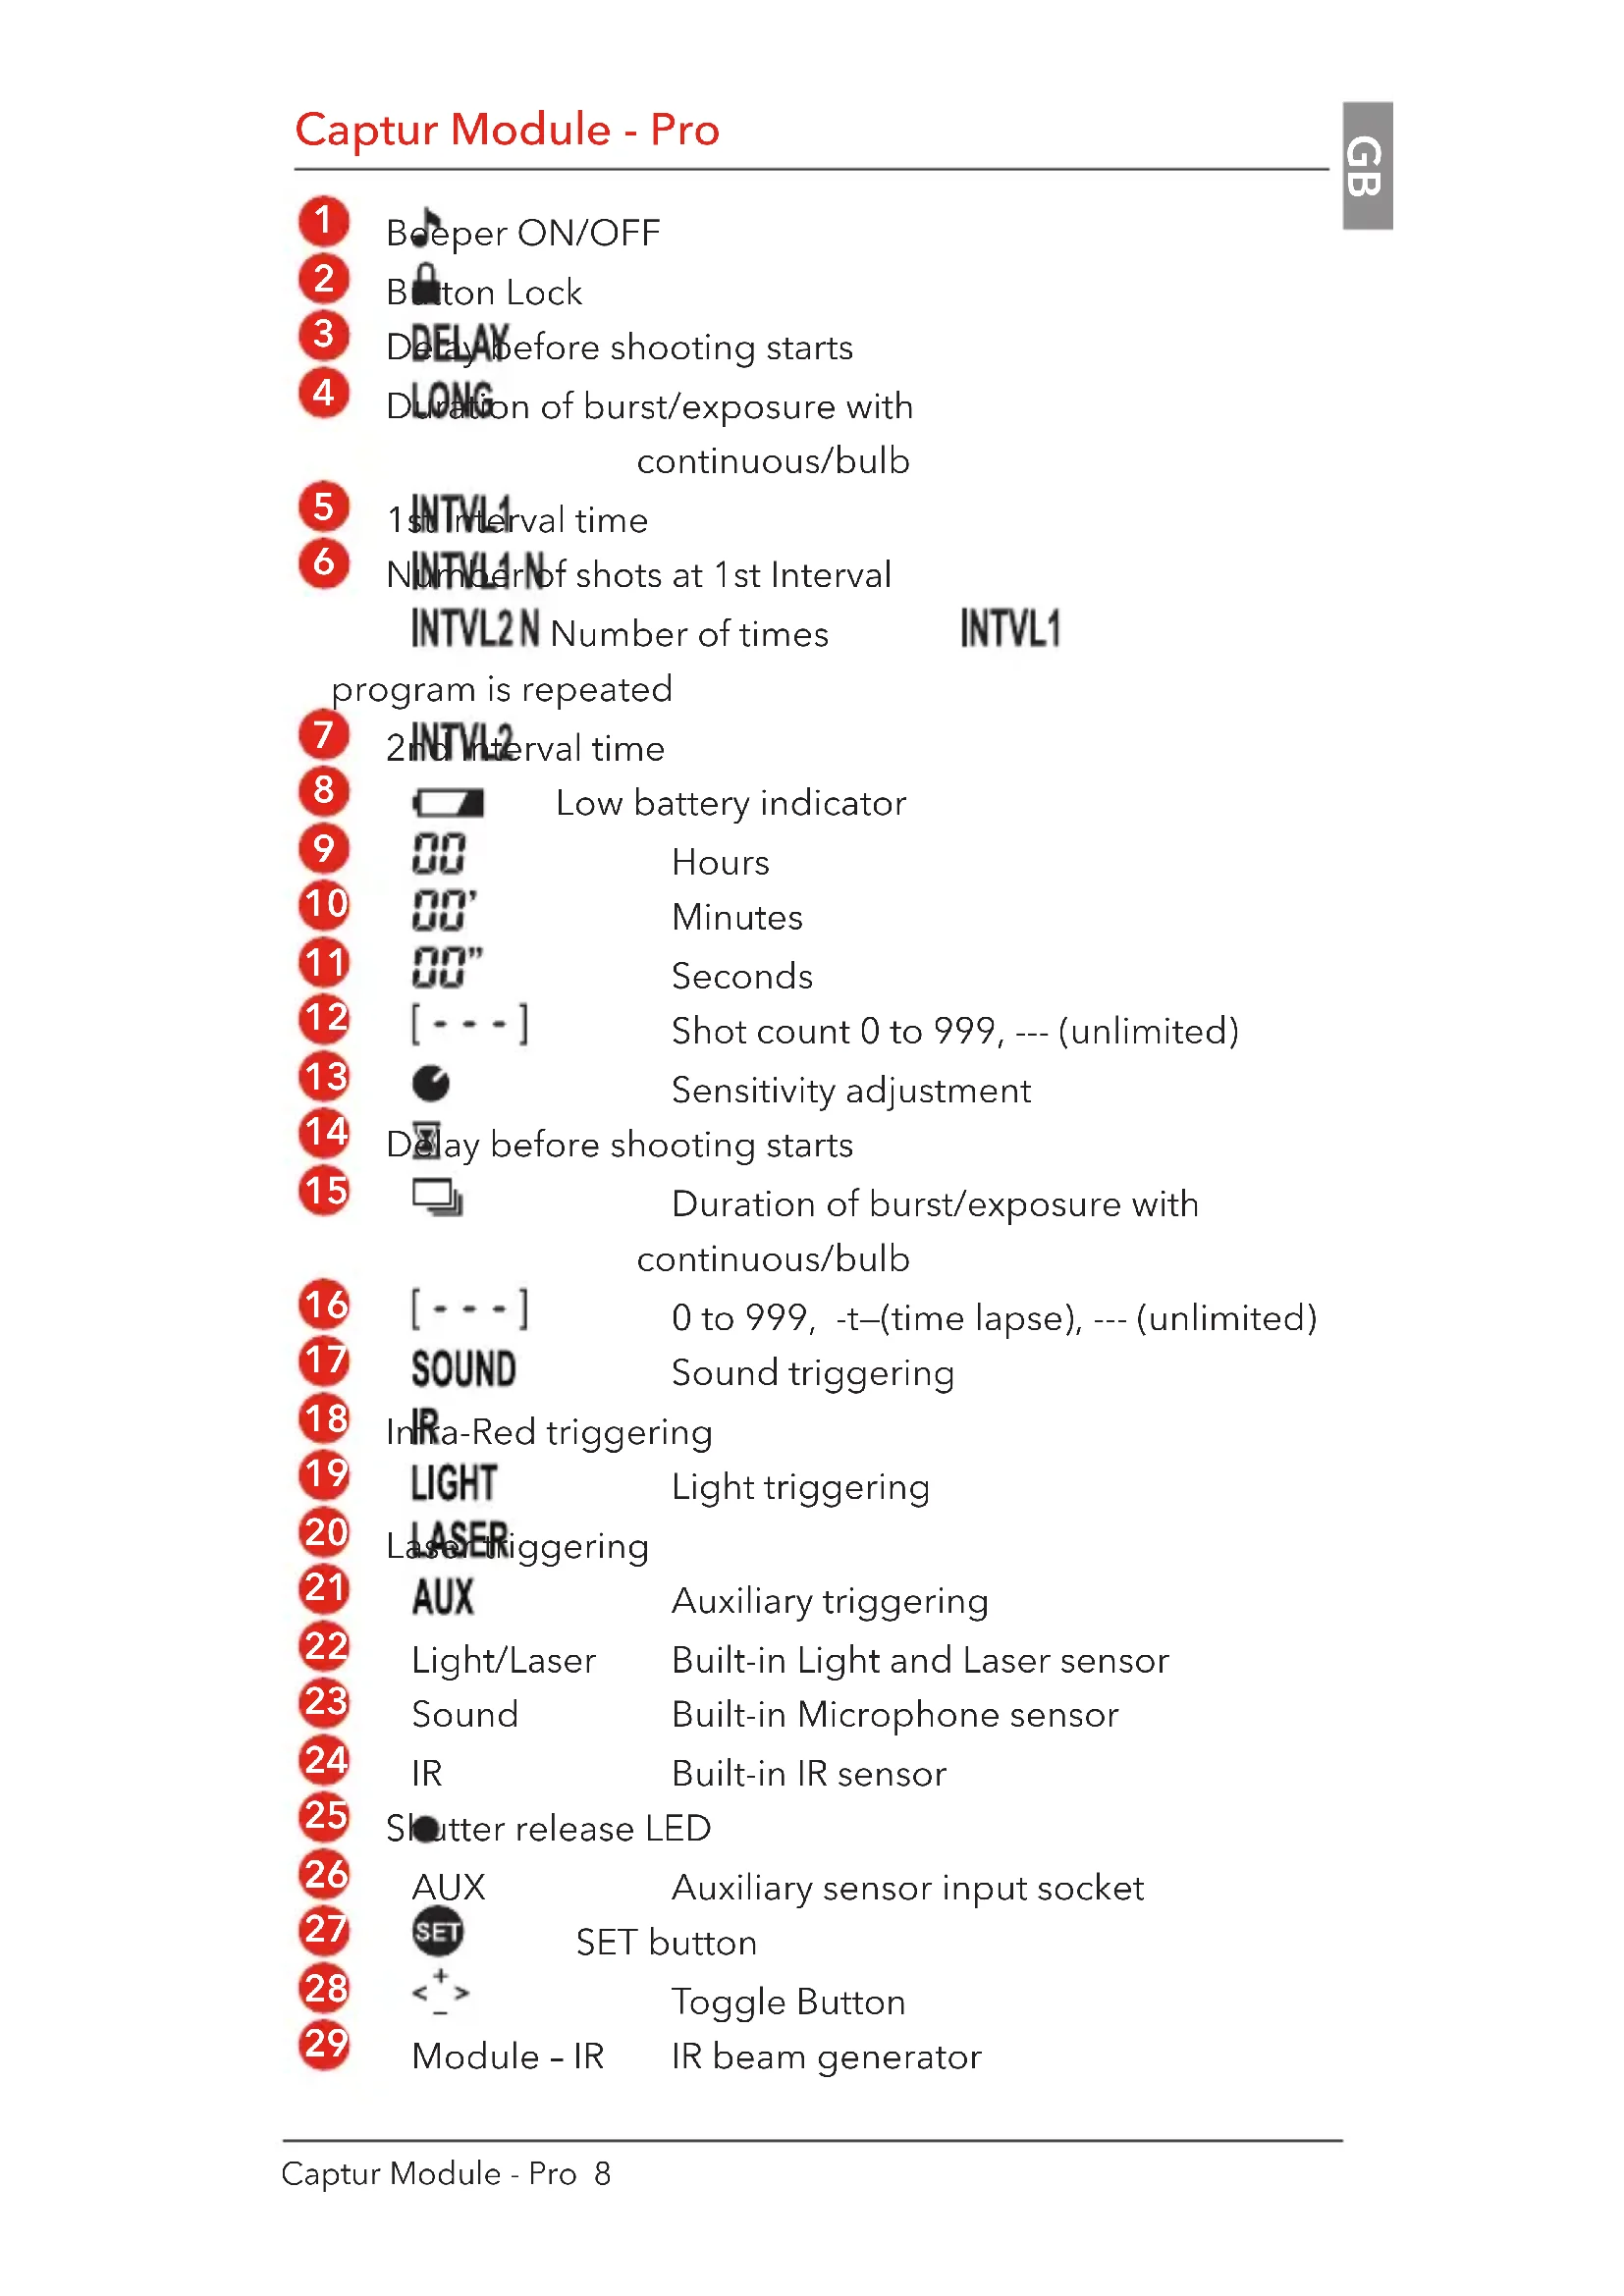
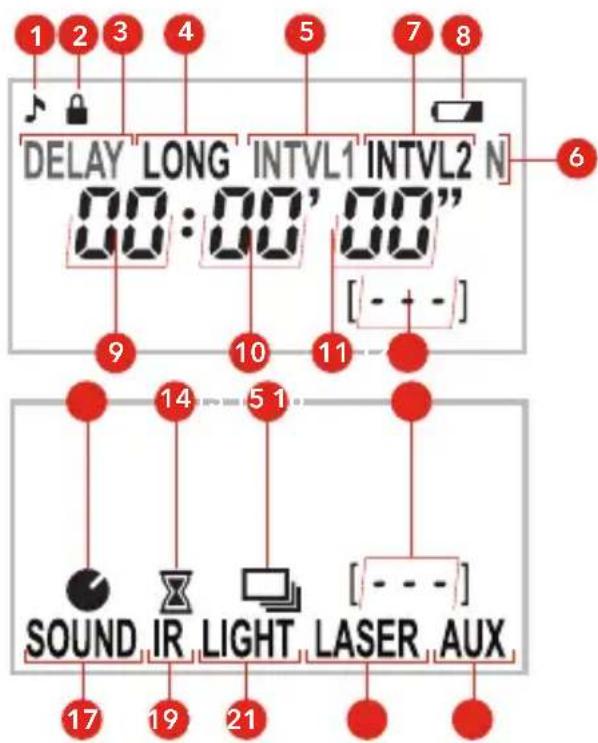
1 Beeper ON/OFF
2 Bton Lock
3 Delay before shooting starts
4 Duration of burst/exposure with continuous/bulb
5 1st interval time
6 Number of shots at 1st Interval
INTVL2N Number of times INTVL1
program is repeated
7 2nd interval time
8 Low battery indicator
9 Hours
10 00' Minutes
11 00" Seconds
Shot count 0 to 999, -- (unlimited)
13 Sensitivity adjustment
14 Day before shooting starts
15 Duration of burst/exposure with continuous/bulb
16 [---] 0 to 999, -t-(time lapse), --- (unlimited)
17 SOUND Sound triggering
18 InRa-Red triggering
19 Light triggering
20 Lasering
21 AUX Auxiliary triggering
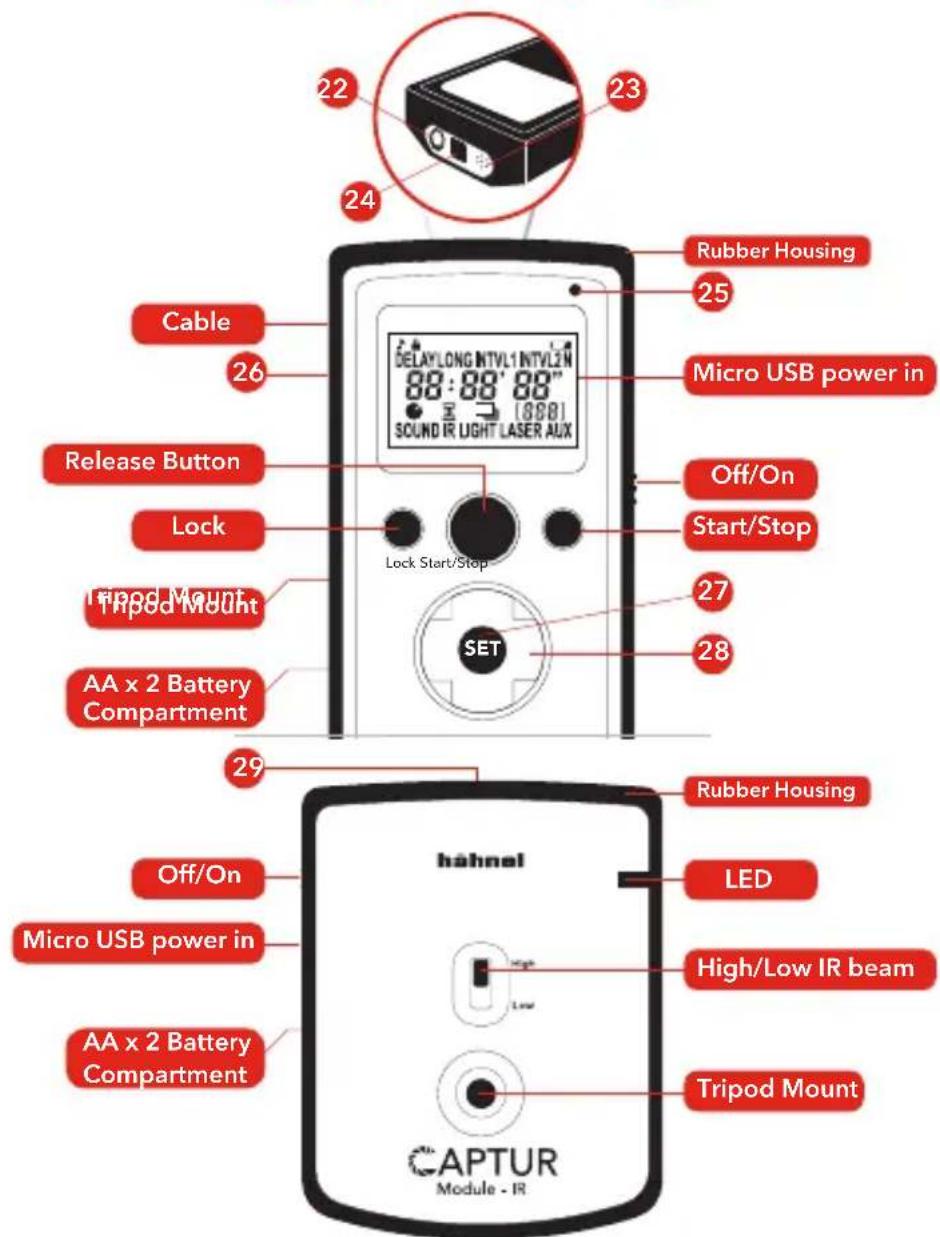
22 Light/Laser Built-in Light and Laser sensor
Sound Built-in Microphone sensor
24 IR Built-in IR sensor
25 Slutter release LED
26 AUX Auxiliary sensor input socket
27 SET SET button
28 Toggle Button
29 Module - IR IR beam generator
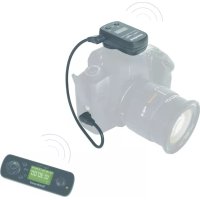
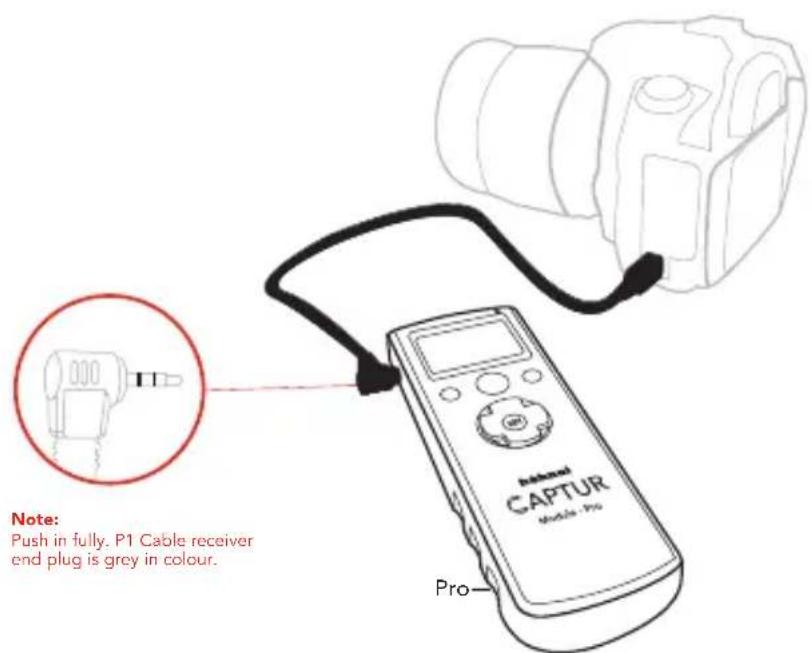
The Captur Module - Pro is used as an accessory with the Captur (sold separately) to control the camera wirelessly. The Captur and the Captur Module - Pro must be channel matched using DCM. Alternatively you can also connect the Captur Module - Pro directly to a DSLR camera with a camera cable (sold separately).
Digital Channel Matching - DCM (Requires Captur Transmitter)
a. Transmitter - Press and hold button + Turn 'ON'. LED will flash green rapidly
b. Timer - Press and hold SET button 27 + Turn ON'. LED will show steady red
c. Receiver - Press and hold button + Turn 'ON'. LED will show steady red
d. DCM is complete. Turn both Module - Pro, Receiver and Transmitter 'OFF' and 'ON' to reboot
Note: For multiple Receivers repeat step 'c' for all receivers without turning off transmitter
Manual Remote Control
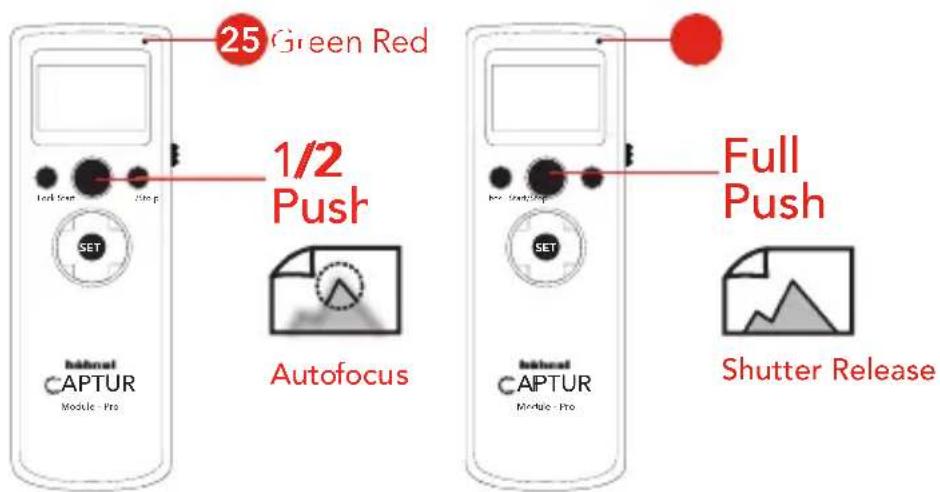
The Release Button works similarly to the camera shutter release. 12 push = Autofocus, LED 25 shows steady green. Full push = Shutter release, LED 25 shows red. To 'HOLD' the shutter release for bulb photography, press down Release Button for more than 3 seconds and LED 25 will flash red. Press Release Button again to release the hold.
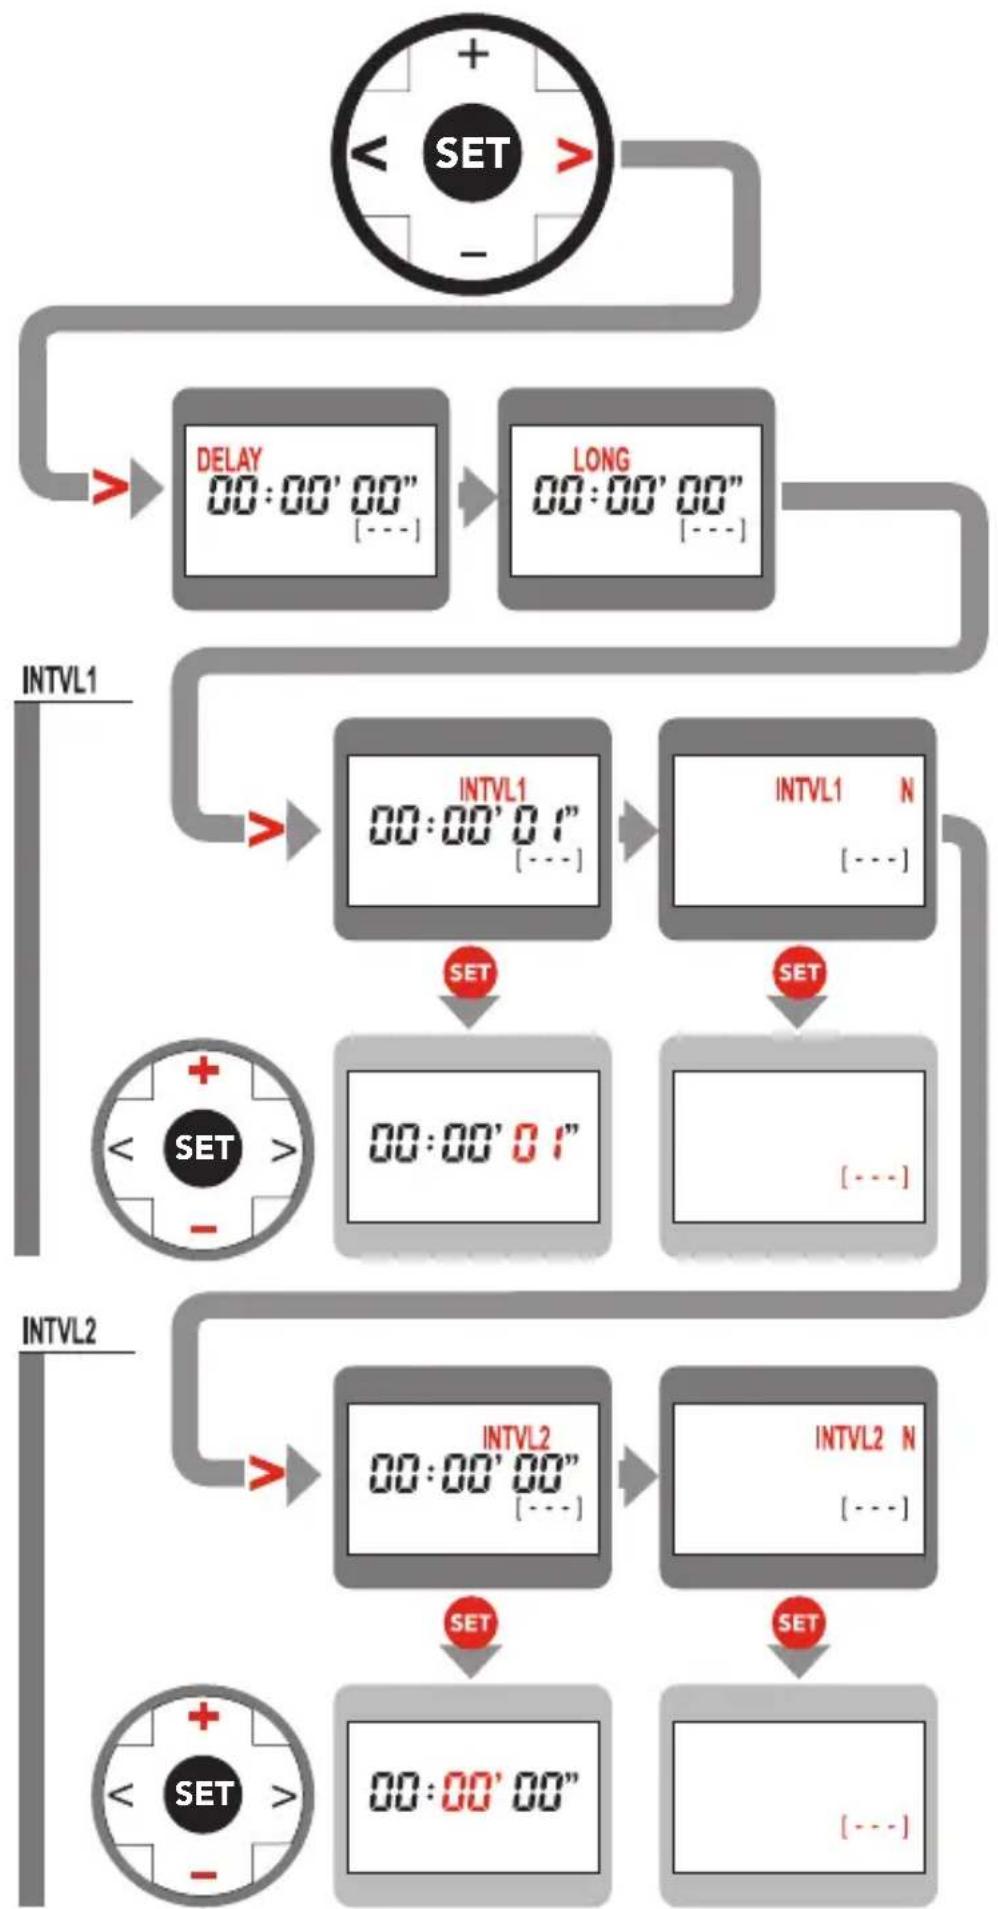
Interval Timer Programmable Functions
Ensure that LCD is displaying 3, 4, 5, 6 or 7. Press Start/Stop button to 'Start' the 'Interval Timed Photography'. The Captur Module - Pro will now take a photo continuously at the factory set interval time. Press Start/Stop again to 'Stop' the interval timed photography. Press SET button 27 to adjusted parameters. Toggle Button 28 + or - is used to adjust the value of the parameters. Press SET button 27 again to confirm adjustment. The values of the following parameters can be adjusted as required. Use Toggle Button 28 < or > to move between the parameters which need to be adjusted.
| Parameters | Description | Setting |
| 3 DELAY | Delay before 1st shutter is released | 0s to max 99hrs 59'min 59"s (in 1s increments) |
| 4 LONG | Burst/bulb time | |
| 5 INTVL1 | 1st Interval Time | 1s to max 99hrs 59'min 59"s (in 1s increments) |
| 6 N | INTVL1N = Number of shots for 1st Interval | 1 to 999 and --- (unlimited) |
| INTVL2N = Number of times INTVL1program is repeated | ||
| 7 INTVL2 | 2nd Interval Time | 1s to max 99hrs 59'min 59"s (in 1s increments) |
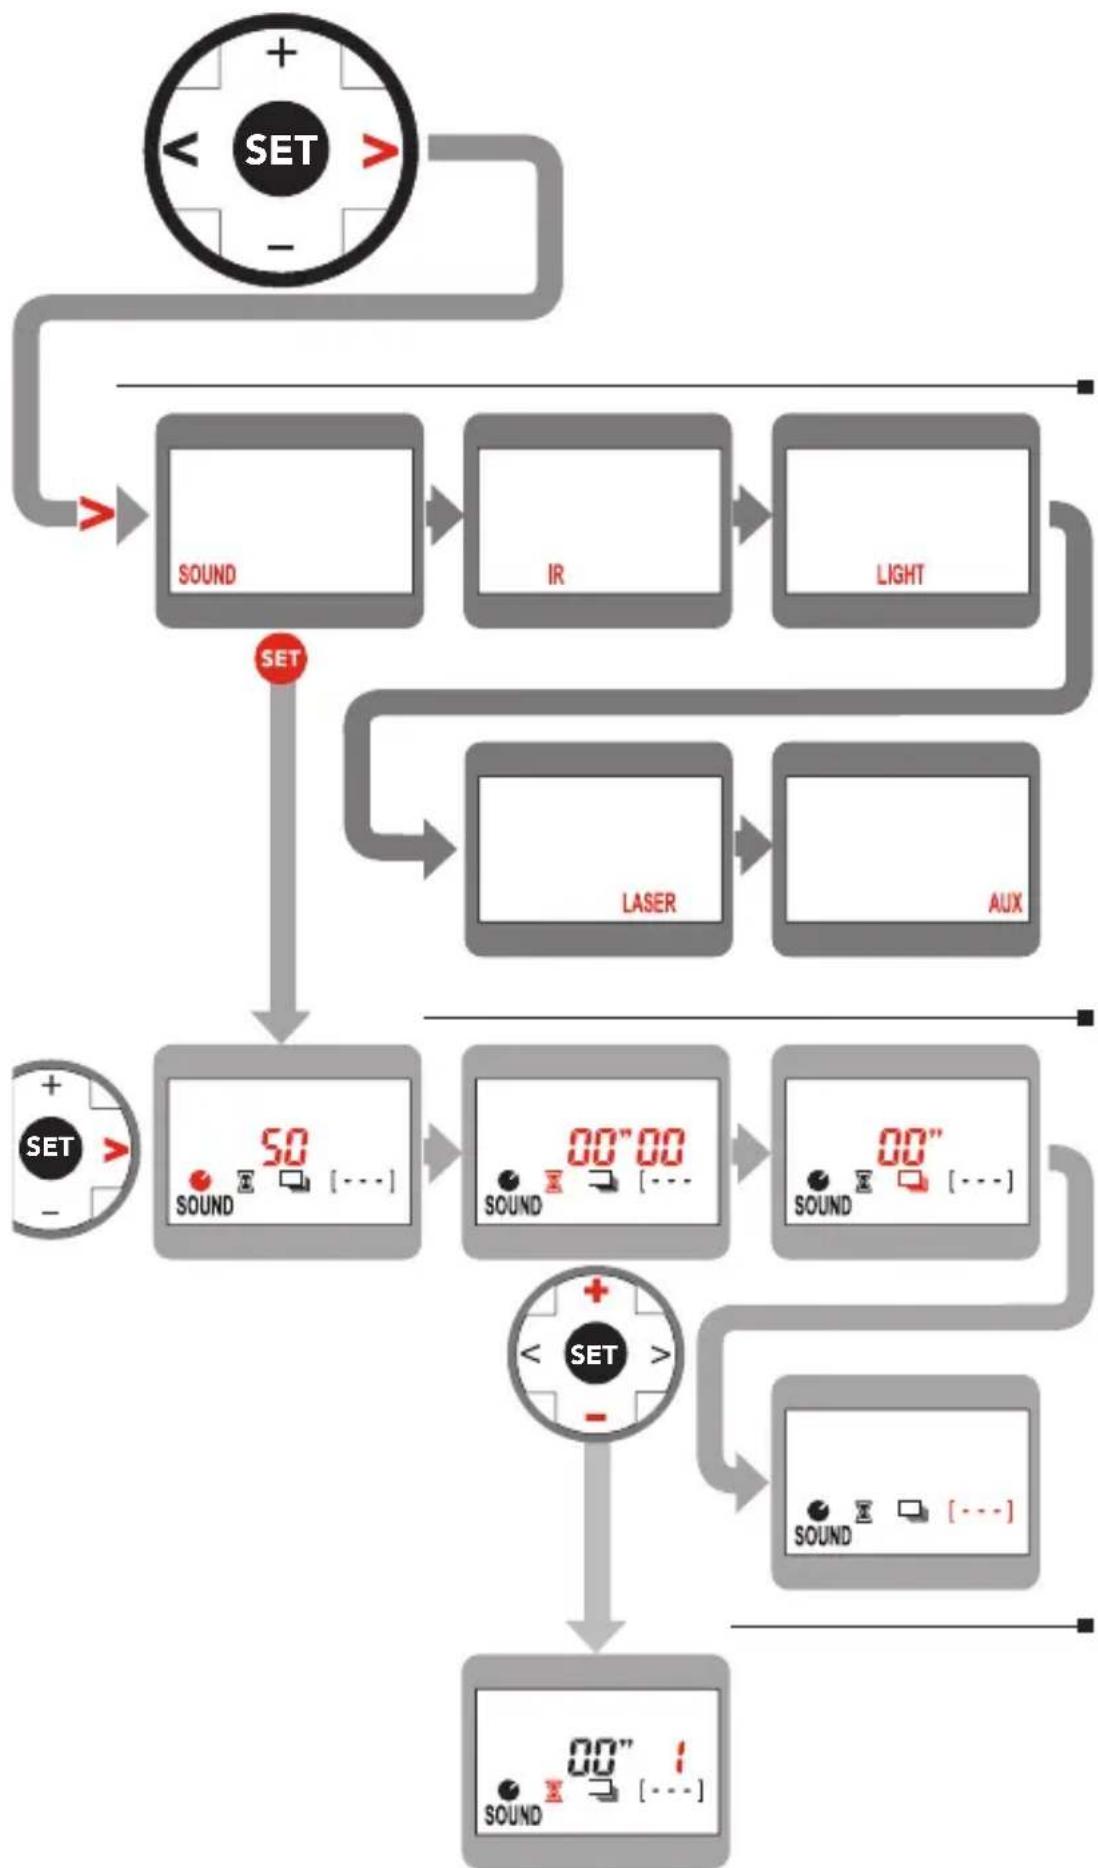
Sensor triggering
The Captur Module - Pro has build in sensors which can trigger the camera. Use Toggle Button 28 < or > to move from one sensor to the other to select the required sensor (e.g. SOUND 17). Now press Start/Stop button to 'Start' the sensor triggering. The Captor Module - Pro is now ready to trigger camera and, LED 25 shows steady green. When the Captur Module - Pro is triggered by the sensor, it will trigger the camera to take photo and LED 25 shows red momentarily (e.g. with "SOUND" started "clap you hand" and the Captur-Pro will trigger. You may need to adjust the "sensitivity" 13 to trigger the sound)
| Sensor | Description | Comments |
| 17 SOUND | Trigger sound sensor 23 | Adjust sensitivity 13 level |
| 18 IR | Align Captur Module - IR 29 with sensor 24 to create a beam | Breaking the beam will trigger the Module - Pro |
| 19 LIGHT | Trigger light sensor 22 | Adjust sensitivity 13 level |
| 20 LASER | Align any Laser Pen (sold separately) with sensor 22 to create a laser beam | Breaking the beam will trigger the Module - Pro |
| 21 AUX | Triggered by external sensor connected to AUX socket | Refer to www.hahnel.ie for more info |
Note:
- More information available on www.hahnel.je
- Wrong connection of external AUX sensors may damage the Capture Module -Pro.
There are several parameters which can be adjusted for each sensor of the Captur Module - Pro. Use Toggle Button 28 < or > to move from one sensor to select the sensor and to select which parameters need to be adjusted. (e.g. move to SOUND 17). Press SET button 27 to adjusted parameters. Toggle Button 28 + or - is used to adjust the value of the parameters (e.g. adjust icon 13 to 80 for more sensitive sound triggering). Press SET button 27 again to confirm adjustment.
| Parameter | SettingDescription | |
| 13 | Sensitivity adjustment Min 01 - | 99 max |
| 14 | Delay before shooting starts 0s | to max 10s in 1/100th second increments |
| 15 | Duration of burst/exposure with continuous/bulb mode in camera | 0s to max 05" sec (in 1 sec increments) |
| 16 | Number of times sensor is allowed to trigger the Module - Pro | 00 - 99 -t- = (starts time lapse) --- = (unlimited) |
Beeper and Lock settings
- Press Lock to turn ON and OFF the beeper 1. Beeper will "beep" when camera is triggered by any program
- Press and hold Lock to or the Captur Module - Pro buttons. The Release Button will always remain active
Warning.
- Do not modify product
- Keep Captur Module - Pro and Captur Module - IR, dry at all times
- Do not use in the presence of flammable gas
- Keep out of the reach of children
- Do not expose to excessive temperatures or strong direct sunlight
- Do not leave the unit in the trunk or on the dashboard of a vehicle.
- Overheating can result in leaking, fire or explosion
- Observe correct battery polarity
- Dispose in accordance with appropriate environmental regulations
- Take battery out of unit if stored for an extended period of time
Scan QR code for more information on the Captur Module Pro
Digital Channel Matching
Captur Module-Pro,77n77n77n77n.
nNN nN nn nnn nnn nnn nnnn nnnn nnnn nnnn nnnn nnnn nnnn nnnn nnnn nnnn nnnn nnnn nnnn nnnn nnnn nnnn nnnn nnnn nnnn nnnn nnnn nnnn nnnn nnnn nnnn nnnn nnnn nnnn nnnn nnnn nnnn nnnn nnnn nnnn nnne 27) (SET 27) nn nn nn nn nn nn nn nn nn nn nn nn nn nn nn nn nn nn nn nn nn nn nn nn nn nn nn nn nn nn nn nn nn nn nn nn nn nn nn nn nn nn nn nn nn nn nn nn nn nn nn nn nn nn nn nn nn nn nn nn nn nn nn nn nn nn nn nn nn nn nn nn nn nn nn nn nn nn nn nn nn nn nn nn nn nn nn nn nn nn nn nn nn nn nn nn nn
25LEDn7n,n1n=πn% 25LEDn7n,n1n=nn n7n 25LEDnn,n7n.
34100N N LCD 27
n nnnn nnnn nnnn nnnn nnnn nnnn nnnn nnnn nnnn nnnn nnnn nnnn nnnn nnnn nnnn nnnn nnnn nnnn nnnn nnnn nnnn nnnn nnnn nnnn nnnn nnnn nnnn nnnn nnnn nnnn nnnn nnnn nnnn nnn nnnn nnnn nnnn nnnn nnnn nnnn nnnn nnnn nnnn nnnn nnnn nnnn nnnn nnnn nnnn nnnn nnnn nnnn nnnn nnnn nnnn nnnn nnnn nnnn nnnn nnnn nnnn nnnn nnnn nnnn nnnn nnnn nnnn nn
| 灭菌时间 | 灭菌 | 灭菌时间 |
| npt 59 nww 99 anap oop y niw 1 (nww 1 w anan) | nwnn aon nwnn nwnn | 3 DELAY |
| nwnn npt | 4 LONG | |
| npt 59 nww 99 anap oop y niw 1 (nww 1 w anan) | nwnn nwnn npt | 5 INTVL1 |
| (nwnn nwn)---, 1999 nwn | nwnn nwnn nwn = INTVL1 N | 6 N |
| nwnn nwn nwn nwn = INTVL2 N | ||
| nwnn nwn nwn nwn nwn nwn INTVL1 | ||
| npt 59 nww 99 anap oop y niw 1 (nww 1 w anan) | nwnn nwn npt | 7 INTVL2 |
Captur Module-Pro
28
/Sound
17
Captur Module-Pro
25LED
Sound 25 LED n nn
n n n n n n n n n n n n n n n n n n n n n n n n n n n n n n n n n n n n n n n n n n
| 13 | 23 | 24 | 25 | 26 | 27 |
| 13 | 22 | 23 | 24 | 25 | 26 |
| 13 | 22 | 23 | 24 | 25 | 26 |
| 13 | 22 | 23 | 24 | 25 | 26 |
| 13 | 22 | 23 | 24 | 25 | 26 |
Captur Module Pro nnnn nn nnnn nn nnnn
Captur Module-Pro w nnnn nn nnnn nnnn nnnn
28 2
nnaa nnae 17] 7n nn nnnn nn
17 SOUND
28 177777777777777777777777777
80 13 nn nnnn
SET 27 nnnn nn n nn [nnnnnnnnnnnnnnn
1111111111
All product specifications subject to change without notice E.SO.E.
All brands, trademarks and registered trademarks are the property of their respective holders. Copyright © hahnel industries Ltd, Ireland.
www.hahnel.ie
A product of hahnelindustries Ltd, Ireland. Made in China
Rev 04/19