SA300 - Smoke detector ALECTO - Free user manual and instructions
Find the device manual for free SA300 ALECTO in PDF.
User questions about SA300 ALECTO
0 question about this device. Answer the ones you know or ask your own.
Ask a new question about this device
Download the instructions for your Smoke detector in PDF format for free! Find your manual SA300 - ALECTO and take your electronic device back in hand. On this page are published all the documents necessary for the use of your device. SA300 by ALECTO.
USER MANUAL SA300 ALECTO
natural_image
Circular white object with a perforated top surface, resembling a digital alarm or sensor device (no text or symbols visible)Rookmelder voor gebruik in huiselijke omgeving Détecteur de fumée pour l’usage dans l’entourage domestique Rauchmelder zum Gebrauch im Heimbereich Smoke detector for domestic use Detector de humo para uso en el hogar
text_image
Diagram illustrating a multi-level living room layout with labeled rooms including bedroom, bathtub, shower, car, and bathroom fixtures.
Recommended

Optional

Do not use
Is available at the following internet address: http://DOC.hesdo.com/SA300_DOP_1.pdf
text_image
Diagram illustrating a multi-level living room layout with labeled rooms including bedroom, bathtub, car, and bathroom.
Recommended

Optional

Do not use
natural_image
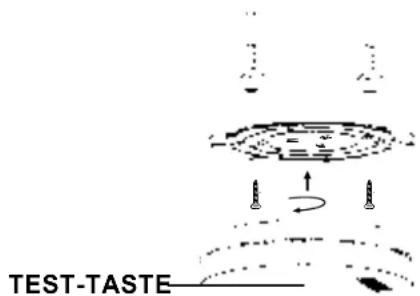
Pure diagram of layered structures with arrows indicating rotation or movement (no text or symbols)TOUCHE DE TEST-
UTILISER, TESTER ET ENTRETIEN :
Usage
Is available at the following internet address:
http://DOC.hesdo.com/SA300_DOP_1.pdf
INSTALLATIONS INFORMATION:
Is available at the following internet address:
http://DOC.hesdo.com/SA300_DOP_1.pdf
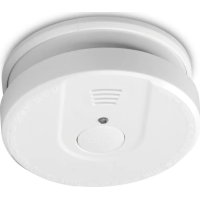
EN The SA300 is a smoke detector set for discovery of fire in the first stage. If smoke develops, the SA300 will give a loud beep of at least 85dB (A). As part of the link function all the smoke alarms within range will sound the alarm. We advice to test the smoke detectors weekly using the test button on the detectors. Save this manual in a safe place or inside of the electricity meter cupboard.
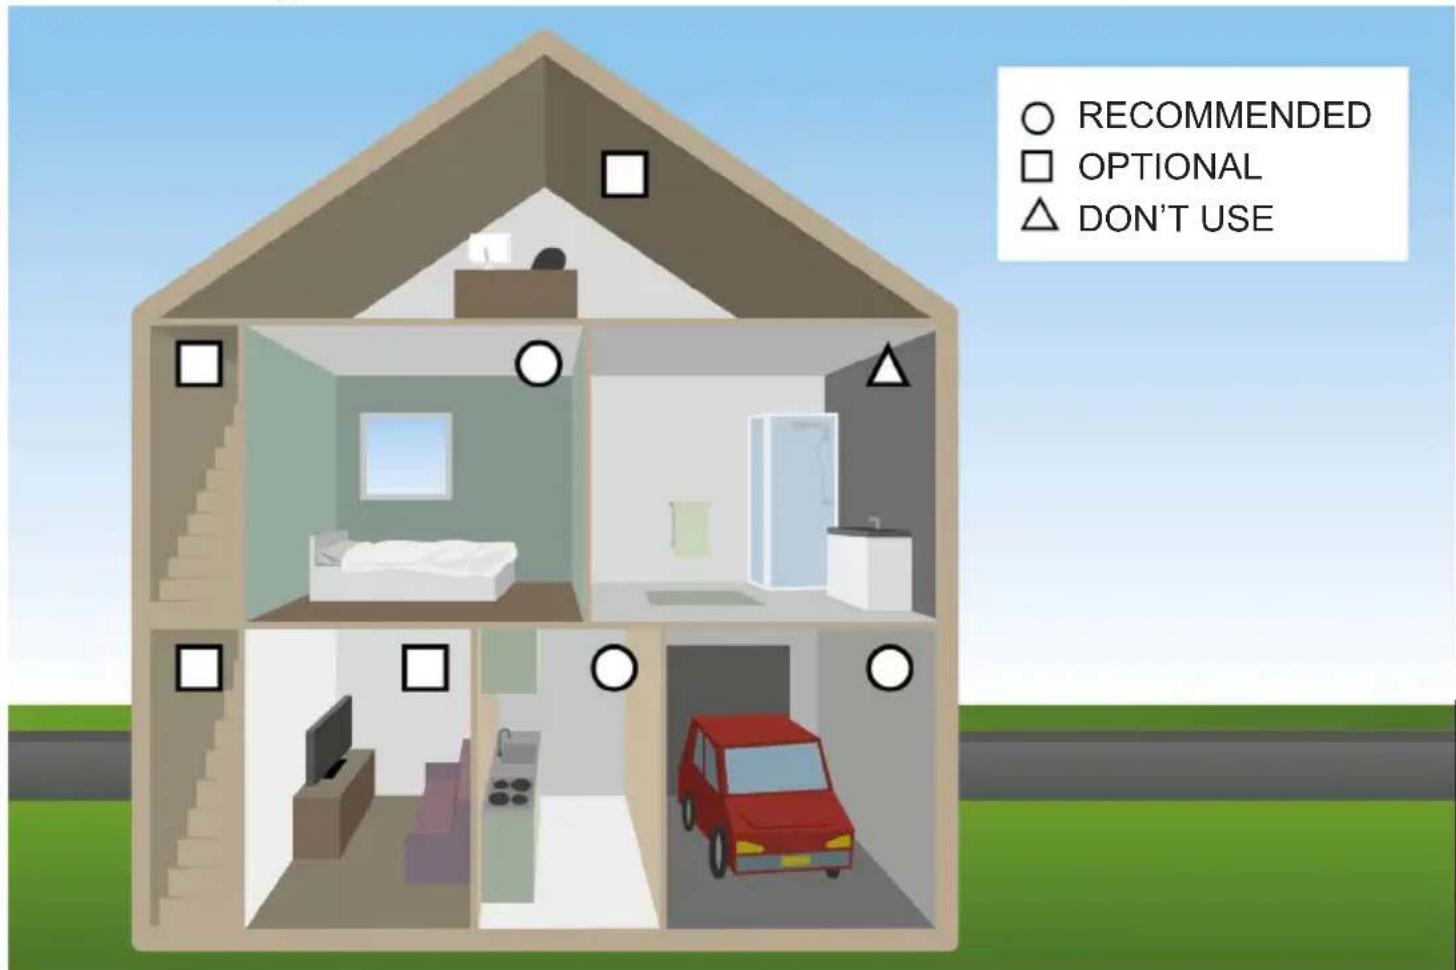
RECOMMENDED INSTALLATION LOCATIONS FOR THE SA300:
- Install the first smoke detector near the bedroom. Ensure that it is placed so, if it would detect fire, at least one exit route would still be accessible. We recommend to place one alarm near each potential blockade of your exit route, so you are alerted before a fire would block off escape.
- Use multiple smoke detectors to increase safety and ensure an alert before the escape route is blocked.
• Install at least one smoke detector on each floor of your house.
• Install at least one smoke detector in each room where people smoke or where there is equipment that may potentially cause a fire. - Smoke and heat will first move upwards towards the ceiling; after that the smoke and heat will travel horizontally.
• Install the detector on the ceiling. Except for rooms smaller than 1m, you should stay at least 50 cm away from the wall and 61cm from any corner. Smoke and heat do not gather in such corners, preventing the detector from alerting you on time.

text_image
Diagram illustrating a multi-level living room layout with labeled rooms including bedroom, bathroom, and car storage area
Recommended

Optional

Do not use
- The kitchen; Steam from cooking might give a false alarm.
- The shower or bathroom; water damp might cause a false alarm and the moist environment might damage the detector.
• The garage: The car exhaust might cause a false alarm. - In front of a fan or nearby the exhaust of an air conditioner or heater.
• In a ceiling nook. - In rooms where the temperature could reach below 0^ or beyond 40^ .
- Do not paint or otherwise cover this smoke detector.
INSTALLATION INFORMATION:
Place the ceiling plate in a suitable location using plugs and screws on the ceiling. Then screw the detector onto the ceiling plate. Press the center of the detector (test button) for 10 seconds until the red LED flashes 1x and beeps. The SA300 has just been switched on. Immediately carry out a first test by pressing the center of the detector (test button) once. see also heading "Testing".
text_image
TEST-TASTEUSING, TESTING AND MAINTENANCE:
Using:
The smoke detector is in operation after the SA300 is activated. Immediately after activating the smoke detector, the red LED gives 1x flash and 1x beep. The red LED will now light up briefly about every 60 seconds. Once smoke is detected, the alarm will sound. Once the smoke disappears, the smoke alarm will stop automatically.
Test:
The entire front of the detector forms the test button, press the front center to test the SA300.
Press and hold the test button for 1 second. Within 7 seconds, the SA300 gives 2x a series of 3 beeps and a red LED under the housing lights up 3x. Then the alarm is still working correctly. Preferably check the detector every week. In alarm status, the smoke detector generates at least 85dB(A) sound pressure. Do not test the smoke detector with candles, open fire, cigarettes or similar but use the test button.
Time-out function:
This function will deactivate the alarm for about 10 minutes. This function can be enabled by pushing the HUSH/TEST button very shortly. The LED will now blink once every 8 seconds to indicate the deactivated smoke alarm.
After 10 minutes, the alarm will be fully active once again. If there is (still) any smoke in the environment, the alarm will go off again.
This function can be used repeatedly.
ATTENTION:
- If the cause of an alarm is unclear, assume it's caused by fire. Immediately evacuate the building.
- Keep the smoke detectors out of range of children.
- Protect against dust during rennovations. Without protection the smoke detectors will lose their functionality.
Maintenance:
The smoke detector is maintenance-free. In very dusty rooms they may be cleaned by vacuum.
PLAN AN ESCAPE ROUTE:
- Make a map and mark all locations of doors and windows and a possible escape route. Note that you may need an escape ladder on high floors.
- Ensure everyone in the house knows the sound the smoke alarms produce and regularly practice use of the escape route.
- Leave the house immediately according to the plan when hearing the alarm. Every second counts: so respond quickly. If you do not notice smoke or heat, check if everyone in the house is in a secure location.
- Do not open any doors without feeling wether the door is warm or if there is smoke coming from underneath the doors. If it is, do not open that door. If the door is cold, put your shoulder firmly against the door and open it a small amount to check for any heat or smoke first.
- If there is much smoke, keep low and take shallow breaths, preferably through a moist towel. Call the fire department as soon as you are safe outside.
REPLACING THE BATTERIES:
The detector is supplied using a built-in lithium battery. Under normal conditions the battery will last at least ten years. If the detector is about to need replacement, the smoke detector will make a beep sound every 60 seconds for at least 30 days. If the smoke detector does not function, please contact your supplier.
ENVIRONMENT:
Do not throw away used batteries, but recycle them using your local chemical depot. Product may not be thrown out as normal waste, but must be recycled as electrical waste.

DECLARATION OF PERFORMANCE:
Is available at the following internet address:
http://DOC.hesdo.com/SA300_DOP_1.pdf
text_image
Diagram illustrating a multi-level living room layout with labeled rooms including bedroom, shower, car, and bathroom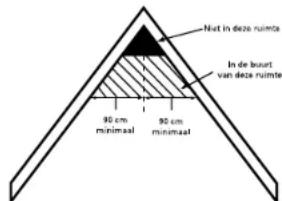
natural_image
Pure diagram of layered structures with arrows indicating rotation or movement (no text or symbols)USO, PRUEBAS Y MANTENIMIENTO:
Uso:
Is available at the following internet address: http://DOC.hesdo.com/SA300_DOP_1.pdf
Photoelectric Smoke Alarm Device

EN14604:2005/AC:2008 DOP nr.:SA300_DOP_1 SM11 1008-CPR-MC 69265247 001 Fire Safety
Hesdo b.v.
Aziëlaan 12
5232 BA 'S-Hertogenbosch
The Netherlands
(+31) (0)73 6411 355
Fire detection in buildings
| Essential characteristic 1: Pass |
| Essential characteristic 2: Pass |
| Essential characteristic 3: Pass |
| Essential characteristic 4: Pass |
| Essential characteristic 5: Pass |
| Essential characteristic 6: Pass |
| Essential characteristic 7: Pass |
| Essential characteristic 8: Pass |
| Mounting type Ceiling | |
| Main power source Batteries, lithium, built-in | |
| Autonomy At least: 10 years | |
| Interconnectible device No | |
| Suitable for installation in a recreational vehicle | No |
| Individual alarm indicator Yes | |
| Alarm prevention facility Yes | |
Service

Help


WWW.ALECTO.NL SERVICE@ALECTO.NL


natural_image
White electronic device with dot pattern and control buttons (no readable text or symbols)CONTENT
Nederlands....3
Français....13
Deutsch....23
English....33
text_image
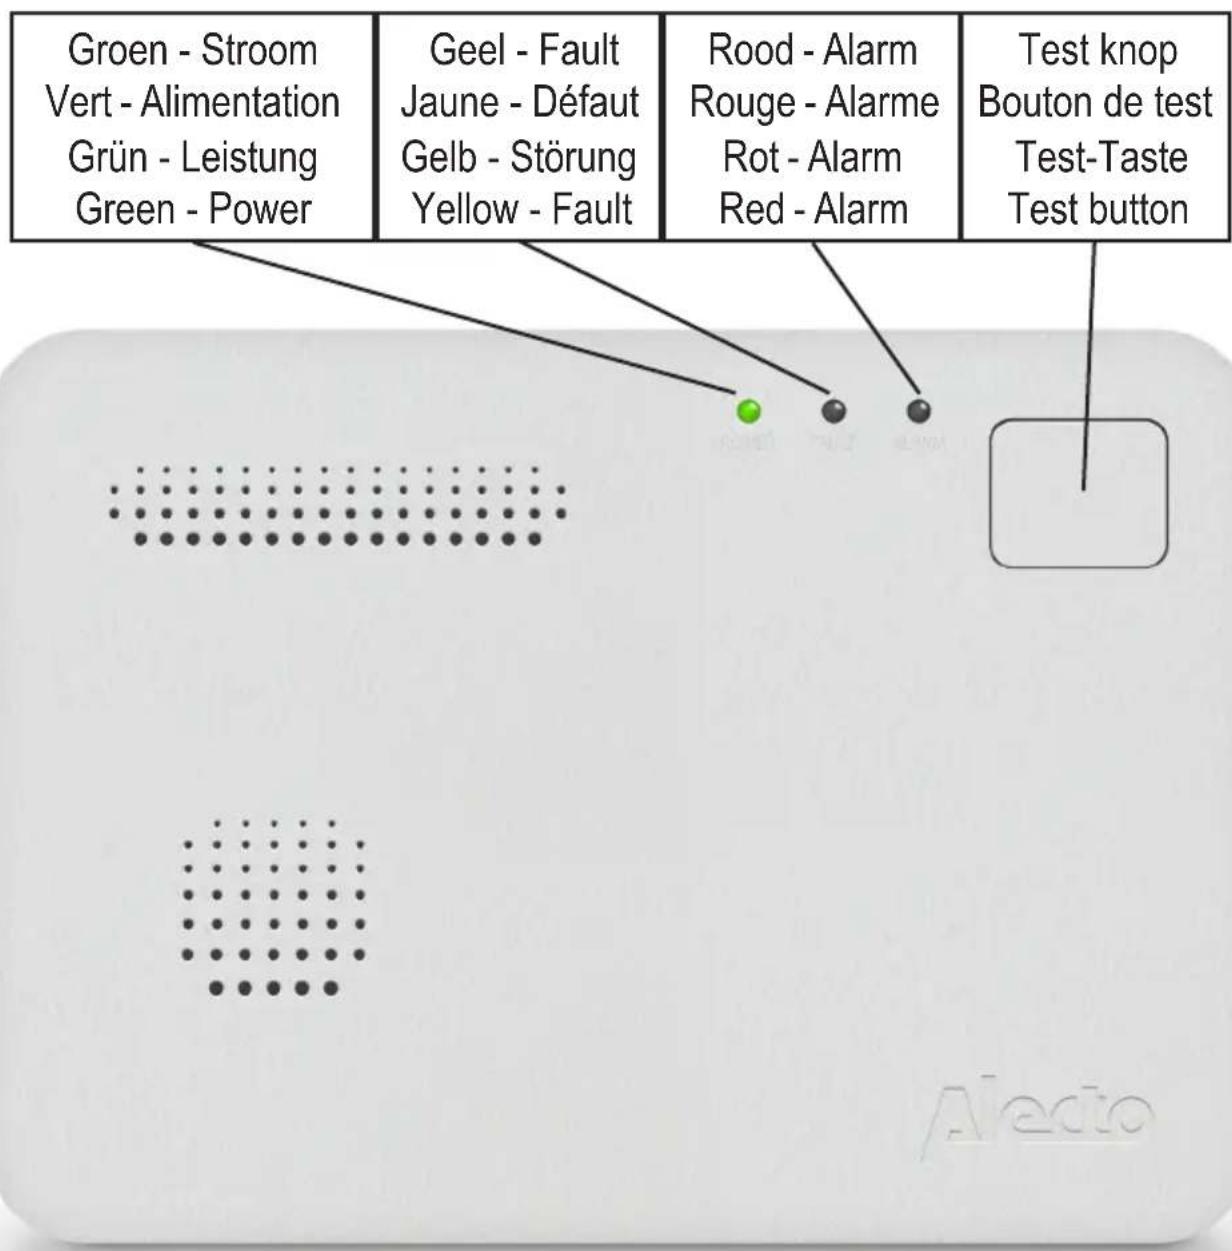
Groen - Stroom Vert - Alimentation Grün - Leistung Green - Power Geel - Fault Jaune - Défaut Gelb - Störung Yellow - Fault Rood - Alarm Rouge - Alarme Rot - Alarm Red - Alarm Test knop Bouton de test Test-Taste Test buttonnatural_image
Illustration of a person sitting at a desk with a computer and a wall-mounted device, no text or symbols present.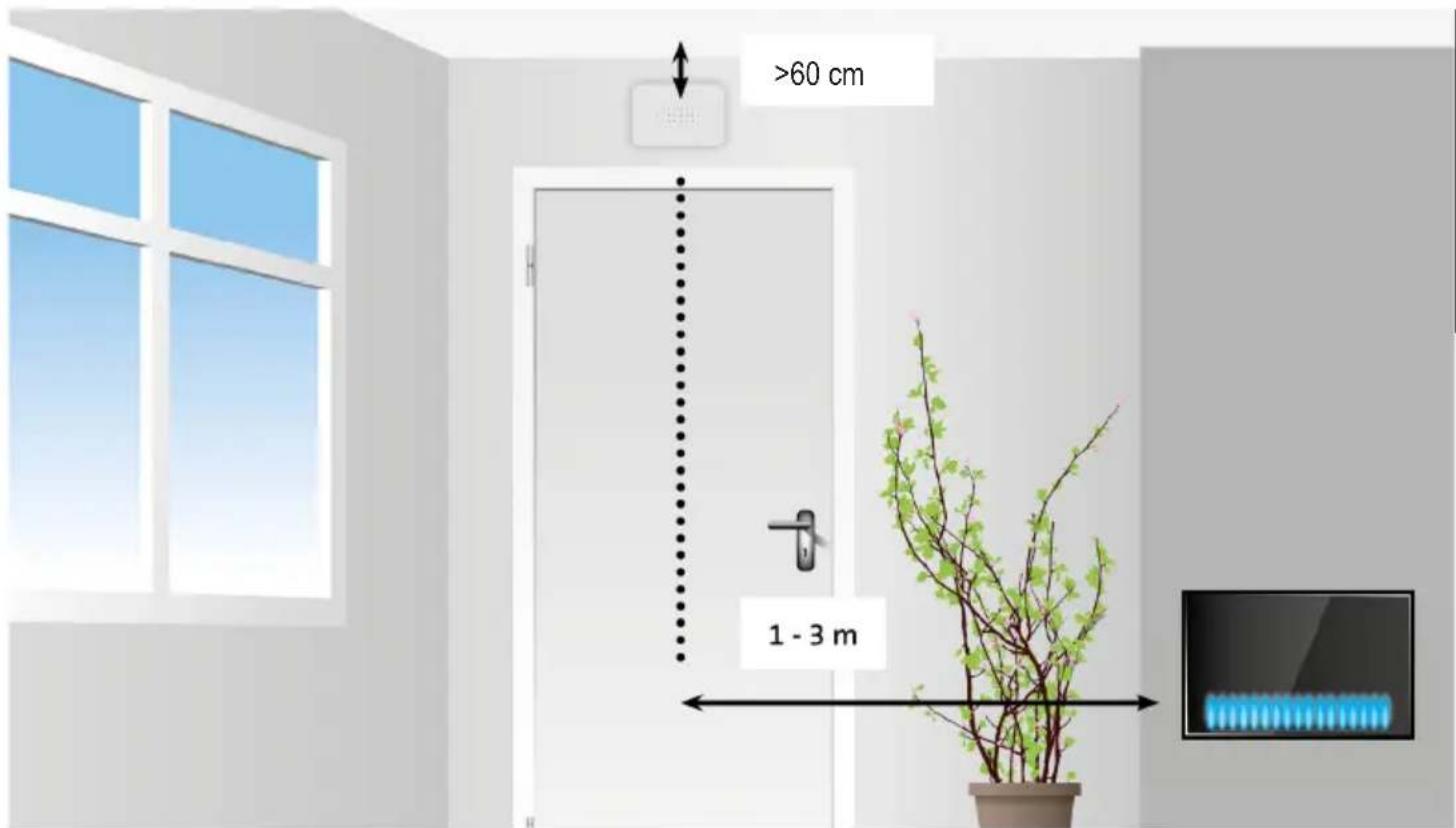
text_image
>60 cm 1 - 3 mSTIL ZETTEN ALARM (HUSH FUNCTIE):
natural_image
Illustration of a person sitting at a desk with a computer, no text or symbols present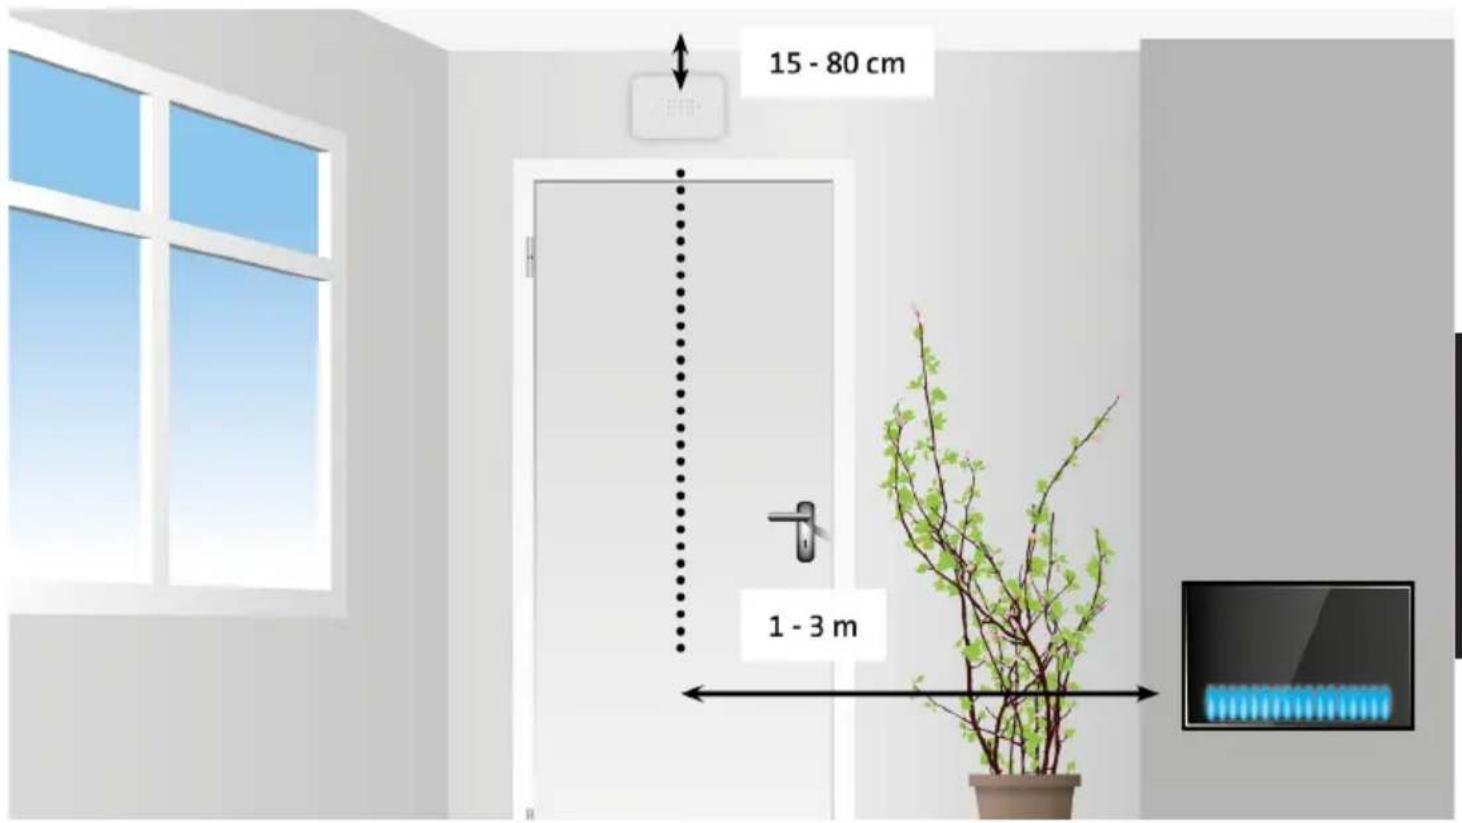
text_image
15 - 80 cm 1 - 3 mMODE D:\EMPL01
natural_image
Illustration of a person using a laptop in an office setting, with a wall-mounted device and a flower on a cabinet (no text or symbols)
text_image
15 - 80 cm 1 - 3 mThe COA1910 is a CO detector, developed especially to detect carbon monoxide in your living area.
GENERAL:
What is carbon monoxide?
Carbon monoxide, designated CO, is also called carbon monoxide. It is a colorless, tasteless, odorless and poisonous gas. ATTENTION this is CO (carbon monoxide) and not CO2 (carbon dioxide).
YOU CANNOT SEE, SMELL OR TASTE CARBON MONOXIDE AND IT CAN BE FATAL.
CO is emitted as part of a hot gas mix and therefore it tends to rise until it cools down. This is in contrast to CO2, which is heavier than air and drops.
All fuel types can produce carbon monoxide.
Most common CO sources:
The most common carbon monoxide sources are (faulty) gas devices used for:
• Heating (Central heating boiler, Geyser, gas heater, portable fuel stoves)
- Cooking
• Vehicles running in an adjacent garage
• Clogged chimneys, smoke ducts or fireplaces
- Fuel-powered tools
• The use of open fire in an enclosed space
The COA1910 does not detect any gases other than CO gas.
Symptoms of carbon monoxide poisoning:
Symptoms of carbon monoxide poisoning are dizziness, fatigue, weakness, headaches, nausea, vomiting, sleepiness and confusion.
Everybody is sensitive to the dangers of carbon monoxide, experts agree however that small children, pregnant women and their unborn babies, elderly people and persons with heart or breathing problems have the highest risk of serious or even fatal injuries. Every year an authorized installer must inspect and clean your heating system, vents, chimney and smoke ducts.
Important:
- This CO detector is not a replacement for smoke, fire or other detectors.
- The detector must be installed by a competent person.
- This detector cannot protect people with special medical conditions
- This detector might not prevent any chronic health effects of carbon monoxide on the body.
- This CO detector is not a replacement for the correct installation, use and periodic maintenance of combustion equipment, nor adequate ventilation of spaces in which these devices are being used.
-
We recommend you to weekly test the CO detector using the "TEST/RESET" button on the CO detector.
-
This CO detector only sounds the alarm when carbon monoxide is present at its sensor.
Therefore, it's possible for carbon monoxide to be present elsewhere and the alarm doesn't sound. - When the alarm sounds, possible harmful carbon monoxide levels are present!
Carbon monoxide can be deadly!
| CO concentration | Period of inhaling and symptoms |
| 50PPM | The maximum concentration a healthy adult can withstand in 8 hours. |
| 200PPM | After 2-3 hours, mild headache, sensations of weakness, dizziness, nausea. |
| 400PPM | Within 1-2 hours, ache in forehead; after 3 hours, life-threatening. |
| 800PPM | Within 45 mins, dizziness, nausea, convulsions; Loss of consciousness within 2 hours; Fatal within 2-3 hours. |
| 1600PPM | Within 20 mins, headache, dizziness, nausea; Fatal within 1 hour. |
| 3200PPM | Within 5-10 mins, headache, dizziness, nausea; Fatal within 25-30 mins. |
| 6400PPM | Within 1-2 min, headache, dizziness, nausea; Fatal within 10-15 mins. |
| 12800PPM | Fatal within 1-3 min. |
Alarm
When the CO detector sounds the alarm, carbon monoxide (CO) might be present which can be fatal. Therefore, never ignore this alarm.
When alarmed, the red ALARM LED will blink rapidly 5 times and emit 5 short audible beeps. The alarm cycle will repeat 3 times every 10 seconds. Once the carbon monoxide concentration falls below 40PPM the alarm will stop.
If the CO concentration exceeds 30PPM for 60 minutes or 40PPM for 40 minutes the low CO concentration alert will sound. Once every 5 minutes, the red alarm LED will simultaneously flash 4 times and 4 short sounds will sound.
What to do when the alarm sounds:
- Open doors and windows and immediately do outside into the fresh air. Check whether everybody has left the building.
- Call an official installer to inspect the correct functioning and state of maintenance of the combustion source (gas or oil powered equipment) that could be the cause for the CO alarm.
- Only enter the building again after the cause has been resolved and the building has been well ventilated.
The alarm sound can be turned off for up to 10 minutes (Hush function) by pressing and holding the TEST key for 3 seconds (<200PPM).
The time the hush function is active depends on the measured CO concentration. The hush time decreases as the CO concentration increases. Above 200PPM the hush function is not possible.
When the CO concentration drops, the alarm will eventually stop automatically. During the hush function, press the test button to immediately disable the hush function and make the alarm audible.
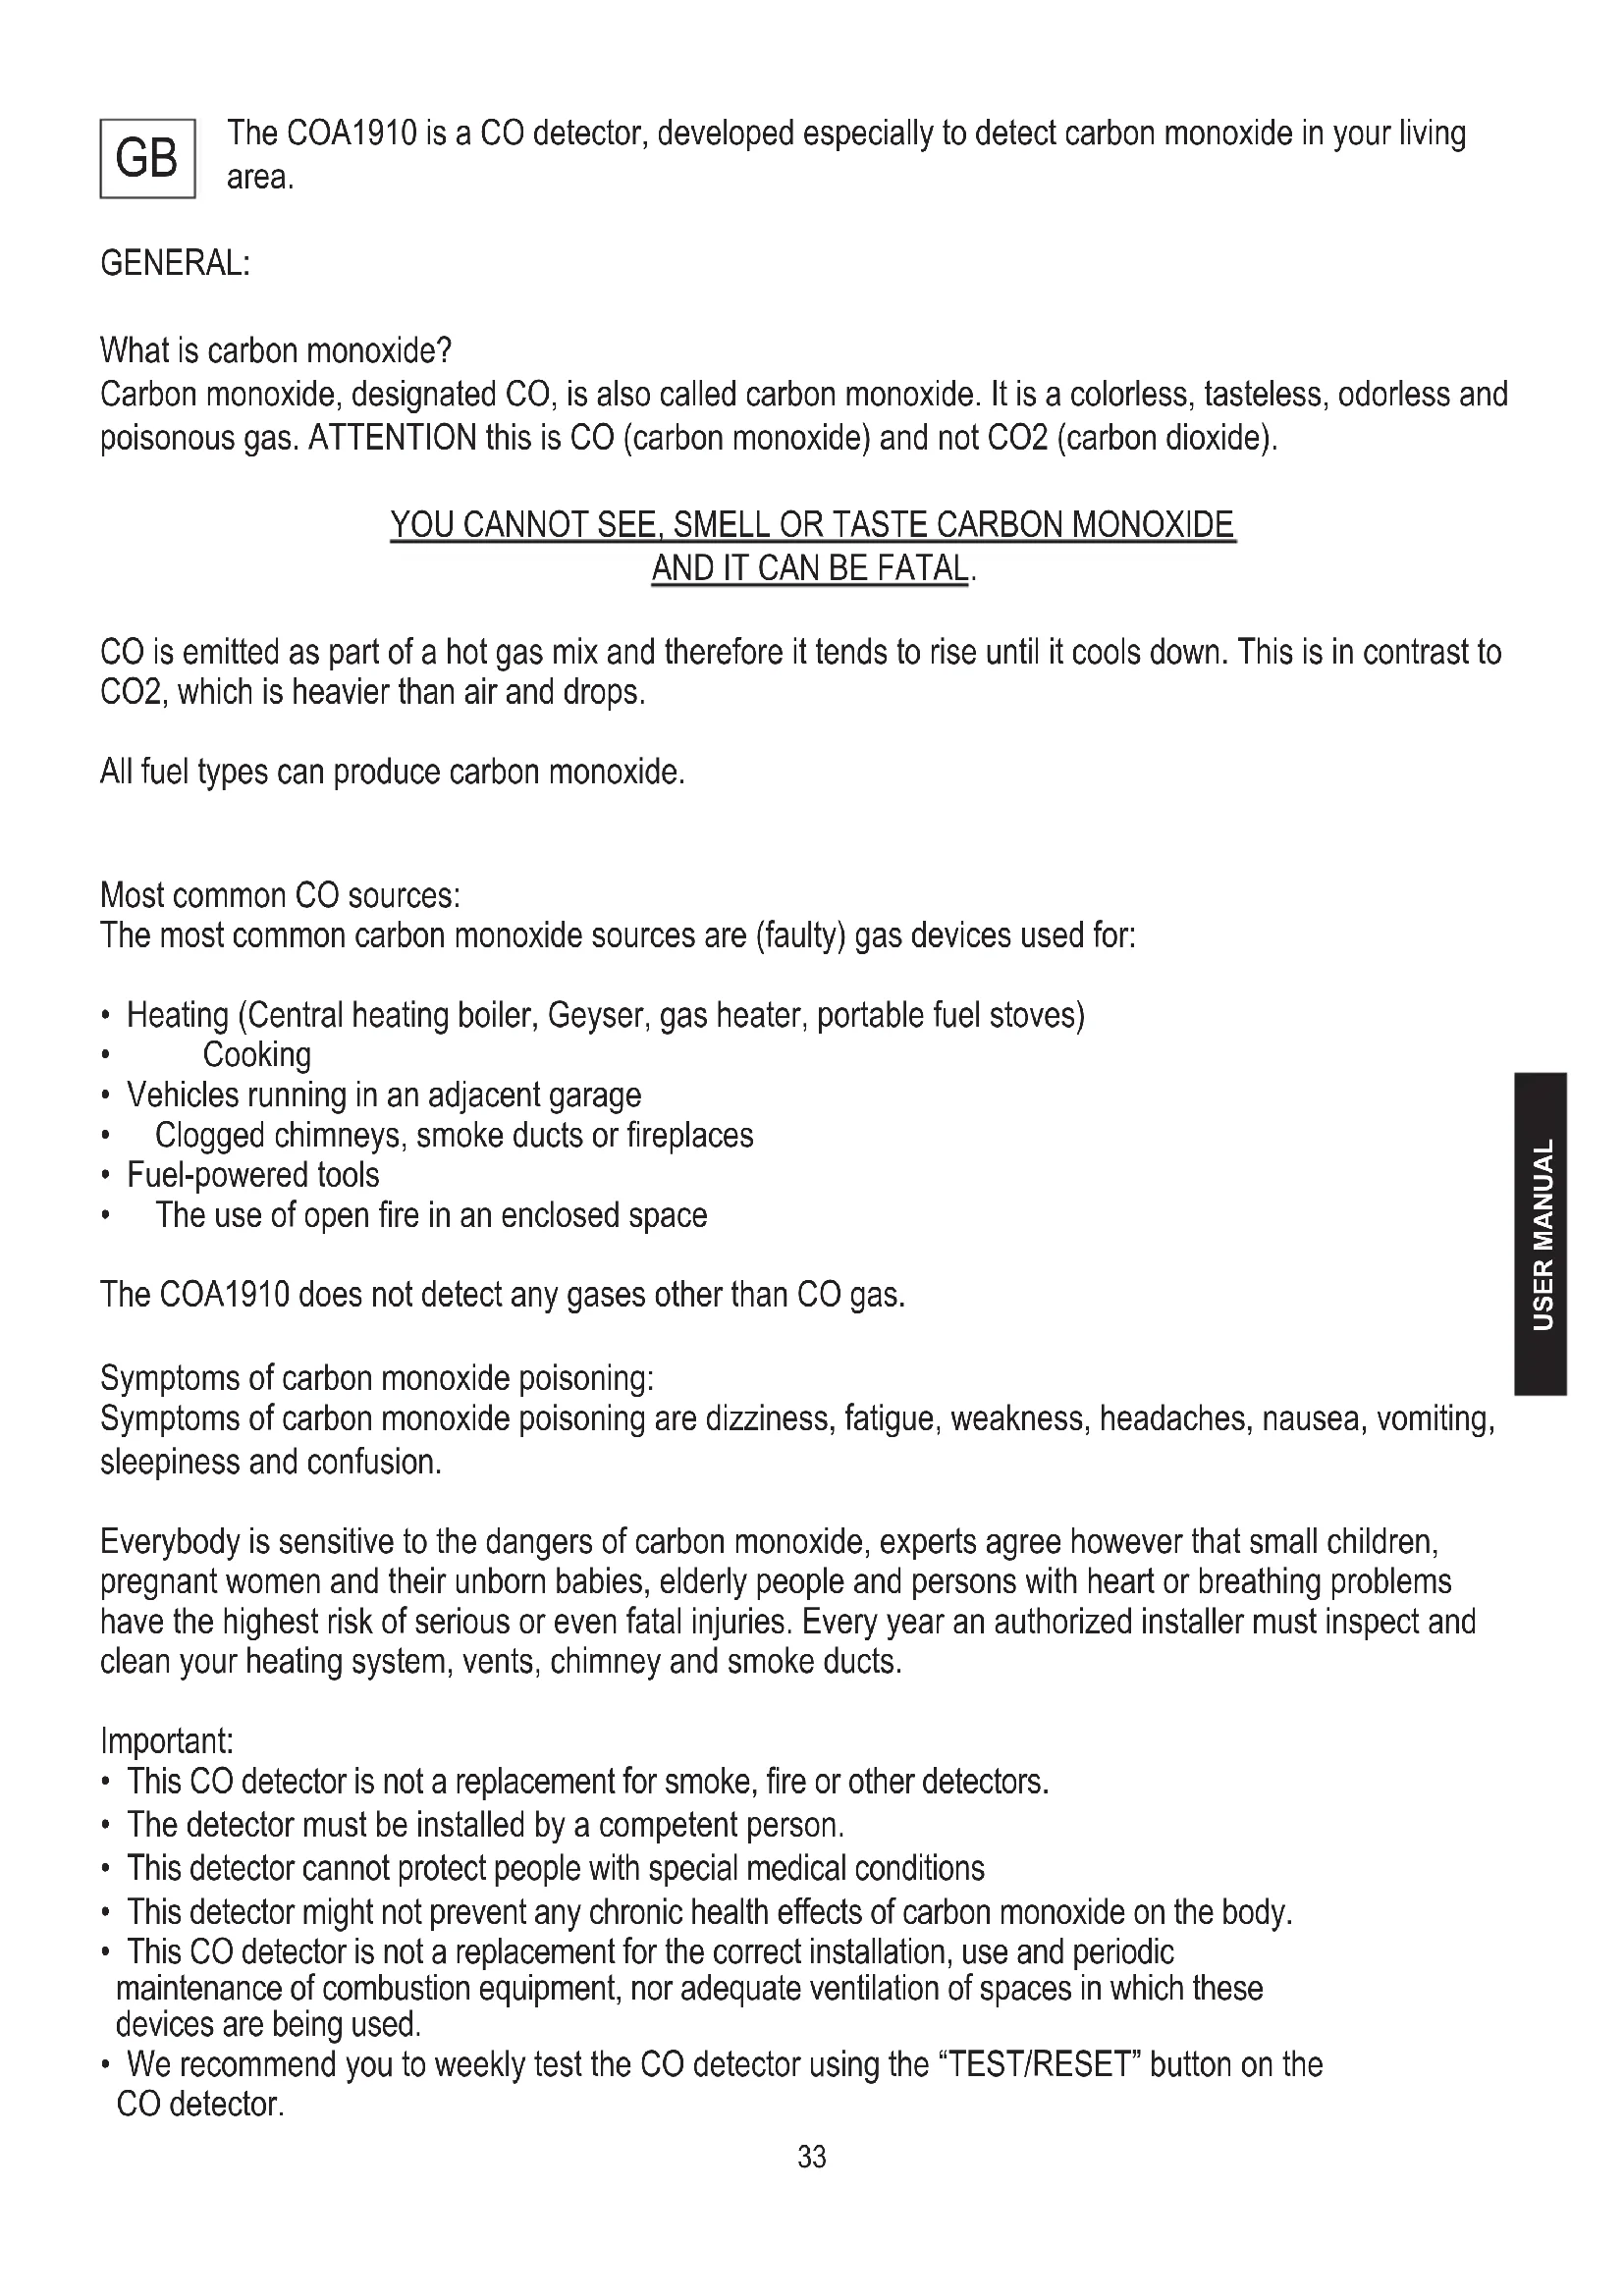
Recommended locations for the installation of the COA1910
General
• Install the CO detector in a location where the alarm can be heard inside bedrooms.
In houses with multiple floors, it's recommended to install a CO detector on each floor.
• Install the detector on a spot where the weekly check can be performed easily.
• We recommend that a CO detector be installed in every room with a combustion appliance at the air outlet of the appliance.
text_image
RECOMMENDED OPTIONAL DON'T USE
text_image
X 90 cm minimaal 90 cm minimaal Not in this area Near this area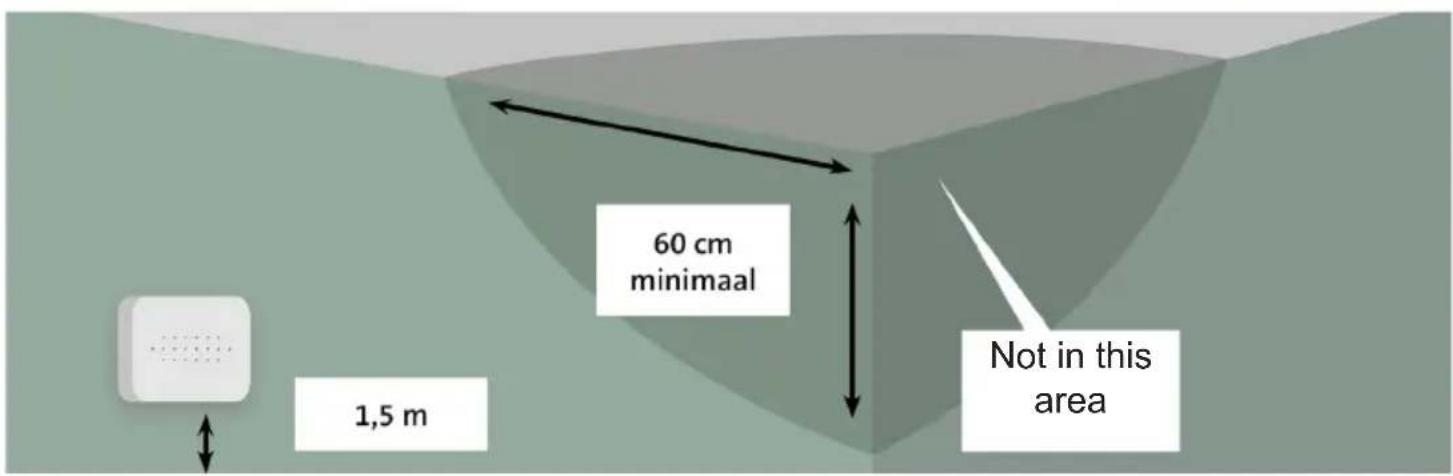
text_image
60 cm minimaal 1,5 m Not in this areaIn spaces without combustion devices
• Install the CO detector in spaces without combustion devices, preferably at breathing height.
• Install the CO detector way from of roof ridges, corners. arched ceilings or front roofs.
• Install the CO detector 60 centimeters from surrounding walls and ceilings.
natural_image
Illustration of a person using a laptop at a desk with a computer and a decorative potted plant (no text or symbols)
text_image
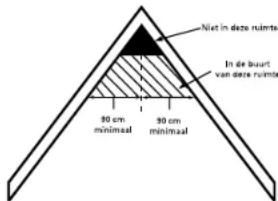
15 - 80 cm 1 - 3 mIn spaces with combustion devices
• Install the CO detector at 1 to 3 meters away from combustion devices, within the air flow from the combustion device.
• Install the CO detector way from of roof ridges, corners. arched ceilings or front roofs.
- In the case of smaller spaces ( <4m^3 ), the detector should be installed outside these spaces.
• Install the CO detector 60 centimeters from surrounding walls and ceilings. Installation on both walls and ceiling is possible in rooms with a combustion device.
text_image
> 60 cm 1 - 3 m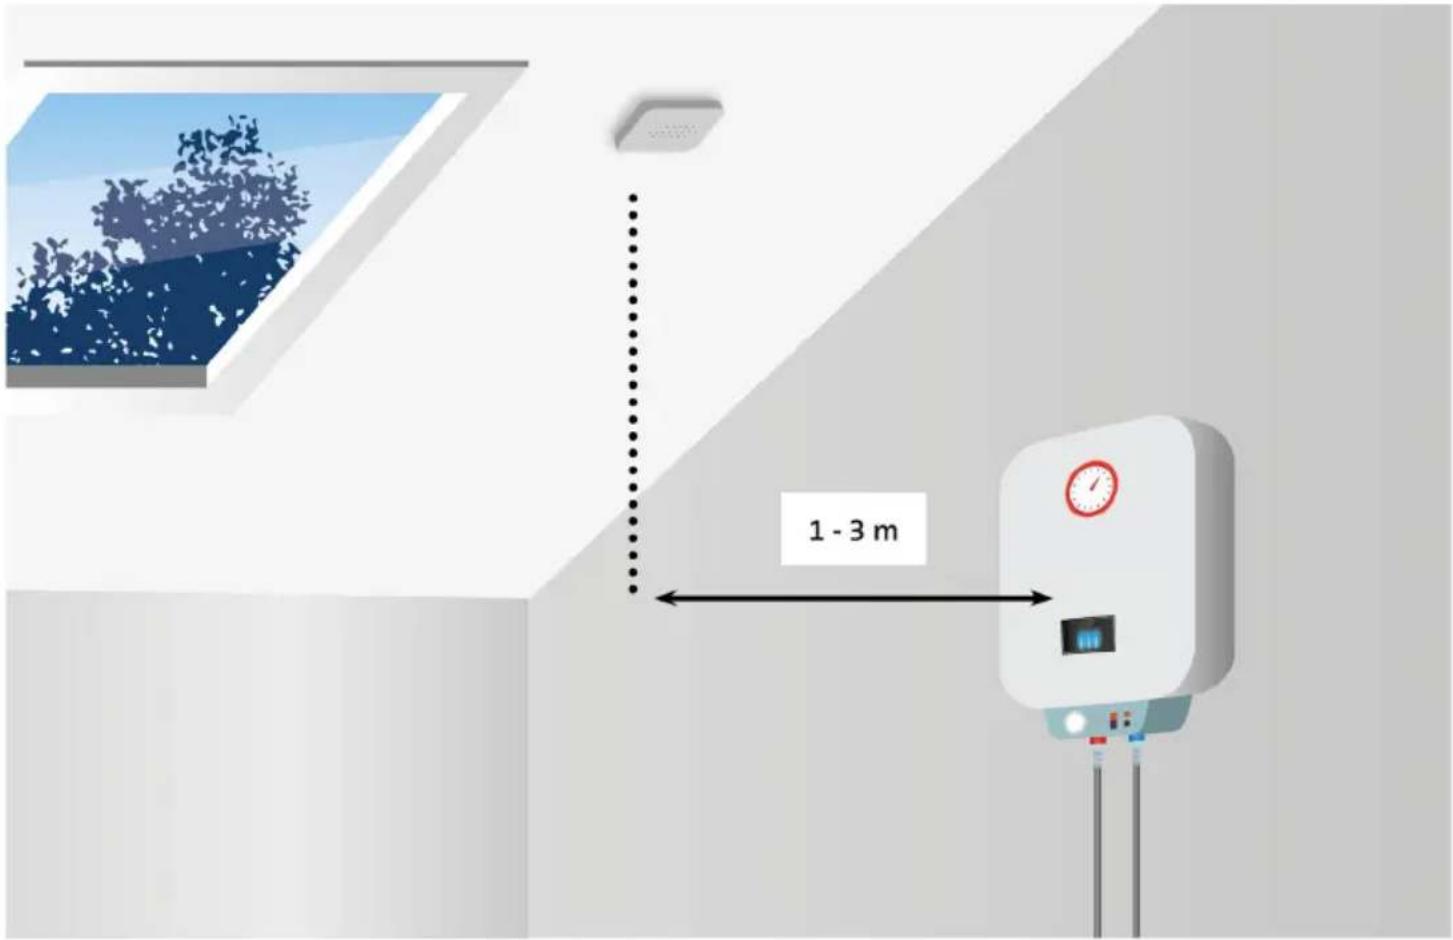
text_image
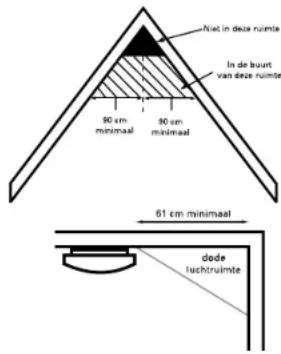
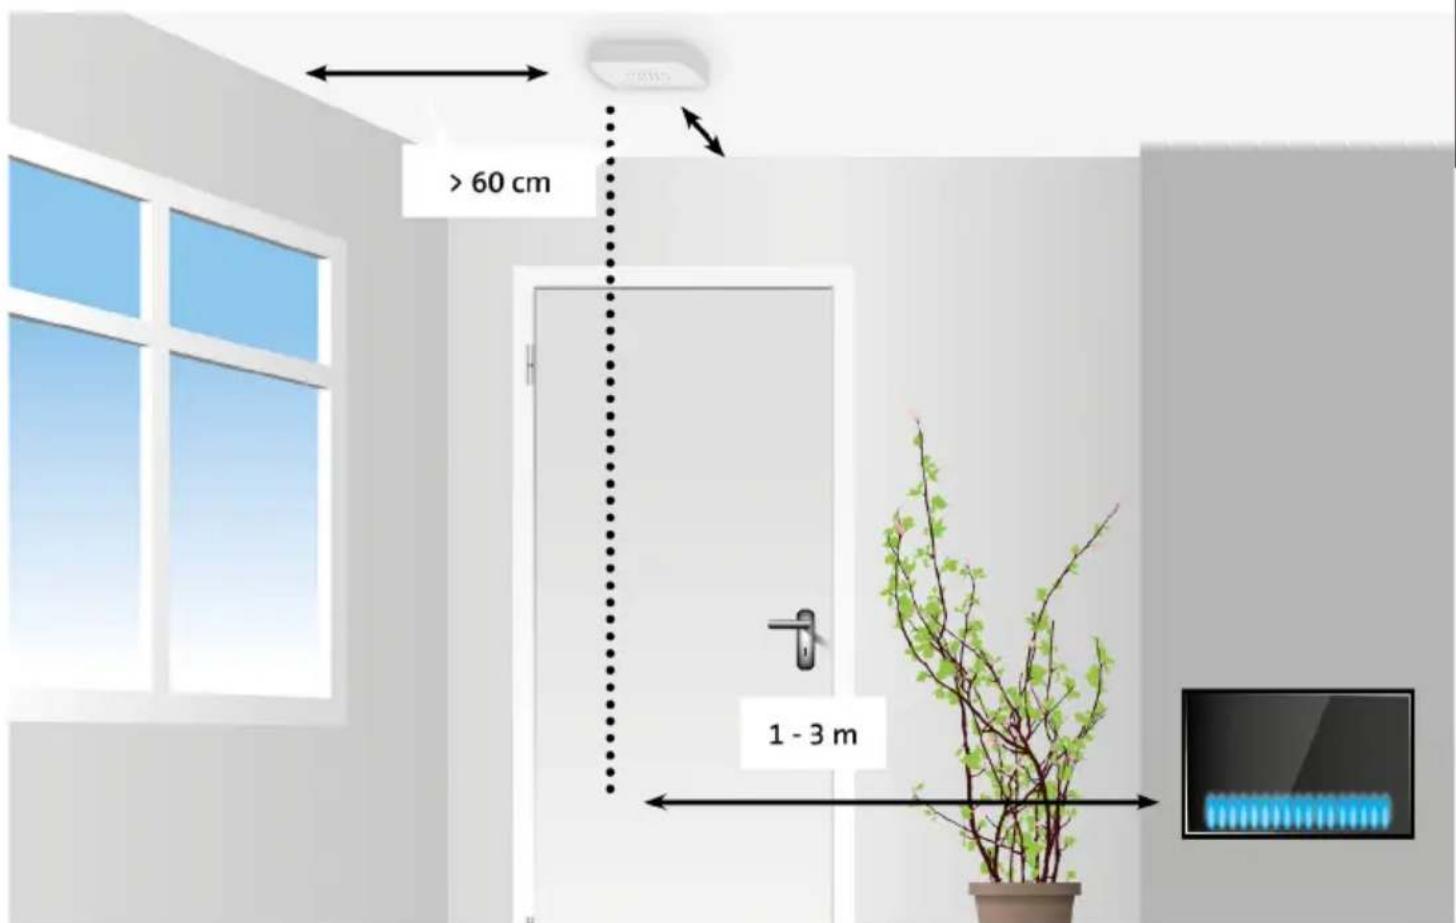
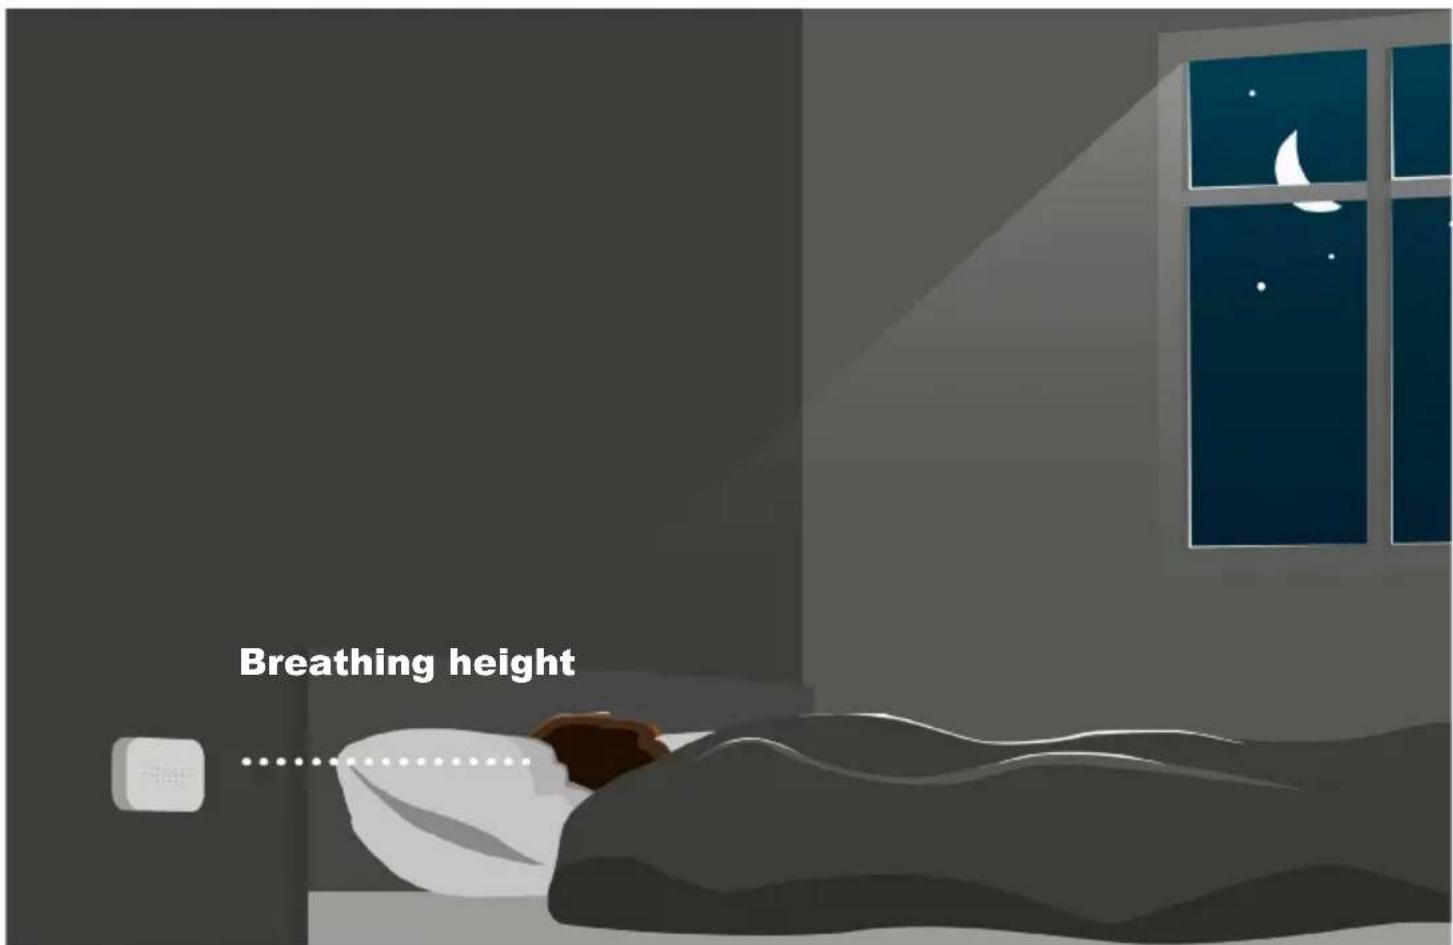
1 - 3 mIn bedrooms
• Install the CO alarm in bedrooms at breathing height while sleeping.
• Install the CO detector way from of roof ridges, corners. arched ceilings or front roofs.
text_image
Breathing height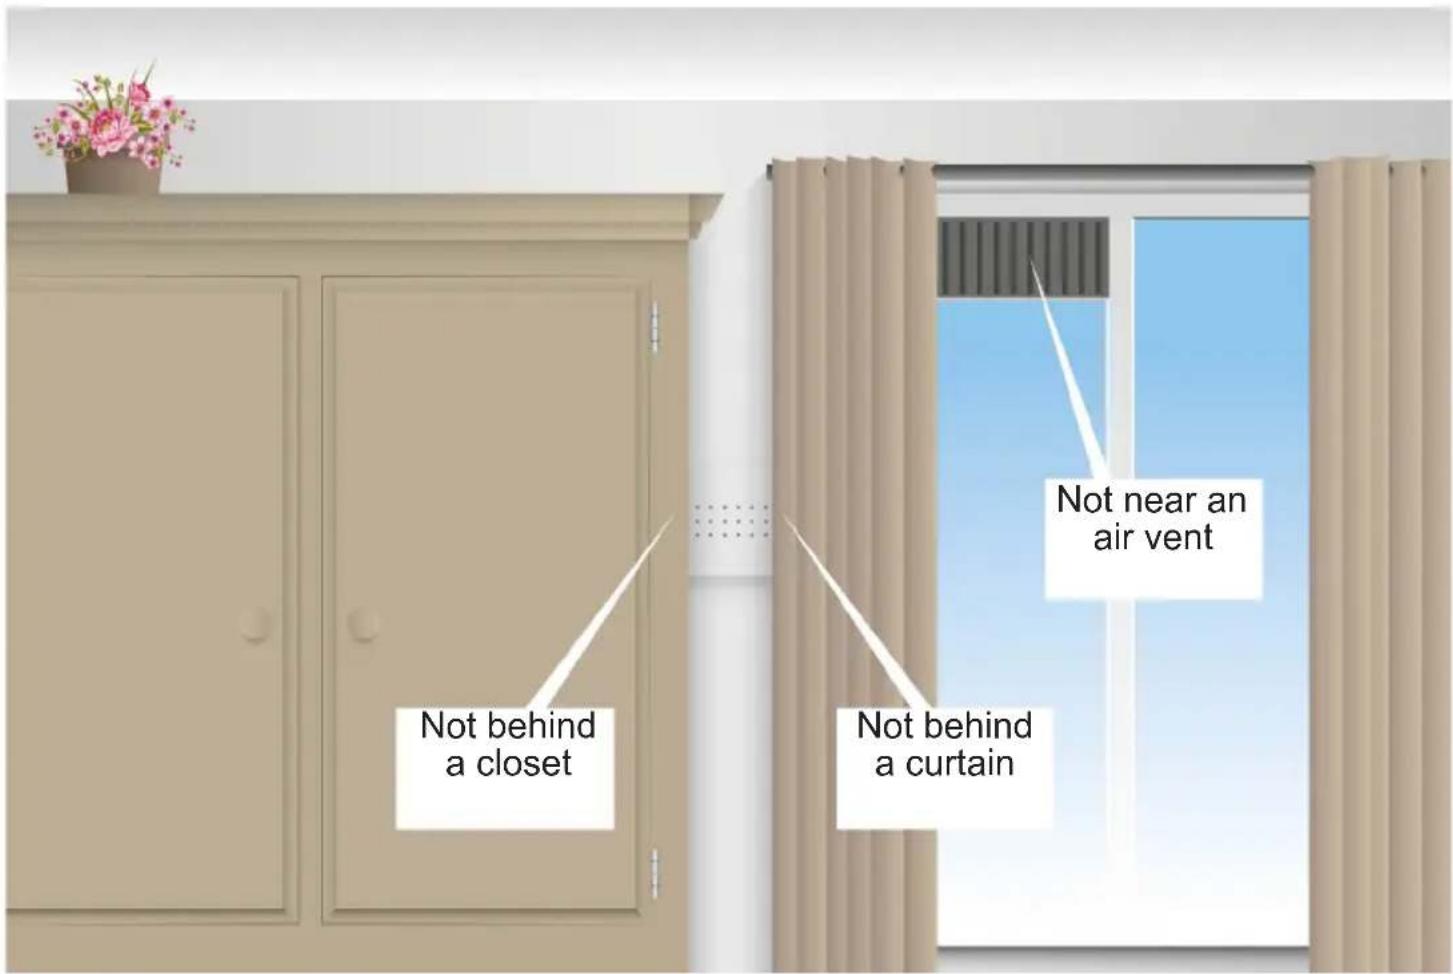
text_image
Not behind a closet Not behind a curtain Not near an air ventAVOID THE FOLLOWING PLACES FOR INSTALLATION:
- Do not install the CO-detector in the turbulent air created by ceiling fans.
- Do not install the CO-detector near vents with fresh air.
- Do not install the CO-detector near doors and windows leading outdoors.
- Do not install the CO-detector near extremely dusty, dirty or greasy spaces such as heating spaces < 4m^-3 or pantries. Dust, grease and household chemicals can affect the sensor.
• Install the CO detector at least 0.5 meters away from gas discharge lamps (halogen) because of electronic interferences that can lead to false alarms. - Do not install the CO detector in humid and wet spaces, such as the bathroom.
- Do not install the CO detector in a location where the temperature is lower than -10^ or warmer than +45^ .
- Do not install the CO detector in a place where the humidity is higher than 93%RH.
- Never install the CO detector behind curtains or furniture. Carbon monoxide must be able to reach the sensor to ensure the sensor can properly detect carbon monoxide levels.
• Never install the CO detector flat on a table or similar surface. - Never install the CO detector in spaces where spray cans may be used (hair spray, deodorant)
INSTALLATION:
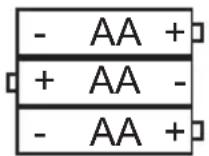
- Insert the included batteries into the detector.
A. Turn the securing pins inward
B. Insert the 3 AA batteries, observing polarity.
(High Energy Alkaline batteries 1.5V AA - LR6)
C. The power, fault and alarm LEDs will light up for 0.5 seconds and the detector will emit a short audible signal.
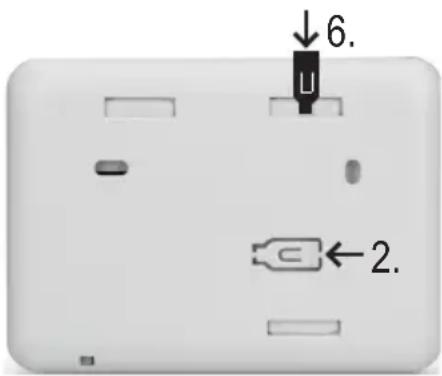
- Push the latch out of the mounting plate.
- Install the mounting plate on a suitable spot
- Use the included plugs and screws.
- You can perform the first test by briefly pressing the test button, see also paragraph "Testing".
- Now interlock the mounting plate with the CO detector by inserting the latch on top into the hole until you hear a click.
- The CO detector is now functional.
text_image
6. 2.USE:
- Every 45 seconds, the power LED lights briefly to indicate that the detector is operating.
- When the detector gives a short bleep every 60 seconds and the yellow "Fault" LED flashes, the batteries should be replaced as soon as possible. At the start of these warnings, the detector will operate for 30 days standby or 4 minutes in alarm mode.
- The table below shows when the detector will sound the alarm.
| CO concentration | NO ALARMfor | ALARMfor |
| 30PPM 120 min. - | ||
| 50PPM 60 min. 90 min. | ||
| 100PPM 10 min. 40 min. | ||
| 300PPM - 3 min. |
In accordance to the EN50291 standard.
- When the alarm sounds, it will turn off within 6 seconds after moving the detector to a space with a CO concentration below 40PPM.
- The alarm sound can be turned off for up to 10 minutes by pressing and holding the TEST button for 3 seconds (<200PPM).
- The detector will automatically perform a fault inspection every 180 seconds.
TESTING:
When the CO detector is operating under normal conditions, the sensor and siren should be tested at least every month. Press the "TEST" key. "POWER", "FAULT" and "ALARM" LED light up. Then the detector gives 5 beeps within 10 seconds and also the red "ALARM" LED lights up. Everything is now ok.
If the detector gives an error message, the yellow "FAULT" LED will light 2 times and give 2 beeps per minute.
SILENCING ALARM (HUSH FUNCTION):
Sometimes the alarm may go off due to influence of environmental factors. For example, smoke containing certain concentrations of carbon monoxide or other chemical gases. When the CO level is lower than 200PPM, you can press the “TEST” button. The alarm will stop and the detector will immediately check the CO value again. When the concentration is higher than 200PPM it is impossible to stop the alarm.
The red LED will blink 8 times per second- and the sound signal will stop for max 10 minutes. If after max
10 minutes the concentration is still above 200PPM the alarm will be activated again. During the hush function, press the test button to immediately disable the hush function and make the alarm audible.
LED INDICATION:
Red LED Alarm, carbon monoxide present
Yellow LED Sensor problem
Green LED Normal functioning, the LED flashes every 45 seconds
BATTERY INFORMATION INDICATION:
- Every 45 seconds the battery is automatically checked.
- Every 45 seconds the green LED will light up briefly as long as the total battery voltage is above 3,6 Volt. This means that the battery capacity is okay. If the battery voltage drops below 3.6 Volts, the yellow "Fault" 1x LED will briefly light up once a minute and a one-time beep will sound. Now the batteries should be replaced as soon as possible.
Use High Energy Alkaline batteries (3 x LR6 / 1,5V AA). Rechargeable batteries are not suitable. The supplied batteries will last approximately 24 months before they run out
REASON FOR SENSOR FAULT:
Faults can be caused by broken circuitry, a faulty sensor or faulty electronic parts.
SENSOR FAULT CAUSED BY CHEMICAL GASES:
When volatile chemical gases such as alcohol are the cause for error detection, this may be corrected by switching the detector off and leave it in fresh air for 24 hours. This will restore the sensor. If the error is not cleared after these 24 hours, the detector is faulty and should be replaced. Don't repair the detector yourself, but have it repaired by the importer.
When the alarm is contaminated and damaged by high concentrations of chemical gases, the sensor could be affected. This will lead to a temporary error or permanent damage. When the alarm sounds and you can smell a chemical gas, this could be the reason. Carbon monoxide is a colourless and odourless gas. Chemical gases do have an odour.
The following substances and gases can cause false alarms or permanently damage the detector: Methane, propane, iso-butane, ethylene, ethanol, alcohol, iso-propanol, benzene, toluene, acid, ether, hydrogen, hepatic gas, sulphur dioxide, aerosol, propellant, alcohol preparation, paint, thinner, dissolvent, bonding agents, shampoo, aftershave balm, perfume, car exhaust (cold start) and certain cleaning agents.
MAINTENACE:
To keep your CO detector in proper working order, please follow these easy steps:
- Once a month, check that the alarm is working properly by pressing the test button.
- Clean the CO detector with a vacuum cleaner or with a soft cloth or brush once every month to remove excess dust.
- Check whether the batteries are damaged, exhausted or corroded.
- Explain to children that they should not play with the CO detector.
- Ensure children are aware of the dangers of carbon monoxide poisoning.
- Never use cleaning agents or other solutions to clean the CO detector.
- Never use air fresheners, hair spray or other aerosols near the CO detector.
- Don't paint the CO detector. Paint covers the vents preventing the sensor from detecting CO.
- Never disassemble, repair or modify the product yourself; there's a high risk that it will no longer function correctly or reliably.
BATTERY REPLACEMENT
Remove the battery cover on the back of the unit by sliding the cover off the product, you will now have access to the batteries.
Remove the batteries from the unit and replace them with 3x new High Energy Alkaline batteries 1,5V AA - LR6, making sure that the battery polarity matches the instructions in the battery compartment.
SENSOR REPLACEMENT:
The sensor has a lifetime of 10 years. After 10 years you need to replace the complete product, the sensor itself is not exchangeable.
If the yellow LED illuminates within these 10 years, even though you've reconnected or replaced the batteries, please refer to the paragraphs Reason for sensor fault and Sensor fault caused by chemical gases.
If the yellow “FAULT” LED lights up 3x and 3 beeps per minute are heard, the entire product should be replaced. This is the End of life warning.
SPECIFICATIONS:
Power supply: 3 x LR6, 1,5V AA high energy Alkaline batteries
Sensitivity and time: 30ppm, alarm is not activated within 120 minutes
50ppm, alarm is activated within 60\~90 minutes
100ppm, alarm is activated within 10\~40 minutes
300ppm, alarm is activated within 3 minutes
standby consumption: <15μA
consumption at alarm: <65mA
Sound pressure at alarm: >85dB (3m distance)
Environmental conditions
during use: -10\~+45°C, 0\~93% humidity.
Type: Type B (unchecked output)
ENVIRONMENT:
Do not throw away used batteries, but recycle them using your local chemical depot. Product may not be
thrown out as normal waste, but must be recycled as electrical waste.
DECLARATION OF PERFORMANCE
The declaration of performance is available on the website http://DOC.hesdo.com/COA1910-DOC.pdf
text_image
Service Help HSC WWW.ALECTO.NL SERVICE@ALECTO.NL Alecto® Hesdo, Australiëlaan 1, 5232 BB, ‘s-Hertogenbosch, The NetherlandsOur service department cannot give personalized information regarding the installation or placement of these devices in your specific environment. Please consult a mechanic or home security specialist.