Xavi - High chair Topmark - Free user manual and instructions
Find the device manual for free Xavi Topmark in PDF.
| Product type | Convertible high chair with swing function |
| Brand | Topmark |
| Model | Xavi |
| Age range | 6-36 months (sitting mode), 0-12 months (swing mode) |
| Maximum supported weight | 15 kg |
| Seat adjustments | Height 6 positions, backrest 4 positions |
| Tray adjustments | 3 positions |
| Footrest adjustments | 4 positions |
| Restraint system | 5-point harness |
| Power supply | 1.5V batteries (not included) or 100-240V mains adapter (included) |
| Main functions | Swing (8 speeds), timer (8/15/30 min), music (12 melodies), bird/water sounds, voice detection |
| Material | Metal and plastic structure, fabric and PU covering |
| Care and cleaning | Removable cover hand washable in warm water with mild soap; wipe structure with damp cloth |
| Safety | Always use the harness, never leave unattended, check locking, do not expose to heat |
| Spare parts and repairability | Use only manufacturer-approved parts |
| Warranty | 2 years |
| General information | Importer: Top Mark BV, Netherlands |
Frequently Asked Questions - Xavi Topmark
User questions about Xavi Topmark
0 question about this device. Answer the ones you know or ask your own.
Ask a new question about this device
Download the instructions for your High chair in PDF format for free! Find your manual Xavi - Topmark and take your electronic device back in hand. On this page are published all the documents necessary for the use of your device. Xavi by Topmark.
USER MANUAL Xavi Topmark
IMPORTANT: KEEP FOR FUTURE REFERENCE.
- Read this instructions carefully before use and keep for future reference.
- Your child's safety may be affected if you do not follow these instructions.
- Use only spare parts delivered by importer for replacing parts or reparation.
- Damages caused by overloading or wrong folding are not granted.
- Prolonged exposure to sunshine may cause changes in the colour of materials and fabrics.
- Do not expose this product to extreme temperatures.
WARNING
- Never leave your child unattended.
- The use of this chair is recommended for children from 6-36 months. The maximum weight is up to 15kg .
- Only to be used for a child that is able to sit in an upright position.
- In swing state the seat is suitable for children from 0–12 months. The maximum weight is 9kg .
Always use the restraint system. - Always use the 5 points safety harness.
- Always use the crotch strap in combination with the waist belt.
- Make sure that the harness is correctly fitted.
- Do not use the chair if any parts are broken, torn or missing.
- Do not use the high chair unless all components are correctly fitted and adjusted.
- Ensure chair is completely erected and check all locks are engaged before placing child in the chair.

WARNING
- Be aware of the risk of open fire and other sources of strong heat, such as electric bar fires, gas fires, etc. in the near vicinity of the chair.
- Avoid hot liquids, power cables and other possible dangers may come within range of a child.
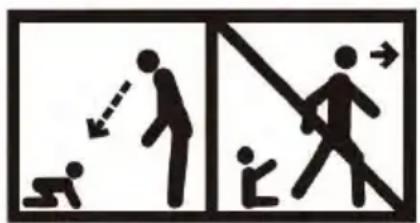
- Do not let your child play with this product.
- Do not allow child to stand on seat or footrest.
-
Do not allow objects on top of table as this chair may become unstable.
-
Do not allow more children, as chair may become unstable.
- Do not use accessories or replacement parts other than the ones recommended by instruction manual.
- Accessories which are not approved by the manufacturer shall not be used.
- Only replacement parts supplied or recommend by the manufacturer/distributor shall be used.
- Do not allow any children, animals or other object to be placed under or near the chair while child is seated in the chair.
- Do not force tray into child when adjusting tray, always allow breathing space for child's comfort.
- Only the tray is not enough to grant the safety of your child, ALWAYS use the 5 points safety harness.
The product must be assembled by an adult. - Never put chair near steps or stairs.
- Never move the high chair when the child is seated inside.
- Always place the high chair on a horizontal, stable surface.
- This product is not intended for prolonged periods of sleeping.
- This product does not replace a cot or bed, if your child need to sleep, it should be placed in a suitable cot or bed.
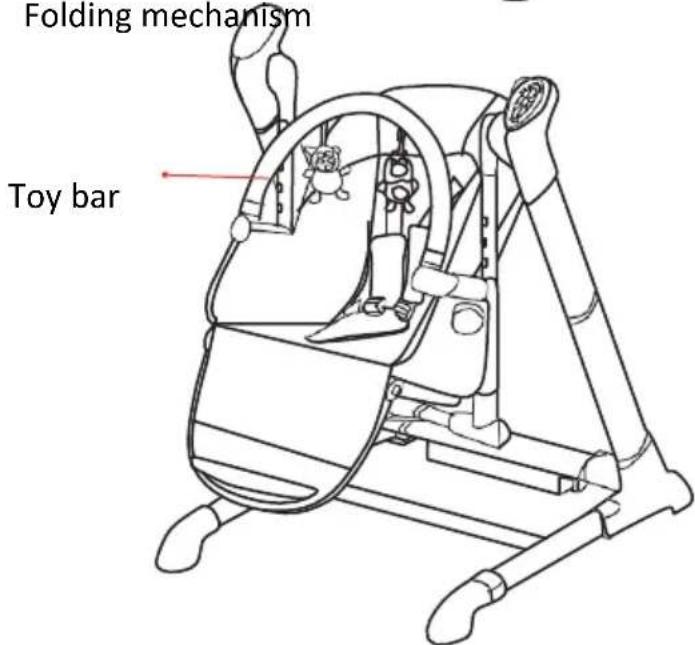
- Never use the toy bar to lift and move the high chair.
Assure the toy bar is correctly assembled on both sides of the high chair. - To avoid injury, please remove the toys when the child is able to grab them with hands and/or feet.
SAFETY OF THE ELECTRICAL PARTS
- Always keep the battery away from the child, do not let your child play with it.
- Exhausted batteries must be removed from the high chair.
- The supply terminals must not be short circuited.
- Only batteries of the same or equivalent type as recommended must be used.
- Batteries must be inserted with the correct polarity.
- How to remove and insert replaceable batteries.
- Rechargeable batteries are to be removed from the high chair before being charged.
- Adapter used with the infant swing must be regularly checked for damage to the cord, plug, enclosure and other parts, and in the event of such damage, they shall not be used.
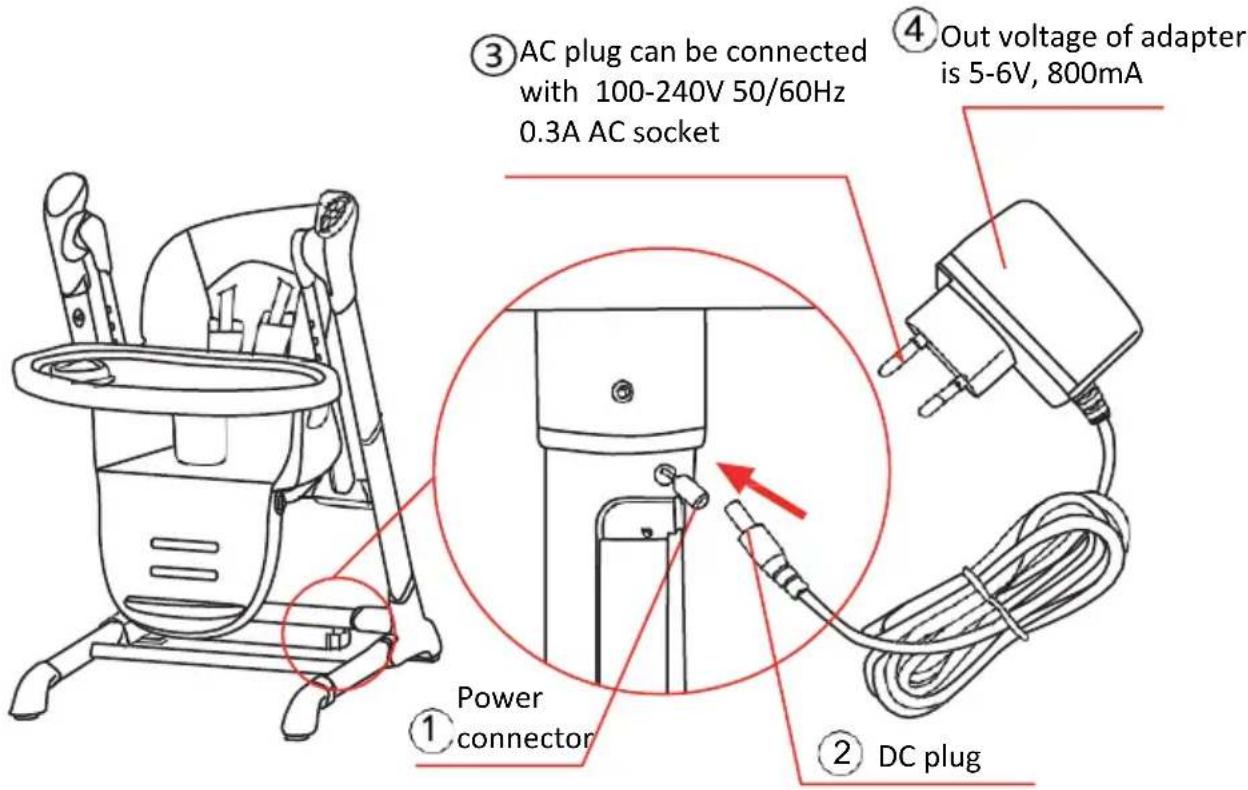
- Adapter provided by this swing can be used for this item. Input voltage of adapter should be 100 - 240V 50 / 60Hz0.3A , output voltage 5 - 6V≤ 800mA .
- Keep away from children, when you use the adapter.
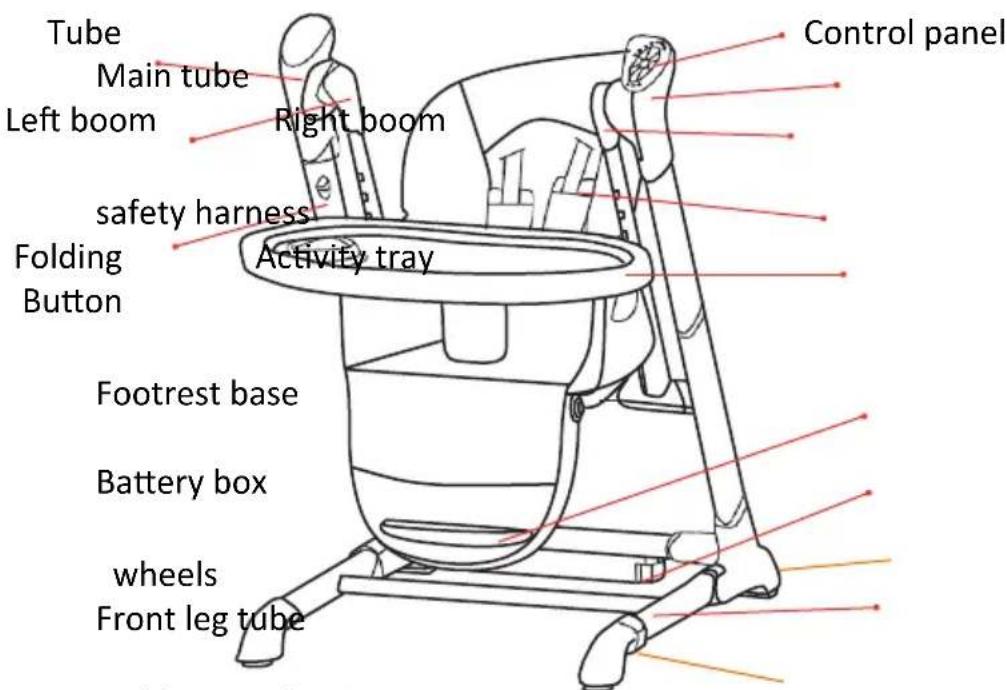
ASSEMBLING
Check if following spare parts are in the box:
| Main tube | 1 | Swing switch locker | 1 | ||
| Tube | 1 | Activity tray | 1 | ||
| Under-frame | 1 | Rigid crotch strap | 1 | ||
| Left boom tube | 1 | Toy bar | 1 | ||
| Right boom tube | 1 | Footrest base | 1 | ||
| Seat cover | 1 | Adapter | 1 |
ASSEMBLING
Note that the fabric patterns, colour pictures and stroller accessories on this product in this instruction manual may vary from that of the product that you have purchased.
If one or more of the above mentioned spare parts are missing or broken, please contact the store where you bought the product, before using.
WARNING
Please keep all packaging material away from babies and children, to prevent suffocation.
EN
ASSEMBLING
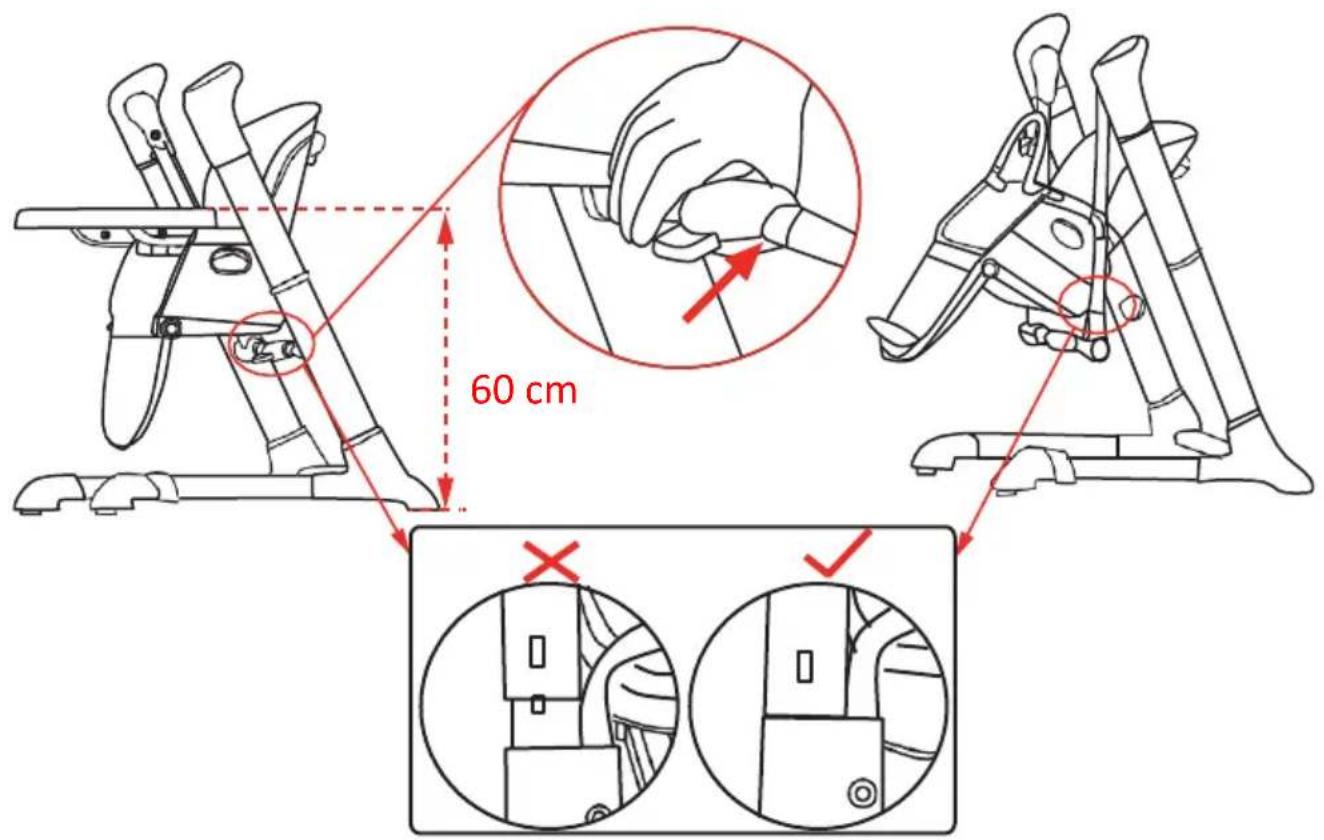
- As below picture shows, open the front leg tube. Pull the tubes downwards till you hear a click.
WARNING! If it is not reached in position, there will be shaking, please check carefully.


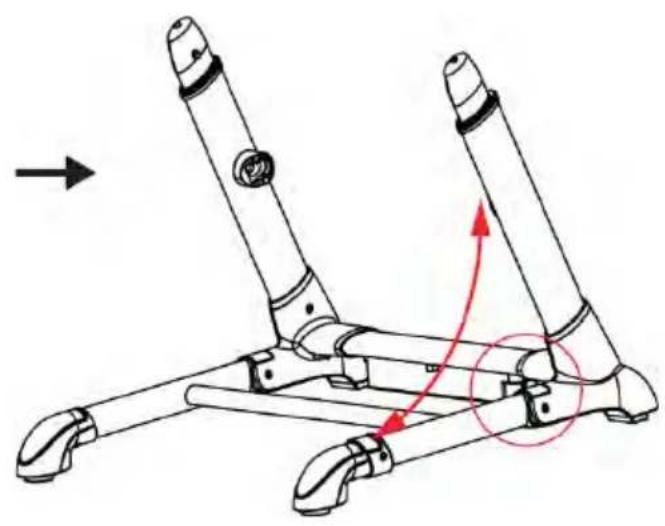
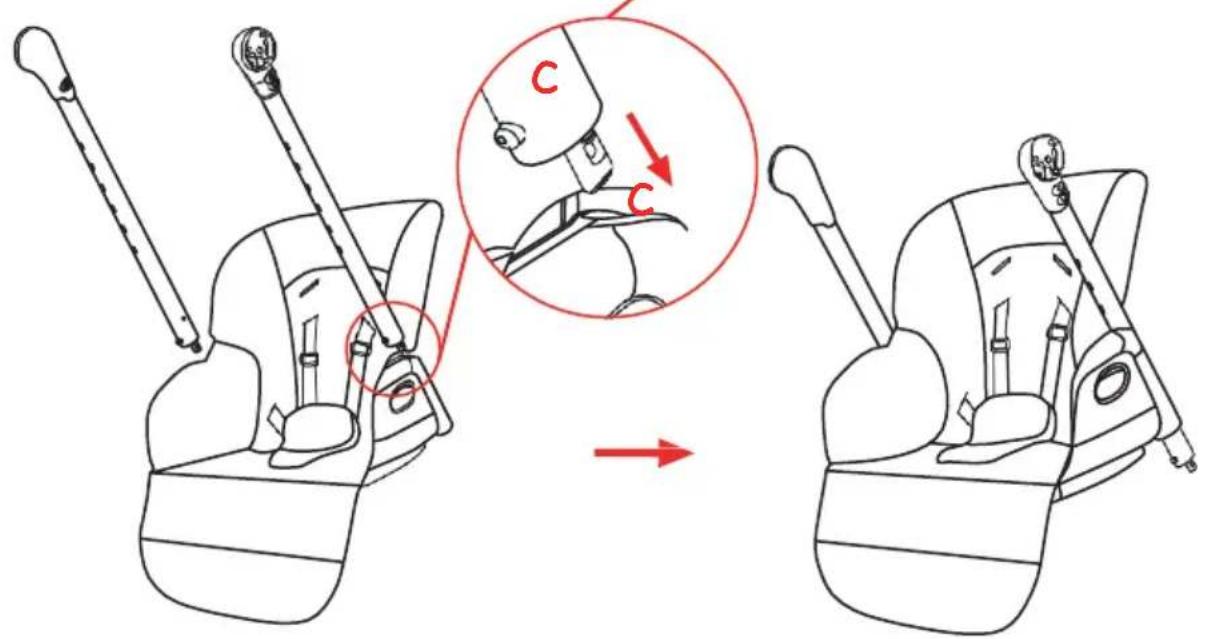
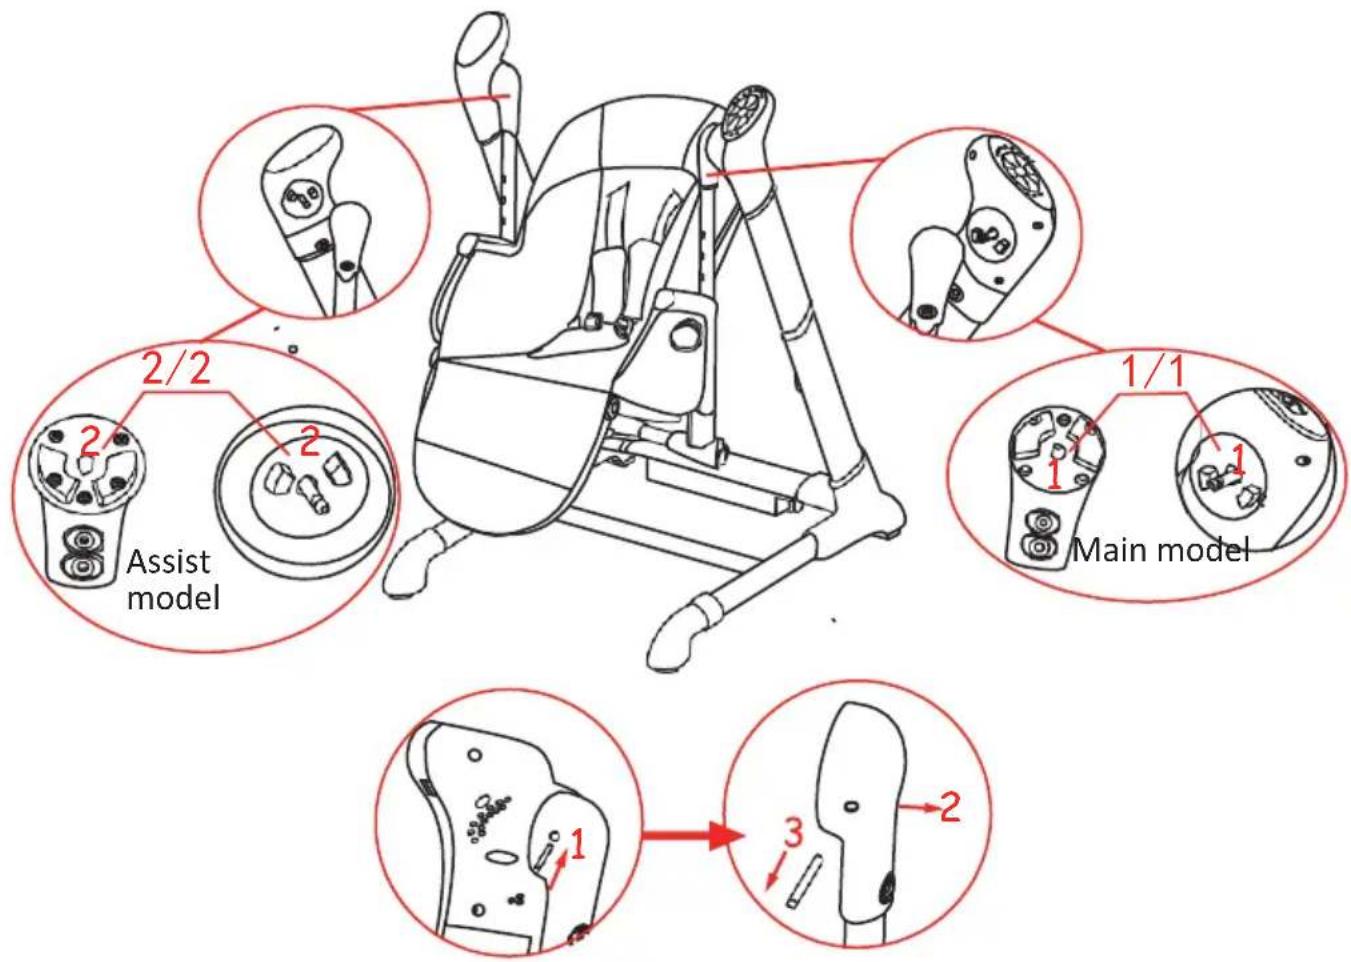
- Keep the main and assist model located above the frame and connect them until you hear a click.
ASSEMBLING
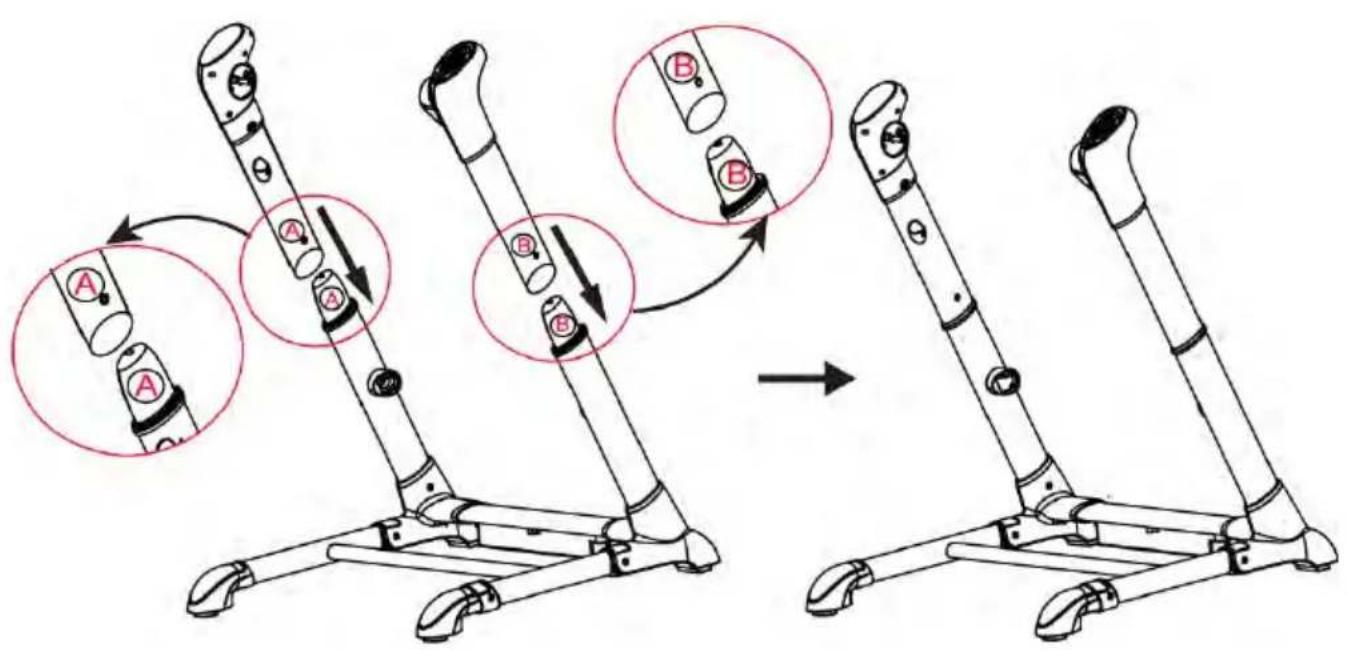
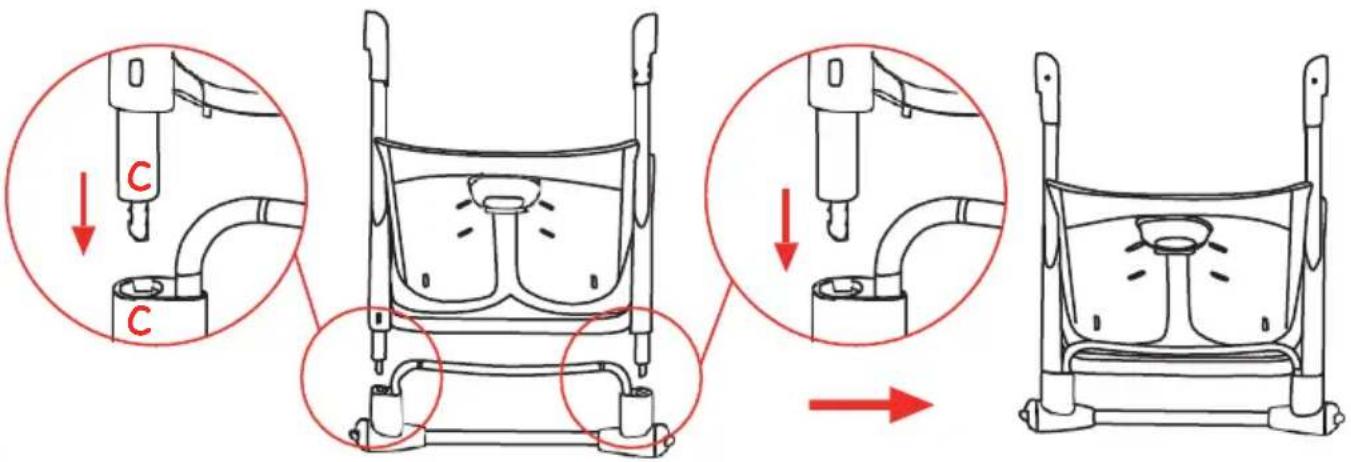
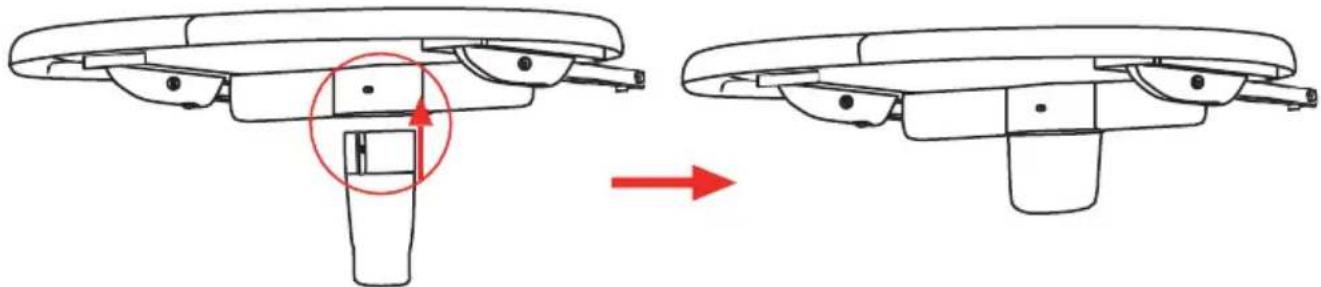
- Insert the left and right boom tube into its swing switch locker, until you hear a click.
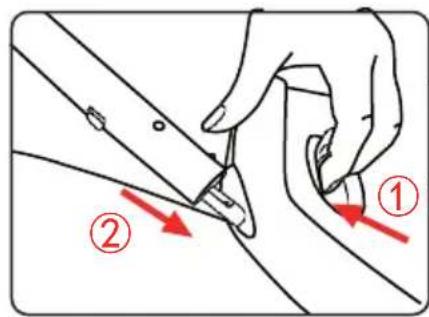
Take the chair down as follows.
ASSEMBLING
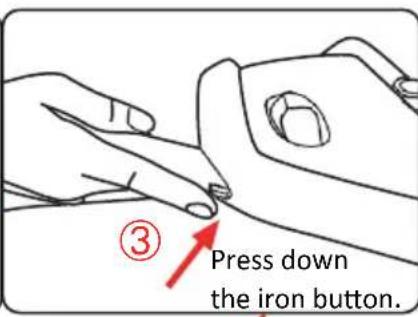
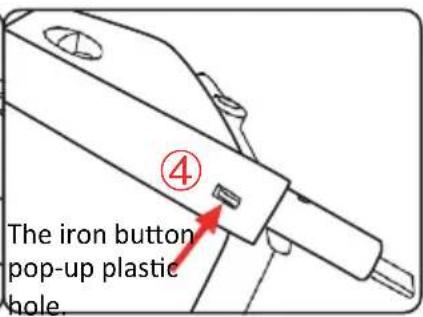
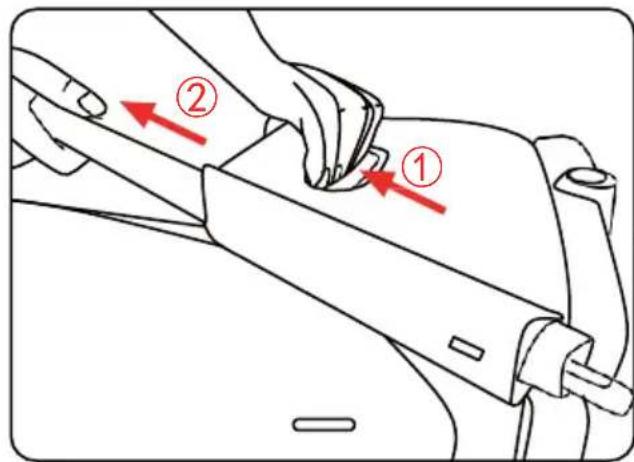
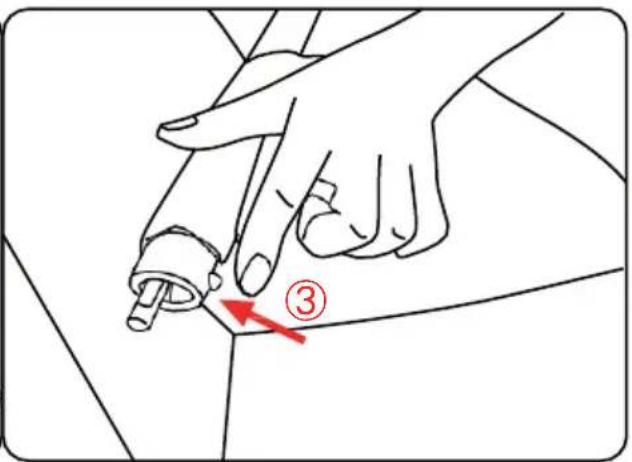
- Insert the left and right boom tube into its fixed set, until you hear a click.

- Fix the left and right boom tube as follows.
Use a small hard object less than 4mm diameter to dismantle.
ASSEMBLING
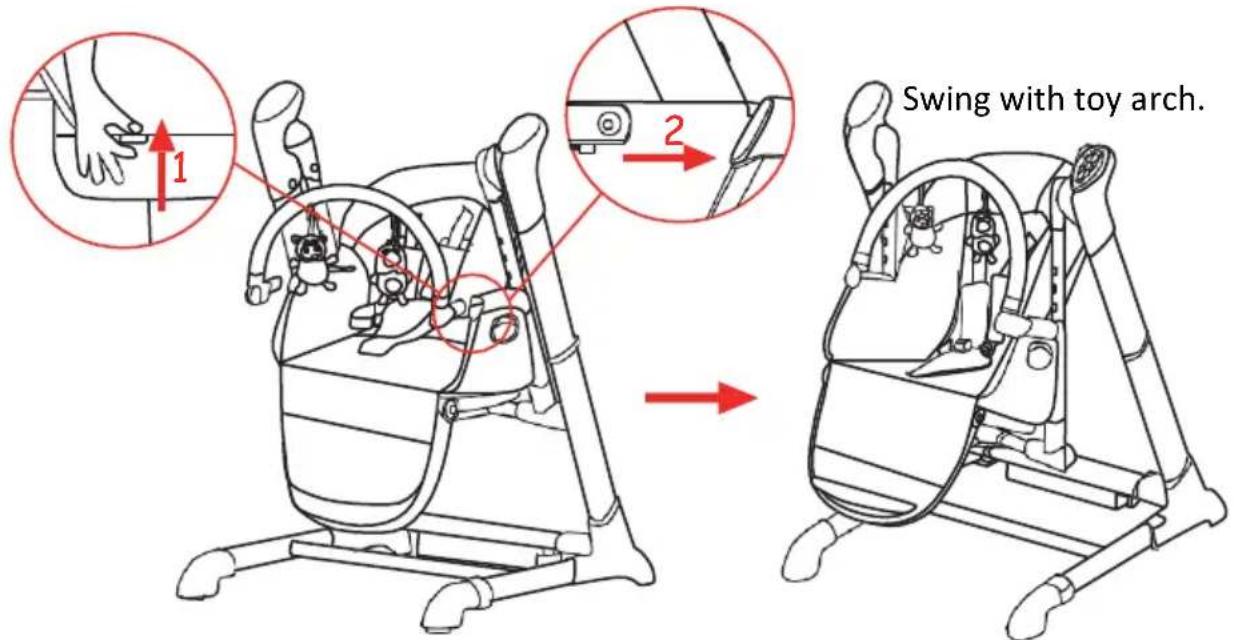
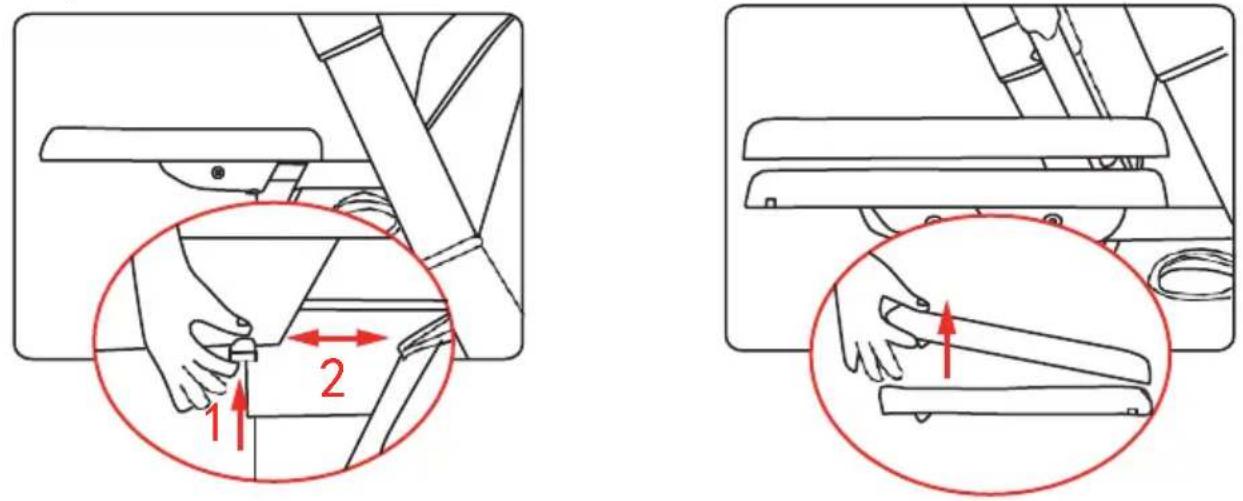
- Fit the rigid crotch strap to the activity tray.
- Press the activity tray buttons, fix it on the seat as follows. Swing High chair with dinner tray.
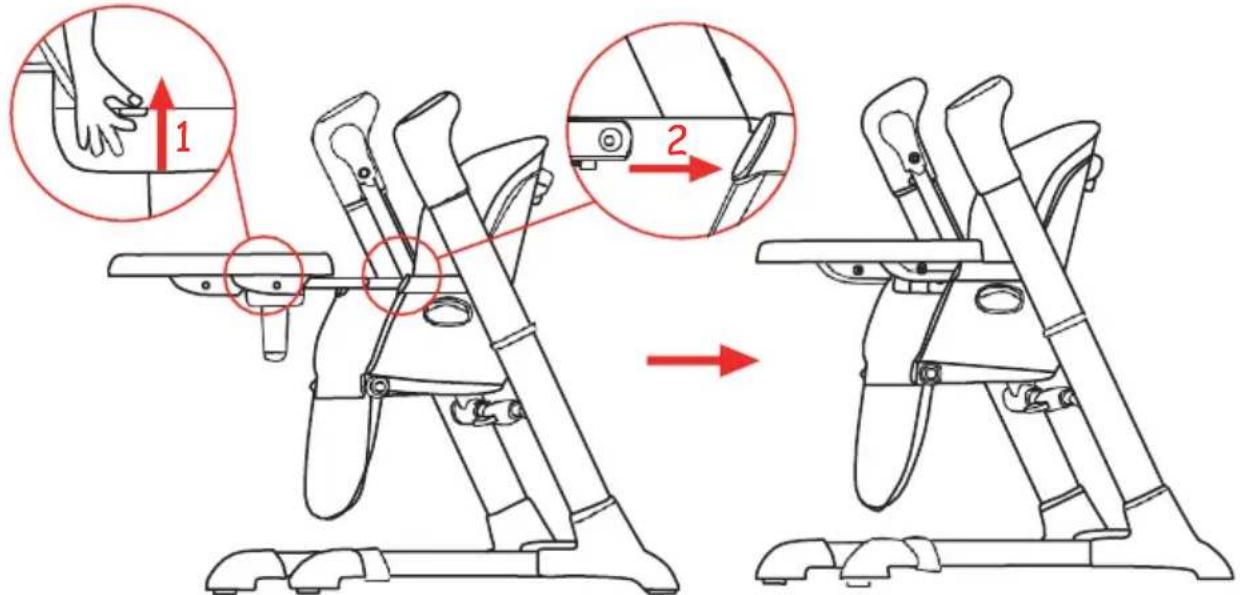
- Press the toy buttons, fix it on the seat as follows.
ASSEMBLING
- Insert the small footrest base into the hole, then press it down and fit it to the desired position.

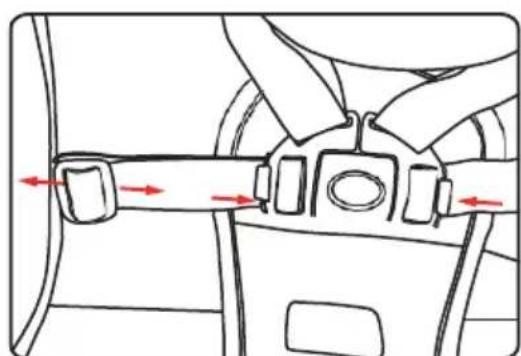
- Fix the cover to the seat part, insert the safety harness into the slot accordingly and locked, fasten the button on seat and fabric. The elastic should be passed through footrest and fixed.
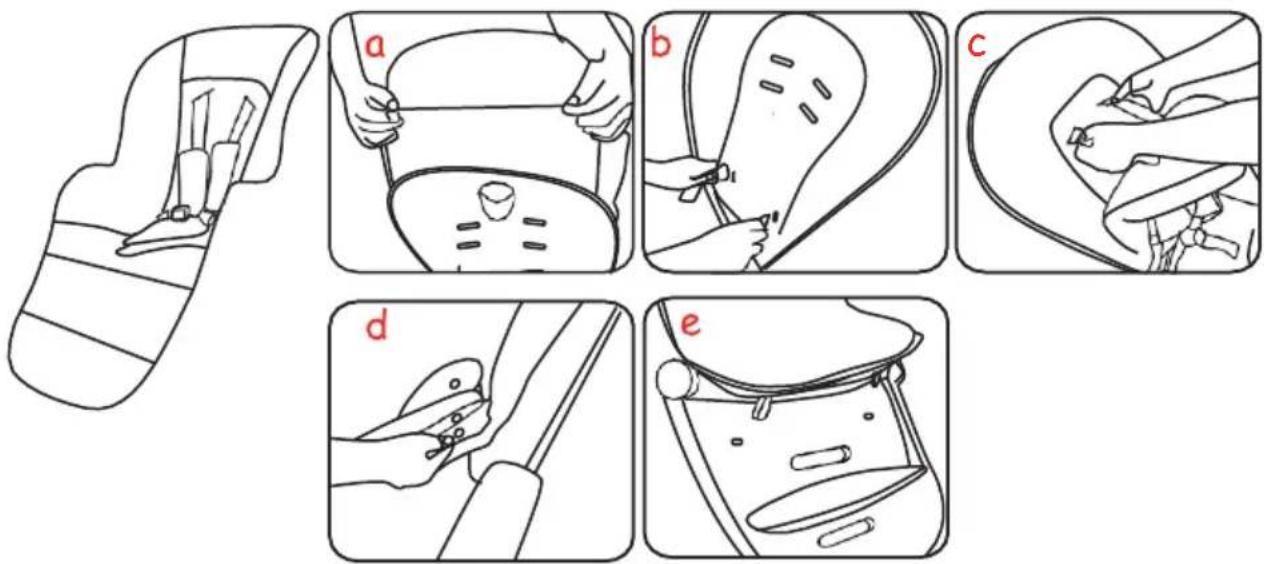
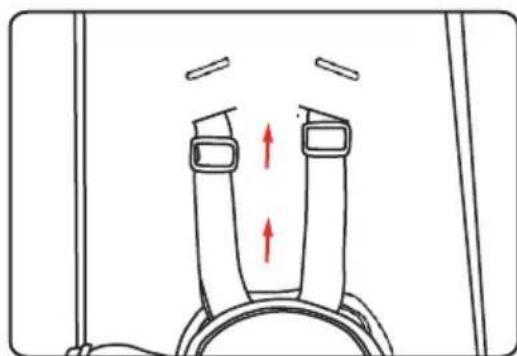
The harness has 2 positions. The straps should go into the slots at, or the nearest slots above the height of the child's shoulders. To adjust the harness, remove each strap by passing it through the slots from the front to the back of the seat; re-route the straps through the appropriate slots. If the shoulder height is not ok. Please re- install the seat again.
ASSEMBLING
- Use a screwdriver to take the screws out of the battery cover, and take the battery cover out. Put batteries into the battery compartment according to the correct polarity, then put the battery cover back and fasten it. Use the same way to take out battery.
-
First, put negative side of 1.5V battery into the battery compartment with the spring.
-
Then, put the positive side of 1.5V battery into the battery compartment with the mark +
- Adjust battery to flat position.
- Close battery cover, lock the screws tightly.
USING
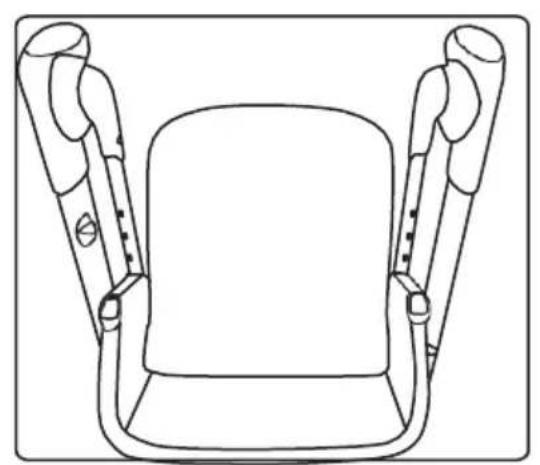
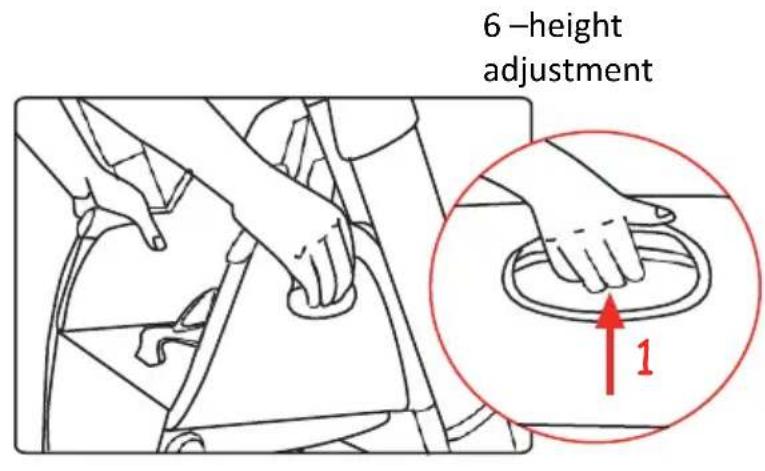
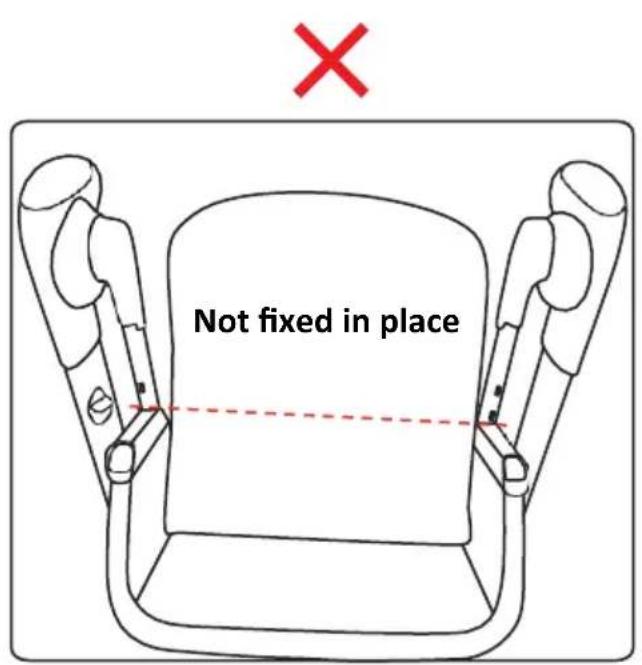
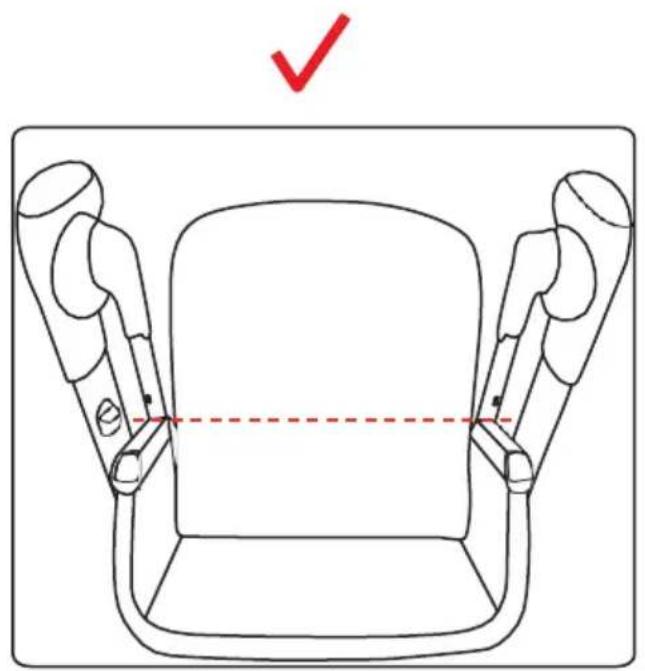
- To adjust the height of the seat, press on both sides of the seat on the adjustable button, then pull or push the seat in desired position until you hear a click. The height of the seat can be adjusted in 6 positions.
WARNING: The buttons must rebound in place, otherwise it is dangerous, if one side of the seat is not fixed in place, and they still can slip out or pull up. Please fix the buttons in place before use. Both sides of the seat should fix in place, keep the seat designated position, not tilt.
EN
USING
- To adjust the backrest, squeeze the adjust button at the back of the backrest. The backrest can be adjusted in 4 positions.
Notice: backrest can be adjusted in 2 positions once the seat is in lowest position.
- Activity tray can be adjusted 4. Remove the tray to clean. in 3 positions.
USING
- Footrest can be adjusted in 4 positions.
- While the seat in lowest position, high chair can be converted to swing. Same step for swing convert to high chair.
WARNING: In swing status, the seat height can't be adjusted.
WARNING: The swing's rocking function must be disabled when swing is converted into high chair, or it will affect the lifespan the motor.
USING
- In swing status, backrest can only be adjusted in 2 positions.
EN
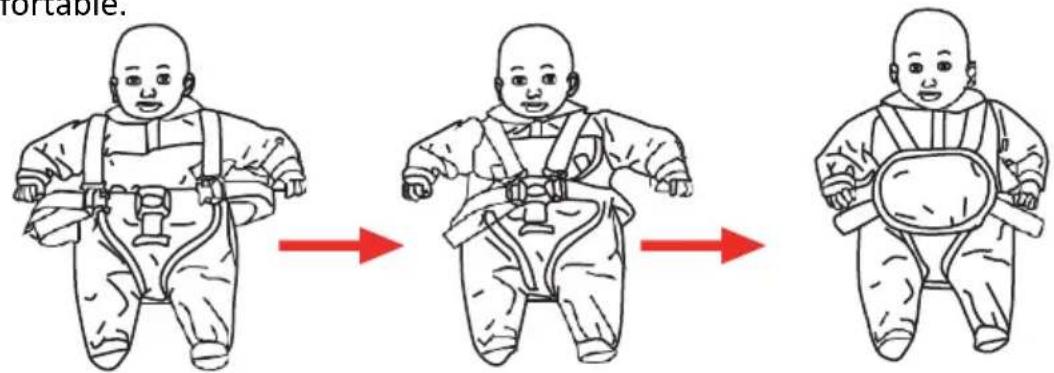
8. USING 5-POINT SAFETYBELT
WARNING: ALWAYS USE THE CROTCH STRAP WITH SAFETY BELTS.
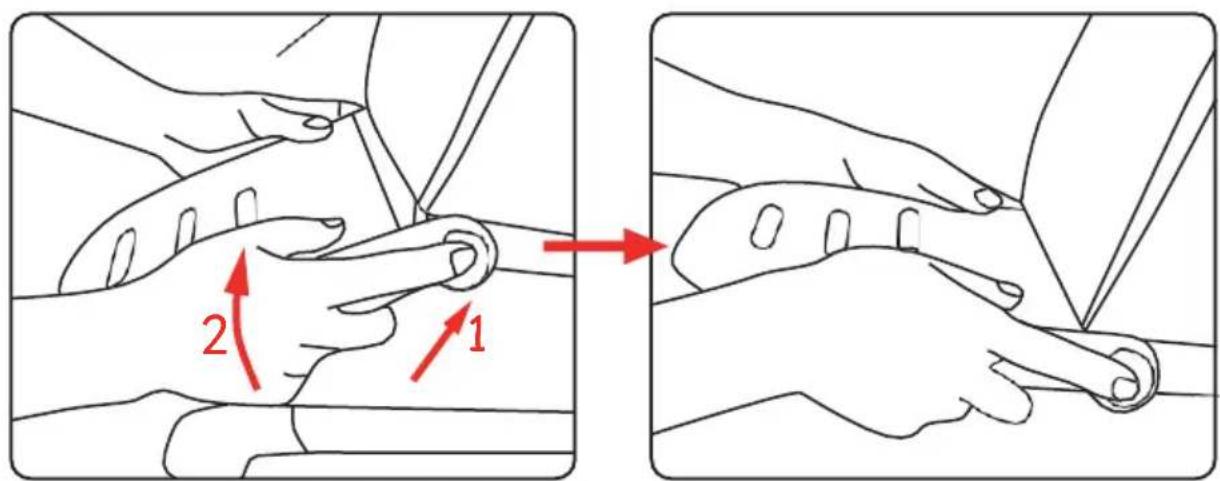
Lock buckle parts of hip belts together into the cross belt (belt between the legs) until secure click is heard. then cover it with the pad. Adjust shoulder, hip and crotch belt to the right length to fit your child. To release belt just push the button. As in the following picture, 5 point safety harness will protect your baby secure and comfortable.
USING
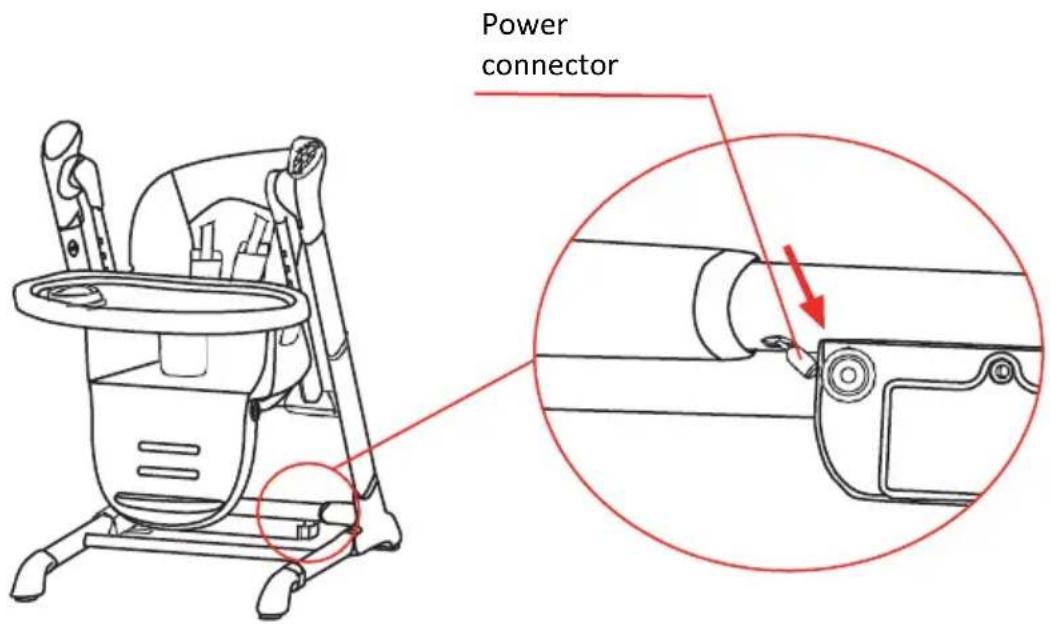
- Instructions for AC adapter. Insert the DC plug ② of adapter into power connector ① then insert AC plug ③ into 100-240V 50/60Hz 0.3A AC socket. Please take the AC plug ③ and DC plug ② out when not in use.
EN
- Put the DC plug into the hole of battery box when you use the battery, and please take the plug out for electric power saving if long time not in use.
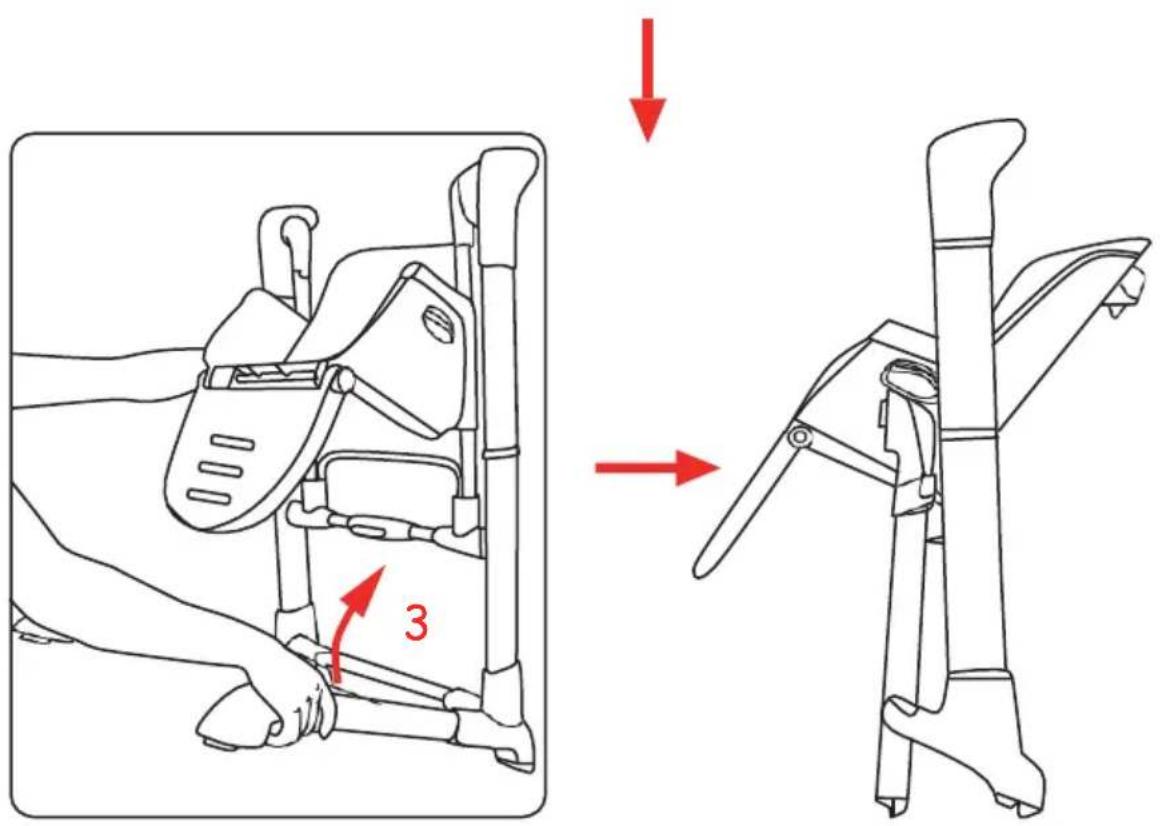
USING
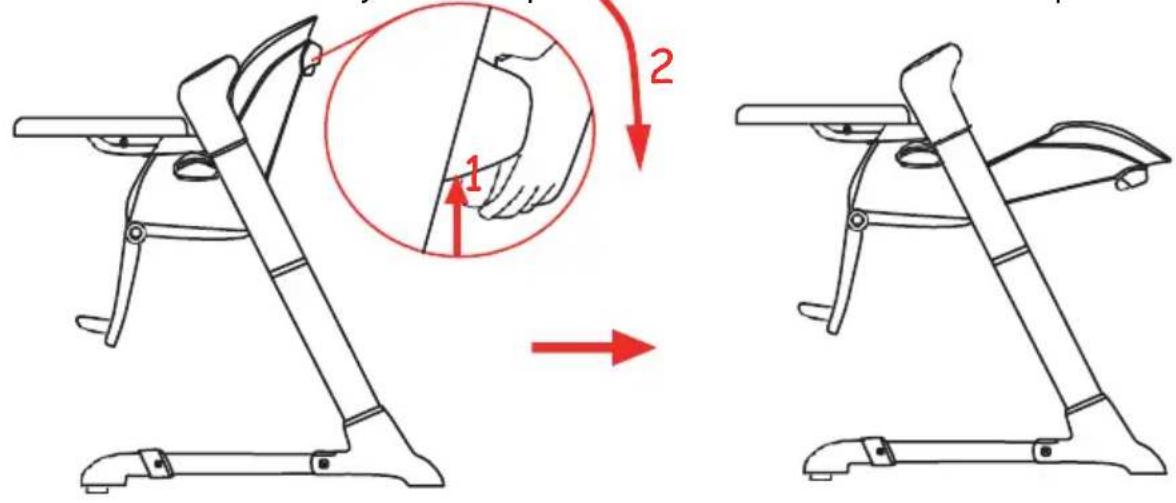
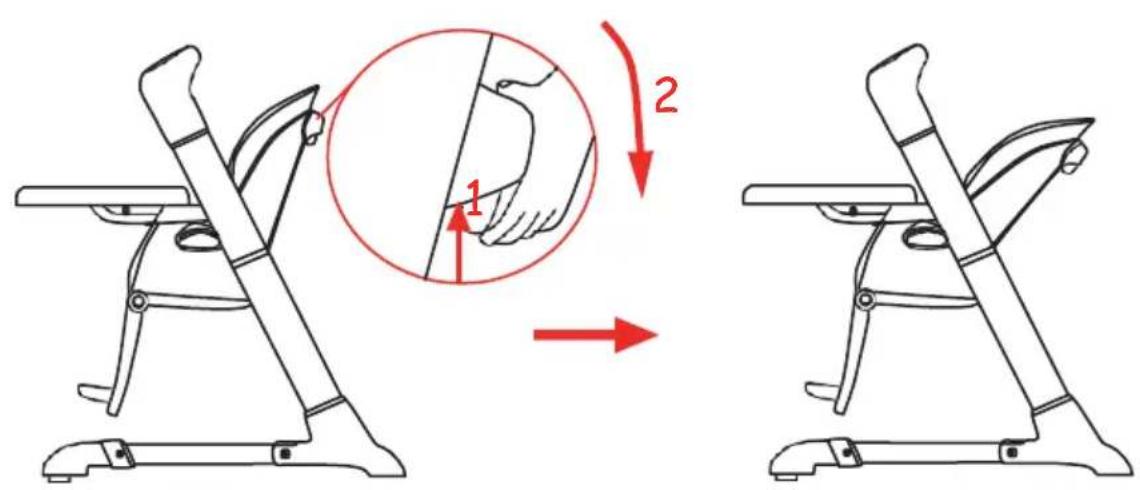
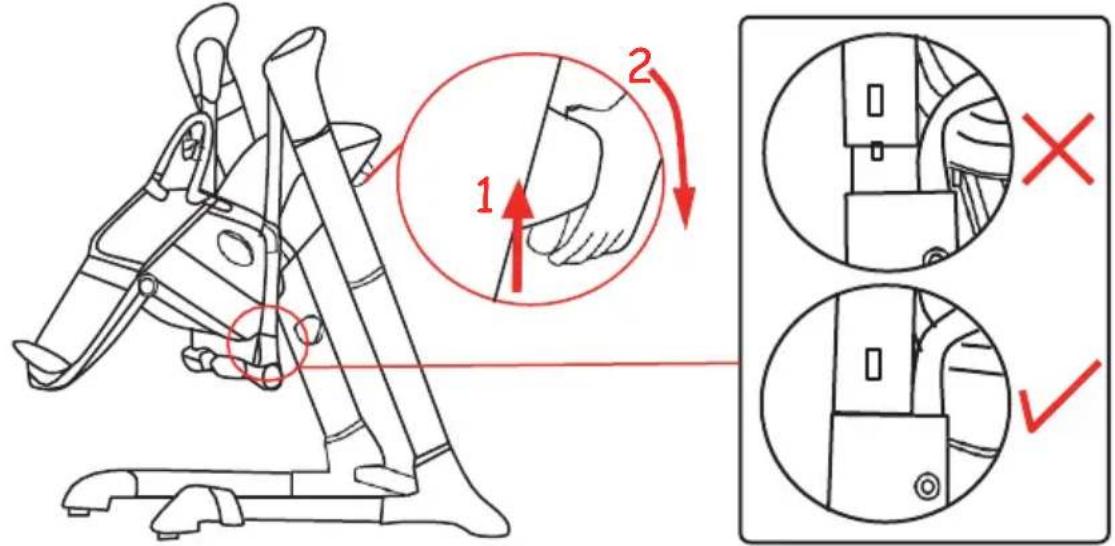
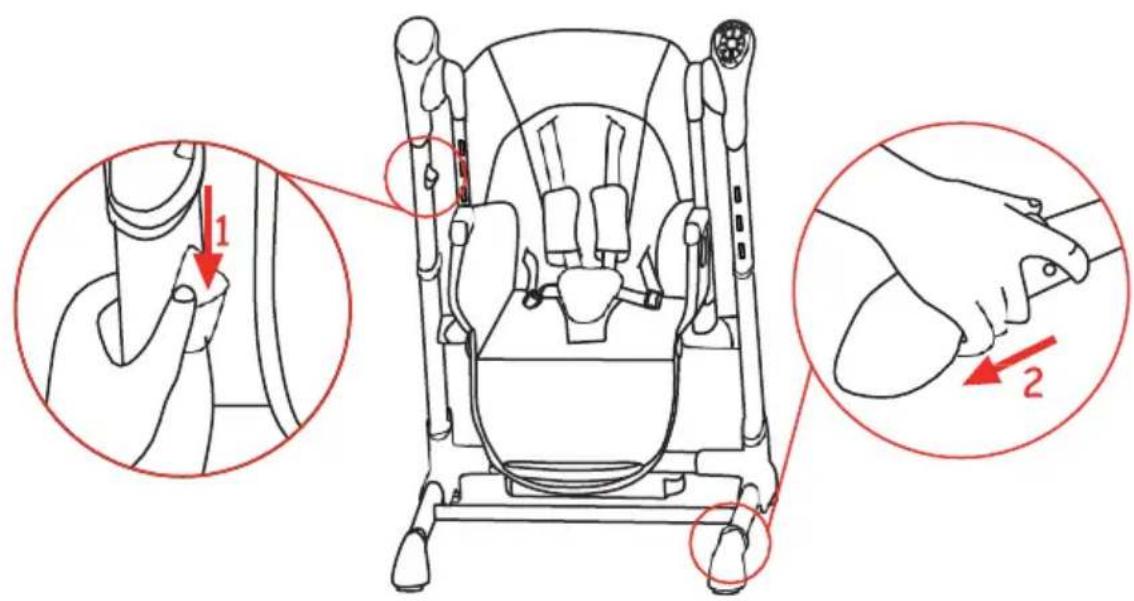
- Press down the folding button (1) and pull the folding mechanism (2) and close the front leg tube for folding (3). Now the frame can stand upright on its own.
WARNING: Do not fold when the high chair is in swing status.

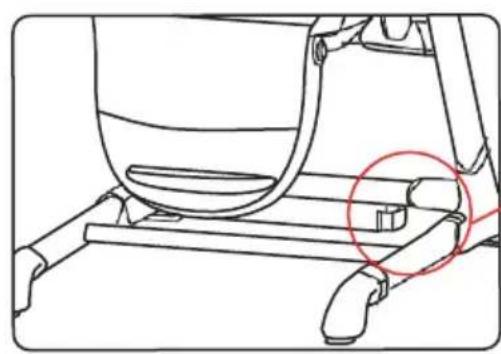
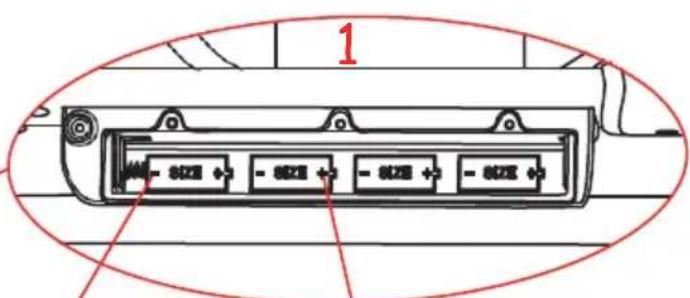
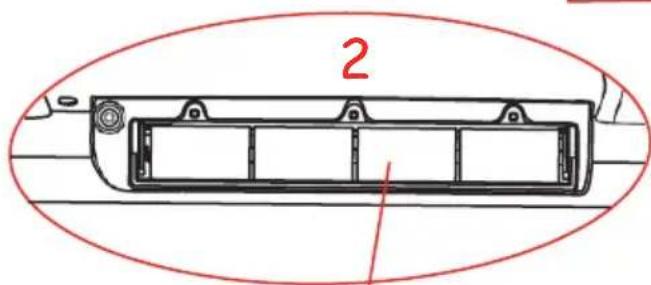
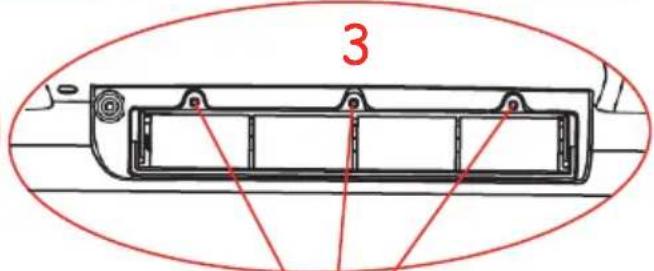
USING
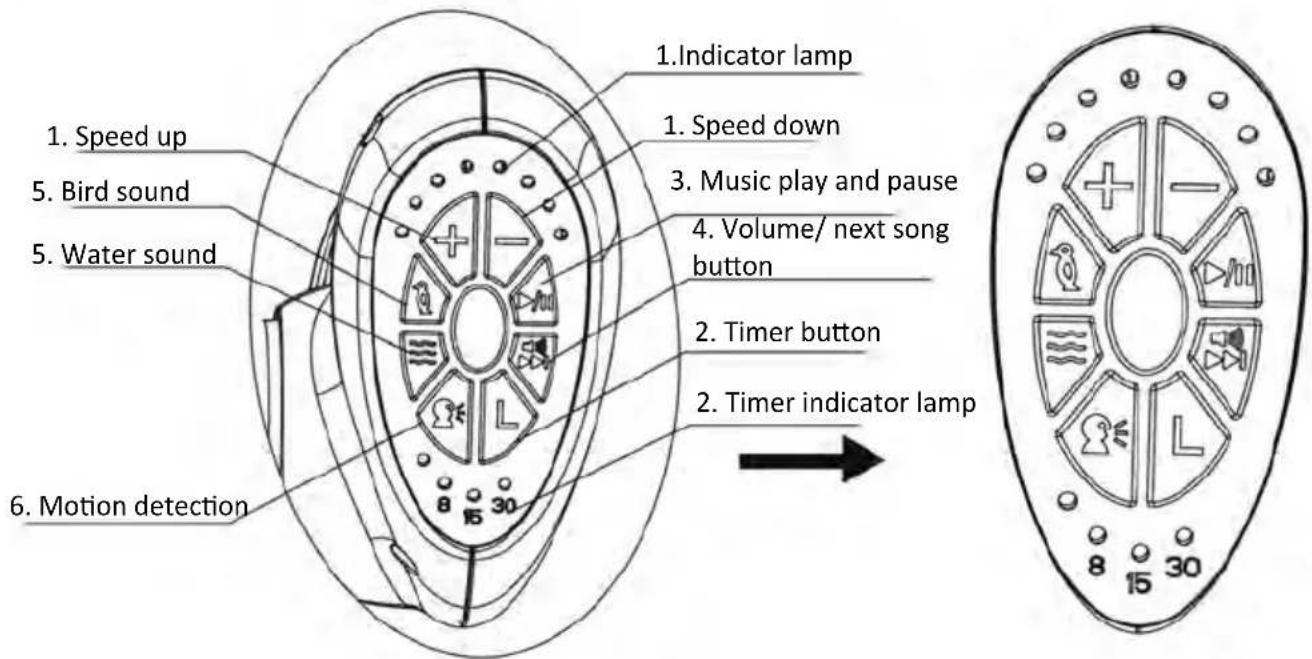
Functions control panel:
- Speed adjust button: There are 8 types of swing speed (8 indicator lamps). Press "+" for speed up, "-" for speed down (as above picture shows).
- Timer: There are three types of time setting. Press the timer button once, the light will be on for 8 minutes. Press it a second time, the light will be on for 15 minutes.
Press it a third time, the light will be on for 30 minutes. When setting time is reached, all functions will stop. If time setting function is not used, all function will start working until power is turned off.
- Play/pause button: Press the button once to start playing music. Press it second time to stop playing music.
- Volume/next song button: After pressing music play button, press this button to play next song (the swing has 12 melodies). Press "volume/next song" button for a while to adjust volume. After setting the volume, release the button.
- Bird and water sound button: Press "bird sound" button for bird sound, press it again to stop. Press "water sound" button for water sound, press it again to stop. (Notice that when playing bird and water sound, pressing the "play/pause" button can also stop the sound).
- Voice control detection: When you press the voice control detection button the indicator light will be on. Press any button to quit this mode. If voice control detection sensor continually receives two or more sounds, the machine will start working. It will swing in lowest speed and play music on middle volume.
| TROUBLE SHOOTING | |
| Probable problems | Solutions |
| Suddenly stops swinging and playing music. | Batteries are not assembled correctly and electricity is not enough. |
| No functions after starting | Check whether polarity of batteries is in correct position. |
| Long time no use Take the | batteries out. |
| Shake thoroughly | Check if the folding joint is opened completely. If not open it completely. |
| Indicator light becomes weak | Electricity or batteries are not strong enough. |
| Motor lifespan shortens | The swing rocking function must be disabled when swing convert into high chair. |
CARE AND MAINTENANCE
To prolong the life of your nursery product, keep it clean and do not leave in the direct sunlight for extended periods of time.
Do not use abrasive cleaners. Do not soak in water. The chassis may be cleaned using warm water with a household soap or a mild detergent. Allow it to dry fully, preferably away from direct sunlight.
Keep it away from rain or water and a very hot or dusty environment, it can damage the circuit board.
Always store your product in a clean dry place.
Do not leave in the boot of car.
Excessive exposure to sunlight and/ or strong heat will make the plastic parts age and colours will fade.
Should parts become stiff, squeak or difficult to operate ensure dirt is not the cause. When storing high chair swing, never stack other items on top of it, this may damage the high chair swing.
Do not dry clean or use bleach.
Do not machine wash, tumble or spin dry, unless the care labelling on the product permits these methods.
The fabric coating is 100% PU. Inlay may be wiped with soap or mild detergent and rinsed with warm water. Allow it to dry completely before folding or storing it away. In some climates the parts may be affected by mould and mildew. To help prevent this occurring, do not fold or store the product if it is damp or wet. Always store the product in a well ventilated area.
Always check parts regularly for tightness of screws, nuts and other fasteners, tighten if required. To maintain the safety of your nursery product, seek prompt repairs for bent, torn, worn or broken parts.
Use only parts and accessories approved by the supplier.
GUARANTEE
We grant 2 year guarantee on this product commencing on the date of purchase. Within the guarantee period we will eliminate any defects in the appliance resulting from faults in materials or workmanship, either by repairing or replacing the complete product.
This guarantee does not cover: damage due to improper use, normal wear or use as well as defects that have a negligible effect on the value or operation of the product.
Damages caused by overloading or wrong folding are not granted.
To obtain service within the guarantee period, hand in the complete product with your sales receipt to the store where the product has been bought. The warranty applies only to the first owner and is not transferable.
Top Mark BV
Postbus 308
8200 AH Lelystad
NETHERLANDS
service@topmark.nl
www.topmark.nl
EN 14988-1/-2: 2006 + A1: 2012
EN 16232: 2013