Performance E50 - Exercise bike TUNTURI - Free user manual and instructions
Find the device manual for free Performance E50 TUNTURI in PDF.

User questions about Performance E50 TUNTURI
0 question about this device. Answer the ones you know or ask your own.
Ask a new question about this device
Download the instructions for your Exercise bike in PDF format for free! Find your manual Performance E50 - TUNTURI and take your electronic device back in hand. On this page are published all the documents necessary for the use of your device. Performance E50 by TUNTURI.
USER MANUAL Performance E50 TUNTURI
Electrical safety 19
Assembly instructions 19
Description (fig. A) 19
Package contents (fig. B & C) 19
Assembly (fig. D) 19
Workouts 19
Exercise Instructions 19
Heart rate 20
Use 21
Power supply (Fig. E) 21
Console (fig F) 22
Explanation Display functions 22
Explanation of buttons 23
Opperation 23
Programs 23
Recovery 24
Bluetooth & APP 25
Cleaning and maintenance 25
Defects and malfunctions 25
Transport and storage. 25
Additional information 26
Technical data. 26
Warranty 26
Declaration of the manufacturer 27
Disclaimer 27
Upright Bike
Welcome to the world of Tunturi New Fitness!
Thank you for purchasing this piece of Tunturi equipment. Tunturi offers a wide range of home fitness equipment, including crosstrainers, treadmills, exercise bikes and rowers. The Tunturi equipment is suitable for the entire family, no matter what fitness level. For more information, please visit our website
www.tunjuri.com
Safety warnings
WARNING
- Read the safety warnings and the instructions. Failure to follow the safety warnings and the instructions can cause personal injury or damage to the equipment. Keep the safety warnings and the instructions for future reference.
WARNING
Heart rate monitoring systems may be inaccurate.
Over exercise may result in serious injury or death. If you feel faint stop exercising immediately.
The equipment is suitable for domestic use only. The equipment is not suitable for commercial use.
Max. usage is limited to 3 hrs a day.
- The use of this equipment by children or persons with a physical, sensory, mental or motorial disability, or lack of experience and knowledge can give cause to hazards. Persons responsible for their safety must give explicit instructions or supervise the use of the equipment.
Before starting your workout, consult a physician to check your health.
If you experience nausea, dizziness or other abnormal symptoms, immediately stop your workout and consult a physician.
- To avoid muscular pain and strain, start each workout by warming up and finish each workout by cooling down. Remember to stretch at the end of the workout.
The equipment is suitable for indoor use only. The equipment is not suitable for outdoor use.
Only use the equipment in environments with adequate ventilation. Do not use the equipment in draughty environments in order not to catch a cold.
Only use the equipment in environments with ambient temperatures between 10^ 35^/ 50^ 95^ . Only store the equipment in environments with ambient temperatures between 5^ 45^/ 41^ 113^ .
- Do not use or store the equipment in humid surroundings. The air humidity must never be more than 80% .
Only use the equipment for its intended purpose. Do not use the equipment for other purposes than described in the manual.
- Do not use the equipment if any part is damaged or defective. If a part is damaged or defective, contact your dealer.
- Keep your hands, feet and other body parts away from the moving parts.
- Keep your hair away from the moving parts.
- Wear appropriate clothing and shoes.
- Keep clothing, jewelry and other objects away from the moving parts.
- Make sure that only one person uses the equipment at a time. The equipment must not be used by persons weighing more than 120kg (264 lbs).
- Do not open equipment without consulting your dealer.
Electrical safety
(Only for equipment with electric power)
- Before use, always check that the mains voltage is the same as the voltage on the rating plate of the equipment.
- Do not use an extension cable.
- Keep the mains cable away from heat, oil and sharp edges.
- Do not alter or modify the mains cable or the mains plug.
- Do not use the equipment if the mains cable or the mains plug is damaged or defective. If the mains cable or the mains plug is damaged or defective, contact your dealer.
- Always fully unwind the mains cable.
- Do not run the mains cable underneath the equipment. Do not run the mains cable underneath a carpet. Do not place any objects on the mains cable.
- Make sure that the mains cable does not hang over the edge of a table.
- Make sure that the mains cable cannot be caught accidentally or tripped over.
- Do not leave the equipment unattended when the mains plug is inserted into the wall socket.
- Do not pull the mains cable to remove the mains plug from the wall socket.
- Remove the mains plug from the wall socket when the equipment is not in use, before assembly or disassembly and before cleaning and maintenance.
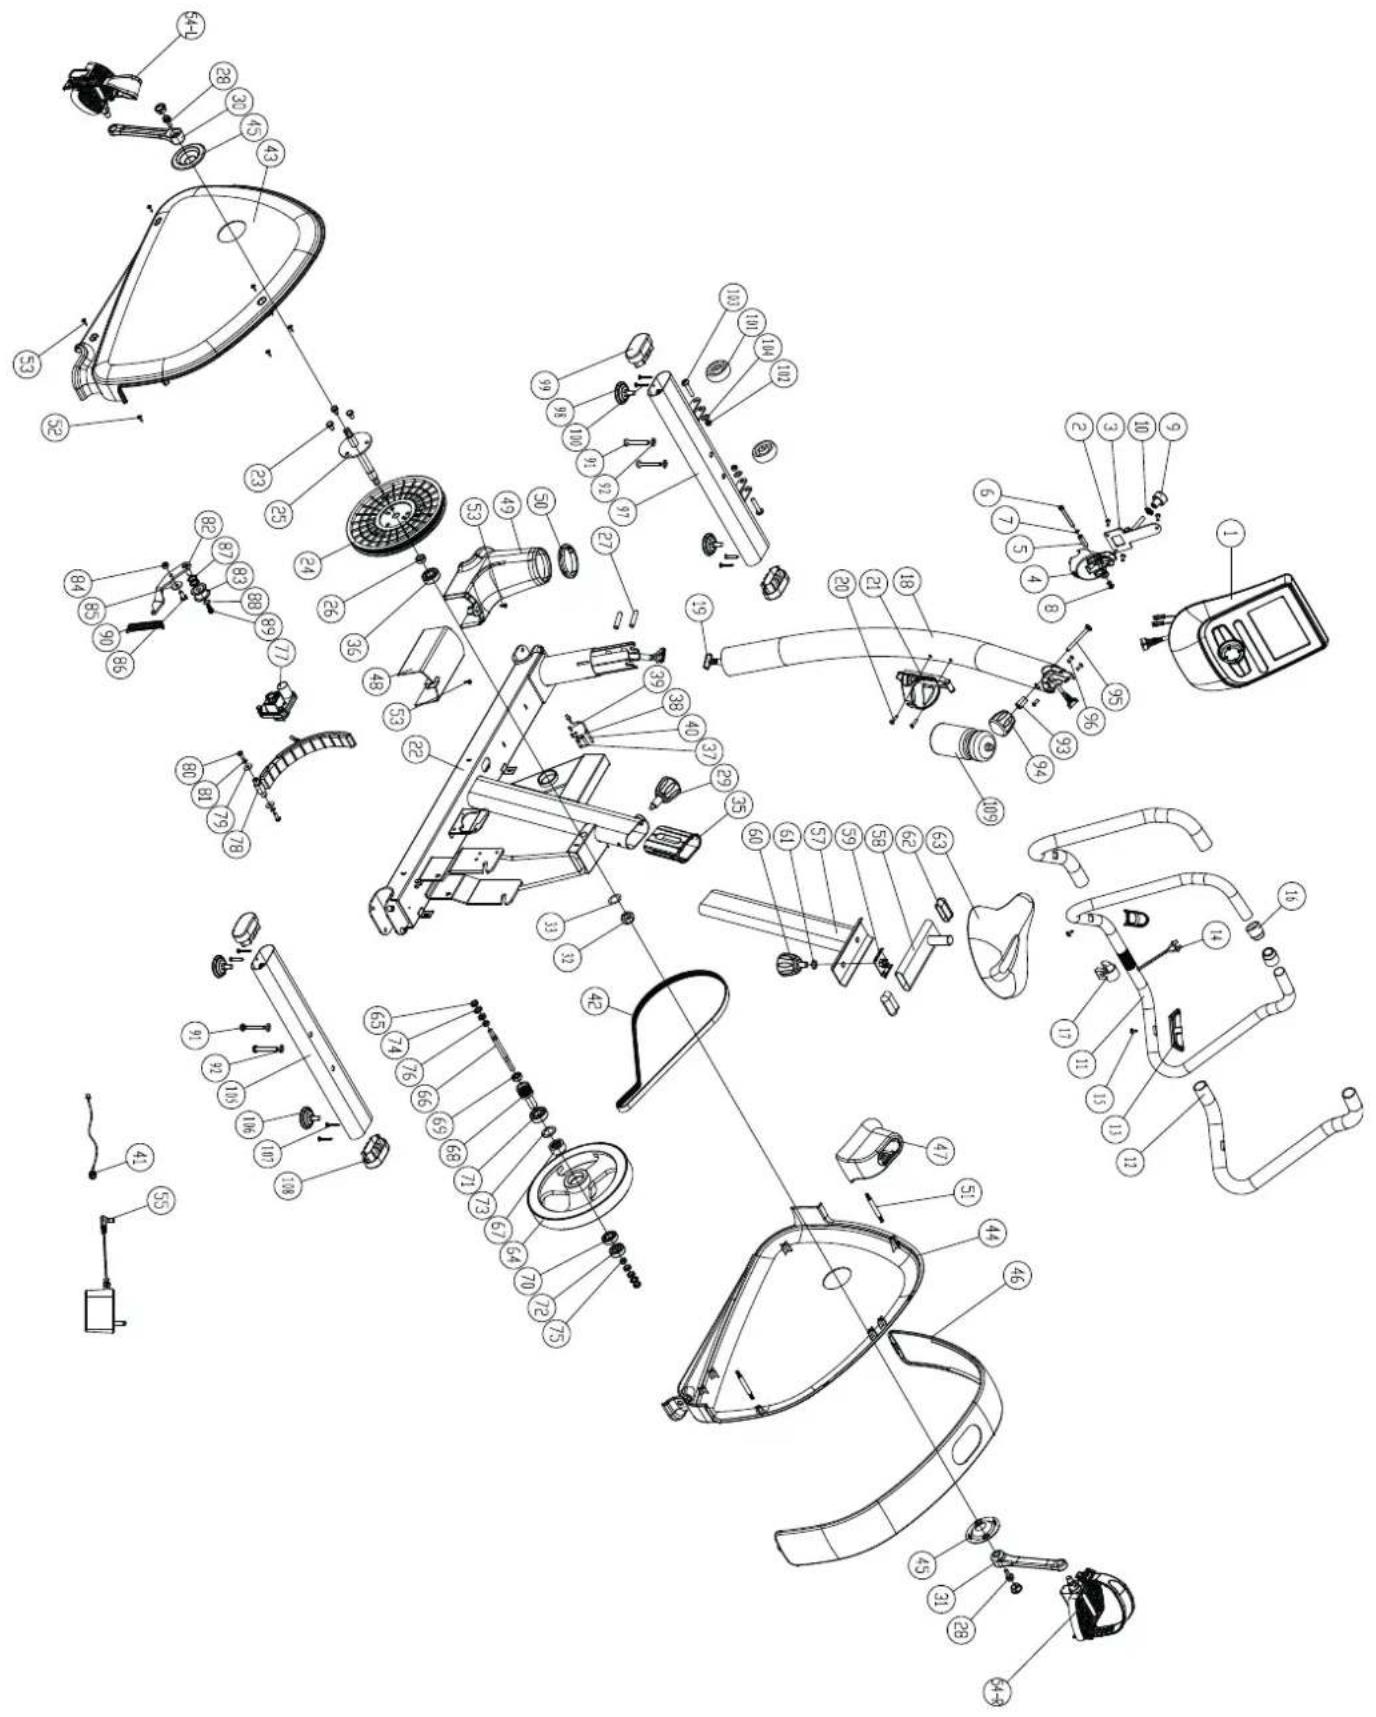
Assembly instructions
Description (fig. A)
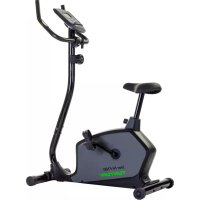
Your upright bike is a piece of stationary fitness equipment used to simulate cycling without causing excessive pressure to the joints.
Package contents (fig. B & C)
The package contains the parts as shown in fig.B.
- The package contains the fasteners as shown in fig. C. Refer to the section "Description"
NOTE
If a part is missing, contact your dealer.
Assembly (fig. D)
WARNING
- Assemble the equipment in the given order.
- Carry and move the equipment with at least two persons.
CAUTION
- Place the equipment on a firm, level surface.
- Place the equipment on a protective base to prevent damage to the floor surface.
- Allow at least 100cm of clearance around the equipment.
Refer to the illustrations for the correct assembly of the equipment.
NOTE
- Save the tools provided with this product, after you completed the product assembly, for future service purposes.
Workouts
The workout must be suitably light, but of long duration. Aerobic exercise is based on improving the body's maximum oxygen uptake, which in turn improves endurance and fitness. You should perspire, but you should not get out of breath during the workout.
To reach and maintain a basic fitness level, exercise at least three times a week, 30 minutes at a time. Increase the number of exercise sessions to improve your fitness level.
It is worthwhile to combine regular exercise with a healthy diet. A person committed to dieting should exercise daily, at first 30 minutes or less at a time, gradually increasing the daily workout time to one hour. Start your workout at low speed and low resistance to prevent the cardiovascular system from being subjected to excessive strain.
As the fitness level improves, speed and resistance can be increased gradually. The efficiency of your exercise can be measured by monitoring your heart rate and your pulse rate.
Exercise Instructions
Using your fitness trainer will provide you with several benefits, it will improve your physical fitness, tone muscle and in conjunction with a calorie controlled diet help you lose weight.
The warming up phase
This stage helps get the blood flowing around the body and the muscles working properly. It will also reduce the risk of cramp and muscle injury. It is advisable to do a few stretching exercises as shown below. Each stretch should be held for approximately 30 seconds, do not force or jerk your muscles into a stretch - if it hurts, STOP
The exercise phase
This is the stage where you put the effort in. After regular use, the muscles in your legs will become more flexible. Work to your but it is very important to maintain a steady tempo throughout. The rate of work should be sufficient to raise your heart beat into the target zone shown on the graph below.
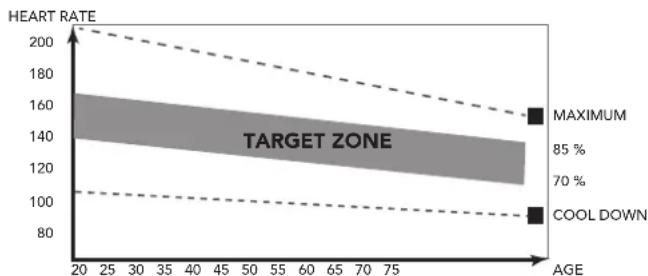
This stage should last for a minimum of 12 minutes though most people start at about 15-20 minutes
The cool down phase
This stage is to let your Cardiovascular System and muscles wind down. This is a repeat of the warm up exercise e.g. reduce your tempo, continue for approximately 5 minutes. The stretching exercises should now be repeated, again remembering not to force or jerk your muscles into the stretch. As you get fitter you may need to train longer and harder. It is advisable to train at least three times a week, and if possible space your workouts evenly throughout the week.
Muscle toning
To tone muscle while on your fitness trainer you will need to have the resistance set quite high. This will put more strain on our leg muscles and may mean you cannot train for as long as you would like. If you are also trying to improve your fitness you need to alter your training program. You should train as normal during the warm up and cool down phases, but towards the end of the exercise phase you should increase resistance making your legs work harder. You will have to reduce your speed to keep your heart rate in the target zone.
Weight loss
The important factor here is the amount of effort you put in. The harder and longer you work the more calories you will burn. Effectively this is the same as if you were training to improve your fitness, the difference is the goal.
Heart rate
Pulse rate measurement (hand pulse sensors)
The pulse rate is measured by sensors in the handlebars when the user is touching both sensors at the same time. Accurate pulse measurement requires that the skin is slightly moist and constantly touching the hand pulse sensors. If the skin is too dry or too moist, the pulse rate measurement will become less accurate.
NOTE
- Do not use the hand pulse sensors in combination with a heart rate chest belt.
If you set a heart rate limit for your workout, an alarm will sound when it is exceeded.
Heart rate measurement (heart rate chest belt)
NOTE
- A chest strap does not come standard with this trainer. When you like to use a wireless chest strap you need to purchase this as an accessory.
The most accurate heart rate measurement is achieved with a heart rate chest belt. The heart rate is measured by a heart rate receiver in combination with a heart rate transmitter belt. Accurate heart measurement requires that the electrodes on the transmitter belt are slight moist and constantly touching the skin. If the electrodes are too dry or too moist, the heart rate measurement will become less accurate.
WARNING
If you have a pacemaker, consult a physician before using a heartrate chest belt.
CAUTION
If there are several heart rate measurement devices next to each other, make sure that the distance between them is at least 1.5 metres.
- If there is only one heart rate receiver and several heart rate transmitters, make sure that only one person with a transmitter is within transmission range.
NOTE
- Do not use a heart rate chest belt in combination with the handpulse sensors.
Always wear the heart rate chest belt under your clothes directly in contact with your skin. Do not wear the heart rate chest belt above your clothes. If you wear the heart rate chest belt above your clothes, there will be no signal. - If you set a heart rate limit for your workout, an alarm will sound when it is exceeded.
The transmitter transmits the heart rate to the
console up to a distance of 1 metre. If the electrodes are not moist, the heart rate will not appear on the display.
- Some fibers in clothes (e.g. polyester, polyamide) create static electricity which can prevent accurate heart rate measurement.
- Mobile phones, televisions and other electrical appliances create an electromagnetic field which can prevent accurate heart rate measurement.
Maximum heart rate (during training)
The maximum heart rate is the highest heart rate a person can safely achieve through exercise stress. The following formula is used to calculate the average maximum heart rate: 220 - AGE. The maximum heart rate varies from person to person.
WARNING
Make sure that you do not exceed your maximum heart rate during your workout. If you belong to a risk group, consult a physician.
Beginner
50-60% of maximum heart rate
Suitable for beginners, weight-watchers, convalescents and persons who have not exercised for a long time. Exercise at least three times a week, 30 minutes at a time.
Advanced
60-70% of maximum heart rate
Suitable for persons who want to improve and maintain fitness. Exercise at least three times a week, 30 minutes at a time.
Expert
70-80% of maximum heart rate
Suitable for the fittest of persons who are used to long-endurance workouts.
Use
Adjusting the support feet
The equipment is equipped with 4 support feet. If the equipment is not stable, the support feet can be adjusted.
- Turn the support feet as required to put the equipment in a stable position.
- Tighten the locknuts to lock the support feet.
NOTE
- The machine is the most stable when all support feet are turned fully in. Therefore start to level the machine by turning all support feet fully in, before turning out the required support feet to stable the machine.
Adjusting the console
The console can be adjusted according to the height and the exercise position of the user.
- Loosen the console adjustment knob.
- Move the console to the required position.
- Tighten the console adjustment knob.
Adjusting the horizontal seat position
The horizontal seat position can be adjusted by setting the seat to the required position.
- Loosen the seat adjustment knob.
- Move the seat to the required position.
- Tighten the seat adjustment knob.
Adjusting the vertical seat position
The vertical seat position can be adjusted by setting the seat tube to the required position. With the leg almost straight, the arch of the foot must touch the pedal at its lowermost point.
- Loosen the seat tube adjustment knob.
- Move the seat tube to the required position.
- Tighten the seat tube adjustment knob.
Adjusting the handlebar
The handlebar can be adjusted according to the height and the exercise position of the user.
- Loosen the handlebar adjustment knob.
- Move the handlebar to the required position.
- Tighten the handlebar adjustment knob.
Power supply (Fig. E)
The trainer is powered by an external power supply. Refer to the illustration to locate the trainer power input.
NOTE
- Connect the power supply with the trainer before connecting it to the wall outlet.
Always remove power cord when machine is not in use.

Console (fig F)
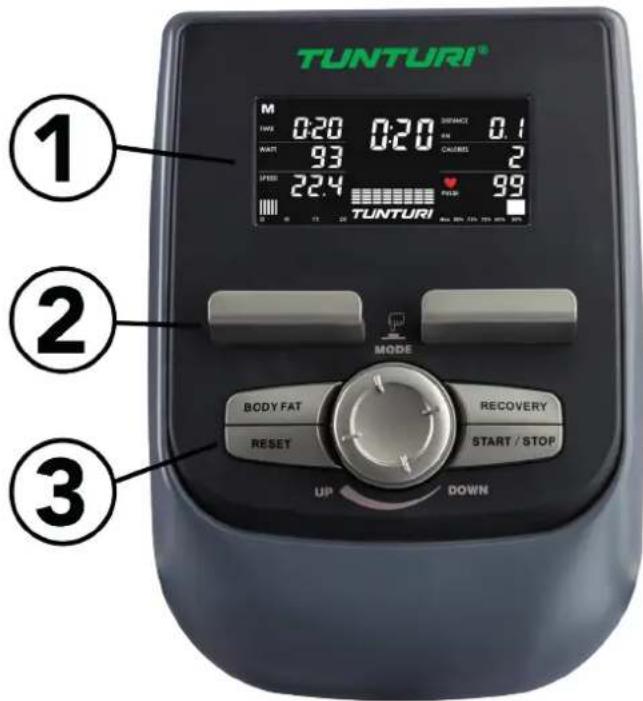
- Display
- Tablet/ book support
- Buttons
CAUTION
- Keep the console away from direct sunlight.
- Dry the surface of the console when it is covered with drops of sweat.
- Do not lean on the console.
- Only touch the display with the tip of your finger. Make sure that your nails or sharp objects do not touch the display.
NOTE
- The console switches to standby mode when the equipment is not used for 4 minutes. If the console is in standby mode, the display shows the room temperature
Explanation Display functions
Time
- Without setting the target value, time will count up.
- When setting the target value, time will count down from your target time to 0 and alarm will sound or flash.
- Without any signal being transmitted into the monitor for 4 seconds during workout, time will STOP
- Range 0:00~99:59
Speed
- Displays current training speed.
Maximum speed is 99.9 KM/H or ML/H.
- Without any signal being transmitted into the monitor for 4 seconds during workout, SPEED will display "0.0"
RPM
- Displays the Rotation Per Minute.
Display range 0~15~999
- Without any signal being transmitted into the monitor for 4 seconds during workout, RPM will display "0"
Watt
- Display current workout watts. Range 0 ~ 999
Level
- Shows tension level setting, when adjusting resistance, for 3 seconds.
Distance
- Without setting the target value, distance will count up.
- When setting the target value, distance will count down from your target distance to 0 with an alarm sound or flash.
- Range 0.00~99.99
Calories
- Without setting the target value, calorie will count up.
- When setting the target value, calories will count down from your target calorie to 0 with an alarm sound or flash.
- Range 0~999.
NOTE
- This data is a rough guide for comparison of different exercise sessions which cannot be used in medical treatment
Pulse
- Current pulse will display after 6 seconds when detected by the console.
- Without any pulse signal for 6 seconds, console will display "P".
- Pulse alarm will sound when current pulse is over the target pulse.
- Range 0-30~230 BPM
BAI TM
- Display BAI consumption BAI value during workout.
-Display range 0 999
NOTE
- BAI (Body Activity Index) is the sum up of effective training volume.
- Training volume = Training Intensity x Training time.
BAI calculates effective training volume based on your heart rate, age, gender and duration.
During the workout, you can see BAI accumulates.
As soon as you complete a workout session, you can obtain a total BAI point of this session, which is the total effective training volume of this session.
If you train harder, higher heart rate zone, you get BAI points faster. If you train less hard, lower heart rate zone, you get BAI points slow.
We recommend to workout by accumulating 100 BAL points every week to enhance your cardio capability.
Explanation of buttons
Up (Dail)
- Increase resistance level
- Setting selection.
Down (Dail)
- Decrease resistance level
- Setting selection.
Mode/Enter
- Confirm setting or selection.
Reset
- In setting mode, press RESET key once to reset the current function figures.
- Press RESET key and hold for 2 seconds to reset all function figures
Start/Stop
- Start or Stop workout
Body Fat
- Test body fat% and BMI in stop mode.
Recovery
- Test heart rate recovery status.
Opperation
Power on
- Plug in power supply to power on computer.
- Press any key to power on the console when being in sleep mode..
- Start pedalling to power on the console when being in sleep mode.
LCD will display all segments (fig. - F-01)
Set user
- Select user, turn dial to select U1~U4, confirm by press MODE.
- Select Gender, turn dial to select Male/Female, confirm by press MODE.
-
Set Age (A), turn dial to select 1~99, confirm by press MODE.
-
Set Height (H), turn dial to select 100~200, confirm by press MODE.
- Set Weight (W), turn dial to select 20~150, confirm by press MODE.
Workout selection
Use Dial UP/DOWN to select:
-M Manual.
- P1~P12 Program profile 1 ~ 12.
- HRC Heart rate control
-W Watt control
- U User program.
Power off
Without any signal being transmitted into the monitor for 4 minutes the monitor will enter SLEEP mode automatically. (Active training data will be lost)
Programs
Quick start
- Press START/ STOP key to start your workout without any pre-set setting.
- Use Dial UP/ DOWN to adjust resistant level during workout.
End your workout
- Press START/ STOP in workout mode to stop/ pause your workout.
To resume your workout press START/ STOP button in pause mode. - Press RESET key (in Pause mode) to reset all workout data.
- Press and hold RESET key for over 2 seconds to reset console. (Active training data will be lost)
Manual mode
- Use Dial Up/ Down function to select workout program, Select M (manual) mode, confirm by press MODE.
- Use Dial Up/ Down function to set the tension level, confirm by press MODE.
- Use Dial Up/ Down key to pre-set training time, confirm by press MODE.
- Use Dial Up/ Down key to pre-set training Distance, confirm by press MODE.
- Use Dial Up/ Down key to pre-set training Calories, confirm by press MODE.
- Use Dial Up/ Down key to set a limit for Pulse, confirm by press MODE.
NOTE
- When setting more than one goal, the training will end at first achieved goal.
- Leave a goal blank and it will not be seen as a pre-set limit.
- When setting a pulse limit, the workout will not stop when exceeding the set limit. An acoustic alarm will notify the user when exceeding the limit as a warning.

- Press START/ STOP key to start workout
- Use Dial UP/ DOWN key to adjust resistance level. Load level is shown in LEVEL window.
Program profile 1~12
- Use Dial Up/ Down function to select workout program, Select one of the pre-set profiles, confirm by press MODE.
- Use Dial Up/ Down function to set the tension level, confirm by press MODE. The complete profile will be scaled proportionally.
-
Use Dial Up/ Down key to pre-set training time, confirm by press MODE.
-
Press START/ STOP key to start workout
- Use Dial UP/ DOWN key to adjust resistance level. The complete profile will be scaled proportionally Load level is shown in LEVEL window.
In Program profile mode, the tension will be adjusted automatically to a pre set profile.
NOTE
- The duration of each segment in the profile is 1/8 of your pre set training time.
- If no training time is set, the duration of each segment will be ± 20 seconds, and will restart the profile again repeatedly until you stop the workout yourself.
Cardio mode.
- Use Dial Up/ Down function to select workout program, Select HRC (heart icon), confirm by press MODE.
- Use Dial Up/ Down function to set the HRC target: 55% = 55% of 220 minus age. 75% = 75% of 220 minus age. 90% = 90% of 220 minus age. TA Target (Default 100) confirm by press MODE.
- When set TA, Use Dial Up/ Down function to set target (30~230), confirm by press MODE.
- Use Dial Up/ Down key to pre-set training time, confirm by press MODE.
- Press START/ STOP key to start workout
- Use RESET, to go back to main menu.
In Cardio mode, the tension will be adjusted automatically to an insensitivity in where your hart rate reaches the Pre set HRC target.
Watt Mode.
- Use Dial Up/ Down function to select workout program, Select Watt Control (W), confirm by press MODE.
- Use Dial Up/ Down function to set the Watt target: 120 is pre-set default (10~350) confirm by press MODE.
-
Use Dial Up/ Down key to pre-set training time, confirm by press MODE.
-
Press START/ STOP key to start workout
- Use RESET, to go back to main menu.
In Watt mode, the tension will be adjusted automatically to an insensitivity in where the Watt reaches the Pre set Watt target.
NOTE
- The Watt parameter is a calculation of RPM and Tension level. When RPM is higher, the tension will be lower. When RPM is lower, the tension will be higher.
User Profile
- Use Dial Up/ Down function to select workout program, Select User Profile (U), confirm by press MODE.
- Use Dial Up/ Down function to set the tension level for the first profile segment. confirm by press MODE.
- Repeat the rest of the profile segment tension levels too in the same manner.
- Press and hold MODE button for 2 seconds to confirm and store the set User Profile.
- Use Dial Up/ Down key to pre-set training time, confirm by press MODE.
- Press START/ STOP key to start workout
- Use RESET, to go back to main menu.
In User Program profile mode, the tension will be adjusted automatically to the pre set profile. The duration of each segment in the profile is 1/8 of your pre set training time.
NOTE
There is one user program available per user.
Recovery
- The RECOVERY key will only be valid if pulse is detected.
- TIME will show "0:60" (seconds) and counts down to 0.
- Computer will show F1 to F6 after the countdown to test heart rate recovery status. User can find the heart rate recovery level based on the chart below.
- Press RECOVERY key again to return to the beginning.
| F1 Outstanding | |
| F2 Excellent | |
| F3 Good | |
| F4 Fair | |
| F5 Below average | |
| F6 Poor | |
Body Fat
- Press the BODY FAT key to start body fat measurement.
- During measuring, users have to hold both hands on the hand grips. LCD display "---" "---" "---" "---" "---" for 8 seconds until computer finish measuring.
- LCD will display BMI and FAT %.
Body fat mode error codes
- *E-1 There is no heart rate signal input detected.
- * E-4 Occurs when FAT% and BMI result is below 5 or exceeds 50.
Bluetooth & APP
- This console can connect with an APP on a smart device by Bluetooth (iOS & Android).
- Establish the Bluetooth connection only via the connection mode on the installed APP on your smart device.
- When the bluetooth connection between APP and console is established the console display will be dimmed.
NOTE
- Tunturi only provides the option to connect your fintess console throughout a blue tooth connection. Therefore Tunturi cannot be held responsible for damage, or malfunctioning of products other than Tunturi products.
- Check the website for extra information.
This console can receive a Bluetooth heart-rate transmitter. There is no need to pair the defice, as the console will auto detect the heart-rate transmitter when it is in range.
Cleaning and maintenance
The equipment does not require special maintenance. The equipment does not require recalibration when it is assembled, used and serviced according to the instructions.
WARNING
-
Do not use solvents to clean the equipment.
-
Clean the equipment with a soft, absorbent cloth after each use.
- Regularly check that all screws and nuts are tight.
- If necessary, lubricate the joints.
Defects and malfunctions
Despite continuous quality control, defects and malfunctions caused by individual parts can occur in the equipment. In most cases, it will be sufficient to replace the defective part.
- If the equipment does not function properly, immediately contact the dealer.
- Provide the model number and the serial number of the equipment to the dealer. State the nature of the problem, conditions of use and purchase date.
Trouble shooting:
- When the display of LCD is dim, it means the batteries need to be changed.
- If there is no signal when you pedal, please check if the cable is well connected.
NOTE
- When stop training for 4 minutes, the main screen will be off.
- If the computer displays abnormally, please reinstall the batteries and try again.
Squeaking rollers
- Regular Usage: Apply 2cc. of the lubricant on each protruding rail surface every three months.
- When sliding wheels are making noise during sliding movement, apply 2cc. of lubricant on each protruding rail surface immediately.
CAUTION
We recommend to use a silicon based lubricant.
- Do not apply too much lubricant or wipe off redundant lubricant with a clean cloth as too much lubricant can cause carpet stain or dirt particle.
Shaky or unstable feeling during use
If the machine feels unstable or unstable during operation, it is advisable to adjust the support feet to bring the frame to the correct height. Read the instructions in this manual in section: "Use"
Transport and storage
WARNING
-
Carry and move the equipment with at least two persons.
-
Remain standing in front of the equipment on each side and take a sturdy grip at the handlebars. Tilt the front of the equipment so as to lift the rear of the equipment on the wheels. Move the equipment and carefully put the equipment down. Place the equipment on a protective base to prevent damage to the floor surface.

- Move the equipment carefully over uneven surfaces. Do not move the equipment upstairs using the wheels, but carry the equipment by the handlebars.
- Store the equipment in a dry place with as little temperature variation as possible.
Additional information
Packaging disposal
Government guidelines ask that we reduce the amount of waste material disposed of in land fill sites. We therefore ask that you dispose of all packaging waste responsibly at public recycling centres.
End of life disposal
We at Tunturi hope you enjoy many years of enjoyable use from your fitness trainer. However, a time will come when your fitness trainer will come to the end of its useful life. Under 'European WEEE Legislation you are responsible for the appropriate disposal of your fitness trainer to a recognised public collection facility.
Technical data
| Parameter Unit of measurement | Value | |
| Telemetric heart rate receiver | Frequency 5.3 Khz/ | Bluetooth |
| Length cm | inch | 99 |
| 39 | ||
| Width cm | inch | 60 |
| 23.6 | ||
| Height cm | inch | 157 |
| 61.8 | ||
| Weight kg | Ibs | 38.7 |
| 85.1 | ||
| Max. user weight kg | Ibs | 120 |
| 265 | ||
| Adapter Voltage/ Current | V | 9V-DC |
| Ma. | 1.0 A | |
Warranty
Tunturi purchaser's warranty
Warranty terms
The consumer is entitled to the applicable legal rights stated in the national legislation concerning the commerce of consumer goods. This warranty does not restrict these rights. The Purchaser's Warranty is only valid if the item is used in an environment approved by
Tunturi New Fitness BV for that particular equipment. The product-specific approved environment is stated in the Owner's Manual provided with your equipment.
Warranty conditions
The warranty conditions commence from the date of purchase. Warranty conditions may vary per country, so please consult your local dealer for the warranty conditions.
Warranty coverage
Under no circumstances shall Tunturi New Fitness BV or the Tunturi Distributor be liable by virtue of this warranty or otherwise for any special, indirect, secondary or consequential damages of any nature arising out of any use or inability to use this equipment.
Warranty limitations
This warranty covers manufacturing defects in the fitness equipment as originally packed by Tunturi New Fitness BV. The warranty shall apply only under conditions of normal, recommended use of the product as described in the Owner's Manual and providing that Tunturi New Fitness BV's instructions for installation, maintenance and use have been complied with. Neither Tunturi New Fitness BV's nor the Tunturi Distributors' obligations apply to defects due to reasons beyond their control. The warranty applies only to the original purchaser and is valid only in countries where Tunturi New Fitness BV has an authorised importer. The warranty does not extend to fitness equipment or components that have been modified without the consent of Tunturi New Fitness BV. Defects resulting from normal wear, misuse, abuse, corrosion, or damage incurred during loading or transportation are not covered.
The warranty does not cover sounds or noises emitted during use where these do not substantially impede the use of the equipment and where they are not caused by a fault in the equipment. The warranty does not cover defects arising from the failure to carry periodic maintenance as outlined within the Owner's Manual for the product. Furthermore, the warranty does not cover defects arising from usage and storage within an unsuitable environment as described within the Owner's Manual which should be indoors, dry, dust and grit free and within a temperature range of +15^ to +35^ . The warranty does not cover maintenance activities, such as cleaning, lubricating, and normal part adjustments, nor installation
procedures that customers can accomplish themselves, such as changing uncomplicated meters, pedals and other similar parts not requiring any dismantling/ reassembling of the fitness equipment. Warranty repairs carried out by other than authorised Tunturi representatives are not covered.
Failure to follow the instructions given in the Owner's Manual will invalidate the product's warranty.
Declaration of the manufacturer
Tunturi New Fitness BV declares that the product is in conformity with the following standards and directives: EN 957 (HB), 89/336/EEC. The product therefore carries the CE label.
01-2017
Tunturi New Fitness BV
Purmerweg 1
1311 XE Almere
The Netherlands
Disclaimer
© 2017 Tunturi New Fitness BV All rights reserved.
The product and the manual are subject to change. Specifications can be changed without further notice.
Deutsch
Tunturi New Fitness BV
Purmerweg 1
1311 XE Almere
The Netherlands
Haftungsausschluss
Mode/Enter (mode/entree)
- Start of Stop (pauzeer) training
Body Fat
Tunturi New Fitness BV
Purmerweg 1
1311 XE Almere
The Netherlands
Disclaimer
© 2017 Tunturi New Fitness BV
Alle rechten voorbehonden.
- Display
- Tablet/ book support
- Buttons

AVVISO
Tunturi New Fitness BV
Purmerweg 1
1311 XE Almere
Paesi Bassi
Mode/Enter (Modo/Intro)
Body Fat (Grasa corporal
Tunturi New Fitness BV
Purmerweg 1
1311 XE Almere
The Netherlands

© 2017 Tunturi New Fitness BV
Tunturi New Fitness BV
Purmerweg 1
1311 XE Almere
Alankomaat
Vastuuvapauslauseke
© 2017 Tunturi New Fitness BV
| 45 Crank cap | 2 | |
| 46 Top cover | 1 | |
| 47 Seat post cover | 1 | |
| 48 Cover of bottom tube | 1 | |
| 49 Handlebar post cover | 1 | |
| 50 Ring for handlebar post | 1 | |
| 51 Shaft of chain cover | 2 | |
| 52 Screw 3 | ||
| 53 Screw 5 | ||
| 54 Pedal, pair | 1 | |
| 55 Switching adaptor | 1 | |
| Switching adaptor | 1 | |
| 56 Fixed tube of bracket | 2 | |
| 57 Seat post | 1 | |
| 58 Horizontal sliding tube | 1 | |
| 59 Fixed screw | 1 | |
| 60 Seat sliding knob | 1 | |
| 61 Flat washer 1 | ||
| 62 End cap 2 | ||
| 63 Seat | 1 | |
| 64 Flywheel compl. (incl. 65~76) | 1 | |
| 65 Nut | 5 | |
| 66 Axle for flywheel | 1 | |
| 67 One-way bearing set | 1 | |
| 68 Pulley for flywheel | 1 | |
| 69 Bearing | 1 | |
| 70 Bearing | 1 | |
| 71 Bearing | 1 | |
| 72 Bearing | 1 | |
| 73 Flat washer 1 | ||
| 74 Star washer | 2 | |
| 75 Plastic sleeve | 1 | |
| 76 Bushing 1 | ||
| 77 Servomotor set F40, E50 | 1 | |
| 78 Magnetic brake Compl Assy. | 1 | |
| 78 Magnetic brake set | 1 | |
| 79 Flat washer 2 | ||
| 80 Hexagon Screw | 2 | |
| 81 Spring washer | 2 | |
| 82 Idler Bracket Compl Assy. | 1 | |
| 82 Idler Bracket | 1 | |
| 83 Idler wheel | 1 | |
| 84 Nylon nut 1 | ||
| 85 Flat washer 1 | ||
| 86 Hex. Screw | 1 | |
| 87 Wave washer | 2 |
| 88 Flat washer 1 | |
| 89 Hex screw 1 | |
| 90 Ider spring 1 | |
| 91 Screw 4 | |
| 92 Flat washer 4 | |
| 93 Bushing 1 | |
| 94 Handlebar knob 1 | |
| 95 Carriage bolt 1 | |
| 96 Screw 2 | |
| 97 Front foot Compl Assy. 1 | |
| 97 Front foot 1 | |
| 98 Adjusting cushion 2 | |
| 99 Foot end cap 2 | |
| 100 Screw 4 | |
| 101 Transport wheel 2 | |
| 102 Nylon nut 2 | |
| 103 Allen bolt 2 | |
| 104 Flat washer 2 | |
| 105 Rear stabilizer Compl Assy. 1 | |
| 105 Rear stabilizer 1 | |
| 106 Adjusting cushion 2 | |
| 107 Screw 4 | |
| 108 Foot end cap 2 | |
| 109 Water bottle 1 | |
| Label set | |
| Hardware kit | |
| User manual | |