DAR040 - Radio LENCO - Free user manual and instructions
Find the device manual for free DAR040 LENCO in PDF.
Download the instructions for your Radio in PDF format for free! Find your manual DAR040 - LENCO and take your electronic device back in hand. On this page are published all the documents necessary for the use of your device. DAR040 by LENCO.
USER MANUAL DAR040 LENCO
CAUTION: Usage of controls or adjustments or performance of procedures other than those specified herein may result in hazardous radiation exposure. This unit should not be adjusted or repaired by anyone except qualified service personnel.
PRECAUTIONS BEFORE USE
KEEP THESE INSTRUCTIONS IN MIND:
1. Do not use this device near water.
2. Clean only with a slightly damp cloth.
3. Do ot oe o lok a etilatio opeigs. Whe plaig the deie o a shelf, leae
free space around the whole device.
4. Install in accordance with the supplied user manual.
6. Unplug this device during lightning storms or when unused for a long period.
7. Keep the device away from heat sources such as radiators, heaters, stoves, candles and other
heat-generating products.
8. Avoid using the device near strong magnetic fields.
9. Electrostatic discharge can disturb normal usage of this device. If so, simply reset and restart
the device following the instruction manual. During file transmission, please handle with care and operate in a static-free environment.
10. Warning! Never insert an object into the product through the vents or openings. High voltage
flows through the product and inserting an object can cause electric shock and/or short circuit internal parts. For the same reason, do not spill water or liquid on the product.
11. Do not use in wet or moist areas such as bathrooms, steamy kitchens or near swimming pools.
12. Do not use this device when condensation may occur.
13. Although this device is manufactured with the utmost care and checked several times before
leaving the factory, it is still possible that problems may occur, as with all electrical appliances. If you notice smoke, an excessive build-up of heat or any other unexpected phenomena, you should disconnect the plug from the main power socket immediately.
14. This device must be well ventilated at all time!
15. This device must operate on a power source as specified on the specification label. If you are
not sure of the type of power supply used in your home, consult your dealer or local power company.
16. The socket outlet must be installed near the equipment and must be easily accessible.
17. Do not overload ac outlets or extension cords. Overloading can cause fire or electric shock.
18. Devices with class 1 construction should be connected to a main socket outlet with a protective
19. Devices with class 2 construction do not require an earthed connection.
20. Keep away from rodents. Rodents enjoy biting on power cords.
21. Always hold the plug when pulling it out of the main supply socket. Do not pull the power cord.
This can cause a short circuit.
22. Avoid placing the device on any surfaces that may be subject to vibrations or shocks.
23. To protect the device during a thunderstorm, unplug the ac power adaptor.
24. When the device is not in use for long periods, unplug the ac power adaptor for safety reasons.
25. To clean the device, use a soft dry cloth. Do not use solvents or petrol based fluids. To remove
severe stains, you may use a damp cloth with dilute detergent.
26. The supplier is not responsible for damage or lost data caused by malfunction, misuse,
modification of the device or battery replacement.
27. Do not interrupt the connection when the device is formatting or transferring files. Otherwise,
data may be corrupted or lost.
28. The us eo stik should e plugged ito the uit dietl. Dot use a us etesio
cable because it can cause interference resulting in failing of data.
29. The apparatus shall not be exposed to dripping or splashing and make sure that no objects
filled with liquids, such as vases, are placed on or near the apparatus.4
30. To completely disconnect the power input, the mains plug of the apparatus shall be
disconnected from the mains, as the disconnect device is the mains plug of apparatus.
31. The mains plug of the apparatus should not be obstructed or should be easily accessed during
32. Battery shall not be exposed to excessive heat such as sunshine, fire or the like.
33. Minimum distance of 10cm around the apparatus is needed for sufficient ventilations.
34. The ventilation should not be impeded by covering the ventilation openings with items such as
newspapers, table-cloths, curtains etc.
35. No naked flame sources such as lighted candles should be placed on the apparatus.
36. Attention should be drawn to the environmental aspects of battery disposal.
37. The apparatus can only be used in moderate extremely cold or climates warm environments
38. The rating label has been marked on the bottom panel of the apparatus.
39. This device is not intended for use by people (including children) with physical, sensory or
mental disabilities, or a lack of experience ad koledge, uless thee ude supeisio o have received instructions about the correct use of the device by the person who is responsible for their safety.
40. This product is intended for household use only and not for commercial or industrial use.
41. Make sure the unit is adjusted to a stable position. Damage caused by using this product in an
unstable position or by failure to follow any other warning or precaution contained within this user manual will not be covered by warranty.
42. Never remove the casing of this apparatus.
43. Never place this apparatus on other electrical equipment.
44. Do not use or store this product in a place where it is subject to direct sunlight, heat, excessive
45. Do not clean this product with water or other liquids.
46. Do not block or cover the slots and holes in the product.
47. Do not push foreign objects into the slots or holes in the product.
48. Do not allow children access to plastic bags.
49. Please check that the voltage on the type plate of your appliance corresponds with your house
electricity supply (type plate is located on the back of the unit).
50. Protect the power cord from being walked on or pinched, particularly at plugs, convenience
receptacles, and the point where they exit from the apparatus.
51. Only use attachments/accessories specified by the manufacturer.
52. Refer all servicing to qualified service personnel. Servicing is required when the apparatus has
been damaged in any way, such as the power supply cord or the plug, when liquid has been spilled or objects have fallen into the apparatus, when the apparatus has been exposed to rain or moisture, does not operate normally, or has been dropped.
53. Do not use a damaged power cord or plug or a loose outlet. Doing so may result in fire or
Warning: prolonged exposure to loud sounds from personal music players may lead to temporary or
permanent hearing loss.5 Exploring the device
9. CD compartment door
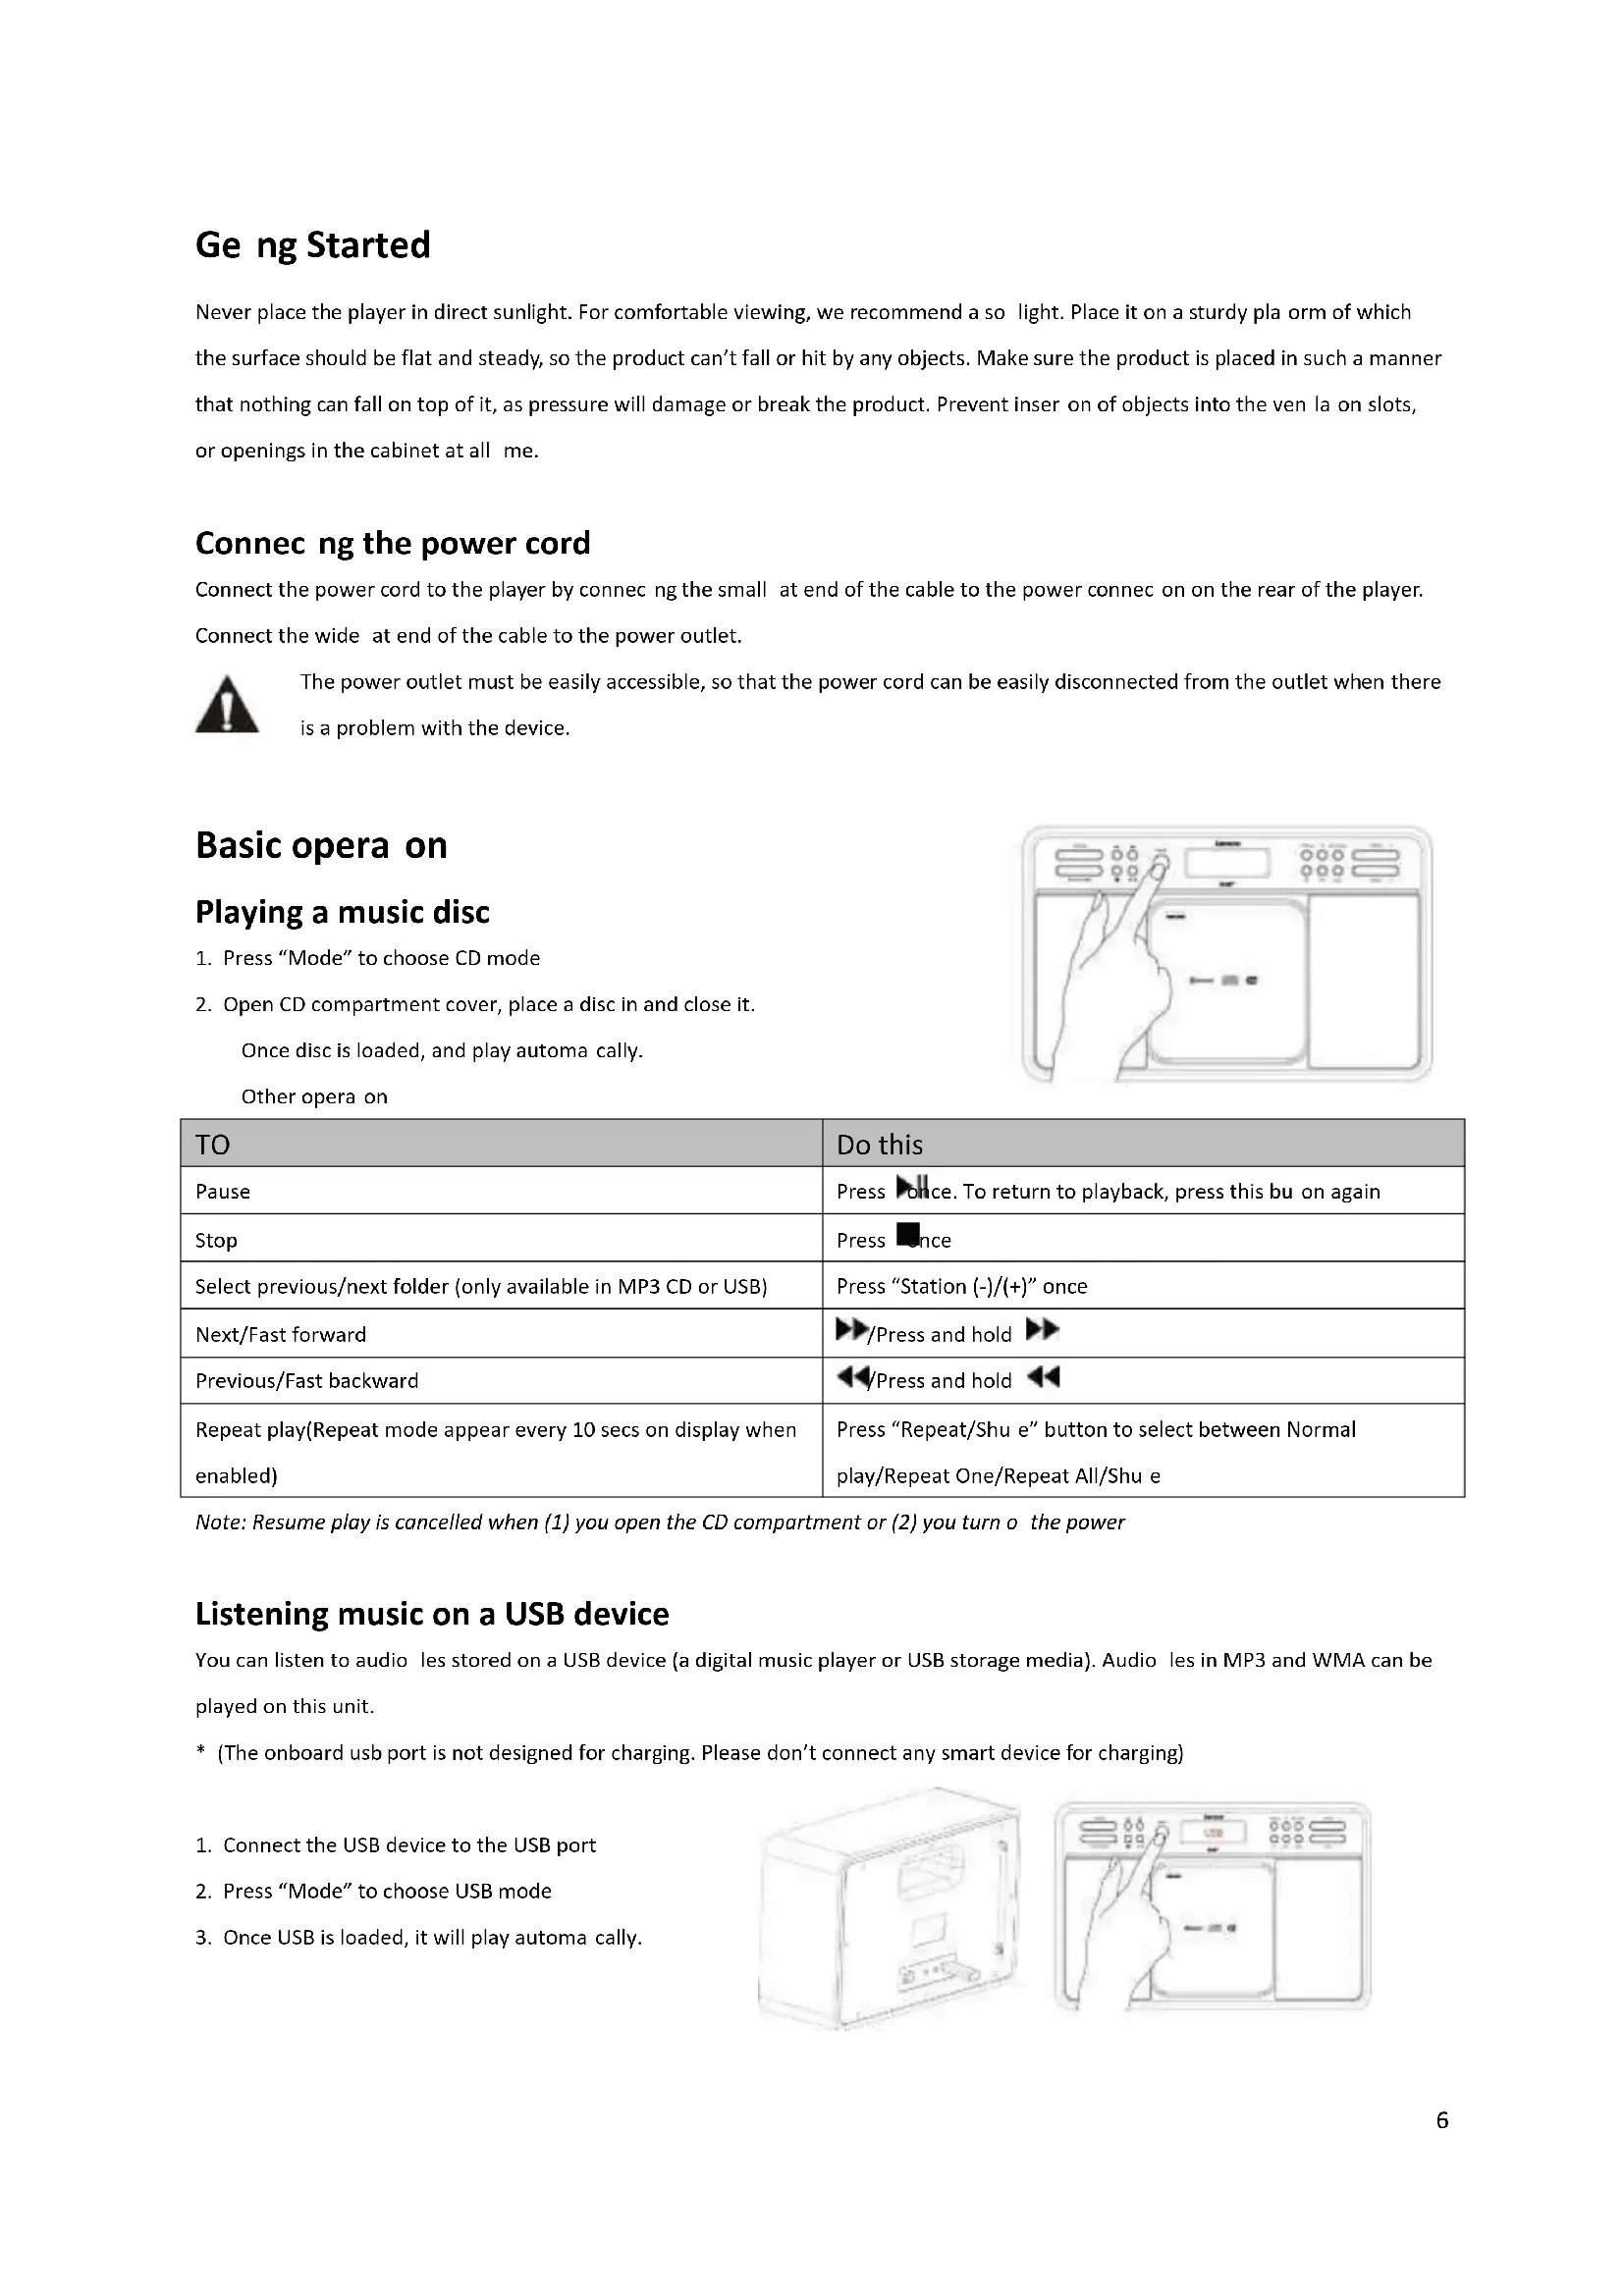
charging function, do not connect any smart device)6 Getting Started Never place the player in direct sunlight. For comfortable viewing, we recommend a soft light. Place it on a sturdy platform of which the sufae should e flat ad stead, so the podut at fall o hit a ojets. Make sue the podut is plaed i such a manner that nothing can fall on top of it, as pressure will damage or break the product. Prevent insertion of objects into the ventilation slots, or openings in the cabinet at all time. Connecting the power cord Connect the power cord to the player by connecting the small flat end of the cable to the power connection on the rear of the player. Connect the wide flat end of the cable to the power outlet.
The power outlet must be easily accessible, so that the power cord can be easily disconnected from the outlet when there is a problem with the device.
Basic operation Playing a music disc
1. Pess Mode to hoose CD ode
2. Open CD compartment cover, place a disc in and close it.
Once disc is loaded, and play automatically. Other operation
Do this Pause Press once. To return to playback, press this button again Stop Press once Select previous/next folder (only available in MP3 CD or USB) Pess Statio -/+ oe Next/Fast forward /Press and hold Previous/Fast backward /Press and hold Repeat play(Repeat mode appear every 10 secs on display when enabled) Pess Repeat/Shuffle utto to selet etee Noal play/Repeat One/Repeat All/Shuffle Note: Resume play is cancelled when (1) you open the CD compartment or (2) you turn off the power Listening music on a USB device You can listen to audio files stored on a USB device (a digital music player or USB storage media). Audio files in MP3 and WMA can be played on this unit.
- (The ooad us pot is ot desiged fo hagig. Please dot oet a sat deie fo hagig
1. Connect the USB device to the USB port
2. Pess Mode to hoose USB ode
3. Once USB is loaded, it will play automatically.7
Program Play In CD/USB Stop mode, press and hold P1/Prog, to ete poga pla eu. Use and to select track number, or press Station (-)/(+) to select folder, and then pess ete to ofi. Press to confirm and store the whole program list, then it will start to play automatically.
Track Track Program Program Folder Folder Track Track Audio CD Audio CD
AUX IN Use the AUX IN oetio to oet eteal audio soues. Pess ode utto to hoose Auilia Iput, the connect external device via AUX IN socket at the back, then you could play the audio file on the external device. Listening to DAB radio
1. Extend the antenna.
2. Pess Mode to hoose DAB ode. (If this is your first time to use, it will scan station automatically.)
3. Pess Statio utto to hoose aailale DAB statios, pess Ete to change station.
Listening to FM radio
Connecting to Bluetooth device
When connected successfully, it has a ring sound and the displa shos BT-CONNECTED
3. Play your songs from the device.
Note: Bluetooth connectivity performance may vary with brand and model of the connected device. It was always suggested using latest firmware for the device may get the best connection performance. Compatibility with all devices and media types is not guaranteed. The presence of other functioning Bluetooth devices during connection may lead to operational difficulties. The Bluetooth transmitter and receiver hardware in this unit has an approximate operational range of 30 feet in open space.8 Generally Bluetooth devices can communicate with each other clearly within a regular sized room or office. Operation between different rooms will depends on the construction of the room. It is important to recognize the fact that Bluetooth communication range may be substantially reduced if the signal passes through a solid object. Human bodies, brick and concrete walls, and heavy furniture or bookcases will reduce the operational range of your Bluetooth device. Glass, dry-wall or wood paneled walls and office partitions may have a less severe but noticeable effect. You should position your Bluetooth devices closer to each other if you observe communication difficulties. Disconnecting Bluetooth To disoet Bluetooth deie, pess ad hold Pla/pause util a ig soud, the displa ill sho a likig BT-LINK. Other Operations Store Stations
1. Select the station you wish to presets.
select which preset number you like.
1. Pess P1/P2/P3 utto oe, to direct recall the station stored
Volume control You could press volume (-) or (+) to adjust the speaker loudness. Using the Info control It is possible to change the information that is displayed on the LCD at each mode. To hage the ifoatio displa, pess Ifo/eu utto oe. Audio CD/AUX mode Information cycling through: Time and date. MP3 CD/USB mode Information cycling through: Time, date, album, artist and title. DAB mode Information cycling through: DLS, signal strength, programme type (PTY), channel name, channel number/frequency, signal error rate, bit rate, time and date.9 FM mode Information cycling through: Radio text, programme type (PTY), frequency, Mono/Stereo, time and date. Bluetooth mode Information cycling through: Time and date. Using the Menu control It let you to configure some system option or this product. To change the menu setting, under DAB or FM mode, press and hold Ifo/eu utto util eteed to eu ode, use Statio-/+ ad Ete to hoose and confirm your selection correspondingly. *Full scan - it will scan available DAB stations. *Manual tune - manually select a particular channel/frequency for DAB station. *DRC - This function reduces the difference between the loudest and quietest audio being broadcast. DRC options: off (default)/high/low Note: DRC only works if it is enabled by the broadcaster for a specific station. *Prune - This eoes all ialid statios idiated i the statio list ith a ? i fot of the statio ae. ^Scan setting - select the method of scans and stop at FM mode. Scan options: Strong stations (default)/All stations ^Audio setting - By default, all stereo stations are reproduced in stereo. Audio options: Stereo allowed (default)/Forced mono) Remarks: * DAB mode only, ^ FM mode only Using the System menu You can set different functions in System menu. Under DAB or FM mode, pess ad hold Ifo/eu ad selet Sste, the pess Ete to logi to. Use Statio -/+ ad Ete to hoose ad ofi ou seletio oespodigl. Time - can set your time and date format.. Set Time/Date Auto update - You can choose the update method of time and date. Update options: Update from Any (default) Update from DAB Update from FM No update Set 12/24 hour - You can change the time format on the display. Time format options: Set 24 hour (default) Set 12 hour10 Set date format - You can change the date format on the display. Date format options: DD-MM-YYYY (default) MM-DD-YYYY Language - There have 4 languages option. Language options: English/German/French/Italian Factory Reset - A factory reset clears all user defined settings, replacing them with the original default values, so time/date, preferences/settings, DAB station list and preset stations are all lost. SW version - It shows the software version of the player. Trouble Shooting Problem: Solutions: The device does not turn on Make sure the AC power cord is connected to the correctly. The CD player does not play even when a CD is in place Place the CD with label side up. Clean the CD. FM Hiss/DAB Burbling/intermittent cut-out/DAB No stations available message Check/move antenna. Move radio. Rescan local (high-strength) stations only.
Error messages Error messages Meaning Service not available No DAB reception. Signal error The DAB signal has been interrupted. No DAB Station The listed station cannot be found. (No Name): The current station does not broadcast an identity name. No statios foud No DAB stations are available, check aerial. No Radio Tet No RDS text information is available on this station. No PTY No RDS programme type information is available. No Nae No RDS station name is being broadcast.11 Specifications Description: CD/MP3/DAB/FM Bluetooth Digital Radio Speaker: 2 x 3W rms Frequency Ranges: FM: 87.5-108MHz; DAB/DAB+: 174.928-239.200 MHz; Bluetooth: 2.4GHz LCD Display: 16-Characters x 2 lines display Power Requirements: 110-240V AC, 50/60Hz (AC power supply) (please use our provided power cord) Approx. Dimensions: 335mm x 210mm x 125mm USB: USB2.0 Full Speed This product operates at 2400 - 2483.5 MHz and is designated only to be used inside a normal household environment. This product is suited for this purpose within all EU counties. Guarantee Lenco offers service and warranty in accordance with the European law, which means that in case of repairs (both during and after the warranty period) you should contact your local dealer. Important note: It is not possible to send products that need repairs to Lenco directly. Important note: If this unit is opened or accessed by a non-official service center in any way, the warranty expires. This device is not suitable for professional use. In case of professional use, all warranty obligations of the manufacturer will be voided. Disclaimer Updates to Firmware and/or hardware components are made regularly. Therefore some of the instruction, specifications and pictures in this documentation may differ slightly from your particular situation. All items described in this guide for illustration purposes only and may not apply to particular situation. No legal right or entitlements may be obtained from the description made in this manual. Disposal of the Old Device
This symbol indicates that the relevant electrical product or battery should not be disposed of as general household waste in Europe. To ensure the correct waste treatment of the product and battery, please dispose them in accordance to any applicable local laws of requirement for disposal of electrical equipment or batteries. In so doing, you will help to conserve natural resources and improve standards of environmental protection in treatment and disposal of electrical waste (Waste Electrical and Electronic Equipment Directive). Service For more information and helpdesk support, please visit www.lenco.com Lenco Benelux BV, Thermiekstraat 1a, 6361 HB Nuth, The Netherlands.12 Nederlands DAR-040
Track Track Program Programmering Folder Folder Track Track Audio CD Audio-cd