2961 - Warming drawers and cabinets NOVY - Free user manual and instructions
Find the device manual for free 2961 NOVY in PDF.


| Product type | Heated drawer and warming cabinet |
| Brand | Novy |
| Model | 2961 |
| Capacity | Service for 6 people (6 plates of 24 cm, bowls, dishes) or 80 coffee cups |
| Maximum load | 25 kg |
| Temperature range | 30 °C to 80 °C |
| Timer | 0 to 4 hours (normal operation); delayed start up to 9h50 |
| Power supply | Single-phase, 230 V / 50 Hz (standard estimate) |
| Power | Not specified (estimated 800-1500 W) |
| Dimensions (W x H x D) | Not specified (adaptable to standard built-in) |
| Weight | Not specified (estimated 15-25 kg) |
| Opening | Push-push mechanism |
| Interior coating | Non-slip (removable for cleaning) |
| Display | Digital with indicator lights (temperature, timer, delayed start) |
| Functions | Forced air heating, timer, delayed start, automatic shut-off |
| Safety | Child lock (not explicitly specified, but instructions for children), hot surfaces indicated, emergency stop by holding "-" button |
| Care and cleaning | Clean with a damp cloth and mild dish soap; do not use steam cleaner |
| Installation | Built-in, requires a fixed shelf; accessible socket after installation |
| Compatibility | Can be combined with other Novy appliances according to instructions |
| Repairability | Repairs exclusively by authorized technician; warranty void if unauthorized intervention |
| Environmental protection | Recyclable packaging; appliance to be disposed according to WEEE directive |
Frequently Asked Questions - 2961 NOVY
User questions about 2961 NOVY
0 question about this device. Answer the ones you know or ask your own.
Ask a new question about this device
Download the instructions for your Warming drawers and cabinets in PDF format for free! Find your manual 2961 - NOVY and take your electronic device back in hand. On this page are published all the documents necessary for the use of your device. 2961 by NOVY.
USER MANUAL 2961 NOVY
EN Operating and installation instructions p. 38
Safety Instructions 40
Precautions during use 41
Appliance Description 42
Main Components 42
How the warming drawer works. 42
Use 43
Before using for the first time 43
Control Panel 43
Operating settings 44
Heating times 44
Load capacity 45
Cleaning and Maintenance 46
Appliance front and control panel 46
Interior of the warming drawer 46
Mat with non-slip surface 46
What should I do if the warming drawer doesn't work? 47
Environmental protection 48
Installation instructions 49
Before installation 49
Installation 49
Electrical Connection 49
Installation 74
Combination possibilities 74
Dear Costumer:
Thank you for choosing this NOVY product.
We ask you to read the instructions in this booklet very carefully as this will allow you to get the best results from using it.
KEEP THE DOCUMENTATION OF THIS PRODUCT FOR FUTURE REFERENCE.
Always keep the instruction manual handy. If you lend the appliance to someone else give them the manual as well!
The user manual is also available for download at www.novy.be
Safety Information
Carefully read the instructions before installing and using the equipment. The manufacturer is not liable for improper installation and use of the equipment that may cause injuries and damage. Always keep the instructions at hand, so they can be easily referred to during use.
Safety of children and vulnerable adults
WARNING!
Risk of choking, injury or permanent disability.
- This appliance can be used by children aged 8 years and above and persons with reduced physical, sensory or mental capabilities or lack of experience and knowledge if they are given supervision or instructions concerning how to use the appliance in a safe way and understand the hazards involved.
Children should not play with the appliance. - Keep packaging materials away from children.
- Keep children away from the appliance during operation or when cooling.
- Cleaning and maintenance should not be done by children without supervision.
Warnings on general safety
- During installation, follow the instructions supplied separately
- Only qualified personnel can install the appliance and replace the cable.
- WARNING: The appliance and its accessible parts become hot during use. Care should be taken to avoid touching heating elements. Children less than 8 years of age shall be kept away unless continuously supervised.
- During use the appliance becomes hot. Care should be taken to avoid touching heating elements inside the oven.
- WARNING: Accessible parts may become hot during use. Young children should be kept away.
- Do not use harsh abrasive cleaners or sharp metal scrapers to clean the oven door glass since they can scratch the surface, which may result in shattering of the glass.
- Do not use steam cleaners to clean the appliance.
- Do not use abrasive detergents or metal scrapers to clean the appliance.
- The electric connection is made via an omnipolar switch, which is suitable for the intensity to be tolerated and which has a minimum gap of 3mm between its contacts, which will ensure disconnection in case of emergency or when cleaning the crockery warmer. If a plug is used for the electric connection, then it must be accessible after installation.
- The connection should include correct earthing, in compliance with current norms.
Disconnect the appliance from the power supply before carrying out any maintenance operation.
Safety Instructions

WARNING!
Before connecting the appliance compare the power data (voltage and frequency) indicated on the characteristics plate with those of the power supply in question. If these data do not match there may be problems. In case of doubt, contact an electrician.
WARNING!
If the electrical wire plug is removed, the appliance must be installed and connected by a technician. Contact a qualified electrician who knows and respects current safety standards. The manufacturer cannot be held responsible for damage resulting from fitting or connecting errors.
WARNING!
The electrical safety of the appliance can only be guaranteed if it is earthed. The manufacturer cannot be held responsible for damage resulting from the absence of or defects in the installation's protection system (e.g. electrical shock).
WARNING!
Only use the appliance once it has been fitted into its built-in position. Only in this manner can it be guaranteed that users cannot access the electrical components.
WARNING!
Never open up the appliance's frame. Possible contacts with electrical conducting parts or changes to electrical or mechanical components may represent a danger to users' safety and prejudice the correct working of the appliance.
WARNING!
Repairs and maintenance, especially of parts carrying electrical current, must only be done by technicians authorised by the manufacturer. The manufacturer and retailers do not accept responsibility for any damaged caused to people, animals or property as a result of repairs and maintenance carried out by nonauthorised personnel.
WARNING!
Repairs undertaken during the guarantee period must only be done by technicians authorised by the manufacturer. If this is not the case then any damage resulting from the repair in question is excluded from the guarantee
WARNING!
The appliance must be disconnected from the electrical current when installation and repair work is being done. To disconnect the appliance from the current, one of the following conditions must apply:
- The switchboard fuses / circuit breakers must be disconnected.
- The plug should be removed from the socket. To remove the plug from the socket do not pull on the electric cable but rather pull out the plug itself directly.
Precautions during use
This appliance complies with current safety standards. Improper use of the appliance may put the user at risk.
Read the operating instructions carefully before using the appliance for the first time. In this way you will avoid the risk of injuring yourself or damaging the appliance.
Depending on the temperature selected and the operating time, the temperature inside the appliance may reach 80°C . To take crockery out of the crockery warmer protect your hands by using oven gloves or an oven cloth.
Do not sit or hang on the drawer. The telescopic runners will be damaged. The maximum load capacity of the drawer is 25kg
Do not store synthetic containers or easily inflammable objects inside the crockery warmer. When you switch on the appliance such containers and objects may melt or catch fire. Fire danger!
Do not use the appliance to heat up the air temperature in the kitchen. The high temperatures reached may cause easily inflammable objects close to the appliance to catch fire.
Do not use high pressure or steam jet cleaning devices. The steam may affect electrical components and cause a short circuit. The steam pressure may also cause damage to the appliance's surface and components in the long term.
When you stop using the appliance at the end of its working life, disconnect it from the power supply and render the electrical cable unusable so that the appliance is not a danger if, for example, children use it for playing.
EN
Appliance Description
Main Components
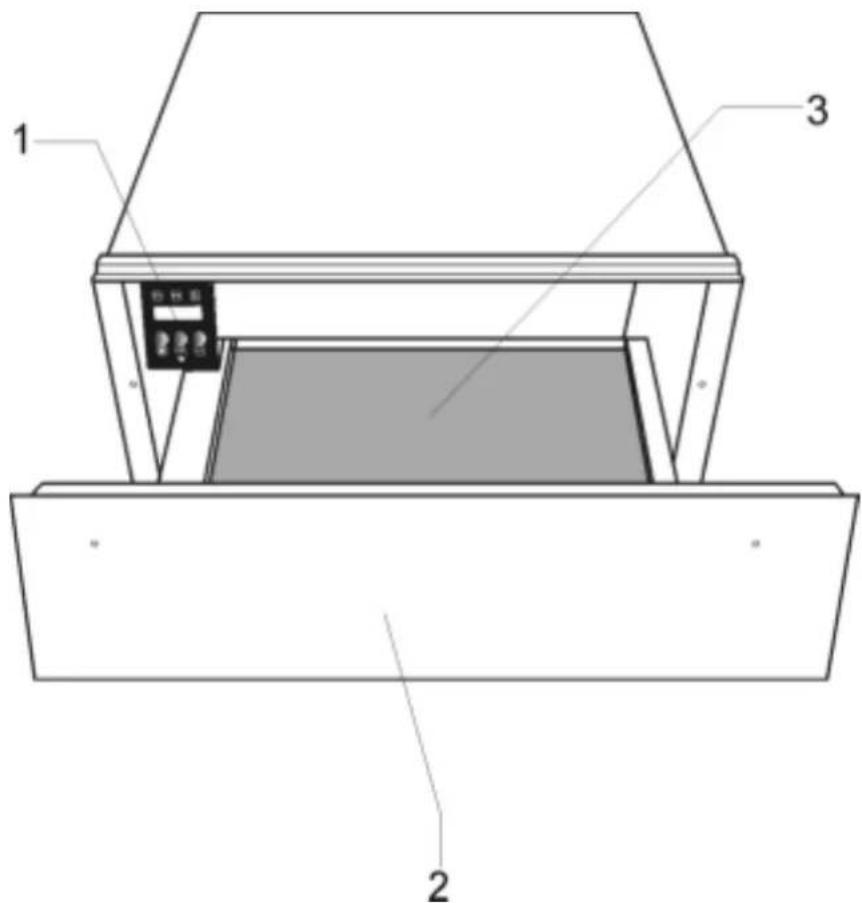
-
- Control panel
-
- Anti-slip mat
-
- "Push-push" tray
How the warming drawer works
This appliance is equipped with a warm air circulation system. A fan distributes the heat generated by an electrical heating element throughout the interior of the appliance.
The thermostat allows the user to define and control the temperature wanted for the crockery.
The circulating hot air that is generated heats up the crockery quickly and evenly.
A metal grille protects both the heating element and the fan.
The base of the drawer is fitted with a non-slip mat to prevent plates and dishes sliding around when the drawer is opened and closed.
Use
Before using for the first time
Before using the appliance for the first time you should clean the interior and the exterior, following the cleaning instructions given in the section "Cleaning and Maintenance".
Then heat the warming drawer for at least 2 hours. For this, set the temperature to the maximum position.
Make sure the kitchen is well-ventilated when you are doing this.
The appliance's parts are protected by a special product. For this reason, during the first heating an odour will be released. Both the odour and any smoke that may form will disappear after a short time and neither signifies that there is anything wrong with the connection or the appliance.
Control Panel
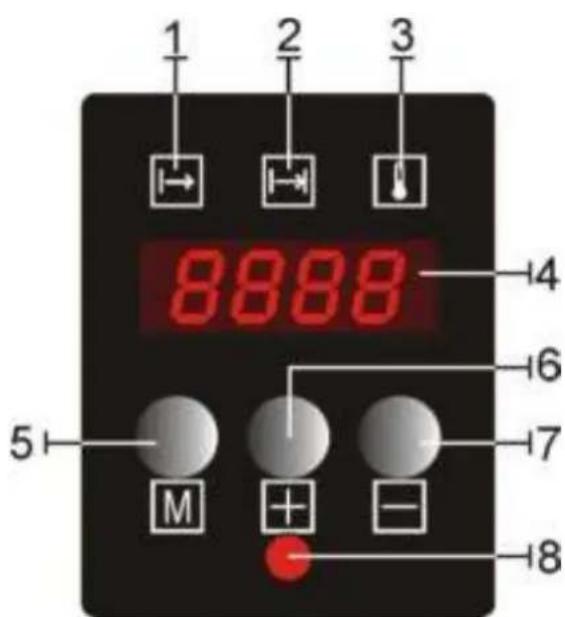
- Delayed Start indicator light
- Timer indicator light
- Temperature indicator light
- Display
- Function / ON key
- “+” (increase) key
- "-(decrease) / OFF key
- Operation indicator light
Use
Operating settings
Stand-by mode
In this mode the whole system is disconnected and no indicator light or display is lit.
Normal Operation
In this mode the system is generating heat. The display shows the remaining operating time and the set temperature alternating each 2 seconds. The Timer and Temperature indicator lights light-up alternating each 2 seconds and coordinated with the display indication. The Operation indicator light is illuminated continuously until the Timer reaches zero.
To program the normal operation, proceed as follows:
- Press the "M" key once or several times until the Timer indicator light is flashing.
- Press the "+" or "-" keys to set the desired operation time in the range 0h00 - 4h00.
- Press the "M" key to validate. The Temperature indicator light starts to flash.
- Press the "+" or "-" keys to set the desired temperature in the range 30 - 80°C .
- When the desired temperature starts to blink, press the "M" key for 3 seconds or wait 5 seconds.
- The Warming Printer starts to operate with the set parameters.
Delayed Start
In this mode the Display shows the remaining time for the operation to start and counting-down. The Operation indicator light will blink and the Delayed Start indicator is illuminated.
To set a delayed start, proceed as follows:
- Program the normal operation parameters as in points 1) to 4) of the previous section.
- Press the "M" key to validate. The Delayed Start indicator light starts to flash.
- Press the "+" or "-" keys to set the desired start delay in the range 0h00 - 9h50.
- When the desired start delay starts to blink, press the "M" key for 3 seconds or wait 5 seconds.
-
The Warming Printer enters the Delayed Start mode.
-
When the delay has elapsed the Warming.
Drawer starts to operate with the set
parameters.
Cancel Operation
The programming can be cancelled at any time by pressing the " - " key for 3 seconds.
The operation or the delayed start can be cancelled (for example, because a guest arrived earlier or the crockery seems warm enough) by pressing the " - " key for 3 seconds.
Heating times
Various factors affect heating times:
Material and thickness of the crockery
Load quantity
How the crockery is arranged
Temperature setting
It is therefore not possible to give any precise heating times.
However, as a guide, the following times are given for the thermostat setting of 60°C and for uniform heating of the crockery:
| Load | Time (min) |
| Crockery for 6 people | 30 – 35 |
As you use the warming drawer more and more you will learn the best settings for your crockery.
Load capacity
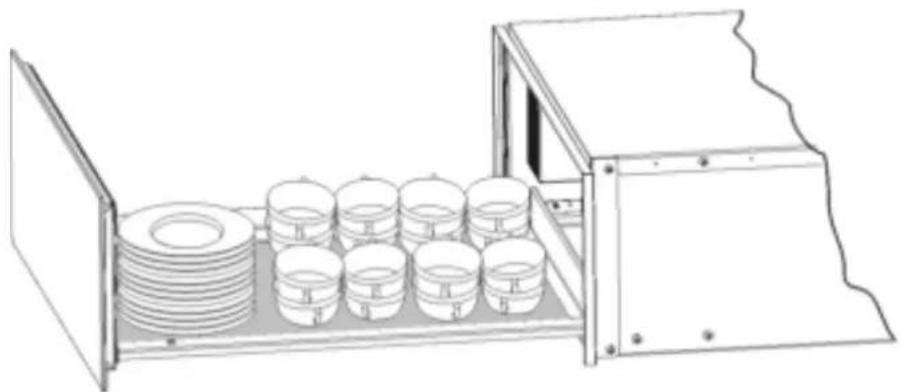
Load capacity depends on the size of the crockery items.
2961
6 persons servings
6 × 24 cm Dinner Plates
6 x 10cm Soup Bowls
1 x 19cm Serving Dish
1 x 17cm Serving Dish
1 x 32cm Meat Plates
or
20 dishes with 28cm
or
80 espresso coffee cups
or
40 tea cups
Or
···
Cleaning and Maintenance
Cleaning is the only maintenance action that is required normally.
Warning! Cleaning must be done with the warming drawer disconnected from the electrical power supply. Remove the plug from the power socket or disconnect the warming drawer power supply circuit.
Do not use aggressive or abrasive cleaning products, abrasive sponges or pointed objects since stains or abrasion marks may appear.
Do not use high pressure or steam jet cleaning appliances.
Appliance front and control panel
The warming drawer can be cleaned using just a damp cloth. If it is very dirty, add a few drops of washing-up liquid to the washing water.
Wipe the surfaces dry using a dry cloth.
For stainless steel fronted warming drawers, special products for treatment of stainless steel surfaces can be used. These products prevent the surfaces becoming dirty again for some time. Apply a thin layer of such a product on the surface using a soft cloth.
On aluminium fronted warming drawers use a gentle glass cleaning product and a soft cloth that does not release fluff. Wipe horizontally without pressing on the surface since aluminium is sensitive to scratches and cuts.
Interior of the warming drawer
Clean the inside of the warming drawer regularly using a damp cloth. If it is very dirty add a few drops of washing-up liquid to the washing water.
Wipe the surfaces dry using a dry cloth.
Avoid water entering through the air circulation opening.
Only use the warming drawer again when it is completely dry.
Mat with non-slip surface
The non-slip surface mat can be removed to facilitate cleaning of the drawer.
The mat can be cleaned by hand using hot water with a few drops of washing-up liquid.
Dry thoroughly.
The non-slip mat should only be replaced when it is completely dry.
What should I do if the warming drawer doesn't work?
WARNING! Any type of repair must only be done by a specialised technician. Any repair done by a person not authorised by the manufacturer is dangerous.
Before contacting Technical Assistance, check on the following:
The crockery doesn't heat up enough.
Check whether:
- The appliance has been switched on.
- The appropriate temperature has been selected.
- The air circulation orifices are covered by the crockery.
- The crockery was left to heat up for sufficient time.
Heating time depends on several factors, such as, for example:
- Crockery material type and thickness.
Quantity of crockery. - How the crockery is arranged.
The crockery doesn't heat up at all. Check whether:
- You can hear the noise of a fan.
If the fan is operating then the heating element is broken; if the fan is not operating then the fan is broken. - The switchboard fuses / circuit breakers have fused / tripped out.
The crockery is heating up too much.
- The temperature selector is broken.
The on/off switch does not light up.
- The switch's pilot light has blown.
Environmental protection
Disposal of the packaging

The packaging bears the Green Point mark.
Dispose of all the packaging materials such as cardboard, expanded polystyrene and plastic wrapping in the appropriate bins. In this way you can be sure that the packaging materials will be re-used.
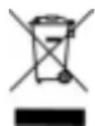
Disposal of equipment no longer used
According to European Directive 2002/96/EC on the management of waste electrical and electronic equipment (WEEE), home electrical appliances
should not be put into the normal systems for disposal of solid urban waste.
Outdated appliances should be collected separately to optimise component material recovery and re-cycling rates and to prevent potential harm to human health and the environment. The symbol of a rubbish container superimposed by a diagonal cross should be put on all such products to remind people of their obligation to have such items collected separately.
Consumers should contact their local authorities or point of sale and request information on the appropriate places to leave their old home electrical appliances.
Before disposing of your appliance, render it non-usable by pulling out the power cable, cutting this and disposing of it
Installation instructions
Before installation
Check that the input voltage indicated on the characteristics plate is the same as the voltage of the power outlet you are going to use.
Open the drawer and take out all the accessories and remove the packing material.
Attention! The front surface of the warming drawer may be wrapped in a protective film. Before using the warming drawer for the first time, remove this film carefully.
Make sure that the warming drawer is not damaged in any way. Check that the drawer opens and closes correctly. If you find any damage, contact the Technical Assistance Service.
Attention: the power socket should be easily accessible after the warming drawer has been installed.
The warming drawer should only be built-in in combination with those appliances indicated by the manufacturer. If it is fitted in combination with other appliances, the guarantee is no longer valid since it is impossible to guarantee that the warming drawer will work correctly.
Installation
To build-in the warming drawer in combination with another appliance there must be a fixed, interim shelf in the housing unit to support the weight of both appliances.
The appliance to be combined with the warming drawer will be placed directly on the latter without any need to have a separating shelf.
To build-in the appliance which is combined with the warming drawer, follow the instructions set out in the respective instructions and fitting booklet.
The relevant installation dimensions are indicated in mm in the diagrams shown at the end of this booklet. Proceed as follows:
- Place the warming drawer on the shelf and slide it towards the interior of the niche in such a way that it is centred and completely lined up with the front of the unit.
-
Check that the warming drawer's frame is properly levelled and is sitting evenly on the shelf.
-
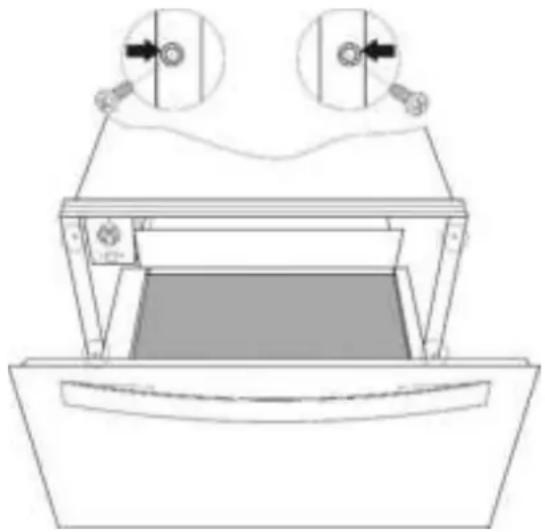
Open the drawer and fix the warming drawer to the sides of the unit using the two screws provided.
Electrical Connection
The warming drawer is equipped with a power cable and plug for single phase current. We advise that the plug is connected to a socket that is easily accessible after installation.
If the warming drawer is to be installed on a permanent basis it should be installed by a qualified technician. In such a case, the appliance should be connected to a circuit with an all-pole circuit breaker with a minimum separation of 3 mm between contacts.
The data necessary for the electrical connection are described on the warming drawer's characteristics plate and these must be compatible with those of the power outlet you are going to use.
WARNING: THE WARMING DRAWER MUST BE CONNECTED TO EARTH.
The manufacturer and retailers do not accept responsibility for any damage that may be caused to people, animals or property if these installation instructions are not observed.
Índice
Combination possibilities /
France: Tel: 0320.940662


- DEAR COSTUMER
- SAFETY INFORMATION
- SAFETY OF CHILDREN AND VULNERABLE ADULTS
- WARNING
- WARNINGS ON GENERAL SAFETY
- SAFETY INSTRUCTIONS
- PRECAUTIONS DURING USE
- EN
- APPLIANCE DESCRIPTION
- MAIN COMPONENTS
- HOW THE WARMING DRAWER WORKS
- USE
- BEFORE USING FOR THE FIRST TIME
- CONTROL PANEL
- OPERATING SETTINGS
- STAND-BY MODE
- NORMAL OPERATION
- DELAYED START
- CANCEL OPERATION
- HEATING TIMES
- LOAD CAPACITY
- 2961
- OR
- CLEANING AND MAINTENANCE
- APPLIANCE FRONT AND CONTROL PANEL
- INTERIOR OF THE WARMING DRAWER
- MAT WITH NON-SLIP SURFACE
- WHAT SHOULD I DO IF THE WARMING DRAWER DOESN'T WORK
- ENVIRONMENTAL PROTECTION
- DISPOSAL OF THE PACKAGING
- DISPOSAL OF EQUIPMENT NO LONGER USED
- INSTALLATION INSTRUCTIONS
- BEFORE INSTALLATION
- INSTALLATION
- ELECTRICAL CONNECTION
- WARNING: THE WARMING DRAWER MUST BE CONNECTED TO EARTH
- ÍNDICE
Brand : NOVY
Model : 2961
Category : Warming drawers and cabinets