
Caldo Crystal - Heating OLIMPIA SPLENDID - Free user manual and instructions
Find the device manual for free Caldo Crystal OLIMPIA SPLENDID in PDF.

| Product type | Wall-mounted fan heater |
| Brand | Olimpia Splendid |
| Model | Caldo Crystal |
| Rated heat output | 2,0 kW |
| Minimum heat output | 1,2 kW |
| Power supply | 220-240 V ~ 50 Hz |
| Insulation class | Class II |
| Control type | Electronic with thermostat and weekly timer |
| Main functions | Turbo heating, min/max power, fan-only mode, ionizer, open window detection, weekly programming |
| Remote control | Infrared, range 8 m, AAA 2x1,5 V batteries included |
| Display | Digital screen on unit and remote |
| Installation | Wall-mounted, minimum height 2 m from floor, distance 35 cm from ceiling |
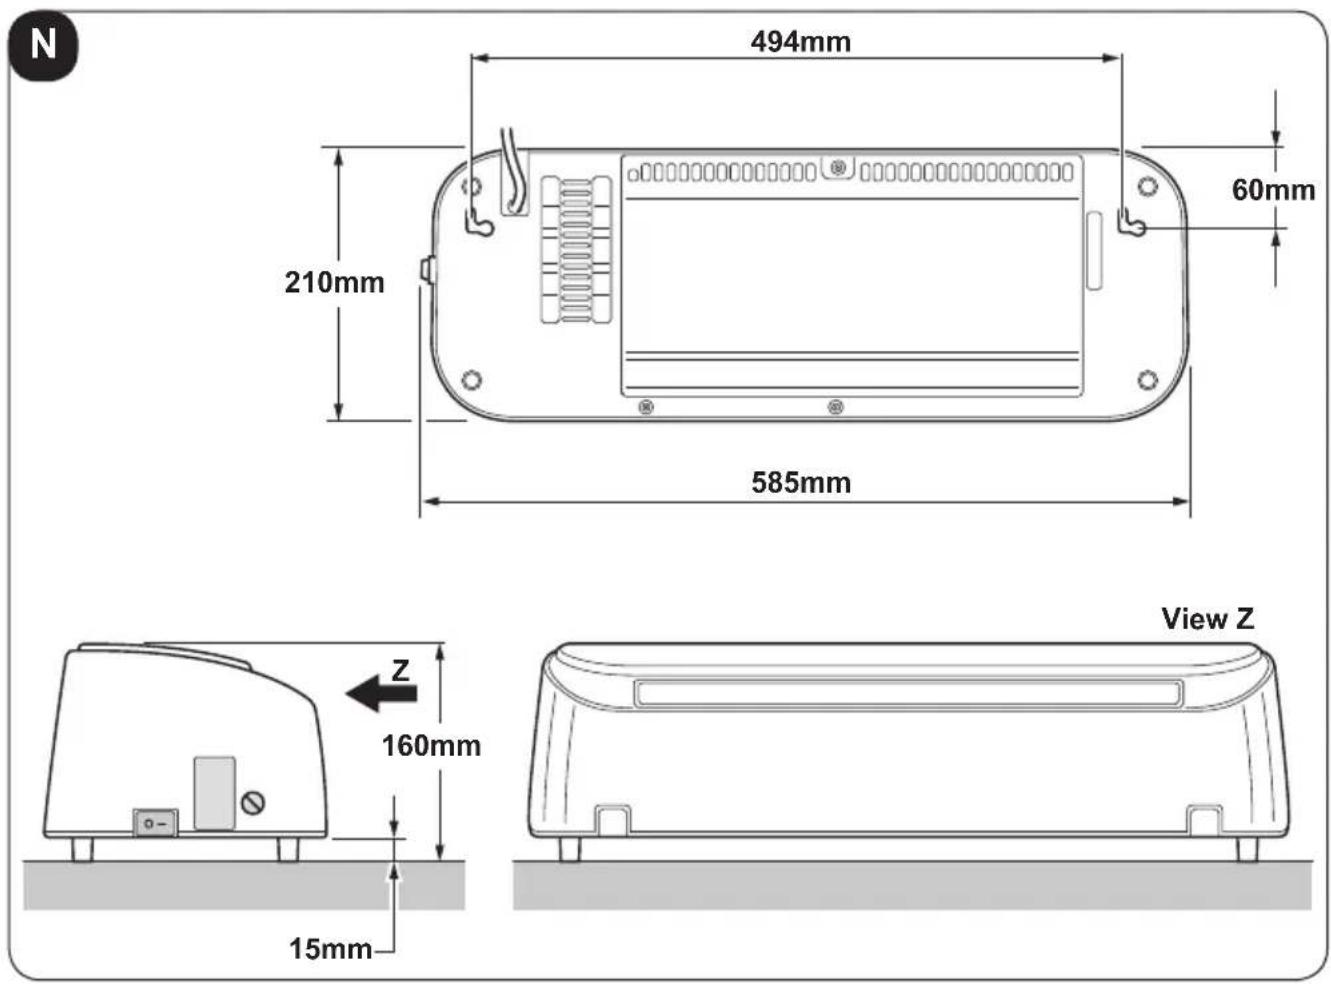
| Dimensions (approx.) | Height 60 cm, Width 50 cm, Depth 20 cm |
| Weight (approx.) | 5 kg |
| Safety | Overheat protection, automatic shut-off, hot surface warning |
| Maintenance and cleaning | Dry or damp cloth (soapy water), vacuum for grilles |
| Included accessories | Remote control, batteries, wall plugs and screws, manual |
| Intended use | Domestic supplementary heating, indoor only |
| Warranty | Standard manufacturer's warranty, subject to compliance with instructions |
Frequently Asked Questions - Caldo Crystal OLIMPIA SPLENDID
User questions about Caldo Crystal OLIMPIA SPLENDID
0 question about this device. Answer the ones you know or ask your own.
Ask a new question about this device
Download the instructions for your Heating in PDF format for free! Find your manual Caldo Crystal - OLIMPIA SPLENDID and take your electronic device back in hand. On this page are published all the documents necessary for the use of your device. Caldo Crystal by OLIMPIA SPLENDID.
USER MANUAL Caldo Crystal OLIMPIA SPLENDID
INSTRUCTIONS FOR INSTALLATION, USE AND MAINTENANCE EN THIS PRODUCT IS ONLY SUITABLE FOR WELL INSULATED SPACES OR OCCASIONAL USE
INSTRUCTIONS POUR L'INSTALLATION, L'EMPLOI ET L'ENTRETIEN FR CE PRODUIT NE PUET ÊTRE UTILISÉ QUE DANS DES LOCAUX BIEN ISOLÉS OU DE MANIÈRE OCCASIONELLE
natural_image
Line drawing of a portable air conditioner unit connected to an electrical outlet (no text or symbols)Fig. C Abb.

ILLUSTRAZIONI

Tasto flap
natural_image
Simple line drawing of four moon icons: sun, crescent moon, and star (no text or symbols)natural_image
Illustration of a hand using a power plug to switch an electrical outlet (no text or symbols present)Illustrations are grouped in the second and penultimate pages of the manual.
MAIN INDEX
The main index of this manual is given on page "EN-4"

1 - GENERAL INFORMATION
We wish to thank you, first of all, for purchasing an appliance produced by our company.
This document is restricted in use to the terms of the law and may not be copied or transferred to third parties without the express authorization of the manufacturer. Our machines are subject to change and some parts may appear different from the ones shown here, without this affecting the text of the manual in any way.
Read this manual carefully before performing any operation (installation, maintenance, use) and follow the instructions contained in each chapter.
Keep the manual carefully for future reference.
After removing the packaging, check that the appliance is in perfect condition. The packaging materials must not be left within reach of children as they can be dangerous
THE MANUFACTURER IS NOT RESPONSIBLE FOR DAMAGES TO PERSONS OR PROPERTY CAUSED BY FAILURE TO FOLLOW THE INSTRUCTIONS IN THIS MANUAL.
The manufacturer reserves the right to make any changes it deems advisable to its models, although the essential features described in this manual remain the same.
During installation and maintenance, respect the precautions indicated in the manual, and on the labels applied inside the units, as well as all the precautions suggested by good sense and by the safety regulations in effect in your country.
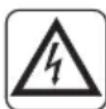
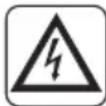
2 - SYMBOLS
The pictograms in the next chapter provide the necessary information for correct, safe use of the machine in a rapid, unmistakable way.
2.1 - Editorial pictograms

Service
Refers to situations in which you should inform the SERVICE department in the company:
CUSTOMER TECHNICAL SERVICE.
Index
Paragraphs marked with this symbol contain very important information and recommendations, particularly as regards safety.
Failure to comply with them may result in:
- danger of injury to the operators
- loss of the warranty
- refusal of liability by the manufacturer.

Raised hand
Refers to actions that absolutely must not be performed.
als to the personnel that the operation described could cause electrocution if not performed according to the safety rules.

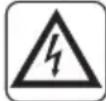
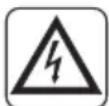
GENERIC DANGER
Forms the personnel concerned that if the operation is not carried out in compliance with the safety regulations, it presents the risk of suffering physical damage.
EN - 2
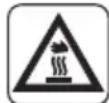
DANGER DUE TO HEAT
Forms the personnel concerned that if the operation is not carried out in compliance with the safety regulations, it presents the risk of burns due to contact with components at very high temperatures.
DO NOT COVER
ates to the personnel concerned, that it is prohibited to cover the appliance, to prevent over-heating.
ATTENTION
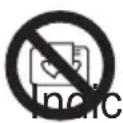
icates that this document must be read carefully before installing and/or using the appliance.
- Indicates that the assistance personnel must handle the appliance following the installation manual.
ATTENTION
icates that there may be additional information in attached manuals.

icates that information is available in the user manual or in the installation manual.
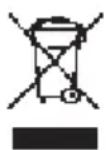
DISPOSAL
This symbol on the product or its packaging indicates that the appliance cannot be treated as normal domestic trash, but must be handed in at a collection point for recycling electric and electronic appliances.
Your contribution to the correct disposal of this product protects the environment and the health of your fellow men. Health and the environment are endangered by incorrect disposal.
Further information about the recycling of this product can be obtained from your local town hall, your refuse collection service, or in the store at which you bought the product.
This regulation is valid only in EU member states.
3 - INDEX
1 - GENERAL INFORMATION ....1
2 - SYMBOLS....2
3 - INDEX......4
4 - GENERAL WARNINGS ....4
5 - DESCRIPTION OF THE APPLIANCE....9
6 - APPLIANCE INSTALLATION ....10
7 - DESCRIPTION OF THE REMOTE CONTROL....12
8 - CONTROL BUTTONS AND DISPLAY ....14
9 - FUNCTIONING ....18
10 - CLEANING....22
11 - TECHNICAL DATA....23
4 - GENERAL WARNINGS
WHEN USING ELECTRICAL APPLIANCES, BASIC SAFETY PRECAUTIONS SHOULD ALWAYS BE FOLLOWED TO REDUCE THE RISK OF FIRE, ELECTRIC SHOCK, AND INJURY TO PERSONS, INCLUDING THE FOLLOWING:

This product should be used only in accordance with the specifications outlined in this manual. Usage other than what has been specified here may result in serious injury.
This document is restricted in use to the terms of the law and may not be copied or transferred to third parties without the express authorization of the manufacturer, OLIMPIA SPLENDID.
- CAUTION: This is an electrical appliance and requires attention when in use.
- CAUTION: To reduce the risk of severe burns, keep this product out of the reach of children and pets.
- CAUTION: Do not allow children to play with any product packaging such as plastic bag.
EN - 4
Disassembly, repair or remodelling by an unauthorized person may result in serious harm and will void the manufactures warranty.

Before connecting, make sure that the plate data corresponds with the mains electrical supply.
The plate (W) is located on the side of the appliance (figure A).

Install it according to the manufacturer's instructions An incorrect installation can cause damage to people, animals or property for which the manufacturer accepts no responsibility.
• Always and only use it in a horizontal position.
- Position it, so that the air flow, both inlet and outlet, is free of obstacles.
If the power cord is damaged, it must be replaced by the manufacturer, his technical service or a similarly qualified person in order to eliminate all possible risks.
Install it in such a way that the switches and other controls cannot be reached by persons using the bath or shower.
- Do not use extensions.
- Keep all objects at least 1.5 meter from the front, sides and rear of the appliance.
- Do not place appliance close to a radiant heat source.
- Do not operate in areas where gasoline, paint or other flammable liquids are used or stored.
- Do not use the appliance to dry clothes.
Do not insert or allow foreign objects to enter any ventilation or exhaust opening, as this may cause an electric shock, fire or damage to the appliance.

- This appliance is intended for household use only not for commercial or industrial use.
Use this appliance only as described in this manual. Any other use is not recommended by the manufacturer and may cause fire, electric shock or injury.

- The most common cause of overheating is deposits of dust or fluff in the appliance. Ensure these deposits are removed regularly by unplugging the appliance and vacuum cleaning air vents and grilles.

Do not use abrasive cleaning products on this appliance. In with a damp cloth (not wet) rinsed in hot soapy water only.
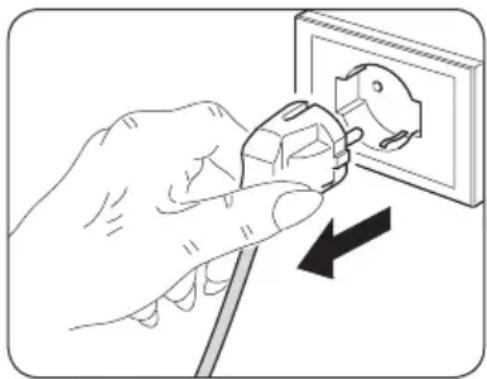
Always remove plug from the mains supply before cleaning.
- Do not connect the appliance to the mains voltage until completely assembled and adjusted.
This appliance heats up slightly when in use. To avoid burns, do not let bare skin touch hot surfaces.
- Do not remove plug from power socket until the appliance has been switched off.
- Do not allow cord to come in contact with heated surfaces during operation.
- Do not twist, kink or wrap the cord around the appliance, as this may cause the insulation to weaken and split.
- Do not use this appliance outdoors, or on wet surfaces. Avoid spilling liquid on the appliance.
- Do not use this heater with programmer, timer or any other device that switches the heater on automatically since a fire risk exists if the heater is covered or positioned incorrectly.
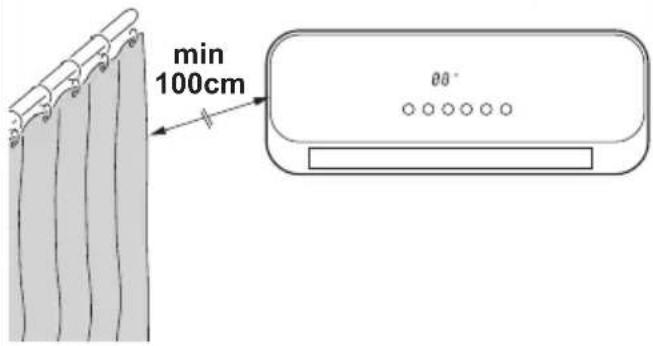
- Do not operate the heater near curtains, as the material could be sucked into the air vents.
- It is forbidden to dispose of or leave in the reach of children the packaging materials which could become a source of danger.
- The appliance may be used by children over 8 years of age and by persons with reduced physical, sensorial or mental capacities, or without the required experience or knowledge, provided they are supervised or have been instructed in the safe use of the appliance and understand the hazards involved.
• Children must not play with equipment.
- Children must not be allowed to clean the appliance or perform user maintenance without proper supervision.
- Do not use this heater in the immediate surroundings of a bath, a shower or a swimming pool.

WARNING: in order to avoid overheating, do not cover the heater.

- Make these instructions known to all the personnel involved in transport and installation of the appliance.
- THE MANUFACTURER IS NOT RESPONSIBLE FOR DAMAGES TO PERSONS OR PROPERTY CAUSED BY FAILURE TO FOLLOW THE INSTRUCTIONS IN THIS MANUAL.
- During installation and maintenance, respect the precautions indicated in the manual, and on the labels applied inside the units, as well as all the precautions suggested by good sense and by the safety regulations in effect in your country.
- In case of replacement of parts, use only original OLIMPIA SPLENDID parts.
If the appliance remains unused for a long period of time, or if no-body stays in the air-conditioned room, it is advised to disconnect power supply to avoid accidents.
Do not use liquid or corrosive detergents to clean the unit, do not spray water or other liquids onto the unit, since they could damage the plastic components or even cause electric shocks.

Do not wet the appliance and the remote control.
Short circuits or fires could occur.

In the event of operating anomalies (e.g. strange noise, bad odour, smoke, abnormal temperature rise, electric dispersions, etc.) disconnect the electric power supply immediately. Contact the local dealer.
Do not plug or unplug the power supply plug during operation. Fire and electric shocks risk.
Do not touch (operation) the product with wet hands.
Fire and electric shocks risk.

Do not block the air inlet or outlet; the product could be damaged.

Do not insert hands or other object through air inlet or outlet while the product is operated.
When there are gas leaks from other units, ventilate the room well before activating the air conditioner.
- After removing the packing, make sure that the appliance is complete, without visible damage that could have been caused during transport. In case of doubt, do not use the appliance and contact the authorised Technical Assistance centres.
4.1 - Proper use
- The appliance should be used for the exclusive purpose of producing hot air for the sole purpose of obtaining a comfortable temperature in the room.
- Improper use of the appliance causing damage to persons, property or animals relieve OLIMPIA SPLENDID of any liability.
- Control the appliance functions ONLY with the supplied remote controller.
- The appliance is equipped with a special function, activated by the user as required, which allows to detect the possible opening of a window and force the functioning in Anti frost mode to limit waste of energy.
4.2 - Unintended and potentially dangerous use
- The appliance MUST be installed as hereinafter described in this manual observing all the warnings described in the previous pages.
- DO NOT use gas, petrol or other inflammable liquids near the appliance.
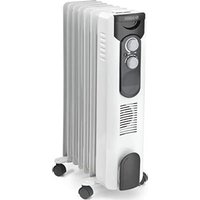
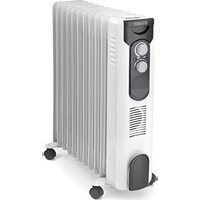
5 - DESCRIPTION OF THE APPLIANCE
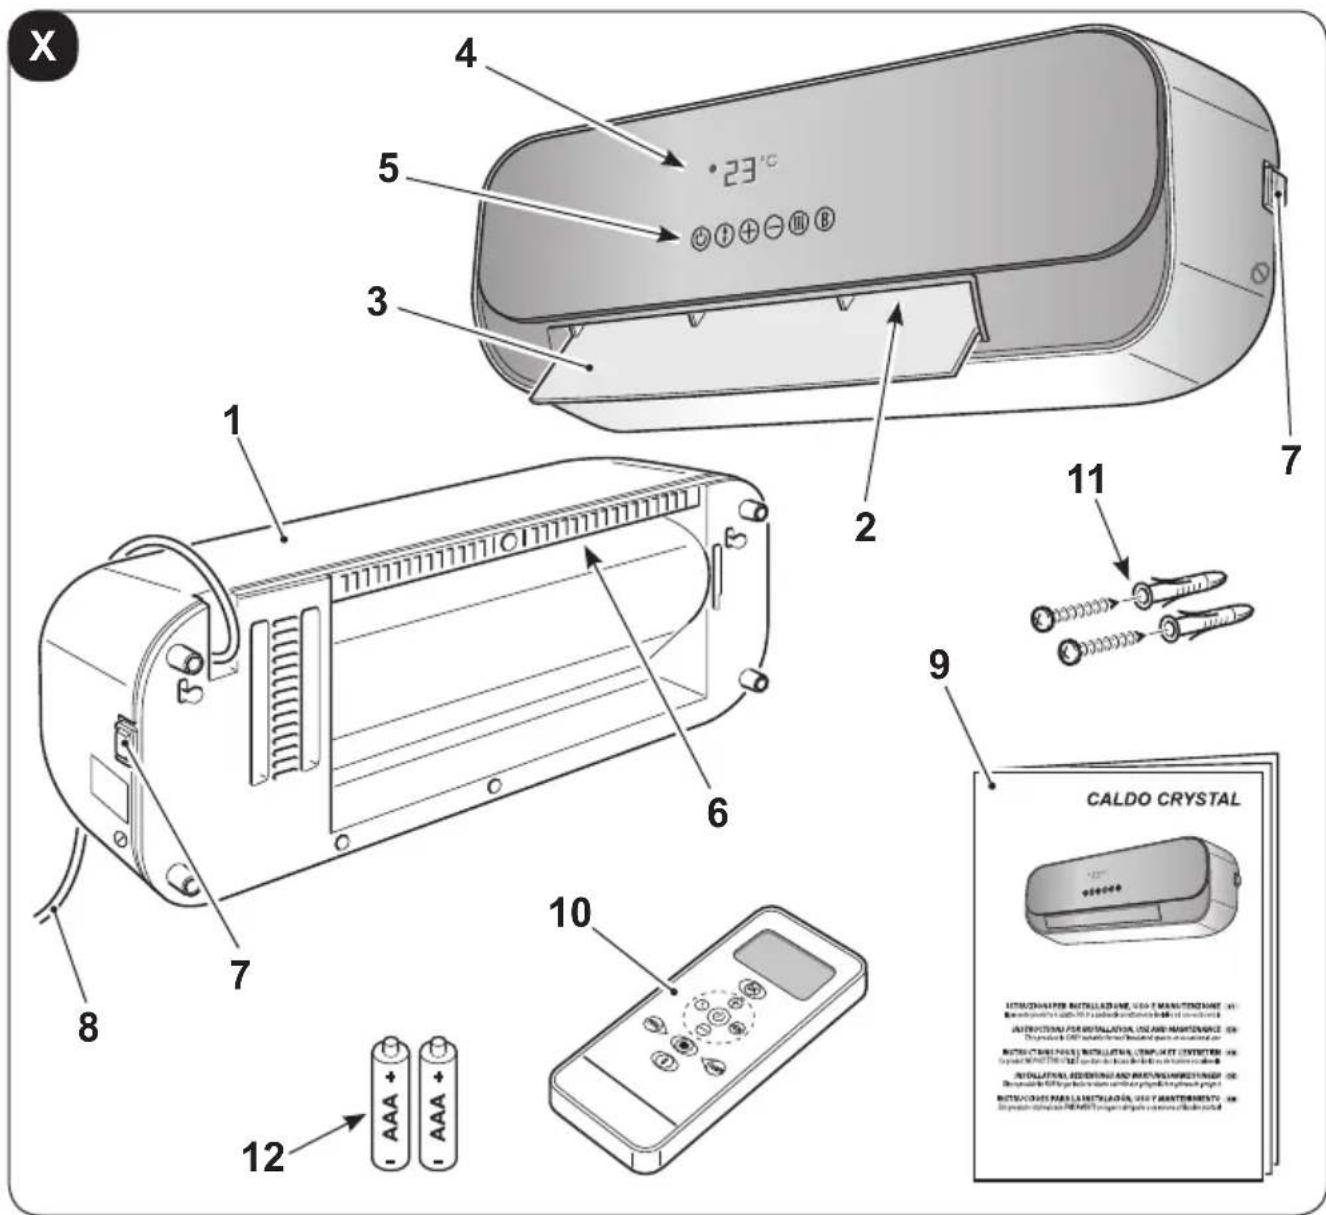
5.1 - Identification of the supplied main parts and components
The appliance is packed in a cardboard packaging.
- Appliance
- Air outlet grill
- Air outlet flap
- Display
- Functions buttons
- Air inlet grill
-
Switch 0/1 (ON/OFF)
-
Power cord
- Instruction booklet
- Remote control
- Wall plugs and screws for the appliance wall fixing (3)
- Remote control batteries (2x AAA 1,5V) (if present)
EN - 9
6 - APPLIANCE INSTALLATION
6.1 - Wall installation
After removing the packaging, make sure of the appliance integrity; in case of doubts, do not use it and please refer to professionally qualified personnel.
The appliance must be installed on a masonry or made of heat resistant material wall (not wooden or made of easily overheatable synthetic material).
For the correct installation, work as follows:
The appliance must be installed:
such a way as to prevent the ON/OFF switch and the buttons from being touched by who is standing in the bathtub or in the shower.
- At a distance of at least 300 mm from walls
- At a distance of at least 1000 mm from flammable materials (cur-tains, textiles etc.)

DO NOT install the appliance beneath power outlets.
are a power outlet in the vicinity of the appliance making sure it's not too far in relation to the power cord length (figure C).
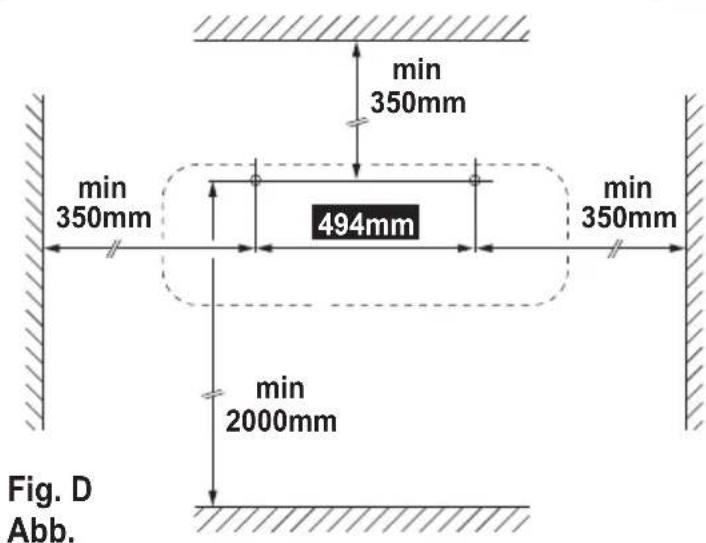
a. Locate the area where the appliance is going to be installed.
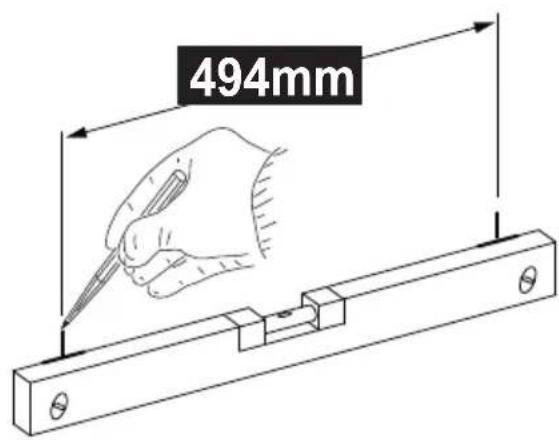
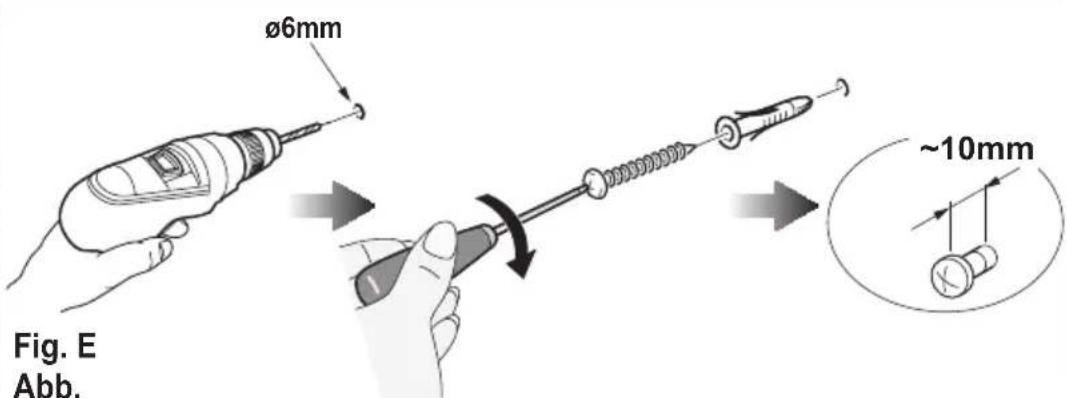
b. Create two due 6mm holes with a centres distance of 494mm (figure D).
The holes must be at least 2000mm away from the floor 350mm from the ceiling (figure D).

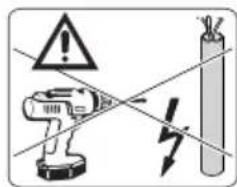
When piercing the wall, make sure that no electrical channels or water hoses are present.
c. Insert the wall plugs in the holes and then fasten the supplied screws.
d. Do not fasten the screws entirely; leave them approximately 10 mm away from the wall (figure E).

Make sure that the screws are well steady in the wall.
EN - 10
e. Place the slots (X) on the rear part of the appliance on the screws pushing the appliance itself against the wall (figure F - phase 1).
f. Push the appliance 10 mm towards the left (figure F - phase 2) then push it about 8÷10mm downwards (figure F - phase 3).
g. Lastly, check that the appliance is steady and well attached to the wall.
6.2 - Electrical connection

- Before connecting the appliance plug to the power outlet, make sure that the voltage values indicated on the data plate correspond to the mains supply ones and that the outlet is equipped with an efficient grounding.
- In case of incompatibility between the outlet and the plug of the appliance, let the outlet be replaced with another one of the suitable type by professionally qualified personnel, which verify that the outlet cables section is suitable for the power absorbed by the appliance. Generally, it's not advised to use adapters and/or extension cords; if their use should become essential, they must comply with the current safety standards and their current capacity (A) mustn't be lower than the appliance maximum one.
- The socket must be easily accessible so that the plug can be removed easily in an emergency.
a. Insert the plug in the power outlet.
b. Press "I" (ON) on the switch (7); the appliance is ready for use.

This product has a flap that opens automatically when the product is turned on and closes automatically when turned off.
- Do not move the flap with your hands. -
As this could damage or deform the unit. Open the flap with your hands only if it accidentally closes in part or in whole.
EN - 11
7 - DESCRIPTION OF THE REMOTE CONTROL
7.1 - Use of the remote control
The remote control supplied with the air-conditioner is the instrument that enables you to use the appliance in the most convenient way.
It should be handled with care and in particular:
- Keep it dry (do not clean it with water or leave it outdoors in bad weather).
- Avoid dropping or bumping it.
- Keep it out of direct sunlight.

The remote control operates by means of an infrared beam.
- Do not place obstacles between the remote control and the appliance during use.
- If other appliances in the room have remote controls (TV, stereo, etc...), there may be interference.
- Electronic and fluorescent lights may also interfere with transmissions between remote control and air-conditioner.
- Remove the batteries in case of prolonged disuse of the remote control.
7.2 - Insertion of batteries
The remote control uses two dry alkaline 1.5V batteries (AAA.LR03/LR03X2).
To insert the batteries correctly (figure 31):
a. Remove the batteries compartment cover.
b. Insert the batteries into the relevant compartment.
Check the polarity indicated on the bottom of the compartment.
c. Close the compartment correctly.
7.3 - Replacement of batteries
The batteries should be replaced when the display on the remote control does not appear sharply or when the remote control does not change the settings.
When the batteries have been replaced, adjust the remote control clock.
- If the remote control is not used for several weeks or longer, remove the batteries. Any leaks from the batteries could damage the remote control.
- The average life-span of the batteries, with normal use, is approx. six months. Replace the batteries when the indoor unit command receipt “beep” can no longer be heard, or if the transmission indicator on the remote control does not switch on.

Always use new batteries and replace both at the same time.
The use of old or different batteries could generate malfunctioning of the remote control.

- When replacing batteries, replace both and dispose of the dead batteries in the appropriate collection centres and as required by law.
- Do not re-charge or disassemble the batteries. Do not throw the batteries into the fire. They can burn and explode.
- If the battery liquid falls onto the skin or clothes, wash well with clean water. Do not use the remote control with batteries that have leaked.
The chemical products contained in the batteries can cause burns or other risks to health.
7.3 - Location of the remote controller
- Keep the remote control in a position from which the signal can reach the indoor unit receiver (max. distance approx. 8 metres - with the batteries charged) (figure H). The presence of obstacles (furniture, curtains, walls, etc.) between the remote control and the appliance reduces the remote control working range.
8 - CONTROL BUTTONS AND DISPLAY
8.1 - Controls on the appliance
The display is needed to control and adjust the appliance functions, six touch buttons are present on it.
The same buttons are present on the remote control too.
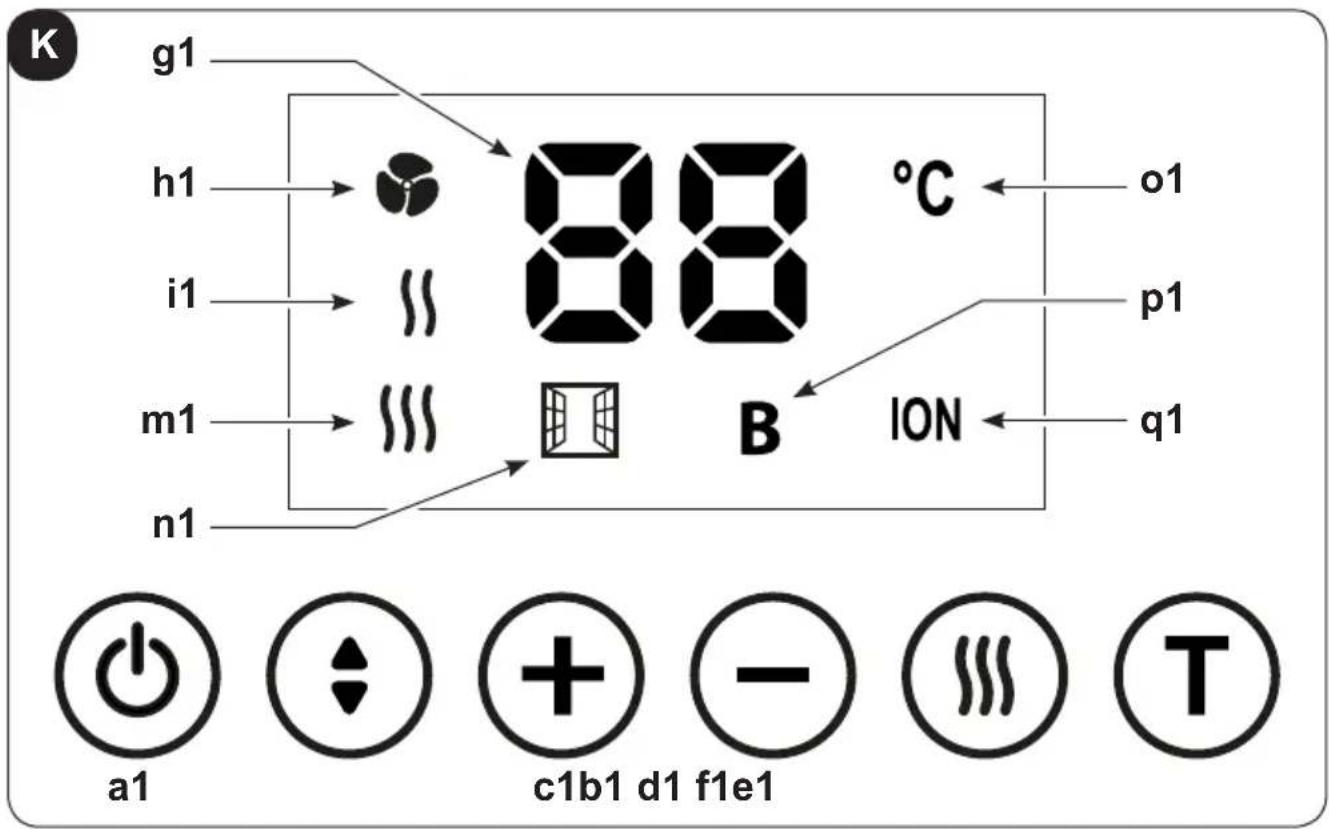
The appliance emits a "beep" every time a button is pressed.

a1. ON/OFF button
Press this button to turn the appliance on; the display turns on.
Press it again to turn it off.

b1. Flap button
Press this button to move the flap and adjust air direction.

c1. + button
Press this button to increase the temperature value settable from 15^ C to 45^ C (press button TURBO first).

d1. - button
Press this button to decrease the temperature value settable from 15^ C to 45^ C (press button TURBO first).
EN - 14

e1. Settings button
Press this button to set the functioning mode

n only

minimum power

maximum power

f1. T button
Press this button to activate Turbo (BOOST) function
Display
g1. Set temperature value
h1. Fan only mode active
i1. Minimum power mode active
m1. Maximum power mode active
n1. Window/Door open function active (see paragraph 9.2)
o1. Temperature unit of measurement
p1. TURBO function active
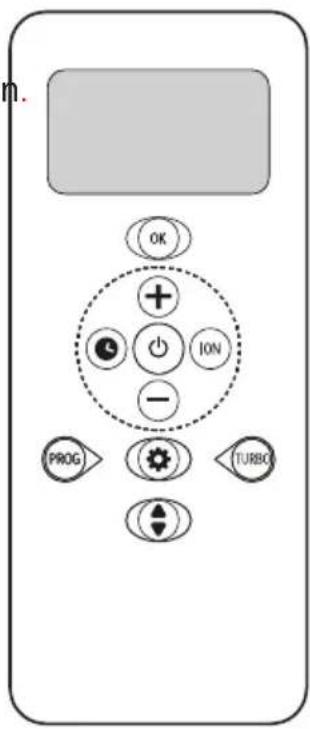
A remote control to ease the settings and the functions of the appliance is supplied.
Some of these buttons are present on the appliance too.
At each pressure of a button of the remote control, the appliance emits a "beep" to report the signal reception.
The selected and/or set functions are displayed through the icons on the remote control display (see paragraph 8.3)

ON/OFF button
Press this button to turn the appliance on; the display turns on.
Press it again to turn it off.
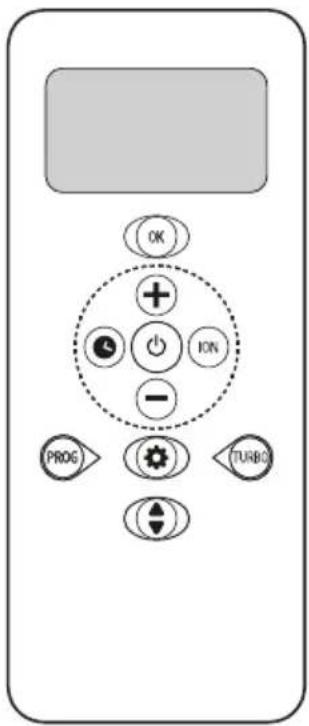

Flap button
Press this button to move the flap and adjust air direction.

+ button
Press this button to increase the temperature value settable from 15^ C to 45^ C (press button TURBO first).

- button
Press this button to decrease the temperature value settable from 15^ C to 45^ C (press button TURBO first).

TURBO button
Press this button to activate TURBO function.

OK button
Press this button to the selected program.

PROG button
Press this button to program the weekly functioning of the appliance (see paragraph 9.1).

ION button
Press this button to activate the IONISER.

Settings button
Press this button to select the desired functioning mode
AUTO > SUN > MOON > SNOWFLAKE > Fan

Clock button
Press this button to set time on the remote control (see paragraph 9.3).
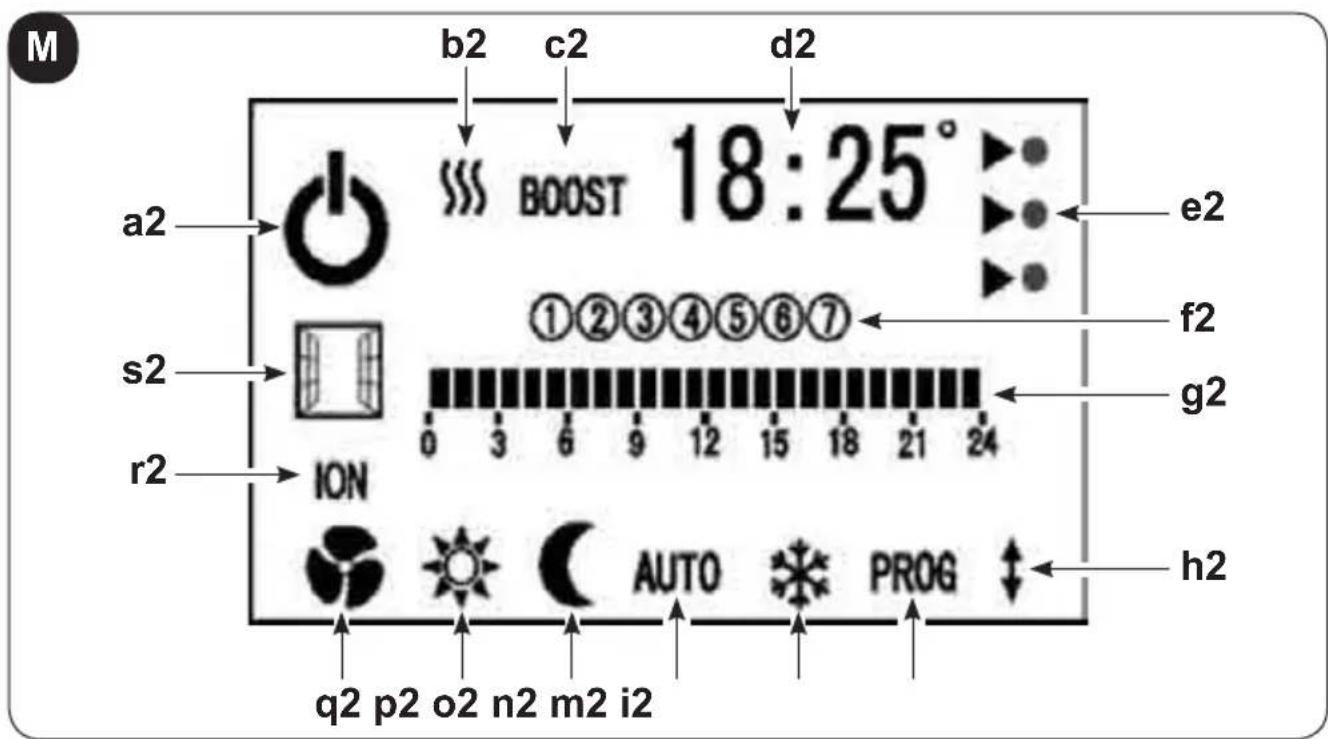
8.3 - Remote control display
On the remote control display, in addition to the set time and temperature, are displayed all the information related to the selected functions and to the functioning mode of the appliance.
EN - 16
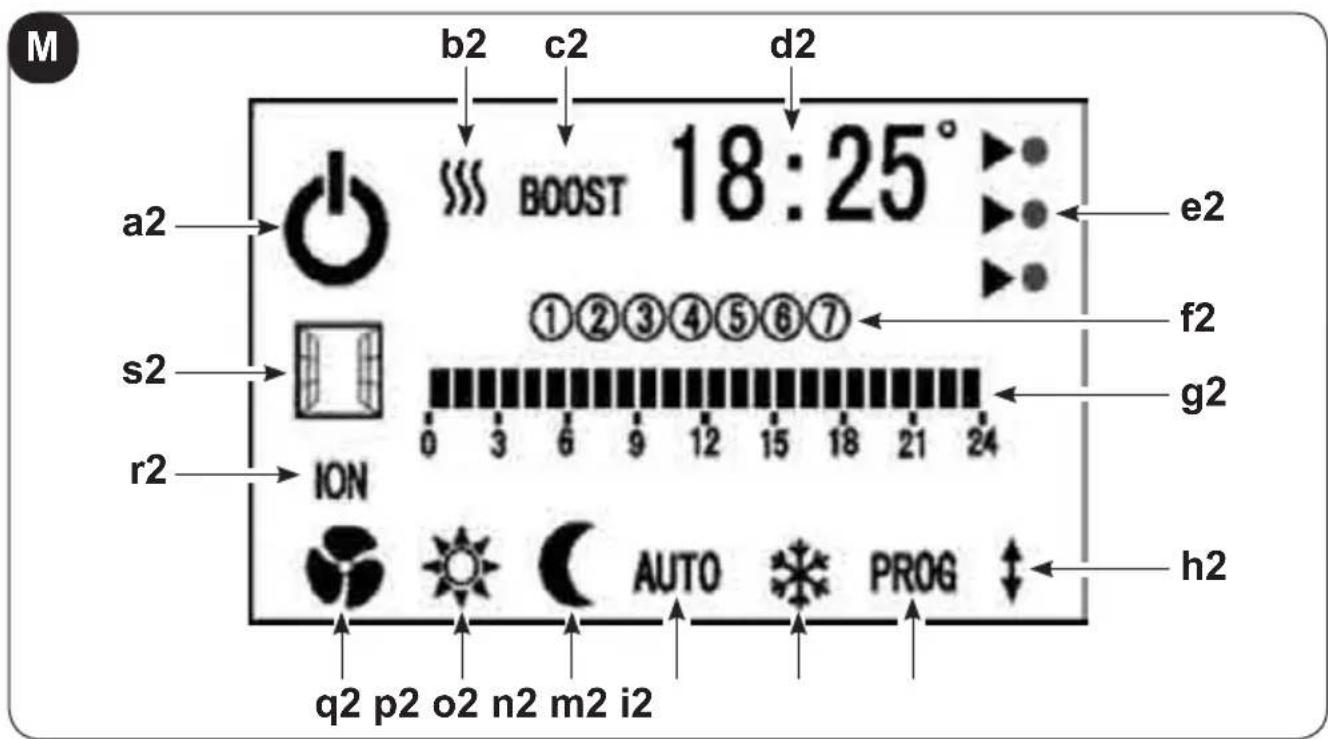
a2. Appliance working
b2. "Minimum power" || or "maximum power" || functions active
c2. "Turbo (BOOST)" function active
d2. Set temperature or hour/minutes value
e2. Energy consumption level ..... ▶ maximum, temperature ≥22°C
average, temp. between 19°C and 22°C
▶ minimum, temperature ≤ 19°C
f2. Days of the week (1= Monday - 7= Sunday)
g2. Hours of the day
h2. Flap oscillation
i2. Weekly programming setting (see paragraph 9.1)
m2. SNOWFLAKE function (Anti frost) setting
n2. AUTO mode setting
o2. MOON mode setting
p2. SUN mode setting
q2. Fan only functioning
r2. IONISER function active
s2. Window/Door open function active (see paragraph 9.2)
9 - FUNCTIONING
9.1 - Weekly program setting
Work as follows:
a. While the appliance is working, press button (PROG); the display is shown as illustrated below.
The following icons flash:
- first day of the week (1)
- first hour of the day (grey colour)
- COMFORT mode symbol.
b. Press button ⓣ select the desired mode:

The selected mode will flash.
c. Press button to confirm the setting; the next hour flashes automatically.
d. Repeat the operations describe above to select the desired functioning mode, then press button to confirm and pass to the next hour.
e. Set all the hours and then press button Ⓞ confirm and pass to the next day (2= Tuesday).
f. It is possible to program all the days of the week differently.
g. Once finished, press button ☑ exit from the programming mode.
h. After programming the first day, if it is desired to "copy" the same programming for the next day, keep button pressed.
i. After programming is over, to activate the appliance for weekly functioning, press button once; the "AUTO" icon will flash.
Press button to confirm your choice.
m. To disable the automatic functioning with weekly programming, press button and select the desired functioning mode (except for AUTO); the selected icon will flash.
Press button to confirm your choice.
Some temperatures, 19°C, 15°C, 7°C respectively, are preassigned to the SUN, MOON and SNOWFLAKE functions.
It is possible to modify those values by operating as follows:

a. While the appliance is working, press button
b. Press it several times until you select the desired mode.
c. Keep it pressed for 3 seconds, until when temperature flashes.
d. Change temperature with buttons ☑ . -
e. Press button ☑ confirm your choice.
9.2 - Window/Door open function
If enabled, the WINDOW/DOOR OPEN function allows the appliance to detect an abnormal amount of cold air in the room.
In this condition, when the appliance is in heating mode and it's delivering heat, if it detects a room temperature reduction by a few degrees, the function activates:
- the related icon is shown on the appliance display and on the remote control
- the machine stops supplying heat
- the machine stops the fan functioning and closes the flap.
As long as the appliance doesn't detect a new increase in the room temperature, heat supply remains interrupted.
If the appliance detects a rise in the room temperature, the appliance automatically restores the previously set heating mode.
If this function is disabled, the appliance works normally.
If the function is active, it is possible to manually restore heat supply by working with the remote control buttons or with those on board the appliance.
Each time the appliance is electrically connected, the WINDOW/DOOR OPEN function is deactivated.
To enable the function:
a. When the appliance is connected to the mains power and in Standby mode, it is possible to enable and disable the WINDOW/DOOR OPEN function.
b. Keep button ⏻ pressed until the appliance emits two beeps; the function is enabled.
c. Keep button ⏻ pressed until the appliance emits one beep; the function is disabled.
9.3 - Hour/Minutes setting
When the appliance is turned off, the remote control display shows hour and minutes. When the appliance is turned on, the hour visualization is replaced by the set temperature.
To set time:
a. Press button 📋 until when hour starts flashing.
b. Press buttons and to set the hour.
c. Press ☐ confirm and pass to the minutes setting.
d. Press buttons + and - to set the minutes.
e. Press to confirm.
9.4 - Protection from overheating
The appliance is equipped with a protection system from overheating which turns it off if it overheats.
In this case:
a. turn the appliance off;
b. remove the possible cause (air intake grid clogged, obstacles in front of the air outlet or inlet, etc.);
c. let the appliance cool down for 15/20 minutes;
d. restart the appliance.
If the issue persists, turn the appliance off, disconnect the plug from the power outlet and please contact the retailer or the technical assistance service.
10 - CLEANING

Before performing any cleaning or maintenance intervention on the appliance, disconnect the plug from the power outlet and wait for the hot parts to cool down.
natural_image
Illustration of a hand using a power plug to switch an electrical outlet (no text or symbols present)Use a dry cloth to clean the appliance and the remote control.
If the appliance is very dirty, it is possible to use a cloth moistened with warm water (max 50^ C) and a mild detergent to clean its external parts (figure L).
Dry with a dry cloth.
Make sure the appliance is completely dry before reconnecting the plug to the power outlet.

Do not use a chemically-treated or anti-static cloth to clean the unit.
Do not use gasoline, solvent, polish or similar solvents.
These products could cause the breakage or deformation of the plastic surface.
Do not use oils, chemical substances or abrasive products to clean the appliance.
Do not wash or immerse the appliance with/in water.
Use a vacuum cleaner to remove dust from the air inlet/outlet grids.
In case of an appliance malfunction, do not try to disassemble it and please contact the retailer or the technical assistance service instead.
10.1 - Appliance preservation
If you do not intend to use the appliance for a particularly long period of time or if you need to perform works which could produce a lot of dust, it is advised to remove the appliance from the wall and to store it in its original packaging together with the remote control (without batteries).
Store everything in a fresh and protected from humidity environment.
EN - 22
11 - TECHNICAL DATA
Consult the data plate applied on the product (figure A) for the technical data listed below:
- Power supply voltage
- Absorbed power
- Insulation class
- Appliance weight
11.1 - Compliance
This product is CE marked to denote compliance with Directives 2014/35/UE (Low Voltage) and 2014/30/UE (Electromagnetic Compatibility).
| CALDO CRYSTAL | Item Symbol | Value Unit | ||
| Heat output | ||||
| Nominal heat output | P_nom | 2,0 | kW | |
| Minimum heat output (indicative) | P_min | 1,2 | kW | |
| Maximum continuous heat output | P_max,c | 2,0 | kW | |
| Auxiliary electricity consumption | ||||
| At nominal heat output | el_max | -- | kW | |
| At minimum heat output | el_min | -- | kW | |
| In standby mode | el_SB | 0,000 | kW | |
| Type of heat output/room temperature control | Yes No | |||
| Single stage heat output and no room temperature control | ☐ ✓ | |||
| Two or more manual stages, no room temperature control | ☐ ✓ | |||
| With mechanic thermostat room temperature control | ☐ ✓ | |||
| With electronic room temperature control | ✓ ☐ | |||
| Electronic room temperature control plus day timer | ☐ ✓ | |||
| Electronic room temperature control plus week timer | ✓ ☐ | |||
| Other control options | ||||
| Room temperature control, with presence detection | ☐ ✓ | |||
| Room temperature control, with open window detection | ✓ ☐ | |||
| With distance control option | ☐ ✓ | |||
| With adaptive start control | ☐ ✓ | |||
| With working time limitation | ☐ ✓ | |||
| With black bulb sensor | ☐ ✓ | |||
| info@olimpiasplendid.it | Olimpia Splendid SpAVia Industriale 1/3, 25060 Cellatica, Brescia, Italy | |||
ILLUSTRATIONS
6.1 - Installation murale
natural_image
Simple line drawing of four moon icons: sun, crescent moon, and asterisk (no text or symbols)natural_image
Illustration of a hand using a power plug to switch an electrical outlet (no text or symbols present)DE - 9
6 - MONTAGE DES GERÄTS
6.1 - Wandmontage
DE - 15

Taste FLAP
natural_image
Simple line drawing of four moon icons: sun, crescent moon, and asterisk (no text or symbols)
Tecla ON/OFF
natural_image
Illustration of a hand using a power plug to switch an electrical outlet (no text or symbols present)
- ILLUSTRAZIONI
- Tasto flap
- MAIN INDEX
- - GENERAL INFORMATION
- - SYMBOLS
- - Editorial pictograms
- Service
- Index
- Raised hand
- GENERIC DANGER
- DANGER DUE TO HEAT
- DO NOT COVER
- ATTENTION
- DISPOSAL
- - INDEX
- - GENERAL WARNINGS
- Do not use abrasive cleaning products on this appliance. In with a damp cloth (not wet) rinsed in hot soapy water only.
- Always remove plug from the mains supply before cleaning.
- This appliance heats up slightly when in use. To avoid burns, do not let bare skin touch hot surfaces.
- - Proper use
- - Unintended and potentially dangerous use
- - DESCRIPTION OF THE APPLIANCE
- - Identification of the supplied main parts and components
- - APPLIANCE INSTALLATION
- - Wall installation
- The appliance must be installed:
- DO NOT install the appliance beneath power outlets.
- The holes must be at least 2000mm away from the floor 350mm from the ceiling (figure D).
- When piercing the wall, make sure that no electrical channels or water hoses are present.
- Make sure that the screws are well steady in the wall.
- - Electrical connection
- - DESCRIPTION OF THE REMOTE CONTROL
- - Use of the remote control
- - Insertion of batteries
- Check the polarity indicated on the bottom of the compartment.
- - Replacement of batteries
- - Location of the remote controller
- - CONTROL BUTTONS AND DISPLAY
- - Controls on the appliance
- a1. ON/OFF button
- b1. Flap button
- c1. + button
- d1. - button
- e1. Settings button
- f1. T button
- Display
- ON/OFF button
- Flap button
- + button
- - button
- TURBO button
- OK button
- PROG button
- ION button
- Settings button
- Clock button
- - Remote control display
- - FUNCTIONING
- - Weekly program setting
- Work as follows:
- - Window/Door open function
- To enable the function:
- - Hour/Minutes setting
- To set time:
- - Protection from overheating
- - CLEANING
- - Appliance preservation
- - TECHNICAL DATA
- - Compliance
- ILLUSTRATIONS
- - Installation murale
- - MONTAGE DES GERÄTS
- - Wandmontage
- Taste FLAP
- Tecla ON/OFF
Brand : OLIMPIA SPLENDID
Model : Caldo Crystal
Category : Heating