
ImageView 110718 - Camera BUSHNELL - Free user manual and instructions
Find the device manual for free ImageView 110718 BUSHNELL in PDF.

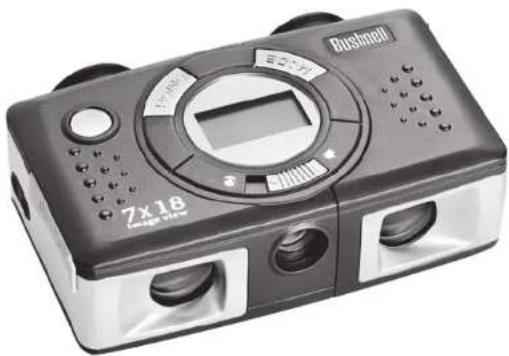
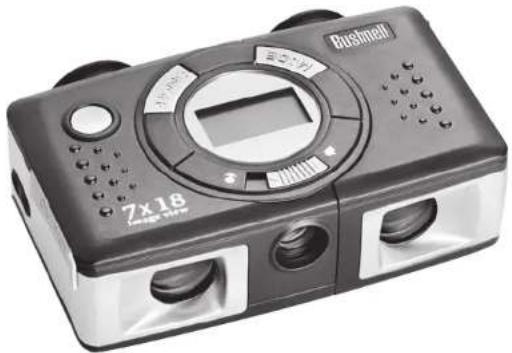
| Product type | Digital camera integrated into binoculars |
| Brand | Bushnell |
| Model | ImageView 110718 (11-0718) |
| Power supply | 2 AAA alkaline batteries |
| Photo resolution | 640 x 480 pixels (high) / 320 x 240 pixels (low) |
| Video mode | AVI, short clips (duration limited by memory) |
| Self-timer | Triggers after 10 seconds |
| Burst mode | 3 consecutive photos at about 1-second intervals |
| Focus | Central wheel + diopter adjustment |
| Focusing distance | Normal mode: > 8 m; Macro mode: 3 to 8 m |
| Diopter adjustment | Dial on the lower front part |
| LCD screen | Display of modes and indicators |
| Internal memory | Capacity not specified, temporary storage |
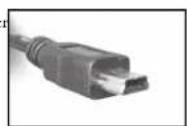
| PC connection | USB (cable included) |
| Operating system | Windows 98/ME/2000/XP |
| Included software | USB drivers + Roxio PhotoSuite 5 |
| Maintenance | Cleaning lenses with a soft cloth and lens cleaner |
| Safety | Never look at the sun through the binoculars |
| Warranty | 2-year limited (parts and labor) |
| Included accessories | USB cable, installation CD-ROM, user manual |
Frequently Asked Questions - ImageView 110718 BUSHNELL
User questions about ImageView 110718 BUSHNELL
0 question about this device. Answer the ones you know or ask your own.
Ask a new question about this device
Download the instructions for your Camera in PDF format for free! Find your manual ImageView 110718 - BUSHNELL and take your electronic device back in hand. On this page are published all the documents necessary for the use of your device. ImageView 110718 by BUSHNELL.
USER MANUAL ImageView 110718 BUSHNELL
LIT. #: 98-0461/07-04
CONTENTS
ENGLISH 1
FRANÇAIS 12
ESPANOL 24
DEUTSCH 36
ITALIANO 48
PORTUGUES 58
ENGLISH
QUICKGUIDE:BUSHNELLIMAGEVIEW11-0718
INSTALL BATTERIES AND TURN ON THE CAMERA
Insert 2 AAA alkaline batteries as indicated inside the battery compartment, located at the side of the left cycpicce. Turn the camera on by pressing and holding the MODE button until the display comes on and the camera becpcs. To turn the unit off, press and hold the MODE button until the display goes out. The camera will turn itself off automatically to save batteries if none of the buttons have been pressed for three min
ADJUST THE BINOCULAR FOR COMFORTABLE VIEWING
Adjust the center focus wheel (located between the eyepieces on the bottom of the camera) while viewing a distant object through the binocular, until it appears sharp. Holding your ImageView by the raised dor and ridge grip areas, carefully slide the left and right sides of the camera farther apart or closer together until you see a single circular image through the cypecies. Rotate the diopter adjustment (dial with index marks on the bottom front of the ImageView) to find the best setting for your vision if the image does not appear as sharp to your right eye as it does for your left eye (close your left eye while you turn the dial, then check with both eyes open). Note the index settings for your eyes on both this diopter adjust dial and the IPD scale that is visible when the left/right halves are slid apart. This will make it easier to reset later if someone else uses your ImageView.
CHECKCAMERA SETTINGS
Make sure the camera is set for high quality ("LQ") does not show on the LCD display-sec full instructions for setting photo quality) if you want the best results, especially if you will be printing the photos. See "Changing Operational Modes" for full instructions in using features such as repeat shot, movie clips (avi mode), and deleting a photo you have just taken.
TAKE A PHOTO (TIPS FOR BETTER QUALITY PHOTOS)
With the camera turned on, press the SNAP button to take a new photo. For best results, hold the ImageView steady using both hands, and lightly press down the SNAP button using the flat end of your finger rather than "punching" it with a fingertip. For
normal photos of distant objects over 25 feet (8 meters) away, leave the 2-position focus switch at the front of the camera on the "mountain" icon (left position). If you need to take photos of closer objects, set the focus switch to the "flower" icon (right position). This will change the camera focus to a range from approx. 10 to 25 fct (3-8 meters). Be sure the focus switch is set back to the normal (mountain) scating when you are no longer taking close range photos.
USING THE IMAGEVIEW WITH YOUR COMPUTER
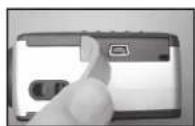
BEFORE CONNECTING THE IMAGEVIEW TO A COMPUTER, first install the driver from the CD-ROM as directed in "Software Installation". After the driver has been installed, you may install Roxio PhotoSuite 5 as well, following the on-screen instructions (if you do not already have photo software you prefer to use). Connect the supplied USB cable between the ImageView and your computer, using a USB port on the computer itself (avoid "hubs"). Please read "Loading Photos to Your Computer" for detailed instructions on transferring photos to a PC using PhotoSuite.

MAGEVIEW
Congratulations on your purchase of a Bushnell ImageView binocular. Before using the product, please read these instructions and take time to familiarize yourself with the different parts and features of the product.
BINOCULAR INSTRUCTIONS
TURING THE CAMERA ON AND OFF
Insert 2 AAA alkaline batteries as indicated on the inside lid of the battery compartment, located at the side of the left eyepiece. Turn the camera on by pressing and holding the MODE/POWER() button until the display comes on and the canra beps. To turn the unit off, press and hold the MODE/ POWER() button until the display goes out. The camera will turn itself off automatically to save batteries if none of the buttons have been pressed for three minutes.
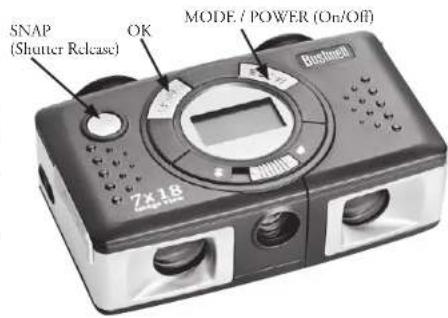
TAKING A PICTURE
With the camera turned on, press the SNAP button to take a new photo. For best results, hold the ImageView steady using both hands, and lightly press down the SNAP button using the flat end of your finger rather than "punching" it with a fingertip. For normal photos of distant objects over 25 feet (8 meters) away, leave the 2-position focus switch at the front of the camera on the "mountain" icon (left position). If you need to take photos of closer objects, set the focus switch to the "flower" icon (right position). This will change the camera focus to a range from approx. 10 to 25 feet (3-8 meters). Be sure the focus switch is set back to the normal (mountain) setting when you are no longer taking close range photos.
CHANGING OPERATIONAL MODES
Pressing the MODE/POWER( 日 button briefly will cycle through several special camera modes and settings. A corresponding icon or symbol (indicated in parentheses below) will be displayed on the LCD for each mode as you cycle through them by tapping the MODE/POWER 日 button, and blink unless you select or confirm it with the OK button (icon will stop blinking). If no button is pressed for more than 5 seconds, the camera will return to normal operation. The modes/settings are shown as you cycle through them in the following order:
-
Timer () : selects the self-timer, which will take a photo after a 10 second delay when you press the SNAP button. This is useful for avoiding blurry photos from bumping the camera when it is mounted on a tripod (optional), especially in low light conditions. Once set, the camera will remain in self-timer mode until you return to the timer mode setting and turn it off.
-
Repeat Shot ( ) : Takes rapid series of 3 consecutive photos, approx. 1 second apart, when you press and hold the SNAP button. As with the timer, the camera will remain in this mode until you change it, or until the camera's memory is full. This is indicated by the display showing "FUL" and a beep alarm.
-
High/Low Quality (LQ): When "LQ" is displayed, pressing "OK" will set the camera to low resolution mode (320x240 pixels)-the "LQ" icon will stop blinking. LQ mode will allow you to fit more photos in the memory before you stop to download them, with the tradeoff of less quality per photo. To reset the camera to high resolution, return to the LQ mode, and press OK again ("LQ" will no longer be displayed). When the LQ icon is off, the camera is in high resolution mode (640x480 pixels) for best quality.
-
AVI Mode: ( ) : This mode sets the camera to take short movie clips (.avi files) rather than still photos. When this mode is activated (press OK when the movic icon blinks), holding down the SNAP button will film an avi movic until you release it (or the memory is full). When the SNAP button is released, the camera reverts back to normal still photo operation (assuming unused memory remains). Repeat the steps to set AVI mode again if you wish to shoot more movie clips.
-
Power Frequency Setting: (60/50 Hz): This sets the correct electrical frequency to avoid any "flickering" in the camera's output. The normal default is "60" Hz (cycle), as used in the United States. If you are using the camera in a country with 50 Hz power frequency, press OK when the "50" icon blinks to select it.
-
Delete Last ( ) : Pressing OK when the "Delete Last" icon is blinking will delete (crase) the last photo you took from the camera's memory.
- Delete All ( : When this mode is selected, the word "ALL" appears next to the trash can icon, and the number of total photos in memory will blink in the display. Press and hold the OK button to erase the entire memory contents. You will hear a tone that becomes higher as the photos are deleted. When the process is complete, the photo number display will reset to zero. If no button is pressed for 5 seconds, the camera returns to stand-by. "Delete All" is a quick way to clear the memory following a download of your photos to a computer, so that the camera is ready to hold as many new photos as possible.
OTHER DISPLAY ICONS
- Battery Indicator ( 10 ) : Shows the amount of battery life left. When only one third of the icon is filled in, you should plan to replace the batteries soon. B e sure to bring an extra set of batteries on a long trip or for important events.
WARNING: Make sure you download all photos (see directions below) from the camera before removing or changing the batteries. The camera memory is battery dependant, and your photos will be lost if you take the batteries out, or if the batteries are allowed to become completely dead.
- PC Connection (PC): When the camera is connected to your PC via the supplied USB cable, the "PC" icon is displayed. Note: when the camera is connected to a PC, the camera will power on automatically, and uses the USB connection for power to conserve battery life while downloading photos.
USING THE IMAGEVIEW WITH YOUR COMPUTER
SYSTEM REQUIREMENTS:
Pentium 166MMX or equivalent minimum
(Recommended Pentium II 266)
Windows 98/ME/2000/XP
Minimum 32MB of RAM
USB Port (do not connect the camera through a USB hub)
Minimum 200 MB of hard drive space, with additional 65MB for IE and Direct X
CD-ROM driver
Supcr VGA monitor and video card
SOFTWARE INSTALLATION
DO NOT CONNECT THE IMAGEVIEW CAMERA TO THE COMPUTER BEFORE INSTALLING THE DRIVER SOFTWARE
To load software, insert the supplied CD into your CD-ROM drive and it will self-start. If your computer does not have an auto play function and does not automatically launch the CD install screen,
open the CD (open "My Computer" and double click the "ImageView" pencil icon) and click "Install Driver". The CD contains the PhotoSuite software, as well as the drivers that will allow your computer to recognize your camera. Even if you have photo-imaging software on your computer and do not need the PhotoSuite software, you will still need to install the drivers for the camera.
Follow the on screen instructions. After drivers are successfully installed first, return to the CD install screen, and click on "Roxio PhotoSuite 5" to install the photo imaging software. If you have questions about using your ImageView, including the downloading process, help is available at www.bushnell.com or call Bushnell customer service at (800) 423-3537. For PhotoSuite software technical support, go to the Roxio website at: www.roxio.com and click "Support", then select your PhotoSuite version and search the online knowledge base. Note that PhotoSuite has an extensive Help menu, so be sure to reference that first.
DOWNSLOADING PHOTOS TO YOUR COMPUTER:
-
Connect the USB cable from the computer to the camera.
-
You may have a brief wait for the process as Windows "builds a driver information database" and confirms that the PC matches the correct software to the attached hardware device.
- Open the program PhotoSuite 5
- Click "Transfer" in the left frame area under "Home Page"
- Select "Transfer from new device"
- Under (#1) "Select a device from the list", click "Dual Mode Camera (8008 VGA)", then click "Next" at the bottom of the left frame area.
- You may now name the group of photos if you wish (#2), or accept the default "Captured (current date). Note that your photos will also be added to your hard drive in a folder of the same name, located in C:/My Documents/My Pictures.
- Click the "Transfer Photos" button (#3).
- After several seconds, the driver screen will appear, and you will see the "live" image from the camera's lens. Disregard this, and click on the bottom rightmost icon (shows a camera pointing into a computer monitor) to start the download from the ImageView to your computer.
- When the download is finished, you should see "thumbnail" preview frames showing the photos, numbered "Img 1", etc. on the right side frame of the driver window.
- Next, click "Transfer All" at the bottom of the driver window, if you want to view and edit all of your photos in PhotoSuite. Or, click on the thumbnail frames to select just the photos you want to work with (click again to deselect one), and click "Transfer" at the bottom of the driver window. You are then returned to the PhotoSuite transfer screen, and should see all of your transferred photos, identified by the date and file number.
- Click "Next", then "Done" at the bottom of the left frame area.
- You may now wish to edit (click Edit & Create, then Edit), or print (click Print & Share, then Print) your photos. For detailed instructions for using these and other PhotoSuite features, please refer to "Roxio PhotoSuite Help", available by selecting the Help menu at the top of your screen.
BINOCULAR INSTRUCTIONS
Your Bushnell binocular is a precision instrument designed to provide many years of pleasurable viewing. This portion of the booklet will help you achieve optimum performance by explaining how you can adjust the binocular to your eyes, and how to care for this instrument. Read the instructions carefully before using your binocular.
EYE ADJUSTMENTS (Figure 1)
How to Adjust For Distance Between Your Eyes
The distance between the eyes, called "interpupillary distance," varies from person to person. To achieve perfect alignment of lens to eye, follow these simple steps.
- Hold your ImageView in the normal viewing position.
- Holding the ImageView at the grip areas (dots and ridges on top and bottom surfaces), carefully slide the left and right sides apart until it is set for your eye spacing (you will see a singular circular field). If you go too far, simply slide the sides back so they are closer together. Note the index scale position to help you reset this if someone else uses your ImageView.
How to Adjust For Individual Eye Strength
As individual cysight varics from one person to another, Bushnall binoculars have a diopter setting feature which allows you to fine-tune the binocular to your vision. Follow the focusing instructions below for your ImageView binocular.
FOCUSING
- Adjust intercpuillary distance. (Figure 1)
- Set the "dioptrc setting" (the dial on the bottom front of the ImageView) to zero (the middle mark on dial - opposite arrow) and view a distant object. (Figure 2)
- Keep both eyes open at all times.
- Using your hand, cover the objective (front) lens on the right side.
- Using the center focus wheel (on the bottom of binocular between the eyepieces), focus on a distant object with fine detail (e.g., brick wall, tree branches, etc.) until it appears as sharp as possible.
- Uncover the objective lens on the right side, cover the other objective lens, then view the same object.
- Using the "diopter setting" dial, focus the same object being viewed. Caution should be used as over turning or forcing the dial can cause damage.
- Your binocular should be adjusted for your eyes. Focus at any far or near distances can now be attained simply by turning the center focus wheel. Make a note of the diopter setting for your cys for future reference.
INSTRUCTIONS FOR CARE OF BINOCULARS
Your Bushnell binocular will provide years of trouble-free service if it receives the normal care you would give any fine optical instrument. Non-waterproof models should not be exposed to excessive moisture.
- If your binocular has roll-down, flexible eyecups, store it with the eyecups up. This avoids excessive stress and wear on the eyecups in the down position.
- Avoid banging and dropping
- Store in a cool, dry place.
- CAUTION: Looking directly at the sun with your binocular may be very harmful to your eyes.
- Never expose your ImageView binocular to any type of excessive of liquid or fluid, as the binocular is not water/fogproof.
- Take the batteries out of your ImageView if you are not going to use it for a long period of time. (Make sure you download any pictures from your camera before you remove the batteries from the camera.)
CLEANING
- Blow away any dust or debris on the lens (or use a soft lens brush).
- To remove dirt or finger prints, clean with a soft cotton cloth rubbing in a circular motion. Use of a coarse cloth or unnecessary rubbing may scratch the lens surface and eventually cause permanent damage. A "microfiber" cleaning cloth (available at most photo dealers) is ideal for the routine cleaning of your optics.
- For a more thorough cleaning, photographic lens tissue and photographic-type lens cleaning fluid or isopropyl alcohol may be used. Always apply the fluid to the cleaning cloth - never directly on the lens.
WARRANTY / REPAIR
TWO-YEAR LIMITED WARRANTY
Your Bushnell® product is warranted to be free of defects in materials and workmanship for two years after the date of purchase. In the event of a defect under that warranty, we will, at our option, repair or replace the product, provided that you retain the product proofing prepaid. This warranty does not cover damages caused by moisture, improper handling, installation, or maintenance provided by someone other than a Bushnell Authorized Service Department.
Any return made under this warranty must be accompanied by the items listed below:
1) A check/money order in the amount of $ 0.00 to cover the cost of passage and handling
2) Name and address for proolos return
3) An explanation of the defect.
4) Proof of 126 Purchased 5) Proofs of the following conditions:
3) Product should be well picked in a third out of shipping carton to prevent damage in transit with return postage prepaid to the address listed below:
IN U.S.A. SEND TO: IN CANADA SEND TO:
Boshnall Performance Optics Boshnall Performance Optics
Actn: Repairs Actn: Repairs
8500 Marshall Drive 25A1ear Pearce Smeer,Unit 1
1200000000000000000000000000000000000000000000000
For products purchased outside the United States or Canada please contact your local dealer for applicable warranty information. In Europe you may also contact Bushnell at: BUSH INELI. Performances Optics GmbH
European Service Center MOERCECTACCT-1
MRSSESTRSS4
D.54788 KOIN
GERMANY 附表:《德国公司法》
14-490221749393
Fax:40901221/09-9
This warranty gives you spicin legal rights.
You may have other rights which vary from country to country.
200hushnll Performance Optics
FRANCAIS
GUIDE RAPIDE: Bushnell® ImageView® 11-0718
INSTALLATION DES PILES ET ACTIVATION DE L'APPAREIL PHOTO
©2004 Business Performance Optics
DEUTSCH
KURZER LEITFADEN: Bushnell® ImageView® 11-07/18
ANDERE DISPLAY ICONS
European Service Centre
MORSESTRASSE 4
D. 50/69 KOIN
Deutschland
14:4902217099393
14902217099398
Atn: Repairs Atn.: Repairs
8500 Marshall Drive 25A East Pearce Street, Unit 1
Lencra, Kansas 66214 Richmond 1ill Ontario LAB 2M9
European Service Centre
MORSESTRASSE 4
D-50769-Colognc
Germania
T+49(0)2217099393
Fax:+49012217099398
st Pearce Street, Unit 1
Lencxa, Kansas 66214
and Hill Ontario L4B 2M9
Para produits adquiringi fos el Osbados Unidos ou de Canadie Izur contruiu su revendreedor local quan a informacoes aplicacoes reference na sua energia . A Buahneli社会发展 por ser contraste da Urpca polo telefonet : BUSINULLI Performance Optics GmbH
European Service Centre
MORSSTRASSL 4
D-50769K01N
Alcmanba
16:4910122170929393
F10:+9102217099398
©2004 Bushnell Performance Optics
Bushnell
©2004 Bushnell Performance Optics
www.bushnell.com

- CONTENTS
- ENGLISH
- QUICKGUIDE:BUSHNELLIMAGEVIEW11-0718
- INSTALL BATTERIES AND TURN ON THE CAMERA
- ADJUST THE BINOCULAR FOR COMFORTABLE VIEWING
- CHECKCAMERA SETTINGS
- TAKE A PHOTO (TIPS FOR BETTER QUALITY PHOTOS)
- USING THE IMAGEVIEW WITH YOUR COMPUTER
- BINOCULAR INSTRUCTIONS
- TURING THE CAMERA ON AND OFF
- TAKING A PICTURE
- CHANGING OPERATIONAL MODES
- OTHER DISPLAY ICONS
- SYSTEM REQUIREMENTS:
- SOFTWARE INSTALLATION
- DO NOT CONNECT THE IMAGEVIEW CAMERA TO THE COMPUTER BEFORE INSTALLING THE DRIVER SOFTWARE
- DOWNSLOADING PHOTOS TO YOUR COMPUTER:
- EYE ADJUSTMENTS (Figure 1)
- FOCUSING
- INSTRUCTIONS FOR CARE OF BINOCULARS
- CLEANING
- WARRANTY / REPAIR
- TWO-YEAR LIMITED WARRANTY
- FRANCAIS
- GUIDE RAPIDE: Bushnell® ImageView® 11-0718
- INSTALLATION DES PILES ET ACTIVATION DE L'APPAREIL PHOTO
- DEUTSCH
- KURZER LEITFADEN: Bushnell® ImageView® 11-07/18
- ANDERE DISPLAY ICONS
- Bushnell
Brand : BUSHNELL
Model : ImageView 110718
Category : Camera