
Zoom WhiteSpeed - Teeth Whitening Device PHILIPS - Free user manual and instructions
Find the device manual for free Zoom WhiteSpeed PHILIPS in PDF.
| Product type | Light-accelerated teeth whitening device |
| Brand | Philips |
| Model | Zoom WhiteSpeed |
| Category | Professional teeth whitening device |
| Usage | Professional (dental office) |
| Number of patients per kit | Single patient |
| Whitening gel | Hydrogen peroxide 25%, 4.6 g per syringe |
| Duration of one session | 15 minutes |
| Number of sessions per treatment | 3 to 4 applications |
| Interval between treatments | Minimum 7 days |
| Gel storage temperature | Between 2 and 10 °C |
| Accelerator power supply | Mains power supply unit |
| Main functions | Accelerated teeth whitening with LED light |
| Included accessories | Lip retractor, facial bib, Liquidam, cotton rolls, gauze, suction tip, application brush, light guide |
| Contraindications | Pregnant/breastfeeding women, under 18, serious illnesses |
| Possible side effects | Tooth sensitivity, gingival irritation if incorrect isolation |
| Usage precautions | Wear eye protection, avoid gel contact with eyes and soft tissues |
| Maintenance | Clean according to instructions, replace light guide after use |
| Available spare parts | Light guides, gel syringes, mixing tips |
| Repairability | Single-use for some components, replaceable light guide |
Frequently Asked Questions - Zoom WhiteSpeed PHILIPS
User questions about Zoom WhiteSpeed PHILIPS
0 question about this device. Answer the ones you know or ask your own.
Ask a new question about this device
Download the instructions for your Teeth Whitening Device in PDF format for free! Find your manual Zoom WhiteSpeed - PHILIPS and take your electronic device back in hand. On this page are published all the documents necessary for the use of your device. Zoom WhiteSpeed by PHILIPS.
USER MANUAL Zoom WhiteSpeed PHILIPS
WhiteSpeed Light-Accelerated Tooth Whitening Procedure Kit

WhiteSpeed Light-Accelerated Tooth Whitening Procedure Kit Instructions for use
English 6
Deutsch 19
Francais 37
Hrvatski 59
Italiano 75
Romána 89
Suomi 104
Быrapск 120
Manufacturing information
Manufacturer:
Discus Dental, LLC
1700A South Baker Avenue
Ontario, CA 91761 USA
philipsoralhealthcare.com

EMERGO EUROPEPrinsessegracht 202514 AP The HagueThe Netherlands

VITA is a registered trademark of the VITA ZAHNFABRIK, H. Rauter GmbH & KG, Bad Saechingen, Germany.
Symbols

Consult instructions for use
Reference to enclosed or attached information

Caution

Keep away from sunlight, keep away from heat
Temperature limits

Conformity European
| Manufacturer | |
| Use by date | |
| Batch code | |
| Catalogue number | |
| Authorized in the European Community | |
| Do not re-use. This product is intended for use on a single patient during a single procedure. | |
| Keep refrigerated |
Important information
Read and understand the information in these instructions for use and in the instructions for use provided with the Philips Zoom! Whitespeed Light-Accelerated Tooth Whitening Gel (whitening gel) prior to initiating whitening treatment.
The whitening gel must be removed from refrigeration and warmed to room temperature so it will thicken before it is applied to the patient's teeth. Either:
-Remove the syringe from refrigeration at least 6 hours before use (preferably the night before) or
-If removed just prior to use, place the syringe in a cup of hot water (49^) for 10 minutes. Remove the syringe from the water and wait 5 minutes before extruding gel.
Conditions of use
This product is to be distributed to and used by dental professionals exclusively. This product is intended for use on healthy patients aged 18 years and older who have no underlying oral health issues, are not perio-involved and do not exhibit failing restorations.
Contents
Philips Zoom! WhiteSpeed Light-Accelerated Whitening Procedure Kits (Light-Accelerated procedure kits) include:
-Sheets .040 EVA tray material (2), (not included in all Light-Accelerated procedure kits)
-Light guide (2)
-IsoPrep retractor (2)
Procedure tray (2) includes:
-Face bib (2)
-Gauze squares (6)
-Liquidam Soft Tissue Isolation Syringe, 2.9g (1)
-Liquidam needle point tip (1)
-Liquidam black tip (1)
-Cotton rolls (2)
-Surgical suction tip (1)
-Application brush (1)
Post care and maintenance kits (not included in all Light-Accelerated procedure kits) include:
-NiteWhite/DayWhite Whitening Gel instructions for use (1)
-Relief ACP oral care gel instructions for use (1)
-Relief ACP oral care gel syringe, 2.4 ml (1)
-Whitening gel (1)
- Tray case (1)
Packaged separately:
-Philips Zoom! WhiteSpeed Light-Accelerated Tooth Whitening Gel
- Instructions for use (1)
-25% Hydrogen Peroxide Whitening Gel syringe, 4.6 g (1)
-Mixing tip (1)
Product description
Philips Zoom! WhiteSpeed Light-Accelerated Tooth Whitening Procedure Kits are professional level (in-office) Light-Accelerated procedure kits and are for single patient use only.
Indications for use - candidate qualification
A screening exam is recommended to ensure the patient has no underlying oral health issues. You may want to treat existing issues before recommending this whitening treatment and disqualify any patient who is perio-involved, exhibits failing restorations or is otherwise in an unhealthy oral state.
Patient's expectations
Set realistic expectations about potential results based on the oral exam and explain the following:
-Results vary by patient.
- Most patients will experience a change of up to 6-8 shades on value-ordered VITA® Classical Shade Guide.
- Anatomy, calcifications, age, tooth condition, hygiene and starting shade affect the results.
- Teeth with yellow and brown stains will achieve the most noticeable results.
-Teeth with gray shading from tetracycline or other medications may experience less noticeable results but should improve.
-Teeth with multiple colorations, bands, splotches or spots due to tetracycline use or fluorosis do not whiten as well, may whiten unevenly, and may require additional whitening treatments.
- Previous orthodontic treatments may cause teeth to whiten unevenly either due to residual resin remaining on the teeth or overpolishing upon removal.
-Crowns and other tooth-colored restorations will not whiten.
- Tooth-colored restorations may require replacement following whitening to maintain a uniform color.
Pre-treatment for reducing tooth sensitivity
It is recommended to prescribe the following prior to the treatment:
-Treat with a desensitizing toothpaste with 5 % KNO _3 twice a day for 14 days before the procedure
-NSAID adhering to the respective drug's instructions for use 1 hour before the procedure
Warnings
-Do not place a composite/bonded restoration within seven days after whitening treatment to ensure color stability of the composite/bonded restoration and bond strength to enamel and dentin.
-Do not use tooth whitening gel on anesthetized teeth.
- Tooth whitening is not recommended when there are previous injuries in the gingival tissues.
-Avoid contact of whitening gel with eyes and soft tissue. If contact with eyes occurs, rinse eyes immediately with plenty of water and seek medical advice.
Intended use
Philips Zoom! Light-Accelerated WhiteSpeed Kits are for use with Zoom! WhiteSpeed Light-Accelerated Tooth Whitening Gel. The Light-Accelerated procedure kit contents are intended to be used as follows.
Kit contents Intended use
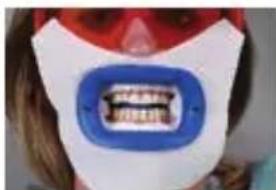
| Lip retractor Moves the lips and cheeks away from the teeth, protecting the lips, cheeks and tongue from coming into contact with the whitening gel. | |
| Face bib Help protect the patient's face from the light source. | |
| Liquidam (gingival barrier material) | Used as an isolation material to prevent the whitening gel from contacting gingival tissues. |
| Cotton rolls Separate the upper and lower vestibule during the procedure and help isolate the patient's lips from the teeth. | |
| Gauze squares Help isolate the patient's lip from the teeth and provide additional separation between the upper and lower vestibule. | |
| Saliva suction tip Remove excess liquid/saliva that may accumulate during the procedure. | |
| Whitening gel applicator brush | Apply whitening gel to the patient's teeth. |
| Light guide An accessory to the LED Accelerator used to help align the head to a specified distance between the LED Accelerator and the patient. | |
| Relief ACP oral care gel Relieve discomfort from dentin sensitivity. | |
Contraindications
Philips Zoom! WhiteSpeed Light-Accelerated
Tooth Whitening Gel is not for use on or by:
-Pregnant or lactating women.
-Patients currently being treated for a serious illness or disorder, e.g. immune compromised, AIDS, etc.
-Patients under 18 years of age.
Possible side effects
-Teeth sensitivity or hypersensitivity.
-Gingival irritation or burn if Liquidam soft tissue isolation is not placed in accordance with the instructions in the Light-Accelerated procedure kit.
Frequency of use
Philips Zoom! WhiteSpeed Light-Accelerated Tooth Whitening Gel is intended for a single patient treatment. A single treatment typically consists of three to four 15-minute applications. A patient may be treated more than once at the discretion of the dental professional, allowing seven days between treatments.
Safety
-Dental professional and patient need suitable protective covering and Zoom! protective eyewear.
-Avoid whitening gel contact with soft tissue and eyes.
First aid instructions
- Contact a Poison Information Center or medical doctor immediately if a large quantity (over 25 % of the syringe) is swallowed. Provide the ingredient label if possible. Do not induce vomiting. Immediately give a glass of water.
-If whitening gel gets into the eyes, hold the eyelids apart and flush the eyes continuously with running water for at least 15 minutes.
-If improper isolation leaves a patient's soft tissue exposed to light, administer a nonsteroidal anti-inflammatory drug (NSAIDs) adhering to the respective drug's instructions for use.
Precautions
The whitening gel must be removed from refrigeration and warmed to room temperature so it will thicken before it is applied to the patient's teeth. Either:
-Remove the syringe from refrigeration at least 6 hours before use (preferably the night before) or
-If removed just prior to use, place the syringe in a cup of hot water (49^) for 10 minutes. Remove the syringe from the water and wait 5 minutes before extruding gel.
Note: Improper soft tissue isolation may result in irritation or burning of gingiva or swollen lips due to WhiteSpeed Accelerator light coming into contact with tissue. Improper soft tissue isolation may also results in chemical burn due to whitening gel coming into contact with tissue.
Note: Wait one week after whitening to place restorations. Patients with porcelain fused to metal crowns, amalgams, lingual bars or implants will feel excessive heat.
In-office whitening treatment
Before the in-office whitening treatment
Complete diagnosis of patient, treat for sensitivity (see 'Pre-treatment for reducing tooth sensitivity') and fabricate trays prior to whitening treatment (see EVA tray material instructions for use if provided).
In-office whitening treatment
1 Pumice teeth just prior to whitening.
2 Remove the light guide from the packaging and place it on the LED Accelerator.
3 Switch on the LED Accelerator using the power button located on the side of the power pack. When the light guide is attached, the display reads 'Guide Status-Guide Attached' followed by 'X of X Sessions'.
4 Place the surgical suction tip on the high vacuum suction.
5 Place the Zoom! protective eyewear on the patient.
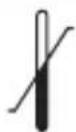
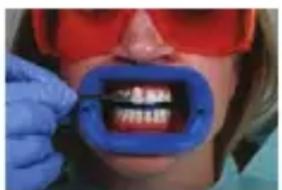
Note: The retractor provided is necessary to ensure proper positioning of the LED Accelerator head and additional protection from light.
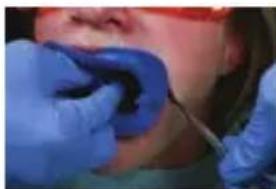

Note: The retractor has been specifically engineered to work with the Philips Zoom! WhiteSpeed Light-Accelerated Whitening System. Do not substitute.
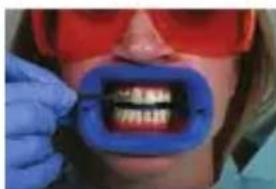
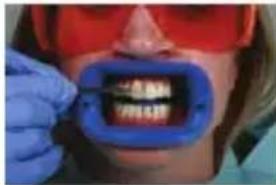
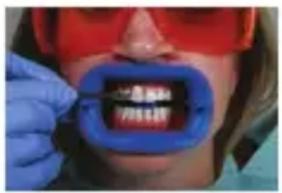
7 Take a retracted 'before' photo using a matched shade tab.
8 Fully recline the patient.
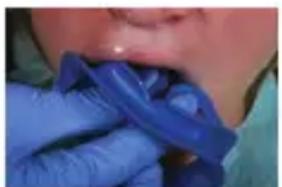
9 Place cotton rolls in the center of the upper and lower vestibules. If the cotton rolls are too large, unfold the gauze and twist it like a cotton roll.
Note: Do not substitute gauze. The gauze provided has been tested and proven to provide superior protection.

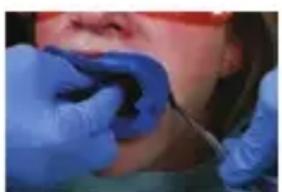
10 Fully open the gauze squares and fold them into triangles. Place the apex of the triangle into the posterior cheek, tuck the balance of material into the cheek, tucking the ends between the cotton rolls and the retractor.
11 Carefully place one face bib around the retractor, one side at a time. Add an additional bib for heavy salivators.
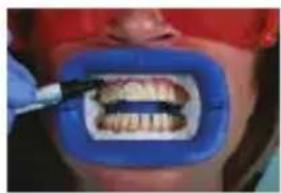
12 Remove the Liquidam syringe from the packaging, twist to remove the cap and attach the metal tip.
Note: Exposed dentin and tissue should be covered by barrier material. Use the 'no pink' rule.
13 Dry soft tissue (failure to do so may create imperfect seal and allow whitening gel to migrate onto soft tissue) and begin by scalloping barrier material to CEJ area (gingival margins) on the upper teeth slightly overlapping enamel and interproximal spaces to form enamel seal.
14 Cure the application of Liquidam using a curing light.
Note: Liquidam can become warm upon curing. Move the light back and forth across the arch using a sweeping motion for about 10 seconds.
15 Change to the plastic tip. Fill in from the cotton roll to just formed line of Liquidam and cure. Be sure to cover all interproximal areas leaving no soft tissue exposed.
On the lower arch, apply Liquidam using the same method.
Use the tip of the syringe to press lightly on the application to ensure that it is completely cured. The material should be solid and have no give.
If necessary, cure the arch again for an additional 5 seconds.
The application should extend distal at least one tooth beyond the area receiving the whitening gel and should be 2mm thick.
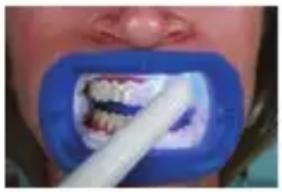
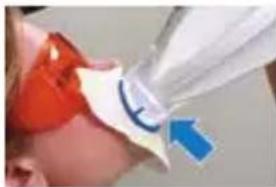
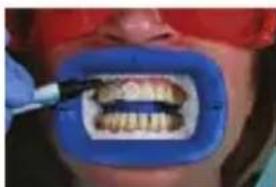
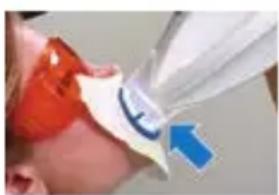
16 Remove the cap from the room temperature whitening gel syringe. Attach the mixing tip by aligning the marking and secure it by turning it one quarter turn clockwise. Using the blue brush provided, apply whitening gel to the patient's teeth (1 - 2 mm thick).
Use caution not to disturb the barrier material. Gingival irritation can occur with prolonged exposure to the whitening gel.
Note: A small air gap or bubbles in the syringe due to degassing of the whitening gel is normal. If the air gap is near the front of the syringe, purge until both sides of the barrel extrude gel.
Note: A slight yellow or pink coloring of the whitening gel is a normal occurrence from the manufacturing process. There is no impact on the peroxide content, other chemical properties, or performance of the whitening gel. It will not discolor the patient's teeth.
17 Once the whitening gel application is complete, raise the back of the chair so the patient is in a slightly reclined position (-45 degree angle) and able to swallow comfortably while maintaining light pressure on the bite block.
Note: The light guide is designed to ensure proper distance and alignment to maintain correct light exposure on the smile zone.
16English
18 Slide the LED Accelerator into place next to the patient. The arm of the LED accelerator should be movable, but stable. Position the LED Accelerator head by aligning the slots on the light guide with the retractor.
19 Follow the prompts on the display panel to switch on the light and to activate the timer. Once the light is on, a countdown is displayed. Light emits from where the arrow points. Light emits from the LED accelerator head to shine on the patient's teeth.
It is normal for the light to flicker for the first few seconds.
The LED Accelerator beeps once when three minutes of the session are remaining and beeps three times in the final three seconds of the 15-minute session.
When the session is finished, the light goes out and you hear a long beep.
Note: If a session must be interrupted, press the 'Pause' button. The remaining session time flashes on the display. To reactivate the session, press either the 'Pause' or 'Start' button.
20 Inform the patient that the progress of each session are tracked by four white lights on top of the LED Accelerator head. Each light indicates one quarter of a session.
Note: During each 15-minute session, make sure the patient has a means of communication (e.g. a bell) or do not leave the patient unattended.
21 After each session, gently pull the LED Accelerator away from the patient, taking care not to dislodge isolation materials.
Note: At the end of each 15-minute session, the display indicates the number of remaining sessions left on the light guide. Press ,Start' to activate the light for the next session.
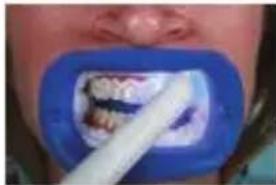
22 Carefully remove the whitening gel with the surgical suction tip and/or wipe the surface of enamel clean with damp gauze. Do not irrigate as the force of the water may pull the dam loose and saturate isolation materials.
23 Check the isolation materials to make sure 'no pink' tissue is visible. Replace or add isolation if needed.
24 Follow the same instructions as above for the remaining sessions.
25 When all sessions on a light guide are finished, the display reads 'Sessions Complete' for three seconds, followed by 'Guide Status - Replace Guide. Detach the light guide from the IsoPrep retractor and pull the LED Accelerator away from the patient.
Note: For sensitive patients, lower the intensity of the LED Accelerator. However, please note this could result in a fourth 15-minute session.
Tip: If the patient notes tooth sensitivity, place Relief ACP (found in the procedure kit or in the patient's Post Care & Maintenance kit) on the lingual surface(s) for the remaining sessions. After the last session is complete, detach the light guide from the retractor and pull the LED Accelerator away from the patient. Suction or wipe the whitening gel from the teeth. Moisten gauze and cotton rolls and remove the isolation materials. If barrier material remains interproximally, remove it with floss.
26 Reinsert the retractor and take a retracted 'after' photo with the lighter shade tab in place. Measure the shade change by counting the shade shift according to the value-ordered shade guide.
Maximizing results
Advise the patient not to consume coffee, tea, red wine and tobacco for two hours after the whitening treatment, until the salivary pellicle reforms on the teeth.
All tooth whitening requires maintenance. The patient may choose to have the whitening treatment again or to use a maintenance product 1-3 nights every 4-6 months, depending on their habits.
At home post care and maintenance Sensitivity relief
Philips Relief ACP oral gel has been shown to decrease tooth sensitivity. Place Relief ACP oral care gel into the take-home trays and set on patient. Normal wear time is 10–30 minutes once per day. If the tray is not available, brush the product on the teeth. Do not spit for approximately 3 minutes. For the best results, do not drink or eat for 30 minutes after application. See the Relief ACP oral gel instructions for use for complete instructions.
At home whitening maintenance
24 hours after the whitening treatment, the patient may use NiteWhite or DayWhite Whitening Gel to maintain or further enhance their results. See the Zoom! NiteWhite/ DayWhite patient instructions for use for complete instructions.
Storage instructions
Whitening gel should be stored at 2^ - 10^ . Storage temperature above 10^ will result in reduced shelf life.
1700A South Baker Avenue
Ontario, CA 91761 USA
philipsoralhealthcare.com

EMERGO EUROPE
Prinsessegracht 20
2514 AP Den Haag
Niederlande

-Philips Zoom! WhiteSpeed Light-Accelerated Tooth Whitening Gel
philipsoralhealthcare.com

EMERGO EUROPE
Prinsessegracht 20
2514 AP Den Haag
Pays-Bas

1700A South Baker Avenue
Ontario, CA 91761 SAD
philipsoralhealthcare.com

EMERGO EUROPE
Prinsessegracht 20
2514 AP Hag
Nizozemska

-IsoPrep retractor (2)
-Philips Zoom! WhiteSpeed Light-Accelerated Tooth Whitening Gel
1700A South Baker Avenue
Ontario, CA 91761 USA
philipsoralhealthcare.com

EMERGO EUROPE
Prinsessegracht 20
2514 AP L'Aia
Paesi Bassi

1700A South Baker Avenue
Ontario, CA 91761 USA
philipsoralhealthcare.com

EMERGO EUROPE
Prinsessegracht 20
2514 AP The Hague
Olanda

Tava de procedura (2) include:
-Bavetãpentrufata (2)
-Patratale de tifton (6)
-Seringă pentru izolătie tesuturi moi Liquidam, 2,9 g (1)
-Varf de ac Liquidam (1)
-Varf negru Liquidam (1)
-Role din bumbac (2)
-Varf de aspirare chirurgicala (1)
-Pensulă de aplicare (1)
1700A South Baker Avenue
philipsoralhealthcare.com

EMERGO EUROPE
Prinsessegracht 20
2514 AP Haag
Alankomaat

1700A South Baker Avenue
Ontario, CA 91761 CAU
philipsoralhealthcare.com

EMERGO EUROPE
Prinsessegracht 20
2514 AP The Hague
HnAepaHaN

VITA e peRnCTpnpaHa TbProBcKa Mapka Ha VITA
HeycneuHn peCTaBpaun nn mMaT pyro He3paBO CbCTOHNe, CBbp3aHO C yCTHaTa KyxHnA.
OuakBaHnHa NaunHeNTIte
Cb3daItepeaIncTnHnOuaKBaHna OTHOCHO
NOTeHnAHHTe pe3yATaN Bb3 OCHOBa Ha OpaAHnA
IperAedNOBacHeTe cAeDHOTo:
-Pe3yataTte Bapnp np pa3aunHnTe naeHTn.
-При повechето пашиенти ce постига помянаdo6 -8нюанca по Класиескaita pa3цьettingа с подреденno StOnHocTи Нюанси VITA® Classical Shade Guide.
-AHaTOMuHnTe OcO6eHoCTn, KaUnpaHnTa, Bb3paCTTa, CbCToHnETo Ha 3b6Nte, yCTHaTa XnIneHa N HauAHHnT HIOaHC ONpeDeAeT KaKBr Ie 6bDaT pe3yTAtNTe.
-Ha-3a6eJekmpe3yTaTn ce nocTnraT npn 3b6n C KbATN KaqABN neTHa.
-Прии збпс Te CBС CBBO OCBeTЯBaHe BCAnEДCTBHe Ha TeТрацИКAnH ИИ Дуг ПЕКAPCTBa мОже Да Има NOcA6O ИЗразецп pe3yIaTn, HO CBшо 6N ТрЯБВАО DA nOKaЖAT NOДОБpeHne.
-3b6n c pa3aunHn OcBETBaHn, nBnU, neTHa nn ToUKN BCAECTBHe Ha yNoTpe6aTa Ha TeTpaUNKAn Hn AyopO3a cbIoo He ce n36eABaT, MoKe Da ce n36eAHT HepaBHomepHo n Da n3NCBAt AOINbAHNTeAHn IpOueDypn 3a n36eABaHe.
-Претшин optoOHTcN npoueAypn MOnke da DOBeaT Do HepaBHomepH O36eAbaHe Ha 3b6nte IAN aKO nO 3b6nte mMa OCTaTbUHa CMOa OT npOuEaPata, IAN aKO 6bTa TpeKaAeHO NOpIpaHIN pRn OTCTpaHraBaHeTo I.
-KopOHKn I ApyrI peCTaBpaCn C UBeTa Ha 3b6nte HMa Da Ce N36eAraT.
-3a Da Ce 3aNa3n eDHaKbB UBeTbT Ha peCTaBpaCn C UBeTa Ha 3b6NtE, MoKe Da Ce HaIoXn Te Da Ce CMeHrT CKeD N36eABAHe.
ПпeДВарNTeАно TpeТиране 3a НаMaλЯВанe На ChYВСТВИТeАнOCТTa Ha 3b6NtE
IpenopbHTeHoe e da npa npiuweTe caeHOTo npa npoueAypata:
-TpeTnpaIte c obe3yBCTBBAuca nacTa 3a 3b6n c 5 % KNO₃ ABA ΠbTN AHeBHO B IpoAβλKeHne Ha 14 ΑHn IpeAn IpoUeAypaTa
-HCnBC, KaTo ce cna3BaT cbOTBeTHnte INHCTpyKuIN 3a ynoTppe6a Ha AekapCTBOTO, 1 Yac npedn npoueAypata
PpeAynpeJKeHn
-He nocTaBryTe KOMnO3HTHn/CbeDInHeHn C 6oHd peCTaBpaUu B paMKITE Ha ceDem dHn cAeD npoueAypaTn PO n36eAbaHe, 3a Da Ce rapaHTnpa Cta6nAHOCT Ha ZBeTa Ha KOMNo3HTHnTe/CbeDInHeHn C 6oHd peCTaBpaUu N cHa Ta Ha CBbp3BaHe KbM eMaIHa I DeHTnHa.
-He n3noA3BaITe n36eAbaunra Ea 3a 3b6n Bbpxy 06e3yBCTBeHn 3b6n.
-36eBaHe Ha 3b6n He ce npenopbUba pni HaAnuHcHa npexxOHN TpaBMN B TbKaHInTe Ha BeHInTe.
-ИЗбягваite KOHTaKT Ha ИЗБeАВациЯ reA C Oчnte
И MeКИTe TьKaHи. B CλуЧан Ha KOHTaKT C OчNTe
He3a6aBHo ИЗПАakHeTe OБИАно CBODa N NOТьPcTe
MeДиЦИнСka ПOMош.
PpeHa3HaueHne
IpoAkyTITe 3a n36eAbaHe Ha 3b6nte Philips Zoom! 3a n36eAbaHe Ha 3b6n CbC CBETAHHNO aKTUBipaHe Philips Zoom! WhiteSpeed ca npEHa3HauEn 3a n3noA3BaHe c n36eAbaunr rA 3a 3b6n CbC CBETAHHNO aKTUBipaHe Zoom! FAn 3a 3b6n C yCKopeHO OT CBETAHaTa DeiCTBne WhiteSpeed. CbDbpxKaHneTO Ha KOMnAeKTA 3a npOueDypa C yCKopeHO OT CBETAHHaTa AeIcTBne e npEHa3HaueHO Da Ce N3NoA3Ba, KaKTo CAEBA.
CbAbpJkaHneHa KOMnAeKTa
PpeHa3haueHne
| Ретрактор за устни Истелу устни и 6узITE наострани OT збITE, koTO така пеДпа3ва устни, 6узITE и e3иka OT KOТаKTС истелвашя гeλ за 3b6и. |
| Иставник за лице Пгедима Зы сcentею на паслену OT CBETAVHNYИЗTOUHNK. |
| Liquidam (maTeрпал за Истолране над венцinte) Истелу се кATO Истолрашь матерпал ЗАпсNTe 3a пеДOTВРТЯВаNE На КОТаКТа Над ВSTБАПСЕУ REA C TБКАПСЕУ H ВЕЧNTe. |
| Памунни рoALКИ РASTDEЛТ ГОНTO И ДОЛНOTO пгEDВерп.e Na YSTHaTа КУХINа NO Вразе Ha proSUeDUPaTA N 3a ИстOLранe Над устни На паслену OT 3b6и. |
| Ква'dрathNi парейл.TогнOTO И паслену OT збITE и 3a OCSryPЯВаNe Ha ДОЛВANITeALNO pa3deLЯнe МeЖДу ГОНTO И ДОЛHOTO пгEDВерп.e NaYINH.Na. YSTHaTaN KUxINa. |
| СIoHOCMyKaTeLEн НakрайнIC ONCTРANBA ИстINHaTaN TeuHocT/ СIoHKA, KoYTo можe Дa ce sb6иpa NO Вразе Ha proSUeDUPaTA. |
| ЧeТka за нанасяп.e Na I36eALBaS. reλ Наася ИстELBauSrga LВpXy 3b6иTe Ha паслену. ВODaч за лamпа Аксесоap КьМ akTINВИршаТа LED лamпa, кoYTo ce ИStIOAN3Ba ЗА подраВнЯВаNE Ha IaBaTa Na ОпpeДeLENo pa3CTOЯнe MeJdY akTINВИршаТa LED лamпa и пас�NTa. |
| Гeλ за орална grpinka Relief ACP O6leKUva ДИSCOMФорta OT ЧВСТВИТЕАHOCCTTaN Ha DeHTNHa. |
ПopotNVВОПОКаЗАнЯ
Пюдуктinte за ИЗбeАВане на 3ьбиTe Philips Zoom! ИЗбeАВaциЯт гeλ 3a 3ьби C усКорeHo OT CBetAnHaTа DeйстВе Philips Zoom! WhiteSpeed He ТряБва Дa ce ИЗПОАЗВa OT ИAN ВьрXY:
-БремEHи ИAN KbPMeUx JKeH.
- Naциенти, КОпTo ca B поцec Ha А ueнe Ha cepиоЗно 3a6oЯBaHe ИИ CBCTОгнe, KaTo HapprIMep KOMnpOMeTupaHa ИмУнHa CnCTeMa, CПИH nAp.
-ⅡaueHTnno18-roAnHaBb3paCT.
Bb3MOxHn HeXeHaHn peakun
-увстВиTeAHOCT nAN CBpbxUyBCTBNTeAHOCT Ha 3b6nte.
-Pa3dpa3HeHne Hn npaHe Ha BeHcHTe, aKO n3OlaunTa 3a MeKn TbKaHn Liquidam He ce noCTaBn npaBnHO Cbo6pa3Ho INcTpyKcHnTe B KOMnEKTa 3a npoueDypaTa C yckopeHo OT CBETAnHaTa DeiCTBnE.
YecToTa Ha n3n0A3BaHe
IpoAkyTITe 3a n36eAbaHe Ha 3b6nte Philips
Zoom! N36eAbaHr reA 3a 3b6n c yckopeHo oT
CBetAHnHaTa DeiCTBVe WhiteSpeed e npedHa3NaueH 3a
IpoUeApya C eINH NaUeHr. EINHnHuHaTa IpoUeApya
ObIKHOBeHO Ce CbCTOn OT TpN DO YeTnPn IprnAraHnA
C IPOdBAKHTeAHOCT OT NO 15 MInHyTN. EINH NaUeHr
MOKe Da 6bDe AekyBaH NoBue OTR BeDhBxNo
YCMOTpeHne Ha CpeuHaNCTa No
AeHTaHa MeDnUHa, KaTO Ce IIO3BOAraT ceAeM AHN MeKdY IpOuCeAypnte.
Be3onachoct
-CneuHaNTbT NO AeHTaHa MeDuHa Ha NaueHbT Tp6Ba Da N3NoA3BaT NOxO4uN 3aunTHn NOKPbAA u 3aunTHn Ouaa Zoom!.
-ИЗБЯВаЙТЕ KOНТАКТ Ha ИЗБeΛВаЦЯ reA C MeKINTe TьКaHI N OчINTe.
Hnctpykun 3a npbPba nOMOu
-KoHcyTnpaIte ce He3a6abHo c HOpMaunOHe nHTbp 3a OTPaBraHn IAN C Aekap, aKO e NOrbHaTo rOAMo KoAnueCTBO (HaD 25%OT cnpnHouKaTa). PpeDoCTaBeTe etNKeTa cbc CbCTaBKnTe, aKO e Bb3MOxHo.He ppeDu3BnKBaITe NOBpbUaHe. He3a6abHo DaIte yAsha BOda.
-Ako n36eAbau, reA nonaDHe B OunTe, dpbKTe KAnaHTe OTBOpEHn IN POMBaHTe OUnTe HePpeKbCHaTO C Teuaa BOda B IPOAbKeHne Ha Na-MaKo 15 MNHyTN.
-Ako Heo6pa H30aun OCTaBn MeKa TbKaH Ha NaueHTa N3AOxHeHa Ha CBeTAnHaTa OT AAmNaTa, PnAoKeTe HeCtepondHO IpOTNBOb3PaAHTeAHO cpeAcTBO (HCINBC), KaTO cna3BaTe cbOTBeTHnTe INHcTpuku 3a HeRoBaTa yNtpe6a.
PpeApa3HmepKn
I36eAbaunr TReA Tpr6Ba Da 6bDe n3BaDeH OT XaADnAHnKa N 3aTOpAnE H Do CTAHa TeMnepaTpya, 3a Da ce CbCTN, PpeDn Da Ce HaHece No 3b6HTe Ha NaUeHTa. HanpaBeTe eAHO OT CaeHNTe Hea:
-ИЗвадеTe сприиюВКаТа OT XАДИАнИКа NOHe 6 УаСапpeДи yNotpe6a (3a пpeДночтAne пpeДишНaТa HOш) ИAN
-AKO n3BaAnTe cnpnHcOBkata ToUHO npeAn ynoTpe6a, noCTaBeTe aB YaHa TOnA YeuMna BOda (49 ^ C 3a 10 MInHyTu. N3BaTe cnpnHcOBkata OT BOdTa I n3yakaiTe 5 MInHyTu, npeAn Da n3CTnCKaTe reA.
3a6eJkKa: Heo6poTo nOuipaHe Ha MeKHTe TbKaHIMoKe Da DOBeDe AO Dpa3He He Hn N3rApHe Ha BeHcnteNNI NOyBaHe Ha yCTHnTe NOPaDN KOHTaKT Ha TbKaHITecBc CBeTAnHaTa OT aKtNBpauaTa lamna WhiteSpeed.Heo6poTo nOuipaHe Ha MeKHTe TbKaHIN cbIo TaKaMOKe Da DOBeDe AO XmNuecko N3rApHe NOPaDN KOHTaKT Ha TbKaH C n36eAbaunrReA.
3a6eJekka:U3yaKaIte eHa ceMnua cAed
u36eBAHeTo, 3a Da NOCTaBnte peCTaBpaun. NaueHTN
c MeTaIOkepaMHN KOpOHKn, aMaAMH NlOM6N,
AHnRbAAH NdbrN Hn IMPaHTN Ue YCeUaT No-TOAma
TOpAnHa.
Процетура за ИзбeВане В Зв6оЕКapСКИ ka6инет
PpeHn npoueAypata 3a n36eAbaHe B 3b6OLekapcknKa6HHet
I3BbPWeTe DnarHocTnKa Ha NaueHTo n TpeTnpaHe 3a YyBCTBnTEAHOCT (BWK. 'PipeDvapnteAHO TpeTnpaHe 3a HamaAbaHe Ha YyBCTBnTEAHOCTTa Ha 3b6nTe') IN 3pa6oTeTe uHHTe npEdupaTa 3a N36eABAHe (BVkTe INHCTpyKuNTe 3a yNtpe6a Ha MaTepnaAa 3a EVA uHHTe, ako ca npdeOCTaBeHN).
PpOeApya 3a n36eAbaHe B 3b6oAeKapcknKa6HHeT
1 ⅢAnfoBaIte3b6nte c nem3a HnOcpeAcTBeHO npdeNn36eABAHeTO.
2 MaxheTe BOdaa 3a Aamnata OT ONaKOBkata N Iro nocTabete Bbpxy aKTHBnpaaata LED Aamna.
3 BkIoUeTe aKTHBnBaAaTa LED aAMna ype3 6yToHa 3a 3axpaHbAHe, pa3noLoJKeH OTCTpaHn Ha 3axpaHbAaHn 6AoK. Korato BOaHyT 3a aAMna 6bDe 3akpeHn, Ha dncIaJe Ie ce nokae ,Guide Status-Guide Attached" (CbctOraHne Ha BOaHa - BOaHyT e 3akpeHn), nocaeBaHo ot ,X of X Sessions" (X ot X ceaHca).
4 NocTaBeTe XnpyprHnra CAnOHOCMyKaTeaeh HaKpaHnK KbM BaKyyMHnra 3aXBaT.
5 IocTaBeTe 3aunTHnTe OuHa Zoom! Ha naueHtA.
3a6eJekka: PpeOCTaBeHnT peTpaKTop e Heo6xOdM 3a OcNpyraHe Ha npaBnHO N03uONHpaHe Ha TaaBaTa Ha aKTbHpaAaTa LED Amna I DoNbHHTeHa 3aUHTa OT CBETAHaTa.
6 BkapaTe peTpaKTopa NOA, bIbA, KaTo n3TeAraTe eHa nO eHa cTpaHITe C NOMoUta Ha 3b6Oaekapcko OfAdaAo.
3a6eJekka: PeTpaKTopbTe cneuHaHO npoeKtupan 3a pa6oTa cbc cnCTemaTa 3a n36eAbaHe c yckopeHo OT cBeTAnHaTa DeiCtBnE Philips Zoom! WhiteSpeed. He n3POnA3BaIte 3aMeCTHTeA.

7 HanpaBeTe cHIMKa ,npeAn" 3aeAHO c peTpaKTopa, KaTO N3NO3BaTe eTNIkET CbC CbBNaAaNHa HIOaHC.
8HaKaHOHeTe NaUeHTo Da AerHe OOKpaI.
9 NocTaBete NaMyHHTe POANB CpeaTa Ha rOpHOTn DOAHOTO npeADBepne Ha yCTHaTa KxNHa. Ako NaMyHHTe POANCa npeKaAeHO roAEMn, pa3rBHeTeMapraTn RaHbInTe KaTO NaMyHa POAna.
3a6eJekKa: He n3noA3BaIte 3aMeCTnTeHa MapAraTa.
PpeOCTaBeHaTa MapAe TeCTBaHa N e DOka3aHo, Ye
OCnrypRaMaKcMmAHa 3aUHTa.
10 OTbOpTe N3UAno KBaApaTHnTe NapYeTa MapA
Hn CbHeTe Ha TpNbBbAHnC. IocTabeTe Bbpxa
Ha TpNbBbAHnKa B 3aDHaT aYacT Ha 6y3aTa,
NoIbXHeTe OCTaTBka OT MaTePnaAa KbM 6y3aTa
Taka, Ye KpaNtata Da ca MeJdY NaMyuHnTe POAKn n
peTpakTopa.
11 BHIMaTeAHO NOCTaBeTe eAnH AnrABHnK 3a Anue OKOAO peTpaKTopa, cTpHa nO cTpHa. OobabeTe AOJIbAHHTeAeh AnrABHnK 3a NaUHeTHn C O6nAHO CAIOHOOTdEAAHE.
12 Ⅱ3BaTe cπpHcOBkata c Liquidam ot onakOBkata, 3aBbptTe KaNaYkata, 3a DaЯ CBAHTe, n 3aKpenTe MeTaAHnHaKpaHnK.
3a6eJekKa: OTKpNTte DeHTnH TbKaHn Tpr6Ba Da 6bDaT NOKpNTc n3OAnpaaMaTePnaA. N3noA3BaIte npaBnATO,da Hma PO3OBO".
13 IocyuTe MeKHTe TbKaHn (aKO He ro HapabNTe, MoKe Da He ce NoAun Do6pa N3Oaun, KoETo ige N03BOAn Ha N36eAbaunr Ra Da DOCTnIRHe Do MeKHTe TbKaHn) n 3aNoUHeTe, fecTOHpaNn N3OaUnpa, MaTePnaI NO o6AACTTa CEJ (kpanuata Ha BeHnTe) Ha rOpHnTe 3b6n, KaTO AeKO npenokpnbATE emaHa n MeKdy3b6HnTe npoctpaHCTBa, 3a Da ce O6pa3yBa N3Oaun Ha eMaHa.
14 BTBbpeTe HaHeceHnla Liquidam c nOMoTaHa 0TOIOnAImepn3npa#a AAMna.
3a6eJekka: Liquidam Moke da ce 3arpee npi
fOTOnoAMepn3npaHeTo. ABnKeTe AamPaTa HAppeA
HnHa3aD NO DbRaTa C n3MnTaUO ABnKeHne 3a OKoAo
10 cekyHAn.
15 CmeHete HaKpaHHka c PAACTMaCOBna. 3aIbAHeTe OT NaMyHaTa POkKa KbM TOKy-IO φOpMnPaHaTa AINHn Liquidam n φOTOnOAnmepn3npaIte. 3aDbAKnTeAHO NOKpInTe BCnKm MeKdY3b6Hn IpocTpaHCTBa n He OCTaBnTe OTKpNTn MEKN TbKaHN.
Hahecete Liquidam Bbpxy OAnhaTa Dbra nO cbunn. NaH.
PnTtncHe TKe HaeceHna MaTePnaC Bbpxa Ha CnpnHcObKaTa, 3a Da CTe CNrpyHn, Ye e HAnbHO fOTOnoAImepn3upaH.MaTePnaBbT Tp6Ba Da e COAnDeH n Da He NoDaBa.
Ako e Heo6xOAMo, fOTOnoAMpeu3npaTte DbraTa OTHOBO oue 5 ceKyHAn.
HaheHenrMaTePnaTp6Ba Da ce npoctnpa B DACTaHa NOCOKa Hau-MaKo eHN 3b6 OTBbD O6AACTTa, B KOrTO ue ce HaHacr ReA 3a N36eBAHe, n Da e C De6eHHa 2 mm.
16 CbaeTe KaaKaTa OT cnpHcOBKaTa c n36eAbaI reHa cTaNHa TempepaTypa.
PnKpeTe cMeNTeHaTa KaHIOA, KaTO NOpaBHTe MapKnpOBkata, n a KcnpaTe, KaTO 3aBbPTnte yeTBbPT o6oT no yacOBHnKObaTa CTpeAka. KaTO n3noA3BaTe pedeocTaBeHaTa CnHra YeTKa, HaneCeTe n36eAbaI rE A Bbpxy 3b6nte Ha NaunehTa (c De6eAHa 1-2 mm).
BnMaBaIte Da He 3acerHeTe N3OAnpaunmaTePnaA. MoKe Da Bb3HnKHe Dpa3HeHe Ha BeHcnte npi npoDbAaHTeALHO n3AaraHe Ha n36eAbaunraReA.
3a6eJekka: HopMaIHo e Da IMa MaIka Bb3dUsha
Ipa3HnHa IAN MexypeTa B CnpHcOBkata
3apaN DeRa3HpaHeTo Ha N36eAbaunr reA. Ako
Bb3dUshaT a Ipa3HnHa e 6An3O Do npEHaTa YacT Ha
CnpHcOBkata, HaTncHeTe, OKaTO OT DBeTe cTpaHn
Ha OTDeAehneTo N3Ae3e reA.
3a6eJka: HopMaHno e ot npOn3BOdCTBeHn
npOuec Da HaCTbNn Aeko XbATO Hn pO3OBO
OuBETBaHe Ha n36eAbaunr Ra. ToBa Hma eEKT
Bbpx CyabpKaHneTO OT nepOKnD, ApyHn XmMueckn
CBOICTBa Hn eEKTINBHOCTTa Ha n36eAbaunr Ra.
To Hma Da Obe3UBeTn 3b6nte Ha naUneHTa.
17 Korato 3aBbpiu HaHacnHeTo Ha reA, BAnrHeTe o6IeRaKaTa Ha CToA, TaKa Ye NaUeHTbT Da e B AeKO HAKoHENo NIOOKeHne (bTbA OKoAo 45 rpaDyca) n Da MoKe Da IpeAByu yDo6Ho, KaTo NODbPka AeK HaTnCK Bbpy npncnoc6eHneTo 3a 6oKnpaHe Ha 3axanKaTa.
3a6eJekka:BoaaybT 3a lamna e npoeKtnpaH da Ocngyra gnpaBnHO pa3CTOarHne nnoDpaBnBaHe, 3a Da ce NODbpKa gnpaBnHO Bb3dEInCTBne Ha CBETAHHaTa Bbpxy 3OHaTa Ha yCMNBkTa.
18 ΠаьзHeTe aKTHBnPaaTa LED aAMna Ha MЯcTo, 6An3O Do NaunEnTa.PamOTO Ha aKTHBnPaaTa LED aAMna Tp6Ba Da MoKe Da ce ABxN, Ho Da e Cta6HNO. I03nIOHpaIe rAbaTa Ha aKTHBnPaaTa LED aAMNa, KaTO NOpaBHIne Pnppe3Ine Ha BOdaHa 3a aAMNa c peTpaKTopa.
19 CaeBaiTe INHCTpyKcunTe Ha NaHeHa Ha DnCnAe, 3a Da BkIoUHTe CBETAHHaTa N Da aKTINbPaTe TaMepa. Korato CBETAHaTa ce BkIoUH, Ie Ce nokaKe TaMep 3a o6paTHO OTbPOBaHe. CBETAHaTa N3AN3a OT NocOKaTa Ha cTpeAkaTa. CBETAHaTa N3AN3a OT rAbaTa Ha aKTHBIPAaTa LED Aamna, 3a Da OCBETN 3b6nte Ha naueHtA.
HopMaIHo e cBeTAnHaTa Da npMnRbA npe3 nbpBNTe HRAKO ceKHyDn.AKTnBnPaaTa LED lamna n3daBa eINH 3ByKOB CnHa, KOraTO OCTaBAT Tpr MNHyTN OT CeAHca, IN3DaBa Tpr 3ByKOBn CnHaA B NocAeHNTe Tpr CEyHn Ha 15-MnHyTHnra CeaHc.
Korato ceaHcB T npNKIOUH, AamNaTa n3raCBA u yBaTe AbbT 3ByKO B CnHaA.
3a6eJka:Ako HraKoI ceaHc Tp6Ba Da 6bDe IpeKbchAt,HaTncHeTe 6yToHa „Pause" (Pay3a).Ha DnCnAe Ie Mna OCTaBaIoTO BpeMe OT ceaHca.3a Da aKTHBnPaTe ceaHc OTHOBO,HaTncHeTe 6yToHa „Pause" (Pay3a) mN 6yToHa „Start" (CTapT).
20 YBeDoMeTe NaueHtA, Ye HappeBkB T npn BceKn ceaHc ce cAeN OT yeTnpn 6eAn Aamn Bbpxy rAbaTa Ha akTbnpaata LED Amna. BcKa Aamna o6o3Haaba eHa YeTBpT OT ceaHca.
3a6eJekka: Io BpeMe Ha BceKn 15-MnHyTeH ceaHc ce yBepTe, Ye naueHTbT pa3noAra Cbc CpeAcCTBO 3a KOMyHKaun (HaNP. 3BbHeu), NAn He OCTaBnTe NaueHTa 6e3 Ha3Op.
21 CaeB BceKN ceaHc BHIMaTeAHO OTCTpaHraBaIte aKTHBnPaaTa LED Aamna OT NaunEnTa, KaTo ce CTapaeTe Da He pa3MeCTInTe N3OAnpaunTe MaTePnAA.
3a6eJekka:B KpaHa BceKn 15-MnHyTeH ceaHc
AHCJIeT NOKa3Ba 6pOJ OCTaBaU n CeaHcN Bbpxy
BODaHa Ha AAMnTa. HATncHeTe „Start" (CTapT), 3a Da
aKTHBnPaTe AAMnTa 3a CKeDBAunr CeaHC.
22 BnMaTeAHOOTcPaHeteN36eAbaunraReaCnOMoTHaXHPyPrHnRA CIOHOcmyKaTeAen HApauHHNK N/nnNouCTeTe NOBbPxHOCCTTa Ha emaAaC BAAxHaMapA. He npomBaIte, TbKATO cIIaTa Ha BOHaTa ctpya MoKe Da pa3Xla6n KoepdaMa n Da HAMOKpn I3OAnpaUnTe MaTePnaAaN.
23 IpoBepTe n3oIpaunTe MaTePnaH, 3a Da ce yBepTE, ye He Ce BVkDa po3Oba TbKaH. CmeHeTe nn do6aBeTe n3oAuzn npn HjKda.
24 CaeBbAte cBUnTe yKa3aHnKaTo nO-rope n npn octaHaNTe ceaHcN.
25 Korato BCnckn ceaHcN Bbpxy BOdaq 3a Aamna 6bDaT npKIOUeHN, DncIeT NOKa3Ba „Sessions Complete" (CeaHcnte ca 3aBbPweHN) B npoAbJKeHne Ha Tprn cekyHAn, CaeA Koeto NOKa3Ba „Guide Status-Replace Guide"(CbCToRHe Ha BOdaq - cMeHeTe BOdaq). Pa3KaueTe BOdaq 3a Aamna ot petpaKTopa IsoPrep n OTCTpaHeTe aKTINBnPaaTa LED Aamna ot nauneHa.
3a6eJka: 3a yBCTBnTeAHH naueHTn HaMaAteuHTeH3nBHOCTTHa aKTHBnPaaTa LED aamna.IMaITe npEaBnO abYe ToBa 6n MoAo daDOBeDe AO YeTBbPtn 15-MnHyTeH ceaHc.
CbBET: Ako nauheHTbT yceTu yBCTBNTeAHOCT Ha 3b6nte, nocTaBeTe Relief ACP (BkIoueH B KOMnEKA t3a npoueDpyu nn B KOMnEKA t3a NocAeBaAsa rpnKa n noApbXka Ha naeHTa) NO AnHRBaHaHaTa(nte) nobbpxHoCT(1) 3a OCTaHaNTe ceaHcN. Cae, 3aBbPbBaHe Ha nocAeHaTa cecnpa3KaueTe BOdaa 3a lamna ot peTpakTopa nOTcPaHete akTbUpaAsaTa LED lamna ot naueHTa. N3cMyte nn n36bpweTe n36eBAaunr reoT 3b6nte. HabAAKHeTe MapraTaNamyHnTe poAKn n OTcPaHete n3OAnpaUnTe MaTePnAa. AKO B MeJx3b6HnTe npocTpaHCTBa e OCTaHaNn3OAnpaS MaTePnAa, OTcPaHete ro c KOHeu.
26 BkapaTe OTHOBo peTpaKTopa HnPaBeTe CHIMKa
,CAeD" 3aeHOC Hero N NOCTaBeH eTtKeTa Ha NOCBETA HIOAHC. N3MepeTe npOMHaTa B HIOAHCa, KaTO ppe6ponte C KOAKO HIOAHca ce e N3MecTnCNOpeA pa3CbETKaTa C NOdpeDeH N O CTOnHOCTN HIOAHcN.
3ana3BaHe Ha pe3yATaTHTe MaKcHMaAHO AbAro BpeMe
IocbBeTbaIte naeHtTa Da He KOHCymipa Kafe, Ya, YepBeHO BnHO N TIOTH B IPOBAAKeHne Ha DBA Yaca CaeI N36eBAUaTa IpoueDpya, DOKaTo He ce O6pa3yBa OTHOBO NeAikyA oT CAIOHKaTa No 3b6HTe.
BcraKo n36eAbaHe Ha 3b6nte n3nckBa IOpApbXka.
IaunHeTbT MoKe Da n36epe OTHOBo Da n3NOA3Ba n36eBAaTa IpoueAupa NAn Da yNoTpe6yBa npOdyKT 3a NOdApbXka 1-3 HOnn Ha BceKn 4-6 Meceua, B 3aBNCIMOCCT OT HABNUITE CN.
IocAeDbAsa rpnka n IoAApbXka y AOMa HamaAbaHe Ha cyBCTBHTeAHOCCTTa
Aoka3aHo e, ye opaHnT reA Philips Relief ACP HamaAraBa yVBCTBnTeAHOCTTa Ha 3b6nTe.
IocTaBeTe rea 3a opaHa rpnKa Relief ACP B shHnTe 3a BkBnN BbPxy naueHTo. O6nuaHOTo BpeMe 3a HocHe e 10-30 mHyTu BeaHbKdHeBHO.AKO Hma HaMnHa ShHa, HaHecTe c yeTka npOdyKTa nO 3b6nte. He PIOyTe 3a OKoAo 3 mHyTu. 3a IocTnRaHe Ha NaHDo6pN pe3yATaTN He NiHTe N He JxTe B npOdbAKeHne Ha 30 mHyTu CaeD hAnacRHe. BnKTe INCTpyKzNTe 3a yNoTpe6a Ha rea 3a opaHa rpnKa Relief ACP 3a PbAHn NoApO6HoCTn.
PoaApbKka Ha n36eAeHnTe 3b6n y doma
24 yaca cIeA n36eBbAsaTa npOceAypa naueHbT MoKe Da n3noA3Ba n36eBbAs reN NiteWhite nn DayWhite 3a noAdpBjKka n DOnBAHHTeAHO NOo6paBaHe Ha noCTnHaTna pe3yAta.T BnKTe nHcTpykUnTe 3a ynoTpe6a 3a naeHtta 3a Zoom! NiteWhite/DayWhite 3a IIbAHn NoAp06HoCTn.
4235.021.4256.3 (07/2019)
- Manufacturing information
- Symbols
- Important information
- Conditions of use
- Contents
- Packaged separately:
- Product description
- Indications for use - candidate qualification
- Patient's expectations
- Pre-treatment for reducing tooth sensitivity
- Warnings
- Intended use
- Kit contents Intended use
- Contraindications
- Possible side effects
- Frequency of use
- Safety
- First aid instructions
- Precautions
- In-office whitening treatment
- Before the in-office whitening treatment
- 16English
- Maximizing results
- At home post care and maintenance Sensitivity relief
- At home whitening maintenance
- Storage instructions
- Tava de procedura (2) include:
- OuakBaHnHa NaunHeNTIte
- ПпeДВарNTeАно TpeТиране 3a НаMaλЯВанe На ChYВСТВИТeАнOCТTa Ha 3b6NtE
- PpeAynpeJKeHn
- PpeHa3HaueHne
- CbAbpJkaHneHa KOMnAeKTa
- ПopotNVВОПОКаЗАнЯ
- Bb3MOxHn HeXeHaHn peakun
- YecToTa Ha n3n0A3BaHe
- Be3onachoct
- Hnctpykun 3a npbPba nOMOu
- PpeApa3HmepKn
- Процетура за ИзбeВане В Зв6оЕКapСКИ ka6инет
- PpOeApya 3a n36eAbaHe B 3b6oAeKapcknKa6HHeT
- BkapaTe OTHOBo peTpaKTopa HnPaBeTe CHIMKa
- 3ana3BaHe Ha pe3yATaTHTe MaKcHMaAHO AbAro BpeMe
- IocAeDbAsa rpnka n IoAApbXka y AOMa HamaAbaHe Ha cyBCTBHTeAHOCCTTa
- PoaApbKka Ha n36eAeHnTe 3b6n y doma
Brand : PHILIPS
Model : Zoom WhiteSpeed
Category : Teeth Whitening Device