
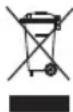
AC6020 - Vacuum Cleaner UFESA - Free user manual and instructions
Find the device manual for free AC6020 UFESA in PDF.
| Product type | Bagless vacuum cleaner |
| Technology | Cycle Tech |
| Main filtration | Permanent HEPA filter (washable) |
| Air outlet filter | HEPA filter (annual replacement) |
| Power regulator | Electronic, continuous adjustment |
| Tank capacity | 1.5 L (estimate) |
| Included accessories | Floor brush, wood floor brush, flat carpet brush, crevice tool, upholstery tool, furniture tool, telescopic tube, hose |
| Aromatherapy | Built-in compartments |
| Full tank indicator | Yes, luminous |
| Cord rewinder | Automatic, pedal |
| Mobility | 360° wheels, carrying handle |
| Use | Domestic |
| Supply voltage | 220-240 V ~ 50/60 Hz |
| Power | 700 W (approx) |
| Filter missing detection system | Yes |
Frequently Asked Questions - AC6020 UFESA
User questions about AC6020 UFESA
0 question about this device. Answer the ones you know or ask your own.
Ask a new question about this device
Download the instructions for your Vacuum Cleaner in PDF format for free! Find your manual AC6020 - UFESA and take your electronic device back in hand. On this page are published all the documents necessary for the use of your device. AC6020 by UFESA.
USER MANUAL AC6020 UFESA
DESCRIPTION OF THE APPLIANCE
- Floor brush
- Brush for wooden floors
- Beater brush (carpets)
- Telescopic tube
- Suction control
6.Hose - Suction hole
- ON/OFF button / Suction control
- Air outlet grille
- Air outlet filters
- Dust container release clip
- Automatic cable rewind pedal / Carry handle
- Container full indicator
- Aromatherapy scent container
- Crevice nozzle
- Upholstery nozzle
- Furniture nozzle
Cycle-Tech unit
- Container
- Lid
- Carrying handle
- Permanent HEPA filter.
- HEPA filter guard
- HEPA filter detector
- Container release button
- Emptying cover
Accessories:
- Bag for aromatherapy scent
IMPORTANT ADVICE
- Read these instructions carefully. Safeguard them for future reference.
- Before plugging the appliance into the mains supply, make sure that the voltage corresponds to that stated on the characteristics plate.
- This appliance has been designed for domestic use only. It must only be used in accordance with these instructions. The manufacturer will not be held responsible for any damage caused by improper or misuse of the appliance
- Do not use the vacuum cleaner on people or animals.
- Never vacuum up hot or glowing substances, sharp objects, wet or liquid substances, or inflammable or explosive products.
- Do not let children handle the appliance.
- This vacuum cleaner must not be used without the Cycle Tech unit and the permanent HEPA filter. This could damage the
apppliance.
The appliance must be switched off before plugging it in or unplugging it.
- Do not operate the appliance with the cable still coiled.
- Do not unplug the appliance by tugging on the cable.
- Unplug the vacuum cleaner from the mains supply when not in use and before proceeding to clean it or when changing the filters.
- Do not expose the vacuum cleaner to outdoor weather conditions, dampness or heat. Do not leave the vacuum beside hot ovens, heaters or radiators.
- Do not use the vacuum cleaner if any of its openings are obstructed, as this will reduce the air flow causing it to overheat, which may damage the appliance.
- Do not handle either the vacuum or the plug with wet hands. Do not immerse the appliance in water.
- Do not pull on either the cable or the suction tube to move the vacuum cleaner. Use the carry handle.
- Do not use the appliance if either the cable or plug are damaged.
- Make sure not to pinch the cable when closing doors.
- Always unplug the vacuum cleaner after use and especially when cleaning it, changing the filter or emptying out the dust container.
- Do not switch the appliance on if the cable or plug are damaged or if it can be detected that the appliance is not working correctly.
- Cable repairs and replacements must be carried out exclusively by an Authorised Technical Service Centre.
SUCTION SYSTEM
This appliance operates without a dust bag using "Cycle-Tech" technology. To do this just attach the unit.
SWITCHING ON
- Insert the hose into the suction hole so that it clicks into position.
Pressing down the release button will help you to insert or remove the hose (6), figure 1. - Attach the telescopic tube (4) to the suction hose (6), figure 2, and adjust the length to suit the user.
- Fit the brush, or whichever accessory is required, to the vacuum tube, figure 3
- Pull the cable out and plug it into the mains supply.
-
Press the On/Off button (8), figure 4
-
The wheels, the 360^ swivel joint and the carrying handle, along with its compactness, make this vacuum cleaner extremely mobile.
- During pauses in vacuuming you can clip the tube onto the vacuum as shown in figure 5.
POWER REGULATION
Regulate the power using the electronic power regulator (8), figure 6. Suction intensity can be regulated from the handgrip. Opening the flap (5) reduces suction, whereas closing it increases suction, figure 7.
WHEN FINISHED
When you have finished using the applian - ce press the On/Off switch.
Press the automatic cable rewind pedal (12) to wind the cable back in, figure 8.
MAINTAINING THE CYCLE-TECH UNIT
When suction power decreases considerably and the full indicator (13) lights up, this means that the container is full or that the filters are clogged.
Follow the instructions for emptying the dust container and cleaning the filters.
Empting the container
The container must be emptied after each use. To do this, press the release button (11) and remove the Cycle-Tech unit, Figure 9.
Empty the contents into a dustbin by pressing button (24) to open the base flap (25), figure 10.
Bring the flap (25) back up to close it again. Locking it back on to the base of the container. Place the container back into its housing on the vacuum cleaner.
Cleaning the filters
It is advisable to clean the permanent HEPA filter at least every six uses and to replace the air outlet filter each year. The filters must always be cleaned whenever any type of blockage occurs with the suction.
Cleaning the permanent HEPA filter:
Take the lid (19) off the container by pulling on it gently and then removing it, figure 11. Take off the filter guard (22) by pulling on it, figure 12. Turn the filter (21) anticlockwise to remove it, figure 13.
Both the filter guard and the HEPA filter can be rinsed under the tap.
Make sure that all of the pieces are completely dry before reassembling them.
Important: Leave them to dry for 24 hours before refitting them.
To help clean the HEPA filter there is a special small brush included, found where the
dust container is located, Figure 14.
Once clean, fit it back under the lid making sure that the holding clips line up, and turn the filter clockwise until it locks into position.
Put the filter guard (22) back on, fit the lid (19) on the container and insert the fully assembled dust container back into its housing on the vacuum cleaner.
This vacuum cleaner has a missing filter detection system (23), figure 15, which prevents the lid from being put back on the container if the HEPA filter (21) is not fitted correctly.
Replacing the air outlet filter
Take the cover off the air outlet filter Remove the HEPA filter, figure 16.
Repeat the same operation on the other side of the appliance.
The HEPA filter can be washed under the tap.
Make sure that it is completely dry before refitting it.
Important: Leave it to dry for 24 hours be - fore refitting it.
Ufesa recommends that the following be replaced yearly, based on use:
- The vertical HEPA filter 21.
-Filter guard 22 - Two HEPA air outlet filters 10:
You can get these replacements at your local shopping centre or from an Authorised Dealer.
Important: The vacuum cleaner must never be switched on unless these filters are fitted correctly.
To guarantee trouble-free operation, use only original Ufesa parts.
BRUSH FOR WOODEN FLOORING
This brush has been specially designed to clean wooden floor surfaces. The soft hair bristles brush over the surface picking up the dust but without damaging the floor.
BRUSH FOR RUGS & CARPETS
This brush is specially designed for cleaning rugs and carpets.
The rotating brush beats gently against the carpet fibres for deeper cleaning.
ACCESSION FOR CLEANING FURNITURE
This accessory is ideal for vacuum cleaning furniture and other delicate surfaces.
ACCESSORY FOR CLEANING UPHOLSTERY
This accessory has been designed to clean all types of upholstery.
ACCESSION FOR CLEANING CREVICES
Use this accessory to vacuum crevices and other awkward surfaces.
AROMATHERAPY
To enjoy a pleasant aroma while vacuum cleaning, the appliance is equipped with two small scent containers fitted to the air outlets on the vacuum cleaner.
Pull out the containers (14), Figure 17.
Open the lid by pulling it upward gently, Figure 18.
Drop two aromatherapy balls into the container, Figure 19.
Put the lid back on and slot it back onto the vacuum cleaner.
REPLACEMENTS
To guarantee trouble free operation, only use original Ufesa filters which can be found at authorised establishments, reference n°: FA0600.
The accessory pack contains:
- The vertical HEPA filter 21.
HEPA filter guard 22 - Two HEPA air outlet filters 10:
CLEANING
Unplug the vacuum from the mains supply before cleaning it. The accessories and the vacuum can be wiped clean with a damp cloth and then left to dry before reusing them.
Never immerse the appliance in water. Do not use solvents nor abrasive products to clean it.
ADVICE ON DISPOSAL:
Our goods come in optimised packaging. This basically consists in using non-contaminating materials which should be handed over to the local waste disposal service as secondary raw materials.
This product complies with EU Directive 2002/96/CE. The crossed wheelie bin symbol shown on the appliance indicates that when it comes to dispose of the product
it must not be included in with household refuse. It must be taken to a special refuse collection point for electric and electronic appliances or returned to the distribu- tor when purchasing a similar appliance. Under current refuse disposal regulations, users who fail to take discarded appliances to special refuse collection points may be penalised. Correct disposal of discarded appliances means that they can be recycled and processed ecologically, helping the environment and allowing materials used in the product to be reused. For more information on available waste disposal schemes contact your local refuse service or the shop where the product was purchased. Manufacturers and importers are responsible for ecological recycling, processing and disposal of products, whether directly or via a public system.
Your local town council can provide you with information about how to dispose of obsolete appliances.
FRANÇAIS
DESCRIPTION DE L'APPAREIL
Reservoir Cycle-Tech
He BbIKIOaIte BUNKy n3 cETN, Depra 3a wHyp.
- Bbiknokai Te nblneoc n3 cetn, korga OH He nCnonb3yeTc, a TAKKe nepei erO YNCTKoN ININ 3AmEHOn QInbTPOB.
- PpdooxpaHnTe nbIeNoc OT BHeuHnx atMOCpehBx BO3deIcTBn, BJaXHOCTn I kapbl. He octabnIte ero BO3ne ropauNX nINT, neey nn paDnAtOpOB.
He nObl3yIte IbIeNOC,ecn KaKoe-JIb60 n3 erO OTBepCTNI 3arOpoxKeHO npenrTCTBnEM, TAK KAK B IpOTNBHOM Cnyae npoxoB O3dyxa 6byET ORpAHueH, YTO MOKeT pINBeCTN K nepepeBy nocneDyUoEmy NOBpeKDeHIO npnbopa.
He npikacaiTecb K nbinecocu n K 1tencelbHOB Bnke MOKpbIMn pykamn. He norpykaTe np60p B Body.
He nepemeeaTe nbInecoc, depra 3a uHyp nHTaanm nn 3a Tpy6y nbInecoca. Nb3yTEcB pyKoDnTpaHCnpTIpOBKn.
He noIb3yIteCb npI6Opom, ecn erO shHy pntaHm uIu wTeNCeJIbHaB BUNKa nobpeXJeHbI. - Пи зakpbibAHIN DBepn B KBapTpe y6eNTeCb,чTo OHa He 3axmaeT shyp nTaHn.
Bcerda BbIKJIOUaIte nbIEcOC n3 cETn nocne nCNoNb3OBAHn N KaKdbI pa3 nped ero yIcTko, 3aMeHOI pINbTp aII INOnpoxKeHHem nbIEc6OpHnka.
He BkIouaTe nbIeCocBpa6Oy,ecneroHHyp nHTAHNnnIITeCNbHaB BNka nobpeXdEhblnn ecnBb3amTnIN,TO np6Op He pa6oTaET HopmaJIbHO.
PemOHn 3aMeHa Whpya DoJXHbI npOn3BOoNTbCnCKIOUHTeJIbHO CnJaAMn ABTopu3OBAHHORo TEXHueCKOro cepBcA.
YCTPOINCTBO NblIECOCA
3TOT np60p pa6oTaet 6e3 CmEHOR MoKa
nbIec6bOpHka, C npimeHenHem TexHOrnn
BCycle-Tech.ДгТTO DOCTaTOH NOMEcHTB
nbIecoc cneuaNBHy nbIec6bOpHK-pe3epByap.
3Ta cnCTema nO3BOiNT Bam npOBoITb YnCTKy
BaIero Doma 3ΦΦeKTHBhIM O6pa3OM 6e3
Heo6xOdMOCTN pNIO6peTeHN 3aNaChbIX
MeIKOB nbIec6bOpHka. 3ΦΦeKTHBHa
CNCTema ΦINbTpauu, B KOTopyB BXoINT
npOTBoaJIepnueckn ΦINbTp TexHOrnn
JIHEPAK, rapaHTnpyET Bam OTJNUHYO OCHcTKy.
BKJIIO E
- BCTaBbTe WnHaH B OTBepctne nIBAcCbBaHnHOeNka.
Haxatne KhoNk pa36nokpObKn 06nErHTOnepaunIO BCTabNeHnN n3BNeueHnUHaHra (6),Kak noKa3aHo Ha pnc.1.
-ПибсоeMHNTe TeneckOuHcckyTO Tpy6Ky (4)К BCacbIbAIOUeMy WnAhry (6), KaK
nokaaHO Ha pnc. 2, nOTperynpyTe dInHy no poCTy Nolb3ObaTeJ.
- YctaHOBtE 电Ky INI DpyryIO HyxHyH HacaIKy Ha Tpy6Ke Nblncocca, KaK Ioka3aHo Ha pnc.3.
- BbItaunTe uHyp u BKIOuHTe erO BCetb.
- Haxmte BbIKIOaTeIb (8), KaK NOKa3aHO ha pnc.4.
-KoneCNK, KpyROBnoBOPoTHoe COeINHeHne n pyKa dIa IepMeueHnB COyTeAHn C KomNaKTbIM pa3MepOM denAOT 3TOT nbIEcOC NCKIOHTeJIbHO MObIbHbIM.
-BoBpemnay3Byb6pke nomeeHn moKHO npKpeNtB Tpy6ky K nbinecocy, KaK noKa3aHo Ha pnc.5.
PEYJINPOBKAMOUHOCTN
Perynpyte MoHoctb c NOMOsb0 3JeKtpoHHoro ycTpoNCTBa (8), KaK nOKa3aHO Ha pnc.6.Cny BCacbBAHNMOxHO perynpobatb Ha pyue.OTkpoTe 3aDbNKky (5)Iy yEmhBHeHN CINbl BCacbBAHN.3aKpOte 3aDbNKky IyCUNHeHN BCacbBAHN.Cm.pnc.7.
NOCJIENCNOJb3OBAHNA
Iocne nCOnb3OBAHnI nbJIeOCa HaKMITE BblKIOUcAteIb.
Haxmnte neaJIb aBtOMaTHuecko y6Opkn shypa (12), kak noka3aHo Ha pnc. 8.
OBCJNYKINBAHNE YCTPOICTBA CYCLE-TECH
Korda MouhoCTb BCacbIbAHn 3aMeTHO ynaTe n 3aropntc HnNkATOp NnHOro KOHTeHepa (13), 3TO 6yTe O3Haayatb, 4TO KOHTeHep 3aONHeH JIN YTO cHJIbTpbl 3acopeHbl.
CneyTe HcTpyKUHM NO ONOPOXHEHIO nbIe6bOpHnKa N UcTKe pJIbTpOB.
OnopoxKHeHne KOHTeHepa
KoHTeHep DOnJKeH OOnOpXHTbCa NocLe KaKdOrO NcNoJIb3OBAHnR. JnA 3TOrO HaxMITE KHOJky pa36nOKnPOBKn (11) n N3BNeKHTe yCTpoIcTBO Cycle-Tech, KaNoka3aHo Ha pnc.9.
OnopoknHe KOHTeHep HaMycOPHOI KOp3HHo,HaXaB KHONKy (24),OTKpbBaIOUyO 3aDbNkKy Ha OCHOBAHm (25),KaK noka3aHo Ha pnc.10.
CHOBA 3aKpOte 3aDnBKKy (25). CHOBA 3aΦNKcPnyTe eHaOCHOBaHmKoHTeHepa. IomeCTne KOHTeHep o6paTHo B Kopnyc nbIeCoca.
Ouuctka qinbtpob
PeKOMEHnyETCA YNCTNTB NOCTOHHbI
fNtbpHEPA XOTb6bpa3nocneKaXdbIX
WeCTINNCIOb3OBaHnNbIEcOCaNEXeERODHO
3aMeHATb fNtbp BbInyCk BA3dyxa.
fNtbpblDOJNXbBCerda OCHuTaBCn npn
JIIO60B6IOKNPOBKe BCacbIBAHn.
YnCTKa nOcTOrHnHO qnlbTpA HEPA:
CHIMITE KpbIky (19) c KOHTeHepa, cJERka
NOTAHyB ee Ha Ce6n 3aTeM OTCoeDHHB
ee (cm. pnc. 11). CHIMITE npedoxpahntelb
fNtpa (22), notHyB erO ha Ce6n (cm. pnc.
12). NOBepHnTe fNtbp (21) npOTNB Yacoboi
CTpeKNu n CHIMITE erO (cm. pnc. 13).
PepoXpAHnTe b fNtbpTa n cam fNtbp
HEPA MoKHO npOMbIbA Tb NOJ KpaHOM.
Peped NOBTOPHO yCTAHOBKoI DeTALeI
fNbtpa y6eNTecb, YTO OH NONHOCTbO cyxN.
Baxho: Nocne YnCTKn npocyuHnTe H B TeHeHne 24 yacOB nepeD noBtOpHou yCTaHOBKO HA MecTO.
Дябоee ydo6hoн uchkn qinbtpa HEPA B KOMJIeK T BKJIOUeHa CneuaJaBHaMaIaIeTka, KOtopyo MOxHO HauTN y IyIec6OpHnka (cM. pnc. 14).
Pocne OuHCTKn Fmbltpa yctahOBnTe ero oBpaTHo nKpblkky, npocneIIB 3a COBMeueHem 3axIMOB depKaTeNei, n NOBepHnTe Fmbltp no YacOBO B cTpeKe do ueNka.
YcTaHOBnTe 6paTHo npedoxpAHnTeIb
fHbTpA (22), NmEcHTe KpbIuKy (19)
Ha KOHTeHep n BCTaBBte NOINHO
co6paHHb Iblnc6OpHk 6paTHo B erO
KopNyC Ha bInecOce.
3TOT nbIeocO 6OpdyoBaH cnCTEmoI 6bHApXeHN OTCyTCTBnФnIbTpA (23).CM. pnc.15.3Ta CNTema Deaet HeBO3MOxHO NOBTOpHyO yCTaHOBky KpbIkwN Ha KOHTeHep,ecnΦnIbTp HEPA (21) HeBepHO yCTaHOBJIeH.
3aMeHaΦnIbTpBaBInyckaBo3dyxa
CHIMNE KpbIky C mIbTpBa BInycka BO3dyxa. CHIMNE pIbTpHEPA (cM. pnc. 16).
Ipeedero NOBTOPHOuYCTaHOBKOUy6eNTecb,HTO OH NOnHOCTbO CyX.
Baxho: Nocne qnctkn npocyuHte ero B TeueHne 24 yacob nepei noBtOpHou ycTaHObKOHa MeCTO.
Ufesa peKOMeHnyet exeroDHyIO (B 3aBNCIMOCTN OT NHTeHCNBHOCTN NCNoJIb3OBaHnA) 3aMeHy CNeIyIOxuX qACTe:
- BeptnikalbHoro pnbtpa HEPA (21).
-Ппебханштетафьтра(22).
-ДБух ФильТpoB HEPA BbInycka Bo3dIyxa (10).
3Tn dTeann MOxHO HaHTN B 6nKaaHem TopROBOM cHTpe nn y aBTOpI3OBAHHoro duJepa.
Baxho: Hikorda He cne dyet BKIOUaTB nIeoc, ecn 3tn fNbTpbl He npabnlbHO yCTaHOBHeHbl.
Ira rapaHTm 6e30Ka3HO pa6oTbI nbIEcOca nOB3yTEcB TOJIbKO opnHaHbHbIM 3aNactAM MapKn Ufesa.
LETKA DIA DEPEBRAHHOI NOJA
3Ta 1eTka pa3pa6oTaHa CneuMaIbHo DnA NCTKn DepeBraHHoro nOla. MArKne 1eTuHKn YNCTAT NOBepxHOCTb, CObupa nbIb N He NOBpeKdAn NoI.
UETKA JNIA KOBPOBbIX N3DEJIM
3Ta 1eTka pa3pa6oTaHa CneuaIbHo IINHcCTKN KOBPOBbIX N3denn.
3TaBpaauoaaJcIeTKa cnerka ydapnE TNO B0OKHAM KOBpa,ObecneuBaB 6Oone rnybokyIO YNCTKy.
PNCNOCO6JIeHNEIINCTKIME6JIH
3To npncnoc6bHne ndeaIbHO noDxOaNT
JIIY NCTKN C NOMOuBIO NblIEcOCa
npedMeTOB Me6eN IN Dpynx DeNkAThbIX
NOBepxHOCTeI.
PNCIOCO6JIeHNEIJIYCHCTKIMARKONMEBEN
3To npncnoc6enne pa3pa6toHa DnIyCTKN BCEx TINOB MRKoM Me6eJN.
PNCNOCO6JIeHNEIINCTKNBUEJAX
IoiB3yIeTcB 3TNM npncnOcBneHnEM nIa NCTKNC NOMOIO BbIeCOCBa BueJnx INpyrNx TpyHOoDcTyNhbIX MecTAX.
APOMATEPANIA
Ia noluyehn noIb3ObaTeIeM
yBOBONbCTBnO T pNpTHoro 3aIaxa npn
YNCTE NbIeCOCOM np6Op o6OpyDobAH
DByMaMJIbIMKoHTeHepAmn IINyDxOB,
KOTOpBe yCTaHOBNeHbI y BO3dyuHbIX
BbInyCKOB Ha NblneCOce.
IOTAHHTe KOHTeHepbHa Ce6Ba N3BNEKHTe
nx (14), KAK NOKa3aHo Ha puc. 17.
OTkpOte KpbIuKy, CJIeRka NotAHyB ee BBepx Ha ce6r (cm. pnc. 18).
BpocbTe Dba wapika dna apomatepann B KOHTeHep (cm. pnc. 19).
Choba yctahOBITE KpbIuKy Ha MeCTO IN BCTaBbTe KOHTeHep 06paTHo B rHe3do Ha nbIJIeCOce.
3ANACHbIe YACTN
Ira pantn 6ecnpo6JemHno pa60tbl NOb3yntecb TOnbKO opuHaJIbHbIMN fNbTpamUfesa, KOtOpbe MOxHO HauTN B aTOpu3OBaHHbx yUpeXDeHNx. Homep CbIKN: FA-0600.
KoMnIeKT npHa,IeXHocTeB KKnIOaET B ce6:
- BéptnKaIbHbI ΦnIbTp HEPA (21).
- PpeooxpaHnteB pfHbTpa HEPA (22).
-Два Фильстра HEPA Вынуcka ВОздуха (10).
CHCTKA
Ipeed uCTKoN nbinecoca BbIKIOHTe er0 n3 cTeN. Ibeiecocn erO npHaJnxHcctn MoXHO uCTNTb C NOMOuBIO BLaXHO TKAHN, HHyXHO DaTb IM NOLHOCTbIO BbICOXHYb nepeD IN NOBTOHPbIM NCNoB3OBAHHeM. HkoRda He cneMyet NorpyxAtb np6OpB B Body. He NoIb3yITecb pactBopntenm nn a6pa3NBbIMn CpeCDTBAMn dna YHCTKn np6oba.
PEKOMEHDAUIN NO CDAUE/ BbIBPOCY YNAKOBKN I CTAPbIX ANIAPATOB
Haun ToBapbl NoCTabJIOTcB ONTNIMINPOBaHON yNAKOBE.B HeB OCHOBHOM NCOJb3OBAHbI 3K0NOrnueckn YNCTBIE MaTePnaJIbI, KOToPbe DOnJXHbICaBaTbCBA MeCTHyO Cnyk6yYTINm3aUN OTXoDB B KaYecTBe BTOpNHoro CbIPbR.

DahHoe 3dEJIne COOTBETCTByeT HopMaM dIpeKtNBbl EC 2002/96/CE. CmBOL nepeepkHytoro KOHTHeHa Dn Mycopa Ha KoneCnKax, HMeOUsncnHa npiBope, O3Haayet,
YTO, KORda HACTyNT BPEMn36abntbcr OT HeHyxHOro npnbopa, OH He DoJXeH NOMeaaTcB MBeCTe C 6bITOBbIMN OTXOaAMN. OH DoJXeH 6bITb DOCTaBHeB CNEuaJIbHOE MeCTo yTNIN3aUIM OTXOIOB 3JeKTPuecknx IN 3JeKTPoHHbIX np6OpOB INN BO3BpaAeH npOaBuPy npn NOKynke HOBO R NOoBHOrnp6OpBa. B COOTBECTBm C DeIeCTBYUaMMN HopMaMn yTNIN3aUIM OTXOIOB NOnb3OBaTeHN, HE DOCTABuBWeHE HeHyxHbIe np6OpBo B CneuaJIbHbIe MeCTa yTNIN3aUIM OTXOIOB, MOYr 6bITb OWTPaPobAOHaB. PpABuJIbHaR OTdJIbHaR yTNIN3aUIM BbIbPOWeHHbIX np6OpOB O3Haayae, TQ OTH MoYr 6bITb peuNKlnpoBAhB, Nepepa6OtaHbI INyHHTOKeH3KOLOrueCKn YnCTbIM CNOcoBOM, He 3aPrn3HIOUcIM OKpyKaIOUyIO CpeDy, He OKa3bIBaOuIm HerATNBHOE Bo3JeCTBNe Ha 3DOpOBe IIODeI N03BONaIOUm NOBTOPHo NCIOJIb3OBaTB MaTePnaJIb, IN3 KOToBx 6bl IN3ROTOBEN np6Op. DInr NoIyHeHn 6OJee NODp6HOH INHOPMAuIN 06 IMeIoUxCSr NpOPaMMax yTNIN3aUIM OTXoIOB 06paauTECB B MecThyIO CnyX6y yTNIN3aUIN OTXOIOB INB MaRa3NH, B KOTOpOM 6bl np6OpTeH np6Op. PpON3BOAnTeIN IN MMIOPTepbl Hecyt OTBeTCTBEHHOCt b 3a 3KOLOrueCKn YnCTyIO yTNIN3aUIN, nepepa6OTKy INyHHTOKeHne BbIbPoWeHHbIX np6OpOB HaprrMyIO INN OocPeIcTBOM ROCydapCTBeHHo CnCTeMbI.
MecThbIe MyHUNnAJIbHbIe Blnactu MoryT npEOCTaBnTB HOpMaUIO O nopAKe cdaN/YHNUTOXeHH HeHyKbIX pnp60pOB.
CESKY
POPIS PRISTROJE
KORATO IPNKJIIOHTPE PABOTA
Korato npnknoHTe pa6oTa c ypeDa, HATNCHE Te 6yToHa 3a BKIOUcBaHe/ n3KIOUcBaHe.
HaTnCHete neDana 3a aBTOMaTHHO HauBaHe Ha Ka6ena (12), 3a da ro npu6epTe, fHypa 8.
IOPBbKKA HA KOHTHEPA E3 TOPBA CYCLE-TECH
Korato cmykaTeHHata cnna Hamaee 3HaHTeJIHO INHdIKaTOPbT 3a NbIeH KOHTeHep (13) CBETHe, TOBA O3HaHabe, Ye KOHTeHepbTe NbIeHnnNue qnITpnte ca 3aDpCTeHn.
CneBaIte HnCTpyKcunTe 3a n3npa3BaHe Ha KOHTeHepa 3a npax nNoCHTbaHe Ha fHnTPnte.
I3npa3BaHe Na KOHTeHepa
KoHTeHepbT Tp6Ba Da ce n3npa3Ba CneI BcKa yNoTppe6a. 3a Da HAnpaBnTe ToBa, HATncHeTe 6yToHa 3a OCBo6oxDaBaHe (11), CNeI KoETo n3BaJeTe KOHTeHepa cycle- tech, fInrypa 9.
N3npa3HeTe CbDpKaHNeTo Ha KOHTeHepa B Kopa 3a 60KnyK, KaTo HAtncHeTe 6yTOH (24), 3a Da OTBOpNTe NOBXKHOTO DbHO (25), Fmrypa 10.
Korato 3npa3HnTe KOHTeHepa, 3aTbOpTe NOBnKHO TO Dho (25), Kato ro noBmHete Harope. 3aTbOpTe ro o6paTHo KbM OCHOBaTa Ha KOHTeHepa.CnoXeTe KOHTeHepa 06paTHO Ha MCTOTO My B npaxocMyKaKaTa.
NouchBahe Ha qnItpne
IpenopbHTeHNO Da NOHCtBaTe NOCTOBHHNHEPA FNITbp HAI-MANKO HA BCEKNI EECT N3NO3BAHHN INa CMEHARE FNITbpa 3a N3NYCKaHe Ha Bb3dyx BeDhXrOINHO. FNITPte Tp6Ba da CE NOHCtBaT BHNAR, KORATO 3acMyKBAHETO bIOknpa.
NoCTBaHe Ha NOCTOHHHnHEPA
CbaTe rOpHnKanak (19) ot KOHTeHepa, KaTo ro n3dbpNaTe BHNMaTeNo ro n3BaJnte, pnr. 11. N3BaJTe 3aunTHnKoKyx Ha pntbpa (22), KaTo ro n3dbpNaTe, pIpya 12. 3aBbptete pIITbpa (21) o6paTHo Ha yacOBHKnOBata cTpeNka, 3a da ro n3BaJnte, pIrypa 13.
PpeNa3HNr KOxy Ha cHJTbpa n Camnrt HEPA cHJTbp MORa Da Ce MHT noT euaa B0da.
YBepeTe Ce, Ye BCnUKN Yactn Ca HaNbHNO 13cbXHann, PpeN da rN crNoBte OTHOB.
BaxHo: OctaBeTe r n da cbxHaT 24 Yaca, npedn da r n cnoKeTe o6paTHo.
3a da 6b de no-NEcho nooCTbaHeTo Ha HEPA
fntbpa, e BkIoUeHa CneuHa HaeTka,
KoHTO CE HAmpa TAm, KbTeTo e pa3NoIOxH
KoHTeHepbT 3a npax, fnpypa 14.
CneI KaTo NoHCTnTe QnITbpa, Ro CNOKeTe
6bPaTHo NOI Kanaka Taka, Ye 3aKpenBaUNte
CKOB Da Ce n3paBnHT, CNEI KOEt RO
3aBbPteTe No NocOKa Ha YacOBHNKOBaTa
CTpeNkA, DOKaTO 3actaHe Ha N03uIN.
Cnoxete 3aunTHnKoKyx (22) o6paTHO, noctabeTe kanaka (19) Bbpxy KOtHeHepa IN BkapaiTe crNoBeHHN KOHTeHepo6paTHO Ha MACTOTOMYBINpaxOCMyKaHKata.
B npaxocmykaKaTama BrpaHea cntema 3a otKpmbaHnncBaU qnIbTp (23),qnypa15, KOrTO npeoTbpaTHBa 3aTbapnHTo Ha KaNaka Ha KOHTeHepa, ako HEPA pntbpt (21) He e cNoxeh npabnHo.
IopMaHa Ha qntbpa 3a n3nyckaHe Ha Bb3dyX
CbaTe KanaKa O T fInTbpa 3a n3nyckaHa Bb3dyx n 3BaTe HEPA fInTbpa, fInypa 16.
Iobopete cblto OT dpyra TpaHa Haypea.
HEPA nntbpbT MOKe da ce Mne noD Teaasa Boda.
YBepTeCe,uee HAnbHcX,npEn da ro nocTabnTe o6paTHo.
Baxho:OctaBeTeΦnTbpa Da cbxHe 24
yaca npedn da ro cNoXnte o6paTHo.
Ufesa Bn npenopbYBa da noMeHrTe CneHNHe Yactu BeHbX roNlHo (B 3aBNCMOCT OT YcctOtaHa H3NON3BaHe):
- BéptnKaJIHnIe HEPaФиNTbP 21.
- 3aunTHnKoJxHaФnTbpa22
-ДВаТАHEPAФиЛТьра3aИЗпуСканеHa 1Bb3dIyx10
Moxete Te3n pe3epBHN Yactn B MeCTHm Ma4a3HH NIN OT OTOpN3npaH TbprOBCKn npedCTaBtEn.
Baxho: Hikora He BkIOuBaIte npaxocMykaKaTata, aKo pntHe ca nOCTaBeHn npaBnHO.
3a da ocunypnte 6e3npo6nemha pa6oTa Ha ypeDa, n3non3BaTe cAmO opnrHauHH uactn Ha Ufesa.
YETKA 3A DbPBEH NIOOBE
Ta3n YeTka e cB3daEHa CneuaHNO 3a NouchTbaHe Ha DbPbeHn NOOBe. MeKITE KOCMn HA YeTkata Cb6paT npaxa OT noDa, 6e3 da Ro HapaHBAt.
YETKA 3A KUNIMM MOKETN
Ta3n YETKa e CneuaJIHO cb3aJaHa 3a NOYNCtBaHe KINIMM N MOKETN.
Bbptnata ce yetka yprna leka no cnpnte Ha KNIIMMA 3a NO-db6OKO NOYCTBAHe.
PNTCTABKA 3A NOUICTBAHE HA ME6EJI
Ta3n npntabkatae ndeanHa 3a nouchtahe Ha Me6en N dpyn denNKaTHN NOBbpxHOCTN.
PNTCTABKA 3A NOUICTBAHE HA TANUEPNN
Ta3n npictabka e cb3daeneHa 3a noHCTbaHe HA BCNUKN BNIOBE TaNUEpIN.
PINTABKA 3A NOUCHBAHE HA IPOJYKIN
H3no3BaIe Ta3n npncTbKaTa 3a noHCTBaHe Ha nponyKn Ipyr TpyHODocTbHn NOBbpXHOCTn.
APOMOTEPAIINR
3a da ce hacnaJdaBaTe Ha npnateH apomat, DOKaTO NOHCCTBaTe C npaxOCMyKaKcTa,ypeBt E ChabDenC DaMaKN KoHTeHepa 3a apomATn3aTopi, NOCTaBEHN KbM OTBOPTE 3a N3nyCKaHe Ha Bb3dYx B npaxOCMyKaKaTa
I3bpaTne KOHTeHepTe (14), 17.
OTbopete 3anyuajkata, kato n3dbpnaTe BHHMATEJIHO HArpe, pIpya 18.
CnoKTe DBe apomatn3npaun TOnHeTa B KOHTeHepa (19), pInypa 19.
IocTabete o6paTHO 3anywaJkata n ro CLOXETe KbM npaxOCMykaKata.
PE3EPBHN YACTN
3a da ocunpynnte 6e3npo6nemHa pa60Ta Ha ypeHa, n3no13BaIte cAmO opnHaJIHn cnItpnHa Ufesa, KOnTO MoKTe Da 3akynTe
B OTOPIIpaHITe Mara3HH, pepepeHTEHomep: FA0600.
KomIIeKbTcacKeCoapcbDbpxa:
- Béptnkanen HEPA pntbp 21.
- PpePna3eH KoxyHa HEPA mntbpa 22
-Дba HEPA cπnTbpa 3a n3nyckaHe Ha Bb3dyx 10
ПОЧИстван <|im_start|>assistant ПОЧИстван <|im_start|>assistant ПОЧИстван <|im_start|>assistant ПОЧИстван <|im_start|>assistant ПОЧИстван <|im_start|>assistant ПОЧИстван <|im_start|>assistant ПОЧИстван <|im_start|>assistant ПОЧИстван <|im_start|>assistant ПОЧИстван <|im_start|>assistant ПОЧИстван <|im_start|>assistant PONCHTBAH
N3KnIOHcTe npaxocMykaKata OT Mpekata npedn da noHCbATE. Akceccapnte n npaxocMykaKATA MORAT da 6bdaT noHCTEN C BIAKeH napqan, KATOcEeTOBa rnoctabte da N3cbXHaT HAnbHNO npedn da Rn BbpHETe NO MeCTa Tm. YpeBbT HNKORA da He CE NOTANB BvB BODa. He N3non3BaIte pa3TBOpHTeIN IIN abpa3NBHN pOdyKTn Pn npoHCTBAHETO.
IPEyIpeKDEHNE3A CKJIaINPAHE/UNXbPnRE
ONaKOBKeTHe HaHaWInTe npOdykTN Ca BnCOKOKaueCTBHeH. Toba noCbIeCTBO 03HaYaba, Ye Ce n3No13BaT 6e3BpeHN 3a OKoNHaTa CpeDa MaTePnaH, KOnTO e npenOpbHTeJHo Da ce npedaaT Ha NyHKT 3a BTOpuHn CypOBuHn.
To3n npOdyKT OTROBAPHa
DInpeKTHBaTa Ha EC 2002/96/ CE. 3auepkHATnT CnMBoJ,
N3o6pa3raBaU KoFa 3a 6oknyk
Ha KOneIuA, O3HaUaBA, Ye To3n
npdykT He Tp6Ba Da Ce n3xBbpHn 3aeDnC O tNaBcIte OT DOMAKINCTBOTo. Tp6Ba Da ce npedeHa CneuAnen NykT 3a cbbpaHe Ha N3XBbpHn OT ynotpe6eJElKTPueckn EJeKTPoHNypeDNn Da CE BbpHe Ha NCTPbTyTopa, KORATO KyNbATE no06eH yPeD. Cnped cera DeNCTBaunTe pa3npoeBn 3a N3XBbpLnHe Ha OTNaDbU, notpeBnteLNTe, KOtO He npedaat N3XBbpHn OT ynotpe6a ypeDN Ha HrkOHT CneuAnHTE pYHKTOBE 3a cbbpaHe Ha OTNaDbU, MORAT Da 6bDat rno6EH. PpaBnHOTo N3XBbpLnHe Ha N3Ne3n OT ynotpe6a ypeDN O3Haayab, Ye Te MOrat Da 6bDat peukKnipauHn I npepaBoTeHn EKOLOrHuO. TOBA NOMara 3a Ona3BaHeto Ha OKoHATA CpeDA N03BOJRA NOBTOHPaTa ynotpe6a Ha MaTePNAIn, N3NO3BAHn BypeDA. 3a Nobeue INfOpMaunr OTHOCHO cbseCTByBaUnTE nporpamn 3a N3XBbpLnHe HAOTNaDbUncceCBbpXeTe CMeCTHaTACnyK6a NO TNaDbUnc Nm C Mara3nHa, OTkbTeO CT3akynnn npOyKTa. Ppon3BOITeNTe H BHOCHTJIte OTROBAPRT 3a EKOJOnHHTOpeukKnipane, npepaBOTBaHe N3XBbpLnHe Ha npOyKTHe, npAko Nn NocpeDCTBOM o6heCTBeHata cnCTema.
HOpmaa3aTOBa,KaKaI3XBbPnITeype,I3JI3bBBeYeOTyNOTpe6a,MOKeTe DaIOJYHTeOTMeCTHNrpaDCNcBBET.
ROMÁN
DESCRIEREAPARATULUI
Jaauiuuiuuiuuiuuiuuiuuiuuiuuiuuiuuiuuiuuiuuiuuiuuiuuiuuiuuiuuiuuiuuiuuiuuiuuiuuiuuiuuiuuiuuiuuiuuiuuiuuiuuiuuiuuiuuiuuiuuiuuiuuiuuiuuiuuiuuiuuiuuiuuiuuiuui uuuuuuuuuuuuuuuuuuuuuuuuuuuuuuuuuuuuuuuuuuuuuuuuuuuuuuuuuuuuuuuuuuuuuuuuuuuuuuuuuuuuuuuuuuuuuuuuuuuuuuuuuuuuuuuuuuuuuuuuuuuuuuuuuuuuuuuuuuuuuuuuuuuuuuuuuuuuuuu uu u u u u u u u u u u u u u u u u u u u u u u u u u u u u u u u u u u u u u u u u u u u u u u u u u u u u u u u u u u u u u u u uu uu uu uu uu uu uu uu uu uu uu uu uu uu uu uu uu uu uu uu uu uu uu uu uu uu uu uu uu uu uu uu uu uu uu uu uu uu uu uu uu uu uu uu uu uu uu uu uu uu uu uu uu uu uu uu uu uu uu uu uu uu uu uu uu uu uu uu uu uu uu uu uu uu uu uu uu uu uu uu uu uu uu uu uu uu uu uu uu uu uu uu uu uu uu uu uu uu uu uuUUUUUUUUUUUUUUUUUUUUUUUUUUUUUUUUUUUUUUUUUUUUUUUUUUUUUUUUUUUUUUUUUUUUUUUUUUUUUUUUUUUUUUUUUUUUUUUUUUUUUUUUUUUUUUUUUUUUUUUUUUUUUUUUUUUUUUUUUUUUUUUUUUUUUUUUUUUUUUUUUUUUUUUUUUUUUUUUUUUUUUUUUUUUUUUUUUUUUUUU
J 1
aai jui iie gii liai.
gaii gaii. Liai iai gaii
Laiuui bi jia glao jia glao ngiu
Jyai aai yai dai ai
y 1980/2002/96
JgIg JgJgJgJgJgJgJgJgJgJgJgJgJgJgJgJgJgJgJgJgJgJgJgJgJgJgJgJgJgJgJgJgJgJgJgJgJgJgJgJgJgJgJgJgJgJgJgJgJgJgJg
jJgUaill Jauu, Jauu Jauu Ufa La
1 1
j1 j 15 aal (23) aal
aai iaii Iaiiagaii aiaiia jka
2j = 2j + 1 L
aaii li joo Si Ie Sj 10
.LoLa
JcLw 24 1 1
.4
jill JaiuW pao j4all
L
aill jolalgss
llil allo g bgsao jie Jaaui jc
JLae
.
gao gai iia Llu jso laolulip
aIlaIgogIgIgIgIgIgIgIg
1
jIJI JIAUJILABU
jssuie 10 Jaxu
A.aaaIaagaiHEPAaIa, Cycle-tech
2.2.11 2.2.11
ufesa
BSH PAE, S.L.
NIF: B-01272368

100% recycled paper
0


- DESCRIPTION OF THE APPLIANCE
- Cycle-Tech unit
- Accessories:
- IMPORTANT ADVICE
- SUCTION SYSTEM
- SWITCHING ON
- POWER REGULATION
- WHEN FINISHED
- MAINTAINING THE CYCLE-TECH UNIT
- Empting the container
- Cleaning the filters
- Cleaning the permanent HEPA filter:
- Replacing the air outlet filter
- BRUSH FOR WOODEN FLOORING
- BRUSH FOR RUGS & CARPETS
- ACCESSION FOR CLEANING FURNITURE
- ACCESSORY FOR CLEANING UPHOLSTERY
- ACCESSION FOR CLEANING CREVICES
- AROMATHERAPY
- REPLACEMENTS
- CLEANING
- ADVICE ON DISPOSAL:
- FRANÇAIS
- DESCRIPTION DE L'APPAREIL
- Reservoir Cycle-Tech
- YCTPOINCTBO NblIECOCA
- BKJIIO E
- PEYJINPOBKAMOUHOCTN
- NOCJIENCNOJb3OBAHNA
- OBCJNYKINBAHNE YCTPOICTBA CYCLE-TECH
- OnopoxKHeHne KOHTeHepa
- Ouuctka qinbtpob
- YnCTKa nOcTOrHnHO qnlbTpA HEPA:
- 3aMeHaΦnIbTpBaBInyckaBo3dyxa
- LETKA DIA DEPEBRAHHOI NOJA
- UETKA JNIA KOBPOBbIX N3DEJIM
- PNCNOCO6JIeHNEIINCTKIME6JIH
- PNCIOCO6JIeHNEIJIYCHCTKIMARKONMEBEN
- PNCNOCO6JIeHNEIINCTKNBUEJAX
- APOMATEPANIA
- 3ANACHbIe YACTN
- CHCTKA
- PEKOMEHDAUIN NO CDAUE/ BbIBPOCY YNAKOBKN I CTAPbIX ANIAPATOB
- CESKY
- POPIS PRISTROJE
- KORATO IPNKJIIOHTPE PABOTA
- IOPBbKKA HA KOHTHEPA E3 TOPBA CYCLE-TECH
- I3npa3BaHe Na KOHTeHepa
- NouchBahe Ha qnItpne
- NoCTBaHe Ha NOCTOHHHnHEPA
- YETKA 3A DbPBEH NIOOBE
- YETKA 3A KUNIMM MOKETN
- PNTCTABKA 3A NOUICTBAHE HA ME6EJI
- PNTCTABKA 3A NOUICTBAHE HA TANUEPNN
- PINTABKA 3A NOUCHBAHE HA IPOJYKIN
- PE3EPBHN YACTN
- ПОЧИстван <|im_start|>assistant ПОЧИстван <|im_start|>assistant ПОЧИстван <|im_start|>assistant ПОЧИстван <|im_start|>assistant ПОЧИстван <|im_start|>assistant ПОЧИстван <|im_start|>assistant ПОЧИстван <|im_start|>assistant ПОЧИстван <|im_start|>assistant ПОЧИстван <|im_start|>assistant ПОЧИстван <|im_start|>assistant PONCHTBAH
- IPEyIpeKDEHNE3A CKJIaINPAHE/UNXbPnRE
- ROMÁN
- DESCRIEREAPARATULUI
- J 1
- 1
- ufesa
Brand : UFESA
Model : AC6020
Category : Vacuum Cleaner