USER MANUAL Benvenuto Classic TCA5401 BOSCH
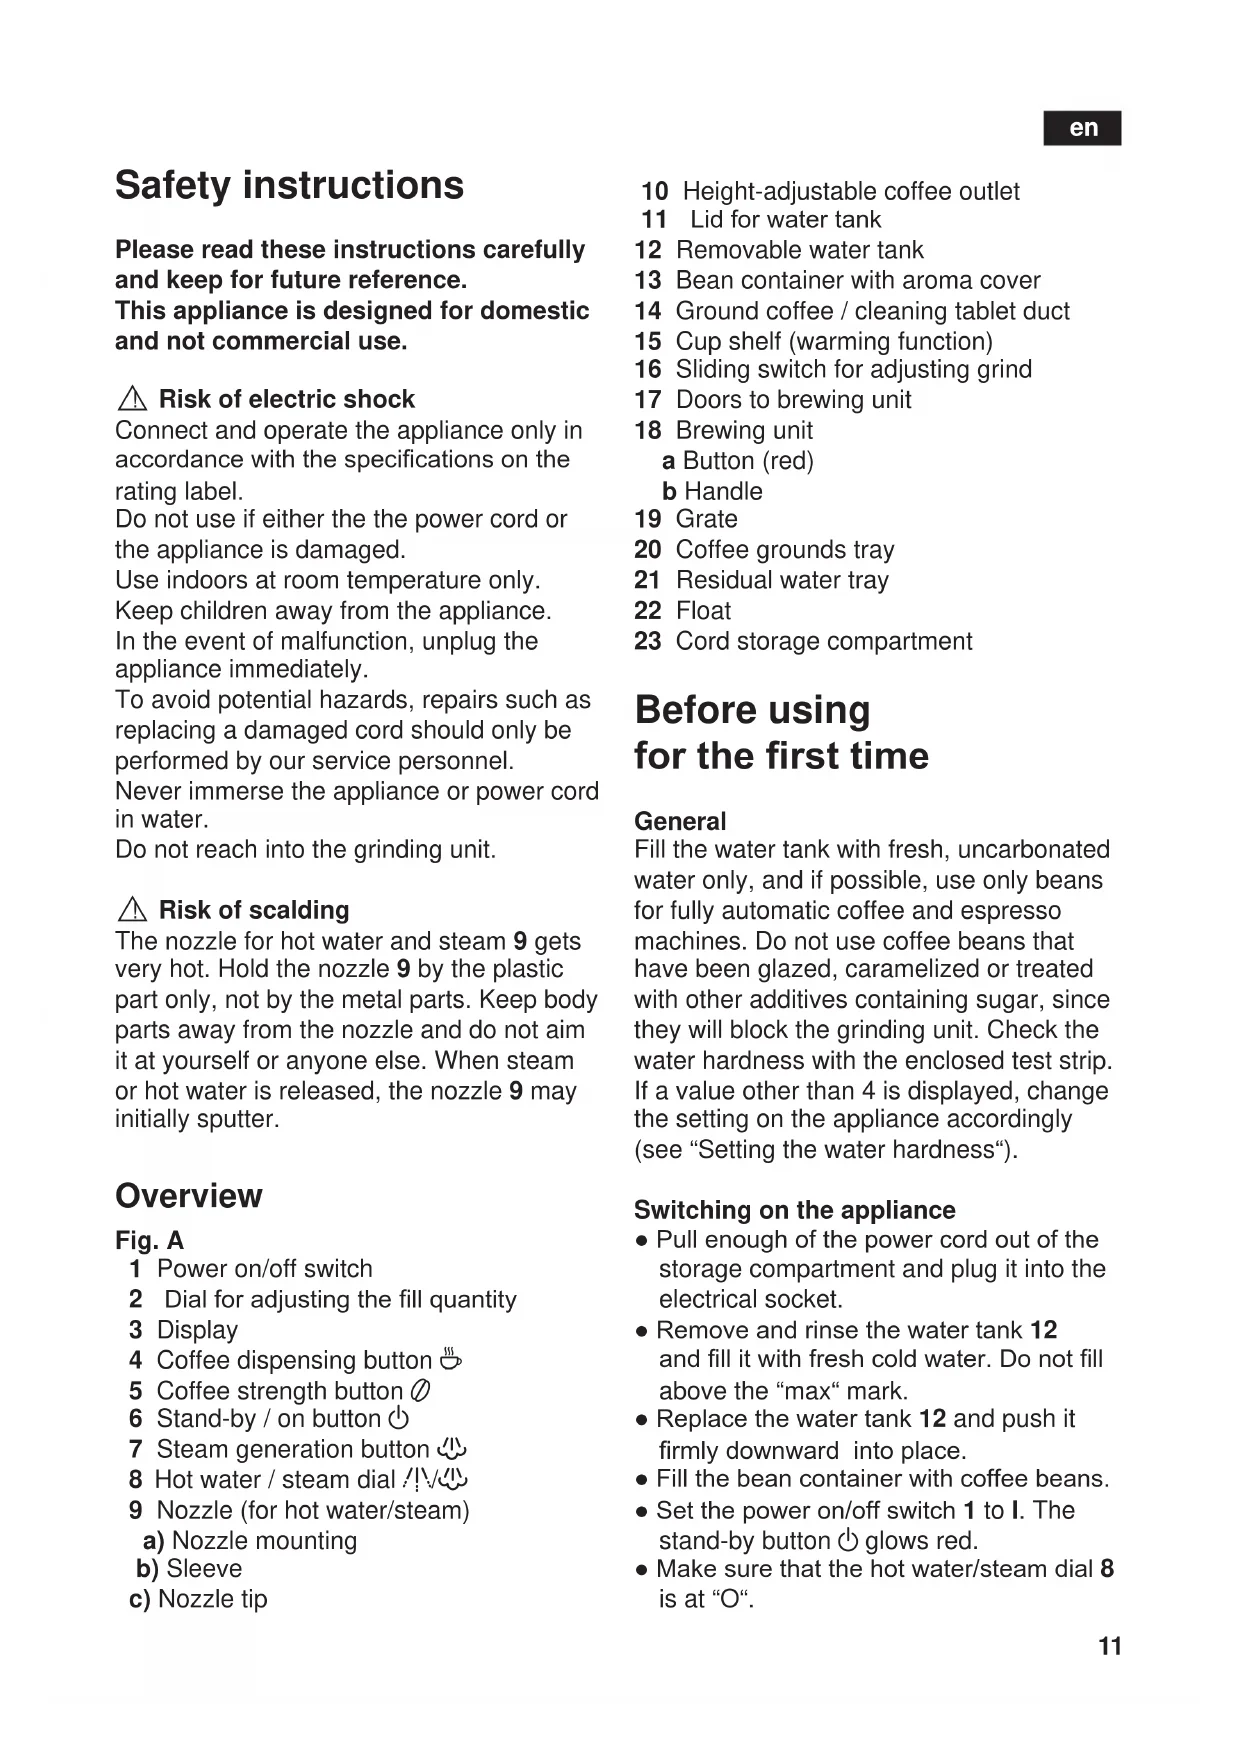
Please read these instructions carefully and keep for future reference.
This appliance is designed for domestic and not commercial use.
Risk of electric shock
Connect and operate the appliance only in accordance with the specifications on the rating label.
Do not use if either the power cord or the appliance is damaged.
Use indoors at room temperature only.
Keep children away from the appliance.
In the event of malfunction, unplug the appliance immediately.
To avoid potential hazards, repairs such as replacing a damaged cord should only be performed by our service personnel.
Never immerse the appliance or power cord in water.
Do not reach into the grinding unit.
Risk of scalding
The nozzle for hot water and steam 9 gets very hot. Hold the nozzle 9 by the plastic part only, not by the metal parts. Keep body parts away from the nozzle and do not aim it at yourself or anyone else. When steam or hot water is released, the nozzle 9 may initially sputter.
Overview
Fig. A
1 Power on/off switch
2 Dial for adjusting the fill quantity
3 Display
4 Coffee dispensing button
5 Coffee strength button
6 Stand-by / on button
7 Steam generation button
8 Hot water / steam dial
9 Nozzle (for hot water/steam)
a) Nozzle mounting
b) Sleeve
c) Nozzle tip
10 Height-adjustable coffee outlet
11 Lid for water tank
12 Removable water tank
13 Bean container with aroma cover
14 Ground coffee / cleaning tablet duct
15 Cup shelf (warming function)
16 Sliding switch for adjusting grind
17 Doors to brewing unit
18 Brewing unit
a Button (red)
b Handle
19 Grade
20 Coffee grounds tray
21 Residual water tray
22 Float
23 Cord storage compartment
Before using for the first time
General
Fill the water tank with fresh, uncarbonated water only, and if possible, use only beans for fully automatic coffee and espresso machines. Do not use coffee beans that have been glazed, caramelized or treated with other additives containing sugar, since they will block the grinding unit. Check the water hardness with the enclosed test strip. If a value other than 4 is displayed, change the setting on the appliance accordingly (see "Setting the water hardness").
Switching on the appliance
- Pull enough of the power cord out of the storage compartment and plug it into the electrical socket.
- Remove and rinse the water tank 12 and fill it with fresh cold water. Do not fill above the "max" mark.
- Replace the water tank 12 and push it firmly downward into place.
- Fill the bean container with coffee beans.
- Set the power on/off switch 1 to I. The stand-by button glows red.
- Make sure that the hot water/steam dial 8 is at "O".
en
- Press the button. lights up on the display.
When switched on for the first time, the water pipes in the appliance must be filled.
- Place a cup under the nozzle 9.
- Turn the dial 8 to /ɪv/ɪv. Water runs into the cup. Turn the dial 8 back to O.
- The button will now flash.
The appliance rinses and heats up.
The appliance is ready for use when all four buttons 忍 0, 忍 and the coffee strength indicator (coffee beans) light up on the display.
i The appliance's factory settings are programmed for optimal performance.
Note: If the appliance is being used for the first time or has not been operated for a prolonged period, the first cup of coffee will not have the full aroma and should not be consumed.
Controls
1 Power on/off switch
The power switch 1 on the rear of the appliance switches the power supply on or off.
When the power has been switched on, the button glows red. The appliance is now in stand-by mode.
Warning
Do not press the power on/off switch while the appliance is operating. The appliance should only be switched off when it is in stand-by mode.
2 Dial for adjusting the amount of coffee per cup
This dial 2 allows variable adjustment of the quantity of coffee from a small cup to a large cup .
3 Display
The display uses symbols to indicate appliance settings and messages.
Coffee dispensing, 2 cups
flashing Lid for ground coffe duct 14 is open
on Ground coffee / Cleaning
on Mild coffee
on Medium-strength coffee
on Strong coffee
flashing Bean container empty
S on Service:
Descale/clean appliance
S flashing Service programme in operation
on Fill water tank 12, hold cup
+ flashing under nozzle 9 and turn dial 8 to /1/
flashing Turn dial 8 to /1/ 心
on Turn dial 8 to O.
on Empty trays
念 flashing Trays missing
Coffee can be brewed by pressing this button.
Press once for one cup. The coffee is ground, brewed and dispensed into the cup. Button flashes during this process.
Press twice within 3 seconds for two cups. The coffee is ground, brewed and dispensed into the cups (the grinding and brewing process takes place twice). Button
flashes and (2 cups) appears on the display during this process.
If the coffee dispensing button is pressed again, the coffee brewing process is terminated.
This button is used to select the coffee strength:
mild
medium
strong
The selected setting is shown on the display.
Button switches on the appliance or switches it to stand-by mode. When button is pressed, the appliance heats up and button a flashes while the appliance heats up and is rinsed. When the buttons, light up and one, two or three beans (depending on the setting) appear on the display, the appliance is ready for operation. The appliance will not be rinsed if:
- it was still warm when switched on, or
- coffee was not discharged before it was switched to "stand-by" mode, or
- steam was discharged shortly before it was switched off.
Button generates steam for foaming or warming.
8 Steam dispensing dial
Hot water or steam can be dispensed by turning the dial to hot water or steam. To dispense steam, the steam generation button must be pressed first (see "Steam for foaming milk").
Settings and displays
Setting the water hardness
It is important that the water hardness be set correctly, so that the appliance indicates accurately when the descaling programme should be run. The factory setting is a water hardness of 4. You can check the water hardness using the enclosed test strip or by asking your local water supplier.
| Degree | Water hardness |
| German (°dH) | French (°fH) |
| 1 | 1-7 | 1-13 |
| 2 | 8-15 | 14-27 |
| 3 | 16-23 | 28-42 |
| 4 | 24-30 | 43-54 |
- Determine the water hardness with the enclosed test strip.
e.g. = Hardness 2
- Switch the device to stand-by.
- Hold down the steam button for at least 3 seconds. The number of service buttons, , , , that light up indicate the selected water hardness.
- Press the steam button repeatedly until the correct number of buttons is lit.
- Press button once. The selected number of service buttons should light up briefly; this indicates that the desired water hardness setting has been saved successfully.
If a water filter (special accessory) is used, the water hardness should be set to 1.
Note: If no button is pressed within 90 seconds, the appliance switches to standby mode without saving the new settings. In this case, the previous water hardness setting is retained.
The first time a filter is used or after changing the filter, the appliance needs to be cleaned.
- Fill the water tank up to the 0.5l mark.
- Place a suitable container (approx. 0.5 litres) under the nozzle 9.
- Turn the dial 8 to /ɪv/
- If no water comes out of nozzle 9, turn the dial back to O.
- Fill the water tank and water pipes (see section "Switching on the appliance").
Adjusting the grinding unit
Sliding switch 16 adjusts the degree of grinding, from coarse to fine.
Warning
Adjust the grinding unit only while it is running! Otherwise the appliance may be damaged.
- Press the coffee dispensing button.
en
- While the grinding unit is running, move the sliding switch 16 to the desired position: the smaller the dots, the finer the grind.
The new setting will not become apparent until the second or third cup is brewed.
Tip: For dark roast coffee beans, choose a coarser grind; for light roast beans, select a finer grind.
Float
The float 22 in the water tray 21 shows when the tray needs emptying.
- If the float 22 is clearly visible, empty the water tray 21.
Preparation
This fully automatic espresso/coffee machine grinds beans freshly for each brew. If possible, use only beans for fully automatic coffee and espresso machines. Deep-freeze or store in a cool place in sealed, airtight containers. Coffee beans can be ground while frozen.
Important: Fill the water tank with fresh water every day. The tank must always contain sufficient water for operating the appliance. Do not allow it to become empty.
Tip: Pre-warm cups, especially small, thick.
espresso cups, by placing on the cup shelf 15 or rinsing with hot water.
Using coffee beans
The appliance must be ready for use.
- Set the desired per-cup quantity using dial 2.
- Select the desired coffee strength using button .
- Place the prewarmed cup(s) under the coffee outlet 10.
- Press the coffee dispensing button once for 1 cup or twice within three seconds for 2 cups. The coffee is brewed and dispensed into the cup(s).
Note
If you select two cups, the grinding and brewing process is performed twice.
- Coffee dispensing stops automatically when the selected quantity has been dispensed.
The brewing process can be terminated by pressing the coffee dispensing button again. When coffee is brewed for 2 cups, it is dispensed via two outlet nozzles (place the cups side by side).
Using ground espresso/ coffee powder
The appliance must be ready for use.
- Set the desired per-cup quantity using the dial 2.
- Place the prewarmed cup(s) under the coffee outlet 10.
- Open the cover of the ground coffee duct 14.
- Add one to two level scoops of ground coffee (grind: medium-fine) to the ground coffee duct 14.
Note
Do not add whole beans or instant coffee! Use a maximum of two level scoops of coffee.
- Close the cover of the ground coffee duct 14.
- Press the coffee dispensing button.
Repeat the process if a second cup is desired.
Note: If coffee is not brewed within 90 seconds, the brewing chamber is emptied automatically in order to prevent overfilling. The appliance is rinsed.
Preparing hot water
The appliance must be ready for use. This function allows water to be heated for a cup of tea, for example.
Risk of burns
The nozzle gets very hot. Do not touch the metal parts!
- Place an appropriate cup under the nozzle 9.
- Push the sleeve on the nozzle 9 all the way down.
- Turn the dial 8 to /ɪv/
Risk of scalding
When the dial 8 is set to /1V, the nozzle may sputter a little. Do not touch the nozzle 9 or aim it at anyone.
- End the process by turning the dial 8 back to O.
Steam for foaming milk
The appliance must be ready for use. You can foam the milk first and add the coffee on top, or foam the milk separately and pour it into the coffee.
Risk of burns
The nozzle gets very hot. Do not touch the metal parts!
- Push the sleeve on the nozzle 9 all the way down.
- Fill the cup approximately 1/3 full of milk.
- Press the button. It will start to flash.
The appliance will heat up for approx. 20 seconds.
- Immerse the nozzle 9 deep into the milk, but do not let it touch the bottom of the cup.
- When the button lights up and appears on the display, turn the dial 8 to /ɪvʌ.
Risk of scalding
When the dial 8 is set to /1/√, the nozzle 9 may sputter. Escaping steam is very hot and may cause liquids to sputter. Do not touch the nozzle 9 or aim it at anyone.
- Rotate the cup slowly until the milk is fully foamed.
- End the process by turning the dial 8 back to O.
Note: When the nozzle 9 has cooled down, clean it immediately. Dried residue is difficult to remove.
Tip: If possible, use cold low-fat (1.5% fat) milk.
Steam for heating drinks
Risk of burns
The nozzle gets very hot. Do not touch the metal parts!
The appliance must be ready for use.
- Push the sleeve on the nozzle 9 all the way up.
- Press the button. It will start to flash.
The appliance will now heat up for approx. 20 seconds.
- Immerse the nozzle 9 deep into the liquid you want to heat.
- When the button lights up and appears on the display, turn dial 8 to [4]12 .
Risk of scalding
When the dial 8 is set to /1/√, the nozzle 9 may sputter a little. Escaping steam is very hot and may cause liquid to sputter. Do not touch the nozzle 9 or aim it at anyone.
- End the process by turning the dial 8 back to O.
Note: When the nozzle 9 has cooled down, clean immediately. Dried residue is difficult to remove.
Maintenance and daily cleaning
Risk of electric shock
Unplug the appliance before cleaning it. Never immerse the appliance in water. Do not use a steam cleaner.
- Wipe the outside of the appliance with a damp cloth. Do not use scouring agents.
- Wash all removable parts by hand only.
- Rinse out the water tank 12 with water only.
- Remove, empty and clean the trays for coffee grounds 20 and residual water 21.
- Wipe out or vacuum the inside of the appliance (tray holders).
Note: If the appliance is cold when switched on with the button, or if it is set to stand by after brewing coffee, it is automatically rinsed, i.e. the system cleans itself.
Nozzle 9 for hot water/steam
- Unscrew the nozzle 9 from the steam pipe.
- Dismantle all parts (Fig. E).
- Clean with a caustic cleaning solution and a soft brush. Clean the tip of the nozzle 9/c with a blunt needle.
- Thoroughly rinse and dry all parts.
Brewing unit
The brewing unit can be removed for cleaning (Fig. D).
- Turn off the appliance with button 已
- Turn the power on/off switch 1 to 0.
- Open the door 17 to the brewing unit 18.
- Hold the red button 18a down and push the handle 18b up until you hear it engage.
- Grasp the brewing unit 18 by the handle, remove carefully, and rinse under running water. Do not use cleaning agents. Do not place in the dishwasher.
- Vacuum the inside of the appliance, or clean it with a damp cloth.
-
Reinsert the brewing unit 18 all the way into the appliance.
-
Hold the red button 18a down and push the handle 18b down as far as it goes, until you hear it engage. The brewing unit is now secure.
- Close the doors of the brewing unit.
Service programme: Combined cleaning and descaling process
If an S is shown on the display while the appliance is on, the service programme must be run immediately to clean and descale the appliance. If the service programme is not run as instructed, the appliance may be damaged.
Specially-developed descending (order no. 310451) and cleaning agents (order no. 310575) are included with the appliance and can also be obtained from customer service.
Warning
Each time you run the service programme, you should follow the instructions for using the cleaning and descaling agents carefully.
Never interrupt the descending programme. Do not drink the liquids.
Never use vinegar or vinegar-based products.
Never put descending tablets or other descending materials into the duct for cleaning tablets.
The S symbol flashes while the service programme is running (approx. 40 minutes).
Important: If there is a filter in the water tank, it needs to be removed before the service programme is run.
Starting the service programme
- Switch the appliance to stand-by mode using the button.
- Hold down the coffee dispensing button for at least 3 seconds.
lights up on the display.
- Empty and reinsert the trays 20 and 21.
lights up on the display.
- Open the cover of the duct 14 for ground coffee / cleaning tablets.
- Place one cleaning tablet in the duct 14 and close the cover.
lights up on the display and the button flashes.
- Fill the water tank with lukewarm water, add descending agent and dissolve completely (total liquid: 0.5 litres).
or
- Pour prepared descending mixture into the water tank (total liquid: 0.5 litres).
- Press the button. The descending process begins. Duration approx. 10 minutes. The descending solution flows into the water tray 21.
flashes on the display.
- Place a suitable container (approx. 0.5 litres) under the nozzle 9.
- Set the dial 8 to /1/4. The descending process begins. Duration approx. 5 minutes. The descending solution flows into the container.
lights up on the display.
- Empty and reinsert the water tray 21.
lights up on the display and the button flashes.
- Empty and clean the water tank 12, fill with fresh water up to the "max" mark and reinsert.
- Place a suitable container (approx. 0.5 litres) under the nozzle 9.
- Press the button. The cleaning process begins. Water flows into the container.
lights up on the display.
- Turn the dial 8 to O. The cleaning process begins. Duration approx. 10 minutes. Liquid flows into tray 21 inside the appliance, then from the coffee outlet.
lights up on the display.
- Empty, clean and re-insert the trays 20 and 21.
The appliance heats up and is ready for use again when all four buttons 串 0, and light up and remain lit.
Important: If the service programme is interrupted, e.g. owing to a loss in power, it is vital that the water tank be emptied, rinsed and filled with fresh water before the appliance is used again. Then turn the appliance on.
- The appliance rinses, liquid flows into tray 21.
flashes on the display.
- Hold a cup under the nozzle 9 and turn the knob 8 to /ɪv/ 心.
Water runs into the cup.
lights up on the display.
- Turn the knob 8 back to O.
The appliance rinses and is ready for use again.
Anti-freeze
In order to avoid damage through cold during transportation and storage, the appliance must be emptied completely first.
The appliance must be ready for use.
- Remove, empty, and replace water tank.
- Place a large, narrow container under nozzle 9.
- Press button.
- As soon as lights up on display, turn dial 8 to [4]12 .
The appliance will release steam for a while.
- When nozzle 9 stops releasing steam, turn dial back to 'O'.
- Turn off the appliance.
Disposal

This appliance is labelled in accordance with the European Directive 2002/96/EG relating to waste electrical and electronic equipment - WEEE. The directive provides the framework for the EU-wide take-back and disposal of end-of-life appliances. Please ask your specialist retailer about current disposal facilities.
Guarantee
The guarantee conditions for this appliance are as defined by our representative in the country in which it is sold. Details regarding these conditions can be obtained from the dealer from whom the appliance was purchased. The bill of sale or receipt must be produced when making any claim under the terms of this guarantee.
Right of modification reserved.
| Troubleshooting |
| Problem Possible cause Solution | |
| ∅∅ flashing when bean container is full. | The grinding unit is not yet full enough. | Press coffee dispensing button again |
| No hot water or steam discharge. | Nozzle 9 is blocked. Clean nozzle 9. | |
| Foam insufficient or too runny. | Sleeve b on nozzle 9 not in correct position. Milk not suitable for foaming | Push down sleeve b on nozzle 9. Use cold low-fat (1.5% fat) milk. |
| Coffee dispensing slows to a trickle. | Coffee is ground too fine. Pre-ground coffee is too fine. | Adjust the grinding unit to a coarser setting. Use a more coarsely-ground coffee. |
| Coffee not dispensed. Water tank not filled or not correctly positioned. | Fill water tank and make sure it is in the right position. If necessary, fill water pipes (see section “Switching on the appliance”). |
| Coffee has no "crema" (creamy foam). | Unsuitable type of coffee. Beans no longer fresh. Degree of grinding inappropriate for beans. | Change type of coffee used. Use fresh beans. Optimize degree of grinding. |
| Grinding unit does not grind the beans. | Beans are not falling into the grinding unit (beans too oily). | Gently tap the bean container. |
| Grinding unit makes a loud noise. | Foreign objects in the grinding unit (e.g. grit, which can be found even in superior types of coffee). | Call the hotline. Note: The appliance can still be used to make pre-ground coffee. |
| Stand-by button and steam button flash alternately. | The brewing unit 18 is missing, or is not properly inserted or secured. | Insert and secure the brewing unit 18. |
| If problems cannot be eliminated, always call the hotline. |
Yka3aHne: Pn nepBOM nCNoIb3OBAHn np6opa nn npn ero nepBOM BKNIOyeHN nocne dNITeNBHO nepepbBa nepBaJyAsha Ka KoPe eJe He NMeet NOHOro apomata ee He cNeDuET BbINBaTb.
3JeMeHTbI ynpaBJIeHnIa
1 CeTeBOB BbIKJIIOuTaTeJIb
HaxoJusnca Ha 3aDne cTOpOHe np6opa ceTeBOB BbIKIOUaTeIb 1 CnyKNT dJa BKIOUeHnI INI OTKIOUeHnI NOdauN 3JIeKTPo3Heprn.
IocJIe BKNIOUeHnIeTeBOrO BbIKIOUaTeJIaKNaBnIua CBeNTcH HeApKIM KpaCHbIMCBetOM. Pnp6Op HaxoDITcB PexKImeOxNDAHnI («stand by»).
BHHMaHne
He noIb3yUmecb cemeebIM bIKIOyamEnem npu paOmaIoueM npu6ope. BIKIOUeHue npu6opa donyckaemc moIbKO npu e0 haxokdeHu u e pexkume oKudahua.
2 NobopoTHbI peyIaTOp ypoBn3aONHeHn
Ipn nOMOuN NOBOPOTHOpeyIaTopa yPOBn3aONHeHnMoKET npOn3BOIDtbcra PnABHa NaCTPOkA ObEMa YaShKn - OT MaIeHbKOuAaKn BnIOMbdo BoJIbWoJ uAaKn P.
3 Ducnnei
Incnnei cnyknt dna OTo6paKeHnHaCTpoek n COo6uEHN np6opa B BVdeCOOTBeTCTBYUUX CmBOJOB.
W W W W W W W W W W W W W W W W W W W W W W W W W W W W W W W W W W W W W W W W W W W W W W W W W W W W W W W W W W W W W W W W W W W W W W W W W W W W W W W W W W W W W W
Muraet Kpbuka waxTbI dny 3arpy3KMOJOTOro Kope 14 OTKpbIta
CBeTITcMolOtbiKoPe/PeXmOuNCTKN
CBETNTc Cna6bI KoPe
CBeHTcHopMaJIbHbIKoFe
000cbetntcKpeknkoede
000 Mmraet EMKoCTb dIa KOpeHbIX 3epen nycTa
S CBETNTcA CepBnC: yka3aHne Ha Heo6xoJIMocTb ydaJIeHnHaKnI/ouNCTKn npnbopa
S Muraet CepBnC: npOn3BOAnTcBbIOJIHeHne cepBnCHOnIporpaMMbl
CBETNTc 3aNoHnTB eMKoCTb DJI
+ MnaeT BOdBi 12. YcTaHOBnTB
yaWKy NOD HacadkoN 9
N, NOBepHyB peryIaTOp
8, yCTaHOBnTB erO B
noJIOXeHne /V/
Mnraet YcTaHOBntb peYyIaTOp 8 B NOJIOKeHne /V.
CBETITcYCTaHOBtbperyJrTop8B NOJXKeHneO.
CBETNTcOnpoxHHTbnoDHObIMnraetNoDOHbOTcyTCTBYOT
4 KnaBnua noaun Kope
IДЯ npriroTOBNeHnO OUepeHOn YaSHKMOJOTOro KoPe Tpe6Byetc NOBtOpNTbDaHHbI pOuceC.
Yka3aHne: EcIn B TeueHne 90 cekyHd OT6Op KoPe He 6yDet npOn3BeDeH, Kamepa 3aBapuBaHnA ABToMaTnueCKn ONopoxHaeTcR Bo n36ExaHne nepenonHeHn. Pnp6Op npOn3BOoNT npOMbIKy.
ПриноТовлени ratrye BODbl
PpH6Op DOnJKeH 6bITb rOTOB K pa6Ote.
DaHHa YHKUIN NO3BOJAEr Ipon3BOuNTb
PpHroTOBHeHne TOpYueB BoDbl, HAnpIMep,
dIyuaKu Yaa.
Onachoctb ownapBaHna
HacaKa cunbHo HaapeBaemc, noomomy npukacmbcMoxHO molko Ke ee nnacmmacc06bIM 3JemeHmam.
- Повстаьтete COOTBETCTByUOуУчшky
нор насаду 9.
CdBnHbTe BtJky Ha HacaKe 9 NOJIHOCTbIO BHN3.
- YcTaHOBInTe NOBOpOTbI peRyJIaTOp 8 B noJoxKeHne /V.
Onachoctb ownapBaHna
Iocne ycmaHOBU peaymopae noXeHue /O 603MOxHo6pa3oBaHue 6pb132.He npukacuimecbK Hacadke 9 u He HanpaBnme ee HaJIOdeu.
3aBepuTe npoecc Bo3BpaTOM peryIaTopa 8 B noIoKeHne O.
Pnp6op npo3BOIDHT HArpeBaHne N BHOBb roTOB K pa6ote B cIyue, ecnB BCE YeTbipe KnaBnIN CBETaTcNocToHHO , , ,
BaxnHa HOpmaun: B cnyae npepbBaHn cepBnCHOn nporpaMMbl, Hanpimep, BCneIcTBnpe6o3NeKTPocHa6KeHn, nepeB BKIOUeHnEM np6bopa 06aTeNbHO Tpe6yETc ONOPOXHnTb EMKOCTb IJRA BOdbI, IpOMbITb ee n 3anONHTb CBexeB Odoi. Nocne 3TORO BKNIOHTe np6op.
- Pnp6op npOn3BOaNT npombIKy CO CINBOM XnIDKOCTN B EMKOCTb 21.
Ha nCnIe MInraeT CmBOJ
- POnCTaBbTe YaWKy NOD HacaKy 9 U yCTaHObIte NOBOpOTbI pyrJrTOp 8 B nOLOXeHne /V.
BoJa cInBaETcB YaWKy.
Ha nucnlee noBnaetc cMBOJ
- YctaHOBNTe NOBOPOTbI peYyIaTOp 8 o6paTHO B NIOJXKeHne ,O".
Pnp6op npOn3BOoNT npOMbIKy n CHOba roTOB K pa6Ote.
3auntataOT3amep3aHnA
Bo n36exaHne BbI3BaHHbIX 3aMep3aHnem NOBpeXdEHN np6opapnp ero TpaHcnpTupOBKe IN xpaHeHN Heo6xOIMo npedBapnteJbHO pONHO tIO ONOPOXHTb np6op.
Pnp6opdoJxeh 6bItb roTOB K pa6oTe.
- ChЯть emKOCTb ДЯ BODbl, ONOPOXHnTbe n yctaHOBt b Ha npexKHee MeCTO.
-ПодстаВИТь NOД HасаКу 9 6Ольшую y3KуI O EMKOCTb.
HaxmTe KnaBnuy
KordaHaDnCnJeeHauHeTMeIbKaTb CnMBoJ ,yCTaHOBHTb NOBOpOTbIN peYJrTop 8 B NIOJKeHne /V.
B TeueHne HnpoDoJnxTeJbHoro BpeMeHn np6Op pOn3BOaNT 06pa3ObaHne npa.
- Nocne TOrO KaK n3 HacaKn 9 nepeCTaHET NOBnTbCn nap, yCTaHOBnTb NOBOpOTbIn peYJrTop o6paTHo B noJoxKeHne "O".
- BbIKnHouNtB npn6op.
yTnIn3aun

ДанныnpиборИмeeTMapknpoBky corlachoEbpoNeIckoI npeKtNBc 2002/96/EC no yTuIn3aun cTapbIX 3JIeKtpnuecknxI aJeKTPoHHbIX npi6opob (waste electrical and electronic equipmentWEEE).Toi npeKTHBOI onpeJeHbI DeIcTByUOHe Ha BceI TeppntOpu EC npabnla npneMa n yTuIn3aun cTapbIX npi6opob. INΦopMaunO6akTyalbHbIX BO3MOxHocTAX yTuIN3aun Bbl MoXte NOJyHTB MaRa3HHe, B KOTOpOM Bbl npno6peN npi6op.
YcnoBna rapaHTnHoro 06CnyxNbHa
IOnyUHTb IcYeepNbIBaIOUHnΦOpMaUHO 06 ycNoBnIX rapaHTnHOrO o6CnyKuBaHnBA Bb moKeTe B Baem 6nJaMse mABTOpN3OBaHHOM cepBnCHOM ueHTpe nIN BcePBnCHOM ueHTpe OT npON3BOJNTeJI OOO «BCX BbITOBaTExnKa》,a TaKKe HauTN B qnpMeHHOM rapaHTnHOM TaIOHe, BblDaBaEMm npn pOdaXe.
Mbl ocTaBnJaem 3a co6oI npaBO Ha BHeceHne N3MeHeHn.