
VeroCafe Latte TES503M1DE - Coffee maker BOSCH - Free user manual and instructions
Find the device manual for free VeroCafe Latte TES503M1DE BOSCH in PDF.
| Brand | Bosch |
| Model | VeroCafe Latte TES503M1DE |
| Product Type | Automatic coffee machine with integrated milk frother |
| Dimensions (H x W x D) | 385 x 280 x 479 mm |
| Net Weight | 9.3 kg |
| Power Supply | 220-240 V, 50/60 Hz |
| Heating Power | 1600 W |
| Maximum Pump Pressure | 15 bars |
| Water Tank Capacity | 1.7 L (without filter) |
| Bean Container Capacity | 300 g |
| Power Cord Length | 100 cm |
| Grinder Type | Ceramic |
| Double Shot Function | aromaDouble Shot for very strong coffee in two stages |
| Milk Frother | Removable, prepares milk froth and hot milk |
| Display | Message display and settings |
| Customizable Settings | Temperature, auto-off, water hardness, filter |
| Maintenance Programs | Calc'n'Clean, descaling, cleaning, rinsing the milk system |
| Daily Cleaning | Drip tray, coffee grounds, frother, brewing unit |
| Safety | Auto-off, frost protection, emergency stop |
| Included Accessories | Measuring spoon, water filter, milk container (TES503M1DE) |
| Warranty | According to country conditions, 2 years standard (to check) |
Frequently Asked Questions - VeroCafe Latte TES503M1DE BOSCH
User questions about VeroCafe Latte TES503M1DE BOSCH
0 question about this device. Answer the ones you know or ask your own.
Ask a new question about this device
Download the instructions for your Coffee maker in PDF format for free! Find your manual VeroCafe Latte TES503M1DE - BOSCH and take your electronic device back in hand. On this page are published all the documents necessary for the use of your device. VeroCafe Latte TES503M1DE by BOSCH.
USER MANUAL VeroCafe Latte TES503M1DE BOSCH

BOSCH
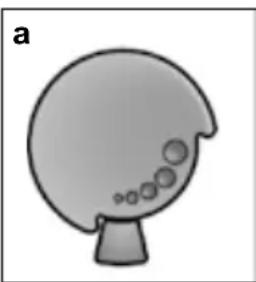
Included in delivery (see page 23)
natural_image
Two simple plastic containers, one open and one closed, with no visible text or symbols on the containers themselves.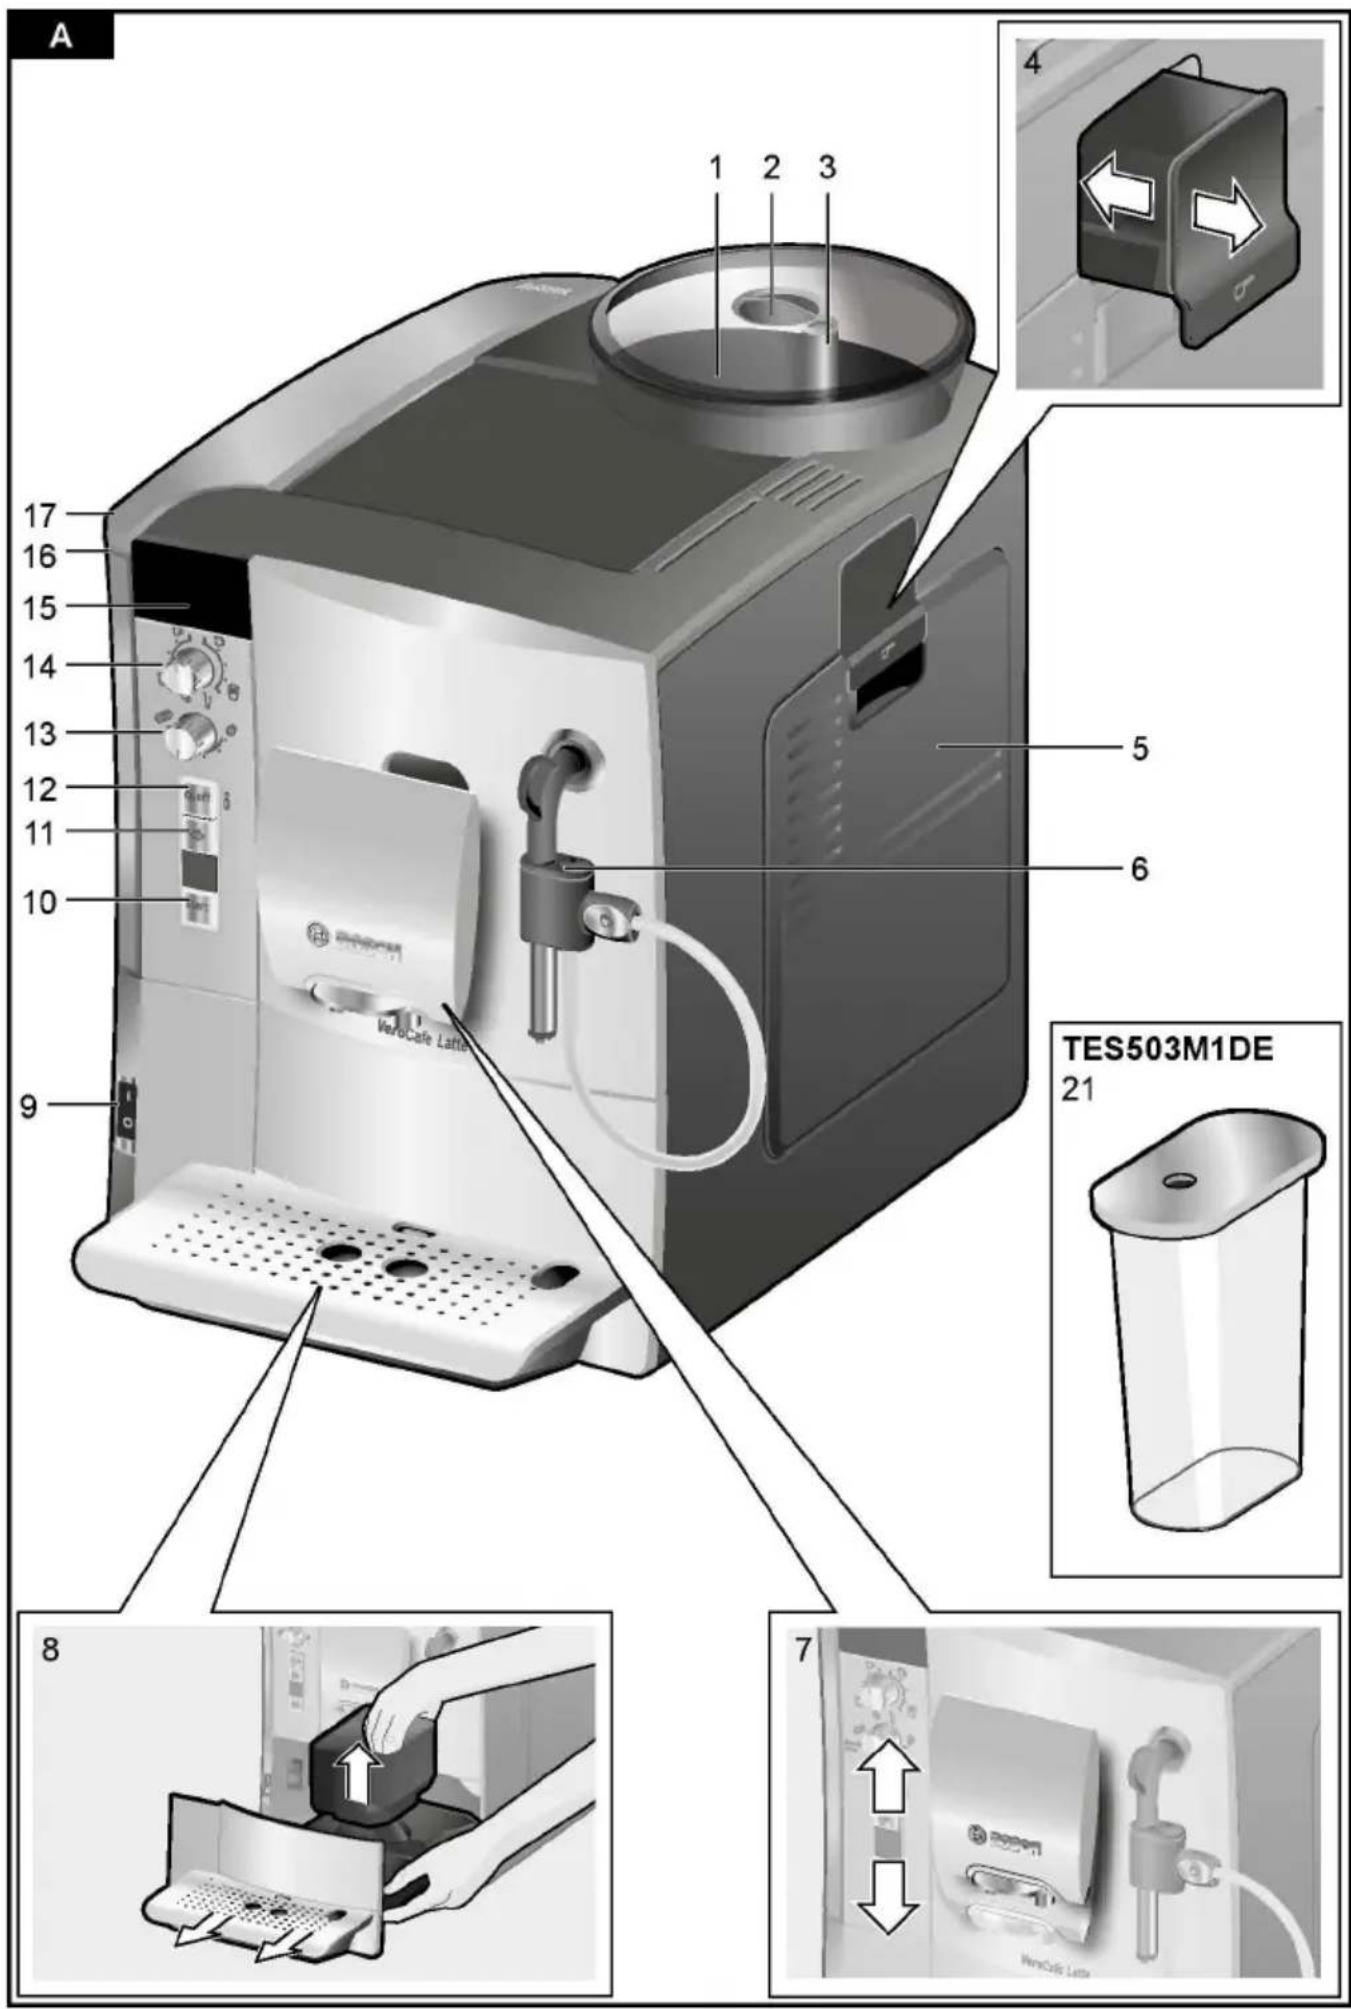
Inhalt
natural_image
Hand holding a medical device with a cable, no visible text or symbolsDrehwähler
natural_image
Two identical gray cylindrical devices with black connectors and a small icon on their tops, shown side by side (no text or symbols)Displaymeldungen
natural_image
Close-up of a black plastic device with two arrows pointing to its port, connected to a cable (no text or symbols visible)natural_image
Illustration of a mechanical device being inserted into a briefcase, showing the process with no text or symbols.natural_image
Close-up of a mechanical caliper with a ruler, showing no text or symbols on the object itself.natural_image
Close-up of a plug with a cable and directional arrows indicating motion (no text or symbols)natural_image
Two identical gray cylindrical devices with black connectors and circular buttons, no visible text or symbols.natural_image
Three abstract 3D shapes with checkmark and cross symbols, no text or labels presentnatural_image
3D mechanical component diagram showing a component being inserted into a housing, with no visible text or symbols.natural_image
Mechanical assembly diagram showing two components with directional arrows, one being inserted and the other holding a handle (no text or symbols present)
natural_image
Mechanical assembly diagrams showing pipe connection and valve mechanism (no text or labels)natural_image
Two-step illustration: left shows a tool emitting gas, right shows a glass of liquid with bubbles (no text or symbols)natural_image
Diagram showing a hand washing a plastic bag into a machine, and another hand pouring liquid from a drain into a mechanical component (no text or symbols present)natural_image
Close-up of a mechanical device with a magnified inset showing internal components (no text or symbols visible)Congratulations on purchasing t
Included in delivery ..... automatic.espresso.machine.f28r
Safety instructions 24
Overview.....P.lease.al.so.note.the.encl.osed.c
Controls .....ence. guide..lt .can .be .kept .in .t
Display messages .... storage.compartment .(5c) .27til aromaDouble Shot.... 27
Before using for the first time. 28
Water filter ..... Included in delivery ^29 Menu settings .....
Adjusting the grinding unit (see.overview.image.at.the begi
Preparation using coffee beansstruction.manual)31
Preparation using ground coffee 32
Dispensing hot water .....a...Fully.automatic.espr.es20 ma
Preparing milk froth and warm mES503....32
Maintenance and daily cleaning Uni.ck .r.ef.er.ence 3gui de
Tips on energy saving .....c. .l.n.s.t.r.u.c.t.i.o.n. .man.u.a.l. . . . 36
Service Programmes .....d. .Milk.frother/Rotary selector ..... 36
Frost protection.....e. .Wat.e.r. .h.a.r.d.n.e.s.s. .t.e.s.t.i.n.g. .s.t.r.i 3
Accessories .....f. .Meas.ur.i.ng .s.p.o.o.n .....
Disposal
Guarantee. . . . . . . . . . . . . . . . . . . . . . . . . . . . . . . . . . . . . . . . . . . . . . . . . . . . . . . . . . . . . . . . . . . . . . . . . . . . . . . . . . . . . . . . . . . . . . . . . . . . . Only. y. f. or. TES503M1DE.
Technical data....9. .Mi .l .k. .c .o .n .t .a .i .n .e .r....4
Simple troubleshooting ..... h. Water filter ..... 41
Safety instructions
Please read and follow the operating instruction to keep them for later reference. Enclose these you give this appliance to someone else. This designed for the preparation of normal house, the home, or in household-like, non-commercial household-like environments include staff kin offices, agricultural and other small businesses or for use by guests at bed-and-breakfast establishments, similar residential facilities.
⚠ Danger of electric shock!
Connect and operate the appliance only accor specifications. To avoid potential hazards, repairs such as replacing a damaged cable must only be carried out by personnel.
This appliance may be used by children aged by persons with reduced physical, sensory or or who lack experience and/or knowledge if t have been given instruction in the safe use have understood the dangers involved. Keep c of age away from the appliance and connectir allow them to use the appliance. Children sh appliance. Cleaning and user maintenance sha children unless they are older than 8 years
Never immerse the appliance or mains cable i power cord and appliance show no signs of da occur, pull the plug or disconnect from the
⚠️ Risk of suffocation!
Do not allow children to play with packaging
⚠️ Risk of scalding!
The milk frother outlet (6c) gets very hot.
Milk froth or warm milk comes out of the mil sure. Splashes of milk can scald. Do not touch it at anyone. After use, allow to cool down first before touching.
Use this appliance only after the milk froth assembled and installed.
⚠️ Risk of injury!
Do not reach into the grinding unit.
Overview
Controls
(see overview images A, B, OPower and Eofaft switch O / I the beginning of this instruction (the opnowam usawi) tch O / I (9) is
1 Bean container the appliance on or to switch i
2 Aroma cover (power supply off).
3 Selector for grind settingimportant: Before switching off
4 Drawer cleaning programme or use the (ground coffee/cleaning tabultetton (12) to switch off.
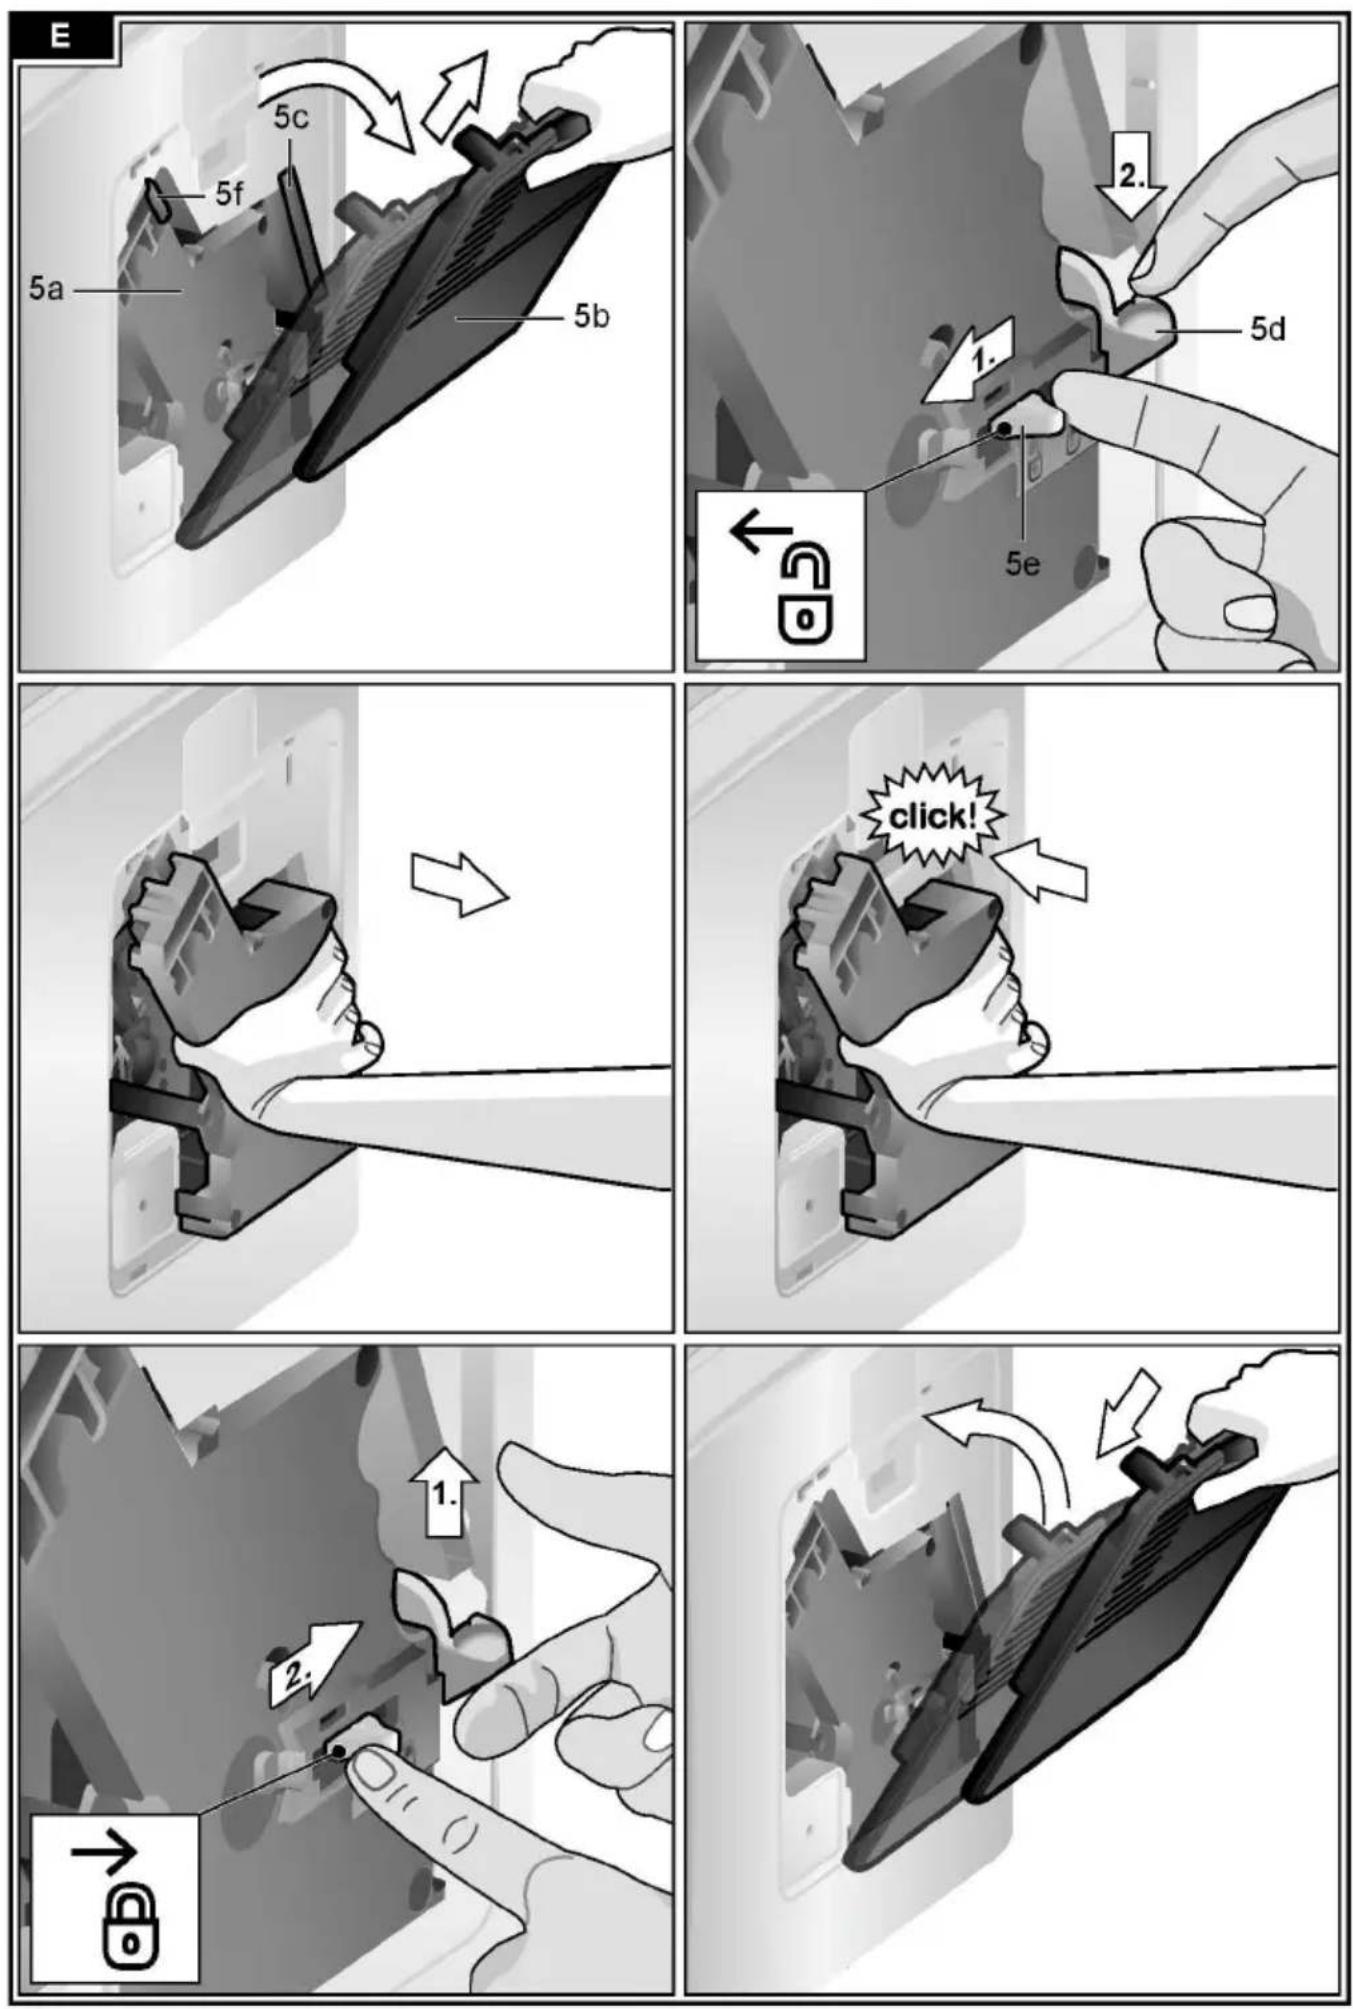
5 Brewing unit (Fig. E)
a) Brewing unit
b) Door When the ☑ off / i button (12)
c) Storage compartment for briefly the appliance rinses and switches
reference guide off. Pressing and holding down
d) Eject lever for brewingouttion (12) displays the user s
e) Lock starts the descaling and cleani
f) Cover
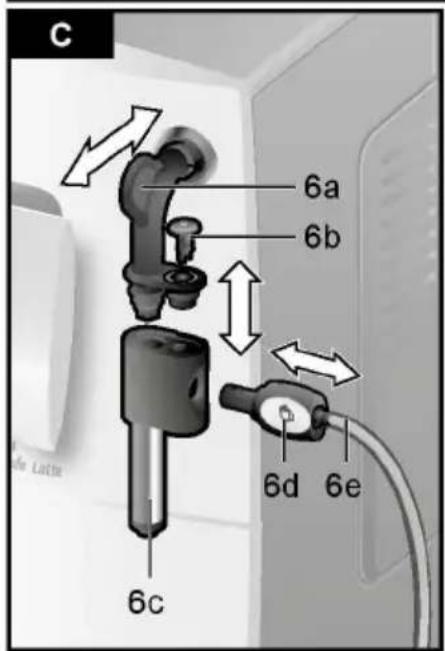
6 Milk frother (Fig. C) remov abult on
a) Steam valve
b) Air nozzle for preparing milk froth or war
c) Outlet
d) Rotary selector for warm milk/milk froth start button
e) Milk tube Press the start button (10) to
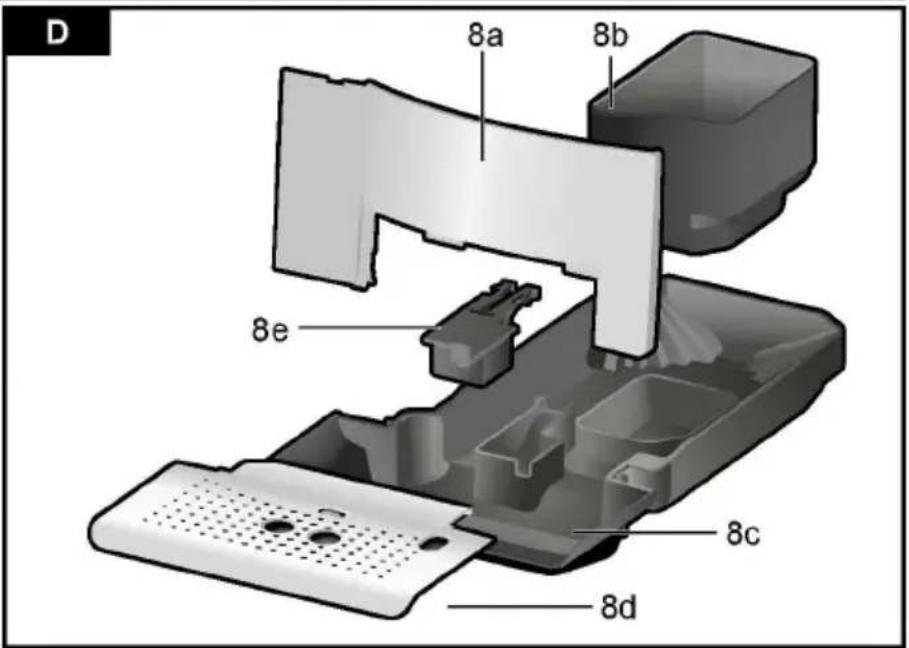
7 Coffee outlet, height - adj purse pad or action or to start a servi
8 Drip tray (Fig. D) Press the start button (10) ago
a) Drip tray panel drink preparation to cut the di
b) Coffee grounds containeprocess short.
c) Drip tray for coffee outlet
d) Grate for coffee outlet "Coffee strength" rotary knob
e) Float
9 Power on/off switch O / I double shot to set the coffee stre
10 start button
11 🎩 button
12 ♘ off / i button
13 “Coffee strength” rotary knob
14 “Drink selection” rotary knob
15 Display
16 Removable water tank
17 Lid for water tank
18 Measuring spoon (insertion aid for water filter)
19 Storage compartment for measuring spoon
20 Power cable with storage compartment


This rotary knob (13) to set the coffee stre
VERY MILD
MILD
NORMAL
STRONG
DOUBLESHOT STRONG+
DOUBLESHOT STRONG++
With these coffee strengths the coffee i brewed in 2 stages. Se " aromaDouble Shot".
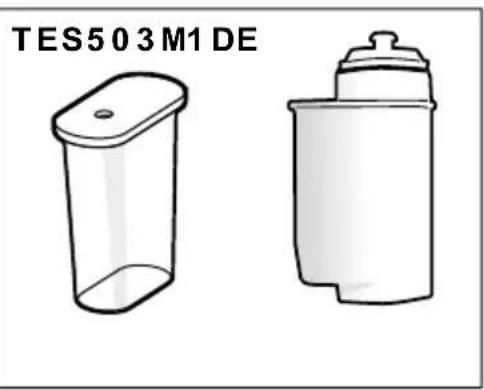
Only for TES503M1DE
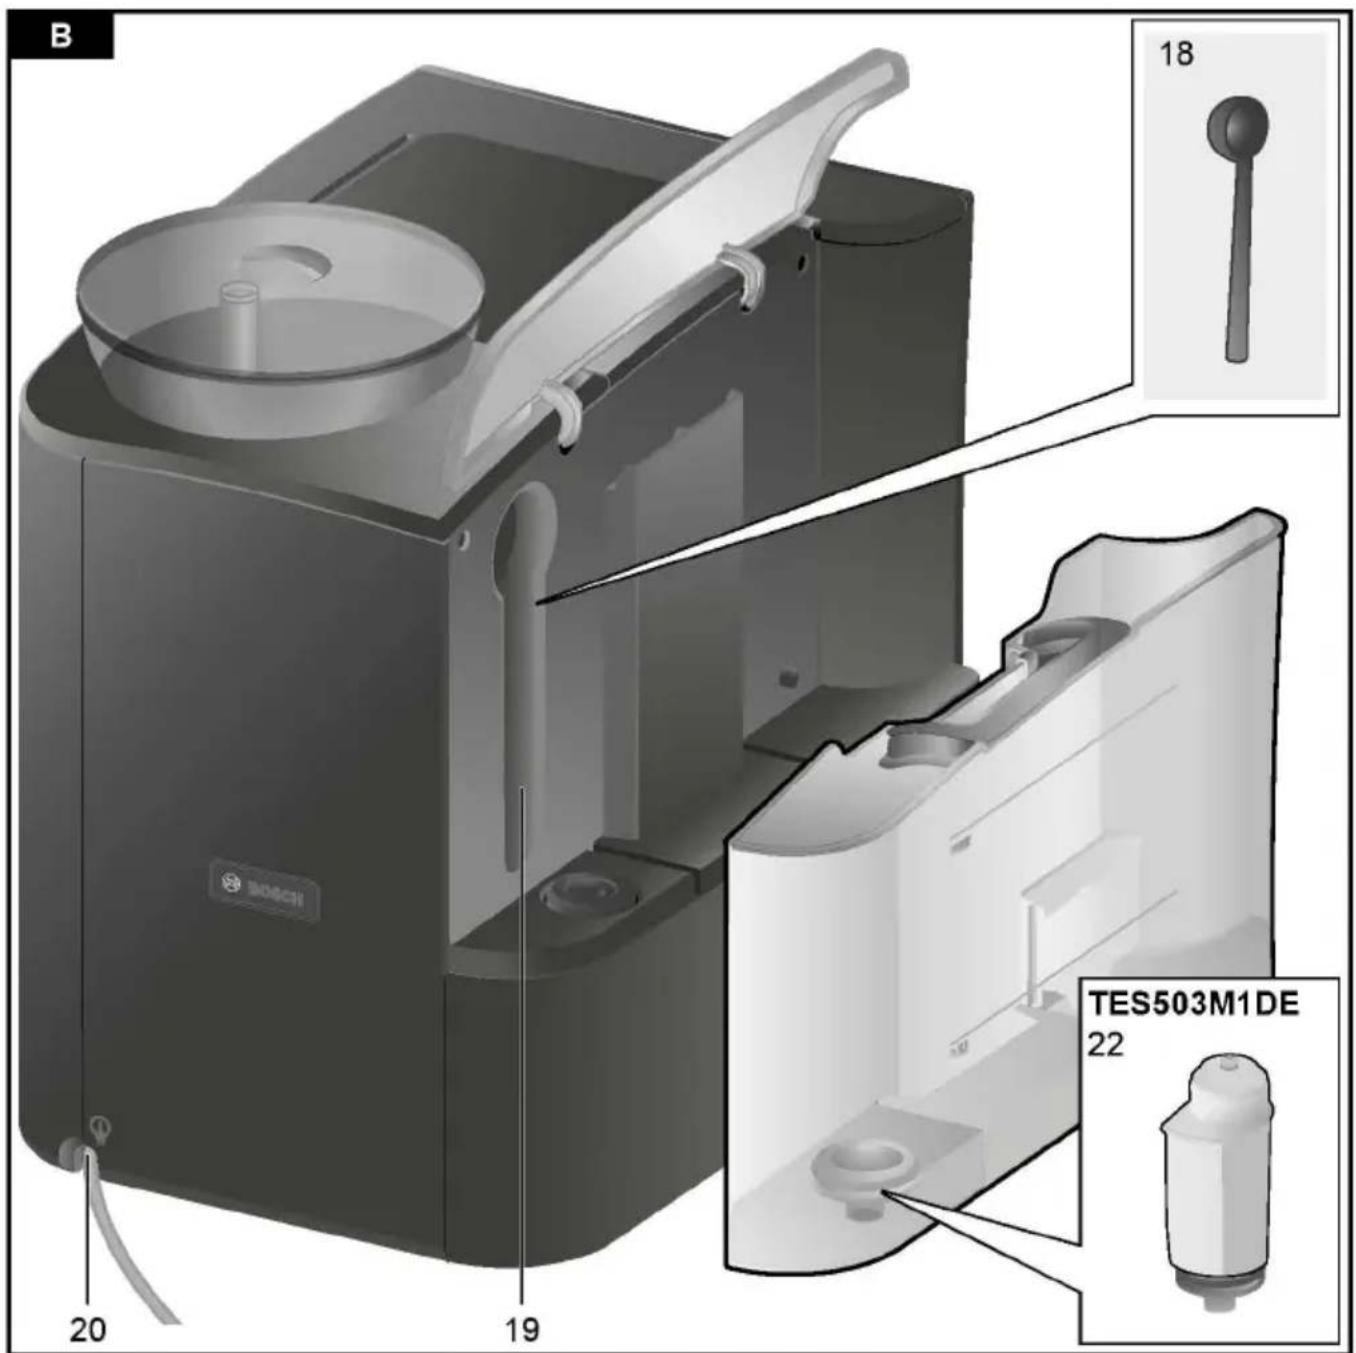
21 Milk container
22 Water filter
"Drink selection" rotary knob
| This rotary knob (14) is used to select the required drink and the per-cup quantity. It is also used to change user settings. | |
| SMALL ESPRESSO | |
| ESPRESSO | |
| to | SMALL CAFÉ CRÈME |
| CAFÉ CRÈME | |
| LARGE CAFÉ CRÈME | |
| 2 SMALL ESPRESSO | |
| 2 ESPRESSO | |
| to | 2 SMALL CAFÉ CRÈME |
| 2 CAFÉ CRÈME | |
| 2 LARGE CAFÉ CRÈME | |
| RINSE MACHINE | |
| RINSE MILK SYSTEM |
N.B.: If a drink is selected that cannot be prepared, INVALID COMBINATION appears in the display. Change the coffee strength or the selected drink.
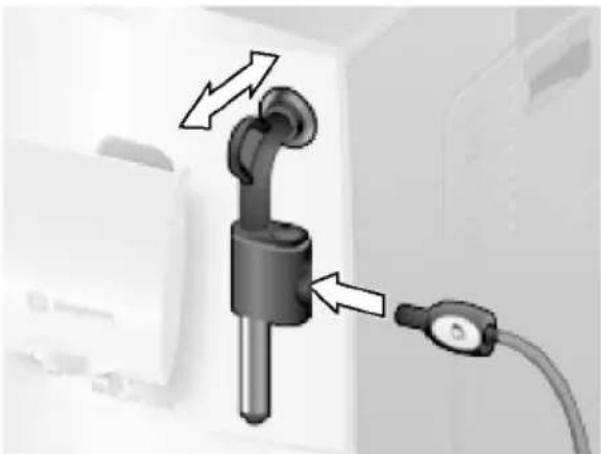
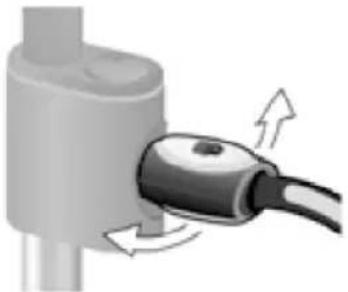
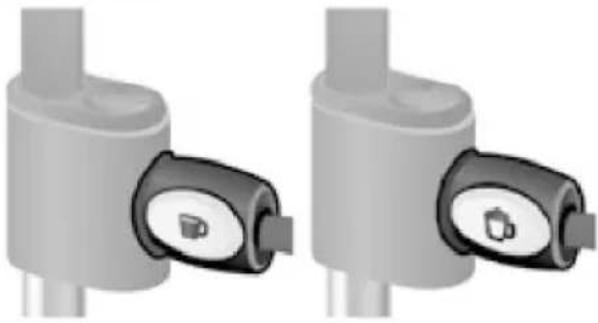
Milk frother
Pull the milk frother (6) out to open it and push it back in to close it.
natural_image
Illustration of a hand holding a medical or diagnostic device with a catheter and arrow indicator (no text or symbols)Rotary selector
To dispense milk froth – for example for a latte macchiato or cappuccino – turn the 📋 symbol to the front.
To dispense warm milk, turn the ▶ symbol to the front. To dispense hot water, set the rotary selector to the horizontal position.
natural_image
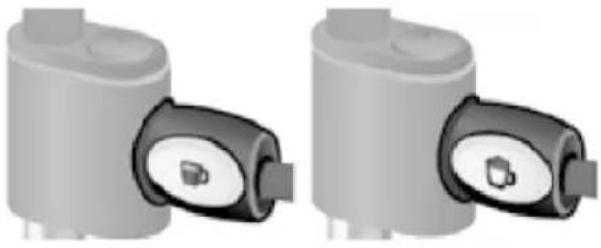
Two identical gray cylindrical devices with black and white buttons, no visible text or symbols.Display messages
The display (15) shows not only the current operating status, but also various messages that give you status information or let you know when you need to take action. As soon as you have taken the necessary action, the message disappears and the menu for drink selection is displayed again.
aromaDouble Shot
The longer the coffee is brewed, the more bitter substances and undesired aromas are released. This has a negative effect on the taste and makes the coffee less easily digestible. So for extra strong coffee the TES503 has a special aromaDouble Shot function. When half the quantity has been prepared, coffee is ground and brewed again so that only the pleasant, aromatic scents are released.
The aromaDouble Shot function is activated with the following settings:

Before using for the first time
General
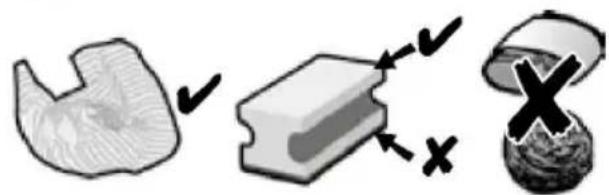
Fill the appropriate container using only pure, cold, uncarbonated water and only roasted beans (preferably espresso or coffee bean blends for fully automatic coffee machines). Do not use coffee beans that have been glazed, caramelised or treated with other additives containing sugar, since they will block the brewing unit.
The water hardness setting can be adjusted on this appliance. The factory default setting for the water hardness is 4. Check the water hardness with the enclosed test strip. If the check reveals a value other than 4, change the setting on the appliance accordingly after switching on (see "Menu settings" WATER HARDNESS).
Switching on the appliance
- Remove the protective film.
- Place the fully automatic espresso machine on a flat, water-resistant surface that can take its weight. Make sure that the machine's ventilation slots remain unobstructured.
Important: Only use the appliance in frost-free rooms. If the appliance has been transported or stored at temperatures below 0 °C, wait at least 3 hours before operation.
-
Pull the power cord out of the storage compartment (20) and plug in. Adjust the length of the cable by pushing it back in or pulling it out. The easiest way to do this is to place the appliance so that its back is flush with the edge of the counter and either pull the cable downward or push it upward.
-
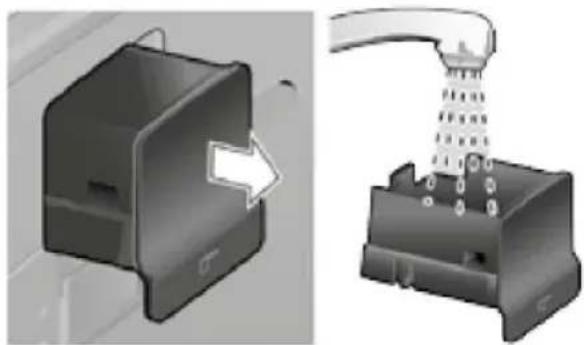
Install the milk frother. Operate the machine only after the milk frother (6) has been fully assembled and installed.
natural_image
Close-up of a black cylindrical device with two arrows pointing to its port, connected to a cable (no text or symbols visible)- Lift the lid of the water tank (17).
- Remove and rinse the water tank (16) and fill it with fresh cold water. Do not fill above the max mark.
- Replace the water tank (16) and push it firmly downward into place.
- Close the lid of the water tank (17) again.
- Fill the bean container (1) with coffee beans (for preparation using ground coffee, see "Preparation using ground coffee").
- Press the power switch O/I (9). The display (15) shows the menu for setting the display language.
- Select the required display language with the upper rotary knob (14). The following languages are available:
DEUTSCH ENGLISH FRANÇAIS ITALIANO - Press the start button (10). The language you selected is saved. The display shows PULL MILK FROTHER.
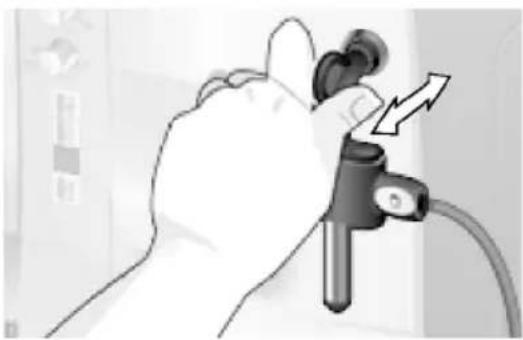
- Place a receptacle under outlet (6c).
- Carefully pull out the milk frother (6) to open it. The appliance rinses out the milk frother (6) with water. The display shows PUSH MILK FROTHER.
- Push the milk frother (6) in to close it. The appliance heats up and rinses. Some water will run out of the coffee outlet.
When the drink selection menu is shown in the display, the appliance is ready for use.
Switching off the appliance
The factory settings of the fully automatic espresso machine are programmed for optimal performance. The appliance switches off automatically after a specific time (time span can be programmed, see "Menu settings" SHUT OFF).
Exception: The appliance switches off without rinsing if only hot water or steam were dispensed.
To switch the appliance off manually before this, press the Ⓧ off / i button (12). The appliance rinses and switches off.
N.B.: If the appliance is being used for the first time, a service program has been run, or the appliance has not been operated for a long period, the first beverage will not have the full aroma and should not be consumed.
When using the espresso machine for the first time, you will achieve a suitably thick and stable "crema" only after the first few cups have been dispensed.
After extended use, water droplets may form on the ventilation slots. This is normal.
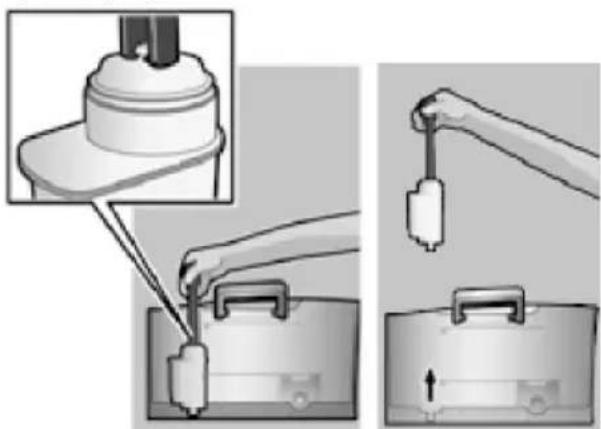
Water filter
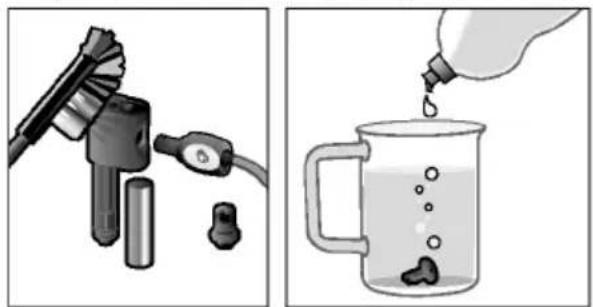
A water filter can prevent scale buildup. Before a new water filter is used, it must be rinsed. To do this, proceed as follows:
- Press the water filter firmly into the water tank with the aid of the measuring spoon (18).
natural_image
Illustration of a mechanical device being inserted into a base case, showing the process with no text or symbols.- Fill the water tank (16) with water up to the max mark.
- Press and hold the Ⓧ off / i button (12) for at least three seconds. The menu opens.
- Press the Ⓧ off / i button (12) repeatedly until the display shows No / OLD FILTER.
- Select ACTIVATE FILTER with the upper rotary knob (14).
- Press the start button (10).
- Place a receptacle with a capacity of 0.5 litres under the outlet (6c).
- Press the start button (10).
- Pull the milk frother (6) to open it.
- Water will now flow through the filter to rinse it.
- Push the milk frother (6) in to close it.
- Empty the container.
The appliance is ready to use once more.
Note: Rinsing the filter simultaneously activates the setting for the CHANGE FILTER! display.
The filter is no longer effective when the CHANGE FILTER! display appears, or at the latest after 2 months. It needs to be replaced for reasons of hygiene and so that there is no build-up of limescale (this could damage the appliance).
Replacement filters can be obtained from retailers or from customer service (see "Accessories"). If no new filter is used, turn the FILTER setting to No / Old.
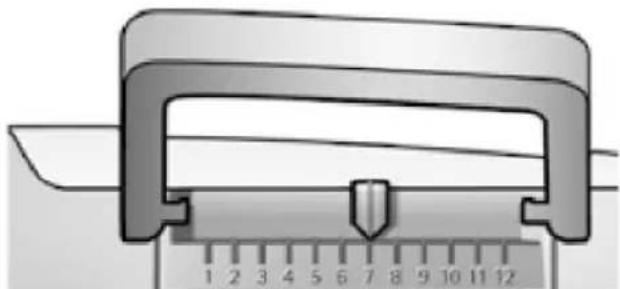
Note: You can use the filter indicator to mark the month in which you inserted the filter. You can also mark the month in which you will need to replace the filter next (at the latest after two months).
natural_image
Close-up of a mechanical caliper with a ruler, showing measurement markings (no text or symbols on the caliper itself)Note: If the appliance has not been used for a prolonged period (e.g. vacation) the filter should be rinsed before the appliance is used again. To do so, dispense a cup of hot water and pour it away.
Menu settings
You can adapt the appliance to your individual needs in the menu settings.
- Hold the ☑ off / i button (12) down for at least 3 seconds.
- Press the Ⓧ off / i button (12) repeatedly until the required menu item appears in the display.
- Select the required setting with the upper rotary knob (14).
- Confirm by pressing the start button (10).
To leave the menu without making any changes, turn the rotary selector to Exit and press the start button (10).
You can set the following:
SHUT OFF
Here you can set the time span after which the appliance automatically switches off following the last drink preparation. A time between 15 minutes and 4 hours can be set. To save power you can specify a shorter period.
FILTER
Here you can set whether a water filter is being used. If a water filter is not being used, turn the setting to No / OLD. If a water filter is being used, turn the setting to ACTIVATE FILTER. New water filters have to be rinsed before use (see "Water filter").
START CALC'N'CLEAN
The service programmes (CALC'N'CLEAN / DESCALING / CLEANING) can be selected manually here. Press the start button (10) and run the selected programme (see "Service Programmes").
TEMP.
The brewing temperature (HIGH / MIDDLE / LOW) can be set here.
LANGUAGE
The display language can be set here.
WATER HARDNESS
The water hardness setting can be adjusted on this appliance. It is important to set the water hardness correctly, so that the appliance indicates accurately when the descaling programme should be run. The factory setting for the water hardness is 4. You can check the water hardness using the enclosed test strip or by asking your local water supplier. Dip the test strip briefly in water, gently shake off any drips, and check the result after one minute.
| Level | Water hardness | |
| German (°dH) | French (°f) | |
| 1 | 1-7 | 1-13 |
| 2 | 8-14 | 14-25 |
| 3 | 15-21 | 26-38 |
| 4 | 22-30 | 39-54 |
Adjusting the grinding unit
The rotary selector (3) adj settings from coarse to fine.
Preparation using coffee beans
This fully automatic espresso grinds beans freshly for each k
Tip: If possible, use only bear automatic coffee and espresso. For optimal quality, deep-freez or store in a cool place in sea. Coffee beans can be ground while
⚠ Warning!
Adjust the grinding unit only while it is
running! Otherwise the appl Diafmcer ematy doe fee drinks can be damaged. Do not reach into tque itge isidmply at the press of a unit.
- While the grinding unit iPr erpuarrait n q,n adjust
the rotary selector (3) from fine (a: Turn The appliance must be ready for anticlockwise) to coarse (b:. TuPl racel dchke- pre-warmed cup(s) wise) as required. coffee outlet (7).
natural_image
Simple grayscale illustration of a mushroom-shaped object with bubbles (no text or symbols)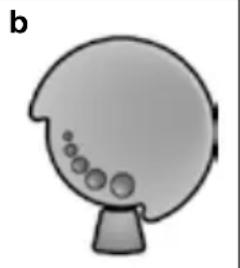
natural_image
Simple illustration of a mushroom-shaped object with bubbles, no text or symbols presentNote: The new setting will not become the lower rotary knob apparent until after the second beapted coffee strength is coffee. display.
Tip: For dark roast coffee finer grind, for lighter beans a coarser grind.
Tip: For a small espresso, al preheat the cup, e.g. using 2. Select the required coffee required per-cup quantity by upper rotary knob (14). The coffee and the per-cup quanti shown in the display.
3. Select the required coffee
nott becoming the lower rotary knob
conseblepted coffee strength is
display.
4. Press the start button (10)
o@afnfsee cihs obsreewed and then pour e cup(s).
N. B.: With some settings the c is prepared in two stages (see "aromaDouble Shot").
Wait until the procedure is ful
Press the start button (10) again brewing process short.
Preparation using ground coffee
This fully automatic espresso machine can also be operated with ground coffee (not instant coffee powder).
N.B.: The aromaDouble Shot function cannot be used when coffee is prepared using ground coffee.
Important: Fill the water tank (16) with fresh water every day. The tank (16) should always contain sufficient water for operating the appliance.
Preparation
- Open the drawer (4).
- Pour in no more than 2 level measuring spoons of ground coffee.
Warning: Do not use whole beans or instant coffee. - Close the drawer (4).
- Select the required drink by turning the upper rotary knob (14) (only one cup possible).
- Press the start button (10).
Coffee is brewed and then poured into the cup.
N.B.: Repeat the procedure for another cup of coffee. If no coffee is taken within 90 seconds, the brewing chamber empties automatically to avoid overfilling. The appliance rinses.
Dispensing hot water
Risk of burns!
The milk frother (6) gets very hot. Hold the milk frother (6) by the plastic part only.
The milk frother must be cleaned before drawing hot water.
The appliance must be ready for use.
- Place the pre-warmed cup or glass under the outlet of the milk frother (6c).
- Set the rotary selector (6d) to the horizontal position.
natural_image
Diagram of a plug inserted into a cylindrical component with directional arrows indicating flow (no text or symbols)- Pull the milk frother (6) to open it. The appliance heats up. Hot water runs out of the milk frother outlet (6c) for about 40 seconds.
- Stop the process by pushing in the milk frother (6).
Preparing milk froth and warm milk
Risk of burns!
The milk frother (6) gets very hot. Hold the milk frother (6) by the plastic part only.
Tip: You can foam the milk first and then dispense coffee, or foam the milk separately and pour it onto the coffee.
The appliance must be ready for use.
- Place a pre-warmed cup under outlet (6c).
-
Insert the milk tube (6e) into a milk container.
-
Turn the rotary selector (6d) to "Warm milk" or "Milk froth".
natural_image
Two identical gray cylindrical devices with black connectors, shown from side and top views (no text or symbols visible)-
Press the 🎩 button (11). The 🎩 button (11) flashes and the appliance now heats up for approx. 20 seconds. The display then shows PULL MILK FROTHER.
-
Pull the milk frother (6) to open it.
Risk of burns!
Milk froth or warm milk comes out of the milk frother (6) at high pressure. Splashes of milk can scald. Do not touch the outlet (6a) or aim it at anyone.
- Close milk frother (6) by pushing it in.
Tip: For optimal milk froth quality, use cold milk with a fat content of at least 1.5 % if possible.
Important: Dried milk residue is difficult to remove, so the milk frother (6) must be cleaned with lukewarm water immediately after use and rinse using the RINSE MILK SYSTEM programme.
Maintenance and daily cleaning
Risk of electric shock!
Unplug the appliance before cleaning it. Never immerse the appliance in water. Do not use a steam cleaner.
- Wipe the outside of the appliance with a soft, damp cloth.
- Do not use abrasive cloths or cleaning agents.
natural_image
Three abstract 3D shapes with checkmarks and X marks, no text or symbols present- Always remove any limescale, coffee, milk or descaling fluid residue immediately. Such residue can cause corrosion.
- New sponge cloths may contain salts. Salts can cause rust film on stainless steel and must therefore be washed out thoroughly before use.
- Pull the drip tray (8c) with the coffee grounds container (8b) forward and out. Remove the panel (8a) and the grate (8d). Empty and clean the drip tray and coffee grounds container.
- Remove drawer (4) and clean.
natural_image
3D mechanical component diagram showing a housing and a disassembly process (no text or symbols)- Remove the float (8e) and clean with a damp cloth.

natural_image
Mechanical assembly diagram showing a piston-like component being inserted into a housing, with no visible text or symbols.
Do not put the following items in the dishwasher: drip tray panel (8a), float (8e), drawer (4), brewing unit (5a).

The following items are dishwasher-safe: drip tray for coffee outlet (8c), coffee grounds container (8b), grate for coffee outlet (8d), aroma cover (2) and measuring spoon (18).
Only for TES503M1DE:
Do not put the lid of the milk container in the dishwasher. The milk container (21) is dishwasher-safe.
- Wipe out the inside of the appliance (tray holders and drawer).
Important: Drip tray for coffee outlet (8c) and coffee grounds container (8b) should be emptied and cleaned daily to prevent mould from developing.
N.B.: If the appliance is cold when switched on with the power switch O/I (9) or if it switches off automatically after coffee has been dispensed, it rinses automatically. In other words the system cleans itself.
Important: If the appliance has not been used for a prolonged period of time (e.g. after a vacation), clean the entire appliance thoroughly, including the milk system and brewing unit.
Cleaning the milk system
If the milk system was not cleaned after milk has been dispensed, after a certain amount of time the message CLEAN MILK SYSTEM! will appear on the display.
Clean the milk system immediately after use! To clean, leave the rotary selector (6d) in the same position it was in when last used.
To pre-clean the milk system automatically:
- Select by turning the rotary knob (14).
- Place a tall, empty container under the outlet (6c).
- Push the outlet as close as possible to the container.
- Place the end of the milk tube (6e) into the container.
- Press the start button (10).
- Pull the milk frother (6) to open it.
The machine automatically releases water into the container and vacuums it up again via the milk tube (6e) to rinse the milk system. The rinse procedure stops automatically after about 1 minute.
- Push the milk frother (6) in to close it.
- Empty the container and clean the milk tube (6e).
In addition to this, clean the milk system thoroughly at regular intervals (by hand or in the dishwasher).
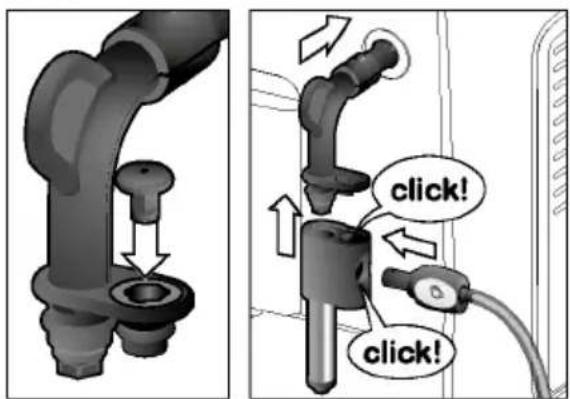
Dismantling the milk system for cleaning:
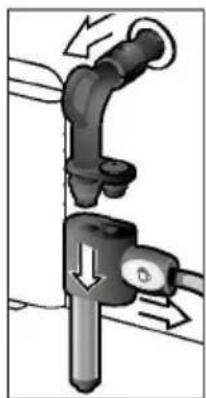
- Detach outlet (6c) from steam valve (6a) (see figure C at the start of the operating instructions).
natural_image
Mechanical diagram showing a pipe joint with directional arrows indicating movement (no text or symbols)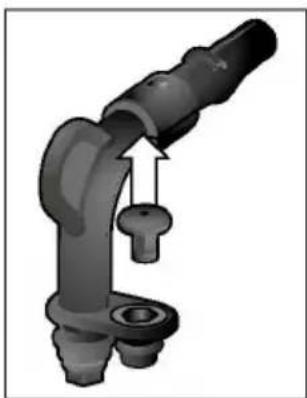
natural_image
Mechanical component diagram showing a bent pipe with a key inserted, no text or symbols present- Clean the individual parts with a detergent solution and a soft brush. If necessary, soak in a warm detergent solution.
natural_image
Two-step illustration: first shows a hairdryer with plug, second shows a water bottle pouring liquid into a glass with bubbles (no text or symbols)-
Rinse all parts with clear water and dry them.
-
Reassemble all the parts and replace fully in the appliance.
⚠️ Risk of scalding!
Use this appliance only after the milk frother (6) has been fully assembled and installed.
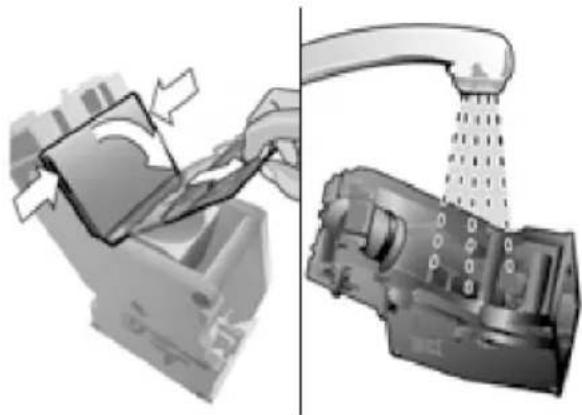
Cleaning the brewing unit
Clean the brewing unit regularly.
To pre-clean the brewing unit automatically:
- Select ⬇ by turning the rotary knob (14).
- Place an empty glass under outlet (7).
- Press the start button (10).
The appliance rinses.
In addition to the automatic cleaning programme, the brewing unit (5a) should be removed regularly for cleaning (see figure E at the start of the operating instructions).
- Switch the appliance off at the power on/off switch O/I (9). No buttons are lit.
- Open the door (5b) to the brewing unit.
-
Slide the red lock (5e) on the brewing unit (5a) completely to the left.
-
Press the eject lever (5d) down fully. The brewing unit is released.
- Grasp the brewing unit (5a) by the recessed grips and remove carefully.
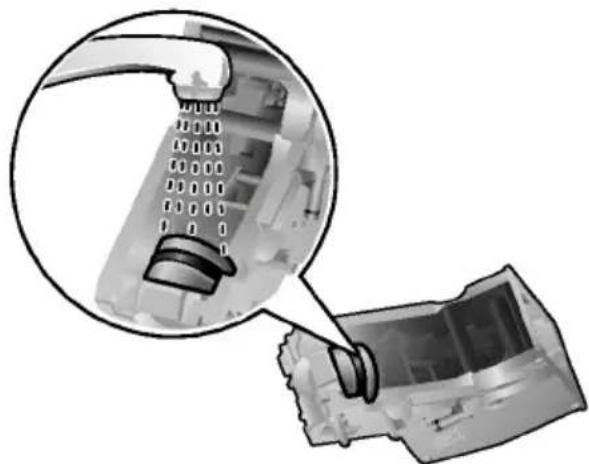
- Remove the cover (5f) of the brewing unit and rinse the brewing unit (5a) thoroughly under running water.
natural_image
Two-panel illustration showing a printer and a mechanical device with a handle, no text or symbols present.- Thoroughly clean the brewing unit sieve under the running water.
natural_image
Close-up of a mechanical component with a magnified inset showing internal structure (no text or symbols visible)Important: Do not clean with detergent or other cleaning agents and do not put it in the dishwasher.
- Wipe out the inside of the appliance thoroughly with a damp cloth and remove any coffee residues.
- Allow the brewing unit (5a) and the inside of the appliance to dry.
- Replace the cover (5f) on the brewing unit and reinsert the brewing unit (5a) fully into the appliance.
- Press the eject lever (5c) up fully.
- Slide the red lock (5e) fully to the right and close the door (5b).
Tips on energy saveService Programmes
- Switch off the fully automatic Referral to the quick reference guide machine when not in use. To address, or age compartment (5c) press the ☑ off / i (12) button. The appliance rinses and switches of depending on usage, the followi
- If possible, do not interscripts will appear on the display milk froth dispensing. Cuttiinertvad scoffee or milk froth dispensing process short results in higher energy collection and in more residual water collecting in the drip tray. CLEAN REQUIRED!
- Descale the appliance regularly to avoid a build-up of limescale. LiOnec's CLEAN requirement results in higher energy consumption.
The appliance should be cleaned de scaled immediately using the sponding programme. You also have option of combining both process Calc'n' Clean function (see "Call If the service programme is not instructed, the appliance may be
⚠ Warning!
Each time you run the service you should follow the instructi the descaling and cleaning ager observe the safety instructions aging of the cleaning agent. Never interrupt the service pro Do not drink the liquids! Never use vinegar, vinegar-base citric acid or citric acid-base Never put descaling tablets or ing agents in the ground coffee the drawer for cleaning tablets
Specially developed descaling a cleaning tablets are available retailers or customer service "Accessories").
Descaling
PLACE CONTAINER
Duration: approx. 25 minutes PULL MILK FROTHER
- Place a receptacle with a c
Important: If there is a filter in the water least 0.5 litres under the out tank (16), it needs to be removed before being frother (6) to descaling programme is run.
DESCALE IN PROGRESS
If the message DESCALE REQUIRED! aThree address calling programme will run on the display, press the ◎ adfofut/ 112 bmt hones.
(12) for 3 seconds and then press the start button (10). The descaling pC C L G N A F I M E W A T E R T A N K start. PRESS START
To descale the appliance before Rinse the water tank (16) and refill it with prompted, press the off / fireustht owat(e12)upf dro the max mar at least 3 seconds. Then press Phes to file start button (10) button (12) briefly twice. Turn the upper
rotary knob (14) until START DESSCAUIGN PROGRESS
appears in the display. The descaling pro gramme now r To start the descaling proceabuot, 30 essecrnes and rinses the start button (10).
PUSH MILK FROTHER
The display will guide you through the milk frother (6) in programme.
EMPTY DRIP TRAY
INSERT DRIP TRAY
- Empty drip tray (8) and
DESCALE IN PROGRESS
The descaling pro gramme now r about 1 minute.
replace them.
EMPTY DRIP TRAY
INSERT DRIP TRAY
N. B.: If the water filter is activated, the display will prompt you to filter and then press the start button again. Remove the filter now if you have not already done so. Press button (10).
rem empty bedrip tray (8) and rep (Replace the filter if one is being used. The appliance has completed descal ittheadt afrdr use again.
FILL DESCALER
PRESS START
Important: Wipe down the appliaca soft, damp cloth to immediateany descaler residue. Such resi
- Pour lukewarm water into octahue een empty osion. New sponge clowater tank (16) up to the contain salt or salt can cause rust film then dissolve 1 Bosch descalning at an blests steel and must the TCZ8002 in it. When using TAZSOD2, out thoroughly before us 2 tablets must be dissolved.
- Press the start button (10).
DESCALE IN PROGRESS
The descaling pro gramme will now run for about 10 minutes.
Cleaning
Cal c' n' Clean
Duration: approx. 10 minutes Duration: approx. 35 minutes.
Important: Clean the brewingCallnc'tn'b@lfeare combines the separ starting the service programmieonsseef descaling and cleaning chapter "Cleaning the brewi prgogumarimes are due to be run so espresso machine automatically If the message CLEAN REQUIRED! apt preias service programme. on the display, press the ♘ off / i button (12) for 3 seconds and then lpmpeerst amte: If there is a filter in the water button (10). tank (16), it needs to be remov. The cleaning programme will tsh e r service programme is run. To clean the appliance before evening unit before starting the prompted, press the ☉ off / pir ogt arme (12) e f chapter "Cleaning at least 3 seconds. Then pre lsrse wihreg Qunoff"./ i button (12) briefly twice. Turn the upper rotary knob (14) until START CLEANING message CALC'N'CLEAN REQUIRED! appears in the display. appears on the display, press t To start the cleaning procedure, on pre(e162) tfter 3 seconds and t start button (10). the start button (10). The serv The display will guide you tthm anrigh whlel start. programme.
EMPTY DRIP TRAY
INSERT DRIP TRAY
- Empty drip tray (8) and
CLEANING IN PROGRESS
The appliance rinses twice.
OPEN DRAWER
- Open the drawer (4).
FILL CLEANER
- Drop a Bosch cleaning tablet Empty the rip tray (8) and rep drawer (4) and close.
CLEANING IN PROGRESS
The cleaning programme will now run for about 8 minutes.
EMPTY DRIP TRAY
INSERT DRIP TRAY
- Empty drip tray (8) and The appliance has finished cleaning is ready for use again.
EMPTY DRIP TRAY
INSERT DRIP TRAY
CALC'N'CLEAN IN PROGRESS
The appliance rinses twice. now run for
OPEN DRAWER
- Open the drawer (4).
FILL CLEANER
repl Accept the Bosch cleaning table drawer (4) and close.
N. B.: If the water filter is activated, the display will prompt you to filter and then press the start button again. Remove the filter now if you have not already done so. Press button (10).
EMPTY DRIP TRAY r l s t e r v e r i p m r a y (10) Empty d r i p t r a y (8) and rep Replace the filter if one is being used. The t appliance has finished cleaning is ready for use again.
FILL DESCALER
PRESS START
- Pour lukewarm water into anhyedespat yer residue. Such resi water tank (16) up to the 0.a5ule mcarkr casidon. New sponge cl then dissolve 1 Bosch desc a bintaig salts.b Salts can cause rust film TCZ8002 in it. When using TOZ60a2, n less steel and must the 2 tablets must be dissolved washed out thoroughly before us - Press the start button (10).
CALC'N'CLEAN IN PROGRESS
The descaling pro gramme will about 10 minutes.
Important: Wipe down the appli a soft, damp cloth to immediate atnlye densptayer residue. Such resi c.a5u sle mcarkr casidon. New sponge cl acbintaig salts.bSalts can cause rust film ToOZ60a2, nless steel and must the dwashed out thoroughly before us 10).
PLACE CONTAINER
PULL MILK FROTHER
- Place a receptacle with a capacity of at least 1 litre under the outNote: (6th)e. appliance must be rea - Pull the milk frother (6) and the watentankt (.16) filled.
CALC'N'CLEAN IN PROGRESS
The descaling programme will about 12 minutes.
- Place a large receptacle up outlet (6c).
- nowresun the button (11). The button (11) flashes and the appliance now heats up for a 20 seconds. The display then PULL MILK FROTHER.
CLEAN / FILL WATER TANK
PRESS START
- Rinse the water tank (16) and refill it with 3. Open the milk frother (6) fresh water up to the max marikt. out and release steam for - Press the start button (10)1.5 seconds.
- Switch the appliance off at on/off switch O/I (9).
CALC'N'CLEAN IN PROGRESS
The descaling programme now5.run\mp\toy the water tank (16) about 30 seconds and rinses ther\appt\rance(8).
PUSH MILK FROTHER
- Push the milk frother (6) in to close it.
CALC'N'CLEAN IN PROGRESS
The cleaning pro gramme will now run for about 8 minutes.
Accessories
Disposal
The following accessories can be used to prevent packaging in an environment from retailers and customers for a key manner. This appliance
| Accessories | Ordering number |
| Retail / Customer service | |
| Cleaning tablets | TCZ600100310575 |
| Descaling tablets | TCZ800200576694 |
| Water filter TCZ70 | 0300575491 |
| Care set TCZ8004 | 00576331 |
| Milk containen | TrCZ8009N00576165 |
| “Fresh Lock” |
in accordance with European Dir 2012/19/EG concerning used elec and electronic appliances (wast and electronic equipment - WEEB guideline determines the framework return and recycling of used applications applicable throughout the El ask your specialist retailer at disposal facilities.
Guarantee
The guarantee conditions for the are as defined by our representative in the country in which it is sold. De these conditions can be obtained dealer from whom the appliance chased. The bill of sale or rec produced when making any claim terms of this guarantee.
Changes reserved.
Technical data
| Power connection (voltage - frequency) 220-240 V - 50/60 Hz | |
| Heater wattage 1600 W | |
| Maximum static pump pressure 15 bar | |
| Maximum water tank capacity (without filter) 1.7 liters | |
| Maximum capacity of the coffee bean | container 300 grams |
| Length of power cable 100 cm | |
| Dimensions (H x W x D) 385 x 280 x 479 mm | |
| Weight, empty 9.3 kg | |
| Type of grinding unit | Ceramic |
Simple troubleshooting
| Problem Cause Solution | ||||
| Display showsREFILL BEANS!although the bean(1) is full, or the unit does not grind beans. | Beans are not falthe grinding unithanging oily)the grindingnd the | Geinng yintaqthe bean change the type of coffe necessary.When the bean container (empty, wipe it with a dry | ||
| No hot water dispensed. The milk holder is soiled | The milk holder is soiled | fOetahent h(e6)miork iftrsother (6holder, see “Maintenancedaily cleaning”. | ||
| Too little or noorthe milk frotherdraw the milk in. | Mhekmf hat frotherholder is soiled(6) does not | Qcanorthiet smilk frother (6holder, see “Maintenancedaily cleaning”. | ||
| Milk unsuitable | for frothing. Use low-fat | |||
| The milk frother correctly assemb | We(6) tihse mottk frother partpeeds together firmly. | |||
| Build-up of lime appliance. | Dealcalien three appliance asdescribed in the instruct | |||
| Coffee dispensing to a trickle or scompletely. | Coffeeisground too finely.Popsground coffefine. | Adjust the grinding unitcoias stero setting. Use coarground coffee. | ||
| Build-up of lime appliance. | Dealcalien three appliance asdescribed in the instruct | |||
| Coffee has no “crema”. Unsuitable type of coffee. Use aty proportion of robusta bea | ||||
| The beans are no fresh. | Usengfresh beans. | |||
| The grinding set suitable for the | Adjust grinding setting to fine. | |||
| Coffee is too “acidic”. The grindcoarse or the pre设置your pre-groundcoffee is too coarse. | ||||
| Unsuitable type of coffee Use a darker ro | ||||
| Coffee is too “bitter”. The grindtoo fine or the pre-groundcoffee is too fine. | Adj uset tihreg girinding unitcoarser setting or use copre-ground coffee. | |||
| Unsuitable type of coffee. Change type of | ||||
| Display showsERRORCALL HOTLINE | The appliance has a fault. Please call th | |||
| If you are unable to solve the problem, always call the hoYou will find the telephone numbers at the back of these instructions. | ||||
| The water filter does notstay in positiontank (16). | The water filter is notmouthedwaberectly | Firmly press the water filterstraight down into the taconnection. | ||
| Display showsCHECK WATER TANK | Water tank has beinsert the water tank coincorrectly inserised the water filter according tonew water filter has notbeen rinsed according toinstructions. | Instructions and then swi | ||
| Carbonated waterwater tank. | Fiin lth e water tank withwater. | |||
| The coffee groundcompact and are t | Thargringting setfine ove do coarse, or notenough ground cof | Aidjg usits theo grinding unitcoarser or finer setting, or use2fe evrals measuring spoonsbeen used. | ||
| Display showsCLEAN BREWING UNIT | Brewing unit (5) | is soiled. Clean brewing | ||
| Too much pre-grofee in the brewi | One acofbrewing unit (5). Fmng umoirte (t 5)n 2 level measspoons of ground coffee. | |||
| The brewing unitnism is stiff. | Remove and clean the brewingunit, see “Maintenance ardaily cleaning”. | |||
| Coffee or milk fr | Buhl duapi by lime | Dealcalien thre appliance asdescribed in the instruct | ||
| varies consider ab | appliance. | |||
| Water dripped oninner floor of the appliance | Drtpetray (8) re | Maved at few seconds afterlast drink was dispensedremoving the drip tray (8removed. | ||
| when the drip tray (8) wasremoved. | ||||
| Display showsINSERT BREWING UNIT | Brewing unit (5)or was not recog | Swis truhs sifng the appliancebir seed ng unit (5) in placethree seconds and switchappliance. | ||
| Restore the unit to itsoriginal factory(“Reset”). | You changed somsethgingad want them. | Tuertn- off the unit with thondios carswitch O / I (9).hold Cheoff / i (12) and t(11) button and turn theon with the power on/offO / I (9). Confirm by pressing thestart button start (10).tory settings are now act | ||
| If you are unable to solve the problem, always call the hoYou will find the telephone numbers at the back of these instructions. | ||||
Sommaire
natural_image
Hand holding a medical or electronic device with a cable, showing a force application (no text or symbols visible)Sélecteur rotatif
natural_image
Two identical gray cylindrical devices with black connectors and circular ports, shown side by side (no text or symbols visible)Messages à l'écran
natural_image
Simple line drawing of a sun with cups and a potted plant, no text or symbols present
natural_image
Diagram of a medical or laboratory device with arrows indicating flow direction (no text or symbols present)natural_image
Illustration showing a hand holding a tool above a briefcase with a valve, and another hand holding a device inside a case (no text or symbols present)natural_image
Mechanical component with a ruler and handle, no visible text or symbolsDÉMARRER CALC'N'CLEAN
natural_image
Two identical diagrams (a and b) showing a mushroom-shaped object with internal particles, no text or symbols present.natural_image
Diagram of a plug with arrows indicating direction, no text or symbols presentnatural_image
Two identical gray cylindrical devices with black connectors and icons, shown side by side (no text or symbols)natural_image
Three abstract shapes with checkmarks and X marks, no text or symbols presentnatural_image
3D illustration of a mechanical component with an arrow indicating direction, showing internal structure and assembly (no text or symbols)natural_image
Diagram showing two mechanical components with arrows indicating motion, one being inserted and the other holding a handle (no text or symbols present)
natural_image
Mechanical diagram showing a pipe joint with directional arrows indicating movement (no text or symbols)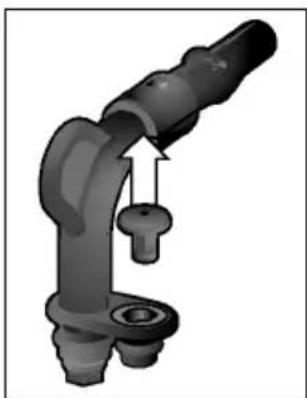
natural_image
3D rendering of a mechanical arm joint with a key inserted (no text or symbols visible)natural_image
Mechanical components including a tool, cylindrical parts, and a plug (no visible text or symbols)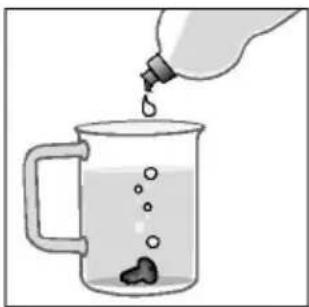
natural_image
Illustration of a bottle pouring liquid into a glass mug with bubbles (no text or symbols)natural_image
Mechanical assembly diagram showing a pipe fitting with a valve inserted into a housing (no text or symbols)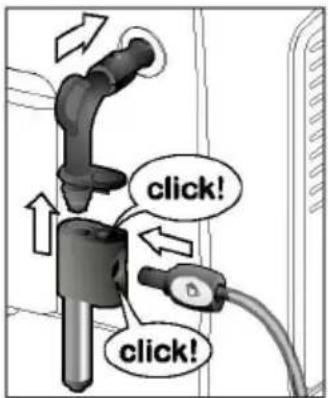
natural_image
Two-panel illustration showing a hand operating a device and a mechanical component with a drain (no text or symbols)natural_image
Close-up of a mechanical component with a magnified inset showing internal structure (no text or symbols visible)CALC'N'CLEAN EN COURS
NETTOYAGE EN COURS
CALC'N'CLEAN EN COURS
CALC'N'CLEAN EN COURS
CALC'N'CLEAN EN COURS
CALC'N'CLEAN EN COURS
natural_image
Hand holding a medical or diagnostic device with a curved arrow indicating motion (no text or symbols visible)Selettore
natural_image
Two identical gray cylindrical devices with black connectors, no visible text or symbolsAl primo impiego
natural_image
Close-up of a black plastic plug with directional arrows indicating movement or force, next to a cable (no text or symbols visible)natural_image
Illustration of a hand using a tool to lift a cylindrical component into a base case, showing the process (no text or symbols present)natural_image
Diagram of a mechanical caliper measuring a metric ruler (no text or symbols present)natural_image
Diagram of a plug inserted into a socket with directional arrows indicating flow (no text or symbols)natural_image
Two identical gray cylindrical devices with black and white buttons, no visible text or symbols.natural_image
Three abstract diagrams showing a textured surface, a rectangular block with arrows indicating direction, and a broken cylindrical object with an 'X' mark (no text or symbols)natural_image
3D mechanical component diagram showing a box being inserted into a housing with a tool extending upward (no text or symbols)natural_image
Diagram showing two mechanical components with arrows indicating motion, one with an upward arrow and the other with a broken handle (no text or symbols present)
natural_image
Mechanical assembly diagrams showing pipe connection and valve mechanism (no text or labels)natural_image
Two-panel illustration showing a hairdryer and a water droplet being poured into a mug (no text or symbols)natural_image
Diagram showing a hand pouring liquid into a device, with no visible text or symbolsnatural_image
Close-up of a mechanical component with a magnified inset showing internal structure (no text or symbols visible)
- BOSCH
- Inhalt
- Drehwähler
- Displaymeldungen
- Safety instructions
- ⚠ Danger of electric shock!
- Overview
- Controls
- "Drink selection" rotary knob
- Milk frother
- Rotary selector
- Display messages
- aromaDouble Shot
- Before using for the first time
- General
- Switching on the appliance
- Switching off the appliance
- Water filter
- Menu settings
- SHUT OFF
- FILTER
- START CALC'N'CLEAN
- TEMP.
- LANGUAGE
- WATER HARDNESS
- Adjusting the grinding unit
- Preparation using coffee beans
- ⚠ Warning!
- Preparation using ground coffee
- Preparation
- Dispensing hot water
- Risk of burns!
- Preparing milk froth and warm milk
- Maintenance and daily cleaning
- Risk of electric shock!
- Cleaning the milk system
- ⚠️ Risk of scalding!
- Cleaning the brewing unit
- Tips on energy saveService Programmes
- Descaling
- PLACE CONTAINER
- DESCALE IN PROGRESS
- PUSH MILK FROTHER
- EMPTY DRIP TRAY
- FILL DESCALER
- Cleaning
- Cal c' n' Clean
- CLEANING IN PROGRESS
- OPEN DRAWER
- FILL CLEANER
- CALC'N'CLEAN IN PROGRESS
- PRESS START
- PULL MILK FROTHER
- CLEAN / FILL WATER TANK
- Accessories
- Disposal
- Guarantee
- Sommaire
- Sélecteur rotatif
- Messages à l'écran
- DÉMARRER CALC'N'CLEAN
- NETTOYAGE EN COURS
- Selettore
- Al primo impiego
Brand : BOSCH
Model : VeroCafe Latte TES503M1DE
Category : Coffee maker