6901000 - Milling machine WOLFCRAFT - Free user manual and instructions
Find the device manual for free 6901000 WOLFCRAFT in PDF.

User questions about 6901000 WOLFCRAFT
0 question about this device. Answer the ones you know or ask your own.
Ask a new question about this device
Download the instructions for your Milling machine in PDF format for free! Find your manual 6901000 - WOLFCRAFT and take your electronic device back in hand. On this page are published all the documents necessary for the use of your device. 6901000 by WOLFCRAFT.
USER MANUAL 6901000 WOLFCRAFT
natural_image
Technical line drawing of a mechanical assembly with no visible text or symbols© Zubehörbeutel
GB Accessory bag
© Sachet avec accessoires
E Bolsa de accessorios
NL Zakje met accessoires
① Sacchetto di accessori
P Saco de acessórios
DK Tilbehørspose
s Tillbehörspase
FIN Lisätarvikepussi
N Tilbehørpose
PL Opakowanie z osprzętem
GR Σάκκος εξαρτημάτων
TR Aksesuvar çantası
© Száček s příslušenstvím
H Tartozékcsomag
RO Pungă cu accesorii
BG Плик за доп.аксесоари
HR Vrećica za pribor
RUSСумка с принадлежностями

119906901
text_image
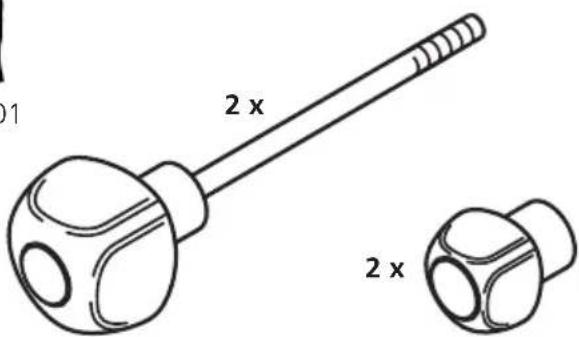
2 x 2 x2 x
M 6 x 35
DIN 933

4 x
A 6,4
DIN 9021

natural_image
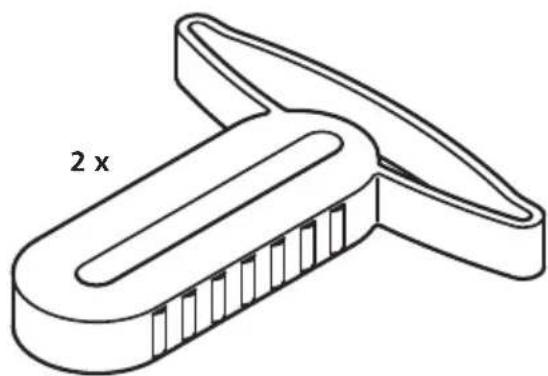
Technical line drawing of a mechanical clamp or clip component (no text or symbols)2x M6

2x
D Bedienungsanleitung
GB Operating instructions
F Mode d'emploi
E Istrucciones de manejo
NL Gebruiksaanwijzing
① Istruzioni per l'uso
P Instrução de operação
DK Betjeningsvejledning
s Bruksanvisning
FIN Käyttöohje
N Bruksanvisning
PL Instrukcja obsługi
©GR Οδηγίες χρήσης
TR Kullanma talimatı
© CZ Návod k použití
H Használati útmutató
RO Instructiuni de montaj
BG Упътване за работа
HR Uputa za uporabu
RUS Инструкция по обслуживанию
text_image
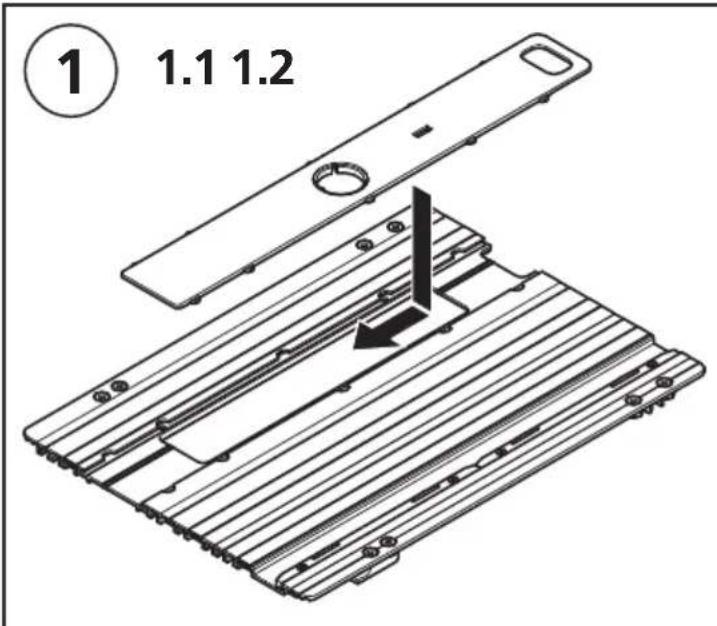
① 1.1 1.2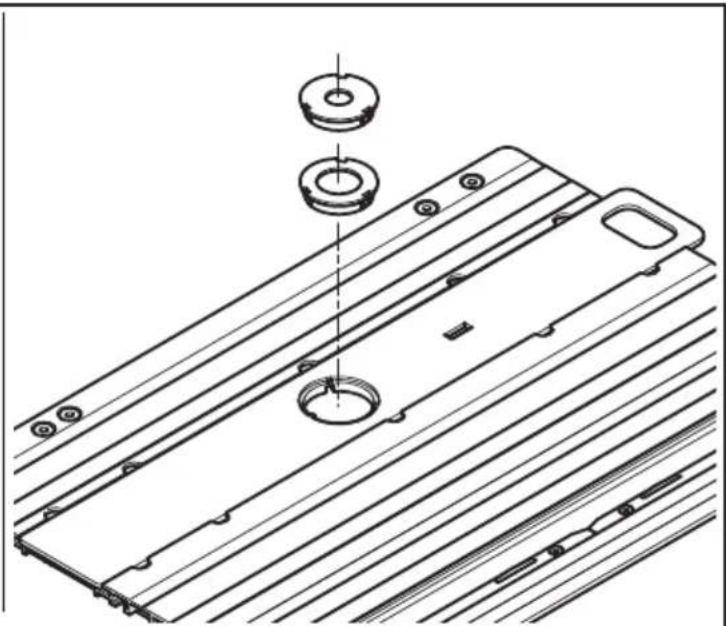
natural_image
Technical line drawing of a mechanical component with two circular features and a central hole (no text or symbols)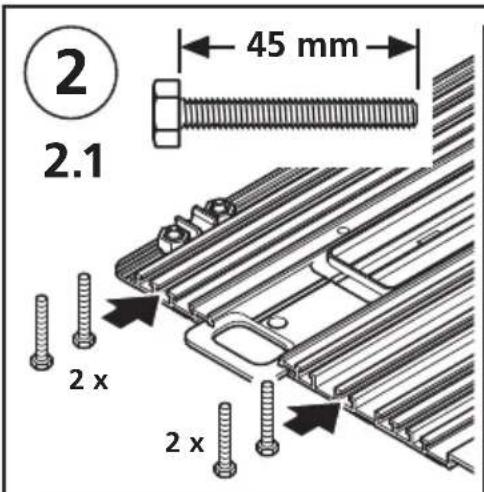
text_image
2 2.1 45 mm 2 x 2 x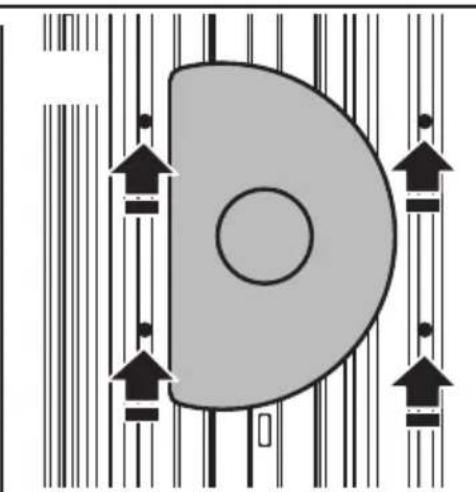
natural_image
Diagram showing directional arrows around a central circular area with vertical bars (no text or symbols)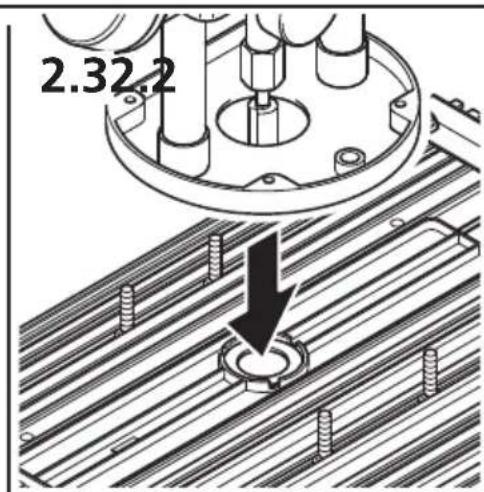
text_image
2.32.2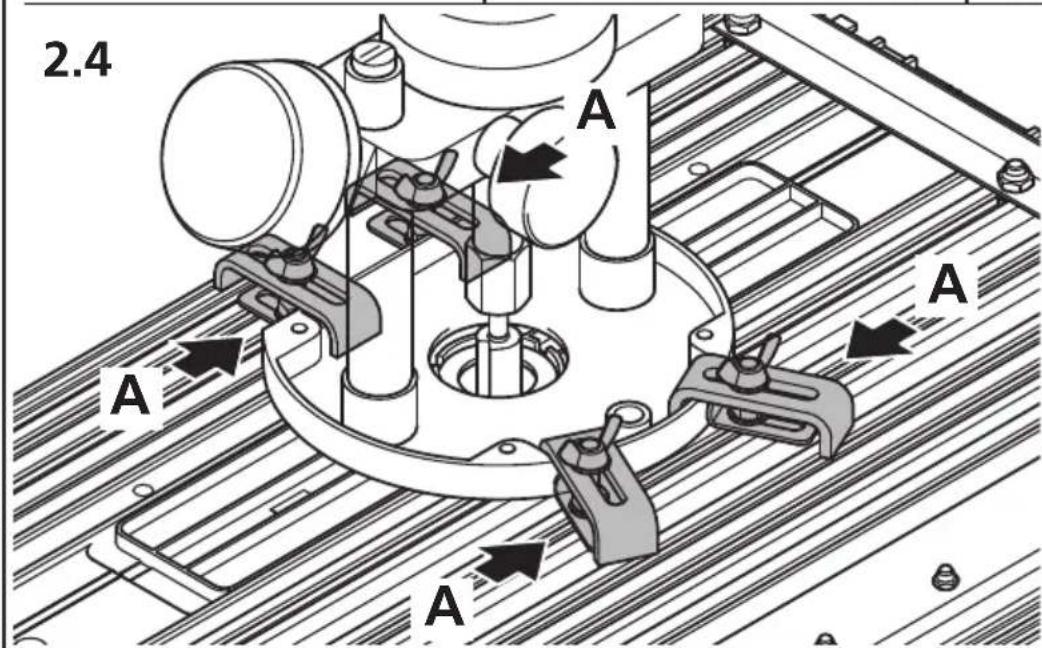
text_image
2.4 A A A A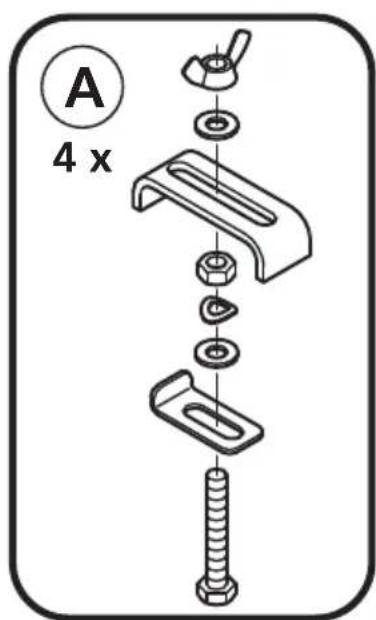
text_image
A 4 x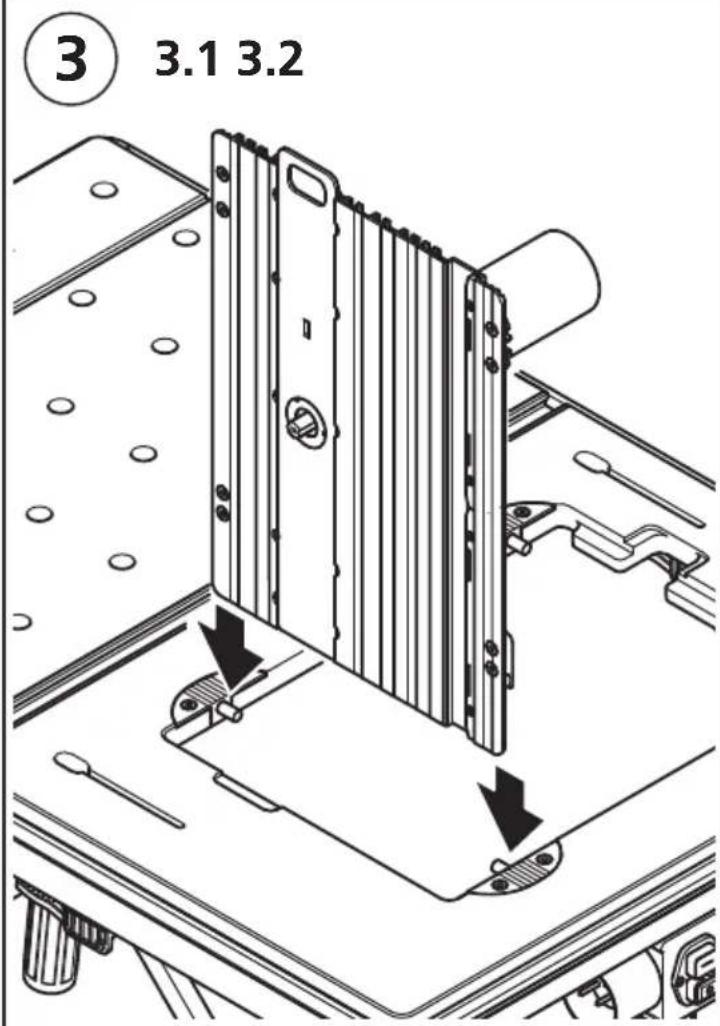
text_image
③ 3.1 3.2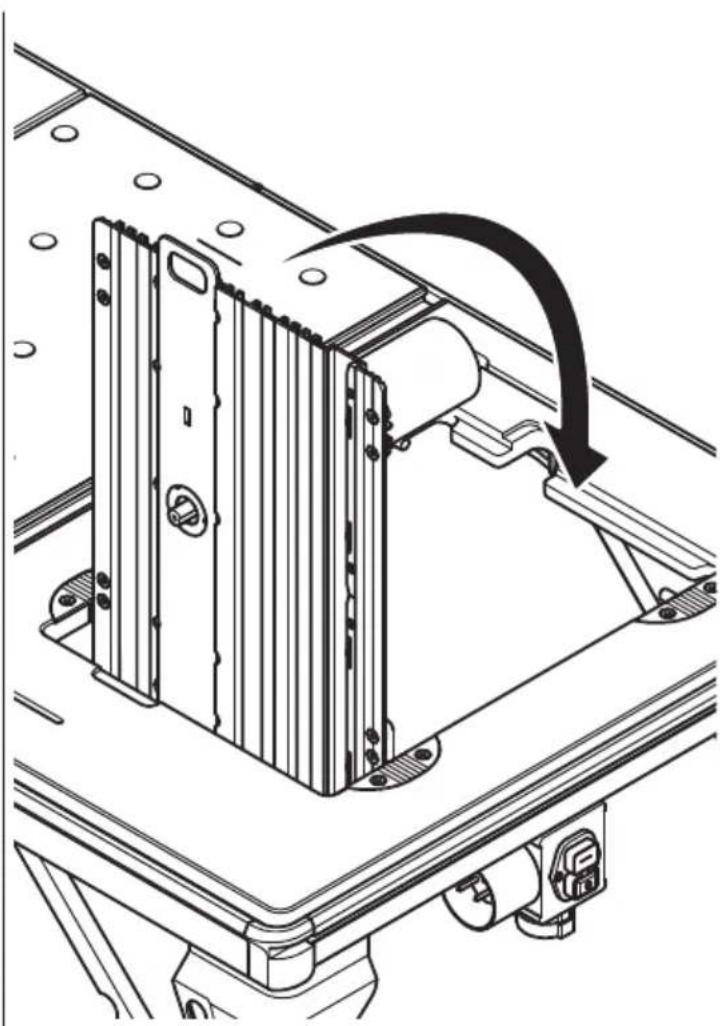
natural_image
Technical line drawing of a mechanical assembly with a curved arrow indicating motion (no text or symbols present)
text_image
3.3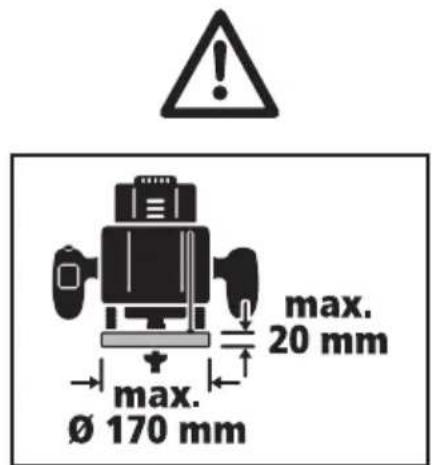
text_image
max. 20 mm max. Ø 170 mm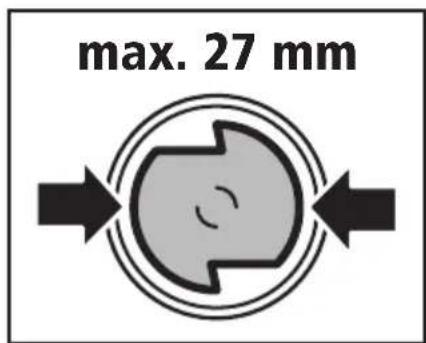
text_image
max. 27 mm
natural_image
Technical diagram showing a mechanical assembly with rotating components and directional arrows (no text or symbols)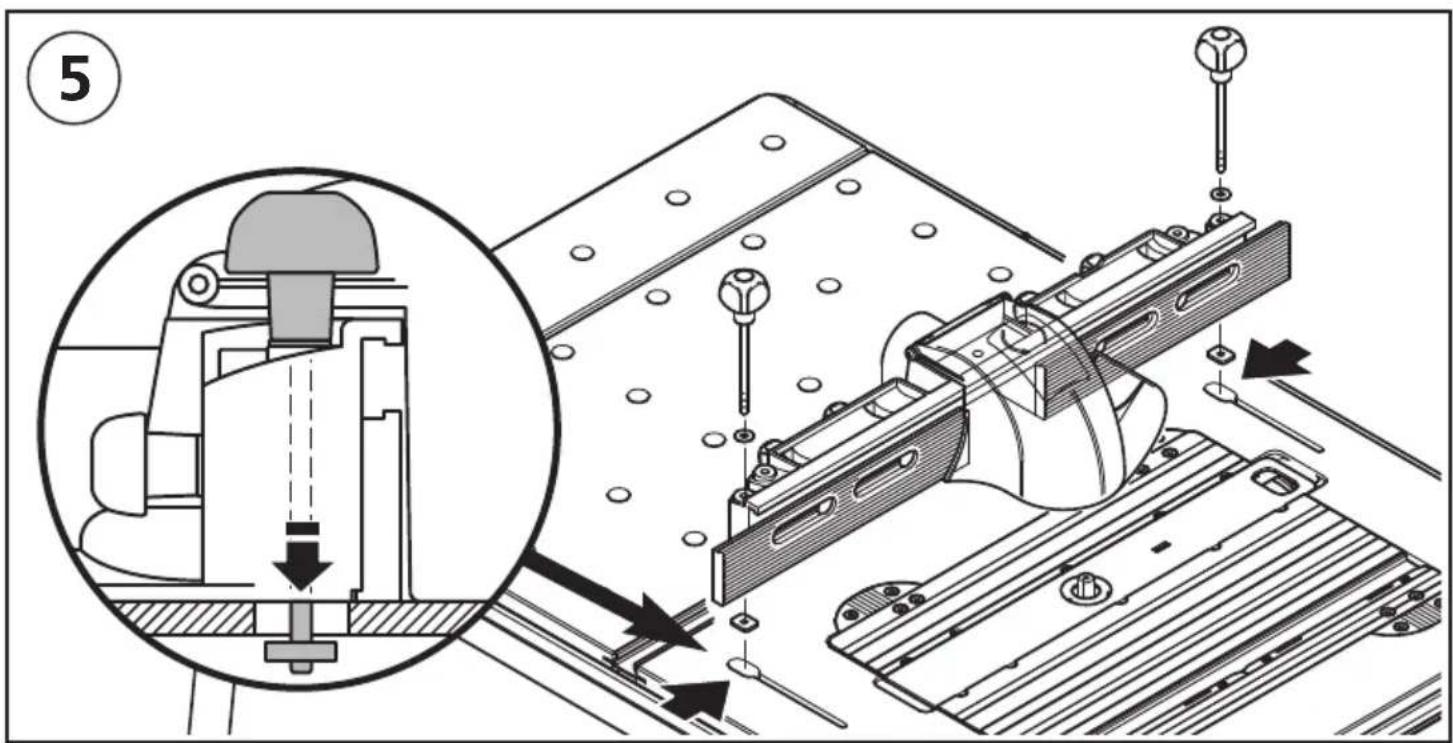
text_image
5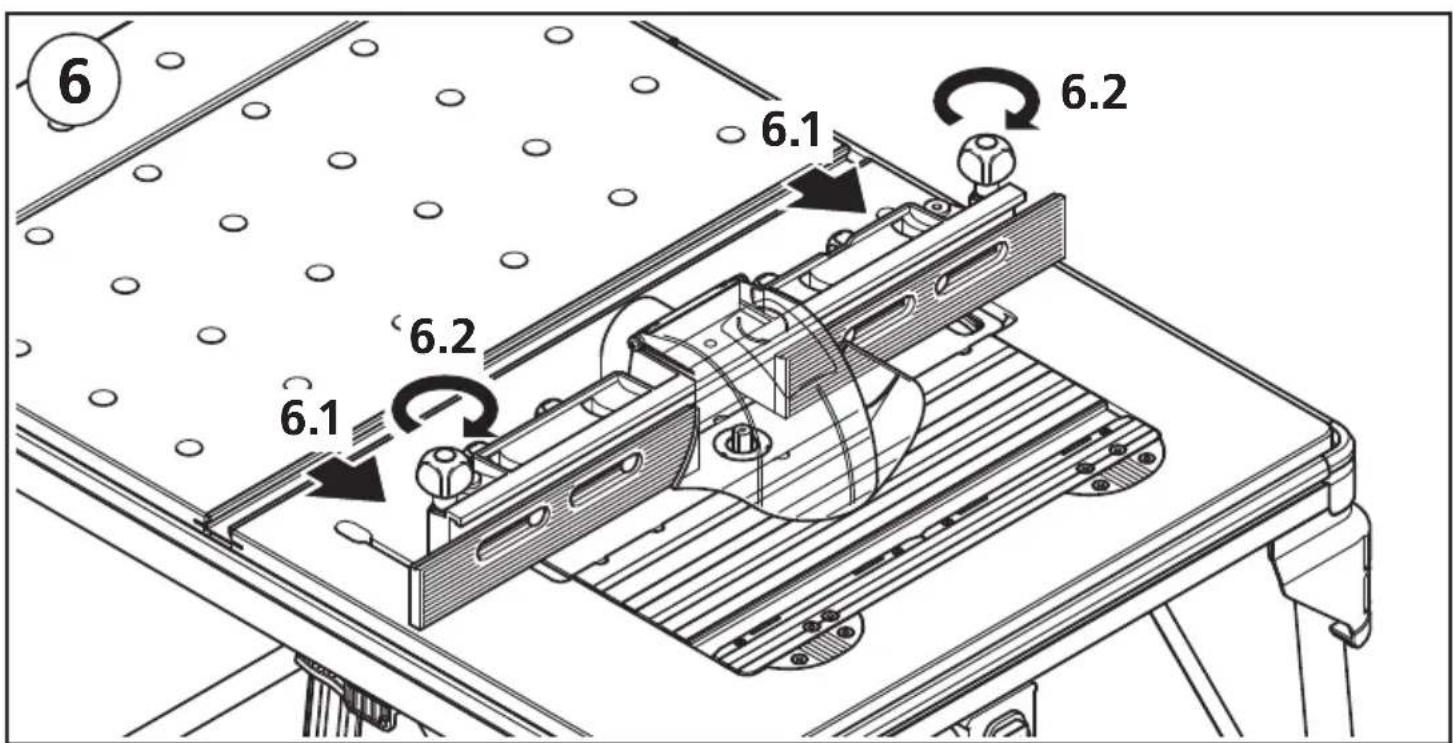
text_image
6 6.1 6.2 6.1 6.2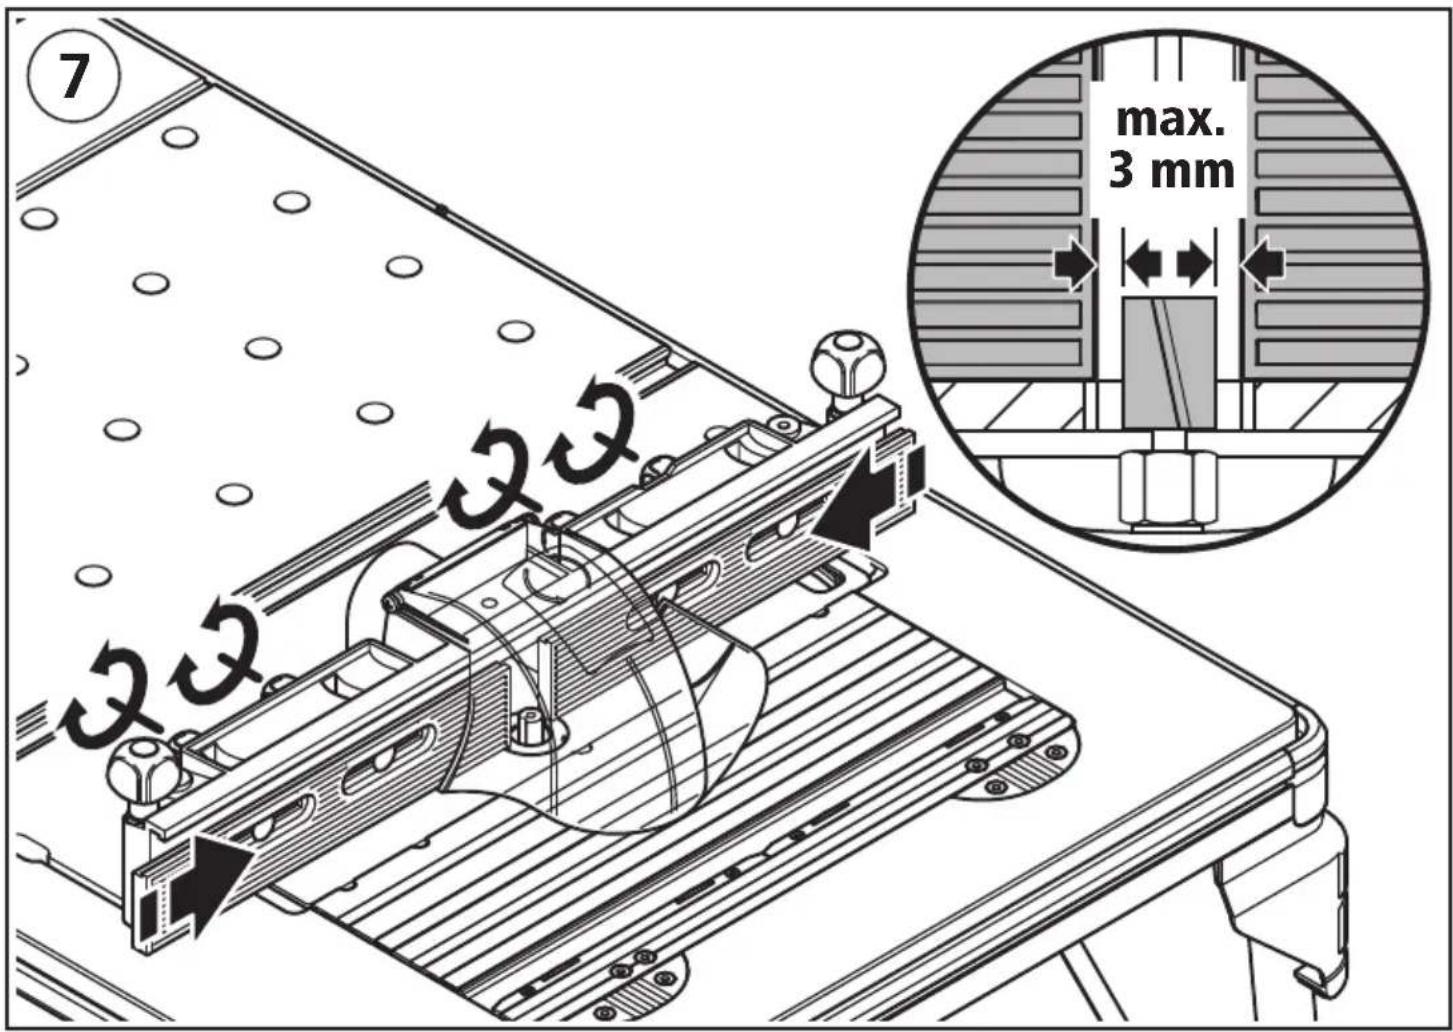
text_image
7 22 22 max. 3 mm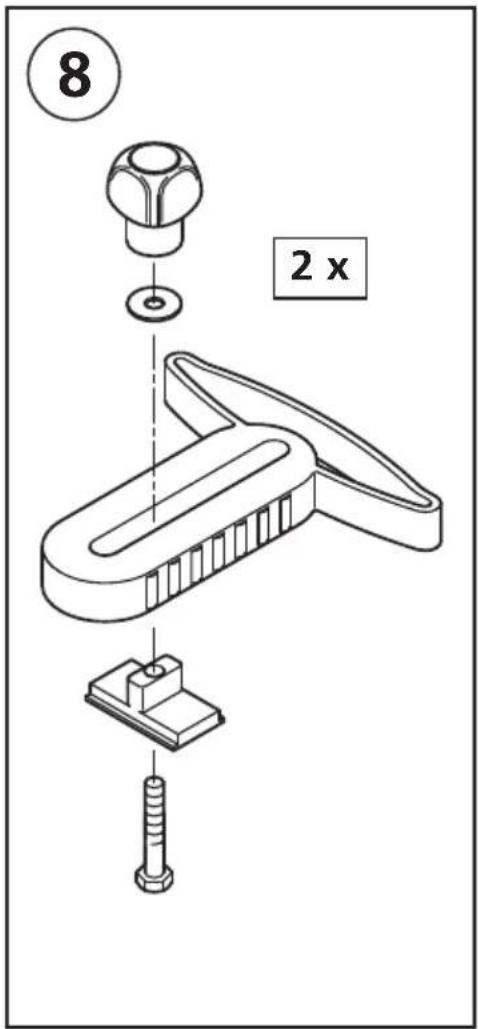
text_image
8 2 x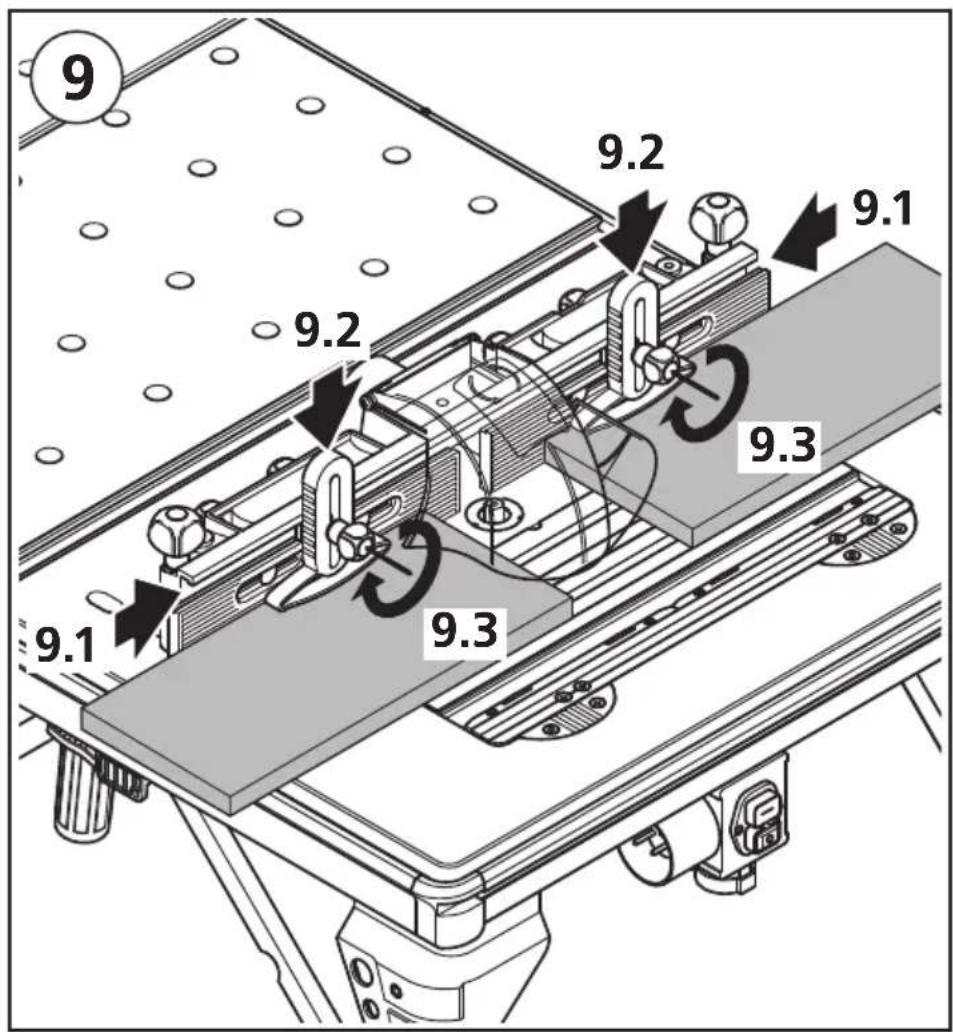
text_image
9 9.2 9.1 9.2 9.3 9.1 9.3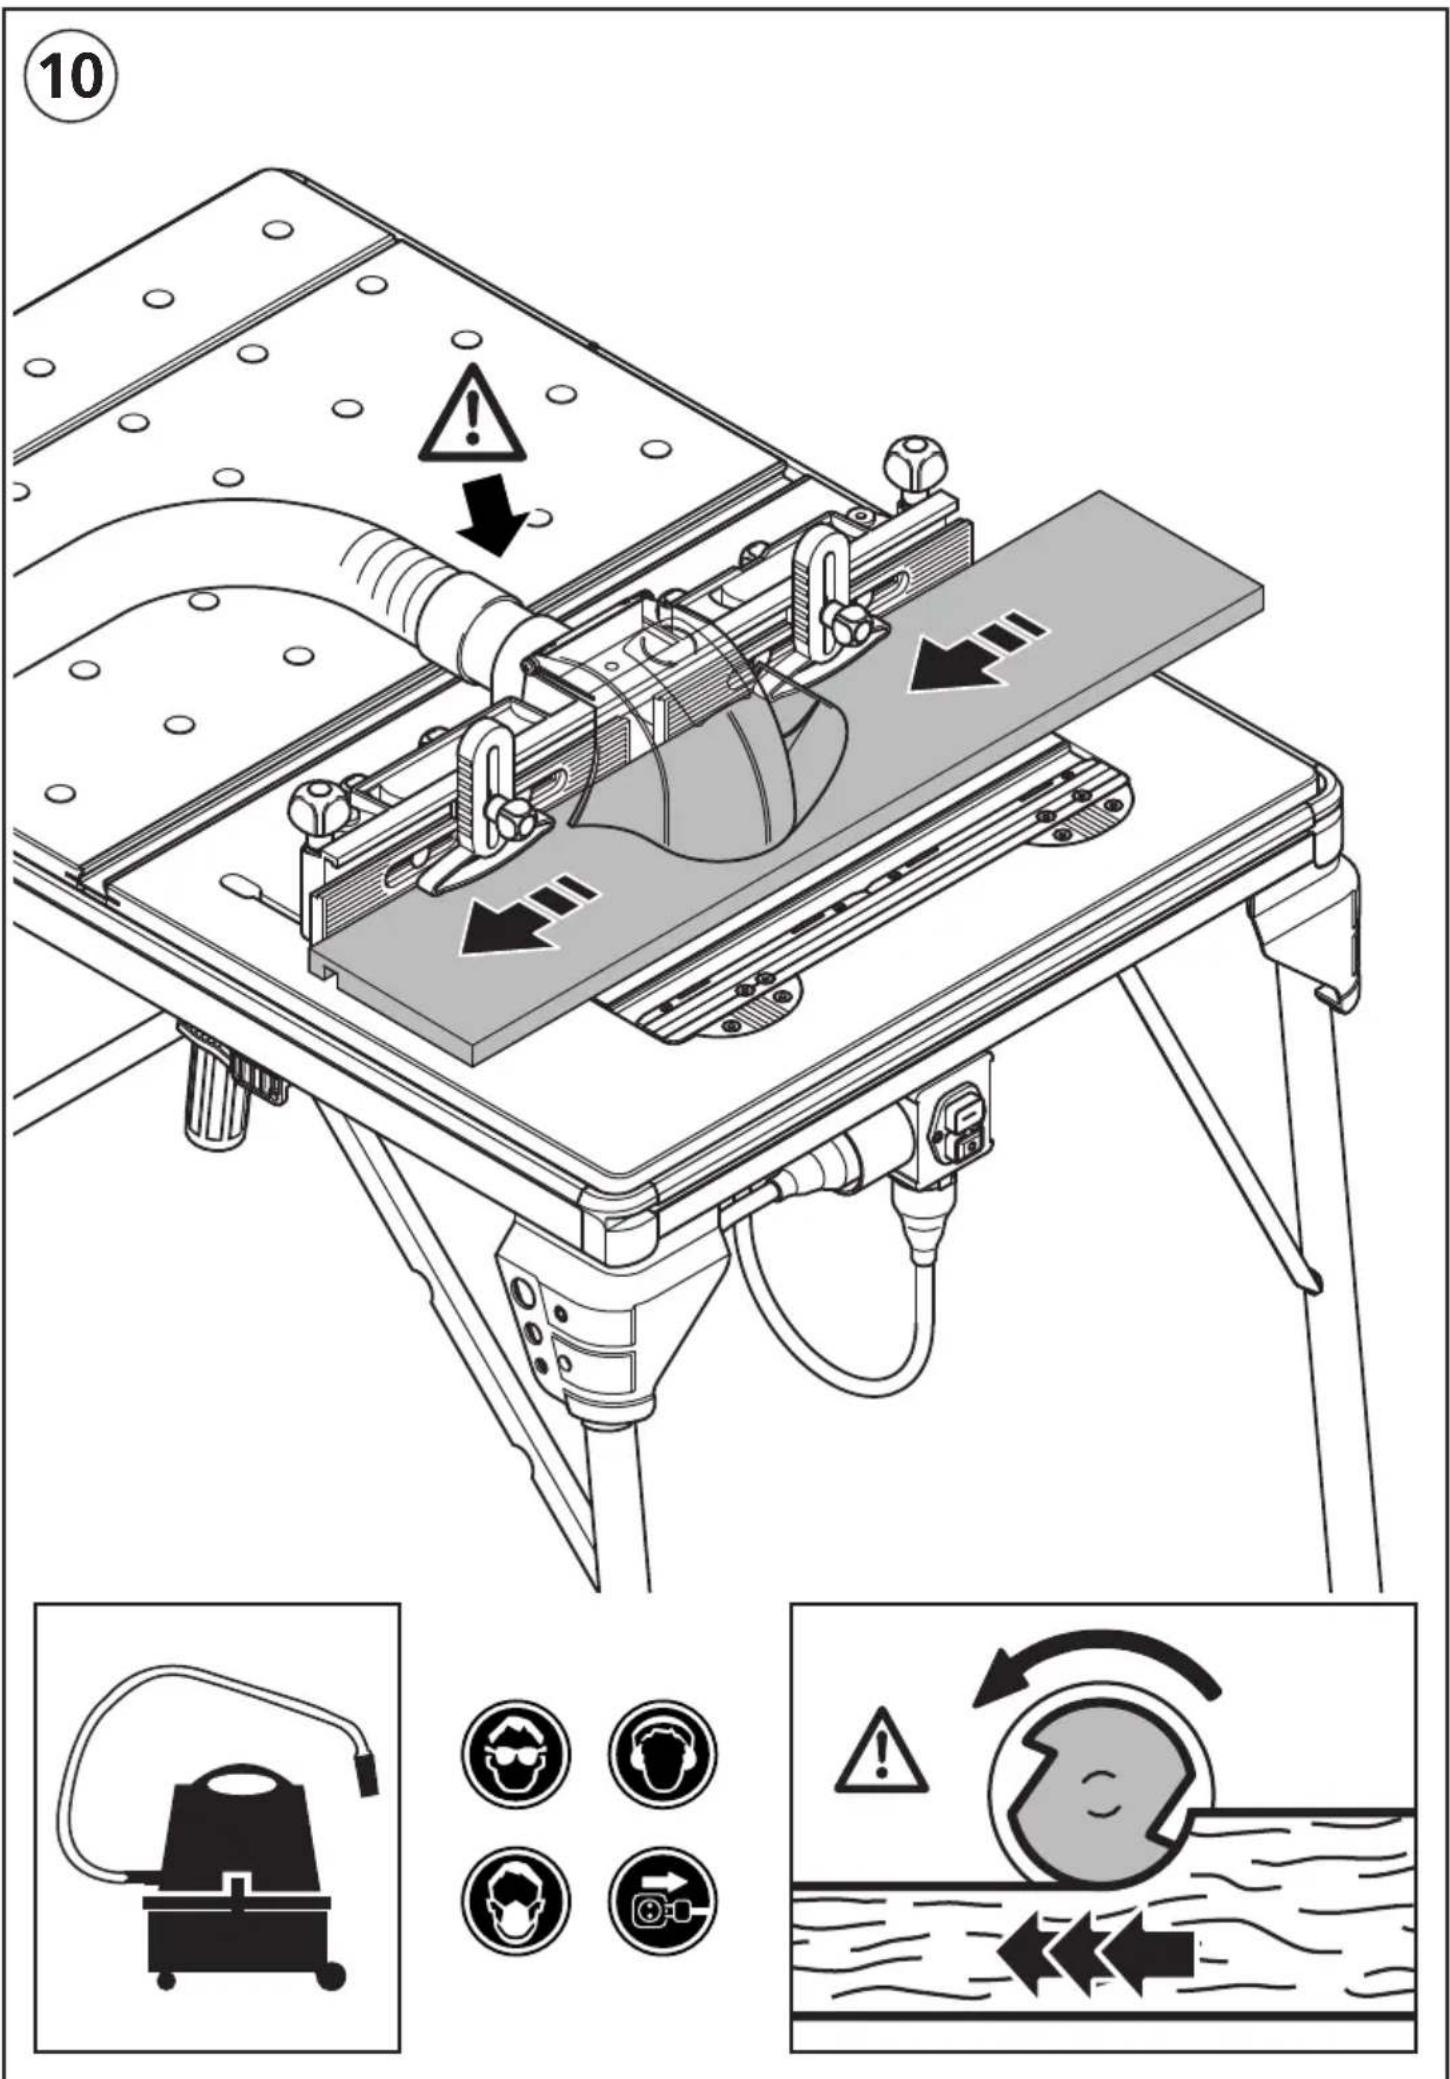
EINLEITUNG
- PLEASE NOTE: Do read all safety and other instructions that have come with the parallel milling guide and with the power tools you use for work. Failing to observe the safety and other instructions may cause electric shocks, fire and/or severe injuries.
- Do keep the operating instructions for future reference in a safe place.

TECHNICAL DATA
Dimensions: 610 x 127 x 242 mm (width x depth x height)
Maximum cutter diameter: 27 mm
Weight: 1,9 kg

SYMBOLS AND THEIR MEANING

Warning against a general danger

Dust mask must be worn.

Read the instructions!

Pull the plug.

Goggles must be worn.

To be milled in counter rotation only.

Hearing protection must be worn.

INTENDED USE
Milling guide 6901 is to be used
- exclusively for being fixed to the wolfcraft machine table (Article No. 6900) in its function as stationary router table.
• as parallel guide for milling jobs with the protective hood as well as the dust extractor installed and activated. - for work pieces with a maximum thickness of 40 mm that can be easily cut.
The user is liable for any damage and accidents caused by using the equipment not for the intended purpose.

GENERAL SAFETY INSTRUCTIONS
- Keep your workplace clean and well lit. Poor housekeeping or unlit working areas may result in accidents.
- Do not work with power tools in an explosive ambience, where flammable liquids are kept and where gas or dust occur. Power tools will generate sparks which might ignite the dust or vapours.
- Keep children and other persons off your workplace, while using power tools. When getting distracted you can lose the control over the equipment.
- The plug of the power tool must fit into the socket. The plug must not be tampered with. Do not use adapters together with grounded power tools. Unmodified plugs and matching sockets will reduce the risk of getting an electric shock.
- Keep power tools out of the rain and away from wetness. Water penetrating into a power tool will heighten the risk of getting an electric shock.
- When working with a power tool outside, use only extension cords that are suitable for outdoor use. Using an extension cord that is suitable for outdoor use will reduce the risk of getting an electric shock.
- If it is unavoidable to use a power tool in a wet ambience, use a residual-current circuit-breaker. It will reduce the risk of getting an electric shock.
• Take care of what you do and handle the power tool with care. Never use a power tool, when you feel tired or when you are under the influence of drugs of any kind or alcohol. One moment of inat-tentiveness while using the power tool can cause severe injuries. -
Do wear suitable personal protective clothing and equipment, such as hearing protection, goggles, dust masks while doing dust-generating jobs as well as protective gloves, when processing rough materials and when changing tools.
-
Remove the setting tools or wrenches before switching on the power tool. A tool or wrench attached to a rotating part of the equipment may cause injuries.
- Wear suitable clothes, i.e. no loose garments or jewellery. Keep your hair, clothing and gloves away from rotating parts. Loose garments, jewellery or long hair may be caught by such rotating parts.
• Always use the protective hood with the dust extractor.
- Do not use power tools with a defective switch. A power tool that can no longer be switched on or off is dangerous and needs repairing.
- Keep unused power tools out of the reach of children. Do not allow persons using equipment which they are not familiar with it, or persons who have not read these instructions. Power tools pose a danger, when being used by inexperienced persons.
- Check before starting to work, whether equipment and tools function properly. Never work with damaged or blunt tools.
- Have your power tools only repaired by duly qualified personnel. Demand original spares, so that the safety of the power tool remains ensured.
- Pull the plug from the socket and/or remove the battery pack from the power tools before you change the setting of your equipment or before you replace any components. The unin-tentional re-start of a power tool may cause accidents.
- Put up the machine table properly before installing the power tool. The table's safe assembly is vital to prevent it from collapsing.
- Attach the power tool safely to the machine plate before using it. If the power tool gets out of place on the machine plate, you may lose control of it.
- Put the machine table on a firm, plain and horizontal surface. If the machine table can shift or wobble, neither the power tool nor the work piece can be moved safely and steadily.
- Do not overload the machine table and do not use it as ladder or scaffolding. Excess loads or standing on the machine table can shift the table's centre of gravity upwards, so that it may topple over.
- Do not process any other materials than wood or easily machinable plastic.
• The machines used must conform to DIN EN 60745-1. Equipment built after 1995 must bear the CE sign.
- Make sure before starting to work that the hand-held circular saw, the router or the jigsaw is properly attached to the machine plate and that the machine plate is safely arrested in the notch of the machine table.
- Use the tools for their intended purpose only.
- Make regular checks, whether all screws are tightened firmly!
- Remove all objects from the workbench that are not required.
- The power tools must only be switched on and off via the safety switch.
- Use only the switch clamp supplied to permanently fix the appliance switch in the „ON“ position.
- Replace damaged gap inserts with new ones.
• Always use a push stick when processing small or narrow work pieces.
- Never use your parallel milling guide improperly or for any other but the intended purpose!
SAFETY INSTRUCTIONS FOR ROUTERS
- Apart from these machine-specific safety instructions, do also observe the safety instructions of the router you work with.
- Be always aware that the work piece may unexpectedly get out of control during the mill-ing process and strike back.
- Do not use the machine table for curved work!
- Do not use routers with a rating of more than 1800 W and a voltage of more than 230 V.
- Please observe that the feed must be against the cutter's direction of rotation.
- Use only sharp and properly maintained milling tools that have been set in accordance with the tool manufacturer's instructions.
- Observe the data concerning the minimum/maximum speed and the direction of rotation indicated directly on the equipment and tools used, or on their packaging, or as detailed in the operating instructions.
- Please be aware that the improper use of milling tools, of work pieces and of the guiding devices for the work piece may cause dangerous situations.
- Keep your hands off the milling tool, when milling close to the guide.
- Support long work pieces on the removal side, in order to avoid dangerous situations that may be caused by the uncontrolled tilting of the work piece. The support must rest on stable ground and have the same height as the machine table, e.g. the roller trestle (Art. No. 6119973).
- Do only process work pieces that, considering their weight, can be held and advanced safely by one person.
- Choose the correct speed that is appropriate for tool and work piece. Please refer to the operating instructions of your router for the correct speed parameters.
- Select the insert rings supplied in relation to the size of the milling cutter. Always use the smallest possible insert ring to ensure safe working conditions.
- Make sure that the parallel milling guide is correctly assembled and installed and that all screws/knurled screws are tightened.

- Shift the cutter shaft into the chuck right up to the marking. Do observe the instructions in your operating manual for the router as regards the proper installation of the cutter in the router.
- Do not use cutters with a diameter of more than 27 mm!
- Do not attempt any modifications to this product.

MILLING WITH THE ROUTER
- Fit the split insert for the router into the machine plate and select a suitable milling tool (Fig. 1). Adjust the router on the machine plate in such a way that the cutter runs in the centre of the milling tool borehole. You can assemble the router as shown in Fig. 2. Insert the router as it has been assembled together with the machine plate into the table and let it get engaged there (Fig. 3). Plug the switch clamp in the router switch and connect the ap-pliance inlet with the safety switch.
- Set the cutting depth at your router and observe the relevant instructions in your operating manual (Fig. 4).
- Install the parallel milling guide as shown in Fig. 5. Install both knurled screws loosely.
- Insert the parallel milling guide into the machine table's long holes as shown and shift the milling guide parallel to the split insert towards the cutter, set the required cutting width and tighten both knurled screws (Fig. 6).
- Now loosen the four knurled screws of the two variable stoppers and set the variable stoppers in such a way that the distance to the cutter does not exceed 3 mm on either side (Fig. 7). Retighten the knurled screws thereafter.
- Assemble both spring holders (Fig. 8) and fasten them on the milling guide by exerting slight pressure on the work piece (as shown in Fig. 9). The spring holders are to ensure the safe guidance of the work piece and to minimize the backlash from the work piece.
- Always make a trial cut, the parallel milling guide might have to be readjusted. Use the dust extractor (Fig. 10).

Warranty
Dear hobbyist!
You have purchased a high-quality wolfcraft® appliance, which we know you will enjoy using.
wolfcraft® appliances are built to high technical standards, and undergo intensive development and test phases before leaving the factory. Constant controls and regular tests during their manufacture, ensure a high quality standard. Sound technical developments, and reliable quality controls warrant for the right choice of appliance.
We provide a warranty of 5 years from the day of purchase on the wolfcraft® product you acquired, provided it is exclusively used for DIY purposes. The warranty only covers damage to the item purchased, and only such damage that can be attributed to faulty material und poor workmanship. The warranty does not cover defects and damage that must be attributed to improper use or insufficient maintenance. Nor does the warranty cover the usual wear and tear as well as defects and damage, of which the customer has been aware when purchasing the equipment.
Warranty claims can only be asserted by producing the invoice or the till receipt.
The warranty granted by wolfcraft ^® does not in any way restrict your statutory consumer rights (i.e. contract performance, withdrawal from the contract, price reduction, claims for damages or reimbursement of expenses).
INTRODUCTION
MARÁS A FELSÓMARÓVAL
Tel. 00 41-41-7 41 77 66
Fax 00 41-41-7 41 65 20
Technical and Commercial Company
12, Papastratou & Asklipiou, Str.
185 45 Piraeus
Telefon: 0030-2104136155
Telefax: 0030-2104137692
info@mavrofidopoulos.gr
HR
Manal d.o.o.
Velimira Skorpika 1 a
10090 Zagreb
Telefon: 00385-1-3466400
Telefax: 00385-1-3466412
manal@manal.hr
RO MD