
EQ.500 integral TQ507D03 - Coffee maker SIEMENS - Free user manual and instructions
Find the device manual for free EQ.500 integral TQ507D03 SIEMENS in PDF.

User questions about EQ.500 integral TQ507D03 SIEMENS
0 question about this device. Answer the ones you know or ask your own.
Ask a new question about this device
Download the instructions for your Coffee maker in PDF format for free! Find your manual EQ.500 integral TQ507D03 - SIEMENS and take your electronic device back in hand. On this page are published all the documents necessary for the use of your device. EQ.500 integral TQ507D03 by SIEMENS.
USER MANUAL EQ.500 integral TQ507D03 SIEMENS
The future moving in.
3
4
5

6
7

8

9
10
11
12
13
14
15
16
17
18
19
20
21
22
23

24
25
26
Table of contents
Safety 8
General information 8
Intended use. 8
User group restrictions.. 8
Safe use 9
Environmental protection and energy saving 12
Disposing of packaging 12
Tips for saving energy. 12
Installation and connection 12
Scope of supply. 12
Installing and connecting the appliance. 12
Familiarising yourself with your appliance 13
Appliance 13
Controls. 13
Display 13
Drinks overview 14
Accessories 15
Before using for the first time. 15
Perform the initial start-up 15
Fill the water tank. 15
Fill coffee bean container. 15
Setting the language. 16
Setting the water hardness. 16
General information 16
Basic operation 17
Switching the appliance on and off. 17
Dispensing drinks 17
Dispensing a coffee drink made from fresh beans 18
Dispensing a coffee drink made from ground coffee 18
Dispensing drinks with milk. 18
Using the milk container 19
Dispensing coffee drink with milk.... 19
Dispensing special drinks 20
Dispensing milk froth 20
Dispensing hot water 20
Drink settings. 21
Water filter 22
Childproof lock 23
Activating the childproof lock 23
Deactivating the childproof lock 23
Cup heater 23
Basic settings 23
Overview of the basic settings 24
Changing the basic settings. 24
Cleaning and maintenance 25
Dishwasher-safe components 25
Cleaning agent 25
Cleaning the appliance 26
Cleaning the drip tray and coffeedregs container 26
Cleaning the ground coffee compartment 26
Cleaning the milk system 27
Cleaning the milk container. 27
Cleaning brewing unit 27
Service programmes. 28
Rectifying faults 32
Malfunctions 32
Notifications on the display panel.... 33
Problem with results 35
Transportation, storage and disposal 37
Activate frost protection 37
Disposing of your old appliance..... 37
After-sales service 37
E number and FD number 38
Warranty conditions 38
Technical specifications. 38

Safety
Please read the safety information to ensure that you use the appliance safely.
General information
Here you can find general information about this information product.
- Read this manual carefully. Only then can you operate the appliance safely and efficiently.
This manual is intended for the user of the appliance. - Observe the safety instructions and warnings.
- Keep the manual and the product information in a safe place for future reference or for the next owner.
- Check the appliance for damage after unpacking it. Do not connect the appliance if it has been damaged in transit.
Intended use
Please read the information on intended use to ensure that you use the appliance safely and correctly.
Only use this appliance:
as specified in this instruction manual.
for preparing hot drinks.
Up to an altitude of max. 2000m above sea level.
User group restrictions
Avoid risks to children and vulnerable persons.
This appliance may be used by children aged 8 or over and by people who have reduced physical, sensory or mental abilities or inadequate experience and/or knowledge, provided they are supervised or have been instructed on how to use the appliance safely and have understood the resulting dangers.
Do not let children play with the appliance.
Children must not perform cleaning or user maintenance unless they are at least 8 years old and are being supervised.
Keep children below the age of 8 at a safe distance from the appliance and power cable.
Safe use
Follow these safety instructions when using the appliance.
WARNING - Risk of suffocation!
Children may pull packaging material over their heads or wrap themselves up in it and suffocate.
- Keep packaging material away from children.
Do not let children play with packaging material.
Children may breathe in or swallow small parts, causing them to suffocate.
- Keep small parts away from children.
Do not allow children to play with small parts.
WARNING - Risk of electric shock!
-
Improper installations can be dangerous.
-
Connect and operate the appliance only in accordance with the specifications on the rating plate.
- Connect the appliance to a power supply with alternating current solely via a correctly installed socket with earthing.
The protective conductor system of the domestic electrical installation must be properly installed.
A damaged appliance or a damaged power cord can be dangerous.
- Never operate a damaged appliance.
- Never operate an appliance with a torn or fractured surface.
- If the appliance or the power cord is damaged, disconnect the appliance from the power supply immediately. Unplug the appliance from the mains or switch off the circuit breaker in the fuse box.
Call our customer service. - Repairs on the appliance must be carried out solely by trained, specialist personnel.
en Safety
- Improper repairs can be dangerous.
- Repairs on the appliance must be carried out solely by trained, specialist personnel.
Penetrating moisture may cause an electric shock. - Never immerse the appliance or the power cord in water.
- Liquids must not be spilled on the appliance plug connection.
Use the appliance in enclosed spaces only. - Never expose the appliance to intense heat or humidity.
- Do not use any steam cleaners or high-pressure cleaners to clean the appliance.
WARNING - Risk of fire!
The appliance will become hot.
- Ventilate the appliance adequately.
-
Never operate the appliance in a cupboard.
-
It is dangerous to use an extended power cord and non-approved adapter.
-
Do not use extension cables or multiple socket strips.
If the power cord is too short, contact our customer service. - Only use the adapter approved by the manufacturer.
WARNING - Risk of burns!
Some appliances parts will become very hot.
- Never touch the hot appliance parts.
- Allow hot appliance parts to cool down before touching them.
WARNING - Risk of scalding!
Freshly prepared drinks are very hot.
Leave drinks to cool down if necessary.
- Do not let escaping liquids or steam come into contact with your skin.
WARNING - Risk of injury!
- Improper use of the appliance may endanger the user.
Use the appliance only for its intended purpose.
- Trapped fingers when closing the appliance door.
Be careful of your fingers when closing the appliance door.
The grinder rotates.
Never reach into the grinder.
WARNING - Risk of magnetism!
The appliance contains permanent magnets. These may affect electronic implants, e.g. pacemakers or insulin pumps.
People with electronic implants must stand at least 10 cm away from the appliance.
This minimum distance of 10cm must also be observed for the water tank when removed.
WARNING - Risk of harm to health!
Dirt on the appliance may be dangerous to health.
Follow the cleaning instructions for the appliance.
Environmental protection and energy saving
Protect the environment by using your appliance in a way that conserves resources and by disposing of reusable materials correctly.
Disposing of packaging
The packaging materials are environmentally compatible and recyclable.
- Sort the individual components by type for disposal.
The types of plastic waste can be identified by the internationally standardised abbreviations such as "PS" for polystyrene.
Information about current disposal methods can be obtained from your specialist dealer or your local authority.
Tips for saving energy
If you follow these instructions, your appliance will use less power.
Set the interval for automatic switch-off to the smallest value.
- If the appliance is not being used, it will switch itself off earlier.
"Basic settings", Page 23
Do not interrupt the dispensing process prematurely.
- The amount of water or milk that is heated is used optimally.
Descale the appliance regularly.
- Limescale deposits increase the appliance's energy consumption.
Installation and connection
You can find out where and how best to install your appliance here. You will also learn how to connect the appliance to the power supply.
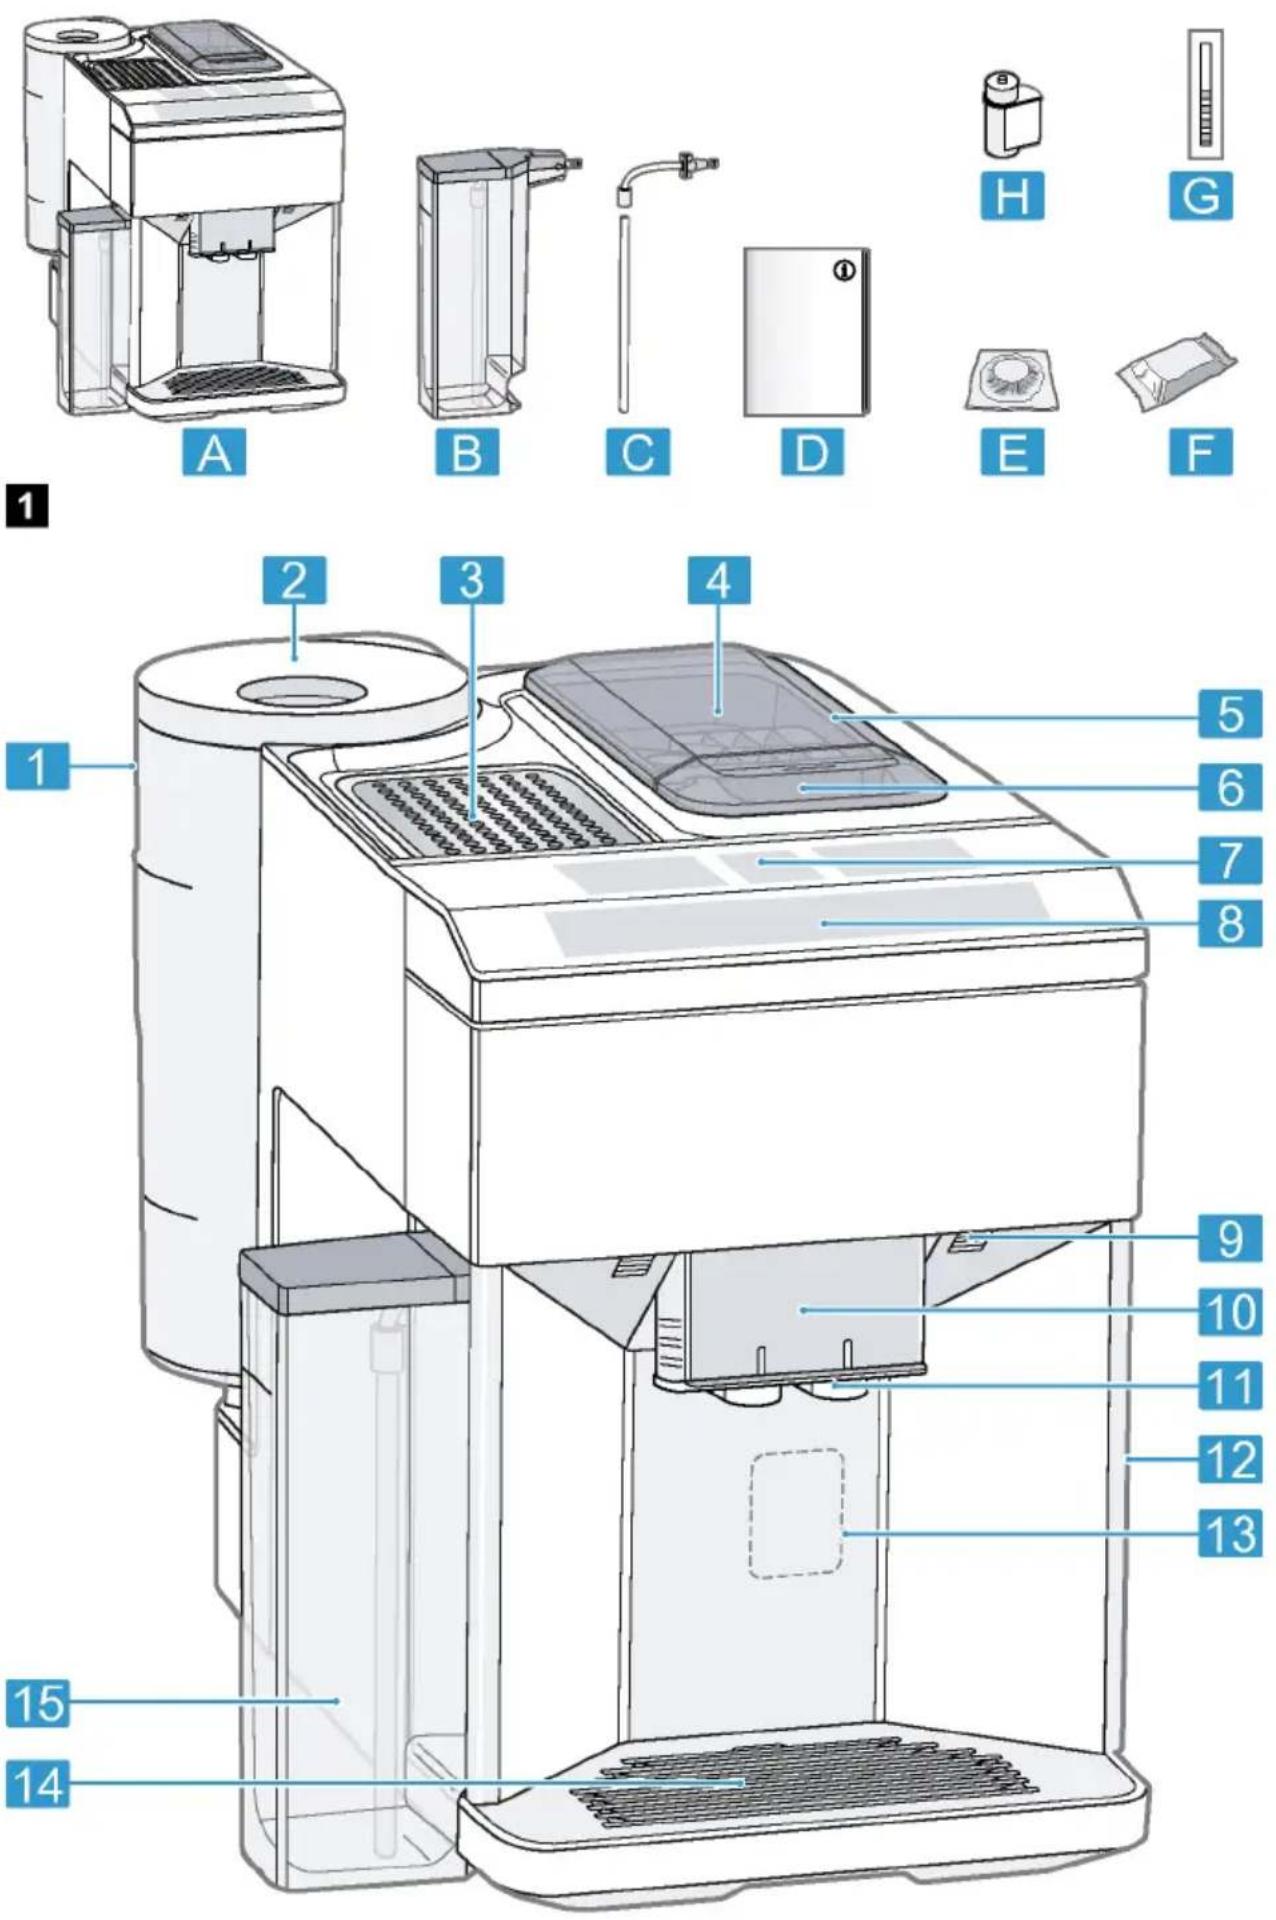
Scope of supply
After unpacking all the parts, check for any damage in transit and for completeness of delivery.
Fig. 1
A Fully automatic coffee machine
B Milk container
C Milk tube and suction pipe
D Instruction manual
E Cleaning tablets
F Descaling tablets
G Water hardness testing strip
H Water filter
1 Depending on the appliance specifications
Installing and connecting the appliance
ATTENTION!
Risk of damage to the appliance. If the appliance is not started up correctly, it may be damaged.
-
Use the appliance in frost-free rooms only.
If the appliance has been transported or stored below 0^ , wait 3 hours at room temperature before starting it up.
After plugging in, always wait approx. 5 seconds. -
Remove the protective film.
-
Place the appliance on a level, water-resistant surface that is capable of bearing its weight.
- Using the mains plug, connect the appliance to an earthed socket that has been correctly installed.
Familiarising yourself with your appliance
Familiarise yourself with the parts of your appliance.
Appliance
Here you can find an overview of the parts of your appliance.
Note: Individual details and colours may differ, depending on the appliance model.
Fig. 2
| 1 | Water tank |
| 2 | Cover for water tank |
| 3 | Cup heater1 |
| 4 | Aroma lid |
| 5 | Bean container |
| 6 | Ground coffee compartment |
| 7 | Display |
| 8 | Control panel |
| 9 | Cup lighting1 |
| 10 | Cover |
| 11 | Outlet system |
| 12 | Brewing chamber door |
1 Depending on the appliance specifications
| 13 | Rating plate |
| 14 | Drip tray |
| 15 | Milk container |
1 Depending on the appliance specifications
Controls
Here you can find an overview of the symbols on your appliance. Press the symbols to make a selection, start the dispensing process or make/adjust a setting.
| Symbol Explanation | |
| ① | Switch appliance on/off |
| menu | Open menu/leave menu Note: The menu buttons are only visible when the menu is open. |
| ^ | Navigate upwards in the menu |
| √ | Navigate downwards in the menu |
| ok | Confirm/save in the menu |
| @ | Go back in the menu |
| @ | Dispense two cups |
| ∅ | Select coffee strength |
| ml | Adjusting the amount |
| start stop | Start/stop |
Display
The display shows the selected drinks, settings and setting options, as well as messages about the appliance's operating status.
The display shows additional information and action steps. The information is hidden after a short period, or by pressing a button. The action steps are hidden when they have been completed.
Drinks overview
You can prepare a wide range of different drinks with your appliance.
Quick selection
| Symbol | Designation | Explanation | Category |
| Espresso | Concentrated coffee. Best served in small, thick-walled cups. Preheat cups with hot water. | → "Dispensing a coffee drink made from fresh beans", Page 18 → "Dispensing a coffee drink made from ground coffee", Page 18 | |
| Caffe crema | Coffee with a crema layer or large cup of coffee prepared using es- presso method. | → "Dispensing a coffee drink made from fresh beans", Page 18 → "Dispensing a coffee drink made from ground coffee", Page 18 | |
| Cappuccino | Espresso with frothed milk. Best served in small cups. | → "Dispensing coffee drink with milk", Page 19 | |
| LatteMacchiato | Coffee speciality with three layers: warm milk at the bottom, espresso in the middle, and milk froth on top. Best served in a glass. | → "Dispensing coffee drink with milk", Page 19 | |
| Special drinks | Dispense other drinks. | → "Dispensing special drinks", Page 20 |
Special drinks
| Symbol | Designation | Explanation | Category |
| Espresso mac-chiato | Espresso finished with milk froth. | → "Dispensing coffee drink with milk", Page 19 | |
| Flat white | Espresso with frothed milk. | → "Dispensing coffee drink with milk", Page 19 | |
| Americano | 1/3 espresso is topped up with 2/3 hot water. | → "Dispensing a coffee drink made from fresh beans", Page 18 → "Dispensing a coffee drink made from ground coffee", Page 18 | |
| Milk froth | For preparing speciality white coffees. | → "Dispensing milk froth", Page 20 | |
| Hot water | For preparing hot drinks, e.g. tea, or to preheat cups. | → "Dispensing hot water", Page 20 |
Accessories
Only use original accessories. These have been made especially for your appliance. Here, you can find an overview of your appliance's accessories.
| Accessories | Retail | Customer Service |
| Cleaning tablets | TZ80001N | 00311807 |
| Descaling tablets | TZ80002N | 00576693 |
| Water filter | TZ70003 | 00575491 |
| Water filter pack of 3 | TZ70033 | - |
| Microfibre cloth | - | 00460770 |
| Care set | TZ80004 | 00576330 |
Before using for the first time
Configure the basic settings. Clean the appliance and the individual parts.
Perform the initial start-up
After connecting the appliance to the power supply, you must configure the settings for its initial start-up. The automatic display for the language selection and water hardness selection only appears when the appliance is switched on for the first time.
Tip: You can change the language and water hardness at any time. "Overview of the basic settings", Page 24
Fill the water tank
Fill the water tank each day with fresh, cold, non-carbonated water.
- Open the lid.
- Remove the water tank using the recessed grip.
- Rinse the water tank.
- If there is a water filter, insert the water filter. "Insert water filter", Page 22
- Fill the water tank up to the "max" mark.
- Insert the water tank into the holder, keeping it upright.
- Close the lid.
Fill coffee bean container
ATTENTION!
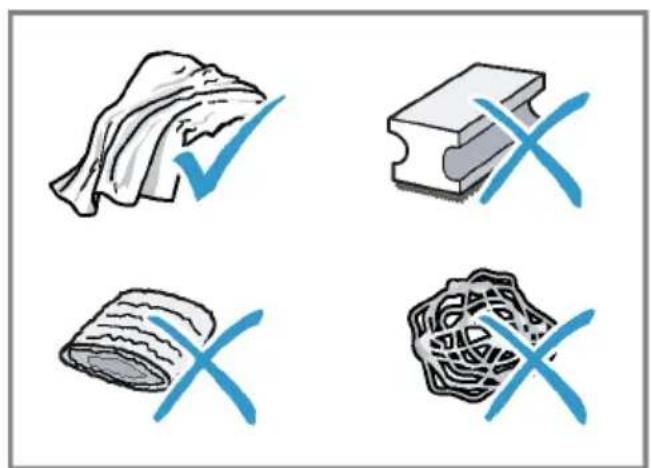
Unsuitable beans can block up the grinder.
Only use pure, roasted bean mixes that are suitable for use in fully automatic coffee or espresso machines.
Do not use glazed coffee beans.
Do not use caramelised coffee beans.
en Before using for the first time
Do not use coffee beans that have been treated with additives containing sugar.
Do not add ground coffee.
- Open the lid.
- Fill with the coffee beans.
The appliance will adjust to the coffee beans with the next dispensing process.
- Close the lid.
Tip: To keep the coffee beans at their best, store them in a sealed container in a cool place.
You can keep the coffee beans in the bean container for a number of days without them losing their aroma.
Setting the language
- Press Do switch the appliance on.
The display will show the language that is preset. - Press or until the display shows the desired language.
- Press ok
Tip: You can change the language at any time.
"Overview of the basic settings", Page 24
Setting the water hardness
It is important to set the water hardness correctly, so that the appliance indicates in good time that it needs descaling. You can use the enclosed test strip to determine the water hardness, or ask your local water company.
- Briefly dip the test strip in fresh tap water.
-
Allow the water to drip off the test strip.
The test strip will indicate the water hardness after 1 minute. -
If a water softening system is installed in your house, select "Softening system".
- Press or until the display shows the desired water hardness. The table shows the allocation of the levels to the different degrees of water hardness:
| Level German de-grees in °dH | Total hard-ness in (mmol/l) |
| 1 1-7 0.18 - 1.25 | |
| 2 8-14 1.42 - 2.49 | |
| 3 15-21 2.67 - 3.74 | |
| 4¹ | 22-30 3.92 - 5.34 |
Factory setting (may vary according to model)
- Press ok
- Check whether the bean container has been filled.
- Press ok
The appliance now rinses itself.
- When the symbols for drink selection and the buttons light up on the operating panel, the appliance is ready for use.
Tip: You can change the water hardness at any time.
"Overview of the basic settings", Page 24
General information
Please bear this information in mind so that you can get the best out of your appliance.
Notes
The appliance has been programmed at the factory with standard settings for optimum operation.
- The grinder has been factory-set for optimum operation. If coffee is only dispensed drop by drop or is too thin with too little crema, you can adjust the grinding level when the
grinder is running.
"Adjusting the grinding level", Page 22
The appliance will switch off automatically if it has not been operated for a given period of time. You can change the duration in the basic settings.
"Overview of the basic settings", Page 24
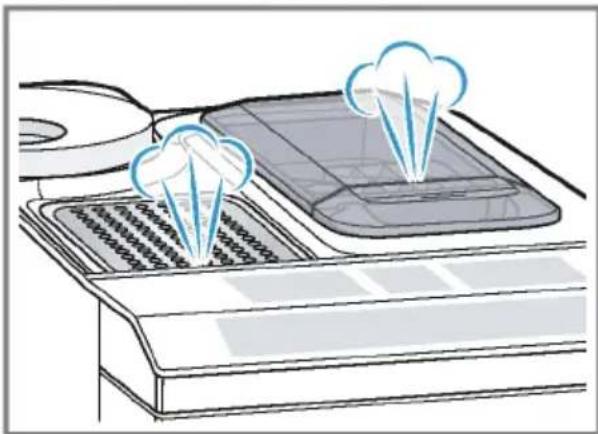
Water droplets may form on the ventilation slits and the lid of the ground coffee compartment while the appliance is in use.
- For technical reasons steam can escape from the appliance.
Tips
- You can switch off the button tones in the basic settings.
"Overview of the basic settings", Page 24 - When you use your appliance for the first time or run a service programme, or if your appliance has not been used for a prolonged period, the first drink will not have its full aroma and should not be consumed.
Once you have started up your appliance and made a few cups, you will then achieve a thick, fine-pored crema every time.
Basic operation
Here you will find out everything you need to know about operating your appliance.
Switching the appliance on and off
- Turn the appliance on or off by pressing 0.
When the appliance switches itself on, the display shows the Siemens logo. When the appliance is turned on or off it rinses itself automatically. During the rinsing process, the display shows a drop. If the appliance is still warm when switched on, or if no drink was dispensed before it was switched off, the appliance doesn't rinse itself.
Dispensing drinks
Learn how to prepare a drink of your choice.
WARNING
Risk of scalding!
Freshly prepared drinks are very hot.
Leave drinks to cool down if necessary.
Do not let escaping liquids or steam come into contact with your skin.
Tips
- You can directly select the drink you want using the quick-selection buttons. The display shows you the drink and the current settings.
- Your appliance has other drinks besides the ones that you can obtain via the quick-selection buttons. "Dispensing special drinks", Page 20
- You can adapt your drink to your personal taste.
→ "Drink settings", Page 21
Notes
If you do not change any settings for approx. 5 seconds, the appliance will exit settings mode. The settings will be automatically saved.
- With a number of settings your coffee is prepared in several steps. Wait until the process is fully completed.
Dispensing a coffee drink made from fresh beans
- Place your pre-warmed cup under the outlet system.
- Press the drinks symbol for a coffee drink without milk.
The display will show the drink and your current settings. "Drink settings", Page 21
3. Change the settings where necessary:
- Use mb adjust the amount.
"Adjusting the amount", Page 21 -
Use to adjust the coffee strength.
"Adjusting the coffee strength", Page 21 -
Press start stop
The coffee beans are freshly ground for each brewing process.
The coffee is brewed and then dispensed into the cup.
Tip
- You can press start to stop the dispensing process early.
Find out how to make coffee drinks with milk.
"Dispensing drinks with milk", Page 18
Dispensing a coffee drink made from ground coffee
ATTENTION!
The ground coffee compartment can become blocked.
Do not used coffee beans.
Do not use instant coffee.
Use a soft brush to gently direct the ground coffee residue into the shaft.
Note
When using ground coffee, the following selections are not available:
Two cups at once
Coffee strength
AromaDouble Shot
- Place your pre-warmed cup under the outlet system.
- Press the symbol for your desired drink.
- Press repeatedly until the display shows "Gr. coffee".
- Open the ground coffee compartment.
- Add a maximum of 2 level teaspoons of ground coffee, max. 12g
- Close the ground coffee compartment.
- Press start stop
The coffee is brewed and then dispensed into the cup.
Tip
You can press start stop the dispensing process prematurely.
If you would like another drink with ground coffee, repeat the process.
Always add the ground coffee just before making the drink.
Dispensing drinks with milk
You can use your appliance to dispense coffee drinks with milk and milk froth.
Tip: You can also use plant-based alternatives to milk, e.g. soya milk.
Note: The quality of the milk froth depends on the type of milk or plant-based alternative used.

WARNING
Risk of burns!
The milk system can become extremely hot.
- Never touch the milk system when it is hot.
- Allow the hot milk system to cool down before touching it.
ATTENTION!
Milk residues can dry on surfaces and are difficult to remove.
Clean the milk system after every use.
"Cleaning the milk system", Page 27
Using the milk container
The milk container has been specially developed for this appliance. Only use the milk container in the household and for storing milk in the refrigerator.
Note
You can only connect the milk container if the milk system is installed in the outlet system with the adapter and tube.
-
Open the lid.
-
Pour in the milk.
- Close the lid.
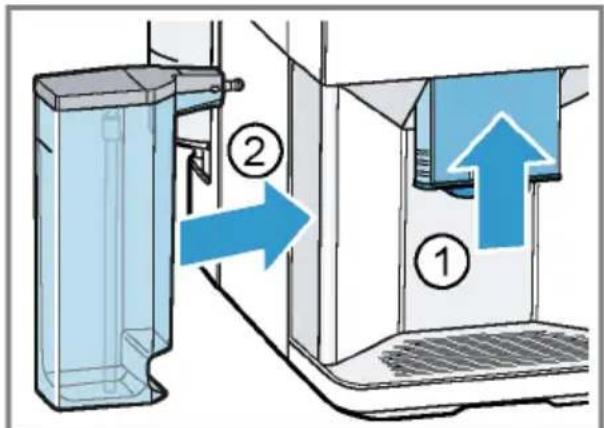
- Insert the milk container on the left of the appliance.
- The milk container will click into place.
Tip
Fold open the lid of the milk container, so more milk can be poured in while the drink is being dispensed.

Dispensing coffee drink with milk
Requirements
The milk container has been connected.
The milk container has been filled with milk.
- Place your pre-warmed cup under the outlet system.
- Press the symbol for a coffee drink with milk.
- The display will show the drink and your current settings.
"Drink settings", Page 21
en Basic operation
-
Change the settings where necessary:
-
Use ml to adjust the amount.
"Adjusting the amount", Page 21
Use to adjust the coffee strength.
"Adjusting the coffee strength", Page 21
- Use the ground coffee compartment.
"Dispensing a coffee drink made from ground coffee", Page 18
- Press start stop and wait until the process is complete.
After preparing the drink, the milk system will automatically clean itself with a short jet of steam.
Tip: If you want to stop the dispensing process early, press start stop. If you want to stop the dispensing process altogether, press 0.
Dispensing special drinks
Your appliance has other drinks besides the ones that you can obtain via the quick-selection buttons.
Press several times.
→ "Drinks overview", Page 14
Dispensing milk froth
Requirements
The milk container has been connected.
The milk container has been filled with milk.
WARNING
Risk of burns!
The milk system can become extremely hot.
-
Never touch the milk system when it is hot.
-
Allow the hot milk system to cool down before touching it.
- Place your pre-warmed cup under the outlet system.
- Press repeatedly until the display shows "Milk froth".
-
Change the setting if necessary:
-
Use ml to adjust the amount.
"Adjusting the amount", Page 21
- Press start stop.
The milk froth will run out of the outlet system.
5. Press start to stop the dispensing process.
Dispensing hot water
Requirement: The milk system has been cleaned.
"Cleaning the milk system", Page 27.
WARNING Risk of burns!
The milk system can become extremely hot.
- Never touch the milk system when it is hot.
- Allow the hot milk system to cool down before touching it.
Note: If the milk system has not been cleaned, small amounts of milk may be dispensed with the water.
- Place your pre-warmed cup under the outlet system.
-
Press repeatedly until the display shows "Hot water".
-
Change the setting if necessary:
-
Use ml to adjust the amount.
"Adjusting the amount", Page 21
-
Press start stop.
Hot water will run out of the outlet system. -
Press stop the dispensing process.
Drink settings
Prepare a drink according to your taste.
Adjusting the coffee strength
- Press the symbol for your desired drink.
- To select the strength of the coffee, press
You can select the following coffee strengths:
- Mild
- Regular
-Strong - Very strong
- AromaDouble Shot
Tip: For a strong taste of coffee, select a high coffee strength when setting a large capacity.
Selecting ground coffee
- Press the symbol for your desired drink.
- Press repeatedly until the display shows "Gr. coffee".
"Dispensing a coffee drink made from ground coffee", Page 18
AromaDouble Shot
You can dispense an extra-strong coffee by using the AromaDouble Shot function.
The longer coffee is brewed, the more bitter substances and undesirable aromas are released. The bitter substances and undesirable aromas affect the taste and digestibility of the coffee. To ensure that only pleasant-tasting and easily digestible aromatic substances are released, fresh coffee beans are ground and brewed when half the quantity has been prepared.
Tip: You can select the AromaDouble Shot function for any drink containing a proportion of at least 35 ml coffee volume.
Note: The AromaDouble Shot function is not available for every drink and drink volume.
Adjusting the amount
- Press the symbol for your desired drink.
- Press repeatedly until the desired volume is shown on the display.
Dispensing two cups at once
Depending on the appliance model, you can prepare two cups at the same time for certain drinks.
Note
The "Two cups at once" function is not available for the following selections:
Ground coffee
AromaDouble Shot
Volume smaller than 35 ml
- Press the symbol for your desired drink.
- Press
The setting is shown on the display.
- Place two cups on the left and right below the outlet system.
- Press start stop
The drink is prepared in 2 steps. The beans are ground in 2 grinding operations.
The drink is brewed and then runs into the cup.
5. Wait until the process is completed.
Grinder
Your appliance has an adjustable grinder, which you can use to customise the grinding level of your coffee beans.
Adjusting the grinding level
Set the desired grinding level while the coffee beans are being ground.
WARNING Risk of injury!
The grinder rotates.
- Never reach into the grinder.
ATTENTION!
Risk of damage to the grinder. The grinder may be damaged if the grinding level is not set properly.
- Only set the grinding level when the grinder is running.
- Select the grinding level using the rotary selector step by step.
| Grinding level | Setting |
| Fine grinding level for dark-roasted beans. | Turn rotary selector counter-clockwise. |
| Coarse grinding level for light-roasted beans. | Turn rotary selector clockwise. |
The setting only has an effect after the second cup of coffee.
Tip: If the coffee is only dispensed drop by drop, set a coarser grinding level.
If the coffee is too thin with too little crema, set a finer grinding level.
Water filter
You can use a water filter to minimize limescale deposits and reduce impurities in the water.
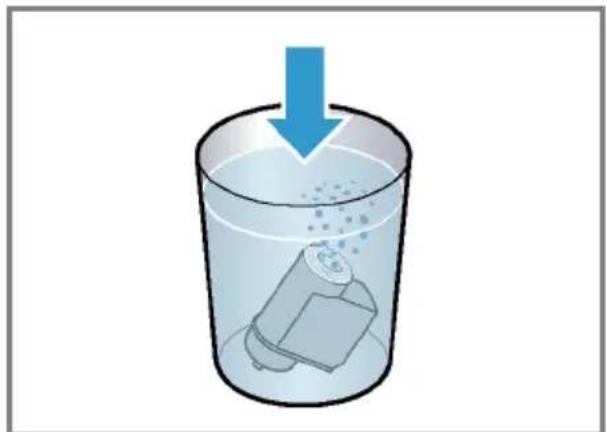
Insert water filter
ATTENTION!
Possible damage to the appliance due to limescale build-up.
Change the water filter in good time.
Change the water filter after 2 months at the latest.
Note: If "Replace water filter" is shown on the display, replace the water filter. If you are not inserting a new filter, select "No filter" and follow the instructions on the display.
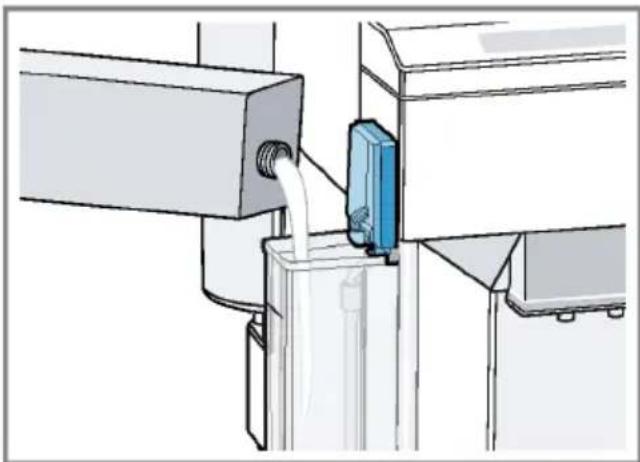
- Immerse the water filter in a glass of water until the air escapes. Fig. 3
- Press menu.
- Press or "Water filter" and ok.
- Use or to select "New filter" or "Replace water filter" and press ok.
- Note: If you are not inserting a new filter, select "No filter" in the menu settings.
Push the water filter firmly into the water tank and press ok. Fig. 4
- Fill the water tank up to the "max" mark and press ok.
- Remove the milk container on the left of the appliance.
- Place a container with a capacity of 1 I under the outlet system and press ok.
The filter will be rinsed and the following message displayed: "Rinsing complete."
The appliance is now ready to use.
Tip: You should also change your water filter for reasons of hygiene. With a water filter, you need to descale your appliance less frequently.
If your appliance has not been used for a long period, for example if you were on holiday, you should rinse the water filter before use by dispensing a cup of hot water.
The water filter can be purchased from retailers or Customer Service.
"Accessories", Page 15
Learn how to insert the water filter.
"Insert water filter", Page 22
Childproof lock
You can lock the appliance, to protect children against scalding and burns.
Activating the childproof lock
Press and hold ml for at least 3 seconds.
The following message will be displayed: "Child lock active. To deactivate press "ml" for 3 sec".
Deactivating the childproof lock
Press and hold ml for at least 3 seconds.
The following message will be displayed: "Child lock deactivated."
Cup heater
You can use the cup heater to pre-heat your cups.
WARNING
Risk of burns!
The cup heater can become very hot.
- Never touch the cup heater when it is hot.
- Allow the hot cup heater to cool down before touching it.
Tips
- You can activate and deactivate the cup heater in the basic settings. "Overview of the basic settings", Page 24
- Place the cups with their base on the cup heater to heat the cups perfectly.
Basic settings
You can configure your appliance to suit your needs and call up additional functions.
Overview of the basic settings
| Setting Selection Description | ||
| Cleaning and care Milk system | DescaleCleancalc'nClean | Start service programme.→ "Service programmes",Page 28 |
| Cup warmer1 | Cup warmer off2Cup warmer on | Switch cup heater on or off.→ "Cup heater", Page 23 |
| Water filter New filter | No filter | Set use of the water filter. |
| Coffee temp. normal | highmax. | Set the temperature for coffee drinks.Note: The setting is effective for all preparation types. |
| Languages See options on the appliance. Set menu language. | Changes are immediately displayed. | |
| Autom. switch-off See options on the appliance. Set how long the appliance should wait after preparing the last drink before automatically switching itself off. | ||
| Water hardness 1 (soft) | 2 (medium)3 (hard)4 (very hard)2Water-softening system | Set the appliance to the local wa-ter hardness.→ "Setting the water hardness",Page 16 |
| Key tones Key tones on | Key tones off | Switch the button tones on or off. |
| Factory settings Full reset? | Continue: OKCancel: ← | Restore settings to the factory settings.Note: All individual settings will be deleted and reset to the factory settings. |
| 1 Depending on the appliance specifications2 Factory setting (may vary according to model) | ||
Changing the basic settings
- Press menu
2.Use to select the desired basic setting and press ok
-
The display will show the setting options and the navigation symbols will light up. The display indicates the current setting.
-
Use or to make the desired selection and press ok.
The setting is now saved. - Use to go back.
- Press menu to exit the menu.
Cleaning and maintenance
To keep your appliance looking its best and working efficiently for a long time, it is important to clean and maintain it carefully.
Dishwasher-safe components
Find out which components can be cleaned in the dishwasher.
ATTENTION!
Some components may be damaged if they are cleaned in a dishwasher.
- Only put dishwasher-safe components in the dishwasher.
Only use programmes that do not heat the water over 60^
Dishwasher-safe components:

Drip plate
Drip grate
Coffee dregs container
Mechanical fill level indicator
Milk system with adapter
Ground coffee compartment with hinged lid
Milk container with lid
Drip tray
Not dishwasher-safe:

Water tank
Water tank lid
Aroma lid
Brewing unit
- Beverage dispenser cover
Cleaning agent
Find out which cleaning agents are suitable for your appliance.
WARNING
Risk of serious harm to health!
Cleaning liquids may lead to health impairments.
Never drink the cleaning liquids.
- Use descending and cleaning agents as described in the instructions and observe the relevant safety information.
ATTENTION!
Unsuitable cleaning products may damage the surfaces of the appliance.
Do not use harsh or abrasive detergents.
Do not use cleaning agents containing alcohol or spirits.
- Do not use hard scouring pads or cleaning sponges.
- Do not use citric acid, vinegar or any vinegar-based agents to descale the appliance.
For cleaning and descaling, only use suitable tablets.
Tips
Use descending and cleaning tablets that have been specially developed for your appliance. You can buy tablets from our customer service.
"Accessories", Page 15
en Cleaning and maintenance
- Wash new sponge cloths thoroughly to remove any salt adhering to them. Salt can cause a rust film to develop on stainless steel surfaces.
Always remove any residues of limescale, coffee, milk, cleaning and descaling solutions immediately, to prevent the formation of corrosion.
Cleaning the appliance
WARNING
Risk of electric shock!
Penetrating moisture may cause electric shock.
- Never immerse the appliance or the power cord in water.
- Liquids must not be spilled on the appliance plug connection.
- Do not use any steam cleaners or high-pressure cleaners to clean the appliance.
WARNING Risk of burns!
Some appliances parts will become very hot.
- Never touch the hot appliance parts.
-
Allow hot appliance parts to cool down before touching them.
-
Clean the housing, the high-gloss surfaces and the control panel with a microfibre cloth. "Accessories", Page 15
- Clean the outlet system with a soft, damp cloth after drinks have been dispensed.
- If the appliance has not been used for a long time, due to holiday for example, clean the entire appliance including the outlet system, milk system, trays and brewing unit.
Note: The appliance will rinse itself automatically if you switch it on when it is cold or switch it off after it has dispensed coffee. The system is therefore self-cleaning.
Cleaning the drip tray and coffee dregs container
Clean and empty the drip tray and coffee dregs container every day to prevent deposits.
- Open the door.
- Pull the drip tray and the coffe dregs container forwards and out.
- Remove and clean the drip plate.
- Empty and clean the drip tray and coffee dregs container.
- Clean the appliance interior and the drip tray holder.
- Remove the mechanical fill level indicator and clean with a damp cloth.
- Assemble the drip tray, drip plate, coffee dregs container and mechanical fill level indicator and insert into the appliance.
- Close the door.
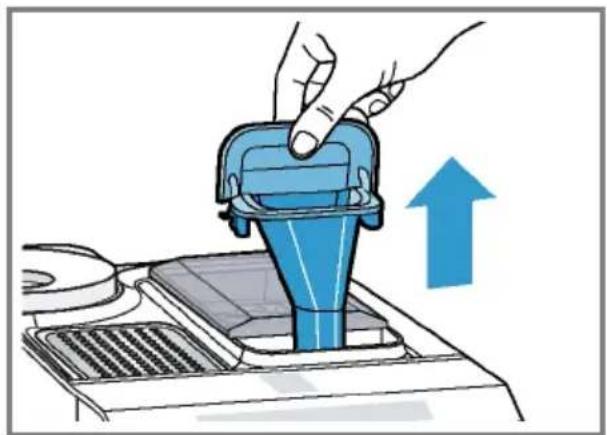
Cleaning the ground coffee compartment
Tip: You can clean the ground coffee compartment in the dishwasher.
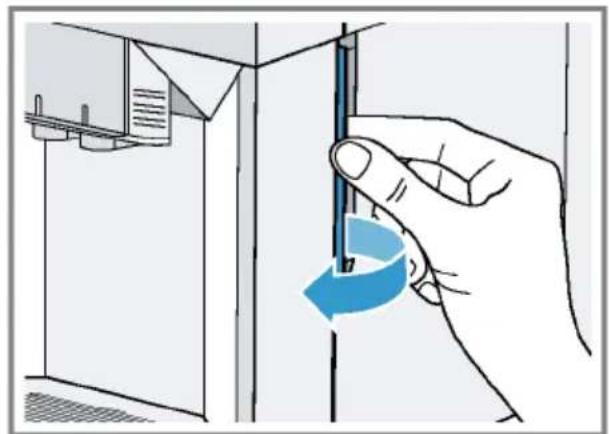
- Pull out the ground coffee compartment by the open lid. Fig. 5
- Clean the ground coffee compartment with washing-up liquid. Fig. 6
- Dry the ground coffee compartment and insert it into the appliance.
Cleaning the milk system
WARNING Risk of burns!
The milk system can become extremely hot.
- Never touch the milk system when it is hot.
- Allow the hot milk system to cool down before touching it.
ATTENTION!
The appliance may be damaged by improper cleaning.
- Do not put the cover of the outlet system in the dishwasher.
Tip
If you want to give the milk system a particularly thorough clean, you can use the "Clean milk system" service program. "Using the milk system cleaning programme", Page 29
- All of the milk system's components are dishwasher-safe.
Find out how to clean the milk container. "Cleaning the milk container", Page 27
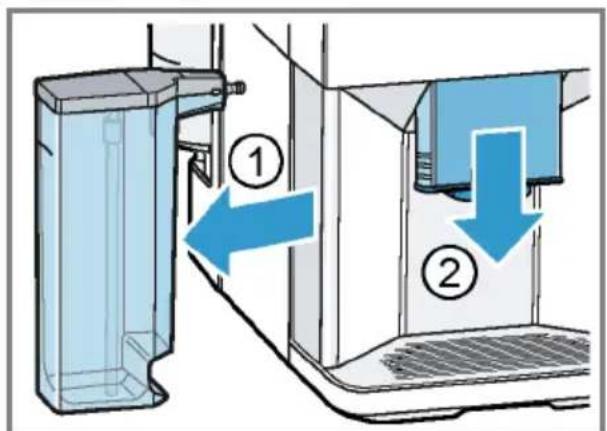
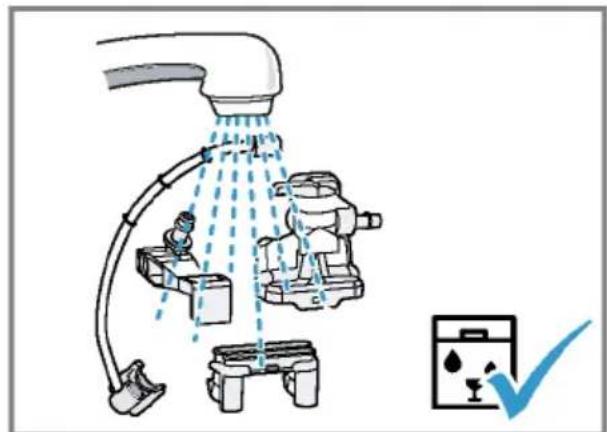
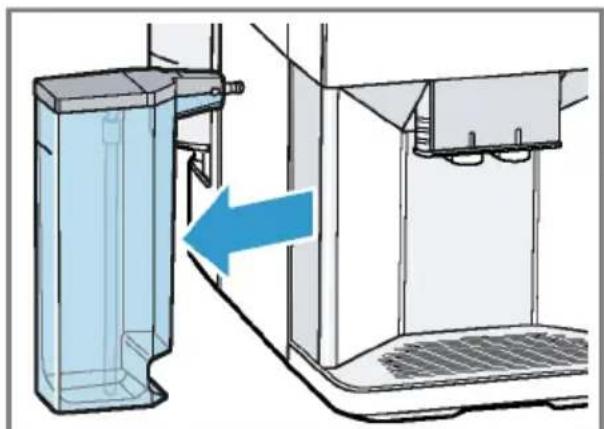
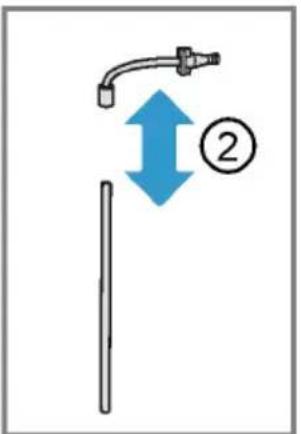
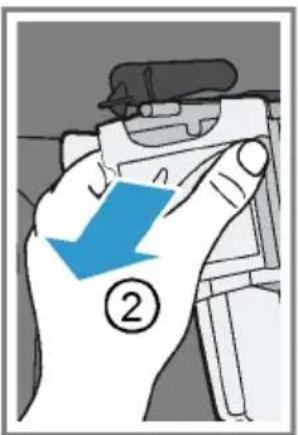
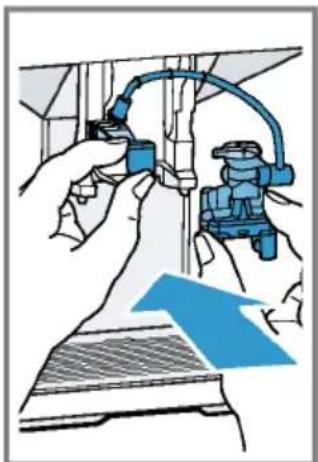
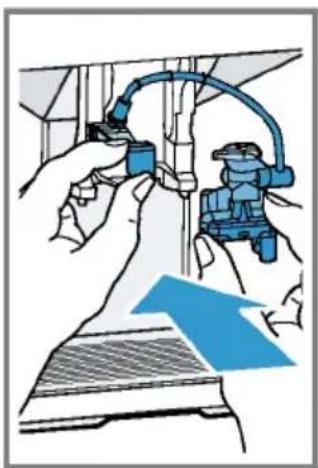
1. Remove the milk container from the appliance. Fig.7
2. Slide the outlet system right down.
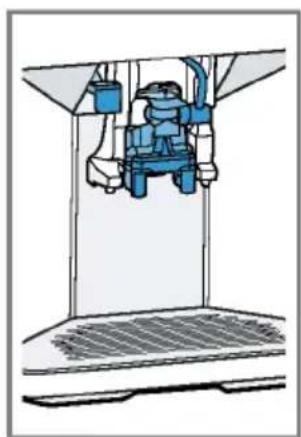
3. Hold the bottom of the cover and pull it forwards and out. Fig. 8
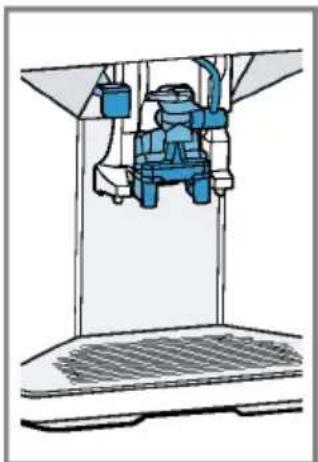
4.Pull the white adapter and the milk system forwards and out. Fig.9
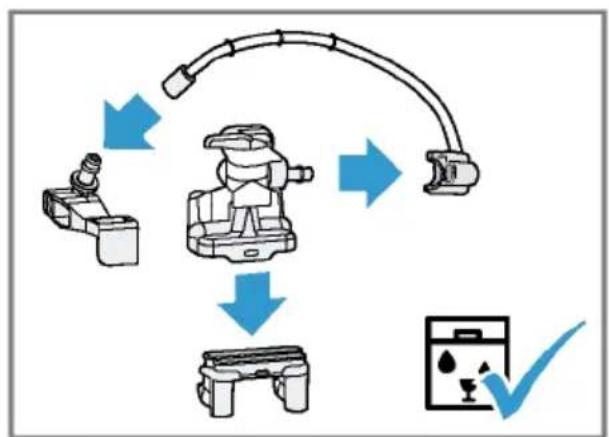
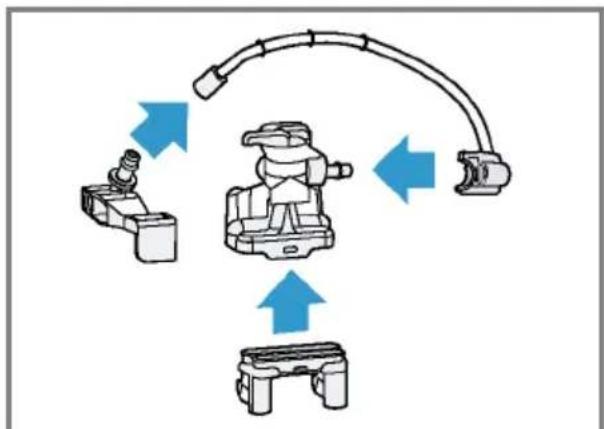
5. Dismantle the milk system into its components. Fig. 10
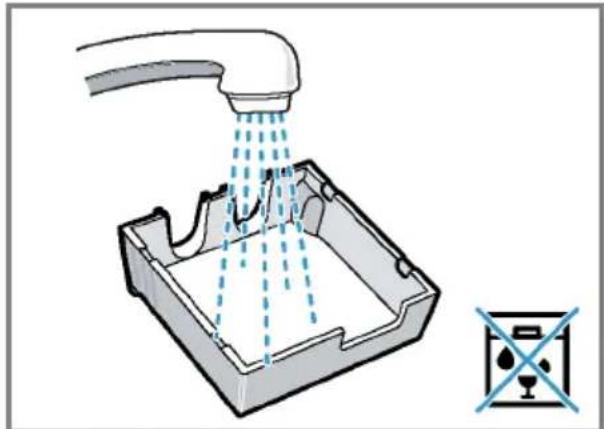
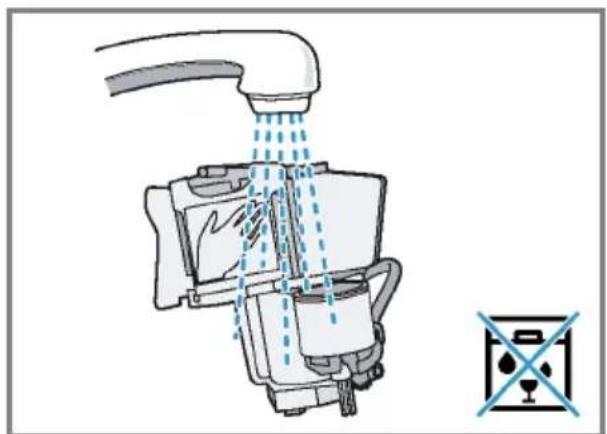
6. Clean the components with detergent solution and a soft cloth. Fig. 11
- Rinse all components with clean water and dry. Fig. 12
- Any detergent residues in the milk system must be completely removed following the rinsing process.
- Assemble the milk system's components. Fig. 13
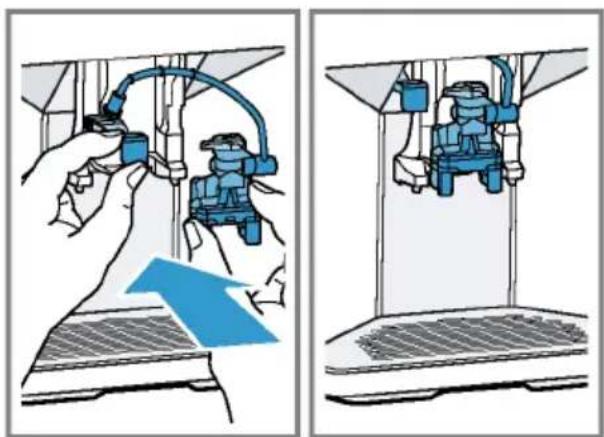
- Slide the outlet system right down.
- Slide the white adapter in on the left and insert the milk system into the appliance from the front, making sure it is straight. Fig. 14
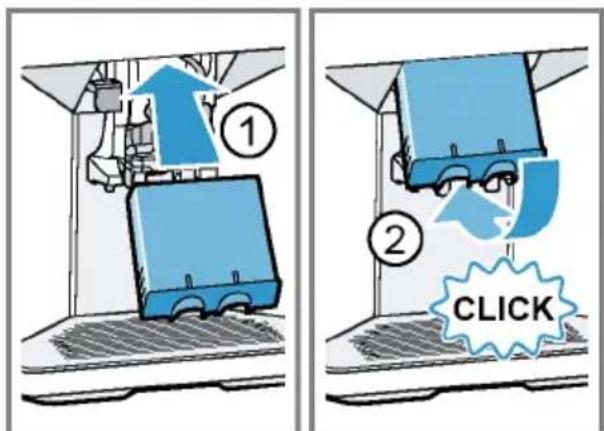
- Fasten the cover at the top and swivel it downwards. Fig. 15
The cover will click into place. - Slide the outlet system all the way up. Fig. 16
- Clean and insert the milk container.
Cleaning the milk container
Clean the milk container regularly, for reasons of hygiene. You can clean the milk container in the dishwasher.
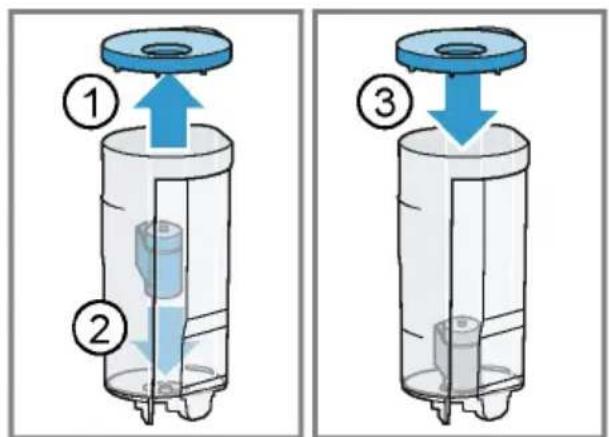
- Remove the milk container. Fig. 17
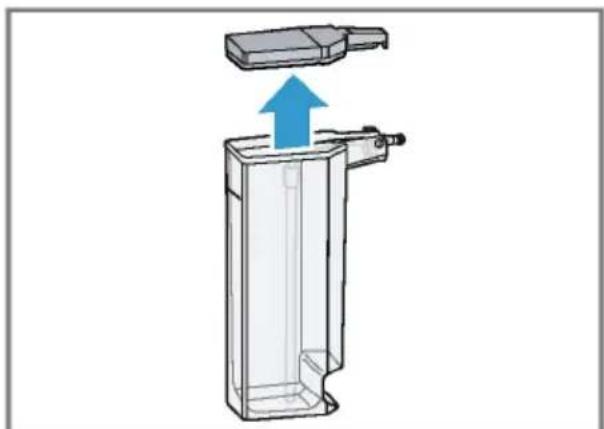
- Take off the lid. Fig. 18
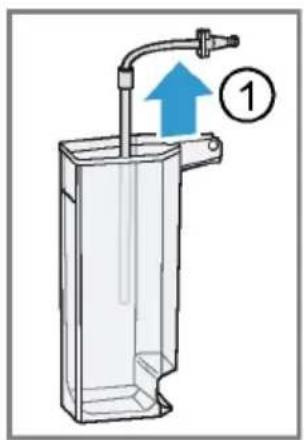
- Remove the milk tube and dismantle. Fig. 19
- Clean all the milk container's components.
Cleaning brewing unit
In addition to the automatic rinsing process, regularly remove and clean the brewing unit.

WARNING
Risk of burns!
Some appliances parts will become very hot.
- Never touch the hot appliance parts.
- Allow hot appliance parts to cool down before touching them.
ATTENTION!
The appliance may be damaged by improper cleaning.
Do not use washing-up liquid.
- Do not use cleaning agents containing vinegar or acids.
Do not clean in the dishwasher.
- Press to switch the appliance off.
- Open the door of the brewing chamber.
Fig. 20
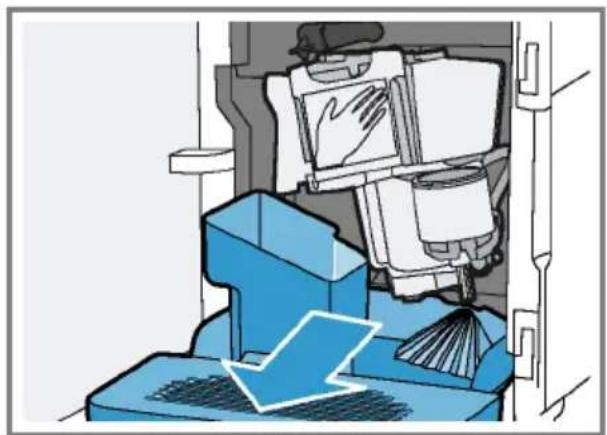
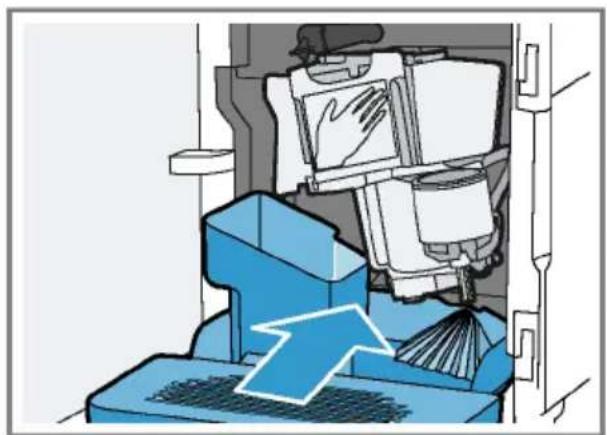
- Remove the drip tray with the coffee dregs container.
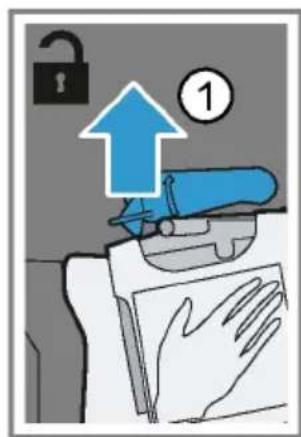
Fig. 21 - Push the red lever upwards.
- Hold the brewing unit by the handle and carefully pull forwards and out.
Fig. 22
- Clean the brewing unit thoroughly under warm running water.
Fig. 23 - Clean the appliance interior with a damp cloth and remove any coffee residues.
- Leave the brewing unit and the appliance interior to dry.
- Hold the brewing unit by the handle.
- Push the red lever upwards.
- Position the brewing unit under the lever and slide it back as far as it will go.
Fig. 24
The lever will click into place.
12.Insert the drip tray with the coffe dregs container.
Fig. 25
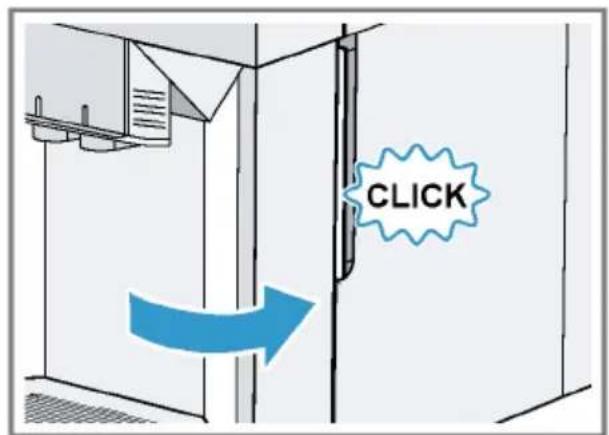
13.Close the door.
Fig. 26
The door can only be closed if the brewing unit and drip tray are inserted correctly.
Service programmes
After certain time intervals, your appliance will recommend that you use the service programmes. Use the service programmes to clean your appliance thoroughly.
ATTENTION!
Risk of damage due to improper or insufficiently prompt cleaning and descaling.
- Immediately perform the descending process in accordance with the instructions.
Do not put any descending tablets or other products into the ground coffee compartment.
Depending on the water hardness and use of the appliance, the display will show the following messages after prior notification:
"Please rinse milk system."
"Descaling necessary. Please press menu for 3 sec."
"Cleaning necessary. Please press menu for 3 sec."
"calc'nClean nec. Please press menu for 3 sec."
Notes
The display indicates the progress of the descending or cleaning process.
If your appliance is not descaled in good time, the display will show the following message: "Dscaling overdue. Appliance is locked. Please press menu for 3 sec."
If your appliance has been locked, you can only operate it again once the descending process has been carried out.
If you accidentally interrupt the service programme, you must reset it. "Resetting a service programme", Page 29
Tips
If you use a water filter, this prolongs the time interval until a service programmes needs to be performed.
- You can combine the cleaning and descaling programmes using the calc'nClean service programme. "Using calc'nClean", Page 30
Clean your appliance with a soft, damp cloth immediately after a service programme to remove any descaling solution residues and prevent corrosion.
Resetting a service programme
Take the following steps if the service programme is interrupted, e.g. due to a power failure.
- Rinse out the water tank.
- Fill the water tank with fresh, noncarbonated water up to the "max" marking.
- Press ok
The appliance will rinse itself for approx. 2 minutes.
4. Empty and clean the drip tray.
5. Insert the drip tray and close the door.
6. Restart the service programme.
Using the milk system cleaning programme
Rinse the milk system with water, if necessary. The rinsing process takes approx. 1 minute.
Requirement: The brewing unit is cleaned.
"Cleaning brewing unit", Page 27
- Press menu
- Use and to select "Cleaning and care" and press OK
3.Use and to select "Milk system"and press ok
4. To start the programme, press ok
The display will guide you through the programme.
5. Remove and empty the milk container.
6. Clean the milk container, milk tube and suction pipe.
7. Fit the components and insert the milk container. Fig. 19
8. Place an empty glass under the outlet system and press k The milk system will now clean itself automatically.
The program has ended and the appliance is ready for operation.
Tip: If you want to clean the milk system particularly thoroughly, clean regularly by hand.
"Cleaning the milk system", Page 27
Using the descaling programme
Run the descending programme when your appliance prompts you. The process takes approx. 30 minutes.
Requirement: The brewing unit is cleaned.
"Cleaning brewing unit", Page 27
- Press menu
- Use and to select "Cleaning and care" and press OK
3.Use and to select "Descale" and press ok - To start the programme, press ok
The display will guide you through the programme.
- Empty and insert the drip tray.
- Remove and empty the milk container.
- Clean the milk container, milk tube and suction pipe.
en Cleaning and maintenance
-
Fit the components and insert the milk container. Fig. 19
-
If there is a water filter, remove it.
-
Press ok
- Empty the water tank and fill with lukewarm water up to the "0.5 I calc" mark.
- Dissolve one Siemens descaling tablet in the water tank and press ok
- Place a container with a capacity of 1 I under the outlet system and press ok
The descending programme will run for approx. 20 minutes.
14.If "Refill descaler." is shown on the display, add more descending solution and press ok
15.Rinse the water tank.
16. Press ok
17.If there is a water filter, insert the water filter. "Insert water filter", Page 22
18. Press ok
19. Fill the tank with fresh water up to the "max" mark.
20. Press ok
- The descending programme takes approx. 1 minute and rinses the appliance.
- Empty and insert the drip tray.
22.Remove and empty the milk container. - Clean the milk container, milk tube and suction pipe.
24.Fit the components and insert the milk container. Fig. 19
The program has ended and the appliance is ready for operation.
Using the cleaning programme
Run the cleaning programme when your appliance prompts you. The process takes approx. 9 minutes.
Requirement: The brewing unit is cleaned.
"Cleaning brewing unit", Page 27
- Press menu
- Use and to select "Cleaning and care" and press OK
3.Use and to select "Clean" and press ok - To start the programme, press ok
The display will guide you through the programme.
5. Empty and insert the drip tray.
6. Open the ground coffee compartment.
7. Place one Siemens cleaning tablet into the ground coffee compartment.
8. Close the ground coffee compartment and press ok
9. Place a container with a capacity of 1 I under the outlet system and press ok
The cleaning programme takes approx. 7 minutes.
10. Empty and insert the drip tray.
The program has ended and the appliance is ready for operation.
Using calc'nClean
You can combine the cleaning and descaling programmes using the calc'nClean service programme. Run the calc'nClean programme when your appliance prompts you. The process takes approx. 43 minutes.
Requirement: The brewing unit is cleaned.
"Cleaning brewing unit", Page 27
- Press menu
- Use and to select "Cleaning and care" and press OK
3.Use and to select "calc'nClean"and pressok - To start the programme, press ok
The display will guide you through the programme.
- Empty and insert the drip tray.
- Remove and empty the milk container.
- Clean the milk container, milk tube and suction pipe.
- Fit the components and insert the milk container.
Fig. 19
-
If there is a water filter, remove it.
-
Press ok
-
Empty the water tank and fill with lukewarm water up to the "0.5 I calc" mark.
- Dissolve one Siemens descaling tablet in the water tank and press ok
- Place a container with a capacity of 1 I under the outlet system and press ok
The descending programme will run for approx. 20 minutes.
14.If "Refill descaler." is shown on the display, add more descending solution and press ok
15.Rinse the water tank.
16. Press ok
17.If there is a water filter, insert the water filter. "Insert water filter", Page 22
18. Press ok
19. Fill the tank with fresh water up to the "max" mark.
20. Press ok
The programme takes approx. 1 minute and rinses the appliance.
21. Empty and insert the drip tray.
22. Open the ground coffee compartment.
23. Place one Siemens cleaning tablet into the ground coffee compartment.
24.Close the ground coffee compartment and press ok
- Place a container with a capacity of 1 I under the outlet system and press ok
The cleaning programme takes approx. 7 minutes. - Empty and insert the drip tray.
27.Remove and empty the milk container. - Clean the milk container, milk tube and suction pipe.
29.Fit the components and insert the milk container.
Fig. 19
The program has ended and the appliance is ready for operation.
Rectifying faults
You can rectify minor faults on your appliance yourself. Read the troubleshooting information before contacting after-sales service. This will avoid unnecessary costs.

WARNING
Risk of electric shock!
Improper repairs can be dangerous.
- Repairs on the appliance must be carried out solely by trained, specialist personnel.
Malfunctions
| Errors | Cause | Troubleshooting |
| Appliance no longer re-sponds. | Appliance has a fault. | 1.Pull out the mains plug and wait 5 seconds.2Re-insert the mains plug. |
| Appliance only dispenses wa-ter, not coffee. | Empty bean container is not detected by the appliance. | Pour in coffee beans. |
| Coffee shaft on brewing unit is blocked. | Clean the brewing unit.→ "Cleaning brewing unit", Page 27 | |
| Beans are too oily and are not falling into the grinder. | Gently tap the bean container.Change the coffee variety.Do not use oily beans.Clean the empty bean container with a damp cloth. | |
| Appliance does not dispense milk or milk froth. | Milk system is soiled. | Clean the milk system in the dish-washer.→ "Cleaning the milk system", Page 27 |
| Milk tube not immersed in milk. | Use more milk. Check whether the milk tube is im-mersed in the milk. | |
| No milk intake by the milk sys-tem. | The milk system is assembled incorrectly. | Assemble the milk system correctly.→ "Cleaning the milk system", Page 27 |
| Order for connecting the milk container and milk system is wrong. | First insert the milk system into the outlet and then the milk container. | |
| Milk tube not immersed in milk. | Use more milk. | |
| Errors Cause Troubleshooting | ||
| No milk intake by the milk system. | Check whether the milk tube is immersed in the milk. | |
| Appliance is not dispensing hot water. | Milk system is soiled. | Clean the milk system in the dishwasher. → "Cleaning the milk system", Page 27 |
| Milk system cannot be as-sembled or disassembled. | Order of assembly is wrong. | First connect the milk system and then the milk container. When disassembling, you must first remove the milk container and then the milk system. |
| Appliance is not dispensing drinks. | Air is in the water filter. | 1. Immerse the water filter in water with the opening facing upwards until no more air bubbles escape. 2. Reinsert the filter. → "Insert water filter", Page 22 Firmly press the water filter straight down into the tank connection. |
| There is dripping water on the inner floor of the appliance. | Drip tray was removed too soon. | Wait a few seconds after the last drink was dispensed before removing the drip tray. |
| Brewing unit cannot be removed. | Brewing unit is not in the removal position (e.g. frost protection activated). | Switch the appliance back on. |
| Appliance cannot be operated. | Appliance is in demo mode. | To deactivate demo mode, press and hold for at least 5 seconds. |
| Change displays. | ||
| Grinder won't start. Appliance is too hot. | Wait 1 hour so the appliance can cool down. | |
Notifications on the display panel
| Errors Cause Troubleshooting | ||
| Display shows "Close" despite the fact that the door is closed. | Door is not properly closed. | Press the door firmly shut. |
| Appliance is too hot. | Wait 1 hour so the appliance can cool down. | |
| Display shows "Please empty drip tray and reinsert." despite the fact that the drip tray is empty. | Appliance is switched off and does not detect emptying. | 1. Switch the appliance on, and remove the drip tray. 2. Re-insert the drip tray. |
| Drip tray is soiled. | Clean the drip tray thoroughly. | |
| Display shows "Please refill water tank" despite the fact that the water tank is full. | Water tank is wrongly inserted. | Insert the water tank correctly. |
| Carbonated water is in the water tank. | Fill the water tank with fresh tap water. | |
| Float is stuck in the water tank. | 1. Remove the water tank. 2. Clean the water tank thoroughly. | |
| New water filter was not rinsed as per instructions. | 1. Rinse the water filter according to the instructions. → "Insert water filter", Page 22 2. Place the water filter into operation. | |
| Air is in the water filter. | 1. Immerse the water filter in water with the opening facing upwards until no more air bubbles escape. 2. Reinsert the filter. → "Insert water filter", Page 22 | |
| Water filter is old. | Insert a new water filter. | |
| Limescale deposits in the water tank are blocking the system. | 1. Clean the water tank thoroughly. 2. Start the descaling programme. → "Using the descaling programme", Page 29 | |
| Display shows "Fill the bean container with coffee beans." despite the fact that the bean container is full. The grinder is not grinding any coffee beans despite full bean container. | Beans are too oily and are not falling into the grinder. | Gently tap the bean container. Change the coffee variety. Do not use oily beans. Clean the empty bean container with a damp cloth. |
| Display shows "Please clean brewing unit, replace and close door". | Brewing unit is soiled. | Clean the brewing unit. → "Cleaning brewing unit", Page 27 |
| Mechanism of brewing unit is stiff. | Clean the brewing unit. → "Cleaning brewing unit", Page 27 | |
| Too much ground coffee in the brewing unit. | Use no more than 2 level measuring spoons of ground coffee. → "Cleaning brewing unit", Page 27 | |
| Display shows "Voltage (V) in- correct". | Voltage in the house system is incorrect. | Only operate the appliance at 220 - 240 V. |
| Display shows "Please restart appliance"." | Brewing unit is heavily soiled or cannot be removed. | Restart the appliance. Clean the brewing unit. → "Cleaning brewing unit", Page 27 |
| Display shows "Please restart appliance." | Appliance has a fault. | 1. Pull out the mains plug and wait 5 seconds. |
| 2. Re-insert the mains plug. | ||
| Display very frequently shows "calc'nClean". | Water is too hard. 1. Insert a new water filter. → "Insert water filter", Page 222. Set the corresponding water hardness. → "Setting the water hardness", Page 16 | |
| Incorrect or too little descal-ing agent used. | When descending, only use suitable tablets. | |
Problem with results
| Errors Cause Troubleshooting | ||
| Coffee or milk froth quality varies widely. | Build-up of limescale in the appliance. | Descale the appliance. → "Using the descaling programme", Page 29 |
| Milk froth quality varies widely. | Milk froth quality depends on the type of milk or plant-based alternative used. | Optimise the result through the selec-tion of the milk or vegetable-based drink type. |
| Coffee is not dispensed or has slowed to a trickle. Set quantity is not reached. | Grinding level is set too fine. | Set a coarser grinding level. → "Adjusting the grinding level", Page 22 |
| Heavy build-up of limescale in the appliance. | Descale the appliance. → "Using the descaling programme", Page 29 | |
| Air is in the water filter. | 1. Immerse the water filter in water with the opening facing upwards until no more air bubbles escape. 2. Reinsert the filter. → "Insert water filter", Page 22 | |
| Coffee has no crema. Type of coffee is not optimal. | Use a coffee variety with a higher pro-pportion of Robusta beans. Use beans with a darker roast. | |
| Beans are no longer fresh. | Use fresh beans. | |
| Grinding level is not appropri-ate for coffee beans. | Adjust the grinder to a finer setting. → "Adjusting the grinding level", Page 22 | |
| Errors Cause Troubleshooting | ||
| Coffee is too acidic. Grinding level is set too coarse. | Adjust the grinder to a finer setting. → "Adjusting the grinding level", Page 22 | |
| Type of coffee is not optimal. | Use a coffee variety with a higher proportion of Robusta beans. Use beans with a darker roast. | |
| Coffee is too bitter. Grinding level is set too fine. | Set a coarser grinding level. → "Adjusting the grinding level", Page 22 | |
| Type of coffee is not optimal. | Change the coffee variety. | |
| Coffee tastes burnt. Grinding level is set too fine. | Set a coarser grinding level. → "Adjusting the grinding level", Page 22 | |
| Type of coffee is not optimal. | Change the coffee variety. | |
| Coffee temperature setting is too high. | Set the coffee temperature lower. → "Overview of the basic settings", Page 24 | |
| Coffee grounds are not compact and are too wet. The grinding level is not set optimally. | Adjust the grinder to a coarser or finer setting. → "Adjusting the grinding level", Page 22 | |
| Too little ground coffee. | Use 2 level measuring spoons of ground coffee. | |
| Beans are too oily. | Use a different type of bean. | |
Transportation, storage and disposal
Here you will find out how to prepare your appliance for transportation and storage. You will also find out how to dispose of old appliances.
Activate frost protection
Protect your appliance from frost during transportation and storage
Requirements
The appliance is now ready to use.
The water tank has been filled.
ATTENTION!
Possible damage to the appliance during transportation or storage due to liquid residues in the appliance.
-
Empty the pipe system before transportation or storage.
-
Place a large container under the outlet system.
- Press and select "Milk froth".
- Press start stop
- Remove water tank.
The appliance will automatically empty its pipe system and switch itself off.
5. Empty the water tank and the drip tray.
6. Clean the appliance thoroughly.
Disposing of your old appliance
Valuable raw materials can be reclaimed by recycling old appliances.
- Unplug the appliance from the mains.
-
Cut through the power cord.
-
Dispose of the appliance in an environmentally friendly manner.
This appliance has been identified in accordance with the European Directive 2012/19/EU on Waste Electrical and Electronic Equipment (WEEE). This Directive provides an EU-wide framework for returning and recycling old appliances.
After-sales service
If you have any queries, are unable to rectify faults on the appliance yourself or if your appliance needs to be repaired, contact after-sales service.
You can solve many problems yourself by consulting the information on troubleshooting in these instructions or on our website. If this is not the case, contact our after-sales service.
We will always find an appropriate solution.
With any warranty claims, we will make sure that your appliance is repaired by after-sales customer service technicians using original spare parts, including after the manufacturer's warranty has expired.
Note: Under the manufacturer's warranty conditions, use of the after-sales service is free.
When contacting after-sales service, you will need the product number (E no.) and the production number (FD no.) of your appliance.
The contact details of the after-sales service can be found in the after-sales service directory at the end of the instructions or on our website.
E number and FD number
The E number and the FD number can be found on the appliance's rating plate.
Making a note of your appliance's details and the after-sales telephone number will enable you to find them again quickly.
Warranty conditions
You can make warranty claims for your appliance under the following conditions.
The guarantee conditions for this appliance are as defined by our representative in the country in which it is sold. Details regarding these conditions can be obtained from the dealer from whom the appliance was purchased. The bill of sale or receipt must be produced when making any claim under the terms of this guarantee.
Technical specifications
Facts and figures for your appliance can be found here.
| Voltage 220-240 V ~ | |
| Frequency 50 Hz | |
| Connection rating 1500 W | |
| Maximum static pump pres-sure | 15 bar |
| Maximum capacity of water tank (without filter) | 1.7 l |
| Maximum capacity of bean container | 270 g |
| Length of the power cable 100 cm | |
| Appliance height 37.3 cm | |
| Appliance width 24.9 cm | |
| Appliance depth 42.8 cm | |
| Weight, empty 8-9 kg | |
Type of grinder Ceramic
Table des matieres
Sécurité 41
Indications generales. 41
WAARSCHUWING - Risico van brand!
WAARSCHUWING - Risico van verbranding!
WAARSCHUWING - Gezondheidsrisico!
WAARSCHUWING Risico van verbranding!
- Nacisnac start stop.
PnHroTOBJIeHHe HAnNTKOB 187
PnroToBneHne KoFeHOro HAnrKa n3 CBexHX KoFeHbIX 3epeH. 187
IprnoToBnHeNe KoFeHOro HAnNTka n3 MoJToRo KoFe. 188
ПригOTOBленеHaNTKOBcMOJOKOM. 188
HcnoIb3OBaHne emKoCTn dJa MOJOKa 189
PnroToBneHne KofoeHoro HAnNTka CMOJOKOM 189
PnroToBneHHe oO6bIX HAnNTKOB ....190
PnroToBneHHe MoNoCHNo Nenbl. 190
HactpoynI dIy HAnNTKOB. 190
ΦnIbTpДЯВODbl 192
Ba3OBbIe yCTaHOBKn. 193
O63op 6a3OBbIX yCTaHOBOK 194
H3MeHeHHe 6a3OBbIX yCTaHOBOK 195
OuHcTka n yXoI 195
PnroHocbIyMbITbB NocyuMoeyHO MaunHe 195
UHCTAuee cpeDCTBO 195
OuHcTka np6opa 196
OuNCTKa IIOIDoHa N EMKoCTn DnA Ko-phiHOn rUzni. 197
OuNCTka OTCeKa JnMOnToRo KoFe ... 197
OuHCTKa CnCTeMbI NOaun MOLOKa..... 197
OuHCTKa EMMKoCTn DnA MOnoka 198
OuHcTka 3aBapOHoro 6Joka. 198
CepBnchbIe npoPpAMMbI 199
YctpaHHe HeNCnPaBHoCTeI 203
C6onBpa6ote 203
Yka3aHa Ha dncnnee 205
Ipo6lema c pe3yltaTOM pa60tbl np6opa 207
ru
TpaHcnpTnpoBka, xpaHeHne uTyIIN3aun. 210
AKNBaun 3aunTbI OT 3aMep3aHn 210 YTNn3aun CTaporo 6bITOBORO np-6opa 210
CepBnchna cnyx6a. 210
Homep E n Homep FD 211
TapaHTnHbIe yCIOBnA 211
TexHHueckHe xapaKTepeHCTnKN 211

Бeэпасноctь
Дя 6e3oNaChOH эКсплуatau npi6opa cJeDyIe yKa3aHnA m no TeMe «Бe3oNaChOCTb».
Овице указань
3decb npBedeHa o6uaHnΦopMaunO daHHOM nHΦopMaunOHHom npoDyKTe.
BHHMaTeIbHo npOHTHe 3Ty HnCTpyKcHIO. OHa nOMoJcET Bam HayuHTbcra 6e3OnaCHO n 3ΦΦeKTHBHO nOJIb30BaTbcra npHbOpom.
3Ta INHCTpykunn npedHa3NaueHa dIy noIb3OBaTeI np6opa.
CneyuTe yka3aHnM no TexnKn 6e3oNaChOCTn n npedynpexdEHHaM.
- Coхсанthe nHCTpyKcHIO n HΦopMaunO o6 n3dennn dIaJIbHeJWeO nCNoJIb3OBaHHn IIN dIepeDaun cIeDyUoSeMy BnaJeBuy.
- Pacnakyte n ocmotpnte npnbop. B cnyae o6napykeHn r nobpeJdeHn, CBraHHbIX c TpaHCnpTnpOBkO, He nodkluoaye npnbop.
IcnoJb3ObaHne no Ha3HaueHnIO
Дя 6e3oNaChOrO nHaJIeJaUero noJIb3OBaHnI npI6Opom co6IoJaTe npaBnla nCNoJIb-3OBaHnI NO Ha3HaueHnIO.
Icnoj3yIe np6op TOnbko:
B COOTBETCTBNN C DaHHOH INHCTpyKUneN NO 3KcnIyatauIN;
ДЯпнгOTOBЛЕнгурачнHaHNTKOB.
Ha BbICote He 6oJee 2000 M haI ypoBHeM Mopra.
OrpaHnueHne Kpyra noIb3OBaTeJe
He donyckaIte pncOB dIaIeTeN IOBepKeHHbIX ONaCHOCT NIIc.
He donyckaite deTei mnaIwe 8 let K npnbopy n ero cetebomy npoBody.
Be3onacHoe npHMeHeHne
Pn noJb30BaHH np6Opom co6HoaTe daHhle yka3aHn no texHnke 6e3oNaChOCTN.
PPEyIpeKDEHNE-Onacnoctb ydywb!
I DeTn MOryT 3aBepHyTbCBy ynaKOBouHbIMaTePnAINnHaTeB erO ce6e Ha roJIOBy n 3aDOxHyTbCn.
He noIyckaiTe JeTeK UyaKOBOHOMy MaTePnAly.
He no3BOJnTe DeTAM HpaTb C yNaKOBOHybIM MaTePnaJIOM.
- DeTN MOryT BdoXHyTb Hnn nporNtHTb MeKne AeTaN, B pe3ynbTaTe Yero 3aDOxHyTbCn.
He noDnyckaIte DeTeK MElkM DetajrM.
He no3BOJnTe DeTAM HrpaTb C MEJKMn DeTaJIaMn.
I PEPENPENK DEHNE -Onacnoctb nopaeHHN 3neKtpuecknM TOkOM!
■Пи HeKBaJIHФИцИрОваHHOM MOHTaXe np6Op MoKet CtaTb HCTOчнКOM ONaCHOCTH.
Pn noKIOHEnnn npbopa n erO 3KcNlyataunco6HOaTe daHHbe, npBBeHN HbIe Ha OHPMeHHoTb6NuKe.
Pn6op MoKHO NOKIOaTb TOnbKO K 3eKTOceT NepMeHHoro ToKa Ype3 yCTaHOBHeHHyO cOrnaCHO PpeDncaHnM PO3eTKy C 3a3EmHeHnEM.
CnCTema 3a3eMneHnB DOMaUHeN 3JIeKTPoPpOBoDKe DoJXHa 6bTb yCTaHOBNeHa corlaCHO npeDncaHnM.
■ NOBpeKdEHHbI npH6op Hnn NOBpeKdEHHbI ceTeBOi Ka6eJIb ABJIOTcN HCToHHKOM onaCHOCTeI.
▶ Kateropnueckn 3anpeuaeTc8 3KcnnyaTHPOBaTb NOBpeJxHnBn np6Op.
▶ Kateropnueckn 3anpeaetcra kcnnyataun npnbopa, nobepxhoctb koToporohMeet TpeuHb Hnn NobpeKdeHa.
B cnyae noBpeKdEHH np60pa Hn CTeBOrO Ka6eH HeMeDHeHNO OToCoeHHTe np60pOT 3neKTpoCeTn. N3BNeKHTe H3 po3EtKn BnKy ceTeBOrO Ka6eH Hn Bbl- KIOUHTe PpeOxpaHHTeB B 6Ioke PpeOxpaHHTeJ.
O6paTntecb B cepBnCHyO cnyx6y.
PemOHPOBaTb np6op pa3pewaeTcToIbko 06yueHHbIM cneuaHnCTaM.
Pn HeKBaHnΦuNPOBaHHOM pmoHTe npHOp MOKeT CtaTB HcTOUHNKOM ONaCHOCTN.
PemOHIOBAtb np6Op pa3pewaeTcToIbko 06yueHHbIM cneuaHnCTam.
- PpOHnKwA B npHbOp Bnara MoXeT cTaB npHnHO ydapa TOKOM.
▶ Kateropnueckn 3anpeuaeTcN norgykaTb np6Op Hn cTeBOB Ka6eJb B BOy.
3anpeaaetc nonadHne KndKocTeHa WTeKeepHoe coedHeHne np6opa.
Hcnoj3yIte np6op Tolbko B 3aKpbTOM nOmeueHHN.
He noIb3yIeTcB np6Opom npn cIIuKOM BblCOKoTempe HIN BlaXHocTH.
He nCnoB3yIe dIy ouHCTK npHbopa napooHCTHTeHHn OUHCTHTeHH BbICOKoT DaBHeH.
I PEPENPENKDEHNE -Onacnoctb Bo3ropaHa!
Pn6op HarpEbaetc.
Obecneyte doctaToHyo BeHTnAunIO np6opa.
▶ Kateropueckn 3anpeeHa 3Kcnnyataun npnbopa B wkafoy.
IcnoIb3OBaHne ydJIiHeHHoro cTeBOrO Ka6eNn He HMeIoUx Donycka aanTepob onaCHO.
He nCnoJb3yIte ydJIHHTeJIbHbIe Ka6eII INMHOROKHTaKTHbIe PO3ETKN.
Ecnn dnnhbceteboro Ka6eH He XbaTaET, 6paTntecb B cepBnchHyO cnxK6y.
HcnoIb3yIte TOnbKO donyueneHHbe npOn3BODnteMe aadantepbl.
PPEyIPEKJDEHNE-OnacHoctbOxKorOB!
HeKOTOpBie yactn npbopa cnIbHO HArpeBaIOTcR.
He npkaaTecb K ropyM qactm np6opa.
Npeed KOHTaKTOM C ropayHM qactAMn np6opa daTe MM OCTbITb.
PPEyIpeKDEHNE-OnacHocTbOwnapnBaHHa
CBeKe npuroToBneHHbIe HAnNTKn OueHb TOpAyne.
Ecn noTpe6yeTc, daTe octbItb HAnNTkAm.
H36eraIte KOHTaKTA BbIeJIHOUxCRA KnIKOCTeN napOB C KOKeJ.
PPEyIeHNE-OnacHocTb TpaBMnpoBaHHa
■Пи He npaBnblbHOM nCnoB3OBAHnnp6opa noB3OBaTeIb MoKet noJyUHTb TpaBMbl.
HcnoB3yIte np6op TOnbKO no Ha3HaueHHO.
3aKpbBaI DBepy npHopa, MoXHo npHcEMtB naIbCuI.
3aKpbBaI DBepu np6opa, He npuIeMHTe naIbcuI.
KofoemonkaBpaaetca.
He npikacaiTecb K BHyTpEHHM qactm Kofoemolkn.
ru Be3onacHoctb
I PEPENPENK DEHNE -Onachocb, CBa3aHHa C MaHTHBIM NOeM!
Pn6op coepknt noctoHHbIe MarHtbl. OHN Moryr BO3dEChBOBaTb Ha 3neKtpOH Hble HmnpaHTaTb, HanpImep, Ha KapDIOCTMMyJTopb INHHexEKTOpb IHCYINHa.
■Iuam C 3neKtpoHHbIMn HmPnHaHTaHTaMn 3anpeuaeTc np6nKaTbcra K np6bopy 6nHexe, yem Ha 10 cm.
Co6IIOJaTe TaKKe MmHMaJIbHOe pacCToRHe 10 cm Do BbHyToRo pe3epByapa DnA BoDbl.
PPEyIpeKJDEHNE-OnacHOCTbIJa3DopOBbI!
3arpa3HeHn np6opa Moryt npeCTaBnTb onacHOCTb dIy 3doPoBB.
Co6IIOaIte yka3aHn no ouncTke np6opa.
OxpaHa OkpykaIOUeI cpebln 3KOHOMN
Bepexno pacxoypeycpbI npn 3Kcnnyataunnpnbopa n ytnnn3npy naKeaumo6pa30mpnroHbIe K NOBTOPHOMYcNoIb3OBAHIO MaTePnaJIbI, Bbl npOBBAJrTe 3a6Oty o6 OkpykaUoSe cpeJe.
YTHIN3aUNyNAKOBKN
YnakoBouHbI MaTePnaIbI 6e3OnacHbI dIy OKpyKaIOUeN Cpebl N NOJNeKAT BTOpHcHoi nepepa6oTke.
YTNIN3NpyIte OTdEnbHbIe DeTaN, npeBapHTeJIbHO paccOpTnPOBaHx. CopTa NlactIKOBbIX OTXODOB cOKpa- 1eHHO 06o3HaayOTcB CootBeTCTBnC MeKdyHApOdHbIMN CTaHdApTaMn; HanpImep, PS O3Haayet NOINCTnPoJ. CBeDeHNr O BO3MOKbIX CNOCobax YTHn3aun MOKHO NOnyUHTB B CneuHaIN- 3nPOBaHHOM TOPROBOM npeDnPnATn, a TaKke B paOHbIX INN rOPOdCKNX OPraHax ynpabJeHn.
3Heproc6epeKHeHne
Pn co6IIODeHnn 3Tnx yka3aHn np6Op 6yDet pacXoOBoBaT MeHbWe 3JeKtpo- 3HEprn.
YcTaHOBHTe HHTepBaJ dJa aBTOMaTHueCKORO OTKIOUeHnHa MHHMaJIbHOe 3Ha-ueHne.
- Ecn np6op He nCnoB3yeTcA, OH OTKIOUaETcpaHbWe. "Ba3OBbIe yCTaHOBKn", Ctp.193
He npepbBaIte npexKeBpeMeHNo npuroTOBHeHne HAnrKa.
+HarpeToe KOJIueCTBO BOIbI HIN MOIOKa IcNoJIb3YeTcR ONTMaJIbHO.
Perynno ouuau Te np6op ot hKnnn.
+HaKnB npNBOaNT K NOBbIeHHOMy 3Hepronotpe6neHIO.
YCTaHOBka N NOdKJIIOUcHne
3decb Bby y3Haete, rnde n KaK lyuwe BCero yctahOBtB npbOp. Kpome toro, onncaHo noKnIOueHne npbopa K 3JeKtpocetN.
KomnneKT noctabkn
Pocne pacnaKOBKn npOBepbTe BCE DeTaJIH Ha OTCyTCTBHe TpaHCnOpTHbIX NOBpeXKeHH N KOMNJIeKTHOcTB NoCTaBKn.
→Pnc.1
Pn6Op n03B0JHET npiroTOBHTb MHOrO pa3HOo6pa3HbIX HAnNTKOB.
Быстры Вьбор
- Pnp6op BkHouaetcN BBKHOaETcK Honko
Pn BKnHoyeHH Ha dncnnee NOBnE Tc norotn Siemens. Pn BKnHoyeHH N BbIKIOUeHH BbINOJHReTc aBTOMaTHueckar npMbIBKa np6opa. B npouecce npMbIBKHa dncnnee OTo6paXkaetc cHMBOI KAn. Ecn np6op npn BKnIOUeHH eue Harpet Hn nepeD BblKNIOUeHHem KoFe He rTOBnIC, npMbIBKa np6opa He BblONHReTc.
PnroToBneHHe HAnHTKOB
3dec onHcHo, KaK npHroTOBHTb HAnHTOK no BaWemy Bb6opy.
I PEPENPEKIDEHNE Onachoctb ownapBaHn!
CBeKe nproToBHeHbIe HAnNTKn OueHb rOpAune.
Ecnn notpe6yetc, daTe 0ctbItb HanNTkam.
H36eraIte KOHTaKTa BbIDeJIIOUHXCA KIKKOCTe I napOB C KOKeJ.
Cobetbl
HaHTOK MoKHO BbIbpaTb HAnpMyIO KhoNkAm6bICTporo BbIbopa. Ha dncnnee OTo6paKaAeTcH AnHTOK N TeKyUne HAcTpOuKn.
Kpome HAnHTKOB, BbIbnpaembIX HaXkA THeM KHOJOK 6bICTPORO BbIOpa, npH- 6Op MoKeT npHroTOBHTb TaKHe dpyrHe HAnHTKN.
"TpuroToBneHHe OcObIX HaHTKOB", Ctp.190
BbMOKeTe HAcTpOHTb npH6Op B COOTBeTCTBn C BaUNM INHINBnDyalbHbIM BKYCOM.
"Hactpoynn dna HannTKOB", Ctp.190
yKa3aHHN
EcnB TeueHne np6n.5cekynd Hn OHa n3 Hactpoek He 6ydet n3MeheHa, np6op BbIXoHT n3 peKmHa HacTpoeK. BblnoHHeHbe Hactpoon coxpaHOTc aBTOMaTnueckn.
HeKOTOpbIe HAcTPOiKn npeAnonaraIOT npHroTOBHeHne KoFe B HeCKoNbKO Wa-roB. DoXdntecb OkOHaTeNbHorO 3a-BepWeHn Ipouecca.
PnroToBHeHne KofoeHOro HAnHTKa H3 CBExHX KofoeHbIX 3epen
- NocTaBbTe noDorpeTyO yawky noD nncneHcep.
- Haxmte Ha cmboI KofoeHoro HAnNTKa 6e3 MoNoka.
Ha dncnnee oTo6paKaIOTc HAnHtOK n TeKyuune HacTpoiKn.
"Hactpoynn dna HannTKOB", Ctp.190
ru Ousne npnncnbI ynpabLeHna
3.ИЗMeHHTb HAcTpoNk MoXHo CNeDyIO- UIM O6pa3OM.
- H3MeHnte KOINueCTBO HAnNTKa KHOKNoI ml.
"H3MeHeHHe KOHNueCTBa HAnNTKa", Ctp.191
- H3MeHHTe KpeNoctb Kofoe KhoNkoi
"Hactpoika Kpenocn Kohe", Ctp.190
- Haxmte KhoNky stop
Pn nCnoB3OBaHn KofoeHbIX 3epen BblonHReTc Hx CBekn NOMOJ dJa KaKdoBapKn.
KoepBaPa cBapnt KoPe n 3aTeM haJIbET erO B yauKy.
Cobet
PnroTOBHeHne HAnNTKa MoXHo npexK DeBpeMeHHO 3aKOHHTb KHONKoN stop.
3decb onHcHo npHroTOBneeHne Ko-FeHHbIX HANITKOB C MONOKOM.
"PnuroToBneHHe HAnHTKOB C MONOKOM", Ctp.188
PnroOBneHne KofoeHoro HAnrKa H3 MoIOTOro Kofoe
BHIMAHHE!
Bo3MOxHa 3a6nBka OTeKa dIa MoIOTOro KoΦe.
He nCnoJb3yIte KoFeHbIe 3epHa.
He nCnoJIb3yIte paCTBOpIMbI KOpe.
Mrkouyko ydaHte octaTKM OJOTORO KOe BOTceK dN MaTMOJTORO KO-
Yka3aHHe
Pn npnoTOBHeHn HAnNTKOB n3 MoIOTOro KoFe BbIbOp CneDyUOxNx HaCTpoEKe HeBO3MOXKeH.
-ДБeЧашк CPA3y
Kpenocb Kofoe
- aromaDouble Shot
- NocTaBbTe noDorpeTuO yawky noD nucneHcep.
-
HaxMMte Ha cHMBoH yXKHO rHaNTka.
-
Haxmte KhoNky O, noka Ha dncnnee He noaBntca "Mon. KoPe".
- OTKpoIte oTceK dJa MoNToTe Kofoe.
- 3acbntte He 60nee 2 Mephbx loxek MOIOTOro Kofoe 6e3 ropKn, MaKc. 12r.
- 3aKpoIte oTcek dIy MoIOTOrO KoIe.
- HaXMMTe KhoNky stop
KoepBaPaKa CBapnT KoPe H 3aTeM HaJIbET erO B aWKy.
Cobet
PnpiroTOBneHHe HAnNTKa MoXHo PpeK-DeBpeMeHHo 3aKOHHTb KHOKNs stop.
I npuroBneHn eue Ondoro Hannt Ka H3 MOJOTOro KoFe NOBTOPe npo- cecc.
3arpykaTe MOToBk KOFe Bcerda He-nocpeDCTBeHNO nepeI npuroTOBneHn-EM HAnNTka.
PnroToBneHHe HAnHTKOB C MoIOKOM
B npnbope MoKHO npnroTaBnBaTb Ko-
feHbIe HAnNTKc MOJOKOM MMOOHyo
neHy.
Cobet: Bbl MoXeTe BMeCTO MOJOKa TaKKe HcNoJIb30BaTb HAnITKN 3 pAcTNTeJIbHOro cbIpB, HApHMep, H3 COH.
Yka3aHHe: KaueCTBO MONOuHOI neHbI 3aBnCHT OT BnDa HcNoJb3yEmoRO MoNOKa HnHaNTKa N3 pACTnteJbHorO cbipBa.
#
PPEYNPEXKDEHNE
Onachoctb oxorob!
CnCTema noaun MoIoka cnIbHo HarpeBa-etc.
HnB Koem cnyae He npHKacaiTecb K cnCTeMe noaH MoIoka.
- Ipeed KOHTaKToM c ropaey CnCTeMoN noDaun MoIoka daTe ee octbTb.
BHIMAHHE!
OCTaTKM OJOKa MoryT 3acoxHyTB, Hx 6yDet TpydHO ydaHtB.
Pocne KaKDoRo HcNoB3OBaHHn Heo6XoHMo OuHuaTb CnCTeMy Npaun MoJoka.
"OuHcTKa CnCTeMbI NOdaHy MOnoka", Ctp.197
HcnoIb3OBAHHe eMKoCTn Ira MoJOKa
EMKocb dIa MoIoka cneuaJIbHO pa3pa60taHa dIa 3TOI np6opa.EmKocb dIa MoIoka ppeHa3HaueHa nCKIOHTeBHO dIa 6bTOBOrO HcNoJb3OBaHn, HanpIMep dIa XpaHeHHa MOlOKa B XoIoNJIbHNke.
Yka3aHHe
EMKocTb Ia MoIoka MoKeT 6bITb NOcOeHHeHa ToJIbKO pN IpaBnIbHOM MOTaXe CnCTeMbI NODaH MoIoka C aadantepomN Tpy6koB DnCneHcepe.

- OTKPOe KpbuKy.
- 3aeneMoJOKo.
- 3aKpoTe KpbIuKy.
- YctaHOBHTe eMKoCTb dIa MoIoka cIeBa Ha npHObpe.
EMKocTb dna MoNoka hckpyetca.
Cobet
YTo6bI B npouecce npnroTOBneHnHaHNTKa DOHTb MOLOKO,OTKNHbTe BBepx KpbIWKy EMKOCTH DnA MOLOKA.
PnroTOBHeHne KofoHoro HAnrKa C MOJOKOM
Heo6xOaHMBle ycNoBnA
EMKoCTb DnM OJOKa NOcOeHHeHa.
EMKoCTbIa MoIoka HanoJIHeHa MoIOKOM.
- NocTaBbTe noDorpeTyU yawKy noD nncnHcep.
- HaxMMTe Ha cHMBoJ KoΦeHOrO HAnNTKa C MOJOKOM.
Ha dncnlee oTo6paKaIOTc HAnITOK n TeKyuune HAcTpoiKn.
→"Hactpoynn dna haNTkoB", Ctp.190
-
3MeHHTb HAcTPOKIMoXHO CNeDyUO-UM O6pa3OM.
-
H3MeHHTe KOJIueCTBO HAnNTKa KHOKNoI ml.
"H3MeHeHne KOInuecTba HAnNTKa", Ctp.191 - H3MeHnte Kpenoctb Kofoe KHonKo
"HacTpoiKa KpeNoCTn KoΦe", Ctp.190 - HcnoB3yIte OTceK dIa MoIOTOro Kofoe.
"PpuroToBneHne KofoeHoro HAnNTka n3 MoIOTOro Kofoe", Ctp.188
ru O6uHnHnbl ynpaBHeHn
- HaxMMTe KhoNky start stop n DoXdntecb OKOHaTeJIbHOrO 3aBepWeHn npoecca.
CnCTema noDaun MOIoka nocJe npiroTOBJIeHNAHNTKa aBTOMaTneCKN OUnIaetc KaPakOBpeMeHHo Nodauey na pa.
Cobet: UTo6bl npexKeBpeMeHHO 3aKOH- uHTb npiroTOBneHHe, hAKMITE stop. UTo6bl npexKeBpeMeHHO nonHOCTbIO 3aKOHHTb npiroTOBneHHe, hAKMITE 0.
PnuroBneHHe oc6bIX HAnHTKOB
Kpome HAnNTKOB, BbIbpaembIX HaXaTHeM KHOIOK 6bICTporo BbIbopa, npH6Op MoKeT pNROTOBt TaKke dpyrne HAnNTKn.
HaKMMTe KhoNky HeckoIbko pa3. "TpeueHb HauNTKOB", Ctp.183
PnuroToBneHne MOnOuHNo neHbI
Heo6xOaHmblcyeycnoBnA
EMKOCbIa MoJOKa noDCoeHHeHa.
EMKOCbIa MoIoka HAnOnHeHa MOnoKOM.
I PEPENPEK DEHNE Onachoctb OKorob!
Cnctema noaun Monoka cnbho HarpBaetcra.
HnBkoem cnyae He npKacaiTecb K cnCTeMe noaun Mooka.
Ipeed KOHTaKTOM c ropauein cHCTeMoN noDAuH MOLOKa daTe ee ocTbTb.
- NocTaBbTe noDorpeTuO yawky noD nncneHcep.
- Haxmaite KhoNky, noKa Ha dncnnee He noBntcra "Mono. IeHa".
-
Пи HeobxOДIMOCTN H3MeHHTe HaCTPOIky.
-
H3MeHnte KOJIuYeCTBO HAHTKa KHOHKnOi ml. "H3MeHeHne KOJIuYeCTBa HaNTKa", Ctp.191
-
HaKMnte KNONky stop.
MoNoHa nHa BbIXoHn3 DnCneHce-pa. - Yto6bl nepeKpaTb npnroTOBneHne, HaxMMTe KhoNky stop.
PnroToBneHne ropaye BObI
Heo6xodnmoe ycnoBne: Cnctema noa- uMoloka ouuueHa.
"OuHCTKa CnCTeMbI NOdaHy MOnoka", Ctp.197.
I PEPENPEKDEHNE Onachoctb oXorob!
CnCTema noaH MoNoka CnBHO HArpeBa-etc.
HnB KOem cnyae He npHKacaiTecb KcNCTeMe NOaH MOJoka.
Ipeed KOHTaKToM c ropaey CnCTeMoN noaH MoNOKa daTe ee octbTb.
Yka3aHHe: Ecnn CnCTema noDaun MoNoka He ouHneHa, To He6oBbOe KOINueCTBO MOlOKa MoKet 6bITb pa3NITo BmecTe c BOdOi.
- NocTaBbTe noDorpeTyO yawky noD nncneHceP.
- Haxmaite KhoNky, noKa Ha DnCnnee He NoBnTcra "Topaay Boda".
-
Пи Heo6xOdHMoCTn n3MeHnte Ha-ctpoNkY.
-
H3MeHnte KOJIyEcTBo HAnNTKa KHOJkoI ml. "H3MeHeHne KOJIyEcTba HaNTKa", Ctp.191
-
HaKMnte KNONky stop
Topuaa B0da BbIXoHnT n3 dncneHcepa. - UTo6bI nepeKpaTntb npHroTOBHeHne, HAKMNTe KHOKNy stop.
HactpoNn dHaHNTKOB
PnroTOBbTe HAnHToK no BaWemy Bkycy.
Hactpoika Kpenocn Kofoe
-
HaKMnte Ha cHMBoH HyKHOro HanNTka.
-
4to6bl Bbipatb Kpenoctb Kope, HaKMITE KHONHy O.
Bb moKeTe Bb6paTb cneDyUoune HaCTpoKn KpeNoCTn KoFe:
- cna6b
HOPMaJIbH.
-KpennKn - oueHb KpeKn
- aromaDouble Shot
Cobet: UTo6bl coxpaHnTB nHTeHcNBbIi BKyc KoFe, npN 60JIbWOM KOINueCTBe HAnNTka Bbl6epnte HacTpoNky 60JIbWei KpeNoCTn.
BbI6op MONOTOro Kofo
- HaKMnte Ha cHMBOJ HxKHO Ro HAHTKa.
- Haxmaite KhoNky O, noHa Ha dncnnee He noBtca "Mon. KoFe".
"PpuroToBneHHe KofoeHoro HAnHTka 13 MoIOTOro Kooe", Ctp.188
aromaDouble Shot
Bb moKeTe npHroTOBHTb OueHb KpeKNk
KoFe, HcNoIb3OBaB FyHKuIO
aromaDouble Shot.
YemdoJIbwe 3aBapnBaETcKoFe,TeM 60JIbwe rOpBX BeIeCTB HHeKeJATEbHbIX apOMaTOB nonadaet B HanHTOK. TOpkKne BeIeCTBA HHexKeJATEbHbIe apOMaTbOtpuataJIbHO BnHOT Ha BKyc N DeJaOT KoFe MeHee npnTHbIM dJa yNoTpe6NeHn. Pocne npnroTOBJeHn NOOBHbI npnroTaBnBAeMOro KOInueCTBa KoFeHNbIe 3epHa 3aHOBO nepMaJIbIBaHTcN 3aBapNBaOTcEe pa3,B pe3yJIbTaTe Yero NoJyuaETcBkyChbIKoFe C npnAHTbIM apOMaTOM.
Cobet:Функциет aromaDouble Shot Moxho NOb30BaTbcrДЯпriROTOBHeHn Bcex KofoeHbIX HAnNTKOB C KOJIneCTBOM Kofoe He MeHee 35 mI.
Yka3aHHe:Функцar aromaDouble Shot BO3MOxHa HeДЯ BCex HAnNTKOB INX KOJIInueCTB.
H3MeHeHHe KOInHuYeCTBa HAnHTKa
- HaKMnte Ha cHMBoH HyKHO HAnNTKa.
- HaKMaTe KhoNky ml, noka Ha dncnnee He noBnTcH yXHoe KOInueCTBO HAnrKa.
PnroToBneHHe DByx ChaWeK cpa3y
B 3aBnHmOCTn OT Tnna npnbopa dIa onpeJeHbIX HAnNTKOB MoXHO npHroTOBnTb DBe YauKo OdHOBpeMeHHO.
yKa3aHHe
Monotbki KoFe
- aromaDouble Shot
KoJnueCTBO HAnrKa MeHee 35 M
- HaKMnte Ha cHMBoH HyKHO HAnNTKa.
- HaKMMTe KHOHnKy Dp
Ha dncnnee oTo6paKaetcHacTpoiKa. - NocTaBbTe DBe YaWKn CneBa H cnpaBa NOd INcpeHcep.
- Haxmte KhoNky stop. Hanitok npirotaBnBaetc B 2 3Tana. 3epHa n3MeIbuaOTc 2 pa3a.
HannToK 3aBapnBaetc npa3nBaetc ByaKy.
5.Дохдntecb okohuaTeNbHoro 3aBepueHnA npoucecca.
Kofoemonka
Pn6op 06opyoBaH perynpyemOn KofoeMOnKo, KOtopaN03BONReT INDINy- aIbHO yCTaHaBnIBaTb CTeneHb NOMOJa KofenHbIX 3epen.
YCTAHOBKa CTeneHn NOMOJa
B npouecce nomola kofeHbIX 3epen yctaHOBnTe HxKHyO CTeneHb NOMOA.
PENEYNPEXKDEHNE
OnachocTb TpaBMnpoBaHnra!
KofoemolkaBpaaetc.
He npikacaiTecb K BHyTpehHm YaCTAM KOΦeMOJKN.
ru O6uhe npHHnbl ynpaBneHna
BHIMAHNE!
Onachoctb NOBpeKdEHHaKOfEMoJKN.
Pn HnpaBnblHoY yctaHObKe cTepeHn
nomola Bo3MOxHNo NobpeKdEHHe KOfEmoJKN.
NoDOrpeBaTeIb YaWeK CnIbHo HarpeBaetC.
HnB Koem cnyae He npHKacaTecb K ropaemy noDorpeBaTeIIO yauek.
IpeKoHTaKToM C roPryH M NOOrpeBaTeMe YaWeK DaIte emy OCTbITb.
Cobetbl
I OndorpeBaTeIb yaWeK MoXHO BKnIO-HTb N BBkHIOHTb B 6a30BbIX yCTaHOB-Kax.
"O630p 6a30BbIX yCTaHOBOK", Ctp.194
IOnTnMaJIbHOroNoDorpeBa yCTaHOBHTe YauKIN DHom Ha NoDorpeBaTeNb.
Ba3ObBiye yCTaHOBKn
Bb moKeTe BblonHHTb HactpoKy npnbopa cornaCHO Baunm Notpe6HOCTM N Bbl3BaTb DOONHHTeHbHbIe FyHKuN.
O63op 6a3OBbIX yCTaHOBOK
H3MeHeHHe 6a3OBbIX yCTaHOBOK
- HaKMTe KONKy menu
- BbI6epHte nocpeCTBOM Hnn HxKHyO 6a30ByHO yCTaHOBYu HaKMnTe ok.
Ha dncnnee oTo6paKaHOTcB03MOXHOCTn HAcTpoeK n 3aropaHTcCnMBoNblI Ia HABnraun. Ha dncnnee oTo6paKaEeTcTeKyuaHacTPOka.
3. BbINOHNHe NocpeDCTBOM HnH HxHHb Bb6Op HaKMnte ok.
HactpoKa coXpaHa B nAmrTn.
4.ДЯBO3BpataHaXMMTe
5. BbIXOa H3 MeHIO HaXMMTe menu
OuNTka n yXoJ
ДяdoJROBpeMeHHoHNCpRaBHOn pa6Otbl np6opa Tpe6yetc erO TuaTeJIbHaon ouNCTKa n yXoD.
PnroHocbIaMbITbBnocydoeHou MaHHe
Hnke onncaHo, KaKHe qactn npnbopa pa3peWaeTcR MbItb B nocydomoeyHoi MaHnHe.
BHIMAHNE!
HeKOTOpbIe qactn npnbopa npn MbITbe B nocydomoeyHO MaunHe MOryt 6bITb NOBpeXKeHbl.
B nocydmoeHou MaunHe MoXHO MbTb TOnbKO npuroHbIe dIaCTH.
HcnoB3yTe TOnbKO nporpamMbI, He HarpBaIOUne BDOY BbIe 60 ^ C
PnroHbI dIyMbITbB NocydoMoeuHO MaHHe

IOndoHHNK
Pewetka
KoHTeHep dIa KOphiHoH ry
MexaHueckn yka3aTeIb yPOBHa HANOJIHeHHA
CnCTema noaH MOnoka c aanTePOM
OTceKdIaMOnOToro KoOe c OTKnHOr KpbIiKoN
EMKOCbIbMOnoka c KpbIwKOJ
IoAdoH
He npiroDhbI dIaMbITbB nocyDOMOeHOn MaunHe

Pe3epByapIaBbI
KpbIkwKa eMKoCTn DnA BOdbI
Kpbiuka, coxpaHoua apoMaT
3abapouh6Jok
KoKyx dncncepaa
UHCTAuee cpeCTBO
Hnke yka3aHbI uHCTaUne cpeDcTba, npu-roHbIe dHa BaWero np6opa.
I PEPENPEKDEHNE
BbICOKa onaCHOCTb IIN 3DOPOBBa!
Mooune KndKocTN MoryT cTaTB npuHOn yuepe6a 3doopBbIO.
▶ Kateropnueckn 3anpeaetcra NHTb MoIOUne HKnKoCTN.
HcnoIb3yIte cpeICTBa IIN ydaJIeHNHaKnNIOUHCTKN B COOTBETCTBN CHHCTpyKUnE,co6JIHOaI npN 3TOM COOTBeTCTBYIOUne yKa3aHNA NO TexHKe 6e3oNaCHOCTN.
BHIMAHNE!
HenoDxoJnne YnCTaJnne cpeCTBa MoryT NOBpeNTb NOBepxHocTH np6opa.
He nCnoB3yIte arpeCnBHbIe nn a6pa- 3NBbIe YnCTaUne CpeDcTBA.
ru OuHCTKa u yxoJ
He nnonb3ynte mooune cpeCTBa, coepkaune aankoroln nnn cnpt.
He nCnoB3yIe JKeCTKHe MoaAkn nn r6Kn.
Дя удалени накпн He Испь3утЯ
лимонны Ксnotу, уксс ин срд-
CTBa Ha ochOBe yKcyca.
Дя ydaJIeHnHaKnHnOuNCTKn Hc- NOIb3yIte TOnbKO NODxOJaUne Ta6NeT KI.
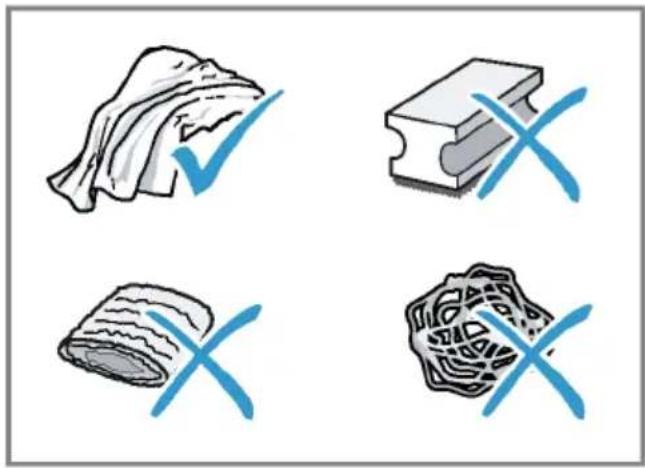
COBeTbl
HcnoIb3yIte Ta6neTKn dny ydaIeHHaKnn n OuncTKn, CneuaJIbHO npEHa-3NaueHHbIe dny BaWero np6opa. Bbl MoKeTe npNo6peCTn Ta6neTKn uepe3 cepBncHyO cnyX6y. "PpHaadJeKHoCTb", Ctp.184
TuaTeNbHO npOMoIte HOBbIe r6aTbIe caJIΦETK, UTO6bI ydaHITb CoII, KOTOp bIe MOrYT HmEtbcR Ha HIX. CoII MoYr TnpNBecTI K O6pa3OBAHnIO HaJeTa pKaBHyIb I Ha NOBepxHOCTaX H3 CTaII.
Berda cpa3y ydaJnTe ocTaTKn HaKnnn, KoFe, MoIoka, MOUnx CpeCTB n CpeCTB dIy ydaJeHHaKnnn ydaJn- Te HeMeIeHNo, TTo6bI npedOTbPaTtB 06pa3ObaHne Koppo3nn.
OuHCTKa npH6opa
PPEyPExKDEHNE
Onachocb nopaxeHHa 3JekTpuecknM TokOM!
PpOHHKwA B npHbOp Bnara MoKeT cTaB npuHNo ydapa ToKoM.
Kateropnueckn 3anpeaetc norgyXaTB np60p nn cTeBOB Ka6eIb B BOdy.
3anpeaetcnonadaHne KndKocTei Ha Tekephoe coeHNHeHne npbopa.
He nCnoJb3yIte IJIa OUHCTKN npH6opa napooOuHCTHTeIN HIN OUHCTHTeIN BbICOKoro DaBJeHH.
PPEyPExKDEHNE
Onachoctb oXorOB!
HeKOTOpBie qactn npbopa cnIbHo HarpBaIOTc.
He npikacaiTecb K ropaHm qactam npnbopa.
IpeepKOHTaKToM C rOpAUMuactAMn npbopa daTe HMOCTbITb.
- OuHCTHe Kopnyc, noHPOBaHHbIe noBepxHOCTn I naHeJIy npaBNeHnMnKpOΦHpOBoBcAflΦeTkoJ "PpHaADJeKHoCTb", Ctp.184
- Nocne npuroToBHeHnHaNtKa OuHCTNe DnCnEHCep MAnKoB BnaXHO TkaHbHO.
- Ecn np6op dnteHoe Bpem He nCnOJb3OBaIcra, HApnpMep, B nepnoD OTnycka, NOHOCbIO OCHNTe np6Op, BKIOUaA DnCneHcep, CNCTeMy NoaMuMOLOKa, NOdONbI N 3aBapOuHbN 6JOK.
Yka3aHHe: Ecnn npnbop BkIouaETcB XOIOHOM COCToHHN Hn BbIKHOaETc Nocne npiroTOBHeHn KoFe, IpombIBKa npnbopa BblONHaTcraBtOMaTHueckn. TaKIM 6pa30M, CnCTema OuHaaetc r CaMOCToRrTeNbHO.
OuHCTKa NOdOHa H eMKoCTn dJa Ko-ΦeHNoI rUuN
EkeHHeBHO Ounuatae H ONOPOKHnTe NOdoH n EMKoCTb DnKofoeHOn rUuN BO 36ExKaHne CNOe BOTNoXKeHn.
- Otkpoite DBepuy.
- BbHbTe, notaHyB bnepei, noDoH n eMKOCTb dHa KofoeHOn rUuN.
- CHHMMTe H ONUCTHTe NOdOH.
- Onopokhnte n ouhcntte nodoH n emKoCTb Jn KofoeHOn rUuN.
- OuHCTnTe BHyTpEHHee npoctpaHCTBO npnbopa n rHe3do noDoHa.
6.ДeMoHTpyuTe MexaHnueckn yka3aTeIb yPOBHa HAnOJIHeHn I OUnCTHTe BlaXHO TKAHbIO. - BbINOHNHB c6OpKy noDoHa, noDoHHnKa, emKoCTN dJa KoFeHOn rUuN MeXaHHueCKOrO yKa3aTeJyPOBnHaONHeHn, BCTaBBTe IN B npNoop.
- 3akpoTe DBepuy.
OuHCTKa OTeKa Ia MoIOTOro KoΦe
Cobet:OTceKdIaMOnOTOroKOeMOxHO MbITbB NOcyDoMoeyHOMaunHe.
- BbIHbTe OTceK dIa MONOTOro KoFe 3a OTKpbityIO OTKnHHyIO KpbIshKy. →Pnc. 5
- OuHCTHe OTcEK dIa MOnOTOro KoOe, NOJIb3yAcB MOUcIM CpeAdCTBOM. PnC. 6
- BbCyuHTe oTceK dIa MONOTOro KoOe N BCTaBbTe B npH6Op.
OuHCTKa CnCTeMbI noJaH MoJOKa
I PEPENPEK DEHNE Onachoctb oXorob!
CnCTema noaun Monoka cnbno HarpeBa-etca.
HnB Koem cnyae He npHKacaiTecb K cnCTeMe noaun MoIoka.
- IpepeKoHTaKTOM c ropayen cHCTeMoN noDAuN MOLOKa daIte ee OCTbITb.
BHIMAHHE!
Pn HnpeBnIbHOuNCTKe BO3MOXHbI NOBpeKdEHHa np6opa.
He nomeaTe KoxyX dncnEhcepa B nocydomoeHyo MaunHy.
Cobet
IIOO Bo TuaTeBHO OuHCTKn CnCTeMbI NOaM MoNOKa MOxHO NcNoB3oBaTb cepBnCHyO nporpaMMy «OuHCTKaCnCTeMbI NOaH MOnOKa».
"PpOpaMa dIa OUHCTKn CnCTeMbI NOdauMOnoka", Ctp.199
Bce KOMnoHbI CnCTEmbl NOaH MoJIOKa MOxHO MblB B NocydoMOeHOn MaHNHe.
Hnke onncAo, KaK Ounchntb emKOctb dMoloka.
"OuHcTKa eMKoCTn IJIa MOnoka", Ctp.198
- OToCoeHnHTe eMkoCTb dJa MoIoka ot npH6opa.
→Pnc.7
- Onyctnte dncneneHce np ynpa Bn3.
- B3aBwncb cH3y 3a Koxkx, BbInbTe erO Bnepd.
→Pnc. 8
- N3BneKeHTe,NotAHyB BnpeD,6enbI aAanTeP nCCTEmy noaun MoNoka.
Pnc. 9 - Pa36epnte cncTeMy noaun MoNoka Ha KOMnOHeHTbl.
→Pnc. 10 - OuHCTHTe KOMNoHEHTbIMbINbHBIM pACTBOPOM MmRKO TKaHbIO.
Pnc. 11 - ПомоTe BCE KOMnoHEtbl YnCToB BO-DoI N BbICyWnte nx.
Pnc. 12 - ПослпромьIBKN TшаTeьну удалnte OCTaTKMblbHOro pactBopa n3 cnCTeMbI NOdauMoLOka.
- BbINOHnTe c6OpKy KOMnoHeHToB cnCTembl NOaH MoIoka.
→Pnc. 13 - Onyctnte dncneHce np ynpa Bn3.
ru OuncTka u yxoA
11.YctaHOBtTe 6eIbI aIantep CneBa I BCTaBbTe CnCTeMy NODaun MOLOKa B npHbOp CnpEdu 6e3 nepeKoca. Pnc. 14
12.BctaBbTe KOxIyxCBePxy n onyCTHtE BHN3. Pnc. 15 KoxIyX OHKcnpyETCA.
13.ПодайтЕ ДИСпЕнсерdo OTKa3a BBepx. →Pnc. 16
14. OuHCTHe N BCTaBBTe eMKoCTb dJIa MoJIOka.
OuHcTKa eMKoCTn dJa MoJOKa
Iro rHHeHueeckm coo6paKeHHaM peryIaRHO ouuauTe emKocTb dJa MOJoka.EMKOCTb dJa MoJoka MoXHo MbITb B noCyDoMoEHO MaunHe.
- CHIMITE eMKoCTb JnRA MOJOKa. →Pnc. 17
- CHHMMTe Kp → PnC. 18
- OTcoeHnHTe npa36epHTe wnaHr dnn MoNOKa. Pnc. 19
- OuHCTIte BCE KOMHOHeTbI eMKoCTn DnA MoNOKa.
OuHCTKa 3aBapOuHOro 6noka
IOnOHnTeNbHO K aBTOMaTHueCKo npombIK Heo6xOdmo peyraHPO BbIHMaTbN OuHsTa 3aBapouh bOK.
I PEPENPENHE Onachoctb oKorob!
HeKoTOpBie qactn npnbopa cnIbHo HarpBaIOTcR.
He npikacaiTecb K ropaHm yactam npnbopa.
- Ppeed KOHTaKToM C rOpAHHM YactAMn npHbopa daIte Hm OCTbTb.
BHIMAHNE!
Hn HnpaBnIbHO OuNCTKe BO3MOXHO NOBpeKdHeNe np6opa.
He nOJIb3yIte MoIOUne cpeCTBa.
He nCnoIb3yIte yHCTaIe cpeIcTBA, coepKaIue yKcycn KncNToY.
3aPpeuaeTcMbITbB NOcydOMOeHOn MaunHe.
- KhoNko BbIKHOHTe np6Op.
- OTKpoTe DBepy KInnAtnBnHnKa. →Pnc. 20
- BbHbTe noAdoH c eMKoCTbIO dIa KOFeHOB rUu. Pnc. 21
- NpHmnte BBepx KpaChb npbUar.
5.Bo3bMnte 3aBapOuHbI 6nOK Ha pykHy n octOpOxHO BbIHbTe ero,NotAHyB Bnepei. Pnc.22 - TuaTeIbHO BbIMoIte 3aBapOuHbI 6JIOK TeNIO npOTouHO BDOI. Pnc.23
- TuaTeIbHO ouHCTHe BHyTpEHHee npocTpaHCTBO npHOpa BlaXHoN TKaHbIO ydaJIte ocTaTK KoFe.
- IOnoKdnte, noka 3aBapOuHbI 6nok IN BHyTpEHHee npocTpaHCTBO npH6opa BBICOXHYT.
9.Bo3bMnte 3aBapOHy6nok 3a pyuKy.
10.ПОДНИМТЕ BBePx KpaCHyI pbUar.
11.YctaHOBHTe 3aBapOHybI 6JOK NOd pbl- Yar H 3aDbHbTe ero Ha3aD do ynopa. →Pnc.24
PbuiarnKcnpyetca
12.BCTaBbTe NOdOcH c eMKoCTbIO dJI KOFeHNO rU. Pnc. 25
13.3aKpoTe DBepuy. →Pnc. 26
Деру можно 3akpbItb TOnbko npn ycnoBHH,TO 3aBapouHbI 6NOK nOd- DOH pabHbHO yCTaHOBneHbI.
CepBnchIe nporpaMMbl
Yepe3 onpeIeJIeHbIe npomExyTKn BpeMeHN peKOMeHdyeTcra 3aynckaTb B npnbOpce cepBncHbIe nporpaMMbl. HcnoIb3yIte cepBncHbIe nporpaMMbl dIra TuaTeJIbHOJ OoNCTKn npnbopa.
BHIMAHNE!
Ipn He npabnblHom nHn HecBoeBpeMeHHOM BbIOJIHeHn OunchKn ydaJeHnHaKnn Bo3HnKaet OnaCHOCTb NOBpeJKeHn.
HemeIeHNO BbInOpHnTe npoecc ydaJIeHnHaKnncorlaCHO HNCTpyKcnn.
He 3arpykaTe Ta6JeTKn IJy ydaJIeHnHaKINI npOue CpeDCTBa B OTCEK IJMAJMOJOTOr KoΦe.
B 3aBnCnMoCTn OT CTeHEn JKeCTKoCTN BOdBi NcNoJIb3OBAHNr Pnp6opa Ha DnCnIee Nocne npEduynpeJxDeHn rnoBnIOTc CLeDyUOnne COooSeHnR.
"OuHCTHe CnCTeMy NOpaUn MoJOKa."
"Tpe6yetc ydaJIeHHe HaKnn. HaxaTb MeHIO 3 cek."
"Tpe6yetc oynctka. Haxkatb MeHIO 3 cek."
"Tpebyetcra calc'nClean. Haxkata MeHIO 3 cek."
yKa3aHH
Incnnei noka3bBaET dHNTeJbHOCTb npocecca.
EcnB npnbope cBoeBpeMeHNo He ydaJeHa haknIb, dinCnIe NOKa3bIbAeT "YdaJeHne haknn IpocpoyeHo. Pnp6op 6JokpOBaH. HaxKaTb MeHIO 3 cek."
Ecn np6op 6loKnpoBaH,IM MoKHO 6ydet CHOBA Nolb3ObaTbcr TOnbKO nocle BblONHeHHoro ydaJIeHnHaKnPi.
EcnBbI cnyaHNO npepBaHn cepBncHyIO npoRpaMMy, Heo6xoHMo 3anyCTNTb ee 3aHOBO. "IOBTOpHbI 3aNcK cepBnCHO npoRpaMbI", Ctp.199
CObetbl
EcnHnncnoJb3yeTcA HnIbTp dJIa BOdbl, nepoDdo BbINOJIHeHna cepBnCHOn nporpaMMbl yBeJIuHBaETc.
YdaJIeHHe HaKINn N OUnCTKy MOJHO BblIPOJIHNb COBMeCTHO B CepBnCHOn IpoRpaMme calc'nClean. "IporpamMa calc'nClean", Ctp.201
IIO OKOHuaHn cepBnCHo npoPamMbI cpa3y npOTpTe np6Op MmKoB BJaX-HOHTKaHbIO, YTObI ydaNtB OCTaTKI pactBopa dIydaJIeHnHaKnPi n 136eJxAtb Kopp03H.
Bo3MoXHbIOBpeJdeHnI np6opa npTpaHcnpOtpOBKe IIN XpaHeHn BCJeDCTBnE OCTaTKOB KNDKoCTN B np6ope.
Ipeed TpaHcnpTnpoBkoN nn nome- uenem Ha xpaHeHne onopoxHNte cnCTeMy noaun KndKoCTN.
- YctaHOBNTe NOI DnCneHcep EMKoCTb 60nbIoro o6bema.
- Haxmnte KhoNky BbIbepeTe "MoNo. Pena".
- HaxMMTe KhoNky start stop
4.ИЗВЕКΙTE pe3eРБуap ДЯ ВОДbl.
Pn6op aBtOMaTnueckn CInBaET KIOCTb n3 Tpy60K n OTKnIOuHaETcR.
5. Onopoknhte pe3epByap IJIa BOblI IOdOH.
6. TuaTeIbHo OunchTe npnbOp.
yTnH3auncna Ctaporo 6bITOBOROpnp60pa
YTNIN3aUNB COOTBeTCTBUN C Tpe6oBaHnAMN 3KOLOrN OBeCneuHBaET BO3MOX-HOCTb BTOpUHoro HcNoIb3OBaHHa YEHhblxCbIpBeBbIX MaTePnaJIOB.
- BbHbTe n3 po3eTKn BNkky cTeBOrO Ka-6en.
- 06peKbTe ceTeBoi Ka6eIb np6opa.
- Ytvn3npyuTe npnbOp B COOTBcTbN C Tpe6OBaHnMn 3KoJOrn.
Даньий пибор Имeel обзразець в COOTВETCTBNE C Tpe6OBaHЯМN ДИPEKТВБI EBPOcoI03a 2012/19/EU o6 otxodax электуеского и ольктpoHHoro obopydobAHnna (Waste electrical and electronic equipment - WEEE).
JaHHaI dIpeKTHBa OnpedeJIaET DeIcTBYIOUne Ha TeppITOpIN EbpocOHa npaBnla BO3BpATA N yTInN3aunCTapoIbTOBOI TEXHKn.
CepBnchna cnyK6a
Ecn y Bac nmeOTc BOnpocbl, Bam He ydaetc camoCTOReIbHO yCTpaHHTb Henc- npaBHOCTb np6opa nn Tpe6yETc OTpeMOHTnPOBaTb np6op, 6paNTecb HnWy cepBnCHyo cnXk6y.
MHorne HenoIaIKN Bbl CMOKeTe yCTpaHHTb CaMOCToRrBHo, BOCNoJIb3OBAuHcNbIHΦOpMaUeB DaHHo INCTpyKuIN NnHa HaWeM Be6-caIte. EcIn 3TO Bam He ydaCTcR, O6paTntecb B HaSy cepBnCHyO cLyX6y.
Mbl Bcerda Hainem noxoadaee peweHne.
Iprn rapaHTnHOM o6cnyKbAHnn n no HCTeueHHn rapaHTn npOn3BOJnteJI Mbl o6ecneuM peMOHT BaUero npnbopa oyYeHHbIMN CNEuaJIncTaMn cepBnCHoN clyx6bl c nCNoIb3OBAHHeM opnHaJIbHbIX 3aNaChbIX Detalei.
Yka3aHHe: PnBbINOJIHeHHI rapaHTNHBIX yCIOBn Ipon3BOJnteIpa6Otbl BbINOJIHaHOTcCEPBNCHO CnyK6oB 6ecnlaTHO.
IpnO6paueHnBceBnCHyUcnyK6by yKaJHTe HOpE n3deJIa (E-Nr.) n 3aBoDcKOHomep(FD-Nr.) np6opa. AApEc n TeJefoH cepBnCHoN cLyK6bl MOxHO HaTn B npnilaraemom nepeuHe cepBnCHbIX CnyK6B KOHcE HnCTpyKcHn IIN HaHaWeM Be6-caTe.
Homep E n homep FD
Homep E n Homep FD yka3aHbI Ha qnpMeHHoT Ta6nUKe np6opa. 4To6bl 6bICTpo HauTN daHHbI ep6opa n Homep TelefoHa cepBnCHoN clyX6bl, Bbl MoKeTe 3aHnCaTb 3Tu DaHHbIe.
TapaHTHbIe ycNoBnA
BbI HmeeTe npaBo Ha rapaHTnHoe 06cnyKHBaHne BaWeTo npbOpa B COOTBETCTBnCO CNeDyUOuMn YCNOBnAMn.
NoIyHTb NcpePbIBaIOUyIO NHOpMaunHO
o6 ycNobnX rapaHTnHoro 06cNyKbBaHnA
Bb MoKeTe B Baem 6JnxKaHem aTOpN3OBaHHOM cepBnCHOM ueHTpe, IIN B cepBnCHOM ueHTpe OT pON3BOAnTeJI
OOO «BCX BbITOBaTExHnKa», IIN B coNPBOAnTeNbHO DOKymeHTaUH.
TexHnueckne xapaKTepeNCTnKN
3decb Bbl HaIndeTe uΦpbI n φaKTbI, OTHO-CaunecK BaWemy npnbopy.
Central Service Contacts
A United Arab Emirates,
E 222
BSH Home Appliances FZE
Round About 13, Plot Nr MO-0532A
Jebel Ali Free Zone - Dubai
Tel.:048814401
mailto:service.uae@bshg.com
www.siemens-home.bsh-group.com/ae
Gate 1, 1555 Centre Road
Clayton, Victoria 3168
Tel.: 1300 167 425*
mailto: aftersales.au@bshg.com
www.siemens-home.bsh-group.com/
au
*Mo-Fr: 24 hours
B Belgique,Belgie,Belgium
E BSH Home Appliances S.A.-N.V.
Avenue du Laerbeek 74 Laarbeeklaan
74
1090 Bruxelles - Brussels
Tel.: 024757002
mailto:bru-repairs@bshg.com
www.siemens-home.bsh-group.com/
be
B Bahrain,
H Khalajfat Est.
P.O.Box 5111
Manama
Tel.: 017400553
mailto:service@khalaifat.com
B Belarus, Benapycb
Y 000"BCX bbyoBaTexHnKa"
ten.: 4957372962
mailto:mok-kdhl@bshg.com
C Schweiz, Suisse, Svizzera, Switzerland
H BSH Hausgeräte AG
www.siemens-home.bsh-group.com/ ch
C Cyprus, Kuppoc
Y BSH Ikiakes Syskeves-Service
39, Arh. Makaariou III Str.
2407 Egomi/Nikosia (Lefkosia)
Tel.: 777 78 007
mailto:bsh.ser
vice.cyprus@cytanet.com.cy
C Ceska republika, Czech Republic
Z BSH domaci spoIrebice s.r.o.
www.siemens-home.bsh-group.com/cz
D Deutschland, Germany
www.siemens-home.bsh-group.com/
dk
Espana, Spain
www.siemens-home.bsh-group.es
F Suomi, Finland
BSH Kodinkoneet Oy
Italahdenkatu 18A,PL 123
00201 Helsinki
Tel.: 0207510715*
mailto: Siemens-Service-FI@bshg.com
www.siemens-home.bsh-group.com/fi
www.siemens-home.bsh-group.fr
Grand Union House, Old Wolverton
Road, Wolverton
Milton Keynes MK12 5PT
To arrange an engineer visit, to order
spare parts and accessories or for
product advice please visit
www.siemens-home.bsh-group.com/
uk Or call Tel.: 0344 892 8999*
*Calls are charged at the basic rate,
please check with your telephone ser
vice provider for exact charges
G Greece, EMMAC
R BSH Ikiakes Siskeves A.B.E. Central Branch Service 17 km E.O. Athinon-Lamias & Potamou 20 14564 Kifisia TnAeOwvo:2104277701 TnAeOwvo:18182 mailto:nkf-CustomerService@bshg.com www.siemens-home.bsh-group.com
H Hong Kong, 香港
K BSH Home Appliances Limited Unit 1 & 2, 3rd Floor, North Block, Skyway House, 3 Sham Mong Road Tai Kok Tsui, Kowloon, Hong Kong Tel.: 2565 6151 (HK) Toll free 0800 030 (Macao) mailto:siemens.hk.service@bshg.com www.siemens-home.bsh-group.com.hk
Republic of Ireland
E BSH Home Appliances Ltd. M50 Business Park, Ballymount Road Upper, Walkinstown Dublin 12 To arrange an engineer visit, to order spare parts and accessories or for product advice please call Tel.: 01450 2655^ www.siemens-home.bsh-group.ie Calls are charged at the basic rate, please check with your telephone service provider for exact charges
Israel
L C/S/B/ Home Appliance Ltd. 1, Hamasger St., North Industrial Park Lod,7129801 Tel.:089777222 mailto:csb-serv@csb-ltd.co.il www.siemens-home.bsh-group.com/il
India, Bharat,
N BSH Household Appliances Mfg. Pvt. Ltd.
Arena House, Main Bldg, 2nd Floor, Plot No. 103, Road No. 12, MIDC, Andheri East
Mumbai 400093
Toll Free 1800 209 1850 www.siemens-home.bsh-group.com/inMo-Sa: 8.00am to 8.00pm (exclude public holidays)
I Iceland
S Smith & Norland hf. Noatuni 4 105 Reykjavik Tel.: 0520 3000 www.sminor.is
Italia, Italy
T BSH Elettrodomestici S.p.A. Via.M.Nizzoli 1 20147 Milano (MI) Tel.02412678200 mailto:info.it@siemens-home.bsh-group.com www.siemens-home.bsh-group.com/it
L Lebanon,
B Tehaco s.a.r.I Boulevard Dora 4043 Beyrouth, P.O. Box 90449 Jdeideh 1202 2040 Tel.: 01 255 211 mailto:Info@Teheni-Hana.com
L Luxembourg
U BSH electromagners S.A. 13-15, ZI Breedeweues 1259 Senningerberg Tel.:26349821 Reparaturen:lux-repair@bshg.com Ersatzteile:lux-spare@bshg.com www.siemens-home.bsh-group.com/lu
M Malta
T Aplan Limited The Atrium Mriehel by Pass BKR3000 Birkirkara Tel.: 025 495 122 mailto:lapap@aplan.com.mt
N Nederland, Netherlands
L BSH Huishoudapparaten B.V. Taurusavenue 36 2132 LS Hoofddorp Storingsmelding:Tel.:0884244020 Onderdelenverkoop:Tel.:088424 4020 mailto:siemens-contactcenter@bshg.com mailto:siemens-onderdelen@bshg.com www.siemens-home.bsh-group.nl
N Norge, Norway
0 BSH Husholdningsapparater A/S Grensesvangen 9 0661 Oslo Tel.:22660573 Tel.:22660600 mailto:Siemens-Service-NO@bshg.com www.siemens-home.bsh-group.com/ no
P Polska, Poland
L BSH Sprzegt Gospodarstwa Domowego Sp. z 0.o. Al. Jerozolimskie 183 02-222 Warszawa Tel.:801 191 534 mailto:Serwis.Fabryczny@bshg.com www.siemens-home.bsh-group.pl
P Portugal
T BSHP Electrodomesticos, Sociedade Unipessoal Lda. Rua Alto do Montijo, n° 15 2790-012 Carnaxide Tel.: 214 250 720 mailto: siemens.electrodomesticos.pt@bshg.com www.siemens-home.bsh-group.com/pt
R Romania, Romania
0 BSH Electrocasnice srl. Sos. Bucuresti-Ploiesti, nr. 19-21, sect.1 13682 Bucuresti Tel.: 021 203 9748 mailto:service.romania@bshg.con www.siemens-home.bsh-group.co
R Russia, Pocca
U 000 «5CX 5bIIOBIE Ipn6Opbl CepBnC ot npOn3BOIDTeN MaJra KaIyKcKa,15 119071 MockBa Ten.:8(800)2002962 mailto:mok-kdhl@bshg.com www.siemens-home.bsh-group.
S Sverige, Sweden
E BSH Home Appliances AB Landsvagen 32 169 29 Solna Tel.:0771 195 500 Tel.:0771 11 22 77 mailto:Siemens-Service-SE@bshg.com www.siemens-home.bsh-group.com/se
S Slovensko, Slovakia
K BSH domáci spotbrebié s.r.o. Firemni servis domácich spotbrebiću Radlická 350/107c 158 00 Praha 5 Tel.: +421 244 452 041 mailto:opravy@bshg.com
T Türkiye, Turkey
BSH Ev Aletleri Sanayi ve Ticaret A.S. Fatih Sultan Mehmet Mahallesli, Balkan Caddesi No: 51 34771 Umraniye, Istanbul Tel.: 0 216 444 6688 mailto:careline.turkey@bshg.com www.siemens-home.bsh-group.com/tr Cagri merkezini sabit hatlidan aramanin bedeli sehir icı ücretlendirme, Cep Telefonlarindan ise kullanlan tarifeye gore degiskenlik gostermektedir
U Ukraine, YkpaHa
A TOB "5CX I06yroBa Texhika" Tel.: 044 490 2095 mailto:bsh-service.ua@bshg.com www.siemens-home.bsh-group.com/ ua
Service world-wide
X Kosovo
K Service-General SH.P.K.
rr.Magjistralja Ferizaj Prishtine
70000 Ferizaj
Tel:00381(0)290330723
Tel.: 0037744172309
mailto:servicegeneral527@gmail.com
Z South Africa
A BSH Home Appliances (Pty) Ltd.
15th Road Randjespark, Private Bag
X36, Randlespark
1685 Midrand-Johannesburg
Tel.: 086 002 6724
mailto:applianceserviceza@bshg.com
www.siemens-home.bsh-group.com/zao
BSH group is a Trademark Licensee of Siemens AG. Manufacturer's Service for Siemens Home Appliances.
BSH Hausgeräte GmbH
Carl-Wery-StraBe 34
81739 Munchen,GERMANY
siemens-home.bsh-group.com
Manufactured by BSH Hausgeräte GmbH under Trademark License of Siemens AG
© Fabriqué par BSH Hausgeräte GmbH titulaire des droits d'utilisation de la marque Siemens AG
© Gebabriceerd door BSH Hausgeräte GmbH onder handelsmerklicentie van Siemens AG
© Wyprodukowano przy BSH Hausgeräte GmbH na warunkach licenci na korzystanie ze znaku towarowej Siemens AG
© Vyrobeno BSH Hausgeräte GmbH v licenci k ochranné známce Siemens AG.
© N3rTOBHeO OOO «BCX BbTObBe Ipn6Opbl» NOI TOBaHbIM 3HaKOM KOMnAHIN CmMeHC A