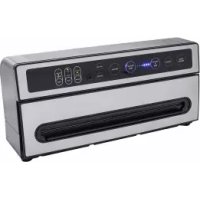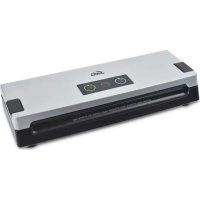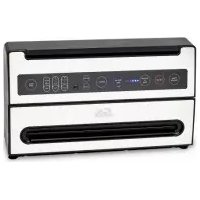
Magic Vac Futura 567 - Vacuum packaging machines Solis - Free user manual and instructions
Find the device manual for free Magic Vac Futura 567 Solis in PDF.


User questions about Magic Vac Futura 567 Solis
0 question about this device. Answer the ones you know or ask your own.
Ask a new question about this device
Download the instructions for your Vacuum packaging machines in PDF format for free! Find your manual Magic Vac Futura 567 - Solis and take your electronic device back in hand. On this page are published all the documents necessary for the use of your device. Magic Vac Futura 567 by Solis.
USER MANUAL Magic Vac Futura 567 Solis
ACCESSIONS OPTIONNEL page 20
Indices
APPLIANCE NAMES and FUNCTIONS.. 28
IMPORTANT SAFEGUARDS 29
OPERATING INSTRUCTIONS page 30
Making bags from MAGIC VAC rolls. page 30
Vacuum packing with bags cut from a roll or pre-cut bags 30
Vacuum packing in MAGIC VAC Executive containers or with MAGIC VAC Universal Caps 30
Vacuum packing in MAGIC VAC Family containers.. page 31
Vacuum packing in glass jars page 31
Vacuum packing with MAGIC VAC bottle caps.. page 31
INSTRUCTIONS FOR CLEANING page 32
TROUBLESHOOTING 33
TECHNICAL SPECIFICATIONS 34
OPTIONAL ACCESSORIES page 34
DAS VAKUUMSYSTEM FÜR DEN HAUSHALT
ACCESSIONS OPTIONNEL
| Voltage | 230V~ 50Hz 170W |
| Estampillage | € |
| Homologations | S |
Conteneur 1,51922.70
Conteneur 2 | et 4 | 922.71
We compliment you on your purchase and thank you for your confidence in us. You are advised to carefully read these directions, which will enable you to use the MAGIC VAC® Future properly and
obtain optimal results in terms of food preservation. Furthermore, we suggest you keep these instructions handy for further reference.
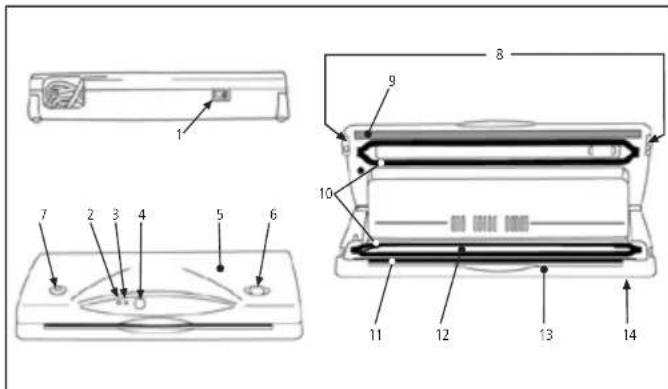
APPLIANCE NAMES AND FUNCTIONS
See illustrations on page 1.
1 ON(I)/OFF(O) switch - Press to turn on the MAGIC VAC, keep the switch on OFF (0) when you are not using it.
2 ON indicator light When the appliance is on, the indicator light is green.
3 SEAL indicator light When the sealing process is under way, the light turns on.
4 MAN SEAL button - If can be turned on at any time.
5 Lid - Opening the lid into the fixed raised position allows you to position the bags before starting the vacuum packing process.
6 Lid manual valve - Press it to stop the vacuum packing cycle at any time or to open the lid at the end of the cycle.
7 Hose air inlet - To connect the hose to jars, containers, universal caps, bottle caps etc.
8 LOCK buttons - In the locked position they secure the lid in place while the vacuum packing cycle is under way in bags, jars and containers; they release automatically.
9 Sealing bar - Protected heating element that seals the bag and prevents it from sticking to the bar.
10 Airtight gaskets- They guarantee that a vacuum will be maintained in the chamber, thus allowing air to be removed from bags and containers.
11 Sealing gasket - It presses the bag against the sealing bar.
12 Vacuum chamber - The open end of the bag is positioned inside the chamber, air is drawn from the bag and any excess liquid is collected on the bottom.
13 Lower part - Entirely removable and washable also in dishwasher for maximum hygiene.
14 Non-slip feet- They prevent the appliance from slipping during use.
SOLIS RECOMMENDS SAFETY FIRST
We at Soils are very safety conscious. We design and manufacture consumer products with the safety of you, our valued customer, foremost in mind.
In addition, we ask that you exercise a degree of care when using any electrical appliance and adhere to the following precautions:
IMPORTANT SAFEGUARDS
The manufacturer takes every step necessary to ensure utmost product quality and safety. However, as for all electrical appliances, you should follow some basic safety rules to avoid creating a hazard for people, animals and/or property.
Before using the appliance for the first time, and periodically throughout its life, check the power supply cord for any damage; if you detect any damage, do not plug it in. Take the appliance immediately to an authorised service centre or your dealer.
- Carefully read the directions before using your MAGIC VAC® Futura and keep them handy for future reference.
- The appliance is not designed for continuous operation. Do not carry out more than one complete cycle every 2 minutes. In extreme ambient conditions, an intensive use of the appliance may trigger the automatic thermal protection devices. In such a case allow the appliance to cool down sufficiently to enable resetting of the protection devices.
- Do not use the appliance on or in proximity to hot surfaces.
- The casing of this unit is not protected again the penetration of liquids.
- Do not draw liquids into the vacuum chamber. Should this happen, immediately dry the vacuum chamber.
- Do not immerse the appliance in water and do not use it if the cord or plug are wet; should
they get wet during use, immediately pull out the plug wearing dry rubber gloves. Do not remove or touch the appliance under water until you have pulled out the plug. Do not use the appliance after its removal from water (take it immediately to an authorised service centre or your dealer).
- To avoid burns, do not touch the sealing bar while using the appliance.
- Never use adapters for power supplies different from the one indicated on the bottom of the unit (plate details).
- Always unplug the appliance after you finish using it.
- Do not open or tamper with the appliance. Servicing may be performed by authorised personnel only. Any unauthorised repairs will invalidate the warranty.
The Manufacturer, the Retailer and the Importer are responsible for safety, reliability and performance only if: a) the unit is used following the instructions for use; b) the electrical system of the premises where the appliance is used is in conformity with current laws.
USE ONLY ORIGINAL MAGIC VAC® BAGS AND ACCESSORIES! (page 34)
OPERATING INSTRUCTIONS
Warning: Do not stare the machine with the LOCK buttons engaged
Before use, always thoroughly clean your appliance and any accessories coming in contact with food (containers, caps, jars etc.) as directed in the "INSTRUCTIONS FOR CLEANING" paragraph.
1. Positioning the appliance
Position the appliance in a dry place on a level surface, making sure that the work area in front of the appliance itself is clear of obstacles and there is enough room to accommodate the bags with the food to be packed. Plug the power cord into a power socket corresponding to the voltage of the appliance (see technical details).
2. Tips on using bags
MAGIC VAC® bags are available in two widths: 20 and 30 cm. Choose the bag size suited for the food you intend to preserve. Check that the bag you are going to use is at least 8 cm longer than the food to be packaged, taking into account an additional 2 cm for each time the bag will be subsequently reused.
3. On/off switch
Press the switch (1) and the green ON light (2) will go on. Note: If you are using pre-cut bags, go directly to step 5 below.
4. Making bags from MAGIC VAC rolls
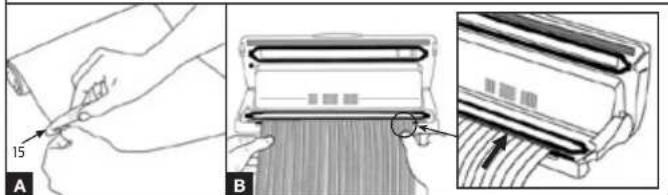
- Unroll a bag of suitable length and cut it using the MAGIC Cutter (15) as shown in Fig. A, moving it from rim to rim. Now you can seal an open side of the cut bag as follows:
- Lift the lid (5) and turn it in the open position.
- Seal either of the two open ends of the bag by positioning it on the sealing gasket (11) with the smooth side facing down (fig. B). Warning: be careful not to let the bag hang over into the vacuum chamber (12) or on the sealing gasket (10).
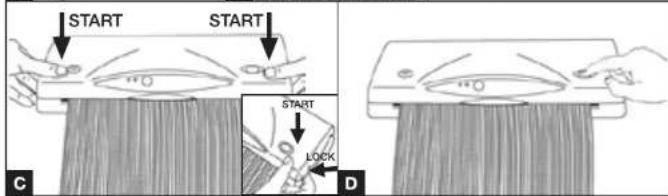
- Close the lid (5) and push down on the front corners of the lid with your thumbs, then push the LOCK buttons (8) into the locked position (fig. C). The appliance will automatically carry out the complete vacuum packing cycle. Wait until the SEAL light goes off (3).
Press down on the rounded recessed area of the manual valve (6) to release the lid (fig. D).
- Lift the appliance lid putting the fingers under the central projecting part and remove the bag.
- Check the quality of the seal obtained, which should appear as a regular, wrinkle-free crosswise strip with no internal ridges in the bag (fig. E).
5. Vacuum packing with bags cut from a roll or pre-cut bags
Lift the lid (5) and turn it in the open position. Place food in the bag without creasing it excessively or stretching surfaces. Eliminate any liquids or food residues from the area inside the bag that will be sealed.
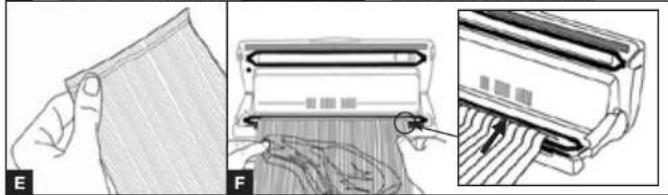
- Place the bag and its contents in front of the appliance and place the open end inside the vacuum chamber (12) with the smooth side facing down (fig. F).
- Close the lid (5) and push down on the front corners of the lid with your thumbs, then push the LOCK buttons (8) into the locked position (fig. G). The appliance will automatically carry out the complete vacuum packing cycle. Wait until the SEAL light goes off (3).
- Press down on the rounded recessed area of the manual valve (6) to release the lid (fig. H).
- Lift the appliance lid putting the fingers under the central projecting part and remove the bag.
- Check the quality of the seal obtained, which should appear as a regular, wrinkle-free crosswise strip with no internal ridges in the bag. (Fig. 1)
- You can interrupt a packaging cycle already in progress at any time by means of the manual valve (6), keeping it pressed until the machine turns off.
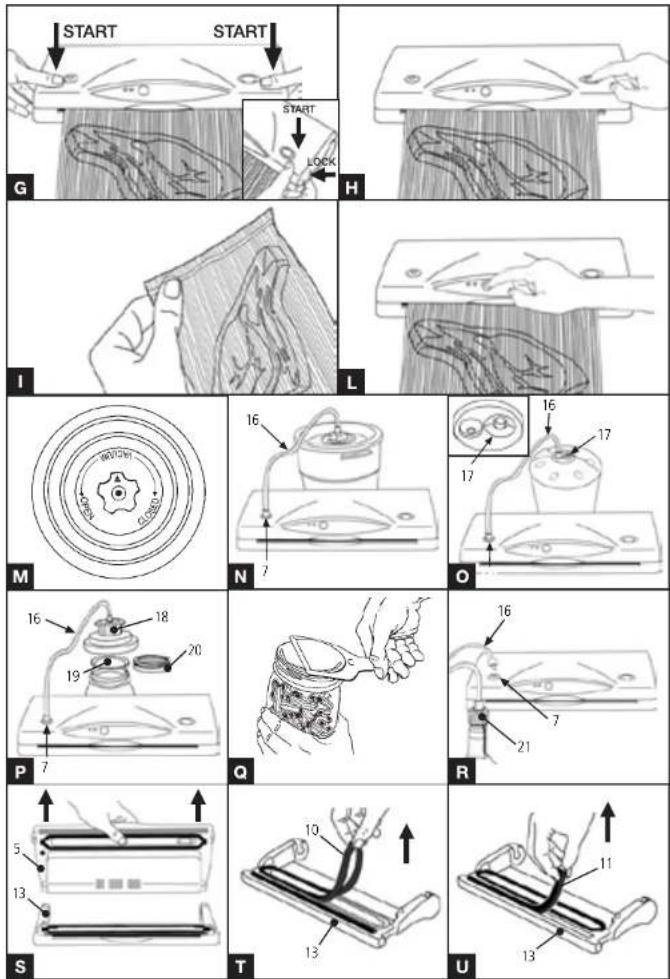
- How to use the MAN SEAL button (4) Pressing this button causes the SEAL light (3) to go on and the sealing process starts immediately. This allows you to prevent delicate, fragile foods from being crushed (e.g. biscuits, etc.) (fig. L).
- Vacuum packing in MAGIC VACExecutive containers or in containers sealed with MAGIC VACUniversal Caps with new knob MAGIC VACExecutive containers and the MAGICVCACUniversal Caps with star-shaped knob
(see fig. M) make vacuum packing easier, because the connection hose can be directly introduced into the knob central hole (see fig. N). MAGIC VA Universal Caps, available in two diameters (100mm and 125mm) are to be used on jars for preserving food and bowls and receptacles made of tempered glass. The Universal Caps work just like the Caps for MAGIC VA Executive containers.
WARNING: When using Universal Caps do not use plastic or glass containers that are not suitable since they could implode under the vacuum pressure of the appliance and cause injury.
Fill the container leaving at least 3cm of room between the contents and upper rim. Place the lid on the container and turn the knob to the "VACUUM" position (fig. M).
- Connect the container lid knob to the appliance inlet (7) by means of the connection hose (16) (fig. N).
Lock the lid (5) by pushing the LOCK buttons (8); the machine will carry out a vacuum packing cycle and turn off automatically on its completion.
- Remove the hose from the container lid knob.
- Turn the knob to the closed position.
To open the containers turn the knob to the "OPEN" position, you should hear a hissing of air as it enters the container. This sound guarantees that the contents have been packed in a vacuum.
8. Vacuum packing in MAGIC VAEC Family containers
Multipurpose containers ideal for storage of frequently used products such as dry and fragile foods; powder foodstuffs; fresh, pureed or strained fruit and vegetables. Their transparency and design makes them attractive to display on kitchen shelves while ensuring that their contents are clearly visible.
- Fill the container leaving at least 3cm of room between the contents and upper rim and position the cap on the container.
- Connect the container lid to the air inlet (7) of the appliance (fig. 0) by means of the connection hose (16).
Lock the lid (5) by pushing the LOCK buttons (8); the machine will carry out a vacuum packing cycle and turn off automatically on its completion.
- Remove the hose from the container lid.
- Press the central button (17) to open the containers (fig. 0).
9. Vacuum packing in glass jars sealed with metal caps (Leifheit type)
Use the large-sized cap attachment to pack foods in large-mouthed glass jars with a metal cap. A small-sized cap attachment is also available for narrow-mouthed jars sealed with metal caps.
- Fill the container leaving at least 3cm of room between the contents and upper rim.
- Connect the cap attachment (18) to the air inlet (7) of the appliance by means of the connection hose (16). Place the cap attachment directly on the jar with the metal cap only (19) and press down, making sure it fits correctly. (fig. P)
Lock the lid (5) by pushing the LOCK buttons (8); the machine will carry out a vacuum packing cycle and turn off automatically on its completion. Make sure that the cap attachment holds firmly by keeping it pressed with your hand.
- Disconnect the hose from the cap attachment. Remove the cap attachment from the jar.
- Apply the ring (20) supplied with the jar and screw it down all the way (fig. P).
To open a glass jar vacuum-sealed with a metal cap, use the cap opener provided (the side with writing should be turned up). Position the cap opener as shown in figure Q and gently pry open the cap until the vacuum is released. Remove the metal cap. This accessory allows you to reuse the cap.
10. Vacuum packing with MAGIC VAe bottle caps
The MAGIC VAC® Bottle Cap may be used to seal partly filled bottles of wine or non-fizzy beverages. Using the Bottle Cap will allow you to create a vacuum inside the bottle so as to slow down oxidation and preserve the freshness and flavour of its contents for a longer time.
By means of the connection hose (16) connect the air inlet (7) of the appliance to the MAGIC VA® Bottle Cap (21) (fig. R). Press the Cap firmly into the bottle.
- Lock the lid (5) by pushing the LOCK buttons (8): the machine will carry out a vacuum
packing cycle and turn off automatically on its completion.
- Disconnect the hose from both the Bottle Cap and the appliance immediately.
INSTRUCTIONS FOR CLEANING
IMPORTANT: Always unplug the appliance before cleaning the MAGIC VAC.
- Carefully wash your hands before proceeding to clean the appliance and its accessories.
- Both before and after use, clean the exposed surfaces of the MAGIC VAC using a sponge moistened with a mild, non-abrosive dishwash detergent. If any liquids accidentally get inside the appliance, do not connect it to the mains electricity supply and do not use it; contact your nearest dealer or authorised service centre.
The appliance is provided with a lower part (13) which is entirely removable and washable also on the dishwasher top rack (fig. S). Before was
To open a bottle sealed with the MAGIC VAC* Bottle Cap, simply pull the cap out of the bottle. You will hear the air rushing into the bottle.
hing the lower part, remove both gasket (10) (fig. T) and sealing gasket (11) (fig. U). Clean both gaskets using a sponge moistened with a mild washing up liquid and leave them to completely dry before positioning them again. Once cleaning and drying are over, carefully fit both gaskets back in their places. Then reinsert the lower part (13) in the port provided on the lid (5).
Thoroughly wash the MAGIC VAC® accessories (containers, caps, jars, etc.) like you would wash any kitchen utensils, allowing them to dry completely. If you wash the accessories in a dishwasher, be sure to place them on the top rack.
TROUBLESHOOTING
The MAGIC VAC does not work Check the switch (1) position.
- Make sure the MAGIC VAC® has been plugged in properly. Check the electric socket by plugging another appliance into it.
The MAGIC VAC will stop automatically if overheated. Allow it to cool down for 15 minutes and try again. - Check for faults in the power card or the plug. Should you detect a fault, do not use the appliance.
The MAGIC VACc fails to apply the first seal on the bag cut from the roll
Make sure the bag cut from the roll is properly positioned as described in the paragraph: "Making bags from MAGIC VAC rolls"
The MAGIC VACb does not create a complete vacuum in the bags
To seal the bag properly, you must make sure that the open end remains completely inside the Vacuum Chamber.
Make sure that the Sealing Bar, the Sealing Gaskets and Airtight Gaskets are free of impurities. After cleaning them, put them properly back in place.
- The MAGIC VAC® bag might have a hole in it. To check it, seal the bag with air on the inside. Dip the bag in water and apply pressure. The appearance of bubbles means that there is a leak. Reseal or use another bag.
The MAGIC VAC does not seal the bag properly
- If the Sealing Bar overheats and melts the bag, you may have to raise the Lid and allow the Sealing Bar to cool down for a few minutes.
The MAGIC VAC is built in conformity with current safety standards. Overheating will cause it to turn off automatically. Allow the appliance to cool down for 15 minutes and try again.
The MAGIC VAC bag does not maintain a vacuum after being sealed
Leaks along the seam may be caused by creases, crumbs, grease or liquids. Reopen the bag, clean the upper inside part of the bag and remove any foreign material from the Sealing Bar before resealing it.
- Check that the bag has no holes in it which have caused air to leak in. Use paper napkins to protect any sharp edges on the contents of the bag.
The MAGIC VAC ^ does not create a vacuum in the containers
- By means of the Connection Hose, connect the container lid (or the Cap Attachment if necessary) to the Air Inlet of the appliance.
- Leave enough room (at least 3cm ) between the contents and the top of the jar or container.
- If liquids come out during the vacuum-packing process, remember that they must first be chilled in a refrigerator, not left at room temperature.
- Check that the rim of the jar or container and the universal lid are not damaged in the sealing area. Wipe the rim and cap clean with a cloth moistened with lukewarm water and repeat the vacuum-packing process.
Make sure that the gasket of the container cap or the universal cap is set properly in place and is not damaged.
MAGIC VAC Executive containers or MAGIC VAC Universal Caps do not maintain a vacuum
- Make sure that the arrow on the knob of the container cap is positioned on "VACUUM" before creating a vacuum in the container and it is positioned on "CLOSED" after a vacuum is formed.
- Make sure that the O-ring beneath the knob of the container cap or the universal cap is set properly in place.
MAGIC VAC ^a Family containers do not maintain a vacuum
- Make sure that the gasket beneath the central button (17) of the container cap is set properly in place and is not damaged.
TECHNICAL SPECIFICATIONS
| Voltage | 230V~50Hz 170W |
| Marked | # |
| Approvals | # |
Dimensions: 39 (L) x 15 (T) x 8 (H) cm
Weight: 2.3 kg
Electromagnetic compatibility
The MAGIC VAC® Futura has been engineered to meet current electromagnetic compatibility requirements. However, if you suspect that the appliance is interfering with the operation of your
TV, radio or other electrical appliance, try relocating the unit until the interference ceases. Alternatively try plugging the appliance into a different power socket.
OPTIONAL ACCESSORIES
Product Art.-No.
Canister 1.51922.70
Canister 2|und4|922.71
3er Canister set with lids (Family) 922.72
Square Canister 922.73
Small lid 922.80 Large lid 922.81
Large No. 522.01 2 Bottled Capa 922.90
2 Rolls 30 x 600 cm 922.50
2 Rolls 20 x 600 cm 922.51
2 Rolls 15 x 600 cm 922.52
50 Bags 20 x 30 cm 922.61
50 Bags 30 x 40 cm 922.64
Set of 6 Leifheit Glass Jars 1 | 922.91
Set of 6 Leifheit Glass Ja
Set of 12 Leifheit Metal Rims and Lids 922.93
SOLIS accessories are made of solid, non tonic materials, which are suitable for food storage (food safe), which are easy to clean and can be sterilized like normal kitchen articles.

Disposal:
In conformity with Directive 2002/96/EC on waste electrical and electronic equipment (WEEE), at the end of its life the unit should be taken to an electrical appliance collection point for its environmentally friendly disposal.