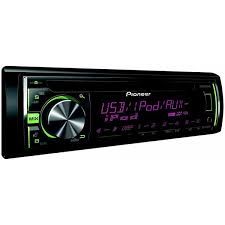
USER MANUAL DEH-X3600UI PIONEER
REPRODUCTOR DE CD CON RECEPTOR RDS
CD RDS-EMPFÄNGER
CD RDS-ONTVANGER
CD RDS ПРИЕМнИK
DEH-X3600UI
DEH-2600UI
Made for

iPod iPhone
Owner's Manual
Mode d'emploi
PykoBOIDCTBO NOIb3OBaTeJIa
Before you start
Thank you for purchasing this PIONEER product
To ensure proper use, please read through this manual before using this product. It is especially important that you read and observe WARN INGs and CAUTIONs in this manual. Please keep the manual in a safe and accessible place for future reference.

If you want to dispose this product, do not mix it with general household waste. There is a separate collection system for used electronic products in accordance with legislation that requires proper treatment, recovery and recycling.
Private households in the member states of the EU, in Switzerland and Norway may return their used electronic products free of charge to designated collection facilities or to a retailer (if you purchase a similar new one).
For countries not mentioned above, please contact your local authorities for the correct method of disposal.
By doing so you will ensure that your disposed product undergoes the necessary treatment, recovery and recycling and thus prevent potential negative effects on the environment and human health.
About this unit
The tuned frequencies on this unit are allocated for use in Western Europe, Asia, the Middle East, Africa and Oceania. Use in other areas may result in poor reception. The RDS (radio data system) function only works in areas that broadcast RDS signals for FM stations.
WARNING
- Do not attempt to install or service this product by yourself. Installation or servicing of this product by persons without training and experience in electronic equipment and automotive accessories may be dangerous and could expose you to the risk of electric shock, injury or other hazards.
- Do not attempt to operate the unit while driving. Make sure to pull off the road and park your vehicle in a safe location before attempting to use the controls on the device.
CAUTION
- Do not allow this unit to come into contact with liquids. Electrical shock could result. Also, damage to this unit, smoke, and overheating could result from contact with liquids.
The Pioneer CarStereo-Pass is for use only in Germany.
Always keep the volume low enough to hear outside sounds.
- Avoid exposure to moisture.
Before you start
CAUTION
This product is a class 1 laser product classified under the Safety of laser products, IEC 60825-1:2007.
CLASS 1 LASER PRODUCT
If you experience problems
Should this unit fail to work properly, please contact your dealer or nearest authorized PIONEER Service Station.
Using this unit
Head unit
DEH-X3600UI
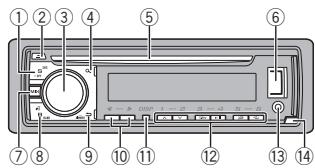
DEH-2600UI
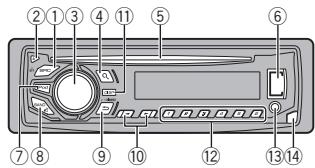
① SRC/OFF
② (eject)
3 MULTI-CONTROL (M.C.)
④ (list)
⑤ Disc loading slot
⑥ USB port
MIX (MIXTRAX)
DEH-X3600UI
7
iPod
DEH-2600UI
8
BAND/4 (iPod control)
9
(back)/DIMMER (dimmer)
10
11
DISP
1/△to6
13 AUX input jack (3.5 mm stereo jack)
14 Detach button
CAUTION
Use an optional Pioneer USB cable (CD-U50E) to connect the USB storage device as any device connected directly to the unit will protrude out from the unit, which could be dangerous.
Display indication
DEH-X3600UI
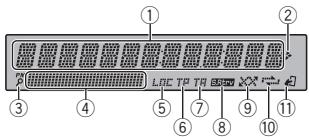
DEH-2600UI

Using this unit
Main information section
Tuner: band and frequency
RDS: program service name, PTY information and service literal information
- CD player, USB storage device and iPod: elapsed playback time and text information
② Appears when a lower tier of folder or menu exists.
③ ±b (list)
④ Sub information section
⑤ LOC(local seek tuning)
⑥ TP (traffic program identification)
TA (traffic announcements)
S.Rtrv (sound retriever)
(9) (random/shuffle)
(10) (repeat)
(iPod control)
11) This unit's iPod function is operated from your iPod.
1 After installation of this unit, turn the ignition switch to ON.
SET UP appears.
2 Turn M.C. to switch to YES.
- If you do not use the unit for 30 seconds, the set up menu will not be displayed.
- If you prefer not to set up at this time, turn M.C. to switch to NO.
3 Press M.C. to select.
To proceed to the next menu option, you need to confirm your selection.
LANGUAGE (multi-language)
This unit can display the text information from a compressed audio file even for information embedded in English, Russian or Turkish.
- If the embedded language and the selected language setting are not the same, text information may not display properly.
- Some characters may not be displayed properly.
1 Turn M.C. to select the desired setting. ENG (English)—PYC (Russian)—TUR (Turkish)
Press M.C. to confirm the selection.
CLOCK SET (setting the clock)
1 Turn M.C. to adjust hour.
2 Press M.C. to select minute.
3Turn M.C.to adjust minute.
4 Press M.C. to confirm the selection.
FM STEP (FM tuning step)
Use FM STEP to set FM tuning step options (seek step settings).
[1] Turn M.C. to select the FM tuning step. 100 (100 kHz)—50 (50 kHz)
2 Press M.C. to confirm the selection.
QUIT appears.
The manual tuning step is fixed at 50kHz
- When AF and TA are turned off, the seek step is fixed at 50kHz even if set to 100.
5 To finish your settings, turn M.C. to select YES.
- If you prefer to change your setting again, turn M.C. to switch to NO.
6 Press M.C. to select.
Using this unit
Notes
- You can set up the menu options from the system menu and initial menu. For details about the settings, refer to System menu on page 9 and Initial menu on page 11.
- You can cancel set up menu by pressing SRC/OFF.
Basic operations

Important
- Handle the front panel with care when removing or attaching it.
- Avoid subjecting the front panel to excessive shock.
- Keep the front panel out of direct sunlight and high temperatures.
- To avoid damaging the device or vehicle interior, remove any cables and devices attached to the front panel before detaching it.
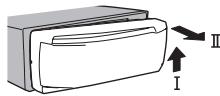
Removing the front panel
Press the detach button to release the front panel.
Push the front panel upward (I) and then pull it toward (II) you.
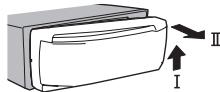
Always store the detached front panel in a protective case or bag.
Re-attaching the front panel
1 Slide the front panel to the left.
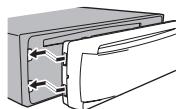
^2 Press the right side of the front panel until it is firmly seated.
Forcing the front panel into place may result in damage to the front panel or head unit.
Turning the unit on
1 Press SRC/OFF to turn the unit on.
Turning the unit off
1 Press and hold SRC/OFF until the unit turns off.
Using this unit
Selecting a source
1 Press SRC/OFF to cycle between:
RADIO—CD—USB/iPod—APP (application)—AUX
- USB MTP displays while the MTP connection is in use.
Only for DEH-2600UI
When there is an iPod connected and a source other than iPod is selected, you can switch to iPod by pressing iPod.
Adjusting the volume
Turn M.C. to adjust the volume.
Note
When this unit's blue/white lead is connected to the vehicle's auto-antenna relay control terminal, the vehicle's antenna extends when this unit's source is turned on. To retract the antenna, turn the source off.
Returning to the previous display
Returning to the previous list (the folder one level higher)
Press DIMMER
Returning to the ordinary display
Canceling the main menu
1 Press BAND/
Returning to the ordinary display from the list
Press BAND/
Radio
Basic operations
Selecting a band
1 Press BAND/et until the desired band (FM1, FM2, FM3 for FM or MW/LW) is displayed.
Switching preset stations
1 Pressor
- Select PCH (preset channel) under SEEK to use this function.
Manual tuning (step by step)
1 Pressor
- Select MAN (manual tuning) under SEEK to use this function.
Seeking
1 Press and hold or , and then release.
You can cancel seek tuning by briefly pressing or ▶.
While pressing and holding or, you can skip stations. Seek tuning starts as soon as you release or
Notes
- For details about SEEK, refer to SEEK (left/right key setting) on page 5.
This unit's AF (alternative frequencies search) function can be turned on and off. AF should be off for normal tuning operation (refer to AF (alternative frequencies search) on page 5).
Storing and recalling stations for each band
1 To store: Press and hold down one of the preset tuning buttons (1 / to 6 / 一 ) until the number stops flashing.
2 To recall: Press one of the preset tuning buttons (1 / to 6 /
Using this unit
Switching the display
Selecting the desired text information
1 Press DISP to cycle between the following:
FREQUENCY (program service name or frequency)
BRDCST INFO (program service name/PTY information)
CLOCK (source name and clock)
Notes
- If the program service name cannot be acquired in FREQUENCY, the broadcast frequency is displayed instead. If the program service name is detected, the program service name will be displayed.
Depending on the band, text information can be changed.
Text information items that can be changed depend on the area.
Using PTY functions
You can tune in to a station using PTY (program type) information.
Searching for an RDS station by PTY information
Press (list).
2 Turn M.C. to select a program type. NEWS/INFO—POPULAR—CLASSICS—OTHERS
3 Press M.C. to begin the search. The unit searches for a station broadcasting that type of program. When a station is found, its program service name is displayed.
To cancel the search, press M.C. again.
- The program of some stations may differ from that indicated by the transmitted PTY.
- If no station is broadcasting the type of program you searched for. NOT FOUND is displayed for about two seconds and then the tuner returns to the original station.
PTY list
For more details about PTY list, visit the following site:
http://www.pioneer.eu/eur/products/25/121/tech/ CarAudio/PTY.html
Function settings
1 Press M.C. to display the main menu.
2 Turn M.C. to change the menu option and press to select FUNCTION.
3 Turn M.C. to select the function.
Once selected, the following functions can be adjusted.
- If MW/LW band is selected, only BSM, LOCAL and SEEK are available.
FM SETTING (FM sound quality settings)
The sound quality level can be set to match the broadcast signal conditions of the FM band signal.
Press M.C. to display the setting mode.
2 Turn M.C. to select the desired setting.
STANDARD-This is the standard setting.
- HI-FI - This is the setting to use to prioritize the high quality of stereo sound.
- STABLE - This is the setting to use to prioritize the low noise of monaural sound.
BSM (best stations memory)
BSM (best stations memory) automatically stores the six strongest stations in the order of their signal strength.
Press M.C. to turn BSM on. To cancel, press M.C. again.
REGIONAL (regional)
Using this unit
When AF is used, the regional function limits the selection of stations to those broadcasting regional programs.
1 Press M.C. to turn the regional function on or off.
LOCAL (local seek tuning)
Local seek tuning allows you to tune in to only those radio stations with sufficiently strong signals for good reception.
1 Press M.C. to select the desired setting. FM: OFF—LV1—LV2—LV3—LV4 MW/LW: OFF—LV1—LV2
The highest level setting allows reception of only the strongest stations, while lower levels allow the reception of weaker stations.
TA (traffic announcement standby)
1 Press M.C. to turn traffic announcement standby on or off.
AF (alternative frequencies search)
Press M.C. to turn AF on or off.
NEWS (news program interruption)
Press M.C. to turn the NEWS function on or off.
SEEK (left/right key setting)
You can assign a function to the left and right keys of the unit.
Select MAN (manual tuning) to tune up or down manually or select PCH (preset channel) to switch between preset channels.
1 Press M.C. to select MAN or PCH.
CD/CD-R/CD-RW and USB storage devices
MTP connection
MTP-compatible Android devices (running Android OS 4.0 or higher) can be connected by MTP connection using the USB source. To connect an Android device, use the cable that came with the device.
Notes
- This function is not compatible with MIXTRAX.
This function is not compatible with WAV.
Basic operations
Playing a CD/CD-R/RD-RW
1 Insert the disc into the disc loading slot with the label side up.
Ejecting a CD/CD-R/CD-RW
Press
Playing songs on a USB storage device
1 Open the USB port cover.
[2] Plug in the USB storage device using a USB cable.
Stopping playback of files on a USB storage device
1 You may disconnect the USB storage device at any time.
Selecting a folder
1 Press 1/ or 2/V.
Selecting a track
1 Press or
Fast forwarding or reversing
1 Press and hold or
- When playing compressed audio, there is no sound during fast forward or reverse.
Returning to root folder
Press and hold BAND/
Using this unit
Switching between compressed audio and CD-DA
Press BAND/
Switching between playback memory devices
You can switch between playback memory devices on USB storage devices with more than one Mass Storage Device-compatible memory device.
1 Press BAND/47.
- You can switch between up to 32 different memory devices.
Note
Disconnect USB storage devices from the unit when not in use.
Turning MIXTRAX on or off
Only for DEH-X3600UI
You can use this function when USB is selected as the source.
You cannot use this function with USB MTP.
Press MIX to turn MIXTRAX on or off.
- For more details about MIXTRAX, refer to About MIXTRAX on page 10.
- When MIXTRAX is in use, the sound retriever function is disabled.
Switching the display
Selecting the desired text information
Press DISP to cycle between the following:
CD-DA
- ELAPSED TIME (track number and playback time)
CLOCK (source name and clock)
SPEANA (spectrum analyzer)
CD-TEXT
- TRACK INFO (track title/track artist/disc title)
- ELAPSED TIME (track number and playback time)
CLOCK (source name and clock)
SPEANA (spectrum analyzer)
MP3/WMA/WAV
- TRACK INFO (track title/artist name/album title)
FILE INFO (file name/folder name)
- ELAPSED TIME (track number and playback time)
CLOCK (source name and clock)
SPEANA (spectrum analyzer)
Selecting and playing files/ tracks from the name list
1 Press to switch to the file/track name list mode.
2 Use M.C. to select the desired file name (or folder name).
Selecting a file or folder
1Turn M.C.
Playing
1 When a file or track is selected, press M.C.
Using this unit
Viewing a list of the files (or folders) in the selected folder
When a folder is selected, press M.C.
Playing a song in the selected folder
1 When a folder is selected, press and hold M.C.
Selecting a repeat play range
Press 6 / 1 to cycle between the following:
CD/CD-R/CD-RW
ALL-Repeat all tracks
- ONE - Repeat the current track
FLD-Repeat the current folder
USB storage device
ALL-Repeat all files
- ONE - Repeat the current file
FLD-Repeat the current folder
Playing tracks in random order
Press 5/xx to turn random play on or off.
Tracks in a selected repeat range are played in random order.
- To change songs during random play, press▶ to switch to the next track. Pressing▶ restarts playback of the current track from the beginning of the song.
Pausing playback
1 Press 4/PAUSE to pause or resume.
Enhancing compressed audio and restoring rich sound (sound retriever)
1 Press 3/S.Rtrv to cycle between:
1-2-OFF (off)
1 is effective for low compression rates, and 2 is effective for high compression rates.
Key operation is disabled when MIXTRAX is on.
2 Turn M.C. to change the menu option and press to select FUNCTION.
Once selected, the function below can be adjusted.
- S.RTRV is not available when MIXTRAX is turned on.
S.RTRV (sound retriever)
Automatically enhances compressed audio and restores rich sound.
1 Press M.C. to select the desired setting. For details, refer to Enhancing compressed audio and restoring rich sound (sound retriever) on page 6.
iPod
Basic operations
Playing songs on an iPod
1 Open the USB port cover.
Connect an iPod to USB input.
Playback is performed automatically.
Selecting a song (chapter)
1 Pressor
Selecting an album
1 Press 1/ or 2/V.
Fast forwarding or reversing
1 Press and hold or
Notes
- The iPod cannot be turned on or off when the control mode is set to CONTROL AUDIO/CTRL AUDIO.
- Disconnect headphones from the iPod before connecting it to this unit.
The iPod will turn off about two minutes after the ignition is switched off.
Function settings
1 Press M.C. to display the main menu.
Using this unit
Turning MIXTRAX on or off
Only for DEH-X3600UI
Press MIX to turn MIXTRAX on or off.
- For more details about MIXTRAX, refer to About MIXTRAX on page 10.
Switching the display
Selecting the desired text information
1 Press DISP to cycle between the following:
- TRACK INFO (track title/artist name/album title)
- ELAPSED TIME (track number and playback time)
CLOCK (source name and clock)
SPEANA (spectrum analyzer)
Browsing for a song
1 Press to switch to the top menu of list search.
2 Use M.C. to select a category/song.
Changing the name of the song or category
1 Turn M.C.
Playlists—artists—albums—songs—podcasts—genres—composers—audiobooks
Playing
1 When a song is selected, press M.C.
Viewing a list of songs in the selected category
1 When a category is selected, press M.C.
Playing a song in the selected category
When a category is selected, press and hold M.C.
Searching the list by alphabet
1 When a list for the selected category is displayed, press to switch to alphabet search mode.
- You also can switch to alphabet search mode by turning M.C. twice.
2 Turn M.C. to select a letter.
3 Press M.C. to display the alphabetical list.
To cancel searching, press DIMMER.
Notes
- You can play playlists created with the computer application (MusicSphere). The application will be available on our website.
- Playlists that you created with the computer application (MusicSphere) are displayed in abbreviated form.
Selecting a repeat play range
1 Press 6 / 一 to cycle between the following:
iPod/CTRL iPod, the repeat play range will be same as what is set for the connected iPod.
Selecting a random play range (shuffle)
1 Press 5/ to cycle between the following:
- SNG - Play back songs in the selected list in random order.
- ALB - Play back songs from a randomly selected album in order.
- OFF - Not play back in random order.
Using this unit
Playing all songs in random order (shuffle all)
1 Press and hold 5 / 20 to turn shuffle all on.
To turn off shuffle all, select OFF in shuffle. For details, refer to Selecting a random play range (shuffle) on page 7.
Pausing playback
1 Press 4/PAUSE to pause or resume.
Enhancing compressed audio and restoring rich sound (sound retriever)
1 Press 3/S.Rtrv to cycle between:
1-2-OFF (off)
1 is effective for low compression rates, and 2 is effective for high compression rates.
You can play songs from the following lists.
- Album list of the currently playing artist
Song list of the currently playing album
- Album list of the currently playing genre
1 Press and hold to switch to link play mode.
2 Turn M.C. to change the mode; press to select.
- ARTIST - Plays an album by the artist currently playing.
- ALBUM - Plays a song from the album currently being played.
GENRE - Plays an album from the genre currently being played.
The selected song/album will be played after the currently playing song.
Notes
- The selected song/album may be canceled if you use functions other than link search (e.g. fast forward and reverse).
Depending on the song selected to play, the end of the currently playing song and the beginning of the selected song/album may be cut off.
Using this unit's iPod function from your iPod
This unit's iPod function can be controlled by using the connected iPod.
CONTROL iPod/CTRL iPod is not compatible with the following iPod models.
Only for DEH-2600UI
You can also switch the control mode by pressing iPod.
Notes
- Switching the control mode to CONTROL iPod/CTRL iPod pauses song playback. Use the iPod to resume playback.
- The following operations are still accessible from the unit even if the control mode is set to CONTROL iPod/CTRL iPod.
— Pausing
Fast forward/reverse
Selecting a song (chapter)
- The volume can only be adjusted from this unit.
Function settings
1 Press M.C. to display the main menu.
Using this unit
2 Turn M.C. to change the menu option and press to select FUNCTION.
3 Turn M.C. to select the function.
Once selected, the following functions can be adjusted.
- AUDIO BOOK is not available when CONTROL iPod/CTRL iPod is selected in the control mode. For details, refer to Using this unit's iPod function from your iPod on page 7.
AUDIO BOOK (audiobook speed)
Press M.C. to display the setting mode.
2 Turn M.C. to select your favorite setting.
- FASTER - Playback at a speed faster than normal
NORMAL - Playback at normal speed
- SLOWER - Playback at a speed slower than normal
S.RTRV (sound retriever)
1 Press M.C. to select the desired setting. For details, refer to Enhancing compressed audio and restoring rich sound (sound retriever) on page 7.
Using connected device applications
You can use this unit to perform streaming playback of and control tracks in iPhone applications or just for streaming playback.
Important
Use of third party apps may involve or require the provision of personally identifiable information, whether through the creation of a user account or otherwise, and for certain applications, the provision of geolocation data. ALL THIRD PARTY APPS ARE THE SOLE RESPONSIBILITY OF THE PROVIDERS, INCLUDING WITHOUT LIMITATION COLLECTION AND SECURITY OF USER DATA AND PRIVACY PRACTICES. BY ACCESSING THIRD PARTY APPS, YOU AGREE TO REVIEW THE TERMS OF SERVICE AND PRIVACY POLICIES OF THE PROVIDERS. IF YOU DO NOT AGREE WITH THE TERMS OR POLICIES OF ANY PROVIDER OR DO NOT CONSENT TO THE USE OF GEO-LOCATION DATA WHERE APPLICABLE, DO NOT USE THAT THIRD PARTY APP
The following is the detailed information regarding the terminals required to use the application for iPhone on this unit.
For iPhone users
- This function is compatible with iPhone and iPod touch.
The device has iOS 5.0 or higher.
Notes
Please check our website for a list of supported iPhone applications for this unit.
- Pioneer is not liable for any issues that may arise from incorrect or flawed app-based content.
- The content and functionality of the supported applications are the responsibility of the App providers.
Using this unit
Starting procedure for iPhone users
1 Connect an iPhone to USB input.
2 Switch the source to APP.
3 Start up the application on the iPhone and initiate playback.
Basic operations
Selecting a track
1 Press or
Fast forwarding or reversing
Press and hold or
Pausing playback
Press BAND to pause or resume.
Switching the display
Selecting the desired text information
Press DISP to cycle between the following:
- TRACK INFO (track title/artist name/album title)
APP NAME (application name)
ELAPSED TIME (playback time)
CLOCK (source name and clock)
SPEANA (spectrum analyzer)
Function settings
1 Press M.C. to display the main menu.
2 Turn M.C. to change the menu option and press to select FUNCTION.
3 Turn M.C. to select the function.
Once selected, the following functions can be adjusted.
PAUSE (pause)
Press M.C. to pause or resume.
S.RTRV (sound retriever)
Press M.C. to select the desired setting, 1-2-OFF (off)
1 is effective for low compression rates, and 2 is effective for high compression rates.
Audio adjustments
1 Press M.C. to display the main menu.
2 Turn M.C. to change the menu option and press to select AUDIO.
3 Turn M.C. to select the audio function. Once selected, the following audio functions can be adjusted.
- FADER is not available when SUB.W/SUB.W is selected in SP-P/O MODE. For details, refer to SP-P/O MODE (rear output and preout setting) on page 11.
- SUB.W and SUB.W CTRL are not available when REAR/REAR is selected in SP-P/O MODE. For details, refer to SP-P/O MODE (rear output and preout setting) on page 11.
- SUB.W CTRL is not available when SUB.W is selected in OFF. For details, refer to SUB.W (subwoofer on/off setting) on page 9.
- SLA is not available when FM is selected as the source.
FADER (fader adjustment)
Press M.C. to display the setting mode.
Turn M.C. to adjust the front/rear speaker balance.
BALANCE (balance adjustment)
Using this unit
Press M.C. to display the setting mode.
2 Turn M.C. to adjust the left/right speaker balance.
EQ SETTING (equalizer recall)
Press M.C. to display the setting mode.
Turn M.C. to select the equalizer. POWERFUL-NATURAL-VOCAL-CUSTOM1-CUSTOM2-FLAT-SUPER BASS
The equalizer band and equalizer level can be customized when CUSTOM1 or CUSTOM2 is selected.
If selecting CUSTOM1 or CUSTOM2, complete the procedures outlined below. If selecting other options, press M.C. to return to the previous display.
- CUSTOM1 can be set separately for each source. However, USB, iPod and APP are all set to the same setting automatically.
- CUSTOM2 is a shared setting used in common for all sources.
3 Press M.C. to display the setting mode.
4 Press M.C. to cycle between the following: Equalizer band—Equalizer level
5 Turn M.C. to select the desired setting. Equalizer band: 80HZ—250HZ—800HZ—2.5KHZ—8KHZ
Equalizer level: +6 to -6
LOUDNESS (loudness)
Loudness compensates for deficiencies in the low-frequency and high-frequency ranges at low volume.
1 Press M.C. to select the desired setting. OFF (off)-LOW (low)-MID (mid)-HI (high)
SUB.W (subwoofer on/off setting)
This unit is equipped with a subwoofer output which can be turned on or off.
1 Press M.C. to select the desired setting. NOR (normal phase)—REV (reverse phase)—OFF (subwoofer off)
SUB.W CTRL (subwoofer adjustment)
Only frequencies lower than those in the selected range are outputted from the subwoofer.
1 Press M.C. to display the setting mode.
2 Press M.C. to cycle between the following: Cut-off frequency—Output level—Slope level Rates that can be adjusted will flash.
3 Turn M.C. to select the desired setting. Cut-off frequency: 50HZ—63HZ—80HZ—100HZ—125HZ—160HZ—200HZ
Output level: -24 to +6 Slope level: 12-24
BASS BOOST (bass boost)
Press M.C. to display the setting mode.
2 Turn M.C. to select a desired level. 0 to +6 is displayed as the level is increased or decreased.
HPF SETTING (high pass filter adjustment)
Use this function when wanting to listen only to high-frequency sounds. Only frequencies higher than the high-pass filter (HPF) cutoff are output from the speakers.
Press M.C. to display the setting mode.
^2 Press M.C. to cycle between the following: Cut-off frequency—Slope level
3 Turn M.C. to select the desired setting. Cut-off frequency: OFF—50HZ—63HZ—80HZ—100HZ—125HZ—160HZ—200HZ Slope level: -12--24
Using this unit
SLA (source level adjustment)
This function prevents the volume from changing too dramatically when the source switches.
- Settings are based on the FM volume level, which remains unchanged.
- The MW/LW volume level can also be adjusted with this function.
- USB, iPod and APP are all set to the same setting automatically.
Press M.C. to display the setting mode.
Turn M.C. to adjust the source volume. Adjustment range: +4 to -4
Important
PW SAVE (power saving) is canceled if the vehicle battery is disconnected and will need to be turned back on once the battery is reconnected. When PW SAVE (power saving) is off, depending on connection methods, the unit may continue to draw power from the battery if your vehicle's ignition doesn't have an ACC (accessory) position.
1 Press M.C. to display the main menu.
2 Turn M.C. to change the menu option and press to select SYSTEM.
Once selected, the following system menu functions can be adjusted.
- INFO DISPLAY AND BRIGHTNESS are not available for DEH-2600UI.
- MUTE MODE is not available for DEH-X3600UI.
LANGUAGE (multi-language)
This unit can display the text information from a compressed audio file even for information embedded in English, Russian or Turkish.
- If the embedded language and the selected language setting are not the same, text information may not display properly.
Some characters may not be displayed properly.
Press M.C. to select the desired setting, ENG (English)—PYC (Russian)—TUR (Turkish)
CLOCK SET (setting the clock)
Press M.C. to display the setting mode.
Press M.C. to select the segment of the clock display you wish to set. Hour—Minute
3 Turn M.C. to adjust the clock.
12H/24H (time notation)
1 Press M.C. to select the desired setting. 12H (12-hour clock) -24H (24-hour clock)
The type of text information displayed in the sub information section can be toggled.
1 Press M.C. to display the setting mode.
2 Turn M.C. to select the desired setting.
SPEANA—LEVEL METER—SOURCE—CLOCK—OFF
- The signal bar indicator displays for SPEANA or LEVEL METER when the source is set to RADIO.
AUTO PI (auto PI seek)
The unit can automatically search for a different station with the same programming, even during preset recall.
1 Press M.C. to turn Auto PI seek on or off.
Using this unit
Activate this setting when using an auxiliary device connected to this unit.
Press M.C. to turn AUX on or off.
DIMMER (dimmer)
Press M.C. to turn the dimmer on or off.
- You can also change the dimmer setting by pressing and holding DIMMER.
BRIGHTNESS (brightness adjustment)
You can use this setting to adjust the display brightness.
The range of settings available for BRIGHTNESS will vary depending on whether DIMMER is on or off. For details, refer to DIMMER (dimmer) on page 10.
Press M.C. to display the setting mode.
Turn M.C. to select the desired setting. DIMMER on: 1 to 4 DIMMER off: 1 to 5
MUTE MODE (mutemode)
Sound from this system is automatically muted or attenuated when a signal from equipment with a mute function is received.
Press M.C. to display the setting mode.
2 Turn M.C. to select the desired setting.
MUTE-Muting
- 20dB ATT - Attenuation (20dB ATT has a stronger effect than 10dB ATT)
10dB ATT - Attenuation
PW SAVE (power saving)
Switching this function on enables you to reduce the consumption of battery power.
- Turning on the source is the only operation allowed when this function is on.
1 Press M.C. to turn the power save on or off.
Selecting the illumination color
Only for DEH-X3600UI
1 Press M.C. to display the main menu.
2 Turn M.C. to display ILLUMI and press to select.
3 Turn M.C. to select the illumination function.
Once selected, the following audio functions can be adjusted.
KEY COLOUR (key section color setting)
You can select desired colors for the keys of this unit.
Press M.C. to display the setting mode.
2 Turn M.C. to select the illumination color.
- Preset colors (ranging from WHITE to BLUE)
- SCAN (cycle through a variety of colors automatically)
CUSTOM (customized illumination color)
DISP COLOUR (display section color setting)
You can select the desired colors for the display of this unit.
Press M.C. to display the setting mode.
2 Turn M.C. to select the illumination color.
- Preset colors (ranging from WHITE to BLUE)
- SCAN (cycle through a variety of colors automatically)
- CUSTOM (customized illumination color)
BOTH COLOUR (key and display color setting)
You can select the desired colors for the keys and display of this unit.
Press M.C. to display the setting mode.
2 Turn M.C. to select the illumination color.
- Preset colors (ranging from WHITE to BLUE)
- SCAN (cycle through a variety of colors automatically)
Using this unit
ILLUMI FX (illumination effect mode)
In this mode, an illumination effect can be seen on the display at certain times such as when the ACC power is turned on/off or a CD is inserted/ ejected.
Press M.C. to turn ILLUMI FX on or off.
The illumination effect will activate when the ACC power is turned on/off regardless of whether the ILLUMI FX setting is on or off.
Note
When CUSTOM is selected, the customized color saved is selected.
Customizing the illumination color
You can create custom illumination colors for both KEY COLOUR and DISP COLOUR.
1 Press M.C. to display the main menu.
2 Turn M.C. to display ILLUMI and press to select.
3 Turn M.C. to display KEY COLOUR or DISP COLOUR. Press to select.
4 Press M.C. and hold until the customizing illumination color setting appears in the display.
5 Press M.C. to select the primary color.
R (red) G (green) B (blue)
6 Turn M.C. to adjust the brightness level.
Adjustment range: 0 to 60
- You cannot select a level below 20 for all three of R (red), G (green), and B (blue) at the same time.
- You can also perform the same operation on other colors.
Note
You cannot create a custom illumination color while SCAN is selected.
About MIXTRAX
Only for DEH-X3600UI
MIXTRAX technology is used to insert a variety of sound effects in between songs, allowing you to experience your music as a nonstop mix complete with visual effects.
Notes
Depending on the file/song, sound effects may not be available.
- Turn MIXTRAX off if the visual effects it produces have adverse effects on driving. Refer to Operations using the MIXTRAX button on page 6.
1 Press M.C. to display the main menu.
2 Turn M.C. to change the menu option and press to select MIXTRAX.
3 Turn M.C. to select the MIXTRAX function.
Once selected, the following MIXTRAX functions can be adjusted. The function is enabled when MIXTRAX is on.
SHORT PLAYBCK (short playback mode)
You can select the length of the playback time.
Press M.C. to display the setting mode.
Turn M.C. to select the desired setting.
1.0 MIN (1.0 minute)—1.5 MIN (1.5 minutes)—
2.0 MIN (2.0 minutes) 2.5 MIN (2.5 minutes)
-3.0 MIN (3.0 minutes)-OFF (off)
FLASH AREA (flash area)
Using this unit
You can select areas for flashing colors.
Press M.C. to display the setting mode.
2 Turn M.C. to select the desired setting.
KEY/DISPLAY (key and display)—KEY (key)—OFF (off)
- When OFF is selected, the color set under IL-LUMI is used as the display color.
FLASH PATTERN (flash pattern)
The flashing color and MIXTRAX special effects display change with changes in the sound and bass levels.
1 Press M.C. to display the setting mode.
2 Turn M.C. to select the desired setting.
- SOUND LEVEL 1 to SOUND LEVEL 6 - The flash pattern changes according to the sound level. Select a desired mode.
- LOW PASS 1 to LOW PASS 6 - The flash pattern changes according to the bass level. Select a desired mode.
- RANDOM 1 - The flash pattern changes randomly according to the sound level mode and low pass mode.
- RANDOM 2 - The flash pattern changes randomly according to the sound level mode.
- RANDOM 3 - The flash pattern changes randomly according to the low pass mode.
DISPLAY FX (display effect)
The MIXTRAX special effects display can be turned on or off.
1 Press M.C. to select the desired setting. ON (MIXTRAX special effects display)—OFF (normal display)
CUT IN FX (manual cut-in effect)
You can turn on or off the MIXTRAX sound effects while manually changing tracks.
1 Press M.C. to select the desired setting. ON(on)—OFF (off)
1 Press and hold SRC/OFF until the unit turns off.
2 Press and hold SRC/OFF until the main menu appears in the display.
3 Turn M.C. to change the menu option and press to select INITIAL.
4 Turn M.C. to select the initial menu function.
Once selected, the following initial menu functions can be adjusted.
FM STEP (FM tuning step)
Press M.C. to select the FM tuning step. 100 (100 kHz) -50 (50 kHz)
SP-P/O MODE (rear output and preout setting)
The rear speaker leads output and the RCA output of this unit can be used to connect a full-range speaker or subwoofer. Select a suitable option for your connection.
1 Press M.C. to display the setting mode.
Turn M.C. to select the desired setting.
- REAR/SUB.W - Select when there is a full-range speaker connected to the rear speaker leads output and there is a subwoofer connected to the RCA output.
- SUB.W/SUB.W - Select when there is a subwoofer connected directly to the rear speaker leads output without any auxiliary amp and there is a subwoofer connected to the RCA output.
- REAR/REAR - Select when there is a full-range speaker connected to the rear speaker leads output and the RCA output. If there is a full-range speaker connected to the rear speaker leads output and the RCA output is not used, you may select either REAR/SUB.W or REAR/REAR.
Using this unit
1 Press and hold SRC/OFF until the unit turns off.
2 Press and hold SRC/OFF until the main menu appears in the display.
3 Turn M.C. to change the menu option and press to select SYSTEM.
4 Turn M.C. to select the system menu function.
For details, refer to System menu on page 9.
Using an AUX source
1 Insert the stereo mini plug into the AUX input jack.
2 Press SRC/OFF to select AUX as the source.
Note
AUX cannot be selected unless the auxiliary setting is turned on. For more details, refer to AUX (auxiliary input) on page 9.
Switching the display
Selecting the desired text information
Press DISP to cycle between the following:
Source name
Source name and clock
If an unwanted display appears
Turn off the unwanted display using the procedures listed below.
1 Press M.C. to display the main menu.
2 Turn M.C. to change the menu option and press to select SYSTEM.
3 Turn M.C. to display DEMO OFF and press to select.
4 Turn M.C. to switch to YES.
5 Press M.C. to select.
Mute function
Only for DEH-X3600UI
This function is enabled when there is a device equipped with a mute function connected to this unit.
Sound is muted automatically if you make or receive a phone call with a device equipped with a mute function.
Note
Phone source displays when you receive a call.
Installation
Connections

Important
- When installing this unit in a vehicle without an ACC (accessory) position on the ignition switch, failure to connect the red cable to the terminal that detects operation of the ignition key may result in battery drain.

ACC position

No ACC position
- Use of this unit in conditions other than the following could result in fire or malfunction.
Vehicles with a 12-volt battery and negative grounding.
— Speakers with 50 W (output value) and 4 to 8 (impedance value).
- To prevent a short-circuit, overheating or malfunction, be sure to follow the directions below.
- Disconnect the negative terminal of the battery before installation.
- Secure the wiring with cable clamps or adhesive tape. Wrap adhesive tape around wiring that comes into contact with metal parts to protect the wiring.
- Place all cables away from moving parts, such as the shift lever and seat rails.
- Place all cables away from hot places, such as near the heater outlet.
- Do not connect the yellow cable to the battery by passing it through the hole to the engine compartment.
Cover any disconnected cable connectors with insulating tape.
Do not shorten any cables.
-
Never cut the insulation of the power cable of this unit in order to share the power with other devices. The current capacity of the cable is limited.
Use a fuse of the rating prescribed.
-
Never wire the negative speaker cable directly to ground.
-
Never band together negative cables of multiple speakers.
-
When this unit is on, control signals are sent through the blue/white cable. Connect this cable to the system remote control of an external power amp or the vehicle's auto-antenna relay control terminal (max. 300 mA 12 VDC). If the vehicle is equipped with a glass antenna, connect it to the antenna booster power supply terminal.
- Never connect the blue/white cable to the power terminal of an external power amp. Also, never connect it to the power terminal of the auto antenna. Doing so may result in battery drain or a malfunction.
- The black cable is ground. Ground cables for this unit and other equipment (especially, high-current products such as power amps) must be wired separately. If they are not, an accidental detachment may result in a fire or malfunction.
This unit
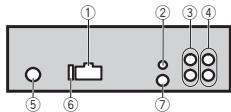
① Power cord input
② AUX2 input jack (3.5 mm stereo jack) (DEH-X3600UI only)
A dedicated input jack designed exclusively for use with devices equipped with a mute function.
③ Rear output or subwoofer output
④ Front output
⑤ Antenna input
⑥ Fuse(10A)
⑦ Wired remote input
Installation
Hard-wired remote control adapter can be connected (sold separately).
Power cord
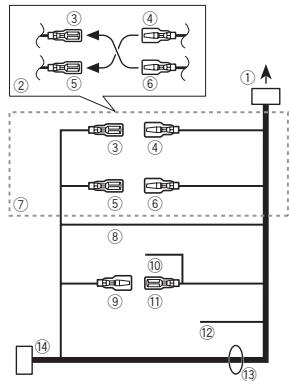
① To power cord input
② Depending on the kind of vehicle, the function of ③ and ⑤ may be different. In this case, be sure to connect ④ to ⑤ and ⑥ to ③
③ Yellow Back-up (or accessory)
④ Yellow Connect to the constant 12 V supply terminaI.
⑤ Red Accessory (or back-up)
6 Red Connect to terminal controlled by ignition switch (12 V DC).
⑦ Connect leads of the same color to each other.
⑧ Black (chassis ground)
⑨ Blue/white
The pin position of the ISO connector will differ depending on the type of vehicle. Connect 9 and 11 when Pin 5 is an antenna control type. In another type of vehicle, never connect 9 and 11.
10 Blue/white
Connect to system control terminal of the power amp (max. 300 mA 12V DC).
1 Blue/white
Connect to auto-antenna relay control terminal (max. 300 mA 12 V DC).
12 Yellow/black
If you use an equipment with Mute function, wire this lead to the Audio Mute lead on that equipment. If not, keep the Audio Mute lead free of any connections.
13 Speaker leads
White: Front left
White/black:Front left
Gray: Front right
Gray/black: Front right
Green: Rear left or subwoofer
Green/black: Rear left or subwoofer
Violet: Rear right or subwoofer
Violet/black: Rear right or subwoofer
ISO connector
In some vehicles, the ISO connector may be divided into two. In this case, be sure to connect to both connectors.
Notes
- Change the initial menu of this unit. Refer to SP-P/O MODE (rear output and preout setting) on page 11. The subwoofer output of this unit is monaural.
- When using a subwoofer of 70W(2) , be sure to connect the subwoofer to the violet and violet/black leads of this unit. Do not connect anything to the green and green/black leads.
Installation
Power amp (sold separately)
Perform these connections when using the optional amplifier.
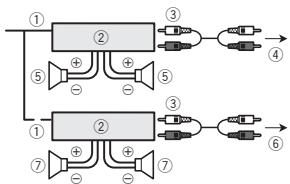
① System remote control Connect to Blue/white cable.
② Power amp (sold separately)
③ Connect with RCA cables (sold separately)
④ To Front output
⑤ Front speaker
6 To Rear output or subwoofer output
⑦ Rear speaker or subwoofer
Installation

Important
- Check all connections and systems before final installation.
- Do not use unauthorized parts as this may cause malfunctions.
- Consult your dealer if installation requires drilling of holes or other modifications to the vehicle.
- Do not install this unit where:
- it may interfere with operation of the vehicle.
- it may cause injury to a passenger as a result of a sudden stop.
-
The semiconductor laser will be damaged if it overheats. Install this unit away from hot places such as near the heater outlet.
-
Optimum performance is obtained when the unit is installed at an angle of less than 60^ .

- When installing, to ensure proper heat dispersal when using this unit, make sure you leave ample space behind the rear panel and wrap any loose cables so they are not blocking the vents.
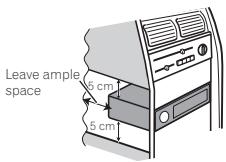
DIN front/rear mount
This unit can be properly installed using either front-mount or rear-mount installation. Use commercially available parts when installing.
DIN Front-mount
1 Insert the mounting sleeve into the dashboard.
For installation in shallow spaces, use the supplied mounting sleeve. If there is enough space, use the mounting sleeve that came with the vehicle.
Installation
2 Secure the mounting sleeve by using a screwdriver to bend the metal tabs (90^) into place.
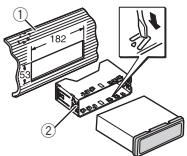
① Dashboard
② Mounting sleeve
Make sure that the unit is installed securely in place. An unstable installation may cause skipping or other malfunctions.
DIN Rear-mount
1 Determine the appropriate position where the holes on the bracket and the side of the unit match.
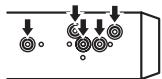
2 Tighten two screws on each side.
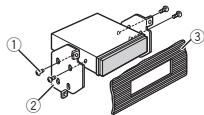
① Tapping screw (5mm × 8mm)
② Mounting bracket
③ Dashboard or console
Removing the unit
1 Remove the trim ring.
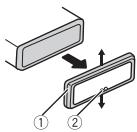
① Trim ring
② Notched tab
- Releasing the front panel allows easier access to the trim ring.
- When reattaching the trim ring, point the side with the notched tab down.
2 Insert the supplied extraction keys into both sides of the unit until they click into place.
3 Pull the unit out of the dashboard.
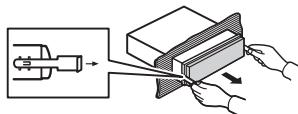
Removing and re-attaching the front panel
You can remove the front panel to protect your unit from theft.
For details, refer to Removing the front panel and Re-attaching the front panel on page 4.
Troubleshooting
Symptoms are written in bold and causes in regular, non-indented text. Regular, indented text is used to indicate actions to be taken.
The display automatically returns to the ordinary display.
You did not perform any operation within about 30 seconds.
Perform operation again.
The repeat play range changes unexpectedly.
Depending on the repeat play range, the selected range may change when another folder or track is being selected or during fast forwarding/reversing
Select the repeat play range again.
A subfolder is not played back.
Sub folders cannot be played when FLD (folder repeat) is selected.
Select another repeat play range.
NO XXXX appears when a display is changed (NO TITLE, for example).
There is no embedded text information.
Switch the display or play another track/file.
The unit is malfunctioning.
There is interference.
You are using a device, such as a cellular phone,
that may cause audible interference.
Move electrical devices that may be causing the interference away from the unit.
Error messages
When you contact your dealer or your nearest Pioneer Service Center, be sure to note the error message.
Symptoms are written in bold and causes in regular, non-indented text. Regular, indented text is used to indicate actions to be taken.
Common
AMP ERROR
This unit fails to operate or the speaker connection is incorrect; the protective circuit is activated.
Check the speaker connection. If the message fails to disappear even after the engine is switched off/on, contact your dealer or an authorized Pioneer Service Station for assistance.
CD player
ERROR-07, 11, 12, 17, 30
The disc is dirty.
Clean the disc.
The disc is scratched.
Replace the disc.
ERROR-07, 10, 11, 12, 15, 17, 30, A0
There is an electrical or mechanical error.
Turn the ignition switch OFF and back ON, or switch to a different source, then back to the CD player.
ERROR-15
The inserted disc is blank.
Replace the disc.
ERROR-23
Unsupported CD format.
Replace the disc.
Sometimes there is a delay between the start of playback and when you start to hear any sound.
Wait until the message disappears and you hear sound.
NO AUDIO
The inserted disc does not contain any playable files. Replace the disc.
SKIPPED
The inserted disc contains DRM protected files.
The protected files are skipped.
PROTECT
All the files on the inserted disc are embedded with DRM.
Replace the disc.
USB storage device/iPod
Sometimes there is a delay between the start of playback and when you start to hear any sound.
Wait until the message disappears and you hear sound.
NO AUDIO
There are no songs.
Transfer the audio files to the USB storage device and connect.
The connected USB storage device has security enabled.
Follow the USB storage device instructions to disable the security.
SKIPPED
The connected USB storage device contains DRM protected files.
The protected files are skipped.
PROTECT
All the files on the connected USB storage device are embedded with DRM.
Replace the USB storage device.
N/A USB
The connected USB device is not supported by this unit.
- Connect a USB Mass Storage Class compliant device.
- Disconnect your device and replace it with a compatible USB storage device.
CHECK USB
The USB connector or USB cable has short-circuited.
Check that the USB connector or USB cable is not caught in something or damaged.
CHECK USB
The connected USB storage device consumes more than maximum allowable current.
Disconnect the USB storage device and do not use it. Turn the ignition switch to OFF, then to ACC or ON and then connect only compliant USB storage devices.
CHECK USB
The iPod operates correctly but does not charge.
Make sure the connection cable for the iPod has not shorted out (e.g., not caught in metal objects). After checking, turn the ignition switch OFF and back ON, or disconnect the iPod and reconnect.
ERROR-19
Communication failed.
Perform one of the following operations.
-Turn the ignition switch OFF and back ON.
-Disconnect the USB storage device.
-Change to a different source.
Then, return to the USB source.
iPod failure.
Disconnect the cable from the iPod. Once the iPod's main menu is displayed, reconnect the iPod and reset it.
ERROR-23
USB storage device was not formatted with FAT12, FAT16 or FAT32.
USB storage device should be formatted with FAT12, FAT16 or FAT32.
ERROR-16
The iPod firmware version is old.
Update the iPod version.
iPod failure.
Disconnect the cable from the iPod. Once the iPod's main menu is displayed, reconnect the iPod and reset it.
STOP
There are no songs in the current list.
Select a list that contains songs.
NOT FOUND
No related songs.
Transfer songs to the iPod.
Apps
STARTUPAPP
The application has not started running yet. Follow the instructions that appear on the screen.
Handling guidelines
Discs and player
Use only discs that feature either of the following two logos.

DIGITAL AUDIO

DIGITAL AUDIO
TEXT
Use 12-cm discs.
Use only conventional, fully circular discs.
The following types of discs cannot be used with this unit:
DualDiscs
- 8-cm discs: Attempts to use such discs with an adaptor may cause the unit to malfunction.
- Oddly shaped discs


Discs other than CDs
- Damaged discs, including discs that are cracked, chipped or warped
CD-R/RW discs that have not been finalized
Do not touch the recorded surface of the discs.
Store discs in their cases when not in use.
Do not attach labels, write on or apply chemicals to the surface of the discs.
To clean a CD, wipe the disc with a soft cloth outward from the center.
Condensation may temporarily impair the player's performance. Let it rest for about one hour to adjust to a warmer temperature. Also, wipe any damp discs off with a soft cloth.
Playback of discs may not be possible because of disc characteristics, disc format, recorded application, playback environment, storage conditions, and so on.
Road shocks may interrupt disc playback.
When using discs that can be printed on label surfaces, check the instructions and the warnings of the discs. Depending on the discs, inserting and ejecting may not be possible. Using such discs may result in damage to this equipment.
Do not attach commercially available labels or other materials to the discs.
The discs may warp making the disc unplayable.
- The labels may come off during playback and prevent ejection of the discs, which may result in damage to the equipment.
USB storage device
Connections via USB hub are not supported.
Do not connect anything other than a USB storage device.
Firmly secure the USB storage device when driving. Do not let the USB storage device fall onto the floor, where it may become jammed under the brake or accelerator pedal.
Depending on the USB storage device, the following problems may occur.
Operations may vary.
The storage device may not be recognized.
- Files may not be played back properly.
- The device may cause audible interference when you are listening to the radio.
iPod
Do not leave the iPod in places with high temperatures.
Firmly secure the iPod when driving. Do not let the iPod fall onto the floor, where it may become jammed under the brake or accelerator pedal.
About iPod settings
- When an iPod is connected, this unit changes the EQ (equalizer) setting of the iPod to off in order to optimize the acoustics. When you disconnect the iPod, the EQ returns to the original setting.
- You cannot set Repeat to off on the iPod when using this unit. Repeat is automatically changed to All when the iPod is connected to this unit.
Incompatible text saved on the iPod will not be displayed by the unit.
Compressed audio compatibility (disc, USB)
WMA
File extension: .wma
Bit rate: 48 kbps to 320 kbps (CBR), 48 kbps to 384 kbps (VBR)
Sampling frequency: 32kHz 44.1 kHz,48 kHz
Windows Media™ Audio Professional, Lossless, Voice/DRM Stream/Stream with video: Not compatible
MP3
File extension:.mp3
Bit rate: 8 kbps to 320 kbps (CBR), VBR
Sampling frequency: 8kHz to 48kHz (32 kHz, 44.1 kHz, 48 kHz for emphasis)
Compatible ID3 tag version: 1.0, 1.1, 2.2, 2.3, 2.4 (ID3 tag Version 2.x is given priority over Version 1.x)
M3u playlist: Not compatible
MP3i (MP3 interactive), mp3 PRO: Not compatible
WAV
File extension:.wav
Quantization bits: 8 and 16 (LPCM), 4 (MS ADPCM)
Sampling frequency: 16kHz to 48kHz (LPCM), 22.05 kHz and 44.1kHz (MS ADPCM)
- You cannot use this function with USB MTP.
Only the first 32 characters can be displayed as a file name (including the file extension) or a folder name.
Russian text to be displayed on this unit should be encoded in one of the following character sets:
- Unicode (UTF-8, UTF-16)
- A character set other than Unicode that is used in a Windows environment and is set to Russian in the multi-language setting
This unit may not work properly depending on the application used to encode WMA files.
There may be a slight delay at the start of playback of audio files embedded with image data or audio files stored on a USB storage device that has numerous folder hierarchies.
Disc
Playable folder hierarchy: up to eight tiers (A practical hierarchy is less than two tiers.)
Playable folders: up to 99
Playable files: up to 999
File system: ISO 9660 Level 1 and 2, Romeo, Joliet
Multi-session playback: Compatible
Packet write data transfer: Not compatible
Regardless of the length of blank sections between the songs from the original recording, compressed audio discs play with a short pause between songs.
USB storage device
Playable folder hierarchy: up to eight tiers (A practical hierarchy is less than two tiers.)
Playable folders: up to 500
Playable files: up to 15000
Playback of copyright-protected files: Not compatible
Partitioned USB storage device: Only the first partition can be played.
There may be a slight delay when starting playback of audio files on a USB storage device with numerous folder hierarchies.
CAUTION
- Pioneer cannot guarantee compatibility with all USB mass storage devices and assumes no responsibility for any loss of data on media players, smart phones, or other devices while using this product.
- Do not leave discs or a USB storage device in any place that is subject to high temperatures.
iPod compatibility
This unit supports only the following iPod models. Supported iPod software versions are shown below. Older versions may not be supported. Made for
- iPod touch (5th generation)
- iPod touch (4th generation)
- iPod touch (3rd generation)
- iPod touch (2nd generation)
- iPod touch (1st generation)
- iPod classic
- iPod with video
- iPod nano (7th generation)
- iPod nano (6th generation)
- iPod nano (5th generation)
- iPod nano (4th generation)
- iPod nano (3rd generation)
- iPod nano (2nd generation)
- iPod nano (1st generation)
iPhone5
iPhone 4S
iPhone 4
iPhone 3GS
iPhone 3G
iPhone
Depending on the generation or version of the iPod, some functions may not be available.
Operations may vary depending on the software version of iPod.
Users of iPod with the Lightning Connector should use the Lightning to USB Cable (supplied with iPod).
Users of iPod with the Dock Connector should use CD-IU51. For details, consult your dealer.
About the file/format compatibility, refer to the iPod manuals.
Audiobook, Podcast: Compatible
CAUTION
Pioneer accepts no responsibility for data lost on the iPod, even if that data is lost while this unit is used.
Sequence of audio files
The user cannot assign folder numbers and specify playback sequences with this unit.
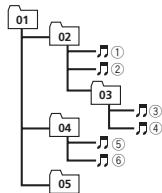
Example of a hierarchy
Level 1 Level 2 Level 3 Level 4
Folder Compressed
audio file
01 to 05: Folder number
① to ⑥: Playback
sequence
Disc
Folder selection sequence or other operation may differ depending on the encoding or writing software.
USB storage device
Playback sequence is the same as recorded sequence in the USB storage device. To specify the playback sequence, the following method is recommended.
Create a file name that includes numbers that specify the playback sequence (e.g., 001xxx.mp3 and 099yyy.mp3).
Put those files into a folder.
3 Save the folder containing files on the USB storage device.
However, depending on the system environment, you may not be able to specify the playback sequence.
For USB portable audio players, the sequence is different and depends on the player.
Russian character chart
| D: C | D: C | D: C | D: C | D: C |
| A:A | B:B | B:B | F:F | F:D |
| E:E,E | F:M | F:3 | H:N, N | K:K |
| A:N | H:M | H:H | G:O | F:I |
| P:P | C:C | T:T | Y:Y | Φ:Φ |
| X:X | U:U | Y:Y | M:M, M | ' : b |
| H:bl | b:b | J:θ | H:IO | R:J |
D:Display C:Character
Copyright and trademark
iTunes
Apple and iTunes are trademarks of Apple Inc., registered in the U.S. and other countries.
MP3
Supply of this product only conveys a license for private, non-commercial use and does not convey a license nor imply any right to use this product in any commercial (i.e. revenue-generating) real time broadcasting (terrestrial, satellite, cable and/or any other media), broadcasting/
streaming via internet, intranets and/or other networks or in other electronic content distribution systems, such as pay-audio or audio-on-demand applications. An independent license for such use is required. For details, please visit http://www.mp3licensing.com.
WMA
Windows Media is either a registered trademark or trademark of Microsoft Corporation in the United States and/or other countries.
This product includes technology owned by Microsoft Corporation and cannot be used or distributed without a license from Microsoft Licensing, Inc.
iPod & iPhone
iPhone, iPod, iPod classic, iPod nano, and iPod touch are trademarks of Apple Inc., registered in the U.S. and other countries.
Lightning is a trademark of Apple Inc. "Made for iPod" and "Made for iPhone" mean that an electronic accessory has been designed to connect specifically to iPod or iPhone, respectively, and has been certified by the developer to meet Apple performance standards. Apple is not responsible for the operation of this device or its compliance with safety and regulatory standards. Please note that the use of this accessory with iPod or iPhone may affect wireless performance.
AndroidTM
Android is a trademark of Google Inc.
MIXTRAX
MIXTRAX is a trademark of the PIONEER CORPORATION.
Specifications
General
Power source 14.4 V DC (10.8 V to 15.1 V Allowable)
Grounding system Negative type
Maximum current consumption 10.0a
Dimensions (W× H× D) DIN
Chassis 178mm × 50mm × 165mm
Nose 188mm × 58mm × 15mm D
Chassis 178mm × 50mm × 165mm
Nose 170 mm × 46 mm × 15 mm (DEH-X3600UI)
Nose 170 mm × 46 mm × 16 mm (DEH-2600UI)
Weight 1 kg
Audio
Maximum power output ... 50W× 4 70W× 1 / 2 (for subwoofer)
Continuous power output 22W× 4 (50 Hz to 15 000 Hz, 5 % THD, 4 load, both channels driven)
Load impedance 4Ω (4Ω to 8Ω allowable)
Preout maximum output level 2.0V
Loudness contour +10 dB (100 Hz) +6.5dB (10 kHz)(volume: -30dB
Equalizer (5-Band Graphic Equalizer):
Frequency 80 Hz/250 Hz/800 Hz/2.5 kHz/ 8 kHz
Equalization range. ± 12 dB (2 dB step)
Subwoofer (mono):
Frequency 50 Hz/63 Hz/80 Hz/100 Hz/ 125 Hz/160 Hz/200 Hz
Slope -12 dB/0ct, -24 dB/0ct
Gain +6dB to -24dB
Phase Normal/Reverse
CD player
System Compact disc audio system
Usable discs Compact disc
Signal-to-noise ratio 94 dB (1 kHz) (IEC-A network)
Number of channels 2 (stereo)
MP3 decoding format ....... MPEG-1 & 2 Audio Layer 3
WMA decoding format .... Ver. 7, 7.1, 8, 9, 10, 11, 12 (2 ch audio)
(Windows Media Player)
WAV signal format ......... Linear PCM & MS ADPCM (Non-compressed)
USB
USB standard specification
USB2.0 full speed
Maximum current supply
1A
USB Class .MSC (Mass Storage Class)
File system .FAT12,FAT16,FAT32
MP3 decoding format ...... MPEG-1 & 2 Audio Layer 3
WMA decoding format ....... Ver. 7, 7.1, 8, 9, 10, 11, 12 (2 ch audio)
(Windows Media Player)
WAV signal format ......... Linear PCM & MS ADPCM
(Non-compressed)
FM tuner
Frequency range 87.5 MHz to 108.0 MHz
Usable sensitivity 9 dBF (0.8μV/75Ω mono, S/N: 30 dB)
Signal-to-noise ratio 72 dB (IEC-A network)
MWtuner
Frequency range 531 kHz to 1602 kHz
Usable sensitivity 25 V (S/N: 20 dB)
Signal-to-noise ratio 62 dB (IEC-A network)
LWTuner
Frequency range 153 kHz to 281 kHz
Usable sensitivity 28uV (S/N: 20 dB)
Signal-to-noise ratio 62 dB (IEC-A network)
Note
Specifications and the design are subject to
modifications without notice.
Avant de commencer
RADIO—CD—USB/iPod—APP (application)—AUX
MW/LW (PO/GO): OFF—LV1—LV2
1-2-OFF (hors service)
S.RTRV (sound retriever)
1-2-OFF (hors service)
S.RTRV (sound retriever)
S.RTRV (sound retriever)
1-2-OFF (hors service)
BASS BOOST (accentuation des graves)
MUTE MODE (mode sourdine)
2.0 MIN (2,0 minutes) 2.5 MIN (2,5 minutes)
3.0 MIN (3,0 minutes)OFF (hors service)
FLASH AREA (zone de clignotement)
ERROR-07, 10, 11, 12, 15, 17, 30, A0
Lecture multi-session: compatible
| D: C | D: C | D: C | D: C | D: C |
| A:A | B:B | B:B | F:F | J:D |
| E:E,E | Z:ZK | Z:3 | H:N,N | K:K |
| A:Π | H:M | H:H | G:O | F:Π |
| P:P | C:C | T:T | Y:Y | Φ:Φ |
| X:X | U:L | U:U | U:U, U | U:b |
| H:bl | b:b | J:3 | H:U | J:Y |
Phase Normale/Inverse
Lecteur de CD
Systeme Compact Disc Digital Audio
(Windows Media Player)
Format du signal WAV ....PCM Lineaire & MS ADPCM
(Non compressé)
USB
Specification standard USB
(Windows Media Player)
Format du signal WAV ....PCM Lineaire & MS ADPCM
(Non compressé)
Syntoniseur FM
ERROR-07, 10, 11, 12, 15, 17, 30, A0
Estensione file: .wma
Velocity in bit: da 48 kbps a 320 kbps (CBR), da 48 kbps a 384 kbps (VBR)
Estensione file:.mp3
file audio compressor
| D: C | D: C | D: C | D: C | D: C |
| A:A | B:B | B:B | F:F | J:D |
| E:E,E | Z:Z | Z:3 | H:N,N | K:K |
| A:Π | H:M | H:H | G:O | F:Γ |
| P:P | C:C | T:T | Y:Y | Φ:Φ |
| X:X | U:U | Y:Y | U:U, U:U | U:Y |
| H:bl | b:b | J:Θ | H:JO | η:Я |
Consumo massimo 10,0 A
Dimensioni (L× A× P) DIN
94 dB (a 1 kHz) (rete IEC-A)
(Windows Media Player)
(Windows Media Player)
ERROR-07, 11, 12, 17, 30
ERROR-07, 10, 11, 12, 15, 17, 30, A0
| D: C | D: C | D: C | D: C | D: C |
| A:A | B:B | B:B | F:F | F:D |
| E:E,E | F:M | F:3 | H:N, N | K:K |
| A:N | H:M | H:H | B:O | F:I |
| P:P | C:C | T:T | Y:Y | Φ:Φ |
| X:X | U:U | Y:Y | M:M, M | '':'b |
| H:bI | b:b | J:J | H:I:O | R:J |
ERROR-07, 10, 11, 12, 15, 17, 30, A0
| D: C | D: C | D: C | D: C | D: C |
| A:A | B:B | B:B | F:F | J:D |
| E:E,E | J:X | J:3 | H:N, N | K:K |
| A:N | H:M | H:H | G:O | F:I |
| P:P | C:C | T:T | Y:Y | Φ:Φ |
| X:X | U:U | Y:Y | M:U, M | ' : b |
| H:bl | b:b | J:Θ | K:IO | J:Я |
D:Anzeige C:Zeichen
Equalizer (5-Band Graphic Equalizer):
Frequenz 80Hz/250 Hz/800 Hz/2.5 kHz/8 kHz
KLASSE 1 LASERPRODUCT
Bij problemen
S.RTRV (sound retriever)
S.RTRV (sound retriever)
S.RTRV (sound retriever)
BASS BOOST (bass boost)
HPF SETTING (high pass filter aanpassen)
ERROR-07, 11, 12, 17, 30
De disc is vuil.
Reinig de disc.
De disc is bekrast.
ERROR-07, 10, 11, 12, 15, 17, 30, A0
Geen verwante songs.
| S:T | S:T | S:T | S:T | S:T |
| A:A | B:B | B:B | F:F | J:D |
| E:E,E | Z:Z | Z:3 | H:N,N | K:K |
| A:N | H:M | H:H | G:O | F:N |
| P:P | C:C | T:T | Y:Y | Φ:Φ |
| X:X | U:U | Y:Y | M:M,M | J:B |
| H:bI | b:b | J:3 | H:IO | J:J |
S: Scherm T: Teken
Copyright en handelsmerken
iTunes
Versie 7, 7.1, 8, 9, 10, 11, 12
(2kan.audio)
(Windows Media Player)
Versie 7, 7.1, 8, 9, 10, 11, 12
(2kan.audio)
(Windows Media Player)
CLOCK SET (yCTaHOBka yacob)
1ПоворашиваеM.C.,чтобу установы.Yась。
JHakimMaeT M.C., YTO6bI Bb6Pabyt cYCTAHOBKY MMHT.
3 [M]yHHTb.
4 HaxmTe M.C., yTo6bI NoTBePdNtB Bb6Op.
IcnoJb3OBAHne daHHoro yctpoiCTBa
FM STEP (laar hactpoikn B FM-dnaana3ohe)
EciHn NOHaO6HTCA BHOB 3M3EHNTB HACTPOKy, NOBEPHIcM. C.N. Hb6BEPITE NO.
6 Haxmte M.C. nBb6opa.
PpmeaHn
HaCtpoNTbnapaMeTpbl MEHO MOXHO B MEHIO CICTEMBI IN B HauJIbHOM MEHO. Eoonie noIpO6Hy IOHΦopMaIcIO CM. B pa3- denax MeHIO CICTEMbIa CTp. 129 i CtapTOBOE MEHO a CTp. 131.
Bbl Mochete OTmeHnltb HactPonky Napametpa, hakab KHonky SRC/OF.
OCHOBhIe Onpaun

BaxHo
- PπIσOeONDEHnHm yCTAHOBe NEpEHEN nAneHN o6paauTaeC h Ne octopoxHO.
- Osterreichne nepedio nahanb ot cnilbnyx yadapob.
-
PteOxpaHnIe NpeDnHIO nAneHb OT Bo3-DeNCTBnI pIpMOrO cONHeHOrO CBeta N BiCOKHX TEMNPATyP.
-
Ппекду Рсгьт Бернюю пань, 608a-telnetbno OTKHNOчTE到 Nte Се Кабели NGyctpoiCTBa,TObБу He NOBpeNTbU yctpoiCTBOu BHTpyeHHIOO TOYENKc canOA.
ChyTne nepedne nane
1 Tc6b6oDcOeMHINbpeNdeHIOHO naHEB, HAKMITE HaKONIKY OeOeHNHIEHAHNI.
2 Hachmite Na haneJIb NO hapaNpBHeNIO BVEpX (I) AND TAHnTE HA c6eII.
3BcTaJaXpaHHTOeOcENHeHHyNaheHb YaTHHTOH CyTPhRE NmH XeHNJ.
UctaHOBka nepeDne naHEni
BkIIOUeHHe yCTpoIcTBA
BbIKIOHHe yCTpoIcTBA
1 HauKMITE uHepKKBaHEe KHOKNy SRC/OFF, NOKA yOCTOBTOE HE bblIOHHTC.
IcnoJb3OBAHne daHHoro yctpoiCTBa
Bb6op nctouHHka CrrHana
FM: OFF—LV1—LV2—LV3—LV4
MW/LW: OFF—LV1—LV2
Hactpoika camoro bblcokoro yobOBnnoB0B- nO3B- NOCCTBNTyB pNEM TOIbKO CTaHnC Ccamblm cnilbHm CnIHALOM, aYMeHbSeHHe YOBPOH NACTPOKn O3BONET npINHMATb CTANHmC 600ee cnaBbM CnIHANOF.
TA (pejIM OJNDAHIN DOPOXKbIX CBOdOK)
1 HaxKMITE M.C., 70b6 BkIKOHTH INBbIKIOHTB PEXKIM OKXJAHDAI DOPOXHKXB CBOIDOK.
AF (NONCK aIbTePHaTINBHyX AcToT)
HAKMMITE M.C., TIO6bI BYKIOCHHTI INI BYIKIOHOHTI yFHKLIIO AF.
NEWS (npepbivahne dny nepedaun HOBOCTe)
1 HAKMITE M.C., 'TTOb6 BYKIOHHTI INI BYIKHOHTI- DYFKHIIOU HOBOCTNI.
SEEK (Hacrpoika neboi npaboi KhoNOK)
Bb6op H Bocpn3BeDene Hne faoB/OdoP0keK n3 cnNcKa
1 HaxMITE KhoNky Q, YTO6bI OTO6pa3NTb cnCOK Ha3BaHnФaJIOB/DOPOKeK.
2 C momoBtuM.C. BbiEgePte HyxHoe HmJ faJIaN (nINn nnK).
Bb6op paHna nn pankn
1 TOBOPaHbAte M.C.
Bocnpon3BeDene
Bb6epnte faaii nnDopokky n Haxmte M.
Посмогтс Камваим Фальов (nanok)ВьБбанногпankie
1 BbIbeIpTe npAnky n HaxMnte M.C.
Bocnp0n3BeDeHMe KcmoN3uIe m3 BbI6paHnoi panKi
1 BbBeprte nanky, zatem HaxmTe u ydepxmbaite M.C.
IcnoIb3OBAHne daHHoro yctpoiCTBa
McnoIb3OBAHne daHHoro yctpoNCTBa
PnOCTaHOBka BOCpOn3BeDHeHn
1 HAKMITE KHOKY 4/PAUSE, YOtboi BKNIOHTI nayy Iani BO306BHOTB BCNPOH3BEDEHIE.
Unyuшени Кан electва 38ka CkabtBx aydinokai-NIOB u BOCCTAOBHENIE NOHOTBI 38yauHINRA (TexHONOHN pneo6ba3OBAHIN 38ka)
1Hakimmaite KHOJky 3/S.Rtrv nIy bIb6opa H3 chyeuOytsyФнку:
1—2-OFF(BbIKJ)
HactpoiKa 1 3ΦΦeKTHBnA for qaiNob c H3KnO CTsENbEo CkTaN, a HactpoiKa 2 - dJaFaiNob C bVcKOk CTsENbEo CkTaN.
Bb6pHAnHaKOMP03NIMIINIaIb5oM 6yEdT BOCpOIN3BOMDITcNPOCNEOKOHuaHnB OBCpOIN3BDEHnTEKUeJIeKOMNO3NIMI.
PpmeaHn
Bo3MOxHs OTMHeMa BOcPOnBEdENbI Bbl6paHnOH KOMON3NIN/Anb6Oma,ecnBbICNpO3yTe IIObEe Dpyrne FyHKUINKpOme NocKa nO kateropn (HanpImep,pepeMOTKa BnepeNd INn Haaad).
B 3aBbCIMMOCTN OT TORO, KAKAY KOMNO3MUIA BB6pHaNA, KOHeI TEKUYIeKOMNO3HmN I HAaNo Bb6pAHHOH KOMNO3HmN/ANb6MoMa MOrYT 6bITb 6oep3Ahly.
BocnpOn3BeDeHne KOMnO3nCmB JkaHpe BocnpOn3BODnMoB DaHHbIM MOMENT KOMnO3nCmN
MochxoBocPnOBDoNTb KOMP03NmI INs cNe-duOuHx nCnKoB.
CnOcK anbOBMOB aPTHCTA, KOMON3IaKO TOpORO BOCNPOBDIOHTB C DAHHBI MOHENT
CINCHOK KOMON3HNI,OTHOZIMXCAK BOCPOPTB3DAMOMY B DAHNH MOMEHT aftb6MOY
CINCKAab60MOB,OTHOACHXK BCOPN03- BODIMOMYB DAHNHMB MOEMT My3bIKaJIbHOMJ kAnpy
1 HauKmte N ydepXnBaIe KhONky , nla nepeKlOuChEnb B pexm Bocpn3BedeHn o KaterOpn.
AUDIO BOOK (cKOpocTb BocnpOn3BeJeHnA ay- DnOKHnI)
JITAOIOB6PakEHHaYCTAHOBHOHORMOHEHAXMATE M.C.
[1] Повачавâte М.C., Тобь Biьбравы Нжкую сансточи.
- FASTER - YckopenHoe BOCPon3BedeHne
NORMAL - BocnpnoBvEneHc o6bHuHOckoPoCTbU
- SLOWER - 3améduhneHoe BocpOIN3BendeHne
S.RTRV (sound retriever, texhonorma pneo6pa3-OBAHN 38yka)
NOR (HornpaHnaHbAAa-REV (6pBaTHaAa3a)-OFF (CaBvDep BbKlnOHe)
SUB.W CTRL (hac tropona ca6bycep)
Ha BbXode ca6byfepe 6dyT bocnpnBaBodnTc8 TOnbko Te TaCtOTbI,KOTOpHe NmKe Yka3aHHbx ChaTOT cpe3A.
JITAO OTO6PbAKeHnYcTahOBoCHOrO MEHO HAKMATE M.C.
JHakimaiye M.C. JnA Bb6opa 3n cneyuioxM ΦhKmI:
Yachota cse3a-YoepoeBbXbODHOORcHnHa- KpyTtN3Ha xapakTEpCTIKHe
N3MeHReMbIe 3NaueHn6yDyT MnRaTb.
③ Повачачайе М.С. за Ббoga насторьк.
Yachota cpea:50HZ—63HZ—80HZ—100HZ—125HZ—160HZ—200HZ
YpOBeHb BbIXoNDHO CnHa:OT-24do+6
Kpytn3Ha xapaKTepeNCTnKN: -12-24
BASS BOOST (YCINHINE HNIXHX 38YKOBbX YaCTO)
Дагоюбарженистановобчоген MOHNO HAKMATE M.C.
[2]Поворатоваян М.С. Дял bu6opa Hnykho ro yopobn.
Пг.уBERVIHENI ИИN yEMHbUeHIN YPOBHA OTObPAJAOTCA HADINIC C 0 D6+O
IcnoIb3OBAHne daHHoro yctpoiCTBa
IcnoIb3OBAHne daHHoro yctpoiCTBa
HPF SETTING (hacptoikaФильтарьхнхЧa-стor)
NcnoB3yIte 3Ty fHKuHIO,ecn Blx OHTNE, TcOb6I BOCPNOBDOBNICb TOnbKO BvCOKMe cACToBHa rPOMKOrOBOpTeHN bEydt BvBOIDnBcraTbKO cAChTOBbBbIe, cHcYCTAHOBENHbEfbnTPOBMBCOXXACTOT(HPF).
117 MIO OTO6pakEHHa YCTAHOBOHOFO MEHO HAXMATE M.C.
2 HaxmMaiTe M.C.ДЯ BbIbOpa I3 cIeNduIoxMx
Функш:
Jactora cpe3a—Kpytun3Ha xapakTepeNCTkn
3Повачиьаям.C.Дя BAбopa NaCTPOn- KN.
Yachota cpea: OFF-50HZ-63HZ-80HZ-100HZ-125HZ-160HZ-200HZ
KpyTn3Ha xapaKTepNCtKN: -12-24
SLA (perynipobka ypOBBA BXoHOro cnHaJa)
AUX (BCNOMORAteNBbI BxOd)
AknBnBuPyIte 3Tu NaHcTPOKU pNIOJNDKIOUeHNIK DaHOMOY cTPOIcTBY BCNOMOrATEJIbHOrO yCTPOIcTBA.
HAKMMTE M.C., TIO6bI BYKIOHOHTB INI BYIKHOHOHTB yFHKMOU AOX.
DIMMER(pernyTOpOCBeueHHOCTN)
1 HaxMMTE M.C.,NTb6B KBNIOHTb INH BIKNIOHTb pyerntopCOCBSEeHNHOCTn
BbI taKoe MOKeTe BbIpaTbI DpyTuO HacToPOnKypeyIaTtopa ocBeuHHeNCHTo, yDepXnBaB HAkatoi KhONky DIMMER.
BRIGHTNESS (Hactpoika npkoctn)
Ncnonb3yetydIgnaHCTpOINrAIPKoCTnDnCnPnne. HBaOpHnactpoekIeR BRIGHTNESS 3abNCIT OT TORO, BKIOUeHa nI pHyNKuIMa DIMMER. Nop6o- hce CM. BpaZene DIMMER (peyIpyTOp oCbeHooctn)Ha ctp.129.
I JNATO OTO6PakKeHnY UCTAHOBOHTHO MO HNHO HAKMATE M.C.
2Повораньайе M.C.дяьбoga насточКИ. DIMMERВКЛ.:OT1do4 DIMMERbIKN.:OT1do5
MUTE MODE (peKIM npnIpyuHn 3Byka)
IcnoJb3OBAHne daHHoro yctpoiCTBa
3Bv/kypobehb 3BvkoB0r CnHana daHHo NcCTeMbYABOTAMHTNECKN NOHNKAETC npI pONyueHmCNHana OTOOBpOyDOBaHnC FyHKJIeepnPrrTJU-uenHb 3Bvka.
Ha 30m yctpoICTBE MOXHO Bb6paT bCET noDcBETK DNCLPN.
[1] Μιοῦ οΤΑβδαρκεθηγν ΚΥΤΑΝΟΒΟΥΗΟ ΜΕΜΗ ΜΑΚΜΑτε M.C.
27 步骤步骤1:将M、C、T、O四个字母分别写在表头上,然后依次按顺序排列。
PnEDYCTAHOBENHbIE ZBETA(BDNIAP3HOEOT WHITE DO BLUE)
- SCAN (ABTOMATUNCECKA CMHAE BCX BCTOB NO OHEPDI)
CUSTOM (IONb3OBATEBCHN LBEOT NO.DCBETKUN)
BOTH COLOUR (Hacptpokka Cbeta PoDCBETK HKNOKN DCINCLNE)
HA tOMY cTPOCTBE MOKHO bBb6Pb TcEBI NOCBETKIN KHONOK H dNcPIJIe.
KoJIgBa YbIbaO scan, co3aTbNoIb3ObaTeBcKnI CBET HeBO3MOKHO.
HΦopmaun o MIXTRAX
TolbkoДЯDEH-X3600UI
TexhOnorna MIXTRAX Incnonb3yeTcraIy BCTaBnEHHN CTpeo03ΦeKTOB MeKJy KOMNO3uYMI, N03BOJnA CnyaB My3bIKY HOH-CTON BCOHTAHC BnYaNbHMIM 9
PpmeaHn
Дяп Некотьх Фальов/komноший ВОЗ-Mожноь добавелнаукobьх сффekt-OBOTCYTCTBYET.
- BbIKIOHHTeФyHKUHO MIXTRAX,ecnBnB3ayIbMbHe 3eFfKtBu OTBNEKAOT Bac OTOBKeHn. CM.ФИHcN KhoJIIN MIXTRAX Ha ctp.124.
MeHIO MIXTRAX
1 Haxmte M.C., QTObI OTKpbITr rnaBHOe MEHO.
2 IIOBOPaHbAte M.C.ДЯ nIPOkpyTkn nyKTOB MeHIO; NaKmTe, YTObI BbIbOpTaB MIXTRAX.
3Дявбора Функци mixTRAX nobopaunbaite M.C.
CnDyHIOUHE Bb6PbHHbIe FyHKUNI MIXTRAX MOKHO HACTPANBaTb. FyHKUNI DoCTyHbI npi BKNJIOHOM pEKHMIXTRAX.
IcnoIb3OBAHne daHHoro yctpoiCTBa
IcnojB3OBAHne daHHoro yctpoiCTBa
SHORT PLAYBCK (peKIM KpaTKOrO BocPpOn3Be-DeHnI)
MOKHO Bb6pTaB bNITIEHbOcTB bPbEMHbOBCpON3BEdEHn.
1.0 MIN (1,0MnH)—1.5 MIN (1,5MnH)
2.0 MIN (2,0 MmH) 2.5 MIN (2,5 MmH)
3.0 MIN (3,0 MmH)OFF(BbIKJ)
FLASH AREA (obnactb npnbcpnyoero zbeta)
Mokho Bb6paBt 6bnactn PynbCnpyioeero zebeta.
Даго отообравочиya установсого менинскmate M.C.
2ПовачuaITEМ.C.dЯьбogaнстроч.
KEY/DISPLAY(khONKиДИСПЕЛ)-KEY (khONK)OFF(BuKIN)
Ecnblb6paHNOFF,UeT,Bb6paHHB B MEHOILLUMI,6yTeNcnoJIb3OaBtCBKaKaeCTBEZETA NOCDcEBINDcJIeN
FLASH PATTERN (UBeTOBAR 3aCTaBka)
PnIbCnpyUOJIe UBETA n Cneu3ΦΦeKtBI MIX-
TRA XEHMOHTCR A 3ABVIMMOCTN OT yPOBHN rPOMKOTNI HMIKIN CHACTOJ.
JITAOIOB6PbAKENHUYCTAHOBOCHORMOHEHO HAKMATEM.C.
Повораччавей М.С. Дяпьбoga насточи.
13 BvBdoI pyrKMOFBOPENTen EbnIypePdHnN neBv
Bebi/epbI:PepeHNIeBbI
CepbI: IpepeHn npaBbI
Cepb/epHbI:PpeDnH npaBbI
3enehbi:3adnhi nebbi nii ca6bvyep ④
3enehnyeepnhy:3aednnebey nnn Ca68ydep
ФИОТЕВУМ:Задинnpавь nii nca-bydep
ERROR-07, 11, 12, 17, 30
ERROR-07, 10, 11, 12, 15, 17, 30, A0
3NeKTPMueckaeIIMeMAxHueckaeHENCnPABHOCTb.
YctahOBITE KIOU 3aKINAHN B NOJOKHHe OFF, a 3aTEM -B NOJOKHnE ON IINI nepeKIOHtEc bHa npTyOINCTOHN CINHala,a 3aTEM o6pAHO Ha npOurpbIbATEb KOMnAKTINCKOB.
ERROR-15
BCTABENH IyctOI DINCK 3AMeHTNE DINCK
ERROR-23
NqDkHnBuHHeOCTyOBTO USB HE noDaejPknBAeTc DAHHM UCTyOBTOBm.
- PtoKlnnHHTe 73eMmHaauOe yUcTPOBTO BUSB knacca Mass Storage.
- OTOcOJIHHTe yCTPOICTBO n 3aMeHITe ERO HA COBMECTIVMOE 3aONOMHAIoUee yCTPOICTBO USB.
DOnoJIHnTeIbHaNΦOpMaun
CHECK USB
KopotKoe 3ambikahme Ha pa3beMe USB INB Ka6e USB.
Y68nteTcB, cyraPamEM USB nKab6en USB he 3aueemennHe nopebckhen.
CHECK USB
Пдкюненhoe 3anommaohouee yctpoiactbo USB notpe6niet 6bIbe MaKcHMaJIbHOdoNyCTHMoi CINJI ToKA.
OToCeoDInHTe 3aONMOHAIOOE yCTPOICTBO USB
NHe IcNoJIb3yIte erO.YCTaHOBIte KIOU
3aKTHAnraH B nOIOKeHNE OFF,3aTEM-B
nOIOKeHne ACC iIN ON, n3aTEM
PiKnIOuHaTe ToIbKO coMBeTmBle
3aONMOHAIOue YCTPOICTBA USB.
CHECK USB
I Pod pa6oTaε, Ho He noD3apRkaeTc.
Y6bdIteBbOTCYCTBNNKOPTOK3aMbKaHnA
BaKaBeN iPod (hanPImpe,HTO KaBeN he 3azat
MeJyD metAnJIeNcKIMn pIeMdtAmu).PiOnce
PiOpBeRKn KaBeN yctAHoBInTe KNIQ hZaxnIraHn
BaNoJoxEnE OFF, a3atm-B noJoxEne ON,
Ni5bO tKnIOvHTe N aHOBO nOdKnIOvHTe iPod.
ERROR-19
C60n CBA3N.
BbInonHnTe CneDyIOUne DeIcTBna.
- YCTAHONBE NKTU 3XAKHINBA B NOJIOXEHNE OFF, A 3ATEM-B NOJIOXEHNE ON.
-OTKJIQUHTe 3aIOMMHaHOUee yCTpoIcTBO USB.
- Bb6epire DpyroimctOHMK CHTHana. 3aTEM BHOBb Bb6epire USB B kaeeCTBE cTtOHKMA CHTHana
C60iPod.
OTKnHOTe Kab65n t oIPd. Iocne noBAnenHna dnCnIe e rIaBHorO meHIO pAd3oHoNOkNHOtEPi d npe3aPry3nt er0.
ERROR-23
3aONMnHaOoee yctPoIcTBo USB he OTfOpmatu
pBOAHO B cTcTeMe FAT12, FAT16 INI fAT32. 3aONMnHaOoee yctPoIcTBo USB doTknHO bHT
fOpmatrpoBaHO B FAT12, FAT16 INI fAT32.
ERROR-16
UCTapeBsaA BepCn npOuBnK iPd. O6OBHne BECN npOuBnK iPd
C60iPod.
OTKnHHTeKa6bEnIot IPod.PoCneNoBAnENHnHa nDaCnPHe rnaBHorO MeHn IPod zHaBOHO npKnHIOHTe IPod nPepeaRpy3rEro.
STOP
B TekyuIeM cIcNcK eOTCyTcBlyOT KOMnO3HcIy. Bb6IpTe cIcNcK, codepKaaM y3bKaIbIbIe KOMnO3HcIy.
NOT FOUND
KOMP03NIMI HE HAJIDEHO. 3aqrjymeKOTOMP03NIMI Ha iPod.
PpIIOxHn
STARTUPAPP
PnIPOKENHE HIE BEE H3aYUEHO. CNeJyE 3KeAHHbM NOdCK3AaKM.
DononHnTeIbHa nHΦopMaun
Pekomehdaunno 06paueHHcN3dennem
Диckи nponrpbIbaTeIb
INcNoB3yTe TOIbKO IaCKN, IMeOuIe OdnH N3 CNeDyIOXN JOROTNOB.


Icnonb3ynte12-cmDnckn.
IcnoB3yTeToBkoObbHbE KpyrIbIe DnCKI.
CnDyUOHe TNbI DnCKOB HEnb3a HcNpB3oBaTb HAHDMC yCTPOKCTBe:
- Dnckn φopmata DualDisc
8-CM DNICK: NONBTKH NCOIb3OBaT TaKHe DNCK C NOMOUsbHOaADITpeA MOYr PnIBeCTN K HENCPABHOCTN YCTPOINCTBA.
- DnCKn Hne06bIyHbIX φoPm


-ДиСкИДургИХФормАТВ,КРОМСCD
PozhejeDhenBHeIe NcKb, B.T.Y.C TpeuHAMiC, OTKOJIOTbIMK KAPMn IINfeOpDMPOBaHBeN
Дмис CD-R/RW,зарис на Которьх He 6blyaЗагерша
He npiKacaiTseb K 3aJIncAHNOI NOBEXHOCHTN DIKOB.
KordaIcknHeIcnOpb3yOtC8,xaHInTe IxB yfnIpyk.
He npKIIeHbAITE 3IaIKETOK, He pIIWHTe I HaeHHOCHTE XMMUeCKHX BEECTB Ha IOBEpXHOCTB. DnCKOB.
ДагчИСКУМСКТ-ДСКСА ПОТРITE ДМСК МФКЕТКHABJSOOTLENTHAΚPANO.
KoHdEHCaZMa MOKet BVPeMeHHO yXyDUnIb pa60Tny pOnrpBbAten. OCTabte eTo dJa aadantauin K 60lee BbCOKo TMepaType npMmepHO naVac.Takke ydaNtBe BNary c DnCKOB c NOMOJIb MyKoTKaHi.
Bocnpon3BedeHne DnCKOB MOKET 6bTb HeBO-3MOKO H3-3a xapakTePNCtIK DnCKA, FOPMATA DNCKA, pNIOJKeHnA, pIINOMOu KOTOPOro BInONIHANBa3nMc, yCNOBw BOCpON3BedeHn, yCNOBw XpaHEHn ANDpyTNX fKaTOPOB.
Touhki OT hOBPOBCTO DApORMOY Tb3BaTb npbEBHBA BOCPON3EDEHNDA KCA.
ПгИнСЮЛБТОВАHINДСКOB,HA NOBEРXHOCTBKO TOpbIxMOryT HANHOCHTcB3THTKIN,H3UHYTE INH CTPyKUNI N pRdYNPReKDEHINJ DRA T3IXN DMCOB. YctahOBa K I N3BNeHEnHE NeKTOPBtX DMCOB MOrY 6bTb HEBO3MOXHb.INcNoJIb3OBAHIne TAKIX DNCOB MOKeT pINBECTn K NOBpeKDeHINO O6OpDobAHIN.
He npnKneBae H na DNCK 3nKETKN nDpyTne MatePnblb.
3TOMOKETdeOpOPMnOparbTbNCKBpeZyNbTaTeYeeroHxBOCpON3BeHeMe6yTeHBeOBMOKxHBIM.
3TnKETKMOYT OTKNBNTbCBO BVPMeBOCPOIN3BEdENHnIa3TpDnHtNb3NeBHeHnEHNckOB,ATaKaNEbOPnEDbOobpyDAnHe.
3anomnhaouoeyctpoictbo USB
PnKIOKIOHENIEype3EUB-KONHTpATOp HneIeDPXBAaETC.
He noqknochauge pyrchr yucrpoctBA, kponme 3a-nomnHaouxichy uycrpoctB USB
DononHntelbna HOpMaun
Windows Media™ Audio Professional, Lossless, Voice/DRM Stream/Stream c nopepkk boe: He nopepkxbaertc
MP3
PacunepHe: .mp3
CKOpocb5 nepaDeaA daHnBu: OT 8 K6Nt/C do 320 K6Nt/C (noCToHaHH), nepeMeHHa
Yactota dncKpeTn3auim: 08 kTdo 48kTc (32kT,44,1kT,48kTnKOBa)
CoMeTImaM BepCnI TeroB ID3:1.0,1.1,2.2, 2.3,2.4 (TeRn ID3 BepCn2 x I mEOT npmOpHTet neped BepCnI 1.x.)
Спник BOCPONIBEDENI M3U: He poddepkBBAIOCT
MP3i (HHTePAKTHBnH MP3), mp3 PRO: He noD-dePexkBAaOTCR
DononHntelbna HhOpMaun
WAV
Pacunepnne: .wav
PaparHIOCTb KBAHTOBAHINa:8n16(LPCM),4 (MS ADPCM)
Yactota dncKpeTn3aun: ot 16 kTn do 48 kT (LPCM), 22,05 kT n 44,1 kTc (MS ADPCM)
- Tfa pyhckla He pa60taet,ecnn BbIbpaHO USB MTP.
DOnoJIHnTeIbHa IHHOpMaun
B KauchéCTBE NátsbAHINI PáJNA IINI NAPKIN MORYT OTObpaXaTbCBy TóIbKO nepbIe 32 CIMBONA (BKNIOYAR PACCIPENHE).
Дамотобрахень в Даноном утостов的服务дурповба рссckoroTekstaДогнжа COOTBETСВОВБТФ.ОДМУС Истедушник Наворб CBMBOЛБОВ:
- IOHnKoI (UTF-8, UTF-16)
- OTMnHbIOTIOHKoDaHa6OpCMBnOB,NC-non3yUoiinC B cpeD Windows,dIraKotopoRbBtboBnHcTpoiKe 3aadn Pyckn 3abIK
307усточьТо можетяразовп HeKOPPEKTHOB 3aBbICMOnTON OTNpIIOKeONHc,ИСПОЛьЗВАнБHbIXДЯКIDINOBANHФаIMOBVMA.
PnHauane Bocnpo3BedeHn aydnocaiNob, coedjkaaixn 1306bpaekhenia, n faaiNOB c 3anOMnHaioJeero yctpoCTBa USB, coedjkaaero pa3BeTBeHHe lyneapaxniaKo, moKet npOcxOdntb He6oIb7a 3aepkxa.
Dnck
Dongyctmuahepaxnxnanok:doBCMmYPOBHe (peaIbnaHnepaxnxnanokcoCTabnert MeHee DByx yPOBHe)
KoHHeCTBO BOCpON3BODIMbX npAnok: He 600ee 99
KolnheTBOBcnpOn3BodIMbXΦaJIIOB:He 600ee 996
Aata n3rTOBJIeHnO6OpyIOBaHn
P1-ΓoI n3rOToBJIeHnI
| Год | 2001 | 2002 | 2003 | 2004 | 2005 | 2006 | 2007 | 2008 | 2009 | 2010 |
| Симв点亮 | A | B | C | D | E | F | G | H | I | J |
| Год | 2011 | 2012 | 2013 | 2014 | 2015 | 2016 | 2017 | 2018 | 2019 | 2020 |
| Симboл | К | L | M | N | O | P | Q | R | S | T |
P2-Mecrau n3rTOBHeHn
| Мессяц | 1 | 2 | 3 | 4 | 5 | 6 | 7 | 8 | 9 | 10 | 11 | 12 |
| Симв养老金 | A | B | C | D | E | F | G | H | I | J | K | L |
DOnoJIHnteIbHaNΦOpMaun
TexHnueckne xapaKTepeNCTNKn
067ne
- B NOCTOHNORO TOKA (DonyctNMb dmaa30n OH 10,8 B Do 15,1B)
Yactota 50T/63T/80T/100T/
125T/160T/200T
Kpytn3Ha xapaKTepeNCTnKn
-12D6/OKT, -24D6/OKT
YcInenHe +6d5do-24d5
Φa3a HopmaJIbHa/06paTHa
PpOurpbIbATEnb KOMnakT-DnCKOB
CHNTEMA AaDIOOCNCTEMAC C KOMNAKT-DINCKOM
IcnoB3yEmble DNCKn .... KomnakT-Dnck
OTHOWEHNE CnHaJI/WM
94dB(1Kt)(ceTBIEC-A)
Uncno KaHaoB 2 (ctepeo)
ΦopMaTДeKoInpOBAHnIgAaiJIOB MP3
MPEG-1 v2 Audio Layer 3
ΦopMaT DeKoOpOBaHnI ΦaIIIOB WMA
Bercn7,7.1,8,9,10,11,12
(ДБУХКАнЛьНБИ 3ВYК)
(Windows Media Player)
ΦopMaT ciHana WAV ....... Linear PCM u MS ADPCM
(6e3 komnpeccu)
USB
CTaHapTna CneuФkaUma USB
USB 2.0 nonhockopocthoH
MaKcHMaJIbHbI TOK IITaHnIa
1A
Knacc USB .MSC (Mass Storage Class)
(Windows Media Player)
ΦopMaT ciHana WAV ....... Linear PCM u MS ADPCM
(6e3KoMnpceccn)
FM-TIOHEP
Duaanao hactot 87,5Mgduo108,0Mg
Pone3HaYyBCTBntbHcOtB
25MKB (OTHOSEHNE CnHaJI/
Wym:20d6)
OTHOWeHne CnHnJI/WHM
62d5 (ceTB IEC-A)
LW-TIOHEP
DuaanaoHacToT .153KfUdo281KfU
Pone3na yBCTbntenbHOCTb
28MKB (OTHOUeHne CnHaJI/
ym:20dB)
OTHOWeHne CnHnAJI/WHM
62d5 (ceTB IEC-A)
Приимеанно:
B COOTBETCTMN CO sTaTbe 5 3aKoHa PocCnCKOΦepeauuN «O 3aunite npab noTpe6bnteNe N IOCTAHOBnEHEmnpabTeNbCTBa PocCNckoF PepeauuN 720 ot 16.06.97 KOMPnHna Pioneer Europe NV orOBApaertcIeDyUoUs cspOK cnky6bln3denn, OOFmuaHbNO nocTbAReMbix Ha poccNcckn pshOk.
ABytOMo6IbNbHa 3eNKTpOHHa:6 Net
POnyHe u3denni (HayuHnKm, MkPofohbl
n.t.n.):5 net
PpmeaHn
Xapakteprnctnkiu KOKHTpyklna MoryT 6blTbN3MeHnebl 6e3 npdeBapnteBHoro ybeDoMJIeHnA.
ДанhoeуctpoIbTO pOIN3BEdHO B TaNanHe.





http://www.pioneer.eu
Visit www.pioneer.co.uk (or www.pioneer.eu) to register your product.
Pioneer CarStereo-Pass
Please fill out immediately after purchase.
PIONEER ELECTRONICS (USA) INC.
P.O.Box 1540, Long Beach, California 90801-1540,U.S.A.
TEL: (800) 421-1404
PIONEER ELECTRONICS OF CANADA, INC.
340 Ferrier Street, Unit 2, Markham, Ontario L3R 2Z5, Canada
TEL: 1-877-283-5901
TEL: 905-479-4411
PIONEER ELECTRONICS ASIACENTRE PTE. LTD.
253 Alexandra Road, #04-01, Singapore 159936
TEL: 65-6472-7555
PIONEER ELECTRONICS AUSTRALIA PTY. LTD.
5 Arco Lane, Heatherton, Victoria, 3202 Australia
TEL: (03) 9586-6300
PIONEER ELECTRONICS DE MEXICO, S.A. de C.V.
Blvd. Manuel Avila Camacho 138 10 piso
Col.Lomas de Chapultepec, Mexico, D.F. 11000
TEL: 55-9178-4270
先锋股份有限公司
台北市内湖區瑞光路407號8樓
電話:886-(0)2-2657-3588
先鋒電子(香港)有限公司
香港九龍長沙灣道909號5樓
電話:852-2848-6488