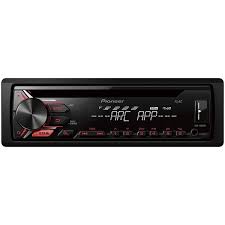
DEH-1900UB - Car stereo PIONEER - Free user manual and instructions
Find the device manual for free DEH-1900UB PIONEER in PDF.


| Product type | Car stereo with CD, USB, AUX player and FM/MW/LW tuner |
| Brand | Pioneer |
| Model | DEH-1900UB |
| Power supply | 14.4 V DC (10.8 V to 15.1 V allowable), negative ground, 10 A fuse |
| Maximum output power | 50 W × 4 channels / 4 Ω (without subwoofer) or 50 W × 2 + 70 W × 1 / 2 Ω (with subwoofer) |
| Continuous output power | 22 W × 4 (50 Hz – 15,000 Hz, 5% THD, 4 Ω) |
| Load impedance | 4 Ω (4 Ω to 8 Ω allowable) |
| Supported audio formats | Audio CD, MP3, WMA, WAV, FLAC (on USB) |
| Connectivity | USB input (front), AUX input (3.5 mm mini-jack), RCA preamp outputs (rear/subwoofer) |
| FM tuner | 87.5 – 108.0 MHz, step 50/100 kHz, RDS, AF, TA, PTY |
| MW/LW tuner | MW 531 – 1602 kHz, LW 153 – 281 kHz |
| Equalizer | 5 bands (80 Hz, 250 Hz, 800 Hz, 2.5 kHz, 8 kHz), ±12 dB |
| High-pass filter (HPF) | Cutoff frequency: 50, 63, 80, 100, 125, 160, 200 Hz; slope -12 or -24 dB/octave |
| Subwoofer output | Mono, adjustable (frequency, slope, gain, phase) |
| Display | Backlit LCD display, brightness adjustment |
| Detachable faceplate | Yes, for theft protection |
| Remote control | Supplied for DEH-1901UB/1901UBG (not for this model, but compatible if separate) |
| Additional features | Pioneer ARC APP (Android via AOA 2.0), Sound Retriever, BSM, PTY, TA traffic information |
| Maintenance | Clean the faceplate with a soft cloth; do not use chemical products; remove the faceplate in case of high heat |
| Safety | Class 1 laser; do not disassemble; disconnect the battery before installation |
| General information | French manual available (PDF); Pioneer website for updates |
Frequently Asked Questions - DEH-1900UB PIONEER
User questions about DEH-1900UB PIONEER
0 question about this device. Answer the ones you know or ask your own.
Ask a new question about this device
Download the instructions for your Car stereo in PDF format for free! Find your manual DEH-1900UB - PIONEER and take your electronic device back in hand. On this page are published all the documents necessary for the use of your device. DEH-1900UB by PIONEER.
USER MANUAL DEH-1900UB PIONEER
REPRODUCTOR DE CD CON RECEPTOR RDS
CD RDS-EMPFÄNGER
CD RDS-ONTVANGER
CD RDS INPUEMHNK
DEH-1900UB
DEH-1900UBG
DEH-1900UBA
DEH-1900UBB
DEH-1901UB
DEH-1901UBG
Owner's Manual
Mode d'emploi
PykoBOIDCTBO NOIb3OBaTeJia
Table of Contents
Before You Start. 2
Getting Started. 3
Radio. 5
CD/USB/AUX 6
Using Pioneer ARC APP 7
Settings 8
FUNCTION settings 8
AUDIO settings. 8
SYSTEM settings 9
ILLUMINATION settings 10
Connections/Installation 10
Additional Information 12
About this manual:
- In the following instructions, a USB memory or USB audio player are referred to as "USB device".
Before You Start
Thank you for purchasing this PIONEER product
To ensure proper use, please read through this manual before using this product. It is especially important that you read and observe WARNINGS and CAUTIONs in this manual. Please keep the manual in a safe and accessible place for future reference.

If you want to dispose this product, do not mix it with general household waste. There is a separate collection system for used electronic products in accordance with legislation that requires proper treatment, recovery and recycling.
Private households in the member states of the EU, in Switzerland and Norway may return their used electronic products free of charge to designated collection facilities or to a retailer (if you purchase a similar new one).
For countries not mentioned above, please contact your local authorities for the correct method of disposal.
By doing so you will ensure that your disposed product undergoes the necessary treatment, recovery and recycling and thus prevent potential negative effects on the environment and human health.
WARNING
- Do not attempt to install or service this product by yourself. Installation or servicing of this product by persons without training and experience in electronic equipment and automotive accessories may be dangerous and could expose you to the risk of electric shock, injury or other hazards.
- Do not attempt to operate the unit while driving. Make sure to pull off the road and park your vehicle in a safe location before attempting to use the controls on the device.
CAUTION
- Do not allow this unit to come into contact with moisture and/or liquids. Electrical shock could result. Also, damage to this unit, smoke, and overheating could result from contact with liquids.
- Always keep the volume low enough to hear outside sounds.
The Pioneer CarStereo-Pass is for use only in Germany. - This product is evaluated in moderate and tropical climate conditions under the Audio, video and similar electronic apparatus - Safety requirements, IEC 60065.
CAUTION
This product is a class 1 laser product classified under the Safety of laser products, IEC 60825-1:2007.
CLASS 1 LASER PRODUCT
If you experience problems
Should this unit fail to work properly, please contact your dealer or nearest authorized PIONEER Service Station.
Getting Started
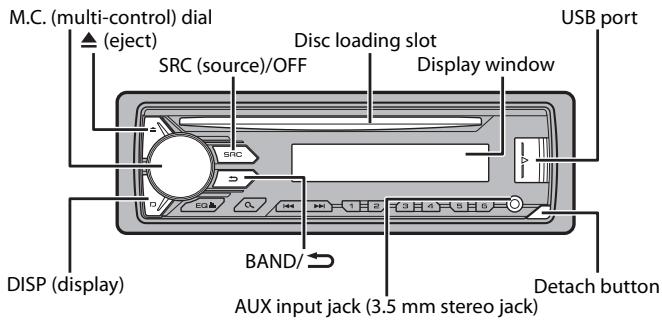
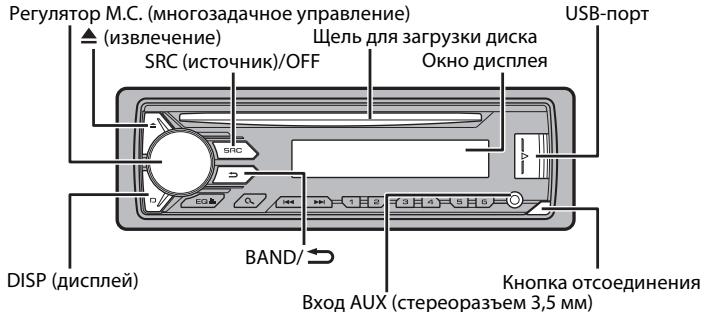
Basic operation
DEH-1900UB/1900UBG/1900UBA/1900UBB/1901UB/1901UBG
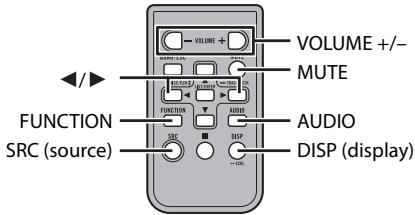
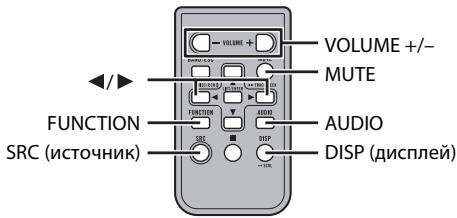
Remote Control
NOTE
Remote control is supplied only for DEH-1901UB/1901UBG.
Frequently used operations
The available buttons vary depending on the unit.
| Purpose | Operation | |
| Head Unit | Remote Control | |
| Turn on the power* | Press SRC/OFF to turn on the power.Press and hold SRC/OFF to turn off the power. | Press SRC to turn on the power.Press and hold SRC to turn off the power. |
| Adjust the volume | Turn the M.C. dial. | Press VOLUME + or - .Press MUTE to mute the unit. Press MUTE again or press VOLUME + or - to unmute. |
| Select a source | Press SRC/OFF repeatedly. | Press SRC repeatedly. |
| Change the display information | Press DISP repeatedly. | Press DISP repeatedly. |
| Return to the previous display/list | Press BAND/→. | Press ↗/ ➔ to select the next/previous folder. |
| Return to the normal display from the menu | Press and hold BAND/→. | - |
- When this unit's blue/white lead is connected to the vehicle's auto-antenna relay control terminal, the vehicle's antenna extends when this unit's source is turned on. To retract the antenna, turn the source off.
Display indication
| Indication | Description |
| » | Appears when a lower tier of the menu or folder exists. |
| P | Appears when the button is pressed. |
| LOC | Appears when the local seek tuning function is set (page 8). |
| TP | Appears when a traffic program is received. |
| TA | Appears when the TA (traffic announcements) function is set (page 8). |
| S.Rtrv | Appears when the sound retriever function is set (page 8). |
| XXX | Appears when random play is set. |
| ← | Appears when repeat play is set. |
Detaching the front panel
Detach the front panel to prevent theft. Remove any cables and devices attached to the front panel and turn off the unit before detaching it.
Detach
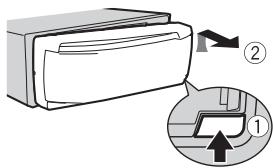

Attach
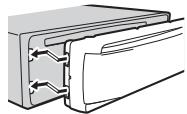

Important
- Avoid subjecting the front panel to excessive shock.
- Keep the front panel out of direct sunlight and high temperatures.
Always store the detached front panel in a protective case or bag.
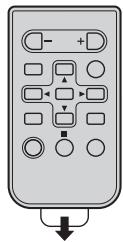
Preparing the remote control
Remove the insulation sheet before use.
How to replace the battery
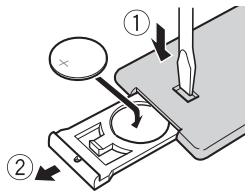
Insert the CR2025 (3 V) battery with the plus (+) and minus (-) poles orientated properly.

WARNING
- Do not ingest the battery, Chemical Burn Hazard
(The remote control supplied with) This product contains a coin/ button cell battery. If the coin/ button cell battery is swallowed, it can cause severe internal burns in just 2 hours and can lead to death.
Keep new and used batteries away from children.
If the battery compartment does not close securely, stop using the product and keep it away from children.
If you think batteries might have been swallowed or placed inside any part of the body, seek immediate medical attention.
- Do not expose the battery or remote control to excessive heat such as direct sunlight or fire.

CAUTION
- There is a potential danger of explosion if the battery is incorrectly replaced. When replacing the battery, replace it with the same type.
- Do not handle or store the battery with metallic tools or objects.
- If the battery leaks, remove the battery and wipe the remote control completely clean. Then install a new battery.
- When disposing of used batteries, please comply with governmental regulations or environmental public institutions' rules that apply in your country/area.

Important
- Do not store the remote control in high temperatures or direct sunlight.
- Do not let the remote control fall onto the floor, where it may become jammed under the brake or accelerator pedal.
Setup menu
When you turn the ignition switch to ON after installation, [SET UP:YES] appears in the display.
1 Press the M.C. dial.
The setup menu disappears after 30 seconds of no operation. If you prefer not to set at this time, turn the M.C. dial to select [NO], then press to confirm.
2 Turn the M.C. dial to select the options, then press to confirm.
To proceed to the next menu option, you need to confirm your selection.
| Menu Item | Description |
| LANGUAGE [ENG](English), [PYC](Russian), [TUR](Turkish) | Select the language to display the text information from a compressed audio file. |
| CLOCK SET | Set the clock. |
| FM STEP [100], [50] | Select the FM tuning step from 100 kHz or 50 kHz. |
3 [QUIT:YES] appears when all the settings have been made.
To return to the first item of the setup menu, turn the M.C. dial to select [QUIT:NO], then press to confirm.
4 Press the M.C. dial to confirm the settings.
NOTES
- You can cancel the menu setting by pressing SRC/OFF.
- These settings can be made at any time from the SYSTEM settings (page 9) and INITIAL settings (page 5).
Canceling the demonstration display (DEMO OFF)
1 Press the M.C. dial to display the main menu.
2 Turn the M.C. dial to select [SYSTEM], then press to confirm.
3 Turn the M.C. dial to select [DEMO OFF], then press to confirm.
4 Turn the M.C. dial to select [YES], then press to confirm.
INITIAL settings
1 Press and hold SRC/OFF until the unit turns off.
2 Press and hold SRC/OFF to display the main menu.
3 Turn the M.C. dial to select [INITIAL], then press to confirm.
4 Turn the M.C. dial to select an option, then press to confirm.
NOTE
The options vary depending on the unit.
| Menu Item | Description |
| FM STEP [100], [50] | Select the FM tuning step from 100 kHz or 50 kHz. |
| SP-P/O MODE [REAR/SUB.W] | Select when there is a full-range speaker connected to the rear speaker output leads and there is a subwoofer connected to the RCA output. |
| [SUB.W/SUB.W] | Select when there is a passive subwoofer connected directly to the rear speaker output leads and there is a subwoofer connected to the RCA output. |
| [REAR/REAR] | Select when there are full-range speakers connected to the rear speaker output leads and RCA output. If there is a full-range speaker connected to the rear speaker output leads, and the RCA output is not used, you may select either [REAR/SUB.W] or [REAR/REAR]. |
| Menu Item | Description |
| S/W UPDATE [SYSTEM INFO] | Select to confirm the latest system information on the unit. |
| [SYSTEM UPDATE] | Select to update the unit to the latest software and initialize the unit settings. For details on the latest software and updating, visit our website. |
| SYSTEM RESET [YES], [NO] | Select [YES] to initialize the unit settings. The unit will be restarted automatically. (Some of the settings may be retained even after resetting the unit.) |
Radio
The tuner frequencies on this unit are allocated for use in Western Europe, Asia, the Middle East, Africa and Oceania. Use in other areas may result in poor reception. The RDS (radio data system) function only works in areas that broadcast RDS signals for FM stations.
Receiving preset stations
1 Press SRC/OFF to select [RADIO].
2 Press BAND/ to select the band from [FM1], [FM2], [FM3], [MW] or [LW].
3 Press a number button (1/ ∧ to 6/ →).
TIP
The / buttons can be also used to select a preset station when [SEEK] is set to [PCH] in the FUNCTION settings (page 8).
Best stations memory (BSM)
The six strongest stations are stored on the number buttons (1 / to 6 / 一
1 After selecting the band, press the M.C. dial to display the main menu.
2 Turn the M.C. dial to select [FUNCTION], then press to confirm.
3 Turn the M.C. dial to select [BSM], then press to confirm.
To seek a station manually
1 After selecting the band, press to select a station.
Press and hold / then release to seek an available station. Scanning stops when the unit receives a station. To cancel seek tuning, press / .
NOTE
[SEEK] needs to be set to [MAN] in the FUNCTION settings (page 8).
To store stations manually
1 While receiving the station you want to store, press and hold one of the number buttons (1/ ∧ to 6/) until it stops flashing.
Using PTY functions
The unit searches for a station by PTY (program type) information.
1 Press during FM reception.
2 Turn the M.C. dial to select a program type from [NEWS/INFO], [POPULAR], [CLASSICS] or [OTHERS].
3 Press the M.C. dial.
The unit begins to search for a station. When it is found, its program service name is displayed.
NOTES
To cancel the search, press the M.C. dial.
- The program of some stations may differ from that indicated by the transmitted PTY.
- If no station is broadcasting the type of program you searched for, [NOT FOUND] is displayed for about two seconds and then the tuneurs return to the original station.
CD/USB/AUX
Playing back
Disconnect headphones from the device before connecting it to the unit.
CD
1 Insert a disc into the disc loading slot with the label side up.
To eject a disc, stop playback first then press .
USB devices (including Android™)
1 Open the USB port cover.
2 Plug in the USB device using an appropriate cable.
NOTE
To automatically switch to [USB] source when a USB device is connected to the unit, set [USB AUTO] to [ON] in the SYSTEM settings (page 10).

CAUTION
Use an optional Pioneer USB cable (CD-U50E) to connect the USB device as any device connected directly to the unit will protrude out from the unit, which could be dangerous.
Before removing the device, stop playback.
AOA connections
For details on AOA connection, see page 7.
MTP connection
A device installed with Android OS 4.0 or later can be connected to the unit via MTP, using the cable supplied with the device. However, depending on the connected device and the numbers of the files in the device, audio files/songs may not be able to be played back via MTP. Note that MTP connection is not compatible with WAV and FLAC file formats.
NOTE
If you use an MTP connection, [ANDROID WIRED] needs to be set to [MEMORY] in the SYSTEM settings (page 9).
AUX
1 Insert the stereo mini plug into the AUX input jack.
2 Press SRC/OFF to select [AUX] as the source.
NOTE
If [AUX] is set to [OFF] in the SYSTEM settings, [AUX] cannot be selected as a source (page 9).
Operations
You can make various adjustments in the FUNCTION settings (page 8).
Note that the following operations do not work for an AUX device. To operate an AUX device, use the device itself.
| Purpose | Operation |
| Select a folder/album*1 | Press 1/∧ or 2/∨. |
| Select a track/song (chapter) | Press ↦ or ↧. |
| Fast forward or reverse*2 | Press and hold ↓← or ▷↓. |
| Search for a file from a list | 1 Press Q to display the list. 2 Turn the M.C. dial to select the desired file (folder) name or category, then press to confirm. 3 Turn the M.C. dial to select the desired file, then press to confirm. Playback starts. |
| View a list of the files in the selected folder/ category*1 | Press the M.C. dial when a folder/category is selected. |
| Play a song in the selected folder/ category*1 | Press and hold the M.C. dial when a folder/ category is selected. |
| Repeat play | Press 6/→. |
| Random play | Press 5/✗A. |
| Pause/resume playback | Press 4/PAUSE. |
| Sound retriever*1 | Press 3/S.Rtrv. [1]: Effective for low compression rates [2]: Effective for high compression rates |
| Return to root folder (CD/USB only)*1 | Press and hold Q. |
| Switch between compressed audio and CD- DA (CD only) | Press BAND/→. |
| Change drives in USB device (Devices that support the USB mass storage device class protocol only) | Press BAND/→. |
1 Compressed audio files only
2 When you use the fast forward or reverse function while playing a VBR file, the playback time may be not correct.
Using Pioneer ARC APP
You can operate the unit from Pioneer ARC APP installed on an Android device. In some cases, you can control aspects of the application, such as source selection, pause, etc., by using the unit.
For details on what operations are available on the application, see the application's help section.
WARNING
Do not attempt to operate the application while driving. Make sure to pull off the road and park your vehicle in a safe location before attempting to use the controls on the application.
For Android device users
This function is compatible with devices that have Android OS 4.1 or later installed and also support AOA (Android Open Accessory) 2.0.
You can download Pioneer ARC APP on Google Play™.
NOTE
Some Android devices connected via AOA 2.0 may not work properly or emit sounds due to their own software design, regardless of the OS version.
Making a connection with Pioneer ARC APP
1 Connect this unit with the mobile device.
Android device via USB (page 6)
2 Press the M.C. dial to display the main menu.
3 Turn the M.C. dial to select [SYSTEM], then press to confirm.
4 Turn the M.C. dial to select [ANDROID WIRED], then press to confirm.
5 Turn the M.C. dial to select [APP CONTROL] for an Android device connected via USB.
If [ON] is selected in [P.APP AUTO ON] (page 9), Pioneer ARC APP on the Android device starts automatically, and all the steps are finished.
NOTE
If Pioneer ARC APP has not been installed on your Android device yet, a message that prompts you to install the application will appear on your Android device. Select [OFF] in [PAPP AUTO ON] to clear the message (page 9).
6 Press SRC/OFF to select any source.
7 Launch Pioneer ARC APP on the mobile device.
Listening to music on Android
1 Press SRC/OFF to select [ANDROID].
Basic operations
| Purpose | Operation |
| Select a track | Press ↓ or >. |
| Fast forward or reverse | Press and hold ↓ or >. |
| Pause/resume playback | Press 4/PAUSE. |
| Sound retriever | Press 3/S.Rtrv. [1]: Effective for low compression rates [2]: Effective for high compression rates |
Settings
You can adjust various settings in the main menu.
Press the M.C. dial to display the main menu.
2 Turn the M.C. dial to select one of the categories below, then press to confirm.
FUNCTION settings (page 8)
- AUDIO settings (page 8)
SYSTEM settings (page 9)
- ILLUMINATION settings (page 10)
3 Turn the M.C. dial to select the options, then press to confirm.
FUNCTION settings
The menu items vary according to the source.
| Menu Item | Description |
| FM SETTING RADIO [TALK], [STANDARD], [MUSIC] | Match the sound quality level with the broadcast signal conditions of the FM band signal. (Available only when FM band is selected.) |
| BSM RADIO | Store the six strongest stations on the number buttons (1/∧ to 6/←) automatically. |
| Menu Item | Description |
| REGIONAL RADIO [ON], [OFF] | Limit the reception to the specific regional programs when AF (alternative frequencies search) is selected. (Available only when FM band is selected.) |
| LOCAL RADIO FM: [OFF], [LV1], [LV2], [LV3], [LV4] MW/LW: [OFF], [LV1], [LV2] | Restrict the tuning station according to the signal strength. |
| TA RADIO [ON], [OFF] | Receive current traffic information if available. (Available only when FM band is selected.) |
| AF RADIO [ON], [OFF] | Allow the unit to retune to a different frequency providing the same station. (Available only when FM band is selected.) |
| NEWS RADIO [ON], [OFF] | Interrupt the currently selected source with news programs. (Available only when FM band is selected.) |
| SEEK RADIO [MAN], [PCH] | Assign ↓ or ↑ buttons to seek the stations one by one (manual tuning) or select a station from the preset channels. |
| S.RTRV CD USB ANDROID [1] (effective for low compression rates), [2] (effective for high compression rates), [OFF] | Enhance compressed audio and restore rich sound. Not available when: • CD-DA/CD-TEXT is played back. • The FLAC file is played back. |
| AUDIO settings | |
| Menu Item | Description |
| FADER*1 | Adjust the front and rear speaker balance. |
| BALANCE | Adjust the left and right speaker balance. |
| EQ SETTING | |
| [SUPER BASS], [POWERFUL], [NATURAL], [VOCAL], [CUSTOM1], [CUSTOM2], [FLAT] | Select or customise the equalizer curve. [CUSTOM1] can be set separately for each source. However, each of the below combinations are set to the same setting automatically. |
| Select an equalizer band and level for further customising. Equalizer band: [80HZ], [250HZ], [800HZ], [2.5KHZ], [8KHZ] Equalizer level: [+6] to [-6] | [CUSTOM2] is a shared setting used for all sources. You can also switch the equalizer by pressing EQ, Continuous repeatedly. |
| LOUDNESS | |
| [OFF], [LOW], [MID], [HI] | Compensate for clear sound at low volume. |
| SUB.W*2 | |
| [NOR], [REV], [OFF] | Select the subwoofer phase. |
| SUB.W CTRL*2*3 | |
| Cut-off frequency: [50HZ], [63HZ], [80HZ], [100HZ], [125HZ], [160HZ], [200HZ] Output level: [-24] to [+6] Slope level: [-12], [-24] | Only frequencies lower than those in the selected range are output from the subwoofer. |
| BASS BOOST | |
| [0] to [+6] | Select the bass boost level. |
| HPF SETTING | |
| Cut-off frequency: [OFF], [50HZ], [63HZ], [80HZ], [100HZ], [125HZ], [160HZ], [200HZ] Slope level: [-12], [-24] | Only frequencies higher than the high-pass filter (HPF) cutoff are output from the speakers. |
| SLA | |
| [+4] to [-4] | Adjust the volume level for each source except FM. |
1 Not available when [SUB.W/SUB.W] is selected in [SP-P/O MODE] in the INITIAL settings (page 5).
2 Not available when [REAR/REAR] is selected in [SP-P/O MODE] in the INITIAL settings (page 5).
*3 Not available when [OFF] is selected in [SUB.W].
SYSTEM settings
You can also access to these menus when the unit is turned off.
| Menu Item | Description |
| LANGUAGE [ENG](English), [PVC](Russian), [TUR](Turkish) | Select the language to display the text information from a compressed audio file. |
| CLOCK SET | Set the clock (page 4). |
| 12H/24H [12H], [24H] | Select the time notation. |
| AUTO PI [ON], [OFF] | Search for a different station with the same programming, even if using a preset station. |
| AUX [ON], [OFF] | Set to [ON] when using an auxiliary device connected to the unit. |
| MUTE MODE (Not available for DEH-1900UBA) [MUTE], [20dB ATT], [10dB ATT] | Mute or attenuate sound automatically when a signal from equipment with a mute function is received. |
| PW SAVE* [ON], [OFF] | Reduce the battery power consumption. Turning on the source is the only operation allowed when this function is on. |
| ANDROID WIEDR [MEMORY], [APP CONTROL] | Select the appropriate connection method for an Android device. |
| P.APP AUTO ON [ON], [OFF] | Select [ON] to automatically launch Pioneer ARC APP when an Android device is connected to the unit via AOA. (Not available when [MEMORY] is selected in [ANDROID WIEDR].) |
| USB AUTO | |
| [ON], [OFF] | Select [ON] to automatically switch to [USB] source when a USB device is connected to the unit. Select [OFF] when a USB device is being connected to the unit just for charging. |
- [PW SAVE] is canceled if the vehicle battery is disconnected and will need to be turned back on once the battery is reconnected. When [PW SAVE] is off, depending on connection methods, the unit may continue to draw power from the battery if your vehicle's ignition does not have an ACC (accessory) position.
ILLUMINATION settings
| Menu Item | Description |
| DIM SETTING | |
| [SYNC CLOCK], [MANUAL] | Change the display brightness. |
| BRIGHTNESS | |
| [1] to [10] | Change the display brightness. The available setting ranges differ depending on [DIM SETTING]. |
Connections/Installation
Connections
Important
- When installing this unit in a vehicle without an ACC (accessory) position on the ignition switch, failure to connect the red cable to the terminal that detects operation of the ignition key may result in battery drain.

ACC position

No ACC position
- Use of this unit in conditions other than the following could result in fire or malfunction.
- Vehicles with a 12-volt battery and negative grounding.
- When speaker output is used by 4 channels, use speakers over 50 W (maximum input power) and between 4 Ω to 8 Ω (impedance value). Do not use 1 Ω to 3 Ω speakers for this unit.
- When rear speaker output is used by 2 of subwoofer, use speakers over 70W (maximum input power).
- Please refer to connections for a connection method.
- To prevent a short-circuit, overheating or malfunction, be sure to follow the directions below.
- Disconnect the negative terminal of the battery before installation.
- Secure the wiring with cable clamps or adhesive tape. Wrap adhesive tape around wiring that comes into contact with metal parts to protect the wiring.
-
Place all cables away from moving parts, such as the shift lever and seat rails.
-
Place all cables away from hot places, such as near the heater outlet.
- Do not connect the yellow cable to the battery by passing it through the hole to the engine compartment.
-Cover any disconnected cable connectors with insulating tape.
-Do not shorten any cables. - Never cut the insulation of the power cable of this unit in order to share the power with other devices. The current capacity of the cable is limited.
- Use a fuse of the rating prescribed.
- Never wire the negative speaker cable directly to ground.
-
Never band together negative cables of multiple speakers.
-
When this unit is on, control signals are sent through the blue/white cable. Connect this cable to the system remote control of an external power amp or the vehicle's auto-antenna relay control terminal (max. 300mA 12 V DC). If the vehicle is equipped with a glass antenna, connect it to the antenna booster power supply terminal.
- Never connect the blue/white cable to the power terminal of an external power amp. Also, never connect it to the power terminal of the auto antenna. Doing so may result in battery drain or a malfunction.
- The black cable is ground. Ground cables for this unit and other equipment (especially, high-current products such as power amps) must be wired separately. If they are not, an accidental detachment may result in a fire or malfunction.
- The graphical symbol —— placed on the product means direct current.
This unit
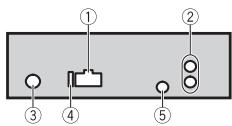
① Power cord input
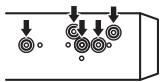
② Rear output or subwoofer output
③ Antenna input
④ Fuse(10A)
⑤ Wired remote input (Not available for DEH-1900UBA) Hard-wired remote control adapter can be connected (sold separately).
Power cord
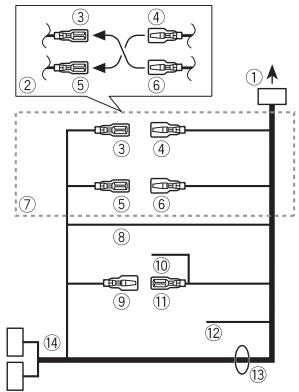
① To power cord input
② Depending on the kind of vehicle, the function of ③ and ⑤ may be different. In this case, be sure to connect ④ to ⑤ and ⑥ to ③
③ Yellow Back-up (or accessory) ④ Yellow
Connect to the constant 12V supply terminal.
⑤ Red
Accessory (or back-up)
⑥ Red
Connect to terminal controlled by the ignition switch (12 V DC).
⑦ Connect leads of the same colour to each other.
⑧ Black (chassis ground)
⑨ Blue/white
The pin position of the ISO connector will differ depending on the type of vehicle. Connect 9 and 11 when Pin 5 is an antenna control type. In another type of vehicle, never connect 9 and 11.
10 Blue/white
Connect to the system control terminal of the power amp (max. 300 mA 12 V DC).
① Blue/white
Connect to the auto-antenna relay control terminal (max. 300mA12VDC
Yellow/black (Not available for DEH-1900UBA)
If you use equipment with a Mute function, wire this lead to the Audio Mute lead on that equipment. If not, keep the Audio Mute lead free of any connections.
⑬ Speaker leads
White: Front left
White/black:Front left
Gray: Front right
Gray/black: Front right
Green: Rear left or subwoofer
Green/black:Rear left or subwoofer
Violet: Rear right or subwoofer
Violet/black: Rear right or subwoofer
ISO connector
In some vehicles, the ISO connector may be divided into two. In this case, be sure to connect to both connectors.
NOTES
- Change the initial menu of this unit. Refer to [SP-P/O MODE] (page 5). The subwoofer output of this unit is monaural.
- When using a subwoofer of 2 , be sure to connect the subwoofer to the violet and violet/black leads of this unit. Do not connect anything to the green and green/black leads.
Power amp (sold separately)
Perform these connections when using the optional amplifier.
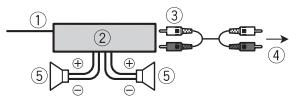
① System remote control Connect to blue/white cable.
② Power amp (sold separately)
③ Connect with RCA cables (sold separately)
④ To rear output or subwoofer output
⑤ Rear speaker or subwoofer
Installation
Important
- Check all connections and systems before final installation.
- Do not use unauthorized parts as this may cause malfunctions.
- Consult your dealer if installation requires drilling of holes or other modifications to the vehicle.
- Do not install this unit where:
-it may interfere with operation of the vehicle.
-it may cause injury to a passenger as a result of a sudden stop.
- The semiconductor laser will be damaged if it overheats. Install this unit away from hot places such as near the heater outlet.
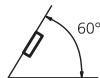
Optimum performance is obtained when the unit is installed at an angle of less than 60^ .
- When installing, to ensure proper heat dispersal when using this unit, make sure you leave ample space behind the rear panel and wrap any loose cables so they are not blocking the vents.
Leave ample space
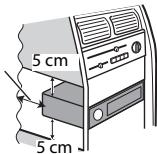
DIN mount installation
1 Insert the supplied mounting sleeve into the dashboard.
2 Secure the mounting sleeve by using a screwdriver to bend the metal tabs (90^) into place.
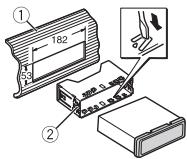
① Dashboard
② Mounting sleeve
- Make sure that the unit is installed securely in place. An unstable installation may cause skipping or other malfunctions.
When not using the supplied mounting sleeve
1 Determine the appropriate position where the holes on the bracket and the side of the unit match.
2 Tighten two screws on each side.
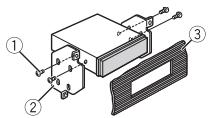
① Tapping screw (5 mm × 9 mm, not supplied with product)
② Mounting bracket
③ Dashboard or console
Removing the unit (installed with the supplied mounting sleeve)
1 Remove the trim ring.
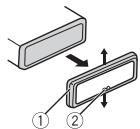
① Trim ring
② Notched tab
- Releasing the front panel allows easier access to the trim ring.
- When reattaching the trim ring, point the side with the notched tab down.
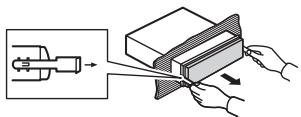
2 Insert the supplied extraction keys into both sides of the unit until they click into place.
3 Pull the unit out of the dashboard.
Additional Information
Troubleshooting
The display automatically returns to the normal display.
No operations have been made for about 30 seconds.
- Perform an operation.
The repeat play range changes unexpectedly.
Depending on the repeat play range, the selected range may change when another folder or track is being selected or during fast forwarding/reversing. -Select the repeat play range again.
A subfolder is not played back.
Sub folders cannot be played when [FLD] (folder repeat) is selected.
- Select another repeat play range.
The sound is intermittent.
→ You are using a device, such as a cellular phone, that may cause audible interference.
- Move electrical devices that may be causing the interference away from the unit.
Error messages
Common
AMP ERROR
This unit fails to operate or the speaker connection is incorrect.
The protective circuit is activated.
- Check the speaker connection.
Turn the ignition switch OFF and back to ON again. If the message remains, contact your dealer or an authorized Pioneer Service Station for assistance.
NO XXXX (NO TITLE, for example)
There is no embedded text information.
- Switch the display or play another track/file.
CD player
ERROR-07,11,12,17,30
→ The disc is dirty.
Clean the disc.
→ The disc is scratched.
-Replace the disc.
ERROR-07, 10, 11, 12, 15, 17, 30, A0
→ There is an electrical or mechanical error.
- Turn the ignition switch OFF and back to ON, or switch to a different source, then back to the CD player.
ERROR-15
→ The inserted disc is blank.
-Replace the disc.
ERROR-23
Unsupported CD format.
-Replace the disc.
FORMATREAD
→ Sometimes there is a delay between the start of playback and when you start to hear any sound.
- Wait until the message disappears and you hear sound.
NO AUDIO
→ The inserted disc does not contain any playable files.
-Replace the disc.
SKIPPED
→ The inserted disc contains DRM protected files.
- The protected files are skipped.
PROTECT
All the files on the inserted disc are embedded with DRM.
-Replace the disc.
USB device
FORMAT READ
→ Sometimes there is a delay between the start of playback and when you start to hear any sound.
- Wait until the message disappears and you hear sound.
NO AUDIO
→There are no songs.
- Transfer the audio files to the USB device and connect.
The connected USB device has security enabled.
- Follow the USB device instructions to disable the security.
SKIPPED
→ The connected USB device contains DRM protected files.
- The protected files are skipped.
PROTECT
All the files on the connected USB device are embedded with DRM.
-Replace the USB device.
N/A USB
The connected USB device is not supported by this unit.
- Disconnect your device and replace it with a compatible USB device.
HUB ERROR
→ The USB device connected via a USB hub is not supported by this unit.
- Connect the USB device directly to this unit using a USB cable.
CHECK USB
→ The USB connector or USB cable has short-circuited.
- Check that the USB connector or USB cable is not caught in something or damaged.
The connected USB device consumes more than maximum allowable current. - Disconnect the USB device and do not use it. Turn the ignition switch OFF and back to ACC or ON. Connect only compliant USB devices.
ERROR-19
Communication failed.
- Perform one of the following operations, then return to the USB source.
- Turn the ignition switch OFF and back to ON.
- Disconnect the USB device.
- Change to a different source.
ERROR-23
USB device was not formatted properly.
- Format the USB device with FAT12, FAT16 or FAT32.
STOP
There are no songs in the current list.
- Select a list that contains songs.
Handling guidelines
Discs and player
- Use only discs that feature either of the following two logos.

DIGITAL AUDIO

DIGITAL AUDIO
- Use 12-cm discs.
- Use only conventional, fully circular discs.
- The following types of discs cannot be used with this unit:
-DualDiscs
-8-cm discs: Attempts to use such discs with an adaptor may cause the unit to malfunction.
- Oddly shaped discs
- Disks other than CDs
- Damaged discs, including discs that are cracked, chipped or warped
- CD-R/RW discs that have not been finalized
- Do not write on or apply chemicals to the surface of the discs.
- To clean a CD, wipe the disc with a soft cloth outward from the center.
- Condensation may temporarily impair the player's performance. Let it rest for about one hour to adjust to a warmer temperature. Also, wipe any damp discs off with a soft cloth.
- When using discs that can be printed on label surfaces, check the instructions and the warnings of the discs. Depending on the discs, inserting and ejecting may not be possible. Using such discs may result in damage to this equipment.
-
Do not attach commercially available labels or other materials to the discs.
-
The discs may warp making the disc unplayable.
- The labels may come off during playback and prevent ejection of the discs, which may result in damage to the equipment.
USB storage device
- Connections via USB hubs are not supported.
- Firmly secure the USB storage device before driving. Do not let the USB storage device fall onto the floor, where it may become jammed under the brake or accelerator pedal.
-
Depending on the USB storage device, the following problems may occur.
-
Operations may vary.
-
The storage device may not be recognized.
-
Files may not be played back properly.
- The device may cause audible interference when you are listening to the radio.
Compressed audio compatibility
- Only the first 32 characters can be displayed as a file name (including the file extension) or a folder name.
- The unit may not work properly depending on the application used to encode WMA files.
- There may be a slight delay at the start of the playback of audio files embedded with image data, or audio files stored on a USB device with numerous folder hierarchies.
-
Russian text to be displayed on this unit should be encoded in one of the following character sets:
-
Unicode (UTF-8, UTF-16)
- A character set other than Unicode that is used in a Windows environment and is set to Russian in the multi-language setting
CAUTION
- Pioneer cannot guarantee compatibility with all USB mass storage devices, and assumes no responsibility for any loss of data on media players, smartphones, or other devices while using this product.
- Do not leave discs or a USB storage device in any place that is subject to high temperatures.
WMA files
| File extension | .wma |
| Bit rate | 48 kbps to 320 kbps (CBR), 48 kbps to 384 kbps (VBR) |
| Sampling frequency | 32 kHz, 44.1 kHz, 48 kHz |
| Windows MediaTM Audio Professional, Lossless, Voice/DRM Stream/Stream with video | Not compatible |
MP3 files
| File extension | .mp3 |
| Bit rate | 8 kbps to 320 kbps (CBR), VBR |
| Sampling frequency | 8 kHz to 48 kHz (32 kHz, 44.1 kHz, 48 kHz for emphasis) |
| Compatible ID3 tag version | 1.0, 1.1, 2.2, 2.3, 2.4 (ID3 tag Version 2.x is given priority over Version 1.x.) |
| M3u playlist | Not compatible |
| MP3i (MP3 interactive), mp3 PRO | Not compatible |
WAV files
WAV file formats cannot be connected via MTP.
| File extension | .wav |
| Quantization bits | 8 and 16 (LPCM), 4 (MSADPCM) |
| Sampling frequency | 16 kHz to 48 kHz (LPCM), 22.05 kHz and 44.1 kHz (MS ADPCM) |
FLAC files
- FLAC file formats cannot be connected via MTP.
- FLAC files may not be playable, depending on the encoder.
| File extension | . flac |
| Sampling frequency | 8/11.025/12/16/22.05/24/32/44.1/48 kHz |
| Quantization bit rate | 16 bit |
| Channel mode | 1/2 ch |
Disc
- Regardless of the length of the blank section between the songs from the original recording, compressed audio discs play with a short pause between songs.
| Playable folder hierarchy | Up to eight tiers (A practical hierarchy is less than two tiers.) |
| Playable folders | Up to 99 |
| Playable files | Up to 999 |
| File system | ISO 9660 Level 1 and 2, Romeo, Joliet |
| Multi-session playback | Compatible |
| Packet write data transfer | Not compatible |
USB device
- There may be a slight delay when starting playback of audio files on a USB storage device with numerous folder hierarchies.
| Playable folder hierarchy | Up to eight tiers (A practical hierarchy is less than two tiers.) |
| Playable folders | Up to 500 |
| Playable files | Up to 15 000 |
| Playback of copyright-protected files | Not compatible |
| Partitioned USB device | Only the first partition can be played. |
Sequence of audio files
The user cannot assign folder numbers and specify playback sequences with this unit. Sequence of audio file depends on the connected device.
Note that the hidden files in a USB device cannot be played back.
Example of a hierarchy
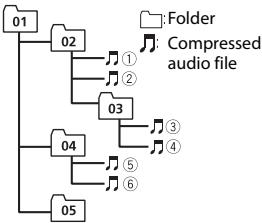
Level 1 Level 2 Level 3 Level 4
01 to 05: Folder number
① to ⑥: Playback sequence
Russian character chart
| D: C | D: C | D: C |
| R:A | Б:B | Б:B |
| F:Γ | Д:Д | Ε:E,Ε |
| *::Ж | Ž:3 | И:И,И |
| K:К | М:Л | М:М |
| H:H | Д:О | Д:П |
| P:P | Ε:C | Τ:Τ |
| Y:Y | Φ:Φ | Ψ:X |
| U:U | Ч:Ч | Ш:Ш,Ш |
| Ž:Ž | Η:ΗΙ | Η:ΗΙ |
| Ž:Э | Η:Ο | Η:Я |
D:Display C:Character
Copyright and trademark
WMA
Windows Media is either a registered trademark or trademark of Microsoft Corporation in the United States and/or other countries.
This product includes technology owned by Microsoft Corporation and cannot be used or distributed without a license from Microsoft Licensing, Inc.
FLAC
Copyright © 2000-2009 Josh Coalson
Copyright © 2011-2013 Xiph.Org
Foundation
Redistribution and use in source and binary forms, with or without modification, are permitted provided that the following conditions are met:
- Redistributions of source code must retain the above copyright notice, this list of conditions and the following disclaimer.
- Redistributions in binary form must reproduce the above copyright notice, this list of conditions and the following disclaimer in the documentation and/or other materials provided with the distribution.
- Neither the name of the Xiph.org Foundation nor the names of its contributors may be used to endorse or promote products derived from this software without specific prior written permission.
THIS SOFTWARE IS PROVIDED BY THE COPYRIGHT HOLDERS AND
CONTRIBUTORS "AS IS" AND ANY EXPRESS
OR IMPLIED WARRANTY, INCLUDING, BUT
NOT LIMITED TO, THE IMPLIED
WARRANTIES OF MERCHANTABILITY AND
FITNESS FOR A PARTICULAR PURPOSE ARE
DISCLAIMED. IN NO EVENT SHALL THE
FOUNDATION OR CONTRIBUTORS BE
LIABLE FOR ANY DIRECT, INDIRECT,
INCIDENTAL, SPECIAL, EXEMPLARY, OR CONSEQUENTIAL DAMAGES (INCLUDING, BUT NOT LIMITED TO, PROCEDURE OF SUBSTITUTE GOODSOR SERVICES;LOSS OF USE, DATA, OR PROFITS; OR BUSINESS INTERRUPTION) HOWEVER CAUSED AND ON ANY THEORY OF LIABILITY, WHETHER IN CONTRACT,STRICT LIABILITY,OR TORT (INCLUDING NEGLIGENCE OR OTHERWISE) ARISING IN ANY WAY OUT OF THE USE OF THIS SOFTWARE, EVEN IF ADVISED OF THE POSSIBILITY OF SUCH DAMAGE.
Android & Google Play
Android, Google Play, and the Google Play logo are trademarks of Google Inc.
Specifications
General
Power source: 14.4 V DC (10.8 V to 15.1 V allowable)
Grounding system: Negative type
Maximum current consumption: 10.0 A
Dimensions (W× H× D) DIN
Chassis: 178mm× 50mm× 165mm
Nose: 188mm× 58mm× 17mm D
Chassis: 178mm× 50mm× 165mm
Nose: 170mm× 46mm× 17mm
Weight: 1 kg
Audio
Maximum power output:
- 50W× 4ch / 4 (for no subwoofer)
- 50 × 2 ch / 4 + 70 W × 1 ch / 2 (for subwoofer)
Continuous power output:
22W× 4 (50Hz to 15000 Hz, 5 %
THD, 4 Ω load, both channels driven)
Load impedance: 4 (4 to 8 allowable)
Preout maximum output level: 2.0V
Loudness contour: +10 dB (100 Hz), +6.5 dB (10 kHz) (volume: -30 dB)
Equalizer (5-Band Graphic Equalizer):
Frequency: 80 Hz/250 Hz/800 Hz/2.5 kHz/8 kHz
Equalization range: ± 12 dB (2 dB step)
Subwoofer (mono):
Frequency: 50Hz / 63Hz / 80Hz / 100
Hz/125 Hz/160 Hz/200 Hz
Slope: -12 dB/oct, -24 dB/oct
Gain: +6 dB to -24 dB
Phase: Normal/Reverse
CD player
System: Compact disc audio system
Usable discs: Compact disc
Signal-to-noise ratio: 94 dB (1 kHz) (IEC-A network)
Number of channels: 2 (stereo)
MP3 decoding format: MPEG-1 & 2 Audio Layer 3
WMA decoding format: Ver. 7, 7.1, 8, 9, 10, 11, 12 (2 ch audio) (Windows Media Player)
WAV signal format: Linear PCM & MS ADPCM (Non-compressed)
USB
USB standard specification: USB 2.0 full speed
Maximum current supply: 1 A
USB Protocol:
MSC (Mass Storage Class)
MTP (Media Transfer Protocol)
AOA (Android Open Accessory) 2.0
File system: FAT12, FAT16, FAT32
MP3 decoding format: MPEG-1 & 2 Audio Layer 3
WMA decoding format: Ver. 7, 7.1, 8, 9, 10, 11, 12 (2 ch audio) (Windows Media Player)
FLAC decoding format: v1.3.0 (Free Lossless Audio Codec)
WAV signal format: Linear PCM & MS ADPCM (Non-compressed)
FM tuner
Frequency range: 87.5 MHz to 108.0 MHz
Usable sensitivity: 11 dBf (1.0 V/75 Ω, mono, S/N: 30 dB)
Signal-to-noise ratio: 72 dB (IEC-A network)
MWtuner
Frequency range: 531 kHz to 1602 kHz
Useable sensitivity: 25 V (S/N: 20 dB)
Signal-to-noise ratio: 62 dB (IEC-A network)
LWTuner
Frequency range: 153kHz to 281kHz
Usable sensitivity: 28 V (S/N: 20 dB)
Signal-to-noise ratio: 62 dB (IEC-A network)
NOTE
Specifications and the design are subject to modifications without notice.
Table des matieres
Raccordements/Installation 11
Raccordements/Installation
Raccordements
Important
ERROR-07, 11, 12, 17, 30
ERROR-07, 10, 11, 12, 15, 17, 30, A0
Protocole USB:
MSC (Mass Storage Class)
MTP (Media Transfer Protocol)
AOA (Android Open Accessory) 2.0
Best stations memory (BSM)
ERROR-07, 11, 12, 17, 30
ERROR-07, 10, 11, 12, 15, 17, 30, A0
Specifica standard USB: USB 2.0 full speed
MSC (Mass Storage Class)
MTP (Media Transfer Protocol)
AOA (Android Open Accessory) 2.0
File system: FAT12, FAT16, FAT32
ERROR-07, 10, 11, 12, 15, 17, 30, A0
Copyright © 2000-2009 Josh Coalson
Copyright © 2011-2013 Xiph.Org Foundation
Curva: -12 dB/oct, -24 dB/oct
Ganancia: +6 dB a -24 dB
(Windows Media Player)
ERROR-07, 11, 12, 17, 30
ERROR-07, 10, 11, 12, 15, 17, 30, A0
AOA (Android Open Accessory) 2.0
KLASSE 1 LASERPRODUCT
Bij problemen
Best stations memory (BSM)
ERROR-07, 11, 12, 17, 30
ERROR-07, 10, 11, 12, 15, 17, 30, A0
Copyright © 2000-2009 Josh Coalson
Copyright © 2011-2013 Xiph.Org Foundation
Helling: -12 dB/oct, -24 dB/oct
Gain: +6 dB tot -24 dB
Fase: Normaal/tegengesteld
Cd-speler
System: Compact Disc Audio
Bruibbare discs: Compact Discs
Signaal-ruisverhouding: 94 dB (1 kHz) (IECA-networke)
AOA (Android Open Accessory) 2.0
Bestandsystem: FAT12, FAT16, FAT32
MP3-decoderingsformaat: MPEG-1 & 2 Audio Layer 3
WMA-decoderingsformaa:Versie 7,7.1,8, 9,10,11,12(2-kanaalsaudio) (Windows Media Player)
FLAC-decoderingformula: v1.3.0 (Free Lossless Audio Codec)
JI3EPHbI IPOdyKT KJACC 1
PpB03HnKHOBeHNn npo6nem
PnH ennoLaKab X bOa6eT OTOI 3NIAEINB CBKNITEc b TOPCOBIM pIepCTABNTENEM KOMPAHINIPOHN3BOIDATAJI IN C NIIKAINAMC SEBPCHNIM PYNKTHOM PIONEER.
Hauano pa60tbl
OchOBhble onepaun
DEH-1900UB/1900UBG/1900UBA/1900UBB/1901UB/1901UBG
IynbT dy
ПОНМЕЧАНЕ
IyBxOaNT B KOMnJIeK TNOCTaBKn ToJbKO yCTpoiCTBa DEH-1901UB/1901UBG.
Yacto nCnoNb3yEmble onepaunn
OCTyHbIe KONKMOrYT OTnuaTbCBy 3aBcNMOcTOn OYCTPOiCTBa.
PpneM npeBapuTeIbHo yCTaHOBJIeHHbIX cTaNcH
1 Haxmnte SRC/OFF dans Bby6opa [RADIO].
2 Haxmte BAND/ dans bbl6opana nonocb [FM1], [FM2], [FM3], [MW] nnn [LW].
3 HauKmIte YucNcOByo KhoNky (ot 1/△do 6/
COBET
KHOIIKIO MOKHO TAKKE ICSIOJIb3OBAtIy IaB bIbOpa IpeBaIapITeJIbHO yCTaHOBHeHNO CTaHcIM,ecmI nIapaMeTpa [SEEK) yCTaHOBNeO 3NaueHne [PCH] B NaCTpoiKaX FUnction (ctp.9).
3anomnHaHne lyuushx cTaHcun(BSM)
3aKaJdoNcNoBOK KNOIKO CoXpAHeO OHa N3 8eCTn paDIOCTaHcN C HauJIyUIM KaueCTBOM npEma (c 1/An 6/).
1 Pocne Bb6opa nooCb haxmnte perytnop M.C. nra oTo6paXeHn rnaBhoro MeHIO.
2 Nobeprnite M.C. dansy bbl6opa [FUNCTION], 3aTeM haxmte da nnoTbePxdenia.
3 NobeprHne M.C. nBryb6opa [BSM], 3aTeMa HaxmIte nIy noTBePkeHn.
Ponck cTaHcnn BpyHyIO
1ПосnéВыбoga nolocbihaxmnteI/ДЯВыбoga ctauиn.
HakmITE uyepeKbAaTe 1,3aTeM OTyNCtIe dJa NOncKa DOctynHO tCaun. PONCK octaHOBITcR, KOrJa yctpoCTBO bByoJInr PtneM cTaun. Jdra OTMEhbl NOnckA HAKMITE
ПОНМЕЧАНЕ
Дяnapametpa [SEEK] Heo6xodmo yctaHOBntb 3naueHne [MAN] B hacptpoKax FUNCTION (ctp.9).
CoxpaHene cTaHcN BpyHyO
1 Bo Bpemr npnemc staunu, KOTOpuy Tpe6yTc coxpaHntb, haxmnte u ydepXnBaIte OHy n3 YncIOBbIX KHOJOK (c 1/An no 6/), Noka MrraHne He npeKpATITcra.
UcnoIb3OBAHneФyHKnI PTY
YcTpoIcTBO BbInoJIHaeT NOINCK CTaHcNn No INHΦOpMaun PTY (TIN npOrpamMbI).
1 Haxmite BO Bpemr FM-npnema.
2 ПовернITE М.С. Ддя Вьбoga Типа поррамьи [NEWS/INFO], [POPULAR], [CLASSICS] ии [OTHERS].
3 Haxmte peryntop M.C.. UcpoiCTBO HauHET NOCK CTaHUN. Iocne haoXeHnA CTaHUN OTo6pa3NTcHa3BaHHe npOrpAMHOn cIyXbI.
ПРИМЕЧАЙ
TO6bIOTMEHHTB NONCK,HAKMITE M.C.
- PnorgpAMMn HEKOTOBxpaADIOCTAHNZMIy MOrT OToNuaTbCt OR npORpAMM, yKzA3AHNbB X nepedaaEMOM KOte PTY.
- EcnH N O dHaN 13 CTaHnI He nepeAeT nporprambl HxKHO TINa, To h An DcInnee B TceHne npimepno dByx Cekynd 6ydet noka3Ano [NOT FOUND], n 3aTeM TIOHEP nepeIDet B pEXm PnEma CTaHnI, c KOTOP0 6bN hauat NOMK.
KomnakT-ДиСК/USB/AUX
Bocnpon3VepeHne
OTKJIouHTe OYCTPOJcTbHaayHnIKnpeepIOKJIouChHeNem KOBOpyDoBaHNIO.
KomnakT-ДИС
1 BCTaBbTe Dnck B eB 3arpy3kn Dncka MapKnpoBaHHO CTopoHOB BBepx.
TtO6bI n3Bnuey dNcK, OCTaHOBnTE BOCnPON3BeHeHne, 3aTeM HaxMNte A.
UcTpoIcTbA USB (BkLIOuJa AndroidTM)
1 OtkpoTe KpbiIsky npTa USB.
2IopKnIOUHTe ycTpoiCTBO USB c nOmoosbIO COOTBeTCTByojoero Ka6ena.
ПРИМЕЧАНЕ
Ддгватмсческого repecknoуньни Актучим [USB], Кordу сдачювто ВБ Доглочиевский RAHBOHM YCTPOBSTY, уztachobite nyan [USB AUTO] 3auchyene [ON] b hactpoiakx System (ctp. 10).

BHIMAHHE
Icnobn3yte IoponnhtenBnHn Ka6Bn Pioneer USB (CD-U50E) nra ndkniouheny uctpoictBa USB, nockoBky IIOO6e yctpoiCTBO, noKNIUeHNHO HneNocpeCTBeHNHO K rnaBHOMY uCTPOCTBY, bdyet BbyCTynb, YTO MOKET npDECTBAHTb oAnCHOTc.
Ipeed n3BvueHem yCTpoiCTBa OCTaHOBe BOcnpOn3BeDeHne.
IopknoueHnA OAn
→ Hert BCTrhoeEHHOI TEKCTOBOI INHOPaMaUN.
-ПepeknOuHTeДиCnIeN HINBocIpOn3BeDnte DpyTuOdoP0KkY/phiN.
IpounrpbBaTeInb KOMnakT- DnCKOB
ERROR-07,11,12,17,30
→ДИСКЗагрAZHEH.
-OuNCTIte DNCK.
→ДиСК ПОцapапан.
-3aMeHNTe Nsck.
ERROR-07, 10, 11, 12, 15, 17, 30, A0
Pioneer He rapaHTnpyET COBmecTHMOCTb C0 BCEMI YTOPTCBMNTMBS UH He Hecet OTBcTBeHNHOCTZA JIo6yIO nTopejo DaHHbX Ha MeiHaapnOriPbIBatEpanx
CMapTΦOHax INDpyNX yCTpoCTbX pIINCIOJIb3OBAHmN ITOrO N3dEJNA.
He octabnIte nckn nn 3aONMaIOoee yCTpoiCTBO USB B MeCTax C bICOKO TEmpeaTpyoB03dyxa.
DaJIbI WMA
| Расиwerене | .wma |
| Скорость пereдачданных | ot 48 КбИТ/c до320 КбИТ/c (CBR), ot48 КбИТ/cdo384 КбИТ/c(VBR) |
| Частota dисKFретиазим | 32 кц, 44,1 кгц,48 кгц |
| Windows Media™ Audio Professional, Lossless, Voice/DRM Stream/Stream c noДерЖКо Виdeo | He подерЖКиВаETся |
Фаль MP3
© 2000-2009 Josh Coalson
© 2011-2013 Xiph.Org Foundation
PacnpocrpaneHne nncnOBzOBAHne B
BnDE nCXoONbIX KODOB nIN 6bnApHbIX
phiIOB, C moNDnKauAmaM INn 6e3,
pa3peaetaCT npri co6nIODeHN
cnEDyUOxN yCNOB:
-BpacnpoctpaHReMOMNCXODHOMKoDe JdJxHO6bTb COxApaHEnO yBEdOMneHnE 06abTopcKm npabe,HaCTOJIuN CnICOK yCNOBn NycOBn O oPraHueHn OTBeTcBHeHOCTN.
DAHHOE IIO INPEIOCTABJARETC
PAPBOO6JIADATEJEMN COABTOPAMN
"KAK ECTb" IN HE PINEOCTABJARET
HUKAKNX ABHBIXNJIN
ПОДРАЗУМЕВАЕМБИXТAPАNTИ
PPIFOHOCTNДЯ ПОДAJNXIN
KOHKPETHOFO INCIOJIb3OBAHNIA. HN
ПИ KAKINX OБСТОВЕЛСТВAX
YIPABJIAOUINEI COABTOPbI HE HECYT
OTBETCTBEHHOCTI 3A IIPMbIE,
KOCBEHHbIE, CJUYAHHbIE, UTPAΦHbIE
IINIOCSNEUYIOUHNEYbITKN(BKJIIOUAR,
HO HE ORPAHINUHBARcB 3ATPATAMN HA
ПРИОБPETEHNE3AMEHRIOLIXX
TOBAPOB N YCJIY, YTPATOI
BO3MOXHOCTN INCIOJIb3OBAHIN,
TOTEPEI DAHHbIX, YNUEHHOI
BbIIOblI JIObIMN YbblTKAMN B
PE3yIbTATE IPIPNOCTAHOBKN
ДЕТЕЛБHOCTN), BOЗнКАIOUINE HA
OCHOBE COIJIALJEHIN,HECEHN
OTBETCTBEHHOCTN IIN HAPUHEHNA
OB3ATEJbCTB (BKJIIOUAR
HE6PEXKHOCTb) IPINICIOJIb3OBAHIN
DAHHOFO IPOFPGAMMHOFO
OBECNEUEHNAJX ECNI KOMNHAHNA
BbIa IPEyPExkDEHA O
BO3MOXHOCTN TAKOTO UUEP5A.
Android & Google Play
Android, Google Play n noroTin Google
Play YBNIOTCA TOBAPHBIM3HaKaAMN
Google Inc.
CepinHbI Homep
Ha 3TOM pncyHke noka3aHa nHfOpMaun O MeCaue n rOe n3rTOBHeHn yCTpOJCTBa.

P1 P2
IcTouHnK nHTaHnA: 14,4B noCT. ToKa (DOnyctmbln dnaIa3oH ot 10,8B do 15,1B)
Ситема заимлени:Забимленье орустelveногboro полоча
MaKcMnAblbHbNtPoEbnHeMbY TOK: 10,0 A
Pa3MePb (× × ) DIN
Uaccn:178MM×50MM×165MM
PereHnra naHnIb:188MM×58MM× 17MM
D
Uaccn: 178MM× 50MM× 165MM
PereHnra naHnbl: 17 MM
Macca: 1 Kr
Aydno
MaKcImaJIbHaB BIXOJaH MaOJHoCTb:
50Bt× 4 kaHana/4Ω(6e3 ca6bypha)
- 50Br× 2 Kahanal/4+70+1 Br×1 Kahanal/2Ω(naia c6byepa)
HOMHaBbHa BbXoDHa MOuHOCTb:
22Bt×4 (ot 50Tgdo15000Tg,
CymMapHoe 3HaueHHe KO3ΦΦuIeHtA
HeJIiHeIHybIX NCKaJKeHn 5 %
HaRpy3ka 4ΩДЯообик KaHaoB)
ConpoTnBHeHne Harpy3Kn:4Ω
(Donyctmo-OT4Ωdo8Ω)
ConpoTnBJIeHne harpy3Kn: 2,0 B
KoHTyp rpoMkoCTn: +10 d5 (100 T),
+6,5 dB (10 kTμ) (rρomKocTB: -30 dB)
3Kbanaa3ep(5-noonchbnrpaufneckn 3kbanaaep):
Uactota:80T/250T/800T/2,5Kt/ 8Kt
IanaaOH amnntyHNo-chaTOTbIX xapaKtepcntk:±12 db (c warom 2 db)
Ca6ByΦep (MOHO):
Yactotra: 50 /63 /80 /100 /125 /160 /200
Kpytshna xapaKTepnCTNK: -12dB/ OKT, -24dB / - 0k
YcIneHne: +6 d5do-24d6
AOA (Android Open Accessory) 2.0
ФайLOBая систema: FAT12, FAT16, FAT32
PonehahyUBCTBNTELBOCTs 25kMB (OTOHOWHEcNTHAN/UMY:20d5
OTHOWENHE CUNHAN/WHM:62 dB (ce TB IEC-A)
Tiohep LW
Dnana3oH yactOT:OT 153 KfUdo 281 KfU
ПОНЕЗЧУБСТВЕЛБСТС:28 KMВ (OTHOUHSENHCUrHAN/SHYM:20 d5)
OTHOWENHE CUNHAN/WHM:62 dB (ce TB IEC-A)
Приимechanical:
B cooTBeCTBm co SttBe8 53aKHa PocnckoΦeepaunio O'0aunTe npab nOtp6bntenei N oNCTaHOBInHeM npAbitelcbTa PocnckoΦeepaunio N720 ot16.06.97 komnaHnaPioneer Europe NV orobapBaet cIeyuOni crop cnJyKbI u3denn, oPhiuaJIbHO NOCTABnEmbx H oPocnckm pboHK.
AROMo6BnBaHa 3eKToPOnHka:6Iet
PpOue N3dEINa (HayuNnKm, MkKpofohbl n
T.n):5Iet
IPIMEYAHN
XapakTePrcIaTNI KOKCTpyKUNA MOryT 6bIb N3MeHeHb 6e3 ppeBaPnTeBnHO ryeDOMLeHry.
ДанhoeуctpoiCTBOIpoM3BEdeHO BO BBeTHAME.
http://www.pioneer-car.eu
Visit www.pioneer-car.co.uk (or www.pioneer-car.eu) to register your product.
Visitez www.pioneer-car.fr (ou www.pioneer-car.eu) pour enregistrer votre apparéil.
Si prega di visitare il site www.pioneer-car.it (o www.pioneer-car.eu) per registrar il prodotto.
Visite www.pioneer-car.es (o www.pioneer-car.eu) para registrar su producto.
Zum Registrieren Ihres Produktés besuchen Sieitte www.pioneer-car.de (oder www.pioneer-car.eu).
Bezoek www.pioneer-car.nl (of www.pioneer-car.eu) om uw producte te registrieren.
Посетитewe.pioneer-rus.ru (ил www.pioneer-car.eu) досяпстраши приобравенно Вами идени.
Pioneer CarStereo-Pass
28-8, Honkomagome 2-chome, Bunkyo-ku, Tokyo 113-0021, Japan
Kopnpaunna Painonnp
28-8, XoHcOMaROMa 2-YOme, ByHKe-Ky, Tokno 113-0021, JnoHnIa
Импортep OOO "ПиОHEP PUC"
105064, Рoscия, r. Москова, Нжни Сухаловinski pepeynok, dom 5,сторенice 19
Ten.: +7(495) 956-89-01
PIONEER EUROPE NV
Haven 1087, Keetberglaan 1, B-9120 Melsele, Belgium/Belgique
TEL: (0) 3/570.05.11
PIONEER ELECTRONICS (USA) INC.
P.O. Box 1540, Long Beach, California 90801-1540, U.S.A.
TEL: (800) 421-1404
PIONEER ELECTRONICS OF CANADA, INC.
340 Ferrier Street, Unit 2, Markham, Ontario L3R 2Z5, Canada
TEL: 1-877-283-5901
TEL: 905-479-4411
PIONEER ELECTRONICS ASIACENTRE PTE. LTD.
2 Jalan Kilang Barat, #07-01, Singapore 159346
TEL: 65-6378-7888
PIONEER ELECTRONICS AUSTRALIA PTY. LTD.
5 Arco Lane, Heatherton, Victoria, 3202 Australia
TEL: (03) 9586-6300
PIONEER ELECTRONICS DE MEXICO S.A. DE C.V. Blvd. Manuel Avila Camacho 138, 10 piso Col.Lomas de Chapultepec, Mexico, D.F. 11000 Tel:52-55-9178-4270,Fax:52-55-5202-3714