USER MANUAL DEH-1600UB PIONEER
REPRODUCTOR DE CD CON RECEPTOR RDS
CD RDS-EMPFÄNGER
CD RDS-ONTVANGER
CD RDS ПРИЕМнИK
DEH-1600UB
DEH-1600UBG
DEH-1600UBA
DEH-1600UBB
Owner's Manual
Mode d'emploi
Thank you for purchasing this PIONEER product
To ensure proper use, please read through this manual before using this product. It is especially important that you read and observe WARN INGSs and CAUTIONs in this manual. Please keep the manual in a safe and accessible place for future reference.

If you want to dispose this product, do not mix it with general household waste. There is a separate collection system for used electronic products in accordance with legislation that requires proper treatment, recovery and recycling.
Private households in the member states of the EU, in Switzerland and Norway may return their used electronic products free of charge to designated collection facilities or to a retailer (if you purchase a similar new one).
For countries not mentioned above, please contact your local authorities for the correct method of disposal.
By doing so you will ensure that your disposed product undergoes the necessary treatment, recovery and recycling and thus prevent potential negative effects on the environment and human health.
About this unit
The tuned frequencies on this unit are allocated for use in Western Europe, Asia, the Middle East, Africa and Oceania. Use in other areas may result in poor reception. The RDS (radio data system) function only works in areas that broadcast RDS signals for FM stations.
WARNING
- Do not attempt to install or service this product by yourself. Installation or servicing of this product by persons without training and experience in electronic equipment and automotive accessories may be dangerous and could expose you to the risk of electric shock, injury or other hazards.
- Do not attempt to operate the unit while driving. Make sure to pull off the road and park your vehicle in a safe location before attempting to use the controls on the device.
CAUTION
- Do not allow this unit to come into contact with liquids. Electrical shock could result. Also, damage to this unit, smoke, and overheating could result from contact with liquids.
The Pioneer CarStereo-Pass is for use only in Germany.
Always keep the volume low enough to hear outside sounds.
- Avoid exposure to moisture.
Before you start
CAUTION
This product is a class 1 laser product classified under the Safety of laser products, IEC 60825-1:2007.
CLASS 1 LASER PRODUCT
If you experience problems
Should this unit fail to work properly, please contact your dealer or nearest authorized PIONEER Service Station.
Using this unit
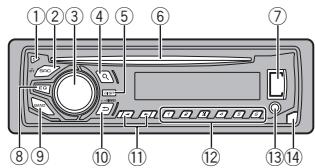
Head unit
① (eject)
② SRC/OFF
3 MULTI-CONTROL (M.C.)
④ (list)
⑤ DISP
⑥ Disc loading slot
⑦ USB port
⑧ EQ
BAND
10 (back)/DIMMER (dimmer)
⑪
1/△to6
13 AUX input jack (3.5 mm stereo jack)
14 Detach button

CAUTION
Use an optional Pioneer USB cable (CD-U50E) to connect the USB storage device as any device connected directly to the unit will protrude out from the unit, which could be dangerous.
Display indication
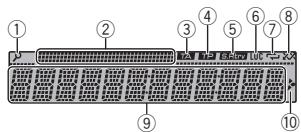
① (list)
② Sub information section
③ TA (traffic announcements)
④ TP (traffic program identification)
⑤ S.Rtrv (sound retriever)
⑥ LOC(local seek tuning)
⑦ (repeat)
(8) (random)
Main information section
Tuner: band and frequency
RDS: program service name, PTY infor
⑨ mation and other literal information
- CD player and USB storage device: elapsed playback time and text information

10 Appears when a lower tier of folder or menu exists.
1 After installation of this unit, turn the ignition switch to ON.
SET UP appears.
2 Turn M.C. to switch to YES.
- If you do not use the unit for 30 seconds, the set up menu will not be displayed.
Using this unit
- If you prefer not to set up at this time, turn M.C. to switch to NO.
3 Press M.C. to select.
4 Follow these steps to set the menu.
To proceed to the next menu option, you need to confirm your selection.
LANGUAGE (multi-language)
This unit can display the text information from a compressed audio file even for information embedded in English, Russian or Turkish.
- If the embedded language and the selected language setting are not the same, text information may not display properly.
- Some characters may not be displayed properly.
1 Turn M.C. to select the desired setting. ENG (English)—PYC (Russian)—TUR (Turkish)
Press M.C. to confirm the selection.
CLOCK SET (setting the clock)
1 Turn M.C. to adjust hour.
2 Press M.C. to select minute.
3 Turn M.C. to adjust minute.
4 Press M.C. to confirm the selection.
FM STEP (FM tuning step)
Use FM STEP to set FM tuning step options (seek step settings).
Turn M.C. to select the FM tuning step. 100 (100 kHz) -50 (50 kHz)
2 Press M.C. to confirm the selection.
QUIT appears.
The manual tuning step is fixed at 50kHz
- When AF and TA are turned off, the seek step is fixed at 50kHz even if set to 100.
5 To finish your settings, turn M.C. to select YES.
- If you prefer to change your setting again, turn M.C. to switch to NO.
6 Press M.C. to select.
Notes
- You can set up the menu options from the system menu and initial menu. For details about the settings, refer to System menu on page 7 and Initial menu on page 7.
- You can cancel set up menu by pressing SRC/OFF.
Basic operations
Important
- Handle the front panel with care when removing or attaching it.
- Avoid subjecting the front panel to excessive shock.
- Keep the front panel out of direct sunlight and high temperatures.
- To avoid damaging the device or vehicle interior, remove any cables and devices attached to the front panel before detaching it.
Using this unit
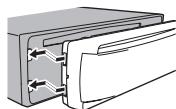
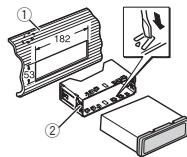
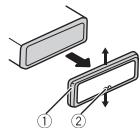
Removing the front panel
Press the detach button to release the front panel.
Push the front panel upward (I) and then pull it toward (II) you.
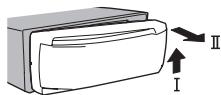
Always store the detached front panel in a protective case or bag.
Re-attaching the front panel
1 Slide the front panel to the left.
Press the right side of the front panel until it is firmly seated.
Forcing the front panel into place may result in damage to the front panel or head unit.
Turning the unit on
Press SRC/OFF to turn the unit on.
Turning the unit off
1 Press and hold SRC/OFF until the unit turns off.
Selecting a source
1 Press SRC/OFF to cycle between: RADIO-CD-USB-AUX
- USB MTP displays while the MTP connection is in use.
Adjusting the volume
Turn M.C. to adjust the volume.
Note
When this unit's blue/white lead is connected to the vehicle's auto-antenna relay control terminal, the vehicle's antenna extends when this unit's source is turned on. To retract the antenna, turn the source off.
Returning to the previous display
Returning to the previous list (the folder one level higher)
Press→DIMMER.
Returning to the ordinary display
Canceling the main menu
1 Press BAND.
Returning to the ordinary display from the list
1 Press BAND.
Radio
Basic operations
Selecting a band
1 Press BAND until the desired band (FM1, FM2, FM3 for FM or MW/LW) is displayed.
Switching preset stations
1 Pressor
- Select PCH (preset channel) under SEEK to use this function.
Using this unit
Manual tuning (step by step)
1 Pressor
- Select MAN (manual tuning) under SEEK to use this function.
Seeking
Press and hold or, and then release. You can cancel seek tuning by briefly pressing or.
While pressing and holding or , you can skip stations. Seek tuning starts as soon as you release or .
Notes
- For details about SEEK, refer to SEEK (left/right key setting) on page 5.
- This unit's AF (alternative frequencies search) function can be turned on and off. AF should be off for normal tuning operation (refer to AF (alternative frequencies search) on page 5).
Storing and recalling stations for each band
1 To store: Press and hold down one of the preset tuning buttons (1 / to 6 / 一 ) until the number stops flashing.
2 To recall: Press one of the preset tuning buttons (1 / to 6 / ).
Switching the display
Selecting the desired text information
Press DISP to cycle between the following:
FREQUENCY (program service name or frequency)
BRDCST INFO (program service name/PTY information)
CLOCK (source name and clock)
Notes
- If the program service name cannot be acquired in FREQUENCY, the broadcast frequency is displayed instead. If the program service name is detected, the program service name will be displayed.
Depending on the band, text information can be changed.
Text information items that can be changed depend on the area.
Using PTY functions
You can tune in to a station using PTY (program type) information.
Searching for an RDS station by PTY information
Press (list).
2 Turn M.C. to select a program type. NEWS/INFO—POPULAR—CLASSICS—OTHERS
Press M.C. to begin the search. The unit searches for a station broadcasting that type of program. When a station is found, its program service name is displayed.
To cancel the search, press M.C. again.
The program of some stations may differ from that indicated by the transmitted PTY.
- If no station is broadcasting the type of program you searched for, NOT FOUND is displayed for about two seconds and then the tuner returns to the original station.
PTY list
For more details about PTY list, visit the following site:
http://www.pioneer.eu/eur/products/25/121/techCarAudio/PTY.html
Function settings
1 Press M.C. to display the main menu.
Using this unit
2 Turn M.C. to change the menu option and press to select FUNCTION.
3 Turn M.C. to select the function.
Once selected, the following functions can be adjusted.
- If MW/LW band is selected, only BSM, LOCAL and SEEK are available.
FM SETTING (FM sound quality settings)
The sound quality level can be set to match the broadcast signal conditions of the FM band signal.
1 Press M.C. to display the setting mode.
2 Turn M.C. to select the desired setting.
STANDARD-This is the standard setting.
- HI-FI – This is the setting to use to prioritize the high quality of stereo sound.
- STABLE - This is the setting to use to prioritize the low noise of monaural sound.
BSM (best stations memory)
BSM (best stations memory) automatically stores the six strongest stations in the order of their signal strength.
Press M.C. to turn BSM on. To cancel, press M.C. again.
REGIONAL (regional)
When AF is used, the regional function limits the selection of stations to those broadcasting regional programs.
Press M.C. to turn the regional function on or off.
LOCAL (local seek tuning)
Local seek tuning allows you to tune in to only those radio stations with sufficiently strong signals for good reception.
1 Press M.C. to select the desired setting. FM: OFF—LV1—LV2—LV3—LV4
MW/LW: OFF—LV1—LV2
The highest level setting allows reception of only the strongest stations, while lower levels allow the reception of weaker stations.
TA (traffic announcement standby)
Press M.C. to turn traffic announcement standby on or off.
AF (alternative frequencies search)
1 Press M.C. to turn AF on or off.
NEWS (news program interruption)
Press M.C. to turn the NEWS function on or off.
SEEK(left/rightkey setting)
You can assign a function to the left and right keys of the unit.
Select MAN (manual tuning) to tune up or down manually or select PCH (preset channel) to switch between preset channels.
1 Press M.C. to select MAN or PCH
CD/CD-R/CD-RW and USB storage devices
MTP connection
MTP-compatible Android devices (running Android OS 4.0 or higher) can be connected by MTP connection using the USB source. To connect an Android device, use the cable that came with the device.
Using this unit
Note
This function is not compatible with WAV.
Basic operations
Playing a CD/CD-R/CD-RW
1 Insert the disc into the disc loading slot with the label side up.
Ejecting a CD/CD-R/RD-RW
1 Press
Playing songs on a USB storage device
1 Open the USB port cover.
[2] Plug in the USB storage device using a USB cable.
Stopping playback of files on a USB storage device
1 You may disconnect the USB storage device at any time.
Selecting a folder
1 Press 1/ or 2/V.
Selecting a track
1 Pressor
Fast forwarding or reversing
1 Press and hold or
- When playing compressed audio, there is no sound during fast forward or reverse.
Returning to root folder
1 Press and hold BAND
Switching between compressed audio and CD-DA
1 Press BAND
Switching between playback memory devices You can switch between playback memory devices on USB storage devices with more than one Mass Storage Device-compatible memory device.
1 Press BAND
- You can switch between up to 32 different memory devices.
Note
Disconnect USB storage devices from the unit when not in use.
Switching the display
Selecting the desired text information
Press DISP to cycle between the following: CD-DA
- ELAPSED TIME (track number and playback time)
CLOCK (source name and clock)
SPEANA (spectrum analyzer)
CD-TEXT
- TRACK INFO (track title/track artist/disc title)
- ELAPSED TIME (track number and playback time)
CLOCK (source name and clock)
SPEANA (spectrum analyzer)
MP3/WMA/WAV
- TRACK INFO (track title/artist name/album title)
FILE INFO (file name/folder name)
- ELAPSED TIME (track number and playback time)
CLOCK (source name and clock)
SPEANA (spectrum analyzer)
Selecting and playing files/ tracks from the name list
1 Press to switch to the file/track name list mode.
2 Use M.C. to select the desired file name (or folder name).
Selecting a file or folder
1 Turn M.C.
Playing
1 When a file or track is selected, press M.C.
Using this unit
Viewing a list of the files (or folders) in the selected folder
1 When a folder is selected, press M.C.
Playing a song in the selected folder
1 When a folder is selected, press and hold M.C.
Selecting a repeat play range
1 Press 6 / to cycle between the following: CD/CD-R/CD-RW
ALL-Repeat all tracks
- ONE - Repeat the current track
- FLD - Repeat the current folder
USB storage device
ALL-Repeat all files
- ONE - Repeat the current file
FLD-Repeat the current folder
Playing tracks in random order
1 Press 5 to turn random play on or off. Tracks in a selected repeat range are played in random order.
To change songs during random play, press to switch to the next track. Pressing restarts playback of the current track from the beginning of the song.
Pausing playback
Press 4/PAUSE to pause or resume.
Enhancing compressed audio and restoring rich sound (sound retriever)
Press 3/S.Rtrv to cycle between: 1-2-OFF (off)
1 is effective for low compression rates, and 2 is effective for high compression rates.
Function settings
1 Press M.C. to display the main menu.
2 Turn M.C. to change the menu option and press to select FUNCTION.
Once selected, the function below can be adjusted.
S.RTRV (sound retriever)
Automatically enhances compressed audio and restores rich sound.
1 Press M.C. to select the desired setting. For details, refer to Enhancing compressed audio and restoring rich sound (sound retriever) on page 6.
Audio adjustments
1 Press M.C. to display the main menu.
2 Turn M.C. to change the menu option and press to select AUDIO.
3 Turn M.C. to select the audio function.
Once selected, the following audio functions can be adjusted.
- FADER is not available when SUB.W/SUB.W is selected in SP-P/O MODE. For details, refer to SP-P/O MODE (rear output and preout setting) on page 7.
- SUB.W and SUB.W CTRL are not available when REAR/REAR is selected in SP-P/O MODE. For details, refer to SP-P/O MODE (rear output and preout setting) on page 7.
- SUB.W CTRL is not available when SUB.W is selected in OFF. For details, refer to SUB.W (subwoofer on/off setting) on page 6.
- SLA is not available when FM is selected as the source.
Using this unit
FAADER (fader adjustment)
Press M.C. to display the setting mode.
Turn M.C. to adjust the front/rear speaker balance.
BALANCE (balance adjustment)
Press M.C. to display the setting mode.
② Turn M.C. to adjust the left/right speaker balance.
EQ SETTING (equalizer recall)
Press M.C. to display the setting mode.
Turn M.C. to select the equalizer. POWERFUL-NATURAL-VOCAL-CUSTOM1-CUSTOM2-FLAT-SUPER BASS
The equalizer band and equalizer level can be customized when CUSTOM1 or CUSTOM2 is selected.
If selecting CUSTOM1 or CUSTOM2, complete the procedures outlined below. If selecting other options, press M.C. to return to the previous display.
- CUSTOM1 can be set separately for each source.
- CUSTOM2 is a shared setting used in common for all sources.
3 Press M.C. to display the setting mode.
4 Press M.C. to cycle between the following: Equalizer band—Equalizer level
5 Turn M.C. to select the desired setting. Equalizer band: 80HZ—250HZ—800HZ—2.5KHZ—8KHZ
Equalizer level: +6 to -6
- You can also switch the equalizer by pressing EQ repeatedly.
LOUDNESS (loudness)
Loudness compensates for deficiencies in the low-frequency and high-frequency ranges at low volume.
Press M.C. to select the desired setting. OFF (off)-LOW (low)-MID (mid)-HI (high)
SUB.W (subwoofer on/off setting)
This unit is equipped with a subwoofer output which can be turned on or off.
1 Press M.C. to select the desired setting.
NOR (normal phase)—REV (reverse phase)—OFF (subwoofer off)
SUB.W CTRL (subwoofer adjustment)
Only frequencies lower than those in the selected range are outputted from the subwoofer.
Press M.C. to display the setting mode.
2 Press M.C. to cycle between the following: Cut-off frequency—Output level—Slope level Rates that can be adjusted will flash.
3 Turn M.C. to select the desired setting. Cut-off frequency: 50HZ-63HZ-80HZ-100HZ-125HZ-160HZ-200HZ Output level: -24 to +6 Slope level: -12--24
BASS BOOST (bass boost)
1 Press M.C. to display the setting mode.
2 Turn M.C. to select a desired level. 0 to +6 is displayed as the level is increased or decreased.
HPF SETTING (high pass filter adjustment)
Using this unit
Use this function when wanting to listen only to high-frequency sounds. Only frequencies higher than the high-pass filter (HPF) cutoff are output from the speakers.
Press M.C. to display the setting mode.
^2 Press M.C. to cycle between the following: Cut-off frequency—Slope level
3 Turn M.C. to select the desired setting. Cut-off frequency: OFF—50HZ—63HZ—80HZ 100HZ—125HZ—160HZ—200HZ Slope level: -12--24
SLA (source level adjustment)
This function prevents the volume from changing too dramatically when the source switches.
- Settings are based on the FM volume level, which remains unchanged.
- The MW/LW volume level can also be adjusted with this function.
Press M.C. to display the setting mode.
2 Turn M.C. to adjust the source volume. Adjustment range: +4 to -4
Important
PW SAVE (power saving) is canceled if the vehicle battery is disconnected and will need to be turned back on once the battery is reconnected. When PW SAVE (power saving) is off, depending on connection methods, the unit may continue to draw power from the battery if your vehicle's ignition doesn't have an ACC (accessory) position.
1 Press M.C. to display the main menu.
2 Turn M.C. to change the menu option and press to select SYSTEM.
Once selected, the following system menu functions can be adjusted.
- MUTE MODE and PW SAVE are not available for DEH-1600UBA.
LANGUAGE (multi-language)
Press M.C. to select the desired setting, ENG (English)—PYC (Russian)—TUR (Turkish)
CLOCK SET (setting the clock)
1 Press M.C. to display the setting mode.
2 Press M.C. to select the segment of the clock display you wish to set. Hour—Minute
3 Turn M.C. to adjust the clock.
12H/24H (time notation)
1 Press M.C. to select the desired setting. 12H (12-hour clock) -24H (24-hour clock)
AUTO PI (auto PI seek)
The unit can automatically search for a different station with the same programming, even during preset recall.
Press M.C. to turn Auto PI seek on or off.
Activate this setting when using an auxiliary device connected to this unit.
Press M.C. to turn AUX on or off.
DIMMER (dimmer)
Press M.C. to turn the dimmer on or off.
- You can also change the dimmer setting by pressing and holding DIMMER.
MUTE MODE (mutemode)
Using this unit
Sound from this system is automatically muted or attenuated when a signal from equipment with a mute function is received.
Press M.C. to display the setting mode.
2 Turn M.C. to select the desired setting.
MUTE-Muting
- 20dB ATT - Attenuation (20dB ATT has a stronger effect than 10dB ATT)
10dB ATT - Attenuation
PW SAVE (power saving)
Switching this function on enables you to reduce the consumption of battery power.
- Turning on the source is the only operation allowed when this function is on.
Press M.C. to turn the power save on or off.
1 Press and hold SRC/OFF until the unit turns off.
2 Press and hold SRC/OFF until the main menu appears in the display.
Only for DEH-1600UBA
Press M.C. to display the main menu.
3 Turn M.C. to change the menu option and press to select INITIAL.
4 Turn M.C. to select the initial menu function.
Once selected, the following initial menu functions can be adjusted.
FM STEP (FM tuning step)
1 Press M.C. to select the FM tuning step. 100 (100kHz) -50 (50 kHz)
SP-P/O MODE (rear output and preout setting)
The rear speaker leads output and the RCA output of this unit can be used to connect a full-range speaker or subwoofer. Select a suitable option for your connection.
Press M.C. to display the setting mode.
Turn M.C. to select the desired setting.
- REAR/SUB.W - Select when there is a full-range speaker connected to the rear speaker leads output and there is a subwoofer connected to the RCA output.
- SUB.W/SUB.W - Select when there is a subwoofer connected directly to the rear speaker leads output without any auxiliary amp and there is a subwoofer connected to the RCA output.
- REAR/REAR - Select when there is a full-range speaker connected to the rear speaker leads output and the RCA output. If there is a full-range speaker connected to the rear speaker leads output and the RCA output is not used, you may select either REAR/SUB.W or REAR/REAR.
1 Press and hold SRC/OFF until the unit turns off.
2 Press and hold SRC/OFF until the main menu appears in the display.
Only for DEH-1600UBA
Press M.C. to display the main menu.
3 Turn M.C. to change the menu option and press to select SYSTEM.
4 Turn M.C. to select the system menu function.
For details, refer to System menu on page 7.
Using an AUX source
1 Insert the stereo mini plug into the AUX input jack.
2 Press SRC/OFF to select AUX as the source.
Note
AUX cannot be selected unless the auxiliary setting is turned on. For more details, refer to AUX (auxiliary input) on page 7.
Switching the display
Selecting the desired text information
1 Press DISP to cycle between the following:
Source name
Source name and clock
If an unwanted display appears
Turn off the unwanted display using the procedures listed below.
1 Press M.C. to display the main menu.
2 Turn M.C. to change the menu option and press to select SYSTEM.
3 Turn M.C. to display DEMO OFF and press to select.
4 Turn M.C. to switch to YES.
5 Press M.C. to select.
Installation
Connections

Important
- When installing this unit in a vehicle without an ACC (accessory) position on the ignition switch, failure to connect the red cable to the terminal that detects operation of the ignition key may result in battery drain.

ACC position

No ACC position
- Never wire the negative speaker cable directly to ground.
-
Never band together negative cables of multiple speakers.
-
When this unit is on, control signals are sent through the blue/white cable. Connect this cable to the system remote control of an external power amp or the vehicle's auto-antenna relay control terminal (max. 300 mA 12 VDC). If the vehicle is equipped with a glass antenna, connect it to the antenna booster power supply terminal.
- Never connect the blue/white cable to the power terminal of an external power amp. Also, never connect it to the power terminal of the auto antenna. Doing so may result in battery drain or a malfunction.
-
The black cable is ground. Ground cables for this unit and other equipment (especially, high-current products such as power amps) must be wired separately. If they are not, an accidental detachment may result in a fire or malfunction.
-
Use of this unit in conditions other than the following could result in fire or malfunction.
Vehicles with a 12-volt battery and negative grounding.
— Speakers with 50 W (output value) and 4Ω to 8Ω (impedance value).
- To prevent a short-circuit, overheating or malfunction, be sure to follow the directions below.
- Disconnect the negative terminal of the battery before installation.
- Secure the wiring with cable clamps or adhesive tape. Wrap adhesive tape around wiring that comes into contact with metal parts to protect the wiring.
- Place all cables away from moving parts, such as the shift lever and seat rails.
- Place all cables away from hot places, such as near the heater outlet.
- Do not connect the yellow cable to the battery by passing it through the hole to the engine compartment.
Cover any disconnected cable connectors with insulating tape.
Do not shorten any cables.
- Never cut the insulation of the power cable of this unit in order to share the power with other devices. The current capacity of the cable is limited.
Use a fuse of the rating prescribed.
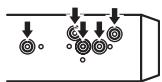
This unit
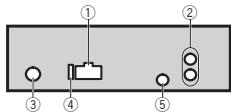
① Power cord input
② Rear output or subwoofer output
③ Antenna input
④ Fuse(10A)
(5) Wired remote input (DEH-1600UB, DEH-1600UBG and DEH-1600UBB only) Hard-wired remote control adapter can be connected (sold separately).
Installation
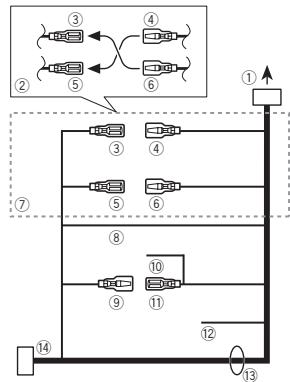
Power cord
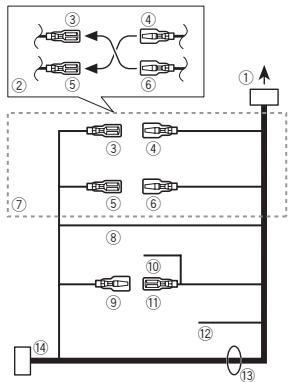
① To power cord input
② Depending on the kind of vehicle, the function of ③ and ⑤ may be different. In this case, be sure to connect ④ to ⑤ and ⑥ to ③
③ Yellow Back-up (or accessory)
④ Yellow Connect to the constant 12 V supply terminaI.
⑤ Red Accessory (or back-up)
⑥ Red Connect to terminal controlled by ignition switch (12 V DC).
⑦ Connect leads of the same color to each other.
⑧ Black (chassis ground)
⑨ Blue/white
The pin position of the ISO connector will differ depending on the type of vehicle. Connect
⑨ and ⑪ when Pin 5 is an antenna control type. In another type of vehicle, never connect ⑨ and ⑪
10 Blue/white
Connect to system control terminal of the power amp (max. 300mA12VDC
1 Blue/white
Connect to auto-antenna relay control terminal (max. 300mA12VDC
12 Yellow/black (DEH-1600UB, DEH-1600UBG and DEH-1600UBB only)
If you use an equipment with Mute function, wire this lead to the Audio Mute lead on that equipment. If not, keep the Audio Mute lead free of any connections.
13 Speaker leads
White: Front left
White/black: Front left
Gray: Front right
Gray/black: Front right
Green: Rear left or subwoofer
Green/black: Rear left or subwoofer
Violet: Rear right or subwoofer
Violet/black: Rear right or subwoofer
ISO connector
In some vehicles, the ISO connector may be divided into two. In this case, be sure to connect to both connectors.
Notes
- Change the initial menu of this unit. Refer to SP-P/O MODE (rear output and preout setting) on page 7.
The subwoofer output of this unit is monaural.
- When using a subwoofer of 70W (2) , be sure to connect the subwoofer to the violet and violet/black leads of this unit. Do not connect anything to the green and green/black leads.
Installation
Power amp (sold separately)
Perform these connections when using the optional amplifier.
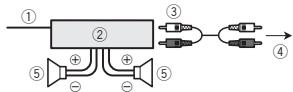
① System remote control
Connect to Blue/white cable.
② Power amp (sold separately)
③ Connect with RCA cables (sold separately)
④ To Rear output or subwoofer output
⑤ Rear speaker or subwoofer
Installation
Important
- Check all connections and systems before final installation.
- Do not use unauthorized parts as this may cause malfunctions.
- Consult your dealer if installation requires drilling of holes or other modifications to the vehicle.
-
Do not install this unit where:
-
it may interfere with operation of the vehicle.
-
it may cause injury to a passenger as a result of a sudden stop.
-
The semiconductor laser will be damaged if it overheats. Install this unit away from hot places such as near the heater outlet.
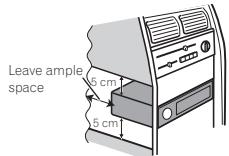
Optimum performance is obtained when the unit is installed at an angle of less than 60^

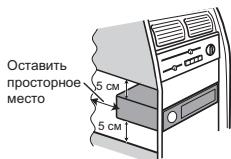
- When installing, to ensure proper heat dispersal when using this unit, make sure you leave ample space behind the rear panel and wrap any loose cables so they are not blocking the vents.
DIN front/rear mount
This unit can be properly installed using either front-mount or rear-mount installation.
Use commercially available parts when installing.
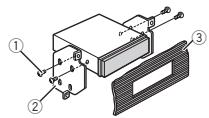
DIN Front-mount
1 Insert the mounting sleeve into the dashboard.
For installation in shallow spaces, use the supplied mounting sleeve. If there is enough space, use the mounting sleeve that came with the vehicle.
① Dashboard
Installation
② Mounting sleeve
- Make sure that the unit is installed securely in place. An unstable installation may cause skipping or other malfunctions.
DIN Rear-mount
1 Determine the appropriate position where the holes on the bracket and the side of the unit match.

2 Tighten two screws on each side.

① Tapping screw (5mm × 8mm)
② Mounting bracket
③ Dashboard or console
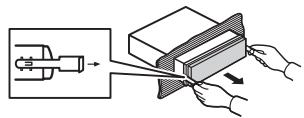
Removing the unit
1 Remove the trim ring.
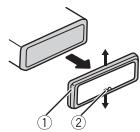
① Trim ring
② Notched tab
- Releasing the front panel allows easier access to the trim ring.
- When reattaching the trim ring, point the side with the notched tab down.
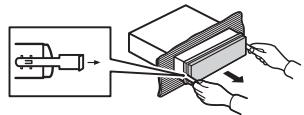
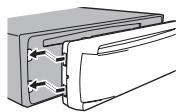
2 Insert the supplied extraction keys into both sides of the unit until they click into place.
3 Pull the unit out of the dashboard.
Removing and re-attaching the front panel
You can remove the front panel to protect your unit from theft.
For details, refer to Removing the front panel and Re-attaching the front panel on page 4.
Troubleshooting
Symptoms are written in bold and causes in regular, non-indented text. Regular, indented text is used to indicate actions to be taken.
The display automatically returns to the ordinary display.
You did not perform any operation within about 30 seconds.
Perform operation again.
The repeat play range changes unexpectedly.
Depending on the repeat play range, the selected range may change when another folder or track is being selected or during fast forwarding/reversing.
Select the repeat play range again.
A subfolder is not played back.
Sub folders cannot be played when FLD (folder repeat) is selected.
Select another repeat play range.
NO XXXX appears when a display is changed (NO TITLE, for example).
There is no embedded text information.
Switch the display or play another track/file.
The unit is malfunctioning.
There is interference.
You are using a device, such as a cellular phone, that may cause audible interference.
Move electrical devices that may be causing the interference away from the unit.
Error messages
When you contact your dealer or your nearest Pioneer Service Center, be sure to note the error message.
Symptoms are written in bold and causes in regular, non-indented text. Regular, indented text is used to indicate actions to be taken.
Common
AMP ERROR
This unit fails to operate or the speaker connection is incorrect; the protective circuit is activated.
Check the speaker connection. If the message fails to disappear even after the engine is switched off/on, contact your dealer or an authorized Pioneer Service Station for assistance.
CD player
ERROR-07,11,12,17,30
The disc is dirty.
Clean the disc.
The disc is scratched.
Replace the disc.
ERROR-07, 10, 11, 12, 15, 17, 30, A0
There is an electrical or mechanical error.
Turn the ignition switch OFF and back ON, or
switch to a different source, then back to the CD player.
ERROR-15
The inserted disc is blank.
Replace the disc.
ERROR-23
Unsupported CD format.
Replace the disc.
Sometimes there is a delay between the start of playback and when you start to hear any sound.
Wait until the message disappears and you hear sound.
NO AUDIO
The inserted disc does not contain any playable files. Replace the disc.
SKIPPED
The inserted disc contains DRM protected files.
The protected files are skipped.
PROTECT
All the files on the inserted disc are embedded with DRM.
Replace the disc.
USB storage device
Sometimes there is a delay between the start of playback and when you start to hear any sound.
Wait until the message disappears and you hear sound.
NO AUDIO
There are no songs.
Transfer the audio files to the USB storage device and connect.
The connected USB storage device has security enabled.
Follow the USB storage device instructions to disable the security.
SKIPPED
The connected USB storage device contains DRM protected files.
The protected files are skipped.
PROTECT
All the files on the connected USB storage device are embedded with DRM.
Replace the USB storage device.
N/A USB
The connected USB device is not supported by this unit.
- Connect a USB Mass Storage Class compliant device.
- Disconnect your device and replace it with a compatible USB storage device.
CHECK USB
The USB connector or USB cable has short-circuited.
Check that the USB connector or USB cable is not caught in something or damaged.
The connected USB storage device consumes more than maximum allowable current.
Disconnect the USB storage device and do not use it. Turn the ignition switch to OFF, then to ACC or ON and then connect only compliant USB storage devices.
ERROR-19
Communication failed.
Perform one of the following operations.
-Turn the ignition switch OFF and back ON.
-Disconnect the USB storage device.
-Change to a different source.
Then, return to the USB source.
ERROR-23
USB storage device was not formatted with FAT12, FAT16 or FAT32.
USB storage device should be formatted with FAT12, FAT16 or FAT32.
STOP
There are no songs in the current list.
Select a list that contains songs.
Handling guidelines
Discs and player
Use only discs that feature either of the following two logos.

DIGITAL AUDIO

DIGITAL AUDIO
TEXT
Use 12-cm discs.
Use only conventional, fully circular discs.
The following types of discs cannot be used with this unit:
DualDiscs
- 8-cm discs: Attempts to use such discs with an adaptor may cause the unit to malfunction.
- Oddly shaped discs


Discs other than CDs
- Damaged discs, including discs that are cracked, chipped or warped
CD-R/RW discs that have not been finalized
Do not touch the recorded surface of the discs.
Store discs in their cases when not in use.
Do not attach labels, write on or apply chemicals to the surface of the discs.
To clean a CD, wipe the disc with a soft cloth outward from the center.
Condensation may temporarily impair the player's performance. Let it rest for about one hour to adjust to a warmer temperature. Also, wipe any damp discs off with a soft cloth.
Playback of discs may not be possible because of disc characteristics, disc format, recorded application, playback environment, storage conditions, and so on.
Road shocks may interrupt disc playback.
When using discs that can be printed on label surfaces, check the instructions and the warnings of the discs. Depending on the discs, inserting and ejecting may not be possible. Using such discs may result in damage to this equipment.
Do not attach commercially available labels or other materials to the discs.
- The discs may warp making the disc unplayable.
- The labels may come off during playback and prevent ejection of the discs, which may result in damage to the equipment.
USB storage device
Connections via USB hub are not supported.
Do not connect anything other than a USB storage device.
Firmly secure the USB storage device when driving. Do not let the USB storage device fall onto the floor, where it may become jammed under the brake or accelerator pedal.
Depending on the USB storage device, the following problems may occur.
Operations may vary.
- The storage device may not be recognized.
- Files may not be played back properly.
- The device may cause audible interference when you are listening to the radio.
Compressed audio compatibility (disc, USB)
WMA
File extension: .wma
Bit rate: 48 kbps to 320 kbps (CBR), 48 kbps to 384 kbps (VBR)
Sampling frequency: 32kHz 44.1 kHz, 48 kHz
Windows Media™ Audio Professional, Lossless, Voice/DRM Stream/Stream with video: Not compatible
MP3
File extension:.mp3
Bit rate: 8 kbps to 320 kbps (CBR), VBR
Sampling frequency: 8kHz to 48kHz (32 kHz, 44.1 kHz, 48 kHz for emphasis)
Compatible ID3 tag version: 1.0, 1.1, 2.2, 2.3, 2.4 (ID3 tag Version 2.x is given priority over Version 1.x.)
M3u playlist: Not compatible
MP3i (MP3 interactive), mp3 PRO: Not compatible
WAV
File extension: .wav
Quantization bits: 8 and 16 (LPCM), 4 (MS ADPCM)
Sampling frequency: 16kHz to 48kHz (LPCM), 22.05kHz and 44.1kHz (MS ADPCM)
- You cannot use this function with USB MTP.
Only the first 32 characters can be displayed as a file name (including the file extension) or a folder name.
Russian text to be displayed on this unit should be encoded in one of the following character sets:
- Unicode (UTF-8, UTF-16)
- A character set other than Unicode that is used in a Windows environment and is set to Russian in the multi-language setting
This unit may not work properly depending on the application used to encode WMA files.
There may be a slight delay at the start of playback of audio files embedded with image data or audio files stored on a USB storage device that has numerous folder hierarchies.
Disc
Playable folder hierarchy: up to eight tiers (A practical hierarchy is less than two tiers.)
Playable folders: up to 99
Playable files: up to 999
File system: ISO 9660 Level 1 and 2, Romeo, Joliet
Multi-session playback: Compatible
Packet write data transfer: Not compatible
Regardless of the length of blank sections between the songs from the original recording, compressed audio discs play with a short pause between songs.
USB storage device
Playable folder hierarchy: up to eight tiers (A practical hierarchy is less than two tiers.)
Playable folders: up to 500
Playable files: up to 15000
Playback of copyright-protected files: Not compatible
Partitioned USB storage device: Only the first partition can be played.
There may be a slight delay when starting playback of audio files on a USB storage device with numerous folder hierarchies.
CAUTION
- Pioneer cannot guarantee compatibility with all USB mass storage devices and assumes no responsibility for any loss of data on media players, smart phones, or other devices while using this product.
- Do not leave discs or a USB storage device in any place that is subject to high temperatures.
Sequence of audio files
The user cannot assign folder numbers and specify playback sequences with this unit.
Example of a hierarchy
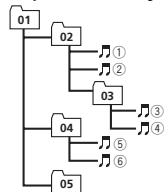
Level 1 Level 2 Level 3 Level 4
Folder
Compressed audio file
01 to 05: Folder number
① to ⑥: Playback sequence
Disc
Folder selection sequence or other operation may differ depending on the encoding or writing software.
USB storage device
Playback sequence is the same as recorded sequence in the USB storage device.
To specify the playback sequence, the following method is recommended.
Create a file name that includes numbers that specify the playback sequence (e.g., 001xxx.mp3 and 099yyy.mp3).
Put those files into a folder.
3 Save the folder containing files on the USB storage device.
However, depending on the system environment, you may not be able to specify the playback sequence.
For USB portable audio players, the sequence is different and depends on the player.
Russian character chart
| D: C | D: C | D: C | D: C | D: C |
| A:A | B:B | B:B | F:F | F:D |
| E:E,E | F:M | F:3 | H:N, N | K:K |
| A:N | H:M | H:H | G:O | F:I |
| P:P | C:C | T:T | Y:Y | Φ:Φ |
| X:X | U:U | U:Y | M:M, M | ...b |
| H:bl | b:b | J:θ | H:IO | R:Ra |
D:Display C:Character
Copyright and trademark
MP3
Supply of this product only conveys a license for private, non-commercial use and does not convey a license nor imply any right to use this product in any commercial (i.e. revenue-generating) real time broadcasting (terrestrial, satellite, cable and/or any other media), broadcasting/
streaming via internet, intranets and/or other networks or in other electronic content distribution systems, such as pay-audio or audio-on-demand applications. An independent license for such use is required. For details, please visit http://www.mp3licensing.com.
WMA
Windows Media is either a registered trademark or trademark of Microsoft Corporation in the United States and/or other countries. This product includes technology owned by Microsoft Corporation and cannot be used or distributed without a license from Microsoft Licensing, Inc.
AndroidTM
Android is a trademark of Google Inc.
Specifications
General
Power source 14.4 V DC (10.8 V to 15.1 V allowable)
Grounding system Negative type
Maximum current consumption 10.0A
Dimensions (W× H× D)
DIN
Chassis 178mm × 50mm × 165mm
Nose 188mm × 58mm × 16mm D
Chassis 178mm × 50mm × 165mm
Nose 170mm × 46mm × 16mm
Weight 1 kg
Audio
Maximum power output ... 50 W × 4
70 W × 1/2 Ω (for subwoofer)
Continuous power output 22W× 4 (50 Hz to 15 000 Hz, 5 % THD, 4 load, both channels driven)
Load impedance 4Ω (4Ω to 8Ω allowable)
Preout maximum output level 2.0V
Loudness contour +10 dB (100 Hz) +6.5dB (10 kHz)(volume: -30dB
Equalizer (5-Band Graphic Equalizer):
Frequency 80 Hz/250 Hz/800 Hz/2.5 kHz/8 kHz
Equalization range. ± 12 dB (2 dB step)
Subwoofer (mono):
Frequency 50 Hz/63 Hz/80 Hz/100 Hz/ 125 Hz/160 Hz/200 Hz
Slope . 12 dB/oc, -24 dB/oc
Gain +6dBto-24dB
Phase Normal/Reverse
CD player
System Compact disc audio system
Useable discs Compact disc
Signal-to-noise ratio 94 dB (1 kHz) (IEC-A network)
Number of channels 2 (stereo)
MP3 decoding format ...... MPEG-1 & 2 Audio Layer 3
Avant de commencer
MW/LW (PO/GO): OFF—LV1—LV2
1-2-OFF (hors service)
S.RTRV (sound retriever)
BASS BOOST (accentuation des graves)
MUTE MODE (mode sourdine)
ERROR-07, 10, 11, 12, 15, 17, 30, A0
Phase Normale/Inverse
Lecteur de CD
Ver. 7, 7.1, 8, 9, 10, 11, 12 (2ca- naux audio)
(Windows Media Player)
Format du signal WAV ....PCM Lineaire & MS ADPCM
(Non compressed)
USB
Specification standard USB
Ver. 7, 7.1, 8, 9, 10, 11, 12 (2ca- naux audio)
(Windows Media Player)
Format du signal WAV ....... PCM Linéaire & MS ADPCM (Non compressed)
Syntoniseur FM
ERROR-07, 10, 11, 12, 15, 17, 30, A0
Estensione file: .wma
Velocity in bit: da 48 kbps a 320 kbps (CBR), da 48 kbps a 384 kbps (VBR)
Estensione file:.mp3
: file audio compressor
| D: C | D: C | D: C | D: C | D: C |
| A: A | B: B | B: B | f: f | d: d |
| E: E, E | f: K | f: 3 | f: V, U | K: K |
| D: C | D: C | D: C | D: C | D: C |
| \( \lambda : \Pi \) | \( H: M \) | \( H: H \) | \( \emptyset : O \) | \( \emptyset : \Pi \) |
| \( P: P \) | \( \mathcal{C} : C \) | \( T: T \) | \( y: Y \) | \( \varphi : \Phi \) |
| \( \forall : X \) | \( \mathcal{U} : \mathcal{U} \) | \( y: y \) | \( \emptyset : \mathcal{U}, \mathcal{U} \) | \( \because b \) |
| \( M: b|l \) | \( b: b \) | \( \exists : \exists \) | \( \forall : \emptyset \) | \( \forall : \exists \) |
Consumo massimo 10,0 A
Ver 7, 7.1, 8, 9, 10, 11, 12 (2 canai audio)
(Windows Media Player)
(Windows Media Player)
ERROR-07, 11, 12, 17, 30
ERROR-07, 10, 11, 12, 15, 17, 30, A0
| D: C | D: C | D: C | D: C | D: C |
| A:A | B:B | B:B | F:F | J:D |
| E:E,E | J:M | J:3 | H:N, N | K:K |
| A:N | H:M | H:H | G:O | F:I |
| P:P | C:C | T:T | Y:Y | Φ:Φ |
| X:X | U:U | Y:Y | M:M, M | ' : ' B |
| H:bl | b:b | J:3 | K:IO | J:J |
ERROR-07, 11, 12, 17, 30
ERROR-07, 10, 11, 12, 15, 17, 30, A0
| D: C | D: C | D: C | D: C | D: C |
| A:A | B:B | B:B | F:F | J:D |
| E:E,E | J:M | J:3 | H:N, N | K:K |
| A:N | H:M | H:H | G:O | F:T |
| P:P | C:C | T:T | Y:Y | φ:Φ |
| X:X | U:L | Y:Y | M:U, M | ' : b |
| H:bl | b:b | J:3 | K:IO | J:Я |
D:Anzeige C:Zeichen
Equalizer (5-Band Graphic Equalizer):
Frequenz 80 Hz/250 Hz/800 Hz/2.5 kHz/8 kHz
KLASSE 1 LASERPRODUCT
Bij problemen
13 AUX-ingang (3,5mm-stereoplug)
14 Verwijderen

LET OP
S.RTRV (sound retriever)
BASS BOOST (bass boost)
HPF SETTING (high pass filter aanpassen)
Back-up (of accessoire)
ERROR-07, 10, 11, 12, 15, 17, 30, A0
| S: T | S: T | S: T | S: T | S: T |
| A:A | B:B | B:B | F:F | D:D |
| E:E, E | f:X | 3:3 | H:N, N | K:K |
| S: T | S: T | S: T | S: T | S: T |
| \( A: \Pi \) | \( H: M \) | \( H: H \) | \( G: O \) | \( F: \Pi \) |
| \( P: P \) | \( L: C \) | \( T: T \) | \( y: Y \) | \( \varphi: \Phi \) |
| \( \ddots : X \) | \( \ddots : \ddots \) | \( y: y \) | \( \ddots : \ddots \) | \( \ddots : \ddots \) |
| \( H: b! \) | \( b: b \) | \( J: \exists \) | \( H: I0 \) | \( R: \exists \) |
S: Scherm T: Teken
Copyright en handelsmerken
MP3
Versie 7, 7.1, 8, 9, 10, 11, 12
(2kan.audio)
(Windows Media Player)
WAV-signaialiformaat ........ Lineaire PCM & MS ADPCM (niet gecompridere)
FM-tuner
Frequeniebereik 87,5 MHz tot 108,0 MHz
Bruikbare geovlieghed ... 9 dBf (0.8 V/75Ω, mono, S/R: 30 dB)
EcnB TeneHHe 30 cekHyd yctpoIcTHo He nCnIb3yETcY, yctahOBHOHe MeHIO He 6yDet BvBOITbc.
- ECNI Bly XOtHTBeBIIONNHHTb HCTPOKNY NO3KHe, NOBEPHHcM.C.,TO6bI Bly6pBTb NO.
3 HaxmTe M.C.ДЯЯ BbI6opa.
4 HactoPte MeHIO C NOMOJI BO ONICAH-HbIX HNIXE DECTBNI.
3a#nKpyTneBbKpnaHnHnHa yctOCTBe
2 HacKMITE Na pRaBbI KpAe npEaHne paHEnn naZafKnCpYrte ee.
B Cnyaepnnpnoexn HsniHrero ycnnnpepehna naneb nn OCHOBHe yctpoCTBOMOTy6bTbNobPekDeHbI.
BkIIOUeHne ycTPOINCTBa
1 HAKMTEKONKY SRC/OFF, YTOB6 BKNIOHHTY cTPOCTBO.
BbIKIOHHe yCTPOIcTBA
1 HAKMITE N U yEPRKBAIE T E KHONY SRC/OFF, NOKA YCPTOCTBEO HE BILKHOHTNCTC.
Bb6op nCTouHnka CnHana
1 HaximmaIe KHONKY SRC/OFN DnBbIbOpa n3 cnedeUoXINx FyHKnu: RADIO—CD—USB—AUX
- Пиюндаковни no рotingokony MTP на дослесо оторазке aus TCP USB.
PerynipOBKa rpoMkoCTn
1 Hachimamte KhoNky BAND, noka Ha DnCnpee He NoBHTcRy HxKHyb dIaIa3On (FM1, FM2, FM3 dnn FM nnn MW/LW).
PtepeKIOUeHMe cTAnuI pReBaPHTeBHOHaCTPOIKI
1 HaXMMTe KHOKNy ANI
TTObIyNIOLOB3OBaT 3Ty FHyNKlIO, B MeHO SEEK Bb6epHrPc PCH (3anpOgrpMMPOBaHna TcAun).
Puchna hactpoika (noarobay)
1 HaXMMTe KHOKNy HNI
Tchbblnncb03aty 37y fynckuR, M HEOE SEEbk6bprrateM (yanhyaHCTPOKHa).
Nonck
1 HAKMITEuYIePDKHBAIREThKHOKNyAIIJIa 3ATTEMOTNYCTHNE.
Bb Mokoteet OTMehntb HactpoRy c NoHcKOM kPktHM HAKATHEM
Pn HaxKaTmN ydepkxBaHn KHOJKN
MOXHO npOnyCKatpaNIOCTAHNI. HcTpoKa C NOvckOM NaHHTeTc cpa3y NoCte OTNPKAHNKINI
PpmeaHn
- Пдогбуну Инфомашио о мени SEEK cm.В радзе SEEK (нартою левиnpавь конок) на чт.87.
Moxho BkIOHOTb IIN bIKIOHTb yHKIOI AF (NOCK anbTePAthBbX bactOT) daHO ro yCTPOIBa. TaI Ob6bHIOH aHcPOrKn yFTHKUN AF dONKHA 6bTb BVkIOHcHa (CMOTPte B AF (NOCK anbTePAthBbX aCTOT) Ha ctp.87).
CoxpanenHe N BbI3OB H3 NaMrtn padnoctaunn dnn KaKdoRo dnana30Ha
NcnoIb3OBAHne KHOJOK npedBapnteJIbHOHaCTpoIKn
1 CoxpaenHeH: hXaMnTe nYapedKmbaIte OdHy n3 KhoNk npedBaPntelbHO Ha-ctpOKn (c 1/An no 6/),noka Homep He npekpatNT MrtBt.
2 BbI3OB: haxMMTe Ondy n3 KhONK npedBapntelbHOH NaCTPOKN (c 1/∧ no 6/←).
IpeeknoueHne dncnner
Bb6op TeKCTOBH INHΦopMaun
HakimaiyeDISPnBb6obaI3neSyuOxHx fyuKHH:
FREQUENCY (Cnyk6b0e HauBaHne npo- rpaMmI nnu cTacto)
BRDCSTINFO (Cnyk66Hoe N3aBaHne nporpammb/HnKoPmaaPTY)
CLOCK(HA3BbHMeIcTOCHNkA CNTHaN a Ncbc)
PpmeaHn
Ecnn cnyke6Hoe h3BaHHe npOrpAMMbI B none FREQUENCY OTCYCTBYET, BmecTo Horo otobpaetaeTc KaHan. Ecnn cnyke6Hoe h3BaHHe npOrpAMMbI o6hApyKeHo, OHO 6yDet OTobpaKatbCra.
TeKTOBQA INHOFOMALI MOKET MEHITbC B 3ABUBICMOCTO IN DANTAHOZA.
B2MOXHOCTbBcEChHm3MeHEnB TEKCTBOyIO INHOPOMAUO 3ABuCITOT OPERHOA.
IcnoIb3OBAHHeФyHKUPTPY
MoXHO hAeTpoBtbc H aPaIOOCTaHcN cNo MoTObSO hINOpMAPOuTpy (TITNaI npOrpaMbM).
IcnoIb3OBAHne daHHoro yctpoiCTBa
PNT
1 HaKMnTe (CNUCOK).
2 KhoNkO M.C. BbIeBpTe TIN NpOgrpAMMbI NEWS/INFO-POPULAR-CLASSICS-OTHERS
3 HacKMte M.C.,Tc6bMyHauhBtNoNc. UyctpoCTBO HauHMaet NoNcK padIoCTaHmI, nepedaoUoAaXdHnBuT NmI pOgAM. PmI o6bApuyKeHHaPdIoCTaHmI HaDcNpEe 6bETnOka3aHO Ha3BaHme DaHNOI npOrpaM MbI.
ДЯ OTMнБИ NOICKA HAKMNTE M.C.[eue p3].
- PnorgpamMbI HekotopBx paIaIOCTaHcIy MOrT yOtUHcTaCBy O nporpamM, yka3aHbX B nepeDabaEMOM kOE PTY.
EcnHn HOna I3 cTaNCHNe He nepedae TnporpammbHyNcHOro Tnna,To Ha DCnPnneB TceHeNe pImeMPO DByck CxKhyBd 6ydet POKa3AHO NOT FOUND, N 3aTeM ToHep EpeNd B peKIM pIeMa TcAniC, C KOtopo B6HJ Nauat PONCK.
Cnncok PTY
Bolnee noopobhyu HfOpmaunio O cTnCKe
PTY MOxHNO NOnyUHTb Ha Be6-caIte:
http://www.pioneer.eu/eur/products/25/121/tech/
CarAudio/PTY.html
HactpoiKa fynKzni
1 HaxMMTE M.C., YTO6bI OTKpbITr rnaBHOe MEHO.
2ПоворачиВаITEМ.C.DЯн npOKpyTKI nyHKTOB MeHIO;HAKMITE,YTObI BbIbpaTb FUNCTION.
3ДиьБИбОраФункIMи nobopauHBAIte M.C.
CnEyduoHue BbIePAnHbIe FyHKUIN MOKHO HcTpaHab.
BДяпанэх Mw/LW мохно Вьбрат ТолъКВ BSM, LOCAL # SEEK.
FM SETTING (hactpoikKauecTba 3bkya FM)
YOpOBHeKaKeCTBa 3ByKa MoXHO yCTaHOBuTb B COOTBcETBn C yCNoBMy nPiMe aM rHana B FM-dmAn3Oe.
JITI OTO6PbAKeHnYyCTaHOBOvHORO MeHO HAKMITE M.C.
2 [PbOpaCuaBaeTMe.C.IIaYBa6oPaHaCTPOH KI.
STANDARD - CTaHdApTHaHa HacTpoiKa.
HI-FI-HACPTOKA C PNPOTETOM BVCOKO-KA KACTBCTA CTEPEOBAYHANIA.
STABLE- HacrpoKa C npnOpiTeTOM N3-Koro yOpBn Yomex MOHOOnHeCKeTOKo 3ByaHn.
BSM (3aONMOHAnHe JyUHXx CTaHnI)
Функлaria BSM (Заламинане руших стуши)
норовет autOMathmecn COxPahyrТВ bЯгату NGTOHCTBA UIECTСТАПСИ C CambIM MOUchBIM CRIHANOTB Nordpide YsblBaHryA erO MOUHOCTM.
1 HAMKMTe M.C.,TOb6I BKIOUHTb FyHKLIO BSM.
IpyOTMeHbIpeXIMHaHXMnTe M.C.ee pa3.
REGIONAL (pernohaJIbHbI)
Pnncnoobannfynkun AFyhnknpe HOnaHbHx nporpamm orpaHnHbaet Bb6op ctaNmu, TpaHcIpyuMmpeNoHaBbIe nporpamMb.
1 HAKMITE M.C., TSTBQI BYKIOHTY IIN BHKIOHTY PTHFYKHILOI PRHOHAIHbIX NORPAMM.
LOCAL (HAcTpOJa C MeCTHBIM NOnCKOM)
McnojB3OBAHne daHHoro yctpoNCTBa
Hactpoika C meCThBIM NOINCKOM N03BONRET Bam HactPANBAITcB TaIbKO HA radIOCTAHMN CdoCTAOHNO MOUHBMn CNHaNAmDNJa KauCTBeHNHO pnpema.
TA (peKM OKnDaHnDopOxHbX CBOOK)
1 HAKMITE M.C., 1T06B BKNIOHTI YBN BKNIOHTI PEXKIM OKXJAHDAIR DOPOXHKIBX CBOIDOK.
AF (nonck aIbItePHaTINBbIX qACTOT)
HAKMITE M.C., T06bI BYKHOHTB INI BYKHOHTB FyHKMIIOF AF.
NEWS (npepbBaHne dIe npedeaH NOBOCTei)
HAKMITE M.C., TTOb6 BYKIOHOHTI HIN BYIKIOHOHTI FyHKIIIO HOBOCTN.
SEEK (HacptoKa neBoN npaBOH KhoNOK)
Praobn I neBoH KHONKAM HA yCTPOBCTBE MOKNHO HAHNAHTb ONpEdeHEnHyO yFkhUcIO.
Bb6epnte MAN (pyuha nahtpoika) dnypuhoHn actpoikn nn PCH (npedyctaHOBNHeHHN kahan) dnypekeIIOueHmMeKdy zapeHne ha tctpoehbIMn kahanAMn.
1 HAKMITE KHONKY M.C., YTO6b BbIb6paTb MAN INH CH.
CD/CD-R/CD-RW n 3aPOMHaIOUne yCTpoiCTBa USB
IopKIOUOHe nO npToKoNy MTP
YctpoIbTa Android, noDepErKBaOaHne pnoToKoI MTP (c onepaIOHOHn CmCTeMOI Android OS 4.0 nIIy BbIue), MOXKO NOJKNIOHTB No pnoTOKOny MTP kAK USB-YctpoICTBO. IIN daNkIOHeHn NcIOJIb3yIte Ka6eBb, BxOJaIzB u KOMNIKeT nocSTaBv yctpoITcBA Android.
PpmeaHne
3TaФункин He noДeржИВaET WAV.
OCHOBhIe Onpaun
Bocnpo3BeJeHne CD/CD-R/CD-RW
1BCTABTBE DING B E CIELI P3A 3Ry4y3M KMAPIOPOBAHNO CTOPOHNO B8BPEX.
I3BneHneHne Dncka CD/CD-R/RD-RW
1 Haxmnte
Bocnpn3BdEHNe KOMN03NIuHa 3aONMHaonAo-ue TcpoIcTe USB
1 OTkpOte KpbIuKny npTa USB.
2. [1]ФLOKHIVN'THE 3AONMOHAAIOOeuey UcypoTbEO USB C nOMOUoo Ka6eBn USB.
OctaNoBka BCoPnoB3eDeneHФаIIOB ha 3anoMnAnOHeM yCtpoTBe USB
3A0MnHAnHOoee yCTPOJcTBO USB MOKHO OTKIOUHTb B JIOLO MOMEHT.
Bb6op nank
1 HaxMMTe KhoNkY 1/Ann 2/V.
Bb6op dopokk
1 HaXMMTe KHOKNy 1NII
YckopeHHa nepeMoTKa BnepeiHa3ad
1 HaKMITE BAND.
BOSTMOXHO NEEPKIOHENIE MEXDZ 32 panaHn- HbMn 3ANPMHOIAHINM YCPTOEBAMN.
PpmeaHne
Ecn3a0nHMAOooieyctrooCTBOUSBHEnc-nbEytaee,OTKIOHOte 10e.
IpeeknoueHne dncnner
BbIop TeKCTOBoI INHOpMaun
1 Hachimaime DISPnA Bb6opa3 nCneDyioxHx dyhKiu:
CD-DA
ELAPSED TIME (HOMEP DOPOKKIN IN BPEM A BOCTPON3BDEENNA)
CLOCK (H3A8BAAHE ICTOCHNKA CINHANA N YacCb)
SPEANA (aHaJIIM3aTOP cNeKtpa)
CD-TEXT
- TRACK INFO (назаиме дорождз/ностп
- Trknlo/n-haразиме дисka)
ELAPSED TIME (HOMEP DOPOKKIN IN BPEM A BOCTPON3BDEHNA)
CLOCK (H3aBaHMe INCTOHNiKA CmHnAHA n aCb)
SPEANA (aHaHIm3aTop cNeKtpa)
MP3/WMA/WAV
- TRACK INFO (Habahwe dopokxim/IMM ic-nonhetaen/ha3ahebe nab06ma)
FILEINFO(H3aBaanHe nankn/H3aBaanHe (faun)
ELAPSED TIME (HOMEP DOPOKKIN IN BPEM A BOCTPON3BDEENNA)
CLOCK(HA3BAHHE INCTOHNIKA CINHNAI naCb)
SPEANA (aHaJIIM3aTOP cNeKtpa)
BbI6Op n BocIpOn3BeDeHne ФaIOB/DPoJoxK eN 3 CnNcKa
1 Haxmte KhoNy Q, T06bI OTObpa3ntb cnCOK Ha3BaHnФaJNoB/DopOKeK.
2 C nomoctuMoM.C. BbiBepTe HyxHoe mHaJnA (nnnnn)
Bb6op faia nnnnann
1 NobopaunBaIte M.C.
Bocnpn3BeDHeHne
Bü6epnTe Φaɪnɪn dɒpɔkKу n Ḥæʌŋmɪte M. C.
Посмогтснистаиманьд�айов(nanok)Вьбданhoнпanke
1 Bb6epnte npky n Haxmte M.C.
Bocnpo3B6eHNe Kcmo3nIuM n3 Bb5bpaHno papKn
1 BvBePte nanky, 3aTeM hXkMnTe H ydepKbIe Tbe M.C.
S.RTRV (sound retriever, texhonoraria pneo6ba3-OBAHNY 38yKA)
ABOMATMueCknyuHaAeT KaueCTBO 38yKa CkaTbIx ayDnOaHIOB N BOCCTAHABNtBaET NOINOTY 38YAHUY.
PerylinpoBkni npaMeTPOB 3Byka
1 HakuMITE M.C., YTO6bI OTKpbITr rnaBHOE MEHO.
2 IIOBOPaHbAitE M.C.ДЯI npOKpyTkn nyHKTOB MeHIO; HAKMITE, YTO6bI BbIbApTa AUDIO.
3Длбвьбораудуновсноворчыг�M.C.
CnDyouOme Bb6panhhe ayuNDOyHKmU MOKHO HACTPANBt.
-ФанклmaFADER Heoctynha,ecnBpeKIMe SP-P/O MODE Bb6paho SUB.W/SUB.W.ПоюрбемСВ.Бараздe SP-P/O MODE(HaTcpoHka BbXdo 3a3Hero KaHana И рпd-BaPHTbHOrO yCnITeTЯ)Ha cTР.91.
Фуншим SUB.W n SUB.W CTRL HeIoCTynHbI,ecnB peKIMe SP-P/O MODE BbIpaHO REAR/REAR.Порбдемс.Em.baTaeJe SP-P/O MODE (HaCtpoiKa BbIXOda 3aJHero KaHana n pIpeBaPInTeBbHorO yCInHTeMa)Ha ctrp.91.
-ФункцИ SUB.W CTRL HeIOCTyHNA,ecNиB peKHHME OFF Bb6pANO SUB.W.Пл.dro6Hee CM.Bpa3dene SUB.W(BkIIOHcHMe/BykIIIOHcHne ca6byfepa)Ha str. 49.
YKHNZLA SLDHEOCTNYA,ecnB KcAeCTBECTHOCTHNNHCA HbBuPAHFM
FADER (perynipovka 6anaHca)
IITANIOTO6PAKGEHINYUCTAHOBQHOHO MEHO HAKMATE M.C.
2 HaxMMTE M.C., YTOb6I OTepyUNIOBAtb 6a-1aHc NpeEiHNx I3aNHX TpOMKOTOBOPINTeJn.
BALANCE (perynipovka 6aHaHca)
JITI OTOOBAPKENHVAYCTAHOBOPHO MEO HAKMATE M.C.
2 [PobovapaIaIeM E.C. TcObIb oTpyrnoBAPo8 BaIaHc neBoro/npAroBa rPoMkOrOBopHTenEn.]
EQ SETTING (BbI3OB HAcTPOEk 3KBaJIaI3epa)
IcnoIb3OBAHne daHHoro yctpoiCTBa
JITAOIO6PbAKeHnYcTAHOBQHOROMeHNOHaXMMATEM.C.
2 Haxmite KhoNky M.C., YTO6bI Bb6pa8 bKaBnaiae.
POWERFUL-NATURAL-VOCAL-CUSTOM1-CUSTOM2-FLAT-SUPER BASS
Ponocy y npo8beHb 3kBvaia3epa Moxho OtpereynipoBab, ecnbl Bb6paHO CUSTOM1 nIh CUSTOM2.
NOR (HormpMaHbAa3ha-REV (6pbatHa 4haa)-OFF (cBvSyep BvIknOe)
SUB.W CTRL (hactpoiaKa caBbyep)
Ha BbXode ca6byfepe 6ydt BoCpnoBAdOHTbTc TOnJIKO TeAChTObl, KOTOpBE HmKe Yka3AHhBxIaCTOT cP3ea.
JITANIOTO6PbAKENHUYCTAHOBQHOFO MHNHO HAKMATEM.C.
JHakimaiye M.C.ДяЯ Вьбoga ИЗ с数字货币х
Фуншкii:
Yactota cpe3a—YoPoeBbXbIOJHO CnHnHa-KpyTn3Ha xapakTeprntcMkn
NmehraMeIbe 3AHeHEny6yDUT MNTatb.
BASS BOOST (yCINENHE NHEKHNX 38YKObIX YaCTOT)
IITMOIOTOBAPKENHUYCTAHOBQHOHORMOHEHAKMATE M.C.
2ПовораиваятМ.C.дя Вьборунжюрва.
PIMyEBVHENHHIYmENMHUeBHENHMPOBHYOTo6bPAKIAOTCRADHNICu0D+6
HPF SETTING (hacptoika knfbltpa bexnHex hactor)
IcnoIb3OBAHne daHHoro yctpoiCTBa
IcnoIb3yIte3TyfHKUHIO,ecnBbXOTHTe, TcOb6I BOCITNOBDOINNCbTolkBO BVICOKNE ZaCToBtHa IrpOMKOrOBOpTeNbEyDTbBVIOBNTCBaTOLkBO CaTObTbBbIe,CHMycTahOBNeHbE qbnltpomBbCOKXHcTocT (HPF).
DIMMER (pergyTOpOCBSeHHOCTN)
1 HaxkMITE M.C., 70b6I BKNIOHTB IIN BIKNIOHTB pyerjTAPOT OCBSEUHNHOCTN.
BbTaKoeMoKeTe Bb6PbTb DpyTuO HacToPO KypeyIaTOpA ocBeuHNoCTn, yDpeKmbAr hKaHAtoN KHOky DIMMER.
MUTE MODE (pexim npnrrnyuweHna 3Byka)
3BvK/ypoBeHb 3BvKOBOrO CnHana daHHoN CnCTeMbI abOTOMaTHeCKn NOnHKaTeC npri nOnyueHmCNHana oT obOpdyOBaHn c FyHKuJe nprrfTuWeHn3BvKa.
JIMI OTO6PakEHHaYCTAHOBOHTHO MOHIO HAKMATE M.C.
2 [Поворачива对接 M.C. Дял bбopa насточь KM.
MUTE-nprnyeHne 3Byka
- 20dB ATT -OCSA6BNEHHE yPOBHN CHTANA (20dB ATT IMeET 60OE E CNLHBN 3Φ-ΦEKT, HEM 10dB ATT)
10dB ATT-ocna6nneHyePOBnCnHa
PW SAVE (3hepros6epekeHne)
BKNIOCHENIE 30T ΦYHKUNI NOBONJIET CHN3ITB nOTpe6bIeMHy MOUHOCT bAkyMylTOpHNO 6a-tape.
PINBKIOH6EHNIOTQYHKUHNEDHCTBEHHOB3MOKHOI ONEPAIeRABTETCRB KIOH6EHME ITOCHNKA CHTNHaA.
1 HaxKMITE M.C., ITo6bI BKNIOHHTI INH NIKHOHOTIy FyHKUHIO 3eHrOcP6EeKHEXA
CTapTOBoE MeHIO
1 HaxmTe uyepeKbAte KhoNky SRC/ OFF, noka yctpoiCTBO He BblKnIOHtCra.
2 Haxmnte KhoNky SRC/OFF udepXnBaIe ee, noka He otKpoetc staptoboe MeHIO. TOnbko dJa DEH-1600UBA Haxmnte M.C.,TTOb6bl OTKpblTg IaBHO MeHIO.
3 NòBOPaHbAaTe M.C.ДЯ nPOKpyTkn nyHKTOB MeHIO; HAKMITE, YTO6bI BbIbOpTaB INITIAL.
4ДЯьБИбОпФУнКИМЕНОССТЕМЛ NOворваWIte M.C.
CnEduOuHne BvIbpaHNHe FyHKnLcTAPBOBTO MEHOKO HAcTpaNbaTb.
FM STEP (war hactpoynB FM-dnana30ne)
1 HaxmTe M.C., 10To6bBb6paTbIaR aHCTpoiKn B FM-dnana3Oe. 100 (100 kU)-50 (50 kU)
IcnoIb3OBAHne daHHoro yctpoiCTBa
SP-P/O MODE (HATROPOKA BbXOda 3aNHEKAKANA n pRbAEBAPITBENHO CYNNTEN)
BbXoH na IpoBoJa 3aDHeRo rPoMKOrOBOpTeNn a BbXoH 3aDHeRo KaKANA RCA MoKHO NcOnIb3oBabT for nOdkJIoCHEny IImpOKoONoCHOr oPROMorOBOpTeNn nn ca6ByepeA. Bb6epitne NaCTPOkY, POxOxraUyIO dnn BaWero coQeINHeHH.
1 Bctabltbe MNHHTeKep CTpeoKa6JIaB rHe3doAUX.
2 HaxMMTE KOHNKY SRC/OF,HTo6bIbB-6pBATs AUX BKAeCTE bOCTHNOHcM CHRHNA.
PpmeaHne
Hebo3MoXHO Bb6paTb AUX,ecn He BkJIOueHa BCNOmOrateBnHra HaCtpoKa. Ioppo6Hyu HnΦOpMaUcNo CM. B paDaJe AUX (BCNOMoRAteBbHbI BXOJ)Ha CTp. 90.
IpeeknoueHne dncnner
Bb60 TeKCTOBO INHOpMaUN
1 Hachimmaire DISP nA Bb6opa 3n cneJeouxH xdyhKui:
Ha3BaHne nCTOHTnKa
Ha3BaHne nCTOuHNKa CnHaJa u YaCbI
EcIn OTKpbIcra HeBepHbI 3kpan
OTKLOHNTE HeBepbI kpaH, Ka OKnCaHO HNKe.
1 HaKMMTE M.C., QT06bI OTKpbITr rnaBHOe MEHIO.
IcnoIb3OBAHne daHHoro yctpoiCTBa
2 NtobopauBaIte M.C.ДЯ npokpyTN KnyHKTOB MeHIO; HAKMITE, YTO6bI BbIb4pTa bSYSTEM.
3 NoberpHnte M.C., TtOb6I tObeP3a3ntb DEMOF OFF, 4atem HAXKNTme.
4 NobeprHne M.C.ДЯ BbIbopa YES.
5 HaxmTe M.C.ДЯ Bby6opa.
YCTaHOBKa
Coeinnen
Baxho
- Pnq yctahOBke daHHoro ycTpoCTBa v B aTOBMOBNE, B KOTOPOM OTCyTCTBYET NONOJEHNE KJIOna 3aXnirAHIN ACC,Kpachb Ka6enb D0JIKeH 6bItb NpIKKIOHeN K KIeMMe, KOTOPaRAnOpTeHNrTa paOoee NONOJEHNE KJIOna 3aXnIRAHIN; B I pOITNBOM C1yae MOKeT Bo3NHKNHTb YeTuKa TOKA AkkyMylTROPHO6atapei.

Плобъене ACC

Положбени ACCOTCYCTBYET
- 3Kcnpnyataunia daHnHO yCtpoCTBa B ycNoBnX,OTINHHbIX OTINCAHbIX HNOXe,MOKETpNBECTn K NOxapary INI c60o B pa6Ote yCtpoCTBa.
TPhAHCNOPTRHbE CpeDCTBa C 12-BOfIbTOBbIM AKKyMylTApOm N3a3eMJIeHnEM OTpNIaTeBbHOrO NOIOcA.
- FGMOF0BOPENTEH C 50BT (BvHXDHA MOUHOCHTb) HOT 4Ω 08 Ω2 (CONPOTMBHEHNE).
Bo m36bckanhe KOPOTKORO 3aMblkAnHnepeRpeBaHnHeNcnpabNocte o8a3atelbNoco6nDaiTe cNeDuOnyueYkaa3HH
-
Pereycta tahabOKBor OTOeOJIHINITE ORTHAETELHUYIO KNEMMY AKKYMNYTIPORA.
3aKpEnIte npObOda pRi NOMoUm 3aKIMOB ININIOJIuINOHJNEHtB.IJN3aIcHTb IPOBQIKn 3aI3OJIpyIte npObOda B MecTax INCOPRIKOCHOBEHcM CMeTANIHcECKMN DeTALMM.
—Pa3MeCTIte BCE KaBeHb IN BdyaneHmN OT noD-BWKbIX DTeaNEi, TAKHX KAK bYpur nepeKJIQUeHnI nepeDaH nHaPpAraJIOuIne CnDEHnI.
—PazmeCTte 此e Ka6enB ydaeneHn OT Ha- rpeBaioxxCsTeTaeN, TaKx Kac peWetka 06orpebatEn.
-
3aIpeaaTc noDklnOuATb XeNtbl npoBod dncnner A kckyMnyrTOPHo Batapee ABTOMOBNJpe3 CBPEHoe OTeBepCTne BOTCEK DEBiratEn.
HbNIOyPye KOHNbIe BcE He NOIOOeIDINHEHbN KAbSeBnIOAIOIOHOHnNEHtO.
He ykopauBaIte Ka6eJI.
Hnkorga He cpeaaeIeonlaio co shnypa nntanHHa dAnHoro YcTpoiCTBa c zebIo noa-n HnTTAHHa h dyrooe yctpoiCTBO. Oynctm Mharpyka kabena no TKO orpahnueha.
I- NcnoJIbYte npReOxpaHHTe b c Yka3AHHbIMn napAMETpAMi.
3a- 2aTaepeuaeeTACnHpaRyUa3eMaTeBtOptnIaTaePbNbYbBODpromKOrOBOPrBriEe.
-
3anpuaetcBc8bivbTbeMeceOTpua-tenhIe KaebnHeckoJIbKx rPOMKOrOBOpHien.
-
PnB KBNIOHEN NITAHNA YCTPOCTBA ynpabIbHOUO CINHAN NOAETC UPE3 CINHE6BNI PPBOOD. PNOKNIOTHE 3OT PNOBOK K KLEMME PYNbTA YNPABNEHNA BHEWHERA YCINTELE MOUHOCTNI INN KLEMME pENE ynpaBHENA aHTENHb C 3NEKTPOPNIBODM (MaKc. 300 MA 12 B NOCTOHN HORA TOK) EcNI ABTOMOBINb OBOPDvOBaB VCTPOEHHO B OKOHNOE CTKEJIO AHENTHO, NOCDEOHNTE BOKOJD K KLEMME NITAHNA YCINNTeRA aHTENHb.
3aapeaetaCnpoDcEHHBcHHe-6bIy kAbelbKKNEMME NHTAHNBA BHEHrero yCnuNTe TMAUHOCTs. TaKeZaepaeTcNOCoEOHNHTb DAnHbI npBOoB K KNEMMe NITAHNA aHTENHbI cALeKtpnpBDOm.B npOTINBOM CNyuae MoKET Bo3HKHyt bYteKa ToKa aKKymJTOpHO bATapEn HIN HA HeCNpABHOCTb.
YCTaHOBKa
- UepHbI Ka6eBb RaJIaTec3a3eMnHOUIM. 3a3eMnHOuIe K a6eNn DaHOrO yTOpOCTBa NduPyHX uYToPcTB (OCo6eHHO yCTpoCTB, npDeHa3auHHeBIX dRkCnPLyatauIN pRi 60JIbXhIX TOKAX, TaKNX KAcY cHJInTEb MOUHOCTN) DOJIxHbI MOHTIPOBATbcr OTeNbHO. B nPoTBMHOM cHyae IH cHyaiHoe OTcoEHNHEHMe MoKET pINBECTN K NOXApI IN HeNCnPABHOCTN.
DaHHoe yCTpoIcTBo

① HnE3do shypa nHTaHna
BbXo3 daHero KaHana nn BbXo3 ca6By- defpa
③ THe3Do aHTeHHbI
④ Плавский пededoxpanHTeIb (10 A)
5 Bxod npoBDHO ng nylbta dNCTAHMOHNHO ynpaBENHn (tonIbKO DEH-1600UB, DEH1600UBG u DEH-1600UBB) CnykHTI DnOKnIOHNpnoBDHO aadTepa nylbta dNCTAHMOHNOr ynpaBENHn (npio6beteTaOTdEnHo).
Unyp nntanra
① Krhe3dy shhpy nTahnna
② B3ABCIMMOCTOITNATAABOMOIBIANyHKUIN ③ N ⑤ MOYTOTNIHAAbCBA. B 3OTCM CUYAE cNEUYET NOKIOHNOHTB ④ K ⑤ N ⑥ K ③
③ KeTTbI
Pezehrbni pa3bem (Hn pa3bem dOponHntelhoro 60obyDobanria)
④ KentbI
Пдкнгдд К кншиме Истониka noctoану HoroToK 12B.
⑤ KpacbIy
Pazbem DonopNHITbHORo 60OpDobAHnA (HIN p3eBPhNbPazbEM)
⑥ KpacbIy
ПовдкючITEКККЕМп,НаКOTOPУЮДАETсаняргенье (12В noctoryHOROToka)пгИКьночENиЗAKINHЯ.
- Pēpek OKOHaTeHNbY yCTaHOBKo npOBeBpTe BCe COeDiNEHnA rI CNTEMy.
YCTaHOBKa
He nCnoIb3yIte Detani, He paRaeSeHHbIe pOIO3BODITENEM K ICSNOIb3OBAHINIO, POCKoIbKy 3TO MOKET CTaTb PnUHHOH HcNcnpabHOCTei.
Ytochnite y dnilepa kOMpaHIN, Tpe6yET NLYCTAHOBAK CBEPIENH INOTBcPTN ININ BHECEHINbIX IN3MeHENB KOHCtpKyIIO ABTOMOJIIN.
YehtaahanyBnBaTe DaHHOE yctpoNCTBO MECTAX, Dze OHO MOKET:
NOMeWAtb ynpabNeHnIO aBtOMo6nJEM.
- TaBMPMOBATb NaCCKJHpaPn BHE3aHNOH OCTAHOBKE ABTOMOJIPLN.
Ipeperpeb noynpobodnikoBoro naepe npnbdeTe K ergo blyxoNy3 cTpo. Pa3meCTte BCE ka6ebm B ydaeneHm ot harpebaoUxxCs deranen, Taknx Kaek pewetka oborpebaten.
- ONTIMaJIbNoI yBJIaTcY cTaHOBKa yCTpOi-CTBa nOy rYIOM MeHee 60°.

PnU yCTAHOBKE HE06XDOIMO 6OeNEHHTb 3eFKeTMBNt OBTOE TENJIa, OCTaBnB DOCTAOOHoe npOcTpaHCTBO 3a 3dJeHnAneHbIu N 3akpEniB C0bOdHnBe KaBEni TaK, 7Oebl O Hn E 3akpbIBaIN BENTNUrIOHHbIe OTBepCTN.
IpeaHee/3aHHee KpenJeHne cTahdapTa DIN
1 CoBMeCTHTe OTBepCTnHa KPOHHTeHe n60KOBbIX NaHEJIx yCTpoIcTba.
2 3aTnHHe nO DaBbNHTa C KkXdoT cToPoHbI.
① Camohape3aoum BHT (5MM×8MM)
② MoHTaXHaJa pAmKa
③ Пибогная паненьь плконсль
Демонтх усточь
1 CHIMNTE paMKy.
①ДекopaТИВHAЯ pamka
② 月3b4OK
- Chrtne nepehdne nanehne obnneraet doctyn k Dekapotaribn oampe.
- PniyuctahOBKeDeKOpaTINBHO pAMKn cToPOHAPAMKc C3bYbOKM DOnJIKHa 6bIb HapapBeHHe BAHN3.
2 BCTaBtte npnnaeraMble 3KcTpaKtopbI c o6eHX CTOpOH yCtpoiCTBa Do ueHka.
3 BtBHTNHEYCTPOYCTBOI3 pH6bOPHOI nAHENI ABTOMO7JIa.
ChyTne u yctaHOBka nepeDne naHei
B centa zaaattby ot kpaanpeednoo panenb MOxHO CHrTb.
Ttob6n nonuytbnononHntenbHyu HnHopmaI zu, CM. ChTne nepedn naeHN u YctanOBKa nepedn naeHN na ctr. 86.
DOnONHrTeIbHaN HOpMaun
YcTpaHeHne HEnCnpaBHOCTe
CIMNTOMb BYdIeHb JxMpHbIM uPfTOM;
pNCHbN bOk3aHb ObUHbIM uPfTOM 6e3
OTcTyna. CnOcOby yctpaHHe Noka3aHb ObU- YHbM uPfTOM cOTcTynn.
DnCnnB aOBMATHueCKN BO3BpaaTcET B XnOChnB peXmN.
B Těchené 30 cěkyund He Šblyno BlynoHNHE NkHKMX onepaún.
Tobortte onepaunio.
IaanaohnOBTOHPOBOGRCNPOHN3BDEENHcAMoPON3BOBHO NIMHERETc.
B 3abciHmOCTn OT b6paHONo dmaa30Ha BOCpOn3BeDEnHr OH MOKET n3MeHJeTc pRn BbOpe DpyroI npAni IINDPoKx, a TAKKe pRn pePeMOTke BnepeJ/Haada.
Bb6epe7 daianaoh noBOTPHORO Bocnpo3BeDhenya eue pa3.
Bloxenha nanka He Bocnpo3Bodntc.
BLoxekHnBe NaNKHe BOCPnO3BQDTRCA,ECNI BbI-6pan dana3oH FLD (NoBtropHOe BOCPnO3BedeHne naNK).
Bb6epeIaRyDnAa3oN NOBtOPHO BOCPNO3BEDEHIN.
TeKCTOBa INHOpMaunOTCyTCTByET.
PteKIOUOTe DnCINH INI NBI KIOUOTe BOCPOINB3EHNDEHpeDpyrO dopKOxF/paIIa.
YCTPOCTBO fYHKNUOHNPYET C OUIH6KAMN. IMHOETC NOMEXN.
INcnoB3yETcYCTPOIcTBO,HANpIMep,COTOBY TeJIeOHO,KOTOPOE MOKET BbIbIBaTb UJMOBble NOMeXN.
6bepirepi60bblbBAIOUIOMEMXHOT3OTOyCtPOICTBa.
Coo6eHn8 o6oHN6kax
PpexdmeomobpatntbcsKtoprobomypeed- CTABITENIOIMB6bnXaHmNCEPBNCbH 电HpTcPione,OBz3aTeNbHOZanOMHnTecoo6- 电E06Own6ke.
CmIMTOMbI bbldeNHeI JxRHPbIM 7pHΦTOM;
PnHbIbN oKAp3aHbI obbHbIM 7pHΦTcB63
OTCTyNA.CnOcObI yctpaHEnHa NOKa3aHbIobb- YHbIM 7pHΦTcCMOTCYNM.
067ne
AMP ERROR
UCTPOICTBO He paObTaET INI HENpABIVILHO NOIOcoeIMHnE rPOMKOrOBOpRITeB; cpaObTAa IeB 3a-NTbI.
IpoBepbTe, noKIOHcHEn IIN rPOMKOROBOpHTeB.
Ecn coo6eHHe He nCye3aet daKe nocne
BbIKIOUeHn/BoKIOUeHn3aXnraHn,
CBXKITecb CINJNEpCKM CEHTPOM INN
aBTopu3ObaHbIM cepBnCHbIM ueHtpom Pioneer.
PpOurpbBATEbKOMnAaT-DnCKOB
ERROR-07,11,12,17,30
ДиСЗЗгярзEH.
OuHCTnTe Dnck.
ДиСК ПОцAPANH.
3aMeHnTe Dnck.
DOnonHnTeIbHa HOpMaun
ERROR-07, 10, 11, 12, 15, 17, 30, A0
3NeKTPnHeecka IIN MEXAHInecka HEnCnPaB HOCTb.
YCTaohobite NtKHOaXaHrAnHRA BNOJoxeHMe OFF, aTatem-B NOJoxeHKeON OJIIN
peKIOHHTeCb Ha npTyOINCTOCHNK CTHHaja, a 3aTeM o6paTHo HA npOnIpyBaTeNb KOMNaKT- DnCKOB.
ERROR-15
BCTAIEH NCTO DNIC. 3AMENITE DNIC.
ERROR-23
ΦompatДиСКЕ не подерЖИБАТСТ. 3мени.TпDE
UHOrda nOpCXOUDTnAdeKpXaMeKdyHaanOM BOCPNO3BDEHnI NOBREHNEM 3BykA
3BNYKOBNTCRNOCNETOFOKAKCINCNPEA NCHE390COTOOO6E
NO AUDIO
HaNcKBe OTCYCTBYIOTФaIbIy,KOTOpBIE MOKHO BOCPOINBAECTNI.
3aMeHnTe DnCK.
SKIPPED
3aKJHANBA NBOXeKHeFFOT, 3ATEM-B NBOXeHEC ACC uN ON, u3ATEM
nOJIKNIOUATEI ToN KO BCOEMCTMbe 3aONHMOAIOOEYcPTOBCTA USB
ERROR-19
C60iCB3n.
BbInonHnTe CneDyIOUne DeiCTBna.
- YCTAHONTE KNUO 3aKINGHAN B NOLONJEHME OFF, A aTEM -B NOLONJEHNE ON.
-OTKJIQUHTe 3aONOMHauOuee yCTpoIcTBO USB.
-BbIbepnte dpyroH nCTOHHK CmHana.
3ATEM BHKbBb6epITE USB B KAChEteB NCTOHKHCA CNHJLA.
ERROR-23
ZanmHaiaooye yctoepCTBO USB he OTopfmatnoboA h C bteMeFAT12,FAT16 nHN FAT32.
ZanomHAnOoJee YcTOpBCTBO USB DQNKbO bItbФopmATnoBaHO B FAT12, FAT16 nHn FAT32.
STOP
B TeKyuIeM cINcKe OTCyTCTByIOT KOMnO3nIuN.
BbI6epHTe cHnCKO, cOeRjXauuM yMbKaflbHHe KOMIOHNs
Pekomehdaunno 6paueHIOcN3deJinem
ДиСкн n npOuRpbIbAteIb
IcNtbnbayteToTbnkOdKcnK,IMeOuHneOdnH3 cnEduynxhNTOGNTHOB.


IcnoJIb3yIte 12-cm IuCKM.
IcnoB3yTeToJIbKOobHbIeKpyTbIeDnCKM.
CnedyuohneTnblDnCKOBHeB3aHcNpIb3o8aBt BaHdAMOHyCTPOKTBe?
-Дисккоформатa DualDisc
- 8-CM DKKN: NONBtIKN INCNOTbOBTb TaKHe N C NOMOtsbO aADITpea MOYr PtNBecTn K HEMCNPAHOCTH YCTPOICTBA.
DnCKHHeo6bHuHbIXΦoPm

Dnckn dpynx fopmatOB, kpoMe CD
TPOBekENHbIe DnK, B T.Y. C TpeuHAMi, CMOTONTOBm KPNAMJ INEoDpOFMOBAPBoHAI
- Dzicko CD-R/WR, 3a1nCb hA KOtOpbX HE 6bIa 3abepeSHA
Ne pinkacaiTaeBc K3auncaHNOI NOBepXHOCTNIKOOB.
Korda dncki he nccnbl3yotc, xpaHITE IN B cyfTnIAPax.
He NpKINKIIeBAAITE 3TNKETOK, He NPIIIMITE H E HAHOCHTE XMMUeCKN XBEIECTB HA NOBEPXHOCTB. DNICOB.
ДИМСЧТКOMKТАМСКПOTРПЕТМСКМФΚΤΚΑΗΟΥОΤΟΥΚΑΝΑΚΟ
DOnOHHTeIbHa IHHOpMaun
KoHdEHCsaIgMOKETBVPeMeHNO yXyDImTb pa6Oto npOIRpbIbATEIa. OCTabTe erO dJa aadIaTcMn K 60lee BlyCOKO TEmpeIaTy pIIMePHO Ha cac. TaKeJyUaJIte BnAry c DmCKOB c NOMIoBu MyKIO TKAH.
Bocpona3BeHnE nDCKOB MOKET bIbHeBO3- MOKHO 13-3a XapakTePcHNT DCNCA, FOpMata DnCKA, pnpIOKeHnEA, pni NOMOu KOTOPOR BIIIOHNJaCb 3aINCb, yCNoBN BoCpONa3BeHnE, yCNoBN xpaHHeHn I npyInx fApkTOPOB.
TofnKoIOT HEPBOHOBCTEOPOFMOY Tb3BaTb npBbBAHBE BCPOPMAEDEHNDA KcA.
ПИСМЛТБОВАДИМ NДСКOB,НЯ NOВЕХСТБΚОТБΥМΟΥΤΗΝΟСΤΒΑΤΗΚΕΤΗΝΥΤΗΝΥΤΑΚΥΜΙΝΥΤΑΝΥΤΑΚΥΜΙΝΥΤΑΝΥΤΑΝΥΤΑΝΥΤΑΝΥΤΑΝΥΤΑΝΥΤΑΝΥΤΑΝΥΤΑΝΥΤΑΝΥΤΑΝΥΤΑΝΥΤΑΝΥΤΑΝΥΤΑΝΥΤΑΝΥΤΑΝΥΤΑΝΥΤΑΝΥΤΑΝΥΤΑΝΥΤΑΝΥΤΑΝΥΤΑΝΥΤΑΝΥΤAΝΥΤΑΝΥΤΑΝΥΤΑΝΥΤΑΝΥΤΑΝΥΤΑΝΥΤΑΝΥΤΑΝΥΤΑΝΥΤΑΝΥΤΑΝΥΤΑΝΥΤΑΝΥΤΑΝΥΤΑΝΥΤΑΝΥΤΑΝΥΤΑΝΥΤΑΝΥΤΑΝΥΤΑΝΥΤΑΝΥΤΑΝΥΤΑΝΥΤÀNД
YCTAHOBKAи I3BJIeueHHeNE HΕΚΟΤБΥΜΙΚΟМΟΥΤБΙΙΙ ΘΕΒΟΞΜΟΧΗΙ.И.NΩΠΟЛБТСАВИЕ TAKIIX DINESKOB MOΚΕ ΠΡΙΒΕCTΗΚ ΜΟΡΕχΕДΕΗΟ ΜΟβργι-DOБΟДАΗΙ.
He npriKnBbAte H na DNkK 3nKETKN dpyrThe MatePnblb.
3TOMOKETdeOpOPMnOBaTBuCKN,BpezYbTaTeYeeroHXBOCPoH3BeHEnHe6yTeHBeO3MOxHBiM.
3TNIKNTIKMOTYTOKNEMITcBBOBPMBCOPOIN3BEDENHnIa3pyDnHbIBNBEHNHE NDCCKA,ATAKNEOBPdETNbObOPyD0BANHe.
3anomnhaouoeyctpoictbo USB
Windows Media™ Audio Professional, Lossless, Voice/DRAM Stream/Stream c nopepkko Bndeo: He nopepkxaetaeTc
MP3
PacunepHe: .mp3
CKOpocbTepeNaDaTaNbHx:OT 8K6nT/Cdo 320 K6nT/c (NoctoNHaH), nepeMeHHa
Yactota dncKpTeMaun: oT 8KgUdo 48KgU (32KgU, 44,1KgU, 48KgU nnKoBa)
DOnonHnTeIbHa nHΦopMaun
CObMeTImaBepnIeTeOBID3:1.0,1.1,2.2, 2.3,2.4(TerN ID3:BepnIeZx MEHOT npHOpHTet nepeD BepcnEi 1.x.)
Спник BOCIPONIBEДENI M3U: He poddeprxHBAOTRA
MP3i (HHTePAKTHBnH MP3), mp3 PRO: He noD-dePekxBaIoTcR
WAV
Pacunepne: .wav
PapaRDIOHCTb KBAHTOBANH:8n16 (LPCM),4 (MS ADPCM)
Yactota dncKpeTn3aun: ot 16 kTg do 48 kTg (LPCM), 22,05 kTg n 44,1 kTg (MS ADPCM)
P1-ΓoI n3rOToBJIeHnI
| Год | 2001 | 2002 | 2003 | 2004 | 2005 | 2006 | 2007 | 2008 | 2009 | 2010 |
| Симв的对象 | A | B | C | D | E | F | G | H | I | J |
| Год | 2011 | 2012 | 2013 | 2014 | 2015 | 2016 | 2017 | 2018 | 2019 | 2020 |
| Симboл | К | L | M | N | O | P | Q | R | S | T |
P2-Mecrau n3rTOBJIeHnA
| Мессяц | 1 | 2 | 3 | 4 | 5 | 6 | 7 | 8 | 9 | 10 | 11 | 12 |
| Симв养老金 | A | B | C | D | E | F | G | H | I | J | K | L |
DOnonHnTeIbHa nHΦopMaun
TexHHueckne xapaKTePncTnKN
067ne
14.8 B NOCTOHOHORO TOKA (DnyctmBd mnaa30n OH 10,8 B Do 15,1B)
IcnoIb3yeMbIe DNCKn ....KoMnaKT-DnCK
OTHOHHE CTHAN/UYM 94b(1kUc)(cetb IEC-A)
Kanahon 2 (ctepeo)
Формд ekdoлрованia Фаль MP3 MPEG-1 n2 Audio Layer 3
25MKB (OTHOWEHNE CnHaJI/
wym:20d6)
OTHOWeHHe CnHaJI/7yM
62d5 (ceTB IEC-A)
LW-TioHep
Hanaohyactot 153Kgdo281Kg
Pone3na yBCTbnteIbHOCTb
28MKB (OTHOSEHNE CnHn/
wym:20d6)
OTHOWEHNE CnHAn/ym
62d5 (ceTB IEC-A)
Примочанe:
B COOTBECTBNM CO CTaBtE 5 3aKoHa PocCmKoH OepepaunrO O 3aauHTe npab noTpebHTeNe rN octaHOBNHeHemnpaBtEnbTa BPOccnKoH OepepaunrN 720 ot 16.06.97 KOMPAnHr Pioneer EuropeNV orOBAPBaET cneDyUOni cpOK cnYkBbIhdeHn,OFmuAHLBO NcOTabJIeMbIX HpocCmck pblHKo.
AbTomobunbHa3 3neKtpOnHka:6 JeT
Pioane n3dienya (nayuHnni, mKnpofohbl n.t.n.):5net
PpmeaHn
XapakTePepriTtKIN KOHCTpyKmIaMgOY 6bTbN N3MeHeHb 6e3 npEdbarHTbeHOBoro yBEO-MNEHnA.
ДанhoeуctpoiCTBO npOIN3BEdHO B TaunanHe.
http://www.pioneer.eu
Visit www.pioneer.co.uk (or www.pioneer.eu) to register your product.
Pioneer CarStereo-Pass
Please fill out immediately after purchase.
PIONEER ELECTRONICS (USA) INC.
P.O.Box 1540, Long Beach, California 90801-1540,U.S.A.
TEL: (800) 421-1404
PIONEER ELECTRONICS OF CANADA, INC.
340 Ferrier Street, Unit 2, Markham, Ontario L3R 2Z5, Canada
TEL: 1-877-283-5901
TEL: 905-479-4411
PIONEER ELECTRONICS ASIACENTRE PTE. LTD.
253 Alexandra Road, #04-01, Singapore 159936
TEL: 65-6472-7555
PIONEER ELECTRONICS AUSTRALIA PTY. LTD.
5 Arco Lane, Heatherton, Victoria, 3202 Australia
TEL: (03) 9586-6300
PIONEER ELECTRONICS DE MEXICO, S.A. de C.V.
Blvd. Manuel Avila Camacho 138 10 piso
Col.Lomas de Chapultepec, Mexico, D.F. 11000
TEL: 55-9178-4270
先锋股份有限公司
台北市内湖區瑞光路407號8樓
電話:886-(0)2-2657-3588
先鋒電子(香港)有限公司
香港九龍長沙灣道909號5樓
電話:852-2848-6488