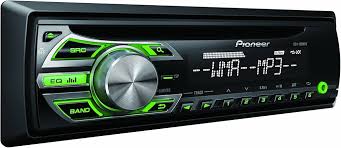
DEH-150MPG - Car stereo PIONEER - Free user manual and instructions
Find the device manual for free DEH-150MPG PIONEER in PDF.


User questions about DEH-150MPG PIONEER
0 question about this device. Answer the ones you know or ask your own.
Ask a new question about this device
Download the instructions for your Car stereo in PDF format for free! Find your manual DEH-150MPG - PIONEER and take your electronic device back in hand. On this page are published all the documents necessary for the use of your device. DEH-150MPG by PIONEER.
USER MANUAL DEH-150MPG PIONEER
REPRODUCTOR DE CD CON RECEPTOR RDS
CD RDS-EMPFÄNGER
CD RDS-ONTVANGER
CD RDS ПРИЕМнИK
DEH-150MP
DEH-150MPG
Owner's Manual
Mode d'emploi
PykoBoIDCTBO NOJb3OBaTeJIa
Before you start
Thank you for purchasing this PIONEER product
To ensure proper use, please read through this manual before using this product. It is especially important that you read and observe WARN INGSs and CAUTIONs in this manual. Please keep the manual in a safe and accessible place for future reference.

If you want to dispose this product, do not mix it with general household waste. There is a separate collection system for used electronic products in accordance with legislation that requires proper treatment, recovery and recycling.
Private households in the member states of the EU, in Switzerland and Norway may return their used electronic products free of charge to designated collection facilities or to a retailer (if you purchase a similar new one).
For countries not mentioned above, please contact your local authorities for the correct method of disposal.
By doing so you will ensure that your disposed product undergoes the necessary treatment, recovery and recycling and thus prevent potential negative effects on the environment and human health.
About this unit
The timer frequencies on this unit are allocated for use in Western Europe, Asia, the Middle East, Africa and Oceania. Use in other areas may result in poor reception. The RDS (radio data system) function only operates in areas with broadcasting RDS signals for FM stations.
CAUTION
This product is a class 1 laser product classified under the Safety of laser products, IEC 60825-1:2007.
CLASS 1 LASER PRODUCT
CAUTION
- Do not allow this unit to come into contact with liquids. Electrical shock could result. Also, damage to this unit, smoke, and overheating could result from contact with liquids.
The Pioneer CarStereo-Pass is for use only in Germany.
Always keep the volume low enough to hear outside sounds. - Avoid exposure to moisture.
- If the battery is disconnected or discharged, any preset memory will be erased.
Note
Function setting operations are completed even if the menu is canceled before the operations are confirmed.
In case of trouble
Should this unit fail to operate properly, please contact your dealer or nearest authorized PIONEER Service Station.
Operating this unit
Head unit
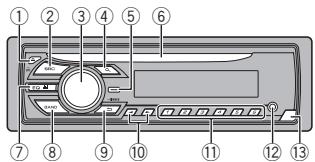
| Part | Part | ||
| ① | ▲ (eject) | ⑧ | BAND |
| ② | SRC/OFF | ⑨ | ( back)/DIMMER (dimmer) |
| ③ | MULTI-CONTROL (M.C.) | ⑩ | ▲▼ |
| ④ | Q (list) | ⑪ | 1/▲ to 6/← |
| ⑤ | DISP | ⑫ | AUX input jack (3.5 mm stereo jack) |
| ⑥ | Disc loading slot | ⑬ | Detach button |
| ⑦ | EQ equalizer | ||
Display indication
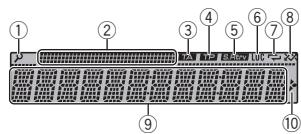
| Indicator | State | |
| ① | p(list) | The list function is being oper-ated. |
| ② | Sub infor-mation sec-tion | Sub information is displayed. |
| ③ | TA (traffic announce-ments) | TA function is on. |
| ④ | TP (traffic program identifica-tion) | A TP station is tuned in. |
| ⑤ | S.Ftrlv (sound re-triever) | The sound retriever function is on. |
| ⑥ | LOC | Local seek tuning is on. |
| ⑦ | ←(repeat) | Track or folder repeat is on. |
| ⑧ | XX (ran-dom) | Random play is on. |
| ⑨ | Main infor-mation sec-tion | • Tuner: band and fre-quency • RDS: program service name, PTY information and other literal informa-tion • CD player: elapsed play-back time and text infor-mation |
| ⑩ | ↑ | Appears when a lower tier of folder or menu exists. |
Set up menu
When you turn the ignition switch to ON after installation, set up menu appears on the display. You can set up the menu options below.
Operating this unit
1 After installation of this unit, turn the ignition switch to ON.
SET UP appears.
2 Turn M.C. to switch to YES.
- If you do not operate for 30 seconds, the set up menu will not be displayed.
- If you prefer not to set up at this time, turn M.C. to switch to NO. Press to select.
If you select NO, you cannot set up in the set up menu.
3 Press M.C. to select.
4 Perform the following procedures to set the menu.
To proceed to the next menu option, you need to confirm your selection.
LANGUAGE (multi-language)
This unit can display the text information from a compressed audio file even for information embedded in English or Russian.
- If the embedded language and the selected language setting are not the same, text information may not display properly.
- Some characters may not be displayed properly.
Turn M.C. to select the desired setting.
ENG (English)—PYC (Russian)
2 Press M.C. to confirm the selection.
CLOCK SET (setting the clock)
Turn M.C. to adjust hour.
2 Press M.C. to select minute.
3 Turn M.C. to adjust minute.
4 Press M.C. to confirm the selection.
FM STEP (FM tuning step)
Normally, the FM tuning step employed by seek tuning is 50kHz . When AF or TA is on, the tuning step automatically changes to 100kHz . It may be preferable to set the tuning step to 50kHz when AF is on.
- The tuning step remains at 50kHz during manual tuning.
1 Turn M.C. to select the FM tuning step. 50 (50 kHz)—100 (100 kHz)
2 Press M.C. to confirm the selection.
QUIT appears.
5 To finish your settings, turn M.C. to select YES.
- If you prefer to change your setting again, turn M.C. to switch to NO. Press to select.
6 Press M.C. to select.
Notes
- You can set up the menu options from the system menu. For details about the settings, refer to System menu on page 6.
- You can cancel set up menu by pressing SRC/OFF.
Basic operations
Important
- Handle gently when removing or attaching the front panel.
- Avoid subjecting the front panel to excessive shock.
- Keep the front panel out of direct sunlight and high temperatures.
- To avoid damaging the device or vehicle interior, remove any cables and devices attached to the front panel before detaching it.
Operating this unit
Removing the front panel to protect your unit from theft
1 Press the detach button to release the front panel.
Push the front panel upward (I) and then pull it toward (II) you.
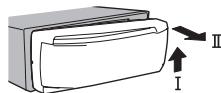
3 Always keep the detached front panel in a protection device such as a protection case.
Re-attaching the front panel
1 Slide the front panel to the left. Make sure to insert the tabs on the left side of the head unit into the slots on the front panel.
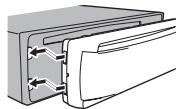
Press the right side of the front panel until it is firmly seated. If you cannot attach the front panel to the head unit successfully, make sure that you are placing the front panel onto the head unit correctly. Forcing the front panel into place may result in damage to the front panel or head unit.
Turning the unit on
1 Press SRC/OFF to turn the unit on.
Turning the unit off
1 Press and hold SRC/OFF until the unit turns off.
Selecting a source
1 Press SRC/OFF to cycle between: TUNER (tuner)CD CD player)-AUX (AUX)
Adjusting the volume
Turn M.C. to adjust the volume.

CAUTION
For safety reasons, park your vehicle when removing the front panel.
Note
When this unit's blue/white lead is connected to the vehicle's auto-antenna relay control terminal, the vehicle's antenna extends when this unit's source is turned on. To retract the antenna, turn the source off.
Frequently used menu operations
Returning to the previous display
Returning to the previous list (the folder one level higher)
1 Press DIMMER
Returning to the ordinary display
Canceling the main menu
1 Press BAND
Returning to the ordinary display from the list
Press BAND
Operating this unit
Tuner
Basic operations
Selecting a band
1 Press BAND until the desired band (FM1, FM2, FM3 for FM or MW/LW) is displayed.
Switching preset stations
Pressor
- Select PCH (preset channel) under SEEK to use this function. For details about the settings, refer to SEEK(left/right key setting) on the next page.
Manual tuning (step by step)
1 Pressor
- Select MAN (manual tuning) under SEEK to use this function. For details about the settings, refer to SEEK(left/right key setting) on the next page.
Seeking
Press and hold or ▷ and then release. You can cancel seek tuning by briefly pressing or ▷.
While pressing and holding or you can skip stations. Seek tuning starts as soon as you release or
Note
This unit's AF (alternative frequencies search) function can be turned on and off. AF should be off for normal tuning operation (refer to AF (alternative frequencies search) on the next page).
Storing and recalling stations for each band
Using preset tuning buttons
1 When you find a station that you want to store in memory, press one of the preset tuning buttons (1 / to 6 / 一 -) and hold until the preset number stops flashing.
- Press one of the preset tuning buttons (1 / to 6 / - 7) to select the desired station.
Switching the display
Selecting the desired text information
Press DISP to cycle between the following:
FREQUENCY (program service name or frequency)
BRDCST INFO (program service name/PTY information)
CLOCK (source name and clock)
Notes
- If the program service name cannot be acquired in FREQUENCY, the broadcast frequency is displayed instead. If the program service name is detected, the program service name will be displayed.
BRDCST INFO text information will change automatically.
Depending on the band, text information can be changed.
Text information items that can be changed depend on the area.
Using PTY functions
You can tune in to a station using PTY (program type) information.
Operating this unit
Searching for an RDS station by PTY information You can search for general types of broadcasting programs, such as those listed in the following section. Refer to this page.
Press (list).
2 Turn M.C. to select a program type. NEWS/INFO—POPULAR—CLASSICS—OTHERS
3 Press M.C. to begin the search.
The unit searches for a station broadcasting that type of program. When a station is found, its program service name is displayed.
To cancel the search, press M.C. again.
The program of some stations may differ from that indicated by the transmitted PTY.
- If no station is broadcasting the type of program you searched for, NOT FOUND is displayed for about two seconds and then the tuner returns to the original station.
PTY list
NEWS/INFO (news and information)
NEWS (News), AFFAIRS (Current affairs), INFO (Information), SPORT (Sports), WEATHER (Weather), FINANCE (Finance)
POPULAR (popular)
POP MUS (Popular music), ROCK MUS (Rock music), EASY MUS (Easy listening), OTH MUS (Other music), JAZZ (Jazz), COUNTRY (Country music), NAT MUS (National music), OLDIES (Oldies music), FOLK MUS (Folk music)
CLASSICS (classics)
L. CLASS (Light classical), CLASSIC (Classical)
OTHERS (others)
EDUCATE (Education), DRAMA (Drama), CULTURE (Culture), SCIENCE (Science), VARIORED (Varied), CHILDREN (Children's), SOCIAL (Social affairs), RELIGION (Religion), PHONE IN (Phone in), TOURING (Travel), LEISURE (Leisure), DOCUMENT (Documentaries)
Function settings
1 Press M.C. to display the main menu.
2 Turn M.C. to change the menu option and press to select FUNCTION.
3 Turn M.C. to select the function.
Once selected, the following functions can be adjusted.
- If MW/LW band is selected, only BSM. LOCAL and SEEK are available.
BSM (best stations memory)
BSM (best stations memory) automatically stores the six strongest stations in the order of their signal strength.
1 Press M.C. to turn BSM on. To cancel, press M.C. again
REGION (regional)
When AF is used, the regional function limits the selection of stations to those broadcasting regional programs.
1 Press M.C. to turn the regional function on or off.
LOCAL (local seek tuning)
Operating this unit
Local seek tuning lets you tune in to only those radio stations with sufficiently strong signals for good reception.
1 Press M.C. to select the desired setting. FM: OFF—LV1—LV2—LV3—LV4
MW/LW: OFF—LV1—LV2
The highest level setting allows reception of only the strongest stations, while lower levels allow the reception of weaker stations.
TA (traffic announcement standby)
1 Press M.C. to turn traffic announcement standby on or off.
AF (alternative frequencies search)
1 Press M.C. to turn AF on or off.
NEWS (news program interruption)
1 Press M.C. to turn the NEWS function on or off.
SEEK(left/rightkey setting)
You can assign a function to the left and right keys of the unit.
Select MAN (manual tuning) to tune up or down manually or select PCH (preset channel) to switch between preset channels.
Press M.C. to select MAN or PCH.
CD/CD-R/CD-RW
Basic operations
Playing a CD/CD-R/CD-RW
1 Insert the disc into the disc loading slot with the label side up.
Ejecting a CD/CD-R/CD-RW
1 Press
Selecting a folder
Press 1/ or 2/V.
Selecting a track
Pressor
Fast forwarding or reversing
1 Press and hold or
- When playing compressed audio, there is no sound during fast forward or reverse.
Returning to root folder
Press and hold BAND.
Switching between compressed audio and CD-DA
1 Press BAND
Switching the display
Selecting the desired text information
1 Press DISP to cycle between the following: CD-DA
- ELAPSED TIME (track number and playback time)
CLOCK (source name and clock)
SPEANA (spectrum analyzer)
CD-TEXT
- TRACK INFO (track title/track artist/disc title)
- ELAPSED TIME (track number and playback time)
CLOCK (source name and clock)
SPEANA (spectrum analyzer)
MP3/WMA/WAV
- TRACK INFO (track title/artist name/album title)
FILE INFO (file name/folder name) - ELAPSED TIME (track number and playback time)
CLOCK (source name and clock)
SPEANA (spectrum analyzer)
Notes
- TRACK INFO and FILE INFO text information will change automatically.
Operating this unit
Depending on the version of iTunes used to write MP3 files to a disc or media file types, incompatible text stored within an audio file may be displayed incorrectly.
Text information items that can be changed depend on the media.
Selecting and playing files/ tracks from the name list
1 Press to switch to the file/track name list mode.
2 Use M.C. to select the desired file name (or folder name).
| Selecting a file or folder 1) Turn M.C. |
| Playing 1) When a file or track is selected, press M.C. |
| Viewing a list of the files (or folders) in the se- lected folder 1) When a folder is selected, press M.C. |
| Playing a song in the selected folder 1) When a folder is selected, press and hold M.C. |
Operations using special buttons
Selecting a repeat play range.
Press 6 / 一 to cycle between the following:
ALL-Repeat all tracks
- ONE - Repeat the current track
FLD - Repeat the current folder
Playing tracks in random order
Press 5/ to turn random play on or off.
Tracks in a selected repeat range are played in random order.
To change songs during random play, press to switch to the next track. Pressing restarts playback of the current track from the beginning of the song.
Pausing playback
1 Press 4/PAUSE to pause or resume.
Enhancing compressed audio and restoring rich sound (sound retriever)
1 Press 3/S.Rtrv to cycle between: 1-2-OFF (off)
1 is effective for low compression rates, and 2 is effective for high compression rates.
Function settings
1 Press M.C. to display the main menu.
2 Turn M.C. to change the menu option and press to select FUNCTION.
Once selected, the function below can be adjusted.
S.RTRV (sound retriever)
Automatically enhances compressed audio and restores rich sound.
1 Press M.C. to select the desired setting. For details, refer to Enhancing compressed audio and restoring rich sound (sound retriever) on this page.
Audio adjustments
1 Press M.C. to display the main menu.
2 Turn M.C. to change the menu option and press to select AUDIO.
3 Turn M.C. to select the audio function. Once selected, the following audio functions can be adjusted.
- FADER is not available when SUB.W/SUB.W is selected in SP-P/O MODE. For details, refer to SP-P/O MODE (rear output and preout setting) on page 7.
Operating this unit
- SUB.W, SUB.W CTRL and HPF SETTING are not available when REAR/REAR is selected in SP-P/O MODE. For details, refer to SP-P/O MODE (rear output and preout setting) on the next page.
- SUB.W CTRL and HPF SETTING are not available when SUB.W is selected in OFF. For details, refer to SUB.W (subwoofer on/off setting) on this page.
FAADER (fader adjustment)
Press M.C. to display the setting mode.
2 Turn M.C. to adjust the front/rear speaker balance.
BALANCE (balance adjustment)
1 Press M.C. to display the setting mode.
Turn M.C. to adjust the left/right speaker balance.
EQ SETTING (equalizer recall)
Press M.C. to display the setting mode.
Turn M.C. to select the equalizer. POWERFUL-NATURAL-VOCAL-CUSTOM1-CUSTOM2-FLAT-SUPER BASS
The equalizer band and equalizer level can be customized when CUSTOM1 or CUSTOM2 is selected.
If selecting CUSTOM1 or CUSTOM2, complete the procedures outlined below. If selecting other options, press M.C. to return to the previous display.
- CUSTOM1 can be set separately for each source.
- CUSTOM2 is a shared setting used in common for all sources.
3 Press M.C. to display the setting mode.
4 Press M.C. to cycle between the following: Equalizer band—Equalizer level
5 Turn M.C. to select the desired setting. Equalizer band: 80HZ—250HZ—800HZ—2.5KHZ—8KHZ
Equalizer level: +6 to -6
You can also switch the equalizer by pressing Eq.1 repeatedly.
LOUDNESS (loudness)
Loudness compensates for deficiencies in the low-frequency and high-frequency ranges at low volume.
1 Press M.C. to select the desired setting. OFF (off)-LOW (low)-MID (mid)-HI (high)
SUB.W (subwoofer on/off setting)
This unit is equipped with a subwoofer output which can be turned on or off.
1 Press M.C. to select the desired setting.
NOR (normal phase)—REV (reverse phase)—OFF (subwoofer off)
SUB.W CTRL (subwoofer adjustment)
Operating this unit
Only frequencies lower than those in the selected range are outputted from the subwoofer.
1 Press M.C. to display the setting mode.
2 Press M.C. to cycle between the following: Cut-off frequency—Output level—Slope level Rates that can be adjusted will flash.
3 Turn M.C. to select the desired setting. Cut-off frequency: 50HZ—63HZ—80HZ—100HZ—125HZ—160HZ—200HZ Output level: -24 to +6 Slope level: -6 —-12
BASS BOOST (bass boost)
1 Press M.C. to display the setting mode.
2 Turn M.C. to select a desired level. 0 to +6 is displayed as the level is increased or decreased.
HPF SETTING (high pass filter adjustment)
When you do not want low sounds from the subwoofer output frequency range to play from the front or rear speakers, turn on the HPF (high pass filter). Only frequencies higher than those in the selected range are output from the front or rear speakers.
Press M.C. to display the setting mode.
[2] Press M.C. to cycle between the following: Cut-off frequency—Slope level
3 Turn M.C. to select the desired setting. Cut-off frequency: OFF—50HZ—63HZ—80HZ —100HZ—125HZ—160HZ—200HZ Slope level: -6-12
SLA (source level adjustment)
SLA (Source level adjustment) lets you adjust the volume level of each source to prevent radical changes in volume when switching between sources.
- Settings are based on the FM volume level, which remains unchanged.
- The MW/LW volume level can also be adjusted with this function.
- When selecting FM as the source, you cannot switch to SLA.
Press M.C. to display the setting mode.
[2] Turn M.C. to adjust the source volume. Adjustment range: +4 to -4
System menu
Important
PW SAVE (power saving) is canceled if the vehicle battery is disconnected and will need to be turned back on once the battery is reconnected. When PW SAVE (power saving) is off, depending on connection methods, the unit may continue to draw power from the battery if your vehicle's ignition doesn't have an ACC (accessory) position.
1 Press M.C. to display the main menu.
2 Turn M.C. to change the menu option and press to select SYSTEM.
3 Turn M.C. to select the system menu function. Once selected, the following system menu functions can be adjusted.
Operating this unit
LANGUAGE (multi-language)
This unit can display the text information from a compressed audio file even for information embedded in English or Russian.
- If the embedded language and the selected language setting are not the same, text information may not display properly.
- Some characters may not be displayed properly.
Turn M.C. to select the desired setting.
ENG (English)—PYC (Russian)
CLOCK SET (setting the clock)
1 Press M.C. to display the setting mode.
Press M.C. to select the segment of the clock display you wish to set. Hour—Minute
3 Turn M.C. to adjust the clock.
12H/24H (time notation)
1 Press M.C. to select the desired setting. 12H (12-hour clock) -24H (24-hour clock)
AUTO PI (auto PI seek)
The unit can automatically search for a different station with the same programming, even during preset recall.
Press M.C. to turn Auto PI seek on or off.
AUX (auxiliary input)
Activate this setting when using an auxiliary device connected to this unit.
1 Press M.C. to turn AUX on or off.
MUTE MODE (mutemode)
Sound from this system is automatically muted or attenuated when a signal from equipment with a mute function is received.
1 Press M.C. to display the setting mode.
2 Turn M.C. to select the desired setting. You can select any one of the options in the following list:
MUTE-Muting
- 20dB ATT - Attenuation (20dB ATT has a stronger effect than 10dB ATT)
10dB ATT - Attenuation
PW SAVE (power saving)
Switching this function on enables you to reduce the consumption of battery power.
- Turning on the source is the only operation allowed when this function is on.
1 Press M.C. to turn the power save on or off.
Switching the dimmer setting
You can adjust the brightness of illumination.
1 Press M.C. to display the main menu.
2 Turn M.C. to display ILLUMI and press to select.
3 Press M.C. to select the desired setting. OFF (off)ON (on)
- You can also change the dimmer setting by pressing and holding DIMMER.
Initial menu
1 Press and hold SRC/OFF until the unit turns off.
2 Press and hold SRC/OFF until the main menu appears in the display.
Operating this unit
3 Turn M.C. to change the menu option and press to select INITIAL.
4 Turn M.C. to select the initial menu function.
Once selected, the following initial menu functions can be adjusted.
FM STEP (FM tuning step)
Normally, the FM tuning step employed by seek tuning is 50kHz . When AF or TA is on, the tuning step automatically changes to 100kHz . It may be preferable to set the tuning step to 50kHz when AF is on.
- The tuning step remains at 50kHz during manual tuning.
1 Press M.C. to select the FM tuning step. 50 (50 kHz)—100 (100 kHz)
SP-P/O MODE (rear output and preout setting)
The rear speaker leads output and the RCA output of this unit can be used to connect a full-range speaker or subwoofer. Select a suitable option for your connection.
1 Press M.C. to display the setting mode.
2 Turn M.C. to select the desired setting. You can select any one of the options in the following list:
- REAR/SUB.W - Select when there is a full-range speaker connected to the rear speaker leads output and there is a subwoofer connected to the RCA output.
- SUB.W/SUB.W - Select when there is a subwoofer connected directly to the rear speaker leads output without any auxiliary amp and there is a subwoofer connected to the RCA output.
- REAR/REAR - Select when there is a full-range speaker connected to the rear speaker leads output and the RCA output. If there is a full-range speaker connected to the rear speaker leads output and the RCA output is not used, you may select either REAR/SUB.W or REAR/REAR.
System menu
1 Press and hold SRC/OFF until the unit turns off.
2 Press and hold SRC/OFF until the main menu appears in the display.
3 Turn M.C. to change the menu option and press to select SYSTEM.
4 Turn M.C. to select the system menu function.
Once selected, the following system menu functions can be adjusted.
Operating this unit
For details, refer to System menu on page 6.
Using an AUX source
1 Insert the stereo mini plug into the AUX input jack.
2 Press SRC/OFF to select AUX as the source.
Note
AUX cannot be selected unless the auxiliary setting is turned on. For more details, refer to AUX (auxiliary input) on the previous page.
Switching the display
Selecting the desired text information
Press DISP to cycle between the following:
Source name
Source name and clock
If an unwanted display appears
Turn off the unwanted display using the procedures listed below.
1 Press M.C. to display the main menu.
2 Turn M.C. to change the menu option and press to select SYSTEM.
3 Turn M.C. to display DEMO OFF and press to select.
4 Turn M.C. to switch to YES.
5 Press M.C. to select.
Installation
Connections

Important
- When installing this unit in a vehicle without an ACC (accessory) position on the ignition switch, failure to connect the red cable to the terminal that detects operation of the ignition key may result in battery drain.

ACC position

No ACC position
- Use of this unit in conditions other than the following could result in fire or malfunction.
Vehicles with a 12-volt battery and negative grounding.
— Speakers with 50 W (output value) and 4Ω to 8Ω (impedance value).
-
To prevent a short-circuit, overheating or malfunction, be sure to follow the directions below.
-
Disconnect the negative terminal of the battery before installation.
- Secure the wiring with cable clamps or adhesive tape. Wrap adhesive tape around wiring that comes into contact with metal parts to protect the wiring.
- Place all cables away from moving parts, such as the shift lever and seat rails.
- Place all cables away from hot places, such as near the heater outlet.
- Do not connect the yellow cable to the battery by passing it through the hole to the engine compartment.
Cover any disconnected cable connectors with insulating tape.
Do not shorten any cables. -
Never cut the insulation of the power cable of this unit in order to share the power with other devices. The current capacity of the cable is limited.
Use a fuse of the rating prescribed. -
Never wire the negative speaker cable directly to ground.
-
Never band together negative cables of multiple speakers.
-
When this unit is on, control signals are sent through the blue/white cable. Connect this cable to the system remote control of an external power amp or the vehicle's auto-antenna relay control terminal (max. 300 mA 12 V DC). If the vehicle is equipped with a glass antenna, connect it to the antenna booster power supply terminal.
- Never connect the blue/white cable to the power terminal of an external power amp. Also, never connect it to the power terminal of the auto antenna. Doing so may result in battery drain or a malfunction.
- The black cable is ground. Ground cables for this unit and other equipment (especially, high-current products such as power amps) must be wired separately. If they are not, an accidental detachment may result in a fire or malfunction.
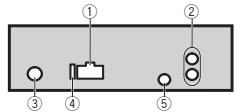
This unit
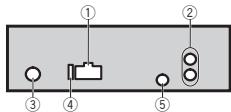
① Power cord input
② Rear output or subwoofer output
③ Antenna input
④ Fuse(10A)
⑤ Wired remote input Hard-wired remote control adapter can be connected (sold separately).
Installation
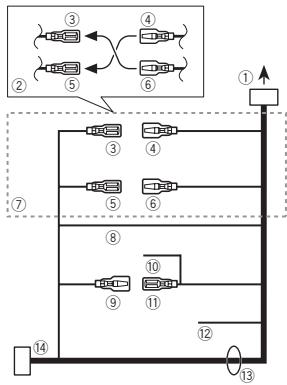
Power cord
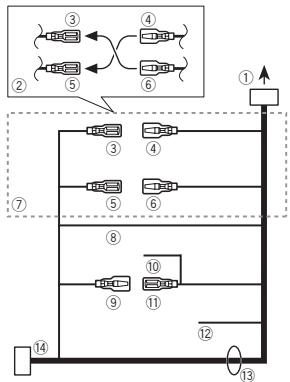
① To power cord input
② Depending on the kind of vehicle, the function of ③ and ⑤ may be different. In this case, be sure to connect ④ to ⑤ and ⑥ to ③
③ Yellow Back-up (or accessory)
④ Yellow Connect to the constant 12 V supply terminaI.
⑤ Red Accessory (or back-up)
⑥ Red Connect to terminal controlled by ignition switch (12 V DC).
⑦ Connect leads of the same color to each other.
⑧ Black (chassis ground)
⑨ Blue/white
The pin position of the ISO connector will differ depending on the type of vehicle. Connect 9 and 11 when Pin 5 is an antenna control type. In another type of vehicle, never connect 9 and 11.
10 Blue/white
Connect to system control terminal of the power amp (max. 300mA12VDC
11 Blue/white
Connect to auto-antenna relay control terminal (max. 300mA12VDC
Yellow/black
If you use an equipment with Mute function, wire this lead to the Audio Mute lead on that equipment. If not, keep the Audio Mute lead free of any connections.
13 Speaker leads
White: Front left
White/black:Front left
Gray: Front right
Gray/black:Front right
Green: Rear left or subwoofer
Green/black: Rear left or subwoofer
Violet: Rear right or subwoofer
Violet/black: Rear right or subwoofer
ISO connector
In some vehicles, the ISO connector may be divided into two. In this case, be sure to connect to both connectors.
Notes
- Change the initial menu of this unit. Refer to SP-P/O MODE (rear output and preout setting) on page 7. The subwoofer output of this unit is monaural.
- When using a subwoofer of 70W (2) , be sure to connect the subwoofer to the violet and violet/black leads of this unit. Do not connect anything to the green and green/black leads.
Installation
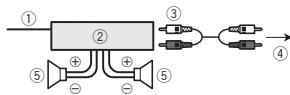
Power amp (sold separately)
Perform these connections when using the optional amplifier.
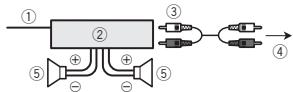
① System remote control
Connect to Blue/white cable.
② Power amp (sold separately)
③ Connect with RCA cables (sold separately)
④ To Rear output or subwoofer output
⑤ Rear speaker or subwoofer
Installation
Important
- Check all connections and systems before final installation.
- Do not use unauthorized parts as this may cause malfunctions.
- Consult your dealer if installation requires drilling of holes or other modifications to the vehicle.
- Do not install this unit where:
it may interfere with operation of the vehicle.
- it may cause injury to a passenger as a result of a sudden stop.
- The semiconductor laser will be damaged if it overheats. Install this unit away from hot places such as near the heater outlet.
Optimum performance is obtained when the unit is installed at an angle of less than 60^

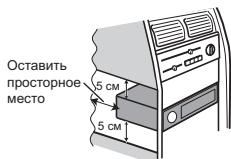
- When installing, to ensure proper heat dispersal when using this unit, make sure you leave ample space behind the rear panel and wrap any loose cables so they are not blocking the vents.
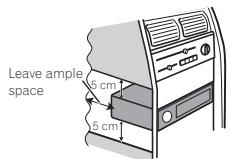
DIN front/rear mount
This unit can be properly installed using either front-mount or rear-mount installation.
Use commercially available parts when installing.
DIN Front-mount
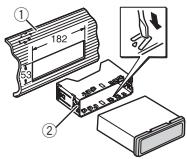
1 Insert the mounting sleeve into the dashboard.
For installation in shallow spaces, use the supplied mounting sleeve. If there is enough space, use the mounting sleeve that came with the vehicle.
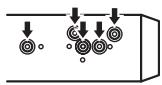
2 Secure the mounting sleeve by using a screwdriver to bend the metal tabs (90^) into place.
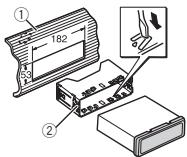
① Dashboard
Installation
② Mounting sleeve
Make sure that the unit is installed securely in place. An unstable installation may cause skipping or other malfunctions.
DIN Rear-mount
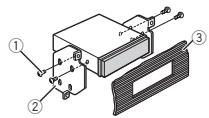
1 Determine the appropriate position where the holes on the bracket and the side of the unit match.
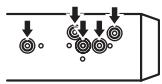
2 Tighten two screws on each side.
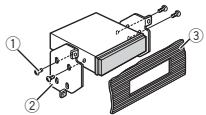
① Tapping screw (5mm × 8mm)
② Mounting bracket
③ Dashboard or console
Removing the unit
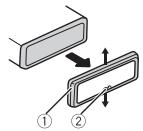
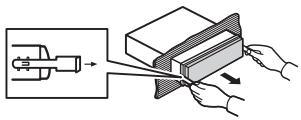
1 Remove the trim ring.
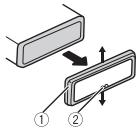
① Trim ring
② Notched tab
- Releasing the front panel allows easier access to the trim ring.
- When reattaching the trim ring, point the side with the notched tab down.
2 Insert the supplied extraction keys into both sides of the unit until they click into place.
3 Pull the unit out of the dashboard.
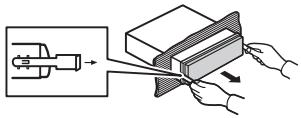
Removing and re-attaching the front panel
You can remove the front panel to protect your unit from theft.
Press the detach button and push the front panel upward and pull it toward you.
For details, refer to Removing the front panel to protect your unit from theft and Re-attaching the front panel on page 3.
Additional information
Troubleshooting
| Symptom | Cause | Action |
| The display automatically returns to the ordinary display. | You did not perform any operation within about 30 seconds. | Perform operation again. |
| The repeat play range changes unexpectedly. | Depending on the repeat play range, the selected range may change when another folder or track is being selected or during fast forwarding/re- versing. | Select the repeat play range again. |
| A subfolder is not played back. | Sub folders cannot be played when FLD (fold- er repeat) is se- lected. | Select another re- peat play range. |
| NO XXXX appears when a display is changed (NO TITLE, for ex- ample). | There is no embedded text in- formation. | Switch the display or play another track/file. |
| The unit is malfunction- ing. There is inter- fERENCE. | You are using a device, such as a cellular phone, that transmits elec- tric waves near the unit. | Move electrical devices that may be causing the in- terference away from the unit. |
Error messages
When you contact your dealer or your nearest Pioneer Service Center, be sure to note the error message.
Common
| Message | Cause | Action |
| AMP ERROR | Unit fails to operate or speaker connection is incorrect; protective circuit is activated. | Check the speaker connection. If the message fails to disappear even after the engine is switched off/on, contact your dealer or an authorized Pioneer Service Station for assistance. |
CD player
| Message | Cause | Action |
| ERROR-07, 11, 12, 17, 30 | The disc is dirty. | Clean the disc. |
| The disc is scratched. | Replace the disc. | |
| ERROR-07, 10, 11, 12, 15, 17, 30, A0 | There is an elec-trical or me-chanical error. | Turn the ignition switch OFF and back ON, or switch to a differ-ent source, then back to the CD player. |
| ERROR-15 | The inserted disc is blank. | Replace the disc. |
| ERROR-23 | Unsupported CD format. | Replace the disc. |
Additional information
| Message | Cause | Action |
| FORMAT | Sometimes | Wait until the message disappears and you hear sound. |
| READ | there is a delay between the start of playback and when you start to hear any sound. | |
| NO AUDIO | The inserted disc does not contain any playable files. | Replace the disc. |
| SKIPPED | The inserted disc contains DRM protected files. | Replace the disc. |
| PROTECT | All the files on the inserted disc are em-bedded with DRM. | Replace the disc. |
Handling guidelines
Discs and player
Use only discs that feature either of the following two logos.

DIGITAL AUDIO


DIGITAL AUDIO
Use 12-cm discs. Do not use 8-cm discs or an adapter for 8-cm discs.
Use only conventional, fully circular discs. Do not use shaped discs.


Do not insert anything other than a CD into the CD loading slot.
Do not use cracked, chipped, warped, or otherwise damaged discs as they may damage the player.
Unfinalized CD-R/RW discs cannot be played back.
Do not touch the recorded surface of the discs.
Store discs in their cases when not in use.
Do not attach labels, write on or apply chemicals to the surface of the discs.
To clean a CD, wipe the disc with a soft cloth outward from the center.
Condensation may temporarily impair the player's performance. Let it rest for about one hour to adjust just to a warmer temperature. Also, wipe any damp discs off with a soft cloth.
Playback of discs may not be possible because of disc characteristics, disc format, recorded application, playback environment, storage conditions, and so on.
Road shocks may interrupt disc playback.
Read the precautions for discs before using them.
Additional information
When using discs that can be printed on label surfaces, check the instructions and the warnings of the discs. Depending on the discs, inserting and ejecting may not be possible. Using such discs may result in damage to this equipment.
Do not attach commercially available labels or other materials to the discs.
The discs may warp making the disc unplayable.
- The labels may come off during playback and prevent ejection of the discs, which may result in damage to the equipment.
DualDiscs
DualDiscs are two-sided discs that have a recordable CD for audio on one side and a recordable DVD for video on the other.
Since the CD side of DualDiscs is not physically compatible with the general CD standard, it may not be possible to play the CD side with this unit. Frequent loading and ejecting of a DualDisc may result in scratches on the disc. Serious scratches can lead to playback problems on this unit. In some cases, a DualDisc may become stuck in the disc loading slot and will not eject. To prevent this, we recommend you refrain from using DualDisc with this unit.
Please refer to the information from the disc manufacturer for more detailed information about DualDiscs.
Compressed audio compatibility
WMA
File extension: .wma
Bit rate: 48 kbps to 320 kbps (CBR), 48 kbps to 384 kbps (VBR)
Additional information
Supplemental information
Only the first 32 characters can be displayed as a file name (including the file extension) or a folder name.
Russian text to be displayed on this unit should be encoded in one of the following character sets:
Unicode (UTF-8, UTF-16)
- A character set other than Unicode that is used in a Windows environment and is set to Russian in the multi-language setting
This unit may not operate correctly depending on the application used to encode WMA files.
Disc
Playable folder hierarchy: up to eight tiers (A practical hierarchy is less than two tiers.)
Playable folders: up to 99
Playable files: up to 999
File system: ISO 9660 Level 1 and 2, Romeo, Joliet
Multi-session playback: Compatible
Packet write data transfer: Not compatible
Regardless of the length of blank sections between the songs from the original recording, compressed audio discs play with a short pause between songs.

CAUTION
Do not leave discs in any place that is subject to high temperatures.
Sequence of audio files
The user cannot assign folder numbers and specify playback sequences with this unit.
Example of a hierarchy
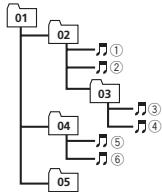
Level 1 Level 2 Level 3 Level 4

Folder
Compressed
audio file
01 to 05: Folder
number
① to ⑥: Playback
sequence
Disc
Folder selection sequence or other operation may differ depending on the encoding or writing software.
Russian character chart
| D: C | D: C | D: C | D: C | D: C |
| A:A | Б:B | Б:B | Г:Г | Д:Д |
| E:E,E | Б:Ж | Б:3 | И:И,И | К:К |
| A:П | H:M | H:H | Б:О | П:П |
| P:P | C:C | T:T | Y:Y | Ф:Ф |
| X:X | U:U | U:Y | Б:Б,Б,Б | С:С |
| H:bl | b:b | J:3 | H:Ю | R:Я |
D: Display C: Character
Copyright and trademark
iTunes
Apple and iTunes are trademarks of Apple Inc., registered in the U.S. and other countries.
Additional information
MP3
Supply of this product only conveys a license for private, non-commercial use and does not convey a license nor imply any right to use this product in any commercial (i.e. revenue-generating) real time broadcasting (terrestrial, satellite, cable and/or any other media), broadcasting/ streaming via internet, intranets and/or other networks or in other electronic content distribution systems, such as pay-audio or audio-on-demand applications. An independent license for such use is required. For details, please visit http://www.mp3licensing.com.
WMA
Windows Media is either a registered trademark or trademark of Microsoft Corporation in the United States and/or other countries.
This product includes technology owned by Microsoft Corporation and cannot be used or distributed without a license from Microsoft Licensing, Inc.
Specifications
General
Power source 14.4 V DC (10.8 V to 15.1 V Allowable)
Grounding system Negative type
Maximum current consumption
10.0A
Dimensions (W× H× D)
DIN
Chassis 178mm × 50mm ×
165 mm
Nose 188mm × 58mm
16mm
D
Chassis 178mm × 50mm ×
165 mm
Nose 170mm×46mm×
16mm
Weight 1 kg
Audio
Maximum power output ... 50 W × 4 70 W × 1/2 Ω (for subwoofer)
Continuous power output 22W× 4 (50 Hz to 15,000 Hz, 5 % THD, 4 load, both channels driven)
Load impedance 4Ω (4Ω to 8Ω allowable)
Preout maximum output level 2.0
Loudness contour +10dB (100Hz) +6.5dB (10kHz) volume: -30dB
Equalizer (5-Band Graphic Equalizer):
Frequency 80 Hz/250 Hz/800 Hz/
2.5 kHz/8 kHz
Equalization range ... ±12 dB (2 dB step)
Subwoofer (mono):
Frequency 50 Hz/63 Hz/80 Hz/100 Hz/
125 Hz/160 Hz/200 Hz
Slope -6 dB/oc, -12 dB/oc
Gain +6dB to -24dB
Phase Normal/Reverse
CD player
System Compact disc audio system
Usable discs Compact disc
Signal-to-noise ratio 94 dB (1 kHz) (IEC-A network)
Additional information
Number of channels 2 (stereo)
MP3 decoding format ...... MPEG-1 & 2 Audio Layer 3
WMA decoding format ....... Ver. 7, 7.1, 8, 9, 10, 11, 12 (2 ch
audio)
(Windows Media Player)
WAV signal format ......... Linear PCM & MS ADPCM
(Non-compressed)
FMtuner
Frequency range 87.5 MHz to 108.0 MHz
Usable sensitivity 9 dBf (0.8μV/75Ω, mono, S/N:
30 dB)
Signal-to-noise ratio 72 dB (IEC-A network)
MWtuner
Frequency range 531 kHz to 1602 kHz
Usable sensitivity 25 V (S/N: 20 dB)
Signal-to-noise ratio 62 dB (IEC-A network)
LWTuner
Frequency range 153 kHz to 281 kHz
Usable sensitivity 28uV (S/N: 20 dB)
Signal-to-noise ratio 62 dB (IEC-A network)
Note
Specifications and the design are subject to
modifications without notice.
Avant de commencer
MW/LW (PO/GO): OFF—LV1—LV2
1-2-OFF (hors service)
S.RTRV (sound retriever)
BASS BOOST (accentuation des graves)
MUTE MODE (mode sourdine)
| D: C | D: C | D: C | D: C | D: C |
| A:A | B:B | B:B | F:F | J:D |
| E:E,E | J:M | J:3 | H:N, N | K:K |
| A:N | H:M | H:H | G:O | F:N |
| P:P | C:C | T:T | Y:Y | Φ:Φ |
| X:X | U:U | Y:Y | J:L, U | J:B |
| H:bl | b:b | J:θ | H:JO | J:Я |
Estensione file: .wma
Velocity in bit: da 48 kbps a 320 kbps (CBR), da 48 kbps a 384 kbps (VBR)
Estensione file:.wav
file audio compre sso
| D: C | D: C | D: C | D: C | D: C |
| A:A | B:B | B:B | F:F | F:D |
| E:E,E | F:M | F:3 | H:N, N | K:K |
| A:N | H:M | H:H | G:O | F:T |
| P:P | C:C | T:T | Y:Y | φ:Φ |
| X:X | U:U | Y:Y | M:M, M | ::b |
| H:bl | b:b | J:Θ | N:IO | R:Ra |
Consumo massimo 10,0 A
Ver. 7, 7.1, 8, 9, 10, 11, 12 (2ca
nali audio)
(Windows Media Player)
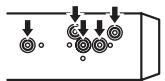
1 Determine the position of the horizontal line.
| D: C | D: C | D: C | D: C | D: C |
| A:A | B:B | B:B | F:F | J:D |
| E:E,E | J:M | J:3 | H:N, N | K:K |
| A:N | H:M | H:H | G:O | F:T |
| P:P | C:C | T:T | Y:Y | φ:Φ |
| X:X | U:U | Y:Y | M:M, M | ::b |
| H:bl | b:b | J:3 | N:IO | R:Y |
Pendiente -6 dB/oct, -12 dB/oct
Ganancia +6dB a-24dB
Fase Normal/Inversa
Reproductorde CD
Sistema ... .. .. .. .. .. .. .. .. .. .. .. .. .. .. .. .. .. .. .. .. .. .. .. .. .. .. .. .. .. .. .. .. .. .. .. compactiono
| D: C | D: C | D: C | D: C | D: C |
| A: A | B: B | B: B | F: F | J: J |
| E: E, E | J: JK | J: 3 | H: H, J, K | K: K |
| A: Π | H: M | H: H | G: O | F: Π |
| P: P | C: C | T: T | Y: Y | φ: φ |
| D: C | D: C | D: C | D: C | D: C |
| ::X | ::L | ::Y | ::H, L, L | ::B |
| ::b| | b: b | ::3 | ::10 | ::R |
D:Anzeige C:Zeichen
Equalizer (5-Band Graphic Equalizer):
Frequenz . 80Hz/250Hz/800Hz/2.5kHz/8kHz
Entzerrungsbereich
±12 dB (Inkrement 2 dB)
Subwoofer (Mono):
Frequenz 50 Hz/63 Hz/80 Hz/100 Hz/
125 Hz/160 Hz/200 Hz
(Windows Media Player)

m = 311 ;
KLASSE 1 LASERPRODUCT
LET OP
S.RTRV (sound retriever)
BASS BOOST (bass boost)
HPF SETTING (high pass filter aanpassen)
map herhalen is geseeected.
01 to 05: Mapnum- mer
| S:T | S:T | S:T | S:T | S:T |
| A:A | B:B | B:B | F:F | J:D |
| E:E,E | J:X | J:3 | H:N, Y | K:K |
| F:N | H:M | H:H | G:O | H:I |
BKNIOHEA yHUNLPI pNnEMa DOPOXHBX CBODOK.
④ mK4op0doxhBxnporpAMM
TIOHep NaTHoENHa TTP-CTAHUNO.
S.Rtrv
sound retriever, tex
BkIIOueH peKIM Sound Ret
⑤ HONOJIA npeo6pa3-OBaHnA 38kya)
rievier(TheXenonorha npeobazaoBanhy3yaK).
⑥ LOC
BKNIOHENAHCTPOKA C MECHTbIM NONKOM.
⑦ (20 一 ( l ) (20 Btop)
BKnIOHEN peXHM NOPTOPHOBOCpOHN3BeDnHn DOPOKKNINI nANK.
8 MzblbHOn nocpeDobatbHbOCTs
BKNIOHEN PEKHM BOCPNO3-BeDENBA IN PBNBOHBNHO NO-CHEDOBATENBHOCTN.
YnpabLeHne daHHbIM yCTpoiCTBOM
INHdNka-Top
CoCTOJIHnE
9
ToHep:ДианэонИчaCTOta
RDS: nabaBne nporpamM, PTY-ihfopmaun i npohra TeKCTOBAAHfopmaunia
ПОНТБВATERь KOMNAKT-DINСКВ:ВЕМЯ,ПОЛWEД-VEEССССССССССССССССССССССССССССССССССССССССССССССССССССССССССССССССССССССССССССССCS
10
OTo6baXaTaCp npn HnHmHnHxHero yOpBHa nPAnKn HmHIO.
YCTaHOBOUHoe MeHIO
PnnoBOPoTe KIOUa 3AoxHARnBa B nOPOKeHHe ON nOcye UCTAOHBK uCTpOCTBa HnDnCtIeN ONBRAETC YCTAHOBQHO MeHIO.
OHO IO3BONET BIIIOHNITb CNEUYOUHHe HA-CTPOIN.
1 Nocse yctahobkn yctpoctba nobepnhte KJIouz 3azkngarHb NIOJOKhen OE. NIOBHTCH NaHINCb SET UP.
2 NobeprHnTe M.C. dIa BbIbopa YES.
EcnB TceHHe 30 Cekynd He BbIPOINHETc HnKaknx Otepaunyc, yCTaHOBOHoe MeHO He 6yDet BbBDOntcbA.
- ECNI Bb XOTITBE BnONHHTB NaCTPOIKY NO3Ke, nopeMHTE M.C., UTO6bblb6paTb NO. HAKMITE dIbn b6opba
B Cnuaye BvBopa NO Hactpoika B yctahOBOCHM MHeHO HeBOOMOKHa.
3 HaxmTe M.C.ДЯВБбopa.
CLOCK SET (yctaHObKa yacob)
Поворачиваям.M.C.,Чтобу установычсы.
[2] HAnKmIaTe M.C., YTo6bI Bb6PbAt yCtAHOBKY MmHTy.
3 [OBopauHBAte M.C., 10To6bI yCTAHOBHTb MHyTb.
4 Haxmte M.C.,yTo6blnTBeprntbBb6op.
BkIIOUeHHe yCTpoIcTBA
1 HAXMITE KONKNY SRC/OFF, YTOB6 BKNIOHNTy cTPOACTBO.
BbIKIOHHe yCTpoIcTBA
1 HAKMMTEuYEDKKBAHTE KOHNKY SRC/OFF, NOKA yCTOPCTBOE He bIKYNOHTC
YnpabLeHne daHbIM yCTpoiCTBOM
BbIbOp nctOuHnKa cnHana
1 Hachimamte KHONKY SRC/OF DnIy BbIb6opa h3 cIeDIOU7yФHkynn
TUNER (TOnHeP)-CD (npoHnPBtBteIb kOMaKT-dNcKOB)—AUX (BCnOmoRatBeIbHoE yToPOJTBO (AUX))
CoxpaHene N BbI3OB H3 NaMaTn padnoctaunn dIy KaKdoRo dnana3OHa
HcnoIb3OBAHne KHOJOK npedBapnteJbHoN HaCTpoiKn
1 TcToBb CoXpAHNTb B nAMrTn HUXYHNO pa- nIOCTaHUNo, HAKMNTe ONDy N3 KHOJOK npEbaDertbHOB nHaCTPOIKN (c 1/No 6/ ) nUpdjxNBaITte ee, NOKA HOMepnBaPHTbHOB NaCTPOIKN He npEkapATNT MIRtB.
2ДиБИбopaиУн��оюрадистаншин haKmteOунИЗКнОнКпeрдьартейьнов hAstрочк(c1/¬no6/)。
IpeeknIOeHne dncnner
Bb6op TEKCTOBH INHΦOpMaun
1 Hachimmaire DISP对阵毆bópa h3 cneyuioquxh yhuikui:
FREQUENCY (Cnykbehoe nabaehne nporpammblnHuaCTOta)
BRDCSTINFO (cnyk66hoe nabaanhe nporpammbo/inhfoopmaun PTY)
CLOCK(HA3BAHHE INCTOHNIKA CMIHNANA IaCbI)
PpmeaHn
- Ecnn cnjyke6hoe hazbaHne nporpammbI b none FREQUENCY oTcYtcbYet, BmecTo hero OTo6paKaTaC kahan. Ecnn cnjyke6 Hoe hazbaHne nporpaMbbI oShapyuKeHO, Oho 6ydet OTo6paKaTbcra.
TECTOBAH INΦOMAPRAI BRCDST INFO 6yETD I3MENHTCBAOTMATUHECKN.
TEKTOBRA INHOFMUSAIINMOKET MEHARTbCBA3BACIMOCNTOIN DNIABN3A0HA.
BOSTOByIO INHOFOMAUHO 3ABcNtOT perVOHA.
IcnoIb3OBAHneФyHKsIpy
Moxhoo HACTOPHTbca Ha npoOCTaHn C no MoTObH INHOPMAPOPT PTY (Ttna nporpAMMb).
POTK CTAHUMRDS c nOMOBIO INHOFOPMAUPTY
Mochko BbIOnNHTb NOINK OoBnK radinOeBaTeJIbHbX npOrpAMm, nAnPMpe, Tex, TcNo pepeHcNeHb C bCndyUoem paDaeJe. cTm. 85.
HaxmTeQ(CNCOK)
2 Khotkoi M.C. BbyepeTe TINI pRpAMMbI NEWS/INFO-POPULAR-CLASSICS-OTHERS
3 HaxMMTE M.C., YTO6bI HAHbT NOINCK. UCTPOCTBO HauHMaET NOINCK PADIOCTAHUIN, nepEDAIOUHN DAHNBJ TNI pORpAM. PnI O6hApyKeHHN PAIDIOCTAHUN HnA DcNpHBe 6yDt NOKa3aHO H3BaHHeIe DAHHO pORpAM-Mbl.
ДягOTМЕньюпСКАнхмITE M.C.esus p33.
- PnorgpamMbIb HekotopBxip daMIOCTaHcIu MOrTy OTIIHuaTcBcR O nporgpAMy, yka3aHbXb B nepeDabaEaEMOM KOE PTY.
EcnHn HOna I3 cTaNCHNe He nepedae TnporpamMbIy HxNHO TnIa,To HAnDcPiee B TceHeIe pImepHO DByck CxKHyBdJ 6DET POKA3aHO NOT FOUND, N3atEM TIOHeP epeiDt B peKmI pNemEA CTaNCHM, C KO-TopoB 6bl Hauat PoNCK.
Cnncok PTY
NEWS/INFO (HOBOCTN INHΦOPMaɪŋ)
NEWS (HOBOCTH), AFFAIRS (TEKUYAANHΦOPMAZIA), INFO (HΦOPMAZIA), SPORT (Cπορτ), WEATHER (πογος), FINANCE (ФИMANCSI)
POPULAR (non-My3bika)
UnpaBHeHne daHHbIM yCTpoiCTBOM
POP MUS (NON-My3bIka), ROCK MUS (POK-My3bIka), EASY MUS (Tferkara My3bIka), OTH MUS (PPOHcMy3bIkanhble KAnhpk), JAZZ (JdzKa3), COUNTRY (KaHTpr), NAT MUS (HaIOHOHbNra My3bIka), OLDIES (3oOtaer konlnekua), FOLK MUS (Hapodha My3bIka)
CLASSICS (Knaaccnka)
PpnoctaHOBbA BocnpOn3BeJeHn
1 HaxKMITE KHOKNY 4/PAUSE, Tc0b6 BKIOHNTB naay IyN BO360BHOTB BCPOPN3BEDEHNE.
Ynyuichene HauceCTBa 38yka cKaTbX ayDnOpaJIOB N BOCCTAHOBHIE NOHOTbI 38CyAHHA (TexHOHONr pNeo6ba3OBAHN 38yKa)
1 Haximmaite KHONky 3/S.Rtv nIy b6opa n3 cneyuoxn fynkcuin: 1-2-OFF (bblK) HacToPka I a4pceKTHBa nI dy paInOB c NHIKO CTeneHbO cXaTnA, a hAcToPka 2 - dIy paInOB C bIcKO KCTeNHO cXaTnA.
UnpabLeHne daHHbIM yCTpoiCTBOM
Hacroika fynkui
1 HakuMITE M.C., YTO6bI OTKpbITr rnaBHOE MEHO.
2 NtObpaHbAte M.C.ДЯ npokpyTkn nyHKTOB MeHIO; HAXMITE, YTObIy Bbl6pTaB FUNCTION.
Bb6paHnHe lyHKIn, KOtOpBe MOKHO HaTaCbaPbA, nepeUcNeHb HNke.
S.RTRV (sound retriever, texhONOIR pneo6ba3-OBAHRI 38yKA)
ABMATUMUHcckN ynyuuaaTe KaueCTBO 3yka CkaTbIX aydinofoaIIOB N BOCCTAHAbnBaET OINHO TYBAYOH.
LOUDNESS (TOHKOMNHeHcaIaIaIaIaIaIaIaIaIaIaIaIaIaIaIaIaIaIaIaIaIaIaIaIaIaIaIaIaIaIaIaIaIaIaIaIaIaIaIaIaIaIaIaIaIaIaIaIaIaIaIaa
TOKOMNEHCAJINKOMNEHCNpyET HNDCTATOHOE 38YKOBOE DAJIENHE B HIXHEM I BEXHEM DnAHA-3OHAX CACTOH N H3NKI rPOMKCTN.
SUB.W (BkIIOHHe/BbIKIOHHe ca6Bypepa)
307 yctpctbBO IME bHTbO KANAHa cbayFePA, kOTporb MOXHO BKNHOATb N BuKnIOHbT.
1 Haukmite M.C.ДЯ Вьбору Нуххон Росточа KM.
NOR (HOPMNAHFAA-REV (o6pTaTHA 0a3A)-OFF (cAByBepBbKIOHeU)
SUB.W CTRL (hac troponka ca6bypep)
Ha BbXode cAbSyfepe 6yDIT BocnpoAnBodnTcB TaTOJIbKO TeAChToBI, KOTOpBE HmKe Yka3aHnBHX AChTOT cP3EA.
Длготообразкетену установсгОНМЕнHA- XMMTE M.C.
JHakimaiye M.C. JnA Bb6opa 3n CneJeuOiuXxФнКи:
Yactota cpe3a—YpObeBbXbIOJHOcIHaNA—KpyTn3Ha xapaKTePncIMKnM NmEhAeMbue 3aHHeNy6bDyt MInrTaB.
③ Повачачайе М.С. за Ббoga насториК.
Yachota cpea:50HZ-63HZ-80HZ-100HZ-125HZ-160HZ-200HZ
UpyBhenbXbIyHOOroCnHHTa:OT-24do+6 KpyTn3xaHPakTePncTtHK:6-12
BASS BOOST (yCINHNE HNKHNX 3YKOBbX HaCTO)
1 HakuMITE M.C., YTO6bI OTKpbITr IaBHOE MEHO.
2 IIOBOPaHbAaTe M.C.ДЯ NpOKpyTkn nyHKTOB MeHIO; HAKMITE, YTObI BbIbOpTa bSYSTEM.
3ДЯьБИбОФУKHIMENHOMCINCTEMbl noboparwBaiteM.C.
CnDyOnuBHe BbPaHb. HpyKlnm MEO CNTeMbI MOXHO HACTpaBHaB.
LANGUAGE (Bb6op 3bika)
JaHnHOe yCTPOIcTBO MOKET OTo6paxTaB TEKCTOBYI INHΦOPMaIIO M3 CkTAb XaYNoFaIIOB, TOM YHCsJIe HNΦopMaIIO Ha aHrIIMckOM m PycCKOM 38blkAX.
- Пин НECOBMECTHMOCTHаSTCPOB BCTPOEHOHBOИ ВьбарHO附BA3bOIMKBoHbIcKaKeHnIЯпьВБОDE TEKTOBxBcoO楚聶HIN.
HEKOTOPBE CIMBOBNI MOYT OTO6paKaTaBcHnepaBnIbHO.
1ПоворачиьатеM.C.dЯьыбogaнстрй. ENG(aHrπiickn)-PVC(pycckn)
CLOCK SET (yctaHObKa yacOB)
YnpabLeHne daHbIM ycTpoCTBOM
JITAO OTO6PbAKeHnYcTahOBoHOrO MEHO HA
2 HaximmaTe M.C., YTObBi Bb6Pab CeMENT dMnIJIe YAcOB, KOtOpBI HxKHO YCTAHOBITb. YAcBb—MmHytBu
[1]Повашива对接улировыв
ВЕРМ.
12H/24H (Φoρмат оторазмень Врemeи)

Плобожиме ACCOTCYTBYET
-
3Kcπnyatauaa daHoro yctpoCTBa B ycnoBnA,OTINHHbIX OTINCAHbIX HNOE,MOKET npuBcTeN K NOxapar Nn c6oO B pa6oTe ycTPOCTBa.
-
TPhAHCNOPTNbE CpeCTBa C 12-BOJbTOBbIM AKKyMylTOpOM n3aEMNeHnEM OTPiZaTeJIbHOrO NOJIOca.
ΓOMKOBOFOPBHTEN C 50BT (BuxoNDHAR MOUCTb)uO4Ωdo8Ω(CONPOTBNEHnE).
Bo 366kanahe KOPOTKORa3bikahan,nepe- rpeba nHnncpabnoctoe oBa3atelbho co6nlaaiene CNeDyUoNye kua3aHn
- Pnyet yadahobOKO oroCoBDHITE ORPHATENBHyIO KNEMMY AKKYMNYTOPA.
-3akpenite npoBoda npn noMoou 3axMIOOB ININIOBIOUMHOIeNTb.IaN3aUHTb npoBokn 3an3OInpyTe npoBoda B MeCTax INCOPNIKOCBOBENc mETaJIHcECKMN DeTALMM.
—Pa3MeCTIe BCE Ka6eHb IN yUdaenHm OT nOdBIXHBxI dTeanei, TAKHX KAK bYar nepeKJIIOUeHn IpepeaHn HapablaIOuHe CIDENH.
—PazMeCTIte Bce Ka6eIN B ydaJIeHm OT Ha- rpeBaIOoXcR daTeaN, TaKx Kac peWetka o6orpeBaTeaN.
3anpeaetcnoKnIOuHbXeNtB npOboD mncnneK kAkyMpyrTOpHO 6atapee aTO- moBnIy uepe3 cbpeHoe OTeBPcTne BOTce Ke DBmraTeNa.
HbNIOyIpye KOnbIy BcHex HeNTOcoEDINHEHnKab6enEIO3OIOMOHNHnTHeN.
He ykopauHbaiTe Ka6einn.
Hnkorga He cpeaae HnOlauco o shypara nHTAHNA DaHNOrO cTpoiOCTBa C cebIb noJaNnNTAHyka hDpyoe cytpoiCTBO.DonycTmAR Harpyka kAbenl no TOKy orpAunHea.
- Icnojblye npdeoxpaHHTeB c Yka3AHHbIMn napamETpAMi.
-3aPanaeechaTcNanpHaYo 3a3emApTbOpTnAeHbN bYbIOD pRomKOrOBOPHTen.
- 3anpeuaetc C8BbIbATb BMeCTe OTPuIaTeNbIbe KaBEn HeCKoJIbKx rPOMKOrOBOpInTeN.
- PnB KlnHcEHm NITAHN yCtpoCTBa UynpaBILIOI CINHAN NOaETC Tpe3 CInHe6BENI PNOBD. PNOKHyTne 3OT nPBOD K KJIEMME PyIbTa YpNApBLENH BHEwHERO yCNIHTeM OMOHOTCN IIN KJIEMME pENE yNPaBLENH aHTENHc B3NEKTPOPNIBODOM (MaKc. 300 MA 12 B NoTOCTHOHR TOKA). EcIN ABTOMOBINb OBOpDyOBaB BCTPOEHHO BOKOHHO CTKJIO AHENTHO, NOcEOdHNITE PNOBD K KJIEMME NITAHN yCINNTeR aHTENHb.
3aapezaetcnooedeinHb cHHe-6bIy kAbelb KKNEMMe NTANHAR BHEWHERO yCNIITeMa MoUHcToN. TaKke 3apezaetcNOcoeMHHT daHHb npOBd K KNEMMe NITAHNA aHTEHbIc 3JeKtPnpBnDOM.B npOTNBOM CNyuae MOKET BO3HNKHTy TyeKa TOKA aKKymJLTopHO bATapeu ININ HA HEINCPABHOCTb.
YctaHOBka
- UepHbI Ka6eBb RaIIraTc83aEMJHOUIM. 3a3eMnIOuIe Kae6enn DaHORO yCTPOiCTBa I npDpynx YcTOpIcb (OCo6eHNO yCTPOIcTB, PnpDAHA3auHbIX TaEckPlyataun pni 60JIbXmX Tokax, TAKNX KAcY cMlNTeB MoUc-HocTH) DOJIKbHbMOHTIPoBaTc8 OTeNbHO. B npOTMHOBcmClyae IN CnyauHoe OTOceINHeHne MoKET nPiBeCTn K NOxApA NIn HeNcnpabHOCTn.
Danhoe yctpoictBO
① Hne3do shHypa nHTaHn
BbXoJdazHeroKananaIIMBbXoJcSaBb-Φepa
③ THe3do aHTeHHbI
④ Плавский п体现在ханител (10 A)
BxOJ npOBnHO rIyIbTa nCTAnuHNOHOrnypanAE
CnykntI pyndnKIOHENH npOBDHO r aanTepa nylbTa dctAHUHOHORu npAbaHNH (npio6petaetcraOTdEbnHO)
Unyp nntaHn
① K rhe3dy shhpy nntaHn
B 3abciHMMOCTNOTINTHAABOMOJIbIpyHKUm③uMOTyOTNIHuaTB.CBtOMcUYaue CNEdyET NpKIOHUTB4K5uN6K3
③ XeNtbi
PezebpHbno pa3bEm (mHpa3bEm dOponHnTeBHObO6OpDbaHna)
④ XeNtbi
YCNNTeJIb MOUHOCTN (PnHO6peTaETcO TdEJIbHO)
HcnoNs3yTeJaHHyo CXemy NODcoeHNHeHn np HcNoJIb3OBaHNu DOnONIHHTeBHOrO yCINITeR MOUHOCTN.
① PnybT DnCTAHUHOHORO YnpaBNEHRA CNTeMOMIPOdcoeHHTe CnHn/6BeNk Ka6eB.
2CYNHHTB MOUHOCTM (npno6pTaetcT O- DnHo)
3 PtoNIOHcTte C mOoBtu Ka6bene RCA (Pn0b6pTaotcRdOtBeNbO)
K B kxydo zadnHero kaHana nn bkydo c6b ydefepa
⑤ 3aHnI rPOMKOrOBoPnteNb nIu ca6Byep
YctaHOBka
BaxHo
- PiepeI OKOHaTeHNbY yCTAHOBKO npOBeBpTE Bce COeOIHNHeHry I CNTEMy.
YCTaHOBKa
He MCNOb3yIte DetAm, He pa3peeHHeBle pOIM3BOIDTEENEM K INCIOB3OBAHNIO, NOCKOBky 3TO MOKET CTaB pINuHHOH HcNpABHOCTei.
YtoHnTe y dInepa KOMpanHn, Tpe6yET nYCTAHOBKa CBEpENHeN OTBEPCTNI ININ BHECEHnIbIX N3MeHENB KOCHPTyKlIO ABTOMOBnIa
YehtaahanyBBAITE daHnHOE yctPOICTBO MECTAX, DE OHO MOKET:
NOMeWAtb ynpaBnEnHIO aBTOMoBnEm.
TAPIMOBATBnPacKaHpA pRn BH3aNHOI OCTAHOBKE ABTOMoBIIJ.
- Пперрев поуровodнikoborо пазера рпвedingк К сьвхody ИЗстор. Рамсгтпес Савели В удалени OTHarpebaio-шхся DeТален, ТakINС кak peшетka oborpebatera.
OTIMMAJIbHOI RBNIEcTcYCTAHOBKa YCTPOINCTBA NOI YrTIOMMe60e 7

Пиу CTAHOBKE NOE6XODIMO OBECENHTb 金融TINBIV NOTBENI,OCTaBIV DOCTATOCHNE pNOCTPANCTBO 3a ZADHNe PAHEJIbU N 3AKPENIB CBO6OHNbIE KABEN TAK, YTObSI OHI He 3AKPbIbAI BEN HENTNIZIOHNHbIE OTBECTNI.
IpeepHee/3aHHee KpenJIeHne cTanhapTa DIN
Длдангоги Идения русdmotpeha BO3-MOЖHOCTbYCTAHOBKc NOMOUSA HepeHrno INIa3dHReK PKeRNeHnA.
PnCytahOBKe MCNpIb3yIe DetanH,MeIOu-ueeBcR BpoDae
Ipeephee kpenneHne cTaHapTa DIN
1 Bctabte MOHTAXHY oObMy b nepeDHHIO NAnIEL.
PnIyCTAHOBKE B HEOJOTAOHIO Pny6OKOM
RHe3e INCNoJIb3yTe MOnAKTHyO bOmyI, BXoDJIaYU B KOMNIKET NOCTABKU yCTPOJCTBIA. PnI
HaNCHIV NDCSTATOHORO NpOCTPAHCTBA aYcTPOJCTBOM pINmIEHETCRA NOMTXKHAR OBOIMa,
NOCTABNREMBA BMECT C ABTOMOINEM.
2 3akpenitte 6ooyu, nooorhyb c no-mooubo OTOBETKHN METALLHcckne Ra3bUKN (90°).
1 CoBMeCTHTe OTBepCTnHa KaPOnHtTeHne H60KobBix NaHeIaXyUCTPOIcTBA.
2 3aTnHHe NO DaB BuHTa C KaKdoT cToPoHbI.
① Camohape3aoum BHT (5MM×8MM)
② MoHTaXHa paMaKa
③ PπbopnnaHnBnnKoHcNoB
Демонтх усточь
1 CHIMNTE paMKy.
①ДекopaTNBnaPamka
② 3blyOK
- CHATNE pepehdne naneHn obnernaeT doCTyn K deKepoRanBn PAMek.
- Pπi yctahOBKe DeKOpaTbHb pAMKn cToPOHa pAMKn C3bYbKom DOnIgKa 6bIb HapnabHeBA BHN3.
2 BCTaBtte npnnaeraMble 3KcTpaKtopbI c o6eHX cTOpOH yCToPiCTBa Do 9eNka.
3 BtltHnTe yctpoIeTbO n3 pni6OpHoi naHEn ABTOm6HnIa.
Chrtne uystahOBka nepedHe naneHn
B centa zaaattb ot kpaenpeednoo naenb MOxHO CHrTb.
HakMMITE H KONKY CHRTNY PAHENI N NOTAHINE PAHENI BBEPx Ia Ce6B.
YtO6bI NpOyHtB DoONHmTeBHyo INHOpMa- uNc, CM. ChTne nepedHne naHEn B UeNEx 3a- uHTbI OT KpaKnU YctAHOBKa nepedHne naHEn Ha ctp.84.
DOnonHnTeIbHa nHΦopMaun
YctpaHeHne HEnCnpabBHOtei
NcIob3yIe DNCKn DAmETPM 12 cm.He IcNol3yIe DNCKn DNAMETPM 8cmIaadTepblIaBONCP0M3BDEHAnE TAKIX DNCKOB.
IcnobnbayoteOnbko6bduKbpeKpyBteDnck. HeIcnpOy3eYdKnckHeNoobHNOH ofoMbu.


Bct BactaRbK E bIeNb 3AegyRk KOMnAKT-DINCKA NHyero, KPOME KOMNAKT-DINCKA.
He nCpOJIb3yIte DnCKn C TpeUHAMM, OTKoNtBIMK pKaARM, DeFOPMPOBANHbE DnCKN ININ DnCKN C DpyTMM NOBpeJdENHmR, NOKcIbKy TAKME DnCKMOTyN POBpejTb npOrpBbATenb.
He 3aekbtybeIa3aNcIaNck CD-R/CD-RW BOCPOINB3ECTn HeJIb3r.
DOnonHnTeIbHa nHΦopMaun
He pinnkacaiTseb K 3auncaHNOI NOBEXHOCTNIINCKO.
KoJda nckn He nncnbl3yOToC, xpaHite Hx B cytnIparX.
He NpKJIeNBEaIte 3tIKeTOK, He NIIuIHTe I HaeHHOCHITe XMMUeCKnX BEEcTeB HAIOBepXHOCTb. DINCKOB.
ДичИСКТКOMIAKT-DИСКАNPOTРNTEДСКМЯΚΤΚAHBIO UTОLETPAΚ PKAHO.
KoHdEHCaZMa MOKET BVPeMeHHO yUxDuNt bpaObTo npOnrpBbAten. OCTabTe eOraI aAdantauznn K 60lee BbCOKo TMnepaTpe npMmepHO naac.Takke ydaJIte Bnary cDnCKOB c NOMOtsko MRAKO TKAHI.
Bocnpon3BedeHnne DnCKOB MOKet 6bTb HEBO3-
MOKO H3-3a xapaTePNTK DnCKA, FOPMATA
DnCKA, pNINOJENHn, pN I NOMOu KOTOPORo Bbl
ONIHnlaBc 3aIcMb, yCNOB BoCpON3BedeHnne,
yCNOB XpaHHeHnN nDpyTHx FkTOPOB.
TOKHNI OT HOBEOBCTO ODOFIO MOYt Bv38ATbNPbEBuHBOBHCOPN3BDEENDAHCA.
PereedIcnoNt3OBAHmE,IckOKB O3hAKOMbTeBc C MepaMn IpeoDCTOPOKHOCTn PnI ObpaUeHNi C HMM.
ПгИнСЮЛБТОВАHINДСКOB,HA NOБЕХСНБТКОТБИМORGYI HANCHOTCSB3TNTKIN,N3UYHTIENHCTPYKUNI INPDEYNPEXEKNHDAJ T3NXDSCOB.UGTahOBaI N3BNEHEnHE NeKTOPBISDNCOBMORY6bTbHEBO3MOXHbI.NCIOJIb3OBAHIne TAKIXDNCKOB MOKET pINBECTIN K NOBPEJDeHNIO O6Opy-DOBANHIA.
He npknneBaeTne HncknK 3nKETKn nDpyTne MatebnpaH.
TOMOKETdeOpMnPoBaTBaCKN,Bpe3yntbTaTe yero Hx BOCPOnH3BeHHeMe 6yDet HeBO3MOXHBHM.
ETKHKNTKMYOT NTKNEITbCBA BOBPMBOCPOIN3BEDENHn 3aTpyDnHb INBNEYEHnDnKOB,ATAKKE NOBpEITbObOPyDBOAHne.
MP3i (HHTePAKTHBnB MP3), mp3 PRO: He nOda-derPbXbaaOTCR
WAV
Pacunepne: .wav
PraayndoNctb KBAHTOBANH:8n16(LPCM),4 (MS ADPCM)
CyaTota DnckpTeHaZaMn:OT6 kTu do48 kTu (LPCM),202kTu n 44,1kTu (MS ADPCM)
DOnonHnTeIbHa nHΦopMaun
B KaucheténbHaBaHnIaPainIINnAnKINMOyT OTo6bpaKaTbCraToIbKO nepbte 32 CmMbOna (BKNUOy paacUkpEnHe).
Дагосторбенив Данимов усторов Скindровka русckOTOКЕТС ддКнС COOTВETCBOBATbO OMHNY CпсдуюхИн habорOB CMHOBTOB:
- IOHkoD (UTF-8, UTF-16)
- OTMnHbIOTIOHKoDaHa6OpCmBBOOB,HCnBb3yUOuICHcBcpeDEWindows,draKOTOPoroB8a3bKOOBHaCTpOKe3aadnPyCKMnJ3bIK
3To yctpoiCTBO MOKET HeBepHO BOCPOI3BO- Dntb HekOTOpIbe faIbI foPMAr WMA B 3aBvCMMOCTOn OT pNIIOXeHIn, IcNOJIb3OBAHHbIX Dn IA INx 3AINIC.
Anck
Дуочtmая порархяnanok:do BCMS mnypoBne(peaIbnaна порархяnanok coCTabnert Mehee dyx ypoBne)
KoinueCTBO BOCPON3BODIMbIX nanok: He 60nee99
KolncheTBOCnPON3BODIMbXФaIIOB:He 600ee996
HeaBnHMo OT npOdoNkTeIbHOCTn Na3bM MeJyKO MOnO3NIuMA B IN3HaJIaNbHO 3aINCS, npi BOCpON3BeDeHNIM DnCKOB CO CKaTbIMn AynD- OaJnAMn MEJyKO mIo3NIuMAm 6dyT KOpOTKMe Na3bI.
DOnOHHTeIbHaI INHOpMaun

BHIMAHNE
He octabJIte DCCKN B MeCTax C BlycOKoT Tem- nepaTypoi.
IocneIOBaTeJIbHOCTb BOCIpOn3BedeHnaydnofoaIIOB
MaKcImaJIbHaB bIXoHnA MOuHOCTb
50BT×4
70 Br × 1 / 2 O (nla c6b5ypepa)
HOMHaJIbHaB BIXOdHa MOUHOCTb
22Br×4 (ot50TJIO 15000TJc, cymmaphoe 3aheHne K03ΦΦmUeNTHa HEnHHeHbX NCKAKeHIN 5%, Harpy3ka 4Ω nla o6oNk KaHanoB)
ConpoTnBneHne Harpy3kn
4Ω(doptymo-ot4Ωdo 8Ω)
MaKcImaJIbHaB bIXoHna MOUHOCTb
2.0B
KoHTyp rpoMkoCTn +10 d5 (100Γu),+6,5d6
Yactota 50T/63T/80T/100T/
125Γu/160Γu/200Γu
Kpytn3Ha xapaKTepcntkn
-6D/OKT-12D/OKT
YcHHeHne +6D5do-24D5
Φa3a HopmaIbHa/06paTHa
PpOurpbIbATEJIb KOMnakT-DnCKOB
CnCTema . AynOncCTema C KOMnAkrT-DHCKOM
Icnonb3ayemble nckn ... KomnakT-dnck
OTHOHNEIeTHAN/uyM 94b(1kFt) (cetb IEC-A)
Yncno KaHaoB 2 (ctepeo)
ΦompartДекдимовань саюл MP3 MPEG-1 n 2 Audio Layer 3
Форматдекадоваях基层网 WMA Версим 7, 7.1, 8, 9, 10, 11, 12 (Духханалын的眼ker) (Windows Media Player)
Формат сизнaria WAV…… Linear PCM in MS ADPCM (6ez kompeccnii)
FM-TIOHeP
Visit www.pioneer.co.uk (or www.pioneer.eu) to register your product.
Pioneer CarStereo-Pass
Please fill out immediately after purchase.
PIONEER ELECTRONICS (USA) INC.
P.O.Box 1540, Long Beach, California 90801-1540,U.S.A.
TEL: (800) 421-1404
PIONEER ELECTRONICS OF CANADA, INC.
340 Ferrier Street, Unit 2, Markham, Ontario L3R 2Z5, Canada
TEL: 1-877-283-5901
TEL: 905-479-4411
PIONEER ELECTRONICS ASIACENTRE PTE. LTD.
253 Alexandra Road, #04-01, Singapore 159936
TEL: 65-6472-7555
PIONEER ELECTRONICS AUSTRALIA PTY. LTD.
5 Arco Lane, Heatherton, Victoria, 3202 Australia
TEL: (03) 9586-6300
PIONEER ELECTRONICS DE MEXICO, S.A. de C.V.
Blvd. Manuel Avila Camacho 138 10 piso
Col.Lomas de Chapultepec, Mexico, D.F. 11000
TEL: 55-9178-4270
先锋股份有限公司
台北市內湖區瑞光路407號8樓
電話:886-(0)2-2657-3588
先鋒電子(香港)有限公司
香港九龍長沙灣道909號5樓
電話:852-2848-6488