
SRU9600 - Universal remote PHILIPS - Free user manual and instructions
Find the device manual for free SRU9600 PHILIPS in PDF.
| Product Type | Universal Remote Control |
| Brand | Philips |
| Model | SRU9600 |
| Number of controllable devices | Up to 8 |
| Power Supply | 3 AA alkaline batteries (LR06) |
| Battery Life | Varies with usage; adjustable backlight to save power |
| Display | Touchscreen with upper section for instructions |
| Navigation wheel | Yes, allows selection of devices and functions |
| Programmable keys | Yes, up to 200 keys via learning |
| Programmable Activities | Yes, customizable key sequences |
| Backlight | Yes, adjustable timeout (5s default) |
| Infrared range | Approximately 10 meters (estimated) |
| Memory | Up to 200 learned keys |
| Dimensions (L x W x H) | 20 x 6 x 2 cm (estimated) |
| Weight | 150 g (estimated with batteries) |
| Material | ABS plastic |
| Available languages | French, English, German, Spanish, etc. |
| Learning function | Yes, copies signals from original remote control |
| Installation assistant | Yes, step-by-step guide at first use |
| Compatibility | TV, DVD, satellite, cable, audio, etc. |
| Reset | Possible via Setup menu |
| Repairability | Replaceable batteries; no specific spare parts provided |
Frequently Asked Questions - SRU9600 PHILIPS
User questions about SRU9600 PHILIPS
0 question about this device. Answer the ones you know or ask your own.
Ask a new question about this device
Download the instructions for your Universal remote in PDF format for free! Find your manual SRU9600 - PHILIPS and take your electronic device back in hand. On this page are published all the documents necessary for the use of your device. SRU9600 by PHILIPS.
USER MANUAL SRU9600 PHILIPS
Installing the Remote Control 3
Using Your Remote Control 4
Selecting a Device 4
Using Touch Screen Keys and Hard Keys 4
Selecting Extra Functions. 4
Using Activities. 5
Setting Up the Remote Control. 5
Add a Device. 5
Delete a Device. 6
Fix a Key. 6
Add a Function 6
Add an Activity 6
Delete an Activity 7
Change Language. 7
Backlight Time Out 7
CopyVolume 7
Full reset. 8
Support 8
Troubleshooting 8
Need help? 8
Introduction
Thank you for purchasing the Philips SRU9600 universal remote control. After installing the remote control you can operate a maximum of 8 different appliances with it: TV, DVD, satellite or cable decoders, audio systems and many more.
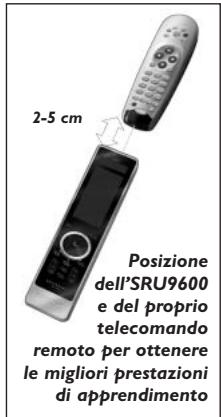
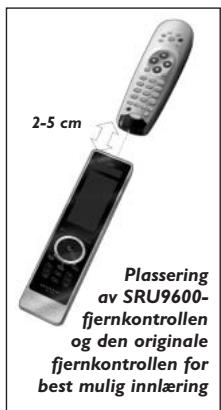
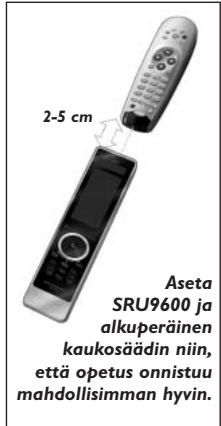
Please refer to the illustration on page 2.
① Standby key
② Page keys
③ Setup key
④Menu key
⑤ Guide key
⑥ Back/Exit key
⑦ Jog Mode key
Volume Up key
Volume Down key
10 Previous Program key
Upper part of the display for:
- Instructions
- Selected device
-Extra functions
Touch screen keys
③ Rotary wheel
14 Cursor keys and OK key
15 Info key
16 Channel Up key
17 Channel Down key
Mute key
You can find information about how to prepare this remote control for use in the next chapter "Installing the Remote Control".
Installing the Remote Control
Your remote control has been in demo mode since you purchased it. To start installing and using the remote control:
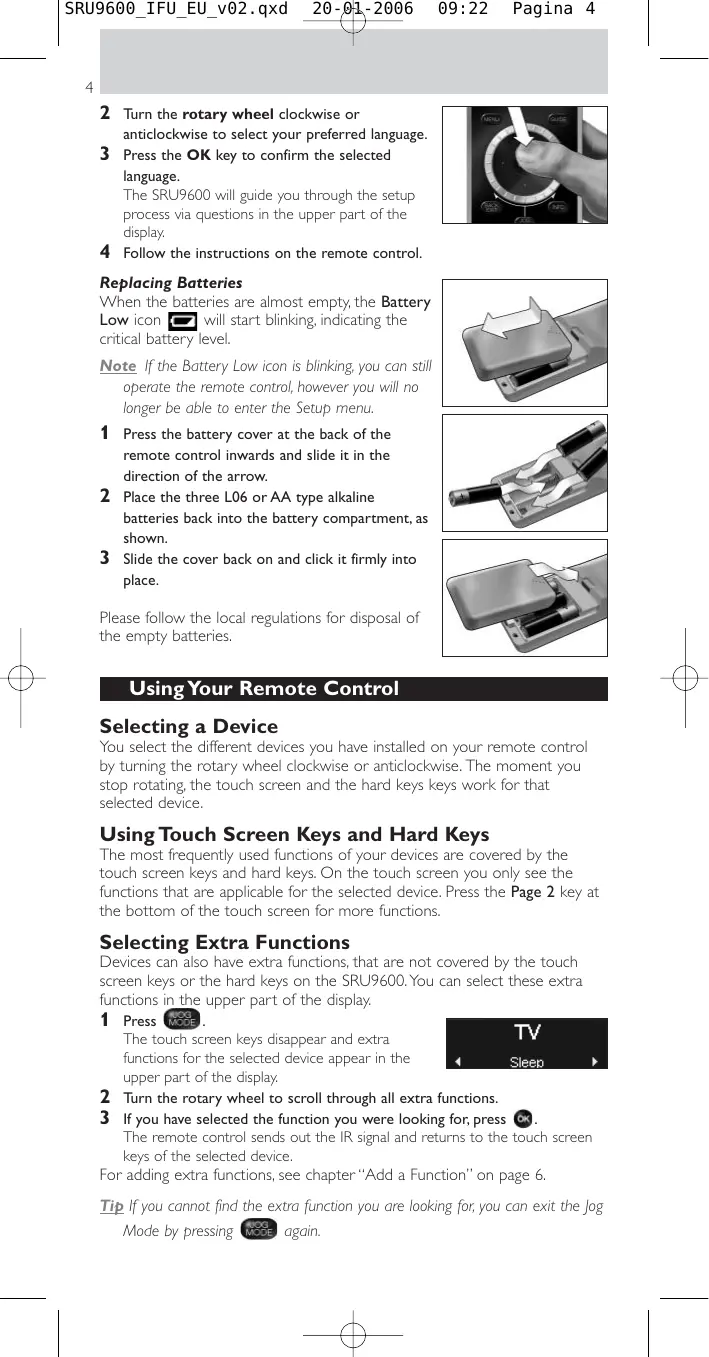
1 Turn the rotary wheel clockwise or
anticlockwise until the Philips logo appears.
The remote control then begins the Installation
Wizard to guide you through the installation.
2 Turn the rotary wheel clockwise or anticlockwise to select your preferred language.
3 Press the OK key to confirm the selected language.
The SRU9600 will guide you through the setup process via questions in the upper part of the display.
4 Follow the instructions on the remote control.
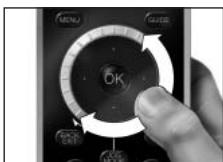
Replacing Batteries
When the batteries are almost empty, the Battery Low icon will start blinking, indicating the critical battery level.
Note If the Battery Low icon is blinking, you can still operate the remote control, however you will no longer be able to enter the Setup menu.
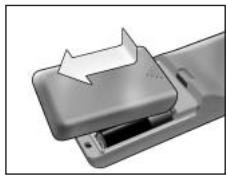
1 Press the battery cover at the back of the remote control inwards and slide it in the direction of the arrow.
2 Place the three L06 or AA type alkaline batteries back into the battery compartment, as shown.
3 Slide the cover back on and click it firmly into place.
Please follow the local regulations for disposal of the empty batteries.


Using Your Remote Control
Selecting a Device
You select the different devices you have installed on your remote control by turning the rotary wheel clockwise or anticlockwise. The moment you stop rotating, the touch screen and the hard keys keys work for that selected device.
Using Touch Screen Keys and Hard Keys
The most frequently used functions of your devices are covered by the touch screen keys and hard keys. On the touch screen you only see the functions that are applicable for the selected device. Press the Page 2 key at the bottom of the touch screen for more functions.
Selecting Extra Functions
Devices can also have extra functions, that are not covered by the touch screen keys or the hard keys on the SRU9600. You can select these extra functions in the upper part of the display.
1 Press MODEJ.
The touch screen keys disappear and extra functions for the selected device appear in the upper part of the display.
2 Turn the rotary wheel to scroll through all extra functions.
3 If you have selected the function you were looking for, press OK. The remote control sends out the IR signal and returns to the touch screen keys of the selected device.
For adding extra functions, see chapter "Add a Function" on page 6.
Tip If you cannot find the extra function you are looking for, you can exit the Jog Mode by pressing MODE again.

Note Some devices do not have any extra functions available in the onboard database. However, you can copy additional functions from your original remote by learning keys. See "Add a Function" on page 6.
Using Activities
An activity is a sequence of key presses that you can program. For example, for watching a DVD you normally would have to:
Turn on the TV;
Turn on the DVD;
Turn on the surround sound system;
- Select the correct input on your TV and surround sound system;
Press the Play button to start the DVD.
With an activity the remote control executes all these steps with just one key press.
Your programmed activities appear, together with the devices, in the upper part of the display when you turn the rotary wheel.
When you press , the remote control executes the sequence of key presses automatically.
For programming activities, see chapter "Add an Activity" on page 6.
Setting Up the Remote Control
To change settings of the remote control you use the Setup menu. The Setup menu provides the following options:
| Option | Description |
| Add device | Adds a new device |
| Delete device | Removes a programmed device |
| Fix a key | Fixes a key that is not working correctly, by learning it from your original remote control |
| Add a function | Adds an extra function by learning it from your original remote control |
| Add an activity | Combines a sequence of different IR signals |
| Delete an activity | Removes a programmed activity |
| Change language | Changes the language of the remote control |
| Backlight timeout | Changes the time-out setting of the remote control |
| Copy volume | Copies the volume keys from one device to another |
| Full reset | Reset the SRU9600 and deletes all your settings |
To enter the Setup menu:
Press and hold for 3 seconds.
The first item of the Setup menu appears.
To exit the Setup menu:
Press EXIT
The touch screen keys of the last selected device appear again.
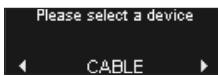
Add a Device
To be able to operate your devices with your SRU9600, you will have to add these devices to
the remote control. You can add up to 8 devices from the available list. You cannot add a device twice. Once you have added a device to your remote control, it disappears from the list. However, the list of devices contains 'TV-2' and 'VCR-2' for when you want to program a second TV or a second VCR.
1 Select the option Add a device in the Setup menu and press OK.
2 Select the device you want to add.
3 Follow the instructions on the remote control.
The selected device is programmed and added to your remote control.
You can select the device by turning the rotary wheel. The touch screen keys appear for the selected device.
Delete a Device
You can delete a programmed device from your remote control.
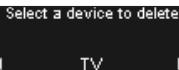
1 Select the option Delete a device in the Setup menu and press OK.
2 Select the device you want to delete.
3 Confirm you want to delete the device.
The device is deleted.
The deleted device is available again in list of devices that you can add.
Note Keys of the deleted device that are used elsewhere, e.g. in an activity or the volume keys you copied, will be deleted as well.
Check the activities you programmed and Volume keys for your devices and reprogram them if necessary.
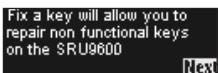
Fix a Key
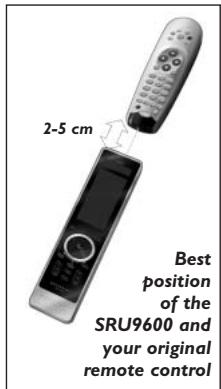
If a hard key, touch screen key or extra function is not working properly with your device, you can learn the key from your original remote control in your SRU9600. You can learn up to 200 keys.
1 Select the option Fix a key in the Setup menu and press OK.
2 Select the device for which you want to fix a key.
3 Confirm you have a working original remote control available to learn from.
4 Select the hard key, touch screen key or extra function you want to fix.
Extra functions can be selected by pressing the Jog Mode key, selecting the function with the rotary wheel and pressing OK.
5 Follow the instructions on the remote control.
The key is learned and fixed.
Note Fixing a key overwrites the key's data that was stored in your SRU9600.
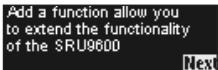
Add a Function
You can add extra functions to your SRU9600.
1 Select the option Add a function in the Setup menu and press OK.
2 Select the device you want to add a function to.
3 Select the label you want to use for the extra function.
4 Learn the function from your original remote.
The extra function is added to your remote control. You can access the extra
functions by pressing
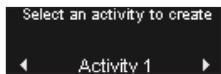
Add an Activity
You can add activities to your SRU9600.
An activity consists of several key presses that will
be sent out by your remote control with just one key press.
By default the SRU9600 inserts a delay of 300ms between every key press to make sure your devices are responding correctly to the IR signals. You can overwrite this default delay.
If one of your devices needs a longer delay before receiving the next IR signal, you can insert a delay of 3 seconds.
If an activity needs no delay between the different key presses, e.g. turning up the volume, you can add the option 'no delay'.
1 Select the option Add an activity in the Setup menu and press
2 Select the label you want to use for the activity.
3 Follow the instructions on the remote control.
1 Turn the rotary wheel to select a device from the list, press OK and add a key press to the activity.
2 Turn the rotary wheel to select '3 seconds' delay and press OK.
3 Turn the rotary wheel to select 'no delay' and press OK.
4 Repeat step 3 to create the activity.
The activity is added to your remote control. You can select the activity by turning the rotary wheel.
Delete an Activity
You can delete an activity from your remote control.
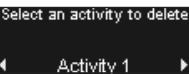
1 Select the option Delete an activity in the Setup menu and press OK.
2 Select the activity you want to delete.
3 Confirm you want to delete the activity.
The activity is deleted.
The activity is available again in the list of activities that you can add.
Change Language
You can change the language of your remote control to one of the following languages:
Select language

■ English; ■ French; ■ German; ■ Spanish.
1 Select the option Change language in the Setup menu and press
2 Select the language you want to use on your remote control.
3 Confirm the selected language.
The language used in the Setup menu is changed.
Backlight Time Out
When you use the remote control, the backlight, the touch screen and the upper part of the display are switched on. After 5 seconds these components are switched off again.
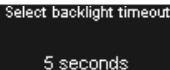
You can change this time out setting to one of the following options:
3 seconds; 5 seconds; 10 seconds; 15 seconds.
1 Select the option Backlight timeout in the Setup menu and press OK.
2 Select your desired backlight time.
3 Confirm the new time out.
The time out is changed for your remote control.
Note The backlight time out has an impact on the lifetime of the batteries, the longer the backlight stays on, the faster the batteries will be drained.
Copy Volume
After adding devices, the SRU9600 automatically copies the Volume keys, as follows:
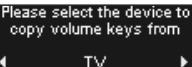
Video devices, like DVD, DVR, VCR and Satellite box, use the Volume keys of the TV (provided that you have programmed a TV).
Audio devices, like CD, MD, Tape and Tuner, use the Volume keys of the Amplifier or Receiver (provided that you have programmed an Amplifier or Receiver).
You can change which Volume keys are used, for instance when you want to use the Volume keys of the Amplifier for the DVD.
1 Select the option Copy volume in the Setup menu and press
2 Select the device you want to copy the Volume keys from (e.g. TV or Amp).
3 Select the device you want to copy the Volume keys to (e.g. DVD or SAT box).
4 Confirm you want to copy the Volume keys from one device to the other. The Volume keys are copied.
Full reset
You can reset the SRU9600 completely, deleting all programmed devices, activities, learned keys and
other settings. After the reset, you will have to install your remote control again.
A full reset deletes all settings
Are you sure you want to reset?
No Yes
1 Select the option Full reset in the Setup menu and press OK.
2 Select Yes and press OK to confirm you want to reset
your remote control.
3 Press to reconfirm.
The remote control deletes all settings and restarts. This can take up to one minute.
Support
Troubleshooting
| Problem | Cause | Solution |
| One or more buttons are not working with my device. | The function may not be available in the database of the SRU9600. | The SRU9600 can learn the correct function from your original remote control. Go to Setup menu and select Fix a key. |
| I cannot find the brand of my device in the SRU9600. | The brand is not available in the database of the SRU9600. | Select 'Not in list' when the SRU9600 asks to select the brand of your device. The SRU9600 will search the entire database for working functions. |
| The SRU9600 does not respond to any key, except for the OK key. | The SRU9600 is in demonstration mode when you buy it in the shop. It starts to run as soon as you press the OK key. | Take out the batteries for 5 seconds and insert them again. The remote should now initialise with the Philips logo and you can install the remote control for your devices. |
| I cannot enter the Setup menu. | The battery level is too low. | Take out the batteries and insert new batteries. |
| I cannot wake-up the SRU9600 anymore. | The battery level is too low. | Take out the batteries and insert new batteries. |
Need help?
If you have any questions about the SRU9600, you can always contact us. You will find our contact details on page 81 of these Instructions for Use. Read these Instructions for Use carefully before you call us.
When you call our helpline, make sure the device is at hand so that our operators can help you determine whether your remote control is working properly.
The model number of your Philips universal remote control is SRU9600/10.
Date of purchase:
..../...../.... (day/month/year)
Table des matieres
Introduction 9
Vouavesbecoindaide? 15
Introduction
3 seconds; 5 seconds; 10 seconds; 15 seconds.
Assistance technique
Dépannage
Please select a device.
CABLE
| A full reset deletes all settings Are you sure you want to reset? | |
| No | Yes |
Please select a device
CABLE
Select backlight timeout
5 seconds
Please select the device to copy volume keys from
TV
Pode repor completeness SRU9600 para as
A full reset deletes all settings Are you sure you want to reset? No Yes
Ajuda
Select a device to delete

TV
Fix a key will allow you to repair non functional keys on the SRU9600 Next
Add a function allow you to extend the functionality of the SRU9600
Please select the device to copy volume keys from
TV
A full reset deletes all settings
Are you sure you want to
reset?
No Yes
Assistenza
Add a function allow you to extend the functionality of the SRU9600 Next
Otau xnpaonoiie to tnlexepiotnpio, o oniaoios wtiouc, n oboyn apnckai to avw
époc tnc 0oovnc éiva evpyoioiμéva. Meta ano 5 deutepoλeTTa anevpyoioiuovtai nai.Mnpoeite va aaláεte autn tn puθmuon anevpyoioinoc σ μia ano tic akolouθεc εuoyec:
Please select the device to copy volume keys from

TV
Euokuec Bivto, otwCDVDVR,VCR kal Apupoioc ekTNC, xpnoiopoovu ta nktpa evtanctn TnAeopaonc (edoeevou oTe exTE npoypaumaraimu nAeopaon).
Sigmaeuec hou, onwC DMDKaetopwo kai Paioovo, xpnaonoiuov ta nKtpa Evtaon tou Evoxutn Touknt (deoevou oti exte npoypaatiaei evav Evoxutn dEkt).
Mmopeite va aIaaEeTe ta IaNkTpa 'EvtaoNC nou xnooiopoiouovtai, yia napadeiyama otav bEeTe va xnpoionoioeTe ta IaNkTpa 'EvtaoNC tou Evxutn Tou DVD.
A full reset deletes all settings Are you sure you want to reset? No Yes
Ynootniipxi
Eniuaon Ppoβλματωv
Please select a device
CABLE
A full reset deletes all settings
Are you sure you want to reset?
No Yes
Support
Felsökning
Select a device to delete
TV
1 Velg alternativev Edit a device i Setup-menyen, og trykk
2 Velg den encheten du vil slette.
3 Bekreft at du vil slette encheten.
Enheten slettes.
Fix a key will allow you to repair non functional keys on the SRU9600 Next
Add a function allow you to extend the functionality of the SRU9600 Next
Select an activity to create Activity1
A full reset deletes all settings
Are you sure you want to reset?
No Yes
1 Velg alternativet Full reset i Setup-menyen, og trykk
2 Velg Yes og trykk ok for a bekrefte at du vil nullstille fjernkontrollen.
3 Trykk for a bekrefte pa nytt.
Fjernkontrollen sletter alle innstlinger og startes på nytt. Dette kan ta opptil ett minutt.
Stotte
Feilsøking
Please select a device.

CABLE
Fix a key will allow you to repair non functional keys on the SRU9600 Next
Lisää lisätoiminto

Select an activity to create Activity1
Add a function allow you to extend the functionality of the SRU9600 Next
Lisaa toiminto
| A full reset deletes all settings Are you sure you want to reset? | |
| No | Yes |
Disposal of your old product
Your product is designed and manufactured with high quality materials and components, which can be recycled and reused. When this crossed-out wheeled bin symbol is attached to a product it means the product is covered by the European Directive 2002/96/EC.
Please inform yourself about the local separate collection system for
electrical and electronic products.
Please act according to your local rules and do not dispose of your old products with your normal household waste. The correct disposal of your old product will help prevent potential negative consequences for the environment and human health.
FR
Guarantee certificate
Certificat de garantie
Garantiebewijs
Garantieschein
Dealer's name, address and signature