Lineo 04.1312.0011 - Milk frother WMF - Free user manual and instructions
Find the device manual for free Lineo 04.1312.0011 WMF in PDF.

| Brand | WMF |
| Model | Lineo 04.1312.0011 |
| Category | Milk frother |
| Mains voltage | 220-240 V ~ 50/60 Hz |
| Power | 450 W |
| Protection class | I |
| Minimum capacity (foam) | 100 ml |
| Maximum capacity (foam) | 150 ml |
| Maximum capacity (hot milk) | 250 ml |
| Programs | Creamy foam, dense foam, cold foam, hot milk |
| Foam type | Hot or cold |
| Inner coating of pot | Non-stick |
| Removable frothing disc | Yes, dishwasher safe |
| Removable sealing ring | Yes, dishwasher safe |
| Lid dishwasher safe | Yes |
| Pot dishwasher safe | No, rinse under running water |
| Base cleaning | Wipe with a damp cloth |
| Overheat protection | Yes, automatic shut-off |
| Automatic stop at end of program | Yes |
| Unattended operation | Not recommended |
| Intended use | Domestic and similar (offices, hotels, etc.) |
| Cable length | Storage under the base |
Frequently Asked Questions - Lineo 04.1312.0011 WMF
User questions about Lineo 04.1312.0011 WMF
0 question about this device. Answer the ones you know or ask your own.
Ask a new question about this device
Download the instructions for your Milk frother in PDF format for free! Find your manual Lineo 04.1312.0011 - WMF and take your electronic device back in hand. On this page are published all the documents necessary for the use of your device. Lineo 04.1312.0011 by WMF.
USER MANUAL Lineo 04.1312.0011 WMF
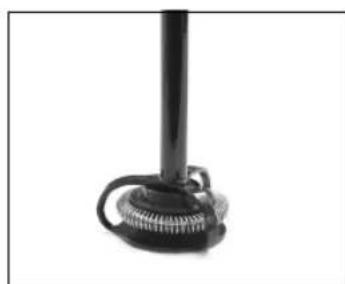
Milk frother components
1-Lid
2 - Scaling ring
3 - WMF milk froth DISC
4-Jug
5 - Start/stop button with control lamp
6 - Appliance base with cable wrap
Important safety instructions
- These devices can be used by children older than eight years old as well as by persons with limited physical, sensory or mental capabilities, persons lacking experience and/or lacking knowledge if they are supervised or have received instructions regarding how the device is to be used safely and have understood the resulting risks. Children must not play with the device. Children must not perform the cleaning and user maintenance, unless they are older than eight years old and are supervised.
- Keep the device and its cable out of the reach of children under eight years old.
- Only operate the appliance with the appropriate base.
- Never immerse the appliance in water.
- If the appliance's connection cable is damaged then it must be replaced by the manufacturer's central customer service department or by a similarly qualified person. Improper repairs may constitute a serious threat for users.
- Clean after use all surfaces, which have got in contact with food.
Follow the notes in chapter "Cleaning and care".
Prior to use
Read the operating manual carefully. It contains important information about the use, safety and maintenance of the appliance.
It should be kept in a safe place and passed on to further users if appropriate. The device may only be used for the intended purpose according to these operating instructions.
This device is meant to be used in the household and for similar applications, such as:
- in kitchens, for employees in shops, offices and other commercial areas;
on agricultural property; - from customers in hotels, motels and other residential facilities;
- in bed and breakfasts establishments.
The appliance is not designed for sole commercial use.
Observe the safety instructions during use.
Technical Data
Rated voltage: 220 - 240V 50 / 60Hz
Power consumption: 450 W
Protection class: I
Safety instructions
- Only connect the device to properly installed earthed sockets. The wire and plug must be dry.
- Do not pull the connecting cable over sharp edges or clamp it. Do not let it hang down and protect it from heat and oil.
- Never disconnect the mains plug from the socket by the cord or with wet hands.
-
Stop using the appliance and/or connect it from the mains plug immediately if:
-
The appliance or mains cable is damaged;
- the device is not leak-proof;
there is any suspicion of a fault after dropping the appliance or similar.
In such cases, send the appliance to be repaired.
- Do not place the appliance on hot surfaces, such as hot plates or similar, or near open flames. It could melt.
- Do not place the device on water-sensitive surfaces. Spray may damage them.
- Never operate the appliance unattended.
- Do not switch on the device without milk.
- Take the pot for filling from the base.
- Only use the appliance to heat up or froth milk. Do not use it to process any other ingredients.
- Do not move the device during operation and do not pull on the mains cable.
- Underside of the jug must be dry before using the appliance.
-
Caution: the device is hot.
The mains plug is to be pulled: -
if malfunctions occur during use,
- before cleaning and care,
-
after use.
-
No liability is accepted for any damages resulting from misuse, incorrect operation or improper repairs.
Claims under warranty are likewise excluded in such cases.
- Packaging material, such as plastic film bags, do not belong in the hands of children.
WMF milk froth DISC
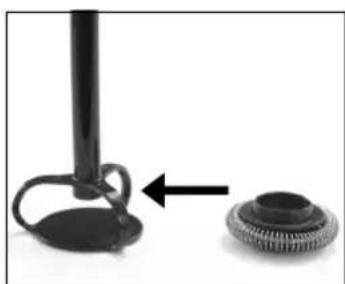
The WMF milk froth DISC (3) can be removed from the appliance for easy cleaning. To do this, gently push down the WMF milk froth DISC (3) and slide it to one side.
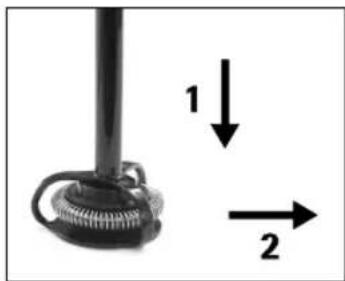
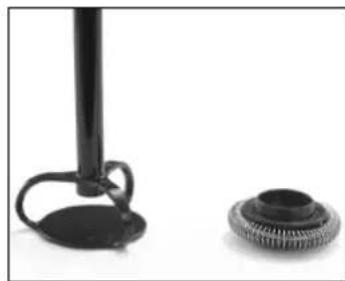
To assemble the appliance, proceed as follows: Simply slide the WMF milk froth DISC (3) sideways into the appliance, an internal magnet holds the DISC firmly in place.
Using the appliance
Before using for the first time, ensure the appliance is thoroughly cleaned, as detailed in the "cleaning and care" section. Any surplus cable can be wound into the bottom of the base unit (6). Connect the mains plug to an earthed socket.
Use and operation
-
Fill the jug (4) with the required quantity of milk and then close the lid (1).
-
Now place the jug (4) on the base unit (6).
Caution:
Always put the lid (1) on the gadget first before switching it on.
Never remove the lid (1) while the gadget is switched on.
Otherwise, the WMF milk froth DISC (3) may no longer function correctly even when the lid (1) is replaced.
Note:
preparation can be stopped at any time by pressing the start/stop button (5) or by removing the jug (4) from the base unit (6).
Allow the appliance to cool down before using again.
The texture and volume of the milk froth depend on the type of milk used (including fat content, protein content, temperature).
Soft creamy milk froth
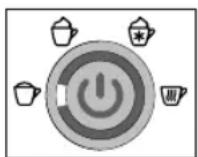
Select this program for warm, creamy, fine-pored milk froth. This is particularly suitable for cappuccino or latte style coffee.
- Fill the jug (4) with 100 to 150ml of cold milk.
The jug (4) is marked with the following measures:
100 ml MIN
150 ml MAX
DO NOT overfill the jug, otherwise the milk froth will overflow and spill over the appliance.
- Place the lid (1) on the jug (4) and push down gently to seal.
- Now press the start/stop button (5) repeatedly until the lamp for the symbol illuminates. After approximately 3 seconds, the appliance starts automatically, the control lamp for the start/stop button (5) is illuminated.
- After the program has finished, the appliance automatically switches itself off, the control lamp is no longer illuminated. Lift the lid (1) and skim off the milk froth separately or pour it out with the rest of the milk.
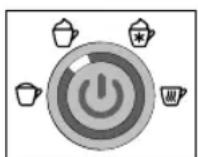
Firm milk froth
Select this program if you require a warm, firmer consistency of milk froth. This is particularly suitable for cappuccino or latte macchiato style coffee.
- Fill the jug (4) with 100 to 150ml of cold milk.
The jug (4) is marked with the following measures:
100 ml MIN
150 ml MAX
DO NOT overfill the jug, otherwise the milk froth will overflow and spill over the appliance.
- Place the lid (1) on the jug (4) and push down gently to seal.
- Now press the start/stop button (5) repeatedly until the lamp for the symbol illuminates. After approximately 3 seconds, the appliance starts automatically, the control lamp for the start/stop button (5) is illuminated.
- After the program has finished, the appliance automatically switches itself off, the control lamp is no longer illuminated. Lift the lid (1) and skim off the milk froth separately or pour it out with the rest of the milk.


Cold milk froth
Select this program for cold, creamy milk froth. This is ideal for frappés, cocktails, iced coffee or deserts.
- Fill the jug (4) with 100 to 150ml of cold milk.
The jug (4) is marked with the following measures:
100 ml MIN
150 ml MAX
DO NOT overfill the jug, otherwise the milk froth will overflow and spill over the appliance.
- Place the lid (1) on the jug (4) and push down gently to seal.
- Now press the start/stop button (5) repeatedly until the lamp for the symbol illuminates. After approximately 3 seconds, the appliance starts automatically, the control lamp for the start/stop button (5) is illuminat
- After the program has finished, the appliance automatically switches itself off, the control lamp is no longer illuminated. Lift the lid (1) and skim off the milk froth separately or pour it out with the rest of the milk.

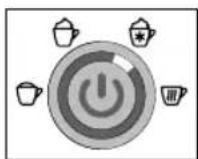
Hot milk

Select this program to heat and lightly froth the milk. The hot milk is ideal for milky coffee, hot chocolate or cocoa.
- Fill the jug (4) with 100 to 250ml of cold milk.
The jug (4) is marked with the following measures:
100 ml MIN
250 ml MAX
DO NOT overfill the jug, otherwise the milk froth will overflow and spill over the appliance.
- Place the lid (1) on the jug (4) and push down gently to seal.
- Now press the start/stop button (5) repeatedly until the lamp for the symbol illuminates. After approximately 3 seconds, the appliance starts automatically, the control lamp for the start/stop button (5) is illuminate
- After the program has finished, the appliance automatically switches itself off, the control lamp is no longer illuminated. Lift the lid (1) and pour the milk.
Cleaning and care
-
Clean the appliance after each use.
-
Unplug at the mains and allow the device to cool down.
-
The lid (1) and WMF milk froth DISC (3) are dishwasher-safe. for easy cleaning, the sealing ring (2) in the lid (1) can be removed.
Note: the jug (4) and base unit (6) should not be placed in the dishwasher.
- The jug (4) can be rinsed under running water.
The inside of the jug (4) is lined with a non-stick coating. Do not use any harsh or abrasive detergents or solvents. Dry the jug (4) with a soft cloth.
Attention: before using the appliance, ensure that the jug (4) is dry underneath.
- Only use a soft, damp cloth to wipe the base unit (6).
| Dishwasher-safe | Can be rinsed under running water | Wipe with a damp cloth | |
| Lid (1) | ✓ | ✓ | ✓ |
| Sealing ring (2) | ✓ | ✓ | ✓ |
| WMF milk froth DISC (3) | ✓ | ✓ | ✓ |
| Jug (4) | - | ✓ | ✓ |
| Base unit (6) | - | - | ✓ |
Troubleshooting
The following tips should help you to solve any problems. If the problem persists, please contact our central customer service department. Please note the warranty information.
| Problem Possible cause | Action | |
| The control lamp is not illuminated, the appliance does not start | The plug is not plugged in. | Connect the plug |
| Overheating protection active | Allow the appliance to cool | |
| Milk is leaking from the lid | Too much milk in the appliance | Pour out some of the milk |
| The lid is not fitted properly | Gently push the lid down | |
| The sealing ring is missing or is dirty | Clean and insert the sealing ring |
For UK use only
-
This product is supplied with a 13 A plug conforming to BS 1363 fitted to the mains lead. If the plug is unsuitable for your socket outlets or needs to be replaced, please note the following. If the plug is a non-rewireable one, cut it from the mains lead and immediately dispose of it. Never insert it into a socket outlet as there is a very great risk of an electric shock.
-
The replacement of the plug at the mains lead has to be done according to the following instructions:
Warning - This appliance must be earthed!
Important: The wires in this mains lead are coloured in accordance with the following code:
green/yellow Earth
blue Neutral
brown Live
As the colours of the wires in the mains lead of this appliance may not correspond with the coloured markings identifying the terminals in your plug, proceed as follows:
-
the wire which is coloured green and yellow must be connected to the terminal which is marked with the letter E or by the earth symbol 念 , or coloured green or green and yellow,
-
the wire which is coloured blue must be connected to the terminal which is marked with the letter N or coloured black,
-
the wire which is coloured brown must be connected to the terminal which is marked with the letter L or coloured red.
-
If a 13 A (BS 1363) plug is used it must be fitted with a 3 A fuse conforming to BS 1362 and be ASTA approved. If any other type of plug is used, the appliance must be protected by a 5 A fuse either in the plug or adapter or at the distribution board. If in doubt - consult a qualified electrician.
-
Never use the plug without closing the fuse cover.

The appliance complies with the European directives 2006/95/EC, 2004/108/EC and 2009/125/EC.
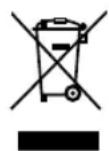
This product may not be disposed of with the normal household waste at the end of its service life but must be delivered to a collecting point for recycling electrical and electronic appliances. The materials are reusable in accordance with their identification. You will make an important contribution to the protection of our environment by recycling used appliances.
Please ask about the responsible disposal point at your community offices.
Subject to change