
SBCSC368/87C - Headphones PHILIPS - Free user manual and instructions
Find the device manual for free SBCSC368/87C PHILIPS in PDF.
| Product type | Baby monitor |
| Brand | Philips |
| Model | SBCSC368/87C |
| Power supply baby unit | 9V DC 200 mA mains adapter (supplied) or 4 LR6 1.5 V batteries (not supplied) |
| Power supply parent unit | 9V DC 200 mA mains adapter (supplied) via charging cradle or rechargeable NiMH 3.6 V/500 mAh battery (supplied) |
| Battery life (baby unit) | Up to 30 hours |
| Battery life (parent unit) | Up to 5 hours |
| Charging time | 12 to 14 hours for full charge |
| Transmission frequencies | 40.675 MHz / 40.695 MHz |
| Range | Up to 300 meters in ideal conditions |
| Number of channels | 2 selectable channels |
| Main functions | Wireless audio transmission, channel selection, anti-interference technology, link indicator, rechargeable, belt clip |
| Light indicators | Red POWER indicator, green TRANSMIT indicator, red CHARGE indicator |
| Safety | Keep out of baby's reach; do not place in the crib or playpen |
| Cleaning | Clean with a soft dry cloth |
| Spare parts | LR6 batteries (not supplied), rechargeable battery (supplied), mains adapters (supplied) |
| Included accessories | 2 mains adapters, 1 NiMH battery, 1 belt clip, 1 charging cradle |
Frequently Asked Questions - SBCSC368/87C PHILIPS
User questions about SBCSC368/87C PHILIPS
0 question about this device. Answer the ones you know or ask your own.
Ask a new question about this device
Download the instructions for your Headphones in PDF format for free! Find your manual SBCSC368/87C - PHILIPS and take your electronic device back in hand. On this page are published all the documents necessary for the use of your device. SBCSC368/87C by PHILIPS.
USER MANUAL SBCSC368/87C PHILIPS
SBC SC 368 - Babysitter
Instructions for use
Mode d'emploi
English page 4
Illustrations 3
Technical specifications 34
Ennll
Francais page 7
Illustrations 3
Spécifications techniques 34
Fannnns
Espanol . pagina 10
Illustraciones 3
Especificaiones tecnicas 34
Paaeep
Congratulations! You have just purchased a truly cordless Babysitter (SBC SC368) that enables you to monitor your child from wherever you are in and around your house. The Babysitter has been tested to meet all necessary regulations and standards, and features a rechargeable battery back-up that guarantees operation at all times.
Note: While the Babysitter is intended as an aid, it is not a replacement for real parent supervision and should not be used as such.
2. QUICK REFERENCE
QUICK REFERENCE
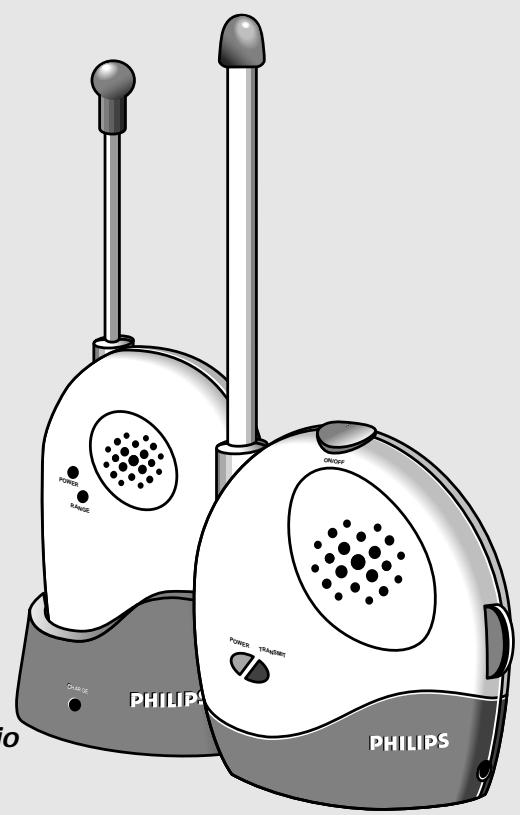
- Connect one of the enclosed mains adapters to the 'baby unit' (transmitter) and the other to the 'parent unit' (receiver) recharging base (fig. 3).
- Switch the transmitter on (fig. 1.4) and place it near the baby's bed.
- Place the receiver in the recharging base (fig. 3).
- Switch the receiver on to an acceptable sound level (fig. 1.2).
- Every time sound is detected from or near the baby, it is transmitted to the parent's unit.
- Adjust the sound level on the receiver as required.
3. POWER SUPPLY
Mains power supply
- Check that the mains voltage as indicated on the mains adapter corresponds to your local mains voltage. If it does not, consult your dealer or our service organisation.
- Connect a mains adapter to the transmitter as indicated in fig. 3.
- Place the receiver inside the recharging base and connect a mains adapter as indicated in fig. 3.
- If the mains power adapter is connected correctly, the red CHARGE LED on the recharging base lights up.
Battery power supply
Transmitter (batteries not enclosed)
- Install batteries inside the transmitter as indicated in fig. 2 for cordless transmitter operation.
Receiver (batteries enclosed)
Rechargeable battery pack is already installed inside the receiver.
- For maximum battery life make sure that the batteries inside the receiver are totally discharged and recharged on a regular basis.
3. POWER SUPPLY
Notes
- Both the transmitter and receiver have a 'battery low' indication. If the batteries are low the red POWER LED starts flashing.
- To conserve batteries, connect the units to the mains by using the enclosed mains adapters.
- If batteries are installed and the mains power adapters are connected, the units operate on mains power. In the event of a mains failure, the batteries will take over.
IMPORTANT
- Replace batteries inside the transmitter with original PHILIPS LR6 POWERLIFE batteries only.
- Battery pack inside the receiver has already been installed. Have these batteries replaced only by an official dealer or our service organisation!
4. OPERATION
OPERATION (fig. 4)
Transmitter
- Make sure the mains power adapter is connected correctly, or batteries are installed.
- Place the transmitter near the baby's bed, making sure that the microphone is placed in the best position for picking up baby's sounds.
IMPORTANT!
Make sure that the transmitter is always out of reach of the baby; never place the transmitter inside baby's bed or playpen!
- Switch the transmitter on using the ON/OFF switch (fig. 1.4).
- The red POWER LED lights up.
- If sound is picked up by the built-in microphone, the transmitter starts transmitting automatically. The transmission stops when no sound is picked up any more. During transmission the green TRANSMIT LED lights up.
- The Babysitter sound level can be adjusted by turning the SENSITIVITY control (fig. 1.5) to the desired microphone sensitivity level.
- The higher the sensitivity is set, the earlier the unit starts transmitting when your baby makes a sound.
Receiver
- Make sure that the mains power adapter is correctly connected to the recharging base.
- The receiver uses rechargeable battery power only in the event of a mains failure, or when the unit is not placed inside the standing base.
- Place the receiver inside the recharging base, near to the parent's location.
- If the mains power adapter is connected correctly, the red CHARGE LED on the recharging base lights up.
- Switch the receiver on to an acceptable sound level (fig. 1.2).
- The red POWER LED lights up.
- If a sound signal is received from the 'baby unit', it is heard via the built-in speaker.
- Adjust the sound level as required.
Notes
Do not place transmitter and receiver too close to each other while operating. Otherwise the units will start resonating (giving a high-pitch sound).
IMPORTANT!
Before using the Babbysitter, check the sound transmission to ensure that both units function correctly. After this first check, sound transmission should be checked on a regular basis as follows:
- Have an adult softly speak into the transmitter.
- Sounds transmitted from the baby room should be heard clearly via the receiver in another room.
4. OPERATION
4516u3
CHANNEL SELECTION
- The Babysitter can use 2 different channels for radio signal transmission. If sound reception is very poor, please try the other transmission channel as follows:
- Move the channel selector on both units to the other channel (fig. 1.1 and fig. 1.3).
Note: Always make sure the channel switches on both units are set to the same position. This ensures optimum reception.
ANTI-INTERFERENCE TECHNOLOGY
To reduce the reception of other signals, the unit checks each received signal for a special code. In this way annoying transmissions from e.g. radio amateurs, cordless telephones or other brands of babysitters are reduced to a minimum.
TRANSMISSION CONTROL
If the receiver is switched on, it will check that the transmitter is still within transmission range. If the signal is blocked, or if the units are placed out of range for more than 30 seconds the receiver starts beeping and the green LED flashes. To stop the transmission control signals, try one of the following options:
- Move the receiver closer to the transmitter to restore sound reception again.
- The maximum operating distance is 300m in ideal conditions.
- Switch to the other transmission channel (see chapter 'Channel Selection').
- Check batteries in both transmitter and receiver (in case batteries are low).
Signals from the transmitter may also be blocked when the set is used in an environment with a lot of radio frequency (RF) interference. If the beeping cannot be stopped by using one of the options mentioned above:
- Adjust the switch inside the receiver's battery compartment.
Note: When you have switched off the receiver's beeping manually you will no longer know whether it receives signals or not. Therefore put the switch back in its original position when you are going to use the set again.
RECHARGEABILITY
The receiver has a recharging function. If the rechargeable batteries are empty they can be recharged easily via the recharging base. To recharge batteries:
- Make sure that the mains power adapter is correctly connected to the recharging base.
- If the mains power adapter is connected correctly, the red CHARGE LED on the recharging base lights up.
- Place the receiver inside the recharging base; batteries start to recharge.
- Totally empty batteries will take up 12-14 hours to fully recharge.
BELT-CLIP
With completely charged batteries, the receiver can be used as a truly cordless product. The unit can be carried in and around the house, using the easy belt-clip. This clip can easily be attached to and removed from the receiver (fig. 5).
1. GENERALITES
SOMMAIRE
- GENERALITES 7
- GUIDE D'UTILISATION. 7
- ALIMENTATION 7-8
- FONCTIONNEMENT 8-9
FICHE TECHNIQUE 34
ILLUSTRATIONS 3
INTRODUCTION
- Tóo η movāδa tou μωρού 000 kaɪ η movāδa twv yovéwv εivai εξοπλιμενενς με ενδειξη χαμηλης ταόης twv ματapiw. Av η ταση twv μαntapiw εívala xαμηλ, θα αρχοει va αναβοσβηνει η κόκκινη ενδειξη POWER LED.
-Gamma of the power of the power of the power of the power of the power of the power of the power of the power of the power of the power of the power of the power of the power of the power of the power of the power of the power of the power of the power of the power of the power of the power of the power of the power of the power of the power of the power of the power of the power of the power of the power of the power of the power of the power
Av exov too0eTnei npatapiEc evw ivai ouvdeepieva ta avtantop, o maovae 8a etoupyov uepaox npuatoC ano to nektpiko iktu. Ze nepirtwn diakonncpueuatoC, o npataies 8a avalabouyn npaox npuatoC.
\SHMANTIKO:
-AvtkataotntoTe TIC mntapaiE tsovadac tou mpuou mvo uauoVtkeC mntapaiE PHILIPS LR6 POWERLIFE.
Oi eapopoticioevcs npatapies exouv hon toothee tne i eoa ot movada twy ovew. ia va toothetwu npatapiow, auoubouleuteite tv avinipooauro mac nty unnpeda texviikc Eunptetnonc.
4. XEPII2MO2
XEPIIeMOe (EiK.4)
Movδa μωpu
Bεβaωθειτοι to ανταπtop ia to ηλεκτρίοδiktuεxει αυνδεθει σωτα, ἡιτι εχουνtonoθετηθει μπατapiεσι Σιακεύη.
TootheotnovabaTou wpu Kovta oTo KpbaTou wpu, kai baiwtheta ot to Mikpowo ToTOnoTheoi nVIO katalnn th eon yia tn lns qvwn tsu wpu.
ZHMANTIKO!
- Batteries 4 x 1.5V; LR6 (not included);
- Battery pack DC 3.6V/500 mAh, NiMh (included);
- Mains power adapter, DC 9V, 200mA (2 x included).
Operating voltage: DC 6-9 Volt
Battery back-up time:
- upto 30 hours (transmitter)
- upto 5 hours (receiver)
Transmission frequencies:
- 40.675 MHz / 40.695 MHz
FICHE TECHNIQUE
Alimentation:

Printed in The Netherlands

TCText/RR/9813
- SBC SC 368 - Babysitter
- QUICK REFERENCE
- QUICK REFERENCE
- POWER SUPPLY
- Mains power supply
- Battery power supply
- Notes
- IMPORTANT
- OPERATION
- OPERATION (fig. 4)
- Transmitter
- IMPORTANT!
- Receiver
- 4516u3
- CHANNEL SELECTION
- ANTI-INTERFERENCE TECHNOLOGY
- TRANSMISSION CONTROL
- RECHARGEABILITY
- BELT-CLIP
- GENERALITES
- SOMMAIRE
- INTRODUCTION
- \SHMANTIKO:
- XEPII2MO2
- XEPIIeMOe (EiK.4)
- Movδa μωpu
- ZHMANTIKO!
- FICHE TECHNIQUE
Brand : PHILIPS
Model : SBCSC368/87C
Category : Headphones