
ESWD52 - Epilator PANASONIC - Free user manual and instructions
Find the device manual for free ESWD52 PANASONIC in PDF.

| Product type | Epilator |
| Brand | Panasonic |
| Model | ESWD52 |
| Usage | Dry or wet skin (in the shower or bath) |
| Heads provided | Leg/arm epilation head, shaving head, bikini comb |
| Caps | Quick cap, skin protector cap, beginner cap |
| Power supply | AC charger RE7-46 (automatic voltage adaptation) |
| Charging time | Approximately 1 hour |
| Run time | Approximately 30 minutes (40 minutes with beginner/protector cap) |
| Battery | Rechargeable Li-ion, lifespan 3 years (weekly charging) |
| Dimensions (epilator) | 5.8 cm × 12.6 cm × 3.9 cm |
| Weight (epilator) | 170 g |
| Dimensions (charger) | 6.7 cm × 9.2 cm × 2.5 cm |
| Weight (charger) | 145 g |
| Sound level (epilation) | 68 dB(A) re 1pW |
| Sound level (shaving) | 62 dB(A) re 1pW |
| Included accessories | Cleaning brush, pouch |
| Care and cleaning | Cleaning brush, wash with water and liquid soap, dry completely |
| Part replacement | Outer foil to be replaced every year, inner blade every two years |
| Safety | Do not use on face, genitals, irritated or damaged skin |
Frequently Asked Questions - ESWD52 PANASONIC
User questions about ESWD52 PANASONIC
0 question about this device. Answer the ones you know or ask your own.
Ask a new question about this device
Download the instructions for your Epilator in PDF format for free! Find your manual ESWD52 - PANASONIC and take your electronic device back in hand. On this page are published all the documents necessary for the use of your device. ESWD52 by PANASONIC.
USER MANUAL ESWD52 PANASONIC
Operating Instructions
(Household) Epilator
Model No. ES-WD52
natural_image
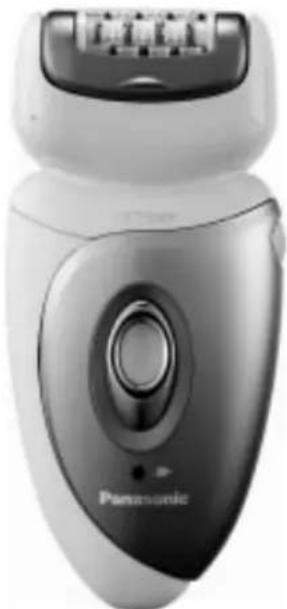
Panasonic electric shaver with black and white body, no visible text or symbols on the device itselfBefore operating this unit, please read these instructions completely and save them for future use.
English 4 Dansk 74
Deutsch 12 Suomi 81
Français 20 Polski 89
Italiano 28 Česky 97
Español 36 Slovenčina 105
Nederlands 44 Română 113
Português 52 Magyar 121
Norsk 60 Türkçe 130
Svenska 67
natural_image
Simple line drawing of an open book with a curved arrow indicating rotation (no text or symbols)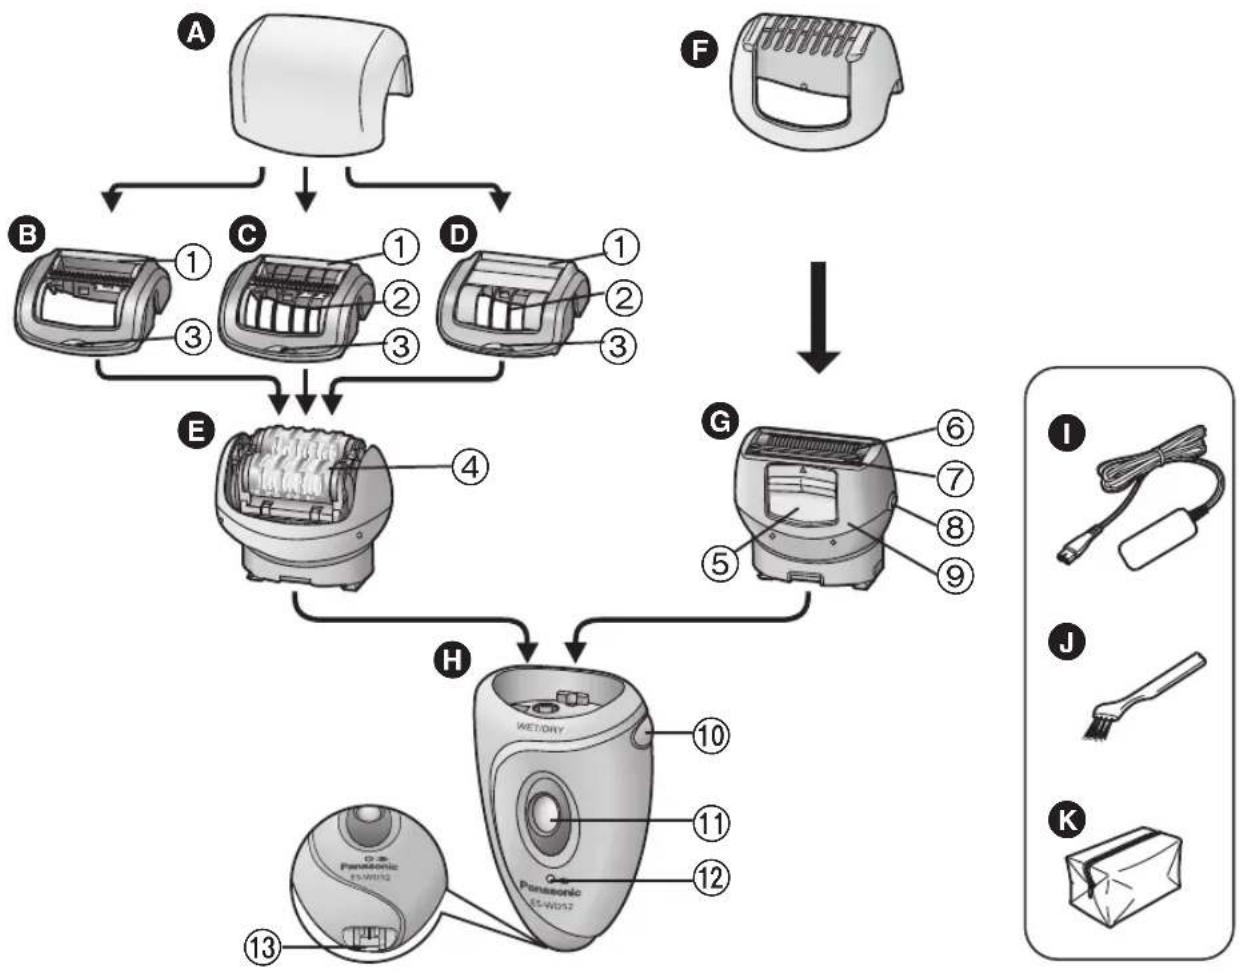
flowchart
graph TD
    A["Base Hand"] --> B["Component 1"]
    A --> C["Component 2"]
    A --> D["Component 3"]
    A --> E["Component 4"]
    A --> F["Component 5"]
    A --> G["Component 6"]
    A --> H["Component 7"]
    A --> I["Component 8"]
    A --> J["Component 9"]
    A --> K["Component 10"]
    A --> L["Component 11"]
    A --> M["Component 12"]
    A --> N["Component 13"]
Thank you for choosing a Panasonic WET/DRY epilator. With our WET/DRY technology, you can enjoy using your Panasonic epilator dry or in the shower or bath for gentle and easy epilation. Please read all instructions before use.
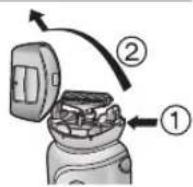
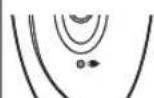
Parts identification
A Protection cap
B Fast cap
© Gentle cap (→Page 6)
D Beginner cap (→Page 6)
① Foam wiper
② Skin protector
③ Cap release rib
E Epilation head for legs/arms
④ Epilation discs
F Bikini comb (→ Page 7)
G Shaver head
⑤ Pop-up trimmer switch
⑥ Outer foil
⑦ Trimmer
⑧ Frame release button
⑨ Frame
H Main body
⑩ Head release button
⑪ OFF/ON switch
⑫ Charging light
⑬ Socket
Accessories:
① Charger (RE7-46) (Do not use chargers other than the one provided.)
J Cleaning brush
K Pouch
Quick steps for epilating
1 Charging (→Page 6)
▶ 2 Selecting the head (→Page 7)
3 Epilating (→Page 7-8)
Important
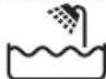
The appliance can be used for wet or dry epilation. The following is the symbol for a wet epilator. It means that the appliance can be used in a bath or shower.
- Make sure skin is clean before and after use.
• In the following cases, please consult your physician. - Having eczema, rashes, sensitive skin, proneness to infections, varicose veins, diabetes, hemophilia, poor blood clotting or other skin conditions
- The following might result in bacteria entering the skin and cause damage and inflammation.
- Using just before swimming and sports activities
- Sharing with other persons
- Always attach an epilation head and its cap or a shaver head and its frame to the epilator when turning on. Failure to do so might cause finger injury, hair entanglement in the spinning gears or mechanical malfunction.
• The following might cause sensitive skin damage, injury, inflammation, pain, bleeding, and severe pain. - Using the appliance if the epilation discs, the skin protector, the frame, the fast cap, the gentle cap, the beginner cap or the outer foil have been damaged.
- Using on or near your face, genitals, warts, pimples, bruises, rashes, wounds or loose skin.
- Using around moles.
- Applying strong pressure to the skin, repeatedly moving over the same area or using a jabbing motion.
- Using before or during menstruation, pregnancy, about one month after giving birth.
- Using when ill, sunburned, etc.
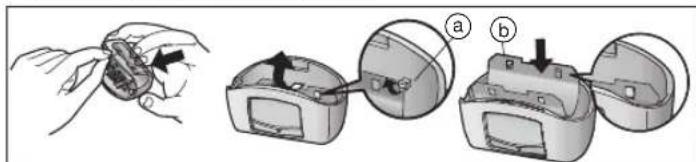
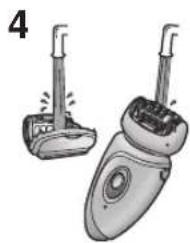
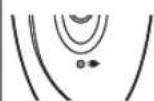
▶Charging the epilator
- Never use the charger in a bathroom.
- Always ensure the appliance is used on an electric power source matched to its rated voltage.
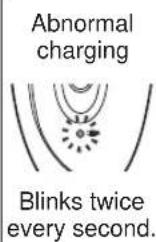
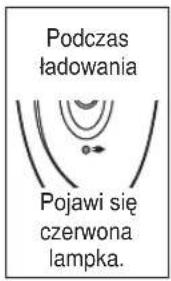
- The charging light may not turn on after a few minutes in some cases. However, it will turn on eventually if you continue charging.
- The appliance can be left plugged in after it is fully charged without deteriorating the battery life.
- The life of the battery is 3 years if charged approximately once every week. The battery in this epilator is not intended to be replaced by consumers. Have the battery replaced by an authorized service center.
▶ Using the epilator
- Never use the appliance if the cord or the charger is damaged, overly hot or if the plug fits loosely in a household outlet.
- Do not drop or hit the appliance as the skin protector, the frame, the fast cap, the gentle cap, the beginner cap or the epilation discs can be damaged.
- This appliance is not intended for use by persons (including children) with reduced physical, sensory or mental capabilities, or lack of experience and knowledge, unless they have been given supervision or instruction concerning use of the appliance by a person responsible for their safety. Children should be supervised to ensure that they do not play with the appliance.
- The recommended use temperature is 5-35 °C. If you use the appliance in temperature outside of the recommended range, it may stop functioning or might reduce the operating time.
- Do not use the epilation head for legs/arms to epilate your underarms and bikini-line.
▶Cleaning the epilator
- Regularly clean the cord connector to prevent dust.
- Do not use nail polish remover, benzine, alcohol, etc. to clean the appliance.
- Always unplug the charger from a household outlet and from the epilator before cleaning the appliance.
- Wipe the main body only with a dry cloth. The use of alcohol etc. might cause discoloration or deformation of the main body.
• Take care not to damage the skin protector, the frame, the fast cap, the gentle cap and the beginner cap during cleaning.
▶Storing the epilator
- Do not bend, twist, pull, or modify the cord.
- Do not wrap the cord tightly around the appliance.
- Keep the appliance out of the reach of children or invalids.
- Keep the appliance away from sinks, bathrooms or other high-humidity areas where it could be exposed to water and moisture after use.
- Keep the appliance away from where it will be exposed to high temperatures or direct sunlight.
- When storing the epilator, always attach the protection cap for the epilation head and the bikini comb for the shaver head.

Tips for best epilation results
Please refer to "Quick User Card" as well.
● The hair removal is not permanent, so after the 2nd use we recommend that you epilate the arms and legs about once every two weeks.
When epilating for the first time, or using for the first time in a while, we recommend using the beginner cap. The beginner cap narrows the epilating area thus reducing the number of hairs removed at one time. It provides a more gentle epilation for beginners and those with sensitive skin.
• We also recommend warming the skin to soften the skin before use.
The gentle cap has a skin protector for gentler epilation. So it can remove hairs by holding the skin down to reduce pain.
1. Remove the fast cap [B].
2. Attach the gentle cap [C]/the beginner cap [D].
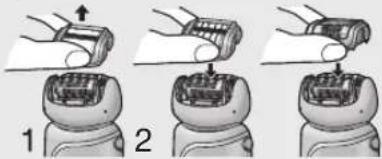
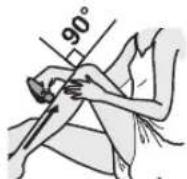
- Apply the epilator at a 90° angle to your skin. Always make sure that the appliance is in contact with your skin and press gently while moving it slowly against the hair growth.
![PANASONIC ESWD52 - Attach the gentle cap [C]/the beginner cap [D]. - 2](/content/2026/03/449284/images/0bc51f722cc5a8c2f9020ccd51fa830ad1d58e48ae09596217f8806a2b818185.jpg)
● Massaging with a body puff may help to prevent ingrown hairs.
● Reddening might appear after use. A cool towel will help if you feel pain or there is a rash.
- If your skin gets dry after epilation, we recommend applying a moisture lotion two days after epilation.
Before use
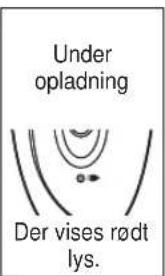
Charging the appliance
For best performance, fully charge the appliance before use. You cannot operate the appliance while charging.
Charging time = Approx. 1 hour
The epilator can be used for approximately 30 minutes (40 minutes when using the beginner cap/gentle cap) after 1 hour of charging. (This will differ depending on the temperature.)
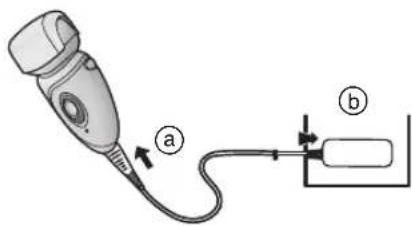
Plug the charger into the epilator (a) and a household outlet (b).
• The recommended charge temperature is 15-35 °C.
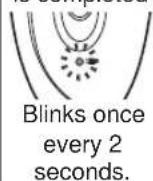
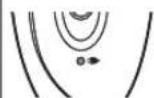
After charging is completed

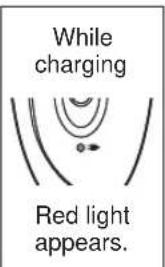
Blinks once every second.
10 minutes after charging is completed
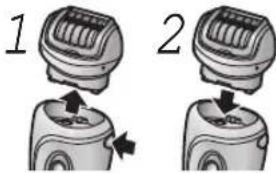
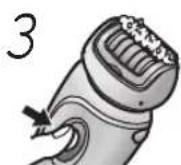
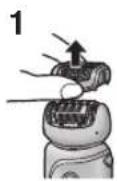
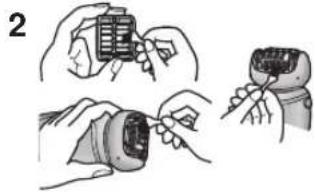
Changing the head
1 Remove the head while holding the head release button.
2 Push the head until it clicks.

Best length of hair for epilation
Trim your hair before epilating for the first time or if you have not epilated for a long time. Hair removal is easier and less painful when the hair is short.
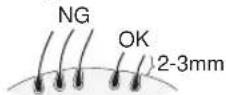
Cut your hair to between 2 mm and 3 mm long.
You can shave hair leaving the length of 2-3 mm by using the bikini comb attached.
Using the bikini comb
Place the bikini comb onto the shaver head and slide trimmer up.
- When the bikini comb is in place, make sure the comb is in close contact with the skin.
flowchart
graph TD
    A["Device 1"] --> B["Device 2"]
    B --> C["Device 3"]
Epilating
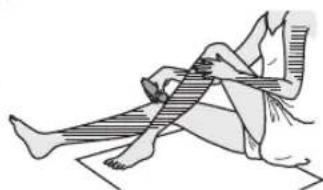
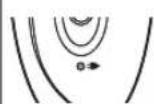
Areas suitable for epilation
The epilator can be used on the areas. Using the epilator on other areas may cause pain or skin trouble.
natural_image
Illustration of a person performing a seated leg stretch exercise (no text or symbols)- In the case of dry epilation, spread out paper etc. to catch the falling hairs.
Areas not suitable for epilation
The epilator should not be used on the inner side of the upper arms and areas such as elbows or knees which are prone to sagging.
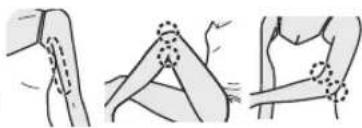
natural_image
Illustration of three stages of a human arm joint or stretch, showing different movement patterns (no text or symbols present)Dry epilation
Before epilating, wipe away water or sweat on your skin.
Press the OFF/ON switch to turn on the power.
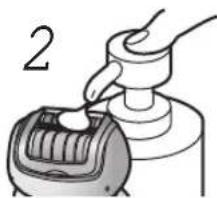
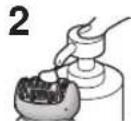
Wet/foam epilation
WET epilation (epilating after wetting the skin and epilator and then applying foam) makes the skin softer so is gentler to your skin when epilating.
1 Wet your skin.
2 Wet the discs and place a small quantity of liquid body soap on the discs.
natural_image
Illustration of a hand using a tool to press or install a device into a container (no text or symbols visible)• Always use body soap when wet epilating.
- Rinse any body soap out of your hands.
3 Press the OFF/ON switch to turn on the power.
- Foam is created. Foam makes the epilator slide better, so you can move it fast.

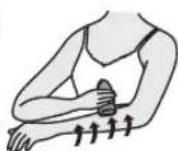
Upwards from the bottom of the leg. Inwards from the outside of the arm.
Shaving
Dry shaving
Before shaving, wipe away water or sweat on your skin.
1 Attach the shaver head [G].
2 Remove the bikini comb [F].
3 Check that the outer foil is not deformed or damaged.
4 Press the OFF/ON switch [H⑪] to turn on the power.
- Press gently so that the whole blade is in close contact with the skin and the surface of the blade does not move up and down.
Wet/foam shaving
Shaving with soap lather makes the skin slippery for a closer shave.
1 Attach the shaver head [G].
2 Remove the bikini comb [F].
3 Check that the outer foil is not deformed or damaged.
4 Wet your skin and put soap lather on your skin.
• Do not use shaving cream, skin cream or skin lotion as it will clog the blades.
5 Press the OFF/ON switch [H⑪] to turn on the power.
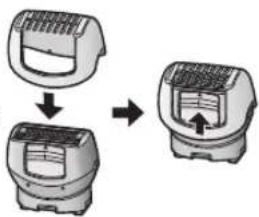
Cleaning
Always clean the frame, fast/gentle/beginner caps and discs after use to keep them in a hygienic state. Switch off and unplug the appliance before cleaning.
Dry cleaning
- Lift the fast/gentle/beginner caps upward while holding the cap release rib [BCD③] or remove the frame by pushing the frame release button [G⑧].
- Clean the epilation head [E] and the shaver head [G] with the cleaning brush [J].
natural_image
Illustration of hands assembling a mechanical component with a close-up view (no text or symbols)Wet cleaning
-
Lift the fast/gentle/beginner caps upward while holding the cap release rib [B C D ③] or remove the frame by pushing the frame release button [C ⑧].
-
Apply liquid hand soap to the discs and the blades.
-
Turn the switch on and then wet the discs and the blades to create foam.
-
Wash the head with water to wash out hair.
- Do not use hot water.
- If soap is not completely washed away, then a white deposit can accumulate and prevent the discs and the blades from moving smoothly.
- Turn the switch off, wipe the appliance with a dry cloth and dry it well.
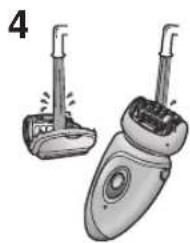
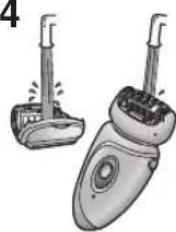
natural_image
Illustration of two different types of electric shaver devices, one with a base and the other with a handle (no text or symbols present)Replacing the outer foil
We recommend replacing the outer foil [G6] every year and the inner blade every two years. Remove the outer foil of the shaver head [G] only when replacing it.
- While pushing the outer foil gently with the fingers, use a fingernail to release the plastic panel (b) on the blade from the hooks (a) on the inside of the frame.
- The new outer foil should be slightly bent and pushed in until it is hooked in the frame.
natural_image
Illustration of a hand holding a small object, showing three steps: adding an arrow to the left, adding a close-up of the lid, and adding a separate inset (a) and (b), with no visible text or symbols.Removing the built-in rechargeable battery
Remove the built-in battery when disposing of the epilator. Perform steps ① to ⑦ to disassemble the epilator using a screwdriver.
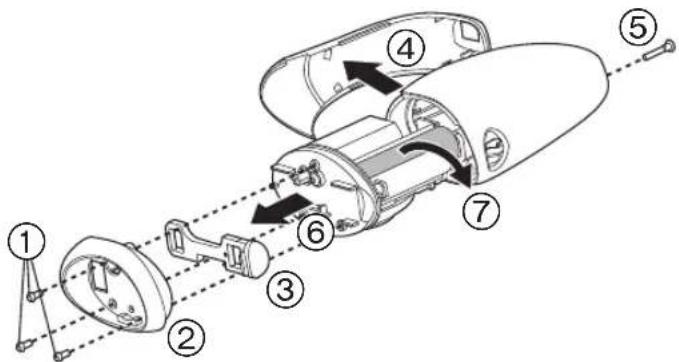
- Unplug the charger from the epilator before disassembling it.
- Press the OFF/ON switch to turn on the power and then keep the power on until the battery is completely discharged.
- Please take care not to short-circuit the battery.
For environmental protection and recycling of materials
This epilator contains a Li-ion battery. Please make sure that the battery is disposed of at an officially assigned location, if there is one in your country.
Guarantee
Please visit Panasonic web site http://panasonic.net or contact an authorized service center (you find its contact address in the pan european guarantee leaflet.) if you need information or if the epilator or the cord get damaged.
Specifications
Power supply: See the rating plate on the product.
(Automatic voltage conversion)
You can see the voltage, manufacturer, country of origin, etc. by detaching the head attachment.
Charging time: Approx. 1 hour
This product is intended for house-hold use only.
Airborne Acoustical Noise
Epilation head for legs/arms: 68 (dB(A) re 1pW)
Shaver head: 62 (dB(A) re 1pW)
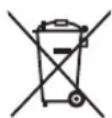
Information for Users on Collection and Disposal of Old Equipment and used Batteries
These symbols on the products, packaging, and/or accompanying documents mean that used electrical and electronic products and batteries should not be mixed with general household waste.
For proper treatment, recovery and recycling of old products and used batteries, please take them to applicable collection points, in accordance with your national legislation and the Directives 2002/96/EC and 2006/66/EC.
By disposing of these products and batteries correctly, you will help to save valuable resources and prevent any potential negative effects on human health and the environment which could otherwise arise from inappropriate waste handling.
For more information about collection and recycling of old products and batteries, please contact your local municipality, your waste disposal service or the point of sale where you purchased the items.
Penalties may be applicable for incorrect disposal of this waste, in accordance with national legislation.
For business users in the European Union
If you wish to discard electrical and electronic equipment, please contact your dealer or supplier for further information.
[Information on Disposal in other Countries outside the European Union]
These symbols are only valid in the European Union. If you wish to discard these items, please contact your local authorities or dealer and ask for the correct method of disposal.
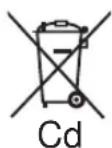
Note for the battery symbol (bottom two symbol examples):
This symbol might be used in combination with a chemical symbol. In this case it complies with the requirement set by the Directive for the chemical involved.
natural_image
Illustration of a person performing a seated leg press exercise (no text or symbols present)natural_image
Illustration showing three stages of a human arm joint or stretch, with no text or symbols present.Trockene Epilation
Nasse/Schaum Epilation
natural_image
Illustration of a hand using a tool to press or install a component, no text or symbols presentnatural_image
Illustration of hands using a handheld device to adjust a component (no text or symbols visible)Nassreinigung
3

4
natural_image
Illustration of two electric shakers with tip holders, one emitting exhaust smoke (no text or symbols)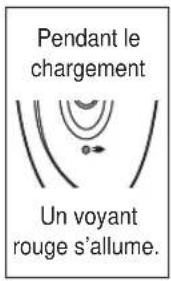
natural_image
Illustration of a person performing a seated leg stretch exercise (no text or symbols)natural_image
Illustration showing three different postures of a human arm joint, with no text or symbols present.Epilation à sec
natural_image
Illustration of a hand using a tool to press or install a component, no text or symbols present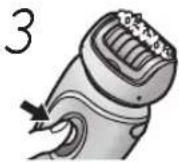
natural_image
Illustration of hands using a handheld device to adjust or install a component (no text or symbols visible)Nettoyage à l'eau
natural_image
Illustration of two different types of electric shaver devices, one with a handle and the other with a blade (no text or symbols)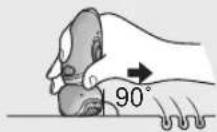
Prima dell'uso
Durante la carica


flowchart
graph TD
    A["Device with lid"] --> B["Device with fan"]
    B --> C["Device with fan"]
    C --> D["Device with fan"]
Epilazione
natural_image
Illustration of a person performing a seated leg stretch exercise (no text or symbols)natural_image
Illustration showing three different postures of a human leg joint, with dotted lines indicating specific areas (no text or symbols present)Epilazione a secco
natural_image
Illustration of a hand using a tool to press or install a device, no text or symbols presentnatural_image
Illustration of hands assembling a camera module with a close-up view (no text or symbols)Pulizia a umido
natural_image
Illustration showing a hand holding a small electronic device, with two views (a and b) of a device being inserted into a housing (no text or symbols present)
natural_image
Illustration of two different types of electric shaver devices, one with a base and the other with a handle (no text or symbols present)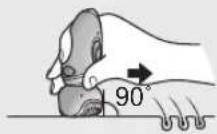
natural_image
Illustration of a person sitting on a bench with bandages, no text or symbols presentnatural_image
Illustration showing three stages of a human arm joint or stretch, with no text or symbols present.Depilación seca
Antes de depilarse, seque su piel si está mojada o transpirada.
natural_image
Illustration of a hand using a tool to press or install a device into a container (no text or symbols visible)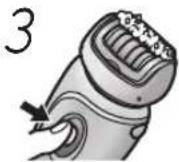

natural_image
Illustration of hands using a tool to adjust or install a component, showing step 2 (no text or symbols present)Limpieza en húmedo
natural_image
Illustration of two different types of electric shaver devices, one with a handle and the other with a handle (no text or symbols present)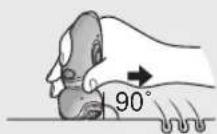
Voor gebruik
Tijdens het opladen
natural_image
Illustration of a person performing a seated leg press or exercise technique (no text or symbols present)natural_image
Illustration of three stages of a human arm joint or muscle positioning (no text or symbols)Droog epileren
natural_image
Illustration of a hand using a tool to press or install a component, no text or symbols present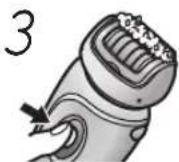

natural_image
Illustration of hands using a handheld device to adjust or install a small electronic component (no text or symbols visible)Nat schoonmaken
natural_image
Illustration of two electric shaver devices with no visible text or symbols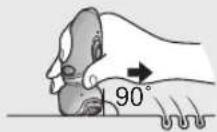
Antes de usar
Carregar o aparelho
Durante o carregamento
flowchart
graph TD
    A["Device with fan or fan-like device"] --> B["Device with fan or fan-like device"]
    B --> C["Device with fan or fan-like device"]
Depilação
natural_image
Illustration of a person performing a seated leg stretch or exercise (no text or symbols present)natural_image
Illustration of three different postures of a human arm joint, showing different anatomical positions (no text or labels present)Depilação a seco
natural_image
Illustration of a hand using a tool to press or install a device into a container (no text or symbols visible)3 Prima o interruptor DESLIGAR/LIGAR para ligar o aparelho.
natural_image
Illustration of hands using a handheld device to adjust or install a component (no text or symbols visible)Limpeza com água
natural_image
Illustration of two electric shaver devices with no visible text or symbolsLadetid = Omtrent 1 time.
Under lading
Rød lampe vises.
natural_image
Illustration of a person sitting on the floor performing a bandage exercise (no text or symbols)natural_image
Illustration showing three stages of a human arm joint or stretch, with no text or symbols present.Tørr hårfjerning
Tørk bort svette eller vann på huden før hårfjerning.
natural_image
Illustration of a hand using a tool to press or install a component, no text or symbols presentnatural_image
Illustration showing two different physical or anatomical scenarios: one with a 90-degree angle marker and the other with finger movement arrows (no text or symbols)Barbering
Tørrbarbering
Tørk bort svette eller vann på huden før barbering.
natural_image
Illustration of hands assembling a mechanical component with a close-up view (no text or symbols)Våt rengjøring
natural_image
Illustration of two electric shaver machines, one with a lit fuse and the other a flat blade (no text or symbols)Fjerne det innebygde oppladbare batteriet
Fjern det innebygde batteriet när du kaster hårfjernen.
Utfør steg ① til ⑦ for å demontere hårfjernen med et skrujern.
Ladetid: Omtrent 1 time.
Dette produktet er kun ment til husholdningsbruk.
Barberhode: 62 (dB(A) re 1pW)
natural_image
Illustration of a person sitting on the floor performing a bandage exercise (no text or symbols)natural_image
Illustration of three different postures of a human arm, showing different anatomical positions (no text or symbols present)Torr epilering
natural_image
Illustration of a hand using a tool to press or install a component, no text or symbols present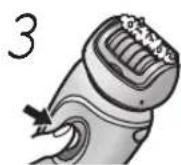

natural_image
Illustration showing two different positions of a person's arm and foot, with no visible text or symbols.Rakning
Torrakning
natural_image
Illustration of hands using a handheld device to adjust or install a small electronic component (no text or symbols visible)Våt rengöring
natural_image
Illustration of two electric shaver devices, one with a base and the other with a handle (no text or symbols)Byte av ytterfolien

flowchart
graph TD
    A["Device with internal structure"] --> B["Device with internal structure"]
    B --> C["Device with internal structure"]
Epilering
natural_image
Illustration of a person sitting on the floor performing a bandage exercise (no text or symbols)natural_image
Illustration of three stages of a human arm joint or muscle positioning, showing different movement patterns (no text or symbols present)Tør epilering
Tør huden af for vand eller sved inden epilering.
natural_image
Illustration of a hand using a tool to press or install a component, no text or symbols presentnatural_image
Illustration showing two different positions of a person's arm and foot, one with a 90° angle marker and the other with a finger inserted (no text or symbols present)Barbering
Tør barbering
Tør huden af for vand eller sved inden barbering.
natural_image
Illustration of hands installing or adjusting a device component (no text or symbols visible)Våd rengøring
natural_image
Illustration of two electric shaver devices, one with a base and the other with a handle (no text or symbols)Latauksen aikana
flowchart
graph TD
    A["Device with lid"] --> B["Device with vent"]
    B --> C["Device with lid"]
Epilointi
natural_image
Illustration of a person performing a seated leg press exercise (no text or symbols present)natural_image
Illustration showing three different postures of a human arm joint, with dotted lines indicating specific areas (no text or symbols present)Kuivaepilointi
natural_image
Illustration of a hand using a tool to press or install a device into a container (no text or symbols visible)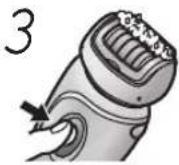

natural_image
Illustration of hands assembling a mechanical component with a close-up view (no text or symbols)Puhdistus pesemällä
natural_image
Illustration of two different types of electric shaver devices, one with a brush and the other with a flat blade (no text or symbols)Ulomman teräverkon vaihtaminen
natural_image
Illustration of a person performing a seated leg stretch exercise (no text or symbols)natural_image
Illustration of three stages of a human arm joint or stretch, showing different movement patterns (no text or symbols present)Depilacja na sucho
natural_image
Illustration of a hand using a tool to press or install a device into a container (no text or symbols visible)natural_image
Illustration of hands assembling a mechanical component with a close-up view (no text or symbols)natural_image
Illustration of two electric shaver devices with no visible text or symbols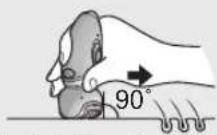
Během nabíjení
natural_image
Illustration of a person performing a seated leg stretch exercise (no text or symbols)natural_image
Illustration of three different postures of a human arm joint, showing different movement patterns (no text or symbols present)Epilace na sucho
natural_image
Illustration of a hand using a tool to press or install a device into a container (no text or symbols visible)natural_image
Illustration of hands using a handheld device to adjust or install a device (no text or symbols visible)Mokré čistění
natural_image
Illustration of two different types of electric shaver devices, one with a handle and the other with a blade (no text or symbols)natural_image
Illustration showing a hand holding a small electronic component, with two views (a and b) of a device being inserted into a housing (no text or symbols present)
Počas nabíjania
Rozsvieti sa červené svetlo.
natural_image
Illustration of a person performing a seated leg press exercise (no text or symbols present)natural_image
Illustration showing three different postures of a human arm joint, with no text or symbols present.Suchá epilácia
natural_image
Illustration of a hand using a tool to press or install a device into a container (no text or symbols visible)natural_image
Illustration of three-step hands using a camera module to adjust the lens (no text or symbols present)Mokré čistenie
natural_image
Illustration of two different types of electric shaver devices, one with a base and the other with a blade (no text or symbols)natural_image
Illustration showing a hand holding a small object, with two views (a and b) of a device inside a housing, no text or symbols present.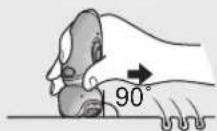
flowchart
graph TD
    A["Device with fan blade"] --> B["Device with fan blade"]
    B --> C["Device with fan blade"]
Epilatul
natural_image
Illustration of a person performing a seated leg press or exercise (no text or symbols present)natural_image
Illustration showing three different postures of a human arm joint, with no text or symbols present.Epilatul uscat
natural_image
Illustration of a hand using a tool to press or install a device into a container (no text or symbols visible)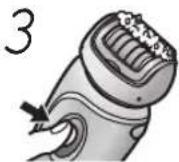

natural_image
Illustration of hands assembling a mechanical component with a close-up view (no text or symbols)Curățare umedă
natural_image
Illustration of two electric shaver devices with no visible text or symbolsnatural_image
Illustration showing a hand holding a small object, with two views (a and b) of a device being inserted into a housing (no text or symbols present)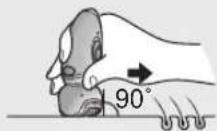
Használat előtt
Töltés közben

flowchart
graph TD
    A["Device with lid"] --> B["Device with fan"]
    B --> C["Device with door and vent"]
    C --> D["Device with lid and vent"]
Epilálás
natural_image
Illustration of a person performing a seated leg press or exercise (no text or symbols present)natural_image
Illustration of three different postures of a human arm joint, showing different movement patterns (no text or symbols present)Száraz epilálás
natural_image
Illustration of a hand using a tool to press or install a device into a container (no text or symbols visible)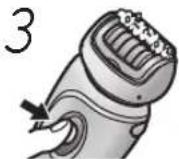

natural_image
Illustration of three-step hands using a camera module to adjust the lens (no text or symbols present)Nedves tisztítás
natural_image
Illustration of two different types of electric shaver devices, one with a handle and the other with a base (no text or symbols present)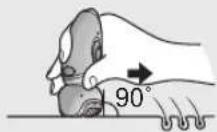
flowchart
graph TD
    A["Device with lid"] --> B["Device with fan"]
    B --> C["Device with door and vent"]
    C --> D["Device with lid and vent"]