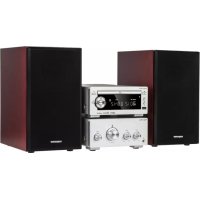
KM 1908 - Hi-fi system Krüger&Matz - Free user manual and instructions
Find the device manual for free KM 1908 Krüger&Matz in PDF.
| Product type | Hi-Fi system with DVD player, Bluetooth, FM/DAB+ radio |
| Output power | 2x 80 W (max) |
| Frequency range | 45 Hz - 20 kHz |
| Impedance | 3 Ω |
| Power supply | 220-240 V, 50/60 Hz |
| Standby consumption | < 0.5 W |
| Bluetooth | Version 3.0, range 8 m |
| Radio | FM and DAB+ with 20 presets each |
| Connectivity | USB, HDMI ARC/1/2, optical, coaxial, AUX, headphone output, video output |
| Main features | DVD/CD playback, USB, Bluetooth, radio, alarm, timer, equalizer, parental control |
| Safety | Laser protection, automatic shutdown in absence of signal, mute |
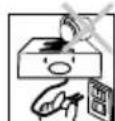
| Maintenance and cleaning | Soft cloth slightly damp, avoid chemicals |
| General information | Brand: Krüger&Matz, Model: KM 1908, Made in China |
Frequently Asked Questions - KM 1908 Krüger&Matz
User questions about KM 1908 Krüger&Matz
0 question about this device. Answer the ones you know or ask your own.
Ask a new question about this device
Download the instructions for your Hi-fi system in PDF format for free! Find your manual KM 1908 - Krüger&Matz and take your electronic device back in hand. On this page are published all the documents necessary for the use of your device. KM 1908 by Krüger&Matz.
USER MANUAL KM 1908 Krüger&Matz
WIEDERGABEVONUSBGERATEN
D
THD: 1% (1 kHz, 1 W)
Anschlüsse:
HDMI ARC Ausgang
2x HDMI Eingang
USB Steckplatz
Koaxial-Eingang
Optischer Eingang
Thank you for purchasing this system. Please read these operating instructions before operating the unit. The operating instructions should be retained for future reference.
For your safety
Before operating this system, check the voltage of this system to see if it is identical with the voltage of your local power supply.
Don't obstruct the ventilation openings of the equipment with items such as newspaper, table-cloths,curtains,etc..Overheating will cause damage and shorten the life of the equipment.
When you disconnect the power cord, always pull the plug, never the cable.

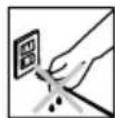
NEVER let anyone especially children push anything into holes, slots or any other opening in the case - this could result in a fatal electrical shock;
Protect the power cord from being walked on or pinched, particularly at plugs, convenience receptacles, and the point where they exit from the device.
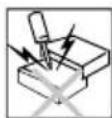
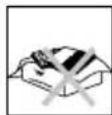
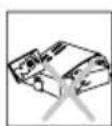
Never hitting the product use the sharp objects.
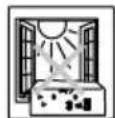
Never place the product and accessories near naked flames or other heat sources, including direct sunlight.
Laser Product
This product is equipped with low power laser equipment. For your own safety do not remove any covers or take the product apart. Repair work must be carried out by qualified personnel.
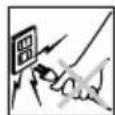
To avoid electric shock, do not open the cabinet. Refer all servicing to qualified service personnel.
CLASS 1
LASER PRODUCT
Never expose the product and accessories to rain or water. Never place liquid containers, such as vases, near the product.
Caution:
This product is equipped with low power laser equipment inside, for your safety, don't open the laser radiation protective equipment. Don't look at the laser radiation district when the equipment is operating.
WARNING:
TO PREVENT FIRE OR SHOCK HAZARD, DO NOT EXPOSE THIS APPLIANCE TO DRIPPING OR SPLASHING.

CAUTION
RISK OF ELECTRIC SHOCK DO NOT OPEN


CAUTION:
TO REDUCE THIS RISK OF ELECTRIC SHOCK DO NOT REMOVE COVER (OR BACK), NO USER SERVICEABLE PARTS INSIDE, REFER SERVICING TO QUALIFIED SERVICE PERSONNEL.

This symbol indicates that dangerous voltage constituting a risk of electric shock is present within this unit.

This symbol indicates that there are important operating and maintenance instructions in the literature accompanying this unit.
- Clean with soft, slightly damp cloth only.
- Use only original accessories.
- Unplug the device during lightning storms or when unused for long periods of time.
- Different types of batteries or new and used batteries are not to be mixed.
- When inserting batteries, please note the correct polarity.
- This appliance may be used by children who are above 8 years old and by persons with reduced physical, sensory or mental capabilities, or lack of experience and knowledge, if they are supervised and guided by a person who is responsible for their safety in a cautious manner, and all the safety precautions are understood and followed. Children should not play with this device. Children should not perform cleaning and servicing of the device unsupervised.
- Fixed power cable may only be replaced in an authorized service point.
- Do not move the unit during playback
- To avoid danger of suffocation, keep the bag away from babies and children. This bag is not a toy.
Hearing safety
Listen at a moderate volume.
- Sound can be deceiving. Over time your hearing "comfort level"adapts to higher volumes of sound. So after prolonged listening, what sounds "normal"can actually be loud and harmful to your hearing. To guard against this, set your volume to a safe level before your hearing adapts and leave it there.
To establish a safe volume level:
- Set your volume control at a low setting.
- Slowly increase the sound until you can hear it comfortably and clearly, without distortion.
Listen for reasonable periods of time:
- Prolonged exposure to sound, even at normally "safe" levels, can also cause hearing lose.
- Be sure to use your equipment reasonably and take appropriate breaks.
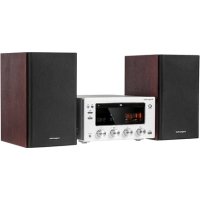
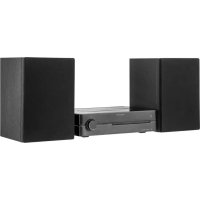
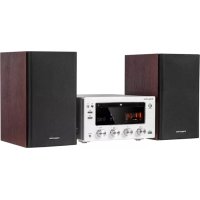
PRODUCT DESCRIPTION
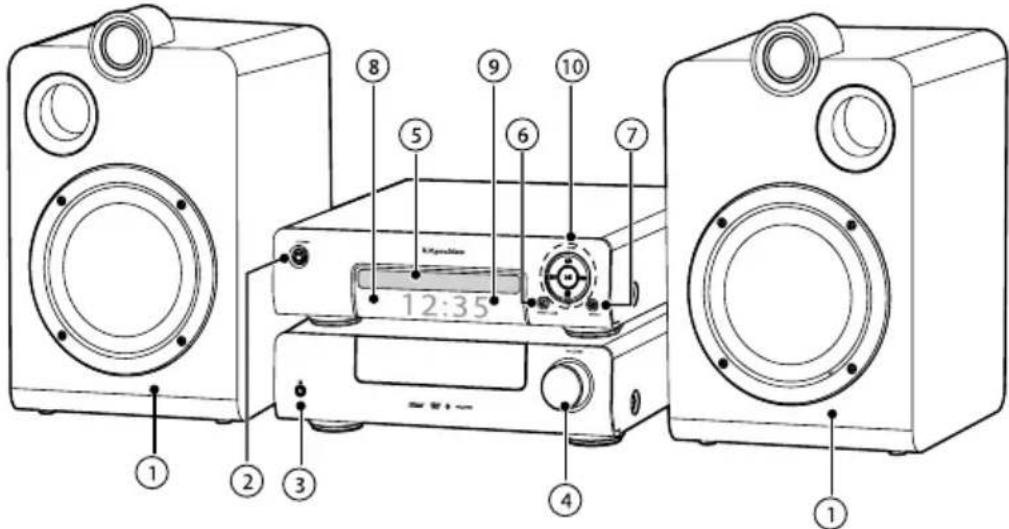
- Speakers
- button (turn ON / switch to Standby mode)
- Headphone Socket
- VOLUME control knob
- Disc compartment
- button (open / close the disc compartment)
- SOURCE button (select a play function)
- Display
- Remote Control Sensor
-
1b2tions
-
In DISC/USB/Bluetooth mode, skip to previous/next audio track.
- In DISC/USB mode, press and hold to search
backward/forward within a track/disc.
- In FM mode, select a previous/next preset station.
>按钮
- Play/pause/resume playback.
- Press and hold to activate the pairing function in Bluetooth mode and disconnect the existing paired Bluetooth device.
- Confirm selection.
EQQ button
- Select the preset equaliser:
FLAT-POP-CLASSIC-ROCK-JAZZ.
(MODE) button
- Select repeat/shuffle play modes

- AUX output (R/L)
- VIDEO output
- CONTROL CABLE Socket
- HDMI IN 1/2 Sockets
- HDMI OUT (ARC) Socket
- FM/DAB Antenna Socket
-
USB Port
-
OPTICAL input
- COAXIAL input
- AUX (R/L) input
- SPEAKER OUT (R/L) Sockets
- AC power supply cable socket
- Speakers Connector
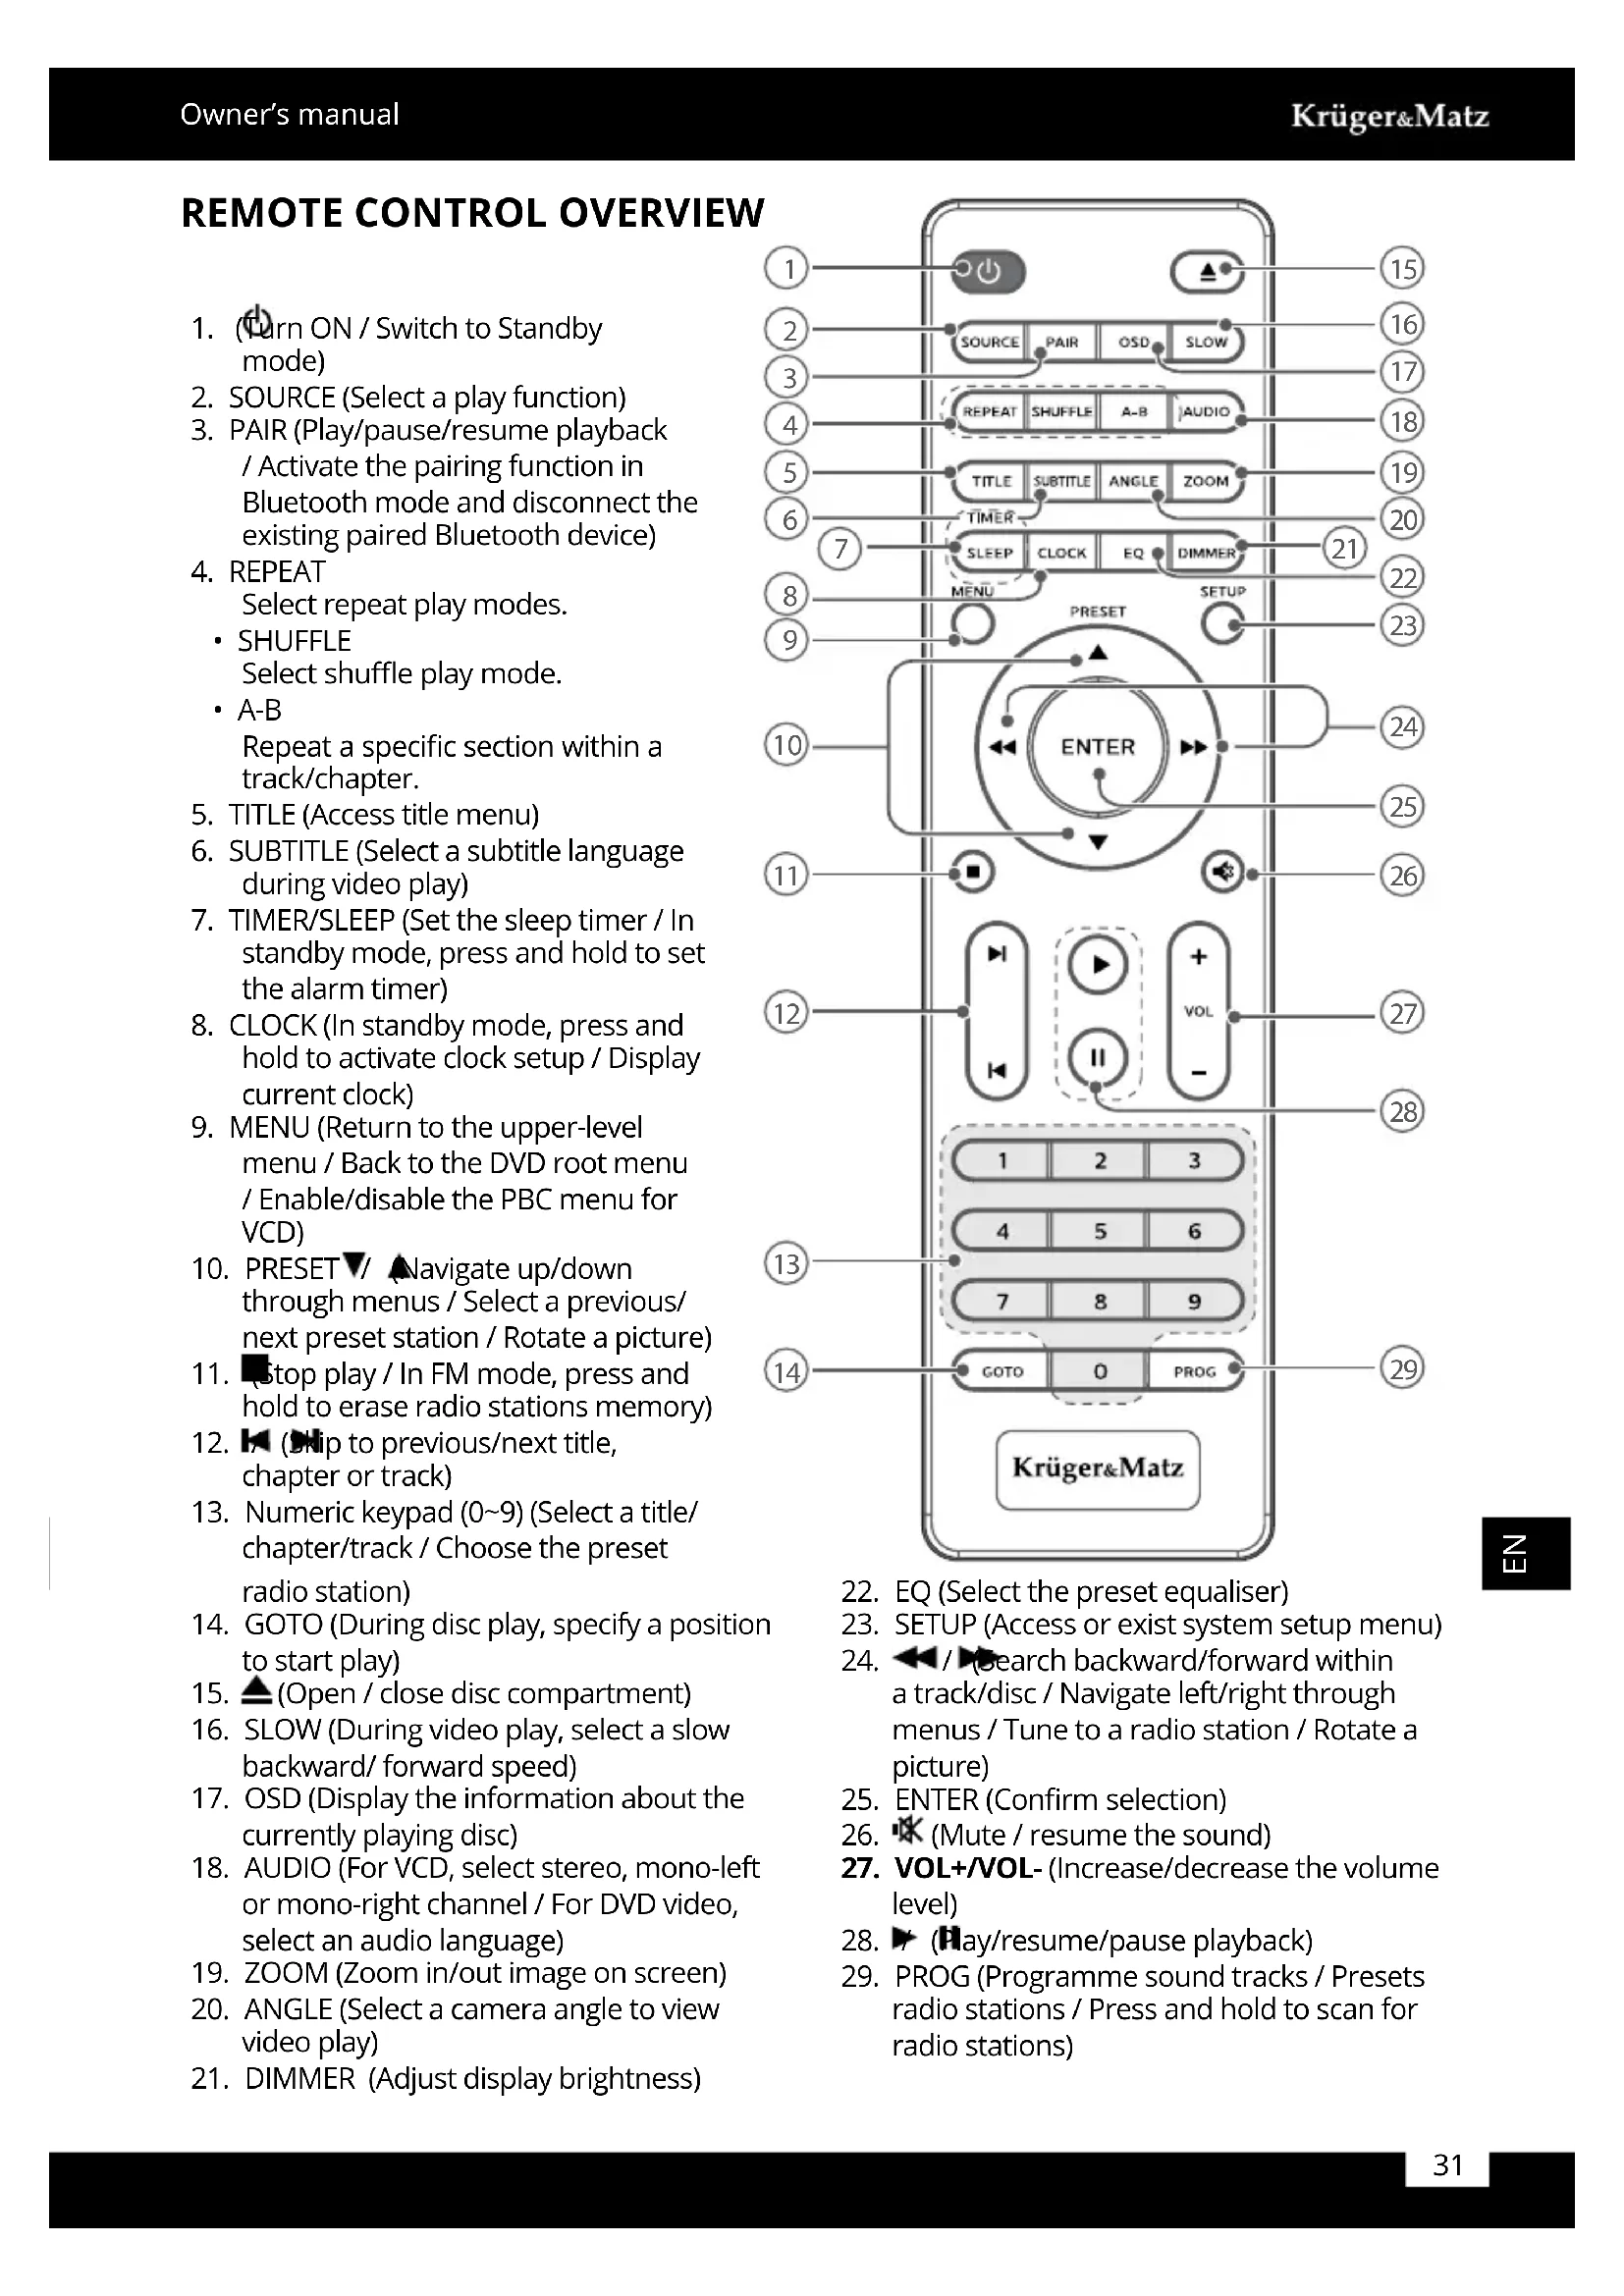
REMOTE CONTROL OVERVIEW
- (Turn ON / Switch to Standby mode)
- SOURCE (Select a play function)
- PAIR (Play/pause/resume playback / Activate the pairing function in Bluetooth mode and disconnect the existing paired Bluetooth device)
-
REPEAT Select repeat play modes.
-
SHUFFLE
-
Select shuffle play mode.
A-B Repeat a specific section within a track/chapter. -
TITLE (Access title menu)
- SUBTITLE (Select a subtitle language during video play)
- TIMER/SLEEP (Set the sleep timer / In standby mode, press and hold to set the alarm timer)
- CLOCK (In standby mode, press and hold to activate clock setup / Display current clock)
- MENU (Return to the upper-level menu / Back to the DVD root menu / Enable/disable the PBC menu for VCD)
- PRESET▼/ Navigate up/down through menus / Select a previous/ next preset station / Rotate a picture)
- Stop play / In FM mode, press and hold to erase radio stations memory)
- (Chip to previous/next title, chapter or track)
- Numeric keypad (0~9) (Select a title/ chapter/track / Choose the preset radio station)
- GOTO (During disc play, specify a position to start play)
- (Open / close disc compartment)
- SLOW (During video play, select a slow backward/ forward speed)
- OSD (Display the information about the currently playing disc)
- AUDIO (For VCD, select stereo, mono-left or mono-right channel / For DVD video, select an audio language)
- ZOOM (Zoom in/out image on screen)
- ANGLE (Select a camera angle to view video play)
- DIMMER (Adjust display brightness)
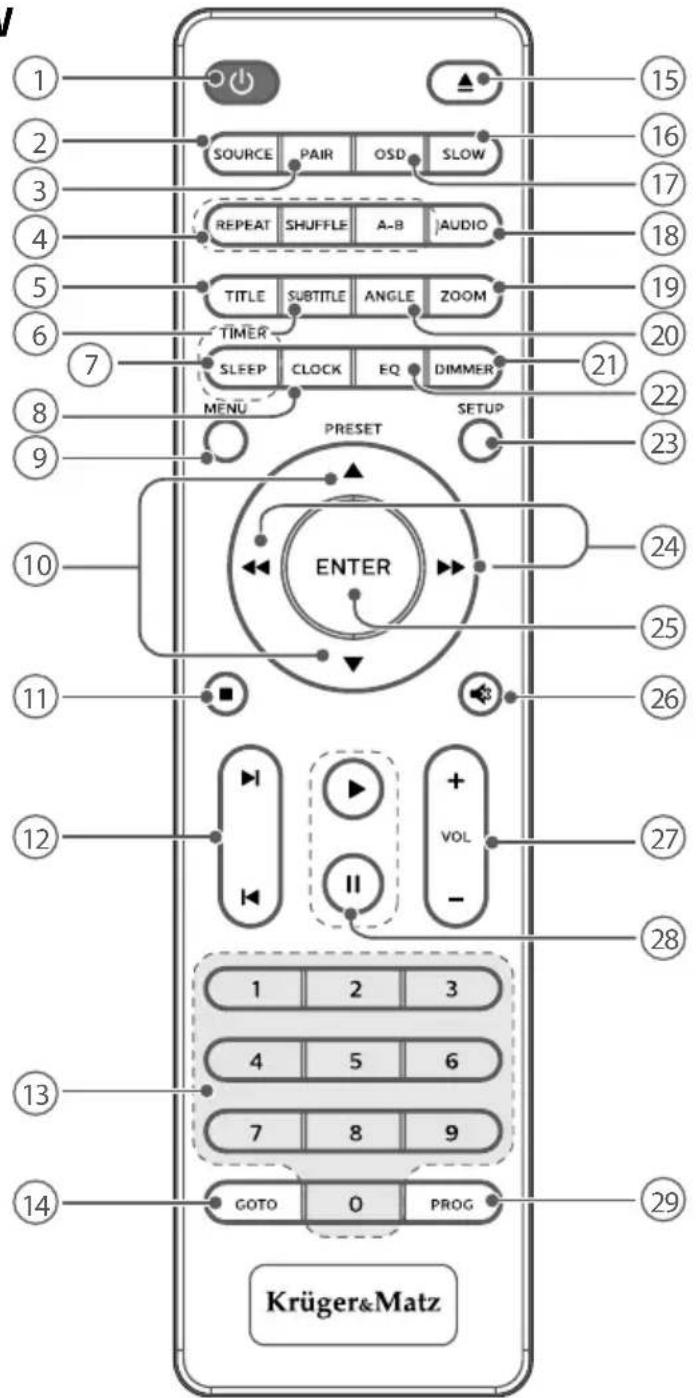
- EQ (Select the preset equaliser)
- SETUP (Access or exist system setup menu)
- /Search backward/forward within a track/disc / Navigate left/right through menus / Tune to a radio station / Rotate a picture)
- ENTER (Confirm selection)
- (Mute / resume the sound)
- VOL+/VOL-(Increase/decrease the volume level)
- (Hay/resume/pause playback)
- PROG (Programme sound tracks / Presets radio stations / Press and hold to scan for radio stations)
Installation of batteries
- Open the battery cover.
- Insert 2 AAA batteries with correct polarity (+/-) as indicated.
- Close the battery cover.
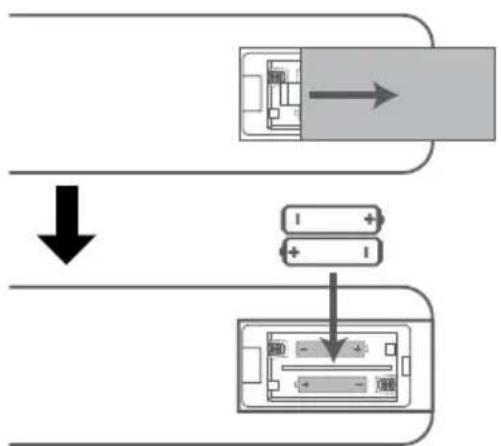
Handling the Remote Control
- Remove the batteries if the remote control is not going to be used for an extended period of time.
- To avoid possible failure, read the following instructions and handle the remote control properly.
- Do not drop or cause impact to the remote control.
- Do not spill water or any liquid on the remote control.
- Do not place the remote control on a wet object.
- Do not place the remote control under the direct sunlight or near sources of excessive heat.
- Do not use caustic cleaners (porcelain, stainless steel, toilet, or oven cleaner etc.) on the remote, as it may suffer damage.
Note:
Remove the battery from remote control handset when it is not to be used for a long period. Otherwise it can be damaged due to leakage of battery.

Remote Control Operation Range
Point the remote control to the unit no more than 6 meters from the remote control sensor and within 30^ horizontally and 30^ vertically of the front of the unit. The operating distance may vary according to the brightness of the room.
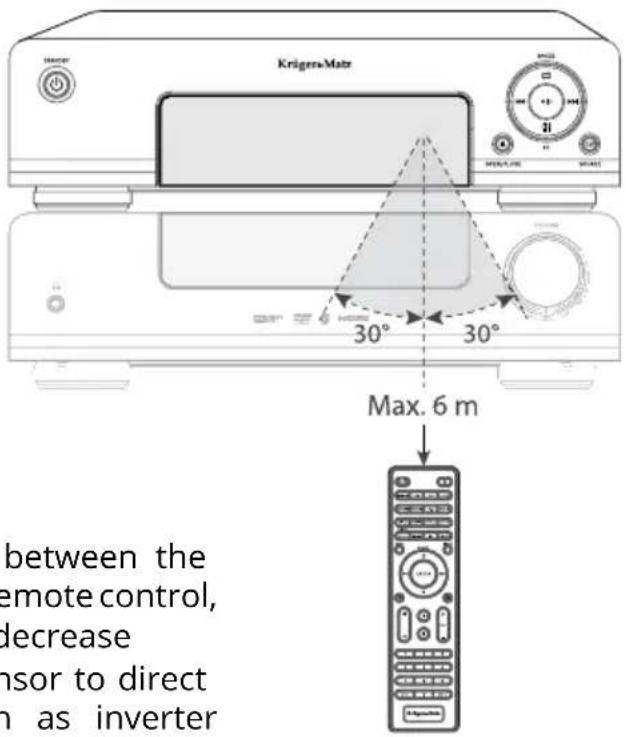
Note:
- Make sure that there is no obstacle between the infrared remote sensor of the unit and remote control, as the remote controllable range may decrease
- Do not expose the infrared remote sensor to direct sunlight or other strong light, such as inverter fluorescent light.
CONNECTIONS
Caution: Make all connections before plugging the unit into the AC Power outlet.
Connect Control Cable
Connect the control cable connector from the back of the DVD unit to the CONTROL CABLE jack on the back of the amplifier.

Connect to Speakers
Note:
- For optimal sound, use the supplied speakers only.
- Connect only speakers with impedance that is the same or higher than the supplied speakers. Refer to the Specifications section of this manual.
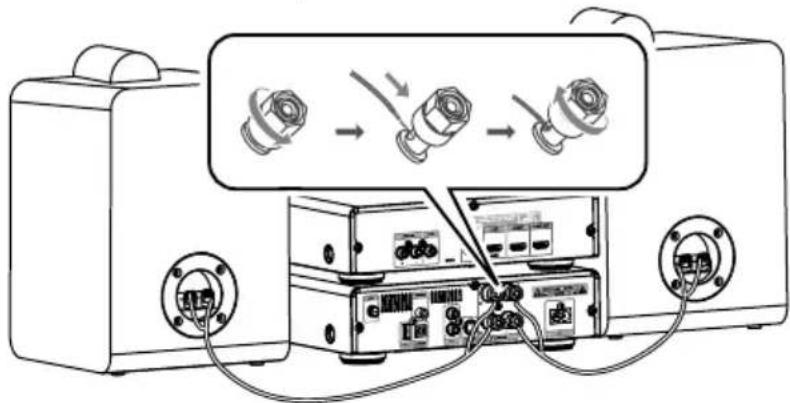
- Loosen the left / right speakers connector.
-
Use the speaker cable (included) to connect the speaker port on the left/right speaker.
-
Golden harness cable connect to the "+" (red connector) terminal
Silver harness cable connect to " - " (black connector) terminal -
Screw the red (+) / black (-) connector to secure the cable.
- Connect the speakers to the SPEAKER OUT (R/L) sockets on the rear of the main unit.
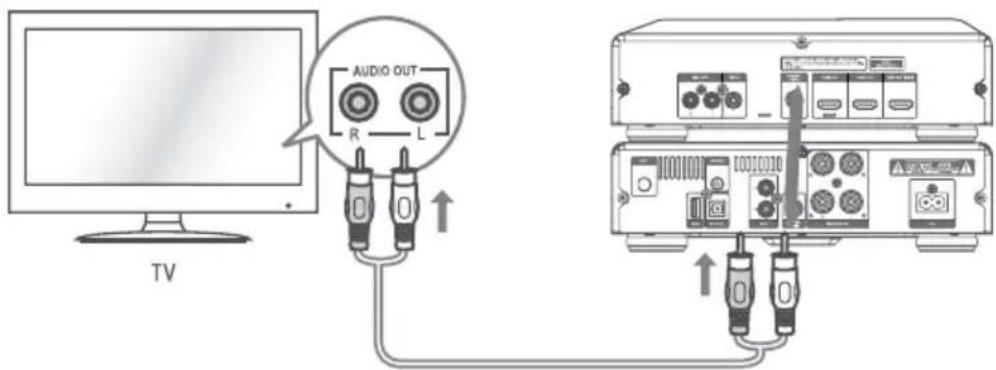
Connecting to the composite video socket
- Connect the composite video (YELLOW) cable to the VIDEO socket on this unit and the video input socket on the TV.
- Then Connect audio cables (RED/WHITE) to the AUDIO OUT R / L sockets on this unit and the audio input sockets on TV.

HDMI Socket
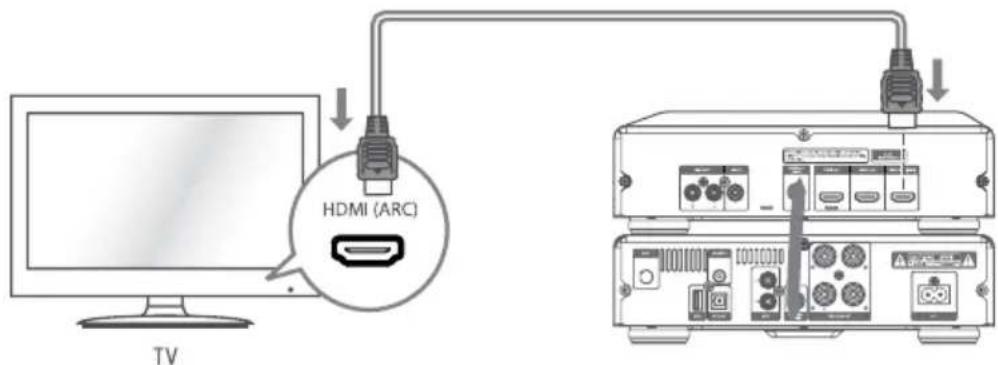
Method 1: ARC (Audio Return Channel):
-
This unit supports HDMI with Audio Return Channel (ARC). If your TV is HDMI ARC compliant, you can hear the TV audio through your unit by using a single HDMI cable.
-
To enjoy the ARC function, make sure your device HDMI OUT socket is connected by an HDMI cable to the HDMI OUT (ARC) socket of your ARC-compliant TV. Tips:
- Your TV must support the HDMI-CEC and ARC function. HDMI-CEC and ARC must be set to On.
- Only HDMI cables can support the ARC function.
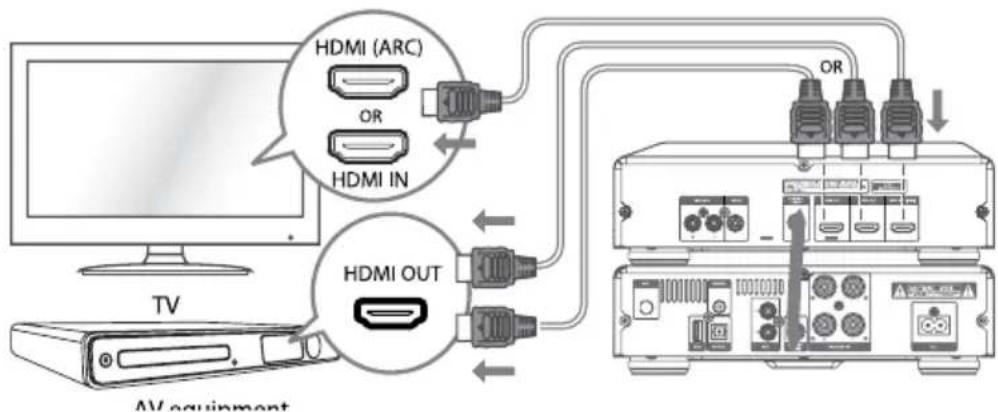
Method 2: Standard HDMI
If your TV is not HDMI ARC-compliant, connect your device to the TV through a standard HDMI connection.
- Use an HDMI cable (not included) to connect the device's HDMI OUT socket to the TV's HDMI IN socket.
- Use an HDMI cable (not included) to connect this device's HDMI IN (1 or 2) socket to your external devices.
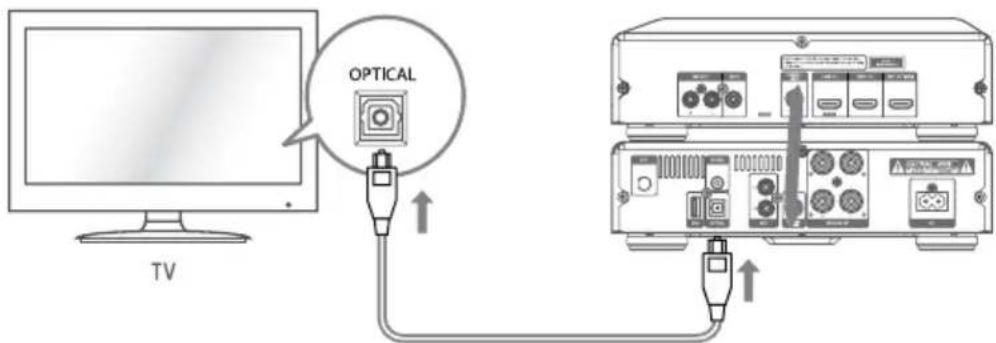
OPTICAL Socket
Connect an OPTICAL cable (not included) to the TV's OPTICAL OUT socket and the OPTICAL socket on the unit.
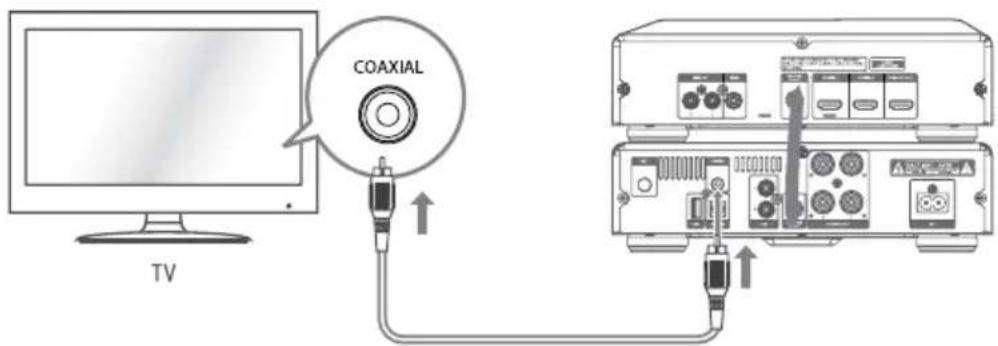
COAXIAL Socket
Use the COAXIAL (not included) cable to connect the TV's COAXIAL OUT socket and COAXIAL socket on the unit.
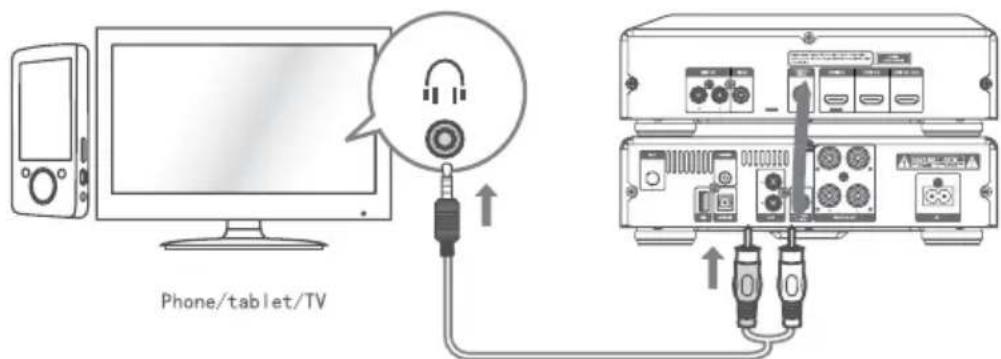
AUX Socket
Use an RCA to RCA audio cable (not included) to connect the TV's audio output sockets to the AUX (R L) socket on the unit.
Use a RCA to 3.5mm audio cable (included) to connect the audio player's headphone socket to the AUX (R L) socket on the unit.
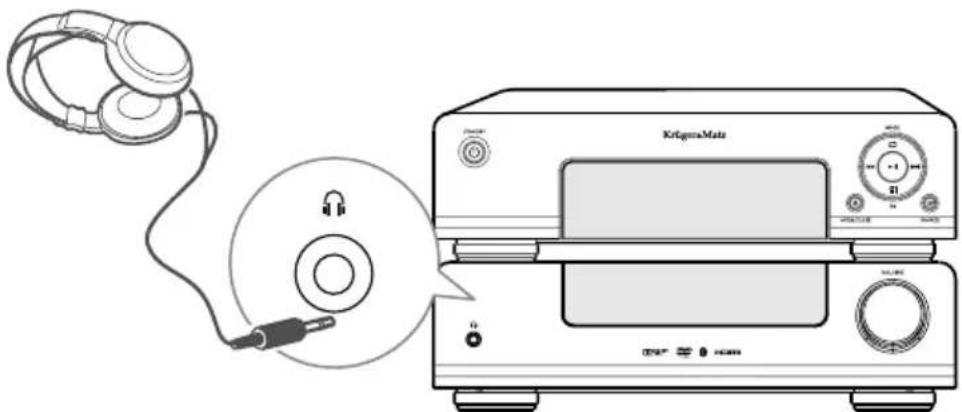
Connect to Headphone
Plug a headphone into the (Headphone) socket. When you connect headphones to hear the sound from the speakers.
乙
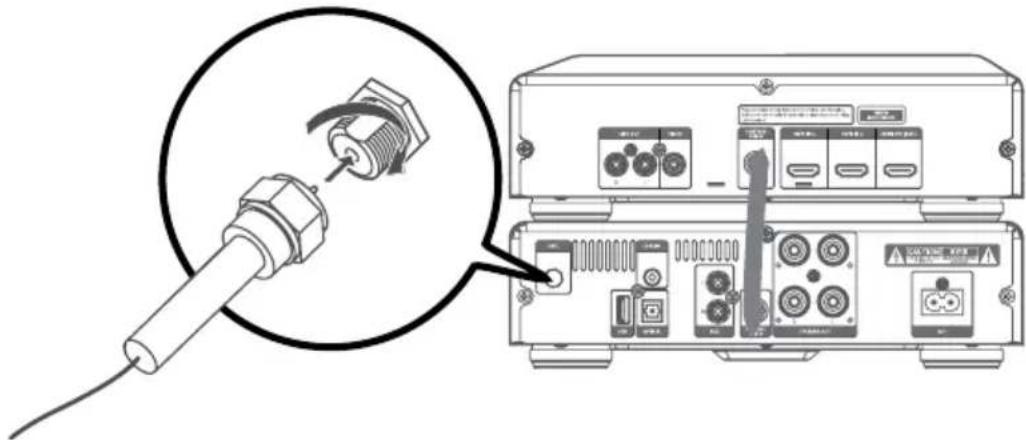
Connecting the FM/DAB Antenna
Connect the supplied FM/DAB Antenna to the ANT socket on the rear of the unit by turning the Antenna screw cap (as indicated).
Note: Do not overtighten, this could damage the Antenna.
Caution: To avoid noise, keep Antenna away from the unit, the connecting cable and the AC power cable.
Connect Power
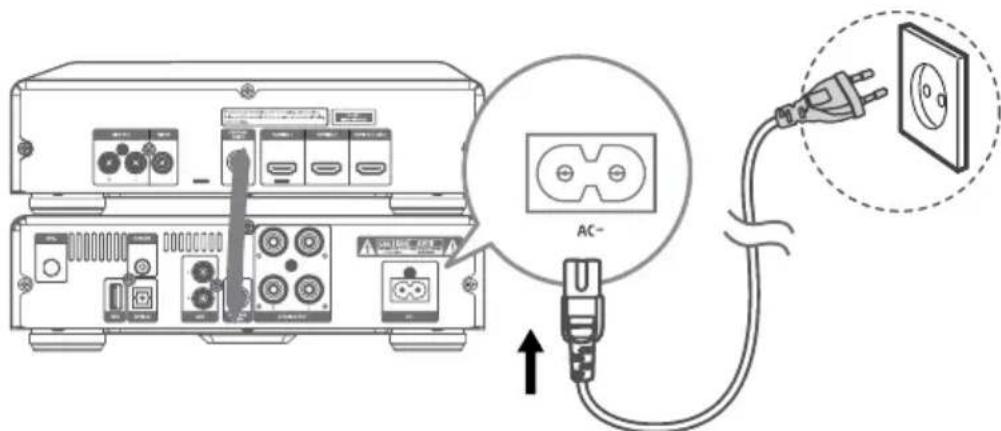
Risk of product damage! Ensure that the power supply voltage corresponds to the voltage printed on the back or the underside of the unit.
- Connect the power to the AC~ socket on the unit and a wall outlet.
- NOTE: Be sure to unplug the power cord from the outlet when the system is not in use for an extended period of time.
GENERAL OPERATION
Powering ON/OFF
When you insert the AC power cable into a wall outlet, the unit will be in standby mode.
- Press the STANDBY button to switch the unit on.
- Press the STANDBY button to switch the unit back to standby mode.
Disconnect the mains plug from the mains socket if you want to switch the unit off completely.
If there is no signal input under the DISC, USB, BT (Bluetooth), ARC, HDMI 1, HDMI 2, COAXIAL, OPTICAL or AUX mode, the unit will automatically switch off within 15 minutes.
SETTING THE CLOCK
Synchronization of the Clock
Note: by default, time is synchronized with RDS.
- When in STANDBY mode, press and hold the MENU button on the remote control to synchronise the clock.
-
Press the buttons on the remote to switch the clock synchronization modes:
-
RDS Only synchronize with the RDS radio station.
-
OFF Turn off the clock synchronization function, only adjust the clock manually.
-
Then press the ENTER button on the remote control to confirm.
Manual setting of the clock
- In STANDBY mode, press and hold CLOCK until "CLOCK SET" scrolls on the display.
- Press the / buttons on the remote control to adjust the hour digits while flashing, then press the CLOCK or ENTER button on the remote control to confirm, then the minute digits will flash.
- Press the buttons on the remote control to adjust the minute digits while flashing, then press the CLOCK or ENTER button on the remote control to confirm.
Note:
- Press the button on the unit or the button on the remote control to select 12/24 hour format.
- Each activated state will be cleared if any buttons are not pressed within 15 seconds.
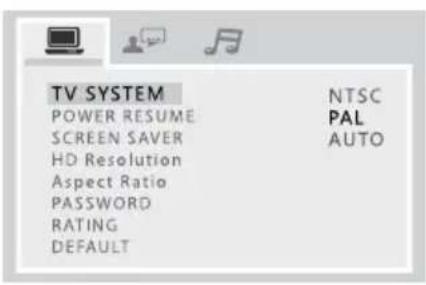
SELECT THE CORRECT TV SYSTEM
Change this setting if the video is not displayed correctly. By default, this setting matches the most common setting for TVs.
- Press the SETUP button to access or exit system setup menu.
Press the ,v, buttons and press the ENTER button to confirm selection.
- Select [video] -> [TV SYSTEM].
-
Select setting:
-
[PAL] - For TV with PAL color system.
- [AUTO] - For TV that is compatible with both PAL and NTSC.
- [NTSC] - For TV with NTSC color system.
SELECT MODES
Press the button on the unit or the SOURCE button on the remote control repeatedly to select DISC, USB, OPTICAL, FM, DAB, Bluetooth, AUX, COAXIAL, ARC, HDMI 1, HDMI 2 mode. The selected mode will show on the display.
Adjusting the Volume
To increase or decrease the volume, rotate the VOLUME control knob on the unit or press the VOL+/VOL- buttons on the remote control.
Mute sound
If you wish to turn the sound off, press the button on the remote control. Press the button again or press VOL+/- button to resume normal volume.
Presetting Equalizer
Press the EQ button repeatedly to scroll through the following options:
$$ F L A T > P O P > C L A S S I C > R O C K > J A Z Z $$
Changing the Front Panel Darkness
To dim or brighten the display, press the DIMMER button repeatedly on the remote control to the desired brightness.
PLAY FROM EXTERNAL AUDIO DEVICE
- Ensure that the unit is connected to the TV or audio device.
- While in ON mode, press the button on the unit or the SOURCE button on the remote control repeatedly to select the OPTICAL, COAXIAL, HDMI ARC, HDMI 1, HDMI 2 mode.
- Operate your audio device directly for playback features.
- Press the VOL +/- buttons to adjust the volume to your desired level. In the OPTICAL, COAXIAL, ARC, HDMI 1, HDMI 2 mode, if there is no sound output, ensure the audio setting of the input source is set to PCM mode.
DAB RADIO OPERATION
Caution:
- Make sure that you have correctly connected and fully extended the antenna.
-
You can program a maximum of 20 DAB radio stations.
-
Press the + button on the unit or the SOURCE button on the remote control repeatedly to select DAB radio.
- Press the MENU button on the remote control to display the DAB menu. Press the , buttons to select Full scan. Press the ENTER button to confirm.
Auto Scan
-
Press the MENU button on the remote control to enter the DAB menu. Then press the buttons to select the "FULL SCAN". Press the ENTER button on the remote control to confirm. The display will show "SCAN..."that indicates the progress of the scan and the amount of stations that have been found so far.
-
Alternatively directly press and hold the PROG button on the remote control to perform a full scan.
-
Once the scan has finished, the unit will display the total number of stations have been found and a list of the found stations. All the stations that have been found will be stored automatically.
To explore the found stations, press the buttons to the selected station.
- Full auto scan will not replace the DAB stations in memory. If you want to remove all the previously scanned stations, system reset is required.
Presetting Stations Manually
You can store up to 20 of your favourite DAB stations to the memory. This will enable you to access your favourite stations quickly and easily.
- To store a preset, you must first be listening to the station that you would like to save.
- Press the PROG button on the remote control. The display will show "## Empty", and the preset number will flash.
- Press the / buttons on the remote control to select your desired station preset number.
- Press the PROG button to confirm your station, the display will show "STORE".
Recalling a Preset Station
-
Once you have saved a station to one of the preset buttons, you can recall it by pressing the buttons on the remote control to select your desired preset number.
-
Preset number and station name will show on the display to indicate the preset station you are listening to.
-
The stored stations will be saved into the memory and power off will not erase it. Storing a new station in a preset location will erase the previously stored station in that location.
DRC (Dynamic Range Control)
Dynamic Range Control is an advanced technology that reduces the difference in volume between stations when switching stations.
- In DAB mode, press the MENU Button on the remote control and then press the , buttons to select "DRC". Press the ENTER button to confirm.
- Press the , buttons to select DRC HIGH, LOW or OFF. Press the ENTER button to confirm the setting.
System Reset
- In DAB mode, press the MENU button on the remote control and then press the buttons to select "SYSTEM". Press the ENTER button on the remote control to confirm.
- Press buttons on the remote control to select "RESET". Press the /PAIR button on the remote control to confirm. The display will show "RESET N". Press the buttons on the remote control to select "RESET Y". Press the ENTER button on the remote control to confirm. The display will show START and then WELCOME. The unit will perform a full scan and the display will show "Scan ..."
DAB Information Display
You can view the DAB service information in the following modes. Depending on the DAB radio station you are tuning to, some information modes may be unavailable. Repeatedly press the OSD button on the remote control to view the following information.
DLS
Dynamic label segment is a scrolling message that the broadcaster may include with their transmissions. The message usually includes information, such as programme details etc.
Note: DAB – unlike normal radio, groups together several radio stations and transmits them on one frequency.
- Singal strength
The display will show a slide bar to indicate the signal strength, the stronger the signal, the longer the bar will be from left to right.
Programme type
- Ensemble name
A multiplex is a collection of radio stations that are bundled and transmitted on one frequency. There are national and local multiplexes. Local ones contain stations that are specific to that area.
- Channel number
Frequency
- Error in signal
A number showing the error rate. If the number is 0, it means the signal received is error free and the signal strength is strong. If the error rate is high, it is recommended to reorient the radio aerial or reposition the unit.
Audio mode
Stereo/Mono
- Clock (if not available, the display will show incorrect time)
- Date (if not available, the display will show incorrect date)
FM RADIO OPERATION
Note:
- Before operating the radio, please check that the antenna is correctly connected and adjusted for length and direction.
- You can program a maximum of 20 FM radio stations
Auto Scan and Save Preset Station
- Press the button on the unit or the SOURCE button on the remote control repeatedly to select TUNER mode.
-
Press and hold the PROG button on the remote control to activate automatic programming. All available stations are programmed in the order of waveband reception strength.
-
The first programmed radio station is played automatically.
-
Tune to a Preset Radio Station
-
Press the PRESET / buttons to select a preset number that you want.
Tuning in a Station
-
Tune in radio stations automatically
-
Press and hold the 按钮 on the unit, the frequency changes down or up automatically until a station is found.
-
The search may not stop at a station with a very weak signal.
-
Tune in radio stations manually
-
Press the buttons repeatedly until you find the station you want.
- If reception is still poor, try to adjust the position of the aerial or try to move the radio to another location.
Presetting Stations Manually
You can preset up to 20 FM stations.
- Tune in the desired station, then press the PROG button.
- Press the or number (0~9) buttons to select the preset number.
- Press the PROG button to store the station.
- Repeat above steps 1 to 3 for each station you want to store in memory with a preset number.
RDS RECEPTION
Every time you press the OSD button, the display will cycle through the following display modes: Station Name, Programme Type, Radio Text, Frequency, CLOCK INFO. Note:
RDS information will be displayed only if available
- When automatic programming is used, RDS stations are programmed first.
DISC OPERATION
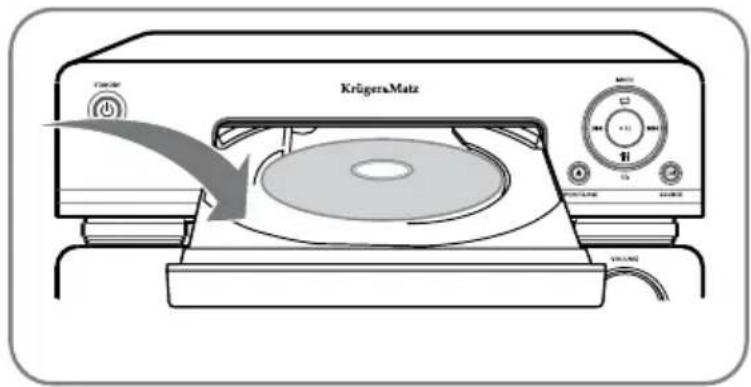
- While in ON mode, press the button on the unit or the SOURCE button on the remote control repeatedly to select DISC mode.
- Press the button to open the disc door and place the disc on the disc tray (with the printed side up).
- Press the button to close the disc door, the unit will read the disc and play it automatically.
Note: If the playback does not start automatically, select a title/chapter/track and then press the button.
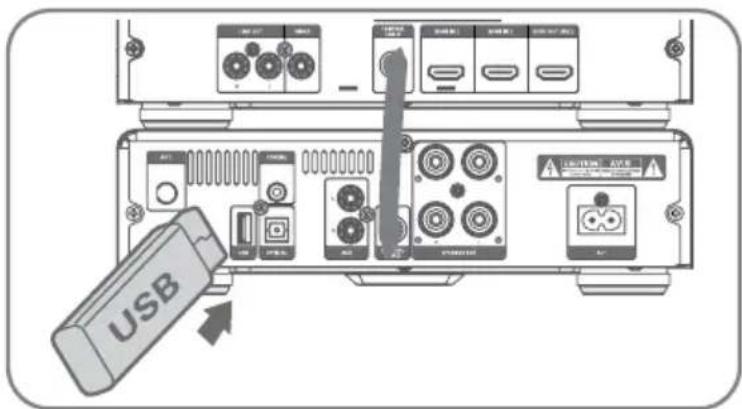
USB OPERATION
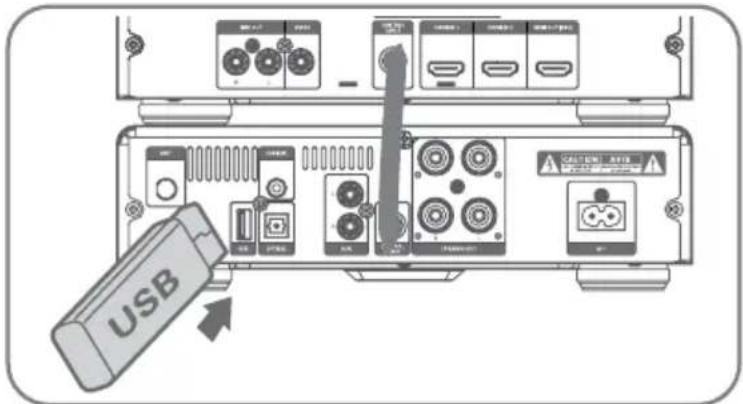
- Insert the USB device's USB plug into the USB socket.
- Press the USB button on remote control or button on the unit to select the USB source.
- Playback starts automatically. If the playback does not start automatically, select a title/chapter/track and then press the button
USB Storage Device Data Protection
- Always insert the USB device in the correct direction. Failure to do so may result in damage to the USB device and this unit.
- Do not remove the USB device while it is being accessed.
- Electrical interference and electrostatic discharges may cause the USB device to malfunction and suffer damage, resulting in data loss.
It is strongly recommended that any important data is backed up on a PC to protect against corruption, data loss or device malfunction. Please note that our company shall not accept any liability for damage or loss of stored data.
Note: USB connection may not compatible with all hard drive models.
Play Control
- To stop play, press the button on the remote control.
- To pause or resume play, press the button on the unit or the button on the remote control.
- To skip to the previous/next track, press the K / K buttons on the unit or K/ K buttons on the remote control.
- Press and hold the , buttons on the remote control to perform fast forward/ reverse playback. Press the button to resume normal playback.
- Press the OSD button on the remote control to display the current play information.
Slow backward/forward play
- During video play, press SLOW button to select a slow backward speed.
The sound is muted. - To resume play at normal speed, press the button.
Random Playback
During play, press the SHUFFLE button, unit will randomly play the song.
Select Repeat Play Options
During play, press the REPEAT button repeatedly to select a repeat option play mode. The selected mode will show on the display:
RPT ONE - Repeat current track.
RPT ALL - Repeat all tracks.
RPT OFF - Repeat turned off.
Repeat A-B (DVD/VCD/CD/MP3/WMA)
- During music or video play, press the A-B button at the start point.
-
Press the A-B button at the end point.
-
The selected section starts to play repeatedly.
- To cancel repeat play, press the A-B button again.
Note: The section A and B can be set only within the same track/title.
Select an Audio Language
During disc play, press the AUDIO button to select an audio language on video DVDs.

- The language options appear. If the selected audio channels is unavailable, the default audio channel is used.
- For some DVDs, the language can only be changed from the disc menu. Press the MENU button to access that menu.
Display Menu
In DVD play mode, press the TITLE button to go back to the title menu during PBC playback.
Select a Subtitle Language
- During playing, press the SUBTITLE button to select a subtitle language on DVDs.
- For some DVDs, the language can only be changed from the disc menu. Press the MENU button to access that menu.
Select a Camera Angle
During play, press ANGLE button repeatedly to select a camera angle.
- This feature is only available for DVDs recorded with multiple camera angles.
Zoom in/out image
During video/picture play, press the ZOOM button to zoom in/out the image.
- When the image is zoomed in, press , , , buttons to go across the image.
Use the Disc Menu
When you load a DVD/(S)VCD disc, a menu may be displayed on the TV screen.
To access or exit the menu: Press the MENU button.
- For VCD with PlayBack Control (PBC) feature (version 2.0 only): The PBC feature allows you to play VCD interactively according to the menu screen. During playing, press the MENU button to enable/disable PBC.
- When PBC is enabled, the menu screen is displayed.
- When PBC is disabled, normal play is resumed.
Search by Time or Chapter/Track Number
-
During the DVD/VCD playback, press the GOTO button to access quick menu:
-
For the Track/Title/Chapter field, enter the track/title/chapter number.
-
For the Disc time/Track time/Title time/ Chapter time, enter the play position in hours, minutes and seconds.
-
Use numerical (0~9) buttons to input title/chapter/ track number and disc/track time.
- Press ENTER button to confirm a selection. Play starts automatically at your selected point.
Programme Play
You can programme up to 20 tracks to play in any desired order. The player must be in STOP mode only with a Disc inserted.
- Insert a disc and press the STOP button when it starts playing.
- Press the PROG button.
- Press the number buttons (0-9) or buttons on the remote control to select the desired track number.
- Press the PROG button to confirm the track number to be stored.
- Repeat steps 3-4 to select and store all desired tracks.
- Press the button to start programme play.
- Press the button twice or open the disc compartment to clear programme. The display shows "PRG CLR".
PLAY FROM BLUETOOTH DEVICE
Pairing bluetooth-enabled devices
To connect your Bluetooth device to the unit, you need to pair the device to the unit. Pairing needs to be done only once.
- Press the button on the unit or the SOURCE button on the remote control repeatedly to select Bluetooth mode. "NO BT" will show on the display if the unit is not paired to any Bluetooth device.
-
The system has entered pairing mode.
-
press the "PAIR" button on the remote control or press and hold the button on the unit to be searchable. The display will show "PAIR".
-
Turn on the Bluetooth function on your device.
- Search for other Bluetooth device with your device.
- Select "KM1908" in the pairing list.
- Enter default password "0000" if necessary.
- Start music play on your Bluetooth device, you can use this unit's remote to control the function to your Bluetooth device.
#
Note:
- The device will also be disconnected when the device is moved beyond the operation range.
- If you want to reconnect the device to the unit, place it within the operational range.
- The operational range between this unit and a Bluetooth device is up to 8 meters.
- Compatibility with all Bluetooth devices is not guaranteed.
- Any obstacle between this unit and a Bluetooth device can reduce the operational range.
- Keep this unit away from any other electronic device that may cause interference
- If a connection exist, press the "PAIR" button on the remote control or press and hold the button on the unit to re-activate the pairing mode, the connection will be interrupted.
- If no other Bluetooth device pairs with this player within two minutes, the player will recover its previous connection.
-
When connected to an external device, the display shows "BT".
-
If the connected Bluetooth device supports Advanced Audio Distribution Profile (A2DP), you can listen to the music stored on the device through the player.
-
If the external device supports Audio Video Remote Control Profile (AVRCP), you can use the player's remote control to play music stored on the device.
SET SLEEP TIMER
This unit can switch to standby mode automatically after a set period.
When the unit is turned on, press TIMER/SLEEP button repeatedly to select a preset period (in minutes):
120 > 90 > 60 > 30 > 15 > 00
-
Press the TIMER/SLEEP button to view the remaining time before switch off.
-
To deactivate the sleep timer, press TIMER/SLEEP button repeatedly until [SLEEP 00] is displayed.
SET THE ALARM TIMER
This unit can be used as an alarm clock. You can select DISC, USB, DAB or TUNER as alarm source.
-
In standby mode, press and hold the TIMER/SLEEP button until [TIMER SET] scrolls on the display. Then the hour digits flash.
-
Press button on the remote control to adjust the hour digits, and then press the TIMER button on the remote control to confirm, the minute digits will flash on the display.
-
Press the [n]n buttons on the remote control to adjust the minute digits, and then press the TIMER/SLEEP button on the remote control to confirm.
-
Press the buttons on the remote control to select:
TUNER (to wake to your selected FM Radio Station)
DAB (to wake to your selected DAB Radio Station)
DISC (to wake to your Disc music)
- USB (to wake to your USB music)
Press the TIMER/SLEEP button on the remote control to confirm, the display will show the volume level.
- Press the / buttons on the remote control to adjust the volume, and then press the TIMER/SLEEP button on the remote control to confirm. "TMR ON / TMR OFF" will flash on the display.
- Press the buttons to select "TMR ON" or "TMR OFF" to enable the timer or to disable the time, and then press the TIMER/SLEEP button on the remote control to confirm.
Press the TIMER/SLEEP button on the remote control to view the alarm settings or activate the alarm.
Note:
Each enabled state will be cleared if a button is not pressed within 15 seconds.
- When the alarm rings, press the button on the remote control or on the unit. The alarm stops but the alarm settings remain.
SETTING ADJUSTMENTS
Most settings and adjustments are required to be set when you first use the unit. Settings adjustment is available after connecting this device to TV set via HDMI cable.
Press the SETUP button to access or exit system setup menu. Press the / , / buttons and press the ENTER button confirm selection

| TV SYSTEM AUTO: | For TV that is compatible with both PAL and NTSC. NTSC: For TV with NTSC color system. PAL: For TV with PAL color system. |
| POWER RESUME | ON: Select this to make last memory function available for DISC. OFF: Select this to make last memory function invalid. |
| SCREEN Saver ON: | The screen saver starts up if nothing is played back and no operations are performed for 4 minutes. OFF: The screen saver does not start up. |
| HD Resolution The resolution options include AUTO, 480i/576i, 480p/576p,720p, 1080i, 1080p. Note: If no display appears on the TV screen due to unsupported resolution, reconnect any available interlace video output to your isplay and re-adjust the resolution settings to 480p/576p. | |
| Aspect Ratio To a | void distortion on older televisions, you may need to change the way in which the image is displayed. Televisions use a 4:3 aspect ratio; high-definition televisions use 16:9 aspect ratio (as do movies).Some discs do not allow the aspect ratio to be changed and you will therefore have to change the aspect ratio on the TV.[4:3PS]: This mode is used with 4:3 televisions. 4:3 images are displayed normally. When showing 16:9 programmes, the full height of the screen is displayed, and the left and right part of the image are cut off.[4:3LB]: This mode is used with 4:3 televisions. 4:3 images are displayed normally. 16:9 images are visible at their full width, but there are blank area at the top and bottom of the screen.[16:9]: Use with a 16:9 wide television.Some wide-screen discs that do not permit the Pan Scan mode playback are automatically played in Letter Box mode.Depending on the DVD, 4:3 Letter Box may be selected automatically instead of 4:3 Pan Scan and vice versa.If 16:9 (Wide) is selected and a normal TV is connected, 16:9 content will appear distorted during playback (objects look thin). |
| PASSWORD You can set a new password for parental control. | |
| RATING Playback of some DVD discs can be limited depending on the age of the users. The parental control system allows the playback limitation level to be set by the parent.The lower the level, the stricter the limitation.If the rating of the loaded DVD disc is higher than the level you set, the system will require a password. Enter your password and press the ENTER button to start playback. | |
| DEFAULT All the items in the Setup menu (except for the password and parental control) will be reset to the default settings. | |
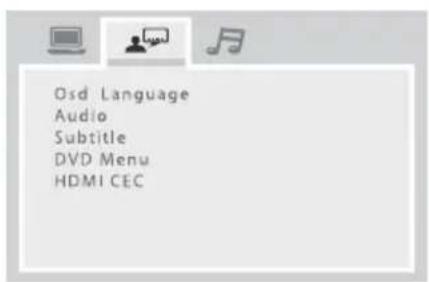
| OSD Language Select the desired language for on screen menus of the unit. | |
| Audio SubtitleDVD MenuYou can select a preferred language for audio, subtitle and disc menu.When you select a preferred language that is not recorded on the DVD, one of the recorded languages is automatically selected.You can override the Audio setting in the Setup menu by pressing the AUDIO button on the remote control unit while a DVD disc is playing.You can override the Subtitle setting in the Setup menu by pressing the SUBTITLE button on the remote control while a DVD disc is playing. | |
| HDMI CEC You can use one single remote control to control all HDMI CEC devices that connected via HDMI connection.ON: Enable HDMI-CEC feature. OFF: Disable HDMI-CEC feature. | |
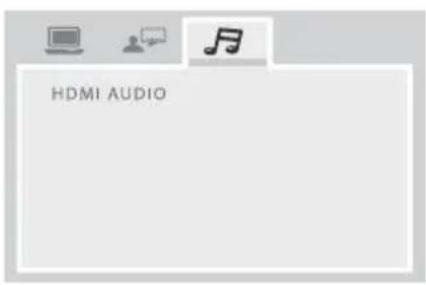
| HDMI AUDIO AUTO: Detect and select the best supported audio format automatically.PCM: Multi-channel audio format will be down-mixed to two channel sound. | |
TROUBLESHOOTING
If you are having a problem with your system, check this list for a possible solution before calling for service.
If you can not solve the problem from the hints give here, or the system has been physically damaged, call a qualified person, such as your dealer, for service.
No power
- Ensure that the AC adaptor plug of the unit is connected properly.
- Ensure that there is power at the AC outlet.
USB device not supported
The USB device is incompatible with the unit. Try another one.
Timer does not work
- Set the clock correctly.
- Switch on the timer.
Cannot display some file in USB device
- The number of folders or files in the USB device has exceeded a certain limit. This phenomenon is not a malfunction.
- The formats of these files are not supported.
No disc detected
- Insert a disc.
- Check if the disc is inserted with the print side facing inward.
- Wait until the moisture condensation at the lens has cleared.
- Replace or clean the disc.
- Use a finalized Disc or correct format disc.
Poor radio reception
- Increase the distance between the unit and your TV or VCR.
- Fully extend and adjust the FM antenna.
Remote control does not work
- Reduce the distance between the remote control and the unit.
- Insert the battery with its polarities (+/- signs) aligned as indicated.
- Replace the batteries.
- Aim the remote control directly at the sensor on the front of the unit.
乙
No sound
Adjust the volume.
PROTECT THE DISC
- To keep the disc clean, please don't touch the disc's surface when you are holding it. You should hold the edge.
- If the disc is dirty, it will affect the sound quality. Please use the clean and soft cloth to wipe the disc from inside to outside. Don't wipe the disc in circular motion.


- Don't stick paper on the disc.
- After you have finished with the disc, please place it back in its original case. To avoid warping or damage, do not stack discs.
- Don't play the disc which has flaw or deformation, in case of damaging this player.
- Clean your discs using only a soft dry cloth. Do not use any chemicals such as benzine, thinner, antistatic or record sprays as these can damage the disc surface.
SPECIFICATIONS
DVD player
Bluetooth 3.0
FM radio
DAB+ digital radio
Max. output power: 2 × 80 ~W
Frequency response: 45Hz - 20kHz
Impedance: 3 Ω
THD: 1% (1 kHz, 1 W)
I/O:
HDMI ARC output
2x HDMI input
USB port
Coaxial input
Optical input
AUX input (2x RCA)
Audio output (2x RCA)
Video output (1x RCA)
Remote Control
Power consumption: 55 W
Power consumption in standby mode: < 0.5W
Power supply: 220-240 V; 50/60 Hz
LEARN MORE
For more information on this product, go to www.krugermatz.com.
Visit www.krugermatz.com website for more products and accessories.
In case of any doubts or questions reach out to our Frequently Asked Questions section.
Specifications are subject to change without prior notice.

"The Lechpol Electronics company declares that product KM1908 is consistent with the essential requirements and other relevant provisions of directive 2014/53/UE. The proper declaration for download from www.lechpol.eu"
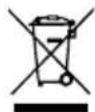
English Correct Disposal of This Product (Waste Electrical & Electronic Equipment)

(Applicable in the European Union and other European countries with separate collection systems) This marking shown on the product or its literature, indicates that It should not be disposed with other household wastes at the end of its working life. To prevent possible harm to the environment or human health from uncontrolled waste disposal, please separate this from other types of wastes and recycle it responsibly to promote the sustainable reuse of material resources. Household users should contact either the retailer where they purchased this product, or their local government office, for details of where and how they can take this item for environmentally safe recycling. Business users should contact their supplier and check the terms and conditions of the purchase contract This product should not be mixed with other commercial wastes for disposal.
Made in China for LECHPOL ELECTRONICS, 1 Garwolinska Street, 08-400 Mietne.
Avant l'utilisation
CLASS1 LASER PRODUCT
Noter :
Alimentation on /off

telecommandepourapprover.
THD: 1% (1 kHz, 1 W)
Entrée/Sortie:
Sortie HDMI ARC
2x EntreHDMI
Port USB
Entree coaxial
Entrée optical
Entree AUX (2x RCA)
Sortie Audio (2x RCA)
Sortie video (1x RCA)
Telecommande
Consommation electrode: 55 W
$$ F L A T > P O P > C L A S S I C > R O C K > J A Z Z $$
THD: 1% (1 kHz, 1 W)
Wejscia/wyjsca:
WyjscieHDMIARC
2x wejscie HDMI
Port USB
Wejscie coaxial
Wejscie optyczne
CLASS1 LASER PRODUCT
Metoda 1: ARC (Audio Return Channel):
THD: 1% (1 kHz, 1 W)
Intrare/lesire:
lesire HDMI ARC
2x Intrare HDMI
Port USB
Intrare coaxiala
Intrare optica
Intrare Auxiliara (2x RCA)
lesire Audio (2x RCA)
lesire Video (1x RCA)
Telecomanda
Consum: 55 W
Consum in modul de asteptare: < 0.5 W
Alimentare: 220-240 V, 50/60 Hz
MAI MULTE INFORMATII
Krüger&Matz is a registered trademark