
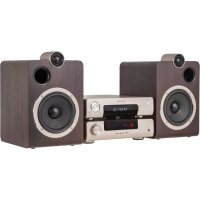
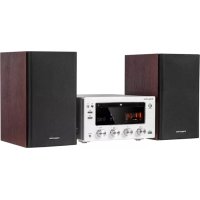
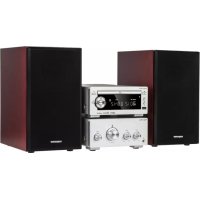
KM1961 - Hi-fi system Krüger&Matz - Free user manual and instructions
Find the device manual for free KM1961 Krüger&Matz in PDF.

| Product Type | Hi-Fi system (Hi-Fi chain) |
| Brand | Krüger&Matz |
| Model | KM1961 |
| CD player | Yes, with track programming |
| FM / DAB+ radio | FM and DAB+, automatic and manual search, 20 FM presets, 23 DAB+ |
| Bluetooth connectivity | Bluetooth with NFC, range 8 m, password 0000 |
| USB port | Play audio files from USB stick or card reader |
| AUX input | 3.5 mm jack socket |
| RCA input | Audio In L/R |
| Headphone output | 3.5 mm jack |
| Tube preamplifier | Yes |
| Remote control | Yes, with CR2025 battery |
| Dimensions (speaker) | 160 x 202 x 244 mm |
| Power supply | 230 V AC (check label) |
| Alarm function (Timer) | Yes, adjustable to CD, USB, radio or Bluetooth |
| Equalizer | P-EQ presets (classic, rock, pop, jazz, etc.) |
| Bass adjustment | S-BASS button for bass boost |
| Loudness function | Yes |
| Auto standby mode | After 15 minutes of inactivity (except radio/Bluetooth) |
| Sleep timer | Yes, adjustable (time before standby) |
| Cleaning | Soft cloth slightly damp, no detergent |
| Safety | Read the manual, do not expose to water or heat sources |
Frequently Asked Questions - KM1961 Krüger&Matz
User questions about KM1961 Krüger&Matz
0 question about this device. Answer the ones you know or ask your own.
Ask a new question about this device
Download the instructions for your Hi-fi system in PDF format for free! Find your manual KM1961 - Krüger&Matz and take your electronic device back in hand. On this page are published all the documents necessary for the use of your device. KM1961 by Krüger&Matz.
USER MANUAL KM1961 Krüger&Matz
ANSCHLIESSEN
natural_image
Line drawing of an electrical outlet connected to a power plug, showing internal components and wiring (no text or symbols)BETRIEB
Eln / Ausschalten
Owner's manual Owner's manual
Krüger&Matz
SAFETY INSTRUCTIONS
Read this instruction manual and keep it for future reference. Producer does not take responsibility for damages caused by inappropriate handling and use of the product.
- Place the device on flat, stable surface.
- Do not place heavy objects on the device.
- Do not place anything in speakers interior.
- Do not place the device in close proximity to heat sources, such as radiators etc. Do not place the device on unstable surfaces.
- Position the device in a properly ventilated place. Do not obstruct ventilation by covering ventilation openings.
- Protect this device from humidity, water and other liquid. Avoid using/storing it in extreme temperatures. Do not expose it to direct sunlight and other sources of heat.
- Before connecting the device to power supply socket, make sure the voltage indicated on the appliance corresponds to the voltage in the power supply socket.
- Keep the volume at a reasonable level throughout entire time of using the speaker. To prevent damage to your hearing, do not raise the volume too high.
- If you experience tinnitus, discomfort or other concerning behaviors, stop using the device immediately.
- Make sure, that the device is placed away from electrical devices that generate
- Disconnect from power outlet if the device is not going to be used for a long time.
- Do not handle this device with wet hands.
- Do not use this device if it has been damaged.
- Do not attempt to repair this device yourself. In case of damage, contact authorized service point for check-up or repair.
- Always disconnect the product from the power source before cleaning.
- Clean this device with a soft, slightly damp cloth. Do not use any chemical agents to clean this device.
- When disconnecting the power cord, grasp and pull the plug, never the cord.
- Protect the power cord from being walked on or bent particularly at plug plugs and exiting from the apparatus.
MAIN UNIT DESCRIPTION
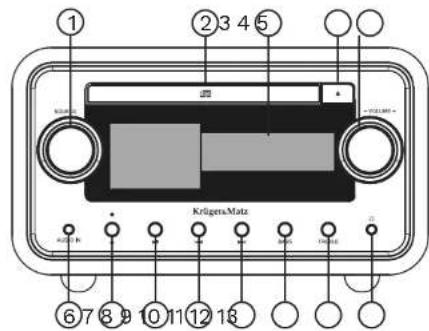
- Mode change knob
- CD drive
- Display
- Eject the tray from the disk drive button
- Volume knob
- Audio input (3,5 mm)
- Power button
- Play / pause button
-
Previous track button
-
Next track button
- BASS button
- TREBLE button
- 3.5 mm audio jack output
- Power socket
- RCA input
- USB port
- Antenna DAB / FM input
- AUX input
Krüger&Matz
Owner's manual Owner's manual
Krüger&Matz
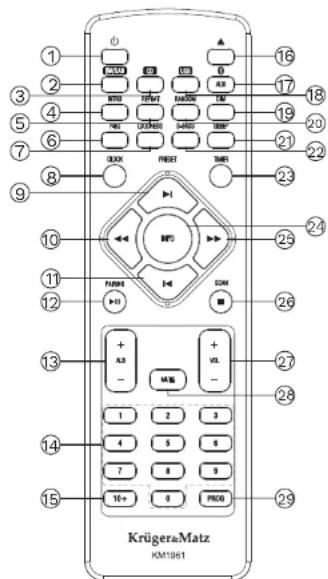
REMOTE DESCRIPTION
-
Standby button
-
FM / DAB+ radio button
-
CD player button
-
Intro button (In USB and CD mode, press to play only the first 10 seconds of each track)
-
Repeat button (Press to loop through one track, whole folder, or turn this option off)
-
Equalizer button (Select the preset equalizer)
-
Loudness button
-
Clock settings button
-
Next track button
-
Back button
-
Previous track button
-
Play / pause / pairing button
-
Next / previous album
-
Numeric keypad (Select track / saved radio station)
-
Select a number greater than 9 (Press this button and then one of the numeric keypad buttons to dial a number greater than 9)
-
Open / close disc compartment
-
Bluetooth, AUX and Audio mode button (keep pressing to change between modes)
-
USB mode button
-
DIM button (Adjust display brightness)
-
Random playing
-
Timer button
-
Enhanced bass button
-
Alarm clock
-
Information display selection button during song playback (press to switch between elapsed song time, remaining song time, remaining album time)
-
Forward button
26.STOP / SCAN button
- Volume buttons
28.Mute button
29.Radio preset button
BATTERY INSTALLATION
- Unscrew the screw at the back of the remote control.
- Remove the insulating mylar strip from the battery if the battery is being used for the first time. It is located at the bottom back side of the remote control.
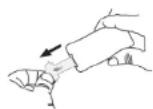
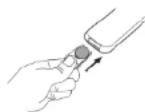
- Pull out the battery compartment with your fingernails.
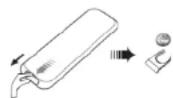
- Replace a new battery (size 2025) correctly and fully insert the battery compartment back to the original position.
Caution:
- Remove the batteries if the remote control is not going to be used for an extended period of time.
- To avoid possible failure, read the following instructions and handle the remote control properly.
- Do not drop or cause impact to the remote control.
- Do not spill water or any liquid on the remote control, nor place it on wet surfaces.
- Do not place the remote control under the direct sunlight or near sources of heat.
- Clean this remote control only with soft, slightly damp cloth.
Remote Control Operation Range
- Point the remote control towards the remote sensor IR of the front of the unit.
- Make sure that there is no obstacle between the infrared remote sensor of the unit and remote control.

Krüger&Matz
Owner's manual Owner's manual
Krüger&Matz
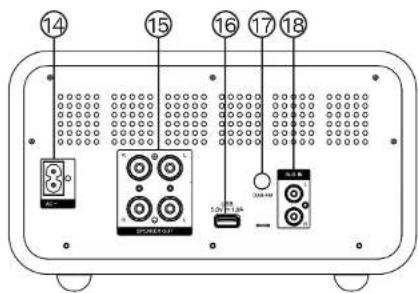
CONNECTING
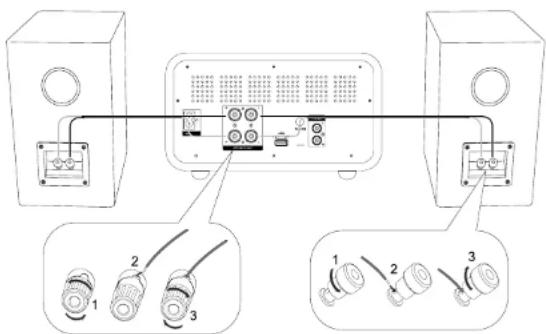
Connecting speakers
- To connect the speakers, slightly unscrew the nuts on the sockets on the back of the main unit.
- Insert the stripped part of the wire completely. The right speaker cables should be connected to the "R" socket, the left speaker cables to the "L" socket, making sure that the cables connected to the central unit are connected to the speakers in the same way (red socket on the central unit to the red socket on the loudspeaker, black in the same way as red)
- Tighten the socket nuts firmly so that the inserted wires do not fall out.
Connecting external device
- To connect an external device to the KM1961 hi-fi system using an RCA cable (not included), connect the cable to:
• the AUDIO IN (L&R) sockets on this unit.
- the audio output sockets on the external audio device
-
Connect an AUX IN (3,5 Jack) cable to:
-
the AUX IN socket on this unit.
• the headphone socket on the external audio device
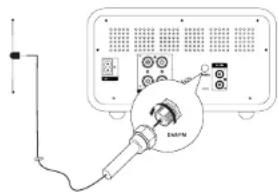
Connecting FM/DAB antenna
- Connect the FM / DAB antenna to FM radio socket at the back of the unit.
- If connection is poor, connect the outside antenna.
Caution: To avoid noise, keep antennas away from the system, the connecting cord and the AC power cord.
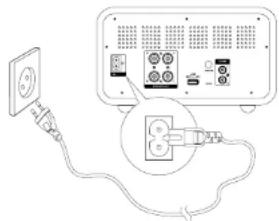
Connecting to power supply
Caution:
- Ensure that the power supply voltage corresponds to the voltage printed on the back or the underside of the unit.
- Before connecting the AC power cord, ensure you have completed all other connections.
natural_image
Diagram showing a power outlet connected to an electronic device with a plug inserted (no text or symbols visible)OPERATION
Turn on / off
Press STANDBY button to turn the unit on. The device will switch to the last selected source.
Standby mode
Press and hold STANDBY to switch the unit to Eco Power standby mode. The red Eco Power indicator turns on.
Note: After 15 minutes of inactivity, the device will automatically enter standby mode (except FM / DAB radio and Bluetooth mode with connected external device).
Sleep timer
This unit can switch to standby mode automatically after a set period.
- When the unit is turned on, press SLEEP button repeatedly to select a preset period (in minutes)
- To deactivate the sleep timer, press SLEEP button repeatedly until [OFF] (sleep off) appears.
Krüger&Matz
Owner's manual Owner's manual
Krüger&Matz
Setting the clock
- In standby mode, press and hold CLOCK button to activate the clock setting mode.
- Use the track change buttons to select the desired value.
- Press CLOCK button on the remote to go to next option.
Adjusting the Display Brightness
In standby mode, press the DIM button to select brightness level.
PLAY FROM BLUETOOTH DEVICE
To connect your Bluetooth device to the unit, you need to pair the device to the unit. Pairing needs only to be done once.
- To connect devices, turn on the Bluetooth mode on this unit using the Bluetooth button on the remote control or the mode knob on the head unit.
- Turn on the Bluetooth function on your device.
- Search for other Bluetooth device with your device.
4..Select "KM1961" in the pairing list.
5.Enter default password "0000" if necessary. - Press and hold pairing cleared button (PAIRING) to clear pairings.
The device also has an NFC communication module, thanks to which you can also pair an external device with the Hi-Fi system without the need to search for it in available Bluetooth devices. To do this, just turn on the NFC on the external device and put it on the plate in the upper part of the main unit, and then on the screen of the external device you must accept the pairing.
E Z
Caution:
- The operational range between this unit and a Bluetooth device is approximately 8 m.
- Compatibility with all Bluetooth devices is not guaranteed.
- Any obstacle between this unit and a Bluetooth device can reduce the operational range.
- Keep this unit away from any other electronic device that may cause interference.
- If the distance between the devices exceeds the communication range, the devices will be disconnected. To reconnect, place external device in operational range.
PLAY FROM AN EXTERNAL DEVICE
- To play tracks from an external device, connect the devices with an audio cable (cable not included), corresponding to the AUX IN jacks / AUDIO IN jack.
- Press corresponding AUDIO IN/AUX IN button to select the audio input.
- Start playing on the external device.
FM / DAB RADIO
Tune FM / DAB stations
- Press FM button on the remote or use mode knob on the main unit to chose FM radio.
- Press and hold forward / back button on the front panel (or on the remote control), the radio tunes to a first station automatically.
- Repeat step 2 to tune to more stations. To tune to a station manually, press the next / previous track button repeatedly until you find desired frequency.
Program FM radio stations automatically
You can program a maximum of 20 preset radio stations. Press and hold the PROG button to activate automatic programming.
• AUTO is displayed briefly.
- All available stations are programmed in the order of waveband reception strength.
Program DAB radio stations automatically
You can program a maximum of 30 preset radio stations. Press and hold the SCAN button to activate automatic programming.
• AUTO is displayed briefly.
- All available stations are programmed in the order of waveband reception strength.
Program radio stations manually
- Tune to a radio station.
- Press the PROG button to activate programming. The PROG begins to blink, press it again to confirm. The preset number and the frequency of the preset station are displayed.
- Repeat the previous steps to program other stations.
Note: To overwrite a programmed station, store another station in its place.
Krüger&Matz
Owner's manual Owner's manual
Krüger&Matz
Tune to a preset radio station
Press next / previous track button on the front panel ( or remote control) to select a preset number
Set the MONO and STEREO modes
To switch between MONO and STEREO modes, press the REPEAT button on the remote control.
Switching the currently displayed information
To switch the currently displayed information, press the INFO button on the remote control.
ADJUST VOLUME LEVEL AND SOUND EFFECT
Adjust volume level
During play, press the VOL+/- button on the remote on use volume regulation knob on the main unit to increase/decrease the volume level.
Enhance bass
During play, press S-BASS button to turn on/off super bass enhancement. If the function is on, the display will show BASS.
Loudness function
During play, press LOUDNESS button to turn on/off loudness function.
Mute sound
During play, press MUTE button to mute or restore sound
Select a preset sound effect
During play, press P-EQ button repeatedly to select:
Note: Make sure that you have set the time correctly.
- In standby mode, press and hold TIMER button, until [TIMER SET] scrolls on the display. The hour digits are displayed and begin to blink.
- Press next / previous track button on the front panel or remote control to set alarm mode and set hour, then press TIMER button again to confirm. The minutes digits are displayed and begin to blink.
- Press next / previous track button on the front panel or remote control to set minute. Press TIMER button to confirm.
- Press VOL +/- button to adjust volume, then press TIMER button to confirm.
- In standby mode, press TIMER button repeatedly to activate / deactivate timer The corresponding message TIMER ON or TIMER OFF will appear on the screen.
PLAYBACK FROM USB
After connecting USB devices (flash memory, memory card reader), the device will play songs saved on the external data carrier. To do this:
- Connect a USB device to the KM1961 USB port.
- To select the USB function, use the mode dial on the main unit or the USB button on the remote control. "USB" will appear on the display.
- To start playback, press the play / pause button on the remote control or the main unit.
- To stop the track, press the play / pause button or the STOP button on the remote control.
- To change track, press the previous / next track button.
- To rewind a track, press and hold the backward / forward button.
- To change album, press the next / previous track button.
Charging external devices
When the device is connected to the power supply, the USB port on the front panel can be used to charge external devices. The maximum charging voltage is 5V H.A.
PLAYING FROM CDS
- Use the mode dial on the main unit or the CD button on the remote to select the CD function. "DISC" appears on the display.
- Press the tray eject button on the remote or central unit, then place a disc on it, and then press the tray eject button again.
- To start playback, press the play / pause button on the remote control or the main unit.
Krüger&Matz
- To stop the track, press the play / pause button or the STOP button on the remote control.
- To change track, press the previous / next track button.
6.To rewind a track, press and hold the backward / forward button. - To change album, press the next / previous track button.
Programming playback
The device can play only selected tracks on the disc.
-
To program playback, press the STOP button on the remote control.
-
Then press the PROG button on the remote control - the device screen will display the message 001 P-01.
-
Press the next / previous track button or use the numeric keypad to select a track number. The screen will show the number of the selected track.
-
To move to the possibility of programming the next track, press the PROG button.
-
Successive pieces should be programmed in the same way.
-
To start playback of the programmed tracks, press the play / pause button.
-
To disable the Programmed Playback function, press the STOP button.
SPECIFICATION
General Information
Tube preamplifier
CD disc player
Radio: FM / DAB+
Bluetooth + NFC
Remote control
Playback from USB
Charging external devices
Technical data
DAB+ frequency range: 174,928 - 239,200 MHz
FM frequency range: 87.5 - 108 MHz
Profiles Bluetooth: A2DP
Range: up to 8 meters
Max. Bluetooth transmission power: 4 dBm
NFC working frequency: 13,56 MHz
Woofer: 4,3" (110 mm)
Tweeter: 1,5" (38 mm)
Output power (RMS): 2 x 30 W
Owner's manual Owner's manual
Krüger&Matz
Impedance: 6 Ohm
THD: <1% (1 KHz, 1 W)
Inputs / outputs:
Headphone output Jack 3,5 mm
2 x RCA speaker outputs
Audio input Jack 3,5 mm
AUX input
USB port (5 V 1A)
Antenna socket
Power socket
Power consumption: 35 W
Power supply: AC 100 - 240 V\~; 50 - 60 Hz
Dimensions:
Main unit: 250 x 276 x 146 mm
Speaker: 160 x 202 x 244 mm
LEARN MORE
For more information on this device visit: www.krugermatz.com. Read owner's manual carefully before using. Visit www.krugermatz.com website for more products and accessories. In case of any doubts or questions reach out to our Frequently Asked Questions section.

English
Correct Disposal of This Product
(Waste Electrical & Electronic Equipment)


It is forbidden to place equipment waste marked with the symbol of a crossed-out trash bin together with other waste. This equipment is subject to collection and recycling. The harmful substances it contains can cause environmental pollution and pose a threat to human health.
Made in China for LECHPOL ELECTRONICS Sp. z o.o. Sp.k., uL Garwolińska 1, 08-400 Miętne.
Krüger&Matz
Attention:
Krüger&Matz
UTILISATION
Marche / arrêt
Note: Make sure that you have set the time correctly.
- In standby mode, press and hold TIMER button, until [TIMER SET] scrolls on the display. The hour digits are displayed and begin to blink.
- Press next / previous track button on the front panel or remote control to set alarm mode and set hour, then press TIMER button again to confirm. The minutes digits are displayed and begin to blink.
- Press next / previous track button on the front panel or remote control to set minute. Press TIMER button to confirm.
- Press VOL +/- button to adjust volume, then press TIMER button to confirm.
- In standby mode, press TIMER button repeatedly to activate / deactivate timer The corresponding message TIMER ON or TIMER OFF will appear on the screen.
LECTURE DEPUIS USB
When the device is connected to the power supply, the USB port on the front panel can be used to charge external devices. The maximum charging voltage is 5V H.

AANSLUITING
natural_image
Diagram showing a power outlet connected to an electronic device with a plug and socket (no text or symbols present)BEDIENING
Aan / ult
Uwaga:

Krüger&Matz
natural_image
Diagram showing connections between a power outlet, cable, and electronic equipment (no text or symbols present)OBSŁUGA
Włącz / wyłącz
Port USB (5 V == 1 A)
Gniazdo antenowe
Gniazdo zasilania
Pobór mocy: 35 W
Zasilanie: AC 100 - 240 V\~; 50 - 60 Hz
Wymiary
Atentie:
CONECTAREA
Conectarea difuzoarelor
Conectarea la alimentare
Atentie:
natural_image
Diagram showing a power outlet connected to an electronic device with a plug and socket (no text or symbols visible)FUNCTIONARE
Pornire / oprire
PRIPOJENIE
Pripojenle reproduktorov
natural_image
Diagram showing a power outlet connected to an electronic device with a cable, no text or symbols presentPOUŽITIE
Zapnutle / vypnutle
www.krugermatz.com
Krüger&Matz is a registered trademark
- ANSCHLIESSEN
- BETRIEB
- Eln / Ausschalten
- SAFETY INSTRUCTIONS
- Krüger&Matz
- Owner's manual Owner's manual
- REMOTE DESCRIPTION
- BATTERY INSTALLATION
- Caution:
- Remote Control Operation Range
- CONNECTING
- Connecting speakers
- Connecting external device
- Connecting FM/DAB antenna
- Connecting to power supply
- OPERATION
- Setting the clock
- Adjusting the Display Brightness
- PLAY FROM BLUETOOTH DEVICE
- E Z
- PLAY FROM AN EXTERNAL DEVICE
- FM / DAB RADIO
- Tune FM / DAB stations
- Program FM radio stations automatically
- Program DAB radio stations automatically
- Program radio stations manually
- Tune to a preset radio station
- Set the MONO and STEREO modes
- Switching the currently displayed information
- ADJUST VOLUME LEVEL AND SOUND EFFECT
- Adjust volume level
- Enhance bass
- Loudness function
- Mute sound
- Select a preset sound effect
- PLAYBACK FROM USB
- Charging external devices
- PLAYING FROM CDS
- Programming playback
- SPECIFICATION
- General Information
- Technical data
- Dimensions:
- LEARN MORE
- Attention:
- UTILISATION
- LECTURE DEPUIS USB
- AANSLUITING
- BEDIENING
- Aan / ult
- Uwaga:
- OBSŁUGA
- Włącz / wyłącz
- Wymiary
- Atentie:
- CONECTAREA
- Conectarea difuzoarelor
- Conectarea la alimentare
- FUNCTIONARE
- Pornire / oprire
- PRIPOJENIE
- Pripojenle reproduktorov
- POUŽITIE
- Zapnutle / vypnutle
Brand : Krüger&Matz
Model : KM1961
Category : Hi-fi system