Butler E2100 TE 5770 - Phone TOPCOM - Free user manual and instructions
Find the device manual for free Butler E2100 TE 5770 TOPCOM in PDF.
User questions about Butler E2100 TE 5770 TOPCOM
0 question about this device. Answer the ones you know or ask your own.
Ask a new question about this device
Download the instructions for your Phone in PDF format for free! Find your manual Butler E2100 TE 5770 - TOPCOM and take your electronic device back in hand. On this page are published all the documents necessary for the use of your device. Butler E2100 TE 5770 by TOPCOM.
USER MANUAL Butler E2100 TE 5770 TOPCOM
To use 'Caller ID' (display caller), this service has to be activated on your phone line. Normally you need a separate subscription from your telephone company to activate this function. If you don't have the Caller ID function on your phone line, the incoming telephone numbers will NOT be shown on the display of your telephone.
Belangrijk
UK This product works with rechargeable batteries only. If you put non-rechargeable batteries in the handset and place it on the base/charger, the handset will be damaged and this in NOT covered under the warranty conditions.
UK This product is in compliance with the essential requirements and other relevant provisions of the R&TTE directive 1999/5/EC. The Declaration of conformity can be found on: http://www.tristar.eu
- Only use the charger plug supplied. Do not use other chargers, as this may damage the battery cells.
- Only insert rechargeable batteries of the same type. Never use ordinary, non-rechargeable batteries. Insert rechargeable batteries so they connect to the right poles (indicated in the battery compartment of the handset).
- Do not touch the charger and plug contacts with sharp or metal objects.
- The operation of some medical devices may be affected.
- The handset may cause an unpleasant buzzing sound in hearing aids.
- Do not place the basic unit in a damp room or at a distance of less than 1.5m away from a water source. Keep water away from the handset.
- Do not use the telephone in environments where there is a risk of explosions.
- Dispose of the batteries and maintain the telephone in an environment-friendly manner.
- As this telephone cannot be used in case of a power cut, you should use a mains-independent telephone for emergency calls, e.g. a mobile phone.
- This telephone uses rechargeable batteries. You have to dispose of the batteries in an environment friendly manner according to your country regulations.
Disposal of the device (environment)

At the end of the product lifecycle, you should not throw this product into the normal household garbage but bring the product to a collection point for the recycling of electrical and electronic equipments. The symbol on the product, user guide and/or box indicate this.
Some of the product materials can be re-used if you bring them to a recycling point. By re-using some parts or raw materials from used products you make an important contribution to the protection of the environment. Please contact your local authorities in case you need more information on the collection points in your area.
Batteries must be removed before disposing of the device. Dispose of the batteries in an environmental manner according to your country regulations.
Cleaning
Clean the telephone with a slightly damp cloth or with an anti-static cloth. Never use cleaning agents or abrasive solvents.
ECO mode (low-radiation)
This cordless telephone (compliant with the DECT standard) facilitates low-radiation operation. During communication the handset power will be reduced depending on the distance between handset and base.
This does not mean that normal DECT radiation is harmful to health. The low-radiation mode prevents unnecessary DECT radiation load.
The base does not reduce the radiation. Put the base on a place where you are not constantly, for example in the corridor. Avoid child, sleep and living rooms.
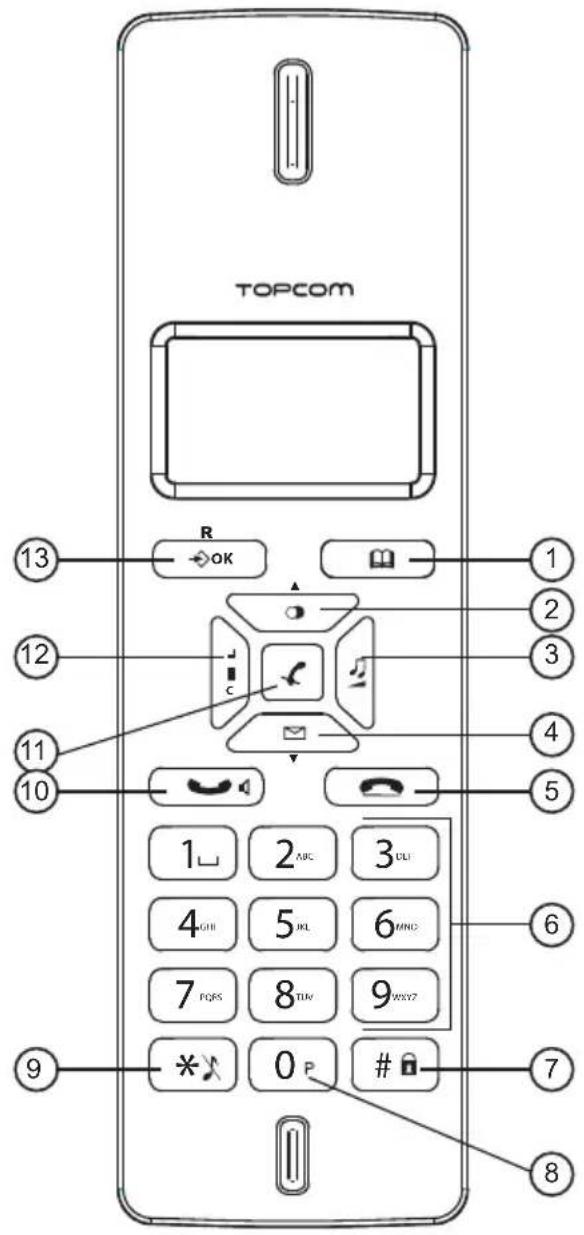
1 Buttons
- Phonebook button
- Redial / up button /
- Melody / volume button /
- Call log / down button /
- On-hook button
- Alphanumeric buttons
7.Key lock button - Pause button P
- Ringer on/off button
- Off-hook / handsfree button
- Mute button
- Internal call / delete button
- Menu / OK / flash button OK/R
2 Di s p I a y
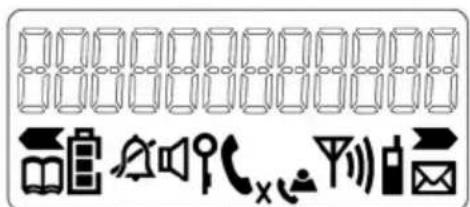
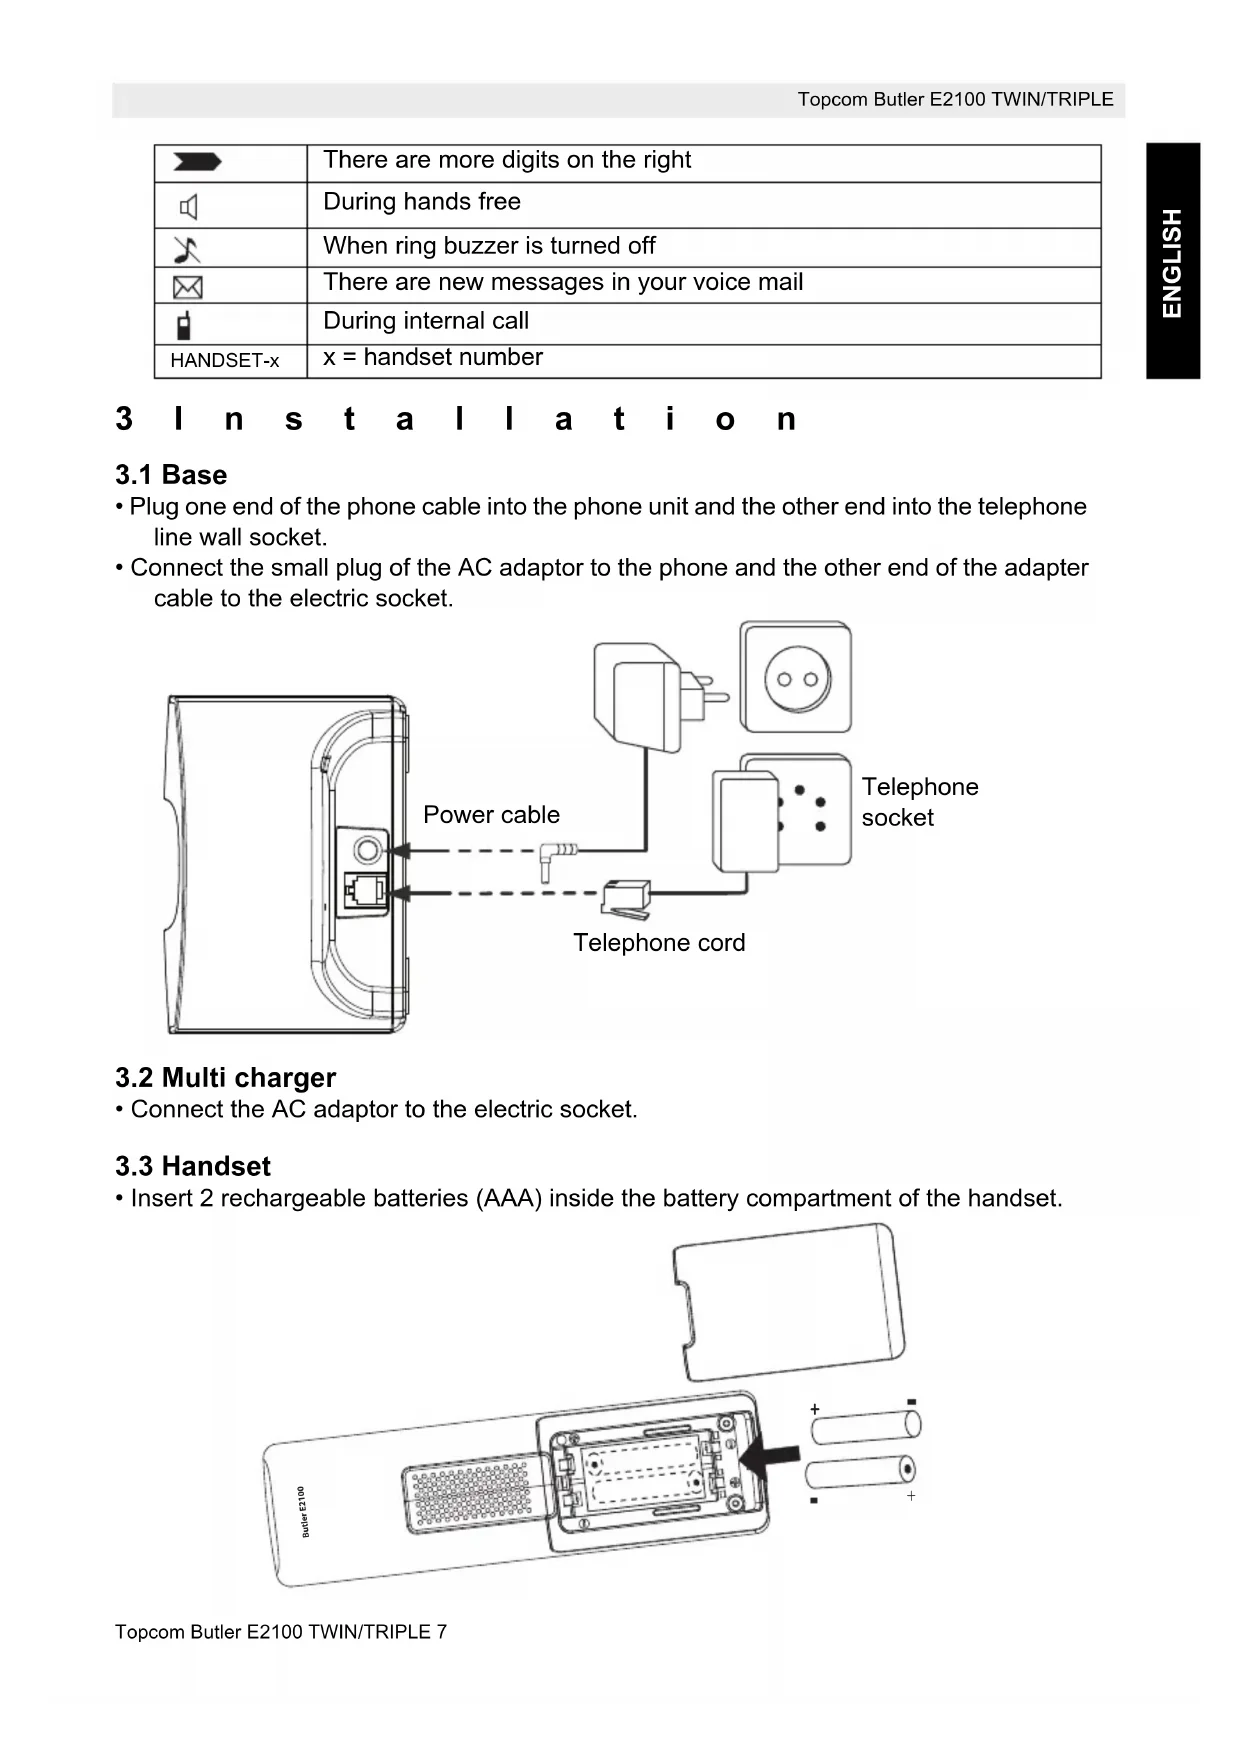
| Icon Meaning | |
| You are online | |
| New numbers in call list | |
| Rechargeable battery level indicator | |
| The antenna indicates the quality of reception. The antenna blinks when the handset is out of range! | |
| Microphone is muted | |
| Memory records are being retrieved or set up | |
| The keypad is locked | |
| There are more digits on the left | |
| There are more digits on the right |
| During hands free |
| When ring buzzer is turned off |
| There are new messages in your voice mail |
| During internal call |
| x = handset number |
3 l n s t a l l a t i o n
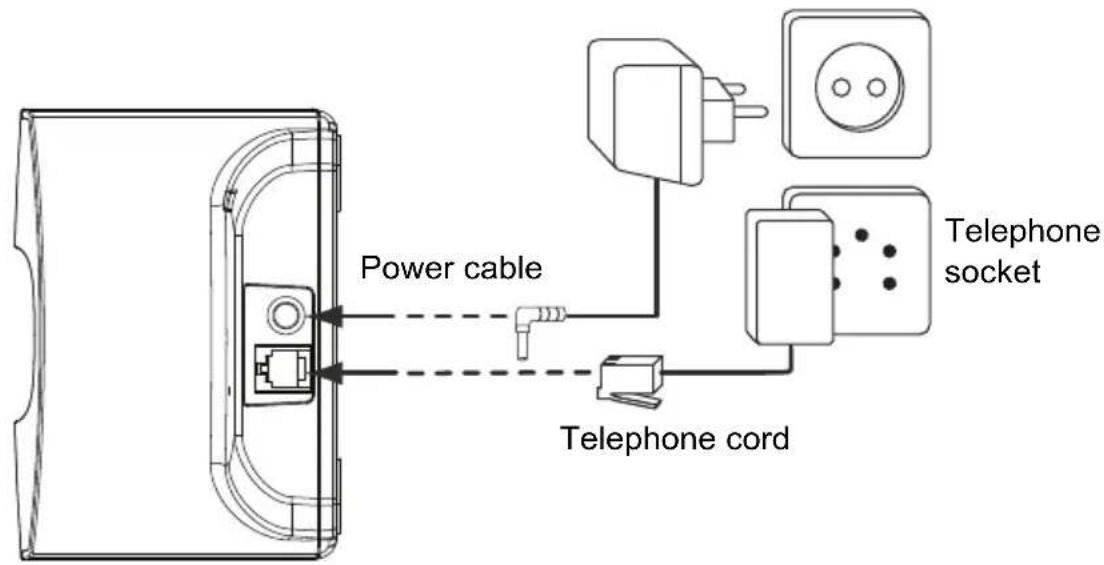
3.1 Base
- Plug one end of the phone cable into the phone unit and the other end into the telephone line wall socket.
- Connect the small plug of the AC adaptor to the phone and the other end of the adapter cable to the electric socket.
3.2 Multi charger
- Connect the AC adaptor to the electric socket.
3.3 Handset
- Insert 2 rechargeable batteries (AAA) inside the battery compartment of the handset.
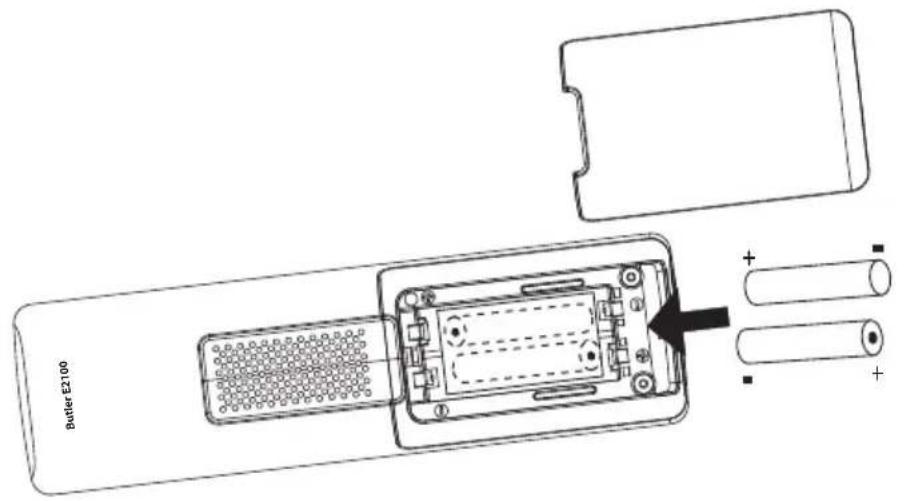
Put the handset on the base unit.
Charge the handset for a period of 24 hours before using the handset for the first time. To extend the battery life time, discharge the batteries completely from time to time. As soon as the handset emits a warning tone or when the battery icon is empty, you have to put it back on the base/charger unit for charging.
4 Battery low indication
When the battery is empty, the handset no longer carries out operations. When a battery is completely empty and you have put the handset on the base unit for a short period of time, the battery symbol will appear to be fully charged but this is actually not the case. The battery capacity will decrease rapidly. We advise you to put the handset on the base unit for 12 hours so that it can be recharged completely.
- F battery
Empty battery
When you are in the middle of a conversation and the battery is almost empty, the handset will emit a warning signal. Place the handset on the base unit to charge.
5 O p e r a t i o n
5.1 Navigating the menu
The Butler E2100 has a menu system which is easy to use. Each menu leads to a list of options. To enter the menu, press the menu button OK. Use the up or down button to scroll to the menu option you want. Press OK to select further options or to confirm the setting displayed. To go back in the menu press the delete button C.
5.2 Setting the language
Press menu button OK. Use the up or down button to scroll to 'HANDSET' and press OK. Scroll to 'LANGUAGE' and press OK. Scroll to the language you want with the up or down button and press OK.
5.3 Setting the date and time
The date and time are stored inside the base. The date and time can be set by each handset but it's not needed to set it per handset individual:
Press menu button OK. Use the up or down button to scroll to 'DATE TIME' and press OK. Enter the year by the numerical keypad (09 = 2009...) and press OK.
Enter the month by the numerical keypad (01 = January...) and press OK. Enter the day of the month and press OK. Enter the hours (24h format) and press OK. Enter the minutes by the numerical keypad and press OK.

- When removing the base power, you have to set the date and time again!
- If you have CallerID on your telephone line and the operator sends date and time, your clock will be set automatically on an incoming call.
5.4 Outgoing calls
5.4.1 Making a phone call
Press the off-hook button. You will hear the dial tone. Enter the desired telephone number. Press the on-hook button when you want to terminate the call.
5.4.2 Call setup with dial preparation
Enter the desired telephone number. An incorrect number can be corrected by means of the mute button. When you haven't pressed a button for 20 seconds, the number you've already entered will disappear and the handset returns to standby mode. Press the off-hook button. The number will be dialled automatically. Press the on-hook button again when you want to terminate the call.

If you wish to insert a pause, press the pause button P on the location where you want a pause of 3 seconds.
5.4.3 Redialling the last number dialled
Press the off-hook button You will hear the dial tone. Press the redial button . The number you last called is dialled automatically.
5.4.4 Redial one of the last 3 numbers dialled
Press the radial button The number you last called appears on the display. If you would like to dial one of the last 3 numbers dialled, press the radial button a few times until the desired number appears on the display. Press the off-hook button The number shown on the display is dialled automatically. After finishing your call, press the on-hook button to hang up.
5.5 Incoming calls
When a call comes in, the handset will start to ring. Press the off-hook button to answer the incoming call.
5.6 Activate/deactivate hands free function
This function allows you to communicate without having to pick up the handset. When you are on the phone, press the handsfree button to activate the hands free function.
Press the same button to deactivate the hands free function.

When you are calling in hands free mode and you want to change the volume, press the volume button

When you use the hands free function for a long time, the batteries will be discharged faster!
5.7 Mute function
It is possible to deactivate the microphone during a conversation. Now you can speak openly without being heard by your correspondent.
Press the mute button during a conversation. The microphone will be deactivated. The mute symbol _× appears on the display. Press the mute button again when you want to continue the conversation.
5.8 Setting the volume
During a conversation you can set the volume by pressing the volume button You can set the volume alternatively in between 1-5. You can also use the up down button. Press OK to save changes.

The hands free receiver volume is also adjustable as above described!
5.9 Flash button (R)
When you press the R button, also called flash or recall, the unit generates a line interruption (of 100 ms or 300 ms). It gives you the possibility to use the special services of your telephone provider and/or to transfer calls when you have a telephone exchange.
Press menu button OK. Use the up or down button to scroll to 'BASE' and press OK. Use the up or down button to scroll to 'RECALL' and press OK. Use the up or down button to select 'LONG' (300ms) or 'SHORT' (100ms) and press OK to confirm.
5.10 Setting the ring volume and melody
5.10.1 Handset external melody
Press and hold the melody button until the current melody is heard. Select the desired melody (1-9) by means of the up or down buttons. Press again or press OK to confirm the setting.
Or (by menu)
Press menu button OK. Use the up or down button to scroll to 'HANDSET' and press OK. Use the up or down button to scroll to 'RING TONE' and press OK. Use the up or down button to scroll to 'EXTERNAL' and press OK. Use the up or down button to select the melody (1-9) and press OK.
5.10.2 Handset internal melody
Press menu button OK. Use the up or down button to scroll to 'HANDSET' and press OK. Use the up or down button to scroll to 'RING TONE' and press OK. Use the up or down button to scroll to 'INTERNAL' and press OK. Use the up or down button to select the melody (1-9) and press OK.
5.10.3 Handset ring volume
Press the volume button in standby. The handset will ring in the current volume. Use the up or down button to select the desired volume 'OFF', 1 - 5. Press again or press OK to confirm the setting.
Or (by menu)
Press menu button OK. Use the up or down button to scroll to 'HANDSET' and press OK. Use the up or down button to scroll to 'RING TONE' and press OK. Use the up or down button to scroll to 'VOLUME' and press OK. Use the up or down button to select the volume (OFF, 1-5) and press OK.

You can turn the ringer volume of each individual handset on or off by simply press and hold the key in standby.
5.11 Keypad beep
You can turn the key press beep tones on or off:
Press menu button OK. Use the up or down button to scroll to 'HANDSET' and press OK. Use the up or down button to scroll to 'KEYPAD BEEP' and press OK. Use the up or down button to select on or off and press OK.
5.12 Key lock
When the keypad is locked, pressing any button will have no effect during standby (except holding the button).
Press and hold the button. appears on the display and the keypad is locked Press and hold the button again to unlock the keypad.
When there is an incoming call, you can still answer the call by pressing the off-hook button. During the call, the keypad functions as normal. When the call is ended, the keypad will be locked again.
5.13 Setting the dialling mode
There are two types of dialling mode:
DTMF/Tone dialling (the most common) (default)
Pulse dialling (for older installations)
To change the mode of dialling:
Press menu button OK. Use the up or down button to scroll to 'BASE' and press OK. Use the up or down button to scroll to 'DIAL MODE' and press OK. Use the up or down button to select 'TONE' for DTMF dialling or 'PULSE' for pulse dialling and press OK to confirm.
5.14 Handset name
You can change the name that appears on the screen (max. 9 characters) during idle stage: Press menu button OK. Use the up ▲ or down▼ button to scroll to 'HANDSET' and press OK. Use the up ▲ or down▼ button to scroll to 'HANDSET NAME' and press OK. The current handset name is shown. To Delete the character by the mute button ←. Use the keypad to enter the new name. To Press the menu/OK button OK to confirm.
5.15 Auto answer On/Off
When there is an incoming call, you can program the handset to take the line automatically when lifting it out of the base or charger:
Press menu button OK. Use the up or down button to scroll to 'HANDSET' and press OK. Use the up or down button to scroll to 'AUTO TALK' and press OK. Use the up or down button to switch it On or OFF and press OK.
5.16 Changing the PIN code (system PIN code)
Certain functions are only available if you know the PIN code of the base.
The PIN code has 4 digits. The default PIN code setting is '0000'. If you would like to change the PIN code and set your own secret code, do the following:
Press menu button OK. Use the up or down button to scroll to 'BASE' and press
OK. Use the up or down button to scroll to 'SYSTEM PIN' and press OK.
Enter the current PIN code and press OK. Enter the new PIN code and press
OK. Enter the new PIN code again to confirm and press OK.
5.17 Using the alphanumeric keypad
With your telephone you can also enter alphanumeric characters. This is useful for entering a name into the phonebook, giving a name to a handset, ...
To select a letter, press the corresponding key as many times as necessary. For example to select an 'A', press '2' once, to select a 'B', press '2' twice and so on. To select 'A' and then B consecutively, select 'A', wait until the cursor moves on to the next character, then press '2' twice. To select a space, press 1.
The keypad characters are as follows:
| Key | First press press | Second press press | Third press press | Fourth | Fifth | ||||
| 1 Space + - | / | 1 | |||||||
| 2 | A | B | C | 2 | |||||
| 3 | D | E | F | 3 | |||||
| 4 | G | H | I | 4 | |||||
| 5 | J | K | L | 5 | |||||
| 6 | M | N | O | 6 | |||||
| 7 | P | Q | R | S | 7 | ||||
| 8 | T | U | V | 8 | |||||
| 9 | W | X | Y | Z | 9 | ||||
| 0 | _ | Ø | |||||||
6 Phonebook
You can program 50 phonebook entries in the phone's memory. Names can be up to 16 characters long and numbers up to 24 digits.
6.1 Consulting the phonebook
Press the phonebook button to enter the phonebook. Enter the first letter of the name or press the up or down button to search the name you want. If the phonebook is empty, 'EMPTY' is shown on the display. You can see the name, number and melody by pressing the phonebook button
6.2 Add a phonebook entries
Press the phonebook button Press the menu/OK button OK to confirm. 'NEW ENTRY' appears and press the menu/OK button OK. Enter the name you wish to store. Press the menu/OK button OK to confirm. Enter the telephone number. Press the menu/OK button OK to confirm. Select the melody using the up or down button. Press the menu/OK button OK to confirm.

If you wish to insert a pause, press the pause button P on the location where you want a pause of 3 seconds.
6.3 Dial a phonebook entry
Press the phonebook button to enter the phonebook. Enter the first letter of the name or press the up or down button to search the name you want to dial. Press the off-hook button and the number will be dialled automatically. Press the on-hook button when you want to terminate the call.
6.4 Edit name or number
Press the phonebook button to enter the phonebook. Enter the first letter of the name or press the up or down button to search the name you want to dial. Press the menu/OK button OK. Use the up or down button to scroll to 'EDIT ENTRY' and press OK. Delete the character by the mute button . Use the keypad to enter the new name. Press the menu/OK button OK to confirm. Enter/delete the telephone number, using the keypad or the mute button . Press the menu/OK button OK to confirm. Select the melody using the up or down button. Press the menu/OK button OK to confirm.
6.5 Delete an entry
Press the phonebook button to enter the phonebook. Enter the first letter of the name or press the up or down button to search the name you want to dial. Press the menu/OK button OK. Use the up or down button to scroll to 'DELETE ENTRY' and press OK. Press the menu/OK button OK to confirm or the delete button C to go back.
6.6 Delete All entries
Press the phonebook button to enter the phonebook. Enter the first letter of the name or press the up or down button to search the name you want to dial. Press the menu/OK button OK. Use the up or down button to scroll to 'DELETE ALL' and press OK. Press the menu/OK button OK to confirm or the delete button C to go back.
7 Caller-ID function (CLIP)
The Butler E2100 displays the telephone numbers of incoming calls. This function is only possible if you are subscribed to a telephone operator that provides this service. Contact your telephone provider for more information. When you receive a call, the numbers are saved in a call list. This list can hold 20 telephone numbers (each of max. 23 digits). If the number is longer than 12 digits, you can press the phonebook button to show the other digits!
7.1 New calls
When you've received a new unanswered call, the CLIP symbol will blink on the display and the amount of missed calls is shown as 'XX-MISSED'.
7.2 Consulting the call list
Press the call log button. The last received call is shown on the display. If the list is empty,
'EMPTY' is shown on the display. If not, you can see the name, number and date/time.
Pressing the phonebook button the following will be shown on the display:
ABCDE


When number is matching with the phonebook number or when CallerID name is send.
24375699


When no matching with the phonebook or CallerID number without name.
08136048


Sequence number + date and time when call is received.
You can scroll from name to number and date time by pressing the phonebook button
Use the down button to scroll to the next call. Use the up button to show the previous call. You can leave the call list by pressing the delete button C.
7.3 Calling a number from the call list
Scroll through the call list until the desired number is shown on the display. Press the off-hook button The number will be dialled automatically.
7.4 Erasing a number from the call list
Scroll through the call list until the desired number is shown on the display. Press the menu/OK button OK. Use the up or down button to scroll to 'DELETE' and press OK. Press the menu/OK button OK to confirm or the delete button C to go back.
7.5 Erasing all numbers from the call list
You can only erase all numbers from the call list if all are read.
When you are in the call list, press the menu/OK button OK. Use the up or down button to scroll to 'DELETE ALL' and press OK. Press the menu/OK button OK to confirm or the delete button to go back.

Unread numbers cannot be deleted!
7.6 Store a number from the call log into the phonebook memory
Scroll through the call list until the desired number is shown on the display. Press the menu/OK button OK. Use the up or down button to scroll to 'SAVE TO PB' and press OK. Press the menu/OK button OK to confirm or the delete button C to go back. Edit or enter the name and press OK. Edit or enter the telephone number and press OK. Select the melody using the up or down button. Press the menu/OK button OK to confirm and to go back to the call list.
8 Register/de-register a handset
8.1 Register to a Butler E2100 base
You can subscribe 5 handsets to one base unit. Each handset can register to 4 base stations and the user can select which base he wants to use. By default, each handset is subscribed on the base unit upon delivery (base unit 1).

You only need to subscribe the handset if:
- The handset subscription has been removed from the base unit (e.g. for reinitialisation).
- If you want to subscribe a different handset to this base unit.
The below procedure is only applicable to a Butler E2100 handset and base unit!
Remove the base power by unplugging the power cable at the back. Power up the base again by plugging the power cable back in. The base will be in registration mode for 1 minute.
During this minute, you must do the following to subscribe the handset:
Press menu button OK. Use the up or down button to scroll to 'REGISTER' and press OK. Select the number of the base unit you would like to subscribe the handset to (1-4) using the up or down button. Press the menu/OK button OK to confirm Enter the base pin code (0000) and press OK. The unit will start searching for the base. If the pin is wrong, the handset will mention it and will stop the registering procedure. When the handset is registered, it will show 'HANDSET' followed by the handset number.
8.2 Removing a handset
You can remove a handset from a base to allow another handset to be registered:
Press menu button OK. Use the down button to scroll to 'DE-REGISTER' and press OK. Enter the pin code (0000) and press OK. Enter the handset number (1-5) you want to remove and press OK. The unit will go back to the previous menu if the removal is successfully.

You can only remove existing handsets and others than the one you are using.
8.3 Selecting a base unit
If your handset is subscribed to several base unit stations (max. 4), you must select a base unit because the handset can only communicate with one base unit at a time. There are two possibilities:
8.3.1 Automatic selection
If you set handset to automatic selection, the handset will automatically choose the closest base unit in standby:
Press menu button OK. Use the up or down button to scroll to 'HANDSET' and press OK. Use the up or down button to scroll to 'SELECT BASE' and press OK. Use the up or down button to select 'AUTO' and press OK.
8.3.2 Manual selection
If you set handset to manual selection, the handset will only choose the handset you have set:
Press menu button OK. Use the up or down button to scroll to 'HANDSET' and press OK. Use the up or down button to scroll to 'SELECT BASE' and press OK. Use the up or down button to select 'Manual' and press OK. Use the up or down button to select base 1-4 and press OK.
8.4 Call transfer and conference call during an external call

These functions only work when more than one handset (like a Twin/Triple/Quattro version) is registered to the base!
During an external call, press the button followed by the number (1-5) of the other handset.
The other handset will start to ring:
- When the other handset takes the line you can talk internally. If you hang up, the external line will be connected with the other handset. If you press and hold the button for 3 seconds you can talk with the 2nd handset and external line at the same time (conference call)
- Or press the -button again to return to the external call.
Press the on-hook button to end the call.
8.5 Internal call (intercom)
- In standby press the -button followed by the number (1-5) of the other handset.
- The other handset will start to ring. You can stop the ringing by pressing the on-hook button.
- If the other handset answers the call by pressing the off-hook button you can talk internally.
- Press the on-hook button to end the call.
9 Reset of the handset
This will undo all changes and set back all default settings (ringer volume, ringer melody, etc...).
Press menu button OK. Use the up or down button to scroll to 'HANDSET' and press OK. Use the up or down button to scroll to 'RESET' and press OK.
Press OK again to confirm. Enter the pin code (0000) and press OK. The unit will go back to standby.
Default handset settings are:
Handset volume 3
Handset melody 8
Flash time Short
Dial mode Tone
Ringer On/Off On
Auto Talk
Off

All memories (redial, phonebook, call log,...) will be erased!
10 Troubleshooting
| Problem | Possible cause | Solution |
| No Display | Batteries not charged | Check the position of the batteries |
| Recharge the batteries | ||
| No dialling tone | Telephone cable not properly connected | Check the connection of the telephone cable |
| Volume of conversation partner too low | Adjust the volume during the conversation by pressing the volume key | |
| Handset ringer volume too low | Adjust the ringer volume | |
| Not possible to dial a number | Wrong dial mode | See “Setting the dialling mode” to set the correct dial mode |
11 Technical data
Range: up to 300 m in open space
up to 50m in buildings
Dialling options: DTMF (tone) and Pulse
Batteries: 2 × 1.2V , 500 mAh AAA Type NiMH rechargeable
Max. standby time: approx. 100 hours
Max. talk time: 10 hours
Ambient temperature: +5^ C to +45^ C
Permitted relative air humidity: 25 to 85%
Power supply base adapter: 100-240V AC, 50Hz
Memories: 50 with max. 24 digits and 14 characters
12 Topcom Warranty
12.1 Warranty period
The Topcom units have a 24-month warranty period. The warranty period starts on the day the new unit is purchased. There is no warranty on standard or rechargeable batteries (AA/ AAA type).
Consumables or defects causing a negligible effect on operation or value of the equipment are not covered.
The warranty has to be proven by presentation of the original or copy of the purchase receipt, on which the date of purchase and the unit-model are indicated.
12.2 Warranty exclusions
Damage or defects caused by incorrect treatment or operation and damage resulting from use of non-original parts or accessories are not covered by the warranty.
The warranty does not cover damage caused by outside factors, such as lightning, water and fire, nor any damage caused during transportation.
No warranty can be claimed if the serial number on the units has been changed, removed or rendered illegible.
Any warranty claims will be invalid if the unit has been repaired, altered or modified by the buyer.
This appliance may only be used with rechargeable batteries. If you want to replace the originally included batteries, please check whether the batteries you use are suitable and rechargeable. Alkaline batteries may under NO circumstances be used in the handsets. If you use Alkaline batteries and place the handset on the basis, the batteries will heat up and may explode. Any damage which may be caused cannot be recovered from the manufacturer and the damage thus caused to the appliance is not covered by the warranty conditions. Any repairs will be charged to you.
Volume do telephone 3
Melodia do telephone 8
Tempo Flash Curto
Modo de marca Tom