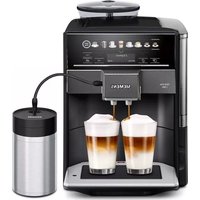
EQ.3 S300 TI313219RW - Coffee maker SIEMENS - Free user manual and instructions
Find the device manual for free EQ.3 S300 TI313219RW SIEMENS in PDF.

User questions about EQ.3 S300 TI313219RW SIEMENS
0 question about this device. Answer the ones you know or ask your own.
Ask a new question about this device
Download the instructions for your Coffee maker in PDF format for free! Find your manual EQ.3 S300 TI313219RW - SIEMENS and take your electronic device back in hand. On this page are published all the documents necessary for the use of your device. EQ.3 S300 TI313219RW by SIEMENS.
USER MANUAL EQ.3 S300 TI313219RW SIEMENS
Fully automatic espresso machine
A B T O M A T N U C E C K A Y K O D E M A I N H A
Kaffeevollautomat
TI3.3.../TI3.5...
siemens-home.bsh-group.com/welcome
en Instruction manual 6
fr Mode d'emploi 28
nl Gebruiksaanwijzing 53
pl Instrukcja obstugi 78
cs Navod k pouzití 103
ru Pnpabnna noIb3ObaHnra 128
de Gebrauchsanleitung 153
Register your product online
1
2

3
4
5
6

7
Table of contents

Intended use. 6

Important safety information . . . 6

Environmental protection . 8
Saving energy. 8
Environmentally-friendly disposal . . . 8

Getting to know your appliance . 9
Included in delivery. 9
Assembly and components 9
Controls 10

Accessories 11

Before using for the first time . 12
Installing and connecting the appliance 12
Commissioning the appliance 12

Operating the appliance 13
Preparing coffee using freshly ground beans 13
Preparing drinks with milk 14
Adjusting beverage settings 15
Water filter 17
Frost protection. 17

Settings. 18
Automatic switch-off 18
Switching the audible signal on/off. 18
Setting the language. 18
Setting the water hardness 19
Factory reset. 19

Daily care and cleaning 20
Cleaning agent 20
Cleaning the appliance 20
Cleaning the drip tray and coffee grounds container 21
Cleaning the milk system 21
Cleaning the brewing unit 21

Service programme. 22
Starting Calc'nClean 23

Trouble shooting. 24

Customer service 27
Technical data. 27
E number and FD number. 27
Guarantee 27

Intended use
Check the appliance for damage after unpacking it. Do not connect the appliance if it has been damaged in transport.
This appliance is intended for domestic use only.
Only use the appliance indoors at room temperature and up to 2000 m above sea level.

Important safety information
Please read carefully, follow and retain the operating instructions. When passing on the appliance, enclose these instructions.
This appliance can be used by children aged from 8 years and above and by persons with reduced physical, sensory or mental capabilities or lack of experience and knowledge if they have been given supervision or instruction concerning use of the appliance in a safe way and if they understand the hazards involved. Keep children under 8 years of age away from the appliance and connecting cable and do not allow them to use the appliance. Children shall not play with the appliance. Cleaning and user maintenance shall not be made by children unless they are older than 8 years and supervised.
Warning
Danger of electric shock!
The appliance may only be connected to a power supply with alternating current via a correctly installed socket with earthing. Ensure that the protective conductor system of the domestic electricity supply has been correctly installed.
- Connect and operate the appliance only in accordance with the specifications on the rating plate. If the power cord of this appliance is damaged, it must be replaced by customer service.
- Do not use if the power cable or appliance is damaged. If a fault occurs, pull the mains plug or switch off the mains voltage immediately.
- To prevent hazards, the appliance may be repaired by our customer service only.
- Never immerse the appliance or mains cord in water.
The plug and socket connection of the appliance must not come into contact with liquids.
Please note the special information on cleaning in the instructions.
Warning
Hazard due to magnetism!
The appliance contains permanent magnets which may affect electronic implants, e.g. heart pacemakers or insulin pumps. Persons with electronic implants should keep a minimum distance of 10 cm from the appliance and the water tank when removed.
Warning
Risk of suffocation!
Do not let children play with packaging material. Store small parts safely as they can be easily swallowed.
Warning
Risk of burns!
The milk system becomes very hot. After use, allow it to cool down first before touching it.
After use, surfaces such as the cup warmer may still be hot for a certain period.
- Freshly prepared beverages are very hot. Leave to cool a little if necessary.
Warning
Risk of injury!
- Improper use of this appliance may result in injury.
- Do not reach into the grinding unit.
Warning
Fire hazard!
The appliance will become hot.
- Never operate the appliance in a cupboard.

Environmental protection
Saving energy
If the appliance is not being used, switch it off.
Set the interval for automatic switch-off to the smallest value.
If possible, do not interrupt coffee or milk froth dispensing. Stopping a process prematurely results in higher energy consumption and the drip tray fills up more quickly.
- Descale the appliance regularly to avoid a build-up of limescale. Limescale residue results in higher energy consumption.
Environmentally-friendly disposal
Dispose of packaging in an environmentally-friendly manner.

This appliance is labelled in accordance with European Directive 2012/19/EU concerning used electrical and electronic appliances (waste electrical and electronic equipment - WEEE). The guideline determines the framework for the return and recycling of used appliances as applicable throughout the EU.
Please ask your dealer about current disposal routes.

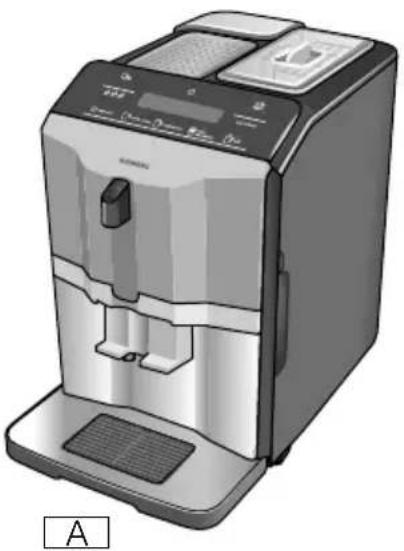
Getting to know your appliance
This section provides an overview of the scope of delivery, the assembly and the components of your appliance. It also introduces you to the different controls.
Note: Depending on the appliance model, individual details and colours may differ.
How to use these instructions:
The cover pages of the operating instructions can be folded out towards the front. The illustrations are identified using numbers that are referred to in the operating instructions. Example: Fig. 1
Included in delivery
→Fig.1
A Fully automatic coffee machine
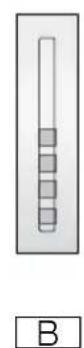
B Water hardness testing strip
C Instruction manual
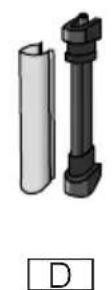
D Milk frother
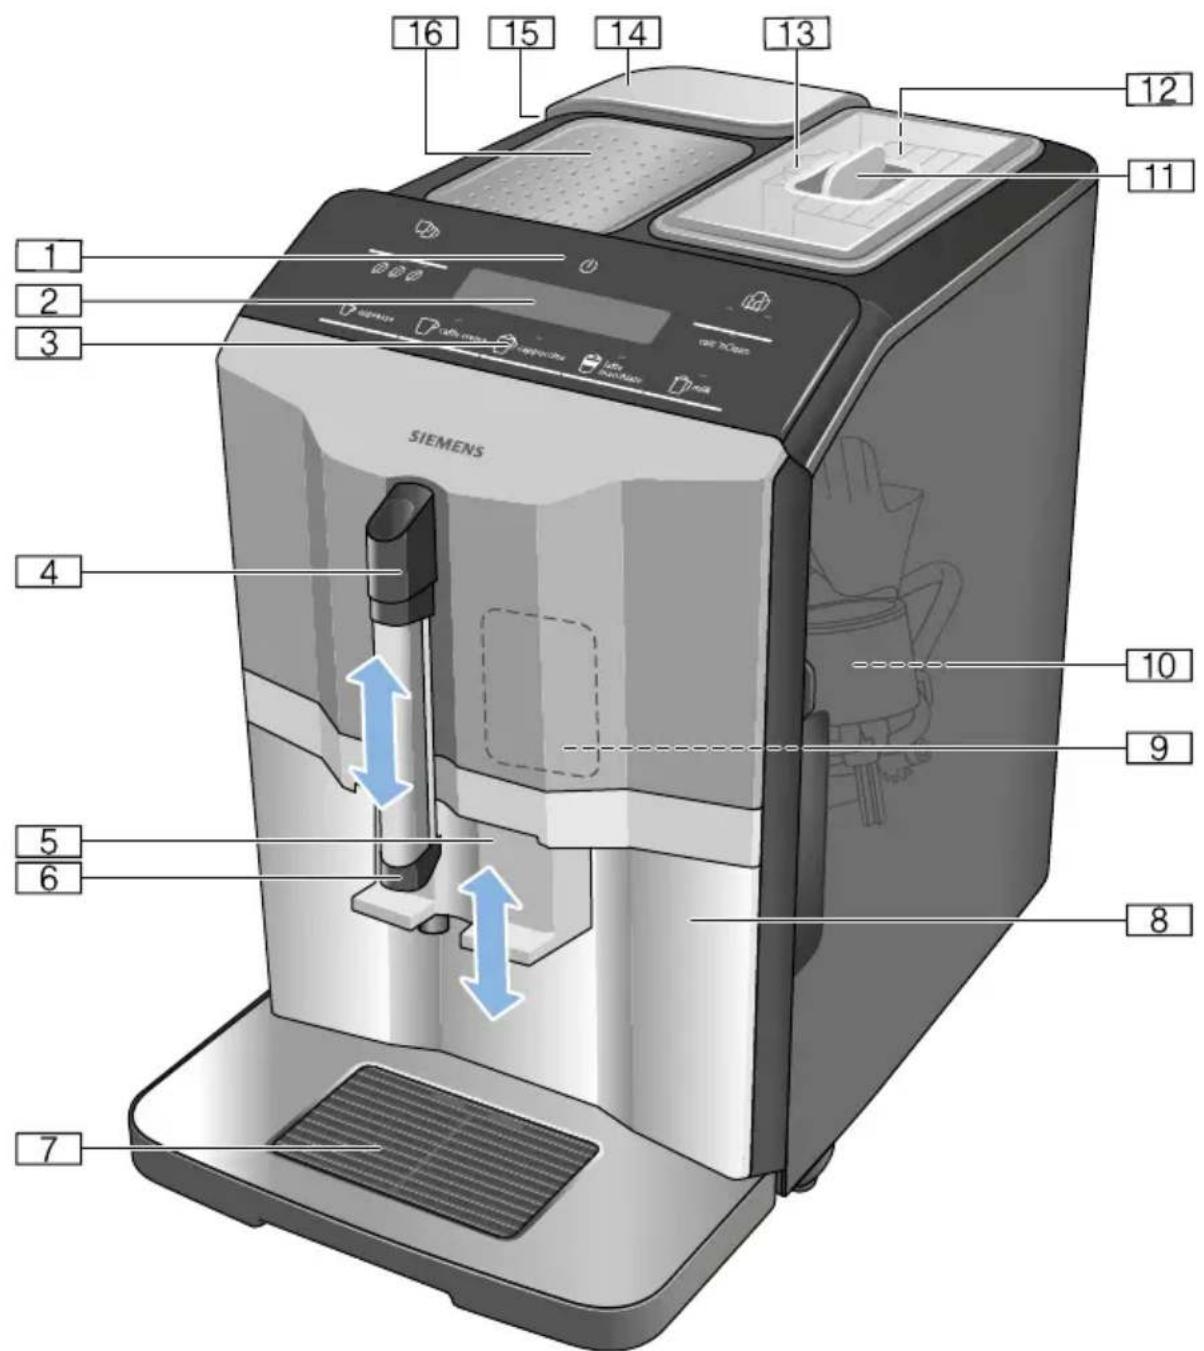
Assembly and components
→Fig. 2
1On/offbutton(stand-bymode)
2 Display
3Control panel
4 Handle of milk frother
5 Outlet system for coffee, height adjustable
6 Milk frother (holder, frother, cover), height adjustable
7Drip tray (coffee grounds container, drip grate, drip plate, float)
8 Door of brewing chamber
9Rating plate
10Brewing unit
11Aroma lid
12Bean container
13 Rotary selector for setting grinding level
14 Cover for water tank
15Water tank
16 Cup warmer
Controls
By touching the fields, you can e.g. select and start making a drink or adjust the coffee strength.
| Button Meaning | |
| Switch the appliance on and off The appliance rinses automatically when it is switched on and off. The appliance is not rinsed if: ■ it is still warm when switched on, or ■ coffee was not dispensed before the appliance was switched off. The appliance is ready for use when the LEDs of the buttons for selecting drinks light up in the control panel. The appliance has automatic switch-off. → "Selecting automatic switch-off" on page 18 | |
| espresso Dispensing Espresso | |
| caffe crema Dispensing Caffe crema or display navigation “<” (back without saving). | |
| cappuccino Dispensing cappuccino or display navigation “▼” (navigate down). | |
| latte macchiato Dispensing latte macchiato or display navigation “ok” (confirm and save). | |
| milk Frothing up milk | |
| Coffee strength Adjusting the coffee strength → "Adjusting beverage settings" on page 15 | |
| calc'nClean Start the service programme Flashes when the service programme needs to be performed.→ "Calc'nClean service programme" on page 23 | |
| Make 2 Espresso or 2 Caffe crema at the same time. Position the cups next to one another under the coffee dispenser.→ "Operating the appliance" on page 13 | |
| The fully automatic coffee machine has a cup warmer that can be switched on or off manually with the button. When the cup warmer is on, the button lights up. Warning Risk of burns! The cup warmer becomes very hot! Note: For optimal cup warming, place them with the base on the cup warmer. | |
| Display | |
| Lights up when the water tank needs to be topped up with water, the water tank is not inserted, or the water filter needs to be changed. A message appears on the display. | |
| Lights up when trays need to be emptied. Flashes when door of brewing chamber is open. | |
| espresso | |
| is continuously lit | Ready to use, selection possible |
| is pulsing Dispensing underway | |
| is flashing Waiting for operation, e.g. with calc'nClean off Not available | |
Display
The display 2 shows the selected drinks, settings and setting options, as well as messages about the appliance's operating status.
The display also prompts the user to perform certain actions.
The individual steps for performing the action are shown in the display.
If the action required has been carried out, e.g. "Fill water tank", the corresponding message will disappear.

Accessories
The following accessories are available from retailers or from customer service:
| Accessory Order number |
| Retail Customer service |
| Cleaning tablets TZ80001N 00311807 |
| Dscaling tablets TZ80002N 00576693 |
| Water filter TZ70003 00575491 |
| Care set TZ80004 00576330 |
The contact data for customer service in all countries can be found at the back of these instructions.

Before using for the first time
In this section, you will learn how to commission your appliance.
Note: Only use the appliance in frost-free areas. If the appliance was transported or stored at temperatures below 0^ , you must wait for at least 3 hours before using it.
Installing and connecting the appliance
- Remove any protective plastic film.
- Place the appliance on a level, water-resistant surface which can bear the weight.
- Using the mains plug, connect the appliance to an earthed socket that has been correctly installed.
Note: After plugging in, always wait (approx. 5 seconds).
Commissioning the appliance
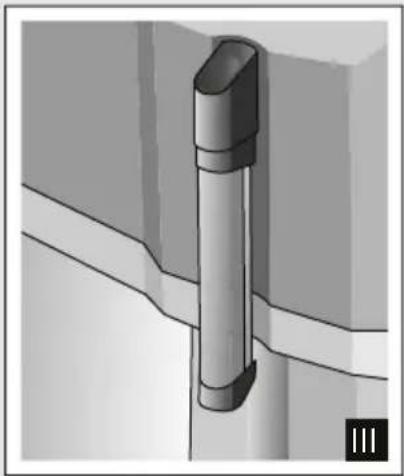
Attaching milk frother
Fig. 3
- Remove milk frother parts from the bag.
- Assemble milk frother.
- Attach the milk frother on the front of the appliance.
Filling the bean container
This appliance can be used to make coffee drinks from coffee beans.
- Open the lid [11] of the bean container [12].
- Pour in coffee beans.
- Close the lid again.
Notes
- Coffee beans that have been glazed or caramelised or that contain other sugary additives block the brewing unit. Only use pure bean mixes that are suitable for use in fully automatic espresso or coffee machines.
The coffee beans are freshly ground for each brewing process. - Keep the coffee beans sealed and stored in a cool place to maintain optimum quality.
- Coffee beans can be stored in the bean container for a number of days without losing their aroma.
Filling the water tank
Important: Fill the water tank with fresh, cold, still water on a daily basis. Prior to operation, check whether the water tank has been sufficiently filled.
- Carefully remove the cover of the water tank.
- Use the handle to remove the water tank and then rinse out.
- Fill the water tank with water up to the "max" marking.
- Put the water tank back in the holder again, keeping it straight, and fit the cover of the water tank.
Setting the language
- Switch on the appliance with the button. The preset language appears in the display.
- Touch the "▼" button cappuccino repeatedly until the required language appears on the display.
- Touch the "ok" button lattemacchiato to confirm the setting.
The appliance rinses and is ready to use when "Choose beverage" appears in the display.
Notes
Language selection only appears automatically when the appliance is switched on for the first time.
You can change the language at any time. "Settings" on page 18
General information
The factory settings of the fully automatic coffee machine are programmed for optimal performance.
The appliance switches off automatically after a specific time.
Whenever a button is pressed, a signal sounds. It can be switched off. "Settings" on page 18
- When the appliance is used for the first time, after running a service programme or has not been operated for a long period, the first beverage will not have the full aroma and should not be consumed.
After commissioning the appliance, you will only achieve a suitably thick and stable "crema" after the first few cups have been dispensed.
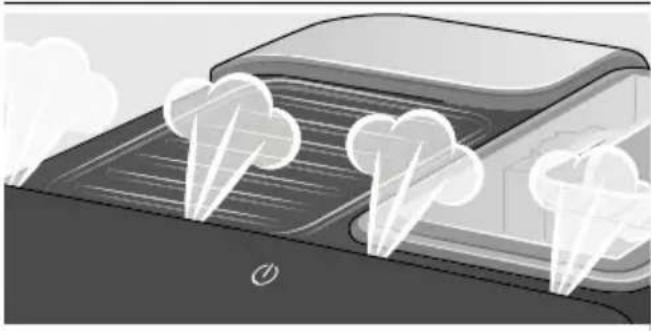
If the appliance is in use for a long period of time, water droplets will form on the ventilation slots. This is normal.
Escaping steam is not a fault but due to the design of the machine.
Before using your new appliance, you should check and select the water hardness. "Settings" on page 18

Operating the appliance
In this section, you will learn how to make beverages with coffee and milk. It contains information about settings, water filters and adjustment of the grinding level, in addition to frost protection.
Note: Freshly prepared beverages may be very hot.
Preparing coffee using freshly ground beans
You can choose between Espresso and Caffe crema. "Preparing drinks with milk" on page 14
The appliance is switched on. The water tank and bean container have been filled.
- Place a cup under the outlet system.
- Touch repeatedly to select the required coffee strength.
- Touch the espresso or caffe crema button.
The coffee is brewed and then dispensed into the cup.
Note: To stop dispensing the drink before the end, touch espresso or caffe crema again.
en Operating the appliance
Preparing drinks with milk
This appliance has a milk frother. You can make drinks of coffee with milk or froth up milk.
Tip: You can also use plant-based alternatives to milk, e.g. soya milk.
Notes
The quality of the milk froth depends on the type of milk or the plant-based alternative used.
Dried milk residues are difficult to remove so always perform cleaning. "Daily care and cleaning" on page 20

Warning
Risk of burns!
The milk frother gets very hot. Hold only by the handle. After use, let it cool down first before touching it.
Coffee drinks with milk
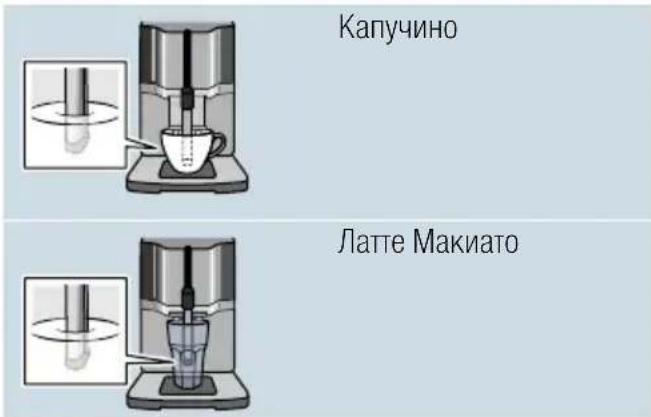
You can choose between cappuccino and latte macchiato. When doing so, please check the position of the coffee dispenser and milk frother.
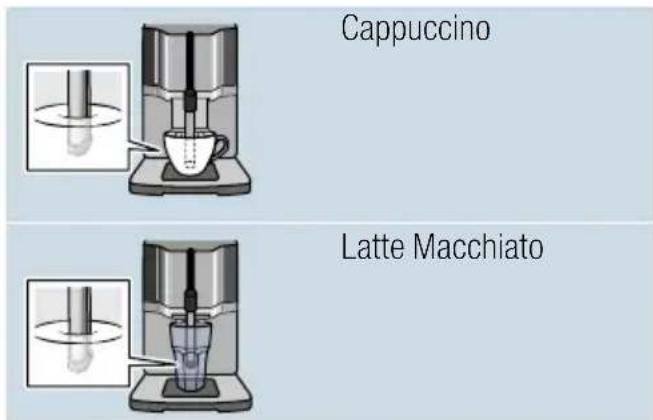
The appliance is switched on. The water tank and bean container have been filled.
The milk frother is installed.
- Fill a large cup or a large glass with approx. 100ml milk for cappuccino and approx. 150ml milk for latte macchiato.
- Place a cup or a glass under the outlet system.
- Push the coffee dispenser and milk frother right down.
- Touch repeatedly to select the required coffee strength.
- Touch the cappuccino or latte macchiato button.
The milk is first frothed up in the cup or glass. The coffee is then brewed and dispensed into the cup or glass.
Note: To stop current dispensing of the drink before the end, touch cappuccino or latte macchiato again.
Frothing up milk
The appliance is switched on. The water tank has been filled.
The milk frother is installed.
- Fill a large cup or a large glass with approx. 100ml milk.
- Place a cup or a glass under the outlet system.
- Push the coffee dispenser and milk frother right down.
- Touch the milk button. The milk is frothed up.
Note: To stop the process before the end, touch milkagain.
Adjusting beverage settings
Preparing two cups at once
Before making a drink, you can select dispensing of two cups at once.
Touching switches the function on or off.
"Double cup on" or "Double cup off" lights up in the display for 5 seconds.
The Double cup function is only possible for espresso and caffe crema; the buttons light up. Dispensing other drinks is not possible while the Double cup function is switched on.
Notes
The drinks are prepared in two steps (two grinding operations). Please wait until the process is fully completed.
If no button is pressed within 90 seconds, the appliance automatically switches to the setting "Double cup off".
Coffee strength
Before making a drink, you can adjust the coffee strength:
To do so, touch to select the strength you require.
| very mild |
| mild |
| regular |
| strong |
| very strong |
| only with TI305: |
| aromalntense |
Note: The coffee strength selected is then active for all drinks made with coffee.
Filling level
You can adjust the filling level of your drinks.
Press and hold espresso or caffe crema for 3 seconds.
Dispensing takes place, with the button selected flashing.
Progress is shown on the display:
Once the required filling level is reached, touch the button selected to stop. The new filling level is only apparent after the next drink is dispensed.
Note: The filling level can be selected either for Espresso (25 - 60 ml) or Caffecrema (80 - 200 ml). A minimum quantity is always brewed: Espresso approx. 25 ml and Caffecrema approx. 80 ml.
Frothing time
You can adjust the frothing time of your drinks.
Press and hold cappuccino, latte macchiato or milk for 3 seconds.
The milk is frothed up, and the button selected flashes.
Progress is shown on the display:

Once the required frothing time is reached, touch the button selected to stop.
Note: Setting the frothing time has no impact on the amount of coffee.
en Operating the appliance
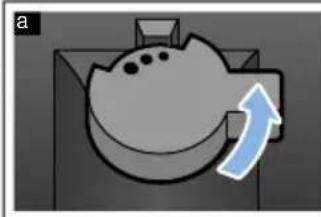
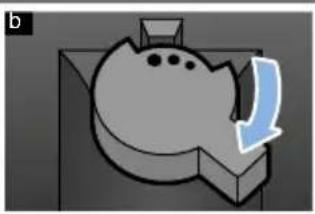
Setting the grinding level
This appliance features an adjustable grinder. This enables the grinding level of the coffee to be individually changed.
Warning
Risk of injury!
Do not reach into the grinding unit.
Caution!
The appliance may be damaged! Only adjust the grinding level when the grinder is running!
When the grinder is in operation, use the rotary selector 13 to set the grinding level.
Finer grinding level: turn anticlockwise. (Fig. a)
Coarser grinding level: turn clockwise. (Fig. b)
Notes
The new setting will not become apparent until after the second cup of coffee.
- Set a finer grinding level with dark-roasted coffee beans and a coarser grinding level with lighter coffee beans.
Water filter
Fig. 7
A water filter lessens limescale deposits and reduces impurities in the water. The appliance also does not need to be descaled so often. Water filters are available from retailers or from customer service.
If a water filter is inserted, the appliance will show when this needs to be changed. The display shows the relevant prompt.The symbol will light up.
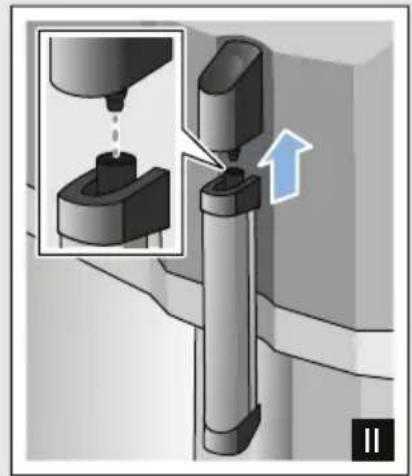
Inserting or replacing a water filter
A new water filter must be rinsed before it can be used.
The appliance is switched on. The water tank has been filled.
- Simultaneously hold down and calc'nClean for at least 3 seconds.
- Touch the "▼" button cappuccino repeatedly until "W. hardness" appears.
- Confirm by pressing the "ok" button latte macchiato.
- Press the "▼" button cappuccino repeatedly until "Water filter" appears.
- Confirm by pressing the "ok" button latte macchiato.
The display shows "Filter act." - Immerse the water filter (opening facing up) in a container filled with water until no more air bubbles rise to the surface.
Fig. 7 - Then press the water filter firmly into the empty water tank.
- Fill the water tank with water up to the "max" marking.
- Place a container with a capacity of 1.0 litre under the outlet.
-
Touch the "ok" button lattemacchiato to save the setting and start rinsing.
-
Touch the < button caffe crema to exit the menu.
- Then empty the container. The appliance is ready for use again.
Removing the water filter
If the water filter has been removed and no new one inserted, please select the appropriate water hardness. "Setting the water hardness" on page 19
Frost protection
To prevent frost damage during transportation and storage, completely empty the appliance beforehand.
Info: The appliance must be ready for use and the water tank filled.
- Place a large container under the outlet of the milk frother and push the frother down.
- Press and hold the milk button for at least 5 seconds. The LED in the button flashes, and the appliance now heats up.
- As soon as steam escapes from the milk frother, remove the water tank.
- Allow the appliance to cool down. Wait until "Water tank empty" appears.
- Use the button to switch the appliance off.
- Empty the water tank and the drip tray and thoroughly clean the appliance.
The appliance can now be transported or stored.
Note: The brewing unit is now secured and cannot be removed.

Settings
This appliance has different factory settings. You can customise the settings on the appliance.
Note: If no button is pressed within 90 seconds, the appliance switches to "Choose beverage" without saving. The previous setting remains unchanged.
You can select the following settings:
Automatic switch-off
The appliance switches off automatically at a specific time after the last button was pressed. This time can be selected, with settings from 15 minutes to 4 hours possible here.
- Simultaneously hold down and calc'nClean for at least 3 seconds.
- Touch the "▼" button cappuccino repeatedly until "Auto Stand-by" appears.
- Confirm by pressing the "ok" button latte macchiato. The factory settings are activated, the language selection appears.
- Touch the "▶" button cappuccino and select the time. The following settings are possible:
- after 15 min.
- after 30 min. (factory setting)
- after 1 hour
- after 2 hours
- after 4 hours
- Confirm by pressing the "ok" button latte macchiato. The factory settings are activated, the language selection appears.
- Touch the << button caffecrema to exit the menu.
Switching the audible signal on/off
Whenever a button is pressed, an audible signal sounds.
This can be switched on or off.
- Simultaneously hold down and calc'nClean for at least 3 seconds.
- Touch the "▼" button cappuccino repeatedly until "Sound" appears.
- Confirm by pressing the "ok" button latte macchiato. The factory settings are activated, the language selection appears.
- Touch the "▼" button cappuccino and select "Sound on" or "Sound off".
- Confirm by pressing the "ok" button latte macchiato. The factory settings are activated, the language selection appears.
- Touch the < button caffe crema to exit the menu.
Setting the language
- Simultaneously hold down and calc'nClean for at least 3 seconds.
- Touch the "▼" button cappuccino repeatedly until "Language" appears.
- Confirm by pressing the "ok" button latte macchiato. The factory settings are activated, the language selection appears.
- Touch the "▼" button cappuccino and select the required language.
- Confirm by pressing the "ok" button latte macchiato. The factory settings are activated, the language selection appears.
- Touch the < button caffe crema to exit the menu.
Setting the water hardness
It is important to set the water hardness correctly so that the appliance indicates in good time when the descending programme should be run. The preset water hardness is level 4.
You can check the water hardness using the enclosed test strip or by asking your local water supplier.
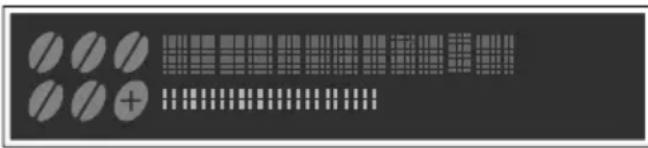
- Briefly immerse the enclosed test strip in fresh tap water, leave it to drip and read off the result after 1 minute. The number of fields on the test strip that change colour indicate the water hardness level.
- Simultaneously hold down and calc'nClean for at least 3 seconds.
- Touch the "▼" button cappuccino repeatedly until "W. hardness" appears.
- Touch the "ok" button lattemacchiato and confirm.
- Touch the "▼" button cappuccino and select the water hardness. The following settings are possible:
-W.hardness1
-W.hardness2
-W.hardness3
-W.hardness4(factory setting)
Water filter (when used)
- H2O-softener (setting if water softener available)
- Touch the "ok" button lattemacchiato to save the setting.
- Touch the < button caffe crema to exit the menu.
The table shows the allocation of the levels to the different degrees of water hardness:
Setting Degree of water hardness German (^) French (^)
| 1 | 1-7 | 1-13 |
| 2 | 8-14 | 14-25 |
| 3 | 15-21 | 26-38 |
| 4 | 22-30 | 39-54 |
Subsequent changes to the water hardness can be made at any time.
Note: When using the water filter (see section "Accessories"), proceed as follows "Water filter" on page 17.
Factory reset
If you set the appliance back to the factory settings, you will lose your own settings.
- Simultaneously hold down and calc'nClean for at least 3 seconds.
- Touch the "▼" button cappuccino repeatedly until "Factory reset" appears.
- Confirm by pressing the "ok" button latte macchiato.
The factory settings are activated, the language selection appears.
- Touch the "▼" button cappuccino repeatedly until the required language appears on the display.
- Touch the "ok" button latte macchiato to confirm the setting. The appliance rinses and is ready to use when "Choose beverage" appears on the display.

Daily care and cleaning
With good care and cleaning, your appliance will remain fully functioning for a long time to come. In this section, you will learn how to correctly clean and care for your appliance.

Warning
Risk of electric shock!
Before cleaning the appliance, pull out the mains plug. Never immerse the appliance in water. Do not use a steam cleaner.
Cleaning agent
Please observe the following information to ensure that the different surfaces are not damaged by using the wrong type of cleaning agent.
Do not use:
Harsh or abrasive cleaning agents.
Any cleaning agents containing alcohol or spirits.
Hard scouring pads or sponges.
Notes
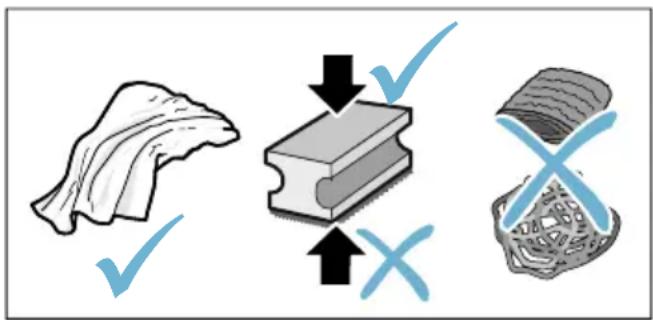
- New sponge cloths may contain salts. Salts can cause rust film on stainless steel. Wash new sponge cloths thoroughly before use.
Always remove any limescale, residues of coffee or milk, cleaning or descaling solution immediately. This residue may cause corrosion.
Caution!
Not all of the appliance's components can be cleaned in the dishwasher.
→Fig.5-7
Not dishwasher-safe:

Water tank
Cover for water tank
Aroma lid
Brewing unit
Drip tray
Dishwasher-safe:

Drip plate
Drip grate
max. 60^ C
Coffee grounds container
Float
Milk frother
Cover for milk frother
Cleaning the appliance
- Wipe down the outside of the appliance with a soft, damp cloth.
- Clean the control panel using a micro-fibre cloth.
- Wipe down the coffee dispenser if required after dispensing each beverage.
Notes
If the appliance is cold when switched on or if it is switched off after dispensing coffee, it rinses automatically. The system is therefore self-cleaning.
If the appliance has not been used for a long period of time (e.g. while you are on holiday), clean the entire appliance thoroughly, including the milk frother, trays and brewing unit.
Cleaning the drip tray and coffee grounds container
Fig. 5
Note: The drip tray and coffee grounds container should be emptied and cleaned every day in order to prevent deposits. With frequent use also empty from time to time, as soon as the float is clearly visible, or the relevant message appears in the display.
- Open the door.
- Pull the drip tray with the coffee grounds container forwards and out.
- Remove the drip plate with grate.
- Empty and clean the drip tray and coffee grounds container.
- Wipe out the inside of the appliance (area of drip tray).
Cleaning the milk system
The milk system must be cleaned after each use to remove residues.
Warning
Risk of burns!
The milk frother gets very hot. Hold only by the handle. After use, let it cool down first before touching it.
- Fill a glass half-full with water and place under the outlet system.
- Push the milk frother right down.
- Touch the milk button to clean the milk system.
- Push the milk frother right up and allow it to cool down.
- Dismantle the milk frother into its individual parts and clean thoroughly.
→Fig.6
- Dry the individual parts, reassemble and fit back onto the appliance.
Notes
To stop the process before the end, touch milk again.
All parts of the milk system should be cleaned in the dishwasher. Detergent residues in the milk system must be thoroughly removed following the rinsing process.
Cleaning the brewing unit
Fig. 4, Fig. 5
In addition to automatic cleaning, the brewing unit should be removed regularly for cleaning.
Caution!
Clean the brewing unit without detergent or products containing vinegar or acid and do not place in the dishwasher.
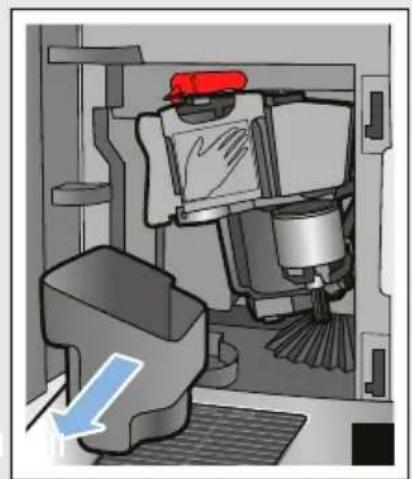
Remove the brewing unit:
- Switch off the appliance.
- Open the door to the brewing chamber.
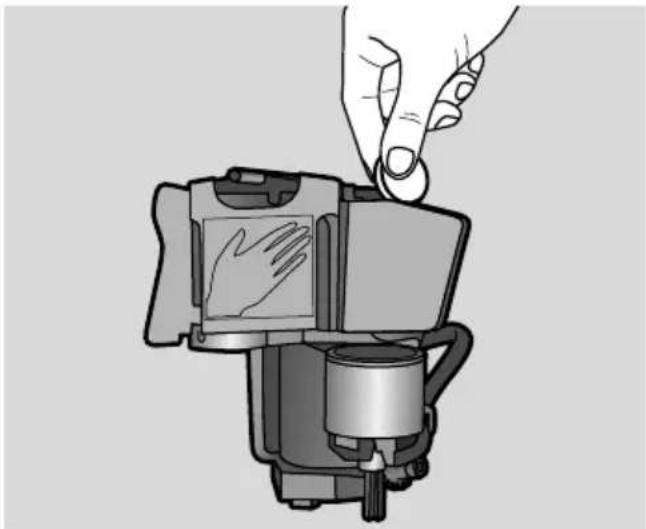
- Remove the coffee grounds container.
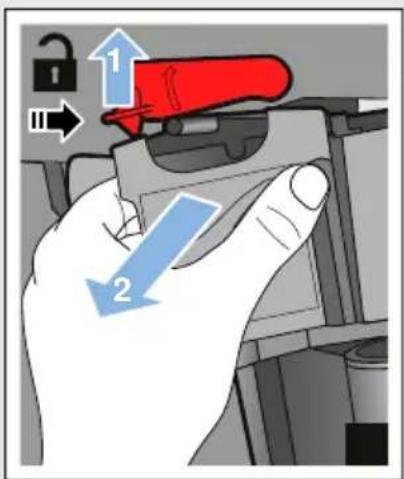
- Push the red lever up, grasp the brewing unit by the handle and pull forwards carefully.
- Rinse the brewing unit thoroughly under warm, running water.
- Clean the interior of the appliance thoroughly with a damp cloth, removing any coffee residues.
- Allow the brewing unit and the interior of the appliance to dry.
Insert the brewing unit:
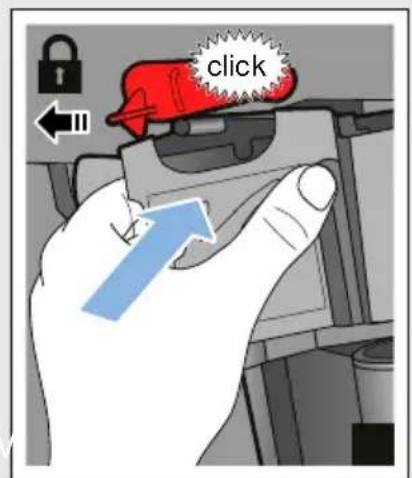
- Hold the brewing unit only by the handle.
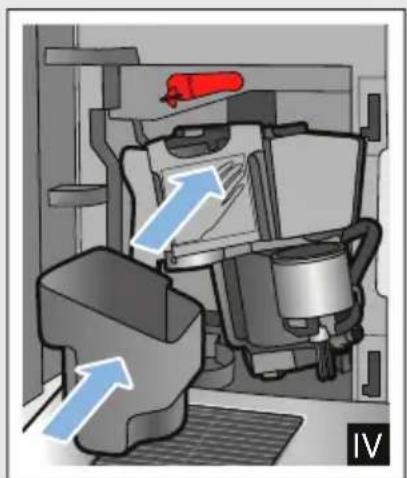
- Push the red lever up, position the brewing unit underneath and slide back as far as it will go. The lever must snap into place.
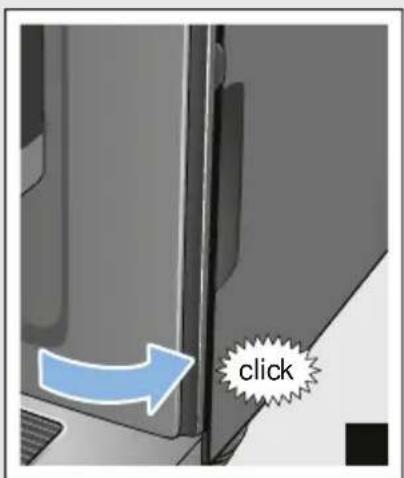
- Insert the coffee grounds container again and close the door.
Important: If the brewing unit has not been inserted, or the brewing unit or drip tray not inserted correctly, it will not be possible to close the door.

Service programme
Every so often - with the exact frequency depending on water hardness and usage - the calc'nClean button will light up. The display shows "Calc'nClean required".
The appliance should be immediately cleaned and descaled using the programme.
Notes
- Important: If the appliance is not cleaned and descaled in good time, it may be damaged.
- Important: If the appliance is not descaled and cleaned in time, it will be locked. The display shows "Device locked"
- If the appliance is locked, it can only be operated again once the service programme has been carried out.
Caution! For each of the service programmes, use Calc'nClean descaling and cleaning agents as described in the instructions and observe the (relevant) safety information.
Do not drink the liquids. - Never use citric acid, vinegar or any vinegar-based agents to descale the appliance.
For cleaning and descending, only use the tablets intended for such purposes. They have been specially developed for this appliance, and new stocks can be ordered through customer service. "Accessories" on page 11 - Never insert descending tablets or other products into the brewing unit.
- Never interrupt the service programme.
Prior to starting a service programme, remove, clean and re-insert the brewing unit. Clean the milk frother.
At the end of a service programme, wipe down the appliance using a soft, damp cloth to immediately remove any descaler residue. This residue may cause corrosion.
- New sponge cloths may contain salts. Salts can cause rust film on stainless steel, so cloths must always be washed out thoroughly before use.
Using a water filter increases the intervals until a service programme needs to be performed.
If the service programme is interrupted, e.g. by a power failure, calc'nClean and will light up on the display. Proceed as described in the section calc'nClean from item 10.
Starting Calc'nClean
Duration: approx. 40 minutes
- Press and hold the calc'nClean button for approx. 5 seconds.
symbol lights up. - Open the door, remove the drip tray and coffee grounds container and empty.
- Remove and clean the brewing unit.
- Place a Siemens cleaning tablet in the brewing unit and re-insert the unit.
- Re-insert the drip tray and coffee grounds container and close the door.
symbol lights up. - Remove the water filter (if there is one).
- Pour 0.5 litres of lukewarm water into the empty water tank up to the mark and dissolve a Siemens descaling tablet in it.
- Re-insert the water tank and place a large container (approx. 1 litre) under the outlet system.
- calc'nClean flashes, touch calc'nClean.
The programme starts, cleans and descapes the appliance. calc'nClean pulses. Duration approx. 20 minutes.
symbol lights up.
-
Empty the container, open the door, empty the drip tray and re-insert.
-
Close the door and place a container under the outlet system.
symbol lights up. - Clean the water tank and replace the water filter (if removed).
→Fig.7
- Fill with fresh, still water up to the "max" mark. Place the container under the outlet system again.
- calc'nClean flashes, touch calc'nClean.
The programme starts and then cleans and rinses the appliance. calc'nClean pulses.
symbol lights up.
15. Empty, clean and re-insert the drip tray and coffee grounds container. The programme has finished. The appliance is ready for use again.

Trouble shooting
Faults often have simple explanations. Before calling the customer service,
please refer to the fault table and attempt to correct the fault yourself.
Please read through the safety information at the beginning of these instructions.
Fault table
| Problem Reason Remedial action | ||
| The appliance no longer responds. | Fault in the appliance. Pull out the mains plug, wait 5 seconds, plug it back in. | |
| Coffee or milk froth quality var-ies considerably. | Build-up of limescale in the appliance. | Descale the appliance in accordance with the instructions. |
| The individually selected per-cup quantity is not reached. | The grinding level is too fine. Set a coarser grinding level. | |
| Coffee dispensing slows to a trickle or stops completely | Heavy build-up of limescale in the appliance. | Descale the appliance as described in the instructions. |
| Air in the water filter. Immerse the water filter in water until no more air bubbles escape, then insert the filter again. | ||
| The quality of the milk froth var-ies. | The quality of the milk froth depends on the type of milk or the plant-based alternative used. | Optimise the result by selecting your milk or plant-based alternative as appropriate. |
| No coffee dispensed, only water. | An empty bean container is not detected by the appliance. | Add coffee beans Note: The appliance will adjust to the coffee beans on the next dispensing process. |
| The coffee shaft on the brewing unit is blocked. | Clean the brewing unit. → "Cleaning the brewing unit" on page 21 | |
| Beans are not falling into the grinding unit (beans too oily). | Gently tap the bean container. Possibly change the type of coffee. When the bean container is empty, wipe it with a dry cloth. | |
| Coffee has no "crema". Unsuitable type of coffee. Use a type of coffee with a higher proportion of robusta beans. | ||
| The beans are no longer freshly roasted. | Use fresh beans. | |
| The grinding level is not suitable for the coffee beans. | Set a finer grinding level. | |
| The coffee is too "acidic". Grinding level set too coarse. Set a finer grinding level. | ||
| Unsuitable type of coffee. Use a darker roast. | ||
| The coffee is too "bitter". | Coffee is ground too fine. | Set a coarser grinding level. |
| Unsuitable type of coffee. Change the type of coffee. | ||
| The coffee tastes "burnt". Coffee is ground too fine. Set a coarser grinding level. | ||
| Unsuitable type of coffee. Change the type of coffee. | ||
| Milk/blended milk drinks too hot.Milk froth too thin, loud sucking noise. | Too little milk in glass or cup. Use more milk or adjust frothing time. | |
| Milk/blended milk drinks too cold. | Too much milk in glass or cup. Use less milk or adjust frothing time. | |
| No milk/milk froth dispensed. The milk frother is soiled.The milk frother is not inserted in the milk. | Clean the milk frother in the dishwasher. → "Cleaning the milk system" on page 21Use more milk, check whether the milk frother is inserted in the milk. Slide the outlet system right down. | |
| The water filter does not stay in position in the water tank. | The water filter is not mounted correctly. | Immerse the water filter into water until no more air bubbles escape; insert the filter again.Firmly press the water filter straight down into the tank connection. |
| Water dripped onto the inner floor of the appliance when the drip tray was removed. | Drip tray removed too early. Wait a few seconds after the last drink was dispensed before removing the drip tray. | |
| The brewing unit cannot be removed. | The brewing unit is not in the removal position (e.g. frost protection activated). | Switch the appliance on again. |
| The appliance cannot be operated, display messages changing. | The appliance is in demo mode. Hold the button for at least 5 seconds to deactivate demo mode. | |
| The grinder will not start. The appliance is too hot. Wait 1 hour so the appliance can cool down. | ||
| Display shows "Close door" despite door closed. | The door is not properly closed. Press the door firmly closed. | |
| The appliance is too hot. Wait 1 hour so the appliance can cool down. | ||
| Display shows: "Empty trays" despite empty drip tray - what to do? | Emptying is not detected when the appliance is off. | When the appliance is switched on, remove and re-insert the drip tray. |
en Trouble shooting
| Display shows "Fill water tank" despite full water tank. | Water tank wrongly inserted. Insert water tank correctly. | |
| Carbonated water in the water tank. | Fill the water tank with fresh tap water. | |
| Float is stuck in the water tank. Remove the water tank and clean thoroughly. | ||
| New water filter not rinsed according to the instructions. | Rinse the water filter according to the instructions and then switch on. | |
| Air in the water filter. Immerse the water filter (opening up) in water until no more air bubbles escape; insert the filter again. → "Inserting or replacing a water filter" on page 17 | ||
| Water filter is old. Insert a new water filter. | ||
| Limescale deposits in the water tank can block up the system. | Thoroughly clean the water tank and start calc'nClean. → "Calc'nClean service programme" on page 23 | |
| Display shows "Fill water tank" and LEDs flashing. | Water tank is missing or not inserted correctly. | Insert water tank correctly. |
| The pipe system in the appliance is dry. | Fill the water tank with fresh tap water. Do not fill with carbonated water. | |
| Air in the water filter. Immerse the water filter (opening up) in water until no more air bubbles escape; insert the filter again. | ||
| Display shows "Clean brewing unit". | Brewing unit is soiled. Clean the brewing unit. | |
| The brewing unit's mechanism is stiff. | Clean the brewing unit. → "Daily care and cleaning" on page 20 | |
| Display shows "Incorrect voltage". | Incorrect voltage in building. Only operate the appliance at 220V-240V. | |
| Display shows "Appliance too cold". | The ambient temperature is too cold. | Operate the appliance at temperatures >5 °C. |
| Display shows "Restart appliance", LEDs flashing. | Brewing unit very heavily soiled or brewing unit cannot be removed. | Switch the appliance off and back on again. Clean brewing unit if possible. |
| Display shows "Restart appliance"; LED does not light up. | Fault in the appliance. Restart appliance. | |
| Display shows "Clean/fill water tank", calc'nClean and light up. | The descaling process has been interrupted. | Proceed as described in the section calc'nClean from item 10. |
| Display "calc'nClean" keeps on appearing. | The water is too hard. Insert water filter and activate according to the instructions. → "Water filter" on page 17 | |
| If you are unable to solve the problem, always call the hotline. You will find the telephone numbers at the back of these instructions | ||

Customer service
Technical data
| Power connection (voltage - frequency) | 220-240 V ~, 50/60 Hz |
| Power rating 1300 W | |
| Maximum static pump pressure 15 bar | |
| Maximum water tank capacity (without filter) 1.3 l | |
| Maximum capacity of the coffee bean container ≈ 250 g | |
| Length of the power cable 100 cm | |
| Dimensions (H x W x D) 37.3 x 24.9 x 42.8 cm | |
| Weight, empty approx. 8-9 kg | |
| Type of grinder Ceramic/steel |
E number and FD number
When calling us, please give the full product number (E no.) and the production number (FD no.) so that we can provide you with the correct advice. These numbers can be found on the rating plate 9. ( Fig. 2)
To save time, you can make a note of the data for your appliance and the telephone number for customer service here, should this be required.
E no.
FD Number
Customer service
The contact data for customer service in all countries can be found at the back of these instructions.
Guarantee
The guarantee conditions for this appliance are as defined by our representative in the country in which it is sold. Details regarding these conditions can be obtained from the dealer from whom the appliance was purchased. The bill of sale or receipt must be produced when making any claim under the terms of this guarantee.
Changes reserved.
Table des matieres

nI Service programme
Calc'nClean starten
Duur: ca. 40 minutes
IpeTeKaKaHaatbNoJb3OBAtbcra HOBbIM npuOpOM, pOBoEpbTe N UCTAHOBNTe JcEeTKoCTb BObl. "YCTaHOBKn" Ha cTpaHnca 141

UnpaBJIeHne 6bITOBbIM npH6Opom
B daHno IaBe OncaHo npiroTOBHeNe KOeHNbIX MOnOuHbIX HAnITKOB. OncaHbI TAKKe yCTaHOBKn Pnp6opa, NcNoJIb3OBAHne QnilbTpA DIA BOdbl, IN3MeHHeNcTepeHn NOMoJa, a TaKKe 3aUNTa OT 3aMep3aHn.
Yka3aHHe: CBeKeepnroTOBneHHbIe HAnNTKMOrT 6bITb OueHb RopAUMN.
PnroToBJIeHne KofoeHoro HAnNTka H3 CBeXeMOnOTbIX KofoeHbIX 3epeH
Bbl mokeTe BbipaTb Especco nn Caffecrema. "PnuroTOBneHne HAnrKOB CMOLOKOM" Ha cTpaHnua 137
Pnpob BKlnoueH. Pe3epByap dIa BOdbi N eMKoCTb Ira KopeHbIX 3epeH HAnOJIHeHbl.
- NocTaBbTe YauKyu NOI dNcpeHcep.
- KocHyBwInCb HeCKoJIbKO pa3 000, yCTaHOBnTe HxKHyIO KpeNoCTb Kofoe.
- KocHTecb KHONKn especco nn cafe crema.
KoepaKa CBapNT KoPe n 3aTeM HaJIbET erO B YAaKy.
Yka3aHHe: UTo6bI npexJeBpeMeHHO 3aKoHcHTb npiroTOBJIeHne HAnITKa, CHOBa KocHTecb esspso nnCaffe crema.
ПригOTOBлЕне HaNTKOB C MOЛOKOM
B daHHOM npiobope nmeetc KaanyHaTOp. Bbl moKeTe npiroTOBnTB KOeHbIe HAnrTKn C MOJOKOM NIN BCHeHnTB MOJOKO.
Pekomehdaun: BblMOxTe BmecTo MOJOKa TAKKe NcNoJIb3OBaTb HAnITKn n3 pAcTIeBHO rO cbIpBa,HaNPIMep, n3 CON.
Yka3aHn
KaueCTBO MOLOUHOI NeHbI 3aBNCNT OT BnDa IcNoJIb3yeMOrO MoJOKa IIN HAnITKa N3 PaCTInTeJIbHOrO CbIPbI.
3acoxune OCTaTKMOLOKa ydaJIHTb CNOXHO,IO3TOMy O6r3aTeIbHO OuNCTHTb. "EKeJHBeHbIyXoI N OuynCTKa"Ha cTpaHnua 143
IpeDynpEJdHne OnachocTb oXora!
KanyuHaTop CnIbHo HarpBaetc. BepTeCb Tolbko 3a pyky. Pocne IcNoIb3OBAHn, IpexKe yem npKacatbc, DoXdntEc6 OxJaXDeHn.
Koehhhe HAnHTKc MONOKOM
Bbl moxete Bbipatb kanyuHNO nn laTMeMaKnaTo. Pn 3tOM npMITE BO BHIMAHNE pOLOXeHne DnCpeHcepa n kanyuHaTopa.
Pnp6op BKIOUeH. Pe3epByap IJI BODbI N
EMKoCTb IJI KOFeINbIX 3epeH
HaONHebl.
KanyuHaTop yCTaHOBneH.
ru YnpaBJIeHne 6bITOBbIM npI6OpOM
- HaneiTe B 60JIbIyU yauKyu nn 60JIbWOn CTaKaH npu6J. 100 mI MOLOKa dJa KaNyUHOn I npu6J. 150 mI MOLOKa dJa NaTte MaKnato.
- NocTaBbTe yawky nIn CTaKaH NOd INcCneHceP.
- Onyctnte dincpeHcep dIa KoFe n KaanyHaTOp Do yNopa BHN3.
- KocHyBwInCb HeckoJbKO pa3 000, yCTaHOBnTe HxKHyIO KpeNoCTb KoΦe.
- KocHTecb KHONKcappuccino Inin latte macchiato.
CnauaBcneHnBaetcMoIOKOBuWKe nnCTaKaHe.3aTeM 3abapnBaETcKoFe n pa3nBaetcB uWky nn CTaKaH.
Yka3aHHe: UTo6bI npexKeBpeMeHHO 3aKoHcHTb DaHHbI 3TaI pNtROBJIeHn HAHTKa, CHOBa KCHNTecb cappuccino IInI latte macchiato.
BcneHbAHne MoJOKa
Pn6Op BkIoueH. Pe3epByap HaNoJIHeH. KaynHaTOP yCTaHOBJIeH.
- HaneiTe B 60JIbIyU yawKy nII 60JIbWoI cTaKaH npn6I. 100 mI MOJOKa.
- NocTaBbTe yawky nIn CTaKaH NOd INcCneHcep.
- Onyctnte dincneHcep dna Kope n KaanyuHaTop do ynopa BHN3.
- KocHTecb KHONKI milk. Pn6op BCHeHNaET MOJOKO.
Yka3aHHe: UTo6bI npexKeBpeMeHHO 3aKOHHTb IpoueCC, CHOBA KCHNTecb milk.
PnroToBnenHe DByx Cawek cpa3y
Ipeedem,KaKa pa3nITb HAnITOK,MOJHO yCTaHOBnTb pO3nVB DByx YaWeK Cpa3y.
ФУнкцИBAKLOUaETcI NBIKLIOUaETcI KacAHnEM
IpeTeM, KaK pa3nITb HAnrTOK, MoXHO yCTaHOBnTB KpeNoCTb KoPe.
ДЯЗTOFO,KOCHyBWHNCbOOO,BbIbepnte HxKHyIO KpeNoCTb.
| оуень слаб. |
| слабий |
| нормальн. |
| кpenки |
| оуень кpenки |
| тлько за TI305: |
| aramalntense |
Yka3aHHe: YCTaHOBNeHHa KpeNoCTb KOFe DeiCTBnTeJIbHa IJRA BCEx KoFeiHbIX HAINTKOB.
KoJnueCTBO HAnHTKa
BbMOXeTe N3MeHHTb KOJIuYeCTBO npIroTaBnBaEMOHO HAnrTKa.
YdepnBaTe HaxaToe espresso nnna caffecremaB TeueHne 3 ceKyHd.
IeT npiroTOBLeHne HAnITka, BbIpaHHaKHOHnKa Mnraet.
Ppoecc oToobpaKaetcHa nncnnee.
Iocne TOrO, KaK 6yJeT DoCTnHyTo HxHoe KOJIueCTBO HaNTKa, KCHNTecb KHONK, YTO6bl PpeKpaNTb IpOuceC. YCTaHOBLeHHoe 3aHOBO KOJIueCTBO HaNTka peaIN3yeTcR, ToIbKO HaUNHa CO CNeDuUoero PpNROTOBHeHn HAHTKa.
Yka3aHHe: MoXHO yCTaHOBnTb KOJIuYeCTBO HAnITKa IJRA EsPssO (25 - 60 mI) nII Caffecrema (80 - 200 mI). Bcerda nprirotabnBaetcMnHmMaJIbHoe KoJIuYeCTBO,EsPssO npn6.25 mI n Caffecrema npn6.80 mI.
ДиHTeJIbHOCTb BCnEHnBaHnA
BbMOxTe N3MeHHTb DInTeIbHOCTb BCHeHnBaHnHaNTKa.
YdepknBaIte HaxaToi cappuccino, lattemacchiato milk B TeueHne 3 cekyHd.
Moloko BCHeHbAeTc, BbIpaHHa KHONKa Mnraet.
Ppoecc oToobpaKaetcHa nCnnee.

Iocne TOrO, KaK HxHnA dInTeBHOCTb BCHeHbAHn OyDet DoCTnHyTa, KOCHNTecb KHONKn, YTObI npeKpaTntb npouecc.
Yka3aHHe: YCTaHOBKa dIITeJIbHOCTN BCIIeHNBaHn He BInReT Ha KOJIueCTBO KoΦe.
YctaHOBka CTeneHn NOMOJa
DaHbI npioop o6opyoBaH perynpyemoi Koemolkoi. 3To IO3BOJET HINBnDyaJIbHO N3MeHArTb CTeNEH b NOMOla KoPe.
!IpeDynpexKdEHHe OnachocTb TpaBMnpoBaHnA!
He npikacaiTecb K BHyTpEHnM qactm Kofoemolkn.
BHHMaHHe!
Bo3MoXHbI NOBpeXdEHNr np6opa! CTepeHb NOMoJa MoXHo peYJnPoBaTb TOnbKO pR paOtaIOUe KOFemOLke!
Pp npabotaoue Kooemolke yctaHOBNTe NOBOPOTbIM nepeKIOUaTeIeM 13 CTenEh NOMOJa.
ToHKn NOMOJI:BpaueHne npOTNB yacOBoN cTpeKN. (Pnc.a)
Bollee rpyobn nOmoI:BpaueHne no yacobOn cTpeKe.(Pnc.b)
yKa3aHHa
I3meHHe HactpoKn 6yDet 3amEtHO IINb HaHHa CO BTOPOuAaKN KoPe.
Дя TeMHbIX JapeHbIX KofoeHbIX 3epeH BbIbepnte 6OJee MeKnI NOMOJI,ДЯ 6OJee CBETbIX 3epeH - 6OJee KpyNHbI NOMOI.
ФильТр Дд Воры
Puc. 7
Фильтг Для BODbl CHнжаet Oбра3OBaHne HaKINn, a TaKKe B 3HaunTeIbHoJ Mpe OuNlaeT BODy OT 3aRpy3HeHn. Kpome TOrO, He HxKHO TaK Yacto ydaJIrTb HaKINb N3 PrNo6opa.ФиьТрbl Для BODbl MoJHo npno6peCTn B MaRa3InHax INn Yepe3 CepBnCHHyO CnyXoy.
EcnBCTaBHeN pInbTp IIN BODI, npioOp CnHaH3npyeT, KOrda eRo Tpe6yeTc8 3aMeHHTb. Ha dncnlee nOBnEeTc8 COOTBeTCTByOuN 3anpoc. CmBoJ rOpNT HnpepbIBHO.
YcTaHOBka HnN 3aMeHa FnIbTp a JIa BOJbl
Ipeed nCnoJb3OBAHnem HOBOrO qnilbTp a DnB OdbI eRo HuyKHO Ipomblb.
Pn6op BkIoueH. Pe3epByap HanoJIHeH.
- YdepxuBaTe HaKaTbIMN Ooo n calc'nClean OndHOBpeMeHHO B TeueHne MInHMym 3 ceKyHd.
- “▼” KacaǐTecb KHONKn cappuccino, noka Ha āncπlēe He NɔRbɪTcR «KeCTK. Bɔdbl».
- ПосpeДСТВОМ "OK" NOДТВЕРДИТЕ KHOПКУ latte macchiato.
- “▼” Kacaǐtečb KHOJKN cappuccino, noka Ha āncJIeE He NOBHTcR «ΦɪNbTp BODbl>.
- ПосpeдвOM "ok" поТВердпTe KhoIGNky latte macchiato.
Ha nncnnee noBntcra aKT.>
6.Погу3nteФиьтДЯВОды (OTBepCTnEM BBepx)ВHaNoJIHeHHbI BOIOI KOHTeHepИ OCTaBBTe B HeM, IOKa He ПпeКpaTITcR BbIXOДpy3bIPbKOB BO3dYxa. →Pnc.7
7.Поссе эТORO npoUHO BCTaBbTe ΦиьтрдЯ BOДыВпустон peЗерByap ДЯ BOДы. - 3aIeIte Bovy Bpe3epByap IJIa BOIbI DO OTMeTKn «max»
-
Повсясые EMКОCTь объем минимуm 1,0л по дисөнөр.
-
"ok" KocHTecb KHONK lattemacchiato, uTo6bI COxpaHNTb yCTaHOBky I 3aNyCTNTb pOucec cPOMbIKN.
- “<” KÖCHNTECb KHOJKN caffecrema, YTOObi BbIHTn ɪz MeHʊ.
- No OKOHuaHn ONOpOJHnTe eMKoCTb. Pnp6op cHOBa rOtOB K pa6ote.
H3BneueHHe HnIbTpA IJIa BOIbl
Ecnn nIbTp dIa BOdbI BbHyT N HObblnBtp dIa BOdbI He BCTaBHeH, YcTaHOBNTe JecTKOCTb BOdbI.
"YCTaHOBka JXECTKOCTN BOJbl" Ha cTpaHnua 142
3aunta ot 3amep3aHnA
YTo6bI n36eKaTb NOBpeJdeHn B pe3yJIbTaTe BO3dEInCTBn XoLoJa BO BpeM TaHcNOpTnPOBKn IIn XpaHeHn, Pnp6Opbl Heo6xOIMo PpeDvapntbHo ONoHocTbO ONOPOKHrTb.
HhOpmaun. PnpopdoJxeh 6bITb roTOB K paOte, pe3epByap Ira BoDbl HApONHeH.
- ПocTaBbTe NOД ДИСРЕнсер KaNYuHaToPa eMKoCTb 6OJIbWoTOp a3Mepa I ONyCTnTe BHN3 KaNYuHaToP.
- YdepxnBaIte HaxaToN KHOIpKy milk MNHmym 5 cekyHd. CBeToIOoN KHOIpKu MInraeT, BbINOJIHHeTc pa30rpeB np6Opa.
- KaK TOnbKO n3 KaNyuHaTopa NaHcET BbIXOAnTb Nap, CHIMnTe pe3epByap IJIY BOIbl.
- BbInonHЯETc npoecc nponapuBaHn npnbopa. Doxntecb nOBLeHn INdNkaun «EMKocTb DnBBoI nycta>.
- Khonkoi BbIKIOUHTe np6op.
- OnopoxKHNb pe3epByap IJRA BOJBI IN IOJIOH, TuaTeJIbHO OUInCTIte npioBOp. Tepeb MOxHO TpaHCnOpTnpoBaTb npioBOp nIIyCTaHOBtB eO Ha xpaHeHne.
Yka3aHHe: 3aBapOuHbI 6lOk 3a6JIOKInPOBaH I He BbIHMaETcA.

YCTaHOBKN
B npnbope BbIOnHeHbI pa3JIuHbIe 3aBOdCKne HAcTpoKn. HAcTpoKn npnbopa MOxHO peYJInpOBAt b INDINDbuaJIbHO.
Yka3aHHe: EcIn B TeueHne 90 cekyHn Hn Onda n3 KhoNOK He bdyet Haxkata, npioOp IepexOHTB peKIM BbIOpa HAnITKa 6e3 coXpaHEnHaCTpoE.K. CoXpaHEnHbIe do 3TOTO HaCTPOIKn HE MeHrOTcR.
MOxHO BbIPOJHHTb CJIeIyIOUHe NaCTPOJKN.
ABTOMaTHueeCKoe OTKJIIOUeHne
IIO nCTeueHn ONpeJeHNO BpeMeHn Iocne IocJIeHrO KacAHN KHOPIKNI np6Op aBTOMaTHeCK N BbIKJIOuAeTCR. 3TO BPEM MoXHO yCTaHOBNTb, PpUcEM BO3MOxHa yCTaHOBka OT 15 MInHyT Do 4 YacOB.
- YdepxnBaIte HaxKaTbIMN Ooo n calc'nClean OndHOBpeMeHHO B TeueHne MInHMym 3 CeKyHd.
- "▼" KacaTecb KHONKcappuccino, NOKa Ha dncJIee He NOBUTcR «ABT. OXnIaHne>.
3.ПосpeДСТВOM"OK"ПОДТВЕРДNTe KHOПКу latte macchiato. 3aJeICTBOBaHbI 3aBOIDCKne HAcTPOIN, NOBnEeTcR OKHO BbIbOpa Ra3bIka. - "Kochintecb KHONKI cappuccino yCTaHOBNTe Bpem. Bo3MOxHbI CJIeDyUoJne HAcTpoiKN: -yepe3 15 mN. -yepe3 30 mN. (3aBOJcKaYCTaHOBka) -yepe3 1 yac -yepe3 2 yaca -yepe3 4 yaca
5.ПосpeДСТВOM"OK"ПОДТВЕРДNTe KHOПКу latte macchiato. 3aENCTBOBaHbI 3aBOdCKne HAcTpoNKn, NOBnETCr OKHO BblOpa Ra3bIka. - “<” KCHNTECb KHONKU caffecrema, UTOObI BbInTu N3 MeHIO.
BkIIOueHne N BbIKIOueHne 3ByKOBOrO cnHaJa
Ipn Haxatnn IIO6O KnOpKn pa3daetc 3ByKOBOv CNHaJ.
Ero MoXHO BKJIOUHTb IIN BbIKJIIOUHTb.
- YdepxnBaIte HaKaTbIMN Ooo n calc'nClean OndHOBpeMeHHO B TeueHne MInHMym 3 CekyHd.
- “▼” KacaTecb KhoNk cappuccino, noka Ha dinCnlee He noBvTcR «3ByK».
3.ПосpeДСТВOM"OK"ПОДТВЕРДNTe KHONKY latte macchiato. 3aJeICTBOBaHbI 3aBOIDCKne HAcTPOIN, NOBJIaETcR OKHO BbIbOpa Ra3bIka. - “▼”KochnTeCb KHONKN cappuccino N BblOpNE «3ByK BKJ.» IJI N «3ByK BblKJ.»
5.ПосpeДСТВOM"OK"ПОДТВЕРДNTe KHONKy latte macchiato. 3aJeICTBOBaHBI 3aBOIDCKne HAcTPOIN, NOBnEeTcOKNHO BbIOpa Ra3bika. - “<” KOCHTecb KHONKn caffecrema, UTObI BbIInu3 MeHIO.
YctaHOBka 3bika
- YdepxnBaIte HaXaTbIMN Ooo n calc'nClean OndHOBpeMeHHO B TeueHne MInHMym 3 cekyHd.
- “▼” KacaTecb KHOJKN cappuccino, noka Ha dinCnlee He noBNTcA «r3bIK>.
3.ПосpeДСТВOM"OK"ПОДТВЕРДNTe KHOПКу latte macchiato. 3aДeИСТВОВаны 3aВОДСКи ИСТpoIKN,ПОВЛЯETСОKHO BblOpa RA3bIka. - “▼”KoCHInTeCb KHOInKn cappuccino N yCTaHOBIne HxHbIy3bIK.
5.ПосpeДСТВOM"OK"ПОДТВЕРДИTe KHOПКу latte macchiato. 3aJeICTBOBaHbI 3aBOIDCKne HAcTPOIKN, NOBJIaETcR OKHO BblOpa Ra3bIka. - “<” KCHHTEcB KHONKU caffecrema, UTObI BbIHTN N3 MeHIO.
YctaHOBka HeCTKOCTN BOJBI
IpaBnIbHna yCTaHOBka JecTKOCTN BODbl BaxHa IJIa CBOEbpemEHNO HAIpOMnHaHnO Heo6XoIMOCtN ydaJIeHnHaKnII. PpeBaPntelHo YCTaHOBJIeH peKIM JecTKOCTN BOJb 4. XEcTKOCTb BOJb MOxHO y3HaTb B MeCTHO BDOCHa6XaIOUeI OprAHn3aUNn INI ONpeDeJIITb Prn NOMOUI npINaRaEMOn INHdIKaTOPHO NOLOCKN.
- Ha KOPOTKoe BpemI NOrpy3nTe npnilaRaemyIO INHdNKaTOphHyIO NOLOCKY B CBExkyIO BOIDOnPOBOHDHyIO BODy IN CnyCTra MNHyTu IpoBepbTe pe3yJbTaT. KoJInuEcTBo OKpaWeHHbIX NOJe H a INHdNKaTOphOH NOLOCKe NOKa3bIBaET CTeJIeHb JecTKOCTN BODbl.
- YdepxuBaTe HaxaTbIMN Ooo n calc'nClean OndHOBpeMeHHO B TeueHne MInHMym 3 cekyHd.
- “▼” Kacaǐtečb KHONKcappuccino, noka ha dinçnlee He noRbITcR «KeCTK. Bɔdbl».
- "ok" KocHTecb KHONKI latte macchiato I NOdTBepdnte.
- “▼”Kochintecb KHONKN cappuccino n yCTaHOBnTe JKeCTKOcTB BOdbl. DoCTynhbl cIeDyUOuNe yCTaHOBKn:
-KeCTK.BoDbl1
-KeCTK.BoDbl2
-KeCTK.BoDbl3
- XecT.BoDbl 4 (3aBOIDcKayCTaHOBka)
ΦnIbTp BOIbl (ecnn BCTaBneH)
- YMЯrчNT. H2O (yCTaHOBka npn HaJInuH yCTpoIcTBa dIЯ CMaIgUeHnRA BoIbI)
- "ok" KOCHTecb KHONK lattemacchiato, yTO6bI COXpaHNTb yCTaHOBky.
- “<” KOCHTecb KHONKU caffecrema, UTOObI BbIiTN N3 MeHIO.
B Ta6nue npeCTaBHeO COOTBeTCTBnepeKIMOB pa3nUHbIM CTePeHmJecTKoCTN BObl:
| Рек imm | Стениь XXECTKOCTN BOДБI | |
| Hemeцая shkaJa (°dH) | ФразуЗckaя shkaJa (°fH) | |
| 1 1-7 1-13 | ||
| 2 8-14 14-25 | ||
| 3 15-21 26-38 | ||
| 4 22-30 39-54 | ||
IocneIyIOUeE I3MeHHeNHe JecCTKoCTN BOJbI BO3MOXHO BJIIOOIMOMeHT.
Yka3aHHe: Pn nCnoJb3OBAHnФnIbTp a DnBODbl (cM. rnaBy «PnHaJneXHoCTn») BblONHHTe CJIeDyIOUee "ΦnIbTp dnn BODbl" Ha cTpaHnua 140.
Bo3BpaT K 3aBOIDcHm HacTpOiKaM
BocctaHaBnBaIOTc3aBOdCKne HacTpoiKN,co6CTBeHHbIe yCTaHOBKn TepaHTc.
- YdepxnBaIte HaKaTbIMN Ooo n calc'nClean OndHOBpeMeHHO B TeueHne MInHMym 3 ceKyHd.
- “▼” KacaɪTeCb KHɒnKu cappuccino, noka Ha ἀπηλee He NɔrBntcR «3aB.HactpoɪKN».
3.ПосpeДСТВOM"OK"ПОДТВЕРДИТЕ КНОПКу latte macchiato. ЗадиCTBOBAны 3аВОДСКи Hастpoйк,пОВБЯETСА OKHO В Язblka. - “▼”ПрикасаTeСьКнОнKe cappuccino, NOkaHaДиСплee He NOВNTcA HxKHbIЯ3bIK.
- "ok" KocHTecb KHONkI lattemacchiato IJIa IOdTBepKJeHnBBbOpAHNo yCTaHOBKn.Ipnbop npOMbIBaETcN rTOOB KaPabote NocTe TOrO, KaK Ha DInCnJIeE NOABNTcA BbOpATb HAnITOK>.

He Bce yactn npnbopa pa3pewaeTcMbITb BV NocydomOeHOn MaunHe.
Pnc.5-7
He npirodblI MblbB B nocydomoeyhoMa-

Pe3epByap nlaBBoDbl
Kpbuka pe3epByapa nla Bovbl
Kpbiika, coxpaHIOUaJ apOMaT
3aBapOuHbI 6Jok
POnDIOH
PnroHbI IJIaMbITbB NocydomoeyHO MaHNHe:
IToKdIa c6opaKaIeIb
PeWetka
EmkoctbIg KofoeHOnrui
MaKc. 60°C
NonlaBok
KanyuHaTOp
Kpbioka kanyuHaTopa
Ounstka npnbopa
- Празптук Корпс Мяков Влжно TkaHbIO.
- OuInCTIte nAHeJIy npaBJeHnMnKpOΦn6pOBoCaIΦeTKoJ.
- Ecni notpe6yETc, npotnpaTe dinCneHcep dIg KoOe nocIe KaJdoTo npnroTOBHeHnHaNTka.
Yka3aHH
Ecn npnbop BkIouaetcB XOIOHOM COCToHn Nn BBKIOUaETcN OcNe npriTOBHeHn KOpe, IpombIBKa npnbopa npOn3BOuNTcA abTomatueckn. TaKm o6pa30m, CnCTema OunuaeTc CaMOCToTaeNbHO.
IpepeДЛNTeJIbHbIMpepepbIbOM B IcNoJIb3OBAHn(HaPpImep,pepeD OTnyCKOM)CLeDyET TuaTeJIbHO OuNCTITb BeCb PnpOp, BKIOUaJ AINcPeHcepДЯ KoΦe, KaNYuHaTOp, YaShKIn 3aBapOuHbI bLOK.
OuNTka PoiDIOHa N eMkoCTn IJI KoΦeHONI rUzN
Puc. 5
Yka3aHHe: POndoH n EMKoCTb dIy KOpEiHO rUu HxKHO ONoPoxKHTb N OChuAtb KaKdbI DeHb BO n36eKaHne CLOEB OTloKeHn. Pnq uactOM NCPOJb3OBAHn HxKHO nepNOdNueCKn ONoPoxKHTb, KOrDa CTaHET OTYeTINBO BnDEH NpJIaBOK IIn Ha DnCnlee NOBNTc COOTBeTCTByOuSgA INDnKaunr.
- OtkpoiTe Ibepuy.
- BbHbTe NODIOH C EMKoCTbIO IJI KOpEiHOI rUuN, NOTAHyB INx BnpeI.
- BbHbTe IOTOK dJa c6opa Kaenb C peWeTkoI.
- Onopoxhnte n ounctnte eoioH n emKoCTb Ia KoopeHOn rUuN.
- Прпгte BHyтpenHHeepoctpaHCTBO npbopa (B 3OHe noDOnHa).
OuNTka cNCTeMbI NOaHu MOJOKa
CnCTemy IOdaun MOLOKa CneIyET OuHuaTb NocLe KaKDoRO NcNoJIb3OBAHn Idny ydaJeHnO OCTaTKOB.
IpeynpeJdeHne Onachoctb oXora!
KanyuHaTOp CnIbHo HaIpeBaETc.
Bepntecb TOnbKO 3a pyky. Nocle
NCNoJIb3OBAHn, npexKe yem
PpIKacatbc, DOxJNTecb OxJaXdEHn.
- HaneiTe cTaKaH Do NIOOBnBb BODoN I NOCTaBBTe NOI DnCnEhcep.
- Onyctnte kanyuHaTOp Do ynpa BHN3.
- KocHTecb KHONKn milk, BbINOJIHReTcR OuNCTKa CNTeMbI NODaun MOJOKa.
- ПОДнIMITE калунHaTOp Вьерх Идайт eMy OCTыТь.
- Pa36epnte KaIyuHaTOp Ha OTDeJIbHbIe JeTaJI N TlcaTeJIbHO OuNCTnTe. Pnc. 6
- BbCyuHTe OTdEJIbHbIe DeTaJI, COBepHTe Ix N BCTaBbTe ObpaTHO B npnbop.
YKa3aHHa
YTo6bI npexdEBypeMeHHo 3aKOHHTb npOuceC,CHOBa KOCHNTecb milk.
Bce yactn cnctembl noaun MOLOKa Cne dyetMbITb BNOCyIDOMOeHOn MaunHe. Nocne npombIKN TzataTeNbHO ydaIte OCTaTKMblbHOro paCTbopa n3 cnCTembl NOaun MOLOka.
Ounstka 3abapouhoro 6loka
Pnc. 4, pnc. 5
ДононтелбНОΚ aВТOMATичeСКОМоКе HeoБхODIMO peГУЛЯРН O bIИМaTb Длг OчNTКИ 3aВapОчHь 6ЛOK.
BHHMaHHe!
- YCTaHOBnB O6paTHO NOdoH n eMKoCTb IJI KOpEiHoN rUuN, 3aKpOnTe JBePUv.
3aogopaeTcNMBOJ.
6.ИЗВЕΚΙTEФильТРДЯВODы(прн.HaJIHUNH).
7. HaneiTe B nyctoepByap dIy BOdbI TeNlyO BDOy DO OTMeTKn 0,5 n paCTBOpTE B HeN TaBneTKy dIy VdaJIeHn HAKnI Siemens.
8. BCTaBbTe o6paTHo pe3epByap IЯ BOIbI I NOcTAbTe IOD IINcHcepe EMKocTb 60JIbIoro O6bema (np6J.1).
9. calc'nClean Mmraet, KOCHTecb calc'nClean
PporpaMa 3anyckaetc, BbINOJIHRA ouNCTKy npNoopa n ydaJeHne HaKnPi. calc'nClean nybcnpyET.DnIteIbHOCTb np6I.20 MNHyT. 3aropaetc cIMB0J
- Onopoxhnte emKoCTb, OTKpoTte DBepuy, ONOpoxhnte NOdoH IN BCTABTe eTo oOpaTHO.
11.3aKpOte DBepu N NoCTaBbTe EMKOcTB NOI INCnEHcep. 3aropaeTc CmBOJ.
12.ОчNTTE KOHTeHepДЯ BOdBi N yCTaHOBInTe O6paTHOФINbTpДЯ BOdBi (ecn OH 6bl BbHyT). →Pnc.7 - 3aJeIe CBexyIO Hera3npoBaHHyIO BDO OTMETK N CHOBA IOCTaBbTe EMKOCTb NOI INCINHCEP.
- calc'nClean MURAE, KOCHTECb calc'nClean.
PpOpaMa 3aNyCKaETcR, BbINOJIHra OuNCTKy np6opa n ero npOMbIKy. calc'nClean nyIbCnpyet. 3aropaeTc CmB0J
- OnopoxHNTE, OYnCTNTE NOdoH uyCTaHOBNTe 6oPaTHO NOdoH N eMKoCTb IJI KoPeHNO rUuN. IporpaMa 3aBepseHa. PnpOp cHOba rotOB K paOte.

Störungen, was tun? 173

Kundendienst 176
de Störungen, was tun?
www.siemens-home.bsh-group.com
AE 048030501
LI 052741788
AL 0662064794
LU 26349300
AT 0810550522
LV 067425232
AU 1300368339
ME 050432575
BA 033213513
MK 022454600
BE 070222142
NL 0884244020
BG 029315062
NO 22660600
CH 0434554095
PL 801 191 534
CN 4008899999
PT 214250720
Call rates depend on the network used
RO 021 203 9748
CZ 0251095546
RU 88002002962
DE 091170440044
SE 0771 11 22 77 (local rate)
DK 44898985
SK 0244452041
EE 06278730
SL 012007017
ES 902118821
TR 4446688
FI 0207510700
Calls charged at local or mobile rate
XS 0112139552
GR 18182 (AotriXpewon)
HR 013028226
HU 003614895461
IE 014502655
0.03 € per minute at peak. Off peak 0.0088 € per minute.
IL 089777222
IS 05203000
IT 800 018 346 (Line Verde)
BSH group is a Trademark Licensee of Siemens AG. Manufacturer's Service for Siemens Home Appliances.
DE Deutschland, Germany
www.siemens-home.bsh-group.de
AE United Arab Emirates,
aai
BSH Home Appliances FZE
Round About 13, Plot Nr MO-0532A
Jebel Ali Free Zone -Dubai
Tel:048814401
mailto:service.uae@bshg.com
www.siemens-home.bsh-group.com/ae
www.siemens-home.bsh-group.at
Gate 1, 1555 Centre Road
Clayton, Victoria 3168
Tel.: 1300 167 425*
Fax:1300306818
mailto:aftersales.au@bshg.com
www.siemens-home.bsh-group.com/au
- Mo-Fr: 24 hours
BE Belgique, Belgie, Belgium
BSH Home Appliances S.A. - N.V.
www siemens-home.bsh-group.com/be
BH Bahrain,
Khalafat Est.
P.O.Box 5111
Manama
Tel.: 017400553
mailto:service@khalaifat.com
BY Belarus, Benapycb
OOO"BCX BbITOBaTExHHKa
ten:4957372962
mailto:mok-kdhl@bshg.com
CH Schweiz, Suisse,
www.siemens-home.bsh-group.com/ch
CY Cyprus, Kuttipos
BSH Ikiakes Syskeves-Service
39, Arh. Makaariou III Str.
2407 Egomi/Nikosia (Lefkosia)
Tel:77778007
Fax:022658128
mailto:bsh.service.cyprus@
cytanet.com.cy
CZ Ceska Republika,
Czech Republic
Firemniservisdomacich spotfebcu
Radlicka 350/107c
158 00 Praha 5
Tel. 0251 095 546
www.siemens-home.bsh-group.com/cz
DK Danmark, Denmark
BSH Hvidevarer A/S
Telegrafvej 4
2750 Ballerup
Tel.: 44898028
BSH-Service.dk@bshg.com
www.siemens-home.bsh-group.com/dk
ES Espana, Spain
www.siemens-home.bsh-group.es
Fl Suomi, Finland
BSH Kodinkoneet Oy
Italahdenkatu 18 A
PL 123
00201 Helsinki
Tel: 0207 510 715
mailto:Siemens-Service-Fl@bshg.com
www.siemens-home.bsh-group.com/fi
siemens-home.bsh-group.com
www.siemens-home.bsh-group.fr
GB Great Britain
BSH Home Appliances Ltd.
Grand Union House
Old Wolverton Road
Wolverton
Milton Keynes MK12 5PT
To arrange an engineer visit, to order spare parts or accessories or for product advice please visit www.siemens-home.bsh-group.com/uk Or call
Tel.: 0344 892 8999*
* Calls are charged at the basic rate, please check with your telephone service provider for exact charges.
GR Greece, EAA
BSH Ikiakes Siskeves A.B.E.
Central Branch Service
17 km E.O. Athinon-Lamias &
Potamou 20
14564 Kifisia
TnKepwvo:18182
TnAePwvo:2104277701
mailto: nkf-CustomerService@bshg.com
www.siemens-home.bsh-group.com/gr
HK Hong Kong, 香港
BSH Home Appliances Limited
Unit 1 & 2, 3rd Floor
North Block, Skyway House
3 Sham Mong Road
Tai Kok Tsui, Kowloon,
Hong Kong
Tel.: 2565 6151 (HK)
Toll free 0800 030 (Macao)
Fax:25656681
mailto:siemens.hk.service@bshg.com
www.siemens-home.bsh-group.com/hk
IE Republic of Ireland
BSH Home Appliances Ltd.
M50 Business Park
Ballymount Road Upper
Walkinstown
Dublin 12
To arrange an engineer visit, to order spare parts and accessories or for product advice please call
Tel: 01450 2655
www.siemens-home.bsh-group.ie
- Calls are charged at the basic rate, please check with your telephone service provider for exact charges.
IL Israel
C/S/B/ Home Appliance Ltd.
1, Hamasger St.
North Industrial Park
Lod, 7129801
Tel.: 089777222
Fax:089777245
mailto:csb-serv@csb-ld.co.il
www.siemens-home.bsh-group.com/ij
IN India, Bharat,
BSH Household Appliances
Mfg. Pvt. Ltd.
Arena House,
Main Bldg. 2nd Floor
Plot No. 103, Road No. 12
MIDC, Andheri East
Mumbai 400 093
Toll Free 1800 209 1850
www.siemens-home.bsh-group.com/in
*Mo-Sa: 8.00am to 8.00pm
(exclude public holidays)
IS Iceland
Smith & Norland hf.
Noatuni 4
105 Reykjavik
Tel: 05203000
Fax:05203011
www.sminor.is
IT Italia, Italy
www.siemens-home.bsh-group.com/it
LB Lebanon, jli
Tehaco s.a.r.l.
Boulevard Dora 4043 Beyrouth
P.O.Box 90449
Jdeideh, 1202 2040
Tel. 01 255 211
mailto:Info@Teheni-Hana.com
LU Luxembourg
www.siemens-home.bsh-group.com/lu
MK Macedonia,Makeonna
GORENEC
Jane Sandanski 67 lok.3
1000 Skopje
Tel. 02 2454 600
Mobil: 070 233 689
mailto:gorenec@yahoo.com
MT Malta
Aplan Limited
The Atrium
Mriehel by Pass
BKR3000 Birkirkara
Tel.: 025495122
Fax: 021480598
mailto:lapap@aplan.com.mt
NL Nederlande, Netherlands
www.siemens-home.bsh-group.nl
NO Norge, Norway
www.siemens-home.bsh-group.com/no
PL Polska, Poland
www.siemens-home.bsh-group.pl
PT Portugal
BSHP Electrodomésticos,
www.siemens-home.bsh-group.com/pt
RO Romania, Romania
BSH Electrocasnice srl.
Sos. Bucuresti-Ploiesti,
nr.19-21,sect.1
13682 Bucaresti
Tel: 021 203 9748
Fax:021 203 9733
mailto:service.romania@bshg.com
www.siemens-home.bsh-group.com/ro
RU Russia, Poccua
OOO"BCX BbITOBBIE Pn6Opbl
CepBnC O T npOn3BODntTeN
Mana Kanyckka, 15
119071MockBa
Ten. 8 (800) 200 29 62
mailto:mok-kdhl@bshg.com
www.siemens-home.bsh-group.ru
SE Sverige, Sweden
BSH Home Appliances AB
Landsvagen 32
169 29 Solna
Tel.: 0771 195500 local rate
Tel.: 0771 11 22 77 local rate
mailto:Siemens-Service-SE@bshg.com
www.siemens-home.bsh-group.com/se
SK Slovensko, Slovakia
www.siemens-home.bsh-group.com/tr
www.siemens-home.bsh-group.com/ua
XK Kosovo
Service-General SH.P.K.
rr. Magjistralja Ferizaj Prishtine
70000 Ferizaj
Tel.: 00381 (0) 290 330 723
Tel: 0037744172309
mailto:servicegeneral527@gmail.com
ZA South Africa
BSH Home Appliances (Pty) Ltd.
15th Road Randjespark
Private Bag X36, Randjespark
1685 Midrand-Johannesburg
Tel: 086 002 6724
Fax:0866171780
mailto:applianceserviceza@bshg.com
www.siemens-home.bsh-group.com/za


BSH Hausgeräte GmbH
Carl-Wery-StraBe 34,81739 Munchen,GERMANY
siemens-home.bsh-group.com